20
arning @ School Conference 2010Principal IT tools to make our lives e OneNote – Pat Poland [email protected] Microsoft OneNote 2007
| Date post: | 25-Dec-2015 |
| Category: |
Documents |
| Upload: | sydney-george-berry |
| View: | 215 times |
| Download: | 1 times |

Learning @ School Conference 2010 Principal IT tools to make our lives easierO
neN
ote
– Pa
t Pol
and
prin
cipa
l@de
anw
ell.s
choo
l.nz
Microsoft OneNote
2007

Learning @ School Conference 2010 Principal IT tools to make our lives easierO
neN
ote
– Pa
t Pol
and
prin
cipa
l@de
anw
ell.s
choo
l.nz
Microsoft OneNote
2007www.deanwell.school.nz

Learning @ School Conference 2010 Principal IT tools to make our lives easierO
neN
ote
– Pa
t Pol
and
prin
cipa
l@de
anw
ell.s
choo
l.nz
What is OneNote?
References:http://pubs.logicalexpressions.com/pub0009/LPMArticle.asp?ID=793

Learning @ School Conference 2010 Principal IT tools to make our lives easierO
neN
ote
– Pa
t Pol
and
prin
cipa
l@de
anw
ell.s
choo
l.nz
Uses for a School Leader

Learning @ School Conference 2010 Principal IT tools to make our lives easierO
neN
ote
– Pa
t Pol
and
prin
cipa
l@de
anw
ell.s
choo
l.nz
Getting Started
Create a new Notebook
1. File New Notebook.2. Type a name for the Notebook, such as My Practice.3. Click Blank in From Template.4. Click I will use it on this computer
Create a new Section
1. File New Section2. Type a name for the section, such as IT Tools.
Create a new Page 1. Click on the section you want the new page in.2. File New Page.
What is a Sub-page?
A sub-page is created under a page. If a page is called National Standards, sub-pages could be Reading, Writing, Mathematics, and Rubbish.
What is a Section Group?
Use a section group when you want sub-sections. For example, a section might be Curriculum, but within that section you want sub-sections for each Learning Area.
Cool tip: The right mouse button is your friend (as in all Microsoft Office programmes. Right-clicking brings up useful shortcuts!
To start Microsoft OneNote:Start All Programs Microsoft Office Microsoft Office OneNote 2007
Learning @ School Conference 2010 Principal IT tools to make our lives easierO
neN
ote
– Pa
t Pol
and
prin
cipa
l@de
anw
ell.s
choo
l.nz
Cool thing number
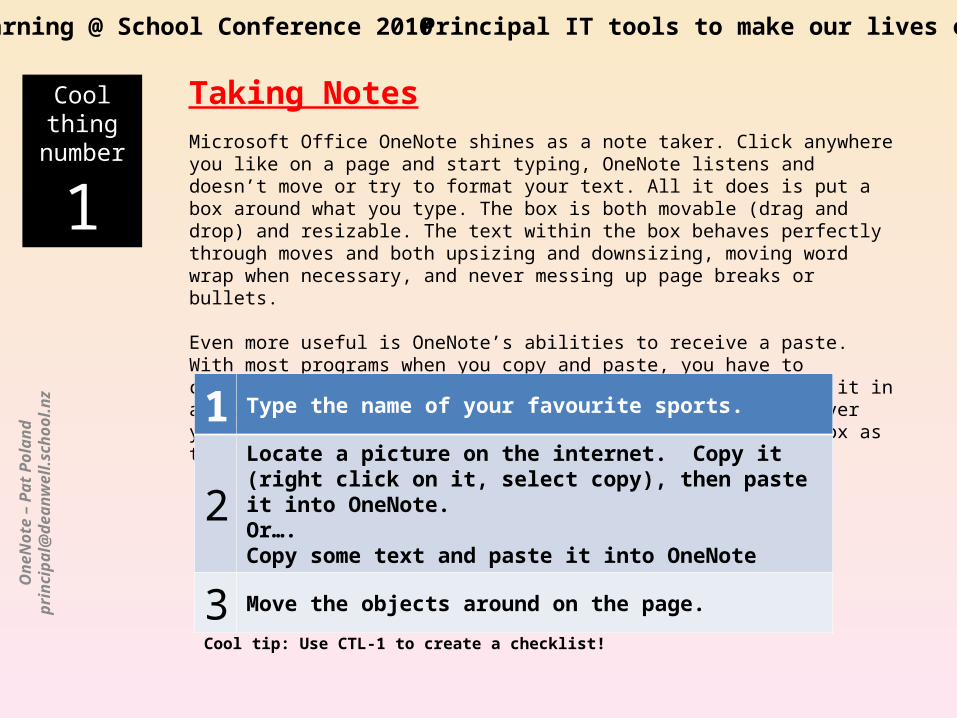
1Taking NotesMicrosoft Office OneNote shines as a note taker. Click anywhere you like on a page and start typing, OneNote listens and doesn’t move or try to format your text. All it does is put a box around what you type. The box is both movable (drag and drop) and resizable. The text within the box behaves perfectly through moves and both upsizing and downsizing, moving word wrap when necessary, and never messing up page breaks or bullets.
Even more useful is OneNote’s abilities to receive a paste. With most programs when you copy and paste, you have to consider what will happen to the pasted data once you put it in a new program. Not with OneNote. OneNote just takes whatever you paste and puts it on the page in the same malleable box as text or graphics.
Cool tip: Use CTL-1 to create a checklist!
1 Type the name of your favourite sports.
2Locate a picture on the internet. Copy it (right click on it, select copy), then paste it into OneNote.Or….Copy some text and paste it into OneNote
3 Move the objects around on the page.

Learning @ School Conference 2010 Principal IT tools to make our lives easierO
neN
ote
– Pa
t Pol
and
prin
cipa
l@de
anw
ell.s
choo
l.nz
http://www.beehive.govt.nz/minister/anne+tolley?bio=1
Screen Clippings
Cool thing number
2
You can use Microsoft Office OneNote 2007 to take a picture of any part of your computer screen and insert the picture into your notes. Such pictures are called screen clippings.
To create a screen clipping in OneNote and insert it into a specific location in your notes, do the following:1.Display the information on your screen that you want to capture in the screen clipping. For example, navigate to the Web page that you want to capture as a picture. 2.In OneNote, place the pointer on the notes page where you want to add the screen clipping. 3.On the Insert menu, click Screen Clipping. OneNote is minimized, and the last active window is shown, slightly dimmed.4.Drag the pointer in any direction to create a rectangular selection over the screen area that you want to capture. For example, you can start from the lower right corner of the area you want to capture, and then drag the pointer diagonally to the upper left. 5.When you release the mouse button, OneNote captures your selection as a picture and inserts it into your notes page. OneNote also copies it to the Clipboard so you can use the screen clipping on another page in your notebook or in another program. 6.Shortcut: you the Clip button.
1 Go to screen you want to copy something from (such as Internet).
2 Go to note in OneNote that you want to paste into. Click Clip button.
3 Drag around what you want to copy.
Cool tip: ScreenHunter is a free tool to copy any screen image. It copies the image to the clipboard and stores a copy on your hard disk for later use.
http://www.wisdom-soft.com/products/screenhunter_free.htm

Learning @ School Conference 2010 Principal IT tools to make our lives easierO
neN
ote
– Pa
t Pol
and
prin
cipa
l@de
anw
ell.s
choo
l.nz
Copy a file from my documents or emailCool thing number
3OneNote is great for storing important bits of paper in one place:
• Op Grant notices;• CDC reports in a child;• Referral forms; • Information relating to one project.• Items for a BOT Meeting.
My Documents Email
1 Locate a file in My Documents. Open your email programme. Locate an email with an attachment .
2 Copy it: Edit Copy (or right click copy).
Right click on the document and copy it (or just drag it onto your OneNote page).
3 Paste it onto your OneNote page. Edit Paste (or right click).Note: the original stays in My Documents if you copy it.
Paste it onto your OneNote page. Edit Paste (or right click).Note: the original stays in My Documents if you copy it.
Cool tip: Copy quickly with CTRL-C. Paste with CTRL-V. Cut with CTRL-X.
I have had trouble in the past when I insert the file as a link; I always Insert a copy.

Learning @ School Conference 2010 Principal IT tools to make our lives easierO
neN
ote
– Pa
t Pol
and
prin
cipa
l@de
anw
ell.s
choo
l.nz
Insert a copy of a paper documentCool thing
number
4The Ops Grant Notice has arrived. How do you get it into OneNote? If your photocopier is connected to your computer network, it almost certainly has the facility to email.
1.Place your document on the copier, copy to email, and as if by magic it will appear in your inbox.2.Once it is in your inbox, you can then copy or drag it into OneNote.3.Photocopy to email.4.It will arrive on your email programme.5.Follow the procedure in Number 3 to get the attachment from your6.Email programme into OneNote.
Cool tip: Purchase Adobe Acrobat Professional. It allows the user to the PDF documents into text you can copy and edit. You can rotate pages, add annotations... Very powerful Usually about $250-$400 for Academic version.Dick Smith: http://search.dse.co.nz/search?w=adobe+acrobat+professional&sessionid=4b846083030239ca2742c0a87f3b0686Pbtech: http://www.pbtech.co.nz/index.php?item=PUBADB3314
Tip 1: Rename your document at the copier before you send it. Otherwise, the file with a name like 2345376474.pdf. Not helpful.Tip 2: Train your secretary to do the ‘photocopy-to-email’!
Learning @ School Conference 2010 Principal IT tools to make our lives easierO
neN
ote
– Pa
t Pol
and
prin
cipa
l@de
anw
ell.s
choo
l.nz
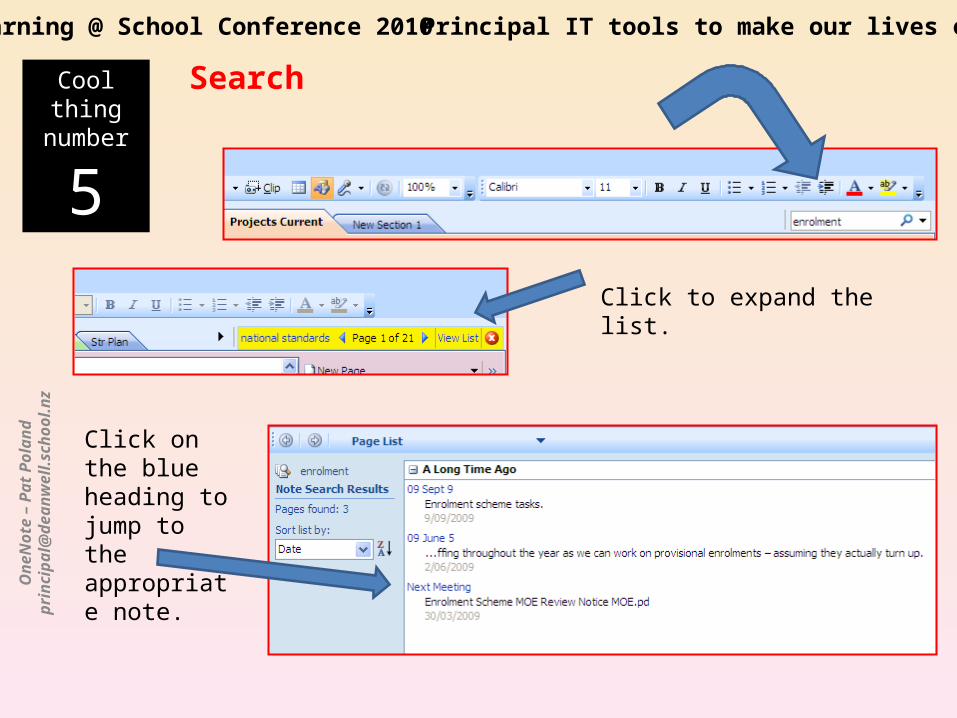
Search
Click to expand the list.
Click on the blue heading to jump to the appropriate note.
Cool thing number
5

Learning @ School Conference 2010 Principal IT tools to make our lives easierO
neN
ote
– Pa
t Pol
and
prin
cipa
l@de
anw
ell.s
choo
l.nz
Templates Templates are pre-defined pages to make your life easier. You can use the templates supplied with OneNote, download templates from the Microsoft web site, create your own templates, modify templates, and save templates for future use.1.Format Templates2.Click the + next to each heading to see what is available.3.Note: you may not have the 2010 calendar templates; I downloaded these for free from the Microsoft web site.
Cool tip: Undo is your friend! CTRL-Z is a quick way to use Undo.
1 Select a template by clicking it.
2 Personalise the template. Perhaps add your school name.
3 Save the template for future use. Format Templates Save current template for future use.

Learning @ School Conference 2010 Principal IT tools to make our lives easierO
neN
ote
– Pa
t Pol
and
prin
cipa
l@de
anw
ell.s
choo
l.nz
1. My documents/OneNote Notebooks OneNote 2007 Guide.
2. Press the F1 key.3. Microsoft online:
http://office.microsoft.com/en-us/onenote/default.aspx4. Google Microsoft OneNote 2007 and a brief description of
the help you need.

Learning @ School Conference 2010 Principal IT tools to make our lives easierO
neN
ote
– Pa
t Pol
and
prin
cipa
l@de
anw
ell.s
choo
l.nz
Formatting Toolbar

Learning @ School Conference 2010 Principal IT tools to make our lives easierO
neN
ote
– Pa
t Pol
and
prin
cipa
l@de
anw
ell.s
choo
l.nz
Standard Toolbar

Learning @ School Conference 2010 Principal IT tools to make our lives easierO
neN
ote
– Pa
t Pol
and
prin
cipa
l@de
anw
ell.s
choo
l.nz
Tagging Notes

Learning @ School Conference 2010 Principal IT tools to make our lives easierO
neN
ote
– Pa
t Pol
and
prin
cipa
l@de
anw
ell.s
choo
l.nz
Tips for getting started with OneNote1.To increase your note-taking area on a small screen, you can hide the titles of the page tabs by clicking the Collapse Page Tabs arrow in the page tabs column. 2.To maximize your available screen space while taking notes, press F11 to use OneNote in Full Page view. (Press F11 again to exit Full Page view.) 3.Page tabs appear on the right side of your notebook by default. To display the page tabs on the left side of your notebook, in the Display category in the Options dialog box (Tools menu), select the Page tabs appear on the left check box. 4.To change the default color that is applied to a new section, right-click the section tab at the top of the page, point to Section Color on the shortcut menu, and then click the color that you want to apply. Click None to remove coloring from a section entirely. 5.If you want to change the way OneNote is set up, you can customize any of the items on the menus and toolbars by right-clicking a toolbar and then clicking Customize on the shortcut menu. 6.If you have a microphone and a webcam, run the Tuning Wizard before you attempt to record audio and video notes. On the Tools menu, click Options. In the Options dialog box, click Audio and Video, and then click Tuning Wizard. 7.If you have a Microsoft Windows Mobile-based smartphone or Pocket PC, you can install OneNote Mobile and synchronize notes between your computer and your smartphone. Connect your mobile device to your computer while OneNote 2007 and Microsoft ActiveSync are running. Choose to install OneNote Mobile when prompted, or install it manually at a later time. (On the Tools menu, click Options. In the Options dialog box, click OneNote Mobile, and then click Install OneNote Mobile.) 8.To view a list of useful keyboard shortcuts that make accessing OneNote tools, commands, and dialog boxes faster and easier, click Keyboard Shortcuts on the Help menu.

Learning @ School Conference 2010 Principal IT tools to make our lives easierO
neN
ote
– Pa
t Pol
and
prin
cipa
l@de
anw
ell.s
choo
l.nz
Tips for taking notes1.If copying and pasting text and graphics from a Web page to a page in your notebook doesn't seem to properly retain the formatting, try capturing the information in a screen clipping instead. On the Insert menu, click Screen Clipping, and then drag the pointer to create a rectangular selection around the content on your screen that you want to capture. 2.Save time by creating AutoCorrect entries for words and phrases that you type repeatedly. When you type the short form of AutoCorrect text on a notes page, OneNote automatically replaces it with the full text that you specified. On the Tools menu, click AutoCorrect Options. In the Replace box, type a word or phrase that you want OneNote to automatically replace when typed. In the With box, type the text that should appear in place of the replaced word or phrase. 3.To see when a block of notes was last written or updated, right-click the paragraph handle preceding the text in any note container. The last two items on the shortcut menu will show you when the text was created or updated, and by whom. 4.To move an item, such as a block of text or a picture, so that it appears over or under another item on the page, hold down ALT while moving the item. 5.To quickly remove a note tag, place the cursor in the text that is tagged, and then press that note tag's keyboard shortcut (CTRL+1 through CTRL+9). You can also use this keyboard shortcut to quickly select or clear a To Do note tag. 6.To hide notes that you already followed up on and marked as complete, select the Show only unchecked items check box in the Note Tags Summary task pane. 7.You can easily modify the templates that are included with OneNote and create a custom design of your own. Start by applying an existing template to a new, blank page, and then add or change anything you like. On the Format menu, click Templates. In the Templates task pane, click Save current page as a template.

Learning @ School Conference 2010 Principal IT tools to make our lives easierO
neN
ote
– Pa
t Pol
and
prin
cipa
l@de
anw
ell.s
choo
l.nz
Tips for formatting notes1. To quickly create a numbered list, type 1. followed by a space, type the list item, and then press ENTER. The next
line of text will automatically begin with the number 2. 2. To quickly create a bulleted list, type an asterisk (*) followed by a space, type the list item, and then press ENTER.
The asterisk changes to a bullet, and the next line of text will automatically begin with another bullet. 3. If you are typing in a bulleted list and you want to start a new paragraph of text within the same list item, press
SHIFT+ENTER. 4. To turn a numbered list on or off, press CTRL+SLASH MARK (/). To turn a bulleted list on or off, press
CTRL+PERIOD. 5. To quickly increase or decrease indentation for a line of text, place the cursor in front of the text that you want to
reposition, and then press ALT+SHIFT+RIGHT ARROW to increase the indent, or ALT+SHIFT+LEFT ARROW to decrease the indent.
6. To create a hyperlink to another page in your notebook, open the notebook section containing the page that you want to link to, right-click the tab of the page in the margin, click Copy Hyperlink to this Page, and then paste the hyperlink wherever you want it to appear in your notes.
7. To create a hyperlink to another section in your notebook, right-click the tab of the section that you want to link to, click Copy Hyperlink to this Section, and then paste the hyperlink wherever you want it to appear in your notes.
8. To create a hyperlink to another OneNote notebook on your computer, right-click in the Navigation bar the name of the notebook that you want to link to, click Copy Hyperlink to this Notebook, and then paste the hyperlink wherever you want it to appear in your notes.
9. To create a hyperlink to a Web site whose URL contains spaces, type an angle bracket (< >) at the beginning and end of the URL (for example, type <http://wide world importers>).
10. To create a hyperlink to an e-mail address, type mailto: and then type the e-mail address (for example, type mailto:[email protected]).
11. To create a hyperlink in your notes to a document on your computer, type file:// and then type the document's location and file name (for example, type file://C:\My Documents\Resume.doc). If the file name contains spaces, type an angle bracket at the beginning and end of the path (for example, type <file://C:\My Documents\My Resume.doc>).

Learning @ School Conference 2010 Principal IT tools to make our lives easierO
neN
ote
– Pa
t Pol
and
prin
cipa
l@de
anw
ell.s
choo
l.nz
Tips for organizing and searching notes1.To rearrange the page tabs on the side of the current page in any notebook, drag any page tab to a new position. 2.To rearrange the section tabs at the top of any notebook, drag any section tab to a new position. 3.To rearrange your notebooks in the Navigation bar, drag any notebook tile to a new position. 4.To search your notes faster, you can install Instant Search. On the Tools menu, click Options. In the Options dialog box, click Other, and then click Install Instant Search. 5.After searching your notes, press ENTER to navigate through the search results.
Tips for protecting personal notes1.To keep notes in a particular section safe from prying eyes, right-click the section tab, and then click Password Protection on the shortcut menu. 2.To automatically lock a password-protected section in your notebook, you can set a time interval in the Passwords category in the Options dialog box (Tools menu).

Learning @ School Conference 2010 Principal IT tools to make our lives easierO
neN
ote
– Pa
t Pol
and
prin
cipa
l@de
anw
ell.s
choo
l.nz
Tips for sharing notes1.Before sharing your notes, check for spelling mistakes. Press F7 to open the Spelling task pane and start the spell check. If the task pane is already open, click Start Spell Check. 2.To preserve the appearance of notes that contain special or complex formatting (for example, diagrams, overlapping note containers, or notes with a variety of handwritten annotations) and share them with someone who doesn't have OneNote, you can save notes as a Web page. On the File menu, click Publish Pages. In the Publish dialog box, click Single File Web Page (Publish a copy) (*.mht) in the Save as type list. After the file has been created, you can send it in e-mail, copy it to a shared location on a network, or publish it on a Web site. 3.To quickly send notes in an e-mail message to another user, select one or more notes pages by clicking their page tabs. Next, click E-mail on the Standard toolbar, and then type the appropriate information in the To, Cc, and Bcc boxes. If necessary, modify the Subject of the e-mail message, and type any comments for the recipient in the Introduction box. If you change your mind before sending the message, click E-mail on the Standard toolbar again to cancel the message and return to your notes. 4.If you frequently send your notes to others in e-mail, you can add an e-mail signature to your notes. Signatures can help identify the subject or the source of notes, such as your name or contact information. On the Tools menu, click Options. In the Options dialog box, click Sending E-mail. Select the check box Add the following signature to e-mail messages and Web pages created in OneNote, and then enter the text that you want OneNote to include in the footer of your notes pages. 5.To quickly share your own customized stationery with other OneNote users, apply your stationery to a new, blank page, point to Send to on the File menu, and then click Mail Recipient (as Attachment). Recipients who have Office OneNote 2007 installed can use the Save current page as a template option in the Templates task pane to add the design to their list of available templates. 6.Use different colors to identify participants in a live sharing session. Ask each person to use a specific pen or font color when he or she adds notes to the shared page. For example, you can type your notes in blue text and use a blue pen to mark up a diagram. Another person can use green text or a green pen. Add a list of names and corresponding text colors at the top of the shared note page so that session participants know who is typing or writing.


![[MS-ONE]: OneNote File FormatMS-ONE... · MS-ONE] — OneNote File Format](https://static.documents.pub/doc/80x56/5f939c6491986f2b0015ccc3/ms-one-onenote-file-format-ms-one-ms-one-a-onenote-file-format.jpg)


