19
LECC Extranet Lloyd's Electronic Cargo Certificate (LECC) - Extranet User Guide September 2013 edition
| Date post: | 14-Apr-2018 |
| Category: |
Documents |
| Upload: | hoangquynh |
| View: | 236 times |
| Download: | 6 times |
LECC Extranet Lloyd's Electronic Cargo Certificate (LECC) - Extranet User Guide September 2013 edition
2
LECC Extranet User Guide – 2013
Disclaimer
Important – This document is the property of Lloyd’s Agency and the information contained herein is confidential. This document, either in whole or part must not be reproduced or used for purposes other than for that which it has been supplied, without the prior written permission of Lloyd’s Agency.
Lloyd’s Agency is not liable for any errors or omissions.
3
LECC Extranet User Guide – 2013
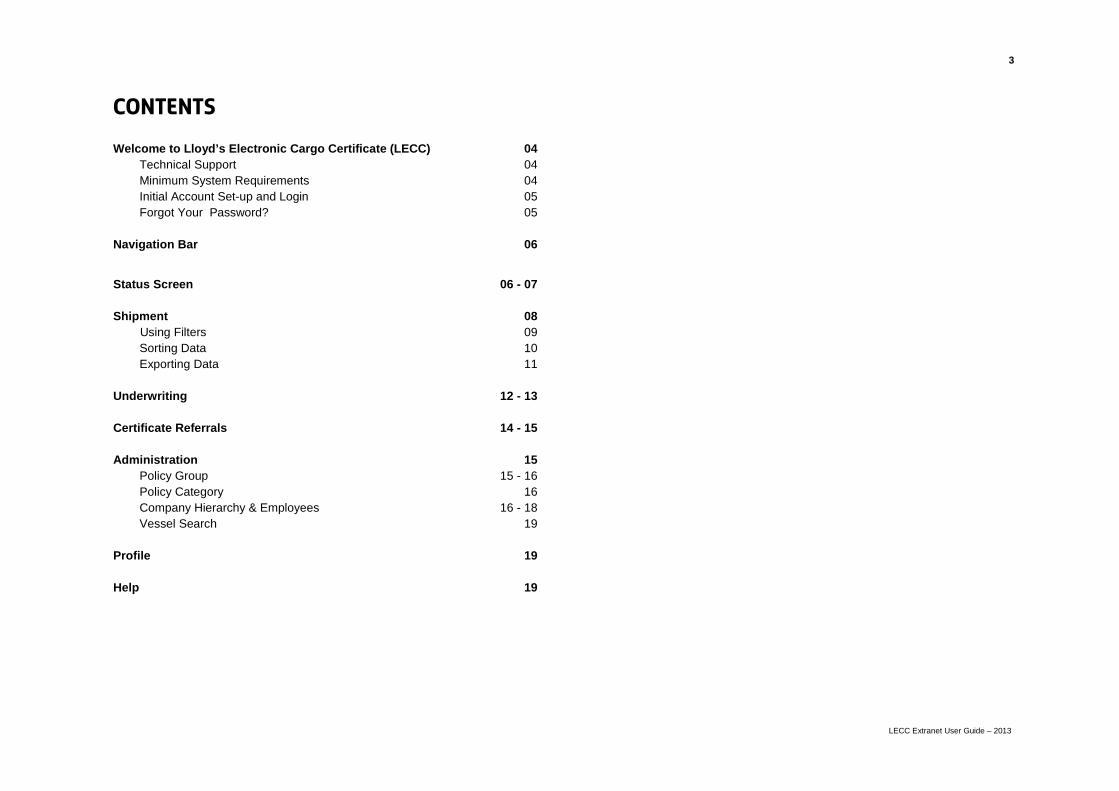
Contents
Welcome to Lloyd’s Electronic Cargo Certificate (LECC) 04 Technical Support 04 Minimum System Requirements 04 Initial Account Set-up and Login 05 Forgot Your Password? 05 Navigation Bar 06
Status Screen 06 - 07
Shipment 08 Using Filters 09 Sorting Data 10 Exporting Data 11
Underwriting 12 - 13
Certificate Referrals 14 - 15
Administration 15 Policy Group 15 - 16 Policy Category 16 Company Hierarchy & Employees 16 - 18 Vessel Search 19
Profile 19
Help 19
4
LECC Extranet User Guide – 2013
WELCOME TO LLOYD’S ELECTRONIC CARGO CERTIFICATE (LECC)
Lloyd’s Electronic Cargo Certificate online system provides an interactive end-to-end solution that allows the entire market to capitalize in the Internet’s low communication cost by offering real-time collaboration to the Assured, Brokers and Underwriters through a centralized database. The system also allows you to issue certificates online and provides you with reporting and query capabilities.
• Lloyd’s Certificate Office can offer Lloyd’s, IUA Companies or Joint-Market certificate templates.
• Easy access 24x7 from any Internet browser. • Shipment data validated against Policy restrictions. • Real-time referrals for Clients and their Brokers. • 3rd party verification of certificates by Banks, Consignees and
Lloyd’s Agents. • Generate real-time claims and shipment reports on-screen and/or
export them to PDF or Microsoft® Excel formats. • Simplified Endorsements and Renewals. • Work in a secure environment.
Lloyd's Electronic Cargo Certificates consists of four parts, 'Extranet', 'Client side', 'Verify Certificate', and ‘View Claims Status’. • Client Side – Access for Assureds to create Certificates of
Insurance for Marine Cargo business.
• Extranet – For Brokers, Underwriters and Coverholders to access Insurance Contract and related information.
• Verify Certificate – For Banks and external parties to verify Certificates of Insurance issued through the site.
• View Claims Status – Primarily for use by Agents, Underwriters, Brokers and Coverholders to view status of Claims submitted through the site.
Technical Support
For Technical Support or enquires either contact: Lloyd’s Agency – Certificates Department within UK business hours at [email protected] or: The Oceanwide Help Desk at [email protected]
Minimum System Requirements
• Microsoft Internet Explorer version 6.0 or higher. Versions 7.0 or 8.0 (with compatibility mode turned on) are recommended.
• Browser must have JavaScript enabled and support 128-bit SSLv3 or TLSv1 encryption.
• Adobe Acrobat Reader version 6.x through 9.x.
It is advisable to use Microsoft Internet Explorer to view this website as you may experience compatibility issues with other web browsers.
5
LECC Extranet User Guide – 2013
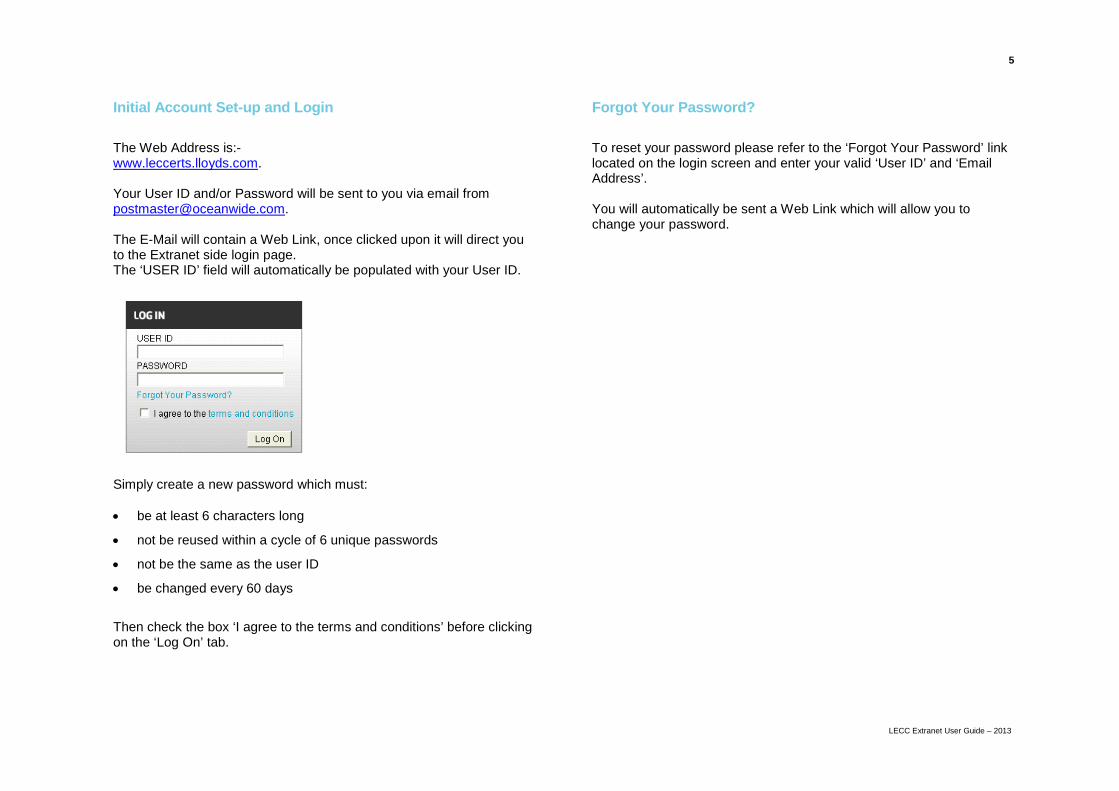
Initial Account Set-up and Login
The Web Address is:- www.leccerts.lloyds.com. Your User ID and/or Password will be sent to you via email from [email protected]. The E-Mail will contain a Web Link, once clicked upon it will direct you to the Extranet side login page. The ‘USER ID’ field will automatically be populated with your User ID.
Simply create a new password which must: • be at least 6 characters long
• not be reused within a cycle of 6 unique passwords
• not be the same as the user ID
• be changed every 60 days
Then check the box ‘I agree to the terms and conditions’ before clicking on the ‘Log On’ tab.
Forgot Your Password?
To reset your password please refer to the ‘Forgot Your Password’ link located on the login screen and enter your valid ‘User ID’ and ‘Email Address’. You will automatically be sent a Web Link which will allow you to change your password.
6
LECC Extranet User Guide – 2013
Navigation Bar
To maneuver within the different areas of Lloyd’s Electronic Cargo Certificate (LECC) website, use the Navigation bar displayed in light cyan blue toward the top of screen. Note: Depending on your security rights some options on the Navigation bar may vary from user to user.
A brief description of each option found on the Navigation bar is described as follows:-
Navigation Bar
Status: Displays the status screen dashboard which will show you a summary of all your accounts and their status, such as outstanding referrals.
Shipment: This section will allow you to do a search on a or all shipments made by the Assured; create shipment reports and action referrals.
Assured This section will enable you to query client login information.
Underwriting In this section you will be able to query policy information and view electronic certificate templates for a particular policy.
Claim: Provides the ability to query existing claims and if you have the required security rights to make action against the claims.
Analysis Provides the ability to run specific reports such as ‘Claims Analysis’ and ‘Shipment Analysis’ report.
Administration: This section provides a variety of system set-up functions as well as the ‘Company Hierarchy & Employee’ option.
Profile This section holds your user profile information such as name, email address, phone number and system format defaults.
Help: Provides the ability to access help guides provided by the software vendor.
Log Off: Use this to exit LECC.
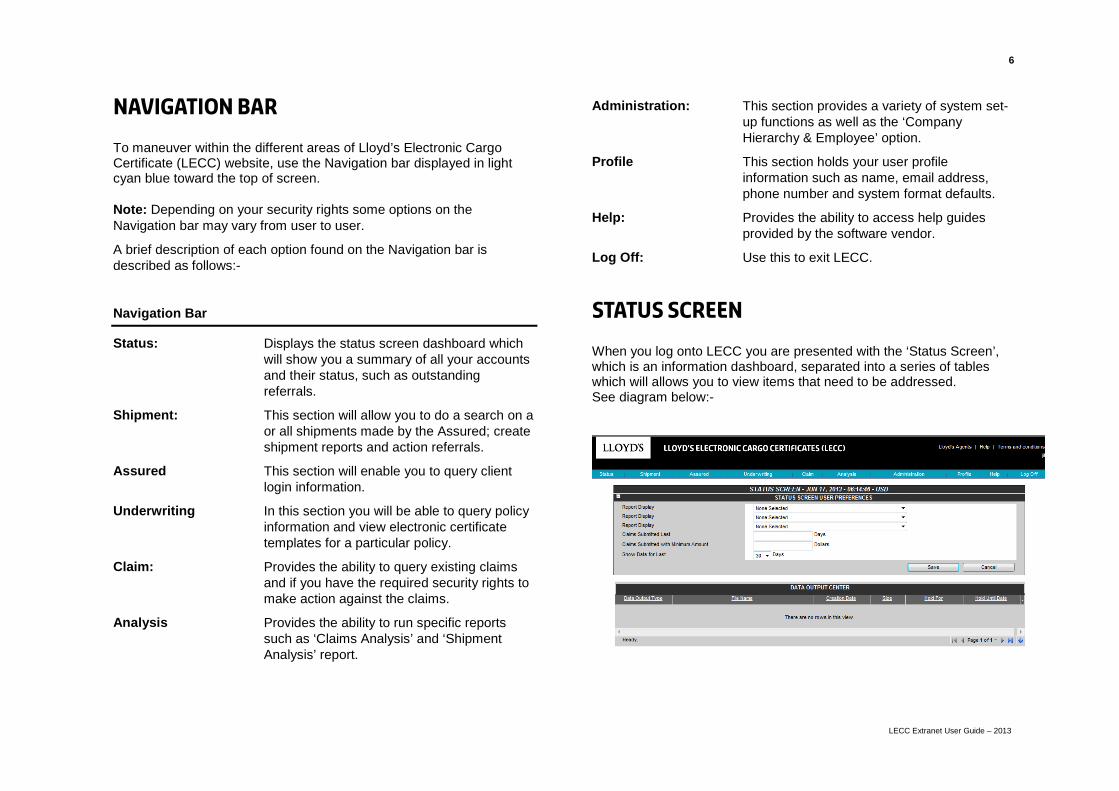
Status Screen
When you log onto LECC you are presented with the ‘Status Screen’, which is an information dashboard, separated into a series of tables which will allows you to view items that need to be addressed. See diagram below:-
7
LECC Extranet User Guide – 2013
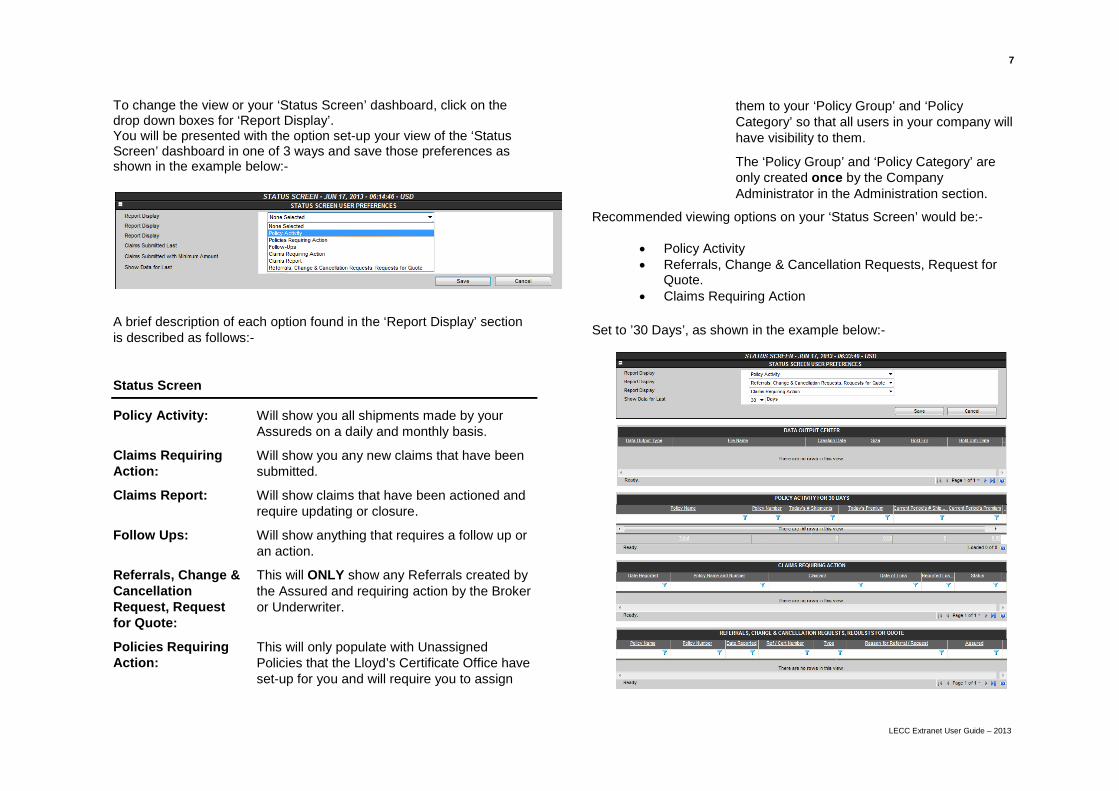
To change the view or your ‘Status Screen’ dashboard, click on the drop down boxes for ‘Report Display’. You will be presented with the option set-up your view of the ‘Status Screen’ dashboard in one of 3 ways and save those preferences as shown in the example below:-
A brief description of each option found in the ‘Report Display’ section is described as follows:-
Status Screen
Policy Activity: Will show you all shipments made by your Assureds on a daily and monthly basis.
Claims Requiring Action:
Will show you any new claims that have been submitted.
Claims Report: Will show claims that have been actioned and require updating or closure.
Follow Ups: Will show anything that requires a follow up or an action.
Referrals, Change & Cancellation Request, Request for Quote:
This will ONLY show any Referrals created by the Assured and requiring action by the Broker or Underwriter.
Policies Requiring Action:
This will only populate with Unassigned Policies that the Lloyd’s Certificate Office have set-up for you and will require you to assign
them to your ‘Policy Group’ and ‘Policy Category’ so that all users in your company will have visibility to them.
The ‘Policy Group’ and ‘Policy Category’ are only created once by the Company Administrator in the Administration section.
Recommended viewing options on your ‘Status Screen’ would be:-
• Policy Activity • Referrals, Change & Cancellation Requests, Request for
Quote. • Claims Requiring Action
Set to ’30 Days’, as shown in the example below:-
8
LECC Extranet User Guide – 2013
SHIPMENT
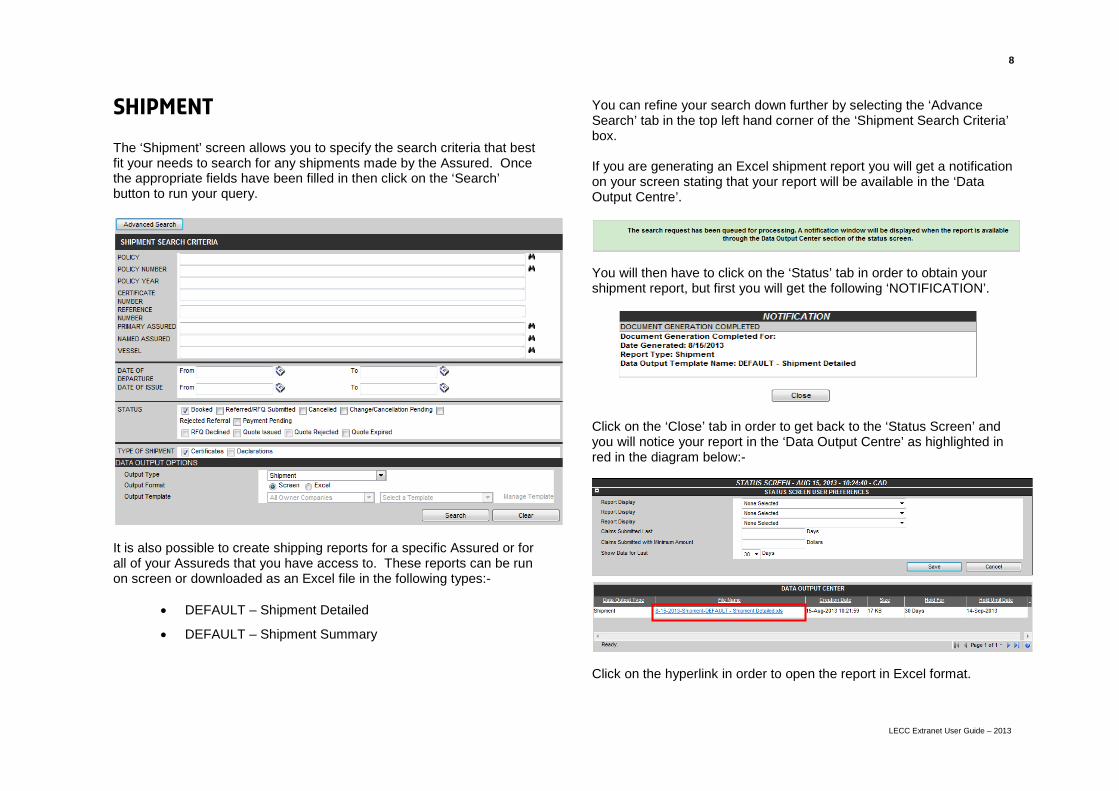
The ‘Shipment’ screen allows you to specify the search criteria that best fit your needs to search for any shipments made by the Assured. Once the appropriate fields have been filled in then click on the ‘Search’ button to run your query.
It is also possible to create shipping reports for a specific Assured or for all of your Assureds that you have access to. These reports can be run on screen or downloaded as an Excel file in the following types:-
• DEFAULT – Shipment Detailed
• DEFAULT – Shipment Summary
You can refine your search down further by selecting the ‘Advance Search’ tab in the top left hand corner of the ‘Shipment Search Criteria’ box. If you are generating an Excel shipment report you will get a notification on your screen stating that your report will be available in the ‘Data Output Centre’.
You will then have to click on the ‘Status’ tab in order to obtain your shipment report, but first you will get the following ‘NOTIFICATION’.
Click on the ‘Close’ tab in order to get back to the ‘Status Screen’ and you will notice your report in the ‘Data Output Centre’ as highlighted in red in the diagram below:-
Click on the hyperlink in order to open the report in Excel format.
9
LECC Extranet User Guide – 2013
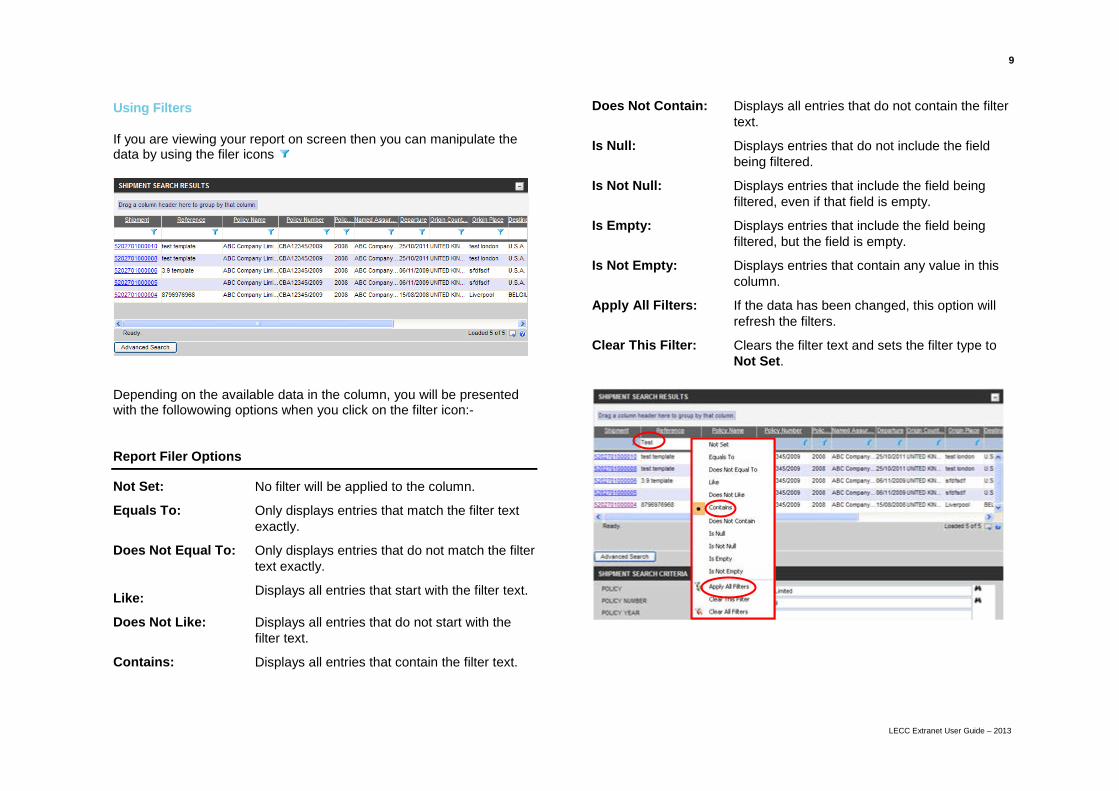
Using Filters If you are viewing your report on screen then you can manipulate the data by using the filer icons
Depending on the available data in the column, you will be presented with the followowing options when you click on the filter icon:- Report Filer Options
Not Set: No filter will be applied to the column.
Equals To: Only displays entries that match the filter text exactly.
Does Not Equal To:
Like:
Only displays entries that do not match the filter text exactly.
Displays all entries that start with the filter text.
Does Not Like: Displays all entries that do not start with the filter text.
Contains: Displays all entries that contain the filter text.
Does Not Contain: Displays all entries that do not contain the filter text.
Is Null: Displays entries that do not include the field being filtered.
Is Not Null: Displays entries that include the field being filtered, even if that field is empty.
Is Empty: Displays entries that include the field being filtered, but the field is empty.
Is Not Empty: Displays entries that contain any value in this column.
Apply All Filters: If the data has been changed, this option will refresh the filters.
Clear This Filter: Clears the filter text and sets the filter type to Not Set.
Clear All Filters: Clears all filter text on the current page and sets all filter types to Not Set.
10
LECC Extranet User Guide – 2013
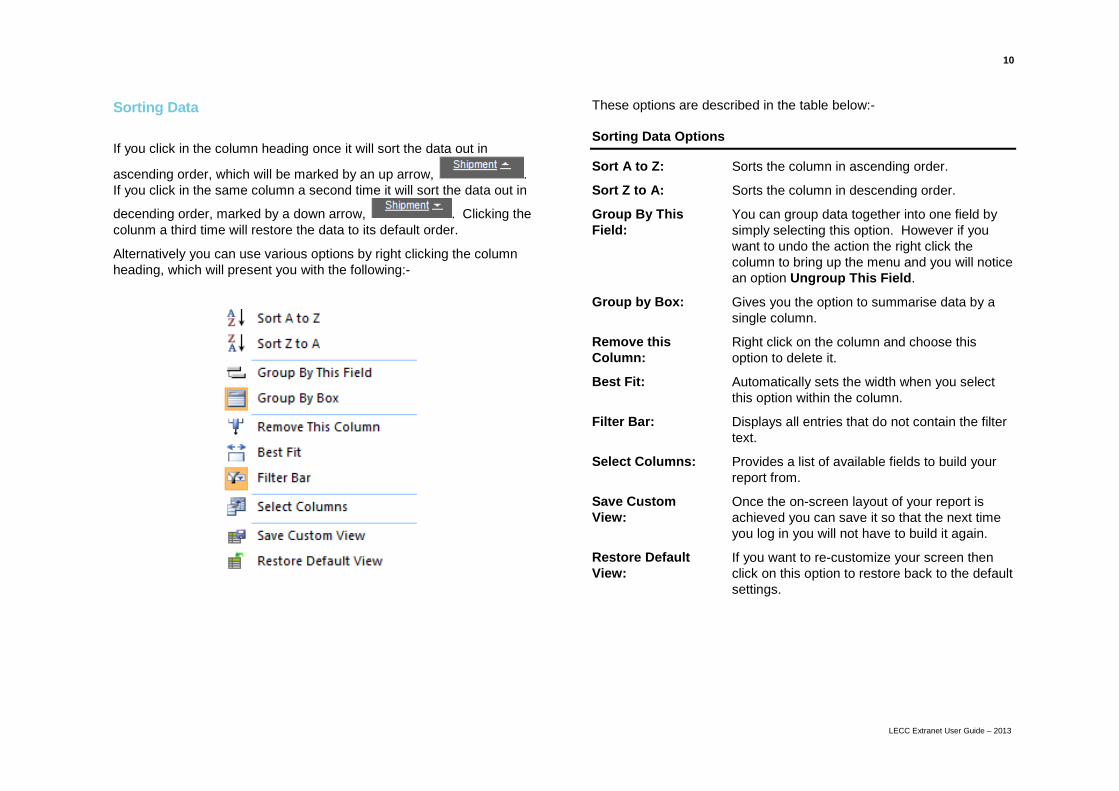
Sorting Data
If you click in the column heading once it will sort the data out in
ascending order, which will be marked by an up arrow, . If you click in the same column a second time it will sort the data out in
decending order, marked by a down arrow, . Clicking the colunm a third time will restore the data to its default order.
Alternatively you can use various options by right clicking the column heading, which will present you with the following:-
These options are described in the table below:- Sorting Data Options
Sort A to Z: Sorts the column in ascending order.
Sort Z to A: Sorts the column in descending order.
Group By This Field:
Group by Box:
You can group data together into one field by simply selecting this option. However if you want to undo the action the right click the column to bring up the menu and you will notice an option Ungroup This Field.
Gives you the option to summarise data by a single column.
Remove this Column:
Right click on the column and choose this option to delete it.
Best Fit: Automatically sets the width when you select this option within the column.
Filter Bar: Displays all entries that do not contain the filter text.
Select Columns: Provides a list of available fields to build your report from.
Save Custom View:
Once the on-screen layout of your report is achieved you can save it so that the next time you log in you will not have to build it again.
Restore Default View:
If you want to re-customize your screen then click on this option to restore back to the default settings.
11
LECC Extranet User Guide – 2013
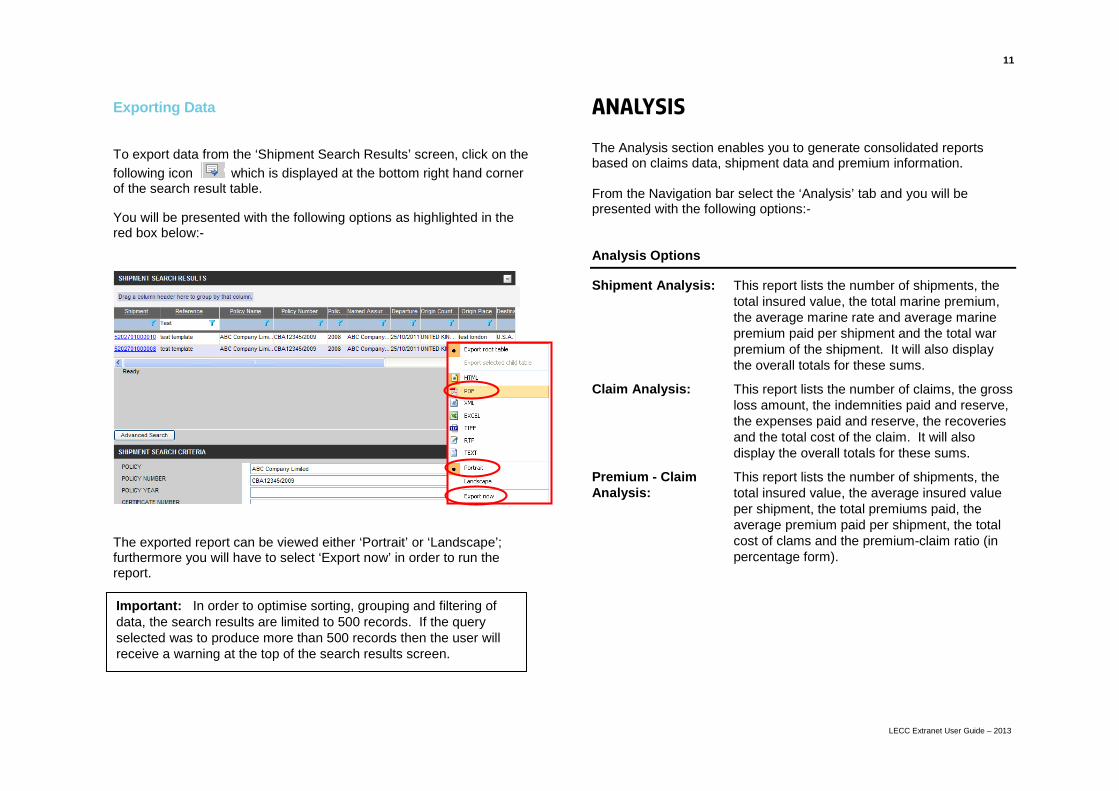
Exporting Data To export data from the ‘Shipment Search Results’ screen, click on the following icon which is displayed at the bottom right hand corner of the search result table. You will be presented with the following options as highlighted in the red box below:-
The exported report can be viewed either ‘Portrait’ or ‘Landscape’; furthermore you will have to select ‘Export now’ in order to run the report.
Analysis
The Analysis section enables you to generate consolidated reports based on claims data, shipment data and premium information. From the Navigation bar select the ‘Analysis’ tab and you will be presented with the following options:- Analysis Options
Shipment Analysis:
This report lists the number of shipments, the total insured value, the total marine premium, the average marine rate and average marine premium paid per shipment and the total war premium of the shipment. It will also display the overall totals for these sums.
Claim Analysis: This report lists the number of claims, the gross loss amount, the indemnities paid and reserve, the expenses paid and reserve, the recoveries and the total cost of the claim. It will also display the overall totals for these sums.
Premium - Claim Analysis:
This report lists the number of shipments, the total insured value, the average insured value per shipment, the total premiums paid, the average premium paid per shipment, the total cost of clams and the premium-claim ratio (in percentage form).
Important: In order to optimise sorting, grouping and filtering of data, the search results are limited to 500 records. If the query selected was to produce more than 500 records then the user will receive a warning at the top of the search results screen.
12
LECC Extranet User Guide – 2013
Shipment Analysis When you select the ‘Shipment Analysis’ option you will be presented with the following screen below:-
Fill the appropriate fields in order to run your analysis then click on ‘Generate Report’.
You will have the option to generate the report in either an ‘Excel’ or ‘PDF’ format as highlighted in red above.
Underwriting
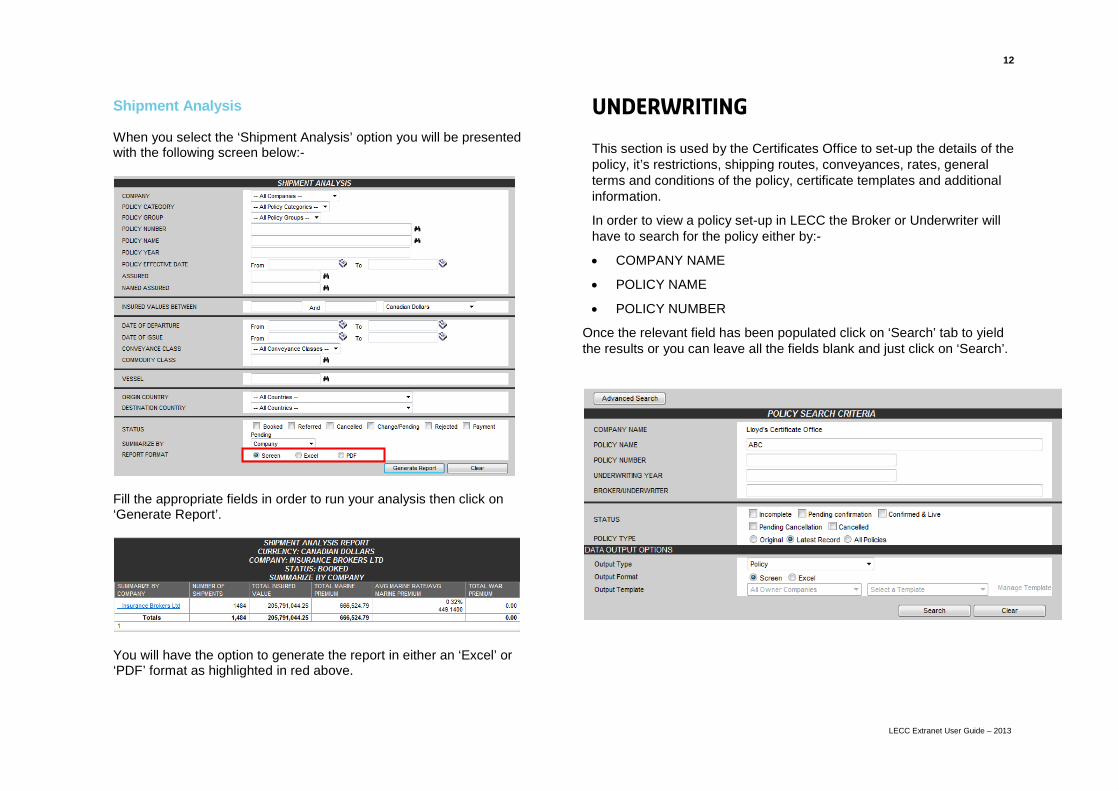
This section is used by the Certificates Office to set-up the details of the policy, it’s restrictions, shipping routes, conveyances, rates, general terms and conditions of the policy, certificate templates and additional information.
In order to view a policy set-up in LECC the Broker or Underwriter will have to search for the policy either by:-
• COMPANY NAME
• POLICY NAME
• POLICY NUMBER
Once the relevant field has been populated click on ‘Search’ tab to yield the results or you can leave all the fields blank and just click on ‘Search’.
13
LECC Extranet User Guide – 2013
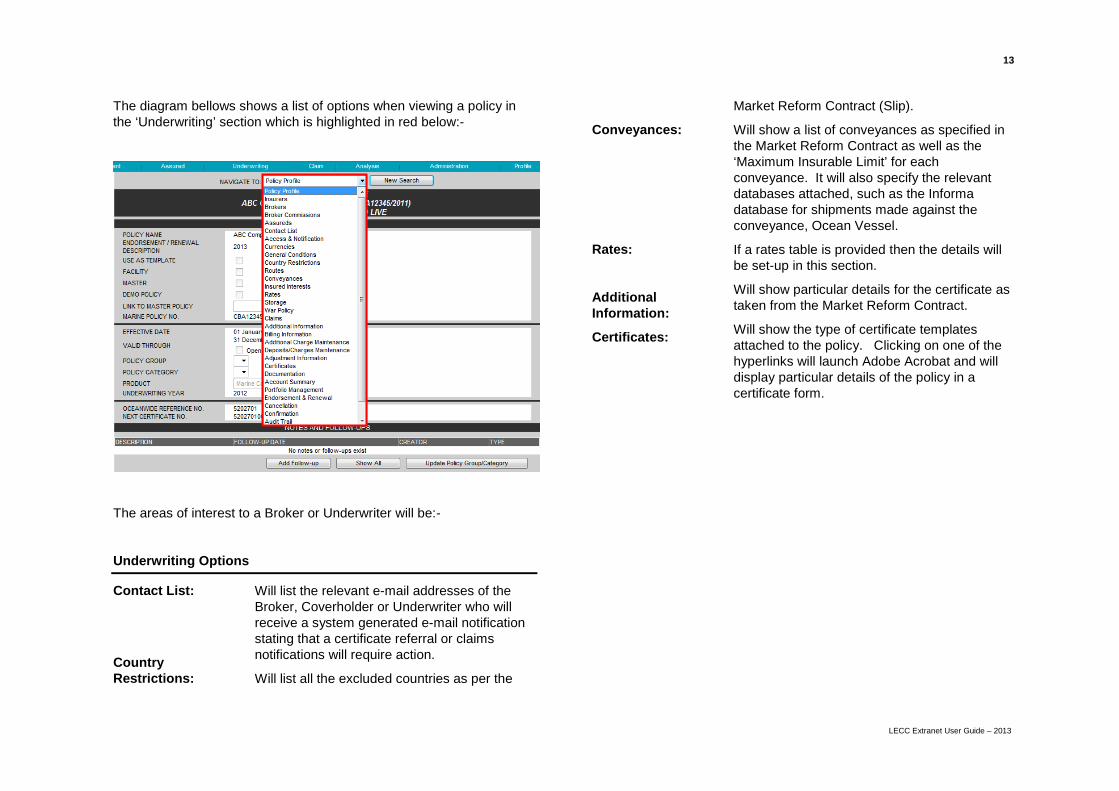
The diagram bellows shows a list of options when viewing a policy in the ‘Underwriting’ section which is highlighted in red below:-
The areas of interest to a Broker or Underwriter will be:-
Underwriting Options
Contact List:
Country Restrictions:
Will list the relevant e-mail addresses of the Broker, Coverholder or Underwriter who will receive a system generated e-mail notification stating that a certificate referral or claims notifications will require action.
Will list all the excluded countries as per the
Conveyances:
Rates:
Additional Information:
Certificates:
Market Reform Contract (Slip).
Will show a list of conveyances as specified in the Market Reform Contract as well as the ‘Maximum Insurable Limit’ for each conveyance. It will also specify the relevant databases attached, such as the Informa database for shipments made against the conveyance, Ocean Vessel.
If a rates table is provided then the details will be set-up in this section.
Will show particular details for the certificate as taken from the Market Reform Contract.
Will show the type of certificate templates attached to the policy. Clicking on one of the hyperlinks will launch Adobe Acrobat and will display particular details of the policy in a certificate form.
14
LECC Extranet User Guide – 2013
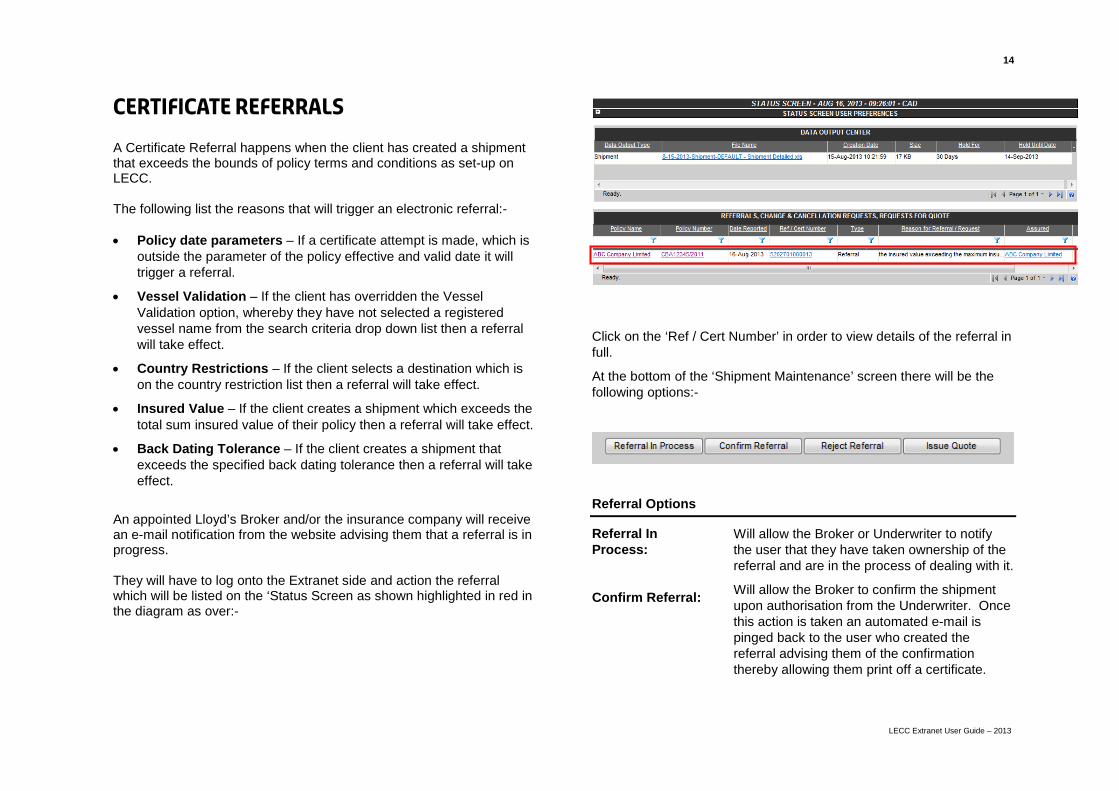
Certificate Referrals
A Certificate Referral happens when the client has created a shipment that exceeds the bounds of policy terms and conditions as set-up on LECC. The following list the reasons that will trigger an electronic referral:- • Policy date parameters – If a certificate attempt is made, which is
outside the parameter of the policy effective and valid date it will trigger a referral.
• Vessel Validation – If the client has overridden the Vessel Validation option, whereby they have not selected a registered vessel name from the search criteria drop down list then a referral will take effect.
• Country Restrictions – If the client selects a destination which is on the country restriction list then a referral will take effect.
• Insured Value – If the client creates a shipment which exceeds the total sum insured value of their policy then a referral will take effect.
• Back Dating Tolerance – If the client creates a shipment that exceeds the specified back dating tolerance then a referral will take effect.
An appointed Lloyd’s Broker and/or the insurance company will receive an e-mail notification from the website advising them that a referral is in progress. They will have to log onto the Extranet side and action the referral which will be listed on the ‘Status Screen as shown highlighted in red in the diagram as over:-
Click on the ‘Ref / Cert Number’ in order to view details of the referral in full.
At the bottom of the ‘Shipment Maintenance’ screen there will be the following options:-
Referral Options
Referral In Process:
Confirm Referral:
Will allow the Broker or Underwriter to notify the user that they have taken ownership of the referral and are in the process of dealing with it.
Will allow the Broker to confirm the shipment upon authorisation from the Underwriter. Once this action is taken an automated e-mail is pinged back to the user who created the referral advising them of the confirmation thereby allowing them print off a certificate.
15
LECC Extranet User Guide – 2013
Reject Referral:
Issue Quote:
Will allow the Broker to reject the shipment upon authorisation from the Underwriter as well as specifying the reason. Once this action is taken a system generated automated e-mail is pinged back to the user who created the referral advising them of the rejection and the reason for it.
Is to request for a Quote on a shipment. It is a feature that is not utilised by LECC and it is advised not to use it for it will not yield any results.
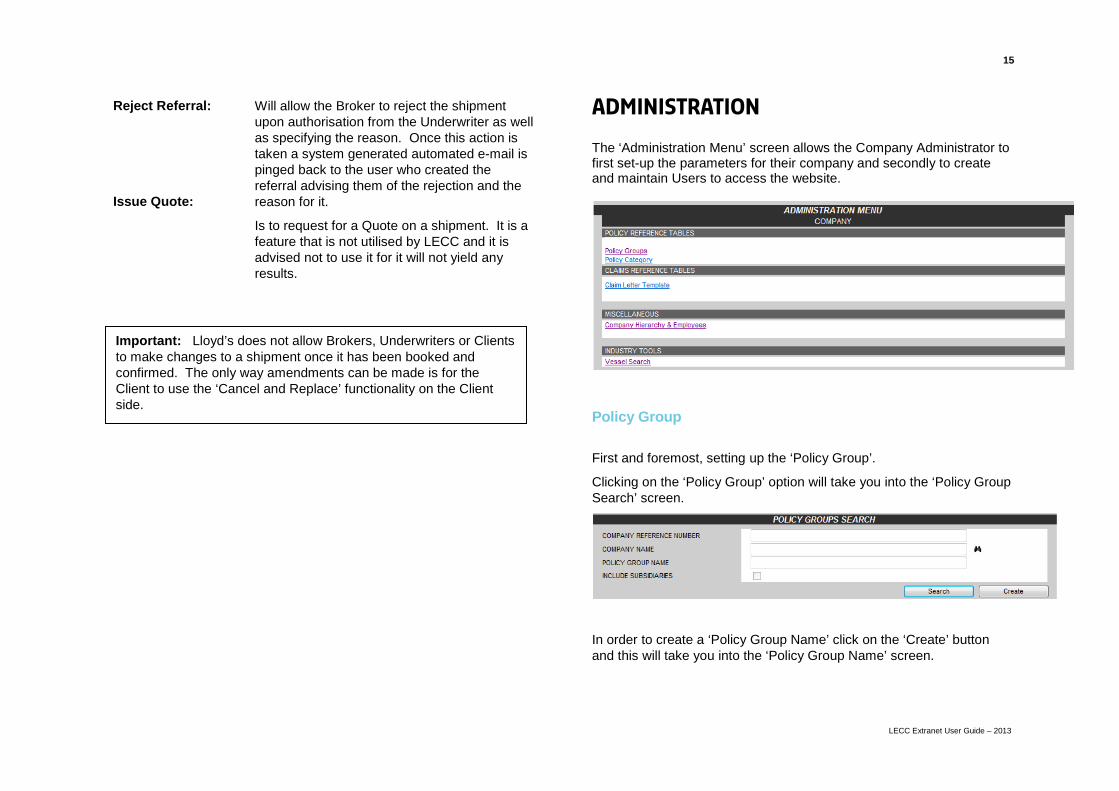
Administration
The ‘Administration Menu’ screen allows the Company Administrator to first set-up the parameters for their company and secondly to create and maintain Users to access the website.
Policy Group
First and foremost, setting up the ‘Policy Group’.
Clicking on the ‘Policy Group’ option will take you into the ‘Policy Group Search’ screen.
In order to create a ‘Policy Group Name’ click on the ‘Create’ button and this will take you into the ‘Policy Group Name’ screen.
Important: Lloyd’s does not allow Brokers, Underwriters or Clients to make changes to a shipment once it has been booked and confirmed. The only way amendments can be made is for the Client to use the ‘Cancel and Replace’ functionality on the Client side.
16
LECC Extranet User Guide – 2013
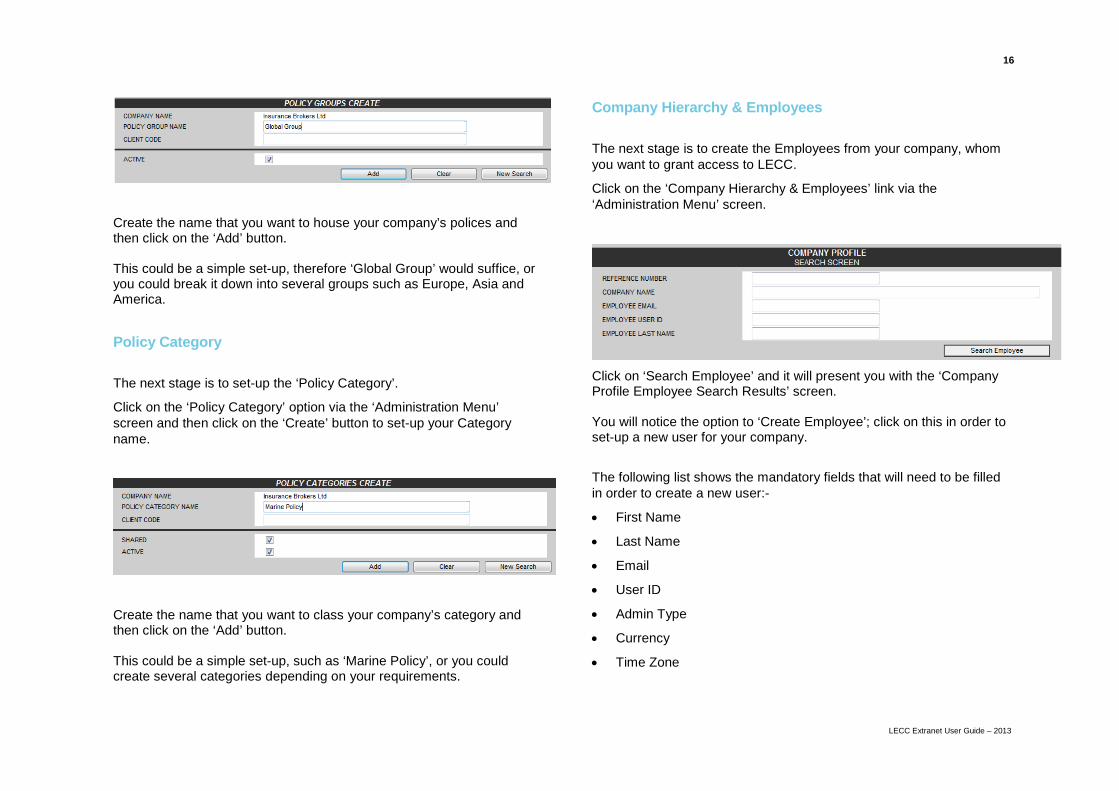
Create the name that you want to house your company’s polices and then click on the ‘Add’ button. This could be a simple set-up, therefore ‘Global Group’ would suffice, or you could break it down into several groups such as Europe, Asia and America.
Policy Category
The next stage is to set-up the ‘Policy Category’.
Click on the ‘Policy Category’ option via the ‘Administration Menu’ screen and then click on the ‘Create’ button to set-up your Category name.
Create the name that you want to class your company’s category and then click on the ‘Add’ button. This could be a simple set-up, such as ‘Marine Policy’, or you could create several categories depending on your requirements.
Company Hierarchy & Employees
The next stage is to create the Employees from your company, whom you want to grant access to LECC.
Click on the ‘Company Hierarchy & Employees’ link via the ‘Administration Menu’ screen.
Click on ‘Search Employee’ and it will present you with the ‘Company Profile Employee Search Results’ screen. You will notice the option to ‘Create Employee’; click on this in order to set-up a new user for your company.
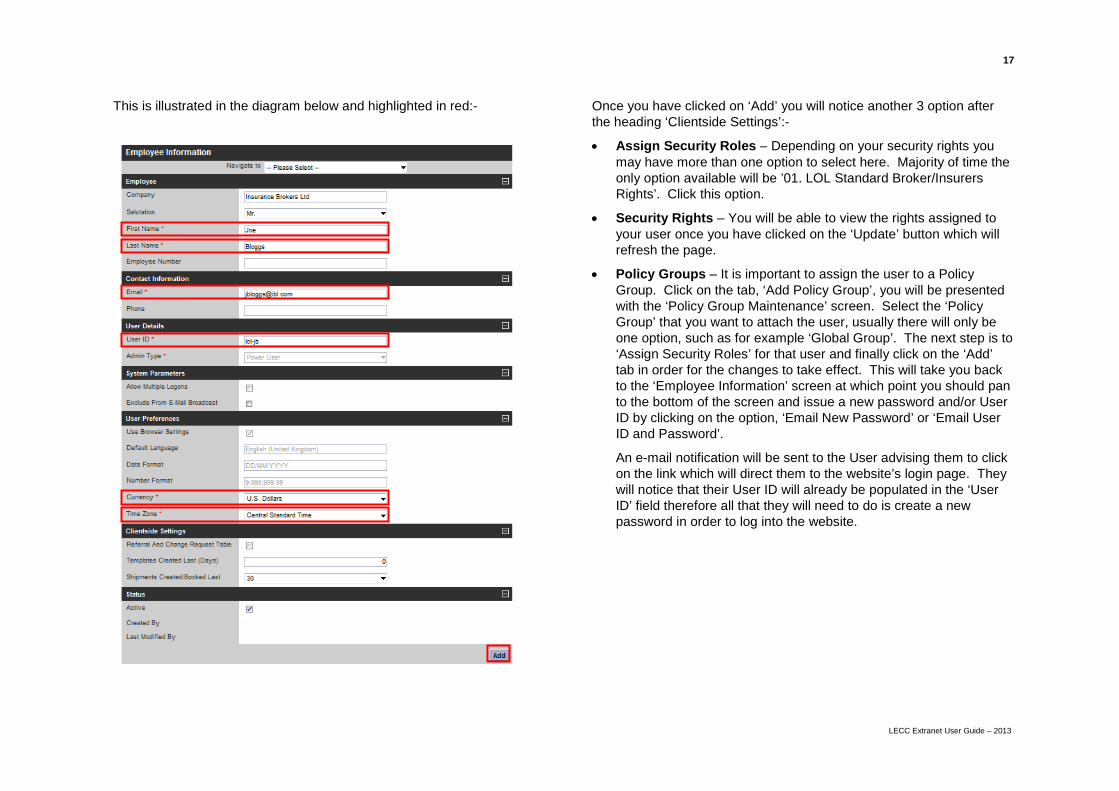
The following list shows the mandatory fields that will need to be filled in order to create a new user:-
• First Name
• Last Name
• User ID
• Admin Type
• Currency
• Time Zone
17
LECC Extranet User Guide – 2013
This is illustrated in the diagram below and highlighted in red:-
Once you have clicked on ‘Add’ you will notice another 3 option after the heading ‘Clientside Settings’:-
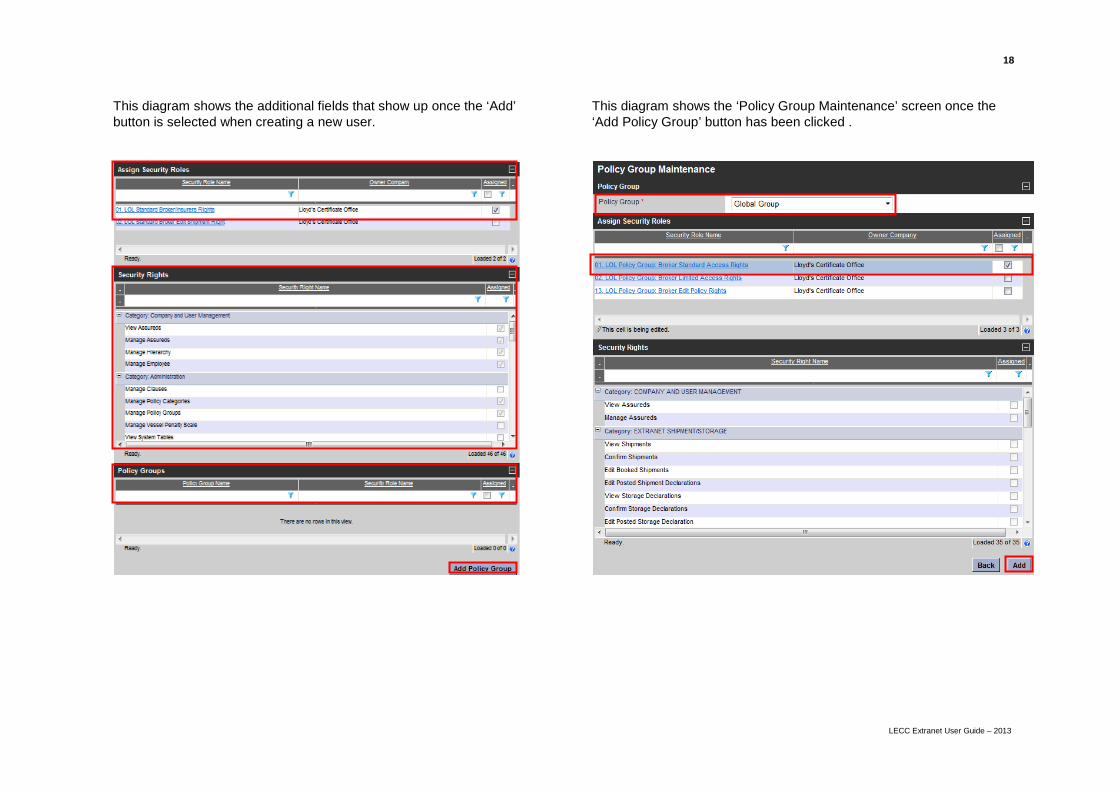
• Assign Security Roles – Depending on your security rights you may have more than one option to select here. Majority of time the only option available will be ’01. LOL Standard Broker/Insurers Rights’. Click this option.
• Security Rights – You will be able to view the rights assigned to your user once you have clicked on the ‘Update’ button which will refresh the page.
• Policy Groups – It is important to assign the user to a Policy Group. Click on the tab, ‘Add Policy Group’, you will be presented with the ‘Policy Group Maintenance’ screen. Select the ‘Policy Group’ that you want to attach the user, usually there will only be one option, such as for example ‘Global Group’. The next step is to ‘Assign Security Roles’ for that user and finally click on the ‘Add’ tab in order for the changes to take effect. This will take you back to the ‘Employee Information’ screen at which point you should pan to the bottom of the screen and issue a new password and/or User ID by clicking on the option, ‘Email New Password’ or ‘Email User ID and Password’.
An e-mail notification will be sent to the User advising them to click on the link which will direct them to the website’s login page. They will notice that their User ID will already be populated in the ‘User ID’ field therefore all that they will need to do is create a new password in order to log into the website.
18
LECC Extranet User Guide – 2013
This diagram shows the additional fields that show up once the ‘Add’ button is selected when creating a new user.
This diagram shows the ‘Policy Group Maintenance’ screen once the ‘Add Policy Group’ button has been clicked .
19
LECC Extranet User Guide – 2013
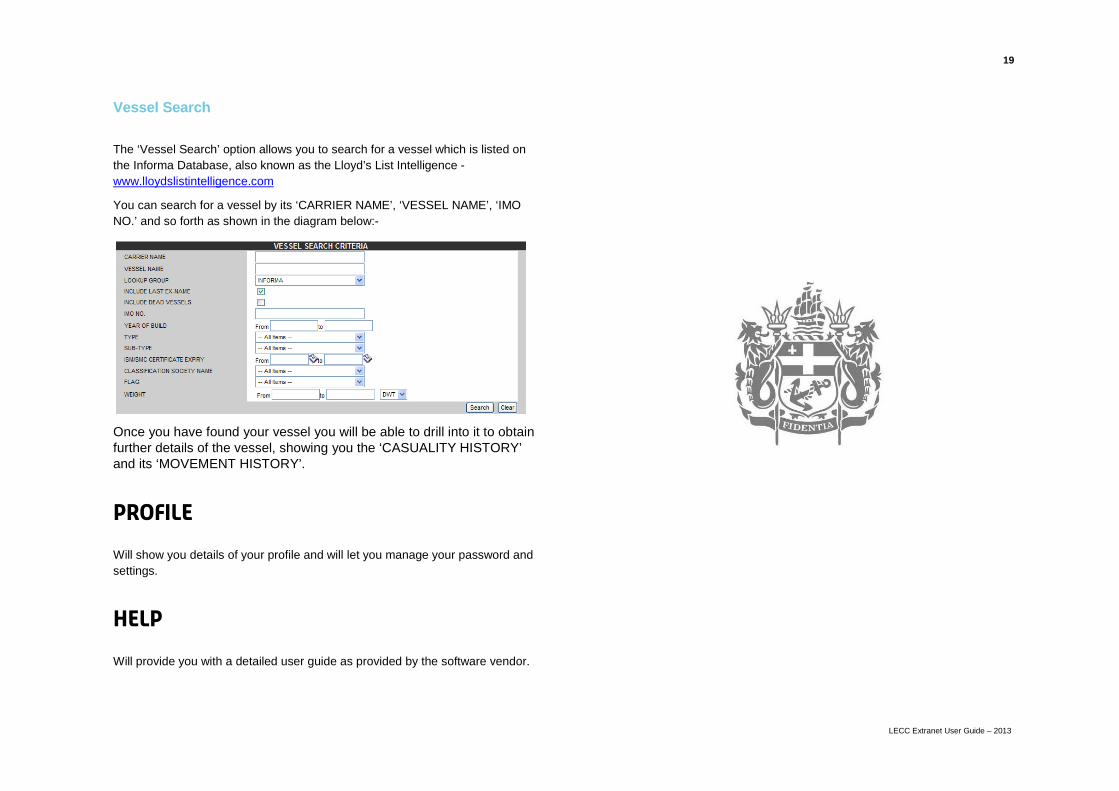
Vessel Search
The ‘Vessel Search’ option allows you to search for a vessel which is listed on the Informa Database, also known as the Lloyd’s List Intelligence - www.lloydslistintelligence.com
You can search for a vessel by its ‘CARRIER NAME’, ‘VESSEL NAME’, ‘IMO NO.’ and so forth as shown in the diagram below:-
Once you have found your vessel you will be able to drill into it to obtain further details of the vessel, showing you the ‘CASUALITY HISTORY’ and its ‘MOVEMENT HISTORY’.
Profile
Will show you details of your profile and will let you manage your password and settings.
Help
Will provide you with a detailed user guide as provided by the software vendor.


