87

Legal NotesUnauthorized reproduction of all or part of this guide is prohibited.The information in this guide is subject to change without notice.We cannot be held liable for any problems arising from the use of this product, regardless of the information herein.
Regarding TrademarksMicrosoft®, Windows®, Windows 7®, Windows Vista®, Windows XP®, Windows Server®, Word®, and Powerpoint® areregistered trademarks of Microsoft Corporation in the U.S. and/or other countries. KPDL is a trademark of KyoceraCorporation. PCL® is a trademark of Hewlett-Packard Company. TrueType® and Mac OS® are registered trademark ofApple Inc. Adobe®, Acrobat®, Adobe Reader®, Photoshop® and PostScript® are trademarks of Adobe Systems,Incorporated. UNIX® is a trademark in the United States and other countries, licensed exclusively through X/OpenCompany Limited.All other brand and product names herein are registered trademarks or trademarks of their respective companies.Examples of the operations given in this guide support the Windows 7 printing environment. Essentially the sameoperations are used for Microsoft Windows Vista, Windows XP, Windows Server 2003, and Windows Server 2008environments.User Interface screen captures shown in this guide may differ depending on your printing system.This user guide and its contents were developed for the 5.2 driver.
Models supported by the KX printer driverFS-3040MFP+FS-3140MFP+FS-3540MFPFS-3640MFP
© 2011 KYOCERA MITA Corporation

Table of Contents
Chapter 1 InstallationPreparing to Install the Driver ........................................................................................................ 1-1Selecting an Installation Method ................................................................................................... 1-1Installing Utilities ........................................................................................................................... 1-2Upgrading Driver Components ...................................................................................................... 1-2Express Installation ....................................................................................................................... 1-2
Installing in Express Mode ....................................................................................................... 1-2Custom Installation ....................................................................................................................... 1-4
Installing in Custom Mode with a Network Connection using Discover ................................... 1-4Installing in Custom Mode with a USB Connection using Discover ......................................... 1-5Installing in Custom Mode with a Network Connection using Custom Select .......................... 1-6Installing in Custom Mode with a USB Connection using Custom Select ................................ 1-8
Optional Printer Components ........................................................................................................ 1-9Installing Optional Printer Components ................................................................................... 1-9
The Add Printer Wizard ................................................................................................................. 1-9Installing a Printer Driver in Windows 7 and Windows Vista .................................................... 1-9Installing a Printer Driver in Windows XP .............................................................................. 1-10
Printer Driver Settings Access ..................................................................................................... 1-10Changing the Default Driver Settings .................................................................................... 1-10
Chapter 2 Device SettingsAccessing Device Settings ............................................................................................................ 2-1Device Options .............................................................................................................................. 2-1
Setting Device Options ............................................................................................................ 2-1Auto Configure .............................................................................................................................. 2-1
Enabling Auto Configuration .................................................................................................... 2-2Memory ......................................................................................................................................... 2-2
Setting the Memory ................................................................................................................. 2-2RAM Disk ...................................................................................................................................... 2-3
Setting RAM Disk .................................................................................................................... 2-3Administrator Settings ................................................................................................................... 2-3General ......................................................................................................................................... 2-3
Show Quick Print Tab .............................................................................................................. 2-4Send Count Information ........................................................................................................... 2-4Send Application Name ........................................................................................................... 2-4Associate Profile with Application ............................................................................................ 2-4Password Protect Administrator Settings ................................................................................ 2-4SNMP ...................................................................................................................................... 2-5
Lock Settings ................................................................................................................................ 2-6Lock Settings Options .............................................................................................................. 2-7
User Login ..................................................................................................................................... 2-7User Login Options .................................................................................................................. 2-8Printing with User Login ........................................................................................................... 2-8
Job Accounting ............................................................................................................................. 2-9Job Accounting Options ........................................................................................................... 2-9Printing with Job Accounting ................................................................................................. 2-10
KX DRIVER i

User Settings .............................................................................................................................. 2-10Identification .......................................................................................................................... 2-10Units ...................................................................................................................................... 2-11Language Preference ............................................................................................................ 2-11
PDL (Page Description Language) ............................................................................................. 2-11PDL Options .......................................................................................................................... 2-12PDF Options .......................................................................................................................... 2-13
XPS Driver .................................................................................................................................. 2-15Compatibility Settings ................................................................................................................. 2-16
Media Source Enumeration ................................................................................................... 2-16Ignore Application Collation ................................................................................................... 2-16Combine Source and Media Type Lists ................................................................................. 2-17
Removing a Plug-in ..................................................................................................................... 2-17
Chapter 3 Quick PrintQuick Print Options ....................................................................................................................... 3-1
Common Printing Options ....................................................................................................... 3-1Collate ..................................................................................................................................... 3-2Duplex Printing ........................................................................................................................ 3-2Multiple Pages per Sheet ........................................................................................................ 3-3Edit Quick Print ........................................................................................................................ 3-3
Profiles .......................................................................................................................................... 3-3Selecting a Profile .................................................................................................................... 3-4Saving a Profile ....................................................................................................................... 3-4Editing a Profile ....................................................................................................................... 3-5Importing a Profile ................................................................................................................... 3-5Exporting a Profile ................................................................................................................... 3-5Application Based Printing ....................................................................................................... 3-6
Chapter 4 BasicBasic Settings ............................................................................................................................... 4-1Source and Media Types .............................................................................................................. 4-2Print Size and Page Size ............................................................................................................... 4-2
Creating a Custom Page Size ................................................................................................. 4-3Printing with Custom Size Pages ............................................................................................. 4-3
Duplex Printing .............................................................................................................................. 4-3Printing in Duplex Mode .......................................................................................................... 4-4
Collate ........................................................................................................................................... 4-4Printing Collated Documents ................................................................................................... 4-5
Quality ........................................................................................................................................... 4-5Print Preview ................................................................................................................................. 4-5
Previewing a Print Job ............................................................................................................. 4-5Kyocera Logo ................................................................................................................................ 4-6
Displaying Version Information ................................................................................................ 4-6Displaying Plug-in Information ................................................................................................. 4-6
Chapter 5 LayoutMultiple Pages per Sheet .............................................................................................................. 5-1
Printing Multiple Pages per Sheet ........................................................................................... 5-1Scaling .......................................................................................................................................... 5-2
Setting Scaling on the Page .................................................................................................... 5-2Gutter ............................................................................................................................................ 5-2
Creating a Gutter ..................................................................................................................... 5-2Booklet .......................................................................................................................................... 5-3
Printing a Booklet .................................................................................................................... 5-3
User Guideii
Poster ............................................................................................................................................ 5-3Printing a Poster ...................................................................................................................... 5-4
Chapter 6 ImagingPrint Quality and Custom Quality .................................................................................................. 6-1
Selecting Print Quality ............................................................................................................. 6-1Selecting EcoPrint ................................................................................................................... 6-2Half Speed Mode ..................................................................................................................... 6-2
Fonts ............................................................................................................................................. 6-2Font Settings ........................................................................................................................... 6-2Selecting Font Settings ............................................................................................................ 6-3Font Substitution ..................................................................................................................... 6-3Disable Device Fonts ............................................................................................................... 6-4
Graphics ........................................................................................................................................ 6-4Selecting Graphics Settings .................................................................................................... 6-4Pattern Scaling ........................................................................................................................ 6-4Inversion Settings .................................................................................................................... 6-5Optimization Settings .............................................................................................................. 6-5CIE Optimization ..................................................................................................................... 6-6Halftone Screen ....................................................................................................................... 6-6
Adjusting Grayscale ...................................................................................................................... 6-7Text and Graphics Effects ............................................................................................................. 6-7
Chapter 7 PublishingCover Mode .................................................................................................................................. 7-1
Printing Covers ........................................................................................................................ 7-1Cover Mode Options ................................................................................................................ 7-2Choosing Cover Media ............................................................................................................ 7-4
Page Insert .................................................................................................................................... 7-5Printing Page Inserts ............................................................................................................... 7-5Page Insertion Options ............................................................................................................ 7-6
Transparency Interleaving ............................................................................................................ 7-6Inserting Backing Sheets Between Transparencies ................................................................ 7-7
Chapter 8 JobJob Storage (e-MPS) .................................................................................................................... 8-1
Job Storage (e-MPS) options .................................................................................................. 8-1Proof and Hold .............................................................................................................................. 8-2
Printing a Proof and Hold Job .................................................................................................. 8-2Private Print .................................................................................................................................. 8-2
Storing a Private Print Job ....................................................................................................... 8-3Job Name ...................................................................................................................................... 8-3
Don’t Use Application Name .................................................................................................... 8-3Overwrite Job Name ................................................................................................................ 8-3Selecting a Job Name ............................................................................................................. 8-4
Chapter 9 AdvancedPrologue/Epilogue ......................................................................................................................... 9-1
Selecting a Prologue/Epilogue File .......................................................................................... 9-1Editing a Prologue/Epilogue File ............................................................................................. 9-1Deleting a Prologue/Epilogue File ........................................................................................... 9-2Assigning a Prologue/Epilogue File ......................................................................................... 9-2Unassigning a Prologue/Epilogue File ..................................................................................... 9-2Specifying the Insertion Point .................................................................................................. 9-2
Watermark .................................................................................................................................... 9-3
KX DRIVER iii

Adding or Editing a Watermark ................................................................................................ 9-3Selecting Pages for Watermark ............................................................................................... 9-4
Security Watermark ...................................................................................................................... 9-5Adding or Editing a Security Watermark .................................................................................. 9-6Adjusting Security Watermark Calibration ............................................................................... 9-7Selecting Pages for Security Watermark ................................................................................. 9-7
Status Monitor ............................................................................................................................... 9-8Selecting Status Monitor Options ............................................................................................ 9-8Setting Status Monitor Preferences ......................................................................................... 9-9
EMF Spooling ............................................................................................................................. 9-10Selecting EMF Spooling ........................................................................................................ 9-10
Enable Client Profile .................................................................................................................... 9-10
Glossary ................................................................................................................................................................... i
User Guideiv
1 Installation
A printer driver is an application that manages communication between a printerand your computer. Once installed, the printer driver settings must beconfigured in the printer Properties and Printing Preferences.
Note: In Windows operating systems, you must be logged in withadministrator rights to install the printer driver.
Preparing to Install the DriverThis section describes the initial steps to take before you install the printerdriver, and based on your operating system, the next procedure you can follow.
1 Turn on the computer and the printer.
In Windows 7 and Windows Vista with a USB connection, a driver installationwill be made from the Microsoft Windows Update site if a certified driver isavailable and the system is connected to the web. We recommend you continuewith the steps to install the driver for an expanded feature set. In Windows, if theFound New Hardware Wizard dialog box appears during the installationprocess, click Cancel. If the Hardware Installation warning dialog boxappears, click Continue Anyway.
2 Insert the Product Library disc into the disc drive. The Main Menu appears.
Note: If the Product Library fails to start after inserting it into the disc drive,use Windows Explorer to locate Setup.exe on the local drive and double-clickto open.
3 Click View License Agreement to read the license agreement.
4 Click Accept to proceed.
5 To begin the installation, click Install Software.
Note: If the Windows Security warning dialog box appears at any pointduring the installation process, click Install this driver software anyway.
6 The Installer appears with several installation methods displayed.
Selecting an Installation MethodYou can select Express Mode for a network or USB connection and theinstallation wizard will discover your printers. You can also select CustomMode for a network or USB connection and either manually select installationpackages and specify utilities or let the installation wizard discover your printer.
KX DRIVER 1-1

Installation
Express Mode InstallationInstalling in Express Mode on page 1-2Custom Mode InstallationInstalling in Custom Mode with a Network Connection using Discover onpage 1-4Installing in Custom Mode with a USB Connection using Discover on page 1-5Installing in Custom Mode with a Network Connection using Custom Selecton page 1-6Installing in Custom Mode with a USB Connection using Custom Select onpage 1-8
Installing UtilitiesOn the Installation Method page, click Utilities to install printer utilities. Youcan also select utilities to install during the Custom Installation procedure.
Upgrading Driver ComponentsIf the installation wizard detects older driver or utility components, the SoftwareComponent Upgrade page appears.
1 Choose the component to upgrade. Click Next.
2 Confirm your upgrade settings. To start the upgrade, click Upgrade.
3 When the upgrade completes, click Next. The Installation Method pageappears.
Express InstallationExpress Mode applies to driver installation for a USB or network connectiononly. The installation wizard discovers printers that are turned on, andconnected by USB and network cable. In Custom Mode, you are able to selectthe installation packages and specify the port.
Installing in Express ModeThis section describes the express installation procedure of the driver softwarein Windows operating systems.
1 Ensure that your printer and computer are turned on and connected by USB ornetwork cable.
Note: In Windows 7 and Windows Vista with a USB connection, a driverinstallation will be made from the Microsoft Windows Update site if a certifieddriver is available and the system is connected to the web. We recommend youcontinue with the steps to install the KX Driver for an expanded feature set. InWindows, if the Found New Hardware Wizard dialog box appears during theinstallation process, click Cancel. If the Hardware Installation warning dialogbox appears, click Continue Anyway.
User Guide1-2
Installation
2 On the Installation Method page, click Express Mode.
3 The Discover Printing System page opens, searching for your printingsystem.If Discover finds your printing system, select your model from the list and clickNext.If Discover does not find your printing system, a message appears. Removeand reinsert the USB or network cable, and ensure it is connected properly.Click Refresh to retry the discovery. If the system still cannot find your printingsystem, contact your system administrator.
4 Select Use host name for port name to use a host name for the StandardTCP/IP port. If the installation wizard still displays the IP address, contact yoursystem administrator. (Not available with a USB connection.)
5 Click Information if you want to open a dialog box with details about IPAddress, Host Name, Printer Model, Contact, Location, and Serial Number.Click OK. Click Next. (Not available with a USB connection.)
6 On the Printer Settings page, you can assign a name to your printing system.
Note: With a first time USB connection, the Printer Settings page does notappear.
You can also choose to share this printer with others or set this printer as thedefault printer. Make your selections, and then click Next.
7 On the Confirm Settings page, click Install if the settings are correct. ClickBack to correct the settings.
8 The Installation Completed page appears displaying the following driveroptions.
Print a test pageThis selection verifies a connection with the printer and creates a print out ofthe installed driver components.Enable Status MonitorThe Status Monitor displays system status messages on your computerscreen during printing tasks. The Status Monitor button appears on theAdvanced tab.Show Quick Print TabThis selection lets you define basic print options into group profiles that canbe accessed easily. The Show Quick Print tab option also appears in theAdministrator Settings in Device Settings.Device SettingsSelect the Device Settings check box to open Device Settings where youcan choose installed options for your printing system. (The Device Settingscheck box appears only in Windows XP with a network connection.)
When the installation completes successfully, click Finish to exit the installationwizard.A message may appear if there is a software installation failure.
KX DRIVER 1-3
Installation
Click Finish, and retry the installation. If the same message appears again,contact your system administrator.The installation of the printer is now complete. If prompted, restart yourcomputer.
Custom InstallationCustom Mode applies to driver installation for a USB or network connection.The installation wizard can discover printers that are turned on, and connectedby USB and network cable, or you can manually select the driver from driversthat are available. You can specify the printer port, fonts, and the utilities youwant to install.Printer drivers that ship with Windows operating systems are called minidrivers.The minidriver is available separately for PCL and KPDL and provides basicsupport for your printer.The KX XPS DRIVER is only available for printing systems used with Windows7 and Windows Vista. The XPS driver is discussed in the Device Settingschapter. Minidriver functionality is not documented in this user guide.
Installing in Custom Mode with a Network Connection usingDiscover
This section describes the custom installation procedure of the driver softwarein Windows operating systems using a network connection.
1 Ensure that your printer and computer are connected to a network.
2 On the Installation Method page, select Custom Mode.
3 The Discover Printing System page opens searching for your printing system.The Discover button is automatically selected. A list of models appears. ClickNext.If Discover does not find your printing system, a message appears. Removeand reinsert the network cable, and ensure it is connected properly. ClickRefresh to retry the discovery. If the system still cannot find your printingsystem, contact your system administrator.
4 On the Custom Installation page, select the driver and software packages youwant to install from the Driver and Utility tabs, and clear those not intended forinstallation. Click Next.If you only select software packages from the Utility tab, you will skip to theConfirm Settings page.
5 On the Printer Settings page, you can assign a name for your printing system.You can also choose to share this printer with others or set this printer as thedefault printer. Make your selections, and then click Next.
6 On the Confirm Settings page, click Install if the settings are correct. ClickBack to correct the settings.
Note: If the Hardware Installation warning dialog box appears, clickContinue.
User Guide1-4

Installation
7 The Installation Completed page appears displaying the following driveroptions.
Print a test pageThis selection verifies a connection with the printer and creates a print out ofthe installed driver components.Enable Status MonitorThe Status Monitor displays system status messages on your computerscreen during printing tasks. The Status Monitor button appears on theAdvanced tab.Show Quick Print TabThis selection lets you define basic print options into group profiles that canbe accessed easily. The Show Quick Print tab option also appears in theAdministrator Settings in Device Settings.Device SettingsSelect the Device Settings check box to open Device Settings where youcan choose installed options for your printing system. (The Device Settingscheck box appears only in Windows XP.)
When the installation completes successfully, click Finish to exit the installationwizard.A message may appear if there is a software installation failure.Click Finish, and retry the installation. If the same message appears again,contact your system administrator.The installation of the printer is now complete. If prompted, restart yourcomputer.
Installing in Custom Mode with a USB Connection using DiscoverThis section describes the custom installation procedure of the driver softwarein Windows operating systems using a USB connection. With Discover, alldevices available for the driver installation are found automatically. This is therecommended Custom Mode USB installation method.
1 Ensure that your printer and computer are turned on and connected using aUSB cable.
Note: In Windows 7 and Windows Vista, a driver installation will be made fromthe Microsoft Windows Update site if a certified driver is available and thesystem is connected to the web. We recommend you continue with the steps toinstall the KX Driver for an expanded feature set.
2 On the Installation Method page, select Custom Mode.
3 The Discover Printing System page opens, searching for your printingsystem. The Discover button is automatically selected.Select your device and click Next.If Discover does not find your printing system, a message appears. Removeand reinsert the USB cable, and ensure it is connected properly. Click Refreshto retry the discovery. If the system still cannot find your printing system, contactyour system administrator.
KX DRIVER 1-5

Installation
4 On the Custom Installation page, select the driver and software packages youwant to install from the Driver and Utility tabs, and clear those not intended forinstallation. Click Next.If you only select software packages from the Utility tab, you will skip to theConfirm Settings page.
5 On the Printer Settings page, you can assign a name to your printing system.
Note: With a first time USB connection, the Printer Settings page does notappear.
You can also choose to share this printer with others or set this printer as thedefault printer. Make your selections, and then click Next.
6 On the Confirm Settings page, click Install if the settings are correct. ClickBack to correct the settings.
Note: If the Hardware Installation warning dialog box appears, clickContinue Anyway.
7 The Installation Completed page appears displaying the following driveroptions.
Print a test pageThis selection verifies a connection with the printer and creates a print out ofthe installed driver components.Enable Status MonitorThe Status Monitor displays system status messages on your computerscreen during printing tasks. The Status Monitor button appears on theAdvanced tab.Show Quick Print TabThis selection lets you define basic print options into group profiles that canbe accessed easily. The Show Quick Print tab option also appears in theAdministrator Settings in Device Settings.
When the installation completes successfully, click Finish to exit the installationwizard.A message may appear if there is a software installation failure.Click Finish, and retry the installation. If the same message appears again,contact your system administrator.The installation of the printer is now complete. If prompted, restart yourcomputer.
Installing in Custom Mode with a Network Connection usingCustom Select
This section describes the custom installation procedure of the driver softwarein Windows operating systems using a network connection.
1 Ensure that your printer and computer are connected to a network.
2 On the Installation Method page, select Custom Mode.
User Guide1-6
Installation
3 The Discover Printing System page opens, searching for your printingsystem. The Discover button is automatically selected. Choose Custom selectand click Next.
4 The Printing System page appears. Select your printing system model fromthe list and click Next. If there is only one driver model, this page does notappear. Proceed to the next step.
5 On the Printer Port page, select the port connected to your printing system, oradd a port connected to your system by clicking Add Port. Click Next.
6 On the Custom Installation page, select the driver and software packages youwant to install from the Driver and Utility tabs, and clear those not intended forinstallation. Click Next.If you only select software packages from the Utility tab, you will skip to theConfirm Settings page.
7 On the Printer Settings page, you can assign a name for your printing system.You can also choose to share this printer with others or set this printer as thedefault printer. Make your selections, and then click Next.
8 On the Confirm Settings page, click Install if the settings are correct. ClickBack to correct the settings.
Note: If the Hardware Installation warning dialog box appears, clickContinue.
9 The Installation Completed page appears displaying the following driveroptions.
Print a test pageThis selection verifies a connection with the printer and creates a print out ofthe installed driver components.Enable Status MonitorThe Status Monitor displays system status messages on your computerscreen during printing tasks. The Status Monitor button appears on theAdvanced tab.Show Quick Print TabThis selection lets you define basic print options into group profiles that canbe accessed easily. The Show Quick Print tab option also appears in theAdministrator Settings in Device Settings.Device SettingsSelect the Device Settings check box to open Device Settings where youcan choose installed options for your printing system. (The Device Settingscheck box appears only in Windows XP.)
When the installation completes successfully, click Finish to exit the installationwizard.A message may appear if there is a software installation failure.Click Finish, and retry the installation. If the same message appears again,contact your system administrator.
KX DRIVER 1-7
Installation
The installation of the printer is now complete. If prompted, restart yourcomputer.
Installing in Custom Mode with a USB Connection using CustomSelect
This section describes the custom installation procedure of the driver softwarein Windows operating systems using a USB connection. With the Customselect option, you manually select the printing system and printer port to install.In Custom mode, Custom Select is not recommended for USB inenvironments where printing systems are connected and reconnected usingUSB ports. The Discover method provides a more reliable installation path.
1 Ensure that your printer and computer are turned on and connected using aUSB cable.
Note: In Windows 7 and Windows Vista, a driver installation will be made fromthe Microsoft Windows Update site if a certified driver is available and thesystem is connected to the web. We recommend the Custom Mode usingDiscover for USB connections to ensure a reliable installation.
2 On the Installation Method page, select Custom Mode.
3 The Discover Printing System page opens, searching for your printingsystem. The Discover button is automatically selected. Choose Custom selectand click Next.
4 The Printing System page appears. Select your printing system model fromthe list and click Next.
5 On the Printer Port page, select an existing port connected to your printingsystem. Click Next.
6 On the Custom Installation page, select the driver and software packages youwant to install from the Driver and Utility tabs, and clear those not intended forinstallation. Click Next.If you only select software packages from the Utility tab, you will skip to theConfirm Settings page.
7 On the Printer Settings page, you can assign a name to your printing system.
You can also choose to share this printer with others or set this printer as thedefault printer. Make your selections, and then click Next.
8 On the Confirm Settings page, click Install if the settings are correct. ClickBack to correct the settings.
Note: If the Hardware Installation warning dialog box appears, clickContinue Anyway.
9 The Installation Completed page appears displaying the following driveroptions.
Print a test page
User Guide1-8

Installation
This selection verifies a connection with the printer and creates a print out ofthe installed driver components.Enable Status MonitorThe Status Monitor displays system status messages on your computerscreen during printing tasks. The Status Monitor button appears on theAdvanced tab.Show Quick Print TabThis selection lets you define basic print options into group profiles that canbe accessed easily. The Show Quick Print tab option also appears in theAdministrator Settings in Device Settings.
When the installation completes successfully, click Finish to exit the installationwizard.A message may appear if there is a software installation failure.Click Finish, and retry the installation. If the same message appears again,contact your system administrator.The installation of the printer is now complete. If prompted, restart yourcomputer.
Optional Printer ComponentsYou can expand the functionality of your printer driver by installing optionalcomponents.
Installing Optional Printer Components
1 On the Product Library disc menu > Advanced Tools menu, select OptionalPrinter Components.
2 Select a printer to install optional components, and click Next.
3 On all Select pages, choose your components, and click Next.
4 On the Confirm Settings page, click Install if the displayed settings arecorrect. Click Back to correct any settings.
5 The Printer Components Installation Completed page appears. Click Finish.
When you have completed installing printers and optional components, restartyour computer if prompted.
The Add Printer WizardThe Add Printer Wizard displays a series of pages that guide you throughprinter installation. You are prompted to make installation choices on eachpage.
Installing a Printer Driver in Windows 7 and Windows VistaThis section describes how to install a printer driver using the Add PrinterWizard in Windows 7 and Windows Vista.
KX DRIVER 1-9
Installation
1 Click Start and click Devices and Printers (Windows 7), or click Control Paneland double-click Printers (Windows Vista).
2 Click Add a printer.
3 The Add Printer Wizard appears. Click either Add a local printer or Add anetwork, wireless or Bluetooth printer. Follow the instructions on each page,and then click Next to proceed to the next page.
Note: If the Windows Security warning dialog box appears, click Install thisdriver software anyway.
4 The last page of the wizard appears with a message that you’ve successfullyadded the printer you selected. Installation of the printer driver is now complete.Click Print a test page if you want to produce sample print output from thenewly installed printer. To close the Add Printer Wizard, click Finish.
Installing a Printer Driver in Windows XPThis section describes how to install a printer driver using the Add PrinterWizard in Windows XP.
1 Click Start and Printers and Faxes.
2 Click Add a printer.
3 The Add Printer Wizard appears. Follow the instructions on each page, andthen click Next to proceed to the next page.
Note: If the Found New Hardware Wizard page appears, click Cancel. If theHardware Installation warning dialog box appears, click Continue Anyway.
4 When the Completing the Add Printer Wizard page appears, installation ofthe printer driver is now complete. To close the Add Printer Wizard, clickFinish. If prompted, restart your computer.
Printer Driver Settings AccessThe printer driver software can be accessed from the Print dialog box of anapplication, or from Start. If accessed from an application, then changes madeto driver settings remain in effect until the application ends. If accessed fromStart, changes are maintained as the default printer settings.
Changing the Default Driver SettingsDefault driver settings apply to print jobs initiated from any application, but theyare overwritten by setting changes made within each application.
1 Click Start and click Devices and Printers (Windows 7), or click Control Paneland double-click Printers (Windows Vista), or Printers and Faxes (WindowsXP).
2 Right-click on your printing system icon.
User Guide1-10

Installation
3 Click Printing Preferences.
4 In the Printing Preferences dialog box, select the desired features in all tabs.
5 Click OK to save the settings.
KX DRIVER 1-11
2 Device Settings
In Device Settings, you can select installed printing system options so theassociated features can be used with the printer driver. You can also match thememory setting in the driver with the memory installed in your printing system,which lets the driver manage font downloads more efficiently. Administrator,User, PDL (Page Description Language), and Compatibility settings can also beselected.
Accessing Device SettingsDevice Settings can be accessed from Devices and Printers (Windows 7),Printers (Windows Vista), or Printers and Faxes (Windows XP) folder.
1 Click Start and click Devices and Printers (Windows 7), or click Control Paneland double-click Printers (Windows Vista), or Printers and Faxes (WindowsXP).
2 Right-click the desired printing system model.
3 Click Printer properties (Windows 7) or Properties (Windows Vista, WindowsXP).
4 Click Device Settings.
Device OptionsOptional devices extend the capabilities of your printing system for source andjob storage.In a client/server environment, this feature is unavailable to a client logged in asa restricted user.
Setting Device OptionsYou can set the printer driver to match the optional devices installed on yourprinting system.
1 In Device Settings > Device options, select the check boxes for all installeddevices.
2 Click OK in the Properties dialog box.
Auto ConfigureAuto Configure detects the devices installed on the printing system if it isconnected over a network. Auto Configure can detect printing system devicessuch as input devices. When your computer is connected to the printing system
User Guide2-1

Device Settings
through a TCP/IP or WSD port, the Auto Configure button appears in DeviceSettings. Auto Configure updates the Device options list, Memory, RAMdisk, and preview images to keep the printer driver consistent with the printingsystem configuration.Not all installed devices are detected by using Auto Configure. Beforeselecting OK in Device Settings, check the settings to make sure that they arecorrect.
Note: The default setting for Windows XP Service Pack 2 is for the WindowsFirewall to be set to On. The setting can be changed to allow communicationbetween the printing system and your computer. In the Windows SecurityAlert dialog box, click Unblock.
Silent Auto ConfigurationSilent auto configuration checks the printing system every 10 minutes forchanges in optional devices or memory. When a change is detected, the driveris automatically updated with the new settings. Silent auto configuration isonly available for printing systems installed in Windows 7 or Windows Vista.In a client/server environment, this feature is unavailable to a client logged in asa restricted user.
Enabling Auto ConfigurationThe Auto Configure button can be used to detect all available device optionswhen the printing system is connected to a network through a TCP/IP port.
1 Verify that all optional devices are attached to the printing system, and that it isturned on and ready to print.
2 In Device Settings, click Auto Configure.
In Windows XP, the driver settings are updated immediately.In Windows 7 and Windows Vista, the Auto Configure dialog box opens. Selectfrom Auto configure options:
Auto Configure NowClick the button at any time to retrieve the current settings from the printingsystem. It is recommended to do this when the driver is first installed andwhen Silent auto configuration is turned off.Silent auto configurationSelect to let the driver check the printing system every 10 minutes for anychanges in optional devices or memory. When a change is detected, thedriver is automatically updated with the new settings.
MemoryMemory is the amount of standard and optional memory installed in the printingsystem. To maximize the downloading of printing system fonts, the driver mustbe set to match the total printing system memory.
Setting the MemoryBy default, the Memory setting matches the standard memory in the printingsystem. If optional memory is installed, set the memory in the printer driver tomatch the total amount of memory.
KX DRIVER 2-2

Device Settings
1 Install optional DIMM memory in the printing system.
2 In Device Settings > Memory, type or select the amount of total installedmemory by clicking the up and down arrows until the text box shows the correctnumber of megabytes (MB).
If your printing system includes the Auto Configure feature, you can use it toobtain information about the memory size.
RAM DiskThe RAM disk functions as a virtual hard disk, saving print requests into theprinting system’s memory. Because the RAM disk is temporary memory, all datastored there is lost when the power is turned off.In a client/server environment, this feature is unavailable to a client logged in asa restricted user.
Note: For some models, RAM disk requires optional printing system memory.Once installed, set the RAM disk in Device Settings > Device options.
If selected, the Ignore application collation feature in the CompatibilitySettings dialog box lets the driver control collation. RAM disk can then increasethe print speed of collated multiple copies by sending the print job just once.
Setting RAM DiskYou can set the RAM disk to save print requests into the printing system’smemory.
1 At the printing system's operation panel, turn on RAM disk and set its size.
2 In Device Settings > Device options, select RAM disk.
3 In the RAM disk text box, type or select the desired RAM disk size. Click the upand down arrows until the text box shows the correct number of megabytes(MB) available physically on the operation panel.
The maximum RAM disk size depends on the amount of installed memory.
Administrator SettingsAdministrator Settings lets you set options that include controllingaccessibility, displaying features in the interface and setting a password tocontrol access to the Administrator Settings options. Selections varyaccording to printing system model.In a client/server environment, this feature is unavailable to a client logged in asa restricted user.
GeneralAn administrator can control the display of the Quick Print tab, and othermiscellaneous settings, including password and SNMP settings.
User Guide2-3
Device Settings
Show Quick Print TabThis option lets you control the display of the Quick Print tab. You can definebasic print options into group profiles for improved accessibility.With a clear check box for Show Quick Print tab, the tab does not appear inthe Printing Preferences dialog box.To enable this feature, in Device Settings > Administrator Settings >General, select Show Quick Print tab.With a selected check box for the Show Quick Print tab, the tab appears in thePrinting Preferences dialog box. When you select the Show Quick Print tabcheck box, you can access additional check boxes:
Hide other tabs displays only the Quick Print tab to the user.Set Quick Print tab as default opens to this tab when you access PrintingPreferences.Hide Edit Quick Print control prevents users from customizing the QuickPrint tab.
Send Count InformationThis option lets you embed count information in the print job, which can be usedby some applications for accounting purposes. Count information includes thenumber of copies produced as well as duplex printing, multiple pages per sheet,color mode, color page count, and paper size values.When PDF is selected in the PDL settings dialog box, only color page countinformation is sent with PDF.To enable this feature, in Device Settings > Administrator Settings >General, select Send Count information.
Send Application NameThis option lets you send the application name with a print job, so that adifferent printing process is used for each application. Some third party printaccounting programs use this information to calculate print totals based onapplication type.This option is unavailable when PDF is selected in the PDL Settings dialog box.To enable this feature, in Device Settings > Administrator Settings >General, select Send Application name.
Associate Profile with ApplicationThis option lets you set all printing from each installed application to use thesame driver settings as defined in a profile. Before using this feature:
A profile must be created in the Profiles dialog box, accessed from anyPrinting Preferences tab.An association must be created between a profile and an application in theApplication Based Printing dialog box, accessed from the Profiles dialogbox.
To enable this feature, in Device Settings > Administrator Settings >General, select Associate Profile with application.
Password Protect Administrator SettingsYou can set Password protect administrator settings in the AdministratorSettings dialog box to prevent unauthorized changes in this dialog box. If
KX DRIVER 2-4
Device Settings
selected, this setting prompts you to enter a password and confirm thepassword. This password protection blocks access to all AdministratorSettings options.
Setting the Administrator Password
You can set a password to prevent unauthorized changes in the AdministratorSettings dialog box.
1 In Device Settings > Administrator Settings > General, select Passwordprotect administrator settings.
2 In the Password dialog box, enter a password, using at least 4 and no morethan 16 characters. Reenter the password in Confirm password and click OK.
Clearing the Administrator Password
You can remove the administrator password.
1 In Device Settings, select Administrator.
2 In the Enter Password dialog box, type the password and click OK.
3 In the Administrator Settings dialog box, clear the Password protectadministrator settings check box and click OK.
SNMPSimple Network Management Protocol (SNMP) is a set of rules that govern themanagement of network devices, such as printing systems. These settingsdetermine the level of security when using the Auto Configure feature, andprevent unauthorized printing to the SNMPv3 printing system. SNMP settingsmust be set in the printer driver and in the printing system’s Command Center.The following options are available:
SNMPv1/v2cThis option ensures successful Auto Configure communication using Readcommunity name and Write community name.SNMPv3This option ensures secure Auto Configure communication using a username and password. Authentication and privacy options are available byselecting Settings.Apply to other modelsThis option displays a list of installed printing systems to apply the selectedsettings.
SNMPv3 Options
You can select options for secure communication with the printing system.AuthenticationThis option provides an algorithm to check that a transferred file has arrivedintact. Message Digest 5 (MD5) and Secure Hash Algorithm 1 (SHA1) are hashalgorithms used to authenticate packet data.
MD5
User Guide2-5
Device Settings
This option provides a cryptographic hash function with a 128 bit hash value.It adds security and protection against Gateway Load Balancing Protocol(GLBP)-spoofing software.SHA1This option produces a message digest that is 160 bits long. SHA1 is thesuccessor to MD5.
PrivacyThis option uses encryption for secure communication. It is available after youselect the Authentication option. You may select one Privacy option.
DESThis option uses the Data Encryption Standard for encryption. DES turnscleartext into ciphertext via an encryption algorithm. It encrypts and decryptsdata using 8-byte blocks and a 56-bit key.AESThis option uses the Advanced Encryption Standard for encryption. AES is asymmetric block cipher that can process data blocks of 128 bits, using cipherkeys with lengths of 128, 192, and 256 bits. It is more secure than DES.
Selecting SNMP Settings
These settings in the driver must be set to match the settings in the printingsystem’s Command Center.
1 In Device Settings > Administrator > General, click SNMP Settings.
2 Select SNMPv1/v2c or SNMPv3.
For SNMPv1/v2c, type the Read community name and Write communityname, to a maximum of 32 characters, and click OK.For SNMPv3, type a User name to a maximum of 32 characters, and aPassword from 8 to 32 characters.
3 To set authentication and privacy options for SNMPv3, click Settings.
4 In the dialog box, select from the available options.
5 Click OK.
6 Optional: Under Apply to other models, you can select all or any availablemodels. The SNMP settings are applied to all selected models.
Lock SettingsAn administrator can specify settings at the tab or feature level in the driver, andthen lock them. The settings are then applied to all print jobs, and changes arerestricted. The settings are locked in Device Settings > AdministratorSettings > Lock Settings. For example, a driver setting could be set forprinting duplex documents. This would save paper, resulting in cost savings andecological benefits.Locking a setting will also lock the feature where it appears in other tabs. Forexample, selecting Lock Multiple pages per sheet will also select and lock thatfeature in the Quick Print and Layout tabs.
KX DRIVER 2-6
Device Settings
The administrator can also set a password that is required to temporarily unlocka feature.In a client/server environment, this feature is unavailable to a client logged in asa restricted user.
Lock Settings OptionsThe Lock Settings tab displays driver settings that an administrator can lock.Once locked, user changes are restricted and the settings are applied to all printjobs. Once the settings are made, the Password settings option can beaccessed. This lets an administrator control usage of paper and toner amounts:
EcoPrintThis option locks the EcoPrint setting.DuplexThis option locks the current Print on both sides setting selected in theQuick Print or Basic tab.Multiple pages per sheetThis option locks the current Multiple pages per sheet setting selected inthe Quick Print or Layout tab. The Pages per sheet option is not locked.Clicking the icon in the Quick Print tab, or the selection in the Layout tab,switches between the two-page and four-page options. In the Layout tab, alloptions are available and not limited to two-page and four page.Profile with applicationThis option locks a defined profile of driver settings by application.Job tabThis option locks settings selected in the Job tab.Security settingsThis option locks the Security Watermark in the Advanced tab. SecurityWatermark is an optional plug-in.Password settingsThe password set by the administrator temporarily unlocks driver features. Itprompts the user for a password. When the administrator sets the password,the Unlock button appears in the driver tabs or the Application BasedPrinting dialog box. To unlock a feature, click Unlock and type thepassword.
User LoginUser login provides job restriction by user, in contrast to the Job accountingfeature, which assigns privileges by division or department. A maximum of 20login user names and passwords can be registered at the printing system and100 User IDs and passwords can be stored in the printer driver for use withmultiple printing systems.User login adds users with a user name and password. This feature limitsprinting privileges to specified users for secure printing and accounting. Thenumber of pages printed by each user will be tracked by the printing system.Users added in the printer driver must also be manually registered at theprinting system’s operation panel.
User Guide2-7
Device Settings
User Login OptionsUser login settings selected in the driver are applied to every print job sent fromyour computer. The available options are as follows.
Use specific nameThis option can be used to specify a user name and password to use thesame User login for every print job. If this option is selected, the user doesnot have to type the name and password for each print job.Prompt for nameThis option prompts the user for a user name and password. You can use aname that is not on the list, and the name is not added to the list. Whensending a print job, type a Name and Password when prompted, then clickOK to print.If you type a name that is not registered in the printing system, the job printsonly if Unknown User ID Job is set to Permit at the printing system.Prompt for name and validateThis option prompts for a Name and Password. For the job to print, the username and password entered must be on the Login user name list. You canuse the Login user names entered in the Login user name list of the driver.When sending a print job, type a Name and Password when prompted, thenclick OK to print. This option ensures that the job prints, only after verifyingthat the selected Name is saved in the driver.Validate user name (computer) or prompt for login user nameThis option searches for the Windows User name in the driver’s Login username list. Validation is done every time the user prints a job. If the WindowsUser name exists in the Login user name list, the associated driver Loginuser name and Password from the list are used for the print job. To releasethe print job, the user must enter the Login user name and Password at theprinting system operation panel.If a match is not found, the driver checks for administrator or userpermissions. With user permissions, the print job is canceled, and the user isprompted to contact an administrator to establish printing permissions. Withadministrator permissions, the driver prompts for the Login user name andPassword. Along with the Windows User name, these are then added to thelist so succeeding print jobs do not require the user to enter a Login username and Password again.Login User NameClick to add, delete, edit, import, or export login user names and passwords.Once a Login user name list is created, the list can be exported as a groupby saving it as a text file (.CSV, .KXC., and .TXT). To import a Login username list, browse for an existing list and save it in your printer driver.
Printing with User LoginAfter login user names are assigned and user login mode is set to On at theprinting system, you can choose User login to print in user login mode.
1 In Device Settings > Administrator Settings > User Login, select UserLogin.
2 Select a User Login option:
Use specific namePrompt for name
KX DRIVER 2-8
Device Settings
The remaining User Login options become available when you create a loginuser name list.
Note: If you select the Use specific name or Prompt for name option,proceed to step 5.
3 Under the Login user name list, click the buttons to view and manage the list.
4 Select from the remaining User Login options:
Prompt for name and validateValidate user name (computer) or prompt for login user name
5 Click OK in all dialog boxes.
6 Print the document from the application.
7 When the Print Options dialog box appears, type or select a Name andPassword, and click OK. Login is required for some options.
Job AccountingJob accounting gives an administrator the ability to control usage of a printingsystem. With Job accounting, an administrator can assign account IDs(identification numbers) to users or departments, a specific account ID, or makeaccount ID input mandatory for printing. After account IDs are created, you canview from the printing system operation panel the number of copies associatedwith a specific ID as well as limit the number of copies for individual IDs.Account IDs can be up to 8 digits.
Note: Job accounting must be set to On at the printing system. A maximumof 20 account IDs can be registered at the printing system and 100 account IDscan be stored in the printer driver for use with multiple printing systems.
Job Accounting OptionsJob accounting supports the following options:
Use specific account IDSelect this option to track the print jobs of a user or group with an account ID.It sends the account ID with each print job. An administrator can restrict auser or group from changing their account ID by using the Passwordprotect administrator settings in the Administrator Settings dialog box.Prompt for account IDSelect this option to track the print jobs of a user or group with an account IDas well as prompt for an account ID. At the time a print job is sent, the user isprompted to enter a Job Accounting ID.Prompt for account ID and validateSelect this option to prompt for an account ID that is saved in the driver.When sending a print job, type an account ID when prompted, then click OKto print. The account ID is validated against the account ID list. If typedincorrectly, you are prompted to type it again.Display account ID list
User Guide2-9
Device Settings
Select this option to display the account ID list at the time of printing. Theprint job can be assigned to a user or group. The account ID list is stored inthe driver and more than one ID must be established for the list to appear.Account IDsAdd, edit, or delete account IDs from the list stored in the driver. Account IDdescriptions match the user or group with an account ID. After an account IDlist is created, the list can be exported as a group by saving it as a text file(.CSV, .KXC, .TXT). To import an account ID list, browse for an existing listand open it.
Printing with Job AccountingAfter account IDs are assigned and Job accounting is set to On at the printingsystem, the number of pages printed is added to the selected account ID total.
1 In Device Settings > Administrator Settings > Job Accounting, select Jobaccounting.
2 Select a Job Accounting option:
Use specific account IDPrompt for account ID
The remaining Job accounting options become available when you create anaccount ID list.If you select the Use specific account ID or Prompt for account ID option,proceed to step 5.
3 Select Account ID List to create and manage account ID lists.
4 Select from the remaining Job accounting options:
Prompt for account ID and validateDisplay account ID list
5 Click OK in all dialog boxes.
6 Print the document from the application.
7 For some options, when the Print Options dialog box appears, type or selectan account ID, and click OK.
User SettingsUser Settings lets you specify user and department names, select the defaultunit of measure, and change the driver display language.In a client/server environment, this feature is unavailable to a client logged in asa restricted user.
IdentificationIdentification lets you identify your print job with a User name andDepartment name, up to 31 characters. The User name can be used toidentify a print job stored on RAM disk memory.
KX DRIVER 2-10
Device Settings
Setting User Identification
You can type User name and Department information to be used with the JobStorage (e-MPS) feature.
1 In Device Settings > User, type your preferred name in the User name textbox.
2 Type your department or group name in Department text box.
You can type up to 31 characters in the User name and Department textboxes.
3 Click OK in the User Settings and Properties dialog box.
UnitsYou can set Inches or Millimeters as the unit of measurement. This is used forthe following settings:
Custom page size setting in the Page Sizes dialog box in the Basic tab.Spacing setting in the Watermark Add and Edit dialog boxes in theAdvanced tab.Poster settings and Gutter settings in the Layout tab.
Selecting a Unit of Measurement
You can select a unit for displaying measurements in the user interface.
1 In Device Settings > User Settings, select Inches or Millimeters.
2 Click OK in the User Settings and Properties dialog boxes.
Language PreferenceThe Language preference option specifies the user interface language ofDevice Settings in Properties and all tabs of Printing Preferences.Available languages vary depending on your locale and your computer settings.
Setting Language Preference
You can select a user interface language.
1 In Device Settings > User Settings, select the desired language from theSelect language list.
2 Click OK in the User Settings and Properties dialog boxes.
PDL (Page Description Language)A Page Description Language (PDL) specifies the contents and layout of aprinted page. In Device Settings, you can choose from PCL XL, (PrinterCommand Language XL), PCL 5e, KPDL (an emulation of PostScript printing),or PDF (Portable Document Format). The printer default is PCL XL, which issuitable for most printing purposes. When using the XPS driver in Windows 7and Windows Vista, XPS is the only PDL selection. After you select a PDL, theselection appears in the lower corner of the Preview image.
User Guide2-11

Device Settings
In GDI compatible mode, vector graphics are rasterized for printing as bitmapimages. Use the GDI compatible mode option to improve the output quality ofthe graphic created by the application.
Note: To add PDF to the list of PDL choices, you must install the Output toPDF plug-in.
In a client/server environment, this feature is unavailable to a client logged in asa restricted user.
PDL OptionsThe PDL options, available in the PDL Settings dialog box, are accessed inDevice Settings.
PCL XLThe most recent version of HP PCL and PCL 6. This PDL includes PCL 5efeatures. PCL XL lacks backward compatibility with earlier PCL versions,though it is enhanced over PCL 5e in these areas:
Reduced file sizeBetter print speedFaster return to application
PCL 5eFully compatible with earlier PCL versionsBidirectional communication supportWide selection of fonts for use with Microsoft Windows applicationsComplex graphics might not print as well
KPDLKPDL is used when printing from applications that support PostScript 2 or 3.
An emulation of PostScript printingStrong graphics reproductionPrint speeds may be slower than PCL 5eRequires more printing system memory than PCL 5eEnables native TrueType font downloadingSupports most Graphics settings options
PDFOutput to PDF is a plug-in feature that lets you print and save documents frommultiple sources to Adobe PDF. This feature can be used as an alternative toexisting commercial applications for creating PDF documents. Documentssaved as PDF retain their original appearance, and can be viewed and printedwith Adobe Reader on Windows, Mac OS, and UNIX platforms.For a document using mixed paper sizes, all pages in the PDF use the size ofthe first page.
Note: With PDF selected in the PDL Settings dialog box, only a limited set ofdriver options are available.
KX DRIVER 2-12
Device Settings
PDL Settings
When you click the Settings button, the available options are:
PCL XL Settings or KPDL SettingsEnable smart duplex printingThis option automatically keeps a sheet of paper from being sent through theduplex unit if the sheet will only be printed on one side. The duplex unit willbe bypassed for the following types of print jobs: a one page document, onepage from a multi-page document, or a multi-page document that prints ontoa single sheet. Selecting this option can reduce wear on the mechanicalduplex unit, and result in comparatively faster printing times.
PCL XL SettingsSkip printing blank pagesThis option prevents the printing system from outputting any page thatcontains no data, or that has, at most, one space character. Selecting thisoption can save paper, and result in comparatively faster printing times. Thisfeature is for regular printing (not for booklet, duplex or multiple pages persheet).
KPDL SettingsAllow data passthroughThis option reduces errors when printing complex jobs from applications thatuse PostScript formatting. When selected, EMF spooling is not available inthe Advanced tab.
PDF SettingsProvides options for printing and saving documents to Adobe PDF format.See PDF topics for details.
Selecting a PDL
You can select a page description language from PDL options.
1 In Device Settings > PDL > PDL Settings, select the desired page descriptionlanguage from the Select PDL list.
2 You can select the GDI compatible mode option to improve the output qualityof graphics created by your application.
3 Select Settings when the PDL is set to PCL XL, KPDL or PDF.
If you select PCL XL, you can select Skip printing blank pages and Enablesmart duplex printing.If you select KPDL, you can select Allow data passthrough and Enablesmart duplex printing.If you select PDF, you can select from the available PDF Settings.
4 Click OK in the PDL Settings and Properties dialog boxes.
PDF OptionsYou can select PDF options if you have installed the Output to PDF plug-in.The PDF Settings dialog box contains the following options:
User Guide2-13
Device Settings
PDF SettingsEmbed fontsThis option ensures that document fonts appear accurately in the PDF file onscreen. This option ensures accurate reproduction but significantly increasesthe file size.Compress dataThis option enables flat compression for the generated PDF document. Thisoption significantly reduces the file size. Additional compression options areavailable within Adobe Acrobat.SecurityThis option applies encryption to the PDF document. Click Settings foradditional Security settings. See the next section for details.Print and saveThis option lets you print and save a document as a PDF file. Click Settingsfor additional Print and save settings.
Security SettingsThis option lets you select an encryption level and create passwords for thegenerated PDF file.The following security options are available:Encryption
Encryption provides password protection so that a document cannot beopened or altered by unauthorized users.40 bitThis encryption option provides low level security for a PDF document. It issupported for earlier versions of Adobe Acrobat and Adobe Reader 6.0, orlater.128 bitThis encryption option provides high level security for a PDF document. It issupported for Adobe Acrobat and Adobe Reader 6.0, or later.
PasswordsSelect passwords for changing security settings and for opening adocument. Passwords are supported up to 16 characters in length.Require password to change security settingsType an Owner password. Within Adobe Acrobat, this password is requiredto change the document restrictions in the Files > Properties > Securitysection. When a document with this password is opened in Adobe Reader, itcannot be printed or edited, and document data cannot be copied.Require password to open documentType a User password. The user password must be entered at the time thePDF document is opened. This password must be different from the ownerpassword.
Print and Save SettingsThis option lets you print and save a document as a PDF file.Save to file only
A PDF file is created and saved locally.Save to file and print
KX DRIVER 2-14
Device Settings
A PDF file is created, saved locally, and sent to print.After you select between these two options, you can choose the followingoption:
Automatically save to default fileA PDF file can be saved automatically as a default file to be used again.
You can then select from the following options:Replace default fileThis option lets you replace the default file.Use default file + date and timeThis option lets you use the default file name and add a date and time stampeach time the document is saved.Default file directoryThis option lets you browse to a location to save your PDF.
Printing and Saving to PDF
You can print a document and save it to Adobe PDF, if you have installed theOutput to PDF plug-in.
1 In Device Settings > PDL Settings, in the Select PDL list select PDF.
2 Click Settings.
3 In the PDF Settings dialog box, select Print and save.
4 Click Settings, and select from print and save options. See the PDF Optionstopic for details.
5 Click OK in all dialog boxes.
6 Open and print the document.
7 Name and save the PDF file.
XPS DriverIn Windows 7 and Windows Vista, the XML Paper Specification (XPS) Pagedescription language provides the most efficient method for displaying,processing, and printing documents. As both a PDL and a document format,XPS requires compatible printer hardware and software written for the WindowsPresentation Foundation (WPF) architecture. PCL and KPDL are notcompatible with an XPS environment. Therefore, an XPS driver supports asingle PDL setting. The XPS driver can be installed from the Product Librarydisc. In the Installation Method menu, click Custom Mode, and on theCustom Installation page, select KX XPS DRIVER.To view a print to file XPS document, download and install the Microsoft XPSViewer.
User Guide2-15

Device Settings
Compatibility SettingsCompatibility Settings lets you specify media source values, override theapplication's Collate setting, and combine the Source and Media type lists inthe Basic tab.In a client/server environment, this feature is unavailable to a client logged in asa restricted user.
Media Source EnumerationMedia source enumeration supports compatibility for media source valuesunique to the printer driver, such as those for cassettes or feeders. Your newlyinstalled printer driver maintains identical media source support with the driver itreplaces, whether for this driver or one from another manufacturer. If mediasource macros exist for the older driver, then the alignment of media sourcevalues maintains support without the need to change the macros.
Setting Media Sources
Use the Driver Info utility (\Utility\Driver Info\DrvInfo.exe) to compare thesource values for all installed drivers.If the values for a given media source differ between printer drivers, you canreassign an enumerated value to create a match between the drivers.
1 In Device Settings > Compatibility Settings, from the Media sourceenumeration list select the paper supply method. The current value is listed inthe Enumerated value box.
2 Type an Enumerated value for the media source, and click Apply. To alignsettings with a different driver, this value should align with those in the otherdriver.
3 Click OK in the Compatibility Settings and Properties dialog boxes.
You can restore all the options in Compatibility Settings to the default byclicking Reset.
Ignore Application CollationThis option bypasses the Collate setting in software applications, and givespriority to the printer driver setting.
With the check box selected, the printer driver Collate setting is used.With the check box cleared, the application Collate setting is used.
Selecting Printer Driver Collation
You can ignore the collation setting in the application and use the printer drivercollation setting.
1 In Device Settings > Compatibility Settings, select Ignore applicationcollation.
2 Click OK in the Compatibility Settings and Properties dialog boxes.
You can restore all the options in Compatibility Settings to the default byclicking Reset.
KX DRIVER 2-16

Device Settings
Combine Source and Media Type ListsYou can change the driver's Basic tab so that Media type and Source arecombined into one list, labeled Source. In the combined list, Media types arelisted first, followed by cassettes and MP tray.
Creating a Combined Source List
You can combine the Source and Media type lists in the Basic tab to makeone Source list.
1 In Device Settings > Compatibility Settings, select Combine source andmedia type lists.
2 Click OK in the Compatibility Settings and Properties dialog boxes.
You can restore all the options in Compatibility Settings to the default byclicking Reset.
Removing a Plug-inYou can remove an installed plug-in from the driver. If removed, the plug-infeatures do not appear in the driver interface.
Note: To remove the Output to PDF module, PDF must not be selected inthe PDL Settings dialog box.
1 In Device Settings, click Kyocera logo > Plug-in.
2 Select a plug-in module from the list and click Delete, then Yes.
3 Click OK in all dialog boxes.
User Guide2-17

3 Quick Print
In the Quick Print tab, you can apply basic print settings to print jobs. AnyQuick Print settings can be saved as a group, called a profile, and applied toany print job. Profiles support common printing tasks.The administrator can set the view of the Quick Print tab through theInstallation process, or Administrator Settings in Properties.This chapter can be used as a separate Quick Print user guide when KX Driversupport is controlled by an administrator.
Quick Print OptionsYou can set one or more print options on the Quick Print tab. You can createyour own customized view of print options with Edit Quick Print. And you canalso select from profiles that have been set with predefined options forfrequently run print jobs.
Common Printing OptionsThe upper section of the Quick Print tab has several icons that represent themost common options for print jobs. Click on the Quick Print icons to changesettings for the print job. Some of these options also appear on the Basic,Layout, and Imaging tabs.
OrientationThis icon changes between portrait, landscape, portrait rotated, landscaperotated printing formats.Collate
KX DRIVER 3-1
Quick Print
This icon changes the ordering of the printed pages. The page orderingsequence can either be 123, 123, or 111, 222 and so on.Print on both sidesThis icon changes between duplex printing for flipping on the long edge,duplex printing for flipping on the short edge, or for not using duplex printing.Multiple pages per sheetThis icon changes between Off, 2, and 4 for the number of pages printed onone sheet. For more than 4 pages per sheet, define these settings in Layout> Multiple pages per sheet.EcoPrintThis icon changes the text and graphics to appear lighter in the printed job.EcoPrint does not increase print speed.Edit Quick PrintThis button lets you select the print option icons to display and in what orderwhen you access the Quick Print tab. The Edit Quick Print button is notavailable when the driver is accessed from an application’s Print dialog box.
Any basic print options can be Reset to the default values in the Quick Printtab. This button only appears when it is accessed from an application’s Printdialog box.The following sections describe some of the Quick Print tab options in moredetail. Collate, Duplex printing, and EcoPrint can also be found in the Basicand Imaging tabs, and Multiple pages per sheet in the Layout tab. TheProfiles options are accessed from Printing Preferences.
CollateCollate specifies the order in which the pages of a multiple copy job are printed.With Collate selected, the first time the print job is sent to the printing systemthe data is rendered as page images in the printing system's memory. Theremaining job copies are printed from the stored data. This avoids the extraprocessing involved in sending every copy from the computer to the printingsystem.With Collate selected, the driver prints the complete job set by set. With Collatecleared, it prints each page by set. For example, with Collate selected, threecopies of a five-page document output as pages one through five in succession,three times.The printer driver automatically overrides the application's Collate setting anduses the printer driver setting. You can use the application's Collate setting byclearing the Ignore application collation check box in the CompatibilitySettings dialog box accessed from Device Settings.
Duplex PrintingDuplex printing is printing on both sides of each page. Select Print on bothsides to start duplex printing. The printing system contains a duplex unit thatturns the paper over to allow printing on the reverse side. Print on both sidesmust be selected to print on both sides of the cover and insert pages.
Flip on long edgeTurn the long edge of the page to view the content.Flip on short edgeTurn the short edge of the page to view the content.
User Guide3-2

Quick Print
Multiple Pages per SheetMultiple pages per sheet prints several pages on a single sheet of paper forthe purpose of reviewing the document and conserving paper. The size andreadability of the multiple pages decrease as the number of pages per sheet isincreased. You can set the arrangement of the pages from the Layout tab aswell as print borders around each of the pages.When Multiple pages per sheet is selected, Scaling and Poster areunavailable.
Edit Quick PrintThe assortment of icons at the top of the Quick Print tab can be customized toinclude features that you use most often. Any number of icons from 0 to 5 canbe displayed. All icons can be removed from view if you want to use only theProfiles options in the Quick Print tab.
Note: An administrator can hide the Edit Quick Print button by selectingHide Edit Quick Print control in Device Settings > Administrator Settings.The Edit Quick Print button is not available when the driver is accessed froman application’s Print dialog box.
Editing Quick Print Options
You can select from a limited set of driver features to appear in the Quick Printtab.
1 Click Start and click Devices and Printers (Windows 7), or click Control Paneland double-click Printers (Windows Vista), or Printers and Faxes (WindowsXP).
2 Right-click on the desired printing system model and click PrintingPreferences.
3 Select the Quick Print tab.
4 Click Edit Quick Print.To add a feature to the Quick Print tab, select the feature under Availablecontrols, and click the right arrow to move the feature to Selected controls.A maximum of 5 features can appear under Selected controls.To remove a feature from the Quick Print tab, select the feature underSelected controls, and click the left arrow to move the feature to Availablecontrols. To use only the Profiles in the Quick Print tab, move all featuresto Available controls.Click the up and down arrows to change the position of the features underSelected controls. The feature at the top appears on the left in the QuickPrint tab.To restore the list to factory default options, click Reset.
5 After making your selections, click OK.
ProfilesIn Profiles, you can save printer driver settings as a profile. You can selectmultiple options in any Printing Preferences tab, save them to a profile, and
KX DRIVER 3-3

Quick Print
use all of them at once when you apply the profile. The profiles list alwaysincludes a Factory Default profile that returns the driver options to their defaultsettings. The profiles can include Common Profiles, which are installed asoptional components through the Optional Printer Components, and anycustom profiles created. A maximum of 26 profiles can be established in onedriver, including the Factory Default profile. Settings made in Device Settingscannot be saved to a profile.
Selecting a ProfileYou can select and apply a profile from the Quick Print tab or from the Profilesdialog box.
Quick Print tab
1 From Profiles, select a profile.
2 Click Apply. The side panel displays the options for that profile using an iconand a summary.
3 Click OK.
Profiles dialog box
1 In any of the Printing Preferences tabs, click Profiles.
2 In the Profiles dialog box, select a profile.
3 Click Apply. The side panel displays the options for that profile.
4 Click OK.
Saving a ProfileThe Save button lets you create your own profiles. You can select the printingoptions you want in the driver, then save the driver settings including yourcustomizations as a profile. You can then use that profile to print the same typeof print job again without having to reselect all the settings. In PrintingPreferences, the Profiles button appears at the bottom of all the tabs.
1 Set the printing options you want for your print job by opening PrintingPreferences and selecting all your driver settings.
2 Click Profiles > Save.
3 To identify the profile, type a Name, select an Icon, and type a Description.
4 Click OK to save the profile.
The newly added profile appears in the Profiles dialog box.
User Guide3-4

Quick Print
5 Click Apply to use the selected profile for the current print job, or click OK toclose the dialog box.
Note: To reset the printer driver to default settings, select the Factory Defaultprofile, and click Apply. This clears the settings of a selected profile.
You can remove a profile by selecting it in the Select profile list and clickingDelete.
Editing a ProfileThe Edit button lets you make changes to an existing profile. The FactoryDefault profile cannot be edited.
1 Click Profiles.
2 In the Select profile section, select the profile to be edited, and click Edit.
3 Any of the three options can be edited: name, icon and description. Click OK tosave the edited changes.The newly edited profile appears in the Profiles dialog box.
4 Click Apply to activate the selected profile to the current print job, or click OK toclose the dialog box.
Importing a ProfileThe Import button lets you import a copy of a profile from other printer driversinto your printer driver.
1 Click Profiles > Import.
2 Browse for the existing profile (.KXP), select it, and click Open.
A message appears if any of the profile settings in the imported file areunavailable in the existing driver. Select Yes, to import the profile, or No, tocancel the import.
3 If you selected Yes in the previous step, the newly imported file appears in theProfile dialog box.
4 Click Apply to use the selected profile for the current print job, or click OK toclose the dialog box.
Exporting a ProfileThe Export button lets you export a copy of a profile from your printer driver foruse in other printer drivers. The Factory Default profile cannot be exported.
1 Click Profiles.
2 In the Select profile section, select the profile to be exported, and click Export.
KX DRIVER 3-5

Quick Print
3 The Export Profile dialog box appears. Name and save the profile.
4 Click OK to close the Profiles dialog box.
Application Based PrintingAn administrator can associate a profile with an application so that all printingfrom the application uses the same profile settings. This makes profiles easierto use and ensures consistent printing from an application. For example, aduplex profile can be applied to all spreadsheet printing to save paper.Associations between profiles and applications can be created at any time in theProfiles dialog box. To use the associations in printing, the feature must beturned on in the Administrator Settings dialog box, accessed from DeviceSettings.A maximum of 25 associations can be created in the Application BasedPrinting dialog box, accessed from the Profiles dialog box.In a client/server environment, clients can view details about serverassociations but cannot change settings or select another profile.
Adding an Association
Once profiles have been created or imported, you can create an associationbetween a profile and an application. Then the application always prints usingthe associated profile settings.
1 In any tab, click Profiles to open the Profiles dialog box.
2 Click Application to open the Application Based Printing dialog box.
3 Click Add to open the Add Association dialog box.
4 Enter a name for the association, to a maximum of 31 characters.
5 Under File name, enter a valid executable file name (.EXE) for an applicationthat allows printing, or browse to find a file located on your computer.
6 Select a profile from the list.
7 Click OK in the Add Association and Application Based Printing dialogboxes to create the association.
You can remove an association by selecting it and clicking Delete.
Editing an Association
You can change the name, file, and profile for an association.
1 In any tab, click Profiles to open the Profiles dialog box.
2 Click Application to open the Application Based Printing dialog box.
3 Select an association to edit and click Edit to open the Edit Association dialogbox.
User Guide3-6

Quick Print
4 Change desired settings under Association name, File name, or Profile.
5 Click OK in the Edit Association and Application Based Printing dialogboxes to save the revised association.
KX DRIVER 3-7
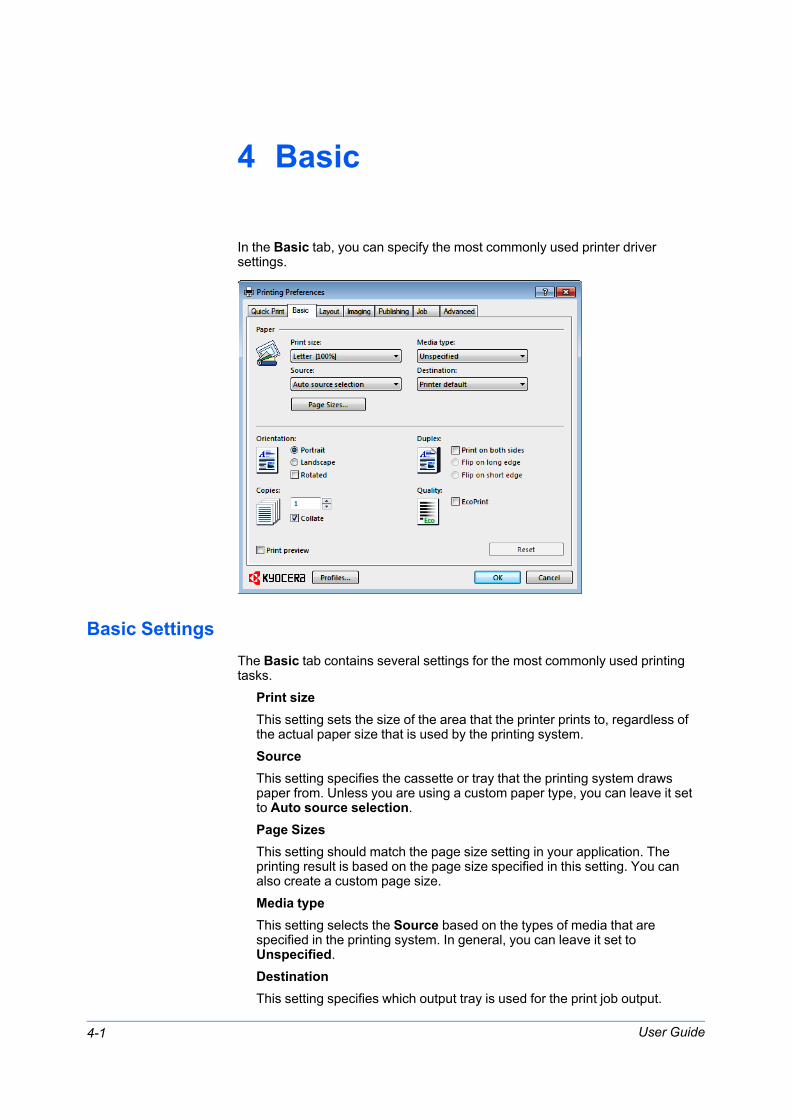
4 Basic
In the Basic tab, you can specify the most commonly used printer driversettings.
Basic SettingsThe Basic tab contains several settings for the most commonly used printingtasks.
Print sizeThis setting sets the size of the area that the printer prints to, regardless ofthe actual paper size that is used by the printing system.SourceThis setting specifies the cassette or tray that the printing system drawspaper from. Unless you are using a custom paper type, you can leave it setto Auto source selection.Page SizesThis setting should match the page size setting in your application. Theprinting result is based on the page size specified in this setting. You canalso create a custom page size.Media typeThis setting selects the Source based on the types of media that arespecified in the printing system. In general, you can leave it set toUnspecified.DestinationThis setting specifies which output tray is used for the print job output.
User Guide4-1
Basic
OrientationThese settings specify the paper orientation of the print job. If Rotated isselected, the print job orientation is rotated 180 degrees.CopiesThis setting specifies the number of copies to print. For collating multiplecopies, select Collate.DuplexThese settings enable printing on both sides of a sheet of paper.QualityThis EcoPrint check box makes the entire image, text and graphics, appearlighter in the printed job. This setting does not increase print speed.Print PreviewThis setting lets you view your document before printing.
Note: Some applications may override print settings made in the driver.Usually the application can be set to follow the settings. In Microsoft Word2007, ensure that Default tray in Options is set to Use printer settings.
Source and Media TypesIn the Basic tab, Source specifies which tray or cassette the printer uses for aprinting job. The default is Auto source selection, which instructs the printer tosearch for the media requested by the application or the printer driver. If theselected tray or cassette empties during a print job, then the printer searches foranother source, and continues the job.Media type instructs the printer to search for the type of paper or media that isrequested by the application or the printer driver. The choices shown maychange depending on the selection in Source. If Auto media selection isselected, then the printer searches for another tray or cassette using the samemedia.Transparencies, labels, and envelopes must be supplied from the MP tray.Ensure the paper is properly loaded by following the instructions outlined in theprinting system's Operation Guide.
Note: Source and Media type are separate items in the dialog box, but canbe combined using the Combine source and media type lists setting inCompatibility Settings. If they are combined, Media type is not available onthe Basic tab. To change this setting, open Device Settings > CompatibilitySettings and clear the Combine source and media type lists selection.
Print Size and Page SizePrint size controls the output page size of the document. To use this setting,ensure that the Page Sizes setting matches the page size setting in yourapplication. If the Print size is different from the page size in your application,then each page is enlarged or reduced to match the Print size. The percentagevalue shown in brackets indicates the size of the Print size setting relative tothe Page Sizes setting. If the Page Sizes does not match the page size settingin the application (the size of the original) then, in most cases the Print size isignored and the document is printed based on its original size.You can create a page size with your chosen dimensions for printing on non-standard size paper. For example, you can create a custom banner with a
KX DRIVER 4-2
Basic
height from 5.82 inches (148.0 mm) up to 14.01 inches (356.0 mm) and a widthfrom 2.75 inches (70.0 mm) up to 8.5 inches (216.0 mm). You can then save thecustom setting to the Page Sizes and Print size lists for later selection.
Creating a Custom Page SizeTo use custom page sizes, they must be created and added to the Print sizelist. The driver supports a maximum of twenty custom sizes.
1 In the Basic tab, click Page Sizes.
2 Click New.
3 A default custom name appears in the Name box. Type a name for your custompage size.
4 Type or select values for the height and width. If the height or width valueexceeds the allowable limit, it automatically adjusts to the limit after Apply orOK is clicked.
5 When done, click Apply.
The custom page size appears in the Print size list, which is used for enlargingand reducing the sizes of prints.To delete a custom page size from the Page Sizes dialog box, select the nameof the custom page size and click Delete.
Printing with Custom Size PagesYou can print on custom-sized pages.
1 Load custom-sized paper into the MP tray.
2 In the Basic tab, select the name of your custom page size in the Print size list.
3 Click OK to return to the Print dialog box.
4 Click OK to start printing.
Duplex PrintingDuplex printing is printing on both sides of each page. Select Print on bothsides to start duplex printing. If it is not selected, then the printer prints on onlyone side of each page. The printer system contains a duplex unit that turns thepaper over to allow printing on the reverse side. Print on both sides must beselected to print on both sides of the cover and insert pages.
Flip on long edgeTurn the long edge of the page to view the content.Flip on short edgeTurn the short edge of the page to view the content.
User Guide4-3
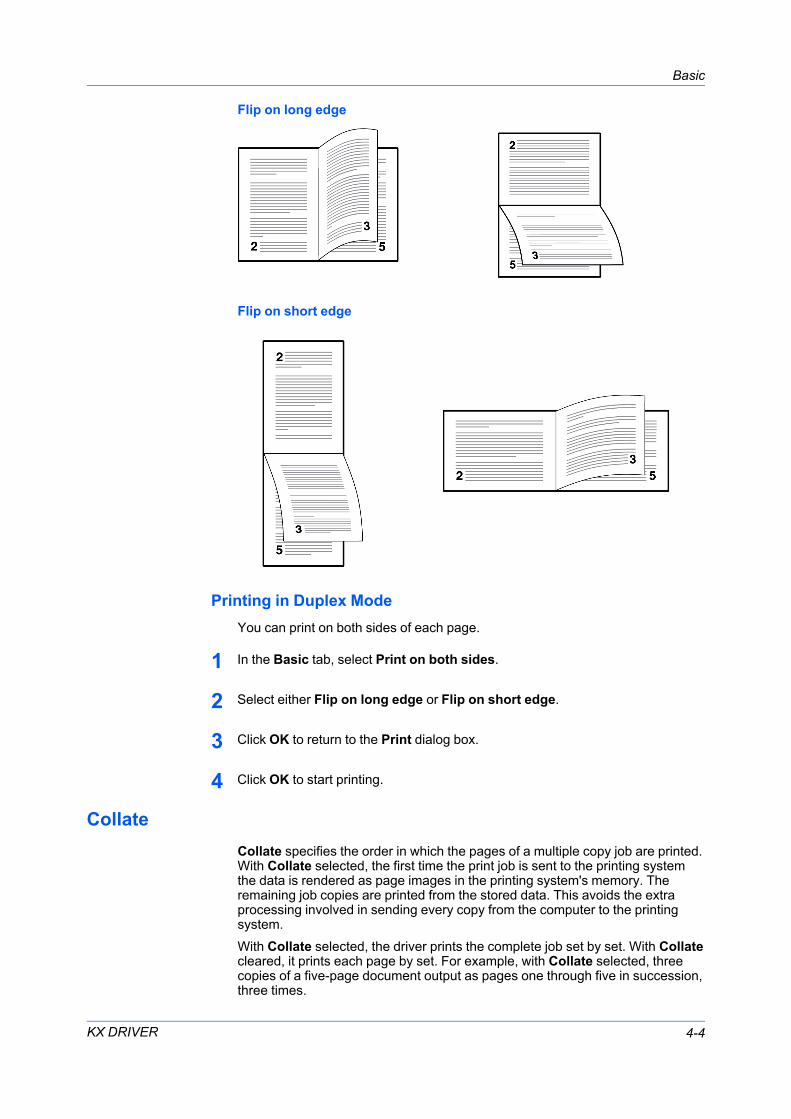
Basic
Flip on long edge
Flip on short edge
Printing in Duplex ModeYou can print on both sides of each page.
1 In the Basic tab, select Print on both sides.
2 Select either Flip on long edge or Flip on short edge.
3 Click OK to return to the Print dialog box.
4 Click OK to start printing.
CollateCollate specifies the order in which the pages of a multiple copy job are printed.With Collate selected, the first time the print job is sent to the printing systemthe data is rendered as page images in the printing system's memory. Theremaining job copies are printed from the stored data. This avoids the extraprocessing involved in sending every copy from the computer to the printingsystem.With Collate selected, the driver prints the complete job set by set. With Collatecleared, it prints each page by set. For example, with Collate selected, threecopies of a five-page document output as pages one through five in succession,three times.
KX DRIVER 4-4

Basic
The printer driver automatically overrides the application's Collate setting anduses the printer driver setting. You can use the application's Collate setting byclearing the Ignore application collation check box in the CompatibilitySettings dialog box accessed from Device Settings.
Printing Collated DocumentsWhen printing multiple copies of a multiple page document, the printer canassemble the pages of each copy in numerical order.
1 In the Basic tab, select the Collate check box.
2 Type or select the number of complete sets of the print job in the Copies box.The document page count must not exceed the printer tray capacity.
3 Click OK to return to the Print dialog box.
4 Click OK to start printing.
QualityThe Quality feature, EcoPrint, changes toner saturation in the printed job,making the entire print image, including text and graphics, appear lighter. Theamount of toner varies based upon your printing system model and the type ofdata printed (text, graphics, or both). EcoPrint is also available in the QuickPrint and Imaging tabs.To enable this feature in the Basic tab, select the EcoPrint check box.
Print PreviewAfter selecting driver settings, you can use Print preview to check the print jobbefore you proceed with printing. If you are satisfied with the preview, you canprint. Or you can cancel printing if you want to change driver settings.
Previewing a Print JobYou can see a print preview before printing.
1 Select desired driver settings in all tabs, or select a profile.
2 In the Basic tab, select Print preview.
3 Click OK in the Printing Preferences and Print dialog boxes.
4 When the Print preview dialog box appears:
Click the arrow buttons to view document pages.To close the preview and make additional changes in driver settings beforeprinting, click the “X” button.If you are satisfied with the preview, click the printer button to print the job.
User Guide4-5
Basic
Kyocera LogoThe Kyocera logo appears on the bottom portion of any Printing Preferencesscreen or Device Settings screen. Click the logo to open the About dialog boxthat displays the driver version number and driver plug-in information.
Displaying Version InformationIn Device Settings or any tab, click Kyocera logo > Version to view thefollowing driver information:
File NameVersionDescriptionDateManufacturerComments
To view copyright information, click Legal Notices.Click OK to close the driver information dialog boxes.
Displaying Plug-in InformationA plug-in integrates with the printer driver to extend the driver’s capabilities.In Device Settings or any tab, click Kyocera logo > Plug-in to view thefollowing plug-in information:
ModuleDescriptionVersion
Click OK to close the driver information dialog boxes.
KX DRIVER 4-6
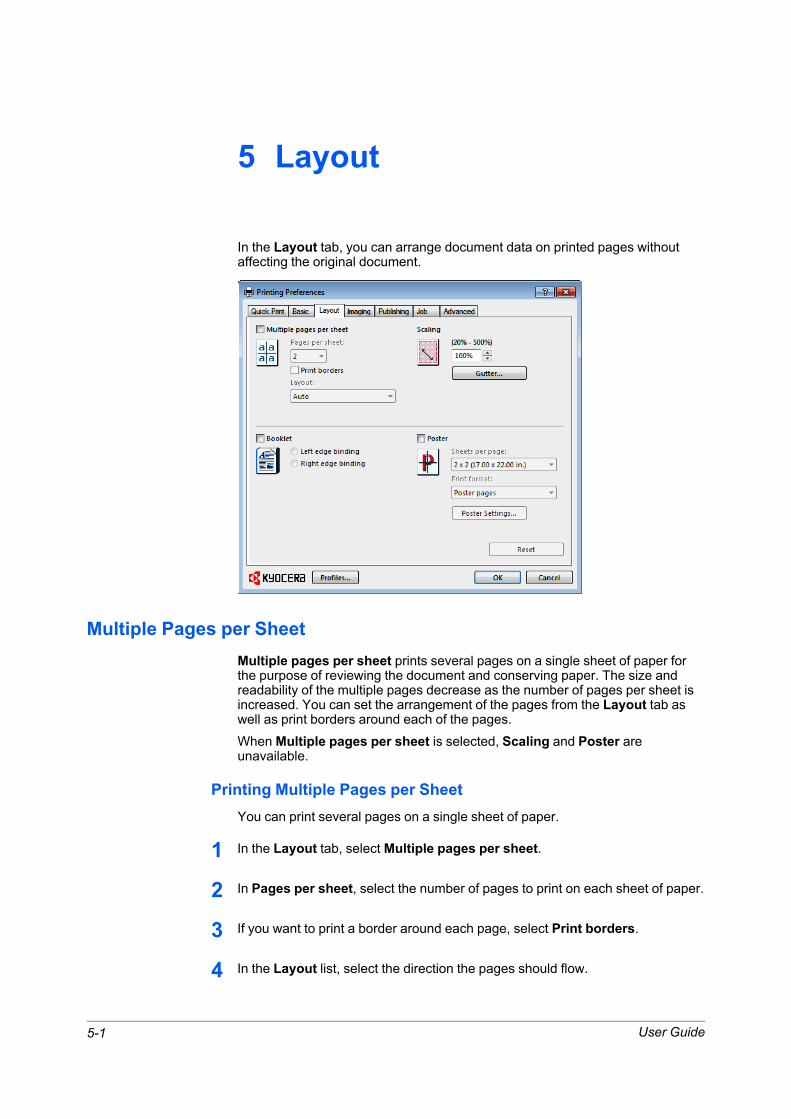
5 Layout
In the Layout tab, you can arrange document data on printed pages withoutaffecting the original document.
Multiple Pages per SheetMultiple pages per sheet prints several pages on a single sheet of paper forthe purpose of reviewing the document and conserving paper. The size andreadability of the multiple pages decrease as the number of pages per sheet isincreased. You can set the arrangement of the pages from the Layout tab aswell as print borders around each of the pages.When Multiple pages per sheet is selected, Scaling and Poster areunavailable.
Printing Multiple Pages per SheetYou can print several pages on a single sheet of paper.
1 In the Layout tab, select Multiple pages per sheet.
2 In Pages per sheet, select the number of pages to print on each sheet of paper.
3 If you want to print a border around each page, select Print borders.
4 In the Layout list, select the direction the pages should flow.
User Guide5-1

Layout
5 Click OK to return to the Print dialog box.
6 Click OK to start printing.
ScalingScaling increases or decreases text and graphics on a page. You can alsoselect a gutter setting that enlarges the margins to accommodate stapling orhole punch.When Scaling is selected, other Layout tab options are unavailable.
Setting Scaling on the PageYou can increase or decrease text and graphics on a page.
1 In the Layout tab, select Scaling.
2 Type or select a percentage between 20 to 500.
Scaling adjusts proportionately the height and width of the page. A lowerpercentage reduces the page and a higher percentage enlarges the page.
3 Click OK to return to the Print dialog box.
4 Click OK to start printing.
GutterA gutter creates additional blank space on the left side and at the top of thesheet. It is often used for binding, hole punch or stapling to make a print jobeasier to read. Increasing the measurements in Gutter increases the marginsaround your text and graphics on the left side, or top of the printed sheet. Thiscreates a larger margin space by shifting the printable area to the right, or downas much as one inch (25.4 mm).
Creating a GutterYou can increase the margins on the left side and at the top of the printed sheet.
1 In the Layout tab, click Gutter.
2 In the Gutter width options, type or select a value between 0.20 to 1.00 inches(5.0 to 25.4 mm).
Short edge (top)This selection modifies the outside margin on the top-edge of the page.Long edge (left)This selection modifies the outside margin on the left-side of the page.
Note: Availability of Gutter settings varies depending on Orientation andDuplex mode settings in the Basic tab.
KX DRIVER 5-2
Layout
3 If text extends too close to the edge of the page, select Reduce image to fit.The text appears slightly reduced and away from the edge of the page. If textdoes not extend beyond the page when the gutter increases, clear Reduceimage to fit.
4 Click OK to save gutter settings, then click OK again to return to the Print dialogbox.
5 Click OK to start printing.
BookletBooklet prints a two-page layout on both sides of each sheet of paper. You canfold and bind the booklet in the center. Folded booklets are half the size of theselected paper. For example, if you select Letter in Basic > Paper > Print size,the printed output can be folded into a 5.5 x 8.5 inch-size booklet.When Booklet is selected, other Layout tab options are unavailable.A different paper source can be selected for the booklet cover. To include acover on the booklet, select the Publishing tab, then select Cover mode.
Printing a BookletYou can print a booklet.
1 In the Layout tab, select Booklet, and one of the two binding options.
Left edge bindingThis selection prints text that reads from left to right.Right edge bindingThis selection prints text that reads from right to left.
2 Click OK to return to the Print dialog box.
3 Click OK to start printing.
PosterThe Poster feature lets you create a document to a size that is larger than thepaper your printer can support. You can print a poster, or banner, up to 25 timeslarger than the original document. Segments of the poster document are printedon several sheets of paper and with the assistance of poster settings, you canreassemble the sheets easily to create a poster.Use Sheets per page to select the poster size in relation to the originaldocument size. Each option shows the number of sheets to be printed and themaximum poster size.When Poster is selected, other Layout tab options are unavailable.
Note: Sheets per page displays the unit of measurement in inches ormillimeters. You can change the Units setting in the User Settings dialog box,accessed from Device Settings.
User Guide5-3

Layout
Use Poster Settings to select options, in any combination to make it easier tocreate a poster. These options print visual cues on the poster sheets thatprovide help in cropping and assembling the pages.
Overlap edgesThis selection duplicates the edges of document data on adjoining sheets.Poster appearance is improved when the edges overlap slightly. Select thecheck box, then type or select a value between 0.00 and 1.20 inches (0.0and 30.4 mm). This option reduces the final poster size slightly.Print crop marksThis selection prints a border at the edges of each poster sheet. You cancrop each sheet on the border before assembling the sheets. This optionensures that data on adjoining sheets matches precisely.Print assembly marksThis selection prints numbers at the edges of each sheet, matching numberson adjoining sheets. Assemble each sheet edge to the same numbered edgeon another sheet.
Use Print format to print a proof sheet, along with the poster, to guide you inassembling the printed poster sheets.
Poster pagesThis selection prints all of the sheets to be assembled as a poster.Proof sheetThis selection prints all the poster pages on one sheet with markings thatdisplay the sheet assembly.Poster pages and proof sheetThis selection prints all poster sheets and a one-page proof sheet.
Printing a PosterYou can print a poster.
1 In the Layout tab, select Poster.
2 In Sheets per page, select the poster size. Each option describes the numberof sheets it takes to represent one finished poster page.
3 Click Poster Settings to select options in any combination. These optionsensure a precise assembly of the pages to create the poster.
4 In Print format, select one of the options for a finished print format.
5 Click OK to return to the Print dialog box.
6 Click OK to start printing.
KX DRIVER 5-4

6 Imaging
In the Imaging tab, you can manage print quality and grayscale settings.
Print Quality and Custom QualityPrint quality lets you set the resolution for the print job. Resolution is ameasurement, in dots per linear inch (dpi), that describes the sharpness andclarity of printed text and images. Custom Quality lets you set a more refinedresolution for the print job. Half speed mode lets you reduce print speed toimprove printing on small or thick paper.
Selecting Print QualityIn the Imaging tab, select a Print quality from the list. The number ofselections in Print quality depends on the number of resolutions supported bythe printing system.
High quality, Proof, DraftSelect one of these settings to print from the highest to the lowest printresolution. Proof is unavailable when PCL 5e is selected in the PDLSettings dialog box.CustomCustom lets you choose a setting for Custom Quality and EcoPrint.Selecting Custom without EcoPrint results in a default setting to the highestprinting system resolution.Click Custom Quality to open a settings dialog box with selections for amore refined resolution. Depending on your model, Resolution can be set toFine 1200, Fast 1200 (unavailable for the PCL 5e Page description
User Guide6-1

Imaging
language), 600 dpi, or 300 dpi. Kyocera image refinement smoothes theedges of text and vector graphics and can be set to On, or Off.
Selecting EcoPrintEcoPrint changes toner saturation in the printed job, making the entire printimage, including text and graphics, appear lighter. The amount of toner variesbased upon your printing system model and the type of data printed (text,graphics, or both). EcoPrint does not increase print speed. EcoPrint is alsoavailable in the Quick Print and Basic tabs.
1 In the Imaging tab, in the Print Quality list, select Custom.
2 Click EcoPrint to open the EcoPrint dialog box.
3 To start EcoPrint, select On; to stop it, select Off.
4 Click OK to close the EcoPrint dialog box.
Half Speed ModeHalf speed mode reduces the print speed to half the rated speed. Whenselected, the toner adheres better when printing on small size, thick, or texturedpaper. This mode may result in quieter printing.
Note: Half speed mode applies to all media types except Transparency andVellum.
FontsA computer font is a data file containing a set of glyphs (visual representationsof textual elements), characters, or symbols. Common terms for fonts are:
Outline fonts, in contrast to bitmap fonts, are defined as a set ofmathematical lines and curves. An outline font is more easily scalable(designed to display and print clearly at any point size) than a bitmap font.Bitmap fonts define each character as a pattern of pixels (the smallestresolvable rectangular areas of an image). Such fonts are not easily scalableand distort when reduced or enlarged.Native fonts are the basic or original fonts installed with the computeroperating system. TrueType fonts are the native fonts used by MicrosoftWindows.TrueType fonts are a type of scalable outline fonts. TrueType has long beenthe most common format for fonts on Microsoft Windows.System fonts are the primary fonts used by the operating system. They aretypically accessed through an application interface or through a common fontdialog box.Device fonts are stored either permanently or temporarily in the printingsystem memory.
Font SettingsThe Font Settings dialog box lets you specify how TrueType fonts are sent tothe printing system. The chosen method affects the speed and quality of theprint job:
KX DRIVER 6-2

Imaging
Download as outlinesThis method is best suited for large documents or print jobs using multiplefonts and font sizes. Print speeds are faster because of the optimizationfeatures in this setting. The repetition of similar font data sent to the printingsystem is reduced, thereby increasing the print speed. Print speed is notincreased when using Asian fonts such as Japanese, Chinese, and Korean,because of the large amount of font information used for these particularfonts.Allow native downloadThis method improves text quality and increases print speed by convertingTrueType fonts to Adobe Type 42 font format. This feature is available whenKPDL is selected in the PDL Settings dialog box.Download as bitmapsDownloading fonts as bitmaps provides more detail, however it creates largefile sizes. This is best suited for print jobs with custom fonts, very small fonts(point size 1-4), or Asian fonts.Substitute with device fontsSystem fonts and device fonts are automatically matched based on typefacename. This function increases print speed and efficiency. It is useful forchanging a font used throughout a large document, by replacing the old fontwith the desired font.
Note: GDI compatible mode does not support Substitute with devicefonts.
Selecting Font SettingsYou can specify how TrueType fonts are sent to the printing system.
1 In Imaging > Font Settings, select one of the methods for sending TrueTypefonts.
2 Click OK to return to the Print dialog box.
3 Click OK to start printing.
Font SubstitutionFont substitution is the process of using one font in place of another when theintended font is not available to a printing system. Font substitution may becritical for output of documents to printing systems that are not well supportedby a large font inventory.
Setting Font Substitution
You can use one font in place of another.
1 Click Start and click Devices and Printers (Windows 7), or click Control Paneland double-click Printers (Windows Vista), or Printers and Faxes (WindowsXP).
2 Right-click on the desired printing system model and click PrintingPreferences.
User Guide6-3

Imaging
3 In Imaging > Font Settings, select Substitute with device fonts, then clickFonts.In the Fonts Substitution dialog box, the System fonts list shows the fontsinstalled on your computer. The Available device fonts list shows the printingsystem fonts.
4 Select the system font, and then the available device font to be substituted.
5 Click OK to save your settings.
If the device font does not have similar font characteristics to the system font,character spacing in the document may appear incorrect.
Disable Device FontsIn some cases, the printing system substitutes fonts even if you send theTrueType fonts as outline fonts or bitmap images. Select Disable device fontsto prevent substitution of device fonts for TrueType fonts.This option also improves portability of printable data. (If cleared, device fontsmay not match when sent to a different printing system.)Some Adobe applications have device font limitations. To overcome theselimitations, select Disable device fonts. Device fonts are normally visible in theapplication font lists as printer icons next to the font name, unless there areequivalent system fonts, in which case the “TT” TrueType icon remains.
Disabling Device Fonts
You can prevent substitution of device fonts for TrueType fonts.
1 In Imaging > Font Settings, select the Disable device fonts check box.
2 Click OK to save your settings.
GraphicsGraphics are pictorial representations of information. Graphics can be functional(charts, diagrams) or artistic (drawings, photographs). Graphics Settings letyou select options for your printed graphics.
Note: Some options are available only when a specific PDL is selected.
Selecting Graphics Settings
1 In the Imaging tab, click Graphics.
2 In the Graphics Settings dialog box, select from the available options, and thenclick OK to save your selections.
Pattern ScalingPattern scaling is a feature that can help improve visual compatibility betweenscreen and print output. Graphics objects, such as a shape or a path, ofteninclude patterns and fills that are composed of collections of printed dots. Apattern is a planned or random repetition of colors, shapes, lines, values, andtextures to create a visual arrangement. A fill is the application of a color or
KX DRIVER 6-4
Imaging
grayscale to a graphics object. If printed patterns and fills do not match theappearance of that on the screen, use Pattern scaling to select a differentdensity of printed dots.In the Imaging tab, click Graphics to open the Graphics settings dialog boxand access the Pattern scaling settings.
Auto (default setting)This setting prints patterns and fills to match the on-screen appearance.CoarseThis setting prints patterns and fills with the fewest number of lines, patterns,or dots. Coarse is the same as Auto when PCL XL or PCL 5e is selected inthe PDL Settings dialog box.MediumThis setting prints patterns and fills with a greater number of lines, patternsor dots than the Coarse setting. Medium is the same as Auto when KPDL isselected in the PDL Settings dialog box.FineThis setting prints patterns and fills with the greatest number of lines,patterns, or dots. Printed patterns and fills may appear more dense than theon-screen appearance.
Inversion SettingsInversion is the opposite of the normal order, arrangement, or position of animage or printed content.In the Imaging tab, click Graphics to open the Graphics settings dialog boxand access the Inversion options. The settings are available when KPDL isselected in the PDL Settings dialog box.
Reverse imageThis setting prints images like a photo negative, reversing black and whiteareas of the image.Mirror printThis setting prints the page content backwards, as it would appear in a mirrorimage.
Optimization SettingsOptimization is a process or methodology of improving a printing system'sfunction or effectiveness.In Imaging > Graphics Settings, select Optimization settings. The settingsare available when KPDL is selected in the PDL Settings dialog box.
Fast printingThis setting increases print speed and decreases spool size. It deliversimages in binary format. It can be used for most everyday printing needs.Document portabilityThis setting creates a PostScript file in ASCII text encoding. Unlike the binaryformat created in Fast printing, the ASCII text created with this selectioncan be edited.
User Guide6-5
Imaging
CIE OptimizationCIE optimization bypasses the normal procedure of processing every aspect ofthe CIE color space used in applications such as Adobe Acrobat andPhotoshop. This feature increases print speed for documents printed from theseapplications by optimizing CIE data. It has no effect on print jobs that do not useCIE data. CIE optimization should be selected for speed not accuracy, soprinted output may be different from appearance on the screen.In the Imaging tab, click Graphics to open the Graphics settings dialog boxand access the CIE optimization check box. CIE optimization is availablewhen KPDL is selected in the PDL Settings dialog box.
Halftone ScreenHalftone Screen lets an experienced user print different shades of gray as arefound in photographs. Shades are produced by printing dots of various sizesand shapes, and by spacing them closer or farther apart. Shading can also beadjusted by the number of rows of data, the angle of the rows, and the shape ofthe data.Halftone Screen is available when KPDL is selected in the PDL Settingsdialog box. It is unavailable when GDI compatible mode is selected in the PDLSettings dialog box.
Setting the Halftone Screen
Halftone Screen provides a means to apply shades of gray to black and whiteprinted output.
1 In Imaging > Graphics Settings, click Halftone Screen.
2 Clear the Use printer's default screens check box.
3 Set the available options to the desired values:
InkLists the halftone screens available. For black and white printers, this optionappears unavailable and is permanently set to Black.FrequencyDisplays the number of rows of dots per inch or centimeter. Set the rangefrom 2.0 to 999.9, and select lines/inch or lines/cm.AngleSets the angle at which rows are aligned. Set the range from -180 to 180degrees.ShapeSelect the shape of the halftone dot:EllipseResists optical jump. An optical jump occurs when an area of an imagesuddenly become darker. An ellipse shape provides a smooth gradation oftones. Select Ellipse for images with dark areas.RoundResists moiré formation and dot gain. Moiré formation is an unintendedpattern that occurs when two or more colors are printed at the wrong angles.The correct angles depend on the number of colors being printed. Dot gain is
KX DRIVER 6-6
Imaging
when the halftone dots increase when printed, causing a moiré pattern.Select Round for images with light tints and highlighted areas.LineUsed for special effect. Select Line to change the effect by selecting adifferent angle.
4 Select Increase accuracy of screens for better print quality, possiblyincreasing print time.
5 Click OK to return to the Print dialog box.
6 Click OK to start printing.
Adjusting GrayscaleThe grayscale adjustment settings change the Brightness and Contrast ofgraphics. These settings are useful if graphic images are printing too light, toogray, or too dark. Text remains unaffected.
1 In the Imaging tab, under Adjustment, select Custom.
A preview image in the Adjustment Settings dialog box illustrates anybrightness and contrast changes.
2 Drag the Brightness slider right to lighten, or left to darken the graphic imagesof the print job.You can also change brightness by entering a numeric value in the text box atthe right. The brightest setting is +100; the darkest is -100. Zero is the defaultmid-level setting. Adjusting brightness is useful when graphic images areprinting too dark or too light.
3 Drag the Contrast slider right or left to increase or decrease the proportion oflight to dark in the graphic images of the print job.A high contrast setting decreases the grayscale spectrum, making light grayslighter and dark grays darker. A low contrast setting increases the grayscalespectrum, making light grays darker and dark grays lighter.You can also change contrast by entering a numeric value in the text box at theright. The highest contrast setting is +100; the lowest is -100. Zero is the defaultmid-level setting. Adjusting contrast is useful if graphic images are printing toogray, or too black and white.
4 Click OK to save your grayscale adjustment settings.
Text and Graphics EffectsSpecial settings are available for black and white printing.
Print text as blackThis option prints all color text as black. It produces faster printing of colortext by reducing the amount of data sent to the printer. In black and whiteprinters, it increases the detail for light-colored text printed. White text andimage colors are unaffected.
User Guide6-7

Imaging
Print graphics as blackThis option prints all color graphics with black, rather than grayscale. Thisfeature is intended for CAD applications.
KX DRIVER 6-8

7 Publishing
In the Publishing tab, you can create covers and inserts for a print job, and addbacking sheets between transparencies.
Cover ModeCover mode lets you add cover pages for the front and back of your document.You can print on cover pages of a different weight or color than the maindocument. The source of the cover paper is specified by adjusting the Mediafor cover settings in the Publishing tab.Print on both sides must be selected in the Basic tab or Quick Print tab inorder to print using the Front inside or Back outside options.Although Cover mode and Page insert can be used simultaneously, theycannot be used with Transparency interleaving.
Printing CoversYou can choose cover pages for printing.
1 In the Publishing tab, select Cover mode.
2 Select Front or Front and back to specify the type of covers.
3 Select from Print onto options if you want to print on the covers.
4 Click OK to return to the Print dialog box.
User Guide7-1
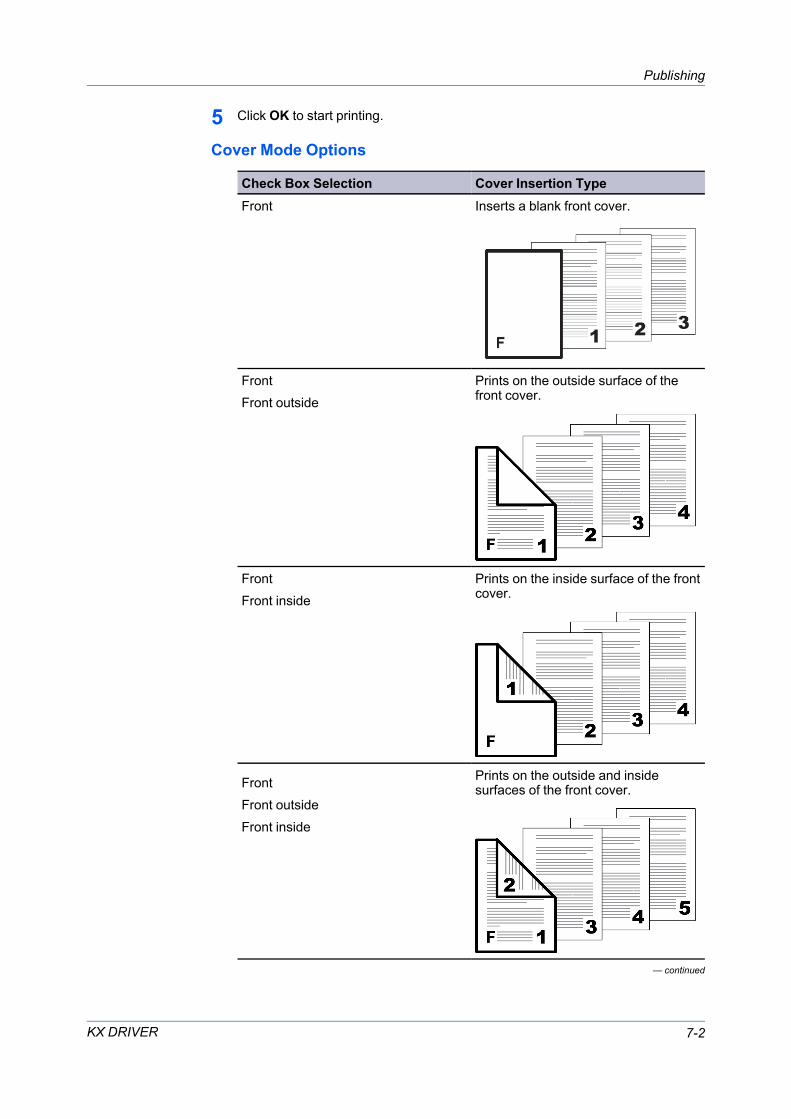
Publishing
5 Click OK to start printing.
Cover Mode Options
Check Box Selection Cover Insertion TypeFront Inserts a blank front cover.
Front Prints on the outside surface of thefront cover.Front outside
Front Prints on the inside surface of the frontcover.Front inside
Prints on the outside and insideFront surfaces of the front cover.Front outsideFront inside
— continued
KX DRIVER 7-2
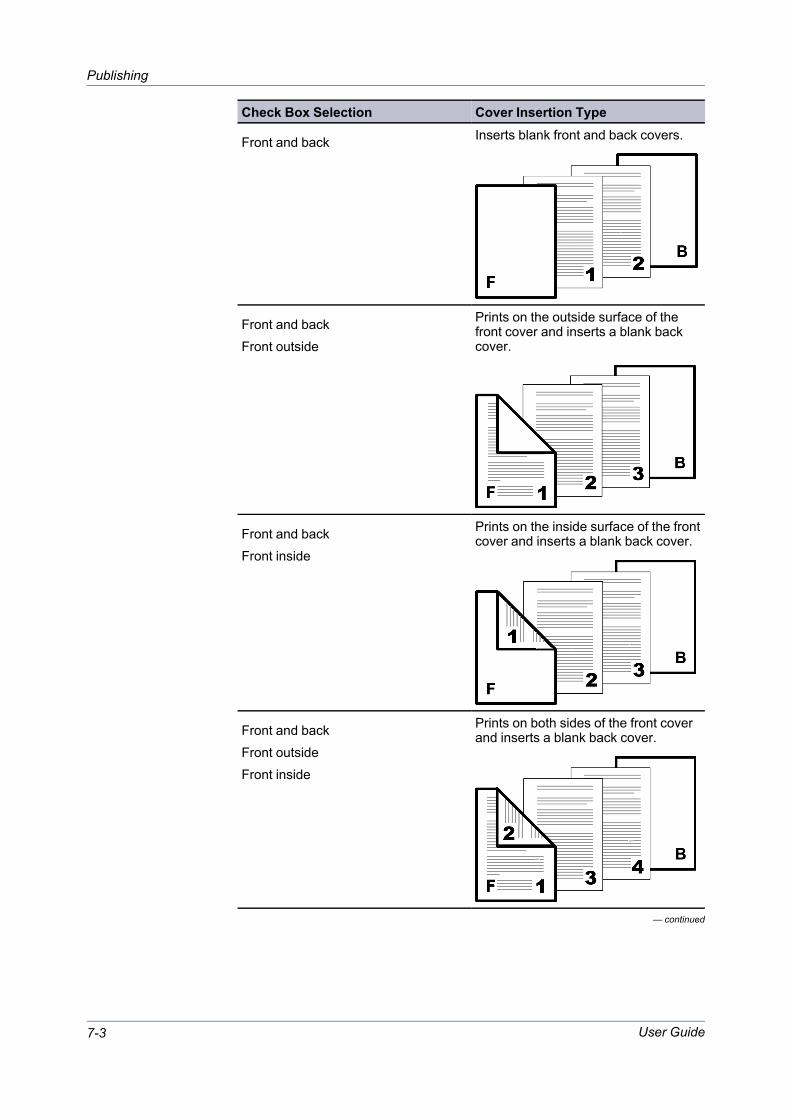
Publishing
Check Box Selection Cover Insertion TypeInserts blank front and back covers.Front and back
Prints on the outside surface of theFront and back front cover and inserts a blank backcover.Front outside
Prints on the inside surface of the frontFront and back cover and inserts a blank back cover.Front inside
Prints on both sides of the front coverFront and back and inserts a blank back cover.Front outsideFront inside
— continued
User Guide7-3
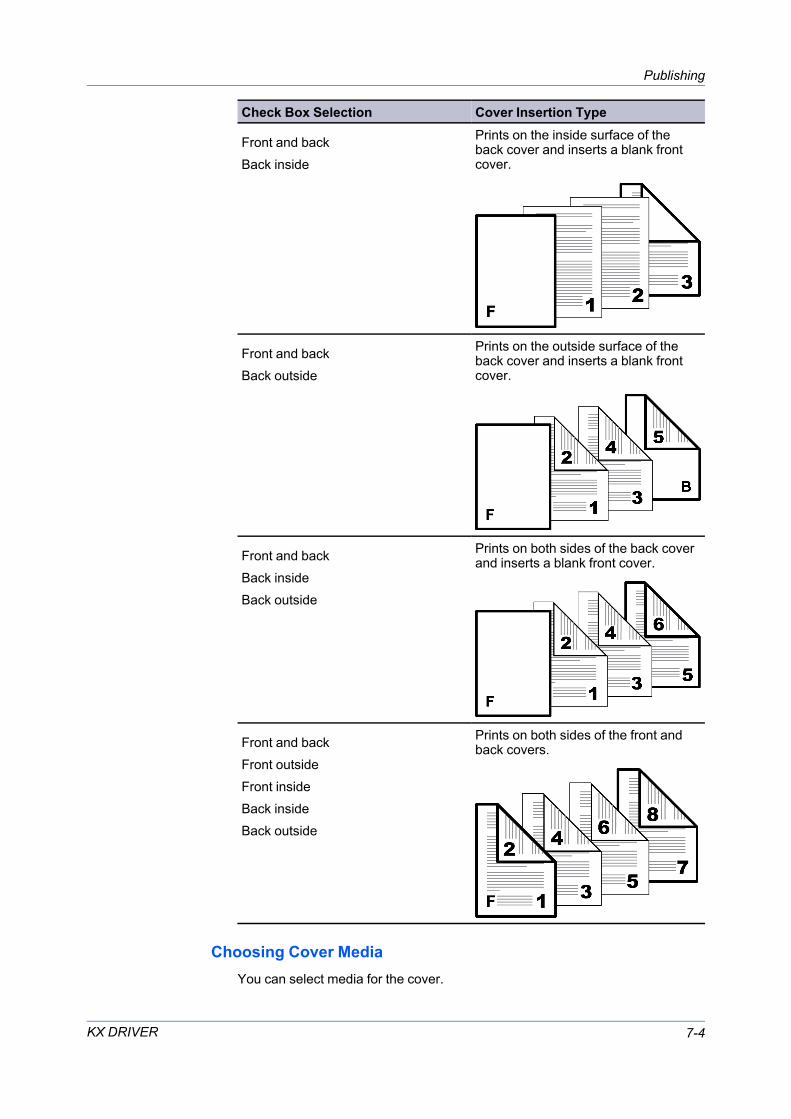
Publishing
Check Box Selection Cover Insertion TypePrints on the inside surface of theFront and back back cover and inserts a blank frontcover.Back inside
Prints on the outside surface of theFront and back back cover and inserts a blank frontcover.Back outside
Prints on both sides of the back coverFront and back and inserts a blank front cover.Back insideBack outside
Prints on both sides of the front andFront and back back covers.Front outsideFront insideBack insideBack outside
Choosing Cover MediaYou can select media for the cover.
KX DRIVER 7-4
Publishing
1 In the Publishing tab, select Cover mode.
2 In the Media for cover list, select the media type or source cassette for the frontand back covers. When you choose the media type, a source cassette matchingthat media type is automatically selected.
3 Click OK to return to the Print dialog box.
4 Click OK to start printing.
Page InsertA Page insert is a preprinted page or a page of a different paper type that isinserted at specified points in a print job. The inserted page can also be printedon during the print job. Both sides of the page insert can be printed on by usingthe duplex unit.Although Cover mode and Page insert can be used simultaneously, theycannot be used with Transparency interleaving.
Printing Page InsertsSeveral ways are available to arrange page inserts: you can print on one or bothsides or insert a blank sheet.
1 In Publishing > Page insert, select the option corresponding to your desiredpage arrangement.
2 To print on both the front and back of the inserted page, select the Print ontofront and Print onto back check boxes.
3 In Insert before pages, type the page number to insert. A page is insertedbetween the page number you typed and the page before it.
4 From the Media for page list, select the media type of the inserted page or thesource paper cassette. When you choose the media type, a source cassettematching that media type is automatically selected.
5 Click OK to return to the Print dialog box.
6 Click OK to start printing.
User Guide7-5

Publishing
Page Insertion Options
Check Box Selection Page Insertion TypePage insert Inserts a blank page.
Page insert Prints on the front side of the insertedpage.Print onto front
Page insert Prints on the back side of the insertedpage.Print onto back
Prints on both sides of the insertedPage insert page.Print onto frontPrint onto back
Transparency InterleavingTransparency interleaving inserts a backing sheet between printedtransparencies. The backing sheet, also known as an interleaf, helps keeptransparencies clean and prevents them from clinging together. This feature is
KX DRIVER 7-6
Publishing
only available when printing on transparencies supplied from the MP tray. Youcan print the same content on the backing pages as on the transparencies.Transparency interleaving cannot be used together with Cover mode orPage insert.
Inserting Backing Sheets Between TransparenciesYou can insert backing sheets between transparencies.
1 In Basic > Media type, select Transparency. If the Source and Media typelists have been combined (by a selection in Device Settings > CompatibilitySettings), Media type does not appear. Instead, in the Source list select Auto(Transparency).
2 Click Publishing > Transparency interleaving.
3 To print the transparency content on the inserted pages also, select the Printonto backing check box.
4 In the Media for backing list, select the Media type of the backing sheet or theSource paper cassette. When you choose the media type, a source cassettematching that media type is automatically selected.
5 Click OK to return to the Print dialog box.
6 Click OK to start printing.
The printing system's operation panel prompts you to load transparencies intothe MP tray, and if necessary, load backing paper into the selected cassette.
User Guide7-7

8 Job
In the Job tab, you can store print jobs in the memory installed in the printingsystem. You can also select a Job name to use with Job storage features. Youcan use this tab to set or change the default settings that apply when you print adocument from a Microsoft Windows application.
Job Storage (e-MPS)Job storage (e-MPS) offers a set of options for saving print jobs in printingsystem memory, so that you can print or reprint them later. Print jobs can easilybe reprinted later using the printing system’s operation panel, and printing ofsensitive documents can be restricted to approved users.E-MPS is a multitier solution that provides advanced print management, directlyfrom the desktop. By storing a job in the printing system, you can print it fromthe operation panel without sending it again from the computer.To use the Job storage (e-MPS) features, you must set a user name in theUser Settings dialog box, available in Device Settings.
Job Storage (e-MPS) options
Storage location Access code When job is When job isrequired printed deleted from
memoryProof and hold RAM disk No One copy when job When printing
is sent; remaining system is turned offcopies later
— continued
KX DRIVER 8-1
Job
Private print RAM disk Yes When access code When printingis entered at system is turned offoperation panel or after printing
Proof and HoldProof and hold is a Job storage (e-MPS) option that prints one copy of a printjob so that you can proof it before printing the remaining copies. This feature isavailable when a RAM disk is set up in the driver and turned on at the printingsystem.After the proof copy is printed and checked, remaining copies can be printedfrom the printing system’s operation panel without sending the job again fromthe computer. If desired, you can change the number of copies printed.
Note: Proof and hold is not available for some applications such as MicrosoftExcel.
All Proof and hold jobs are stored in RAM disk memory after printing but aredeleted when the printing system is turned off. You can manually delete a job atthe operation panel.
Warning: A print job can replace a job in RAM disk memory having the sameUser name and Job name. To prevent this, select Use job name + date andtime under Overwrite job name.
Printing a Proof and Hold JobProof and hold lets you print one copy of a multicopy job to proof beforeprinting the remaining copies. The job is stored in RAM disk memory until theprinting system is turned off or the job is manually deleted.
1 Click the Basic tab, and select the number of copies to be printed.
2 Click the Job tab and select Job storage (e-MPS).
3 Click Proof and hold, and click OK in both dialog boxes to print.
Private PrintPrivate print jobs are saved in RAM disk memory for printing until a four-digitAccess code is entered. When the RAM disk reaches maximum capacity and anew job is sent to be stored, the oldest stored job is replaced by the new job.Private print jobs are deleted when the printing system is reset or turned off.When sending a sensitive document to the printing system, a user must type afour-digit access code, which is attached to the print job along with the Jobname and User name. The job is not printed until a user enters the accesscode at the printing system’s operation panel. After the job is printed, it isremoved from printing system memory.The number of Private print jobs that can be stored is limited only by thestorage capacity of the RAM disk. You can manually delete a job at theoperation panel.
User Guide8-2
Job
Warning: A print job can replace a job in RAM disk memory having the sameUser name and Job name. To prevent this, select Use job name + date andtime under Overwrite job name.
Storing a Private Print JobPrivate print lets you store a document temporarily in printing system memorywithout printing, and protect it with an Access code. The job is stored in RAMdisk memory until it is printed, manually deleted, or turned off.
1 In the Job tab, select Job storage (e-MPS).
2 Select Private print.
3 In the Access code box, type four numbers if you want to restrict access toyour document.
4 Click OK.
Job NameA Job name is a unique identifier for each print job. It helps you find and printyour job from the printing system’s operation panel. When you send a print jobusing one of the Job storage (e-MPS) options, you can assign a custom nameto the job or use the name of the application file.For Microsoft Word and PowerPoint, you can choose to include or omit theapplication name from the application defined Job name. You can also ensurethat jobs in printing system memory are not replaced by new jobs having thesame Job name.
Don’t Use Application NameDon't use application name is an option to remove the application name fromthe job name in job storage features. By selecting Don't use application name,the file name you choose appears clearly in the job list. This feature isapplicable only when printing from Microsoft Word or PowerPoint.
Overwrite Job NameOverwrite job name is an option to ensure that a saved print job is not replacedin printing system memory by a new job having the same Job name. If a usersends two print jobs with the same User name and Job name, the second jobreplaces the first job without any prompt. To prevent this, Overwrite job namecan automatically change the Job name by adding the date and time the job issent. This feature also helps you to track when print jobs were sent from thecomputer.The selected option applies to a Job name with either Application defined orCustom selected. Overwrite job name options include:
Replace existing fileThis option lets the current print job replace an existing job in printing systemmemory, if a job with the same User name and Job name exists.Use job name + date and timeThis option adds the current date and time to the end of the Job name, in theformat:
KX DRIVER 8-3
Job
mmddyy hhmmssThe previous print job with the same job name remains in the printing systemmemory.
Selecting a Job NameYou must select a job name to use with Job storage (e-MPS) features, so thatyou can find your job in job lists on the printing system’s operation panel. Theselected job name is saved with the print job when the job is sent to printingsystem memory.
1 In the Job tab, select Job storage (e-MPS).
2 Under Job name, select a name:
Application definedThis option uses the name of the application document as the job name. ForMicrosoft Word or PowerPoint documents, selecting Don’t use applicationname removes the name of the application so that only the document nameappears as the job name.CustomThis option uses a unique name for each job. Type a name in the box, up to79 characters.
3 Select an Overwrite job name option in case a job already exists in printingsystem memory with the same job name:
Replace existing fileIf a job with the same user name and job name exists, the current print jobreplaces an existing job in printing system memory.Use job name + date and timeThis option adds the current date and time to the end of the job name, in theformat:mmddyy hhmmss
The previous print job with the same job name remains in the printing systemmemory.
User Guide8-4

9 Advanced
In the Advanced tab, you can choose special features that extend thecapabilities of the printing system.
Prologue/EpilogueThe Prologue/Epilogue feature lets you insert a command file at the beginningof a print job or at the end. The command file, prepared in a text editor, utilizesprogramming commands from the printer resident PRESCRIBE language. TheProduct Library disc includes a PRESCRIBE command language referenceguide. A command file is a set of instructions the printing system interprets toproduce a given output. For example, a Prologue/Epilogue command file maycontain a macro that places a graphic object such as a logo at the top of aletterhead document.
Selecting a Prologue/Epilogue FileA Prologue/Epilogue file must be available on your computer before it can beadded to a print job. To create this file, use a text editor like Windows Notepad.In Advanced > Prologue/Epilogue, select a Prologue/Epilogue file name toinsert into the print job. (If no file names are visible in the list, you must click Addto browse for files on your computer or network to add to the list.) After the file isselected, insertion point options become available.
Editing a Prologue/Epilogue FileYou can edit a Prologue/Epilogue file on your computer.
KX DRIVER 9-1
Advanced
1 In Advanced > Prologue/Epilogue, select a Prologue/Epilogue file namefrom the list, and then click Edit.
2 After your text editor opens, make your changes to the file.
3 Save the file and exit.
Note: Editing and saving a command file replaces the contents of the existinglocal or network file.
Deleting a Prologue/Epilogue FileYou can remove a Prologue/Epilogue file from the list.
1 In Advanced > Prologue/Epilogue, select a Prologue/Epilogue file namefrom the list, and then click Delete.
2 In the delete confirmation box, click Yes to accept.
Note: Only the file name is removed from the command file list. The file itselfis not deleted, but remains on the network or local computer.
Assigning a Prologue/Epilogue FileYou can insert a Prologue/Epilogue file into a print job.
1 In Advanced > Prologue/Epilogue, select a Prologue/Epilogue file namefrom the list.
2 Under Insertion Point, select a place to insert the Prologue/Epilogue file.
Unassigning a Prologue/Epilogue FileIf you designate a Prologue/Epilogue file as unassigned, you are removing itfrom the print job. It remains in the list. Unassigned selections are useful whenthe list contains several Prologue/Epilogue files, and you want to use some butnot others.
1 In Advanced > Prologue/Epilogue, select a Prologue/Epilogue file namefrom the list.
2 Under Insertion Point, select Unassigned.
Specifying the Insertion PointThe insertion point is the location in the print job where the selectedPrologue/Epilogue command file is processed by the printing system. Each filein the list can be assigned only one insertion point.
Note: The Start of the page and End of the page insertion point options areavailable only if PCL 5e is selected in the PDL Settings dialog box.
With a command file selected in the list, choose one insertion point option:
User Guide9-2

Advanced
UnassignedThe selected command file is not inserted into the print job. This selection canbe used when you are working with multiple command files and want to usesome but not others. Select Unassigned for the command files you do not wantto use in the print job.Beginning of the print jobThe command file is inserted as the first page of the print job. The documentstarts printing on the second page.End of the print jobThe command file is inserted as the last page of the print job, which prints afterthe last page of the document.Start of the pageThe command file is inserted at the top of each page of the print job.End of the pageThe command file is inserted at the bottom of each page of the print job.
Only on odd pagesIf Start of the page or End of the page is selected, this option can beselected to insert the command file into all odd-numbered pages.Only on even pagesIf Start of the page or End of the page is selected, this option can beselected to insert the command file into all even-numbered pages.PagesIf Start of the page or End of the page is selected, this option can beselected to insert the command file into specified pages. In the text box, typeindividual page numbers separated by commas, or a page range separatedby a hyphen. For example, if you type 2 in the text box, the command file isinserted only into page 2. If you type 1, 3, 5-12 the command file is insertedinto page 1, page 3, and pages 5 through 12. If the Pages option is selectedand you click OK without typing any numbers, you will be prompted tospecify page numbers.
WatermarkA watermark is a recognizable image or pattern that can be placed on a page orthroughout a document. You can choose one of the standard watermarks orcreate your own text. The preview area at the left of the dialog box shows howthe watermark appears on a page. This is useful for making adjustments to theappearance and location of the watermark.
Adding or Editing a WatermarkYou can create a new watermark that displays your chosen text. Any watermarkcan be edited, though a limited number of options can be changed for defaultwatermarks.
1 In the Advanced tab, click Watermark.
2 In the Watermark dialog box, click Add to create a user defined watermark; orunder Select watermark, select a default or custom watermark and click Edit.
KX DRIVER 9-3
Advanced
3 Under Watermark name, type a name, up to 39 characters. A defaultwatermark cannot be renamed.
4 Under Watermark text, type your preferred text. This option is not availablewhen editing a default watermark.
5 Select the font, style, and size of the text.
6 Select the color of the watermark from the list. The options available are blackand shades of gray.
7 Select the watermark Count, to a maximum of 20. In the Spacing spin box,select the distance between two or more watermarks in tenths of an inch or inmillimeters.
8 Select the Position of the watermark with one of the following options.
Centered [default]This option places the center of the watermark text in the center of the page.User definedThis option lets you manipulate the x and y coordinate boxes to move thetext around the page.
You can also change the position by clicking the position button at the bottom ofthe preview area. Click and hold as you drag the pointer to move the watermarkimage.
9 Select the Angle of the watermark with one of the following options.
Diagonal [default]This option places the watermark text at the default angle on the page.User definedThis option lets you type a degree value for the angle. An angle is measuredin degrees, from 0 to 360.
You can also change the angle by clicking the angle button at the bottom of thepreview area. Click and hold as you drag the pointer to move the watermarkimage.
10 The Rotate around center check box at the bottom far right of the dialog boxdetermines the method of rotation for the watermark. You must select Userdefined in both Position and Angle to enable this option. Select Rotatearound center to position the watermark text with the center of the text as itsaxis, and clear it to position the watermark text with the left end of the text as itsaxis.
11 In all dialog boxes, click OK.
Selecting Pages for WatermarkThe Page selection option for Watermark lets you choose the location forwatermarks in your document.
User Guide9-4

Advanced
1 In Advanced > Watermark > Select watermark, choose a default or customwatermark to print.
2 Under Page selection, choose pages for printing the watermark:
All pagesThis option prints the watermark on each document page.First page onlyThis option prints the watermark on the first document page.All pages except first pageThis option prints the watermark on all pages after the first page.Only on specified pagesThis option prints the watermark on page numbers typed in the box.Print onto front outside coverThis option prints the watermark on the front cover. It is available whenCover mode is selected in the Publishing tab. If Cover mode and Frontoutside are both selected in the Publishing tab, Print onto front outsidecover is selected automatically.
3 In all dialog boxes, click OK.
Security WatermarkThe Security Watermark is a plug-in feature that prints a nearly invisible imageor text against a background pattern. The security watermark appears onlywhen the printed page is photocopied. This helps to identify printed pages thatshould not be photocopied, or to distinguish between original prints andphotocopies. Six standard security watermarks are available as text or image,and you can create custom security watermark text.A notable feature of Security Watermark is the Document guard pattern,which prevents the document from being photocopied, scanned, faxed, orprinted from memory. If a scan, fax, or print from memory is attempted, theprocess is stopped and an error message appears on the printer's operationpanel.Following installation of the printer driver, use the Optional PrinterComponents wizard to install the Security Watermark plug-in.Security Watermark appears in the Advanced tab when PCL XL is selected inthe PDL Settings dialog box.The administrator can ensure that a security watermark is printed on all jobs byselecting Device Settings > Administrator > Lock Settings > Lock SecuritySettings.Selecting Security Watermark sets these driver features to the followingvalues:
Watermark in the Advanced tab is set to None.Resolution in Imaging > Print Quality > Custom > Custom Quality is setto 600 dpi.Kyocera Image Refinement in Imaging > Print Quality > Custom >Custom Quality is set to Off.EcoPrint in Quick Print, Basic > Quality, or Imaging > Quality is set toOff.
KX DRIVER 9-5

Advanced
Adjustment Settings (Brightness and Contrast) in Imaging > Grayscale> Adjustment > Custom is set to 0.
The reverse is also true. If these features are changed, then the SecurityWatermark selection is set to None, and cannot be used.
Adding or Editing a Security WatermarkYou can create a new security watermark that displays text but not an image.Any security watermark can be edited, though a limited number of options canbe changed for default security watermarks.
1 In the Advanced tab, click Security Watermark.
2 In the Security Watermark dialog box, click Add, to create a new securitywatermark; or under Select security watermark, select a default or customsecurity watermark and click Edit.
3 For Security watermark name, type a name up to 39 characters. A defaultsecurity watermark cannot be renamed.
4 For Security watermark text, type text or leave blank. This option is notavailable when editing a default security watermark. Select from the followingoptions:
NoneThis option leaves the line blank.User definedThis option inserts your text up to 39 characters.All other options display date, time, or other job information that is obtainedfrom the computer or printer driver when the job is printed.
5 Select the desired font, size, style, and angle of the text.
6 Select Print as footer also if you want the first available line of securitywatermark text to be printed at the bottom of the page. Select the page positionfrom the list. This option is useful because the security watermark itself is notnormally visible on the printed page.
7 Under Background pattern, select a design for the security watermarkbackground.
Standard patternSelect a design for the security watermark background. This option prints theselected pattern with the security watermark text or image.Document guard patternThe document guard design appears as the security watermark background.This option prevents the printed page from being photocopied, scanned,faxed, or printed from memory. If a photocopy is attempted, then gray copy isproduced. If a scan, fax or print from memory is attempted, the process isstopped and an error message appears on the printing system’s operationpanel.
User Guide9-6
Advanced
8 Select Overprint for applications such as Microsoft PowerPoint and InternetExplorer where the document content fills the entire page. The securitywatermark is printed over the document data so that it can appear in aphotocopy. When editing an image, or if Device Settings > PDL Settings >GDI compatible mode is selected, Overprint is selected automatically.
9 Adjust the calibration. After adjusting calibration, in all dialog boxes click OK.
Adjusting Security Watermark CalibrationFor a security watermark to be effective, it must be nearly invisible in a printedpage and clearly visible in a photocopied page. Because printing systems anddriver settings can vary, you must adjust the calibration before printing asecurity watermark. Adjusting the calibration is also recommended whenchanging the background pattern, replacing the toner or printing system, andafter heavy printing activity.
1 In Advanced > Security Watermark, click Add to create a custom securitywatermark; or under Select security watermark, select a default or customsecurity watermark and click Edit.
2 After all security watermark options are selected in the Add SecurityWatermark or Edit Security Watermark dialog box, click Adjust Calibration.
3 Under Pattern shading and Text contrast, select initial options:
Light, Normal, DarkSelect the shading density of the background pattern.Contrast 1-9Select the level of contrast against the background pattern, from lightest todarkest.
These selections may need to be changed after printing a sample in the nextstep.
4 Click Print Sample to print a page displaying all nine contrast options againstthe selected pattern shading. It is recommended to print a sample page for eachpattern shading option.
5 From the Text Contrast Sheet, find the sample where the security watermark ismost nearly invisible.
6 In the Adjust Calibration dialog box, select options to match the samplechosen in step 5.
7 In all dialog boxes, click OK.
Selecting Pages for Security WatermarkThe Page selection options for security watermark determine where thesecurity watermarks are placed in the print job.
1 In Advanced > Security Watermark > Select security watermark, choose adefault or custom security watermark to print.
KX DRIVER 9-7
Advanced
2 Under Page selection, choose pages for printing the security watermark:
All pagesThis option prints the security watermark on each document page.First page onlyThis option prints the security watermark on the first document page.All pages except first pageThis option prints the security watermark on all pages after the first page.Only on specified pagesThis option prints the security watermark on the page numbers typed in thetext box.Print onto front outside coverThis option prints the security watermark on the front cover. This option isavailable when Cover mode is selected in the Publishing tab. If Covermode and Front outside are both selected in the Publishing tab, Printonto front outside cover is selected automatically.
3 In all dialog boxes, click OK.
Status MonitorThe Status Monitor displays printing system status messages in the lower rightcorner of the window during printing. You can start a status monitor for eachsupported printing system. More than one status monitor can be displayed atone time.
Selecting Status Monitor OptionsYou can select how to display the Status Monitor image and select fromavailable options.
1 In the Advanced tab, click Status Monitor.
2 If you want the Status Monitor image to appear during a print job, in the StatusMonitor dialog box, select the Status Monitor check box.
3 To view the print job status without changing the Status Monitor setting, clickOpen Status Monitor.The Status Monitor image appears in the lower right corner of your computerscreen.
4 Move the pointer over the Status Monitor image to display balloon-style statusmessages containing information about printing system activity and the printerport.
5 To display a list of options, right-click the Status Monitor icon in the systemtray.
User Guide9-8
Note: The Status Monitor image closes on its own after 5 minutes, if there isno printing activity.
Advanced
ConfigureOpens a web browser to display a printer web page.
Note: If your printer is connected with a USB cable, this feature cannot beused. Define settings using the operation panel of the printing system.
Always on topLeaves the Status Monitor image on top of other open windows.OpacityAdjusts the Status Monitor to let a variable amount of background to showthrough the image. Select a percentage between 20 to 100.Enlarge windowSelect to increase the size of the Status Monitor image.Sound NotificationOpens a dialog box with options for Status Monitor sound notification anddisplay choices.www.kyoceramita.comOpens a web browser to the KYOCERA MITA home page.ExitCloses the Status Monitor image.
Setting Status Monitor PreferencesYou can configure printing system alerts with accompanying sound or speech inthe Status Monitor Preference dialog box.
1 Right-click the Status Monitor image in the system tray.
2 Click Sound Notification.
3 Select the Enables Event Notification check box.
4 Select an event for a Status Monitor alert.
Cover openPaper jamAdd paperSleepAdd tonerToner lowNot connectedPrintingPrinting completed
KX DRIVER 9-9
Hide the status monitor/Show the status monitorSwitches between hiding and showing the Status Monitor image.
Advanced
5 You can also add sound or speech to your chosen alert.
To add a sound file:Clear the Use Text to speech check box.The sound file text box becomes available. Type the location of a sound file(.WAV), or browse to find a file located on your computer.
To add speech:Select Use Text to speech.Type your preferred text in the text box. The Microsoft Text to Speech utilityreads your typed text and plays it back in a spoken voice.
6 Click Apply to save your settings, click OK to save your settings and close thedialog box, or click Cancel to close the dialog box without saving any settings.
EMF SpoolingEMF (Enhanced MetaFile) is a spool file format used in printing by the MicrosoftWindows operating system. When a print job is sent from an application, it istransferred to the spool file. The application writes to and the printer driver readsfrom the spool file simultaneously. For multiple or large documents, this quicklyreturns application control to the user while the printer is still printing thedocument.
Note: EMF spooling is unavailable when Allow data passthrough isselected in the KPDL Settings dialog box.
Selecting EMF SpoolingTo print with EMF spooling:
1 From the Advanced tab, select the EMF Spooling check box.
2 Click OK and continue the printing process as usual.
Enable Client ProfileClient profile refers to profile settings saved on a client computer. You have thechoice to use your local profiles or the server profiles. This feature is intendedfor use on the client side (PC side) in a client-server environment.
In the Advanced tab, clear the Enable client profile check box to selectprofiles from the server to apply to print jobs created by the driver. Serverprofiles are read–only.Select the Enable client profile check box for using custom profiles locallyin the driver.
User Guide9-10
GlossaryA Access code A four-digit code that you must enter at the printing system’s
operation panel to print a Private print job.
Application based printing An administrator can associate a profile with anapplication so that all printing from the application uses the same profile settings. Thismakes profiles easier to use and ensures consistent printing from an application.
Auto configure Device settings feature that queries a printing system through thenetwork and automatically retrieves settings for optional devices, memory, and RAMdisk. Driver settings will be updated with information received from the physicalprinting system. Installed devices will be displayed in the Preview image.
B Booklet Layout feature that prints a multi-page document in a booklet format byusing a duplex unit. Two pages are printed on each side of a sheet to create adocument that can be read like a book.
C Cassette A removable plastic tray that holds a supply of paper for input to theprinter.
D Don’t use application name Don’t use application name is an option to shortenthe application defined job name for jobs created in Microsoft Word or PowerPoint.The file name will appear clearly in the job list.
dpi Dots per (linear) inch. Measurement that describes the sharpness and clarity ofprinted text and images. The higher the dpi, the more detail there is in the printedoutput.
E EcoPrint Imaging feature that changes toner saturation, making the entire image,text and graphics, appear lighter in the printed job. The actual amount of toner useddepends on the printing system mode and the type of data printed (text, graphics, orboth). EcoPrint does not increase print speed. This feature is also available in theQuick Print and Basic tabs.
Edit Quick Print This feature lets you customize the Quick Print view with yourpreferred print job options.
Enable client profile Client profile refers to profile settings saved on a server andaccessed by clients in a client/server environment. This feature in the Advanced tablets an administrator control and distribute profiles.
G GDI compatible mode A page description language option that accuratelyreproduces what is viewed on the screen using the Microsoft Graphical DeviceInterface (GDI) component to render the document. It generates data in a rasterprinting format, creating a larger printable file.
Gutter Blank space on the left side or top of a printed page that can be increasedby scaling down text and graphics. When used with Duplex printing, the enlargedblank space lines up evenly on both sides of the sheet. The larger blank space is
KX DRIVER i
created by shifting the printable area to the right or down as much as one inch (25.4mm).
H Half speed mode This feature lets you reduce print speed to improve printing onsmall size, thick, or textured paper. Selecting this mode may result in quieter printing.
Halftone screen Imaging process that breaks down an image into dots. Anexperienced user can adjust Halftone screen settings to create shades of gray ingraphic images. Larger dots spaced close together create darker shades, and smallerdots spaced farther apart create lighter shades. Shading can be varied by adjustingthe number of rows of dots, the angle at which rows of dots are placed, and the shapeof the dots.
J Job accounting An accounting system that records and controls the number ofpages printed by each account ID. Account IDs can be assigned at the printing systemand stored in the driver. After account IDs are assigned, you can use the Jobaccounting option to print in the Job accounting mode.
Job name A Job name is a unique identifier for each print job, to help you find andprint the job from the printing system’s operation panel. When you send a print jobusing one of the Job storage (e-MPS) options, you can assign a custom name to thejob or use the name of the application file.
M Media source enumeration A Device Settings option that maintainscompatibility for cassettes and feeders between old drivers and new drivers or whenmoving from one manufacturer to another. Compatibility creates a smooth transitionfor environments using macros or PRESCRIBE commands to access cassettes andfeeders.
MP tray Source tray used for labels, transparencies, envelopes, and customprinting media.
Multiple pages per sheet This feature lets you print several pages on a singlesheet of paper for the purpose of reviewing the document and conserving paper.
O Operation panel The keys and display on the printing system. Use the operationpanel to set options such as media type and EcoPrint, and to print jobs stored in RAMdisk memory.
Optional Printer Components Optional Printer Components include CommonProfiles and Plug-In Modules, and need to be installed separately from the driverinstaller. They are located on the Product Library disc in the Advanced Tools menu.
P PDF The Adobe portable document format (PDF) is independent of the applicationsoftware, hardware, and operating system used to create documents, and also of theoutput device on which they are displayed or printed.
PDL Page Description Language. This is the language used by your computer totell the printing device how to print a document. Availability of some printing optionsdepends on the selected PDL.
Plug-in An accessory program that integrates with the printer driver to enhance orextend the driver's capabilities.
User Guideii
Poster Layout feature for printing a document in a larger size than the maximumsupported by the printer so the cumulative sheets can be assembled as a poster. Usethis feature to print a document in a large, eye-catching poster format, up to 25 timeslarger than the original document size.
PRESCRIBE An internal printer language that embeds commands into specifiedlocations in a print job.
Print graphics as black This option prints all color graphics and text with black,rather than grayscale. This feature is intended for CAD applications.
Print preview This feature lets you view your document before you send it to print.
Print text as black Prints all color text as black. It produces faster printing of colorprint jobs by reducing the amount of data sent to the printer. In black and whiteprinting, it increases the detail for light-colored text printed. White text and imagecolors are unaffected.
Private print Job option that saves print jobs in RAM disk memory for printing untila four-digit access code is entered. Private print jobs are deleted when the printingsystem is reset or turned off.
Profile A set of user defined driver settings that are saved as a group. Once saved,you can select a profile by name and apply its settings to a print job without selectingeach feature individually.
Prologue/Epilogue Advanced feature that allows you to insert a macro intospecific locations in the print job. An advanced user may choose to use this feature toembed a PRESCRIBE command that will call a macro to overlay PRESCRIBE formdata or a graphic object, such as a logo or a signature, at a specific point in the printjob.
Proof and hold Job option that prints one copy of a print job so that you can proofit before printing the remaining copies. This feature is available when RAM diskmemory installed and selected in Device Settings. After the proof copy is printed andchecked, remaining copies can be printed from the printing system’s operation panelwithout sending the job again from the computer.
Q Quick Print tab The Quick Print tab improves usability by providing an easier wayto set print options. You can choose basic settings or a predefined printer profile,rather than having to go to various tabs. Quick Print settings can be captured in agroup called a profile. Profiles support common printing tasks, saving you from havingto repeatedly select the same settings. The Administrator can set the view of the QuickPrint tab through the Installation process, or Administrator Settings in Properties.
R Resolution The number of dots printed in one inch. Higher resolution improves thequality of detailed printed images.
S Security Watermark Plug-in feature that adds watermark text and a backgroundpattern to a print job. The text blends into the background pattern making it nearlyinvisible when printed. The security watermark appears only when the printed page isphotocopied. A security watermark can be used to help protect against unauthorizedreproduction of documents, or simply to differentiate original documents fromphotocopies.
KX DRIVER iii

SNMP Simple Network Management Protocol. The standard TCP/IP protocol formanaging IP network devices, including printing devices. SNMP settings determinethe level of security when using the Auto Configure feature, and prevent unauthorizedprinting to the SNMPv3 printing device. SNMP settings must be set in theAdministrator settings in Device Settings, and in the printing system’s CommandCenter.
Status monitor Optional feature that displays printing system status messages inthe lower right corner of the window during printing. You can customize theappearance of the status monitor, and determine what messages are displayed andhow by selecting preferences and notifications.
T Transparency A clear plastic, page-sized sheet used as a printing medium.
Transparency interleaving Publishing feature that inserts a backing sheetbetween printed transparencies. The backing sheet, also known as an interleaf, helpskeep transparencies clean and prevents them from clinging together.
U User login Registers users with a user name and password. User login providesjob restriction by user, in contrast to the Job accounting feature, which assignsprivileges by division or department.
W Watermark The Watermark feature is available in the Advanced tab. A watermarkis a recognizable image or pattern that can be placed on a page or throughout adocument. You can choose one of the standard watermarks or create your own text.
User Guideiv


Rev. 14.03 2011.04


