Legistar helps you manage the legislative process, from drafting files to publishing agendas and minutes.
Learning Legistar This section reviews the Legistar interface and setup procedures. LearningLegistar also covers the different menus and modules in Legistar.
Pre-Agenda Approval in theFiles Module
This section explains how legislation is drafted into Legislative Files in theLegislative Files module. In this stage of the Legistar workflow you will alsobegin the Approval Tracking process. The Approval section reviews how toapprove legislation submittal requests for the public agenda. This stage ofthe Legistar workflow completes the Approval Tracking process.
Agenda Creation in theAgendas Module
This section explains how to create an agenda with the approved legislativefiles. This chapter also explains in detail how to format, edit, and publishyour agenda.
Meeting ActionManagement in MeetingManager
This section captures how to record your meeting video and actions inMeeting Manager.
Meeting Finalization in theMinutes Module
This section explains how to edit and publish your meeting video andminutes documentation.
OverviewThe Legistar system is an all-in-one product for managing your documents and meeting managementresponsibilities. Legistar works with other products in your Granicus solution to perform the followingtasks:
• Maintain supporting documentation
• Generate agendas
• Manage meetings
• Control and support workflow
• Index meeting video
• Create minutes
• Publish data, reports, files, and media to the web
• Organize and track legislative files
WorkflowTo help you get the most from your Granicus solution, the contents of this guide have been organized to fit a specificworkflow of how Legistar is best used. You will be led through the following steps:
Pre-agenda Approval in the Legislative Files Module1. Legislation details are drafted into legislative files by department “drafters.”2. Legislative files are routed through the Approval Tracking System (ATS).3. Approved legislative files are scheduled for the upcoming agenda.
Agenda Creation in the Agendas Module1. Legislative files are reviewed by the clerk’s office.2. Agenda is generated and the agenda report is published to InSite.3. The meeting data is exported to MediaManager for the meeting to be available for loading in LiveManager.
Meeting Action Management in LiveManager1. During the meeting, the meeting’s actions are recorded in LiveManager.
Meeting Finalization in the Minutes Module1. Meeting video is trimmed and timestamps are edited in MediaManager, and the video is published in InSite.2. Minutes data is reviewed in the Minutes module.3. Minutes report is run and published to InSite.
Signing In to Legistar 5Before you sign in to Legistar you must have a user account and password for Legistar. If you do nothave these credentials, please contact your System Administrator.
If you do not have a Legistar icon on your desktop, go to Start > Programs > Legistar 5 to open theprogram. You can create a Legistar desktop shortcut by navigating to Start > Programs and draggingand dropping Legistar 5 onto your desktop.
1. Double-click the Legistar icon on your desktop.
Legistar Icon
2. Enter your User Name and Password in the Sign In window. Your password is case sensitive andmust contain a minimum of six characters.
If you lose your username or password, contact your Legistar system administrator.
3. Select your live database from the dropdown menu. Your live database stores the work and settingsrelevant to your meeting body. Your other database is for training purposes only.
4. Verify the Local radio button is selected. The Local connection allows you to connect to Legistarthrough your local network. The Remote connection is for connecting to Legistar over the internet.Best Practice: Select the Local radio button.
Navigating the Legistar Home InterfaceWhen you first open Legistar, the application opens from within the Home module. Familiarize yourselfwith the location of the following buttons and features:
Legistar Menus and ModulesIt’s important for you to understand the way Legistar divides the workflow and functionality of its software. There are sixdifferent menus and modules in Legistar that we recommend you familiarize yourself with.
The Home Module
When you first open Legistar, the application opens from within the Home module. From this interface you have multipleoptions for opening recent files, viewing recent approval requests, and launching other menus and modules.
The Recent Agendas, Recent Minutes, Recent Files lists, and Approval Requests displayed on the Home screen areauto-populated based on the records you have most recently edited or visited for more than 20 seconds.
The number of files that appear on these lists can be adjusted in Local Settings > Personal Settings under the Toolsmenu on the Home screen.
The Tools Menu
Settings for personalizing what you see in the Legistar interface and for access to Legistar Admin can be found via theTools dropdown menu in the Home module.
Tools Menu
Option Description
Local Settings From this menu you can personalize Legistar to enhance your meeting workflow
Administration In Administration you can configure the database to match the workflow of your LegislativeManagement
RefreshAdministration Select Refresh Administration to enable your recent changes
In the Files module you can create the files required to build the agenda. If you have Approval Tracking enabled, this iswhere you perform the first steps in starting the sequence.
Files Module
The Agendas Module
In the Agendas module you will generate the agenda, work with agenda lines, auto-number, and prepare your agendafor publishing.
Common Legistar Module FunctionalityInside each of the Legistar modules, you will find the following fields and buttons. The functionality of these items willwork the same within each module, although the options under each button may differ.
Select any of the modules (Files, Agendas, Minutes, or Search) to see the following features at the top of the interface:
Common Module Features
Item Description
Save Allows you to save any changes made since entering the module screen
SearchAllows you to search the Legistar database (available only in Search Mode). You can enterdata or select the appropriate values and click Search; this prompts Legistar to retrieve allthe matching corresponding data
New Allows you to create a new file in the Legistar database
Clear Clears display information and returns you to Search Mode
Lock Prevents any changes from occurring on the file until it is unlocked
Edit Allows you to edit text fields with tools such as cut, copy, and paste
Tools Gives you access to a variety of different options and functions depending on the screen
Browse Allows you to review the screen records or the records most recently accessed
Reports Allows you to select a report to run based on the displayed Legistar data
Help Contains information on specific fields as well as many of the process steps found in thismanual. Each screen has a Help button that covers the relevant screen
Date Fields and Calendar ButtonsThe date fields within Legistar store and display dates in the mm/dd/yyyy format. To enter dates, complete the followingsteps:
1. Click the Calendar button
next to any of the date fields. The calendar window opens.
2. Select a date from the calendar. The entered date is highlighted.
• Click the directional arrows to select a different month.
• Click and hold the month and year to select from a list of months.
Calendar Window
The entered date will appear in one of the following three colors; these colors are customizable in Admin, butthe recommended defaults are:
• Black- Past date• Red- Today’s date• Green- Future date
Note: You can also enter the date in the text field using the mm/dd/yyyy format.
Note: When selecting the Agenda Date from the calendar, you can only select a scheduled meeting date highlighted ingreen. This setting can be enabled and disabled in Admin > System Settings > Restrict Agenda Date Selection.
Legistar provides you with a series of shortcuts to quickly and efficiently auto-fill dates in the system. Enter the followingin a date field (replacing any # signs with the desired number) and press the Tab key:
Shortcut Description
T Enters today's date in the active field
+#d The date moves ahead by the specified number of days; for example, enter +10d to jumpforward ten days
-#d The date moves backward by the specified number of days; for example, enter -10d to jumpten days into the past
+#w The date moves ahead by the specified number of weeks; for example, enter +2w to jumpforward two weeks
-#w The date moves backward by the specified number of weeks; for example, enter -2w to jumptwo weeks into the past
+#m The date moves forward by the specified number of months; for example, enter +2m to jumpforward one month
-#m The date moves backward by the specified number of months; for example, enter -2m tojump two months into the past
+#y The date moves forward by the specified number of years; for example, enter +1y to jumpforward one year
-#y The date moves backward by the specified number of years; for example, enter -1y to jumpone year into the past
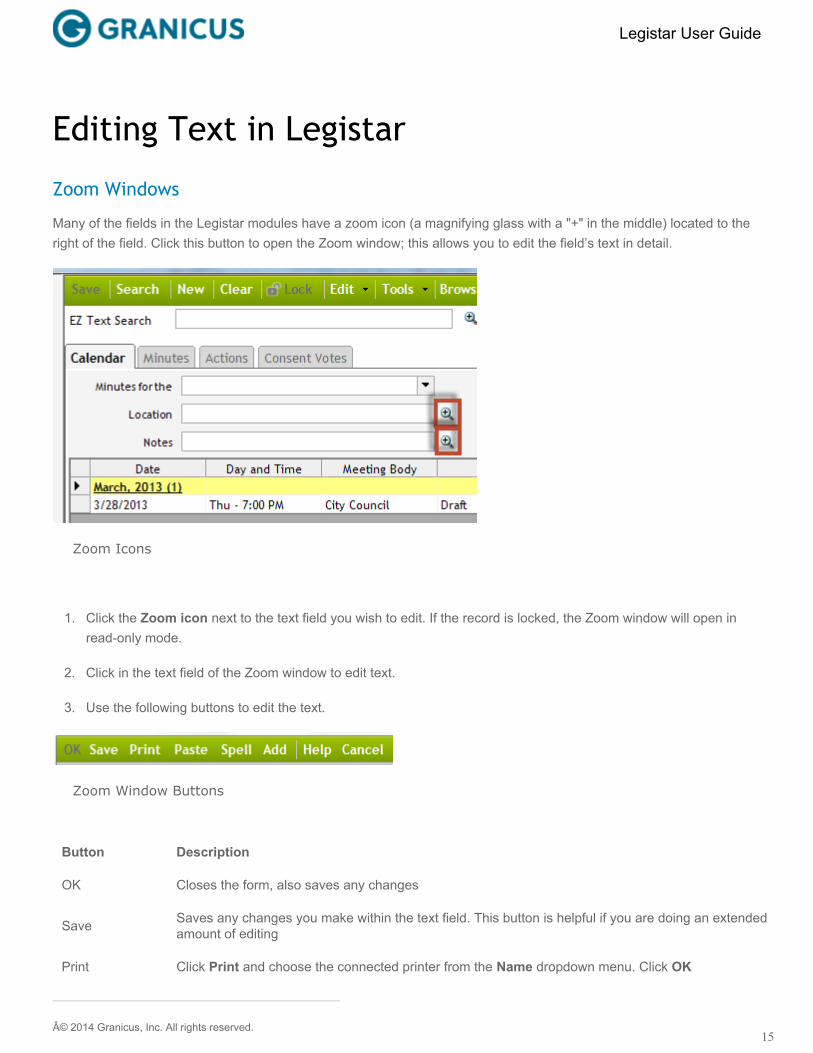
Many of the fields in the Legistar modules have a zoom icon (a magnifying glass with a "+" in the middle) located to theright of the field. Click this button to open the Zoom window; this allows you to edit the field’s text in detail.
Zoom Icons
1. Click the Zoom icon next to the text field you wish to edit. If the record is locked, the Zoom window will open inread-only mode.
2. Click in the text field of the Zoom window to edit text.
3. Use the following buttons to edit the text.
Zoom Window Buttons
Button Description
OK Closes the form, also saves any changes
Save Saves any changes you make within the text field. This button is helpful if you are doing an extendedamount of editing
Print Click Print and choose the connected printer from the Name dropdown menu. Click OK
Paste Click Paste to input any text you have copied to the clipboard. To copy text, highlight any text fromwithin a field in Legistar and press Ctrl + C
Spell Runs a spell check on any of the text within the zoom window text field
Add Launches the Standard Paragraph tool from which you can enter text you use often
Help Launches additional help information for the Zoom window
Cancel Closes the Zoom window without saving any of the changes you have made
4. Click Save.
Rich Text Formatting
You may see additional buttons for editing text. These buttons are part of the RTF - Rich Text Formatting - Zoom box,signified by a magnifying glass icon with an "A" in the center.
Button Description
CutHighlight the text from the Zoom window and click the Cut button to remove the text and copy itto your clipboard for pasting elsewhere
Copy Highlight the text from the Zoom window and click the Copy button to duplicate the text to yourclipboard for pasting elsewhere
FindLocates the occurrence(s) of a word in a document
BoldHighlight the desired text and click the B button to bold the text
ItalicsHighlight the desired text and click the I button to Italicize the text
UnderlineHighlight the desired text and click the U button to Underline the text
StrikeHighlight the desired text and click the Strike button to place a line through the text
Spelling Check ToolThe Spelling Check tool in Legistar is similar to other spell check tools you may have used before. The features of theSpelling Check tool are described below.
1. Click Spell in the zoom window. The entered text will automatically be checked for any errors.
Spell Button
2. Review the features below to choose to ignore the spelling suggestion, add the word to yourdictionary, or change the misspelling to the suggested word.
Spelling Check Window
Item Description
Not in DictionaryLists the possible misspelling or unrecognized word. Also displays the new entry to whichthe word should be changed
SuggestionsPossible listed corrections to the misspelled or unrecognized word. Select the checkbox tohide the suggestions. Select a suggestion from the list and click Change to modify theoriginal word
Add Words ToSpecifies the dictionary to which new words will be added. The default location is theLegistar dictionary on the Legistar server
Ignore Disregards the instance of the misspelled or unrecognized word
Ignore All Disregards all instances of the misspelling or unrecognized word
Add Appends the misspelled or unrecognized word to the current custom dictionary
ChangeAlters the instance of the misspelled word to the selected altered word. This button isenabled when the possible misspelling in the Not in Dictionary field has been changed
Change AllAlters all instances of the misspelled word to the selected altered word. This button isenabled when the possible misspelling in the Not in Dictionary field has been changed
Cancel Disables the current spell check process
3. Click Exit to leave the Spelling Check tool and click OK at the prompt.
Standard ParagraphsThe standard paragraph feature allows you to store commonly used sentences and paragraphs in one location. Then,you can copy the text to the clipboard and paste it into an area of Legistar as needed.
Loading a Standard Paragraph
1. Click Tools > Standard Paragraphs or press F8 to access the Standard Paragraphs window.
Selecting Standard Paragraph from the Tools Menu
2. Select the stored standard paragraph name from the list or search for a specific standard paragraphusing the search box.
3. Click Copy To Legistar Clipboard to copy the text to the clipboard.
4. Click within the text field to make it active.
5. Right-click within the field> select Paste to paste the standard paragraph into the field.
Legistar ReportsEvery module in the Legistar interface contains the Report button; however, different reports are generated dependingon the active module. The Reports feature in Legistar is used to retrieve and format almost any sort of information fromthe system. You can run reports for specific files, meeting minutes, agendas, or general information that meets yourcriteria.
Launching Reports
The Reports button is always located in the upper right-hand corner of the screen.
Reports Button
If you’re opening Reports from the Files, Agendas, or Minutes Modules you will have to select a report type from thedropdown menu before you can open the Reports window.
Click Reports and select one of the report types to open.
Common Report Settings
Each Report window in Legistar contains settings specific to that (Legislative Files, Agendas, and Minutes) module.
Setting Description
Destination
This setting allows you to choose where you will send afinished report. Generally, your options include a PDF,HTML, printer, InSite, MS Word document, and email.Select a Destination option from the dropdown menu.
Save Settings Allows you to save the enabled settings for the report.
Include Attachments If the selected report includes attachments, selecting thischeckbox will print both the attachments and the report.
Save the Report Select this checkbox to save the report. A Save dialoguebox will open prompting you with instructions.
General CertificationStandard legal template for surrounding text that needs to be certified
Notice of Public Hearing /Hearing Notices
Provides notice of a meeting and is available from the Agenda screen. If a
special meeting is scheduled that is not entered in Legistar, this report can
be used to create a notice for the meeting
Matter Summary / FileSummary
A summary for a file or group of files. Available from the Home and Filesmodules
Matters Introduced / FilesIntroduced
A lists of files introduced in user-defined date ranges
Meeting AttendanceContains the attendance records for specific member; it's organized bymeeting body
Meeting Calendar A list of upcoming or past meetings
Approver Status
Lists all the files that are currently in a "Review Requested” or “ReviewPaused" status for any given approver. This report shows how many filesany given approver still has to act on. The report is available from theHome screen, and displays the following data: File ID, Approver name,Request Date, Escalation Date, Agenda Date, Title. You can select 1 ormore approvers, and whether to show or hide paused sequences.
Referral ListLists outstanding referrals that have not been returned. It containsinformation on the body to whom the referral was made, the date it wasmade, and the body that referred the matter
Subject Matter Index A list of files based on the Index Terms added in the Associations tab
Voting RecordA record of a Council’s votes in a specific body and / or for a specific daterange
Mailing Labels Creates Mailing Labels or lists of the people entered in Administration
Upcoming Agenda Items
Pulls items based off the date range selected at run time. You can also select thefile type and body to use to generate the report. You can run this report from theHome screen
Pending Items List /Pending List
Lists files currently under pending committee actions
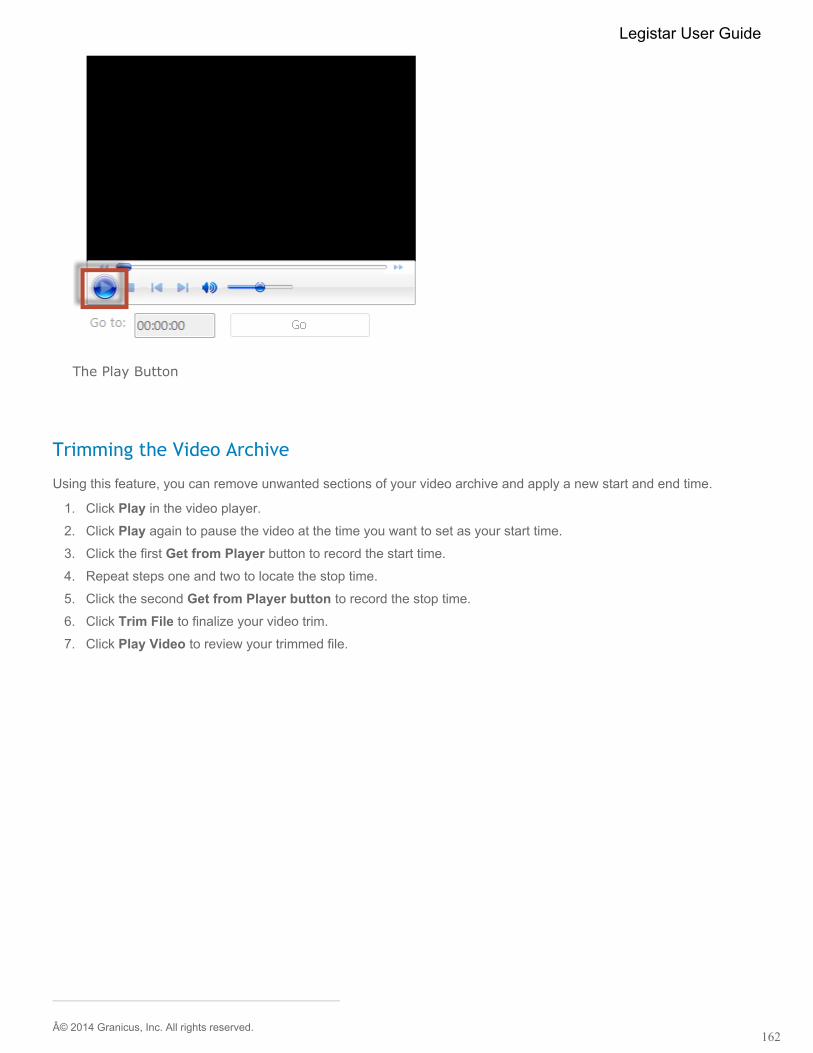
Note: The items you see here may be different depending on the module you are in and how yourLegistar system is configured.
3. Enter the appropriate settings as desired.
4. Select the report's Destination from the drop-down menu available.
Locking and Unlocking Records in LegistarLocking a file prevents any changes to the file until it is unlocked. Locking and unlocking a file can be done by clickingthe Lock button from the Files module or the Lock/Unlock toggle command on the Tools Menu. If the file is alreadylocked, this option reads Unlock.
There may also be certain actions which lock a file. For example, after an item has been adopted the file willautomatically lock. Only certain users have the ability to lock and unlock a file.
To lock a record, click Lock on the toolbar.
After you lock a record, the Lock button changes to say Unlock. Click Unlock
Work Modes in LegistarThere are four different work modes in Legistar. You can see which mode in which you're working by looking at the topof the Legistar window.
Identifying Work Mode in Legistar
These are described in the table below:
Mode Description
Search Mode When you first open a module, the mode is already set to Search Mode, allowing you toenter variables for searching
New Record Mode Enable by clicking New in the Files module
Edit Record Mode Select Edit > Edit Record in order to enable editing of the different fields in the openrecord
Read-Only Mode Read-only mode restricts users from performing any edits on a file. They can only viewthe information on screen
Personalizing LegistarBefore you begin working in Legistar, we recommend you personalize the application to fit your workflow and individualneeds. Complete the following steps to personalize Legistar.
Select Tools > Local Settings from the Legistar Home interface. The Personal Settings menu opens. Configure theapplication to suit your needs from this menu.
See the Related section below for topics about this section of Legistar.
Changing Your PasswordNot all Legistar users have permission to change their own passwords. If you don’t have permission, you need tocontact your system administrator to change your password for you. If you do have the necessary permissions,complete the following steps:
1. Select Tools > Local Settings from the Legistar Home interface. The Personal Settings menuopens.
2. Select the Password tab.
3. Enter your Old Password.
4. Enter your New Password.
5. Enter your New Password again for confirmation.
6. Click Save.
7. Select the Personal Settings tab to return to the Personal Settings menu.
Personal Settings Menu - General SettingsComplete the following steps from the Personal Settings menu:
The General settings allow you to set default settings for any new files you create. See below for descriptions of eachsetting.
General Settings
Item Description
Auto-SaveIf set to YES, any changes made to Legistar data will auto save when you exit theinterface. However, you should occasionally click the Save button when working inLegistar
Calendar DisplayIf set to YES, the Calendar tab within the Agendas and Minutes interface displaysdata from the default date ranges set in Personal Settings > Agendas and PersonalSettings > Minutes
Recent Files Limit Sets the default number of files that appear under the Recent lists on the LegistarHome interface
Sets the maximum number of files retrieved within the Search feature. If there areadditional files available outside of the set Search Threshold, you will receive amessage requesting the display of all search results
Warning! The maximum threshold you can enter is 999; however, a large thresholdnumber may result in a slower retrieval speed. The recommended threshold is 100.
Work StyleIf set to Yes, a rich text format is used to display the meeting data with which you areworking in the Agendas and Minutes interfaces. This display is NOT a preview ofyour final agendas or minutes document
Additional Home Screen HelpMenu Item Text
Use this field to insert an additional item into the Help Menu
Additional Home Screen HelpMenu Item URL Use this field to insert the URL to which the above item links
Personal Settings Menu - Legislative FilesComplete the following steps from the Personal Settings menu:
Click Legislative Files on the accordion menu. See below for descriptions of each setting.
Personal Settings - Legislative Files
Item Description
Add Contact Email On Add New File
If set to YES, the Controlling Body’s email will be included on a newLegislative File. The email address must be entered for a contact underPeople > Address and then set in Administration > Government Bodies >Bodies > Contact > select the person you entered in People
Default Body Sponsor The default appears in the Legislative File module > Associations tab >Sponsor field
Default File Controlling Body
Sets the default Controlling Body for a new file, the Controlling Body hasthe ability to control legislative files that are set up for body security. Thissetting appears in Legislative Files > In Control when the user generates anew legislative file
Sets the default status for a new legislative file. After the file is created,this status can be changed. The System Administrator can edit theavailable default status options via Administration > Legislative Files > FileStatus. File status examples include draft, passed, adopted, etc.
Default File Type
Sets the default file type for a new legislative file. After the file is created,the type can be changed. The System Administrator can edit the availabledefault File Type options via Administration > Legislative Files > TypeName. File types include appointment, closed session, resolution,proclamation, etc.
Default Name Sponsor
Sets the individual sponsor for legislative files. The file’s sponsors aredisplayed in Legislative File > Associations > Sponsors. Individuals areenabled as sponsors in Admin > Government Bodies > Bodies >any of thelisted legislative bodies > Sponsor Type and can be edited by the SystemAdministrator
Show Tool Tip In File DisplayAllows you to mouse-over a field and receive a definition for that field.Only applicable if the field’s help text is entered in Administration > LabelSettings > Legislative Files > enter Help Text
You can set up Legistar to import scans directly into the system. Complete the following steps from the Home module:
1. Select Tools > Local Settings to open the Personalize Legistar screen.2. Expand File Locations.3. Enter the path to your scanner into the Import field.4. Click Save.
Now, when you click Scan in the Files module, the Legistar system will automatically recognize your printer or scannerto grab the file.
There are a few things to keep in mind when using this feature. It is very easy to produce scans with unwieldy file sizes ifyour scanner settings are photo quality. Attachments in Legistar are typically a working copy of the original, so photoquality/high resolution is usually not needed.
• It is generally best practice to set the Quality to either Medium or Normal
• Resolution should be set to at most 300 dpi• Manually review the scan to ensure it is not producing unneeded or blank pages
Laserfiche SettingsIf you have the Laserfiche - Legistar integration, you can save your Laserfiche username and password in the PersonalSettings mene. Complete the following steps from the Personal Settings menu:
1. Click the Laserfiche tab.
2. Enter your Laserfiche Username.
3. Enter your Laserfiche Password.
4. Click Save.
Laserfiche Settings
>>Next Section: Pre-Agenda Approval in the Files Module
Legistar allows you to approve each agenda item as it is routed through the approval process. Thissection walks you through this process, as you prepare your agenda.
Use the Files module to draft legislative files, then route them through ATS. You can also run reports onand search for legislative files.
The following content walks you through the Files interface. Because many of the following features canbe customized, they are described here in their default state and follow the standardized best practicesset by the Legistar team.
The Files, Agendas, and Minutes interfaces are divided into two sections: Workspace and Tabs.
Workspace
The Workspace is located at the top of the Files, Agendas, and Minutes interface. The fields within theWorkspace contain general information for the different record types and are editable by the user. Themain Legistar features are accessible through the Workspace, though some of the available features willvary depending on the active module.
Workspace in the Files Module
The following sections highlight the main fields within the Files Workspace.
Item Description
EZ Text Search
Searches Legislative Files for the input text. Click the MagnifyingGlass icon
to open a text box for further defining your search
File IDEvery Legislative File receives this unique file number. The SystemAdministrator can change the format of the File ID via the Permanentand Temporary settings in System Administration
Identifies the type of Legislative File, such as an ordinance orresolution. This field searches for, groups, and reports on legislativefiles. More importantly, File Type places the legislative file in theappropriate place on the agenda per your setup in Administration
Status
Identifies what stage the file is at in the legislative process. Thedefault status for new files is based on the user’s personal settings.The Status also groups agenda items and is used for searching andreporting
In ControlDetermines which legislative body is currently scheduled to meet andact on the file. In Control also determines agenda item order andworks with security restrictions
File CreatedThe Date Introduced field is the date on which the file was created.This date can also be manually changed
TitleThe Title field is the title of the legislative file's text. It isautomatically populated with the text you input in the Title section ofthe legislative file
Agenda DateDirects a legislative file to appear on a coordinating date-specificAgenda.
Final ActionIndicates the date the legislative file was completed and restricts afile from ever being included in an Agenda. The Final Action date isautomatically assigned when an action is processed as a final action
Tools Menu in the Files Module
The following fields explain the different features within the Tools menu. Some of these features areexclusive to the Files module.
Attachment UtilityThe Attachment Utility tool allows you to manage theattachments that have expired according to the expirationdate for each attachment
Security LogAllows you to view a list of all changes made to the file, aswell as the date and time on which they were made
SpellThe Spell tool allows you to spell-check the text fields of thefile
Error LogThe error log is strictly for support purposes and will only beused under the guidance of a Legistar technical supportrepresentative
The Tabs section is located on the bottom half of the Files, Agendas, and Minutes interface. This sectioncontains more detailed settings and recorded information for the features within in the Workspacessection.
Tabs Section in the Files Module
Text File Tab
The Text File tab contains a text preview box and features for editing the text. However, you cannotdirectly edit text within the preview box; you must use the features to the right of the text previewbox. These features are described below.
Item Description
EditOpens the assigned text editor or Microsoft Word for you to makechanges to the current version of the legislative file
New Allows you create a new version of the legislative file
DeleteAllows you to delete the current version of the file text and go back tothe old version
Version Allows you to set the version of the legislative file
Version ListsDisplays the available versions of the file available for editing andreview
Set as CurrentAllows you to view and set an old version of the legislative file as thecurrent file
History Tab
The History tab displays all actions (history lines) that have occurred for a legislative file, includingApproval Tracking history. Any actions taken during a meeting will display here but cannot be edited;meeting actions must be edited within the minutes.
Allows you to change the criteria for the lines displayed. Optionsinclude the following:
• Past Actions- Displays only history records on which actions havebeen recorded
• Scheduled Meetings- Displays only history records on which noaction has been recorded. This can include 30-Day rule items,items introduced at Roll Call, and items on agendas that have nothad minutes recorded
• Show All- Displays all history records
VersionAllows you to view the version of the file associated with the selectedhistory line
Action Date The date the action in the selected history line occurred.
TimeThe time the action occurred. The time is important as history lines aresorted by the timestamp
Acting Body The body that took the action
Action Taken Motion made on the action
Sent To The meeting body to which the associated legislative file was referred
Due Date The date by which a response to a referral is required
Return The date the legislative file was returned to the referring body
Action Note Any text on the discussion of the legislative file
Action Text The motion string of the action, generated by Legistar
The Attachments tab allows you to manage all supporting documents associated with a particularlegislative file. Supporting documents can be of any file type or file size; these documents can also beadded, deleted, annotated, and ordered within the Attachments tab. Attachments can include virtuallyany file format as well as on-the-fly scanned documents and links to outside sources of material,video, or other third party information and URLs.
Attachments Tab in the Files Module
Item Description
Reordering ArrowsUse these arrows to reorder multiple attachments associated with alegislative file. Select the attachment > click the up or down arrows torearrange the list of attachments
NameThe name of the file that appears on the InSite page and agenda (ifenabled). By default, the file name entered into the name field
Description Allows the user to enter information about the contents of an attachment
Expiration DateThe date the attachment becomes void. Entering a date in this field willnot trigger automatic deletion
Attached On The date the attachment was added to the legislative file
Time The time the attachment was added to the legislative file
File Size The size of the attachment
File Type The file type of the attachment
Print This Attachment WithReports
Select this to print the attachment when creating an agenda packet orgenerating a report
Show This AttachmentWith Reports
Select this to print the attachment when creating an agenda packet orgenerating a report
The following features describe the buttons along the Attachments tab’s bottom pane:
Item Description
ImportAllows you to browse and upload a supporting document to add to alegislative file. Select Import to upload a file, hyperlink, or scan a document
Launch Allows you to open an attachment in its original Windows application
RemoveAllows you to delete the attachment from the legislative file. Click thedropdown arrow for the option to delete all of the attachments associatedwith a legislative file
Update Attachment DetailsAfter you rename or update the description and other attributes for anattachment, clicking the Update Attachment Details button changes thedisplay on the left
Associations Tab
The Associations tab allows you to index and reference your legislative files by selecting features froma list of predetermined choices.
Code SectionsAllows you to attach related code sections to a legislative file. You cancreate new, import, and edit existing code sections by clicking the CodeSections Edit button
IndexesAssign indexes to a legislative file to relate the file to a specific topic. Youcan also create new and import indexes by clicking the Index Edit button
Sponsors
Assign sponsors (council members) for the legislative file. Click theSponsors Edit button to assign sponsors and mark them as primary orsecondary. To create a new sponsor, you must go to Tools >Administration > Government Bodies > Bodies or Office Membersto create and set new sponsors for your legislative files
Related FilesAllows you to link related legislative files together to assemble a packet oflegislative files. Click the Related Files Edit button to assign the files
Details Tab
The Details tab lists additional information about the selected legislative file. This information includesthe file’s contact, notes, cost, hearing date, etc.
File NameName of the legislative file (Optionally, this may appear on the"Workspace" area)
Requester The name of the department that requested the item
Drafter The email address of the user who created the file
NotesYou can enter additional information about the legislative file in thisfield
Agenda NumberDisplays the agenda number assigned during the agenda process.There can only be one agenda number and it must be the mostrecent number
Enactment NumberAssigned when an item is adopted. The EN is set up in Admin andassigned during minutes processing. There can only be one EN perfile and typically the item is final when the EN is present
Not Viewable ViaInSite
Determines if the legislative file is viewable on Legistar InSite.Selecting this checkbox overrides any status that typicallydetermines if the file appears on InSite
Contact Allows you to assign a primary contact person for the legislative file
Cost Allows you to list any cost associated with the legislative file
Hearing Date
Displays the date on which the legislative file is to be heard in ameeting. The legislative file is not automatically added to the agendauntil the hearing date. The hearing date is for reference only; itprovides NO function
Enactment DateDisplays an automatically generated ID based on the enactedlegislation
Last EditIdentifies the last person who edited the file, the changes made, andwhen the change occurred
Info Tabs
The Info 1 tab (and the hidden Info 2 tab) display custom metadata for your solution. Both of thesetabs can be hidden and contain customizable fields. You must customize the fields withinAdministration.
Warning! The fields in the Info tabs will not print on any reports.
Approval Tracking Tab
Within the Approval Tracking module you can set up numerous Approval Tracking sequences for eachLegislative File. These sequences allow you to follow the drafting, editing, and approval of yourLegislative File. This section of the program allows you to add sequences, start the approval process,and take approval actions.
Approver Body The body typically assigned for a certain type review or action
Approver Name This is the name of the approver for a specific legislative file, required ofeach approval sequence
Due DaysThe established number of days the approver has to review the legislativefile. If the legislative file has not been approved within the set number ofdays, the file will be escalated to another individual
Email Template Selects the type of approval requested, whether the person has toactually approve the file or if it is just an FYI file
Requester This is the individual who is requesting the approval; this is different thanthe requestor listed under the Details tab
ManageFrom the Manage tab (located at the bottom right-hand corner of thescreen) you can add the ATS sequence and make changes in the order ofthe approvers
Approve From the Approve tab (located at the bottom right-hand corner of thescreen) you can enter notes, the file action, and delegate approvers
Reordering ArrowsUse these arrows to reorder multiple approvals associated with alegislative file. Select the approval > click the up or down arrows torearrange the list of approvals
The following features describe the buttons along the Approval Tracking tab’s bottom pane:
Item Description
Add Sequence Creates the chain of approvals an item has to go through in order to beapproved
Save As Saves and adds a personal sequence
Start Begins the Approval Tracking Sequence; when clicked, the first reviewerin the sequence is immediately notified
CancelEnds the Approval Tracking Sequence before it is complete. Anyone thathas been notified to review the file will receive another notification thatthe sequence has been cancelled
Escalate Causes the file to be sent to an alternate approver; this can happenmanually or when the due date occurs
1 of 2 Displays the pending approval out of the total for review
Save Saves the progress of the sequence
New Starts a new sequence
Delete Removes the approver from the sequence
Pending Lists all the approvals you have waiting for review
The Attachment Utility screen is reached through the tools menu in Legislative Files section. This form isused to manage the attachments that have expired according to the expiration date for eachattachment.
To preview all the attachments that have met the expiration date, simply enter the date (it is mosteffective to use the less than sign) >8/12/04 and click on "Search" and the files will be listed in order inthe top portion of the screen.
After you have found your desired attachments you can save them to a different directory then copythem to CD and/or batch print them. Then you can delete attachments that are expired or leave themfor later if they are still needed.
Printing the Attachments before deletion
To print the attachments move them to the print job section by selecting them and clicking on thedown arrow or the add all button.
The drafting process in Legistar is the same for any type of legislative file you create. The steps in theprocess do not change, but the information you enter will vary. Legislative files may be drafted by manypeople on your team, but for simplicity's sake within the Legistar workflow, anyone who drafts files iscalled a “drafter”.
Creating a New Legislative FileWhen you open the Legislative Files screen from Legistar > Files, the screen will always open in SearchMode. When you click the New button the screen will automatically display in Record Mode. You can onlyedit fields within Record Mode.
The File ID, Status, Type, and In Control fields auto-complete with default settings. This default contentis set in Tools > Local Settings.
1. Click New in the Legislative Files module. The other fields auto-complete to the default settings.
2. Select the Agenda Date, if known. The other fields auto-complete to the default settings when youclick the New button.
The Text File tab displays the text of the legislative file. When you create a new file, you have the abilityto draft and format your file text in either the Legistar Drafting Editor or Microsoft Word. The followinginstructions explain both methods.
You don’t have to create a legislative file from new text. You can import or copy and paste text.
Warning! To use Legistar’s Text Editor you must set the Use Microsoft Word for Text Editor optionto NO in Tools > Administration > System Settings > Use Microsoft Word for Text Editor.
Drafting File Text in the Legistar Text Editor
1. Click Edit under the Text File tab.
Edit Button on the Text File Tab
2. Confirm the Text Editor window opens.
3. Select one of the following methods to enter the legislative file text:
This is the preferred methods if you are using a predefined template or creating an on-the-fly draftwith prepared text sections.
1. Click the New drop-down arrow > Templates > select a template. Templates are created anduploaded in Tools > Administration > Legislative Files > Text File Templates. A new recordopens using the template you selected. If you use standard text for creating multiple file types,creating a template from the standard text will increase the efficiency of your legislative filedrafting process.
2. Click the File Sections drop-down arrow > select a section. File Sections are created and editedin Tools > Administration > Legislative Files > Text Sections.
3. Enter your text in the text window under the ..File Section. You will replace the brackets and theinside text with your text.
Method #2:
This is the preferred method when you are working from a pre-existing Word file, something that wasdrafted by someone else, or in another word processor such as WordPerfect.
1. Click New.
2. Click the New drop-down arrow > Import File > select a .txt or .rtf file > Open. The documentyou import must be an .rtf or .txt file and it must have the ..title and ..body sections identified.
Drafting Legislative File Text in Microsoft Word
If specialized text descriptions or sections are required, click the File Sections drop-down arrow >select a section and that text will be inserted. File Sections are created and edited in Tools >Administration > Legislative Files > Text Sections. Use the Save File As option to save the file as a newtemplate.
1. Click Edit to open the legislative file, or click Import to open an existing Word document on yourcomputer.
4. Select one of the following options to enter the legislative file text (the option you choose will bebased on file type):
a. Click the Templates button drop-down > select an .rtf or .txt file > Open.
b. Click the Text Sections drop-down button > select one of the options.
Text section labels are always prefixed with two dots. For example, Legistar recognizes the textthat follows “..Title” as the descriptive paragraph for each file. Almost every standard report inthe system uses this section to describe the content of the legislative file.
System administrators may add as many text sections as required to organize the legislativetext and associated information. For example, a requirement may be to include notes from staffin a new section called “..Recommended Action”.
Legistar always recognizes these text section labels, which are predefined in the system:
▪ ..Title
▪ ..Body
▪ ..Recommended Action
Notes: The ..Title and ..Body text section labels will print on the Text File, Certified Copy andSignature Reports. ALL other labels will only print on the Text File report.
For LiveManager and iLegislate users: The ..Recommended Action text section label linksto theSuggested Action field in LiveManager and iLegislate. You can select it in thecheckboxes when running a report.When running reports on InSite, only the Text tab/Legislation Text report will display the..coding.
a. Click the Standard Paragraphs drop-down button > select one of the options.
b. Edit and enter additional text until your file is complete.
c. Click Save.
Microsoft Word Editor Limitations:
When you use Microsoft Word as your editor in Legistar, while most formatting will carry over toLegistar properly, note that it may not appear in Legistar exactly as you have entered it in Word. Thisapplies to the following:
• Rich text format (RTF) code attributes such as bolding, font style and color, underlining, bulleted andnumbered lists.
• Indentation (Best practice is to use preset tabs)
• Pictures, Tables
• The Track Changes feature, which you use to record edits
Additionally, the Word Editor has the following limitations:
• You should not insert tables, graphics or images into the text file. Our best practice recommendation isthat you include them as attachments.
◦ The ..Title section cannot accommodate graphics at all. The ..Body section can accommodatesmall graphics, but for better results, we recommend you insert them as attachments.
◦ Word documents that you add into Legistar cannot contain larger than 3MB worth of graphicdata, as graphics that have a large file size will slow down the process of uploading the worddocument to Legistar. Therefore, the file size for graphics should be as small as possible.
• The Preview screen under the Text File tab is the least perfect replication of your formatting in the Worddocument. The Text File Report offers the closest replication of the Word document. When you are in theFiles module, you can run this report by clicking Reports and selecting the report name from the Reportsmenu.
• RTF code cannot be larger than 100MB (this is not related to file size)
• You cannot use footnotes in the Word Editor
>>Next Section: Adding Attachments to Legislative Files
Adding Attachments to Legislative FilesYou can add attachments of any file type and size to legislative files. Complete the following steps fromthe Files Module while drafting a legislative file in Legistar:Warning! Attachment names should never include special characters (such as #, $, or ^).
1. Select the Attachments tab within the legislative files module.
2. Click Attach from the bottom left-hand corner of the interface.
3. Select the Attach File, Attach Hyperlink, Import from Laserfiche, or Scan option.
Adding an Attachment to a Legislative File
If you select... Do this...
Attach File
Locate the file for import > click the Open button.
Note: There are no limits on file size though larger files will take alittle longer to attach.
Note: If you attempt to attach an open Word document, the uploadprocess is canceled, and an error message is displayed thatinstructs you to close the document before attaching it.
Attach Hyperlink Enter a hyperlink in the field > click the OK button.
Import From LaserficheYou may or may not see this option depending on whether youhave the Laserfiche integration enabled.
Scan1 Select a source from the Scan option > click the OK button.2 Enter a Description and Expiration Date. (Optional)3 Click Save.
Tip for Success! If you need to delete a file, select the file and click Remove.
Managing AttachmentsAttachments with an expiration date can be managed with the Attachment Utility tool in the Tools menu.
Opening an Attachment
1. Select an attachment from the Attachments menu.
To print attachments with the report, you must select both the Print This Attachment withReports checkbox from the Attachments tab and the Include Attachments checkbox from theDestination section of the Reports interface.
To make your attachment available on InSite, select the attachment and select the Show ThisAttachment on Internet Reports checkbox.
>>Next Section: Adding History Lines to Legislative Files
Adding New History Lines to Legislative FilesHistory Lines are automatically added when a file is acted on in a meeting. However, occasionally you will have to add aline manually. This situation typically occurs when you want to record an action taken outside of a meeting such as theReceived and Assigned action.
Complete the following steps from the Files module in Legistar:
1. Open the legislative file. See Searching for Legislative Files for instructions on finding a file.2. Select the History tab.3. Click the New button at the bottom of the screen. (see figure below)
Adding a New History Line
4. Notice that the Action Date and Time fields auto-complete.5. Complete the following fields and then click Save.
Field Description
Action Date The date the action in the selected history line occurred
Time The time the action occurred; the time is important as history lines aresorted by the timestamp
Checking the Spelling of a Legislative FileYou can run the Spell feature to check the spelling of all the text fields while drafting a legislative file inthe text editor. Complete the following steps from the Files Module in Legistar:
1. Click Edit within the Text File tab.
2. Click the ABC button to run the Spell feature.
3. Complete one of the following options from the Spelling Check window:
a. Click the Ignore button to ignore the spelling of a word.
b. Click the Ignore All button to ignore all instances of the spelling of a word.
c. Select the suggested correct spelling and select Change or Change All to change all instances of thespelling of a word.
4. Click OK at the Spell check complete window.
>>Next Section: Creating New Versions of Legislative Files
Creating New Versions of Text FilesLegistar allows you to track different versions of a text file. The current version of the text file is usedwhen the file is added to the agenda.
1. Open the file for which you will add a new version.
2. Select the Text File tab > New button.
3. Click Yes at the prompt to copy the current file’s content to the new version of the file. Select No ifyou want to start with a blank new version of the file.
4. Select Yes at the prompt if you want the new version of the file to contain the same sponsors as theprevious version.
5. Confirm the version field changes to reflect the new version, i.e. (Current).
Adding a New Version of a File
6. Click Edit and edit the text of the file.
7. Click Save > Go back.
8. Click Yes at the prompt to replace the old title with the new title.
To delete a legislative file from Legistar, complete the following steps from the Files module in Legistar:
Note: Legislative files must be removed from all meetings before they can be deleted. Because of this, in most cases itis better to simply remove a file from an agenda than it is to delete it from Legistar entirely.
1. Open the file you wish to delete.2. Click the Edit menu.3. Select Delete Legislative File from the drop-down menu available.4. Click Yes at the prompt.
Deleting a Legislative File
>>Next Section: Text Tips for Drafting Legislative Files
Text Tips for Drafting Legislative FilesThe following tips will help you enter text efficiently, identify file sections, avoid potential errors, and produce effectiveagenda and minutes documents.
Item Description
..Title
• Also referred to as the Agendas Entry• The...title file section is used on the majority of the Legistar reports.• Should not be more than a few sentences long• Keep the title strictly subject related, ex. “First Reading Ordinances” or “Second ReadingOrdinances”• Do not delete the “..” before the file section title; this will cause the text to not display onthe report
Formatting• Do not enter any formatting in the file text window (for example, do not enter bullets,tabbing, or other placement items). If you must use formatting, use Microsoft Word to enterit
File Sections• Do not use duplicate alpha characters in file sections, ex. you cannot have a section“.."title” and a section “..tax”• With the exception of the body text, you don’t have to use “..” before any file section title
The list-to-list boxes on the Associations tab in the Files module allow choices from a list to be added aspart of a Legislative File. The left side of the box lists available options which are controlled in theAdministration tables by your System Administrator. The right side lists the users' selections.
Move the choices by selecting an item, then clicking the arrow key to move the item to the other side(multiple items can be moved by holding the ctrl key down while selecting each one) or by doubleclicking on the item. The double arrow will move all the items in the box. The up and down arrowsarrange the listing of the selected choices only. This is used to designate the importance of sponsors.
The Associations Tab
When searching in a list-to-list box you can only search items that have been previously used. Below arethe system categories which use list-to-list boxes:
Code Sections
The Code Section list-to-list box allows you to reference parts of your municipal code or Ordinances. Thisis very valuable when searching and you want to find every piece of Legislation that affects a particularsection of code. This sections list is usually readily available from your codifier and is easily imported intothe system.
Sponsors can be an individual or body who backs a particular piece of legislation. The primary sponsor islisted first, and the order can be changed using the up and down arrows. Sponsorship can change if anew version is created. Therefore, each version of a file can have different sponsors.
Sponsors are unique for each client, therefore Legistar offers you options in the choices that areavailable for sponsorship. In the Government Bodies (Main tab) of Administration you assign whichindividuals or committees are available for sponsorship.
Available Choices for Sponsorship
Members Only - Only the members will be available to be used as a sponsor.
Body Only - The entire body acting as one unit, the name of the body will be available to use as asponsor.
Members and Body - The committee as a whole and each member will be available to use as asponsor.
None - There will not be any choices in the sponsor list-to-list box.
Indexes
Indexes allow you to cross-reference a term or terms to a particular file. This can then be used as a valuable searching tool.
Related Files
Related Files allow you to link related Legislative Files. Historically, we have found that this has been used for files that are part of a
project, purchase order, or veto.
>>Next Section: Adding Sponsors to Legislative Files
Routing Legislative Files through the ApprovalTracking SequenceMost legislative files require review and approval prior to being added to an agenda. The Approval Tracking sectionallows you to submit these items for approval and regulate the entire approval process. The Approval TrackingSequence is also known as ATS.
Approval Sequences are added in Tools > Administration > Approval Tracking > Approval Master.
Drafters begin the ATS process by selecting an approval sequence. Approvers can approve, delegate, disapprove,extend, and pause or cancel an approval tracking sequence.
You may also find these FAQs useful:
Approval Tracking in Legistar Cheat Sheet
Approver Cheat Sheet
Restarting a Disapproved Sequence
>>Next Section: Selecting an Approval Tracking Request (Drafters)
-or-
>>Next Section: Locating your Files for Approval Requests (Approvers)
Selecting an Approval Tracking Request(Drafter)Complete the following steps from the Files module. You can also open a file from the Recent Files widgeton the Home module.
1. Open a legislative file and verify you are in Edit Record mode.
2. Select the Approval Tracking tab.
3. Click the Add Sequence drop-down button and select an Approval Sequence from the menuavailable.
4. Click Start. After you start the Approval Tracking process, the file can only be edited by theAssigned Approver and the Approval Requester until the Approval Process is complete.
Starting the Sequence
5. Confirm the names on the sequence which includes the Escalation Date and the Approval Statusappear in the Tools window after you begin the sequence.
6. Confirm the file status changes to ATS Review and an email has been sent to the first approver ofthe sequence.
>>Next Section: Locating your Files for Approval Requests (Approvers)
Locating Your Files for Approval Requests(Approvers)The files awaiting your approval are listed on the home screen under Approval Requests, or select the file from thePending dropdown button within the Approval Tracking tab.
Approving Requests in Legistar
You can approve files both inside Legistar and though the web.
Legistar Approval Process
To approve a file using Legistar, complete the following steps:
1. From the Home module, select the file from the Pending list on the bottom right of the screen.
2. Review the Type, In Control, and Agenda Date fields from the top of the screen.
3. Click the Text File tab. If changes to the text are required, click Edit to access the text.Click Save to return to the Files screen.
4. Click the Attachments tab to review attachments. Make sure they are named appropriately.
5. Click the Associations tab to review any information there.
6. Click the Details tab and make sure the drafter correctly added a File Name, Department, andfilled out any other necessary fields.
7. Click the Approval Tracking tab and select an Action (see figure below):
• Approve – Sends the file to the next person in the approval process.
• Disapprove – Sends emails to the drafter and anyone who already approved the item, informingthem that you did not approve the file. Be sure to add a note explaining why you did not approvethe file.
• Delegate – Sends the item to another eligible approver. You’ll need to fill in the Delegate field tothe right of the Action field.
• Extend Due Date – Gives you more time to consider the file by extending the due date.
8. Click Save. You will receive a prompt telling you that this action will freeze your ability to takeaction on this file in the future. This means you can only approve once and you cannot return todisapprove the file later. Click Yes to continue. This sends the file to the next person in the approvalprocess.
Note: If you want to edit a file or add additional people to the approval sequence after sending it forapproval, click the Approval Tracking tab and press the Pause button. This stops the approvalprocess and allows you to modify the file.
Selecting an ATS Action
Web Approval Process
To approve a file using the web, complete the following steps:
1. Navigate to your organization's InSite web page by clicking the link in your approval notice email orby entering the web address in your browser: <your site name>.legistar.com (remember toleave off the "www")
2. Click Sign In in the top right corner. Legistar will remember you so you won’t have to do this everytime.
3. Click the Approval Tracking tab. If you don’t see that tab, click the My Accounts link in the topright corner to pull it up. You may also need to ask your Legistar system administrator to enable thetab.
4. Click the File ID of the item you would like to approve.
5. Review the information on the screen.
1. Make changes to the text if needed.
2. Click View to review attachments.
3. Click Edit to modify attachment names.
4. If you make any changes to an existing attachment or need to upload a new attachment do sousing the New Attachment button.
6. Change the text and upload new attachments if needed.
7. Enter any Notes if needed.
8. Select your approval Action:
• Approve – Sends the file to the next person in the approval process.
• Disapprove – Sends emails to the drafter and anyone who already approved the item, informingthem that you did not approve the file. Be sure to add a note explaining why you did not approvethe file.
• Delegate – Sends the item to another eligble approver. You’ll need to fill in the Delegate field tothe right of the Action field.
• Extend Due Date – Gives you more time to consider the file by extending the due date.
9. Click Submit.
>>Next Section: Delegating a File in ATS (Approvers)
Delegating a Legislative File in ATS(Approvers)With the proper permissions, the approver can delegate the approval to someone else.
1. Select the Approver from the Approval Tracking tab.2. Click the Approve tab.3. Select Delegate from the Action dropdown menu.4. Select an approver from the Delegate Approvers drop-down menu.5. Click Yes at the confirmation window. At this point the requestor and new approver will receive emails about the
delegation.
>>Next Section: Disapproving a File in ATS (Approvers)
Disapproving a Legislative File in ATS(Approvers)If you select disapprove and enter notes on why you’re disapproving the item, the status of the item will change back todraft. Emails are then sent to the initiator and approvers. After the initiator has received the disapproved file, they canmake a new file version, add a new approval sequence, and re-submit the file.
1. Select the Approver from the Approval Tracking tab.2. Click the Approve tab.3. Select Disapproved from the Action dropdown menu.4. Enter Notes explaining why you are disapproving the request.5. Click Save.6. Click the Yes button at the confirmation menu.7. Confirm the file's Status changes to Draft.
>>Next Section: Extending an Approval's Due Date (Approvers)
Extending an Approval's Due DateApprovers can extend the due date on any item sent. Selecting the Extend Due Date option will extend the due date bythe set number.
1. Select the Approver from the Approval Tracking tab.2. Click the Approve tab.3. Select Extend Due Date from the Action drop-down menu.4. Click Yes.5. Click Yes again at the confirmation menu.6. Confirm the new date is displayed on the approval line.
Pausing or Canceling an Approval (Clerks andApprovers with the Necessary Permissions)
Pausing an Approval
When you pause the Approval Sequence, emails are sent to each assigned approver to inform them of the pause.
Use pause in the instance you do not want the request to escalate.
1. Select Pause.2. Confirm the status of the file changes. Emails are now sent to each assigned approval individual to inform them of
the pause.
Pausing an Approval
Canceling an Approval (Clerks)1. Select the Approver from the Approval Tracking tab.
2. Click Cancel.3. Click Yes at the Cancellation prompt menu.4. Confirm the legislative file status changes to ATS Cancelled. At this point, the approver will receive an Approval
Tracking cancellation confirmation email.
>>Next Section: Running Reports from the Legislative Files Interface
Running Reports from the Legislative FilesInterfaceYou can run reports in Legistar to send your legislative file to InSite, PDFs, printers, email, Word documents, Laserfiche,and more.
To run a report on a legislative file, open the file and click Reports > select the type of report you wish to run. Thesereport types are covered in detail in the following sections:
Running a Certified Copy Report
Running a File Summary Report
Running a Master Report
Running a Signature Copy Report
Running a Text File Report
Running a Report from the Legislative Files Interface
Running a Certified Copy ReportThe Certified Copy report provides file text and information for distribution to the public. This report would most likely berun after a file has been passed at a meeting.
3. Configure the report settings as desired. These settings are described in detail below:
Setting DescriptionPrints the signature image uploaded in Administration
Available Variables A list of different variables you can add to the Signature Block; these variablescontain information about the legislative file and its printed report
Signature Block Pre-filled text that prints at the bottom of the report
Preview A display-only field that allows users to view the signature block before it isprinted
Use The signature line that is included at the end of the report
Signature Text The text that appears next to the report’s signer. Should be the desired title forthe signer
Signer The signatory name that will appear for the signature line of the report. If leftblank, the report will select the first name from the dropdown list
Digital Signature
4. Select the Print and Destination options.5. Click Run.6. Click Close.
Running a File Summary ReportThe File Summary report only contains the basic data about a file. This report is useful if you want the results of the filesfound in a search.
Running a Master ReportThe Master report contains the File Number, File Type, Status, Enacted Number, Effective, Version, In Control, FileName, Date Introduced, Requester, Cost, Final Action, Comment, Title, File Text, and History.
Running a Signature Copy ReportThe Signature Copy report provides a place to assign the required signatures and their preceding title and body of theordinance or resolution. This type of report is most likely to be run after the file has been passed.
Note: There must be a final action date assigned for the legislative item in order to print a Signature Copy report.
3. Configure the report settings as desired. These settings are described below:
Item Description
Available VariablesA list of different variables you can add to the Signature Block; thesevariables contain information about the legislative file and its printedreport
Signature Block Pre-filled text that prints at the bottom of the report
Preview A display-only field that allows users to view the signature block before itis printed
Use The signature line that is included at the end of the report
Signature Text The text that appears next to the report’s signer; should be the desiredtitle for the signer
Signer The signatory name that will appear for the signature line of the report. Ifleft blank, the report will select the first name from the dropdown list
Digital Signature Prints the signature image uploaded in Administration
4. Select the Print and Destination settings. Select the Save this report checkbox if you wish to save yoursignature report.
Running a Text File ReportThe Text File report prints the text of an item with little additional information. You can also select the specific sections toprint. Print this type of report for a full text review of the legislation.
1. Select Reports > Text File.2. Review the Text File Report interface.
Text File Report
3. Configure the report settings as desired. These settings are described below:
You must be in Search mode before you can search for a legislative file. Click Clear at any time to returnto Search mode.
Text Search
The Text Search searches through the text entered into a file’s text section. Clicking on the AdvancedSearch button gives you much greater flexibility than a normal keyword search. This is achieved by usingAnd, Or, and Not statements.
The simple search looks for a word or consecutive words and displays all the legislative matters thathave text files matching the search criteria. Users may further define the search by indicating whether tosearch the current text file or previous versions.
To display a specific file, use the Go to File button at the top of the screen, or, double click theLegislative File number displayed.
Searching with Advanced Full Text Search
1. Click Search on the left side of the Legistar interface, then click Advanced Search (see figurebelow).
2. Enter your search terms using the six boxes at the top of the screen, which are defined below:
• AND Search: If you want your search results to contain two search words, not just one or theother, use the first two boxes.
• OR search: If your desired search results should match either of two search words, use boxesthree and four.
• For search results that match a search word regardless of what you’ve entered in boxes onethrough four, enter it into box five.
• NOT search: Any word entered into the last box will eliminate all files containing that word.
3. Click Search in the left corner. If you wish to open a file in Legislative Files, double click on thatfile.
For example, the search shown below would return results containing both "police" and "car" witheither the word "new" or "purchase", as long as the file does not contain the word "truck".
Sample Advanced Search
Searching with Simple Search
1. Enter the keyword in the Search Text field.
2. Click Search to run the search.
3. Enter search terms into any of the Workspace fields in the Files module; these could include the File ID,Type, Status, In Control, File Created, Title, Agenda Date, and Final Action.
You can also enter text in the EZ Text Search field. EZ Text only searches through all legislativefile text fields; dropdown and date fields are not searched. For example, when searching for theword "park" this will pull forward anything with the word "park" in it. It will pull forward resultssuch as "parking", "parking lot", "Braves Ballpark", etc. In reverse, when searching for "parkinglot" anything with the words "Braves Ballpark", "park", and "parking" will be populated. In thisparticular case, when using multiple words to search, it is a Best Practice to use the AdvancedSearch.
TIP: Enter an asterisk* after your entered search text to locate all files that contain the enteredcharacters. For example, enter 11-02* to search for files 11-021, 11-022, 11-023, and so on.
Creating a Saved SearchIf you regularly run the same search, you may find it helpful to use Legistar’s Save Search feature.
1. Verify you are in Search Mode. If the top of the interface does not read “Search Mode,” click the Clear button.2. Enter search terms into any of the Workspace fields; these could include the File ID, Type, Status, In Control,
File Created, Title, Agenda Date, and Final Action. You can also enter text in the EZ Text Search field.3. Click Search.
Saving a Search
4. Select Tools > Save Search (see figure above). The Search Name dialog box opens.5. Enter a name in the text field and click OK.6. Click Clear to enable Search mode.7. Select the drop-down arrow next to Search.8. Select the name of the saved search you just created (see figure below).
Agendas in Legistar are made up of header lines and agenda items based on the agenda template. Each agendasection will select and list files based on their Status, Type, and Controlling Body. You can review agendas in theAgendas module.
Your agendas can be automatically generated. You can also add files manually by selecting a line where you want thefile to be added and using the Add Line button at the bottom of the screen.
The grids on both the Calendar tab and the Agenda tab can be configured for a specific view. The user can choose tohide or display any of the columns. The display of the columns can be saved by right-clicking on the grid and selectingthe context menu option Save Grid Layout.
You can also run reports on and delete agendas.
If a section is consistently missing items, there is probably something missing from the Agenda template, and youshould contact your system administrator.
Navigating the Agendas ModuleTo open the Agendas module, click the Agendas button on the left side of the Legistar interface.
Agendas Button
Calendar Tab in the Agendas Module
Use the Calendar tab to view agendas based on user-defined search criteria. The Calendar displays all meetings thatoccur within the last ninety days. In this tab you can clear the listed meetings and search for meetings outside of thedefault date range. The 90 day range can be changed by your System Administrator.
The fields within the Calendar tab allow you to narrow your search for a particular agenda. These fields aredescribed below:
Item Description
Agenda for the Allows you to search for the agenda by meeting body
Location Allows you to search for the agenda by the location of where the meeting occurred
Notes Allows you to search for the agenda by any notes entered in the field
Date Allows you to search for the agenda based on the previously set agenda date
TimeDisplays when the meeting is scheduled to begin. Every meeting body should have a default time enteredby the System Administrator.
StatusSets the status of the agenda and allows you to publish agendas to InSite. All agendas start in Draft andmust be changed to Final when they are complete
Calendar List
The Calendar List displays the results of your agenda search query, in addition to a list of all available agendas.
The Agenda tab displays the headers and items contained within the agenda. Within this tab you can generate theagenda and edit the lines and the number of items.
1. Select an agenda from the Calendar List.2. Click the Agenda tab from the Agendas module.
The Agenda Tab in the Agendas Module
Tip for Success! You can select a line on the agenda form by clicking the line, or you can select multiple lines byholding down the Ctrl key and clicking individual lines.
Agendas Tab Buttons
The buttons at the bottom of the Agenda tab interface are exclusive to the tab; they allow you to create a newagenda, auto number agenda items, add new lines, and perform other actions.
Generate Allows you to create a new agenda based on the associated template in Administration
Auto # Allows you to number the agenda items
AddAllows you to add a blank line above or below a selected line for on-the-fly new agenda item additions. Additionally,you can add an existing file or many files already in the system to an agenda, or make a copy of a selected line
Delete Allows you to remove any selected line(s) from the agenda
Go to File If an agenda item is selected, this button will open the legislative file’s original text
Agenda Item Fields
The Agenda item radio button, when selected, allows you to create a new agenda item or add an agenda item from alist. You can also select the settings for an agenda item.
1. Select the Agenda Item radio button to enable the agenda item fields.2. Complete the agenda Item fields. These fields are described below:
Agenda Item Fields
Item Description
File ID
ID of the Legislative File associated with theAgenda item; click within the field to enter the ID orclick the dropdown button to select a legislativefile
The file type of the selected legislative file displaysany file the meeting body can act on without a finalaction date; however, if entering a new file, select aFile Type from the dropdown menu
DescriptionThe file’s name; does not print on the report. Ifentering a new file, this displays the File Title.
CommentClick within this optional field to record notes orinstructions regarding the agenda item
Item #The number for each agenda item within theagenda form, click the Auto # button to generate
Header / Comment Fields
The Header / Comment button, when selected, allows you to create new headers or edit existing headers.
1. Select the Header / Comment radio icon to enable those fields.2. Complete the Header / Comment fields. These fields are described below:
Header/Comment Fields
Item Description
Header List Allows you to select a header from a list of headers used in the agenda template
StyleControls the font size and formatting the header uses when it appears on the agendareport
Description Contains the text of the header or the title\name of the legislative file
Item # Assigned numbers for headers on the agenda form. They do not print on the agendaand minutes and should not be changed
Comment Displays any notes or instructions for the associated header
The Tools dropdown menu is unique to each module. The following features can be found in the Agendas module’sTools menu.
Item Description
Security Log Allows you to view a list of all changes, the date, and time for the legislative file
Spell Allows you to spell check all text fields for the legislative file
Change Meeting DateOnly available in the Calendar tab; allows you to change a meeting date after the agenda isgenerated
Fix Line Numbers Allows you to fix line numbers if they are ever out of order and contain duplicates
Delete Multiple Lines Allows you to delete all selected lines
Error Log For support purposes only; to be used only with the guidance of the Granicus staff
Work Style Displays header lines in a text style similar to the header text for each line
LockAllows you to lock a file and prevent any changes until it is unlocked. If the file is already locked,this option will display as “Unlock”
Lock All LegislativeFiles
Allows you to lock all items listed on the agenda
Unlock All LegislativeFiles
Allows you to unlock all items listed on the agenda
Create Resolution From Create a legislative file from an added agenda item
Copy File Allows you to duplicate a selected legislative file
Refresh Updates the screen with any changes you or another user may have recently made
Standard Paragraph Allows you to store commonly used sentences and paragraphs in one location. You can copy thisstored copy into any text field in Legistar
Assign File Id's Allows you to automatically assign File ID’s to agenda items
Undo File IdAssignment Allows you to undo the assignment of File ID’s to agenda items
Export Data This will open the export data form for setting the values when exporting to MediaManager. Thisis only enabled if manual export is being used
Edit Export Options Allows you to edit the export settings
LiveManager Launches the Live Manager application for recording your meeting minutes and actions
Approval Web Link Used in conjunction with the Approval Tracking module
Delete PublishedAgendas from Calendar Allows you to remove the report if an agenda has been published to InSite
Attach File to SelectedRecords This will add an attachment to all files on the agenda in one step
Reviewing Legislative Files (Clerks)1. Enter or select an agenda date from the Date field.
2. Click Search (see figure).
Selecting the Agenda Date
3. Review the Status of the legislative files. Although the system will automatically notify approvers oftheir due dates, at this point you may also wish to send out a friendly reminder to the approvers toget their items approved before the agenda deadline.
4. Update the Status of the legislative files.
It is important to understand what criteria places a file in a particular place so you can troubleshoot todetermine why a legislative file is not on an agenda or isn’t in the right section. During Legistar trainingyou will be provided these exact details, or you can ask the system administrator to print you an agendadefinitions report.
You can create agendas with the click of one button. The Generate button in Legistar retrieves all the legislative filesmatching preset Agenda Definitions. These definitions set agenda order, headings, and the placement location oflegislative files.
It is important you understand the criteria for the placement of a legislative file on the agenda; this allows you totroubleshoot any agenda generation problems you may have.
The following additional variables determine where a file appears on an agenda:
• File Type• Status• Controlling Body• Agenda Date
The following Administration setting controls how the agenda is generated:
At the completion of the generation of your agenda, a corresponding minutes document is also created. This minutesdocument is an exact replica of the agenda and it is used to record the meeting’s motions and votes.
How to Generate an Agenda
To create a new agenda, you will combine the legislative files you previously created and organize them into themeeting agenda document. You have the options to either automatically generate the agenda or manually add lines tothe agenda form. The recommended method is to generate an agenda, which automatically will place the legislative filesin the correct position on the agenda. The manual method should be used for a special meeting or meeting cancellationnotice.
1. Click New from the Calendar tab.2. Select the meeting body from the Agenda for the drop-down menu.3. Verify the Date, Location, and Time default settings. Note that the Location field typically refers to a room, not a
street address. The Location and Time default settings are set in Administration > Government Bodies >Bodies.
4. Click the Agenda tab.5. Click Generate. The Agenda Status keeps the agenda from being published on InSite. When you click the
Generate button to create the agenda, the Agenda Status is set to Draft. When the Agenda Status is changed toFinal, the individual is able to view the agenda from InSite.
The Generate Button on the Agenda Tab
6. Confirm the agenda generates in the Agenda window. When the agenda is generated, Legistar combs through thedatabase and assigns legislative files to the agenda based on the Agenda Definitions and Agenda Dates you haveset for the selected meeting body. At this time you should review each legislative file and verify each is in itscorrect location.
After you are satisfied with your agenda, you must finalize it.
>>Next Section: Adding, Copying, and Deleting Agenda Lines
Adding, Copying, and Deleting Agenda LinesYou can edit your agenda by adding, copying, or deleting agenda lines.
Agenda Lines
There are two types of agenda lines; header lines and legislative files. The type of line is indicated by the Agenda Itemand Header / Comment radio buttons next to the File ID field.
• Header Lines- Procedural Items such as invocation and roll call or section titles such as “Communications fromMunicipal Agencies” or “Bills Introduced.”
• Legislative Files- Database files that are easily recognizable on the agenda form as they display File ID numbers.
Adding Agenda Lines
There are multiple ways to add new lines to the agenda document.
1. Right-click any line from the agenda document, or click Add at the bottom of the screen.2. Select one of the following:• Select Add after Selected Line to place the new line after the existing line.• Select Add before Selected Line to place the new line before the existing line.• Best Practice: Select Add Many Lines to enter more than one line after the existing line.
◦ Hold down Ctrl and select Legislative Files from the multiple file menus.◦ Click the larger arrow to move the files into the Agenda.
Copying Agenda Lines1. Select the legislative file you want to copy.2. Click the dropdown Add arrow > select the Copy Selected Line option.3. Confirm the line is added to the agenda form.4. Click Save.
Deleting Agenda Lines1. Select an agenda line from the Agenda window.2. Click Delete, or right-click the line you want to delete and select Delete from the context menu available.3. Click Yes at the confirmation dialog.
You can create agendas manually for special meetings or cancellation notices. Typically, these agendas will onlycontain a few agenda lines.
1. Verify you are on the Calendar tab of the Agenda module.2. Click New.3. Select the meeting body from the Agenda for the drop-down menu.4. Select the date from the Date menu.5. Confirm the default settings are accurate.6. Click the Agenda tab.7. Click the Add button and select one of the options from the drop-down menu available (see figure below).
Add Menu Options
Agenda Lines
There are two types of agenda lines; header lines and legislative files. The type of line is indicated bythe Agenda Item and Header / Comment radio buttons next to the File ID field.
• Header Lines- Procedural Items such as invocation and roll call or section titles such as “Communications from MunicipalAgencies” or “Bills Introduced.”
• Legislative Files- Database files that are easily recognizable on the agenda form as they display File ID numbers.
There are multiple ways to add new lines to the agenda document.
1. Right-click any line from the agenda document, or click Add at the bottom of the screen.
2. Select one of the following:
• Select Add after Selected Line to place the new line after the existing line.
• Select Add before Selected Line to place the new line before the existing line.
• Best Practice: Select Add Many Lines to enter more than one line after the existing line.
◦ Hold down Ctrl and select Legislative Files from the multiple file menus.
◦ Click the larger arrow to move the files into the Agenda.
Finalizing an AgendaAfter you have organized the agenda lines on the agenda form, complete the following steps to finalize the agenda.
Agenda Auto-Numbering
Only complete the steps in this section if you use agenda item numbers.
The default numbering structure assigns all of the legislative files under one heading a number in numerical order. Thenumbering starts over under any subsequent heading. However, the numbering could be structured differently if youchange the agenda numbering settings in Administration > System Settings.
1. Click the Auto-# button.
Auto # Button
2. Click Yes at the confirmation dialog.3. Confirm numbers have been added to the legislative files.
Agenda Status
The agenda status keeps the agenda from being published on InSite. When you click the Generate button to create theagenda, the agenda status is set to Draft. When the agenda status is changed to Final, the individuals to which yougave the proper security settings will be able to view the agenda
Creating a Board Agenda1. Click New at the top of the Agenda module from the Calendar tab.2. Verify the Date, Time, and Location are correct.3. Enter whether the meeting is regular, special, or rescheduled in the Notes field.4. Click Save.5. Click the Agenda tab > Generate. Selecting Generate applies agenda header lines and items to the agenda
based on the template set in Administration.6. Select an agenda item to place a new agenda line and click Add.7. Click the Auto # button to number the agenda lines > click Yes at the dialog.8. Click Reports and select the Board Agenda option. This may be renamed to something else, such as Meeting
Agenda, depending on how your organization chose to configure Legistar. See Setting Up Meeting AgendaReports for more details.
9. Configure the report settings. These settings are described below:
Show Cover Prints the cover page for the agenda report
Show File ID Displays each File ID for agenda items print on the report
Show Agenda Status Prints the word “Draft” on the agenda when in Draft status; this should be uncheckedwhen publishing the agenda
Show Legislative FileSponsors
Prints the sponsors for each agenda item on the report
List Attachments Prints a list of all supporting documentation for each agenda item
Show Agenda Notes Prints the notes taken on each line of the agenda
Show Legislative FileHistory
Prints the history associated with each agenda item
Show Legislative FileHistory Notes
Prints the notes that were taken in reference to each action taken on the agenda items
Show Text Title Prints the title contained in the Title box rather than the ..Title of the file text
Select Disability BoilerPlate
Allows users to select from various Disability Boiler Plates contained in Administration
10. Select the Report Destination.11. Click Run.12. Select Final from the Status drop-down menu on the Calendar tab.
Creating a Committee Agenda
The steps for making a committee agenda are similar to those for creating a board agenda, but no items areautomatically pulled in using the generate button. Only the agenda outline is created.
1. Click the New button at the top of the Agenda module from the Calendar tab.2. Verify the Date, Time, and Location are correct.
3. Click Generate from the Agenda tab.4. Select and right-click the appropriate header under which you want to list agenda items, then click Add. Insert an
agenda item that will be heard on that meeting.5. Click Auto # at the bottom of the Agenda tab.6. Click Reports and select Committee Agenda from the menu available. This may be named something else, such
as Meeting Agenda Outline Only, depending on how your organization has configured Legistar. See Setting UpMeeting Agenda Reports for more details.
7. Configure the report settings. These settings are described below:
Item Description
Show Cover Prints the cover page for the Agenda Report
Show File ID Prints the File ID for each agenda item on the report
Show Agenda StatusPrints the word “Draft” on the agenda when in draft status. This should be uncheckedwhen publishing the agenda
Show Legislative FileSponsors
Prints the sponsors for each agenda item on the report
List Attachments Prints a list of all supporting documentation for each agenda item
Show Agenda Notes Prints the notes taken on each line of the agenda
Show Legislative FileHistory
Prints the history associated with each agenda item
Show Legislative FileHistory Notes
Prints the notes taken in reference to each action taken on the agenda items
Show Text Title This will print the title contained in the Title box rather than the ..Title of the File text
8. Select the Report Destination and click Run.9. Select Final from the Status drop-down menu on the Calendar tab.
Publishing an Agenda to InSite
When you create the agenda without adding agenda items a notice about the upcoming meeting will automatically beplaced on the InSite page.
1. Select the agenda from the Agenda List in the Agendas module.2. Change the Status of the agenda to Final.3. Set the Destination to Publish to Calendar.4. Click Run.5. Click Yes at the Update Agenda URL popup if you would like to send the Agenda URL to Granicus MediaManager
for storage in the template. This will enable the agenda URL on the Granicus view page so the agenda is viewablewhen the meeting video is in playback.
Meeting Details
• When the status of the meeting is set to Final, the Meeting Details link under the Calendar tab will become live.• The Meeting Details link lists all of the legislative files on the agenda without including the Headers.
Agenda and Minutes Reports
• The agenda and minutes reports are not available on InSite until you publish them using the Publish to Calendaroption in the Reports window of Legistar.
• Publishing the agenda or minutes enables the appropriate hyperlink within the InSite calendar.
Item Description
Show Cover Displays an extra page with the logo, listing of body members, etc.
Show File ID Displays the legislative file ID on the report
Show Agenda StatusDisplays the meeting status, allowing individuals to distinguish between a draft and finalcopy of the report
Show Legislative FileSponsor
Displays the legislative file sponsor
Keep Section TogetherKeeps the sections together on one page; restricts a legislative file from starting on a newpage of the agenda
Show Notes Displays the Agenda Note on the report
List Attachments Lists all the attachments that are a part of the legislative file
Show Text Title Displays the ..title on the report
The Agendas report tab includes five report options which can be renamed in Administration. All reports have a criteriatab; this tab allows you to determine the variables that you want to display on the report every time you run it.
Meeting Agenda
The Meeting Agenda report creates the committee agenda. The boxes on the criteria page allow for some flexibilityon which data fields are shown.
1. Click Reports > select Meeting Agenda. If you don't see this option, check with your Legistar administrator toensure you are selecting the committee agenda report.
2. Configure the following settings as desired:
Item Description
Show Cover Prints the cover page for the Agenda Report
Show File ID Prints each File Id for agenda items on the report
Show Agenda StatusPrints the word “Draft” on the agenda when in draft status. This should be uncheckedwhen publishing the agenda
Show Legislative FileSponsors
Prints the sponsors for each agenda item on the report
List Attachments Prints a list of all supporting documentation for each agenda item
Show Agenda Notes Prints the notes taken on each line of the agenda
Show Legislative FileHistory
Prints the history associated for each agenda item
Show Legislative FileHistory Notes
Prints the notes that were taken in reference to each action taken on the agenda items
History Notes Prints the file history and notes from the history line
Keep Section Together This keeps items from being separated onto different pages
Show Text Title This will print the title contained in the Title box rather than the ..Title of the File text
3. Set the Destination option.4. Click Run.
Hearing Notice
The Agenda Hearing Notice report is a brief agenda overview designed to be sent to attendees before a meeting.
1. Click the Reports button > select Agenda Hearing Notice.2. Configure the following settings as desired:
Item Description
Name ListThis will auto-populate the Selected Names field with a pre-defined list created by the SystemAdministrator
SelectedNames
These names will print at the top of the report as addressees of the report
3. Set the Destination option.4. Click the Run button.
Printing Agenda Reports1. Select the agenda document you want to publish from the Calendar tab.2. Select Final from the Status drop-down menu.3. Click the Reports drop-down button, and select one of theoptions, depending on which report you'd like to run.4. Set the Destination to Printer.5. Click Run.
The following contains additional information on how to use InSite with your meeting agenda.
Meeting Details
When the status of the meeting is set to Final, the Meeting Details link under the Calendar tab will become live.
The Meeting Details link lists all of the legislative files on the agenda and allows users to upload Cancellation Noticesor other reports to a meeting.
Upload a Cancellation Notice
The Cancellation Notice Report allows the clerk to post a cancellation notice on InSite.
1. Sign in to InSite with your Legistar username and password.
2. Select the Meeting Details link attributed to the meeting that will be cancelled.
3. Click Add New File located next to Attachments.
4. Select the Agenda option.
5. Click in the File field and browse to your saved Cancellation Notice; select the notice.
6. Enter a file name in the Name field, i.e. “Cancellation Notice.”
To delete an agenda from Legistar, complete the following steps in the Agendas module:
1. Verify you are in Edit Record mode.2. Select the agenda document you want to remove from the Calendar tab.3. Select Edit > Delete Meeting.4. Click Yes at the confirmation prompt.
If an agenda has already been published to InSite, select Tools > Delete Published Agendas from Calendar andclick Yes at the confirmation prompt.
We've recently updated Legistar and LiveManager so that they work together better. Many of you may now beusing LiveManager in place of Meeting Manager. For help using LiveManager with Legistar, please see Workingwith Legistar and LiveManager.
We will be phasing out Meeting Manager over the next several months. See the articles below for instructions on usingMeeting Manager:
Getting Started in Meeting Manager
Admin Setup for Meeting Manager
Running a Meeting in Meeting Manager
Recording a Meeting in Meeting Manager
Indexing in Meeting Manager
Stopping the Meeting
>>Next Section: Meeting Finalization in the Minutes Module
Review the following sections for an overview of Meeting Manager’s features.
Encoder Control Buttons
Meeting Manager Encoder Control Buttons
• The Start button begins the recording and live streaming (if enabled) of your meeting.• The Pause button temporarily stops the recording of your meeting; the live stream of your meeting will continue to
broadcast when Pause is clicked.• The Stop button ends the recording and live streaming (if enabled) of your meeting. Only click this button when you
are absolutely sure the meeting is over.• The Extend button adds 30 minutes to the duration time of your meeting.• The Index button syncs a particular agenda item with a specific time in the video recording.
• The Attendance button captures the attendance of the meeting members.• The Vote button records the results of a vote.• The Review button allows the user to study the results of the recorded votes.• The Display button enables the public display of the meeting; this allows the public to view the results of votes.• The Start Timer button begins a timer for monitoring the duration of a speaker’s time.• The Stop Timer button ends the speaker’s timer.
The Action Summary, Agenda Notes, and Minutes Notes Tabs
Action summary tab
• The Action tab contains information on the selected agenda item. When a vote is taken on an item the results canbe found within this tab.
• In the Agenda Note tab you can record notes that will appear in the Agenda Note field in Legistar. You can chooseto make these notes public when you run and publish the Agenda Report.
• In the Minutes Note tab you can record notes that will appear as the Action Note in Legistar. You can choose tomake these notes public when you run and publish the Minutes Report.
Setup for Importing and Exporting Data to Granicus
Before you can record the meeting’s video and actions, you must verify certain settings are enabled in Legistar Admin.Theses settings allow your meeting data to be transferred to MediaManager and communicate with the encoder. Youonly have to set these settings once for each body type.
1. Launch Legistar Administration.2. Select Government Bodies from the navigation tree on left side of the interface.3. Click the MediaManager Export Settings tab.
4. Select the Body Type for which you want to apply MediaManager export settings.5. Enter the Duration for your event in minutes. This should be the maximum amount of time you think your event
will last. We recommend that you add an hour on to the meeting's expected length.6. Select the camera from the Camera drop-down menu. The camera refers to the encoder that records and
transfers live broadcasts to the Granicus DataCenter in real time.7. Select the video player template from the Player Template drop-down menu. The video player template is the web
design or “skin” that houses your video player.8. Select the Archive Folder in which you want the video recording of your meeting to reside in MediaManager.9. Select the status for your video recording from the Archive Status drop-down menu. This status will apply to the
video after it has been uploaded to Granicus.• Pending – The uploaded video status that holds the video in a private, intermediate state as you edit and finalize
and data. After you’ve completed your editing, you can set the status of the video to Public or Pending.• Public - The uploaded video status that allows citizens to view the recorded video of the meeting from your
InSite page. You can change the Public status to not-public or Pending at any time.• Not-Public – The uploaded video status that keeps the video private and available for internal viewing only. You
can change the Not-Public status to Public or Pending at any time.11. Click Save.12. Exit Administration.13. Select Tools > Refresh Administration to apply your changes.
Running a Meeting in Meeting ManagerThe following instructions explain the recommended workflow for performing meeting tasks in Meeting Manager.However, the structure of your meeting or other factors may require you to use a different workflow than the onedescribed here. Your Granicus Product Trainer can help you develop the best workflow for your meeting procedures.
Launching Public Display
Before your meeting begins, set up another computer installed with Legistar with a connection to a projector. On thissecond computer, launch Legistar and Meeting Manager, and enable the public display with the following instructions.
Public Display Settings1. Click the Granicus logo in the top left corner of Meeting Manager and click Options from the menu available.
• Time Limit: Enter an increment of time into the Time Limit field to set the amount of time a speaker has, ex.3:00
• Alert After: Enter an increment of time into the Alert After field to set at what time the speaker timer will warnthe speaker that time is running out, ex. 2:30. The alert counts down from the amount of time entered in the Alertafter field; for example, if you want the Alert after to occur where there is 30 seconds remaining of the allottedthree minutes, then enter 2:30 in the Alert after field.
3. Select the Display tab. You can enter the following settings:
• Font name- Enter a font for formatting text in the Display.• Font size- Enter a font size for formatting text in the Display.• Header row height- Enter the height in pixels for the header row.• Grid row height- Enter the height in pixels for the grid row.
4. Click OK.
Open the Display1. Select the Display button from the Meeting Manager interface.2. Confirm that anytime a vote is enabled the results of the vote flash on the public display.
3. Confirm that anytime the Speaker Timer is enabled a timer begins to countdown on the public display.
Running the Meeting
Starting the Meeting1. Click Start to start the encoder.
Start Button
Pausing the Meeting1. Click Pause to stop the recording of the meeting. This will not stop the live stream, however.2. Click Resume (the Start button) to start the meeting again.
If the duration time of your meeting begins to run out, use the Extend button to add an additional half-hour to youmeeting time. You can use this feature as often as you need to.
You can see the displayed amount of time remaining in your meeting beneath the Extend Meeting button.
1. Click Extend to add 30 minutes on to the meeting's duration.
Recording Attendance
You have to record the attendance of meeting members in order to record votes later in the meeting. RecordAttendance allows you to select individual attendance statuses for each meeting member.
1. Select the agenda item on which you want to index attendance. Generally, this is the Roll Call item.2. Click the Attendance button.3. Select Record Attendance, All Present, or All Absent.4. Select the individual meeting Status for each member. Select the least popular meeting statuses. Next, select All
Remaining- Present or All Remaining – Absent to complete the attendance.5. Click the Save Attendance button.
Recording Individual Attendance
Adding Meeting Members
You can add a meeting member on the fly by using the Add Member feature in Meeting Manager.The Add Member list is populated by the meeting member profiles entered in Legistar Admin. For
Agenda Notes appear in the Agenda Note field in Legistar. These notes will not become public until you publish theAgenda Report. Minutes Notes appear in the Action Note field and will not become public until you publish the MinutesReport.
1. Select an agenda item.2. Click the Agenda Note tab to enter a note on the agenda or the Minutes Note tab to enter a note on the minutes.3. Enter text in the center pane.
Entering an Agenda Note
Recording a Speaker1. Index the agenda item relevant to the speaker’s discussion.2. Record a note capturing the speaker’s information.3. Click the Start Timer button to begin the speaker timer.4. Click the Stop Timer button to stop the speaker timer.
Speaker Timer Buttons
Recording Actions
Recording a Unanimous Vote1. Index the agenda item on which you want to record an action.
2. Select Mover and Seconder from the appropriate drop-down menus.3. Select theaction from the Action drop-down menu.4. Select a Referred to option if necessary.5. Select Roll Call – All Yes or All No.6. Make any necessary edits to the Note field.
Recording a Unanimous Vote
Marking an Item for Consent
Generally, you will have already marked items for consent in Legistar. If you have not, right-click the agenda item >select Mark All Items as Consent.
1. Index the agenda item header marked for consent.2. Select Vote > Consent Action/Vote.3. Select the Mover, Seconder, Action, Vote type, then click OK to apply the standard action to all files selected.4. Click OK to apply to consent vote.
Occasionally, someone may request that an item marked as a consent item be removed from the consent agenda.To remove an item from the consent agenda, right-click the item and select Unmark this Item as Consent from thecontext menu available.
Recording Multiple Actions on an Item1. Index the agenda item on which you want to record multiple actions.2. Select the action from the Action drop-down menu.3. Select a referral from the Referred to drop-down menu if needed.4. Click Vote > Roll Call – New Vote.5. Select te Mover and Seconder from the Vote menu.6. Select the vote results for each meeting member.7. Click Save Vote .
9. Exit the Vote Task window.10. Enter any additional information in the note field.11. Right-click the agenda item and select duplicate this item.12. Confirm the item is duplicated.
Recording a Roll Call Vote1. Select the agenda item on which you want to record an action.2. Select the action from the Actions menu.3. Click Vote > select the Roll Call – New Vote option (to record individual votes), Roll Call- All Yes, or Roll Call-
All No.4. Select the Mover and Seconder in the vote window.5. Select the vote results for each meeting member.6. Click Save Vote.7. Enter any additional information in the Notes field of the Actions tab.
A Block vote must be unanimous in its results. Block votes will be identified in orange in the Agenda pane.
1. Index a header (parent) item.2. Select Vote > Block Action/Vote.3. Select the Mover, Seconder, and Action from the appropriate drop-down menus.4. Select the Referred to option and Due Date if necessary.5. Select the Select all button or the individual items for applying to the Block vote.6. Select Apply Above Action to All or Apply Standard Action to All to apply each Legislative File’s individual
standard action. The standard action is set in Admin > Legislative Files.7. Click OK.
After Roll Call votes have been recorded you can go back and review the votes’ results.
1. Click Review Votes.2. Review the votes in the Vote Matrix window.3. Click Export the votes to a PDF(optional). The PDF should automatically open in Adobe Reader.4. Click Close.
Indexing in Meeting ManagerIndexing agenda items syncs your meeting’s agenda with specific reference points in the meeting video. This allowscitizens to select an agenda item from your published agenda and then view the corresponding time in the meetingvideo in which the agenda item was discussed.
1. Double-click an agenda item to index it. Each indexed item is marked with a clock icon.
Indexed Agenda Items
Indexing Notes and Best Practices
• You can also index an item by selecting the item and clicking Index.• Indexing the first and last agenda items is a good idea as it records in your meeting video where the meeting begins
and where it ends.• The indexes you create during the meeting are not permanent. You have the options to edit all indexes after the
OverviewFrom the Minutes module you can create new and open existing minutes documents. Within the minutes document, youcan edit and record the meeting video and actions taken on agenda items during the meeting, process consent votes,and take notes. When you're finished reviewing your minutes, you can publish the minutes and meeting video to InSite.
1. Click Minutes on the left-hand side of the Legistar interface. The Minutes Module opens.
The Minutes Module
The Calendar Tab in the Minutes Module
When you select the Minutes button, the Minutes Module opens on the Calendar tab (see figure below). The Calendarinterface allows you to view the most recent minutes documents from meetings that occurred within the last 90 days.From this tab, you can search for a particular minutes document by selecting and entering criteria from the availablefields.
Minutes for the Limits your minutes search results to those for a particular meeting body
Location Allows you to search for the minutes by the location of where the meeting occurred
Notes Allows you to search for the minutes by any notes entered in the field
Date and Time Allows you to search for the minutes based on the previously set minutes date and time
Media Displays information on connecting to Granicus video
Status Allows you to search for the minutes per the status of the minutes document.
The Minutes Tab in the Minutes Module
The features in this tab allow you to generate or manually create minute lines. From this tab you can also move lines,add and delete lines, auto-number, and run reports.
To enable the Minutes tab, you have to double-click a meeting on the Calendar tab, or click the New button to generatea new Minutes document. The Minutes tab should open automatically; if it doesn’t, click the Minutes tab.
The Actions tab is used to enter roll call, actions, discussion notes, and Action text. This tab is not used for adding linesor marking lines for a consent vote; these functions must be done from the Minutes tab. This tab contains three sub-tabs on the right-hand portion of the screen.
The Actions Tab
Item Description
Item # Lists the item number of the legislative file. These do not print on the agenda and should not bechanged. Item numbers carry over from the agenda
File ID Lists the File ID of the legislative file, but is blank for header items
Ver
Version of the file connected to a Legislative File; determines which version prints on theMinutes report. If an amendment is made that causes a new version to be created, the first itemline should contain the old version number, and the second line should have the new versionnumber
DescriptionContains the text of the header; may also contain code to print a paragraph on the agenda orminutes reports. On lines associated with items, displays the File Name, which will not print onthe agenda report
StyleControls the font size and formatting for the header when it appears on the agenda report. Thisfield is not active on lines associated with legislative files
MoverAllows you to select the Mover on an agenda item from a pre-populated list set inAdmin
Seconder Allows you to select the motion Seconder from a pre-populated list
Action The result of a motion and vote taken on an agenda item
Sent toThe Sent To field shows the body the item is being referred to, and will set that body as theControlling Bodyfor that item. It is inactive unless the action calls for a target body
Due Date The Due Date is the date by which a response to a referral is required
Action Note The Action Note is any text on the discussion of the file or header
Time Index Point at which the agenda item is marked to sync with the video recording of the meeting
Action TextThis is the motion string of the action generated by Legistar. It can be modified for a specificline if a line requires any special verbiage
The Rec Votes Subtab
Rec (short for Record) Votes is the subtab used to enter the results of the vote on the selected line. When you selectthe Roll Call option as your vote type, this section loads a list of the meeting members as recorded in attendance. If anymembers are absent, this screen will reflect attendance status. You will not be able to record any actions or votes untilafter roll call has been entered.
Votes are entered by clicking on the box to the right of the voting member and selecting the correct vote taken by thatmember.
Consent Votes, sometimes called batch votes, allow actions to be taken on several items at once with only one vote.The system will automatically take the action that is designated in Administration as the Standard Action for each type ofmatter.
As soon as the agenda is generated, the document duplicates and the new copy becomes the minutes form. It isimportant to keep in mind that the minutes form is a draft and is not your final minutes document. You will use theminutes form for recording the actions and notes of the meeting.
After the meeting has occurred, the meeting’s events are recorded in the minutes form. These events include themotions, votes, notes, and other actions from the meeting. You can also enter detailed information and dialogue into theminutes form. Immediately following the meeting, you can create a summary report to distribute to meeting members.
1. Open your recent meeting from the Minutes module.2. Select the Actions tab.3. Select the agenda item you wish to edit. From here you can enter or edit additional information in the available
Editing Meeting VideoViewing Playback of the Meeting
You can use the Meeting Manager feature to play back video of your meeting; this is helpful for when you are editingindexes, notes, and other meeting data.
Using this feature, you can remove unwanted sections of your video archive and apply a new start and end time.
1. Click Play in the video player.2. Click Play again to pause the video at the time you want to set as your start time.3. Click the first Get from Player button to record the start time.4. Repeat steps one and two to locate the stop time.5. Click the second Get from Player button to record the stop time.6. Click Trim File to finalize your video trim.7. Click Play Video to review your trimmed file.
Every time a trim is generated on an archive, the system automatically creates a copy of the original archive andplaces it in the Recycle Bin in Granicus MediaManager. The title of the auto-saved archive appears with the words(Auto-Generated Trim Backup) in the title.
Warning! Whenever an archive is moved into the Recycle Bin, the system permanently deletes any archives 14days or older in the Recycle Bin. These deleted files are not recoverable.
Recovering Your Original Video Archive File
If you make a mistake when trimming your video file and would like to recover the original file, complete the followingsteps.
1. Launch your Granicus site at jurisdiction.granicus.com, ex. cityofsanfrancisco.granicus.com.
2. Click the Archives tab.
3. Click the Recycle Bin at the bottom of the Archive Folders list.
The Edit Indexes feature allows you to adjust the index syncing an agenda item with the recorded video.
Adjusting All Indexes
A feature in the Video Edit tool allows you to simultaneously adjust all of the indexes.
1. Select the Selected items by option.2. Enter the amount of time for which you want to update the indexes.3. Click the Update Indexes button.
The Update Indexes Button
Adjusting Individual Indexes1. Select an agenda item with a corresponding index.2. Click inside the Time Index field.3. Enter a new increment of time in the Time Index field.
4. Click the agenda item again to set the new index.5. Click Close.
Remove Selected Indexes1. Select an agenda item with an index.2. Press the Ctrl key and select additional agenda items with indexes (optional).3. Click the Remove Indexes button.
Remove All Indexes1. Click the Remove All Indexes button. This will remove all of the indexes within the indexed agenda items.
When the minutes document is generated, the status of the document is set to Draft to prevent other users from viewingthe minutes until the status is manually changed to Final.
Setting up Minutes for InSite
After the minutes are finalized, several processes occur automatically:
• When you create the minutes document without adding items, a notice of the upcoming meeting is put on the InSitepage.
• The Meeting Details link within the Calendar tab on InSite becomes a hyperlink as soon as the minutes’ status is setto Final. If you do not want the meeting details to be available, keep the status if the minutes in Draft.
• The Meeting Details hyperlink lists all of the minutes’ legislative files without the headers of the Minutes document.• Minutes reports are not available until they are posted to the InSite page using the Publish to Calendar option in
Reports.
Publishing the Minutes to InSite
In order to make the agenda or minutes report available to the public through InSite, the report must be published.
1. Select the minutes document you wish to publish.2. Select the Calendar tab.3. Set the meeting Status to Final.
Setting the Meeting Status to Final
4. Click the Reports button to choose the report you want to run.5. Set the Destination to Publish to InSite Calendar(PDF).6. Click Run to run the report. Legistar runs the report and makes a copy available to the public on InSite.
Publishing to InSiteThe Publishing status controls whether or not the archive is public to citizens on InSite.
1. Select Pending, Public, or Not Public from the Status dropdown menu of the Video Edit window.
Pending is the temporary status you will use for your video when you are not finished editing the content; when the videois set to Pending it is not available to the public.
If you select Public, the Video link on the InSite Calendar page will become active and the video will become availablefrom the InSite Archive page. The time lapse from when Public is selected to when the video appears is ten minutes.
The Not Public status restricts the video from public viewing.
There are multiple ways to add new lines to the minutes document.
1. Right-click any line from the minutes tab of the minutes document. Alternatively, you can click the Add menu atthe bottom of the screen.
2. Select one of the following:• Select Add after Selected Line to place the new line after the existing line.• Select Add before Selected Line to place the new line before the existing line.• Select Add Many Lines to enter more than one line after the existing line.
◦ Hold down Ctrl and select Legislative Files from the multiple file menu.◦ Click the larger arrow to move the files into the minutes.
4. Select a style from the Style dropdown menu if the line is a header. Each style has different font attributes.
Header List - Contains all of the headers available to add to your agenda during generation. Examples of useinclude adding a header for last minute legislative files and defining headers for new agendas and specialmeetings.
Copying Minutes Lines1. Select the minutes line you want to copy.2. Click the Add drop-down menu > select Copy Selected Line.3. Confirm the line is added to the agenda form below the original line.4. Click Save.
Copy Selected Line
Deleting Minutes Lines1. Select the minutes line you wish to delete.2. Click Delete. You can also right-click the minutes line and select Delete from the context menu.
The Minutes report tab includes three report options which can be renamed in Administration. All reports have a criteriatab; this tab allows you to determine the variables that you want to display on the report every time you run the report.
Meeting Minutes – This report is more formal compared to the others and includes a cover page and all the details ofthe meeting. However, you can rename the report and determine what prints on the report within the Criteria Optionssection of Administration.
Action Summary- This report only prints the legislative files, headers are not included. However, you can select othervariables to print in the Criteria Options section of Administration.
Meeting Referral Notice- This report produces all actions taken during the meeting, including those referred to anotherbody.
Printing the Minutes Report1. Click the Reports drop-down menu and select the Meeting Minutes option.2. Select Print from the Destination menu.3. Click Run.
The Action Summary ReportThe Action Summary prints a concise version of the minutes. This report lists all matters discussed in the currentmeeting and the actions taken upon each matter.
1. Select Reports > Action Summary.2. Configure the settings on the Action Summary interface. These settings are described below.
The Action Summary Interface
Item Description
Show Cover Prints the cover page
Show File ID Prints the File ID for each agenda item on the report
Show Minutes Status Prints the word “draft” on the minutes when in draft status. This should be uncheckedwhen publishing the minutes
Show Legislative FileSponsors
Prints the sponsors for each agenda item on the report
Show Action Notes Prints the notes taken on each line of the minutes
The Meeting Minutes report allows you to print all the details of a meeting, including votes, notes, and attendance. TheMeeting Minutes is a specially designed minutes report for the Board of Supervisors.
1. Select Reports > Meeting Minutes.2. Configure the settings in the Meeting Minutes report interface. These settings are described below.
The Meeting Minutes Report
Item Description
Show Cover Prints the cover page
Show File ID Prints the File ID for each agenda item on thereport
Show Minutes StatusPrints the word “draft” on the minutes when in draftstatus. This should be unchecked when publishingthe minutes
The Meeting Referral Notice report prints referral notices for each matter that has been referred to another body. Thisreport contains all the necessary information for the referral including any notes created for that minutes item.
1. Select Reports > Meeting Referral.2. Configure the settings on the Meeting Referral interface. These settings are described below.
The Meeting Referral Notice Interface
Item Description
Minutes Notice Header A free text field that a user can use to add a text block to the top of the report
Minutes Notice Footer A free text field that a user can use to add a text block to the end of a report
3. Select the Print and Destination options.4. Click Run.