14
Bonus EV3 Programming Lessons By Droids Robotics LEGO MINDSTORMS and Raspberry Pi IR Light controller
Bonus
EV3 Programming
Lessons
By Droids Robotics
LEGO MINDSTORMS and Raspberry Pi IR Light controller
Objectives
■ Program a Raspberry Pi to control a string of LED lights using an IR sensor
■ Learn how to make the EV3 communicate with a Raspberry Pi
■ Learn to use an IR sensor and IR LED to emulate remote signals
■ Prerequisites:
– Must have basic Python programming knowledge
– Must be comfortable using a Raspberry Pi (Unix/Linux commands & GPIO)
– Must be familiar with EV3 Bluetooth Messaging
– Must have done EV3 Raspberry PI Communicator lesson on EV3Lessons.com
© EV3Lessons 2016 (Last Update: 2/4/2016)
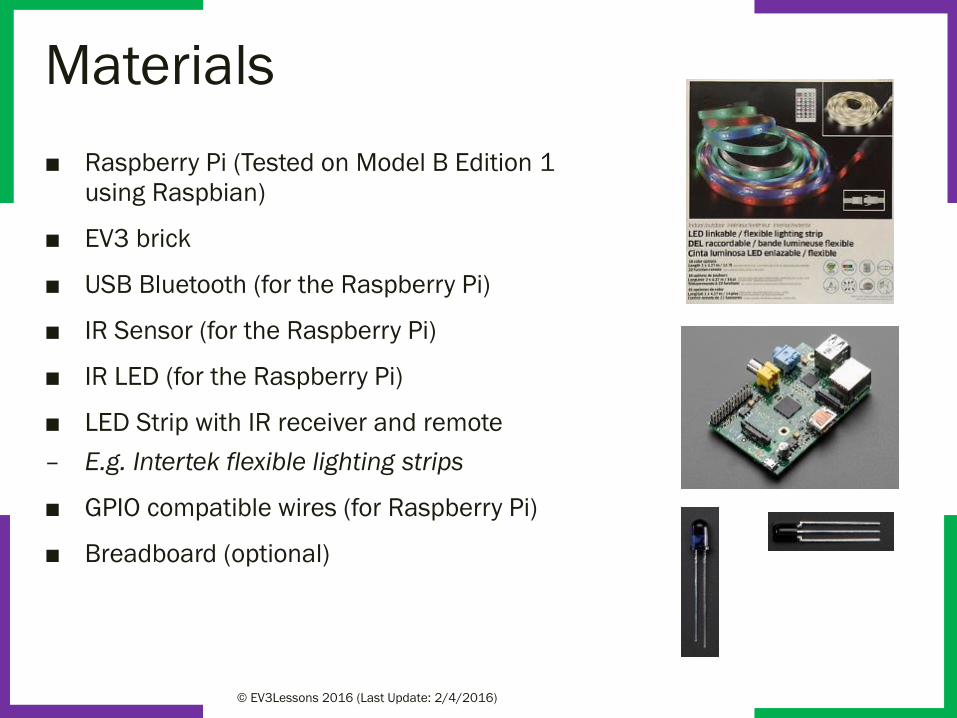
Materials
■ Raspberry Pi (Tested on Model B Edition 1
using Raspbian)
■ EV3 brick
■ USB Bluetooth (for the Raspberry Pi)
■ IR Sensor (for the Raspberry Pi)
■ IR LED (for the Raspberry Pi)
■ LED Strip with IR receiver and remote
– E.g. Intertek flexible lighting strips
■ GPIO compatible wires (for Raspberry Pi)
■ Breadboard (optional)
© EV3Lessons 2016 (Last Update: 2/4/2016)
Step 1: Pi Setup
■ Setup the IR sensor and IR LED on the GPIO (see next slide).
– Make sure you arrange the wires correctly based on the sensor you own.
(You can use a volt meter to arrange the wires correctly – to identify
ground, voltage and ground)
■ Install packages on the Raspberry Pi
– sudo apt-get update
– sudo apt-get upgrade
– sudo reboot
– sudo apt-get install lirc
– Make sure you have completed all the steps in the EV3-RPi
Communicator Lesson
© EV3Lessons 2016 (Last Update: 2/4/2016)
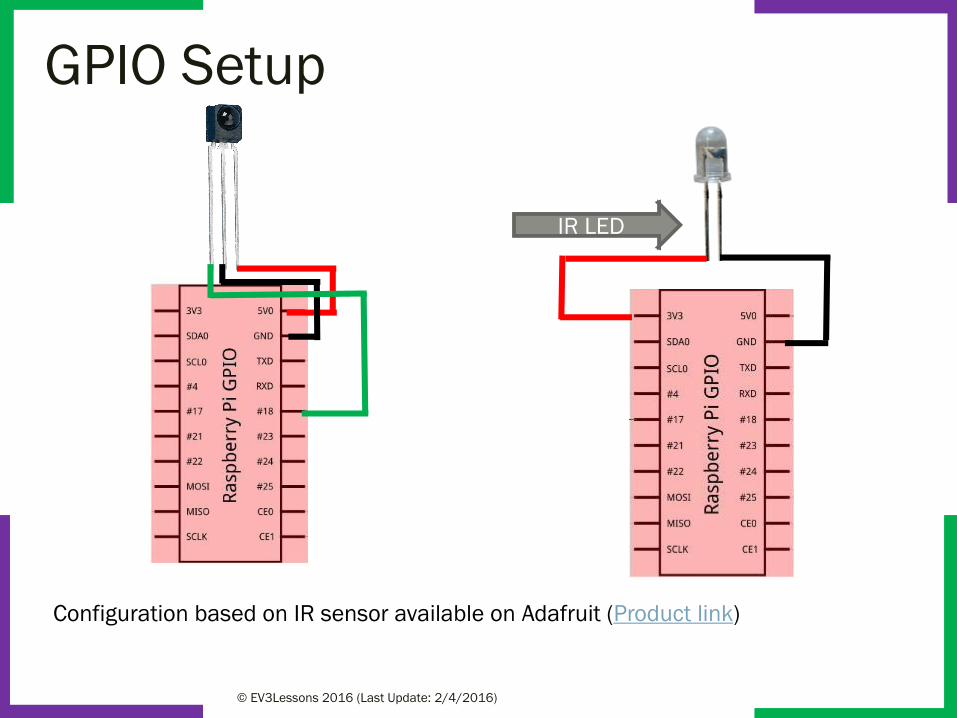
GPIO Setup
© EV3Lessons 2016 (Last Update: 2/4/2016)
IR LED
Configuration based on IR sensor available on Adafruit (Product link)

Step 2: Edit System Files
■ sudo nano/etc/modules
– add these lines at the end to make LIRC start up on boot and set the IR sensor pin to Pin-18 and IR LED pin to Pin-17:
– lirc_dev
– lirc_rpi gpio_in_pin=18 gpio_out_pin=17
■ Now we need to edit the LIRC hardware configuration file. Open it using: sudo nano/etc/lirc/hardware.conf
– Change the following lines:
– DRIVER="default"
– DEVICE="/dev/lirc0"
– MODULES="lirc_rpi"
■ sudo nano /boot/config.txt
– add the following line to the file:
– dtoverlay=lirc-rpi,gpio_in_pin=18,gpio_out_pin=17,gpio_in_pull=up
■ Reboot: sudo reboot
© EV3Lessons 2016 (Last Update: 2/4/2016)
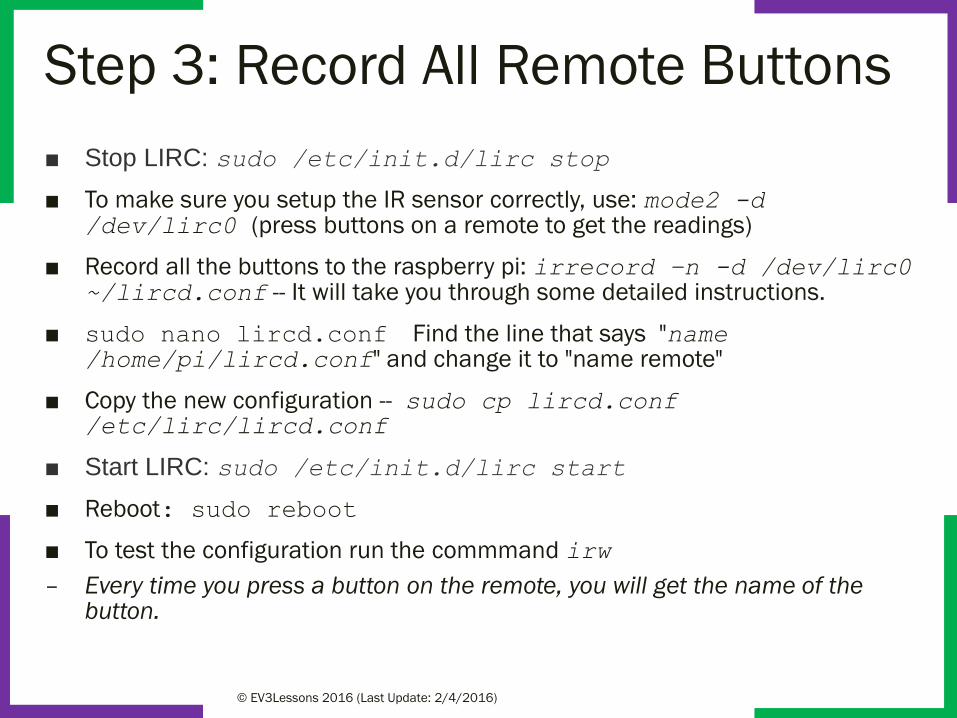
Step 3: Record All Remote Buttons
■ Stop LIRC: sudo /etc/init.d/lirc stop
■ To make sure you setup the IR sensor correctly, use: mode2 -d /dev/lirc0 (press buttons on a remote to get the readings)
■ Record all the buttons to the raspberry pi: irrecord –n -d /dev/lirc0
~/lircd.conf -- It will take you through some detailed instructions.
■ sudo nano lircd.conf Find the line that says "name /home/pi/lircd.conf" and change it to "name remote"
■ Copy the new configuration -- sudo cp lircd.conf/etc/lirc/lircd.conf
■ Start LIRC: sudo /etc/init.d/lirc start
■ Reboot: sudo reboot
■ To test the configuration run the commmand irw
– Every time you press a button on the remote, you will get the name of the button.
© EV3Lessons 2016 (Last Update: 2/4/2016)
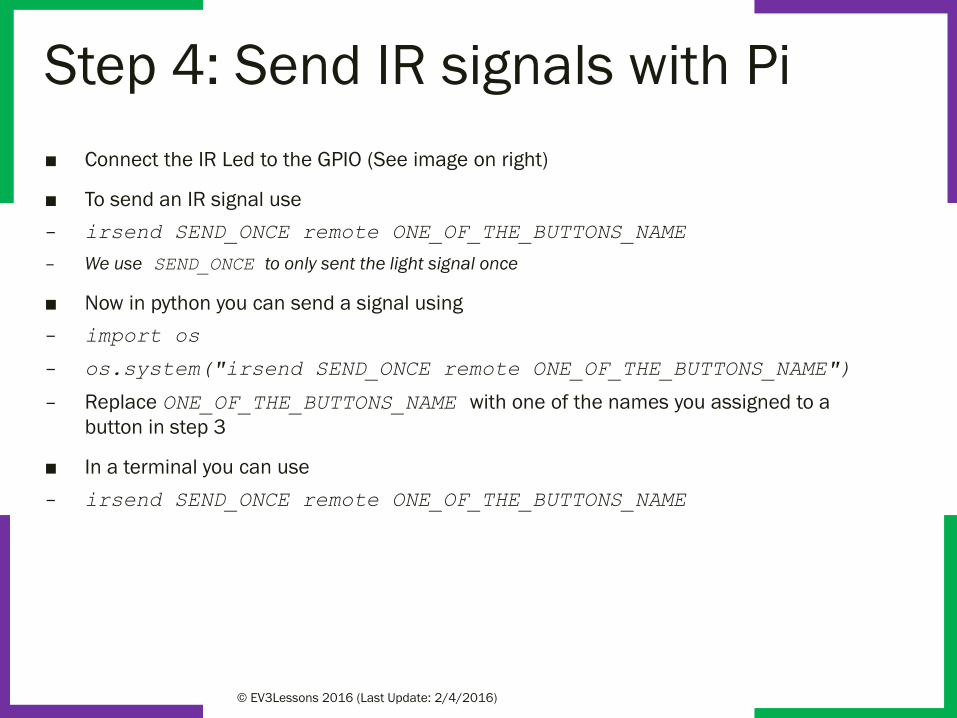
Step 4: Send IR signals with Pi
■ Connect the IR Led to the GPIO (See image on right)
■ To send an IR signal use
– irsend SEND_ONCE remote ONE_OF_THE_BUTTONS_NAME
– We use SEND_ONCE to only sent the light signal once
■ Now in python you can send a signal using
– import os
– os.system("irsend SEND_ONCE remote ONE_OF_THE_BUTTONS_NAME")
– Replace ONE_OF_THE_BUTTONS_NAME with one of the names you assigned to a
button in step 3
■ In a terminal you can use
– irsend SEND_ONCE remote ONE_OF_THE_BUTTONS_NAME
© EV3Lessons 2016 (Last Update: 2/4/2016)

Step 5: Bluetooth EV3 to Pi (If you are not already connected)■ Run hcitool scan to find the mac address of EV3 (will look something
like this: 00:16:53:3F:2F:C3)
■ Run bluetooth-agent 1234 & :proxy for entering passcode for ev3
■ Run sudo rfcomm connect /dev/rfcomm0 MAC_ADDRESS &
:to connect the ev3 (press enter if any message(s) appears on the screen)
■ If you are not returned to a terminal, try pressing “Return/Enter”. If that did not work you probably forgot the & symbol.
© EV3Lessons 2016 (Last Update: 2/4/2016)
Step 6: Base Code
■ Open RPi code you made in the EV3-RPi Communicator Lesson
■ Open EV3 code you made in the EV3-RPi Communicator Lesson
© EV3Lessons 2016 (Last Update: 2/4/2016)
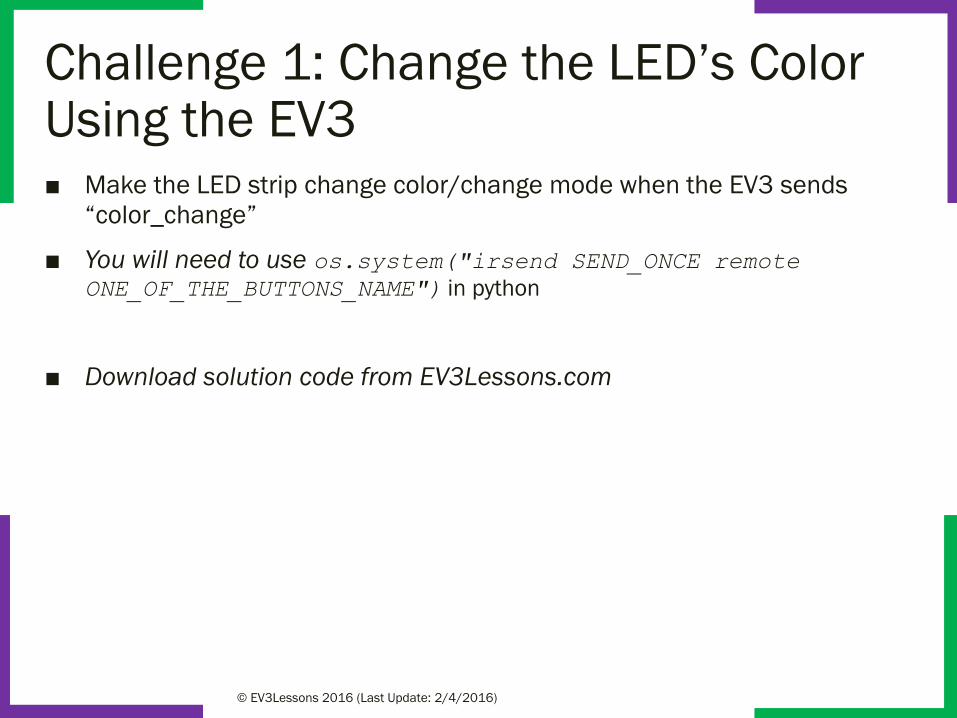
Challenge 1: Change the LED’s Color Using the EV3■ Make the LED strip change color/change mode when the EV3 sends
“color_change”
■ You will need to use os.system("irsend SEND_ONCE remote
ONE_OF_THE_BUTTONS_NAME") in python
■ Download solution code from EV3Lessons.com
© EV3Lessons 2016 (Last Update: 2/4/2016)
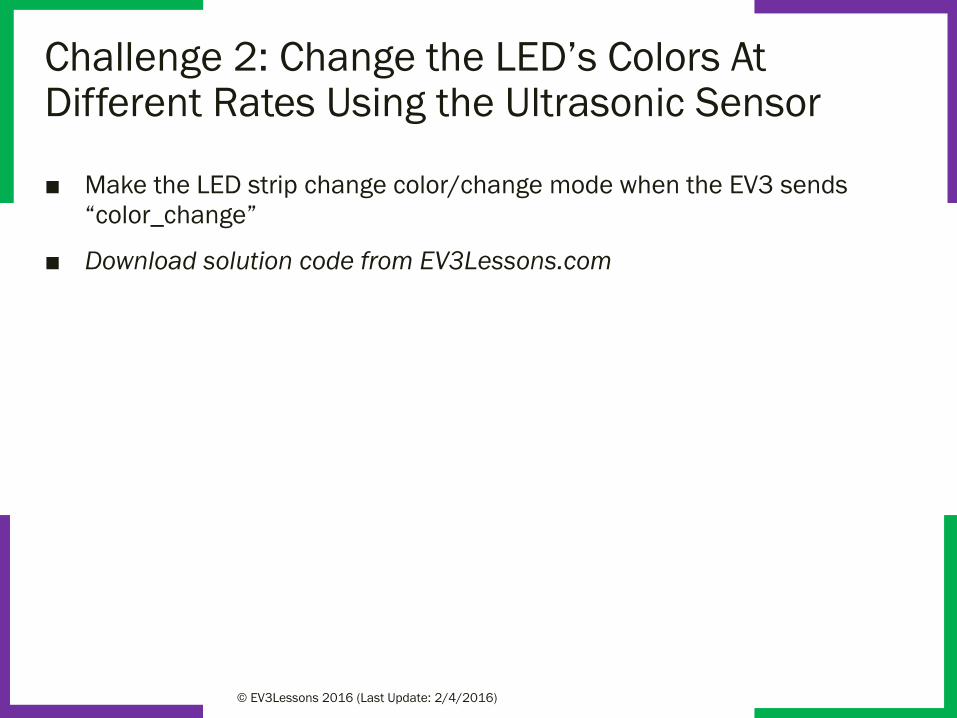
Challenge 2: Change the LED’s Colors At Different Rates Using the Ultrasonic Sensor
■ Make the LED strip change color/change mode when the EV3 sends
“color_change”
■ Download solution code from EV3Lessons.com
© EV3Lessons 2016 (Last Update: 2/4/2016)
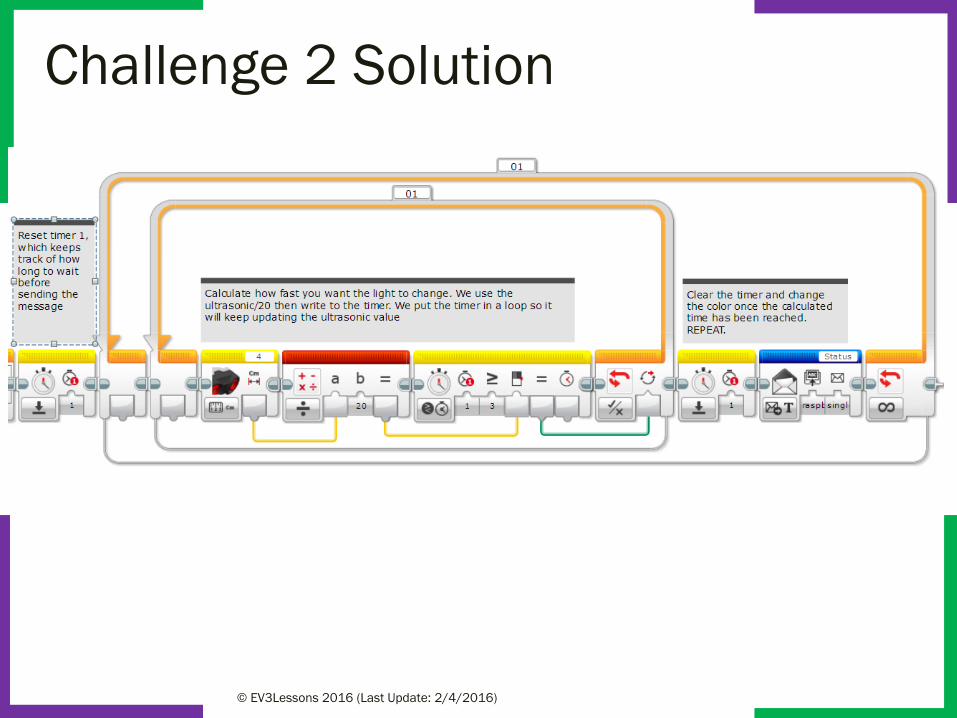
Challenge 2 Solution
© EV3Lessons 2016 (Last Update: 2/4/2016)
CREDITS• This tutorial was created by Sanjay Seshan and Arvind Seshan from Droids
Robotics.
• More lessons are available at www.ev3lessons.com
• Author’s Email: [email protected]
• Credits: Antzy Carmasaic for the IR remote recorder & gipprojects for the code
to connect a Raspberry Pi to an EV3
© EV3Lessons 2016 (Last Update: 2/4/2016)
This work is licensed under a Creative Commons Attribution-
NonCommercial-ShareAlike 4.0 International License.


