Chapter 12 Maintain SWARM Reports 12-1 Lesson 12: Maintain SWARM Reports Objectives • Enter a SWARM report Prerequisites • Have account access in CIWQS to the SWARM Module Business Rules • Minimum Acceptable Data Entry – Log receipt date of SWARM Reports • Requested Minimum Data Entry – Log Sampling Results & receipt of SWARM Reports Logging Receipt of Annual Reports NOTE: Please note that this document is for internal use only. A "discharger" version has been created and is posted on the internet as well as the "SWARM Help" (http://www.waterboards.ca.gov/stormwtr/docs/swarm/swarm_help.pdf ) link on every SWARM screen. 1. After logging into CIWQS, click the link titled "SWARM – Storm Water Annual Report Monitoring". 2. In the SWARM module, RB staff can log Annual Reports multiple ways: • Clicking the link titled “Record Annual Report Receipt Dates” and “mass” logging receipt dates (Process A). or; • Searching for the facility by using the any of the following search criteria: WDID No., Reporting Period, Report Status, Region, etc. and logging the receipt dates for individual facilities (Process B). 3. Process A: • Click “Record Annual Report Receipt Dates” link.
Transcript
Chapter 12 Maintain SWARM Reports 12-1
Lesson 12: Maintain SWARM Reports
Objectives
• Enter a SWARM report Prerequisites
• Have account access in CIWQS to the SWARM Module Business Rules
• Minimum Acceptable Data Entry – Log receipt date of SWARM Reports • Requested Minimum Data Entry – Log Sampling Results & receipt of
SWARM Reports
Logging Receipt of Annual Reports
NOTE: Please note that this document is for internal use only. A "discharger" version has been created and is posted on the internet as well as the "SWARM Help" (http://www.waterboards.ca.gov/stormwtr/docs/swarm/swarm_help.pdf) link on every SWARM screen.
1. After logging into CIWQS, click the link titled "SWARM – Storm Water Annual Report
Monitoring". 2. In the SWARM module, RB staff can log Annual Reports multiple ways:
• Clicking the link titled “Record Annual Report Receipt Dates” and “mass” logging receipt dates (Process A). or;
• Searching for the facility by using the any of the following search criteria: WDID No., Reporting Period, Report Status, Region, etc. and logging the receipt dates for individual facilities (Process B).
• Select the appropriate Reporting Year from the drop down menu. • Enter the Report Receipt Date in the following format mm/dd/yyyy. • Enter either the WDID or Sequence Number in the WDID field and click “Add WDID”
button.
NOTE: If the WDID or Sequence was entered incorrectly (typo), click the “Remove ?” link to delete it from the screen.
NOTE: If the facility has already been entered, an error code will display in the “Reason for
not able to save” column.
• A new row will appear automatically after a valid WDID or Sequence is entered. • Once all the WDIDs have been entered for a specific day, click the “Entry Complete,
Save Dates” button. • Repeat the process for other dates.
4. Process B: • Search for the facility by using the any of the following search criteria: WDID No.,
Reporting Period, Report Status, Region, etc. and click the “Facility Name”.
NOTE: When searching for a facility, verify that the correct Reporting Period is selected. If an annual report is entered into the system after July 1, "Any" should be selected in the "Report Status" field.
Chapter 12 Maintain SWARM Reports 12-3
• Select the correct reporting period.
• Select "YES" to fill out an empty report.
• Click the "Save" Tab.
• Click the “Perform Completion Check” button.
• Enter the receival date in the "Date Report Received" field by using the calendar button and click the "Save Annual Report" button.
• A receipt will be generated upon saving.
Chapter 12 Maintain SWARM Reports 12-4
Entering a "complete" Annual Report
1. After logging into CIWQS, click the link titled "SWARM – Storm Water Annual Report Monitoring".
2. In the SWARM module, search for the facility by using the any of the following
search criteria: WDID No., Reporting Period, Report Status, Region, etc.
NOTE: When searching for a facility, verify that the correct Reporting Period is selected. If an annual report is entered into the system after July 1, "Any" should be selected in the "Report Status" field.
3. Select the correct reporting period.
4. Verify the information on the "General Info" Tab. In order to change the information
on this screen, please fax a copy of the cover sheet with the corrections noted on it to 916-341-5543.
5. Click the "Sampling" Tab. Select whether or not the facility is exempt from collecting and analyzing samples from two storm events and click "Save".
a. If answer is "yes", the following screen will appear. The system will flow through the rest of Section D. After clicking "save" on the last question of Section D, the system will be redirected to the "Quarterly Visual Observations" Tab.
Chapter 12 Maintain SWARM Reports 12-5
b. If answer is "no", the following screen will appear. The system will flow through the rest of Section E.
6. Click the "Mon Locs" Tab. Click the "Create a New Monitoring Location" button if the appropriate monitoring location hasn’t already been created.
Chapter 12 Maintain SWARM Reports 12-6
7. Enter information on this screen as follows:
• Click the "Facility" drop-down list and select the facility.
• For the "Identifier" and "Name" fields, choose a monitoring location name and enter it in each field. Naming suggestions as follows: "Mon-1" for the first monitoring location, "Mon-2" for the second monitoring location, etc.
• Click the "Type" drop-down list and select "Effluent Monitoring".
• Although the "Description" field is not required, the option to further
describe the monitoring location is available (e.g. NW outfall near employee parking lot)
• Click "Save" and repeat these steps to add all monitoring locations.
8. Click the “CDF” Tab.
Chapter 12 Maintain SWARM Reports 12-7
NOTE: The CIWQS Data Format (CDF) Microsoft Excel-based file allows you to configure your data into a format that CIWQS will understand and interpret correctly. You can open the CDF file in Excel and configure it on the basis of your permit requirements. Important Note: The Tools require that macros be enabled. NOTE: Use of the CDF tool is not mandatory. Dischargers are still able to enter data via the “Raw Data” Tab. The CDF tool will most likely be more useful for larger facilities with multiple monitoring locations and multiple additional parameters. If a facility has 1-3 monitoring locations with basic parameters, the CDF tool might be more time consuming than using the “Raw Data” Tab. NOTE: If the CDF tool is used, data entry is not necessary under the “Raw Data” tab as the data was uploaded via the CDF tool.
• Download the CDF Tool (zipped file) and CDF Customization File by clicking the hyperlinks.
• Unzip the CDF Tool, open the Excel file titled “SwCDFTool.xls”, and
enable the macros.
• Once the spreadsheet opens, click the “Browse” button under the “General” Tab and upload the CDF Customization File. This customized file contains SIC code-specific parameters that are required to be analyzed.
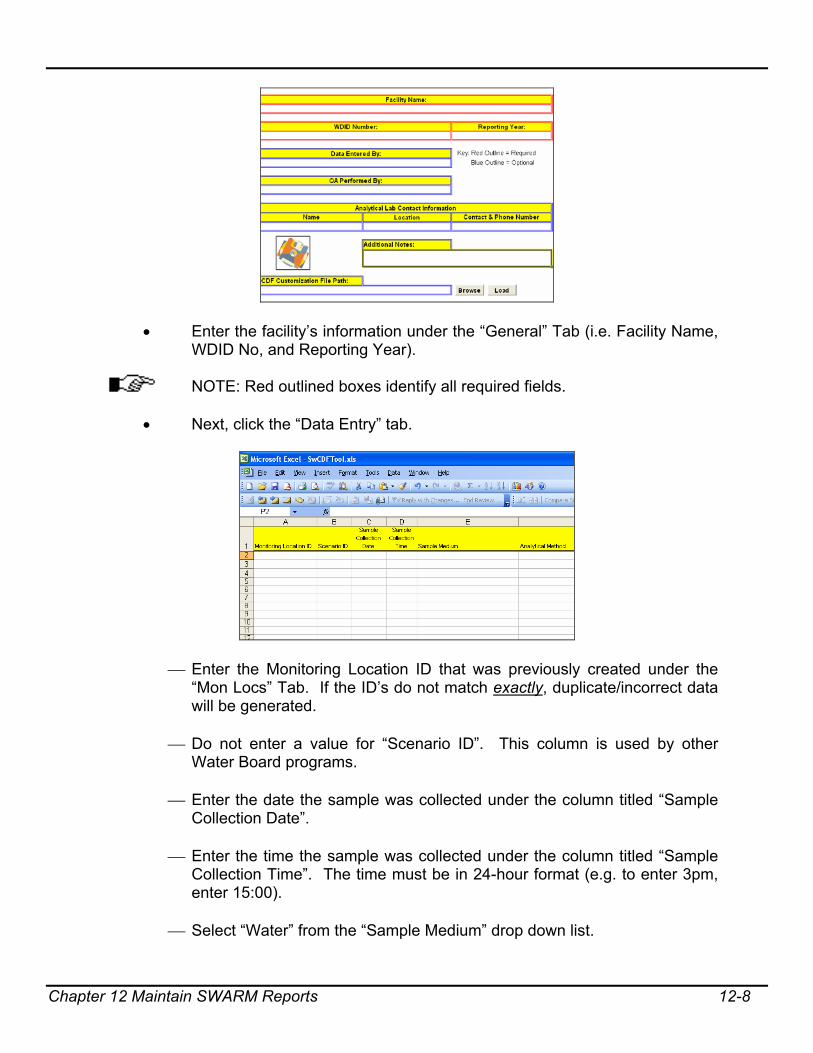
Chapter 12 Maintain SWARM Reports 12-8
• Enter the facility’s information under the “General” Tab (i.e. Facility Name, WDID No, and Reporting Year).
NOTE: Red outlined boxes identify all required fields.
• Next, click the “Data Entry” tab.
Enter the Monitoring Location ID that was previously created under the “Mon Locs” Tab. If the ID’s do not match exactly, duplicate/incorrect data will be generated.
Do not enter a value for “Scenario ID”. This column is used by other
Water Board programs. Enter the date the sample was collected under the column titled “Sample
Collection Date”.
Enter the time the sample was collected under the column titled “Sample Collection Time”. The time must be in 24-hour format (e.g. to enter 3pm, enter 15:00).
Select “Water” from the “Sample Medium” drop down list.
Chapter 12 Maintain SWARM Reports 12-9
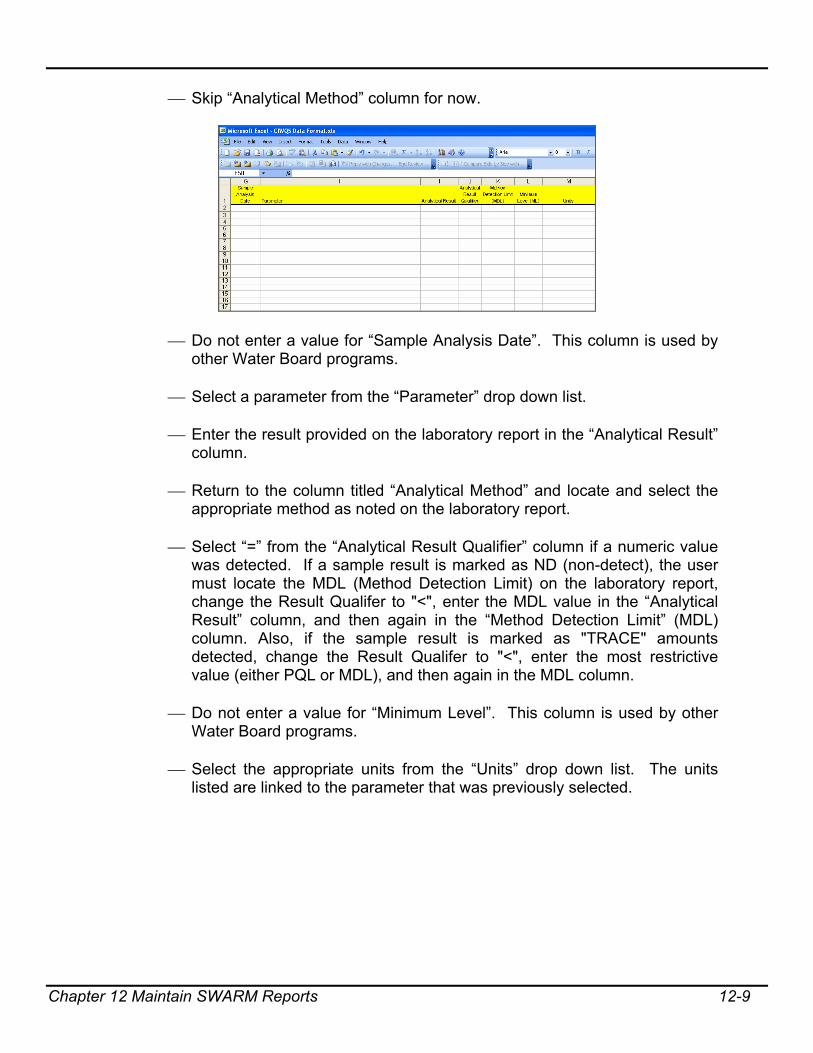
Skip “Analytical Method” column for now.
Do not enter a value for “Sample Analysis Date”. This column is used by other Water Board programs.
Select a parameter from the “Parameter” drop down list.
Enter the result provided on the laboratory report in the “Analytical Result”
column.
Return to the column titled “Analytical Method” and locate and select the appropriate method as noted on the laboratory report.
Select “=” from the “Analytical Result Qualifier” column if a numeric value
was detected. If a sample result is marked as ND (non-detect), the user must locate the MDL (Method Detection Limit) on the laboratory report, change the Result Qualifer to "<", enter the MDL value in the “Analytical Result” column, and then again in the “Method Detection Limit” (MDL) column. Also, if the sample result is marked as "TRACE" amounts detected, change the Result Qualifer to "<", enter the most restrictive value (either PQL or MDL), and then again in the MDL column.
Do not enter a value for “Minimum Level”. This column is used by other
Water Board programs.
Select the appropriate units from the “Units” drop down list. The units listed are linked to the parameter that was previously selected.
Chapter 12 Maintain SWARM Reports 12-10
Enter the name of the person who collected the sample in the “Sampling Person Name” column.
Enter the title of the person who collected the sample in the “Sampling
Person Title” column (Plant Manager, Maintenance Manager, etc).
Enter the time the discharge began in the “Discharge Time” column. The time must be in 24-hour format (e.g. to enter 3pm, enter 15:00).
Do not enter a value for “Rainfall Amount”. This column is used by other
Water Board programs.
Repeat process for all remaining parameters shown in the “Parameter” drop down list.
Return to the “General” Tab within the CDF tool and click the diskette image. This zips the Excel file which will allow it to be uploading into SWARM.
Chapter 12 Maintain SWARM Reports 12-11
A window will appear (similar to one shown above) and save the zipped file.
Return to the “CDF” Tab to upload the zipped file that has been created by
browsing for the file and clicking the “Upload File” button.
9. Click the "Raw Data" Tab.
NOTE: If data was entered via the CDF tool, the “Raw Data” Tab can be skipped.
• Click the “Create New Event” button to create a new record.
Chapter 12 Maintain SWARM Reports 12-12
NOTE: The basic parameters and parameters specific to the facility’s SIC Code (s) will populate the table.
• Click the "Monitoring Location" drop-down to choose the monitoring
location for this sample.
• Enter the date and time of the sampling event. The date and time must be in the following format: MM/DD/YYYY HH:MM:SS. There must be a space in between the date and time, and the time must be in 24-hour format (e.g. to enter March 1, 2006 at 3pm, enter 03/01/2006 15:00:00).
• Enter the time the discharger began in the “Time Discharger Started” field.
The time must be in 24-hour format.
• Enter the name of the person who collected the samples as well as that person’s title in the appropriate fields.
10. Enter the results for all the parameters listed.
• If a parameter is displayed and is not required, enter zero for that
parameter result. Directions on how to delete this record are described below.
• If a sample result is marked as ND (non-detect), the user must locate the
MDL (Method Detection Limit) on the laboratory report, change the Result Qualifer to "<", enter the MDL value, and then again in the MDL column. Also, if the sample result is marked as "TRACE" amounts detected, change the Result Qualifer to "<", enter the most restrictive value (either PQL or MDL), and then again in the MDL column.
Chapter 12 Maintain SWARM Reports 12-13
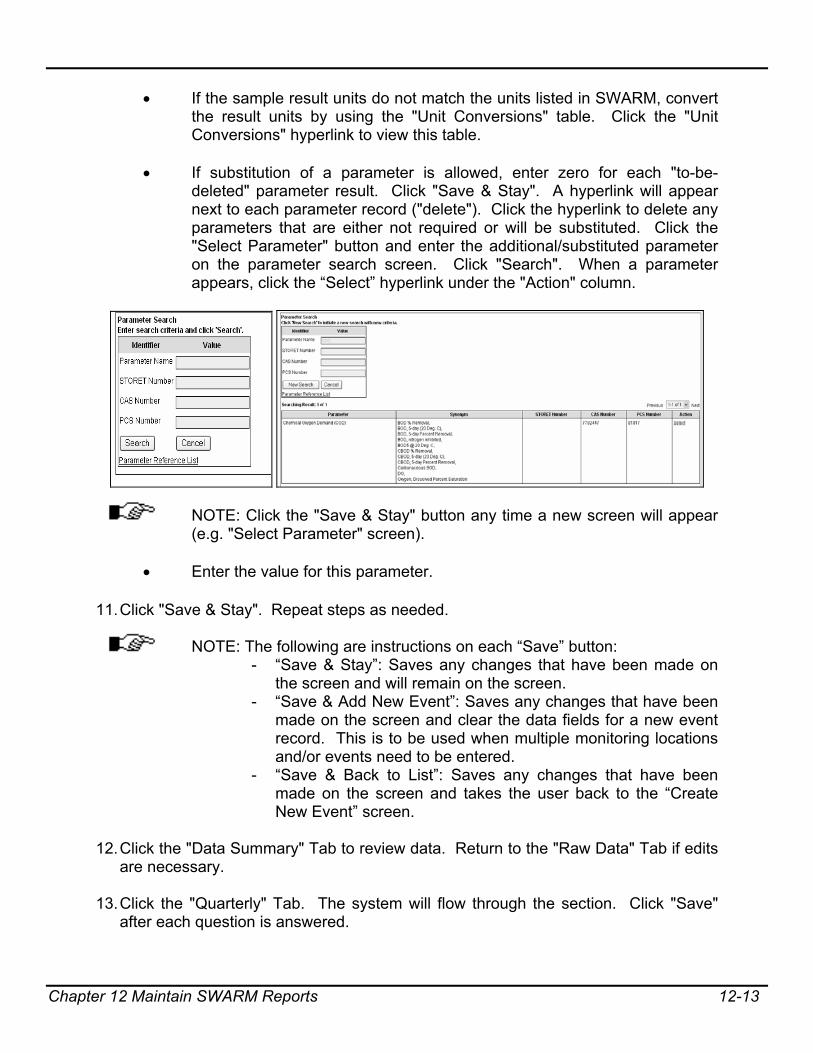
• If the sample result units do not match the units listed in SWARM, convert the result units by using the "Unit Conversions" table. Click the "Unit Conversions" hyperlink to view this table.
• If substitution of a parameter is allowed, enter zero for each "to-be-
deleted" parameter result. Click "Save & Stay". A hyperlink will appear next to each parameter record ("delete"). Click the hyperlink to delete any parameters that are either not required or will be substituted. Click the "Select Parameter" button and enter the additional/substituted parameter on the parameter search screen. Click "Search". When a parameter appears, click the “Select” hyperlink under the "Action" column.
NOTE: Click the "Save & Stay" button any time a new screen will appear (e.g. "Select Parameter" screen).
• Enter the value for this parameter.
11. Click "Save & Stay". Repeat steps as needed.
NOTE: The following are instructions on each “Save” button: - “Save & Stay”: Saves any changes that have been made on
the screen and will remain on the screen. - “Save & Add New Event”: Saves any changes that have been
made on the screen and clear the data fields for a new event record. This is to be used when multiple monitoring locations and/or events need to be entered.
- “Save & Back to List”: Saves any changes that have been made on the screen and takes the user back to the “Create New Event” screen.
12. Click the "Data Summary" Tab to review data. Return to the "Raw Data" Tab if edits
are necessary.
13. Click the "Quarterly" Tab. The system will flow through the section. Click "Save" after each question is answered.
Chapter 12 Maintain SWARM Reports 12-14
14. Click the "Monthly" Tab. The system will flow through the section. Click "Save" after each question is answered.
Chapter 12 Maintain SWARM Reports 12-15
15. Click the "Evaluation" Tab. The system will flow through the section. Click "Save" after each question is answered.
16.Since the Annual Report's receival date has already been logged, data entry is complete.
NOTE: It is not required for staff to transcribe the discharger's explanations. It is
suggested that staff review the explanations as the Annual Report is being entered to determine whether or not they are valid.
17. Click the “Notes” Tab.
• This tab is to be used as Regional Board staff notes after reviewing an Annual Report.
• Select the appropriate RB staff name from the “Note By:” drop down menu. • Enter short notes in the “Notes” field. Remember that everything is considered
Public Record and can/will be retrieved if requested.
Chapter 12 Maintain SWARM Reports 12-16
• Click the “Save” button to save the entry. • If an error (typographical error) is observed or if more details are needed, the
note can be deleted by clicking the “delete” hyperlink. Deleting a Partially Entered/Abandoned Annual Report for Paper Report Entry
NOTE: The staff listed below are the only individuals who have been granted access to delete partially entered/ abandoned annual reports. Please provide the delegated individual with the list of WDID numbers for deletion.
Regional Board Staff R1 Rick Azevedo R2 Rico Duazo R3 Donette Dunaway R4 Enrique Loera R5R George Day R5S Jatin Khandwala R5F Dale Harvey R6A & B Robert Erlich R7 John Carmona R8 Michelle Beckwith & Nam Nguyen R9 Tony Felix
1. Search for the facility using the Facility Search Screen. Once the facility's record is located,
click the "Delete" hyperlink.
2. A new screen will appear and ask the following questions:
a. If answer is "no", the user is directed back to the search screen. b. If answer is "yes", a new screen will appear and ask the following
confirmation question:
Chapter 12 Maintain SWARM Reports 12-17
c. Enter complete WDID number (including spaces). The system will validate the WDID number, delete the record, and return to the search screen.
Exempting Facility from Submitting an Annual Report Through SWARM Module
3. NOTE: The staff listed in the previous section are the only individuals who have been
granted access to exempt a facility from submitting an Annual Report. Please provide the delegated individual with the list of WDID numbers for exemption.
1. Search for the individual facilities that will be exempt from submitting an Annual
Report. 2. Click the appropriate “Yes” hyperlink in the “Report Required?” column.
Chapter 12 Maintain SWARM Reports 12-18
3. Select “No” from the “Report Required?:” drop down menu. 4. Select the appropriate reason why submittal of the Annual Report is not required.