32
Lessons & Activities to Complement
Lessons & Activities to Complement

3 Illinois Agriculture in the Classroom
You, Too, Can Be Like Mr. Mattoo! Pages 4-5
A “Souped-up Balloon” Pages 5-6
Hungry Illinois Caterpillar Pages 7-8 Tops and Bottoms Pages 9-10
“Souper” Detective Page 11
Think Inside the Box! Page 12
Mystery “Souper”star Page 13
Produce Pals Page 14
Beanie Baby Page 15
Tomato Spinners Page 16
3-D Pumpkins Page 17
Garden in a Glove Page 18
Grow Your Own Soup Pages 19-21 “Souper” Surveys Pages 22-23
Measure It! Page 24
Corn Field Math Pages 25-28
Probing Into Plant Parts Pages 29 Power Seeds Pages 30-31
Table of Contents
4 Illinois Agriculture in the Classroom
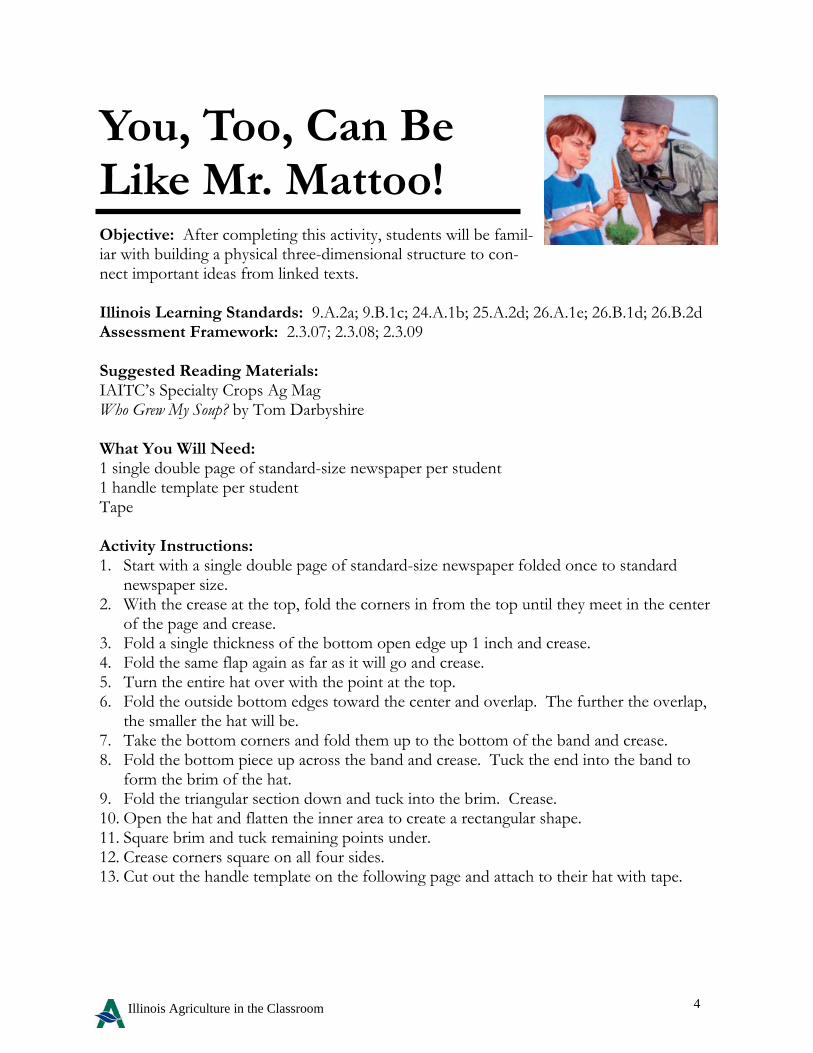
You, Too, Can Be Like Mr. Mattoo! Objective: After completing this activity, students will be famil-iar with building a physical three-dimensional structure to con-nect important ideas from linked texts. Illinois Learning Standards: 9.A.2a; 9.B.1c; 24.A.1b; 25.A.2d; 26.A.1e; 26.B.1d; 26.B.2d Assessment Framework: 2.3.07; 2.3.08; 2.3.09 Suggested Reading Materials: IAITC’s Specialty Crops Ag Mag Who Grew My Soup? by Tom Darbyshire What You Will Need: 1 single double page of standard-size newspaper per student 1 handle template per student Tape Activity Instructions: 1. Start with a single double page of standard-size newspaper folded once to standard
newspaper size. 2. With the crease at the top, fold the corners in from the top until they meet in the center
of the page and crease. 3. Fold a single thickness of the bottom open edge up 1 inch and crease. 4. Fold the same flap again as far as it will go and crease. 5. Turn the entire hat over with the point at the top. 6. Fold the outside bottom edges toward the center and overlap. The further the overlap,
the smaller the hat will be. 7. Take the bottom corners and fold them up to the bottom of the band and crease. 8. Fold the bottom piece up across the band and crease. Tuck the end into the band to
form the brim of the hat. 9. Fold the triangular section down and tuck into the brim. Crease. 10. Open the hat and flatten the inner area to create a rectangular shape. 11. Square brim and tuck remaining points under. 12. Crease corners square on all four sides. 13. Cut out the handle template on the following page and attach to their hat with tape.
5 Illinois Agriculture in the Classroom
6 Illinois Agriculture in the Classroom
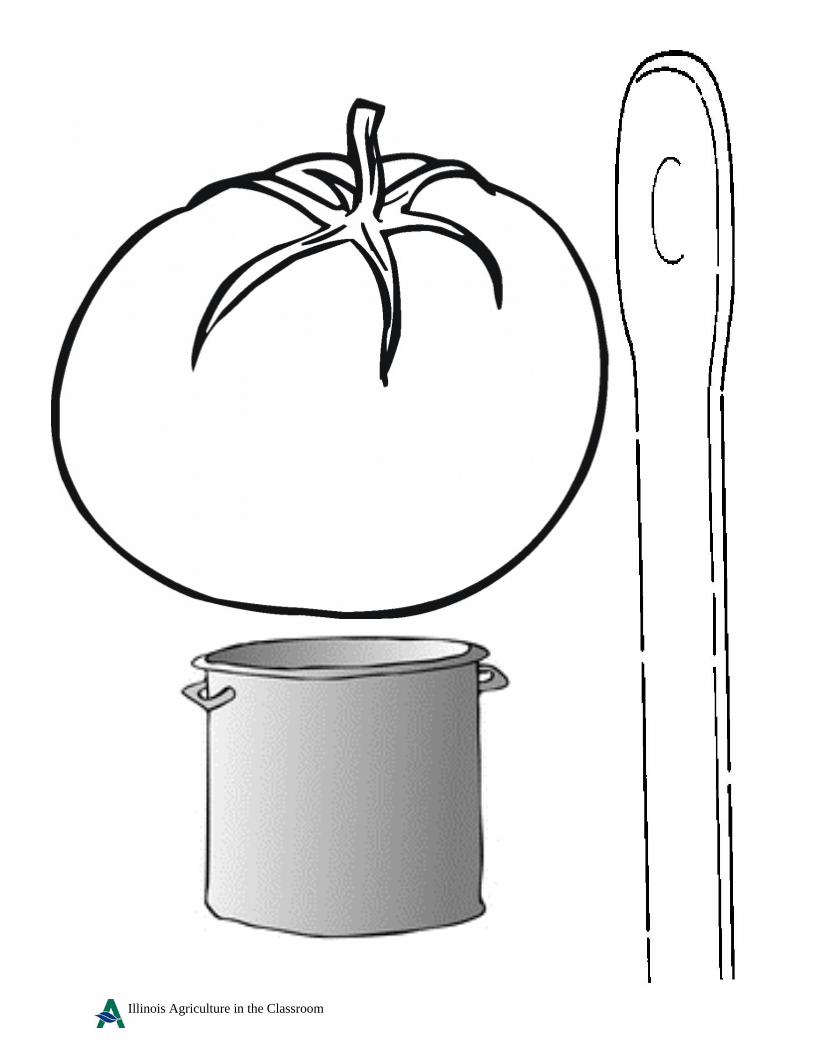
Objective: Students will listen to and follow oral instructions accurate-ly. They will also use prior knowledge in order to construct a 2-D rep-resentation. Illinois Learning Standards: 1.B.1a; 4.A.1c; 25.A.2d; 26.A.1e; 26.B.1d; 26.B.2d Assessment Framework: 1.3.12 Suggested Reading Materials: I Will Never Not Ever Eat a Tomato by Lauren Child Who Grew My Soup? by Tom Darbyshire IAITC’s Specialty Crops Ag Mag What You Will Need? 1 Balloon & Pot Template Per Student Yarn—(2) 5 1/2” pieces (2) 5” pieces Tape or glue Activity Instructions: 1. Have students color their tomato balloon and pot (template on previous page). 2. Measure yarn with a ruler. Each student will need two 5 1/2” pieces for the outsides
and two 5”pieces for the inside. 3. Have students cut out their balloon and pot. 4. Attach the yarn to the balloon and pot with tape or glue. The 5 1/2” pieces should go
on the outside and the 5” pieces should go on the inside. Lesson Extenders: 1. Have students write their favorite vegetable on their balloon and then share as a class.
You can also use this sharing as an opportunity to survey and tally the class’s favorite vegetables.
2. Students can draw their favorite vegetables on their balloon.
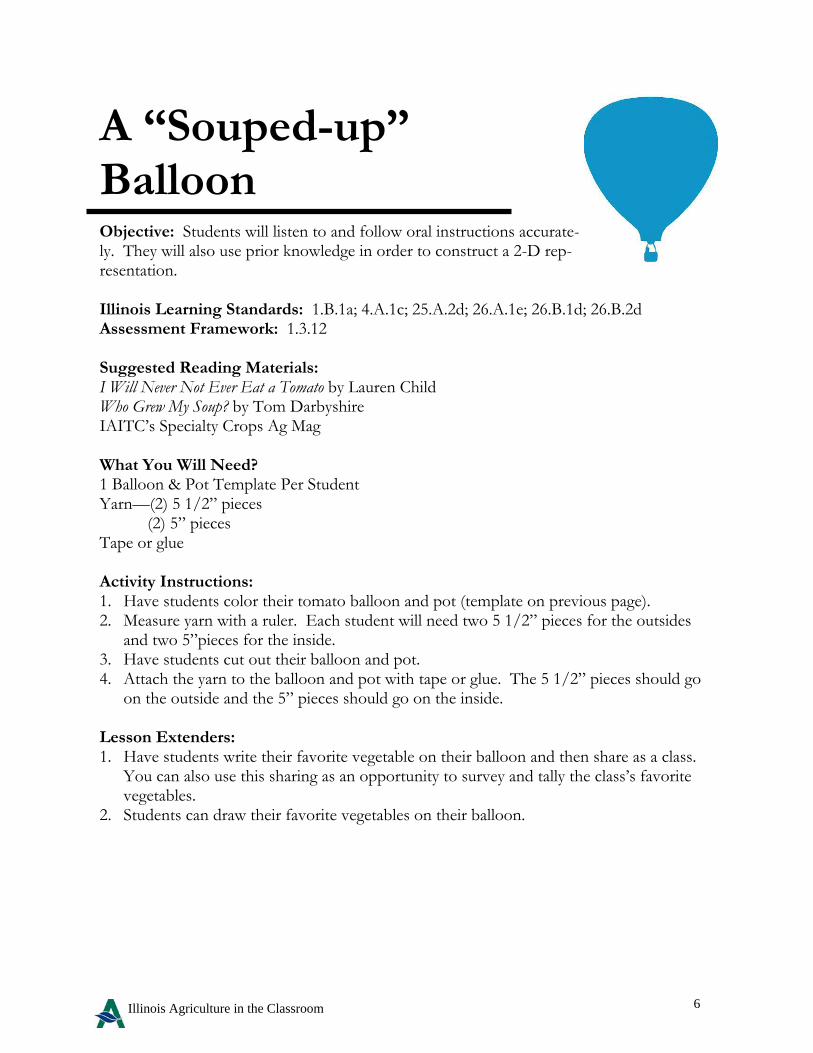
A “Souped-up” Balloon
7 Illinois Agriculture in the Classroom
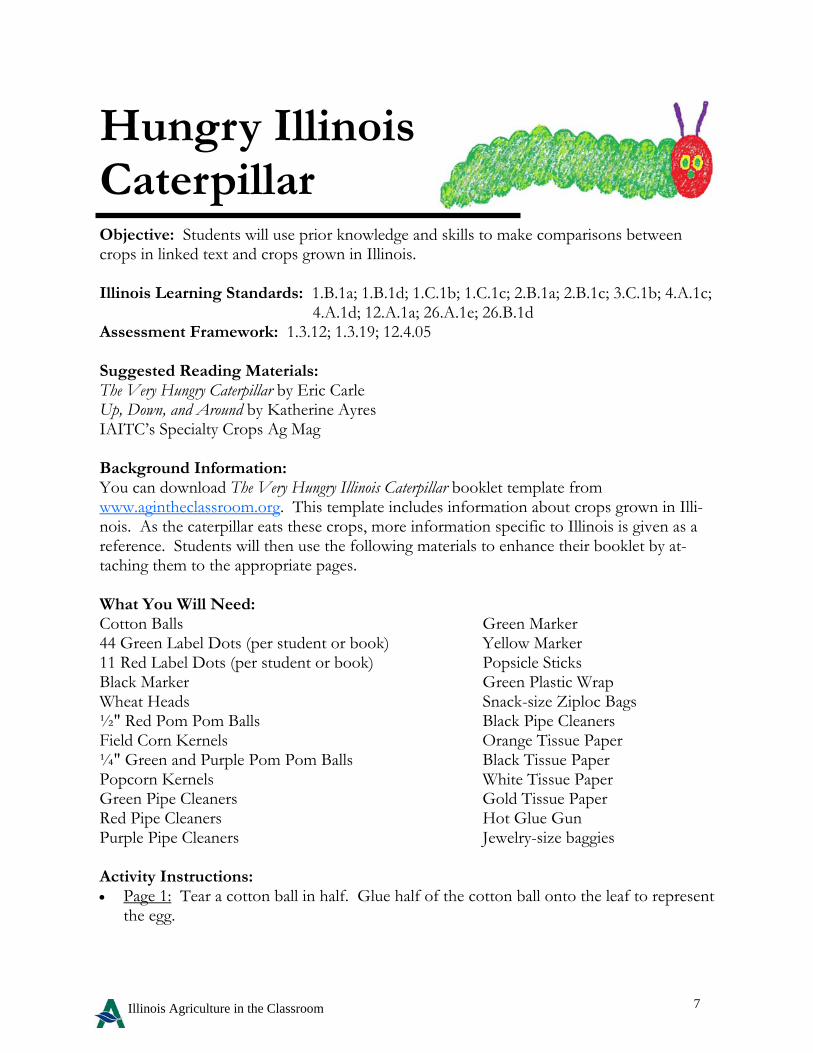
Hungry Illinois Caterpillar Objective: Students will use prior knowledge and skills to make comparisons between crops in linked text and crops grown in Illinois. Illinois Learning Standards: 1.B.1a; 1.B.1d; 1.C.1b; 1.C.1c; 2.B.1a; 2.B.1c; 3.C.1b; 4.A.1c; 4.A.1d; 12.A.1a; 26.A.1e; 26.B.1d Assessment Framework: 1.3.12; 1.3.19; 12.4.05 Suggested Reading Materials: The Very Hungry Caterpillar by Eric Carle Up, Down, and Around by Katherine Ayres IAITC’s Specialty Crops Ag Mag Background Information: You can download The Very Hungry Illinois Caterpillar booklet template from www.agintheclassroom.org. This template includes information about crops grown in Illi-nois. As the caterpillar eats these crops, more information specific to Illinois is given as a reference. Students will then use the following materials to enhance their booklet by at-taching them to the appropriate pages. What You Will Need: Cotton Balls Green Marker 44 Green Label Dots (per student or book) Yellow Marker 11 Red Label Dots (per student or book) Popsicle Sticks Black Marker Green Plastic Wrap Wheat Heads Snack-size Ziploc Bags ½" Red Pom Pom Balls Black Pipe Cleaners Field Corn Kernels Orange Tissue Paper ¼" Green and Purple Pom Pom Balls Black Tissue Paper Popcorn Kernels White Tissue Paper Green Pipe Cleaners Gold Tissue Paper Red Pipe Cleaners Hot Glue Gun Purple Pipe Cleaners Jewelry-size baggies Activity Instructions: Page 1: Tear a cotton ball in half. Glue half of the cotton ball onto the leaf to represent
the egg.
8 Illinois Agriculture in the Classroom
Page 3: Glue the other half of the cotton ball onto the leaf. Below the leaf, stick 4 green stickers and a red sticker. This is your caterpillar. Using a black marker, draw the face of the caterpillar on the red sticker along with his antennae.
Page 5: Stick 4 green stickers and a red sticker below the watermelon. This is your cat-erpillar. Using a black marker, draw the face of the caterpillar on the red sticker along with his antennae.
Page 7: Using the stickers and marker, place a caterpillar on the page. Page 9: Using the stickers and marker, place a caterpillar on the page. Page 11: Using the stickers and marker, place a caterpillar on the page. Page 13: Using the stickers and marker, place a caterpillar on the page. Page 15: Using the stickers and marker, place a caterpillar on the page. In the box, glue
heads of wheat. At the top of the barrel, glue red pom poms for the apples. Page 17: Using the stickers and marker, place a caterpillar on the page. In the box, glue
kernels of field corn. On top of the barrel, glue green and purple pompoms for grapes. Page 19: Using the stickers and marker, place a caterpillar on the page. Cut up a green
pipe cleaner into 1-inch sections. Glue these on top of the barrel for green beans. Place kernels of popcorn into a jewelry-size baggie. Glue the baggie in the popcorn box.
Page 21: Using the stickers and marker, place a caterpillar on the page. Page 23: Using the stickers and marker, place a caterpillar near the leaf on this page. Page 24: Using red, green and purple pipe cleaners, create a big caterpillar and glue to
the page. Page 25: To make the chrysalis, wrap green plastic wrap around a popsicle stick and
glue to the page. Page 27: Create a bag butterfly by cutting up pieces of orange, white, black and gold
tissue paper and putting them in a snack-size baggie. Seal. Take a black pipe cleaner and wrap it around the center of the baggie and then form to look like antennae. Glue or tape to the page.
Lesson Extenders: 1. Do you teach about Monarch Butterflies? Use our second version of The Very Hungry
Illinois Caterpillar. This booklet is downloadable from our website: www.agintheclassroom.org. Look under Teachers, Classroom Resources, Printable AITC Materials. From there, scroll down to Very Hungry Illinois Caterpillar-Another Op-tion.
2. Check out our Very Hungry Illinois Caterpillar SMART Board lesson at www.agintheclassroom.org.

9 Illinois Agriculture in the Classroom
Objective: After completing this activity, students will have a better un-derstanding of how garden vegetables grow and what part of the vegetable they can eat. Illinois Learning Standards: 1.A1a; 1.A1b; 2.B.1c; 4.A.1c; 11.B.1a; 11.B.1c; 12.A.1a; 12.A.1b; 12.B.1a Assessment Framework: 1.3.01; 1.3.06; 1.3.07; 1.3.13; 2.3.02; 2.3.10; 12.4.03; 12.4.04; 12.4.05 Suggested Reading Materials: Tops and Bottoms by Janet Stevens IAITC’s Specialty Crops Ag Mag What You Will Need: Vegetable template from www.agintheclassrom.org 2 Paper Fasteners (brads) Colored pencils or crayons Hole Punch Two white paper plates per student Scissors Glue About the Book: Tops & Bottoms, adapted and illustrated by Janet Stevens, is a story which has its origins in slave stories from the American South. In this trickster tale, a clever hare outwits the lazy bear while planting and harvesting the tops and bottoms of their vegetable garden. Key Words: hare - The American form of hare is generally called rabbit. harvest - The gathering of a crop season. A period in which agricultural work is done
and a particular type of weather prevails. Getting Started: Before reading the book, ask students to think of vegetables they eat. List them on a chart. Emphasize that vegetables are plants grown for food. It may also be necessary to empha-size the difference between fruits and vegetables as the list is made. As a group, look at the cover of the book. What vegetables are pictured? What animals are pictured? Note the Caldecott Honor Book Award Medal. This award is given to books that have outstanding illustrations. Encourage students to look carefully at the illustrations as the story is read.
Tops and Bottoms
10 Illinois Agriculture in the Classroom
Activity Instructions: 1. Have students color and cut out vegetables grown in the book from the vegetable tem-
plate found on the IAITC website. 2. Next have students fold one plate in half and draw a line down the center of the plate.
Color one half of the plate blue and the other half brown. 3. Now have students glue the vegetables on the colored plate. The blue space will serve
as the sky, so anything that grows on “top” should be placed on the line “growing” into the blue, anything that grows from the “bottom” should be placed on the line “growing” into the brown side of the plate. When finished, all the vegetables should be lined up on the center line (fold) with the “tops” vegetables showing in the blue and the “bottom” vegetables showing in the brown.
4. Next, write on the second paper plate the words “Tops” and “Bottoms” in their corre-sponding place on the plate. Now fold the plate in half and cut along the fold.
5. On the left side of the first plate (the one containing the vegetables) place a hole punch about 3 cm in on the line.
6. Lastly, place the two halves labeled “Tops” and “Bottoms” on top of each other and place a hole 3 cm in on the left side. This hole should line up with the decorated plate. Line all the holes up and place a brad to secure the plates. Now the bottom plate should have a cover. When the “Tops” is pulled up it should reveal the crops that grow on top and the same with the “Bottoms.”
Lesson Extenders: 1. Chart: make a chart-list of vegetables before reading Tops & Bottoms to discuss what
vegetables were included in the story. Then recall from the story if it was the top or bottom of the vegetable plant.
2. Story Dictation: Complete a shared writing activity in which students suggest ideas and
the teacher writes down a story based on one of the illustrations in the book. 3. Letters to Bear and Hare’s Families: Write a letter to the Bear and Hare families.
Perhaps students could give them hints on growing vegetables or inquire about how their garden is growing.
4. Writing About Your Garden: Students who have grown a garden might be encour-
aged to write about their experiences. Students who do not have gardens could write about what their plans would be if they could start a vegetable garden.
11 Illinois Agriculture in the Classroom
“Souper” Detective Objective: Students will learn how to identify, say and write rhyming words by engaging in rhyming exercises after doing a read aloud of rhyming picture books. Illinois Learning Standards: 1.A.1a, 1.B.1a, 1.B.1d, 1.C.1c, 2.B.1a, 4.A.1a, 4.A.1b, 4.A.1c, 4.B.1a, 4.B.1b Assessment Framework: 1.3.04, 1.3.05, 1.3.12, 1.3.13, 1.3.19, 1.3.20 Suggested Reading Materials: IAITC’s Specialty Crop Ag Mag Who Grew My Soup? by Tom Darbyshire Materials Needed: Index Cards Activity Instructions: 1. Do a read aloud with a rhyming picture book, such as Who Grew My Soup? Start with a picture walk and have students predict the story's main characters, setting and events. Have students read the title, author's name and illustrator's name. 2. Now read the story and encourage students to say the predictable/repetitive phrases with you. Pause at the end of a rhyming stanza to see if students can predict which rhyming word comes next. 3. Tell students that we will read the book once more. Remind students that this picture book has rhyming words in it. Students will be the rhyme detectives and must touch their nose when they hear two or more words that rhyme. 4. When students touch their nose, stop reading and ask students to identify the words that rhyme. Write each of these words on index cards and place them in the pocket chart. When you are finished reading the story, you should have plenty of rhyming word cards in the chart. 5. Pull out all of the cards, mix them up and place them back in the chart. Call up students to find the rhyming words and then have them stand in the front of the classroom holding their pair of cards. 6. When all of the pairs have been found, have each student at the front of the class read their pair of rhyming words with the rest of the class. 7. Tell students they will now have a chance to make and play their own rhyming game. Pass out index cards and have students write their own rhyming words on cards. Pass out baggies for students to store their cards in. Possible games to play with rhyming cards
Students can play in pairs or independently during centers, mixing up the cards and finding rhyming pairs. Students can record their rhyming pairs in various charts to show evidence of learning. Students can play the game like Memory, turning over and matching rhyming pairs. Students can take the cards home to practice rhyming on their own.
Lesson Extenders Post rhyming words all over the classroom and give students magnifying glasses, clipboards and a sheet on
which to record their pairs. Students should be the best "detectives" they can be to find rhyming words on word walls, in books, on posters, etc.
Use graphic organizers in order to record rhymes. Have students write poems or descriptors in the shape of the fruit or vegetable. Students may write limericks about fruits and vegetables. A limerick consists of five lines. The first, se-
cond, and fifth lines rhyme and lines three and four rhyme. Acrostic poems may be written by students. Have them write the name of a fruit or vegetable vertically on
a piece of paper. Then, a word or words are written next to each letter of the vertical word such that a po-em is formed. Be sure to have them use rhyme in their acrostic poems.

12 Illinois Agriculture in the Classroom
Think Inside the Box! Objective: Students will follow directions and exercise critical-thinking skills to guess the Puzzle Box word. Illinois Learning Standards: 1.C.1a, 4.A.1a, 4.A.2a, 4.A.3a, 4.A.1b, 4.A.2c, 4.A.3c, 4.A.3b, 4.A.1c, 5.A.1a, 5.A.1b Assessment Framework: 1.3.24, 1.4.10, 1.4.22 Suggested Reading Materials: IAITC’s Specialty Crop Ag Mag Buried Treasure: Roots and Tubers by Meredith Sayles Hughes Materials Needed: Puzzles (teacher must plan puzzle clues in advance) Black or white board or chart paper and markers Small rewards, such as pencils Scrap paper cut into 2-inch by 2-inch squares Activity Instructions: Prepare in advance six to ten clues that will help students guess a puzzle word. The puzzle word can relate to any topic or subject they are studying. See an example below: Puzzle Box: Can you guess what this is? Answer: Banana 1. I am yellow and sweet. 2. I grow on a tall plant. 3. Monkeys like to eat me. 4. I'm good for your heart. 5. What am I? 1. Write the clues on the board or chart in the morning. 2. Go over the clues with the class first thing in the morning. Share in advance how the process will work. 3. Show the three prizes of the day. 4. Give the students all day to consider what the puzzle word might be. 5. At the end of the day, read the clues again. 6. Pass out the 2-inch by 2-inch squares of paper. Ask students to write the answer, or two or three guesses, on one side of the paper and their name on the other side. 7. Collect the papers. Identify by name any student who has the correct answer. Put all correct answers in a bag. 8. Pull out three of the papers to determine the winners of the three prizes. Lesson Extenders
Make a chart. Include the name of each child in the classroom. Put a checkmark beside students' names for each right response given each week. After ten weeks, identify the student with the most correct responses. Award spe-cial prizes to those with the most correct responses.
You might consider running the puzzle box game for a week. You could provide a clue each day or several on the first day and then add more each subsequent day that follows. Students could submit guesses at any time during the week. Collect answers at the end of each day, and keep them in an envelope with the day marked on the outside. At the end of the week, see how many people guessed the word at the end of each day.
After you have done this activity with older students a few times, you might invite the students to create the puzzles. Have students write riddles in order to help classmates learn about fruits and vegetables. To help students in this
process, have students choose a fruit or a vegetable about which he/she would like to write a riddle. Have students list descriptive words or facts about their subject. Encourage students to think about color, shape,
size, taste, feel, why it is good for you, what you can learn about the fruit or vegetable from its color, different ways to eat the fruit or vegetable. Have students use the list to write a riddle about the subject.
Challenge students to create rhyming riddles.
13 Illinois Agriculture in the Classroom
Mystery “Souper”star Objective: Students will use the senses in order to make predictions. Students will also use descriptive words to share information. Illinois Learning Standards: 1.C.1a, 4.A.1a, 4.A.2a, 4.A.2c, 4.A.3a, 4.A.3c, 4.A.1b, 4.A.3b, 4.A.1c Assessment Framework: 1.3.24, 1.4.10, 1.4.22 Suggested Reading Materials: IAITC’s Specialty Crop Ag Mag Stinky and Stringy: Stem and Bulb Vegetables by Meredith Sayles Hughes Materials: 5 boxes with lids (cut a hole in the end of each box so a child's hand fits through the hole. Label each box with a different number from 1 to 5.) 5 different fruits or vegetables Scrap pieces of paper for answers 5 brown paper bags numbered from 1 to 5 Activity Instructions: 1. Secretly place a mystery object (fruit or vegetable) in a different box. 2. Invite a child to reach through the hole, touch the mystery object inside, and then share descriptive words about how it feels. Record the descriptions on a sheet of paper. 3. Ask students to write what they believe is in the box, or two or three guesses, on one side of the paper and their name on the other side. 4. Have students place their answers in the bag with the number that corresponds with their answer. 5. Read the descriptive words used by students aloud again before revealing the mystery object. 6. Recognize those students who correctly identified the mystery object. Lesson Extender
Have students draw pictures of what they think each vegetable or fruit looks like before you reveal the mystery object in the box.
Invite each child to taste the different mystery objects (fruit or vegetable). Encourage students to de-scribe each mystery object's taste, smell and appearance. Record students' responses and then review the descriptive words with the group.
Place an assortment of fruits and vegetables in a shopping bag or basket, making sure there are several colors represented. Invite each child to pick a fruit to identify its color. Continue with the remaining fruits, having students place the same-color fruits together.
Adapted from an activity at Dole.com classroom resources for educators.
14 Illinois Agriculture in the Classroom
Produce Pals Objective: Students will respond to a writing prompt, learning about fruits and vegetables. Illinois Learning Standards: 3.A.1, 3.A.2, 3.B.1a, 3.B.2a, 3.B.1b, 3.B.2b, 3.C.1a, 3.C.2a, 4.B. 1b, 5.C.1a Assessment Framework: 3.3.09, 3.3.10, 3.3.11, 3.3.14, 3.3.15, 3.3.16, 3.3.17, 3.3.18 Suggested Reading Materials: IAITC’s Specialty Crop Ag Mag The Enormous Potato by Aubrey Davis Materials: Copies of the writing prompts Glue Paper Activity Instructions: 1. Invite a child to choose a writing prompt and read it aloud as you copy it onto the board. Lead the class in a
discussion of the food and list facts about it on the board. 2. Have each child choose a writing prompt and glue it to his paper. 3. Instruct the student to make a list of facts about the food. If needed, provide time to use resources to verify
facts or add to lists. 4. Direct the child to use the facts to complete the response. Lesson Extender
After publishing the final draft, instruct each student to draw a picture of the food character. Post the stories and illustrations in the classroom or school cafeteria.
Have students work in pairs to generate a response. Invite students in each pair to act out their writ-ing, with one student serving as the narrator and the other acting as the food character(s).
Give each student a blank strip and encourage creation of new writing prompts. Remind the child to use a clever food name! Place the prompts in a writing center with glue and paper.
Possible Writing Prompts Celia and Charlie Celery want everyone to know that they are the stems of plants, so they decide to throw a
party and tell everyone about it. Patty Potato is one of the most popular vegetables in the United States. She decides to write the story of her
life! Brooke Broccoli has a story to tell, and it is the story of why broccoli is one of the “super vegetables.” Her
story goes something like this. Oscar Onions always gets a bad wrap for making people cry. He decides he is going to change the minds of
everyone and help them understand how great he makes food taste. His bright orange color makes Calvin Carrot an important vegetable for our eyesight. He decides to share the
good news about Vitamin K. Peter Peas is tired of people deciding they don’t like him. So he decides to do something to get people to like
him. Here is what he decides to do. Stanley Spinach is happy to be such a popular vegetable, so he decides to tell students ways in which to use
him in food. Full of protein, Barbara Beans finds herself used in many dishes from countries around the world. She decides
to share her story of her travels around the world. Tonya Tomato is having a hard time because no one can decide if she is a fruit or a vegetable. Once and for
all, she is telling her story and helping to end the confusion. Cornelius Corn wants the folks in town to learn some new ways to eat corn, so he decides to… Adapted from an activity at Dole.com classroom resources for educators.
15 Illinois Agriculture in the Classroom
Beanie Baby Objective: Upon completion of this activity, students will have a better understanding of the plant germination process. Illinois Learning Standards: 11.A.2c; 11.A.2d; 11.B.2b; 11.B.2f; 12.A.2a; 12.E.2a Assessment Framework: 11.4.01; 11.4.02; 11.4.03; 11.4.04; 12.4.03; 12.4.04; 12.4.05 Suggested Reading Materials: Oh Say Can You Seed by Bonnie Worth One Bean by Anne Rockwell Spill the Beans and Pass the Peanuts by Meredith Sayles Hughes IAITC’s Soybean Ag Mag What You Will Need: Jewelry size resealable bag (found in craft stores) Measuring spoons Crystal Soil Green Beans or Lima Beans Hole Punch Yarn Water Activity Instructions: 1. Punch a hole in the top of your bag. 2. Place a scant 1/4 teaspoon of Crystal Soil into the bag. 3. Add 2 or 3 green bean or lima bean seeds. 4. Add 1 tablespoon of water. 5. Seal your bag firmly. 6. Insert the yarn into the hole to make a necklace. 7. Wear your Beanie Baby around your neck and under your shirt to keep it in a warm,
dark place. 8. Check your Beanie Baby several times a day for germination and record the growth. Lesson Extenders: 1. Try this experiment with other seeds and record the similarities and differences. 2. Experiment with other controls like light, heat, soil medium, water and record the simi-
larities and differences.
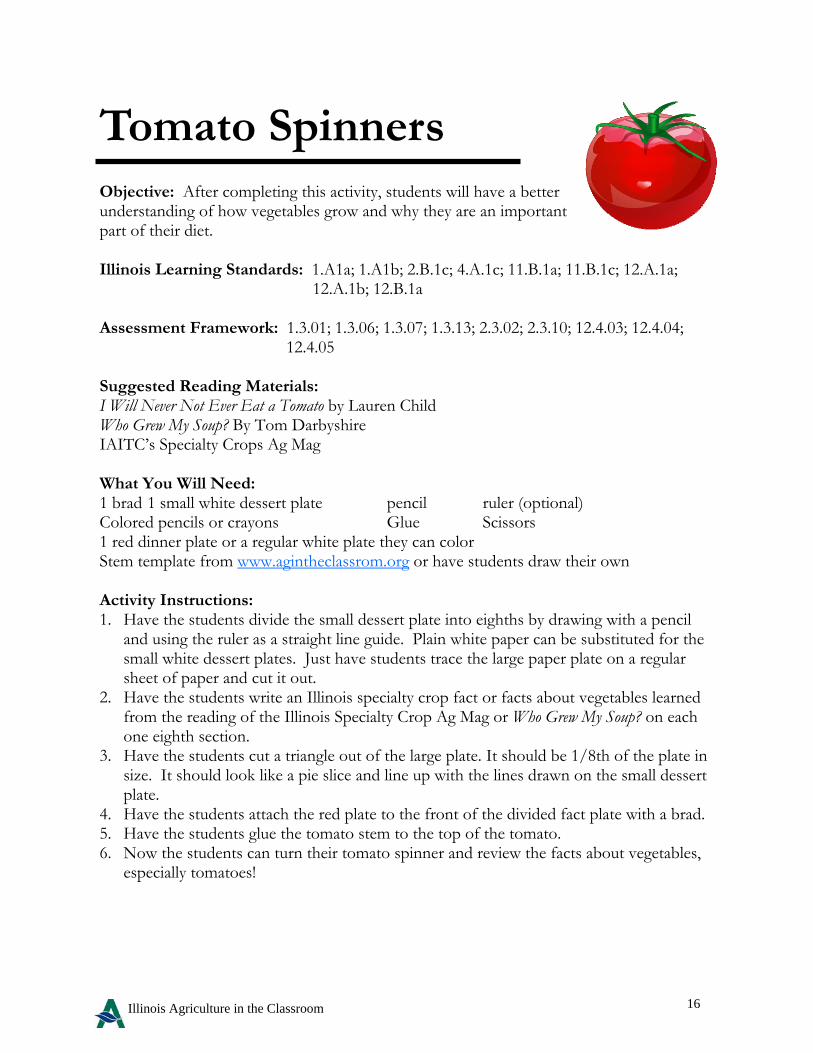
16 Illinois Agriculture in the Classroom
Objective: After completing this activity, students will have a better understanding of how vegetables grow and why they are an important part of their diet. Illinois Learning Standards: 1.A1a; 1.A1b; 2.B.1c; 4.A.1c; 11.B.1a; 11.B.1c; 12.A.1a; 12.A.1b; 12.B.1a Assessment Framework: 1.3.01; 1.3.06; 1.3.07; 1.3.13; 2.3.02; 2.3.10; 12.4.03; 12.4.04; 12.4.05 Suggested Reading Materials: I Will Never Not Ever Eat a Tomato by Lauren Child Who Grew My Soup? By Tom Darbyshire IAITC’s Specialty Crops Ag Mag What You Will Need: 1 brad 1 small white dessert plate pencil ruler (optional) Colored pencils or crayons Glue Scissors 1 red dinner plate or a regular white plate they can color Stem template from www.agintheclassrom.org or have students draw their own Activity Instructions: 1. Have the students divide the small dessert plate into eighths by drawing with a pencil
and using the ruler as a straight line guide. Plain white paper can be substituted for the small white dessert plates. Just have students trace the large paper plate on a regular sheet of paper and cut it out.
2. Have the students write an Illinois specialty crop fact or facts about vegetables learned from the reading of the Illinois Specialty Crop Ag Mag or Who Grew My Soup? on each one eighth section.
3. Have the students cut a triangle out of the large plate. It should be 1/8th of the plate in size. It should look like a pie slice and line up with the lines drawn on the small dessert plate.
4. Have the students attach the red plate to the front of the divided fact plate with a brad. 5. Have the students glue the tomato stem to the top of the tomato. 6. Now the students can turn their tomato spinner and review the facts about vegetables,
especially tomatoes!
Tomato Spinners
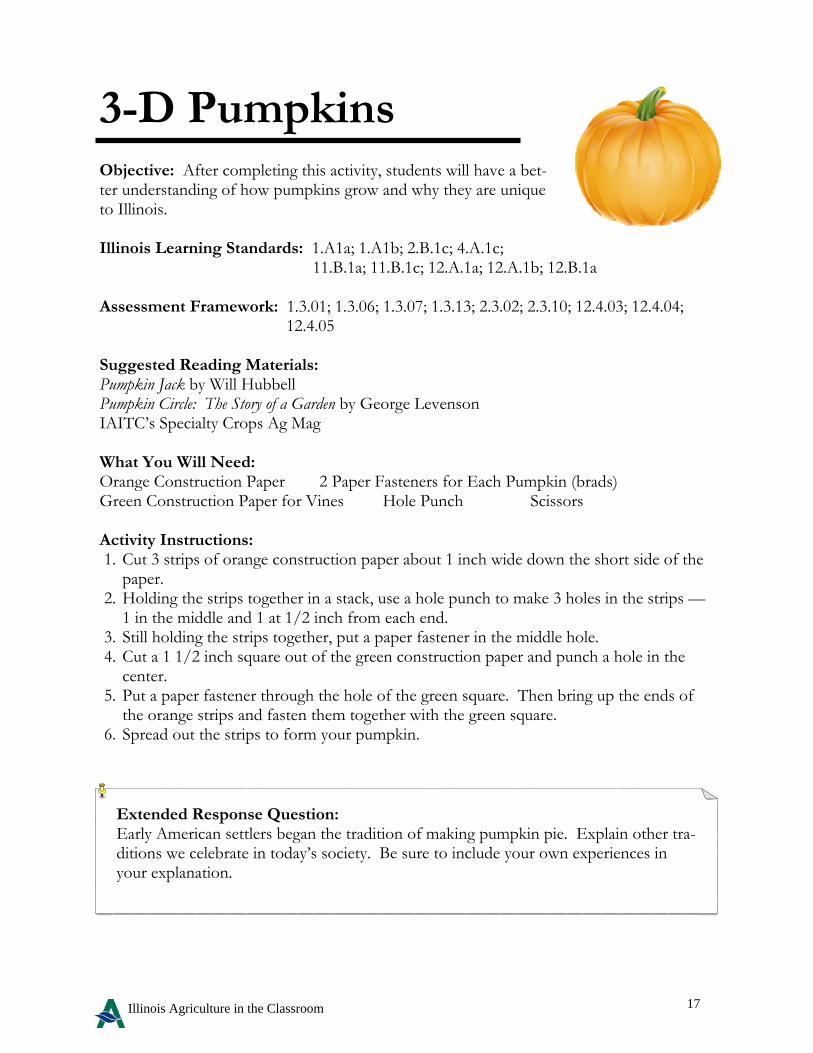
17 Illinois Agriculture in the Classroom
Objective: After completing this activity, students will have a bet-ter understanding of how pumpkins grow and why they are unique to Illinois. Illinois Learning Standards: 1.A1a; 1.A1b; 2.B.1c; 4.A.1c; 11.B.1a; 11.B.1c; 12.A.1a; 12.A.1b; 12.B.1a Assessment Framework: 1.3.01; 1.3.06; 1.3.07; 1.3.13; 2.3.02; 2.3.10; 12.4.03; 12.4.04; 12.4.05 Suggested Reading Materials: Pumpkin Jack by Will Hubbell Pumpkin Circle: The Story of a Garden by George Levenson IAITC’s Specialty Crops Ag Mag What You Will Need: Orange Construction Paper 2 Paper Fasteners for Each Pumpkin (brads) Green Construction Paper for Vines Hole Punch Scissors Activity Instructions: 1. Cut 3 strips of orange construction paper about 1 inch wide down the short side of the
paper. 2. Holding the strips together in a stack, use a hole punch to make 3 holes in the strips —
1 in the middle and 1 at 1/2 inch from each end. 3. Still holding the strips together, put a paper fastener in the middle hole. 4. Cut a 1 1/2 inch square out of the green construction paper and punch a hole in the
center. 5. Put a paper fastener through the hole of the green square. Then bring up the ends of
the orange strips and fasten them together with the green square. 6. Spread out the strips to form your pumpkin.
3-D Pumpkins
Extended Response Question: Early American settlers began the tradition of making pumpkin pie. Explain other tra-ditions we celebrate in today’s society. Be sure to include your own experiences in your explanation.
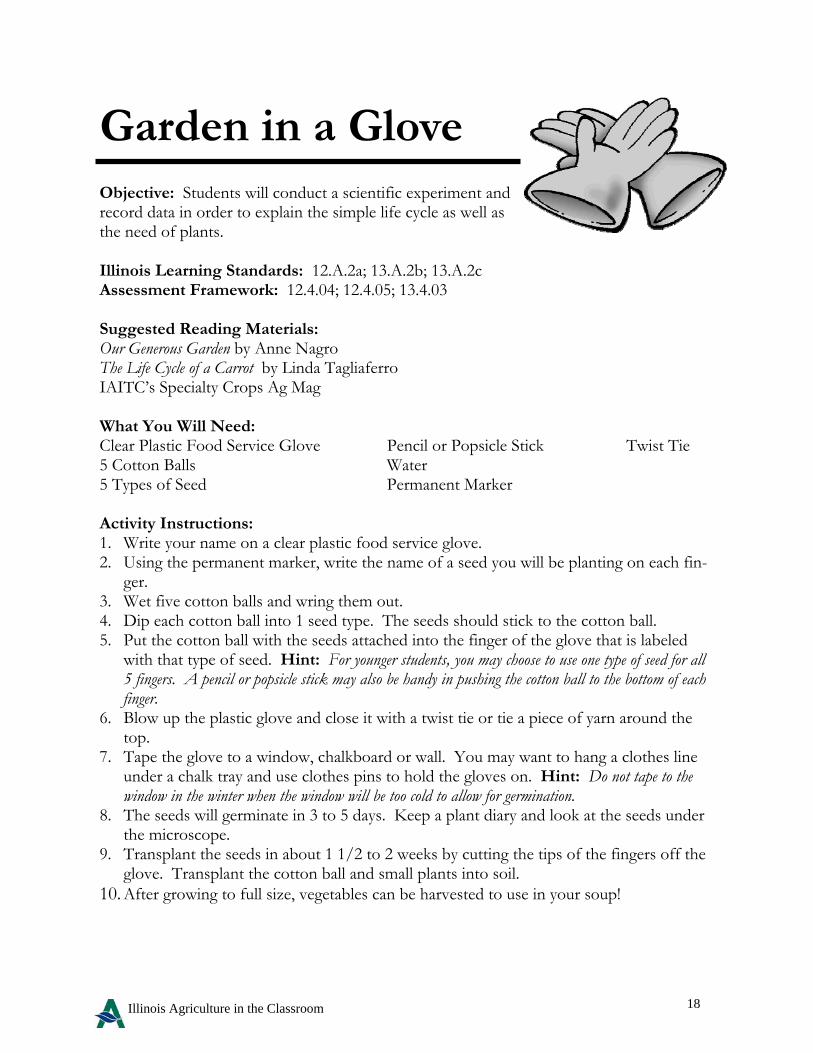
18 Illinois Agriculture in the Classroom
Garden in a Glove Objective: Students will conduct a scientific experiment and record data in order to explain the simple life cycle as well as the need of plants. Illinois Learning Standards: 12.A.2a; 13.A.2b; 13.A.2c Assessment Framework: 12.4.04; 12.4.05; 13.4.03 Suggested Reading Materials: Our Generous Garden by Anne Nagro The Life Cycle of a Carrot by Linda Tagliaferro IAITC’s Specialty Crops Ag Mag What You Will Need: Clear Plastic Food Service Glove Pencil or Popsicle Stick Twist Tie 5 Cotton Balls Water 5 Types of Seed Permanent Marker Activity Instructions: 1. Write your name on a clear plastic food service glove. 2. Using the permanent marker, write the name of a seed you will be planting on each fin-
ger. 3. Wet five cotton balls and wring them out. 4. Dip each cotton ball into 1 seed type. The seeds should stick to the cotton ball. 5. Put the cotton ball with the seeds attached into the finger of the glove that is labeled
with that type of seed. Hint: For younger students, you may choose to use one type of seed for all 5 fingers. A pencil or popsicle stick may also be handy in pushing the cotton ball to the bottom of each finger.
6. Blow up the plastic glove and close it with a twist tie or tie a piece of yarn around the top.
7. Tape the glove to a window, chalkboard or wall. You may want to hang a clothes line under a chalk tray and use clothes pins to hold the gloves on. Hint: Do not tape to the window in the winter when the window will be too cold to allow for germination.
8. The seeds will germinate in 3 to 5 days. Keep a plant diary and look at the seeds under the microscope.
9. Transplant the seeds in about 1 1/2 to 2 weeks by cutting the tips of the fingers off the glove. Transplant the cotton ball and small plants into soil.
10. After growing to full size, vegetables can be harvested to use in your soup!
19 Illinois Agriculture in the Classroom
Grow Your Own Soup Objective: Students will make predictions about germination and harvest timelines. Students will also identify the impact of environ-mental factors on the growth cycle. Illinois Learning Standards: 6.B.1; 12.A.2a; 12.B.1a; 12.E.1b; 13.A1b Assessment Framework: 6.3.09; 12.4.03; 12.4.04; 12.4.05; 12.4.08; 12.4.40; 13.4.03 Suggested Reading Materials: Stone Soup by Marcia Brown The Giant Carrot by Jan Peck Who Grew My Soup? by Tom Darbyshire IAITC’s Specialty Crops Ag Mag Vocabulary Terms: Germinate: when the plant’s seed has opened and sends up its first stem Harvest: to gather crops when they are mature and ready to eat or store Herbs: a group of plants that are used for flavoring or seasoning food or drinks Hypothesis: an explanation for something based on what has occurred, an “educated
guess” Observations: paying attention to how things occur or work and making a note of it Prediction: a good guess of what will happen based on your knowledge Root Vegetables: a group of vegetables with edible portions growing underground
(includes carrots, potatoes and radishes) Suppress: to reduce or stop something from happening What You Will Need: Calendar Seed packets of your favorite vegetables Activity Instructions: 1. Decide which vegetables you will be using for your soup. Be sure to supply students
with the appropriate seed packets. 2. Have students create a growth chart to track important dates. Students will also need
to keep a journal of their observations. 3. Using a calendar and the seed packets, answer the questions on the following work-
sheets. Adapted from a New York AITC activity.
20 Illinois Agriculture in the Classroom
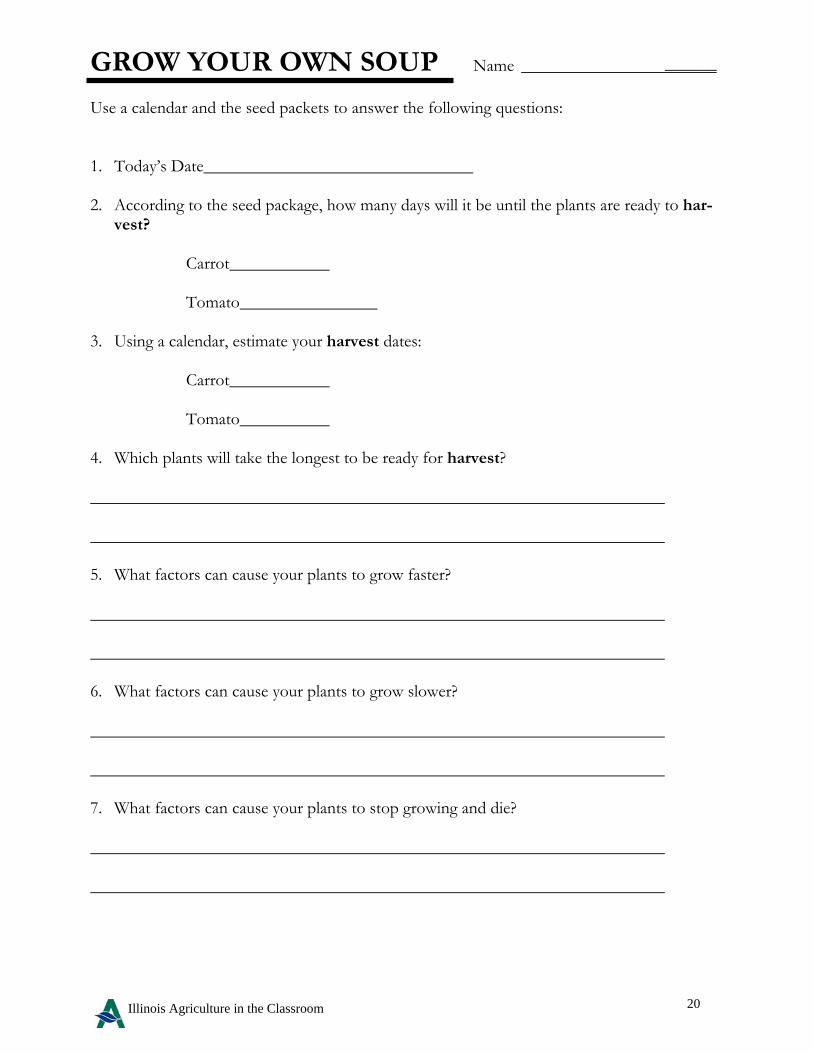
GROW YOUR OWN SOUP Name ______ Use a calendar and the seed packets to answer the following questions: 1. Today’s Date 2. According to the seed package, how many days will it be until the plants are ready to har-
vest? Carrot Tomato 3. Using a calendar, estimate your harvest dates: Carrot Tomato 4. Which plants will take the longest to be ready for harvest? 5. What factors can cause your plants to grow faster? 6. What factors can cause your plants to grow slower? 7. What factors can cause your plants to stop growing and die?
21 Illinois Agriculture in the Classroom
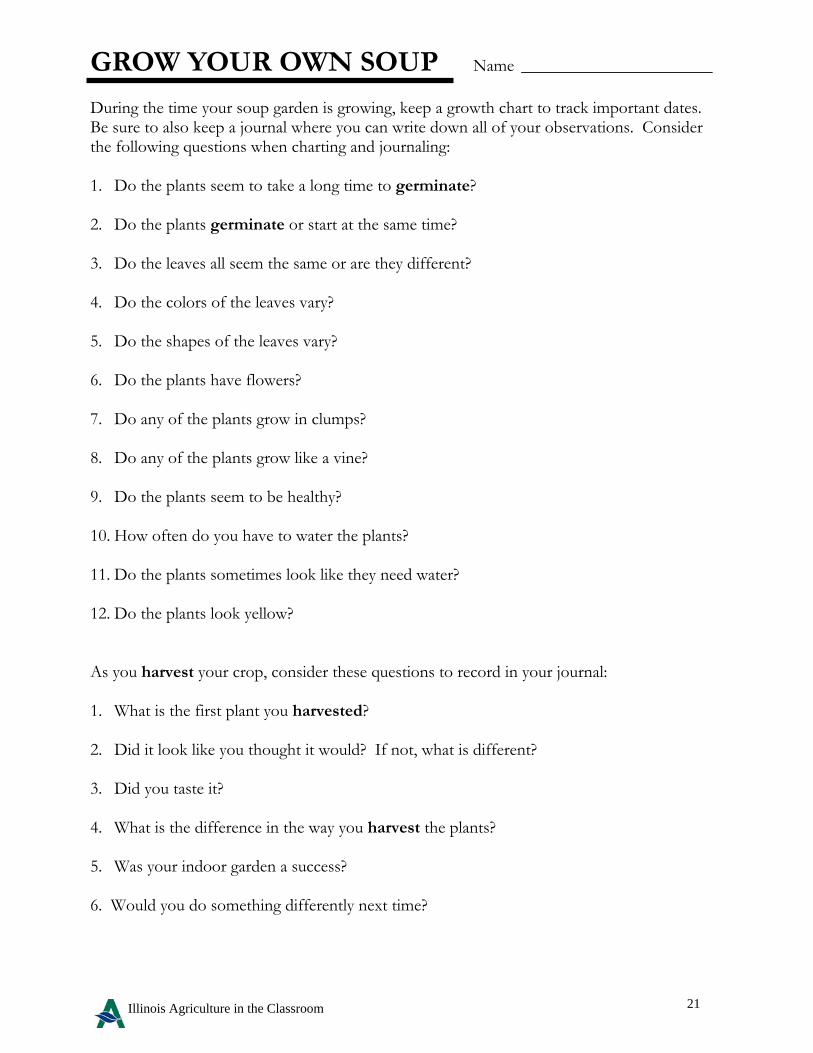
GROW YOUR OWN SOUP Name
During the time your soup garden is growing, keep a growth chart to track important dates. Be sure to also keep a journal where you can write down all of your observations. Consider the following questions when charting and journaling: 1. Do the plants seem to take a long time to germinate? 2. Do the plants germinate or start at the same time? 3. Do the leaves all seem the same or are they different? 4. Do the colors of the leaves vary? 5. Do the shapes of the leaves vary? 6. Do the plants have flowers? 7. Do any of the plants grow in clumps? 8. Do any of the plants grow like a vine? 9. Do the plants seem to be healthy? 10. How often do you have to water the plants? 11. Do the plants sometimes look like they need water? 12. Do the plants look yellow? As you harvest your crop, consider these questions to record in your journal: 1. What is the first plant you harvested? 2. Did it look like you thought it would? If not, what is different? 3. Did you taste it? 4. What is the difference in the way you harvest the plants? 5. Was your indoor garden a success? 6. Would you do something differently next time?
22 Illinois Agriculture in the Classroom
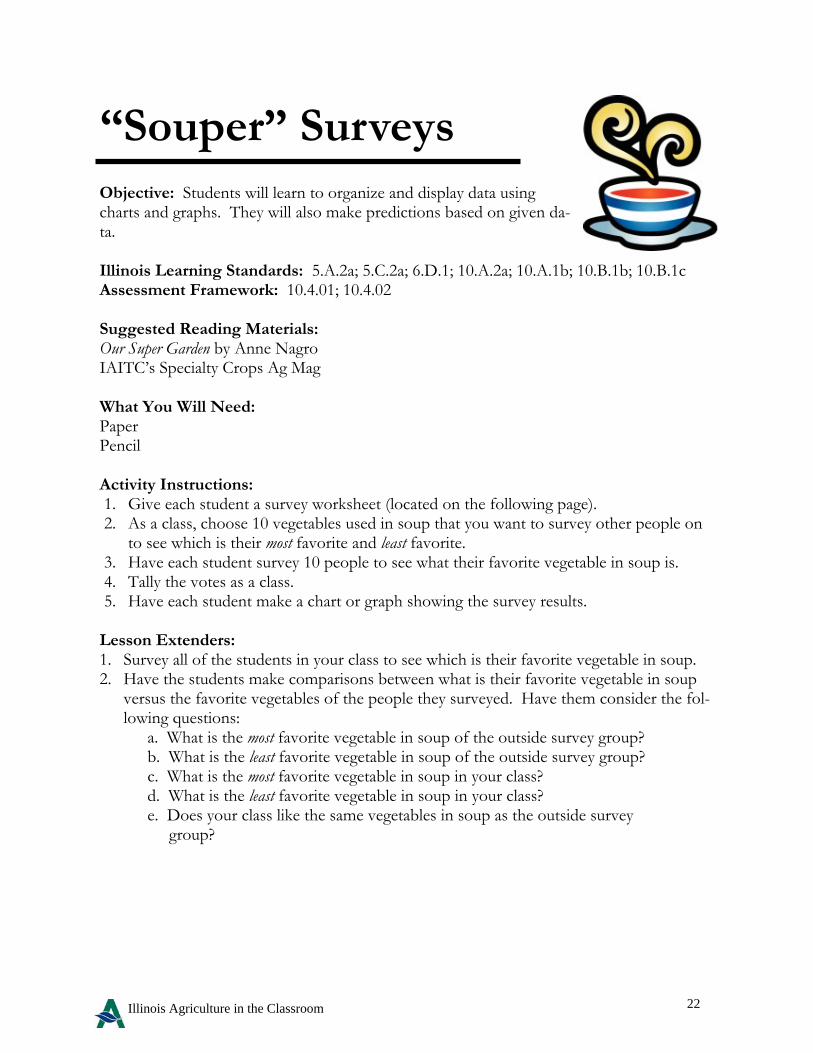
“Souper” Surveys Objective: Students will learn to organize and display data using charts and graphs. They will also make predictions based on given da-ta. Illinois Learning Standards: 5.A.2a; 5.C.2a; 6.D.1; 10.A.2a; 10.A.1b; 10.B.1b; 10.B.1c Assessment Framework: 10.4.01; 10.4.02 Suggested Reading Materials: Our Super Garden by Anne Nagro IAITC’s Specialty Crops Ag Mag What You Will Need: Paper Pencil Activity Instructions: 1. Give each student a survey worksheet (located on the following page). 2. As a class, choose 10 vegetables used in soup that you want to survey other people on
to see which is their most favorite and least favorite. 3. Have each student survey 10 people to see what their favorite vegetable in soup is. 4. Tally the votes as a class. 5. Have each student make a chart or graph showing the survey results.
Lesson Extenders: 1. Survey all of the students in your class to see which is their favorite vegetable in soup. 2. Have the students make comparisons between what is their favorite vegetable in soup
versus the favorite vegetables of the people they surveyed. Have them consider the fol-lowing questions:
a. What is the most favorite vegetable in soup of the outside survey group? b. What is the least favorite vegetable in soup of the outside survey group? c. What is the most favorite vegetable in soup in your class? d. What is the least favorite vegetable in soup in your class? e. Does your class like the same vegetables in soup as the outside survey group?
23 Illinois Agriculture in the Classroom
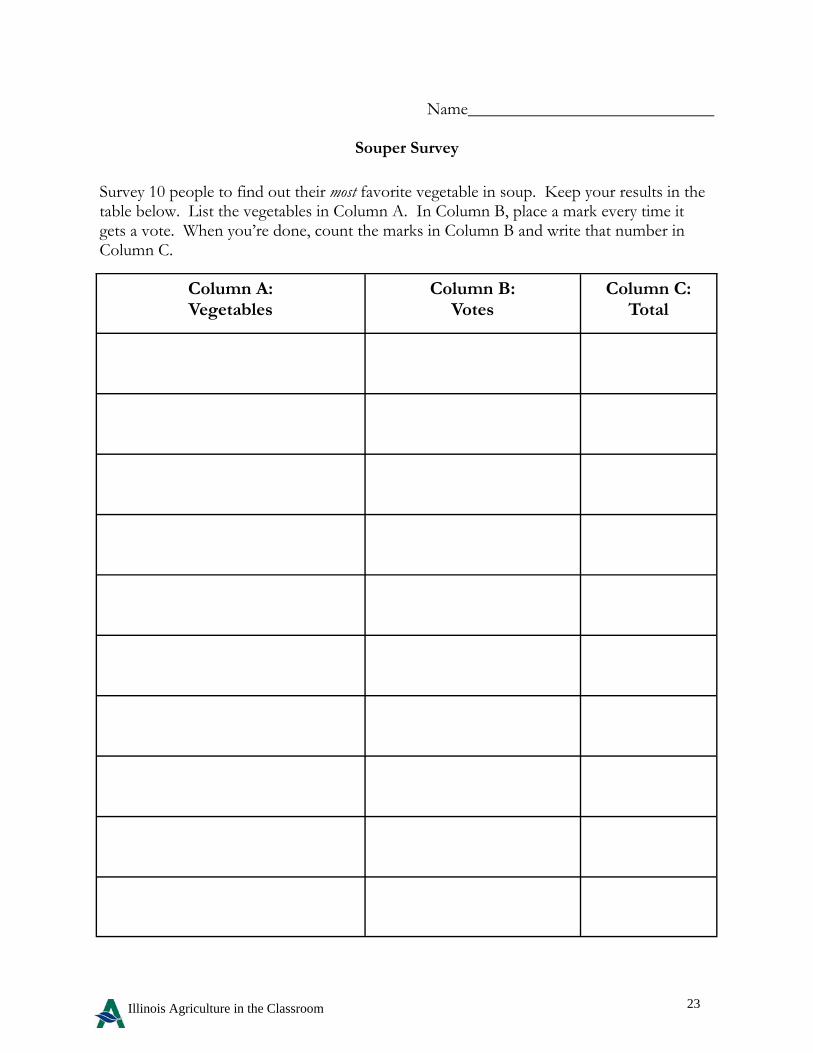
Name
Souper Survey
Survey 10 people to find out their most favorite vegetable in soup. Keep your results in the table below. List the vegetables in Column A. In Column B, place a mark every time it gets a vote. When you’re done, count the marks in Column B and write that number in Column C.
Column A: Vegetables
Column B: Votes
Column C: Total
24 Illinois Agriculture in the Classroom
Measure It! Objective: Students will learn about serving size and use math skills to make predictions. Illinois Learning Standards: 6.B.2, 6.C.2a, .C.2b, 6.c.3b, 7.B.2b, 11.A.1c, 11.A.1f, 21.B.1, 23.B.1, 24.B.1 Assessment Framework: 6.3.14, 7.3.02, 12.4.04, 12.4.05 Suggested Reading Materials: IAITC’s Specialty Crop Ag Mag Green Power: Leaf and Flower Vegetables by Meredith Sayles Hughes Materials Needed: Copies of the recording sheet Foods to measure (fruit juice, leafy greens, canned peas, canned fruit, raisins Plastic serving bowls Large plastic tumbler or pitcher Plastic measuring cups in the following sizes: 1/4 cup, 1/2 cup, and 1 cup Activity Instructions: 1. Explain to students that different amounts of various kinds of fruits and vegetables are considered a serving.
Show students the foods that they will be measuring in their group and tell them how much of each one equals a serving.
2. Name a fruit or vegetable and have each group measure one serving of the item, referring to the serving chart below.
3. Have the group read each question and use the necessary foods to answer the question. 4. After each group has finished, have students share their answers with the class. Lesson Extenders: Make a recipe that involves a variety of measurements. Have each child write a menu for one day that contains at least nine servings of fruits and vegetables. Be sure students write the amount of each food they will eat.
1. How many servings of canned soup are equal to 2 cups?
2. How many servings of leafy greens are equal to 8 cups?
3. How many cups of cooked vegetables would you need to serve six people a serving each?
4. How much juice would you need for each person in your group to have a serving?
5. How much dried fruit would you need for ten people to each have a serving?
6. If you ate 2 1/2 cups of canned vegetables, how many servings would you have eaten?
Adapted from an activity at Dole.com classroom resources for educators.
One Serving Size for Fruits and Vegetables 3/4 cup of 100% juice 1/2 cup of canned soup 1 cup of leafy greens 1/4 cup of dried fruit 1/2 cup of canned or cooked vegetables
25 Illinois Agriculture in the Classroom
Corn Field Math Objective: Students use number sense, measurement, and data analysis to construct drawings and compute multi-step problems dealing with whole numbers, fractions, and percents. Illinois Learning Standards: 6.B.1, 6.B.2, 6.C.1, 6.C.1b, 6.C.2a, 6.C.2b, 6.C.3a, 6.C.3b, 7.A.2a, 7.A.3a, 7.A.3b, 7.B.3, 7.C.1, 7.C.2a, 7.C.3a Assessment Framework: 6.6.12, 6.6.13, 6.6.17, 6.7.08, 6.7.12, 7.6.06 Suggested Reading Materials: IAITC’s Corn Ag Mag Corn Belt Harvest by Raymond Bial Corn by Gail Gibbons Materials: computer/resource materials calculator graph paper ruler compass protractor Background Information: Corn is a grass, native to the Americas. The exact origin is unknown, but tiny ears of corn have been dis-covered at ancient village sites and in tombs of early Americans. Evidence of corn in central Mexico suggests it was used there as long as 7000 years ago, where it was domesticated from wild grass. Cultivated corn is known to have existed in what is now the southwestern US for at least 3000 years. In the United States, many of the various Native American tribes have traditionally grown corn—also known as maize—and used it for both food and utili-tarian purposes. Eastern tribes shared their knowledge of corn production with early European settlers, an act which saved many from starvation. Early American colonists dried corn and ground it as meal for flour. They used the ground corn in por-ridge, cake and bread. Fresh, or sweet corn, the kind we like to eat as corn on the cob, was not developed until the 1700s. Before then corn was only used in its dried form. Along with wheat and rice, corn is one of the world’s major grain crops. It is the largest grain crop grown in the US. About 9 percent of all the corn grown is used to produce food for humans. These foods include corn meal and other food products such as cooking oils, margarine, and corn syrups and sweeteners (fructose). Sixty four percent of all corn grown is used as feed for livestock. Corncobs have been used in the manufacturing of nylon fibers and as a source for producing degradable plastics. Ethanol, a renewable fuel made from corn, has shown the possibility of becoming a major renewable fuel for the world’s automotive industry. Illinois farmers rank second in the country in corn production. In 2009, Illinois farmers planted 12,000,000 acres of field corn, which produced over 2 billion bushels of little golden kernels. One bushel of corn weighs 56 pounds, meaning Illinois farmers hauled over 112 billion pounds of corn out of their fields. Corn is pollinated by wind and is typically planted in 30-inch rows A single seed (or kernel) of corn may produce a plant which yields more than 600 kernels of corn per ear. On one acre of land, any where from 22,000 to 35,000 individual plants may be grown. Hybrid corn is developed to produce from one to two ears per plant. Ears per plant are often determined by moisture availability. Through better soil conservation practices, fertilizer use, better seed quality, and water availability, corn yields have increased 125 percent since 1950. Adapted from an activity by Oklahoma Ag in the Classroom Program
26 Illinois Agriculture in the Classroom
Corn Field Math Vocabulary: Cultivate - to prepare land for the raising of crop.
Domesticated - adapted to living with human beings and serving their purpose.
Ethanol - a colorless, volatile, pungent liquid made from corn which can be
burned as a fuel.
Hybrid - an offspring of parents with different genes especially when of different races, breeds, species, or
genera.
Maize - Native American name for corn. Also called Indian corn.
Pollinated - pollen placed on the stigma of a plant for the purpose of creating seeds, flowers and fruit.
Porridge - a soft cereal or meal boiled in water or milk until thick.
Silage - the entire above ground portion of the corn plant (including ear) that is harvested by cutting and
chopping the plant before it reaches maturity. It is stored in silos or packed into above-ground pits
and used for feed.
Soil Conservation - a protection from loss, waste, etc. of soil through efficient farming methods.
Utilitarian - the quality or property of being useful.
Activity Instructions: 1. Read and discuss the background information and vocabulary. 2. Hand out the worksheet for students to complete. - Students will work in pairs or groups to solve math problems - Students will check answers after completing the first two before continuing. - In class discussion, students will agree or disagree with the reasoning of other classmates and explain their positions. Lesson Extender: Have students create their own problems using the knowledge they have gained through this activity. Have students use graph paper to create scale-drawings illustrating each problem. Encourage students to check current and future corn prices and then complete the problems using the current
or future corn prices. Challenge students to complete the problems using other crops in place of corn. Students will need to deter-
mine the number of plants in a row for the crop they have chosen, the number of plants per square acre, etc. Adapted from an activity by Oklahoma Ag in the Classroom Program
27 Illinois Agriculture in the Classroom
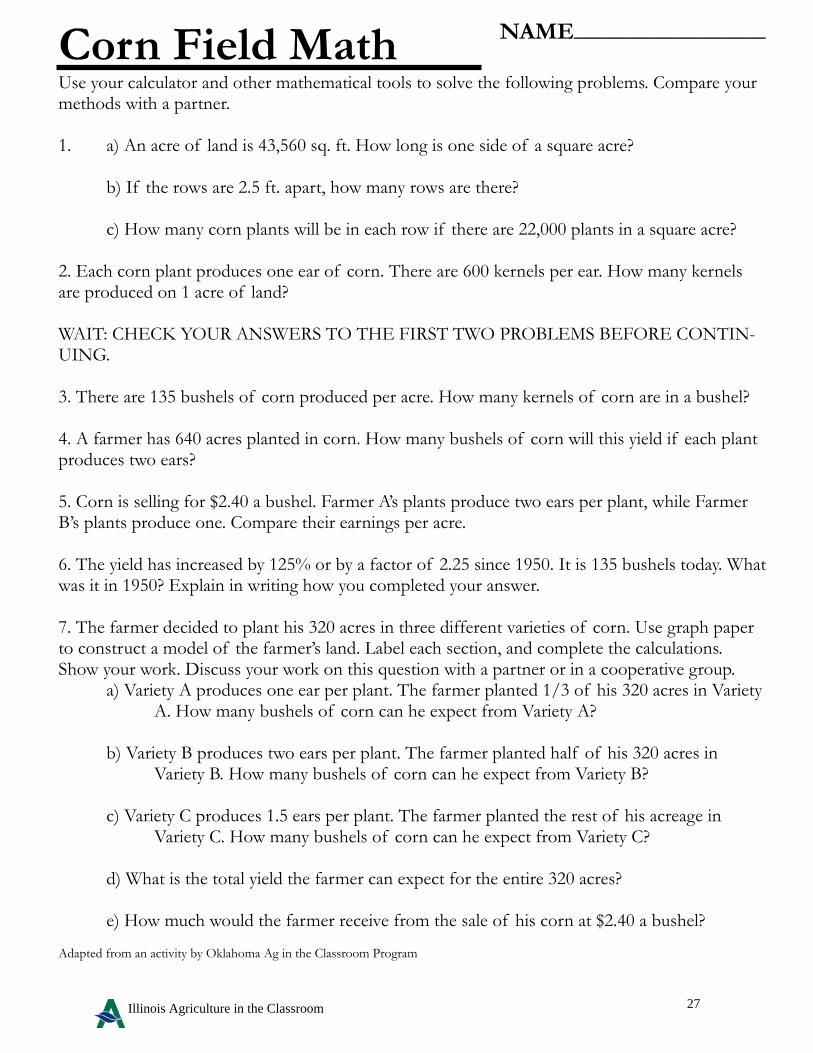
Corn Field Math Use your calculator and other mathematical tools to solve the following problems. Compare your methods with a partner. 1. a) An acre of land is 43,560 sq. ft. How long is one side of a square acre? b) If the rows are 2.5 ft. apart, how many rows are there? c) How many corn plants will be in each row if there are 22,000 plants in a square acre? 2. Each corn plant produces one ear of corn. There are 600 kernels per ear. How many kernels are produced on 1 acre of land? WAIT: CHECK YOUR ANSWERS TO THE FIRST TWO PROBLEMS BEFORE CONTIN-UING. 3. There are 135 bushels of corn produced per acre. How many kernels of corn are in a bushel? 4. A farmer has 640 acres planted in corn. How many bushels of corn will this yield if each plant produces two ears? 5. Corn is selling for $2.40 a bushel. Farmer A’s plants produce two ears per plant, while Farmer B’s plants produce one. Compare their earnings per acre. 6. The yield has increased by 125% or by a factor of 2.25 since 1950. It is 135 bushels today. What was it in 1950? Explain in writing how you completed your answer. 7. The farmer decided to plant his 320 acres in three different varieties of corn. Use graph paper to construct a model of the farmer’s land. Label each section, and complete the calculations. Show your work. Discuss your work on this question with a partner or in a cooperative group. a) Variety A produces one ear per plant. The farmer planted 1/3 of his 320 acres in Variety A. How many bushels of corn can he expect from Variety A? b) Variety B produces two ears per plant. The farmer planted half of his 320 acres in Variety B. How many bushels of corn can he expect from Variety B? c) Variety C produces 1.5 ears per plant. The farmer planted the rest of his acreage in Variety C. How many bushels of corn can he expect from Variety C? d) What is the total yield the farmer can expect for the entire 320 acres? e) How much would the farmer receive from the sale of his corn at $2.40 a bushel? Adapted from an activity by Oklahoma Ag in the Classroom Program
NAME________________
28 Illinois Agriculture in the Classroom
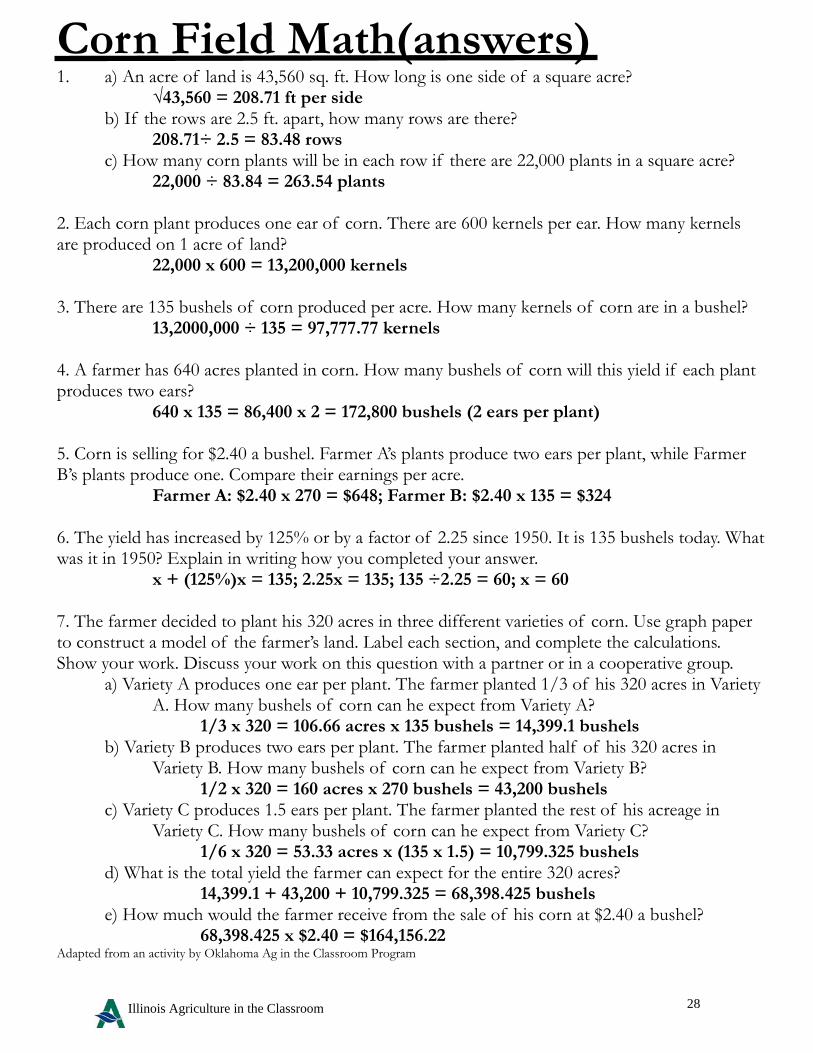
Corn Field Math(answers) 1. a) An acre of land is 43,560 sq. ft. How long is one side of a square acre? √43,560 = 208.71 ft per side b) If the rows are 2.5 ft. apart, how many rows are there? 208.71÷ 2.5 = 83.48 rows c) How many corn plants will be in each row if there are 22,000 plants in a square acre? 22,000 ÷ 83.84 = 263.54 plants 2. Each corn plant produces one ear of corn. There are 600 kernels per ear. How many kernels are produced on 1 acre of land? 22,000 x 600 = 13,200,000 kernels 3. There are 135 bushels of corn produced per acre. How many kernels of corn are in a bushel? 13,2000,000 ÷ 135 = 97,777.77 kernels 4. A farmer has 640 acres planted in corn. How many bushels of corn will this yield if each plant produces two ears? 640 x 135 = 86,400 x 2 = 172,800 bushels (2 ears per plant) 5. Corn is selling for $2.40 a bushel. Farmer A’s plants produce two ears per plant, while Farmer B’s plants produce one. Compare their earnings per acre. Farmer A: $2.40 x 270 = $648; Farmer B: $2.40 x 135 = $324 6. The yield has increased by 125% or by a factor of 2.25 since 1950. It is 135 bushels today. What was it in 1950? Explain in writing how you completed your answer. x + (125%)x = 135; 2.25x = 135; 135 ÷2.25 = 60; x = 60 7. The farmer decided to plant his 320 acres in three different varieties of corn. Use graph paper to construct a model of the farmer’s land. Label each section, and complete the calculations. Show your work. Discuss your work on this question with a partner or in a cooperative group. a) Variety A produces one ear per plant. The farmer planted 1/3 of his 320 acres in Variety A. How many bushels of corn can he expect from Variety A? 1/3 x 320 = 106.66 acres x 135 bushels = 14,399.1 bushels b) Variety B produces two ears per plant. The farmer planted half of his 320 acres in Variety B. How many bushels of corn can he expect from Variety B? 1/2 x 320 = 160 acres x 270 bushels = 43,200 bushels c) Variety C produces 1.5 ears per plant. The farmer planted the rest of his acreage in Variety C. How many bushels of corn can he expect from Variety C? 1/6 x 320 = 53.33 acres x (135 x 1.5) = 10,799.325 bushels d) What is the total yield the farmer can expect for the entire 320 acres? 14,399.1 + 43,200 + 10,799.325 = 68,398.425 bushels e) How much would the farmer receive from the sale of his corn at $2.40 a bushel? 68,398.425 x $2.40 = $164,156.22 Adapted from an activity by Oklahoma Ag in the Classroom Program
29 Illinois Agriculture in the Classroom
Probing Into Plant Parts Objective: Students will use a Venn diagram to identify the similarities and differences between trees and other plants. Students will identify various parts of plants to determine which parts people eat. Students will conduct a celery stalk experiment in which they determine the value and use of the stem and how it helps the plant to meet its needs. Illinois Learning Standards: 11.A.1a, 11.A.1b, 11.A.1f, 12.A.1a, 12.A.1b, 22.A.1b, 22.B.1, 23.B.1 Assessment Framework: 12.4.04, 12.4.05, 12.7.15, 12.7.16, 12.7.17, 12.7.19, 12.7.21 Suggested Reading Materials: IAITC’s Tree Ag Mag IAITC’s Specialty Crop Ag Mag Red Leaf, Yellow Leaf by Lois Ehlert Materials: Plant and tree part diagram Paper Apple, celery, carrots, lettuce Celery sticks Baby food jars (6) Food coloring Chart paper/white board Markers Water Paper Towels Newspaper Activity Instructions: 1. As a class, discuss what plants need to survive and grow. (soil, air, water, sunlight) 2. Pose the question, “How do plants get what they need to survive?” 3. Show the students the cover of Red Leaf, Yellow Leaf by Lois Ehlert. Students make predictions, set purpose
(parts of a tree), and read aloud. 4. Discuss parts of a tree and how they help it to survive. Show students two diagrams—plant parts and tree
parts. 5. Make a Venn diagram and have students compare similarities and differences between plant parts and tree
parts. Discuss the Venn diagrams created. Lesson Extender
After the discussion of plant parts, pass around carrots, celery, lettuce, and an apple. Ask students to notice the similarities and differences between them.
Create a 4-column chart entitled “Which Part Do We Eat?” Students should construct charts at their seats and identify answers: leaf = lettuce, root = carrot, stem
= celery, fruit/seed = apple. Discuss as a class what each part does to help the plant. (root gets water and food from the soil, etc.) Focus on the stem. Ask students what the stem does. If celery is a stem, what would happen if we
gave it different colored water? Would it change, stay the same, die? Have students draw pictures of what their predictions are about the experiment. Have students conduct an experiment by placing food coloring in water and then standing a piece of
celery up in the water. Allow students to observe and record the outcomes of the experiment.
Adapted from an activity at Dole.com classroom resources for educators.
30 Illinois Agriculture in the Classroom
Power Seeds Objective: Students will review the two major angiosperm classes. Students will examine the factors needed for seeds to germinate. Illinois Learning Standards: 7.A.1a, 7.A.3b, 11.A.2a, 11.A.5a, 11.A.2d, 11.A.2e, 11.A.4b, 12.A.2a, 12.B.1a, 13.B.1a, 13.B.1b Assessment Framework: 11.4.01, 11.4.02, 11.4.04, 11.7.01, 11.7.02, 11.7.06, 12.4.04, 12.4.05, 12.7.15 Suggested Reading Materials: IAITC’s Corn Ag Mag IAITC’s Soybean Ag Mag IAITC’s Specialty Crop Ag Mag One Bean by Anne Rockwell Materials: Grass seeds Plaster of Paris Fine-point permanent marker Metric ruler Corn seed Newspaper Paper towel Seeds-starting mix Pea seeds Spackling Paste Trowel 30 clear plastic cups Lettuce seeds Spackling Knife (9cm tall, 6 cm wide) Vocabulary: Angiosperms - plants that produce enclosed seeds. Cotyledon - a seed leaf that stores food for the germinating seedling. It is the first photosynthetic organ of a young seedling. Dicots - an angiosperm whose seeds have two cotyledons or seed leaves. Most angiosperms are dicots. Monocolpate - pollen of a plant with only one pore. Monocots - an angiosperm whose seeds have only one cotyledon or seed leaf. Phloem - the tissue that conducts food and other dissolved materials throughout the body of a vascular plant. Tricolpate - pollen of a plant that has three pores. Vascular bundles - a structure within a stem containing parallel strands of xylem and phloem. Vascular cambium - the meristematic layer of cells that causes growth in width of a stem or root. Venation - an arrangement or system of veins Xylem - the tissue that conducts water and minerals from the roots upward through the plant and helps to support the plant. Background Information: There are many different types of plants in the world. Most common plants are angiosperms. Plants have the ability to grow through very hard structures. Although they appear fragile to humans, they are actually very powerful organisms. This activ-ity will help to demonstrate just how powerful plants really are. Angiosperms (Division Anthophyta) make up most of the plants on the Earth. Plants such as trees, flowers, fruits, vegeta-bles, and field crops all belong to this division. Altogether there are about 235,000 species of Angiosperms. The division Anthophyta includes two classes; The monocotyledons (monocots) and the dicotyledons (dicots). Monocots and dicots are very similar, except for a few distinguishing characteristics.
Monocots:
- flower parts usually found in threes - pollen is monocolpate with only one pore - they only have one cotyledon - the leaf venation is usually parallel - the primary vascular bundles in the stem have a complex arrangement - secondary growth with vascular cambium is absent - examples are grasses, flowers and palms
Dicots: - flower parts are usually found in fours or fives - pollen is tricolpate meaning it has three pores - they have two cotyledons which are food leaves in their seeds - the leaf venation is usually netlike - the primary vascular bundles or transport tissues of the stem are found in a ring - secondary growth with vascular cambium is commonly present - examples are trees, shrubs
31 Illinois Agriculture in the Classroom
Power Seeds Activity Instructions: 1. Because there are so many containers, students can work in groups of two or three.
Each group is responsible for bringing their own seeds. About 54 seeds of each type is necessary. The corn and pea seeds must be soaked in water the night before planting.
2. Using the permanent marker, label 6 containers with GRASS. Print the letters near the bottom of the contain-er. Now label 6 containers with LETTUCE, 6 with CORN, and 6 with PEA.
3. Now draw a line around the outside of each labeled container 6 cm up from the bottom. 4. Select three containers of each seed type (3 Grass, 3 Lettuce, 3 Corn, 3 Pea = 12). Label each container with
PLASTER OF PARIS just below the seed type. Now select three more containers of each seed type and label them SPACKLING PASTE. Now you should have a total of 24 containers. Separate containers first by seed type and then by covering material (should have 8 groups of 3).
5. Take one container marked PLASTER OF PARIS for each seed category and draw a line 0.5 cm above the 6 cm line. Take another container marked PLASTER OF PARIS for each seed category and draw a line 1.0 cm above the 6 cm line. Take the last 3 containers marked PLASTER OF PARIS and draw a line 1.5 cm above the 6 cm line.
6. Repeat this entire procedure for the containers marked SPACKLING PASTE. Now all the containers should be different by seed type, material, or height of line.
7. Spread out the newspaper to avoid making a mess. Now fill each container with seed starting mix up to the 6 cm line.
8. Plant nine seeds of the proper type in each marked container. Use an X-shaped pattern across the container. Plant the corn and pea seeds about 2 cm deep. The grass and lettuce seeds need to be planted just under the surface.
9. Water the contents of each container. 10. Now mix the covering materials according to the directions. You can buy the covering materials pre-mixed as
well. 11. Now use the spackling knife to cover the planted seeds with the appropriate material. Fill the containers to the
height of the line above the 6 cm line. Work quickly because some of the coverings harden very quickly. Make sure everything is covered and the materials touch the walls of every container.
12. Set the containers aside for a few days. Then examine each container’s surface for cracks. Take a look at the starting mix to look for root growth. Record all observations for five days.
Notes Make sure the containers are watered thoroughly before applying the covering. This is the only source of water the seeds
will have for a number of days. In the meantime, too much water could be just as bad. It is important that students be as accurate as possible when applying the covering. There is only half a centimeter to
work with, so too much or too little could affect the results. Timing is very important. It would be a great idea to try to plant everything on Friday. This will allow a growth period
over the weekend and then five consecutive days to record results. It would be good if all the setting up could be done in one day. However, if time does not permit, then the amount of
coverings or seeds can be cut back or the lab can be done in sections. There are a number of variations that can be used with this activity. Try using different types of coverings, or different
seeds, or maybe even different types of soil. Questions 1. Which seeds broke through 0.5 cm of Plaster of Paris? What about 1.0 cm? 1.5 cm? 2. Which seeds broke through 0.5 cm of Spackling Paste? 1.0 cm? 1.5 cm? 3. Which seeds showed the greatest amount of root growth? 4. Which seeds showed the least amount of root growth? 5. Are dicotyledonous seedlings stronger than monocotyledonous seedlings? Justify this answer. 6. The larger the seed, the more powerful the seedling. Is this generalization true or false? Explain.

1701 Towanda Avenue
Bloomington, IL 61701-2050 Phone: (309) 557-3334
www.agintheclassroom.org


