48
Libretto di istruzioni / User manual
| Date post: | 17-Feb-2019 |
| Category: |
Documents |
| Upload: | trinhquynh |
| View: | 254 times |
| Download: | 0 times |

Libretto di istruzioni / User manual

2
caro amico,da oggi trovi i manuali operativi più aggiornati nella tua lingua cliccando al sito:www.brionvega.tv
dear friend,from now on, you'll find the most recently updated operating manuals in your language, by clicking on: www.brionvega.tv
05 Libretto di istruzioni27 User manual

3
Libretto di istruzioni

4
5
INDICE:
AVVERTENZE DI sICuREZZAAVVERTENZE E ACCEssoRIMANuTENZIoNE E CuRAPANoRAMICA ALPHAFuNZIoNI PRINCIPALIFuNZIoNI DVB-TFuNZIoNI DVDCARATTERIsTICHE TECNICHE RIsoLuZIoNE DEI PRoBLEMI
p. 06p. 06p. 06p. 07p. 08p. 17p. 21p. 23p. 23
ITALIANOLIBRETTo DI IsTRuZIoNI
modello:ALPHA BRIoNVEgA
codice: BRAH19D2
gENTILE CLIENTEGrazie per aver acquistato questo televisore BRIONVEGA.All’apertura della confezione, Vi preghiamo di verificare che tutti i componenti e accessori siano inclusi. Prima di effettuare i collegamenti alla corrente elettrica, Vi preghiamo di leggere attentamente il libretto di istruzioni e tenerlo sempre a portata di mano vicino al Vostro ALPHA.
DICHIARAZIoNE DI CoNFoRMITA'La società SUPER//FLUO SpA dichiara che questo apparecchio è costruito in conformità alle prescrizioni del D.M. 548 del 28 agosto 1995 pubblicato sulla G. U. n.301 del 28 dicembre 1995 ed in particolare è conforme a quanto specificato nell'Art.2 comma 1 dello stesso decreto. Inoltre questo apparecchio rispetta la disposizione del D. M. marzo 1992 ed in particolare è conforme alle prescrizioni dell'Art.1 dello stesso D. M.
PRECAuZIoNE: “Bruciatura dello schermo” dovuta alla visualizzazione di un’immagine fissa.•Visualizzare un’immagine fissa sul pannello LCD per oltre 2 ore può causare la ritenzione dell’immagine sullo schermo (“bruciatura dello schermo”).Ridurre la luminosità e il contrasto dello schermo quando si visualizza un’immagine fissa per evitare la bruciatura dello schermo.• Vedere l’immagine sul TV LCD, in un formato che visualizzi bordi neri per un lungo periodo di tempo può lasciare delle tracce in fondo, in alto e al centro dello schermo. Questo può essere causato dalla riproduzione DVD o l’uso di una console per giochi.Danni causati dall’effetto sopra descritto non sono coperti dalla Garanzia.

6
AvverTeNze dI sIcurezzANote
CosA FARE E CosA NoN FARE
CosA FARE Questo prodotto va sempre alimentato tramite una presa di pari potenza • (voltaggio e frequenza) come indicato sull’etichetta posta sulla parte posteriore dell’alimentatore esterno. Se il prodotto è stato danneggiato (compreso danno al cavo o alla spina) • deve essere portato presso un tecnico autorizzato per una verifica e, se necessario, per la riparazione. Spegnere e disconnettere il cavo di alimentazione prima di pulire o • riporre questo prodotto.Assicurarsi che il prodotto non venga inumidito o bagnato.• Usare solamente l’adattatore di potenza fornito con il televisore, marca • POWERBOX mod. EXM 80 5118 Effettuare tutte le connessioni per gli ingressi AV necessarie prima di • collegare l’adattatore di potenza alla linea di distribuzione.
CosA NoN FARENon posizionare fonti di fiamme libere (ad es. candele accese) sopra o • vicino al prodotto.Non posizionare oggetti contenenti liquidi (ad es. vasi) sopra o vicino al prodotto.• Non installare il prodotto sopra altri apparecchi elettrici o superfici non regolari. • Non usare o riporre il prodotto alla luce diretta del sole, calore, polvere o • vibrazioni eccessive.Non maneggiare il prodotto con le mani bagnate.• Non pulire il prodotto con acqua o altri sostanze liquide.• Non ostruire o coprire i vani e le aperture del prodotto.• Non infilare oggetti estranei nei vani o nelle aperture del prodotto.• Non tirare il cavo di alimentazione per lo spegnimento. Spegnere • l’interruttore della presa ed estrarre la spina senza tirare il cavo.Non cercare di aprire il prodotto autonomamente. Non vi sono parti • riparabili personalmente all’interno.
AvverTeNze e AccessOrIAVVERTENZE DI sICuREZZA
Prima di usare questo prodotto, leggere e seguire le avvertenze e le istruzioni.• Posizionare l’alimentatore in prossimità della presa di corrente elettrica • affinché il cavo di alimentazione risulti facilmente accessibile per agevolare una sua eventuale disconnessione. Questo prodotto non è destinato all’uso da parte di bambini piccoli o • di persone inferme se non controllate adeguatamente da una persona responsabile che si assicuri che il prodotto venga usato in sicurezza. Non lasciare che bambini piccoli giochino con questo prodotto.• Questo prodotto è destinato all’uso domestico e non ad usi commerciali • o industriali. Evitare il contatto con acqua (gocciolamento o schizzi). • Non posizionare fonti di fiamme libere (ad es. candele accese) sul prodotto.• Lasciare spazio sufficiente intorno al prodotto per la ventilazione. • Non ostacolare la ventilazione coprendo le bocchette di aerazione con • giornali, tovaglie, tende o simili. Assicurarsi che il televisore LCD sia fissato in posizione stabile. • Danni causati dall’uso del prodotto in posizione instabile o dovuti alla • mancata osservanza di ogni altra avvertenza o precauzione contenuta nel presente libretto di istruzioni non sono coperti da garanzia.
ACCEssoRICoNTRoLLARE gLI ACCEssoRI
INsERIMENTo DELLE BATTERIE NEL TELECoMANDo
Far scorrere la copertura posteriore del 1. telecomando come mostrato nei disegni. Inserire due batterie tipo AAA. 2. Assicurarsi che i poli positivi “+” e negativi “-” delle 3. batterie corrispondano al diagramma all’interno del vano batterie. Riposizionare la copertura.
Libretto di istruzioni Telecomando/batterie Trasformatore
NON APRIRERISCHIO DI SCARICHE ELETTRICHE
NON APRIRE LO SCHIENALE,POSSIBILITA’ DI SCARICHE ELETTRICHE. PER LE RIPARAZIONI
AVVALERSI DI PERSONALE QUALIFICATO.
AL FINE DI RIDURRE IL RISCHIO DI INCENDI O DI SCARICHE ELETTRICHE, NON ESPORRE QUESTO APPARECCHIO A PIOGGIA O UMIDITA’.
AVVISO
ATTENZIONE:
ATTENZIONE:
Il simbolo con la scarica elettrica è utilizzato per avvertire l’utente della presenza della tensione all’interno dell’apparecchio che può costituire un rischio per la salute delle persone.
Il simbolo con il punto esclamativo è utilizzato per avvertire l’utente della presenza di importanti note per l’operatività e la manutenzione dell’apparecchio.
It-
4
Precauzioni
—Continua
Se si forma della condensa, rimuovete tutti i dischi elasciate acceso l’apparecchio per due o tre ore. Inquesto periodo di tempo l’apparecchio si riscalda efa evaporare la condensa.
10. Numeri di regione
—Lo standard DVD utilizza numeri di regione per controllare come possono essere riprodotti dischi nel mondo, essendo questo diviso in sei regioni. Questo apparecchio riproduce solo dischi DVD che corrispondono al suo numero di regione, che è riportato sul pannello posteriore
(per es. , ).
11. Informazioni sul manuale
—Questo manuale spiega come utilizzare tutte le funzioni di questo apparecchio. Sebbene lo standard DVD offra nume-rosi funzioni particolari, non tutti i dischi le utiliz-zano quindi, a seconda del disco che viene riprodotto, questo apparecchio può non rispondere a determinate funzioni. Per informazioni sulle fun-zioni supportate, si vedano le note riportate sulla copertina del disco.
Questo apparecchio contiene un sistema laser a semi-conduttori ed è classificato come “PRODOTTO LASER DI CLASSE 1”. Pertanto, per un uso corretto dell’appa-recchio, vi preghiamo di leggere attentamente questo manuale di istruzioni. Se riscontrate problemi, rivolge-tevi al rivenditore presso cui avete acquistato l’apparec-chio.Per evitare pericolose esposizioni al raggio laser, non aprite il rivestimento.
ATTENZIONE:
ALL’APERTURA VENGONO EMESSE RADIA-ZIONI LASER VISIBILI E INVISIBILI DI CLASSE 1M. NON OSSERVATELE CON STRUMENTI OTTICI.
QUESTO APPARECCHIO UTILIZZA UN LASER. L’UTILIZZO DEI CONTROLLI O L’ESECUZIONE DI REGOLAZIONI E PROCEDURE DIVERSE DA QUANTO QUI SPECIFICATO PUÒ PROVOCARE PERICOLOSE ESPOSIZIONI A RADIAZIONI.
L’etichetta riportata a destra si trova sul pannello posteriore.
1. Questo apparecchio è un PRO-DOTTO LASER DI CLASSE 1 e all’interno del cabinet utilizza un laser.
2. Per evitare l’esposizione al raggio laser, non rimuovete il pannello di copertura. Per assistenza rivolgetevi a personale qualificato.
Per i modelli per l’Europa
1 ALL
Dichiarazione di Conformità
Noi, ONKYO EUROPEELECTRONICS GmbHLIEGNITZERSTRASSE 6, 82194 GROEBENZELL,GERMANIA
GROEBENZELL, GERMANIA
ONKYO EUROPE ELECTRONICS GmbH
dichiariamo sotto la nostra responsabilità che il prodotto ONKYO descritto in questo manuale di istruzioni è in conformità con i corrispondenti standard tecnici: EN60065, EN55013, EN55020 e EN61000-3-2, -3-3.
K. MIYAGI
DV-SP504E_It.book Page 4 Wednesday, August 30, 2006 4:07 PM
Questo simbolo indica “tensione pericolosa” all’interno del prodotto che presenta rischio di scosse elettriche o di lesione alle persone.
MANuTENZIoNI E CuRAUna accurata e regolare pulizia può aumentare la durata del vostro televisore. Prima di pulirlo accertarsi che il televisore sia spento.Pulizia dello schermo: 1. Pulire delicatamente lo schermo con un panno pulito, soffice, inumidito con sola acqua. 2. Lasciare asciugare lo schermo – naturalmente- prima di accendere il televisore.Pulizia dell’estetica: Per pulire polvere o sporco pulire l’estetica con un panno pulito, soffice e inumidito con sola acqua.Assenza prolungata: Se lasciate inutilizzato il televisore per un lungo periodo (per le vacanze ad esempio) si consiglia di staccare l’alimentatore dalla presa di corrente per evitare danni dovuti a sbalzi di tensione o fulmini.Per qualsiasi pulizia: Non utilizzare prodotti detergenti a base di ammoniaca, alcool, solventi o ingredienti abrasivi.Non utilizzare prodotti lucidanti. Non usare asciugamani o panni ruvidi. Non spruzzare liquidi direttamente sullo schermo.
Emissioni laser invisibili se aperto. Evitare di esporsi direttamente al raggio laser.

7
1 2 3 4 5
In caso di mancato utilizzo del telecomando per lungo tempo rimuovere le batterie e conservarle in luogo fresco e asciutto.Se il telecomando non funziona controllare quanto segue:
L’apparecchio TV è acceso?a. I poli delle batterie sono invertiti?b. Le batterie sono esaurite?c. Manca la corrente elettrica o il cavo di alimentazione è scollegato?d. C’è una luce fluorescente particolare o neon nelle vicinanze?e.
PANOrAMIcA ALPHA
PANNELLo DI CoNNEssIoNE
Ingresso alimentazione 1. Ingresso antenna2. Ingresso sCART3. Ingresso HDMI4. Ingresso s-VIDEo5. Ingresso audio destro6. Ingresso Video7. Ingresso audio sinistro8. Presa cuffie 9. Ingresso VgA10.
PC, CVBS e SVIDEO condividono l’ingresso audio destro e sinistro PANNELLo DI CoNTRoLLo
Regolazione canale e selezione voci MENu1. Regolazione volume e voci 2. MENuTasto selezione sorgente segnale3. Display 4. MENu Principale e oK Tasto standby on/ off5.
TELECoMANDoLa luce diretta del sole o a luce artificiale troppo intensa possono causare irregolarità nel funzionamento del telecomando
Premere per accendere/spegnere il televisore•
Selezione sorgente: TV, DVB-T, DVD, Scart, Video Com-• posite, SVHS, PC, HDMINella modalità • MENu consente di ritornare al sottomenu del MENu principale o di chiudere il MENu
In modalità analogica cambia direttamente il programma• Nella modalità TXT analogica viene usato per cambiare pagina• In modalità DVD si sposta alle sequenze etichettate• In modalità DVB-T cambia direttamente il programma•
Per passare al programma TV successivo sia in modalità • analogica che DVB-T Spostamento in su quando OSD è attivato• Per passare alle pagine contigue nella modalità TXT• Per impostare il formato immagine nella modalità DVD•
Per passare al programma TV precedente sia in modalità • analogica che DVB-TPer passare al programma TV precedente• Spostamento in giù quando OSD è attivato• Per passare alle pagine contigue nella modalità TXT•
1 2 3 4 5
7
6
8
9 10
Tasti numerici
su/Canale successivo
Destro/Regolazione Volumesinistra/
Regolazione Volume
MENu/oK/CoNFERMA giù/Canale Precedente
oN/oFF
MoDE(modalità)
1,2,3,4,5,6,7,8,9,0
8
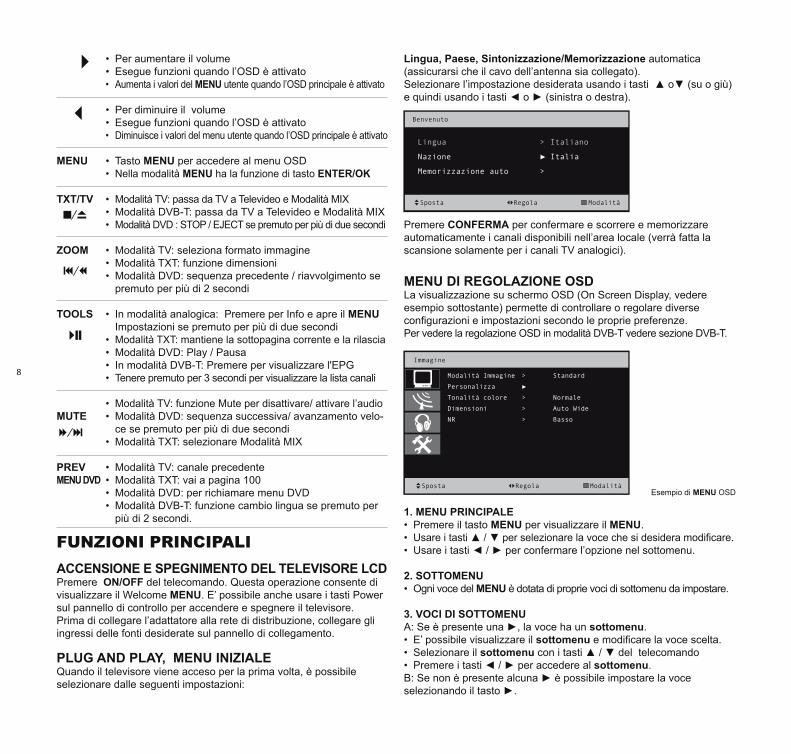
Per aumentare il volume • Esegue funzioni quando l’OSD è attivato • Aumenta i valori del • MENu utente quando l’OSD principale è attivato
Per diminuire il volume • Esegue funzioni quando l’OSD è attivato• Diminuisce i valori del menu utente quando l’OSD principale è attivato•
Tasto • MENu per accedere al menu OSDNella modalità • MENu ha la funzione di tasto ENTER/oK
Modalità TV: passa da TV a Televideo e Modalità MIX• Modalità DVB-T: passa da TV a Televideo e Modalità MIX• Modalità DVD : STOP / EJECT se premuto per più di due secondi•
Modalità TV: seleziona formato immagine• Modalità TXT: funzione dimensioni• Modalità DVD: sequenza precedente / riavvolgimento se • premuto per più di 2 secondi
In modalità analogica: Premere per Info e apre il • MENu Impostazioni se premuto per più di due secondi Modalità TXT: mantiene la sottopagina corrente e la rilascia• Modalità DVD: Play / Pausa• In modalità DVB-T: Premere per visualizzare l'EPG• Tenere premuto per 3 secondi per visualizzare la lista canali•
Modalità TV: funzione Mute per disattivare/ attivare l’audio• Modalità DVD: sequenza successiva/ avanzamento velo-• ce se premuto per più di due secondi Modalità TXT: selezionare Modalità MIX•
Modalità TV: canale precedente• Modalità TXT: vai a pagina 100• Modalità DVD: per richiamare menu DVD• Modalità DVB-T: funzione cambio lingua se premuto per • più di 2 secondi.
FuNzIONI PrINcIPALIACCENsIoNE E sPEgNIMENTo DEL TELEVIsoRE LCD Premere oN/oFF del telecomando. Questa operazione consente di visualizzare il Welcome MENu. E’ possibile anche usare i tasti Power sul pannello di controllo per accendere e spegnere il televisore.Prima di collegare l’adattatore alla rete di distribuzione, collegare gli ingressi delle fonti desiderate sul pannello di collegamento.
PLug AND PLAy, MENu INIZIALEQuando il televisore viene acceso per la prima volta, è possibile selezionare dalle seguenti impostazioni:
Lingua, Paese, sintonizzazione/Memorizzazione automatica (assicurarsi che il cavo dell’antenna sia collegato).Selezionare l’impostazione desiderata usando i tasti ▲ o▼ (su o giù) e quindi usando i tasti ◄ o ► (sinistra o destra).
Premere CoNFERMA per confermare e scorrere e memorizzare automaticamente i canali disponibili nell’area locale (verrà fatta la scansione solamente per i canali TV analogici).
MENu DI REgoLAZIoNE osD La visualizzazione su schermo OSD (On Screen Display, vedere esempio sottostante) permette di controllare o regolare diverse configurazioni e impostazioni secondo le proprie preferenze.Per vedere la regolazione OSD in modalità DVB-T vedere sezione DVB-T.
1. MENu PRINCIPALEPremere il tasto • MENu per visualizzare il MENu.Usare i tasti ▲ / ▼ per selezionare la voce che si desidera modificare.• Usare i tasti ◄ / ► per confermare l’opzione nel sottomenu.•
2. soTToMENuOgni voce del • MENu è dotata di proprie voci di sottomenu da impostare.
3. VoCI DI soTToMENuA: Se è presente una ►, la voce ha un sottomenu.
E’ possibile visualizzare il• sottomenu e modificare la voce scelta. Selezionare il • sottomenu con i tasti ▲ / ▼ del telecomando Premere i tasti ◄ / ► per accedere al • sottomenu.
B: Se non è presente alcuna ► è possibile impostare la voce selezionando il tasto ►.
MENu
TXT/TV
ZooM
TooLs
MuTE
PREVMENu DVD
Esempio di MENu OSD
Modalità Immagine
Personalizza
Tonalità colore
Dimensioni
NR
>
►
>
>
>
Standard
Normale
Auto Wide
Basso
Immagine
Sposta Regola Modalità
Sposta Regola Modalità
Benvenuto
Lingua
Nazione
Memorizzazione auto
>
►
>
Italiano
Italia
9
REgoLAZIoNE DELL’ IMMAgINE
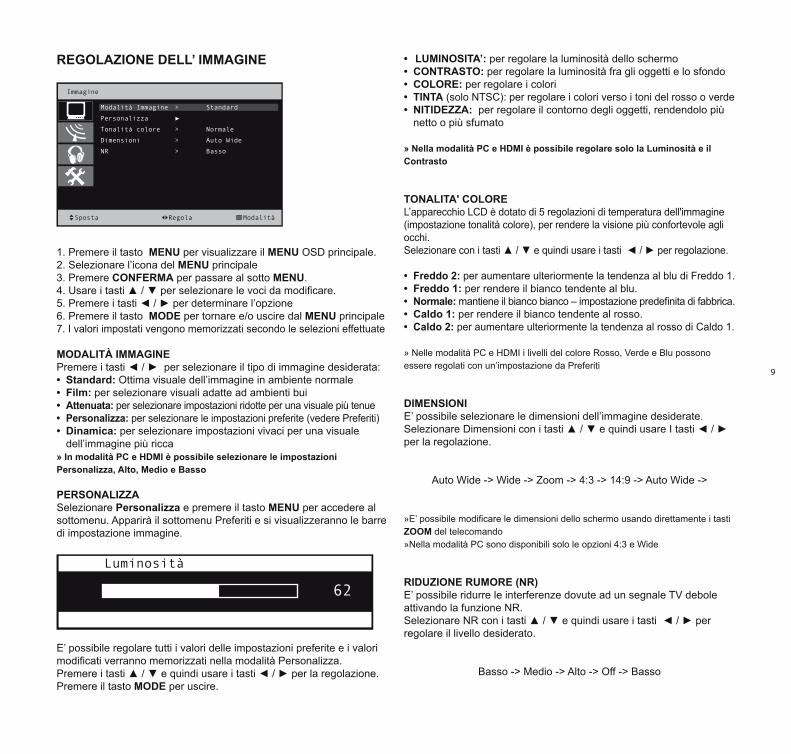
1. Premere il tasto MENu per visualizzare il MENu OSD principale.2. Selezionare l’icona del MENu principale 3. Premere CoNFERMA per passare al sotto MENu.4. Usare i tasti ▲ / ▼ per selezionare le voci da modificare.5. Premere i tasti ◄ / ► per determinare l’opzione 6. Premere il tasto MoDE per tornare e/o uscire dal MENu principale 7. I valori impostati vengono memorizzati secondo le selezioni effettuate
MoDALITà IMMAgINEPremere i tasti ◄ / ► per selezionare il tipo di immagine desiderata:
standard:• Ottima visuale dell’immagine in ambiente normaleFilm:• per selezionare visuali adatte ad ambienti bui • Attenuata: per selezionare impostazioni ridotte per una visuale più tenue Personalizza:• per selezionare le impostazioni preferite (vedere Preferiti)Dinamica: • per selezionare impostazioni vivaci per una visuale dell’immagine più ricca
» In modalità PC e HDMI è possibile selezionare le impostazioni Personalizza, Alto, Medio e Basso
PERsoNALIZZASelezionare Personalizza e premere il tasto MENu per accedere al sottomenu. Apparirà il sottomenu Preferiti e si visualizzeranno le barre di impostazione immagine.
E’ possibile regolare tutti i valori delle impostazioni preferite e i valori modificati verranno memorizzati nella modalità Personalizza.Premere i tasti ▲ / ▼ e quindi usare i tasti ◄ / ► per la regolazione.Premere il tasto MoDE per uscire.
LuMINosITA’:• per regolare la luminosità dello schermoCoNTRAsTo:• per regolare la luminosità fra gli oggetti e lo sfondoCoLoRE: • per regolare i colori TINTA• (solo NTSC): per regolare i colori verso i toni del rosso o verdeNITIDEZZA:• per regolare il contorno degli oggetti, rendendolo più netto o più sfumato
» Nella modalità PC e HDMI è possibile regolare solo la Luminosità e il Contrasto
ToNALITA' CoLoREL’apparecchio LCD è dotato di 5 regolazioni di temperatura dell'immagine (impostazione tonalità colore), per rendere la visione più confortevole agli occhi. Selezionare con i tasti ▲ / ▼ e quindi usare i tasti ◄ / ► per regolazione.
Freddo 2: • per aumentare ulteriormente la tendenza al blu di Freddo 1.Freddo 1:• per rendere il bianco tendente al blu. Normale: • mantiene il bianco bianco – impostazione predefinita di fabbrica.Caldo 1: • per rendere il bianco tendente al rosso.Caldo 2: • per aumentare ulteriormente la tendenza al rosso di Caldo 1.
» Nelle modalità PC e HDMI i livelli del colore Rosso, Verde e Blu possono essere regolati con un’impostazione da Preferiti
DIMENsIoNIE’ possibile selezionare le dimensioni dell’immagine desiderate.Selezionare Dimensioni con i tasti ▲ / ▼ e quindi usare I tasti ◄ / ► per la regolazione.
Auto Wide -> Wide -> Zoom -> 4:3 -> 14:9 -> Auto Wide ->
»E’ possibile modificare le dimensioni dello schermo usando direttamente i tasti ZooM del telecomando»Nella modalità PC sono disponibili solo le opzioni 4:3 e Wide
RIDuZIoNE RuMoRE (NR)E’ possibile ridurre le interferenze dovute ad un segnale TV debole attivando la funzione NR.Selezionare NR con i tasti ▲ / ▼ e quindi usare i tasti ◄ / ► per regolare il livello desiderato.
Basso -> Medio -> Alto -> Off -> Basso
Luminosità
62
Immagine
Sposta Regola Modalità
Modalità Immagine
Personalizza
Tonalità colore
Dimensioni
NR
>
►
>
>
>
Standard
Normale
Auto Wide
Basso
10
REgoLAZIoNE CANALI TV
REgoLAZIoNE CANALI DVB-Tvedere sezione DVB-T
REgoLAZIoNE CANALI TV ANALogICA
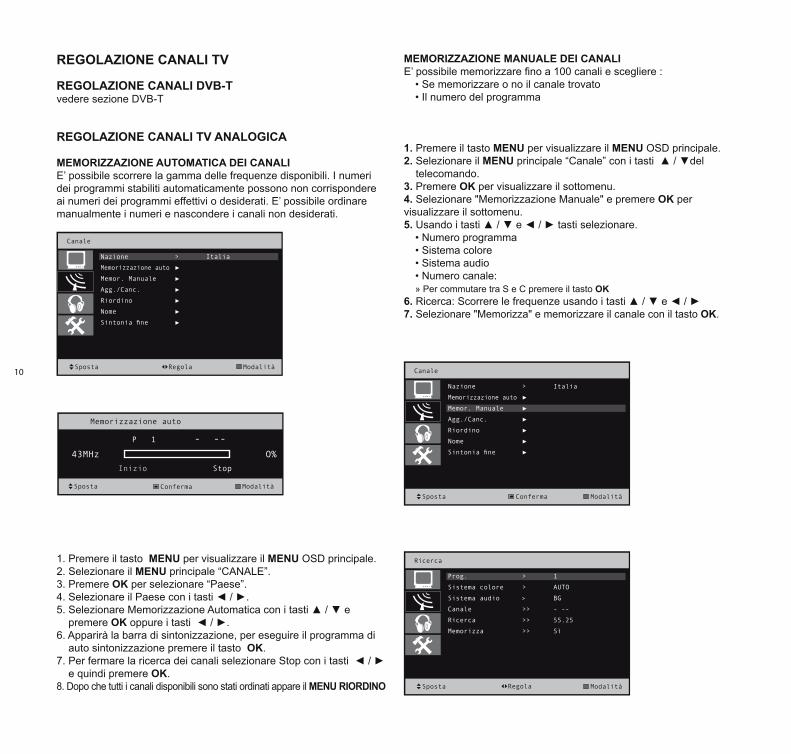
MEMoRIZZAZIoNE AuToMATICA DEI CANALI E’ possibile scorrere la gamma delle frequenze disponibili. I numeri dei programmi stabiliti automaticamente possono non corrispondere ai numeri dei programmi effettivi o desiderati. E’ possibile ordinare manualmente i numeri e nascondere i canali non desiderati.
1. Premere il tasto MENu per visualizzare il MENu OSD principale.2. Selezionare il MENu principale “CANALE”.3. Premere oK per selezionare “Paese”.4. Selezionare il Paese con i tasti ◄ / ►.5. Selezionare Memorizzazione Automatica con i tasti ▲ / ▼ e premere oK oppure i tasti ◄ / ►.6. Apparirà la barra di sintonizzazione, per eseguire il programma di auto sintonizzazione premere il tasto oK.7. Per fermare la ricerca dei canali selezionare Stop con i tasti ◄ / ► e quindi premere oK.8. Dopo che tutti i canali disponibili sono stati ordinati appare il MENu RIoRDINo
MEMoRIZZAZIoNE MANuALE DEI CANALI E’ possibile memorizzare fino a 100 canali e scegliere :
• Se memorizzare o no il canale trovato• Il numero del programma
1. Premere il tasto MENu per visualizzare il MENu OSD principale.2. Selezionare il MENu principale “Canale” con i tasti ▲ / ▼del telecomando.3. Premere oK per visualizzare il sottomenu.4. Selezionare "Memorizzazione Manuale" e premere oK per visualizzare il sottomenu.5. Usando i tasti ▲ / ▼ e ◄ / ► tasti selezionare.
• Numero programma• Sistema colore• Sistema audio • Numero canale: » Per commutare tra S e C premere il tasto oK
6. Ricerca: Scorrere le frequenze usando i tasti ▲ / ▼ e ◄ / ► 7. Selezionare "Memorizza" e memorizzare il canale con il tasto oK.
AggIuNgERE ED ELIMINARE CANALI
Canale
Sposta Regola Modalità
Nazione
Memorizzazione auto
Memor. Manuale
Agg./Canc.
Riordino
Nome
Sintonia fine
>
►
►
►
►
►
►
Italia
Canale
Sposta Conferma Modalità
Nazione
Memorizzazione auto
Memor. Manuale
Agg./Canc.
Riordino
Nome
Sintonia fine
>
►
►
►
►
►
►
Italia
Ricerca
Sposta Modalità
Prog.
Sistema colore
Sistema audio
Canale
Ricerca
Memorizza
>
>
>
>>
>>
>>
1
AUTO
BG
- --
55.25
Sì
Memorizzazione auto
43MHz
Sposta ModalitàConferma
P 1 - --
Inizio Stop
O%
Regola
11
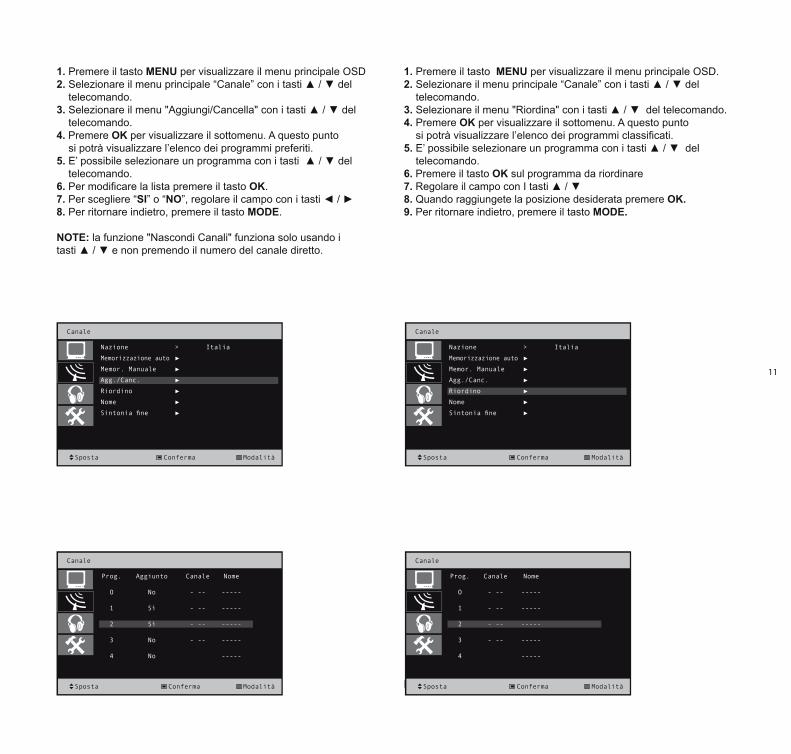
1. Premere il tasto MENu per visualizzare il menu principale OSD2. Selezionare il menu principale “Canale” con i tasti ▲ / ▼ del telecomando.3. Selezionare il menu "Aggiungi/Cancella" con i tasti ▲ / ▼ del telecomando.4. Premere oK per visualizzare il sottomenu. A questo punto si potrà visualizzare l’elenco dei programmi preferiti. 5. E’ possibile selezionare un programma con i tasti ▲ / ▼ del telecomando.6. Per modificare la lista premere il tasto oK.7. Per scegliere “sI” o “No”, regolare il campo con i tasti ◄ / ►8. Per ritornare indietro, premere il tasto MoDE.
NoTE: la funzione "Nascondi Canali" funziona solo usando itasti ▲ / ▼ e non premendo il numero del canale diretto.
RIoRDINo CANALI TV
1. Premere il tasto MENu per visualizzare il menu principale OSD. 2. Selezionare il menu principale “Canale” con i tasti ▲ / ▼ del telecomando.3. Selezionare il menu "Riordina" con i tasti ▲ / ▼ del telecomando.4. Premere oK per visualizzare il sottomenu. A questo punto si potrà visualizzare l’elenco dei programmi classificati. 5. E’ possibile selezionare un programma con i tasti ▲ / ▼ del telecomando.6. Premere il tasto oK sul programma da riordinare7. Regolare il campo con I tasti ▲ / ▼8. Quando raggiungete la posizione desiderata premere oK.9. Per ritornare indietro, premere il tasto MoDE.
DENoMINAZIoNE CANALE TV
Canale
Sposta Conferma Modalità
Nazione
Memorizzazione auto
Memor. Manuale
Agg./Canc.
Riordino
Nome
Sintonia fine
>
►
►
►
►
►
►
Italia
Canale
Sposta Conferma Modalità
Prog.
O
1
2
3
4
Aggiunto
No
Sì
Sì
No
No
Canale
- --
- --
- --
- --
Nome
-----
-----
-----
-----
-----
Canale
Sposta Conferma Modalità
Nazione
Memorizzazione auto
Memor. Manuale
Agg./Canc.
Riordino
Nome
Sintonia fine
>
►
►
►
►
►
►
Italia
Canale
Sposta Conferma Modalità
Prog.
O
1
2
3
4
Canale
- --
- --
- --
- --
Nome
-----
-----
-----
-----
-----

12
1. Premere il tasto MENu per visualizzare il menu OSD principale.2. Selezionare il menu principale “Canale” con i tasti ▲ / ▼ del telecomando.3. Selezionare il menu "Nome" con i tasti ▲ / ▼ del telecomando.4. Premere oK per visualizzare il sottomenu. A questo punto si potrà visualizzare l’elenco dei programmi classificati.5. Per modificare il "Nome" di un programma, premere il tasto oK. 6. Ora digitare il nome selezionando i caratteri con i tasti ▲ / ▼. La posizione del campo può essere modificata con i tasti ◄ / ►. 7. Premere oK per confermare8. Per tornare indietro, premere il tasto MoDE.
sINToNIZZAZIoNE FINE (Sintonia Precisa) La funzione "Sintonia Fine" permette di regolare manualmente un particolare canale per migliorarne la ricezione.
1. Premere il tasto MENu per visualizzare il menu principale OSD.2. Selezionare il menu principale “Canale” con i tasti ▲ / ▼ del telecomando.3. Premere oK per visualizzare il sottomenu.4. Selezionare "Sintonia Fine" con i tasti ▲ / ▼ e premere il tasto oK.
Adesso si dovrebbe visualizzare la barra di regolazione.5. Regolare la sintonia fine con i tasti ◄ / ►.
REgoLAZIoNE DEL suoNo
1. Premere il tasto MENu per visualizzare il menu principale OSD.2. Selezionare il menu principale immagini.3. Premere oK per visualizzare il sottomenu.4. Usare i tasti ▲ / ▼ per selezionare le voci che si desidera modificare.5. Premere i tasti ◄ / ► per impostare l’opzione. 6. Premere il tasto MoDE per tornare e/o uscire dal menu principale.7. I valori modificati vengono memorizzati secondo le selezioni effettuate.
Canale
Sposta Conferma Modalità
Nazione
Memorizzazione auto
Memor. Manuale
Agg./Canc.
Riordino
Nome
Sintonia fine
>
►
►
►
►
►
►
Italia
Canale
Sposta Conferma Modalità
Nazione
Memorizzazione auto
Memor. Manuale
Agg./Canc.
Riordino
Nome
Sintonia fine
>
►
►
►
►
►
►
Italia
Canale
Sposta Regola Modalità
Prog.
O
1
2
3
4
Canale
- --
- --
- --
- --
- --
Nome
-----
-----
-----
-----
-----
Audio
Sposta Modalità
Modalità audio
Volume
Balance
Equalizzatore
Volume auto
Formato Audio
Muto
>
>
>
►
>
>
>
Standard
2O
O
Off
Mono
Off
Regola
Sintonia fine
O
ModalitàRegola
P 1
Reimposta
Sposta
13
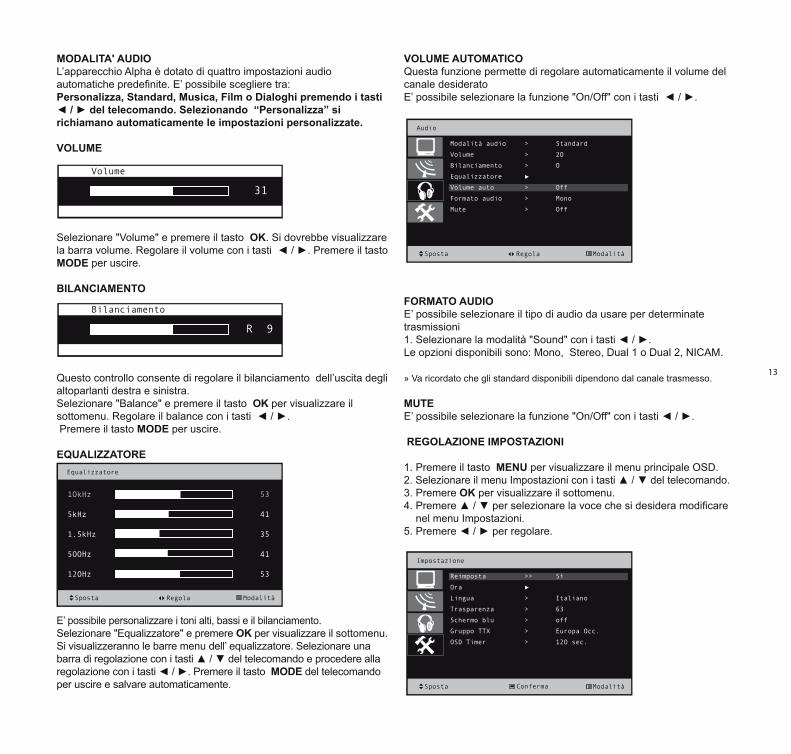
MoDALITA' AuDIoL’apparecchio Alpha è dotato di quattro impostazioni audio automatiche predefinite. E’ possibile scegliere tra: Personalizza, standard, Musica, Film o Dialoghi premendo i tasti ◄ / ► del telecomando. Selezionando “Personalizza” si richiamano automaticamente le impostazioni personalizzate.
VoLuME
Selezionare "Volume" e premere il tasto oK. Si dovrebbe visualizzare la barra volume. Regolare il volume con i tasti ◄ / ►. Premere il tasto MoDE per uscire.
BILANCIAMENTo
Questo controllo consente di regolare il bilanciamento dell’uscita degli altoparlanti destra e sinistra.Selezionare "Balance" e premere il tasto oK per visualizzare il sottomenu. Regolare il balance con i tasti ◄ / ►. Premere il tasto MoDE per uscire.
EquALIZZAToRE
E’ possibile personalizzare i toni alti, bassi e il bilanciamento.Selezionare "Equalizzatore" e premere oK per visualizzare il sottomenu. Si visualizzeranno le barre menu dell’ equalizzatore. Selezionare una barra di regolazione con i tasti ▲ / ▼ del telecomando e procedere alla regolazione con i tasti ◄ / ►. Premere il tasto MoDE del telecomando per uscire e salvare automaticamente.
VoLuME AuToMATICoQuesta funzione permette di regolare automaticamente il volume del canale desideratoE’ possibile selezionare la funzione "On/Off" con i tasti ◄ / ►.
FoRMATo AuDIoE’ possibile selezionare il tipo di audio da usare per determinate trasmissioni1. Selezionare la modalità "Sound" con i tasti ◄ / ►.Le opzioni disponibili sono: Mono, Stereo, Dual 1 o Dual 2, NICAM.
» Va ricordato che gli standard disponibili dipendono dal canale trasmesso.
MuTEE’ possibile selezionare la funzione "On/Off" con i tasti ◄ / ►.
REgoLAZIoNE IMPosTAZIoNI
1. Premere il tasto MENu per visualizzare il menu principale OSD.2. Selezionare il menu Impostazioni con i tasti ▲ / ▼ del telecomando.3. Premere oK per visualizzare il sottomenu.4. Premere ▲ / ▼ per selezionare la voce che si desidera modificare nel menu Impostazioni.5. Premere ◄ / ► per regolare.
Equalizzatore
Sposta Modalità
1OkHz
5kHz
1.5kHz
5OOHz
12OHz
53
41
35
41
53
Regola
Audio
Sposta Modalità
Modalità audio
Volume
Bilanciamento
Equalizzatore
Volume auto
Formato audio
Mute
>
>
>
►
>
>
>
Standard
2O
O
Off
Mono
Off
Regola
Impostazione
Sposta Modalità
Reimposta
Ora
Lingua
Trasparenza
Schermo blu
Gruppo TTX
OSD Timer
>>
►
>
>
>
>
>
Sì
Italiano
63
off
Europa Occ.
12O sec.
Conferma
Volume
31
Bilanciamento
R 9

14
REIMPosTA Con REIMPosTA è possibile ripristinare tutte le impostazioni predefinite e cancellare la tavola dei canali TV. Selezionare REIMPosTA e premere due volte il tasto oK per resettare l’apparecchio.
IMPosTAZIoNE oRAE’ possibile impostare l’orologio del televisore in modo che sul display compaia l’ora quando viene premuto il tasto TooL. E’ necessario impostare l’ora nel caso in cui si desideri utilizzare i timer automatici "On/Off".
1. Selezionare "Ora" e premere il tasto oK per visualizzare il menu "Orologio".
2. PER.... Premere il tasto... Spostarsi fra "ora" o "minuti" ◄ / ► Impostare "ora" o "minuti" ▲ / ▼ Salvare MoDE
»Se il cavo di alimentazione viene scollegato è necessario impostare di nuovo l’ora.»Non è possibile impostare l’ora e i minuti usando i tasti del telecomando.
ACCENsIoNE E sPEgNIMENTo AuToMATICo DEL TELEVIsoRE
E’ possibile impostare i timer on/off in modo che il televisore LCD: • Si accenda automaticamente e si sintonizzi su un canale prescelto ad un volume predeterminato.• Si spenga automaticamente ad un’ora prescelta.
1. Selezionare il Timer ON/OFF con i tasti▲ / ▼.2. Spostare il cursore con i tasti ◄ / ►.3. Regolare l’ora con tasti ▲ / ▼. 4. Attivare il Timer selezionando ON con i tasti ▲ / ▼. 5. Regolare il Programma Accensione usando il tasto ►. 6. Regolare il volume del Timer usando il tasto ►. 7. Premere il tasto MoDE per uscire e confermare.
» Prima di usare il timer è necessario impostare l’ora come descritto precedentemente.»I timer devono essere attivati (ON) per funzionare.
IMPosTAZIoNE TIMER sTANDByE’ possibile selezionare un periodo di tempo tra 30 e 180 minuti dopo il quale il televisore si spegnerà automaticamente per passare alla modalità standby.
1. Premere il tasto MENu per visualizzare il MENu principale OSD.2. Selezionare MENu principale Ora con i tasti ▲ / ▼ del telecomando.3. Premere oK per visualizzare il sottomenu.4. Selezionare Timer spegnimento con i tasti ▲ / ▼.5. Selezionare l’orario prescelto con i tasti ◄ / ► ( Off , 30, 60, 90, 120, 150, 180 min).6. Premere il tasto MoDE per uscire e confermare.
»Il televisore passa alla funzione standby quando il timer arriva a 0
Ora
Modalità
Imp. Ora
Timer Accensione
Timer Spegnimento
Prog. Accensione
Vol. Accensione
Timer Standby
>>
>>
>>
>>
>>
>
2
O
O
:
:
:
1
2O
Off
6
O
O
Off
Off
Regola
Ora
Sposta Modalità
Imp. Ora
Timer Accensione
Timer Spegnimento
Prog. Accensione
Vol. Accensione
Timer Standbay
>>
>>
>>
>>
>>
>
2
O
O
:
:
:
1
2O
Off
6
O
O
Off
Off
Conferma
Ora
Sposta Modalità
Imp. Ora
Timer Accensione
Timer Spegnimento
Prog. Accensione
Vol. Accensione
Timer Standby
>>
>>
>>
>>
>>
>
2
5
4
:
:
:
6
26
9O min
8
2
O
On
On
Regola
Sposta
15
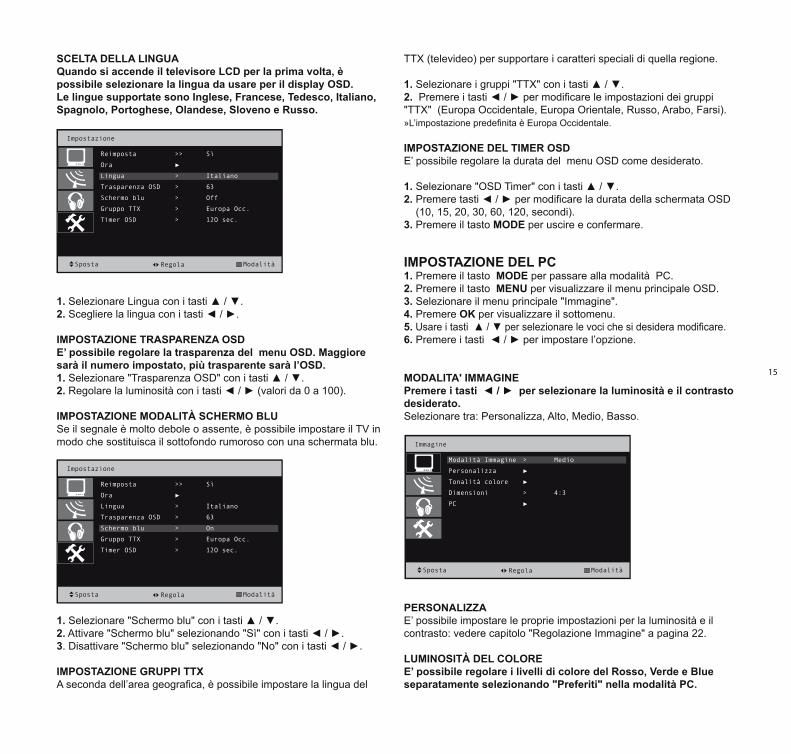
sCELTA DELLA LINguAquando si accende il televisore LCD per la prima volta, è possibile selezionare la lingua da usare per il display osD.Le lingue supportate sono Inglese, Francese, Tedesco, Italiano, spagnolo, Portoghese, olandese, sloveno e Russo.
1. Selezionare Lingua con i tasti ▲ / ▼.2. Scegliere la lingua con i tasti ◄ / ►.
IMPosTAZIoNE TRAsPARENZA osDE’ possibile regolare la trasparenza del menu osD. Maggiore sarà il numero impostato, più trasparente sarà l’osD.1. Selezionare "Trasparenza OSD" con i tasti ▲ / ▼.2. Regolare la luminosità con i tasti ◄ / ► (valori da 0 a 100).
IMPosTAZIoNE MoDALITà sCHERMo BLuSe il segnale è molto debole o assente, è possibile impostare il TV in modo che sostituisca il sottofondo rumoroso con una schermata blu.
1. Selezionare "Schermo blu" con i tasti ▲ / ▼.2. Attivare "Schermo blu" selezionando "Sì" con i tasti ◄ / ►.3. Disattivare "Schermo blu" selezionando "No" con i tasti ◄ / ►.
IMPosTAZIoNE gRuPPI TTXA seconda dell’area geografica, è possibile impostare la lingua del
TTX (televideo) per supportare i caratteri speciali di quella regione.
1. Selezionare i gruppi "TTX" con i tasti ▲ / ▼.2. Premere i tasti ◄ / ► per modificare le impostazioni dei gruppi "TTX" (Europa Occidentale, Europa Orientale, Russo, Arabo, Farsi).»L’impostazione predefinita è Europa Occidentale.
IMPosTAZIoNE DEL TIMER osDE’ possibile regolare la durata del menu OSD come desiderato.
1. Selezionare "OSD Timer" con i tasti ▲ / ▼.2. Premere tasti ◄ / ► per modificare la durata della schermata OSD (10, 15, 20, 30, 60, 120, secondi).3. Premere il tasto MoDE per uscire e confermare.
IMPosTAZIoNE DEL PC 1. Premere il tasto MoDE per passare alla modalità PC. 2. Premere il tasto MENu per visualizzare il menu principale OSD.3. Selezionare il menu principale "Immagine".4. Premere oK per visualizzare il sottomenu.5. Usare i tasti ▲ / ▼ per selezionare le voci che si desidera modificare.6. Premere i tasti ◄ / ► per impostare l’opzione.
MoDALITA' IMMAgINEPremere i tasti ◄ / ► per selezionare la luminosità e il contrasto desiderato. Selezionare tra: Personalizza, Alto, Medio, Basso.
PERsoNALIZZAE’ possibile impostare le proprie impostazioni per la luminosità e il contrasto: vedere capitolo "Regolazione Immagine" a pagina 22. LuMINosITà DEL CoLoREE’ possibile regolare i livelli di colore del Rosso, Verde e Blue separatamente selezionando "Preferiti" nella modalità PC.
Impostazione
Sposta Modalità
Reimposta
Ora
Lingua
Trasparenza OSD
Schermo blu
Gruppo TTX
Timer OSD
>>
►
>
>
>
>
>
Sì
Italiano
63
Off
Europa Occ.
12O sec.
Regola
Impostazione
Sposta Modalità
Reimposta
Ora
Lingua
Trasparenza OSD
Schermo blu
Gruppo TTX
Timer OSD
>>
►
>
>
>
>
>
Sì
Italiano
63
On
Europa Occ.
12O sec.
Regola
Immagine
Sposta Modalità
Modalità Immagine
Personalizza
Tonalità colore
Dimensioni
PC
>
►
►
>
►
Medio
4:3
Regola

16
1. Selezionare "Tonalità Colore" con i tasti ◄ / ►.2. Selezionare "Rosso (R)" con i tasti ▲ / ▼ e premere oK, apparirà la barra impostazioni.3. Regolare il livello con i tasti ◄ / ►.4. Ripetere l’operazione con "Verde (G)" e "Blue (B)" se necessario.5. Premere il tasto MoDE per uscire.
AuTo REgoLAZIoNE DELLo sCHERMo PCAuto regolazione regola autonomamente lo schermo PC per l’immissione del segnale video PC.
1. Premere il tasto MENu per visualizzare il MENu principale OSD.2. Selezionare il MENu principale "Immagine".3. Premere oK per visualizzare il sottomenu.4. Selezionare PC e premere il tasto oK per visualizzare il sottomenu. 5. Selezionare "Auto Regolazione" con i tasti ▲ / ▼ e premere il tasto oK.
REgoLAZIoNE MANuALE DELLo sCHERMo PCse la qualità dell’immagine non è buona dopo aver effettuato la Auto regolazione, provare a regolare le impostazioni manualmente: Fase. Posizione-o, Posizione-V, Frequenza
1. Selezionare l’impostazione che si desidera regolare usando i tasti ▲ / ▼ e premere il tasto oK. Appare la barra delle impostazioni. 2. Regolare ciascun valore delle impostazioni del PC usando i tasti ◄ / ►.3. Premere il tasto MoDE per salvare e uscire.
Immagine
Sposta Modalità
Tonalità colore
Rosso(R)
Verde(G)
Blu(B)
>
>
>
>
Personalizza
5O
5O
5O
PC
Sposta Modalità
Auto Regolaz.
Fase
Posizione O
Posizione V
Frequenza
►
>
>
>
>
25
5O
42
3O
PC
Sposta Modalità
Auto Regolaz.
Fase
Posizione O
Posizione V
Frequenza
►
>
>
>
>
25
5O
42
3O
Conferma
Rosso(R)
56
Conferma
Conferma
17
dvB-T
FuNZIoNI PRINCIPALI DVB-T
Accendere il televisore TV LCD e quindi premere il tasto MoDEripetutamente per selezionare la modalità DVB-T.
• Premere il tasto MENu per visualizzare il MENu OSD principale.• Usare i tasti ▲ / ▼ per selezionare la voce DVBT.• Quindi premere il tasto oK per entrare.• Usando i tasti ▲ / ▼/ ◄ / ► selezionare la voce del MENu interessata.• Quindi premere il tasto oK per accedere al MENu desiderato.
REgoLAZIoNE CANALI DIgITALI
INsTALLAZIoNE
1. Usare i tasti ▲ / ▼ per selezionare la voce Installazione.2. Premere oK per passare al MENu.3. Premere il tasto MoDE per tornare e/o uscire dal MENu.
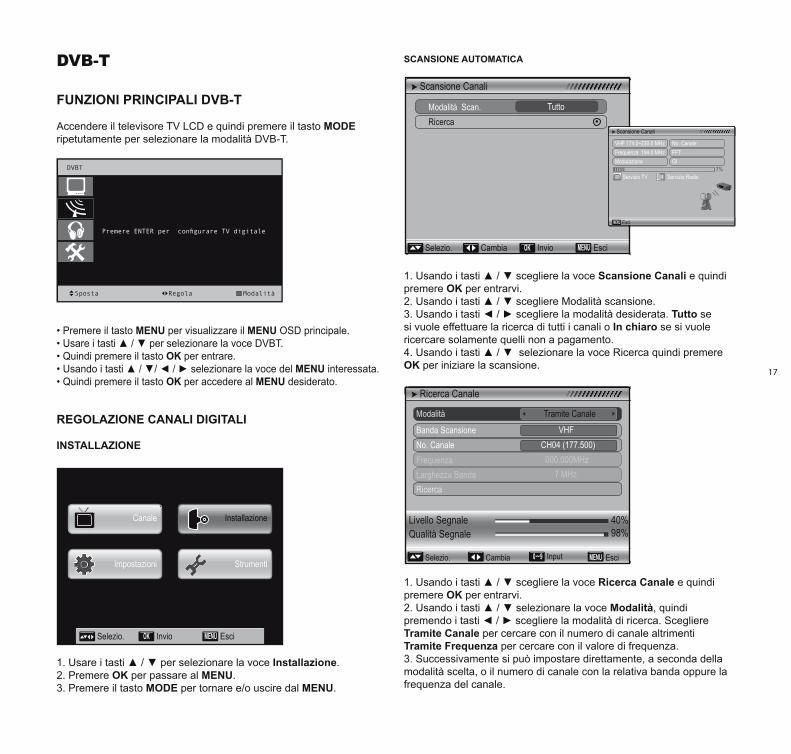
sCANsIoNE AuToMATICA
1. Usando i tasti ▲ / ▼ scegliere la voce scansione Canali e quindi premere oK per entrarvi.2. Usando i tasti ▲ / ▼ scegliere Modalità scansione.3. Usando i tasti ◄ / ► scegliere la modalità desiderata. Tutto se si vuole effettuare la ricerca di tutti i canali o In chiaro se si vuole ricercare solamente quelli non a pagamento.4. Usando i tasti ▲ / ▼ selezionare la voce Ricerca quindi premere oK per iniziare la scansione. RICERCA CANALE
1. Usando i tasti ▲ / ▼ scegliere la voce Ricerca Canale e quindi premere oK per entrarvi.2. Usando i tasti ▲ / ▼ selezionare la voce Modalità, quindi premendo i tasti ◄ / ► scegliere la modalità di ricerca. Scegliere Tramite Canale per cercare con il numero di canale altrimenti Tramite Frequenza per cercare con il valore di frequenza.3. Successivamente si può impostare direttamente, a seconda della modalità scelta, o il numero di canale con la relativa banda oppure la frequenza del canale.
DVBT
Sposta Regola Modalità
Premere ENTER per configurare TV digitale
Selezio. InvioOK EsciMENU
Canale
Impostazioni
Installazione
Strumenti
Scansione Canali
Modalità Scan.Ricerca
Selezio. Cambia Invio EsciOK MENU
Tutto
Livello Segnale 40%98%Qualità Segnale
Ricerca Canale
Banda Scansione
Modalità
Input0 9 Esci
No. CanaleFrequenzaLarghezza BandaRicerca
MENUSelezio. Cambia
Tramite Canale
7 MHz
CH04 (177.500)VHF
000.000MHz
˜
Scansione Canali
VHF 174.0 230.0 MHz
EsciMENU
˜Frequenza 194.0 MHzModulazione
Servizio TV Servizio Radio
No. CanaleFFTGI
7%
18
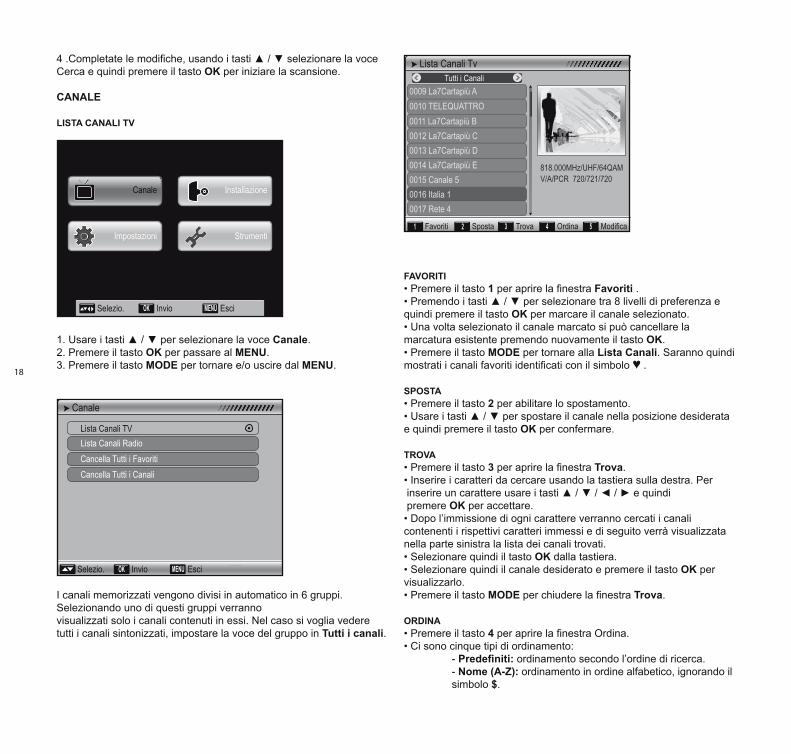
4 .Completate le modifiche, usando i tasti ▲ / ▼ selezionare la voce Cerca e quindi premere il tasto oK per iniziare la scansione.
CANALE
LIsTA CANALI TV
1. Usare i tasti ▲ / ▼ per selezionare la voce Canale.2. Premere il tasto oK per passare al MENu.3. Premere il tasto MoDE per tornare e/o uscire dal MENu.
LISTA CANALI TV
I canali memorizzati vengono divisi in automatico in 6 gruppi. Selezionando uno di questi gruppi verranno visualizzati solo i canali contenuti in essi. Nel caso si voglia vedere tutti i canali sintonizzati, impostare la voce del gruppo in Tutti i canali.
FAVoRITI• Premere il tasto 1 per aprire la finestra Favoriti .• Premendo i tasti ▲ / ▼ per selezionare tra 8 livelli di preferenza e quindi premere il tasto oK per marcare il canale selezionato.• Una volta selezionato il canale marcato si può cancellare la marcatura esistente premendo nuovamente il tasto oK.• Premere il tasto MoDE per tornare alla Lista Canali. Saranno quindi mostrati i canali favoriti identificati con il simbolo ♥ .
sPosTA• Premere il tasto 2 per abilitare lo spostamento.• Usare i tasti ▲ / ▼ per spostare il canale nella posizione desiderata e quindi premere il tasto oK per confermare.
TRoVA• Premere il tasto 3 per aprire la finestra Trova.• Inserire i caratteri da cercare usando la tastiera sulla destra. Per inserire un carattere usare i tasti ▲ / ▼ / ◄ / ► e quindi premere oK per accettare.• Dopo l’immissione di ogni carattere verranno cercati i canali contenenti i rispettivi caratteri immessi e di seguito verrà visualizzata nella parte sinistra la lista dei canali trovati.• Selezionare quindi il tasto oK dalla tastiera.• Selezionare quindi il canale desiderato e premere il tasto oK per visualizzarlo.• Premere il tasto MoDE per chiudere la finestra Trova.
oRDINA• Premere il tasto 4 per aprire la finestra Ordina.• Ci sono cinque tipi di ordinamento: - Predefiniti: ordinamento secondo l’ordine di ricerca. - Nome (A-Z): ordinamento in ordine alfabetico, ignorando il simbolo $.
Selezio. InvioOK EsciMENU
Canale
Impostazioni
Installazione
Strumenti
Lista Canali Tv Tutti i Canali
0009 La7Cartapiù A
Favoriti Sposta Trova21 3 Ordina4 Modifica5
Selezio. Gruppo Pagina<< >> Invio EsciMENU
0010 TELEQUATTRO0011 La7Cartapiù B0012 La7Cartapiù C0013 La7Cartapiù D0014 La7Cartapiù E 818.000MHz/UHF/64QAM
V/A/PCR 720/721/720 0015 Canale 50016 Italia 10017 Rete 4
OK
Canale
Lista Canali TVLista Canali RadioCancella Tutti i FavoritiCancella Tutti i Canali
Selezio. Invio EsciOK MENU

19
- Nome (Z-A): ordinamento in ordine alfabetico, ignorando il simbolo $. - In Chiaro: ordinamento con priorità ai canali non a pagamento. - Bloccato: ordinamento con priorità ai canali criptati.• Premere i tasti ▲ / ▼ per selezionare il tipo di ordinamento e quindi il tasto oK per ordinare nella modalità desiderata.
MoDIFICA• Premere il tasto 5 per entrare nella modalità Modifica. Apparirà una finestra dove viene chiesto di inserire la password. La password predefinita è 0000.• Utilizzare i tasti ▲ / ▼ per selezionare il canale da modificare e quindi scegliere la funzione da applicare: - Premere il tasto 1 per segnare i canali da cancellare. - Premere il tasto 2 per segnare i canali da saltare. - Premere il tasto 3 per segnare i canali da bloccare. Questi canali saranno visualizzabili solamente tramite l’inserimento della password - Premere il tasto 4 per modificare il nome del canale. - Premere il tasto 5 per cancellare tutti i canali.• Una volta applicate le funzioni desiderate nella lista canali, premere il tasto MoDE per uscire dalla modalità Modifica. Apparirà quindi un messaggio che chiederà se si vogliono salvare le modifiche apportate. Scegliere si per salvare le modifiche e di conseguenza uscire oppure scegliere No per uscire ignorando le modifiche effettuate in precedenza.• Premere il tasto MoDE per ritornare al MENu
LIsTA CANALI RADIo Le operazioni e quindi i comandi della Lista canali radio sono i medesimi della Lista canali TV con la differenza che nella modalità Lista canali radio non c’è informazione video e quindi verrà sempre visualizzato un logo con una radio nella finestra di anteprima al posto dell’anteprima video del canale.
CANCELLARE TuTTI I FAVoRITISelezionando la voce Cancellare tutti i Favoriti apparirà un riquadro che richiederà di inserire la password per proseguire. La password predefinita è 0000. Una volta inserita la password corretta verrà visualizzato un messaggio di conferma. Se si sceglie si verranno cancellati tutti i canali Favoriti altrimenti scegliendo No non verrà applicata alcuna modifica.
CANCELLARE TuTToSelezionando la voce Cancellare tutti i canali apparirà un riquadro che richiederà di inserire la password per proseguire. La password predefinita è 0000. Una volta inserita la password corretta verrà visualizzato un messaggio di conferma. Se si sceglie si verranno cancellati tutti i canali memorizzati altrimenti scegliendo No non verrà applicata alcuna modifica.
IMPosTAZIoNI
1. Usare i tasti ▲ / ▼ per selezionare la voce MENu impostazioni.2. Premere oK per passare al MENu.3. Premere il tasto MoDE per tornare e/o uscire dal MENu.
sIsTEMA TV
Selezio. InvioOK EsciMENU
Canale
Impostazioni
Installazione
Strumenti
Impostazione Sistema
Sistema TVRegione ed OraImposta OSDControllo Parentale
Selezio. Invio EsciOK MENU
Sistema TV
Selezio. EsciMENUCambia
Modalità DisplayRapporto Formato
AutomaticoAuto
Dolby Digital SpentoModalità LCN Spento
20
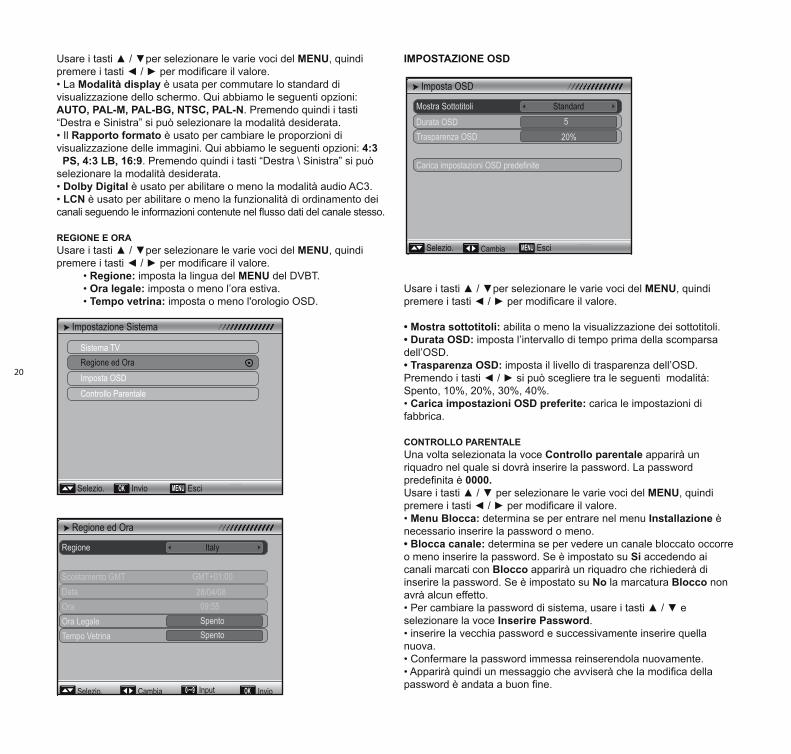
Usare i tasti ▲ / ▼per selezionare le varie voci del MENu, quindi premere i tasti ◄ / ► per modificare il valore.• La Modalità display è usata per commutare lo standard di visualizzazione dello schermo. Qui abbiamo le seguenti opzioni: AuTo, PAL-M, PAL-Bg, NTsC, PAL-N. Premendo quindi i tasti “Destra e Sinistra” si può selezionare la modalità desiderata.• Il Rapporto formato è usato per cambiare le proporzioni di visualizzazione delle immagini. Qui abbiamo le seguenti opzioni: 4:3 Ps, 4:3 LB, 16:9. Premendo quindi i tasti “Destra \ Sinistra” si può selezionare la modalità desiderata.• Dolby Digital è usato per abilitare o meno la modalità audio AC3.• LCN è usato per abilitare o meno la funzionalità di ordinamento dei canali seguendo le informazioni contenute nel flusso dati del canale stesso.
REgIoNE E oRAUsare i tasti ▲ / ▼per selezionare le varie voci del MENu, quindi premere i tasti ◄ / ► per modificare il valore. • Regione: imposta la lingua del MENu del DVBT. • ora legale: imposta o meno l’ora estiva. • Tempo vetrina: imposta o meno l'orologio OSD.
IMPosTAZIoNE osD
Usare i tasti ▲ / ▼per selezionare le varie voci del MENu, quindi premere i tasti ◄ / ► per modificare il valore.
• Mostra sottotitoli: abilita o meno la visualizzazione dei sottotitoli.• Durata OSD: imposta l’intervallo di tempo prima della scomparsa dell’OSD.• Trasparenza OSD: imposta il livello di trasparenza dell’OSD. Premendo i tasti ◄ / ► si può scegliere tra le seguenti modalità: Spento, 10%, 20%, 30%, 40%.• Carica impostazioni osD preferite: carica le impostazioni di fabbrica. CoNTRoLLo PARENTALEUna volta selezionata la voce Controllo parentale apparirà un riquadro nel quale si dovrà inserire la password. La password predefinita è 0000.Usare i tasti ▲ / ▼ per selezionare le varie voci del MENu, quindi premere i tasti ◄ / ► per modificare il valore.• Menu Blocca: determina se per entrare nel menu Installazione è necessario inserire la password o meno.• Blocca canale: determina se per vedere un canale bloccato occorre o meno inserire la password. Se è impostato su si accedendo ai canali marcati con Blocco apparirà un riquadro che richiederà di inserire la password. Se è impostato su No la marcatura Blocco non avrà alcun effetto.• Per cambiare la password di sistema, usare i tasti ▲ / ▼ e selezionare la voce Inserire Password.• inserire la vecchia password e successivamente inserire quella nuova.• Confermare la password immessa reinserendola nuovamente.• Apparirà quindi un messaggio che avviserà che la modifica della password è andata a buon fine.
Impostazione Sistema
Sistema TVRegione ed OraImposta OSDControllo Parentale
Selezio. Invio EsciOK MENU
Regione ed Ora
Scostamento GMT
Regione
Input0 9 Invio
EsciMENU
DataOraOra LegaleTempo Vetrina
OKSelezio. Cambia
Italy
SpentoSpento
28/04/08GMT+01:00
09:55
˜
Imposta OSD
Selezio. EsciMENUCambia
Mostra SottotitoliDurata OSDTrasparenza OSD
Standard5
20%
Carica impostazioni OSD predefinite
21
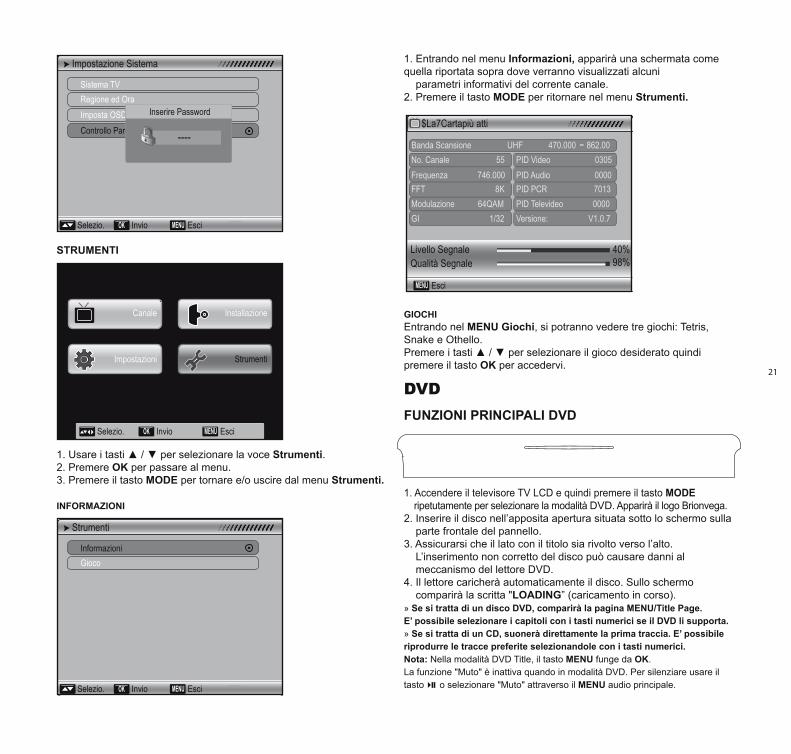
sTRuMENTI
1. Usare i tasti ▲ / ▼ per selezionare la voce strumenti.2. Premere oK per passare al menu.3. Premere il tasto MoDE per tornare e/o uscire dal menu strumenti.
INFoRMAZIoNI
1. Entrando nel menu Informazioni, apparirà una schermata come quella riportata sopra dove verranno visualizzati alcuni parametri informativi del corrente canale.2. Premere il tasto MoDE per ritornare nel menu strumenti.
gIoCHIEntrando nel MENu giochi, si potranno vedere tre giochi: Tetris, Snake e Othello. Premere i tasti ▲ / ▼ per selezionare il gioco desiderato quindi premere il tasto oK per accedervi.
dvdFuNZIoNI PRINCIPALI DVD
1. Accendere il televisore TV LCD e quindi premere il tasto MoDE ripetutamente per selezionare la modalità DVD. Apparirà il logo Brionvega.2. Inserire il disco nell’apposita apertura situata sotto lo schermo sulla parte frontale del pannello. 3. Assicurarsi che il lato con il titolo sia rivolto verso l’alto. L’inserimento non corretto del disco può causare danni al meccanismo del lettore DVD. 4. Il lettore caricherà automaticamente il disco. Sullo schermo comparirà la scritta "LoADINg” (caricamento in corso).» se si tratta di un disco DVD, comparirà la pagina MENu/Title Page.E’ possibile selezionare i capitoli con i tasti numerici se il DVD li supporta.» se si tratta di un CD, suonerà direttamente la prima traccia. E’ possibile riprodurre le tracce preferite selezionandole con i tasti numerici.Nota: Nella modalità DVD Title, il tasto MENu funge da oK.La funzione "Muto" è inattiva quando in modalità DVD. Per silenziare usare il tasto o selezionare "Muto" attraverso il MENu audio principale.
Impostazione Sistema
Sistema TVRegione ed OraImposta OSDControllo Parentale
Selezio. Invio EsciOK MENU
Inserire Password
----
EsciMENU
$La7Cartapiù atti
No. Canale 55 Banda Scansione UHF 470.000 862.00 ˜
Frequenza 746.000 FFT 8K Modulazione 64QAM GI 1/32
PID Video 0305PID Audio 0000PID PCR 7013PID Televideo 0000 Versione: V1.0.7
Livello Segnale 40%98%Qualità Segnale
Selezio. InvioOK EsciMENU
Canale
Impostazioni
Installazione
Strumenti
Strumenti
InformazioniGioco
Selezio. Invio EsciOK MENU

22
PLAy/PAusE• usare i tasti di navigazione sul telecomando per scegliere la selezione dal menu DVD• premere PLAy per avviare il DVD o riprendere la visione dopo aver usato altre funzioni.• la funzione PAusE blocca l’immagine quando usata per un DVD e interrompe il suono quando usata per un CD audio.• premere il tasto PLAy per riprendere la riproduzione.
REWIND/ PREV (riavvolgimento/precedente) Durante la riproduzione premere il tasto PREV una volta e la riproduzione riprende dall’inizio del precedente capitolo o traccia.Tenendo premuto il tasto REWIND si ritornerà indietro alla velocità di 2x, 4x, 8x, 20x.Premi per riprendere la trasmissione.Nota: Durante la riproduzione REWIND, l’audio sarà spento.
FoRWARD/ NEXT (avanti veloce/successivo) Durante la riproduzione premere il tasto NEXT una volta e la riproduzione riprende dall’inizio del successivo capitolo o traccia.Tenendo premuto il tasto FoRWARD si andrà alla velocità di 2x, 4x, 8x, 20x.Premi per riprendere la trasmissione.Note: Durante la riproduzione FoRWARD, l’audio sarà spento.
sToP/EJECT• Premere il tasto una volta per fermare la riproduzione. Premere il tasto PLAy per riprendere la riproduzione dal punto in cui era stata fermata.• Tener premuto il tasto per 2 secondi e il DVD verrà espulso. Premere il tasto PLAy per cominciare dall’inizio. Quando il disco viene espulso, tenerlo leggermente per i bordi ed estrarlo nella direzione di espulsione per evitare graffiature.• Quando la funzione DVD non è attiva (in modalità standby o con altre modalità in uso per lungo tempo) è consigliabile estrarre il disco per proteggere il caricatore e il disco stesso.
FoRMATI DVD suPPoRTATI:DVD-Video, CD-DA, Video-CD 1.0, 1.1 and 2.0, MP3, MPEG4, SVCDTIPI DI DIsCHI suPPoRTATI:legge solo DVD Disc (Single e Dual layer) DVD -R,DVD-RW, 4.7GB
ATTENZIoNE! NoN INsERIRE o RIPRoDuRRE DIsCHI DA 8CM PERCHE’ REsTEREBBERo INCAsTRATI
CoDICE REgIoNE 2E’ consuetudine che i film in DVD vengano pubblicati in tempi diversi in diverse parti del mondo, pertanto tutti i lettori hanno dei codici regione e i dischi possono avere un codice regione opzionale.Se viene caricato un disco con un codice regione diverso sullo schermo apparirà la nota del codice regione. Il disco non verrà riprodotto e dovrà essere estratto. Il codice regione per questo lettore è 2.
INFORMAZIONI AMBIENTALI
Questo prodotto contiene risorse naturali che sono state utilizzate nel processo di produzione. Questo prodotto può contenere sostanze considerate pericolose per l’ambiente e per la salute dell’essere umano. Per prevenire il rilascio di sostante dannose per l’ambiente e sfruttare al massimo l’uso di risorse naturali, SUPER//FLUO s.p.a fornisce le seguenti informazioni per un riciclo corretto e responsabile della maggior parte dei materiali contenuti del prodotto finale.I Waste Electrical and Electronic Equipments (meglio noti come WEE) (prodotti elettrici ed elettronici da smaltire) non devono essere mai smaltiti con i normali rifiuti domestici (raccolta rifiuti domestici). Il simbolo del bidone dei rifiuti con una croce apposto su questo prodotto significa che il prodotto deve essere correttamente smaltito. Materiali quali vetro, plastica e alcuni composti chimici sono altamente recuperabili, riciclabili e riutilizzabili. Potete dare il Vostro contributo seguendo questi semplici passi.
Quando le apparecchiature elettriche o elettroniche non sono più utilizzabili, “restituirle” all’autorità locale o regionale per la raccolta dei rifiuti per il riciclaggio. In alcuni casi il prodotto può essere utilizzato in cambio di uno sconto sull’acquisto di una nuova apparecchiatura SUPER//FLUO s.p.a. Chiamare SUPER//FLUO s.p.a. per verificare se il programma è disponibile nella Vostra zona. In caso di ulteriore assistenza relativa al riciclaggio, riutilizzo o restituzione contro sconto del prodotto, è possibile contattare il Servizio Clienti al numero indicato sul libretto istruzioni e saremo lieti di fornirVi assistenza.
Con il Vostro aiuto possiamo ridurre la quantità di risorse naturali necessarie per produrre apparecchiature elettriche ed elettroniche, ridurre al minimo l’uso di discariche per lo smaltimento di prodotti e migliorare, in via generale, la qualità della nostra vita assicurandoci che le sostanze potenzialmente pericolose non vengano rilasciate nell’ambiente e siano adeguatamente smaltite.
PC Analogico - DsuB IN VgA Risoluzioni supportate640x480 @ 60Hz/90Hz
800x600 @ 55Hz/90Hz
1024x768 @ 60Hz/75Hz
1152 x 900 @ 60Hz/75Hz
1280 x 768 @ 60Hz/75Hz
1280 x 1024 @ 60Hz
HDMIRisoluzioni supportate1920 x 1080p (50/60)
1920 x 1080i (50/60)
1280 x 720p (50/60)
720 x 576p. (50)
720 x 480p (50/60)
640 x 480p (50/60)
1280 X 1024 (60*)
CoLLEgAMENTI I/o

23
CARATTERIsTICHE TECNICHE E AMBIENTALI
RIsoLuZIoNE DEI PRoBLEMI
Prima di contattare l’assistenza tecnica, effettuare i seguenti controlli. Se il problema persiste, scollegare il cavo di alimentazione del televisore LCD e chiamare l’assistenza.
PROBLEMA
Assenza di immagine e audio
Visualizzazione immagine,ma assenza di audio
Il telecomando non funziona
Il televisore si è spento improvvisamente
L’immagine compare lentamente quando il televisore viene acceso
Colore debole o assenteo immagine assente
Barre orizzontali o verticali o sfarfallio dell’immagine
Cattiva ricezione di alcuni canali
Immagini con strisce o righe
Assenza audio da una delle altoparlanti
Il disco non funziona
PC VGA INPUT
Il segnale è fuori gamma
Strisce o righe verticali sullo sfondo e rumore orizzontale e posizione non corretta
Colore schermo instabile o singolo
Se riscontri altri problemi
POSSIBILE SOLUZIONE
- Controllare che la spina principale sia collegata alla rete di alimentazione.- Premere il tasto POWER sulla parte frontale del televisore.- Controllare le impostazioni di contrasto e luminosità dell’immagine.
-Controllare il volume.-Audio muto? Premere il tasto MUTE.-Il problema potrebbe essere legato alla trasmissione: provare un altro canale
- Controllare che non ci siano ostruzioni causate da oggetti tra il televisore e il telecomando.- Controllare che le batterie siano inserite con la polarità corretta (+ con +, - con -).- Controllare la modalità di funzionamento del telecomando: TV, VCR , ecc....- Controllare che le batterie siano cariche ed eventualmente cambiarle.
- Controllare se è impostato il Timer standby.- Controllare impostazioni di controllo alimentazione. Alimentazione interrotta.- Assenza di trasmissione sulla stazione selezionata con audio attivato.
- Questo sintomo è normale: l’immagine è silenziata durante il procedimento iniziale. Contattare il servizio assistenza se l’immagine non compare entro cinque minuti.
- Regolare il colore nel MENU video- Mantenere una distanza sufficiente tra il televisore e il videoregistratore.- Il sintomo può essere dovuto alla trasmissione: provare un altro canale.- Controllare che i cavi video siano correttamente collegati.
- Verificare la presenza di interferenze locali (altre apparecchiature elettriche o di alimentazione).
- Problemi relativi alle stazioni o via cavo. Provare un’altra stazione.- Il segnale è debole: orientare l’antenna per ricevere le stazioni più deboli.- Controllare eventuali sorgenti di possibili interferenze.
- Controllare l’antenna. Cambiare l’orientamento dell’antenna.
- Regolare il balance nel MENU audio
- Assicuratevi che il disco sia inserito con il lato del titolo verso l'alto.- Controllate il codice regione del DVD.
- Regolare la risoluzione, la frequenza verticale o orizzontale.- Controllare se il cavo del segnale è collegato o scollegato.- Controllare la sorgente di ingresso.
- Agire sulla configurazione automatica o regolare la posizione dell’orologio, fase od H/V.
- Controllare il cavo del segnale.- Reinstallare la card del video PC.
Se il problema non si risolve, si prega di contattare il centro autorizzato più vicino.
Le specifiche tecniche, le funzioni e il loro uso sono soggette a modifiche senza preavviso.
sIsTEMA DVB-T INTEgRATo DVB-T (CoFDM)
VHF- 170.00-230.00MHz uHF- 479.00-862.00MHzsI
1, 2, 3 (MPEg Ts standard)
SistemaGamma SintonizzazioneEPG, DUAL AudioISO/IEC 13818
Screen Size 19”376,32 (H) x 301,056 (V)mm
4:31280 x 1024
350 cdm²
160 H, 160 V5ms typical
PAL/SECAMB/G, D/K, I, L, L’
from 8,25MHz to 855, 25MHzMono, Stereo, NICAM, Bilingual
100 channels10 pages
West/East Europe, Russian, Arabic, Farsi
PAL - BGHI/NTSC - M/NTSC - 4.43/SECAM/PAL60PAL/NTSC/SECAM
PAL/SECAM
1 (RF 75 Ohms)1 RCA CVBS in1 SVHS Y/C in
1 x 21 pin scart CVBS, RGBWhite RCA, Red RCA
DSub15
VCD, SVCD, DVD, CD-DA, MP3Read only DVD Disc (Single e Dual Layer), DVD-R/+R/RW
12V DC, 5A< 60 Watts; < 2 Watts in STANDBY
517 x 275 x 440mm16Kg
from 10° to 40°from 10% to 80% non-condensing
Active AreaAspect RatioScreen ResolutionBrightness
Viewing AngleResponse Time
Italian, English, French, German, Spanish, Dutch, Slovenian, Portoguese, Russian
Broadcast SystemSound SystemTuning RangeMTS SupportN°of ProgramsTTXTTX Language Select*Digital Video Broadcasting-Terrestrial (DVB-T) free to air
CBSSVIDEOTV
TV InputAV InputSVideoSCARTL+R Audio Input for CVBS, S-Video, PCVGAHDMI
3 Watts x 2 Stereo Speakers (8 Ohms)Head Phones Jack Stereo
Supported formatsSupported Discs
External Power SupplyPower Consumption
Width x Depth x HeightWeight
Operating Temperature
MODEL ALPHA 19” PAL EUROPE
TECHNICAL AND ENVIRONMENTAL SPECIFICATIONS
OSD LANGUAGES
TV SYSTEM
SUPPORTED VIDEO STANDARDS
I/O CONNECTIONS
AUDIO OUTPUT
DVD PLAYER (INTEGRATED)
POWER INPUT
DIMENSIONS AND WEIGHT
ENVIRONMENTAL CONSIDERATIONS
1200Contrast Ratio
Operating Humidity
* only for models with DVBT on board
Dimensioni schermo 19”376,32 (H) x 301,056 (V)mm
4:31280 x 1024
350 cdm²
160 H, 160 V5ms typical
PAL/SECAMB/G, D/K, I, L, L’
da 8,25MHz a 855, 25MHzMono, Stereo, NICAM, Bilingue
100 canali10 pagine
Europa est-ovest, Russo, Arabo, Farsi
PAL - BGHI/NTSC - M/NTSC - 4.43/SECAM/PAL60PAL/NTSC/SECAM
PAL/SECAM
1 (RF 75 Ohms)1 RCA CVBS in1 SVHS Y/C in
1 x 21 pin scart CVBS, RGBBianca RCA, Rosso RCA
DSub15
VCD, SVCD, DVD, CD-DA, MP3Legge solo DVD Disc (Single e Dual Layer), DVD-R/+R/RW
12V DC, 5A< 60 Watts; < 2 Watts in STANDBY
517 x 275 x 440mm16Kg
da 10° a 40°da 10% a 80% in assenza di condensa
Area AttivaFormato ImmaginiRisoluzione SchermoLuminosità
Angolo VisualeTempo di Risposta
Italiano, Inglese, Francese, Tedesco, Spagnolo, Olanddese, Sloveno, Portoghese, Russo
Sistema di TrasmissioneSistema AudioGamma SintonizzazioneSupporto MTSN° di ProgrammiTTXTTX Selezione Lingue*Sintonizzatore Digitale Terrestre (DVB-T) free to air
CBSSVIDEOTV
Ingresso TVIngresso AVSVideoSCARTSx+Dx ingresso audio per CVBS, S-Video, PCVGAHDMI
3 Watts x 2 Altoparlanti Stereo (8 Ohms)Cuffie Jack Stereo
Formati supportatiDischi supportati
AlimentazioneConsumo di Corrente
Larghezza x Profondità x AltezzaPeso
Temperatura di funzionamento
MODELLO ALPHA 19” PAL EUROPE
CARATTERISTICHE TECNICHE ED AMBIENTALI
LINGUE OSD
SISTEMA TV
STANDARD VIDEO SUPPORTATI
COLLEGAMENTI ENTRATA/USCITA
USCITA AUDIO
LETTORE DVD (INTEGRATO)
INGRESSO ALIMENTAZIONE
DIMENSIONI E PESO
SPECIFICHE AMBIENTALI
1200Contrasto
Umidità di funzionamento
* solo per i modelli dotati di DVBT on board
Dimensioni schermo 11”PAL4:3
Cinescopio Black Matrix
PAL/SECAMB/G, Sintonia in sintesi di Frequenza Digitale
99
4 Wrms
Top/Flop con 10 pagine di Memoria
< 45 Watts; < 6 Watts in STANDBY230V AC ± 10%
Standard ColoreFormato ImmaginiSchermo
Tuner Iperbanda via CavoStandard AudioN° di ProgrammiTTX
SCARTSVHS
Potenza AudioPresa Cuffie
ConsumoTensione di rete
Telecomando multifunzioneTarghetta metallica di Identificazione
Verde Militare
Valerio Cometti Restyling (2007), Marco Zanuso Restyling (1989), Design Marco Zanuso con Richard Sapper (1963-64)
MODELLO ALGOL 11” LIMITED EDITION
CARATTERISTICHE TECNICHE
SISTEMA TV
COLLEGAMENTI ENTRATA/USCITA
USCITA AUDIO
CONSUMO E ALIMENTAZIONE
ACCESSORI
COLORI
DESIGN
Prese Cinch ingresso audio
Case in alluminio
Screen SizeColor StandardAspect RatioScreen
Hyperband Cable TunerStandard AudioN° of Programs
SCARTSVHS
Audio PowerHead Phone Jack
Power ConsumptionVoltage
Multifunction RemoteIdentification Metallic Label
Military Green
Valerio Cometti Restyling (2007), Marco Zanuso Restyling (1989), Design Marco Zanuso with Richard Sapper (1963-64)
Audio Input Cinch Jack
Aluminium Case

24

25
User Manual

26
27
CoNTENTs:
sAFETy PRECAuTIoNWARNINgs AND ACCEssoRIEsMAINTENANCEALPHA oVERVIEWBAsIC oPERATIoNDVB-T oPERATIoNDVD oPERATIoNTECHNICAL AND ENVIRoNMENTAL sPECIFICATIoNs TRouBLE sHooTINg
p. 28p. 28p. 28p. 29p. 30p. 39p. 43p. 45p. 45
eNGLIsH
usER MANuAL
model:ALPHA BRIoNVEgA
code: BRAH19D2
To THE CusToMERThank you for purchasing this BRIONVEGA product.When opening the box for the first time, please check whether all the accessories are present. Before connecting parts and power, please carefully read the user manual and always keep these instructions handy and close by your ALPHA.
CAuTIoN: screen Burn from displaying a still Image•Displaying a still image on the LCD panel for more than 2 hours can cause screen image retention (screen burn).Reduce the brightness and contrast of the screen when displaying a still image to avoid screen burn.•Viewing the LCD TV in a format that displays black borders for a long period of time may leave traces displayed on the top, bottom and center of the screen. This can also be caused by playing a DVD or a game console.Damages caused by the above effect are not covered by the Warranty.
28
RISK OF ELECTRIC SHOCKDO NOT OPEN
TO REDUCE THE RISK OF ELECTRIC SHOCK,DO NOT REMOVE COVER (OR BACK).
REFER SERVICING TO AUTHORISED SERVICE PERSONNEL.
TO REDUCE THE RISK OF FIRE OR ELECTRIC SHOCK, DO NOT EXPOSE THIS PRODUCT TO RAIN OR MOISTURE.
It-
4
Precauzioni
—Continua
Se si forma della condensa, rimuovete tutti i dischi elasciate acceso l’apparecchio per due o tre ore. Inquesto periodo di tempo l’apparecchio si riscalda efa evaporare la condensa.
10. Numeri di regione
—Lo standard DVD utilizza numeri di regione per controllare come possono essere riprodotti dischi nel mondo, essendo questo diviso in sei regioni. Questo apparecchio riproduce solo dischi DVD che corrispondono al suo numero di regione, che è riportato sul pannello posteriore
(per es. , ).
11. Informazioni sul manuale
—Questo manuale spiega come utilizzare tutte le funzioni di questo apparecchio. Sebbene lo standard DVD offra nume-rosi funzioni particolari, non tutti i dischi le utiliz-zano quindi, a seconda del disco che viene riprodotto, questo apparecchio può non rispondere a determinate funzioni. Per informazioni sulle fun-zioni supportate, si vedano le note riportate sulla copertina del disco.
Questo apparecchio contiene un sistema laser a semi-conduttori ed è classificato come “PRODOTTO LASER DI CLASSE 1”. Pertanto, per un uso corretto dell’appa-recchio, vi preghiamo di leggere attentamente questo manuale di istruzioni. Se riscontrate problemi, rivolge-tevi al rivenditore presso cui avete acquistato l’apparec-chio.Per evitare pericolose esposizioni al raggio laser, non aprite il rivestimento.
ATTENZIONE:
ALL’APERTURA VENGONO EMESSE RADIA-ZIONI LASER VISIBILI E INVISIBILI DI CLASSE 1M. NON OSSERVATELE CON STRUMENTI OTTICI.
QUESTO APPARECCHIO UTILIZZA UN LASER. L’UTILIZZO DEI CONTROLLI O L’ESECUZIONE DI REGOLAZIONI E PROCEDURE DIVERSE DA QUANTO QUI SPECIFICATO PUÒ PROVOCARE PERICOLOSE ESPOSIZIONI A RADIAZIONI.
L’etichetta riportata a destra si trova sul pannello posteriore.
1. Questo apparecchio è un PRO-DOTTO LASER DI CLASSE 1 e all’interno del cabinet utilizza un laser.
2. Per evitare l’esposizione al raggio laser, non rimuovete il pannello di copertura. Per assistenza rivolgetevi a personale qualificato.
Per i modelli per l’Europa
1 ALL
Dichiarazione di Conformità
Noi, ONKYO EUROPEELECTRONICS GmbHLIEGNITZERSTRASSE 6, 82194 GROEBENZELL,GERMANIA
GROEBENZELL, GERMANIA
ONKYO EUROPE ELECTRONICS GmbH
dichiariamo sotto la nostra responsabilità che il prodotto ONKYO descritto in questo manuale di istruzioni è in conformità con i corrispondenti standard tecnici: EN60065, EN55013, EN55020 e EN61000-3-2, -3-3.
K. MIYAGI
DV-SP504E_It.book Page 4 Wednesday, August 30, 2006 4:07 PM
This symbol indicates “dangerous voltage” inside the product that presents a risk of electric shock or personal injury.
Caution: Invisible laser radiation when open.Avoid exposure to the beam.
sAFeTY PrecAuTIONsNotes
Do’s AND Do NoT
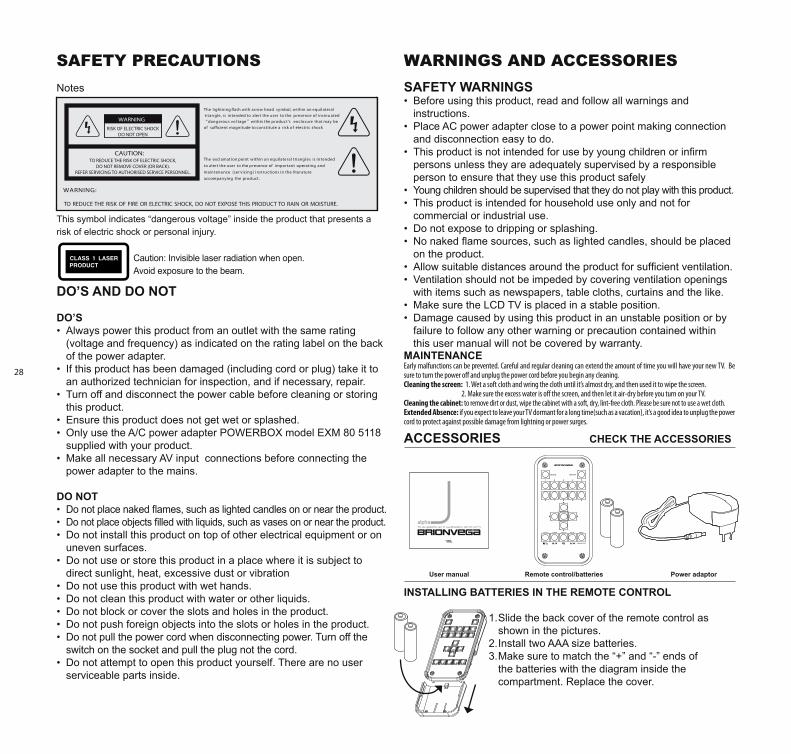
Do’sAlways power this product from an outlet with the same rating • (voltage and frequency) as indicated on the rating label on the back of the power adapter.If this product has been damaged (including cord or plug) take it to • an authorized technician for inspection, and if necessary, repair.Turn off and disconnect the power cable before cleaning or storing • this product.Ensure this product does not get wet or splashed.• Only use the A/C power adapter POWERBOX model EXM 80 5118 • supplied with your product.Make all necessary AV input connections before connecting the • power adapter to the mains.
Do NoTDo not place naked flames, such as lighted candles on or near the product.• Do not place objects filled with liquids, such as vases on or near the product.• Do not install this product on top of other electrical equipment or on • uneven surfaces. Do not use or store this product in a place where it is subject to • direct sunlight, heat, excessive dust or vibrationDo not use this product with wet hands.• Do not clean this product with water or other liquids.• Do not block or cover the slots and holes in the product.• Do not push foreign objects into the slots or holes in the product.• Do not pull the power cord when disconnecting power. Turn off the • switch on the socket and pull the plug not the cord.Do not attempt to open this product yourself. There are no user • serviceable parts inside.
WArNINGs ANd AccessOrIessAFETy WARNINgs
Before using this product, read and follow all warnings and • instructions.Place AC power adapter• close to a power point making connection and disconnection easy to do.This product is not intended for use by young children or infirm • persons unless they are adequately supervised by a responsible person to ensure that they use this product safelyYoung children should be supervised that they do not play with this product.• This product is intended for household use only and not for • commercial or industrial use.Do not expose to dripping or splashing. • No naked flame sources, such as lighted candles, should be placed • on the product.Allow suitable distances around the product for sufficient ventilation.• Ventilation should not be impeded by covering ventilation openings • with items such as newspapers, table cloths, curtains and the like.Make sure the LCD TV is placed in a stable position. • Damage caused by using this product in an unstable position or by • failure to follow any other warning or precaution contained within this user manual will not be covered by warranty.
ACCEssoRIEs CHECK THE ACCEssoRIEs
INsTALLINg BATTERIEs IN THE REMoTE CoNTRoL
Slide the back cover of the remote control as 1. shown in the pictures. Install two AAA size batteries. 2. Make sure to match the “+” and “-” ends of 3. the batteries with the diagram inside the compartment. Replace the cover.
user manual Remote control/batteries Power adaptor
MAINTENANCE Early malfunctions can be prevented. Careful and regular cleaning can extend the amount of time you will have your new TV. Be sure to turn the power off and unplug the power cord before you begin any cleaning.Cleaning the screen: 1. Wet a soft cloth and wring the cloth until it’s almost dry, and then used it to wipe the screen.
2. Make sure the excess water is off the screen, and then let it air-dry before you turn on your TV.Cleaning the cabinet: to remove dirt or dust, wipe the cabinet with a soft, dry, lint-free cloth. Please be sure not to use a wet cloth.Extended Absence: if you expect to leave your TV dormant for a long time(such as a vacation), it’s a good idea to unplug the power cord to protect against possible damage from lightning or power surges.
29
Remove the batteries and store them in a cool, dry place if you wont be using the remote control for a long timeIf the remote control does not work check the following:
Is the TV on?a. Are the plus and minus ends of the batteries reversed?b. Are the batteries drained?c. Is there power outage or is the power cord unplugged?d. Is there a special fluorescent light or neon sign nearby?e.
ALPHA OvervIeWCoNNECTIoN PANEL
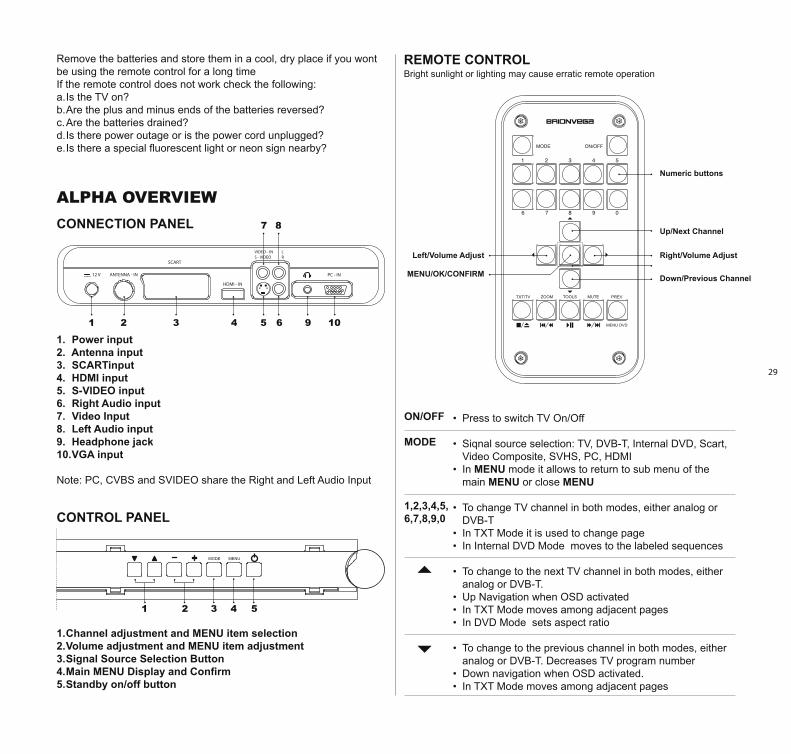
Power input1. Antenna input2. sCARTinput 3. HDMI input 4. s-VIDEo input5. Right Audio input6. Video Input7. Left Audio input8. Headphone jack9. VgA input10.
Note: PC, CVBS and SVIDEO share the Right and Left Audio Input CoNTRoL PANEL
Channel adjustment and 1. MENu item selectionVolume adjustment and 2. MENu item adjustmentsignal source selection Button3. Main 4. MENu Display and Confirm standby on/off button5.
REMoTE CoNTRoLBright sunlight or lighting may cause erratic remote operation
Press to switch TV On/Off•
Siqnal source selection: TV, DVB-T, Internal DVD, Scart, • Video Composite, SVHS, PC, HDMIIn • MENu mode it allows to return to sub menu of the main MENu or close MENu
To change TV channel in both modes, either analog or • DVB-TIn TXT Mode it is used to change page• In Internal DVD Mode moves to the labeled sequences•
To change to the next TV channel in both modes, either • analog or DVB-T.Up Navigation when OSD activated• In TXT Mode moves among adjacent pages• In DVD Mode sets aspect ratio•
To change to the previous channel in both modes, either • analog or DVB-T. Decreases TV program numberDown navigation when OSD activated.• In TXT Mode moves among adjacent pages•
1 2 3 4 5
7
6
8
9 10
Numeric buttons
up/Next Channel
Right/Volume AdjustLeft/Volume Adjust
MENu/oK/CoNFIRM Down/Previous Channel
oN/oFF
MoDE
1,2,3,4,5,6,7,8,9,0
1 2 3 4 5

30
Increases volume• Executes function when main OSD activated • Increases values of user • MENu when main OSD activated
Decreases volume • Executes function when main OSD activated • Decreases values of user • MENu when OSD activated
MENu• button to enter OSD menuIn • MENu Mode this button has the ENTER/oK function
TV Mode: changes from TV to • Teletext and MIX mode.DVB-T Mode: • changes from TV to Teletext and MIX mode.DVD Mode: STOP / EJECT if pressed for more than 2 seconds•
TV Mode: Selects Aspect format• TXT Mode: Size Function• DVD Mode: Previous sequence / Rewind if pressed for • more than 2 seconds
In analog mode: press for Info and enters Setup • MENu if pressed for more two secondsTXT Mode: Holds the current subpage and releases it• DVD Mode: Play / Pause• In DVB-T Mode: Press to display the EPG.• Press for 3 seconds to watch the channel list•
TV Mode: Mute to disable and enable audio• DVD Mode: Next sequence / Fast forward if pressed for • more than 2 secondsTXT Mode: Select MIX mode• DVB-T Mode: MUTE function to enable or disable audio.•
TV Mode: Previous channel• DVB-T Mode : Dual language choice if pressed for more • than 2 secondsTXT Mode: Go to page 100• DVD Mode: Call DVD menu•
BAsIc OPerATIONsWITCHINg LCD TV oN AND oFFPress oN/oFF on the remote control. This will bring you to the Welcome MENu. You may also use the Power key on the front panel to switch the TV on and off.Before connecting the power adapter to the mains, connect the desired input sources via the connection panel.
PLug AND PLAy, WELCoME MENuWhen the TV is powered on for the first time, you may select from the
following settings:Language, Country, Auto store/Tune (ensure the antenna cable is connected).Select the setting you want to change using the ▲ or ▼ (up or down) buttons and then using the ◄ or ► button (left or right) proceed to make your choice.
Press ENTER to confirm and automatically scan and stores channels available in the local area. (the scan will be completed only for the analog TV channels).
osD MENu ADJsuTMENT The OSD (On Screen Display), example shown below ,allows you to control or adjust various features and settings in accordance with your preferences. For the OSD adjustment in DVB-T Mode please check the DVB-T section.
1. MAIN MENuPress the • MENu button to display the MENu.Use the ▲ / ▼ button to select the Main • MENu item you wish to change. Use the ◄ / ► button to set the option in the Sub menu.•
2. suB MENuEach • MENu item has its own sub menu items to set.
3. suB MENu ITEMs
A: If there is ►, the item has an under MENu.You can enter the under • MENu and adjust an item you need.Select sub-• MENu item with ▲ / ▼ button on the remote control
MENu
TXT/TV
ZooM
TooLs
MuTE
PREVMENu DVD
OSD menu example
Picture Mode
Custom
Colour Tone
Size
NR
>
►
>
>
>
Standard
Normal
Auto Wide
Low
Picture
Move Adjust Mode
Move Adjust Mode
Welcome
Language
Country
Auto Store
>
►
>
English
Italia
31
Press ◄ / ► button to enter the sub• MENu. B: If there is no ►, you can set the item by selecting ►.
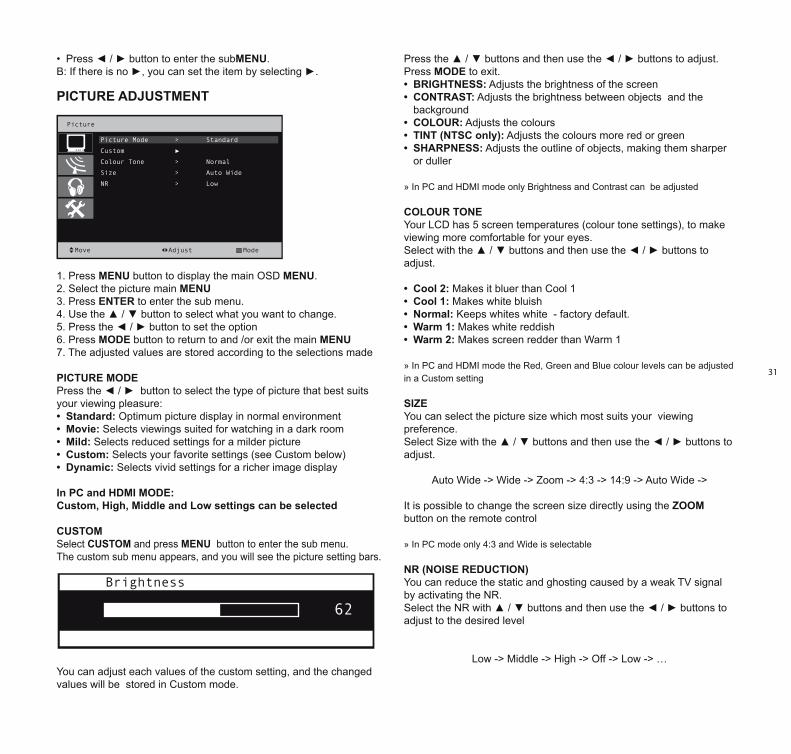
PICTuRE ADJusTMENT
1. Press MENu button to display the main OSD MENu.2. Select the picture main MENu 3. Press ENTER to enter the sub menu.4. Use the ▲ / ▼ button to select what you want to change.5. Press the ◄ / ► button to set the option 6. Press MoDE button to return to and /or exit the main MENu7. The adjusted values are stored according to the selections made
PICTuRE MoDE Press the ◄ / ► button to select the type of picture that best suits your viewing pleasure:
standard:• Optimum picture display in normal environmentMovie:• Selects viewings suited for watching in a dark roomMild:• Selects reduced settings for a milder pictureCustom:• Selects your favorite settings (see Custom below)Dynamic:• Selects vivid settings for a richer image display
In PC and HDMI MoDE:Custom, High, Middle and Low settings can be selected
CusToM Select CusToM and press MENu button to enter the sub menu.The custom sub menu appears, and you will see the picture setting bars.
You can adjust each values of the custom setting, and the changed values will be stored in Custom mode.
Press the ▲ / ▼ buttons and then use the ◄ / ► buttons to adjust.Press MoDE to exit.
BRIgHTNEss:• Adjusts the brightness of the screenCoNTRAsT:• Adjusts the brightness between objects and the backgroundCoLouR:• Adjusts the colours TINT (NTsC only):• Adjusts the colours more red or greensHARPNEss:• Adjusts the outline of objects, making them sharper or duller
» In PC and HDMI mode only Brightness and Contrast can be adjusted
CoLouR ToNEYour LCD has 5 screen temperatures (colour tone settings), to make viewing more comfortable for your eyes.Select with the ▲ / ▼ buttons and then use the ◄ / ► buttons to adjust.
Cool 2:• Makes it bluer than Cool 1Cool 1:• Makes white bluish Normal:• Keeps whites white - factory default.Warm 1:• Makes white reddishWarm 2:• Makes screen redder than Warm 1
» In PC and HDMI mode the Red, Green and Blue colour levels can be adjusted in a Custom setting
sIZEYou can select the picture size which most suits your viewing preference.Select Size with the ▲ / ▼ buttons and then use the ◄ / ► buttons to adjust.
Auto Wide -> Wide -> Zoom -> 4:3 -> 14:9 -> Auto Wide ->
It is possible to change the screen size directly using the ZooM button on the remote control
» In PC mode only 4:3 and Wide is selectable
NR (NoIsE REDuCTIoN)You can reduce the static and ghosting caused by a weak TV signal by activating the NR.Select the NR with ▲ / ▼ buttons and then use the ◄ / ► buttons to adjust to the desired level
Low -> Middle -> High -> Off -> Low -> …
Brightness
62
Picture
Move Adjust Mode
Picture Mode
Custom
Colour Tone
Size
NR
>
►
>
>
>
Standard
Normal
Auto Wide
Low
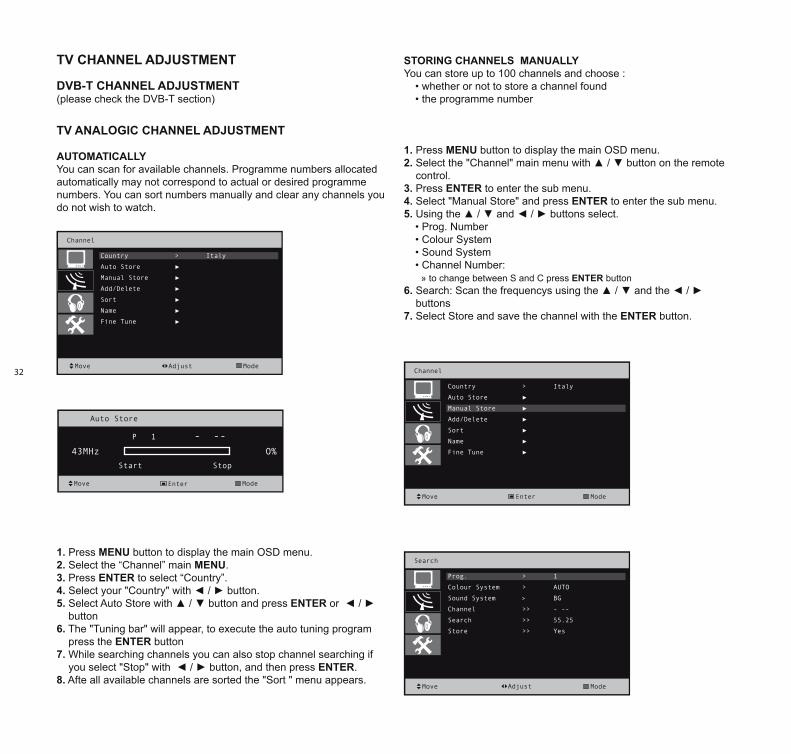
32
TV CHANNEL ADJusTMENT
DVB-T CHANNEL ADJusTMENT(please check the DVB-T section)
TV ANALogIC CHANNEL ADJusTMENT
AuToMATICALLyYou can scan for available channels. Programme numbers allocated automatically may not correspond to actual or desired programme numbers. You can sort numbers manually and clear any channels you do not wish to watch.
1. Press MENu button to display the main OSD menu.2. Select the “Channel” main MENu.3. Press ENTER to select “Country”.4. Select your "Country" with ◄ / ► button.5. Select Auto Store with ▲ / ▼ button and press ENTER or ◄ / ► button 6. The "Tuning bar" will appear, to execute the auto tuning program press the ENTER button7. While searching channels you can also stop channel searching if you select "Stop" with ◄ / ► button, and then press ENTER.8. Afte all available channels are sorted the "Sort " menu appears.
sToRINg CHANNELs MANuALLy You can store up to 100 channels and choose :
• whether or not to store a channel found• the programme number
1. Press MENu button to display the main OSD menu.2. Select the "Channel" main menu with ▲ / ▼ button on the remote control.3. Press ENTER to enter the sub menu.4. Select "Manual Store" and press ENTER to enter the sub menu.5. Using the ▲ / ▼ and ◄ / ► buttons select.
• Prog. Number• Colour System• Sound System • Channel Number: » to change between S and C press ENTER button
6. Search: Scan the frequencys using the ▲ / ▼ and the ◄ / ► buttons7. Select Store and save the channel with the ENTER button.
Channel
Move Adjust Mode
Country
Auto Store
Manual Store
Add/Delete
Sort
Name
Fine Tune
>
►
►
►
►
►
►
Italy
Channel
Move Enter Mode
Country
Auto Store
Manual Store
Add/Delete
Sort
Name
Fine Tune
>
►
►
►
►
►
►
Italy
Search
Move Mode
Prog.
Colour System
Sound System
Channel
Search
Store
>
>
>
>>
>>
>>
1
AUTO
BG
- --
55.25
Yes
Auto Store
43MHz
Move ModeEnter
P 1 - --
Start Stop
O%
Adjust

33
ADDINg AND DELETINg CHANNELs1. Press MENu button to display the main OSD menu.2. Select the "Channel" main menu with ▲ / ▼ button on the remote control.3. Select the "Add/Delete" menu with ▲ / ▼ button on the remote control.4. Press ENTER to enter the sub menu. Then you can see the favorite program list. 5. You can select a program with ▲ / ▼ button on the remote control.6. To edit the list press the ENTER button. 7. Select "No" or "Yes" with the◄ / ► button. 8. To return, press the MoDE button.
Note: the programs marked "No" will be skipped only when pressing ▲ / ▼ and not typing in the program number directly.
TV CHANNEL soRTINg 1. Press MENu button to display the main OSD menu. 2. Select the "Channel" main menu with ▲ / ▼ button on the remote control and then press ENTER.3. Select the "Sort" menu with ▲ / ▼ button on the remote control.4. Press ENTER to enter the sub menu. Then you can see the sort program list. (notice: You can’t see the sort program list on this picture since this picture isn’t a real operating MoDE but a design mode).5. You can select a program with ▲ / ▼ button on the remote control.6. Press ENTER button on the program to sort.7. Move the program with the ▲ / ▼ buttons.8. Press the ENTER button when on the desired location.9. To return, press the MoDE button.
Channel
Move Enter Mode
Country
Auto Store
Manual Store
Add/Delete
Sort
Name
Fine Tune
>
►
►
►
►
►
►
Italy
Channel
Move Enter Mode
Prog.
O
1
2
3
4
Added
No
Yes
Yes
No
No
Channel
- --
- --
- --
- --
Name
-----
-----
-----
-----
-----
Channel
Move Enter Mode
Country
Auto Store
Manual Store
Add/Delete
Sort
Name
Fine Tune
>
►
►
►
►
►
►
Italia
Channel
Move Enter Mode
Prog.
O
1
2
3
4
Channel
- --
- --
- --
- --
Name
-----
-----
-----
-----
-----
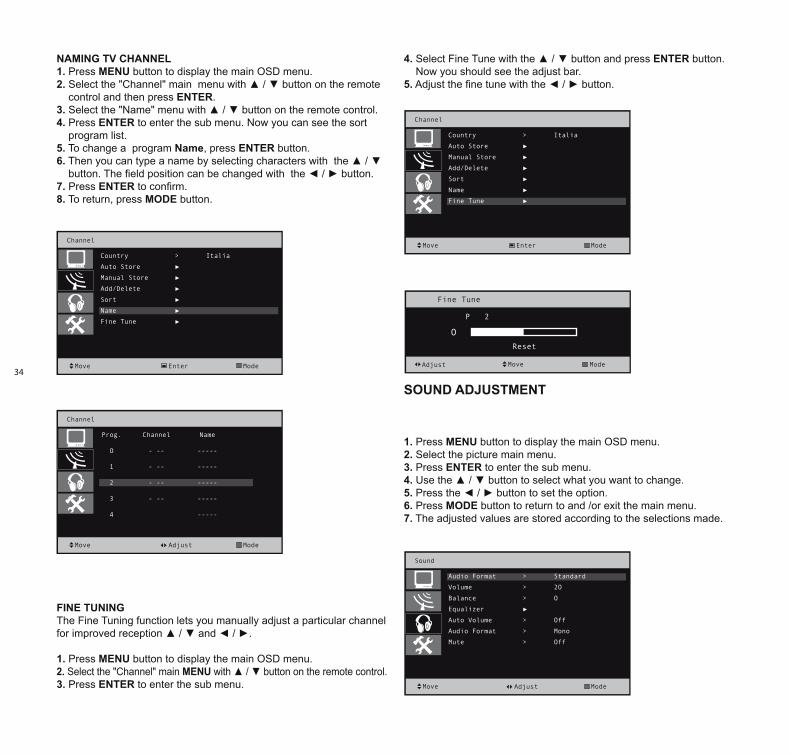
34
NAMINg TV CHANNEL1. Press MENu button to display the main OSD menu.2. Select the "Channel" main menu with ▲ / ▼ button on the remote control and then press ENTER.3. Select the "Name" menu with ▲ / ▼ button on the remote control.4. Press ENTER to enter the sub menu. Now you can see the sort program list.5. To change a program Name, press ENTER button. 6. Then you can type a name by selecting characters with the ▲ / ▼ button. The field position can be changed with the ◄ / ► button. 7. Press ENTER to confirm.8. To return, press MoDE button.
FINE TuNINg The Fine Tuning function lets you manually adjust a particular channel for improved reception ▲ / ▼ and ◄ / ►.
1. Press MENu button to display the main OSD menu.2. Select the "Channel" main MENu with ▲ / ▼ button on the remote control.3. Press ENTER to enter the sub menu.
4. Select Fine Tune with the ▲ / ▼ button and press ENTER button. Now you should see the adjust bar.5. Adjust the fine tune with the ◄ / ► button.
souND ADJusTMENT
1. Press MENu button to display the main OSD menu.2. Select the picture main menu. 3. Press ENTER to enter the sub menu.4. Use the ▲ / ▼ button to select what you want to change.5. Press the ◄ / ► button to set the option. 6. Press MoDE button to return to and /or exit the main menu.7. The adjusted values are stored according to the selections made.
Channel
Move Enter Mode
Country
Auto Store
Manual Store
Add/Delete
Sort
Name
Fine Tune
>
►
►
►
►
►
►
Italia
Channel
Move Enter Mode
Country
Auto Store
Manual Store
Add/Delete
Sort
Name
Fine Tune
>
►
►
►
►
►
►
Italia
Channel
Move Adjust Mode
Prog.
O
1
2
3
4
Channel
- --
- --
- --
- --
Name
-----
-----
-----
-----
-----
Sound
Move Mode
Audio Format
Volume
Balance
Equalizer
Auto Volume
Audio Format
Mute
>
>
>
►
>
>
>
Standard
2O
O
Off
Mono
Off
Adjust
Fine Tune
O
ModeAdjust
P 2
Reset
Move
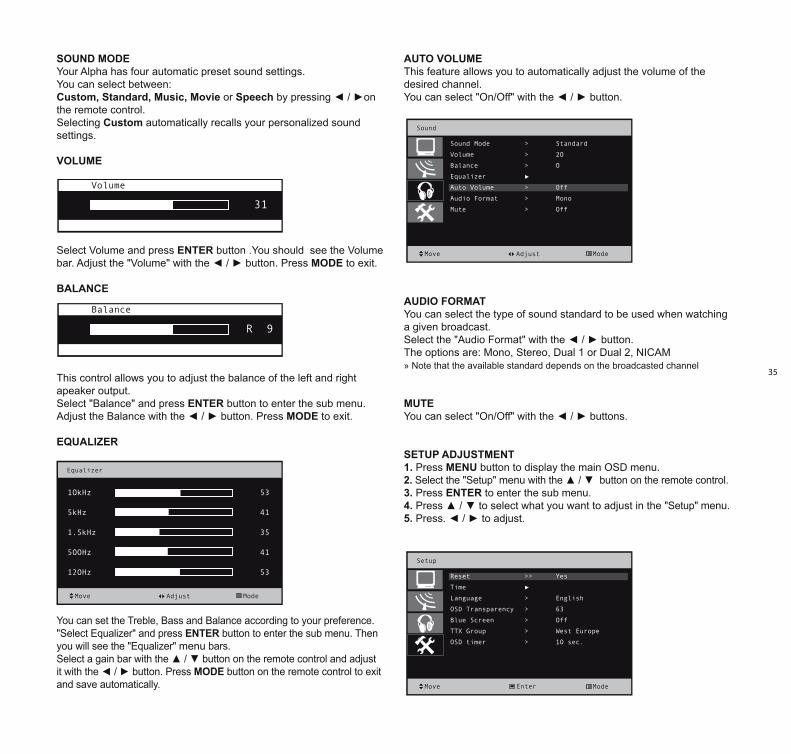
35
souND MoDEYour Alpha has four automatic preset sound settings. You can select between: Custom, standard, Music, Movie or speech by pressing ◄ / ►on the remote control.Selecting Custom automatically recalls your personalized sound settings.
VoLuME
Select Volume and press ENTER button .You should see the Volume bar. Adjust the "Volume" with the ◄ / ► button. Press MoDE to exit.
BALANCE
This control allows you to adjust the balance of the left and right apeaker output.Select "Balance" and press ENTER button to enter the sub menu. Adjust the Balance with the ◄ / ► button. Press MoDE to exit. EquALIZER
You can set the Treble, Bass and Balance according to your preference. "Select Equalizer" and press ENTER button to enter the sub menu. Then you will see the "Equalizer" menu bars.Select a gain bar with the ▲ / ▼ button on the remote control and adjust it with the ◄ / ► button. Press MoDE button on the remote control to exit and save automatically.
AuTo VoLuMEThis feature allows you to automatically adjust the volume of the desired channel.You can select "On/Off" with the ◄ / ► button.
AuDIo FoRMATYou can select the type of sound standard to be used when watching a given broadcast.Select the "Audio Format" with the ◄ / ► button.The options are: Mono, Stereo, Dual 1 or Dual 2, NICAM » Note that the available standard depends on the broadcasted channel
MuTEYou can select "On/Off" with the ◄ / ► buttons.
sETuP ADJusTMENT1. Press MENu button to display the main OSD menu.2. Select the "Setup" menu with the ▲ / ▼ button on the remote control.3. Press ENTER to enter the sub menu.4. Press ▲ / ▼ to select what you want to adjust in the "Setup" menu. 5. Press. ◄ / ► to adjust.
Equalizer
Move Mode
1OkHz
5kHz
1.5kHz
5OOHz
12OHz
53
41
35
41
53
Adjust
Sound
Move Mode
Sound Mode
Volume
Balance
Equalizer
Auto Volume
Audio Format
Mute
>
>
>
►
>
>
>
Standard
2O
O
Off
Mono
Off
Adjust
Setup
Move Mode
Reset
Time
Language
OSD Transparency
Blue Screen
TTX Group
OSD timer
>>
►
>
>
>
>
>
Yes
English
63
Off
West Europe
1O sec.
Enter
Volume
31
Balance
R 9
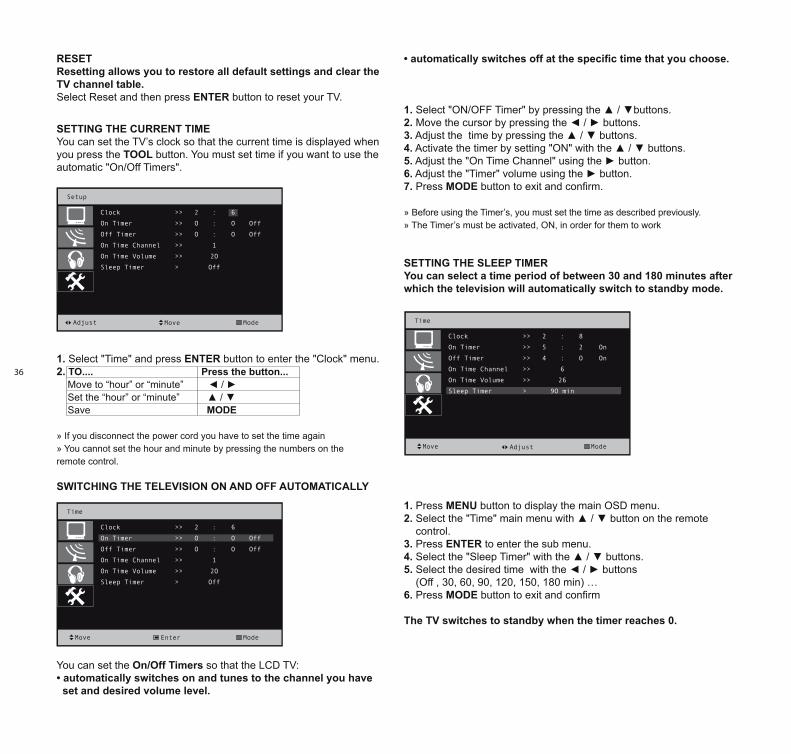
36
REsET Resetting allows you to restore all default settings and clear the TV channel table.Select Reset and then press ENTER button to reset your TV.
sETTINg THE CuRRENT TIMEYou can set the TV’s clock so that the current time is displayed when you press the TooL button. You must set time if you want to use the automatic "On/Off Timers".
1. Select "Time" and press ENTER button to enter the "Clock" menu.2. To.... Press the button... Move to “hour” or “minute” ◄ / ► Set the “hour” or “minute” ▲ / ▼ Save MoDE
» If you disconnect the power cord you have to set the time again» You cannot set the hour and minute by pressing the numbers on the remote control. sWITCHINg THE TELEVIsIoN oN AND oFF AuToMATICALLy
You can set the on/off Timers so that the LCD TV: • automatically switches on and tunes to the channel you have set and desired volume level.
• automatically switches off at the specific time that you choose.
1. Select "ON/OFF Timer" by pressing the ▲ / ▼buttons.2. Move the cursor by pressing the ◄ / ► buttons.3. Adjust the time by pressing the ▲ / ▼ buttons.4. Activate the timer by setting "ON" with the ▲ / ▼ buttons.5. Adjust the "On Time Channel" using the ► button.6. Adjust the "Timer" volume using the ► button.7. Press MoDE button to exit and confirm.
» Before using the Timer’s, you must set the time as described previously.» The Timer’s must be activated, ON, in order for them to work
sETTINg THE sLEEP TIMERyou can select a time period of between 30 and 180 minutes after which the television will automatically switch to standby mode.
1. Press MENu button to display the main OSD menu.2. Select the "Time" main menu with ▲ / ▼ button on the remote control.3. Press ENTER to enter the sub menu.4. Select the "Sleep Timer" with the ▲ / ▼ buttons.5. Select the desired time with the ◄ / ► buttons (Off , 30, 60, 90, 120, 150, 180 min) …6. Press MoDE button to exit and confirm
The TV switches to standby when the timer reaches 0.
Setup
Mode
Clock
On Timer
Off Timer
On Time Channel
On Time Volume
Sleep Timer
>>
>>
>>
>>
>>
>
2
O
O
:
:
:
1
2O
Off
6
O
O
Off
Off
Adjust
Time
Move Mode
Clock
On Timer
Off Timer
On Time Channel
On Time Volume
Sleep Timer
>>
>>
>>
>>
>>
>
2
O
O
:
:
:
1
2O
Off
6
O
O
Off
Off
Enter
Time
Move Mode
Clock
On Timer
Off Timer
On Time Channel
On Time Volume
Sleep Timer
>>
>>
>>
>>
>>
>
2
5
4
:
:
:
6
26
9O min
8
2
O
On
On
Adjust
Move
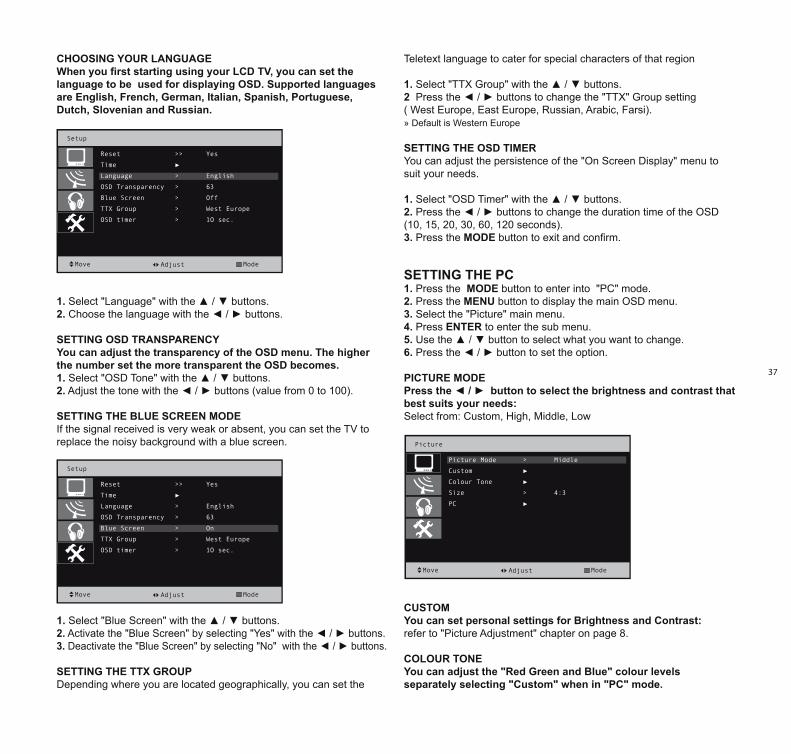
37
CHoosINg youR LANguAgEWhen you first starting using your LCD TV, you can set the language to be used for displaying osD. supported languages are English, French, german, Italian, spanish, Portuguese, Dutch, slovenian and Russian.
1. Select "Language" with the ▲ / ▼ buttons.2. Choose the language with the ◄ / ► buttons.
sETTINg osD TRANsPARENCyyou can adjust the transparency of the osD menu. The higher the number set the more transparent the osD becomes.1. Select "OSD Tone" with the ▲ / ▼ buttons.2. Adjust the tone with the ◄ / ► buttons (value from 0 to 100).
sETTINg THE BLuE sCREEN MoDEIf the signal received is very weak or absent, you can set the TV to replace the noisy background with a blue screen.
1. Select "Blue Screen" with the ▲ / ▼ buttons.2. Activate the "Blue Screen" by selecting "Yes" with the ◄ / ► buttons.3. Deactivate the "Blue Screen" by selecting "No" with the ◄ / ► buttons.
sETTINg THE TTX gRouPDepending where you are located geographically, you can set the
Teletext language to cater for special characters of that region
1. Select "TTX Group" with the ▲ / ▼ buttons.2 Press the ◄ / ► buttons to change the "TTX" Group setting( West Europe, East Europe, Russian, Arabic, Farsi).» Default is Western Europe
sETTINg THE osD TIMER You can adjust the persistence of the "On Screen Display" menu to suit your needs.
1. Select "OSD Timer" with the ▲ / ▼ buttons.2. Press the ◄ / ► buttons to change the duration time of the OSD (10, 15, 20, 30, 60, 120 seconds).3. Press the MoDE button to exit and confirm.
sETTINg THE PC 1. Press the MoDE button to enter into "PC" mode. 2. Press the MENu button to display the main OSD menu.3. Select the "Picture" main menu.4. Press ENTER to enter the sub menu.5. Use the ▲ / ▼ button to select what you want to change.6. Press the ◄ / ► button to set the option.
PICTuRE MoDE Press the ◄ / ► button to select the brightness and contrast that best suits your needs: Select from: Custom, High, Middle, Low
CusToMyou can set personal settings for Brightness and Contrast:refer to "Picture Adjustment" chapter on page 8. CoLouR ToNEyou can adjust the "Red green and Blue" colour levels separately selecting "Custom" when in "PC" mode.
Setup
Move Mode
Reset
Time
Language
OSD Transparency
Blue Screen
TTX Group
OSD timer
>>
►
>
>
>
>
>
Yes
English
63
Off
West Europe
1O sec.
Adjust
Setup
Move Mode
Reset
Time
Language
OSD Transparency
Blue Screen
TTX Group
OSD timer
>>
►
>
>
>
>
>
Yes
English
63
On
West Europe
1O sec.
Adjust
Picture
Move Mode
Picture Mode
Custom
Colour Tone
Size
PC
>
►
►
>
►
Middle
4:3
Adjust
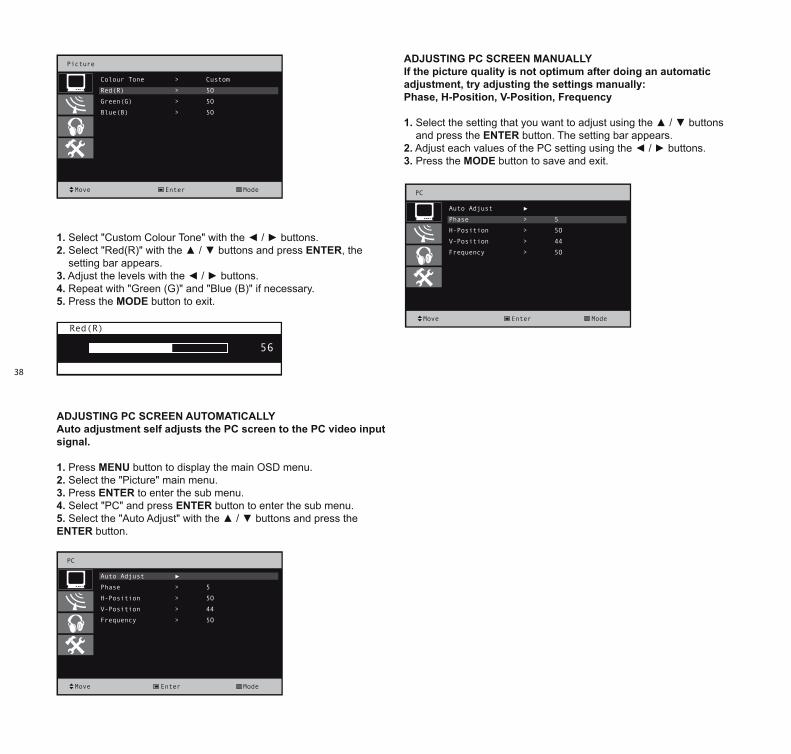
38
1. Select "Custom Colour Tone" with the ◄ / ► buttons.2. Select "Red(R)" with the ▲ / ▼ buttons and press ENTER, the setting bar appears.3. Adjust the levels with the ◄ / ► buttons. 4. Repeat with "Green (G)" and "Blue (B)" if necessary.5. Press the MoDE button to exit.
ADJusTINg PC sCREEN AuToMATICALLyAuto adjustment self adjusts the PC screen to the PC video input signal.
1. Press MENu button to display the main OSD menu.2. Select the "Picture" main menu.3. Press ENTER to enter the sub menu.4. Select "PC" and press ENTER button to enter the sub menu. 5. Select the "Auto Adjust" with the ▲ / ▼ buttons and press the ENTER button.
ADJusTINg PC sCREEN MANuALLyIf the picture quality is not optimum after doing an automatic adjustment, try adjusting the settings manually:Phase, H-Position, V-Position, Frequency
1. Select the setting that you want to adjust using the ▲ / ▼ buttons and press the ENTER button. The setting bar appears.2. Adjust each values of the PC setting using the ◄ / ► buttons.3. Press the MoDE button to save and exit.
Picture
Move Mode
Colour Tone
Red(R)
Green(G)
Blue(B)
>
>
>
>
Custom
5O
5O
5O
PC
Move Mode
Auto Adjust
Phase
H-Position
V-Position
Frequency
►
>
>
>
>
5
5O
44
5O
PC
Move Mode
Auto Adjust
Phase
H-Position
V-Position
Frequency
►
>
>
>
>
5
5O
44
5O
Enter
Red(R)
56
Enter
Enter
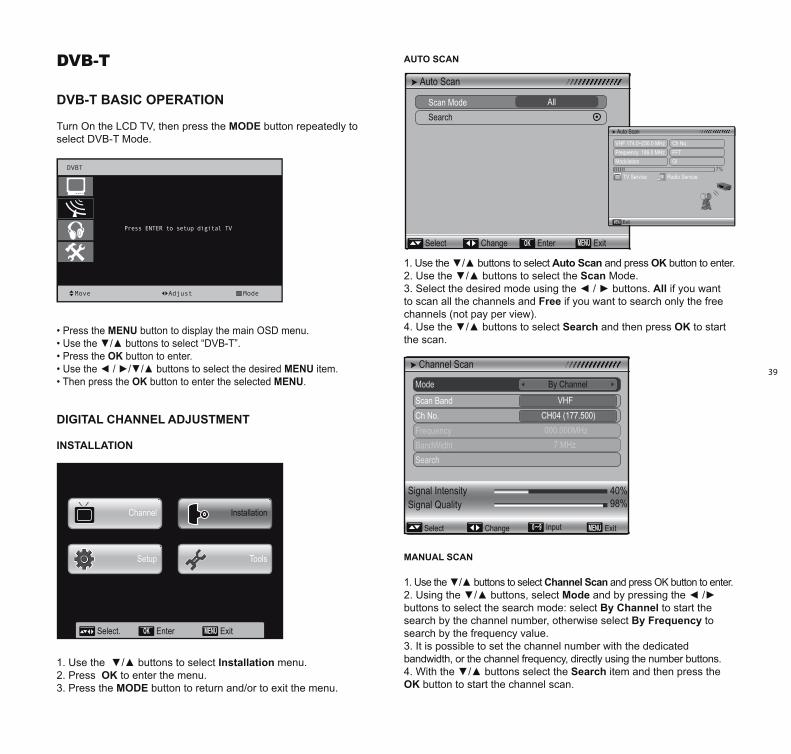
39
dvB-T
DVB-T BAsIC oPERATIoN
Turn On the LCD TV, then press the MoDE button repeatedly to select DVB-T Mode.
• Press the MENu button to display the main OSD menu.• Use the ▼/▲ buttons to select “DVB-T”.• Press the oK button to enter.• Use the ◄ / ►/▼/▲ buttons to select the desired MENu item.• Then press the oK button to enter the selected MENu.
DIgITAL CHANNEL ADJusTMENT
INsTALLATIoN
1. Use the ▼/▲ buttons to select Installation menu.2. Press oK to enter the menu.3. Press the MoDE button to return and/or to exit the menu.
AuTo sCAN
1. Use the ▼/▲ buttons to select Auto scan and press oK button to enter.2. Use the ▼/▲ buttons to select the scan Mode.3. Select the desired mode using the ◄ / ► buttons. All if you want to scan all the channels and Free if you want to search only the free channels (not pay per view).4. Use the ▼/▲ buttons to select search and then press oK to start the scan.
MANuAL sCAN
1. Use the ▼/▲ buttons to select Channel scan and press OK button to enter.2. Using the ▼/▲ buttons, select Mode and by pressing the ◄ /► buttons to select the search mode: select By Channel to start the search by the channel number, otherwise select By Frequency to search by the frequency value.3. It is possible to set the channel number with the dedicated bandwidth, or the channel frequency, directly using the number buttons.4. With the ▼/▲ buttons select the search item and then press the oK button to start the channel scan.
DVBT
Move Adjust Mode
Press ENTER to setup digital TV
Select. EnterOK ExitMENU
Channel
Setup
Installation
Tools
Auto Scan
Scan ModeSearch
Select Change Enter ExitOK MENU
All
Auto Scan
VHF 174.0 230.0 MHz
ExitMENU
˜Frequency 186.0 MHzModulation
TV Service Radio Service
Ch No.FFTGI
7%
Signal Intensity 40%98%Signal Quality
Channel Scan
Scan Band
Mode
Input0 9 Exit
Ch No.FrequencyBandWidhtSearch
MENUSelect Change
By Channel
7 MHz
CH04 (177.500)VHF
000.000MHz
˜
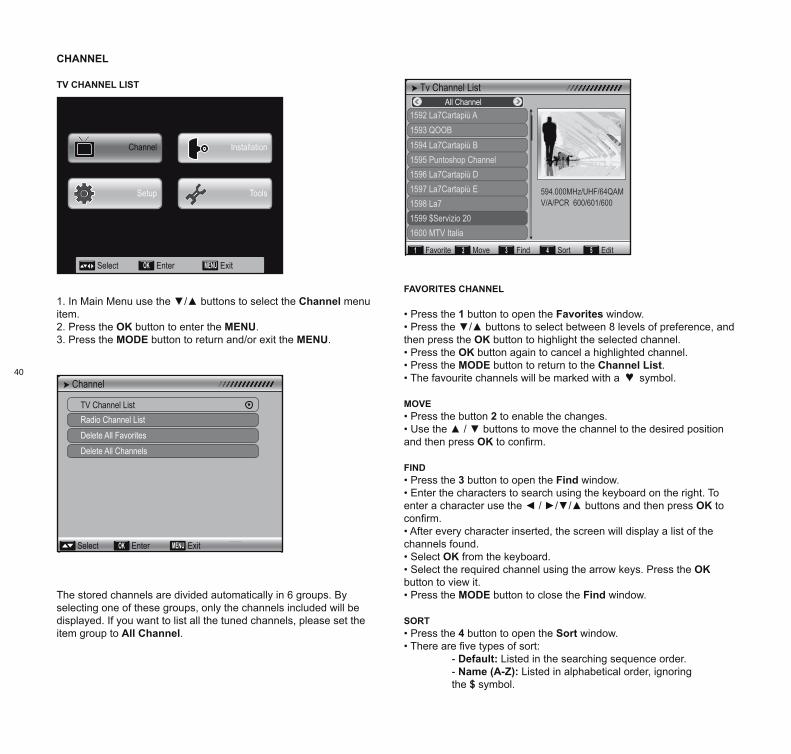
40
CHANNEL
TV CHANNEL LIsT
1. In Main Menu use the ▼/▲ buttons to select the Channel menu item.2. Press the oK button to enter the MENu.3. Press the MoDE button to return and/or exit the MENu.
The stored channels are divided automatically in 6 groups. By selecting one of these groups, only the channels included will be displayed. If you want to list all the tuned channels, please set the item group to All Channel.
FAVoRITEs CHANNEL
• Press the 1 button to open the Favorites window.• Press the ▼/▲ buttons to select between 8 levels of preference, and then press the oK button to highlight the selected channel.• Press the oK button again to cancel a highlighted channel.• Press the MoDE button to return to the Channel List.• The favourite channels will be marked with a ♥ symbol.
MoVE• Press the button 2 to enable the changes.• Use the ▲ / ▼ buttons to move the channel to the desired position and then press oK to confirm.
FIND• Press the 3 button to open the Find window.• Enter the characters to search using the keyboard on the right. To enter a character use the ◄ / ►/▼/▲ buttons and then press oK to confirm.• After every character inserted, the screen will display a list of the channels found.• Select oK from the keyboard.• Select the required channel using the arrow keys. Press the oK button to view it.• Press the MoDE button to close the Find window.
soRT• Press the 4 button to open the sort window.• There are five types of sort: - Default: Listed in the searching sequence order. - Name (A-Z): Listed in alphabetical order, ignoring the $ symbol.
Select EnterOK ExitMENU
Channel
Setup
Installation
Tools
Tv Channel ListAll Channel
1592 La7Cartapiù A
Favorite Move Find21 3 Sort4 Edit5
Select. Group Page<< >> Enter ExitMENU
1593 QOOB1594 La7Cartapiù B1595 Puntoshop Channel1596 La7Cartapiù D1597 La7Cartapiù E 594.000MHz/UHF/64QAM
V/A/PCR 600/601/600 1598 La71599 $Servizio 201600 MTV Italia
OK
Channel
TV Channel ListRadio Channel ListDelete All FavoritesDelete All Channels
Select Enter ExitOK MENU
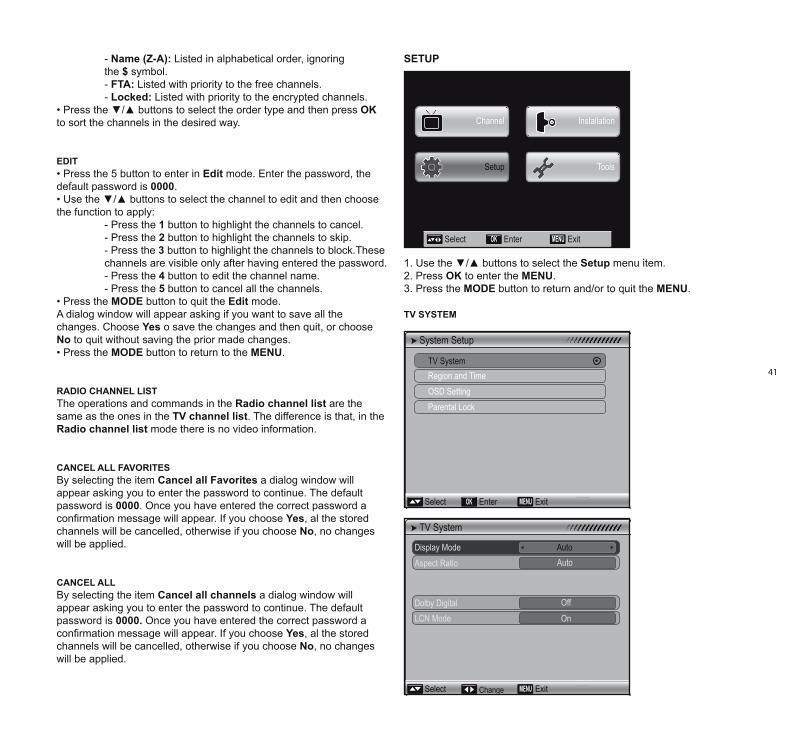
41
- Name (Z-A): Listed in alphabetical order, ignoring the $ symbol. - FTA: Listed with priority to the free channels. - Locked: Listed with priority to the encrypted channels.• Press the ▼/▲ buttons to select the order type and then press oK to sort the channels in the desired way.
EDIT• Press the 5 button to enter in Edit mode. Enter the password, the default password is 0000.• Use the ▼/▲ buttons to select the channel to edit and then choose the function to apply: - Press the 1 button to highlight the channels to cancel. - Press the 2 button to highlight the channels to skip. - Press the 3 button to highlight the channels to block.These channels are visible only after having entered the password. - Press the 4 button to edit the channel name. - Press the 5 button to cancel all the channels.• Press the MoDE button to quit the Edit mode. A dialog window will appear asking if you want to save all the changes. Choose yes o save the changes and then quit, or choose No to quit without saving the prior made changes.• Press the MoDE button to return to the MENu.
RADIo CHANNEL LIsT The operations and commands in the Radio channel list are the same as the ones in the TV channel list. The difference is that, in the Radio channel list mode there is no video information.
CANCEL ALL FAVoRITEsBy selecting the item Cancel all Favorites a dialog window will appear asking you to enter the password to continue. The default password is 0000. Once you have entered the correct password a confirmation message will appear. If you choose yes, al the stored channels will be cancelled, otherwise if you choose No, no changes will be applied.
CANCEL ALLBy selecting the item Cancel all channels a dialog window will appear asking you to enter the password to continue. The default password is 0000. Once you have entered the correct password a confirmation message will appear. If you choose yes, al the stored channels will be cancelled, otherwise if you choose No, no changes will be applied.
sETuP
1. Use the ▼/▲ buttons to select the setup menu item.2. Press oK to enter the MENu.3. Press the MoDE button to return and/or to quit the MENu.
TV sysTEM
System Setup
TV SystemRegion and TimeOSD SettingParental Lock
Select Enter ExitOK MENU
TV System
Select ExitMENUChange
Display ModeAspect Ratio
AutoAuto
Dolby Digital OffLCN Mode On
Select EnterOK ExitMENU
Channel
Setup
Installation
Tools

42
Use the ▼/▲ buttons to select the different items of the menu, then press the ◄ / ► buttons to modify the value.• The Display Mode is used to switch the screen display standard. There are the following options available: AuTo, PAL-M, PAL-Bg, NTsC, PAL-N. By pressing the ◄ / ► buttons you may choose the desired mode.• The Aspect Ratio is used to change the display proportions of the images. There are the following options available: 4:3, Ps, 4:3 LB, 16:9. By pressing the ◄ / ► buttons you may choose the desired mode.• Dolby Digital is used to enable/disable the AC3 mode.• LCN is used to enable/disable the channel sorting function following the informations kept in the data flow of the channel itself.
REgIoN AND TIMEUse the ▼/▲ buttons to select the different items of the menu, then press the ◄ / ► buttons to change the value. • Region: sets the MENu language of the DVBT. • summer Time: sets DST (Daylight Saving Time). • Time Display: Display the time or not.
osD sETTINgs
Use the ▼/▲ buttons to select the different items of the MENu, then press the ◄ / ► buttons to change the value.
• Subtitle Display: enables/disables the display of the subtitles.• OSD Timeout: sets the period of time of the permanence on screen of the OSD.• OSD Transparency: sets the transparency level of the OSD. By pressing the ◄ / ► buttons, you may choose between the following options: Off, 10%, 20%, 30%, 40%.• Load default osD settings: loads the default factory settings. PARENTAL LoCKOnce you have selected the Parental Lock item, a dialog window will appear asking you to enter the password. The default password is 0000.Use the ▼/▲ buttons to select the different items of the MENu, then press the ◄ / ► buttons to change the value.• Menu Lock: determines if it is necessary or not to re-enter the password to access the Installation MENu. • Channel Lock: determines if it is necessary to reinsert the password to watch a locked channel. If it is set to yes, accessing channels marked with Lock, a dialog window will appear asking to enter the password. If it is set to No the mark Locked will have no effect.• To change the system password, use the ▼/▲ buttons and select the Input Password.• Enter the previous password and then enter the new one.• Confirm the entered password by typing it once again.• A message will appear confirming that changing the password succeeded.
System Setup
TV SystemRegion and TimeOSD SettingParental Lock
Select Enter ExitOK MENU
Region and Time
GMT Offset
Region
Input0 9 Enter
ExitMENU
DateTimeSummer TimeTime Display
OKSelect Change
Italy
OffOff
˜
28/04/08GMT+01:00
09:55
OSD Setting
Select ExitMENUChange
Subtitle DisplayOSD TimeoutOSD Transparency
Standard5
20%
Load Default OSD Setting
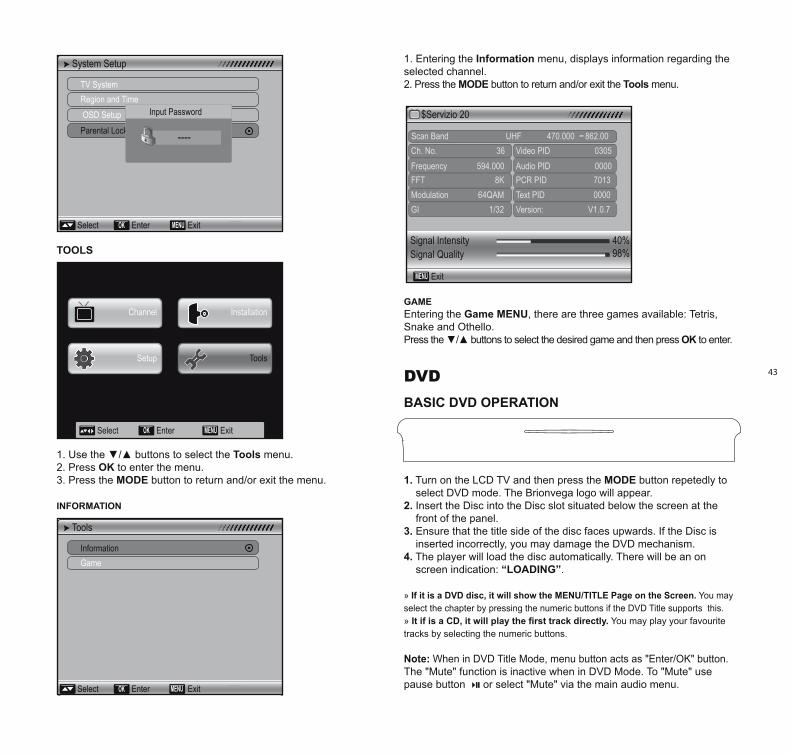
43
TooLs
1. Use the ▼/▲ buttons to select the Tools menu.2. Press oK to enter the menu.3. Press the MoDE button to return and/or exit the menu.
INFoRMATIoN
1. Entering the Information menu, displays information regarding the selected channel.2. Press the MoDE button to return and/or exit the Tools menu.
gAMEEntering the game MENu, there are three games available: Tetris, Snake and Othello.Press the ▼/▲ buttons to select the desired game and then press oK to enter.
dvdBAsIC DVD oPERATIoN
1. Turn on the LCD TV and then press the MoDE button repetedly to select DVD mode. The Brionvega logo will appear.2. Insert the Disc into the Disc slot situated below the screen at the front of the panel.3. Ensure that the title side of the disc faces upwards. If the Disc is inserted incorrectly, you may damage the DVD mechanism. 4. The player will load the disc automatically. There will be an on screen indication: “LoADINg”.
» If it is a DVD disc, it will show the MENu/TITLE Page on the screen. You may select the chapter by pressing the numeric buttons if the DVD Title supports this.» It if is a CD, it will play the first track directly. You may play your favourite tracks by selecting the numeric buttons.
Note: When in DVD Title Mode, menu button acts as "Enter/OK" button. The "Mute" function is inactive when in DVD Mode. To "Mute" use pause button or select "Mute" via the main audio menu.
Tools
InformationGame
Select Enter ExitOK MENU
Select EnterOK ExitMENU
Channel
Setup
Installation
Tools
ExitMENU
$Servizio 20
Ch. No. 36 Scan Band UHF 470.000 862.00 ˜
Frequency 594.000 FFT 8K Modulation 64QAM GI 1/32
Video PID 0305Audio PID 0000PCR PID 7013Text PID 0000 Version: V1.0.7
Signal Intensity 40%98%Signal Quality
System Setup
TV SystemRegion and Time OSD SetupParental Lock
Select Enter ExitOK MENU
Input Password
----
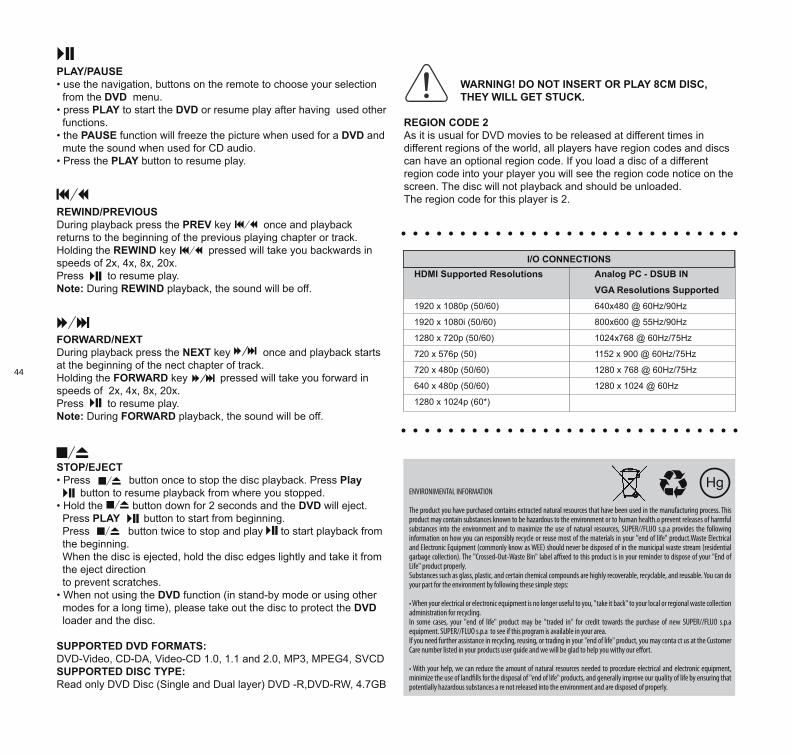
44
PLAy/PAusE• use the navigation, buttons on the remote to choose your selection from the DVD menu.• press PLAy to start the DVD or resume play after having used other functions.• the PAusE function will freeze the picture when used for a DVD and mute the sound when used for CD audio.• Press the PLAy button to resume play.
REWIND/PREVIous During playback press the PREV key once and playback returns to the beginning of the previous playing chapter or track.Holding the REWIND key pressed will take you backwards in speeds of 2x, 4x, 8x, 20x.Press to resume play.Note: During REWIND playback, the sound will be off.
FoRWARD/NEXT During playback press the NEXT key once and playback starts at the beginning of the nect chapter of track.Holding the FoRWARD key pressed will take you forward in speeds of 2x, 4x, 8x, 20x.Press to resume play. Note: During FoRWARD playback, the sound will be off.
sToP/EJECT• Press button once to stop the disc playback. Press Play button to resume playback from where you stopped.• Hold the button down for 2 seconds and the DVD will eject. Press PLAy button to start from beginning. Press button twice to stop and play to start playback from the beginning. When the disc is ejected, hold the disc edges lightly and take it from the eject direction to prevent scratches.• When not using the DVD function (in stand-by mode or using other modes for a long time), please take out the disc to protect the DVD loader and the disc.
suPPoRTED DVD FoRMATs:DVD-Video, CD-DA, Video-CD 1.0, 1.1 and 2.0, MP3, MPEG4, SVCDsuPPoRTED DIsC TyPE:Read only DVD Disc (Single and Dual layer) DVD -R,DVD-RW, 4.7GB
WARNINg! Do NoT INsERT oR PLAy 8CM DIsC,THEy WILL gET sTuCK.
REgIoN CoDE 2As it is usual for DVD movies to be released at different times in different regions of the world, all players have region codes and discs can have an optional region code. If you load a disc of a different region code into your player you will see the region code notice on the screen. The disc will not playback and should be unloaded.The region code for this player is 2.
ENVIRONIMENTAL INFORMATION
The product you have purchased contains extracted natural resources that have been used in the manufacturing process. This product may contain substances known to be hazardous to the environment or to human health.o prevent releases of harmful substances into the environment and to maximize the use of natural resources, SUPER//FLUO s.p.a provides the following information on how you can responsibly recycle or reuse most of the materials in your "end of life" product.Waste Electrical and Electronic Equipment (commonly know as WEE) should never be disposed of in the municipal waste stream (residential garbage collection). The "Crossed-Out-Waste Bin" label affixed to this product is in your reminder to dispose of your "End of Life" product properly.Substances such as glass, plastic, and certain chemical compounds are highly recoverable, recyclable, and reusable. You can do your part for the environment by following these simple steps:
• When your electrical or electronic equipment is no longer useful to you, "take it back" to your local or regional waste collection administration for recycling.In some cases, your "end of life" product may be "traded in" for credit towards the purchase of new SUPER//FLUO s.p.a equipment. SUPER//FLUO s.p.a to see if this program is available in your area.If you need further assistance in recycling, reusing, or trading in your "end of life" product, you may conta ct us at the Customer Care number listed in your products user guide and we will be glad to help you withy our effort.
• With your help, we can reduce the amount of natural resources needed to procedure electrical and electronic equipment, minimize the use of landfills for the disposal of "end of life" products, and generally improve our quality of life by ensuring that potentially hazardous substances a re not released into the environment and are disposed of properly.
Analog PC - DsuB IN VgA Resolutions supported640x480 @ 60Hz/90Hz
800x600 @ 55Hz/90Hz
1024x768 @ 60Hz/75Hz
1152 x 900 @ 60Hz/75Hz
1280 x 768 @ 60Hz/75Hz
1280 x 1024 @ 60Hz
HDMI supported Resolutions
1920 x 1080p (50/60)
1920 x 1080i (50/60)
1280 x 720p (50/60)
720 x 576p (50)
720 x 480p (50/60)
640 x 480p (50/60)
1280 x 1024p (60*)
I/o CoNNECTIoNs
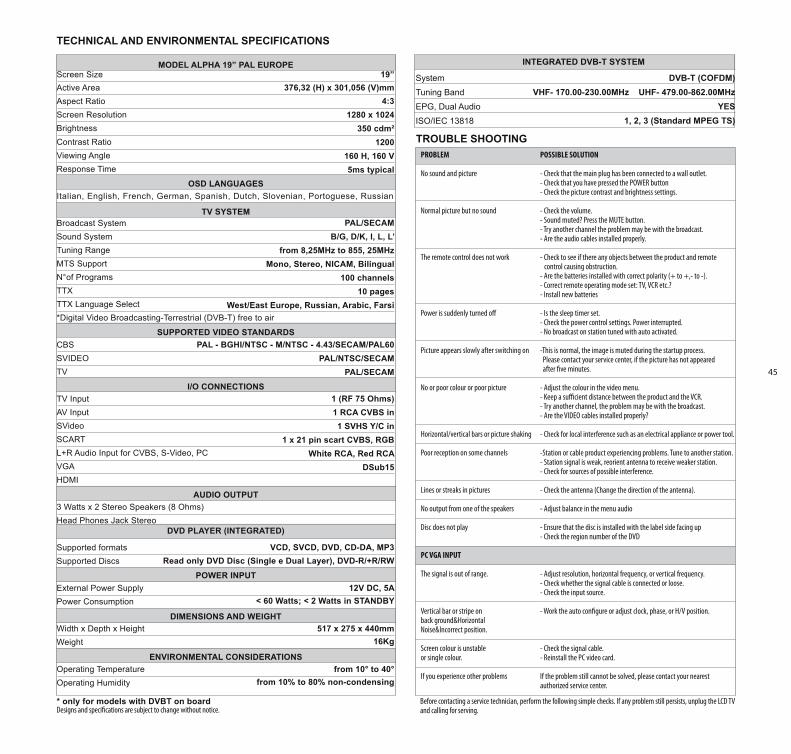
45
TECHNICAL AND ENVIRoNMENTAL sPECIFICATIoNs
TRouBLE sHooTINg
Before contacting a service technician, perform the following simple checks. If any problem still persists, unplug the LCD TV and calling for serving.
PROBLEM
No sound and picture
Normal picture but no sound
The remote control does not work
Power is suddenly turned off
Picture appears slowly after switching on
No or poor colour or poor picture
Horizontal/vertical bars or picture shaking
Poor reception on some channels
Lines or streaks in pictures
No output from one of the speakers
Disc does not play
PC VGA INPUT
The signal is out of range.
Vertical bar or stripe onback ground&HorizontalNoise&Incorrect position.
Screen colour is unstableor single colour.
If you experience other problems
POSSIBLE SOLUTION
- Check that the main plug has been connected to a wall outlet.- Check that you have pressed the POWER button - Check the picture contrast and brightness settings.
- Check the volume.- Sound muted? Press the MUTE button.- Try another channel the problem may be with the broadcast.- Are the audio cables installed properly.
- Check to see if there any objects between the product and remote control causing obstruction.- Are the batteries installed with correct polarity (+ to +,- to -).- Correct remote operating mode set: TV, VCR etc.?- Install new batteries
- Is the sleep timer set.- Check the power control settings. Power interrupted.- No broadcast on station tuned with auto activated.
-This is normal, the image is muted during the startup process. Please contact your service center, if the picture has not appeared after five minutes.
- Adjust the colour in the video menu.- Keep a sufficient distance between the product and the VCR.- Try another channel, the problem may be with the broadcast.- Are the VIDEO cables installed properly?
- Check for local interference such as an electrical appliance or power tool.
-Station or cable product experiencing problems. Tune to another station.- Station signal is weak, reorient antenna to receive weaker station.- Check for sources of possible interference.
- Check the antenna (Change the direction of the antenna).
- Adjust balance in the menu audio
- Ensure that the disc is installed with the label side facing up- Check the region number of the DVD
- Adjust resolution, horizontal frequency, or vertical frequency.- Check whether the signal cable is connected or loose.- Check the input source.
- Work the auto configure or adjust clock, phase, or H/V position.
- Check the signal cable.- Reinstall the PC video card.
If the problem still cannot be solved, please contact your nearest authorized service center.
Designs and specifications are subject to change without notice.
INTEgRATED DVB-T sysTEM DVB-T (CoFDM)
VHF- 170.00-230.00MHz uHF- 479.00-862.00MHzyEs
1, 2, 3 (standard MPEg Ts)
SystemTuning BandEPG, Dual AudioISO/IEC 13818
Screen Size 19”376,32 (H) x 301,056 (V)mm
4:31280 x 1024
350 cdm²
160 H, 160 V5ms typical
PAL/SECAMB/G, D/K, I, L, L’
from 8,25MHz to 855, 25MHzMono, Stereo, NICAM, Bilingual
100 channels10 pages
West/East Europe, Russian, Arabic, Farsi
PAL - BGHI/NTSC - M/NTSC - 4.43/SECAM/PAL60PAL/NTSC/SECAM
PAL/SECAM
1 (RF 75 Ohms)1 RCA CVBS in1 SVHS Y/C in
1 x 21 pin scart CVBS, RGBWhite RCA, Red RCA
DSub15
VCD, SVCD, DVD, CD-DA, MP3Read only DVD Disc (Single e Dual Layer), DVD-R/+R/RW
12V DC, 5A< 60 Watts; < 2 Watts in STANDBY
517 x 275 x 440mm16Kg
from 10° to 40°from 10% to 80% non-condensing
Active AreaAspect RatioScreen ResolutionBrightness
Viewing AngleResponse Time
Italian, English, French, German, Spanish, Dutch, Slovenian, Portoguese, Russian
Broadcast SystemSound SystemTuning RangeMTS SupportN°of ProgramsTTXTTX Language Select*Digital Video Broadcasting-Terrestrial (DVB-T) free to air
CBSSVIDEOTV
TV InputAV InputSVideoSCARTL+R Audio Input for CVBS, S-Video, PCVGAHDMI
3 Watts x 2 Stereo Speakers (8 Ohms)Head Phones Jack Stereo
Supported formatsSupported Discs
External Power SupplyPower Consumption
Width x Depth x HeightWeight
Operating Temperature
MODEL ALPHA 19” PAL EUROPE
TECHNICAL AND ENVIRONMENTAL SPECIFICATIONS
OSD LANGUAGES
TV SYSTEM
SUPPORTED VIDEO STANDARDS
I/O CONNECTIONS
AUDIO OUTPUT
DVD PLAYER (INTEGRATED)
POWER INPUT
DIMENSIONS AND WEIGHT
ENVIRONMENTAL CONSIDERATIONS
1200Contrast Ratio
Operating Humidity
* only for models with DVBT on board
Dimensioni schermo 19”376,32 (H) x 301,056 (V)mm
4:31280 x 1024
350 cdm²
160 H, 160 V5ms typical
PAL/SECAMB/G, D/K, I, L, L’
da 8,25MHz a 855, 25MHzMono, Stereo, NICAM, Bilingue
100 canali10 pagine
Europa est-ovest, Russo, Arabo, Farsi
PAL - BGHI/NTSC - M/NTSC - 4.43/SECAM/PAL60PAL/NTSC/SECAM
PAL/SECAM
1 (RF 75 Ohms)1 RCA CVBS in1 SVHS Y/C in
1 x 21 pin scart CVBS, RGBBianca RCA, Rosso RCA
DSub15
VCD, SVCD, DVD, CD-DA, MP3Legge solo DVD Disc (Single e Dual Layer), DVD-R/+R/RW
12V DC, 5A< 60 Watts; < 2 Watts in STANDBY
517 x 275 x 440mm16Kg
da 10° a 40°da 10% a 80% in assenza di condensa
Area AttivaFormato ImmaginiRisoluzione SchermoLuminosità
Angolo VisualeTempo di Risposta
Italiano, Inglese, Francese, Tedesco, Spagnolo, Olanddese, Sloveno, Portoghese, Russo
Sistema di TrasmissioneSistema AudioGamma SintonizzazioneSupporto MTSN° di ProgrammiTTXTTX Selezione Lingue*Sintonizzatore Digitale Terrestre (DVB-T) free to air
CBSSVIDEOTV
Ingresso TVIngresso AVSVideoSCARTSx+Dx ingresso audio per CVBS, S-Video, PCVGAHDMI
3 Watts x 2 Altoparlanti Stereo (8 Ohms)Cuffie Jack Stereo
Formati supportatiDischi supportati
AlimentazioneConsumo di Corrente
Larghezza x Profondità x AltezzaPeso
Temperatura di funzionamento
MODELLO ALPHA 19” PAL EUROPE
CARATTERISTICHE TECNICHE ED AMBIENTALI
LINGUE OSD
SISTEMA TV
STANDARD VIDEO SUPPORTATI
COLLEGAMENTI ENTRATA/USCITA
USCITA AUDIO
LETTORE DVD (INTEGRATO)
INGRESSO ALIMENTAZIONE
DIMENSIONI E PESO
SPECIFICHE AMBIENTALI
1200Contrasto
Umidità di funzionamento
* solo per i modelli dotati di DVBT on board
Dimensioni schermo 11”PAL4:3
Cinescopio Black Matrix
PAL/SECAMB/G, Sintonia in sintesi di Frequenza Digitale
99
4 Wrms
Top/Flop con 10 pagine di Memoria
< 45 Watts; < 6 Watts in STANDBY230V AC ± 10%
Standard ColoreFormato ImmaginiSchermo
Tuner Iperbanda via CavoStandard AudioN° di ProgrammiTTX
SCARTSVHS
Potenza AudioPresa Cuffie
ConsumoTensione di rete
Telecomando multifunzioneTarghetta metallica di Identificazione
Verde Militare
Valerio Cometti Restyling (2007), Marco Zanuso Restyling (1989), Design Marco Zanuso con Richard Sapper (1963-64)
MODELLO ALGOL 11” LIMITED EDITION
CARATTERISTICHE TECNICHE
SISTEMA TV
COLLEGAMENTI ENTRATA/USCITA
USCITA AUDIO
CONSUMO E ALIMENTAZIONE
ACCESSORI
COLORI
DESIGN
Prese Cinch ingresso audio
Case in alluminio
Screen SizeColor StandardAspect RatioScreen
Hyperband Cable TunerStandard AudioN° of Programs
SCARTSVHS
Audio PowerHead Phone Jack
Power ConsumptionVoltage
Multifunction RemoteIdentification Metallic Label
Military Green
Valerio Cometti Restyling (2007), Marco Zanuso Restyling (1989), Design Marco Zanuso with Richard Sapper (1963-64)
Audio Input Cinch Jack
Aluminium Case

46
47
360LIBBRAH1911
v.le L. Zanussi 11 33170 Pordenone (PN) Italy t. +39 0434 379 211 f. +39 0434 379 500 www.brionvega.tv
Assistenza postvendita // After sales service: t. +39 0434 379 315
Brionvega is a Super//Fluo brand www.super-fluo.com