44
LifeSize® Transit™ Server Guide

LifeSize® Transit™Server Guide

October 2008
Copyright Notice©2005 - 2008 LifeSize Communications Inc, and its licensors. All rights reserved.LifeSize Communications has made every effort to ensure that the information contained in this document is accurate and reliable, but assumes no responsibility for errors or omissions. Information in this document is subject to change without notice. Companies, names, and data used in examples herein are fictitious unless noted. This document contains copyrighted and proprietary information, which is protected by United States copyright laws and international treaty provisions. No part of the document may be reproduced or transmitted, in any form or by any means, electronic or mechanical, for any purpose, without the express written permission from LifeSize Communications.
Trademark AcknowledgmentsLifeSize® is the trademark of LifeSize Communications Inc. All other trademarks are the property of their respective owners.
Patent NoticeFor patents covering LifeSize® products, refer to http://www.lifesize.com/support/legal.
Contacting Customer SupportIf you have questions, concerns, or need assistance, contact your LifeSize Channel Partner.
Providing Customer FeedbackLifeSize Communications welcomes your comments regarding our products and services. If you have feedback about this or any LifeSize product, please send it to [email protected]. Contact information for LifeSize Communications is as follows:
Method AddressInternet http://www.lifesize.com
E-mail [email protected]
Phone (877) LIFESIZE or (877) 543-3749(512) 347-9300
Fax (512) 347-9301
2 LifeSize Transit Server Guide

Welcome to LifeSize TransitLifeSize Transit enables your video communications devices to communicate with each other across firewalls and NATs. The LifeSize Transit system is comprised of SIP and H.323 firewall traversal clients and servers.
SIP firewall traversal includes the following functionality:
• Media server that is optimized for relaying the actual voice, video, and application sharing data.
• Signalling server (proxy server) that handles NAT/firewall traversal, call setup, and operation and maintenance services.
• Registrar that provides the SIP registration function.
• Support for Simple Traversal of UDP through NATs (STUN), Traversal Using Relay NAT (TURN), and Interactive Connectivity Establishment (ICE)
• Support for UDP Relay, relaying media for NAT-unaware SIP user agents or those located behind an endpoint-dependent NAT using symmetric RTP.
H.323 firewall traversal includes the following functionality:
• H.460.18 server for H.323 traversal call control and call establishment
• H.460.19 server for H.323 traversal media control
ConfigurationsThe following diagram illustrates the different configurations in which you can use the LifeSize Transit components.
The LifeSize Transit Server resides on the internet, typically in the DMZ, and enables firewall and NAT traversal, session and media control for UDP, TCP, and HTTP media, as well as H.460 control. It also serves as an H.323 gatekeeper or SIP proxy and registrar. The LifeSize Transit server is both an H.460 traversal server and a SIP traversal server.
LifeSize Transit SIP Firewall traversal, an embedded SIP traversal client included with LifeSize video communications systems, serving as a SIP proxy to communicate over firewalls.
LifeSize Transit SIP Client used with a third party vendors’ device, serving as an enterprise proxy to communicate over firewalls. The enterprise proxy is a multi-user SIP traversal client running standalone and connected to your internal network which communicates with the LifeSize Transit Server. This configuration provides firewall and NAT traversal for third party SIP devices.
H.323 firewall traversal provides firewall traversal for any H.460 enabled devices, including LifeSize.
LifeSize Transit Server Guide 3

A system with a public IP address can also directly communicate with the server to contact another system inside the firewall.
The default configuration of LifeSize Transit Server includes a Media Server and a Signalling Server (Proxy Server) enabled within the same 1U device. Optionally, you can decouple the Signalling Server from the Media Server enabling multiple Media Servers to work directly with a single Signalling Server.
4 LifeSize Transit Server Guide

The Media Server is optimized for processing the actual voice, video, and application sharing data; the Signalling Server handles everything else: registrations, call setup, and the operation and maintenance services. The LifeSize Transit Server also includes an embedded internal SIP Registrar and H.323 Gatekeeper.
Deployment ConsiderationsWhen serving a large number of users spread worldwide, it is a good idea to deploy servers in dedicated geographical areas. Especially for users connecting through tunnelled connections, the tunnelled legs should be kept short for good media quality. You can set up each cluster of servers to serve a certain geographical area (typically continents). The server uses a database of IP addresses and matches the connecting IP address to automatically direct a connecting client to the closest server. Each time the client connects to a server, it downloads a prioritized list of clusters, in which the server entries are randomized per cluster. There must be one master server in a global system. This holds the user database and master configuration.
If you set up one of the servers to be the SIP registrar, it is also a good idea to have this as the master server; otherwise you must deploy a separate database in connection with registrations. A server that is not a registrar is not aware of whether the other servers are registrars, and uses DNS SRV or configured routes to find out where the request should be sent. In this way, the operation and configuration is exactly the same whether a given registrar is embedded in a server or not.
DNS EntriesFor a publicly available service, signalling and media servers need to have public addresses that are registered in the global DNS service. For companies that do not manage their own domain names, ask your Internet Service Provider (ISP) to do this. The DNS entries chosen for the servers must match the name in the SSL certificate. For example:
• pxs1.somecompany.com for the signalling server
• me1.somecompany.com for the media server
Refer to ”DNS SRV Records” on page 37 for more example DNS SRV Records.
Server Network ConfigurationThe Signalling Server and the Media Engine would normally be located on an open Internet site. It is possible to put up a firewall in front of the servers, and even a NAT device. You must open the following ports in the firewall, or set up static routing from the NAT’s public address. The following are default ports, but you can configure them differently.
LifeSize Transit Server Guide 5

Signalling Server• HTTPS port 443 must be reachable for everyone. If configured, the clients first try to
connect on TCP rather than HTTPS, and the client connects using TCP on port 444 and port 80.
• TCP and UDP port 5060 if communication towards other SIP clients, servers is desired.
• UDP ports 3478 and 34501 or as configured for STUN if UDP based media streams (where supported) is desired.
• UDP (and optionally TCP) ports 3560 or as configured for TURN requests if desired.
• HTTPS port 8181 and port 8080 for the interface if remote web management is desired.
• TCP port 22 for SSH if remote shell management is desired.
Media Engine• HTTPS port 443 must be reachable for everyone. If configured, the clients first try to
connect on TCP rather than HTTPS, and the client connects using TCP on port 444 and port 80.
• To support UDP relay and external calls, you must open a UDP port range that is configurable in the me.cfg file under /root/me. Default values are 45100-45899.
• If support for TCP based media (for example application sharing) is desired, you must open a TCP port range. The ports used for this are configurable in the me.cfg file under /root/me. Default values are 34100-34900.
• UDP ports 3478 and 34501 or as configured for STUN if UDP based media streams (where supported) is desired.
• UDP (and optionally TCP) ports 3560 or as configured for TURN requests if desired
• TCP port 22 for SSH if remote shell management is desired.
Normally the servers are co-located on the same network. Otherwise, the Media Engine TCP port 32767 (by default) must be reachable for the Signalling Server.
H.323 Traversal ServerThe optional H.323 traversal server supports relaying H.323 devices and is also an H.460 server. The following additional open ports are required:
• TCP port 1720 for H.323 call signalling
• UDP port 1719 for H.323 RAS signalling
• TCP port 1722 for H.245 media control signalling
• UDP ports 45100-45899 for external media
6 LifeSize Transit Server Guide

• TCP server ports from the range 34100 – 34899 are used dynamically per call.
• UDP port 6768 for H.460.19 multiplexed RTP signaling
• UDP port 6769 for H.460.19 multiplexed RTCP signaling
UDP RelayThe LifeSize Transit server provides FW/NAT traversal for SIP user agents connecting directly. It automatically detects whether a client is behind a symmetric NAT (and cannot use STUN/ICE) and keeps the signalling connection open with frequent refresh registrations when needed. In a call, the server will induce media relay for the client by rewriting the media addresses and ports in SDP.
STUN ServerThe LifeSize Transit server comprises a STUN server on both the signalling and media servers. They are all compliant to RFC 3489 and the updated drafts. STUN requests are very lightweight and require no server resources, so there is no authentication or user ID validation for these requests.
TURN ServerBoth the signalling server and the Media Engine are TURN servers. The signalling server handles authentication and authorization of the Stun Relay sessions, while the Media Engine performs the actual media relay. To achieve load-sharing of Stun Relay sessions, the traffic requests are redirected to the available Media Engine.
STUN Relay sessions consumes resources on the servers, and must thus be authenticated. The same user ID and password are used as when connecting through the tunnel. As with the tunnel connection, individual users can have their unique user ID/password combination, or one global userID/password can be distributed to avoid installing a database. Both short-term and long-term authentication token mechanisms are supported.
Due to limitations with Stun Relay authentication and a nonexistent RADIUS profile, Stun Relay sessions cannot be authenticated with RADIUS. If the Stun Relay feature requires authentication, the server must be set up with a database and user profiles.
LifeSize Transit Server Guide 7

SIP HandlingThe LifeSize Transit server is also a SIP proxy, dynamically proxying requests to many SIP servers. It can restrict which SIP domains that are allowed to register through the server, but will not limit the registered users to place or receive calls from foreign domains.
If the server is set up to do “home routing”, all requests are routed based on the domain of the sender, otherwise they are routed based on the destination. You can configure a mapping between domains and IP addresses, otherwise the server performs SRV DNS requests on the SIP domain as standard. Numbers, 1234@domain;user=phone or tel-URIs, can also be configured as routing to a given domain, potentially adding or removing of digits as a routing plan predicts, optionally with ENUM lookups if no routing entry matches.
The LifeSize Transit server also assists with traversal for SIP signaling. When clients connect from NAT using SIP, the public address is noted instead of what is reported from the client. Based on the reported client capabilities, the server decides whether relay is needed when this client participates in a call. The server also makes sure that the signaling channel is kept open while the client is registered, by specifying a frequent re-registration interval (if the client does not support lightweight keep-alives). The re-registration interval is adjusted if the server detects that the channel has been closed between two re-registration messages.
The SIP registrar stores users registrations, authenticates requests (all or upon registrations, where you can set up certain hosts as “trusted” so no authentication is performed).
H.323 HandlingLifeSize Transit supports H.460.18 and H.460.19 in addition to H.323 on the server side. The deployment consists of the LifeSize Transit server and one or more specially configured instances of the H.460 clients.
LifeSize Transit server can work with an external H.323 Gatekeeper or use built in gatekeeper functionality. When you use an external gatekeeper, all users connecting through one server must register on the same gatekeeper. All servers within the same cluster will form interconnected H.323 zones, where users on the different servers are automatically reachable to each other.
To connect with the system, you must configure the H.323 device with a gatekeeper address. H.460.18/19 devices should set the address of RAS port at Transit Server as its gatekeeper address.
8 LifeSize Transit Server Guide

Installation PrerequisitesEnsure you have the following prior to beginning the installation process:
• a serial cable and serial console running at 38,400 baud, no parity (N, 8, 1) to complete the initial configuration
• a web browser for creating users
• two static public IP addresses; one for signalling and one for media.
Server InstallationTo install the LifeSize Transit Server, follow these steps:
1. Remove all components from the product packaging, including cables, and place them in the desired positions in your environment. Choose a location in a clean, dust-free area that is well ventilated. Avoid areas where heat, electrical noise, and electromagnetic fields are generated. Choose an area near a grounded power outlet.
2. Refer to ”Installing the Server into a Rack” on page 10 if you are installing the server in a rack.
3. Insert the network cable into network port 1 on the back panel of the server; this port is marked with the LAN symbol . Insert the opposite end of the network cable into a network port on the wall.
Note: Network port 2 is reserved for future use.
4. Connect your console to the serial port for the initial configuration using the serial cable included with the product.
5. Insert the power cord into the power outlet on the back panel of the server and the opposite end into a power outlet on the wall.
6. The LifeSize Transit Server boots, and you are prompted to configure it the first time. If the configuration does not automatically appear on your console, press any key to display it.
Power and RebootThe Reset button on the front panel reboots the system. The power button applies or turns off the main system power. Turning off the system power with this button removes the main power but keeps standby power supplied to the system.
Refer to ”Troubleshooting” on page 39 for details about the LED indicators.
LifeSize Transit Server Guide 9

Installing the Server into a RackThe LifeSize Transit Server does not ship with a rack rail hardware package as the system can be rack mounted without the use of rails. To install the server in a rack, follow these steps:
1. Ensure the rack is in a location in a clean, dust-free area that is well ventilated. Avoid areas where heat, electrical noise, and electromagnetic fields are generated. Choose an area near a grounded power outlet.
Note: Ensure that the leveling jacks on the bottom of the rack are fully extended to the floor with the full weight of the rack resting on them. In a single rack installation, attach stabilizers to the rack. In multiple rack installations, couple the racks together.
2. Leave enough clearance in front of the rack to enable you to open the front door completely (approximately 25 inches). Leave approximately 30 inches of clearance in the back of the rack to allow for sufficient airflow and ease in servicing.
3. The server includes two rack mounting brackets located on each side at the front of the chassis. To mount the system into a rack, simply screw these brackets directly to the front of the rack (two screws for each bracket).
4. You may also detach the brackets from the chassis and move them back approximately four inches where there is a group of three holes to which to secure them. Installing in this manner may prevent you from closing the rack door.
Rack Mounting Considerations
Consideration Description
Ambient Operating Temperature
If installed in a closed or multi-unit rack assembly, the ambient operating temperature of the rack environment may be greater than the ambient temperature of the room. Therefore, consider installing the equipment in an environment compatible with the manufacturer’s maximum rated ambient temperature (Tmra).
Circuit Overloading Consider the connection of the equipment to the power supply circuitry and the effect that any possible overloading of circuits might have on overcurrent protection and power supply wiring. Give appropriate consideration to equipment nameplate ratings when addressing this concern.
Reliable Ground A reliable ground must be maintained at all times. To ensure this, the rack itself should be grounded. Pay particular attention to power supply connections other than the direct connections to the branch circuit (the use of power strips, etc.)
10 LifeSize Transit Server Guide

Configuring LifeSize Transit Server After the LifeSize Transit Server boots, and you are prompted to configure it the first time. You can return to this configuration at any time to change settings (such as server IP addresses or the administrator password), restart the server, or load default settings.
Required ConfigurationFollowing are the tasks required to configure the LifeSize Transit Server:
• Initial configuration required upon setup (as described in ”Initial Configuration from a Console Terminal” on page 11).
Note: You must have a DNS server configured or calls will fail.
• Creating SIP domains (as described in ”Additional Configuration from a Web Browser” on page 12).
• Creating users (as described in ”Additional Configuration from a Web Browser” on page 12).
Otherwise, the LifeSize Transit Server comes preconfigured for standard use. You can modify the standard configuration for special circumstances if necessary. LifeSize recommends you consult Customer Support before changing the default configuration.
Initial Configuration from a Console TerminalTo access the initial LifeSize Transit Server configuration, follow these steps:
1. Connect your console terminal to a serial port at 38,400 baud, no parity (N, 8, 1).
2. Press Enter to display the menu.
3. Optional: You can change the date and time of the system clock from the Set Date and Time setting.
Enter the date in the following format: MMDDHHMMYYYY, where MM is the month, DD is the day of the week, HH is the hour, MM is the minute, and YYYY is the year. For example, to enter June 10, 2006, 3:30 pm, enter the following:
061015302006
4. Enter the IP address, subnet mask, and gateway for the Signalling Server.
5. Enter the IP address for the Media Server.
6. Enter the IP address for the primary and secondary DNS server.
LifeSize Transit Server Guide 11

7. Optional: You can also change the administrator username and password, or use SSL Certificates for security.
Note: For security reasons, LifeSize recommends you change the default administrator password during the initial configuration. The default username and password are both admin.
8. Optional: You can change the Ethernet Link Setting to override the default link auto negotiation of the Gigabit NICs.
9. Optional: You can configure the UDP Port Range to use for media communication by entering the starting and ending numbers for the range. Refer to ”Server Network Configuration” on page 5 for more informaiton about allocated ports for SIP, H.323, and H.460.
10. After making your changes, choose option 9 - Save Settings and Restart System.
Additional Configuration from a Web BrowserYou can access most configuration operations from a web browser by following these steps:
1. Enter the IP address of the signalling server plus port 8181 on HTTPS. For example: https://www.company.com:8181. Refer to step 3 in the initial configuration (”Configuring LifeSize Transit Server” on page 11.)
2. This is a secure Internet connection, and you may receive an unknown certificate warning. A client SSL certificate is required to access the web interface. See chapter 2.16.1 on page 48 for info on how to install the certificate.
3. Enter the LifeSize Transit username and password. The default value for both is admin.
Note: You can change these values from the configuration tool as described in ”Configuring LifeSize Transit Server” on page 11.
4. You are now ready to create users and configure the SIP domain.
12 LifeSize Transit Server Guide

Configuring SIP DomainsYou must define a domain name in order to use the LifeSize Transit Server. To configure your SIP domain to be reachable from clients (other than LifeSize Transit client) or other SIP servers, you must set up a SIP DNS SRV record. If all calls go through the LifeSize Transit Client or LifeSize devices, your SIP domain does not have to resolve through DNS.
To define a SIP domain, follow these steps:
1. Click SIP Registrar Settings on the main page.
2. Under SIP Domains, enter your SIP domain name.
3. Click the + button to add the domain.
Note: For more information about this page, refer to ”SIP Configuration” on page 24.
Creating UsersTo create a new user account, follow these steps:
1. Click the Create User link under Provisioning on the main page.
2. Enter the information for the new user account.
Note: For more information about each field, refer to ”Provisioning” on page 36.
3. Click Add.
Configuring a ClusterYou can see the list of calls that are currently relayed through a given server. If media goes direct, no calls are shown. Calls between two clusters of servers are using standard media transport between the clusters, so if both users require tunnelled media, the media will be relayed through two servers (to keep the TCP legs short). Consequently, the same call will be shown at both servers.
If you want to cluster more than one server for SIP only, follow these steps:
1. From the master server in the cluster, click the Cluster Configuration link on the main page.
2. Beneath the Servers table, add server names and IP addresses or DNS names for the master and slave(s). For example:
Server Name: MasterHost Address: transit.austin.lifesize.comClick Add.
LifeSize Transit Server Guide 13

Server Name: SlaveHost Address: transit.houston.lifesize.com Click Add.
3. At the top of the page, enter the master IP address or DNS name that you defined in step 2 (transit.austin.lifesize.com) in the Master proxy server address field and click Set.
4. Mark the Enable redirect when clients connect checkbox and click Set.
5. From the cluster slave, repeat steps 1 - 4.
6. Click Home.
7. From the cluster slave only, click the Database Configuration link on the main page.
8. Select Use master signaling server as database under Database Mode and click Set.
Note: Only perform this step on the cluster slave. Maintain the default setting on the master server.
9. Click Home.
10. Click Server Configuration.
11. Click Restart.
12. Repeat steps 9 - 11 on the master server in the cluster.
Note: When clustering servers, make sure that SIP domains are not defined for the slave(s) on the SIP Configuration page. Refer to ”SIP Configuration” on page 24.
Enabling H.460 Support for H.323 CallsLifeSize systems support the H.460 protocol for firewall and NAT traversal of H.323 calls. You must have an H.460 server configured in your environment for this feature to function properly.
Note: If you configure H.323 settings and enable H.460 support, the system ignores prefer-ences in Administrator Preferences : Network : NAT.
14 LifeSize Transit Server Guide

To enable H.460 client support on a LifeSize system, configure the H.323 preferences in Administrator Preferences : Communications : H.323 as described in your LifeSize Communications Systems Administrator Guide with the following exceptions:
1. Choose Manual for the Gatekeeper Mode preference.
2. For the Gatekeeper IP Address 1 and Gatekeeper Port 1 preferences, enter the IP address and port number of the H.460 server that is configured in your environment.
3. Choose Enabled for the H.460 preference.
4. Navigate to Register and press OK.
Note: Note: If you enable H.460 and specify the IP address and port number of a secondary gatekeeper with the Gatekeeper IP Address 2 and Gatekeeper Port 2 preferences, the system ignores the secondary gatekeeper.
Configuring LifeSize Devices for SIP Firewall TraversalIf you are using the LifeSize Transit server for SIP traversal, you can configure LifeSize devices to work with LifeSize Transit servers by accessing Administrator Preferences from the system interface or from a web browser.
Note: If you are using H.460/H.323 then you do not need to configure LifeSize devices for SIP firewall traversal. Refer to the LifeSize Video Communications Systems Administrator Guide for instructions on enabling H.460 client support for H.323 calls on a LifeSize system.
To configure from a web browser, enter the IP address of your LifeSize Room system (which is displayed at the top of the main screen). On the login screen, choose the language in which to display the interface, enter the administrator password, and click Submit. This is a secure Internet connection, and you may receive an unknown certificate warning. You must have Flash Player version 8 or higher installed and configured on your web browser to access the administrator configuration from a web browser. Refer to your LifeSize Room User Guide for more information about managing the system remotely.
Note: Ensure you configure LifeSize Transit from your LifeSize Room system prior to configuring the SIP server. Otherwise, LifeSize Room may register directly to the LifeSize Transit Server without using the LifeSize device’s SIP firewall traversal software.
LifeSize Transit Server Guide 15

To configure LifeSize Transit using the LifeSize Room remote control and interface, follow these steps:
1. Select the button from the main screen to access the System menu.
2. Select the Administrator Preferences button.
3. Enter the administrator password and press OK.
4. Select the LifeSize Transit button.
5. Enter the signalling server address you defined in step 3 of the initial configuration in the Transit Hostname field (refer to ”Configuring LifeSize Transit Server” on page 11.)
6. Enter the LifeSize Transit username and password you defined in ”Creating Users” on page 13.
7. If your firewall only allows traffic through a web proxy, enter the web proxy address (URL), username, and password. Otherwise, leave these fields blank.
8. If you are planning to call ICE enabled systems you can enable ICE; otherwise, keep LifeSize Transit ICE disabled.
9. If you want LifeSize Room to use UDP SIP signalling when possible, set Transit Signaling to UDP,TCP; otherwise, maintain the default TCP mode.
10. Choose Enabled for the LifeSize Transit preference to use LifeSize Transit to manage calls.
Note: SIP proxy settings (refer to the following configuration of the LifeSize Transit registrar) automatically change to 127.0.0.1:5070 when you enable LifeSize Transit; do not change these settings.
11. Press OK to save your changes.
To configure the LifeSize Transit registrar, follow these steps:
1. Select the button from the main screen to access the System menu.
2. Select the Administrator Preferences button.
3. Enter the administrator password and press OK.
4. Select the SIP button.
5. Select the SIP Server button.
16 LifeSize Transit Server Guide

6. Enter the SIP username for the device and the SIP server authorization username and password you defined in ”Creating Users” on page 13.
Note: SIP proxy settings automatically change to 127.0.0.1:5070 when you enable LifeSize Transit (as described in the previous procedure); do not change these settings.
7. Enter the Registrar Hostname (the hostname or IP address of the SIP registrar server you defined in ”Configuring SIP Domains” on page 13).
8. Enter the IP port number of the SIP registrar server.
9. Choose Enabled for the SIP Registrar preferences.
10. Press OK to save your changes.
11. To call another LifeSize Room system, simply enter the SIP username.
Optional LifeSize Transit Server Configuration SettingsThe remainder of the configuration options are preconfigured and LifeSize recommends you do not change them unless necessary. Consult Customer Support if you need assistance modifying your configuration. The information described in the following sections is recommended for informational purposes only.
Main PageThe main page displays a menu of operation and maintenance functions, as well as links to provisioning from which you can list, search, and create users. The status of events and the server display, including the following data:
Label Description
Event Status An overview of the most important events reported by the server. The administrator should pay special attention to events marked “Severe” and “Warning” as these may indicate a serious problem with the server.
Proxy Server Version The version of the server’s signalling function.
Media Engine Version The version of the active media engine.
Public Address The public address of the server.
Master Server Address
The public address of the master signalling server. This address is not visible if no master server is configured.
Current Time The system time of the machine on which the server is running.
LifeSize Transit Server Guide 17
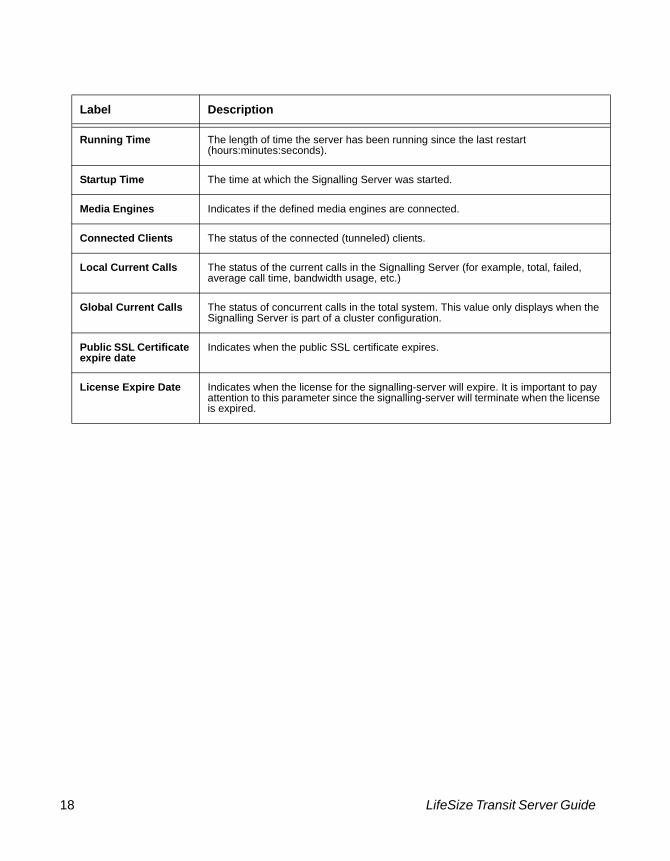
Running Time The length of time the server has been running since the last restart (hours:minutes:seconds).
Startup Time The time at which the Signalling Server was started.
Media Engines Indicates if the defined media engines are connected.
Connected Clients The status of the connected (tunneled) clients.
Local Current Calls The status of the current calls in the Signalling Server (for example, total, failed, average call time, bandwidth usage, etc.)
Global Current Calls The status of concurrent calls in the total system. This value only displays when the Signalling Server is part of a cluster configuration.
Public SSL Certificate expire date
Indicates when the public SSL certificate expires.
License Expire Date Indicates when the license for the signalling-server will expire. It is important to pay attention to this parameter since the signalling-server will terminate when the license is expired.
Label Description
18 LifeSize Transit Server Guide

List Tunneled ClientsSelect List Tunneled Clients to display all connected clients with the following information.
Label Description
User ID The SIP or H.323 user ID with which the user logged in to the SIP client.
Country The country from which LifeSize Transit is connected.
Region The regional location from which LifeSize Transit is connected.
Version The software version of the client.
Connection ID
The internal LifeSize Transit user ID.
Client ID The name of the computer on which the client is installed.
Port The port to which the client is connected.
Public Address
The public address of the client.
Proxy Address
The address of the HTTP(S) proxy, if used.
Proxy Auth The authentication scheme that the HTTP proxy uses.
NAT The type of NAT for the network on which LifeSize Transit is running.
Type The type of SIP client.
Duration Indicates how long the client has been connected.
LifeSize Transit Server Guide 19

Server ConfigurationYou can set basic system parameters for the Signalling Server from the Server Configuration page.
Database ConfigurationAccess the Database Configuration page to configure authentication of the LifeSize Transit users and connection to the database.
To configure the database, follow these steps:
1. Under Database Mode, select how to configure the database:
2. Click Set.
3. Optional: You can specify the hour at which to run database vacuuming. Database vacuuming is necessary if you use PostgreSQL as your database. Vacuuming cleans and optimizes database access once a day. The time at which vacuuming occurs is configurable; enter a value from 0 to 23 (0 equal to midnight and 12 equal to noon). Click Set.
4. Under Database Settings, enter the URL for the location of the database.
System Parameter Description
Restart Signalling Server and Restart all media servers
Restarts the specified servers. Restart immediately terminates all calls and client connections.
Proxy Server Address and Ports
Signalling server public address: You can use this parameter when the server is located behind a static NAT. This address is advertised to other hosts. Signalling server ports Enable or disable ports 443 (standard HTTPS), 444, and 80.
Option Description
No database If local authentication is set and the registrar functionality is disabled, disable the database.
Connect directly to database
You use the database to authenticate LifeSize Transit users and provide SIP authentication. This is the default setting and is already completely configured. LifeSize recommends you do not change this setting.
User Master Signalling Server as Database
The master server is used as the database when several servers are connected in a cluster. Ensure the cluster configuration specifies the master server correctly.
20 LifeSize Transit Server Guide
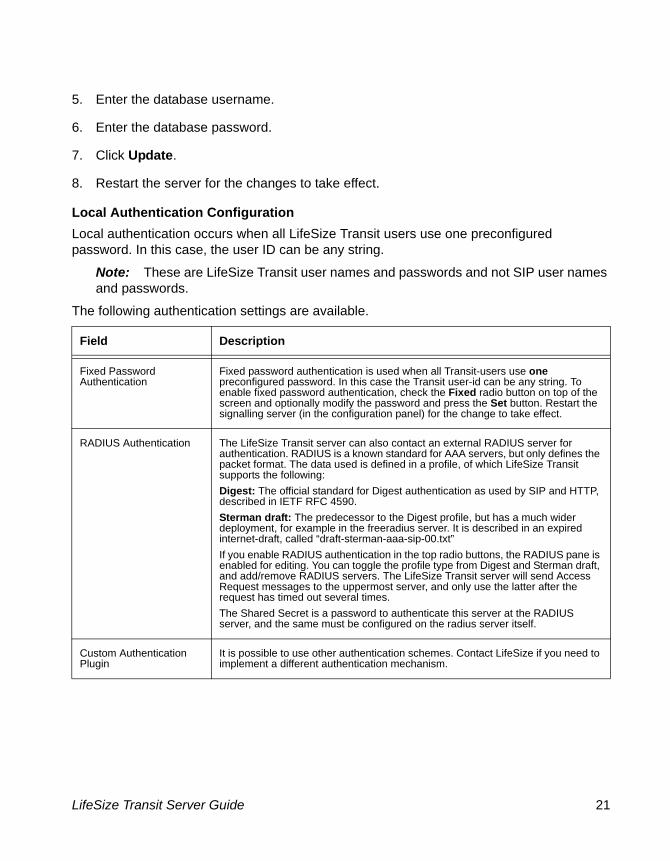
5. Enter the database username.
6. Enter the database password.
7. Click Update.
8. Restart the server for the changes to take effect.
Local Authentication ConfigurationLocal authentication occurs when all LifeSize Transit users use one preconfigured password. In this case, the user ID can be any string.
Note: These are LifeSize Transit user names and passwords and not SIP user names and passwords.
The following authentication settings are available.
Field Description
Fixed Password Authentication
Fixed password authentication is used when all Transit-users use one preconfigured password. In this case the Transit user-id can be any string. To enable fixed password authentication, check the Fixed radio button on top of the screen and optionally modify the password and press the Set button. Restart the signalling server (in the configuration panel) for the change to take effect.
RADIUS Authentication The LifeSize Transit server can also contact an external RADIUS server for authentication. RADIUS is a known standard for AAA servers, but only defines the packet format. The data used is defined in a profile, of which LifeSize Transit supports the following:Digest: The official standard for Digest authentication as used by SIP and HTTP, described in IETF RFC 4590.Sterman draft: The predecessor to the Digest profile, but has a much wider deployment, for example in the freeradius server. It is described in an expired internet-draft, called “draft-sterman-aaa-sip-00.txt”If you enable RADIUS authentication in the top radio buttons, the RADIUS pane is enabled for editing. You can toggle the profile type from Digest and Sterman draft, and add/remove RADIUS servers. The LifeSize Transit server will send Access Request messages to the uppermost server, and only use the latter after the request has timed out several times.The Shared Secret is a password to authenticate this server at the RADIUS server, and the same must be configured on the radius server itself.
Custom Authentication Plugin
It is possible to use other authentication schemes. Contact LifeSize if you need to implement a different authentication mechanism.
LifeSize Transit Server Guide 21

Media Engine ConfigurationThe Media Engine Configuration page shows the media engine connection status.
Field Description
Multi TCP Configuration
Multi TCP allows you to optimize media traffic over TCP by using more than one TCP connection per media stream. It generally improves the media quality in congested networks, but can also cause the RTP packets to be received out of order, so it works best with clients with good sequence control and jitter buffers for received media packets.
Media Configuration Enable application sharing in PXS enables/disables application sharing.Allow direct media between clients enables/disables direct media between clients. This option also disables the use of STUN and ICE for direct media traversal.
Media Relay The Signalling Server can relay RTP/UDP media for clients without LifeSize Transit Clients. For users behind relaxed NAT devices (allowing UDP traffic out) this is an attractive option as the LifeSize Transit Client is not needed. You can control the level of media relay as follows:All: All calls routed through the Signalling Server are relayed, regardless of whether they need it or not. This leads to excessive relaying and is not recommended.All NAT: Relaying media for all users in need, when either the calling or called client is behind NAT (and do not support STUN).Local Users: Behaves the same as All NAT, except relay only occurs for the authenticated users local to this registrar.None: Disables UDP relay.This setting does not affect the behavior of calls to or from a tunnelling client.Mark the Allow direct media for UDP registrations behind the same public address checkbox to yield more efficient media between clients on the same local network. This may cause media to fail on complex local networks with internal firewalls or NAT devices. You may want to enable this setting on an enterprise server if you know there is only one NAT device on the local network, but disable it for ISP installations serving many unknown NATs.
Media Engines If new media engines do not display as connected, ensure that the address, port, and password correspond to the value in the me.cfg file. If the primary media engine is out of service, the server automatically uses the secondary media engine.
22 LifeSize Transit Server Guide

STUN Server ConfigurationLifeSize Transit Servers include both a STUN (RFC 3489) server and a STUN Relay (previously known as TURN) server, both available to the LifeSize Transit clients and external clients. The ports should be reachable through a DNS SRV query with the service “stun”. Any firewalls in front of the server should open these ports as well. All of the ports on this page require a restart before a new value takes effect.
Add Media Engine Connect Address: The address the server uses when connecting to the media engine.Port: The port the server uses when connecting to the media engine. LifeSize recommends using the default port.Public Address: The address used as the media address for clients. Typically the same as the connect address; however, if the media engine is protected by a firewall, the public address used in the firewall is used. DNS must be able to resolve this address.Internal Address: The media address for components on the internal LANs on which the media engine is installed. If this address is specified, all non-tunnelled clients use this address for media (all clients on the public internet must be tunnelled so use caution when specifying this address.)Password: The password used to authenticate the server. The password is configured in the me.cfg file.Click Add after entering data for a new media engine. Media engine 1 in the table is automatically the primary media engine.
Field Description
STUN Server ports Displays the ports used for the STUN servers. A STUN server requires two ports on the primary server, and a third port on another IP address for checking the network connection. The signalling server is always the primary STUN server, while the primary Media Engine is used as the secondary STUN server. The recommended port is 3478. The port set in Port One should correspond to the port that DNS queries return.
Remote STUN Server Ports
Sets the STUN port on the Media Engine, and should correspond to what is set in its configuration file. The default is 34501 if not set.
Field Description
LifeSize Transit Server Guide 23

SIP ConfigurationYou can configure various SIP parameters from the SIP Configuration page.
TURN Server These settings control the behavior of the STUN Relay server. This is an independent protocol that other clients can also use. TURN requests require authentication, with the same user ID and password as used with the client. The signalling server authenticates these, and lets the Media Engine relay the media, so the clients need to support redirections of the TURN requests.Enable TURN Server: Enable or disable the TURN server.TURN Port: The server port for TURN used on the signalling server.TURN Port on Media Engine: The server port for TURN used on the media engine.Enable redirect based on TURN client location: Like the tunnelling connections, you can direct the TURN clients to the TURN server closest to them to reduce latency and provide better media quality in a call. If checked, the TURN requests are matched against the regions (refer to ”Cluster Configuration” on page 29), and the clients may be redirected to the matching servers if the current server is not closest.
Field Description
Use public address in SIP signalling
This checkbox selects which IP address the server will use as its own in the SIP signalling. If deployed behind a NAT, the server is configured with its public address in chapter 2.3. Check this box unless the other SIP servers are on the same private network. If the server is not deployed through a NAT or the public address isn’t set, the checkbox will be disabled.
SIP ports LifeSize recommends you do not change this parameter. If you alter the value of this port, you must modify all clients (not recommended) and restart the server. Use the standard SIP port 5060.
UDP packet size The server can receive and send SIP requests over TCP. If UDP messages are larger than the maximum transmission unit (MTU), they are fragmented and there is a risk they will not be received correctly by all hosts. To avoid UDP fragmentation, outbound requests are sent over TCP if they exceed a certain size. This size is 200 bytes less than the known MTU, or 1300 bytes if the MTU is unknown.
Incoming Redirect Messages
Controls how the server acts on incoming redirect (3xx) messages. For example, a redirect server can send a 302 Moved Temporarily message in response to an INVITE, with the address of the client. The default behavior is enabled which sends the INVITE again to the new locations. If disabled, this redirect message is sent upstream to the calling client that performs the redirection.
Home Routing If set to true, the Signalling Server routes requests from non-local users to their home proxy rather than to the destination. This preserves home based services and authentication and has no effect for users who are local on this server (the registrar is enabled).
Field Description
24 LifeSize Transit Server Guide

You can configure the following parameters for the signalling server with a registrar license. Select SIP Registrar Settings from the main page
Registered SIP UsersA table listing all SIP users registered in the database include information about their contact address, registration and expiration times. If UDP Relay is enabled in the SIP configuration servlet’s Media Relay, the clients connected through a firewall/NAT device are listed in a similar table named Direct Registrations from clients behind NAT.
Domain Registration Policy
The server provides resources (processor power and bandwidth) to users. You can restrict this usage to certain groups by creating a set of SIP domains users are allowed to log on to through this server; registrations of all other domains are rejected. Local users (if the registrar is enabled) will always be allowed regardless of this setting. Local users can still place and receive calls from other domains. If left empty, registrations are allowed for all domains.
Field Description
SIP domains SIP domains are local; LifeSize Transit searches for these domain names in the database. For these domains to be callable from other systems, add these domain names to the DNS for this host.
Security Level Full authenticates all requests.Medium authenticates all requests except from the clients on the local proxy server, where only REGISTER is authenticated.Registration allows requests from the REGISTERED (and authenticated) address; otherwise LifeSize Transit authenticates.None prevents requests from being authenticated.
Trusted hosts Adds a set of hostnames and IP addresses (with optional SIP port) for the trusted hosts. These are not challenged for authentication.
Proxy Mode The proxy mode affects the routing between SIP users on external hosts or other servers. External requests can be handled by redirect or forward.
Label Description
SIP URI The registered SIP user ID.
Alias An optional second identifier per user, typically used for incoming calls from the PSTN.
Expires The date on which the user expires. If the client does not register again before the expiration time, the user remains unregistered.
Field Description
LifeSize Transit Server Guide 25

Proxy RegistrationsThe Proxy Registrations table shows the current proxy registrations and registrations from clients connecting through SIP from behind a NAT. They may or may not be registered on the local registrar, if there is one within the same server.
Contact The IP address and port to which the client is registered.
Path The list of servers traversed to reach the client.
Unregister Clears the registration. The client appears to be registered but does not receive any calls. This function does not prevent the user from registering again.
Label Description
SIP URI The SIP ID (address of record) of the registered user.
Public Address The pubic address used to contact the user.
Private Address The private address (on the LAN) from which the client is registered.
Protocol The transport protocol used when registering, UDP or TCP.
Relay Whether this client needs relay assistance for calls.
Registered The time when the user first registered.
Last Seen The time of the last registration.
Rate The re-registration frequency, in seconds.
Expires The time at which this registration will expire, if not refreshed.
Label Description
26 LifeSize Transit Server Guide

SIP/H.323 RoutingThis page allows the operator to specify routing to SIP or H.323 neighbors, overriding the default DNS lookups. The set of preconfigured remote domains displays; DNS lookups do not occur for these domains, they are routed directly to the configured address. The host can have more than one address port, if separated by commas, however the additional hosts are only used as backup hosts if the server times out.
Routing Phone NumbersThe signalling server includes an expression-based scheme for resolving a phone number to a SIP-URI. It treats an incoming call as a phone number if the request is a TEL URI or a SIP URI where the user part of the URI is only digits (including -, +, *, and #) and the user is a phone parameter, or the domain part is a local domain for this registrar or this server’s local IP address.
Label Description
Domain/H.323 Zone Prefix
Specifies the domain of a SIP URI (address-of-record) or H.323 ID for the routing entry. Requests to a user matching this domain will be sent to the address (es) in the next columns. H.323 prefixes are also configured here. To define neighboring gatekeepers one can set zone prefix and IP address of serving zone gatekeeper. Use Zone Prefix “*” to add a default gatekeeper. Location Requests will be sent to the default gatekeeper in case no zone prefix match is found.
SIP Host Specifies the SIP destination for the domain.By default, SIP requests are routed to the domain in the SIP-URI after a SIP SRV DNS lookup. For testing or SIP servers that you cannot route through SIP SRV DNS, you can specify the domains and IP addresses on this page. DNS lookups do not occur for these domains; they are routed directly to the configured address (if numeric IP addresses, otherwise a host lookup is performed). To specify hosts with more than one address:port, separate them with commas. The additional hosts are only used as backup if the primary host is not responding. Each host can also have a;transport=udp or ;transport=tcp tag to enforce a particular transport, on this form:1.2.3.4:5080;transport=tcp,5.6.7.8:5060;transport=udp
H.323 Zone GK host
Specifies the H.323 Gatekeeper address for the matching domain or prefix. This configuration setting has meaning only when built in gatekeeper is used.
Routing Phone Numbers (SIP)
Matching a number and transforming it to a SIP URI. Refer to ”Routing Phone Numbers” on page 27.
Testing For convenient testing of expressions, you can enter a number and see what it resolves to by pressing the Test button.
ENUM queries If no match was found in the expressions for a number, the Signalling Server can optionally perform an ENUM query to resolve the number to a SIP URI. This checkbox allows or disallows the ENUM queries.
LifeSize Transit Server Guide 27

If the number matches the configured local prefixes it is considered a local number and the registrar looks it up in the database. Otherwise, the matching expressions are queried in case the corresponding result expression is executed to resolve it to a SIP-URI.
The expression rules consist of one matching expression and one result expression, resolving to a SIP-URI (the string is implicitly added to the output). They are based on shell expressions (not regular expressions), including wildcards for digits to be removed, and optionally to be included in the result. The order of the rules is significant; more general rules can eclipse more specific rules so place the most specific first.
The matching expression can include digits, + (international), plus the wildcard question mark (?) and asterisk (*). The question mark (?) is exactly one wildcard digit and will not be part of the output. The asterisk (*) matches one or more digits (not zero). If the asterisk (*) is part of the result string, the matches are placed in output. Any character after the asterisk (*) in the number expression has no meaning. The first asterisk (*) encompasses all further digits. The asterisk (*) can be placed anywhere in the result expression.
Dashes (-) are considered insignificant and are removed from numbers and expressions. The international plus sign (+) is regarded as a matching digit (+44* does not match 44*), but can only be present first in number or output expressions.
The result expression can hold all characters, where only the asterisk (*) has special meaning. It must end with a hostname.
If you specify home routing on the SIP Configuration page, the expressions are not queried for calls from non-local users to a number, but are routed to the home of the calling user.
Following are examples:
MatchingExpression
Result Expression
Input Example
Output Example Notes
555* 62.32.0.18 5551234 62.32.0.18 Absolute gateway routing.
+4785* +4785*@sipsrv.no +47851234 [email protected]
+44??* *@196.32.21.2 +441212345 [email protected] All UK numbers are stripped of country and area code and sent to a gateway.
* 001*@us-gw.com 12345 [email protected] All other numbers are preceded with 001 and sent to a gateway operator.
28 LifeSize Transit Server Guide

Cluster ConfigurationConfigures how several servers interact in a cluster.
Event ReportingEvent Reporting enables you to configure and display event status in the Signalling Server.
Mail Configuration allows you to configure where mail is sent when events are registered in the Signalling Server.
Label Description
Read world table file
For internal use only.
Enable redirect when clients connect
Redirects tunnelled s to other servers. Enabled in production systems. If disabled, tunnelled clients will not be redirected to other servers.
Master proxy server address
The address of the master server. This address is set in systems that use more than one server. Typically, the address of the signalling server on which the registrar is enabled and the database is accessed. If these features are enabled, the administrator must select one server as a master.
Servers All servers in the cluster. The address of the signalling servers is typically the host address for the servers on the LAN. All servers in the cluster are defined in this table. To add entries to the table, use the add server name function. This configuration is crucial to redirect working properly.
Regions Defines the server used for different regions. Only use this feature if several LifeSize Transit clusters exist throughout the world.
Field Description
Outgoing SMTP Server The address of the outgoing SMTP server.
Mail Username The username with which to authenticate the SMTP server.
Mail Password The password with which to authenticate the SMTP server.
Mail Recipients The recipient of the email.
LifeSize Transit Server Guide 29

SNMP TrapsSome events may be forwarded as SNMP traps. To enable SNMP traps, specify the address of a trap receiver. For example, if you have installed HP OpenView on 192.168.0.53 and it uses the default SNMP port 162, set the following trap receiver:
192.168.0.53:162
If the Trap Receiver address field is empty, SNMP traps are disabled. If you change the trap receiver field, you must restart the system for the changes to take effect.
Currently the following SNMP traps may be sent:
Refer to the LifeSize Transit MIB file for details:LifeSize Transit-MIB.my
Field Description
Connection Lost
The connection to the media engine has been terminated.
Congestion When thresholds are reached, such as maximum concurrent calls and maximum connected clients, congestion occurs.
License Expired
A problem with the license file occurred.
Restart The signalling server was restarted.
Configuration Error
A bad SIP route configuration occurred or the authentication plug-in failed to load.
Database Problem
Connection to the database failed or a failure to read conferences in the database occurred.
Certificate Problem
The public SSL certificate is not yet valid, expires in one day, expires in 4 weeks, or has expired.
30 LifeSize Transit Server Guide

EventsInformation about special events in the server are available in the Event Table. Event table size indicates the maximum number of events stored in the table. The event-table displays the following information:
Events displayed on white backgrounds are active, events displayed on grey backgrounds are cleared.
Label Description
Number The event number.
Event Name The logic name of the event.
Severity The seriousness of the event.
Info A written explanation of the event.
Raised The date and time at which the event occurred.
Cleared The date and time at which the event was removed.
Customer ID The identification of the customer.
Key The unique ID of the event.
LocalAddress The address of the host for the event.
Action The possible actions to handle the event.
LifeSize Transit Server Guide 31

Call StatusInformative information about both current and present calls displays on the Call Status page. Successful calls appear in white and failed calls appear in red.
Field Description
Maximum relayed calls
The maximum number of concurrent calls permitted.
Active calls Originating Side of Call:# is the call number. Click this number to view additional details about the call.User ID is the SIP/H.323 ID of the originating user.Connection ID is the LifeSize Transit user ID of the originating user.Public Address is the public IP address of the originating user.Country the country of the originating user.Terminating Side of Call:User ID is the SIP/H.323 ID of the terminating user.Connection ID is the LifeSize Transit user ID of the terminating user.Public Address is the public IP address of the terminating user.Country is the country of the terminating user.Common Information:Duration (sec) is the duration of the call in seconds.Call ID is the unique call identification.
Closed Calls This data corresponds to the active calls data.
32 LifeSize Transit Server Guide

H.323 ConfigurationLifeSize Transit configuration for H.323.
LoggingA comprehensive logging tool is included for identifying problems and system bugs.
The Log Management page enables you to control and view the LifeSize Transit logging mechanism. You can also download the current log files for simple viewing.
Consult Customer Support for assistance with logging.
Field Description
Gatekeeper mode Selects between built in and external H.323 Gatekeepers.
Gatekeeper ID Specifies the ID for the built-in gatekeeper, if enabled.
RAS Authentication Authentication mode for selected RAS messages. The mode can be one of the following:None: No authenticationAlias: H.323 ID/Alias in H.323 messages must match previously provisioned user ID.Prefix: H.323 ID/Alias in H.323 messages must start with one of the prefixes configured on this page. If H.323 email ID is present in the H.323 messages then meaning is reversed and it must end with one of the prefixes configured on this page.
Q931 Authentication Authentication mode for Q.931/Setup message. Authentication types are the same as for RAS.
Prefixes for prefix authentication separated by
Defines the set of prefixes that are allowed to register and/or make calls. Incoming RAS/Q931 messages must have H.323 Alias or Number that starts with one of these prefixes. Available only when RAS and/or Q931 Authentication mode is set to “Prefix.”
Field Description
Level of logged messages Choose the level of information to log and then push the Set button. A high log level increases CPU usage; LifeSize recommends you do not change the default setting.
Select the log groups to exclude Choose All, None or desired log groups (possible by toggling on/off desired log groups) and then push the Apply button.
Current log files To inspect a log file, download either the original file or a zipped version (useful on slow connections) by clicking the appropriate link. The most recent file is the one with the lowest index.
33 LifeSize Transit Server Guide

O&M CertificatesO&M access can be password or SSL certificate protected. By default, access is protected with a username and password. You can change to certificate protected access by selecting option 4 (Administrator Login) from the initial configuration. Refer to ”Initial Configuration from a Console Terminal” on page 11.
To create new certificates from the O&M Certificate Management page, follow these steps:
1. Log in to the LifeSize Transit Server.
2. Select O&M Certificates from the main menu.
3. Enter the following information:
- A two letter country code
- The name of the organization
- A password to protect the client certificate
4. Click Create.
5. Install the new root certificate on the web browser.
a. Click the link and click Open.
b. Click Install Certificate.
c. Click Next on the Certificate Import Wizard.
d. Click Next on the prompt regarding certificate stores.
e. Click Finish.
f. Click Yes in the Security Warning dialog to install the certificate.
g. Click OK in both Certificate Import windows.
34 LifeSize Transit Server Guide

6. Install the new client certificate on the web browser.
a. Click the link and click Open.
b. Click Install Certificate.
c. Verify the file you wish to import in the file name field and click Next.
d. Enter the password for the client certificate and click Next.
e. Click Next on the prompt regarding certificate stores.
f. Click Finish.
g. Click OK.
7. Activate the new certificates on the server by clicking Activate.
8. Click OK to confirm restart of the server.
The signalling server restarts using the new certificates. You must verify the new certificates before they are committed by opening the O&M pages in a new browser. If you do not verify the certificates within three minutes, the server reverts to the old certificates.
To verify the new certificates, follow these steps:
1. Wait 20 to 30 seconds.
2. Close your browser window.
3. Open a new browser window.
4. Navigate to the O&M pages.
5. Verify that the message “New O&M Certificates successfully installed” displays.
Store the root and client certificates in a safe place.
35 LifeSize Transit Server Guide

ProvisioningA user management system that is directly linked to the database. Click List Users to list the following information for all users in the database:
You can modify the following user information by choosing Edit. This is also the information you provide to create a new user account.
• User ID and Password
• SIP ID, user name, alias, and password
• H.323 user alias, user number, and password
• User name and contact information
Click Update or Add after making changes.
Click Delete to remove the entire user record.
Label Description
ID The user ID for the LifeSize Transit user.
Name The name of the LifeSize Transit user.
Country The country for the LifeSize Transit user.
E-mail The email address for the LifeSize Transit user.
Phone The phone number for the LifeSize Transit user.
Login ID The user’s login ID.
SIP ID The user’s SIP ID.
SIP User Name
The user’s SIP name.
SIP Alias An alias used to refer to the SIP user.
H.323 Alias An alias used to refer to the H.323 user.
H.323 Number The user’s H.323 ID.
Lock Prevents the user from accessing the system, for example, when an account has expired or the user violates the system rules.
36 LifeSize Transit Server Guide

You can search users by name, email address, LifeSize Transit Server ID, or SIP/H.323 ID. Click Search Users from the Provisioning menu.
DNS SRV RecordsSeveral of the features (SIP, STUN and TURN) make use of DNS SRV records for automatic discovery from clients. To enable automatic discovery of these services, one must configure (or order) SRV RRs from the DNS server (provider). It is fully possible to use the same server for more than one SIP domain.
The Signaling Server acting as a registrar for the particular domain should be the target in SIP SRV records. A typical SIP SRV RR for the registrar at domain “mydomain.com” looks like this:
If conferences are enabled, these have their own domain to avoid naming conflicts (we use “conference.mydomain.com” here). The signaling server configured as the conference server for the particular domain should be the target in SIP SRV records. A typical SIP SRV RR looks like this:
For a STUN server serving the SIP domain “mydomain.com”, the STUN SRV RR is exemplified below. The signaling server should be the target in STUN SRV records, we recommend to add all signaling servers here. There is no TCP support for STUN, it uses TLS on the same port for authentication.
_Service._Proto.Name TTL Class Priority Weight Port Target
_sip._udp.mydomain.com IN 0 0 5060 62.80.93.12
_sip._tcp.mydomain.com IN 0 0 5060 62.80.93.12
_Service._Proto.Name TTL Class Priority Weight Port Target
_sip._udp.conference.mydomain.com IN 0 0 5060 62.80.93.12
_sip._tcp.conference.mydomain.com IN 0 0 5060 62.80.93.12
_Service._Proto.Name TTL Class Priority Weight Port Target
_stun._udp.mydomain.com IN 0 0 3478 62.80.93.12
_stun-pass._tls.mydomain.com IN 0 0 3478 62.80.93.12
37 LifeSize Transit Server Guide

For a STUN relay (TURN) server for the SIP domain “mydomain.com”, the stun-relay SRV RR looks like outlined below. The stun-relay service is available for the same port on UDP, TCP and TLS transport. The signaling server should be the target in stun-relay SRV records, we recommend to add all signaling servers here.
Database Backup and RestoreTo back up the server database, follow these steps:
1. Enter the IP address of the signalling server plus port 8080 on HTTPS. For example: https://www.company.com:8080.
2. Enter the LifeSize Transit username and password. The default value for both is admin.
Note: You can change these values from the configuration tool as described in ”Configuring LifeSize Transit Server” on page 11.
3. From the LifeSize Transit Server Utilities page, click Database Backup.
4. Click Start Backup.
5. Click Download to save the backup file to a local directory.
To restore the server database, follow these steps:
1. Follow the previous procedure to back up the server database.
2. From the LifeSize Transit Server Utilities page, click Database Restore.
3. Enter or browse for the database backup file you created in the previous procedure.
4. Click Start Restore.
_Service._Proto.Name TTL Class Priority Weight Port Target
_stun._udp.mydomain.com IN 0 0 3560 62.80.93.12
38 LifeSize Transit Server Guide

Upgrading SoftwareTo upgrade the software for LifeSize Transit, follow these steps:
1. Obtain the upgrade software package; refer to www.lifesize.com/support for more information about downloading software.
2. In a web browser, enter the IP address of the signalling server plus port 8080 on HTTPS. For example: https://www.company.com:8080. This is a secure Internet connection, and you may receive an unknown certificate warning; if so, accept the certificate.
3. Enter the LifeSize Transit username and password. The default value for both is admin.
4. Click Software Upgrade from the menu.
5. Browse for the upgrade file you downloaded in step 1.
6. Click Start Upgrade.
Note: This may take several minutes; do not disrupt the upgrade process.
7. A system upgrade status message displays when the upgrade is complete.
TroubleshootingIf the media engine is connected, navigate to the media engine status link on the main page. If you are unable to connect, stop and restart the server.
Also check the status of the connected clients.
Reboot the system if necessary.
Consult Customer Support if you are unable to resolve your problem.
39 LifeSize Transit Server Guide

LED StatusThe LED indicators on the server indicate the following conditions:
Error MessagesThe following messages may display on the Call Status page to indicate the reason a call failed.
LED Icon Indicator
Overheat/Fan Failure When this LED flashes, it indicates a fan failure. When on continuously, it indicates an overheat condition, which may be caused by cables obstructing the airflow in the system or the ambient room temperature being too warm. Check to ensure that the chassis cover is installed securely. This LED remains flashing for as long as the condition exists.
NIC2 Indicates network activity on LAN2 when flashing.
NIC1 Indicates network activity on LAN1 when flashing.
HDD Channel activity for all hard disk drives. This light indicates SATA drive activity when flashing.
Power Indicates power is being supplied to the system’s power supply unit. This LED should be illuminated when the system is operating.
Message Description
UNKNOWN Unknown reason.
NORMAL The call terminated normally.
USER_UNREG The user unregistered during a call.
USER_FORCED_UNREG The user was forced to unregister (signed in from another location, or unregistered by the operator).
PXC_CONN_LOST The signaling connection to the client was lost.
MESSAGE_IN_BAD_STATE Received a disrupted message.
40 LifeSize Transit Server Guide

RESERVE_MEDIA_FAILED Failed reserving media. Most often seen if the signaling server is not connected to the media engine.
JOIN_MEDIA_FAILED Failed joining media. Most often seen if the signaling server is not connected to the media engine.
IO_FAIL_SENDING_MSG An input or output failure occurred when attempting to send a message.
NO_RESPONSE_TO_INVITE Did not receive a response to the invite.
INVITE_REJECTED The invite was rejected.
ME_TUN_CONN_FAIL Tunnel connection failed towards the media engine.
NO_RESPONSE_TO_OK No acknowledgement received following an OK.
BAD_SDP Trouble decoding the SDP in the SIP message, or the media type is unsupported.
FORCED_DOWN_UNREGD Call forced down due to an unregistered user.
TUNNEL_DOWN Signaling connection lost during media transfer.
CONN_FAILED_IN_PXS Failed to connect two users in PXS.
CALL_ENDED_BY_ME The call was ended by the media engine (most likely if it detected a lost TCP connection from the client).
PXS_LOST_CONN_TO_ME The PXS lost its connection to the media engine.
CALL_REL_TIMEOUT The call was released due a timeout.
BAD_SIP_MESSAGE The recipient SIP user could not interpret the request.
SIP_AUTHENTICATION_FAILURE A SIP server required authentication, but authentication data was missing or invalid authentication data was sent.
SIP_USER_NOT_FOUND The (external) user was not found.
EXTERNAL_SERVER_UNAVAILABLE The external server was temporary unavailable.
USER_BUSY The user is busy and cannot accept more calls.
Message Description
41 LifeSize Transit Server Guide

EXTERNAL_TIMEOUT A request to an external server timed out.
USER_REJECTED The user declined the call.
HANGING_CALL BW usage is null over a long time.
CLIENT_CONNECTION_LOST The signaling connection to the client was lost (from the server).
USER_TEMPORARY_UNAVAILABLE The user was temporary unavailable or is not logged on.
NOT_END_TO_END_MEDIA Signaling was okay, but media end-to-end did not occur both ways.
INCOMPATIBLE_MEDIA A single compatible codec in SDP was not located.
OAM_CLOSED The call was forced down by the operator.
REFERRED_OUT The call was referred out by another user. Only used for conference calls
CONFERENCE_OWNER_LEFT The conference owner left an ad-hoc conference.
ME_LOST_CONN_TO_CLIENT The media engine lost connection to the client.
FAILED_TO_SET_ME_FORMATS Failed to set media formats in the media engine. Only used for conference calls.
ME_TUN_CONN_LOST Connection to the media engine was lost.
FAILED_TO_CONN_USERS Failed to connect to the users.
MEDIA_FAILED_SIP_OK Failed to create a connection to the media engine (but the INVITE was accepted).
CALLER_CANCELLED The caller cancelled the call before anyone answered (most likely the called party did not answer).
MAX_CALL_CAP_REACHED The maximum call capacity in the PXS has been reached.
SOCKET_FAILURE The call failed due a local socket/network failure.
Message Description
42 LifeSize Transit Server Guide

System SafetyFollow these basic electrical safety precautions to protect yourself from harm, and the server from damage:
• Be aware of the locations of the power on/off switch on the chassis and the room’s emergency power-off switch or electrical outlet in the case of an electrical accident.
• When disconnecting power, you should first power down the system and then unplug the power cords.
• Use only one hand when working with powered-on electrical equipment to avoid making a complete circuit which will cause electrical shock.
• Do not use mats designed to decrease static electrical discharge as protection from electrical shock. Instead, use rubber mats that have been specifically designed as electrical insulators.
• The power supply power cords must include a grounding plug and must be plugged into grounded electrical outlets.
General Electrical Safety PrecautionsFollow these rules to ensure general safety:
• Keep the area around the server clean and free of clutter.
• The server weighs approximately 16.5 lbs (7.5 kg) when fully loaded. Always keep your back straight and lift with your legs.
• Remove any jewelry or metal objects from your body, which are excellent metal conductors that can create short circuits and harm you if they come into contact with printed circuit boards or areas where power is present.
CAUTION - There is a danger of explosion if the onboard battery is installed upside down, which will reverse its polarities. The battery must be replaced with the same or an equivalent type. Contact your distributor or LifeSize Customer Support for all servicing.
CAUTION - This server may have come equipped with a CD-ROM drive. To prevent direct exposure to the laser beam and hazardous radiation exposure, do not open the enclosure or use the unit in any unconventional way.
43 LifeSize Transit Server Guide

ESD PrecautionsElectrostatic discharge (ESD) is generated by two objects with different electrical charges coming into contact with each other. An electrical discharge is created to neutralize this difference, which can damage electronic components and printed circuit boards. The following measures are generally sufficient to neutralize this difference before contact is made to protect your equipment from ESD:
• Use a grounded wrist strap designed to prevent static discharge.
• For grounding purposes, make sure your computer chassis provides excellent conductivity between the power supply, the case, the mounting fasteners and the motherboard.
• Take care to assure that the chassis cover is in place when the server is operating to assure proper cooling.
44 LifeSize Transit Server Guide


