14
LD1 Light Ring Controller and Dual Colour Light Ring Instruction Manual www.datavideotek.com Rev 280807
LD1 Light Ring Controller and Dual Colour Light Ring
Instruction Manual
www.datavideotek.com Rev 280807

Table of contents Warnings and Precautions 2
Warranty 3
Disposal 3
Packing List 3
Introduction 4
Features4
Connections & Controls 5
LD1 Top Panel 5
LD1 Front Panel 6
LD1 Rear Panel 7
Operating with the Datavideo DVK100 Mk II7
External Control8
Light Ring 9
Specification 11
Service and Support 12
Warnings and Precautions
1. Read all of these warnings and save them for later reference. 2. Follow all warnings and instructions marked on this unit. 3. Unplug this unit from the wall outlet before cleaning. Do not use liquid or aerosol cleaners. Use a
damp cloth for cleaning. 4. Do not use this unit in or near water. 5. Do not place this unit on an unstable cart, stand, or table. The unit may fall, causing serious damage. 6. Slots and openings on the cabinet top, back, and bottom are provided for ventilation. To ensure safe
and reliable operation of this unit, and to protect it from overheating, do not block or cover these openings. Do not place this unit on a bed, sofa, rug, or similar surface, as the ventilation openings on the bottom of the cabinet will be blocked. This unit should never be placed near or over a heat register or radiator. This unit should not be placed in a builtin installation unless proper ventilation is provided.
7. This product should only be operated from the type of power source indicated on the marking label of the AC adapter. If you are not sure of the type of power available, consult your Datavideo dealer or your local power company.
8. Do not allow anything to rest on the power cord. Do not locate this unit where the power cord will be walked on, rolled over, or otherwise stressed.
9. If an extension cord must be used with this unit, make sure that the total of the ampere ratings on the products plugged into the extension cord do not exceed the extension cord’s rating.
10. Make sure that the total amperes of all the units that are plugged into a single wall outlet do not exceed 15 amperes.
11. Never push objects of any kind into this unit through the cabinet ventilation slots, as they may touch dangerous voltage points or short out parts that could result in risk of fire or electric shock. Never spill liquid of any kind onto or into this unit.
12. Except as specifically explained elsewhere in this manual, do not attempt to service this product yourself. Opening or removing covers that are marked “Do Not Remove” may expose you to dangerous voltage points or other risks, and will void your warranty. Refer all service issues to qualified service personnel.
13. Unplug this product from the wall outlet and refer to qualified service personnel under the following conditions:
a. When the power cord is damaged or frayed; b. When liquid has spilled into the unit; c. When the product has been exposed to rain or water; d. When the product does not operate normally under normal operating conditions. Adjust only
those controls that are covered by the operating instructions in this manual; improper adjustment of other controls may result in damage to the unit and may often require extensive work by a qualified technician to restore the unit to normal operation;
e. When the product has been dropped or the cabinet has been damaged; f. When the product exhibits a distinct change in performance, indicating a need for service.
Warranty
Datavideo warrants that the equipment it manufactures shall be free from defects in material and workmanship for a period of 12 months from the date of product purchased. If equipment fails due to such defects, Datavideo will, at its option, repair or provide a replacement for the defective part or product. Equipment that fails after the warranty period, has been operated or installed in a manner other than that specified by Datavideo, or has been subjected to abuse or modification, will be repaired for time and material charges at the Buyer’s expense. This warranty does not affect your statutory rights within the Country of purchase.
Disposal For EU Customers only WEEE Marking.
This symbol on the product indicates that it will not be treated as household waste. It must be handed over to the applicable takeback scheme for the recycling of electrical and electronic equipment. For more detailed information about the recycling of this product, please contact your local Datavideo office.
Packing List:
The following items should be included in the box. If any items are missing please contact your supplier.
1 x LD1 LED Controller
1 x Dual Colour Light Ring with 72mm Thread Mounting Ring
1 x 1.5 ψ Allen Key
2 x GPI Cable 3.5mm Plug to 3.5mm Plug (1.2m)
1 x Remote Control Cable Mini 3 Pin Din to 3 x Spade End (2m)
1 x SVideo Plug to SVideo Plug Cable (20cm)
1 x Power Supply (12V 1.5A)
1 x Instruction Manual
Introduction
The Datavideo LD1 is a Dual Colour Light Ring and LED controller for Chroma Key Studios. It is intended for use with a Retro Reflective Backcloth such as Datavideo RF3025.
It can be used in conjunction with the Datavideo DVK100 Mk II and offers automated switching. N.B. If you own a DVK100 and you are unsure whether it is Mk I or Mk II please check the serial no. Mk II will be 00097180 or higher. If your DVK100 is Mk I please contact your local Datavideo Office for details of how to get it upgraded.
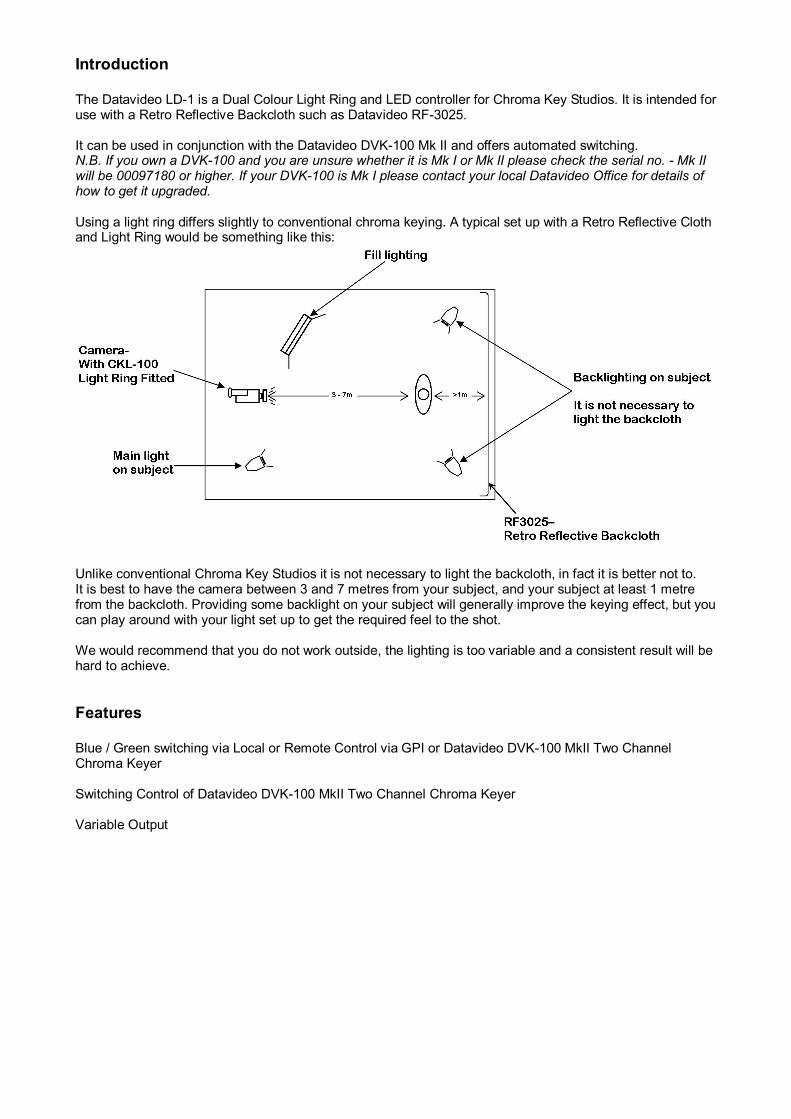
Using a light ring differs slightly to conventional chroma keying. A typical set up with a Retro Reflective Cloth and Light Ring would be something like this:
Unlike conventional Chroma Key Studios it is not necessary to light the backcloth, in fact it is better not to. It is best to have the camera between 3 and 7 metres from your subject, and your subject at least 1 metre from the backcloth. Providing some backlight on your subject will generally improve the keying effect, but you can play around with your light set up to get the required feel to the shot.
We would recommend that you do not work outside, the lighting is too variable and a consistent result will be hard to achieve.
Features
Blue / Green switching via Local or Remote Control via GPI or Datavideo DVK100 MkII Two Channel Chroma Keyer
Switching Control of Datavideo DVK100 MkII Two Channel Chroma Keyer
Variable Output
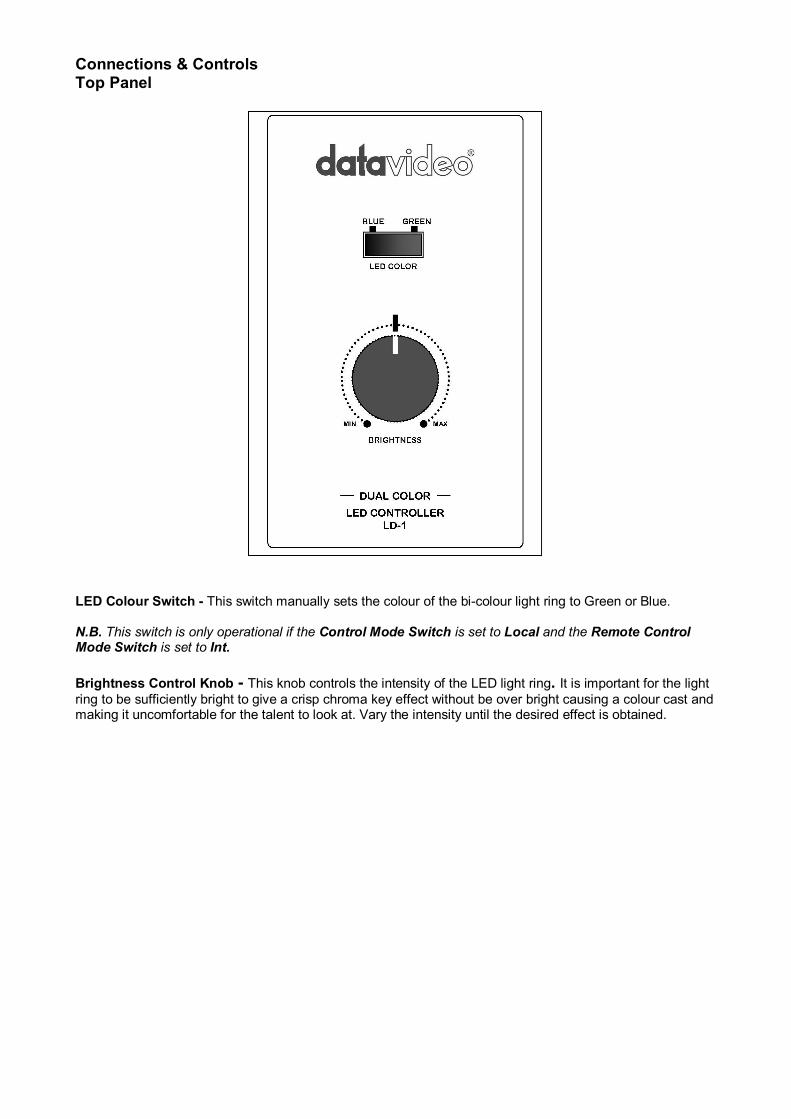
Connections & Controls Top Panel
LED Colour Switch This switch manually sets the colour of the bicolour light ring to Green or Blue.
N.B. This switch is only operational if the Control Mode Switch is set to Local and the Remote Control Mode Switch is set to Int.
Brightness Control Knob This knob controls the intensity of the LED light ring. It is important for the light ring to be sufficiently bright to give a crisp chroma key effect without be over bright causing a colour cast and making it uncomfortable for the talent to look at. Vary the intensity until the desired effect is obtained.
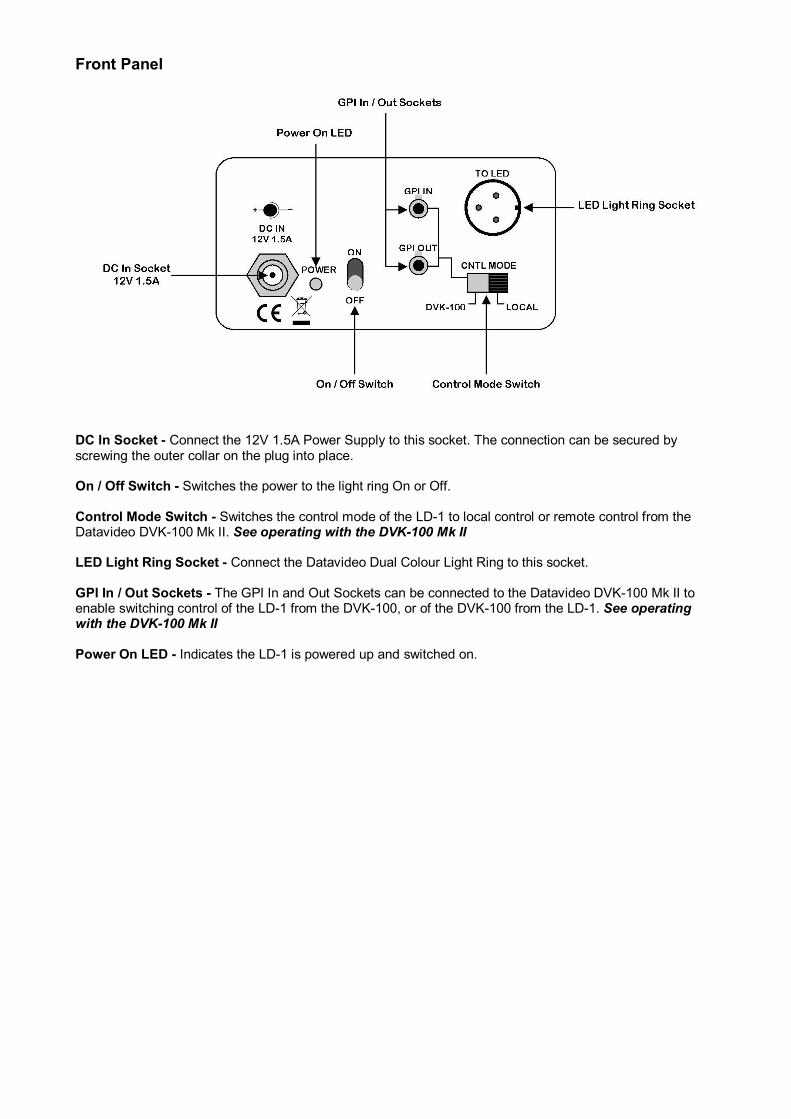
Front Panel
DC In Socket Connect the 12V 1.5A Power Supply to this socket. The connection can be secured by screwing the outer collar on the plug into place.
On / Off Switch Switches the power to the light ring On or Off.
Control Mode Switch Switches the control mode of the LD1 to local control or remote control from the Datavideo DVK100 Mk II. See operating with the DVK100 Mk II
LED Light Ring Socket Connect the Datavideo Dual Colour Light Ring to this socket.
GPI In / Out Sockets The GPI In and Out Sockets can be connected to the Datavideo DVK100 Mk II to enable switching control of the LD1 from the DVK100, or of the DVK100 from the LD1. See operating with the DVK100 Mk II
Power On LED Indicates the LD1 is powered up and switched on.
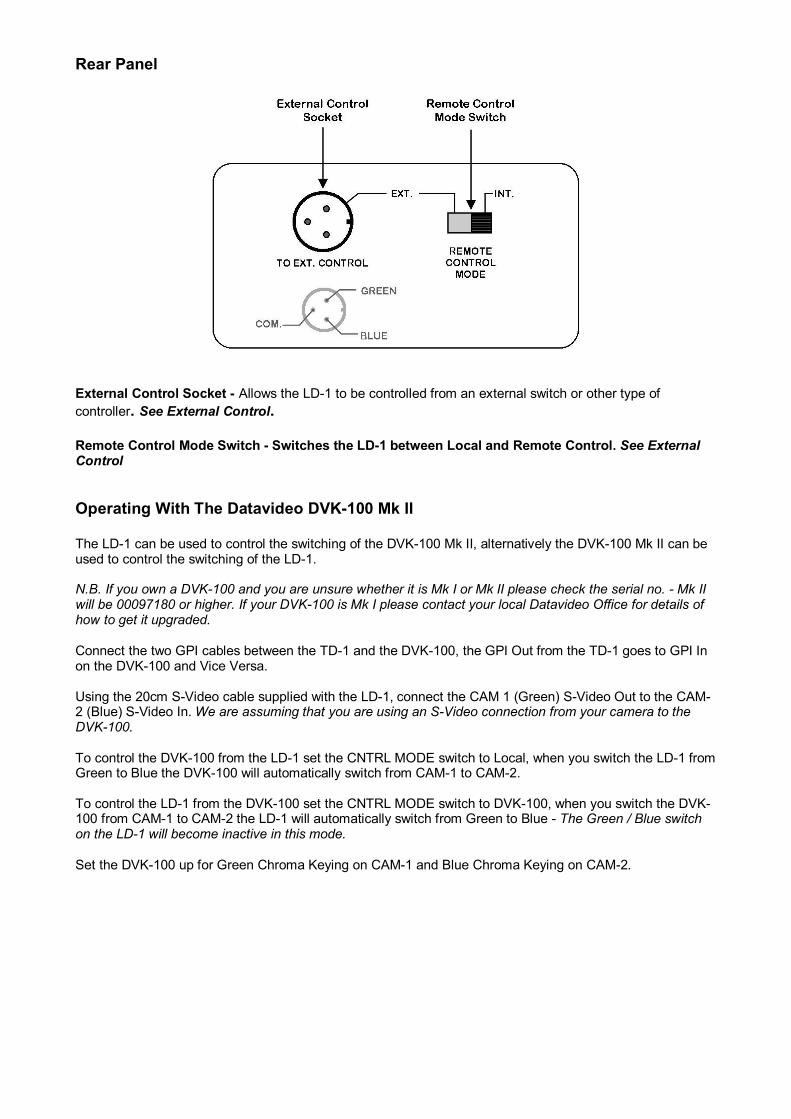
Rear Panel
External Control Socket Allows the LD1 to be controlled from an external switch or other type of controller. See External Control.
Remote Control Mode Switch Switches the LD1 between Local and Remote Control. See External Control
Operating With The Datavideo DVK100 Mk II
The LD1 can be used to control the switching of the DVK100 Mk II, alternatively the DVK100 Mk II can be used to control the switching of the LD1.
N.B. If you own a DVK100 and you are unsure whether it is Mk I or Mk II please check the serial no. Mk II will be 00097180 or higher. If your DVK100 is Mk I please contact your local Datavideo Office for details of how to get it upgraded.
Connect the two GPI cables between the TD1 and the DVK100, the GPI Out from the TD1 goes to GPI In on the DVK100 and Vice Versa.
Using the 20cm SVideo cable supplied with the LD1, connect the CAM 1 (Green) SVideo Out to the CAM 2 (Blue) SVideo In.We are assuming that you are using an SVideo connection from your camera to the DVK100.
To control the DVK100 from the LD1 set the CNTRL MODE switch to Local, when you switch the LD1 from Green to Blue the DVK100 will automatically switch from CAM1 to CAM2.
To control the LD1 from the DVK100 set the CNTRL MODE switch to DVK100, when you switch the DVK 100 from CAM1 to CAM2 the LD1 will automatically switch from Green to Blue The Green / Blue switch on the LD1 will become inactive in this mode.
Set the DVK100 up for Green Chroma Keying on CAM1 and Blue Chroma Keying on CAM2.
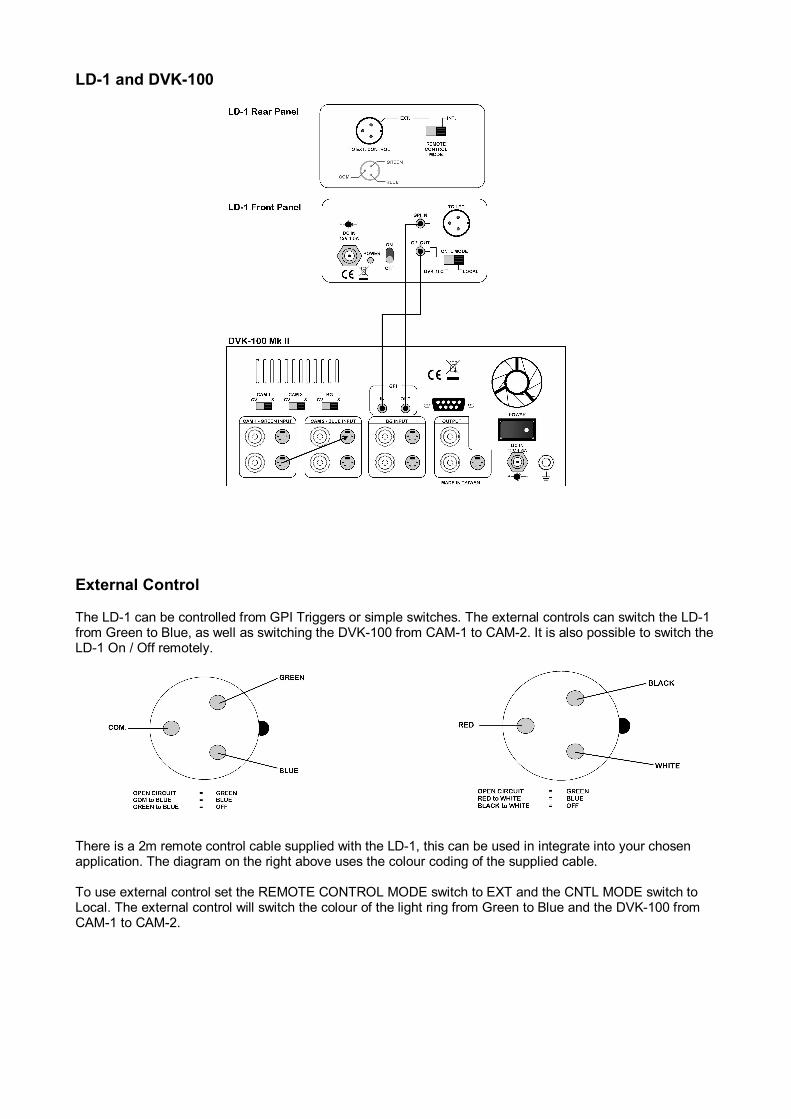
LD1 and DVK100
External Control
The LD1 can be controlled from GPI Triggers or simple switches. The external controls can switch the LD1 from Green to Blue, as well as switching the DVK100 from CAM1 to CAM2. It is also possible to switch the LD1 On / Off remotely.
There is a 2m remote control cable supplied with the LD1, this can be used in integrate into your chosen application. The diagram on the right above uses the colour coding of the supplied cable.
To use external control set the REMOTE CONTROL MODE switch to EXT and the CNTL MODE switch to Local. The external control will switch the colour of the light ring from Green to Blue and the DVK100 from CAM1 to CAM2.
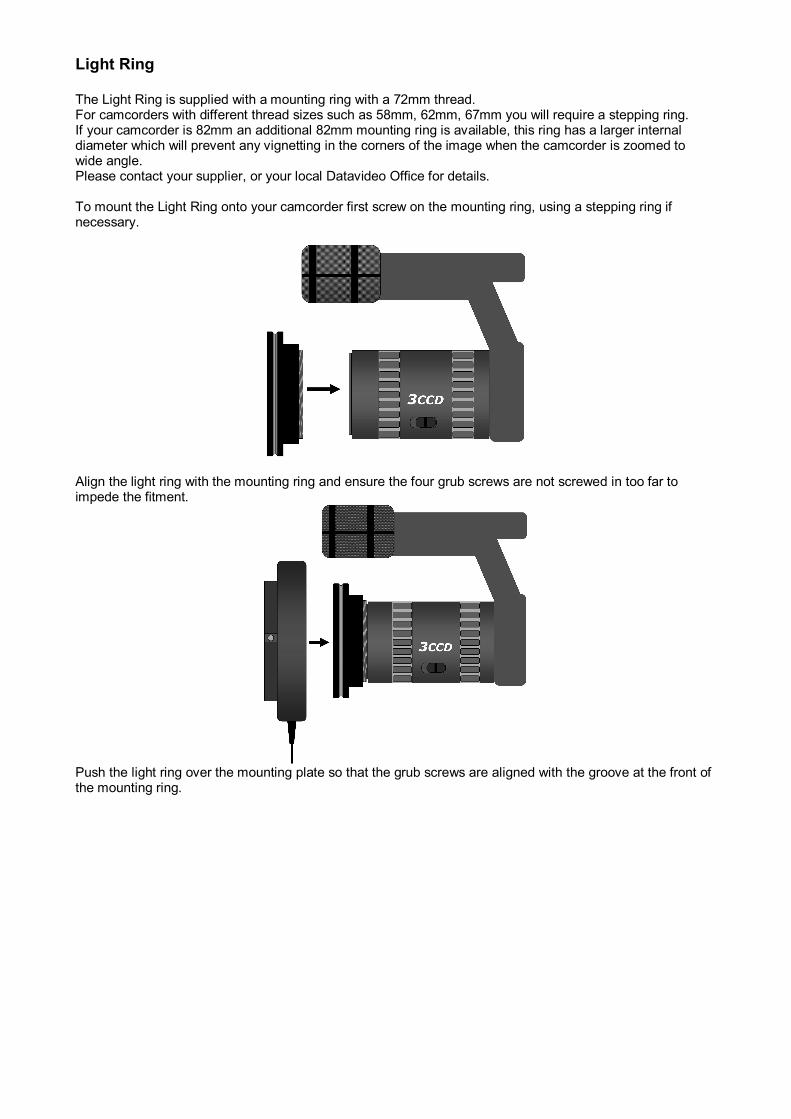
Light Ring
The Light Ring is supplied with a mounting ring with a 72mm thread. For camcorders with different thread sizes such as 58mm, 62mm, 67mm you will require a stepping ring. If your camcorder is 82mm an additional 82mm mounting ring is available, this ring has a larger internal diameter which will prevent any vignetting in the corners of the image when the camcorder is zoomed to wide angle. Please contact your supplier, or your local Datavideo Office for details.
To mount the Light Ring onto your camcorder first screw on the mounting ring, using a stepping ring if necessary.
Align the light ring with the mounting ring and ensure the four grub screws are not screwed in too far to impede the fitment.
Push the light ring over the mounting plate so that the grub screws are aligned with the groove at the front of the mounting ring.
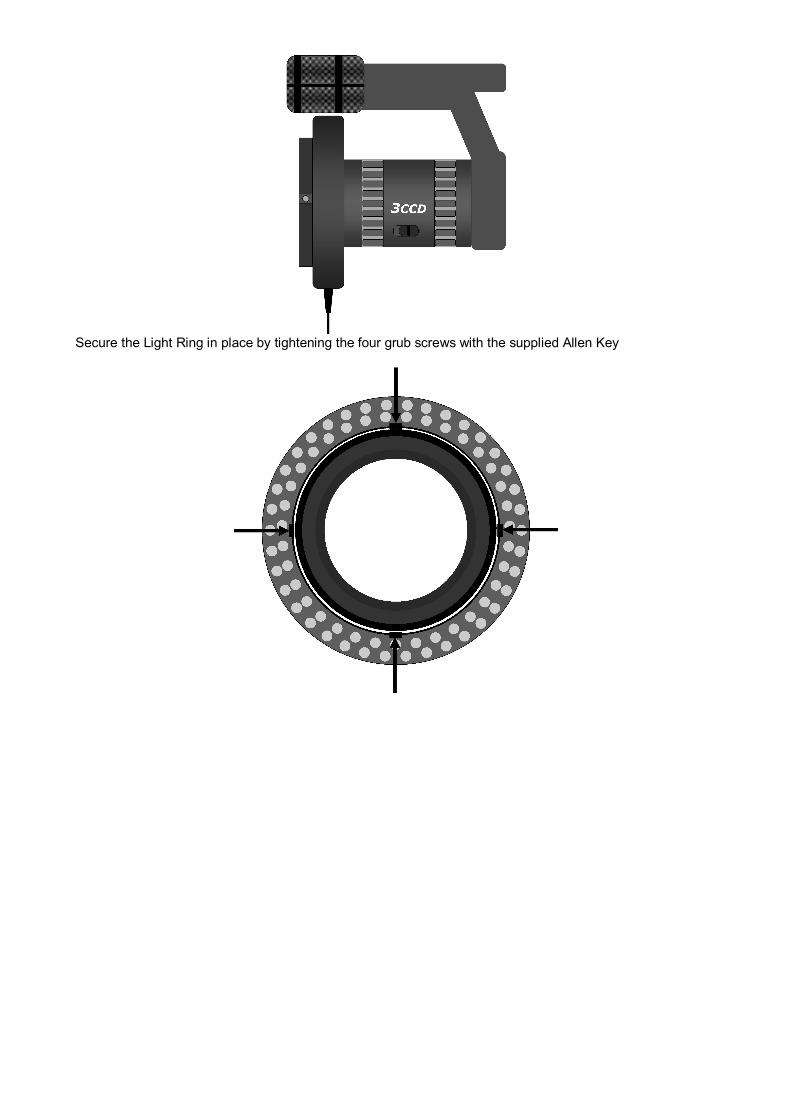
Secure the Light Ring in place by tightening the four grub screws with the supplied Allen Key

Useful Accessories
Datavideo DVK100 Dual Channel Chroma Keyer
The DVK100 is a stand alone, dual channel, chroma keyer that allows automated operation from the LD1. The two camera inputs can be set up with Green on CAM 1 and Blue on CAM 2. The DVK100 is easy to operate and quick to set up, ideal for mobile applications, education, small studios etc.
Datavideo RF3025 Retro Reflective Cloth
RF3025 is a 3m x 2.5m Retro Reflective Backcloth. The special material reflects light directly back towards the camera, so although it appears grey to the naked eye it creates a perfect Green / Blue background when used in conjunction with the Datavideo Dual Colour Light Ring.

Specifications
Light Ring
Outer Diameter 13.2 cm Inner Diameter 10 cm (excluding any adapter rings) Weight 154g
LD1
Power Requirement 12V 1.5A (2.1mm InLine Jack centre positive)
Dimensions (Incl. Mounting Plate) 12.5 x 7.3 x 6 cm L x W x D Weight 324g
All the trademarks are the properties of their respective owners. Datavideo Technologies Co., Ltd. All rights reserved 2007.
Specifications are subject to change without notice
Service and Support It is our goal to make your products ownership a satisfying experience. Our supporting staff is available to assist you in setting up and operating your system. Please refer to our web site www.datavideotek.com for answers to common questions, support requests or contact your local office below.
Datavideo Corporation (USA) 12300U East Washington Blvd., Whittier, CA 90606 USA Tel: +1 562 696 2324 [email protected] www.datavideo.us
Datavideo Technologies Europe BV Floridadreef 106, 3565 AM Utrecht, The Netherlands Tel: +31 30 261 9656 [email protected] www.datavideo.info
Datavideo UK Limited Unit 2 Waterside Business Park, Hadfield, Glossop, Derbyshire SK13 1BE UK Tel: +44 1457 851000 [email protected] www.datavideo.info
Datavideo Technologies Co., Ltd. 10F, 176 JianYi Rd, Chung Ho City, Taipei Hsien, Taiwan 235 Tel: +886 2 8227 2888 [email protected] www.datavideo.com.tw
Datavideo Technologies China Co. 2FD, 2 Lane 777, West Guangzhong Rd, Zhabei District, Shanghai, China Tel: +86 21 5603 6599 [email protected] www.datavideo.cn
Datavideo Technologies (S) PTE Ltd. No. 100, Lorong 23 Geylang, #0103 D’Centennial Bldg, Singapore 388398 Tel: +65 6749 6866 [email protected] www.datavideo.info
Datavideo Hong Kong Limited G/F., 26 Cross Lane, Wanchai, HK Tel: +852 2833 1981 [email protected] www.datavideohk.com


