21
LIGHT Specialist

LIGHT
Specialist

2
INTRO
Imagine the function of lighting in a the-atre. The actors are ready, the scene is set, decoration is placed to give the right impression, the fragrance from the smoke machine is filling the room. The actors have spent months on practicing each word and every move, and more than 100 people have been involved. Without light, none of the above would make sense. The decoration, the actors, the smoke - all the preparation done to “sell” the show would have gone unnoticed.
Every day, we are “on stage” in our stores. We have to make sure that the store is ready for the consumer. We need to take advantage of every square meter, to as-sure the best possible experience for our consumer.
Lighting plays a very important role in showcasing your store merchandise, as well as highlighting the design in your store.
Lighting used in the right way completes a store. It not only helps lead consumers into your store, but also helps us highlight products and increase their visibility; thus, encouraging purchase.
Remember, that styling is not complete until lighting is adjusted to support it.

3
CONTENTS
Lighting plan 04
Areas in the store 06
Different lights in your store 07
Changing the bulb 08
Maintenance – cleaning 09
Windows 10
Entrance 11
Tables 12
Racks 13
Mannequins 14
Wall 15
Jeans Intelligence area 16
Shoes 17
Accessories 18
Fitting room 19
Cash desk 20
Checklist 21

4
LIGHTING PLAN
For each Jack & Jones store there is a lighting plan. This is used for the contrac-tors showing them how to place the rails and electricians where to place the spots. The blueprint of the lighting plan is pro-vided by RIIS RETAIL in the early stage of construction. There are for each store a specific number of spots to secure the right lighting and nevertheless our store concept. It’s key that this lighting plan is executed correctly and that it’s followed.
On the picture you clearly see the spot name, spot information, RIIS item num-ber, amount and even though which bulbs to use and order in the future.
The blueprint also showcase the place-ment of the rails and most important where to use the different spots.
Always make sure that when you visit a store that the lighting is according the lighting plan to avoid too less – or too many – spots, the right spots and place-ment.
See shop overview with lighting plan on next page.

5
LIGHTING PLAN
6
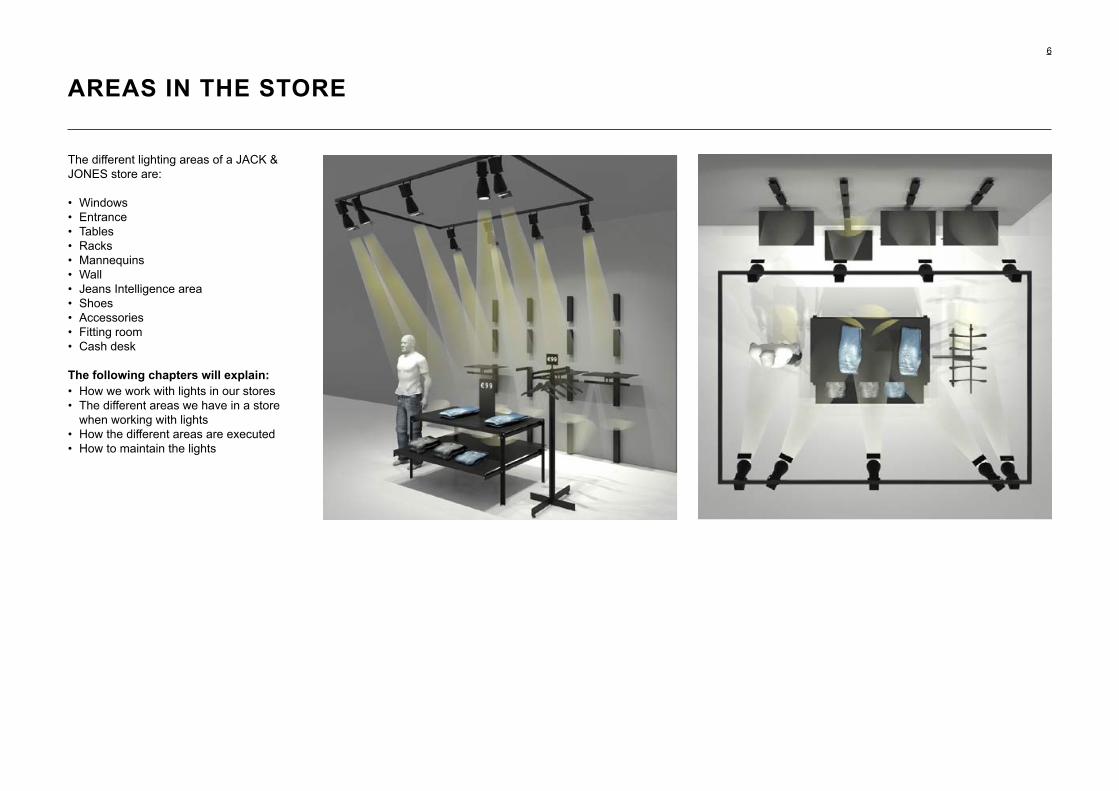
AREAS IN THE STORE
The different lighting areas of a JACK & JONES store are:
• Windows• Entrance• Tables• Racks• Mannequins• Wall• Jeans Intelligence area• Shoes• Accessories• Fitting room• Cash desk
The following chapters will explain:• How we work with lights in our stores• The different areas we have in a store
when working with lights• How the different areas are executed• How to maintain the lights

7
DIFFERENT LIGHTS IN OUR STORE
C: To highlight deco-material; the decospots are mainly used to focus on specif-ic decoration or accessories racks to nar-row the area of light. They are also used in fitting rooms without ceilings.
B: Down lights were used in older stores as a part of the previous lighting design. Today, these are only used with low ceilings, beams and fittingrooms, where it’s not nessesary to move them around. This is fixed lighting.
A: Spotlights are the most common light-ing fixture in our stores. With this type, it’s possible to aim the light in the right direction and to move it around where needed. Installed in lighting tracks witha 3-phase adaptor.
E: Mainly used above the jeans table. According to Shop600 (2011), pendants are no longer in use in the rest of the store above sales tables.
D: Fluorescent tubes are mainly usedaround the ceiling or the walls to createthe right atmosphere.Blue fluorescents have beena part of the JJ Lighting design for thejeanswall, as an eye catcher for thisarea, indicating “this is the jeansarea”.

8
CHANGING BULBS
C: Take the bulb out and dispose it in the right place - not in the regular trash can, for the good of nature/enviroment, as it contains mercury.
B: Take out the faulty bulb. Sometimes it feels stuck, but by twisting it gently back- and forward or pushing the springs on the socket - it gets loose.
A: Remove the front by turning it anti-clockwise. This gives you access to the bulb.
D: Insert the new bulb (same type/ver-sion as the previous one). Avoid touching the glass part by holding the socket of the bulb - or you can use a dry cloth or paper to hold around it. Make sure that the bulb is secured in the right way in the socket - has to be pushed firmly down in the socket.
E: The bulb is now placed in the socket. F: Attach the front again by turning it clockwise. The spot is now ready to use.

9
MAINTENANCE – CLEANING
A: Why don’t you clean the spot when you are already changing the bulb?Simply wipe away dust on the outside surfaces using a dry cloth.If the front glass is milky-white, you need to dismantle the front - as this layer is situated on the inside.
C: Remember all the sides of the spot.
G: Remove the metal holder for the bulb by simply lifting it.
B: Using a dry cloth, wipe away dust on the outside surfaces.
D: If the front glass is milky-white, we need to dismantle the front as this layer is situated on the inside. To clean the inside of the glass, remove the front by turning it anti-clockwise.
H: You will now be able to clean the glass inside with a dry cloth. To as-semble the spot, follow the same steps backwards.
E: Remove the three “splits” by pressing them together to release the cover.
F: You will now be able to remove the cover.
10
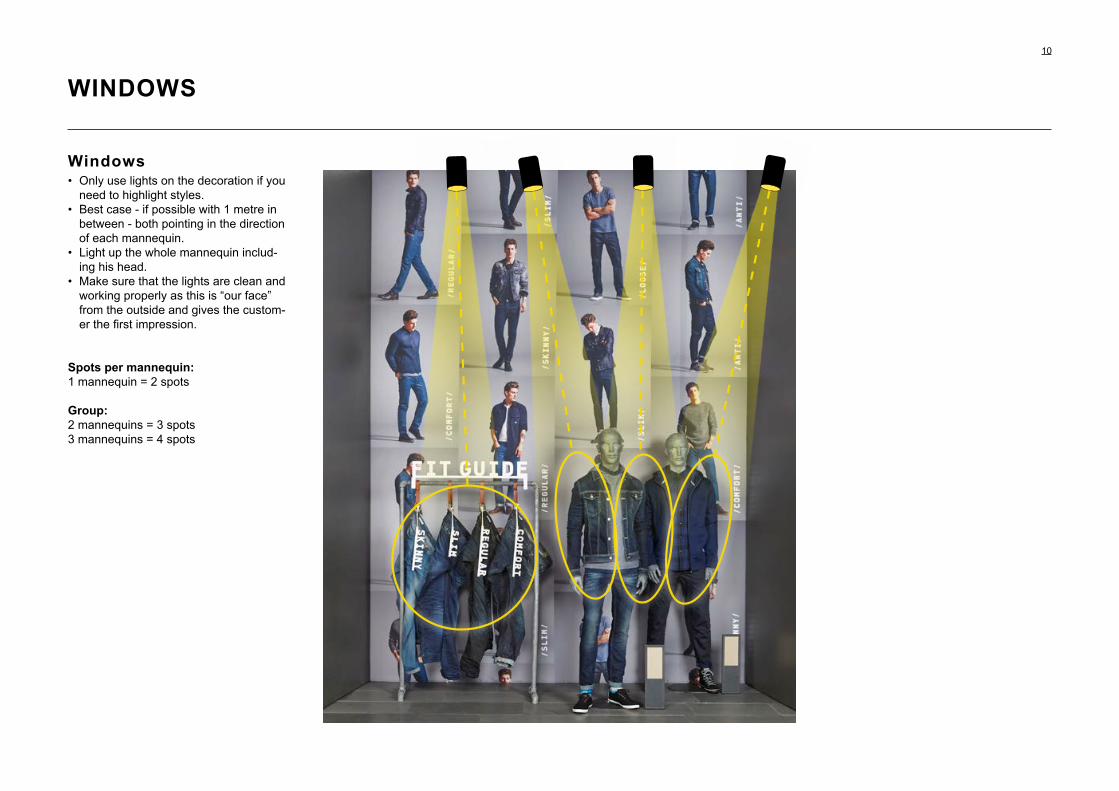
WINDOWS
Windows • Only use lights on the decoration if you
need to highlight styles.• Best case - if possible with 1 metre in
between - both pointing in the direction of each mannequin.
• Light up the whole mannequin includ-ing his head.
• Make sure that the lights are clean and working properly as this is “our face” from the outside and gives the custom-er the first impression.
Spots per mannequin:1 mannequin = 2 spots
Group:2 mannequins = 3 spots3 mannequins = 4 spots

11
ENTRANCE
• Use 1 spot between the alarm gates, pointing directly downwards to the floor.
• Use 1-2 extra spots (if available), to highlight the front table to make it vis-ually attractive.
• Make sure that NONE of the spots are blinding/pointing out against the doors/street, as this is almost a ‘stop sign’ for a consumer.
• Check and ensure that the outside sign and wall mounted lamps are working properly.

12
TABLE
Step 1 - table• Use 2 spots covering the table top.• Use 1 spot for the bottom shelf.• Place the spots max. 1.5 m away from
the table.• No spots to be pointed from the back
of the table.• Adjust the light so its not blinding.• Adjust the light from the spots so the
illuminated edge is max. 30 cm around the table.
13
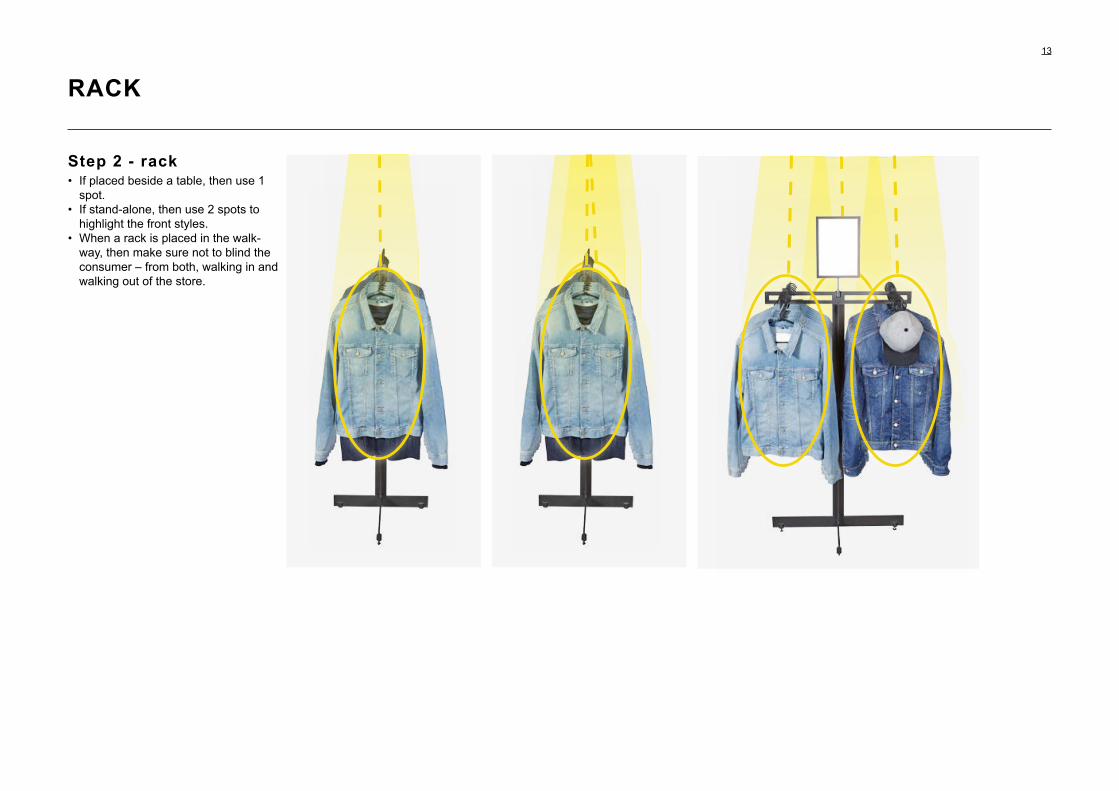
RACK
Step 2 - rack• If placed beside a table, then use 1
spot.• If stand-alone, then use 2 spots to
highlight the front styles.• When a rack is placed in the walk-
way, then make sure not to blind the consumer – from both, walking in and walking out of the store.
14
MANNEQUIN
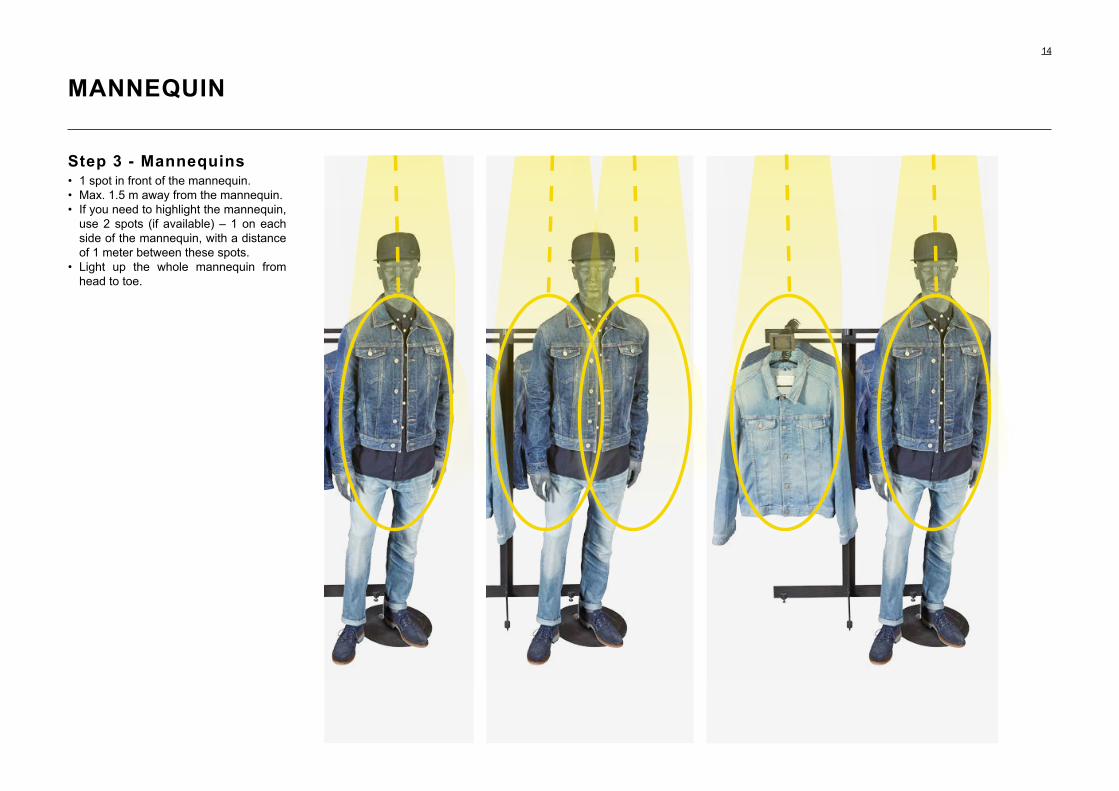
Step 3 - Mannequins• 1 spot in front of the mannequin.• Max. 1.5 m away from the mannequin.• If you need to highlight the mannequin,
use 2 spots (if available) – 1 on each side of the mannequin, with a distance of 1 meter between these spots.
• Light up the whole mannequin from head to toe.

15
WALL
Step 4 - Wall• As a basic rule, use 1 spot per wall part• 3-part wall = 3 spots• 4-part wall = 4 spots• 5-part wall = 5 spots• 6-part wall = 6 spots• All spots are adjusted to highlight the
styles on fronts.• Do not use spots to highlight the deco-
ration on the top shelves.• Adjust the light so you will have as little
light on the surrounding wall as possible.• For stores that have lights with barn
doors – adjust to the above points.• Adjust the spots to capture the light
to avoid unnecessary light at the wall, floor and ceiling (red line).

16
JEANS INTELLIGENCE AREA
Jeans Intelligence wall • 1 spot for each space between the half
mannequins or hanging jeans.• Use cold light (942), to highlight the
blue color.• On the belt rack next to the jeans –
use warm light (930) which is better for leather and wood.
• Adjust the light on the mannequins/hangings, and not on the stock shelves.
Jeans Intelligence tableA: 2 m long tableB: 3 m long table
Use warm light (930) for the jeans table.
1 spot for every metre - on a standard
2 m long table, you’ll need 2 spots as illustrated.
The large jeans table requires 3 spots.
Jeans Intelligence wall
A: Jeans Intelligence table - 2m B: Jeans Intelligence table - 3m
17
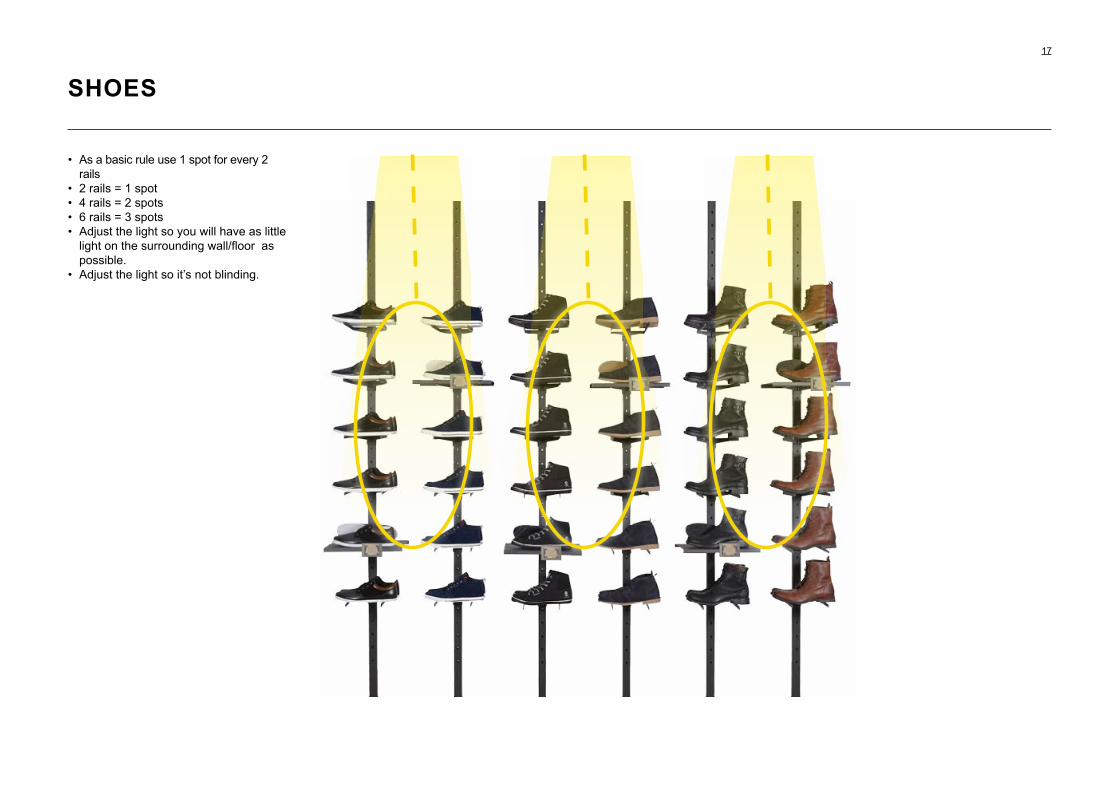
SHOES
• As a basic rule use 1 spot for every 2 rails
• 2 rails = 1 spot• 4 rails = 2 spots• 6 rails = 3 spots• Adjust the light so you will have as little
light on the surrounding wall/floor as possible.
• Adjust the light so it’s not blinding.
18
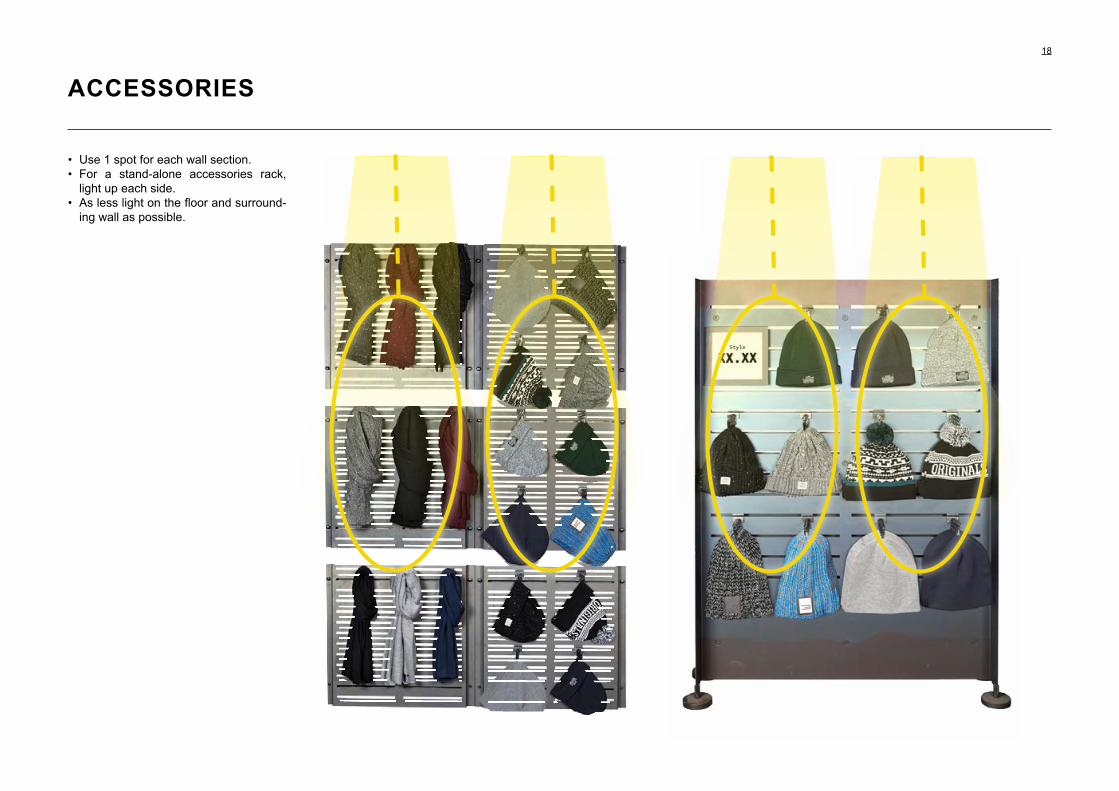
ACCESSORIES
• Use 1 spot for each wall section.• For a stand-alone accessories rack,
light up each side. • As less light on the floor and surround-
ing wall as possible.

19
FITTING ROOM
• Make sure that the halogen spots are always working and that a consumer never enters a dark fitting room.
• Adjust the 2 – often downlights – in the middle of the floor. This way, the person standing will have light mainly on the chest.
• Do not adjust the light against the mir-ror, as it will be blinding the consumer

20
CASH DESK
• 1 spot used for the working zone/desk (2 spots used in total).
• Do not light directly into the terminals, as you can’t see the screens.
• Do not blind the consumer with light.• No spots at the TV screens at the back.• Use 2 decoration spots, if there is a
JACK & JONES logo on the back wall.

21
CHECK LIST
Have you used the right amount of spots according the guidelines?
Are all spots, down lights and fluorescent tubes working properly?
Are the spots clean, and the glass transparent?
Is warm light (830 or 930) used for all spots except for the jeans wall?
Is cold light (942) used at the jeans wall?
Do any spots blind you when you’re standing at the entrance? If so - adjust these spots again.
Is the light in the fitting rooms adjusted and working properly?
Do you have enough spare bulbs in the back office - and the right types?
No spots are taking up space at the stock or back office for no use?
Have the faulty spots been returned?


