164
lightkeyapp.com LIGHTKEY USER GUIDE PROFESSIONAL DMX LIGHTING CONTROL. MAC STYLE.

lightkeyapp.com
LIGHTKEY USER GUIDE PROFESSIONAL DMX LIGHTING CONTROL. MAC STYLE.

Contents 1 Welcome 9
2 Activate Lightkey 10Buy a License 10 ............................................................................................................Activate Lightkey 10 ........................................................................................................Renew a License 11 .......................................................................................................Transfer a License Between Computers 11 .....................................................................View Details About Your License 12 ................................................................................
3 Set Up Your Lights 13Step 1: Create a Project 13 .............................................................................................Step 2: Choose an Output Method 13 ............................................................................Step 3: Patch Your Fixtures 14 ........................................................................................
Find Fixture Profiles 14 ...............................................................................................Add Your Fixtures 16 ..................................................................................................
Step 4: Arrange Your Fixtures 17 ....................................................................................Locate Fixtures 18 ......................................................................................................Size and Rotate Fixture Icons 18 ................................................................................Add Images, Shapes, and Text 19 ..............................................................................
Step 5: Group Fixtures 19 ...............................................................................................Step 6: Set Beam Directions 20 ......................................................................................Step 7: Set Beam Colors 21 ...........................................................................................You’re Done 21 ...............................................................................................................
4 Projects 22Create a Project 22 .........................................................................................................Open or Close a Project 23 .............................................................................................Other Project Actions 23 .................................................................................................Undo Changes 23 ..........................................................................................................
5 The Lightkey Window 24
Lightkey User Guide2

Toolbar 25 ......................................................................................................................Customize the Lightkey Window 25 ................................................................................Full Screen View 26 ........................................................................................................Dual Windows 26 ...........................................................................................................Adaptive Background Color 27 .......................................................................................Lock Lightkey 27 ............................................................................................................
6 Preview 29Edit the Preview 29 .........................................................................................................Edit Objects 30 ...............................................................................................................
Select Objects 30 .......................................................................................................Move Objects 30 ........................................................................................................Align Objects 30 .........................................................................................................Space Objects Evenly 31 ...........................................................................................Resize and Rotate Objects 31 ....................................................................................
Edit Fixtures 32 ...............................................................................................................Size and Rotate Fixture Icons 32 ................................................................................Set Beam Directions 32 ..............................................................................................Set Beam Colors 34 ...................................................................................................Group Fixtures 34 ......................................................................................................Locate Fixtures 35 ......................................................................................................Disable Fixtures 35 .....................................................................................................Add or Remove Fixtures 35 ........................................................................................
Edit Images, Shapes, and Text 35 ...................................................................................Add an Image, Shape or Text 36 ................................................................................Copy and Paste Images, Shapes, and Text 36 ...........................................................Duplicate Images, Shapes, and Text 36 ......................................................................Delete Images, Shapes, and Text 37 ..........................................................................Order Images, Shapes, and Text 37 ...........................................................................Change the Style of Built-in Images and Shapes 37 ...................................................Adjust Shape Features 37 ..........................................................................................Change Text Formatting 38 ........................................................................................
7 Fixture Properties 39Select Fixtures 39 ...........................................................................................................
Select All Fixtures 40 ..................................................................................................Select Fixtures by Location 40 ....................................................................................Select Fixtures by Type 40 ..........................................................................................Select Fixtures by Name 40 ........................................................................................Select Fixtures Through External Control 41 ...............................................................
Select Light Beams 41 ....................................................................................................Fixture Properties 42 .......................................................................................................
Select a Fixture Property 43 .......................................................................................
Lightkey User Guide3

Define a Fixture Property 44 .......................................................................................Effects 45 ...................................................................................................................
Dimmer 45 ......................................................................................................................Master Dimmer 46 .....................................................................................................
Color 47 .........................................................................................................................Color Wheel 49 ...............................................................................................................Gobo Wheel 50 ..............................................................................................................
Gobo Cycle 50 ...........................................................................................................Gobo States 50 ..........................................................................................................
Shutter/Strobe 51 ...........................................................................................................Position 52 .....................................................................................................................Movement Speed 56 ......................................................................................................Focus 57 ........................................................................................................................Zoom 58 .........................................................................................................................Iris 59 .............................................................................................................................Prism 60 .........................................................................................................................Frost 60 ..........................................................................................................................Fog 61 ............................................................................................................................Custom Fixture Properties 62 ..........................................................................................
Slider 62 .....................................................................................................................List of Options 63 .......................................................................................................Reorder and Hide Custom Properties 63 ....................................................................
Lamp 64 .........................................................................................................................Command 64 .................................................................................................................Default Values 65 ............................................................................................................Copy and Paste Fixture Properties 65 .............................................................................View Overridden Fixture Properties 66 ............................................................................Clear Fixture Properties 66 ..............................................................................................Undo Changes 67 ..........................................................................................................Fanning 67 ......................................................................................................................
8 Presets and Sequences 72Create a Preset 73 ..........................................................................................................View Preset Contents 73 ................................................................................................Activate Presets 74 .........................................................................................................Edit a Preset 74 ..............................................................................................................Presets and Overridden Properties 75 .............................................................................Create a Preset Group 76 ...............................................................................................Create a Sequence 76 ....................................................................................................View Sequence Contents 77 ...........................................................................................Run Sequences 77 .........................................................................................................Sequence Order 78 ........................................................................................................Sequence Timing 79 .......................................................................................................
Lightkey User Guide4

Manual Timing 79 .......................................................................................................Beat-Controlled Timing 80 .........................................................................................
Create Fixture Movements With Sequences 81 ...............................................................Organize Presets and Sequences 83 ..............................................................................Find Items in the Preset Palette 84 ..................................................................................Reorder Sequence Steps 85 ...........................................................................................
9 Effects 86Pattern Effects 86 ...........................................................................................................Curve Effects 86 .............................................................................................................Movement Effects 87 ......................................................................................................Add an Effect 88 .............................................................................................................Edit an Effect 88 .............................................................................................................Edit the Effect Timing 89 .................................................................................................Edit the Fixture Order 89 .................................................................................................Edit Pattern Effects 90 ....................................................................................................
Chase 91 ...................................................................................................................Fill 92 .........................................................................................................................Rain 93 ......................................................................................................................Sparkle 93 ..................................................................................................................Fire 94 ........................................................................................................................Jellyfish 94 .................................................................................................................
Edit Curve Effects 94 ......................................................................................................Edit Movement Effects 96 ...............................................................................................
Edit Points 97 .............................................................................................................Transform Paths 99 ....................................................................................................Path Types 100 ..........................................................................................................
Copy and Paste Effects 101 ...........................................................................................Delete an Effect 101 .......................................................................................................Overlaying Effects 101 ....................................................................................................Save an Effect Template 102 ...........................................................................................
10 Live Control 103Live View Pages 103 .......................................................................................................Control Panels 104 .........................................................................................................
Edit a Control Panel 104 .............................................................................................Create a Button 105 ...................................................................................................Create a Text Label 105 .............................................................................................Select Objects 106 .....................................................................................................Move Objects 106 ......................................................................................................Attach Buttons 107 ....................................................................................................Resize Objects 107 ....................................................................................................Rename a Button 107 ................................................................................................
Lightkey User Guide5

Duplicate Objects 107 ................................................................................................Copy and Paste Objects 108 .....................................................................................Delete Objects 108 ....................................................................................................Change Text Formatting 108 ......................................................................................Frames 109 ................................................................................................................
Cuelists 110 ....................................................................................................................Create a Cue 110 .......................................................................................................Create a Cue Group 111 ............................................................................................Cuelist Timing 111 .....................................................................................................Manual Crossfading 112 ............................................................................................Select Cues for Playback 112 ....................................................................................Organize Cues 113 ....................................................................................................Copy and Paste Cues 114 .........................................................................................
Edit Cue Contents and Options 114 ...............................................................................Edit Cue Contents 115 ...............................................................................................View Cue Contents 116 .............................................................................................Edit Ad Hoc Properties 116 ........................................................................................Edit Cue Options 117 .................................................................................................Edit Button Appearance and Behavior 118 .................................................................Edit Cue Modifiers 118 ...............................................................................................
Live Control With Control Panels 120 ..............................................................................Live Control With Cuelists 122 ........................................................................................Blind Mode 123 ..............................................................................................................Freeze Output 124 ..........................................................................................................Startup State 124 ...........................................................................................................Output Order of Precedence 125 ....................................................................................
11 Beat Control 126Beat-Controlled Sequences 126 .....................................................................................Beat-Controlled Effects 126 ............................................................................................Set the Beat 127 .............................................................................................................
Set the Beat by Tapping 127 ......................................................................................Set the Beats per Minute 127 .....................................................................................Set the Beat Through MIDI 128 ..................................................................................
Examples 129 .................................................................................................................Synchronize with Logic Pro 129 .................................................................................Synchronize with Ableton Live 129 .............................................................................Synchronize with Traktor 129 .....................................................................................Synchronize with Waveclock 130 ...............................................................................
12 Manage Fixtures 131Find Fixture Profiles 132 ..................................................................................................Add Fixtures 133 ............................................................................................................
Lightkey User Guide6

Edit Fixtures 134 .............................................................................................................View and Edit Fixture Information 134 ........................................................................Change a Fixture’s DMX Address or Universe 134 ......................................................Duplicate Fixtures 135 ................................................................................................Edit a Fixture Profile 135 .............................................................................................Reassign Fixture Profiles 136 ......................................................................................Delete Fixtures 136 ....................................................................................................
Print the Patched Fixtures 136 ........................................................................................Work With Fixture Profiles 137 ........................................................................................
Edit a Fixture Profile 137 .............................................................................................Import a Fixture Profile 137 .........................................................................................Create a Fixture Profile 137 ........................................................................................Duplicate a Fixture Profile 138 ....................................................................................Delete a Fixture Profile 138 .........................................................................................
13 DMX Output and Input 139DMX Output Preferences 139 .........................................................................................
Serial USB Interfaces 139 ...........................................................................................Open DMX Interfaces 140 ..........................................................................................Eurolite USB-DMX512-PRO MK2 140 ........................................................................Other USB Interfaces 140 ..........................................................................................Art-Net 141 ................................................................................................................Example: Set Up an Enttec Open DMX Ethernet 143 .................................................sACN (E1.31) 145 ......................................................................................................ESP Net 145 ..............................................................................................................Connect to an External OLA Server 146 .....................................................................
Configure Universes 146 .................................................................................................If Your USB–DMX Interface Does Not Appear 147 ......................................................
Monitor DMX Output 148 ................................................................................................
14 External Control 149Quickly Assign Triggers 150 ............................................................................................The External Control Window 151 ...................................................................................
Configurations 151 .....................................................................................................Bindings 152 ..............................................................................................................Triggers 154 ...............................................................................................................Actions 155 ................................................................................................................MIDI Shift Button 157 .................................................................................................
Live Triggers 157 ............................................................................................................How Live Triggers Work 160 .......................................................................................Disable Live Triggers 160 ............................................................................................Live Triggers Troubleshooting 160 ..............................................................................
Trigger Actions From ProPresenter 161 ...........................................................................
Lightkey User Guide7

MIDI Routing 162 ............................................................................................................Multi-Touch Gestures 163...............................................................................................
Lightkey User Guide8

1Welcome ➤ Lightkey is a professional lighting control application for live events,
nightclubs, churches, and any other kind of venue. It lets you control any DMX-compatible fixture—such as moving heads, scanners, LED matrixes, or lasers—through an elegant, easy-to-use interface.
DMX512 or simply DMX (Digital Multiplex) is a standard for communication networks which enables a controller (in this case, Lightkey) to control the features of many different DMX-compatible fixtures. To connect your computer to the DMX network, you need a DMX interface. Lightkey works with a wide range of USB–DMX interfaces from various manufacturers and any interface that supports the Art-Net, sACN, or ESP Net protocols. This is made possible by the Open Lighting Architecture, an open-source framework developed by the Open Lighting Project.
Setting up a lighting installation with Lightkey is quick and easy. An interactive assistant guides you through the entire process.
Once your lighting installation is set up, Lightkey makes it easy and fun to build spectacular light shows. You can create presets, sequence, and cues, add effects using the built-in effects engine, and synchronize your light show to music.
Lightkey’s elegant, Mac-like user interfaces provides all the controls you need in a single, well-arranged window. The white-on-dark controls have been specially designed for use in low-light environments and have large clickable areas, optimized for touch screens.
Lightkey includes a sophisticated system of keyboard shortcuts and gestures to control virtually every application feature. Once you have mastered these shortcuts, you can work faster than ever before. Users who prefer physical controls for their lights during a live show can “remote-control” Lightkey through DMX consoles, MIDI controllers, and user-definable keyboard shortcuts.
Lightkey User Guide9

2Activate Lightkey ➤ Lightkey is available as a free edition and multiple paid editions.
The free edition limits DMX output to 24 channels, whereas the paid editions allow up to 2048 channels.
If you want to use one of the paid editions, you need to purchase a license and activate Lightkey. Activation binds the license to a particular computer (although you can still transfer it to a different computer at any time).
Buy a License You can buy licenses from the Lightkey Online Store. Licenses are valid for one year.
Here are ways to go to the Online Store:
▪︎ Open Lightkey and choose Lightkey > Buy Lightkey.
▪︎ Go to lightkeyapp.com/en/buy.
Activate Lightkey Shorty after you have completed the purchase process you will receive an email with a license key. You use the license key to activate Lightkey on your computer.
For the standard activation process, the computer on which you want to activate Lightkey must be connected to the Internet. There is an alternative way which you can use if the computer has no Internet connection.
To activate Lightkey:
1 Copy the license key to the Clipboard. 2 Open Lightkey and choose Lightkey > Activate Lightkey….
3 Paste the license key into the text field and click Activate.
To activate Lightkey on a computer with no Internet connection:
1 Copy the license key to the Clipboard.
2 Open Lightkey and choose Lightkey > Activate Lightkey….
Lightkey User Guide10

3 Click “No Internet connection?”.
4 Paste the license key into the text field and click Create File. 5 Choose a destination folder—for example, the Desktop—and click Save.
Lightkey creates an Activation Request file in the selected folder. 6 Click Done.
7 Email the Activation Request file to [email protected].
You will shortly receive a reply email with an Activation Response file. We try to process activation requests as soon as possible, but can do so only within normal business hours (we are based in Europe).
8 Double-click the Activation Response file.
Lightkey will show a dialog which tells you that it has been successfully activated. 9 Click Done.
Renew a License A few days before your license expires, Lightkey will show a reminder dialog each time you start the application. In the dialog, you can click Buy License… to go directly to the Lightkey Online Store.
To renew your license:
1 Go to the Lightkey Online Store and select an edition.
2 During the purchase process, you are asked for the starting date of your license. Enter the date when your old license expires. (To find that date, open Lightkey and choose Lightkey > About Lightkey.)
3 Complete the purchase process. At the end you will receive an email with a new license key.
4 On the day when your old license expires, activate Lightkey using the new license key, as described in “Activate Lightkey”.
Transfer a License Between Computers You can transfer a license between computers an unlimited number of times. However, at any given time, you can only activate Lightkey on as many computers as you have licenses. Transferring a license requires that you deactivate Lightkey on the computer where it is currently activated. For the standard deactivation process, the computer must be connected to the Internet. There is an alternative way which works similar to the activation process with no Internet connection (see “Activate Lightkey” above).
To transfer a license to another computer:
1 Open Lightkey on the computer where it is currently activated and choose Lightkey > Deactivate Lightkey…, then click Deactivate.
2 After Lightkey has been successfully deactivated, you can activate it on the new computer, as described in “Activate Lightkey”.
Lightkey User Guide11

❖ Note: After deactivating, the first computer still “remembers” the license key. It automatically appears in the license key field when you activate Lightkey on that computer again, making it easier to transfer licenses between computers.
If you no longer have access to the computer with the active license, please contact us.
View Details About Your License After you activated Lightkey, you can see which edition you purchased and when your license expires.
To see information about your license:
▪︎ Choose Lightkey > About Lightkey.
The window shows your license code, the number of DMX channels, and the expiration date.
Lightkey User Guide12

3Set Up Your Lights ➤ Before you can create light shows, you need to tell Lightkey about
your lighting installation. An interactive assistant guides you through this process, which includes configuring DMX output, patching your fixtures, and creating the virtual Preview.
Step 1: Create a Project When you first start Lightkey, the Project Browser appears. It shows a preview of the three recently used projects (probably none at this point) and some demo projects.
To create a new project:
1 In the Project Browser, click New Project. 2 Enter a name and choose a location for the project file, then click Save.
For more information about projects, see chapter 4, “Projects”.
Step 2: Choose an Output Method Next, you need to tell Lightkey how you would like to output DMX. The following options are available:
▪︎ Offline Mode. Disables DMX output. Use this if you only want to test Lightkey.
▪︎ USB. This option shows a list of all connected USB–DMX interfaces that are supported by Lightkey. If your interface is missing, click Find Devices. If this doesn’t help, refer to “If Your USB–DMX Interface Does Not Appear” in chapter 13, “DMX Output and Input”.
▪︎ Art-Net. Art-Net is a communication protocol which allows distributing DMX data over a local network. Select the network interface which your Art-Net interface is connected to (for example, your computer’s Ethernet port) and then select your Art-Net interface from the list. If your interface is missing, click Find Devices. See “DMX Output Preferences” in chapter 13, “DMX Output and Input”, for more information.
Lightkey User Guide13
▪︎ sACN. Streaming ACN (sACN or ANSI E1.31) is a communication protocol for transferring DMX data over a local network. Select the network interface which your sACN interface is connected to (for example, your computer’s Ethernet port). See “DMX Output Preferences” in chapter 13, “DMX Output and Input”, for more information.
▪︎ ESP Net. ESP (Enttec Show Protocol) is a DMX-over-Ethernet communication protocol developed by Enttec. Select the network interface which your ESP Net interface is connected to (for example, your computer’s Ethernet port). See “DMX Output Preferences” in chapter 13, “DMX Output and Input”, for more information.
To choose an output method:
▪︎ Select one of the output methods as described above, then click Next.
If you want to use multiple universes with different output methods, simply select the output method for the first universe at this point. You can configure the other universes later, as described in “Configure Universes” in chapter 13, “DMX Output and Input”.
Step 3: Patch Your Fixtures In the next step you need to tell Lightkey about your fixtures. For each type of fixture you need a fixture profile, a file which contains a description of the fixture’s capabilities and the way they are controlled. For each of your fixtures you need to tell Lightkey what DMX universe it is connected to and what DMX address it will respond to. On the left of the window is the fixture library which contains all built-in, imported, and user-created fixture profiles. Lightkey comes with a large library of fixture profiles from many different manufacturers, and it can import thousands of freely available profiles in the formats SSL2, FXT, and PFF. The first column lists the manufacturers, the second column shows the profiles for the selected manufacturer. The library also contains a number of generic profiles which don’t relate to a specific fixture model.
On the right is a grid representing the 512 DMX channels in each universe. Your license determines how many channels are available for output. You can switch between universes using the buttons below the grid, but during the initial setup you should only use universe 1.
Find Fixture Profiles For simple fixtures, you may find a matching generic profile. Here’s an overview of the generic fixture profiles:
Profile name Use for
Fog Machine Fog machine, one channel (fog amount)
LED Matrix 3×3 (Mono) 3×3 matrix, one channel per beam
LED Matrix 3×3 (RGB) 3×3 matrix, three channels per beam (Red, Green, Blue)
LED Matrix 3×3 (RGBAW) 3×3 matrix, five channels per beam (Red, Green, Blue, Amber, White)
Lightkey User Guide14

LED Matrix 3×3 (RGBW) 3×3 matrix, four channels per beam (Red, Green, Blue, White)
LED Matrix 4×4 (Mono) 4×4 matrix, one channel per beam (monochrome)
LED Matrix 4×4 (RGB) 4×4 matrix, three channels per beam (Red, Green, Blue)
LED Matrix 4×4 (RGBAW) 4×4 matrix, five channels per beam (Red, Green, Blue, Amber, White)
LED Matrix 4×4 (RGBW) 4×4 matrix, four channels per beam (Red, Green, Blue, White)
LED Strip (DRGB) LED strip, four channels (Dimmer, Red, Green, Blue)
LED Strip (Mono) LED strip, one channel (monochrome)
LED Strip (RGB) LED strip, three channels (Red, Green, Blue)
LED Strip (RGBA) LED strip, four channels (Red, Green, Blue, Amber)
LED Strip (RGBAW) LED strip, five channels (Red, Green, Blue, Amber, White)
LED Strip (RGBD) LED strip, four channels (Red, Green, Blue, Dimmer)
LED Strip (RGBW) LED strip, four channels (Red, Green, Blue, White)
LED Strip 6× (DRGB) 6-beam LED strip, four channels per beam (Dimmer, Red, Green, Blue)
LED Strip 6× (RGB) 6-beam LED strip, three channel per beam (Red, Green, Blue)
LED Strip 6× (RGBAW) 6-beam LED strip, five channel per beam (Red, Green, Blue, Amber, White)
LED Strip 6× (RGBW) 6-beam LED strip, four channel per beam (Red, Green, Blue, White)
LED Strip 12× (DRGB) 12-beam LED strip, four channels per beam (Dimmer, Red, Green, Blue)
LED Strip 12× (RGB) 12-beam LED strip, three channel per beam (Red, Green, Blue)
LED Strip 12× (RGBAW) 12-beam LED strip, five channel per beam (Red, Green, Blue, Amber, White)
LED Strip 12× (RGBW) 12-beam LED strip, four channel per beam (Red, Green, Blue, White)
LED Strip 20× (DRGB) 20-beam LED strip, four channels per beam (Dimmer, Red, Green, Blue)
LED Strip 20× (RGB) 20-beam LED strip, three channel per beam (Red, Green, Blue)
LED Strip 20× (RGBAW) 20-beam LED strip, five channel per beam (Red, Green, Blue, Amber, White)
LED Strip 20× (RGBW) 20-beam LED strip, four channel per beam (Red, Green, Blue, White)
PAR Spot Conventional spot, one channel (monochrome)
PAR Wash Conventional spot, one channel (monochrome)
PAR Spot (DRGB) Conventional spot, four channel (Dimmer, Red, Green, Blue)
PAR Spot (RGB) Conventional spot, three channel (Red, Green, Blue)
PAR Spot (RGBW) Conventional spot, four channel (Red, Green, Blue, White)
Profile name Use for
Lightkey User Guide15

The remaining generic profiles are for demo purposes and should not be used to control real fixtures. For more complex fixtures, you need a profile specific to the fixture.
To find a profile for a specific fixture: 1 Browse the built-in fixture library for a matching profile. You can use the search field at
the top to search by manufacturer or model name.
2 Search for the fixture in our online fixture library. It is frequently updated and contains a large number of high-quality profiles in Lightkey’s native format.
3 We can create a profile for you if you send us the fixture’s DMX chart (often available as a PDF on the manufacturer’s website). Please use this online form to request a profile.
4 Create a profile using Lightkey’s built-in fixture editor or import a profile in the formats SSL2 (Sunlite) or PFF/FXT (DMX FreeStyler). There are thousands of free profiles available on the Internet. Note that imported profiles may need a bit of editing in the fixture editor before they work correctly with Lightkey.
Click at the top of the fixture library and then choose New Profile to create a new profile, or Import Profile… to import a profile.
Add Your Fixtures Once you have profiles for your fixtures, you can add them to the channel grid. This is called “patching”.
To add your fixtures:
1 Select a fixture profile in the library on the left. You can use the search field at the top to search by manufacturer or model name.
2 Do one of the following:
▪︎ Drag the fixture profile from the library to the channel grid. The first occupied channel should match the fixture’s DMX address. Fixtures must not overlap.
▪︎ Double-click the fixture profile in the library. The fixture will be added at the first available DMX address.
The fixture will appear in the channel grid with a dashed outline. Below it there is a window with additional options.
PAR Spot (RGBAW) Conventional spot, five channel (Red, Green, Blue, Amber, White)
PAR Wash (DRGB) Conventional spot, four channel (Dimmer, Red, Green, Blue)
PAR Wash (RGB) Conventional spot, three channel (Red, Green, Blue)
PAR Wash (RGBW) Conventional spot, four channel (Red, Green, Blue, White)
PAR Wash (RGBAW) Conventional spot, five channel (Red, Green, Blue, Amber, White)
Switch DMX switch, one channel: Off (0) or On (255)
Profile name Use for
Lightkey User Guide16

3 If the fixture has different operation modes (or “personalities”), select a mode from the menu below the fixture name. Be sure to select the same mode as is set on the fixture, or Lightkey will not be able to control the fixture! If no menu is shown then the fixture has no modes.
4 To correct the fixture’s start address, change the value in the field “Start at”. (You can increase/decrease the start address by pressing the Up/Down Arrow keys while the insertion point is in the “Start at” field.)
5 Assign a short name to the fixture. Short names appear in Lightkey’s Preview; they can be up to four characters long and usually include one or two letters and a number.
Pick a naming scheme that is suitable for your lighting installation. For example, if you have a row of PAR cans on the floor and one at the ceiling, you can name them F1, F2, F3, … and C1, C2, C3, … Lightkey already proposes a short name based on the fixture type.
If you add multiple fixtures at once, Lightkey will automatically increment the number for each fixture. For example, if you add four moving heads and enter “MH6”, their names will be “MH6”, “MH7”, “MH8”, and “MH9”.
6 If you assigned the same DMX address to multiple identical fixtures, enter their number in the Count field. Lightkey will then display multiple instances of the fixture in the Preview. Those instances always share the same fixture properties.
7 To patch multiple fixtures of the same type with consecutive DMX addresses, enter their number in the field labelled “Patch consecutive fixtures”. (You can increase/decrease the number by pressing the Up/Down Arrow keys while the insertion point is in the field.)
8 Click Patch (or press Return). 9 Repeat the steps until all fixtures have been added. If you don’t have profiles for some
fixtures, you can come back and add them later. 10 Click Next.
You can change the fixture patching information later. See chapter 12, “Manage Fixtures”, for more information.
Step 4: Arrange Your Fixtures Now you start to build the Preview, a visual two-dimensional representation of your lighting installation. The next screen shows a number of icons, each representing a fixture. You can drag the icons around to match the physical locations of your fixtures. You can also add shapes and images. Depending on the location, you can opt for a top view (e.g. a floor plan of your venue) or a front view (e.g. of your stage). You should confine all objects to the area enclosed by the white frame.
Lightkey User Guide17

Locate Fixtures If you are not sure which fixture a particular icon belongs to, you can use Highlight Mode. When Highlight Mode is enabled, the selected fixture(s) will light up.
To enable Highlight Mode:
▪︎ Click in the toolbar or choose Layout > Highlight Mode (or press Command-Shift-H).
Size and Rotate Fixture Icons You can change the length and rotation of some icons to reflect the size and place- ment of the physical fixture. This works for LED fixtures as well as PAR and moving head arrays. You can also choose between two different icon sizes for LED fixtures.
To resize or rotate a fixture icon:
▪︎ Click the fixture icon to select it, then drag one of the blue selection handles around it.
To rotate an LED ring or matrix:
1 Click the fixture icon to select it. 2 Hold down the Command key and drag one of the blue selection handles around it.
Select multiple fixtures to resize or rotate them at once, provided they are of the same type.
To change the icon size of an LED fixture: 1 Click the fixture icon to select it.
2 Do one of the following:
▪︎ Click the fixture’s name, choose Shape from the shortcut menu, and then select one of the options.
▪︎ Choose Layout > Shape, and ten select one of the options.
PAR Moving Head, Scanner Laser, Fog Machine, Generic
Array of PARs Array of Moving Heads LED Bar
Strobe Blinder Panel
LED Strip (single beam) LED Strip (individual beams) LED Matrix
Lightkey User Guide18

Add Images, Shapes, and Text You can add built-in or custom images as well as shapes (rectangles, rounded rectangles, ovals, lines, and various types of trusses) to create a visual representation of your venue. You can also add text labels.
To add a built-in image: ▪︎ Click the topmost icon on the left, then drag an image to the desired location in the
Preview.
Here are ways to add a custom image:
▪︎ Choose Layout > Insert Image File…, then select an image file and click Insert. Lightkey can handle all common image formats.
▪︎ To add an image from another application, copy the image to the Clipboard, go to Lightkey, and choose Edit > Paste.
▪︎ Drag an image file from the Finder to the Preview area and position it where you want it.
After adding an image, drag it to the desired location and adjust its size by dragging one of the blue selection handles around it. Hold down the Command key as you resize an image to distort its aspect ratio.
To add a shape: 1 Press the mouse button over one of the shape icons on the left and drag it to the
desired location in the Preview. 2 Adjust the new shape’s size by dragging one of the blue selection handles around it.
To add text: 1 Press the mouse button over the icon and drag it to the desired location in the
Preview.
2 Double-click the text to select it, then type. 3 To change the text formatting, choose Edit > Font > Show Fonts or click in the
toolbar, then use the Font window to change the font, font size, and other options. 4 Click outside the text or press Return to finish editing.
There are many more things you can do when you design your preview. See chapter 6, “Preview”, for details. When you are done creating your preview, click Next.
Step 5: Group Fixtures In the next step you can create groups of similar fixtures. Grouped fixtures can be quickly selected at once, although it is still possible to select them individually. You should group fixtures with the same type and in the same location—for example, a row of blinders above the stage.
T
A
Lightkey User Guide19

To create a fixture group:
1 Select the fixtures to be grouped. You can press the mouse button over a blank part of the Preview and drag it over the fixtures. Alternatively, hold down the Shift key and click the fixtures one by one.
2 Do one of the following:
▪︎ Click in the toolbar.
▪︎ Control-click one of the fixtures and choose Group from the shortcut menu. ▪︎ Choose Layout > Group (or press Command-Option-G).
Grouped fixtures are enclosed by a dashed frame when they are selected.
When you are done creating fixture groups, click Next.
Step 6: Set Beam Directions
Lightkey needs some information about the positioning of your fixtures in order to render its virtual light beams.
▪︎ For each fixture with a moving light beam, you need to tell Lightkey the home direction, rotation direction, and perspective. Optionally you can also limit the pan and tilt ranges.
▪︎ For each fixture with a fixed light beam, you need to tell Lightkey the direction of the light beam.
Under each fixture’s icon a button labelled “Set…” appears. Once you have set the beam position for a fixture, it changes to a checkmark. You can set the beam positions for multiple fixtures at once by selecting the fixtures and clicking the “Set…” button below one of their icons.
To calibrate the position of a fixture with a movable light beam:
1 Click the “Set…” button below the fixture icon.
2 Follow the instructions and click Next after each step. Click Done after the last step. When you’re done, the “Set…” button below the fixture icon changes to a checkmark.
To set the position of a fixture with a fixed light beam: 1 Click the “Set…” button below the fixture icon.
2 Follow the instructions and click Done. When you’re done, the “Set…” button below the fixture icon changes to a checkmark.
When you have set the beam positions for all fixtures, click Next.
Note: This step only applies if you have fixtures with virtual light beams (PARs, moving heads, scanners, blinders, strobes, panels, or LED bars).
Lightkey User Guide20

Step 7: Set Beam Colors
For fixtures whose color can’t be controlled through DMX, you need to tell Lightkey the color for the virtual light beam.
Under each fixture’s icon a button labelled “Set…” appears. Once you have set the color for a fixture, it changes to a checkmark, and the dot inside the fixture icon adapts the beam color. You can set the beam colors for multiple fixtures at once by selecting the fixtures and clicking the “Set…” button below one of their icons.
To set a fixture’s beam color:
1 Click the “Set…” button below the fixture icon. 2 Choose a color.
When you’re done, the “Set…” button below the fixture icon changes to a checkmark.
When you have set the beam colors for all fixtures, click Next.
You’re Done After completing these steps, Lightkey is ready to control your lights. Click Get Started, and you will see the normal Lightkey window. For more information about the parts of the window, refer to chapter 5, “The Lightkey Window”. If you did not complete all steps during the setup, you can come back and change the settings at any time:
▪︎ Click Edit in the toolbar or choose View > Edit Preview to edit the Preview. ▪︎ Click in the toolbar or choose Lightkey > Manage Fixtures… to add, remove, or
change fixtures and manage DMX output settings.
Note: This step only applies if you have any monochrome fixtures whose color can’t be controlled through DMX.
Lightkey User Guide21

4Projects ➤ The first thing you see when you open Lightkey is the Project
Browser. It shows the three recently used projects (if any) and two demo projects.
A Lightkey project is a file which contains all the information about your fixtures and light shows for a given lighting installation. A project contains:
You can create as many projects as you like, but only one can be open at any given time. Multiple projects can be useful if you use Lightkey in different environments. But in most cases a single project is all you need.
Because Lightkey supports the macOS Auto Save technology, projects are saved automatically in the background.
Create a Project
To create a new project: 1 If a project is open, choose File > Close Project. The Project Browser appears.
2 Click New Project or choose File > New Project. 3 Enter a name and choose a location for the project file, then click Save.
4 Follow the instructions of the interactive assistant to set up your project. The setup process is explained in chapter 3, “Set Up Your Lights”.
Lightkey User Guide22
▪︎ Your fixtures’ patching information ▪︎ Configuration information for your universes ▪︎ The virtual Preview ▪︎ Presets, sequences, and cues ▪︎ Effect templates and movement paths ▪︎ Control panels and cuelists ▪︎ Your external control configurations
Open or Close a Project When you start Lightkey, it automatically opens the recently used project. Therefore, as long as you only have a single project, you rarely need to manually open or close projects.
❖ Note: To have Lightkey reopen the last project when you start the application, make sure that “Close windows when quitting an app” is turned off in the General pane of the System Preferences.
To open a project:
1 If a project is already open, choose File > Close Project. The Project Browser appears. 2 Do one of the following:
▪︎ If the desired project appears in the Project Browser, double-click it.
▪︎ Click Open Other Project… at the bottom-right of the Project Browser, select a project file, and click Open.
▪︎ Choose File > Open…, select a project file, and click Open. ▪︎ Double-click a project file in the Finder.
Here are ways to close a project: ▪︎ Choose File > Close Project.
▪︎ Click the close button (red dot) in the upper-left corner of the Lightkey window. After closing a project, Lightkey returns to the Project Browser.
Other Project Actions You can use the Finder for other actions such as renaming, duplicating, or deleting projects.
To locate a project in the Finder:
▪︎ Control-click a project in the Project Browser, then choose Show in Finder from the shortcut menu.
Undo Changes As you work with Lightkey, you can undo most of the changes you can do to a project. This includes changes to the Preview, presets, sequences, cues, effects, control panels, cuelists, and even fixture properties. You can also redo actions that you have undone.
To undo a change: ▪︎ Choose Edit > Undo (or press Command-Z).
To redo a change: ▪︎ Choose Edit > Redo (or press Command-Shift-Z).
Lightkey User Guide23

5The Lightkey Window ➤ This chapter introduces you to the user interface that is shown once
you open a project. Lightkey presents all the controls you need in a single, well-arranged window. The white-on-dark user interface has been specially designed for low-light environments.
Lightkey User Guide24
The Preset Palette is where you manage presets and sequences
The Preview shows the fixtures on your
stage or dance floor
The Shortcuts view shows keyboard shortcuts and gestures which are relevant to the current context
The Design view lets you change the properties of the selected fixtures. It adapts itself to the fixtures in your project so you only see the controls that are actually needed. You can switch between the Design view and the Live view which you’ll use to control your lights during a live show.
Switch between the Design view and
Live view
The toolbar provides quick access to many features

Toolbar The toolbar at the top of the Lightkey window provides quick access to frequently-used functions. The items in the toolbar change depending on the current context. Here’s how the toolbar looks once you open a project:
Customize the Lightkey Window You can show or hide parts of the Lightkey window according to your requirements. For example, you may want to switch to the Live view and hide the Preset Palette during a live show. Or you may want to hide the Shortcuts view once you became familiar with the shortcuts.
Here are ways to switch between the Design and Live view: ▪︎ Click Design or Live below the Preview.
▪︎ Choose View > Design (or press Command-D) to show the Design view. Choose View > Live (or press Command-L) to show the Live view.
Here are ways to show or hide the Preset Palette:
▪︎ Click in the toolbar and choose Show/Hide Preset Palette from the menu.
▪︎ Choose View > Show/Hide Preset Palette (or press Command-Shift-P).
Here are ways to show or hide the Shortcuts view:
▪︎ Click in the toolbar and choose Show/Hide Shortcuts from the menu.
A B C E G I L M NJ KF HD
A Manage fixtures
B Show the External Control window
C Show the DMX Output window
D Lock or unlock Lightkey
E Show the overridden fixture properties
F Clear the overridden fixture properties
G Enter or exit blind mode
H Freeze or unfreeze output
I Show actions for the selected fixtures
J Add an effect for the selected fixtures
K Edit the Preview
L Add a preset (hold down the mouse button for more actions)
M Search the Preset Palette
N Show view options
Lightkey User Guide25

▪︎ Choose View > Show/Hide Shortcuts (or press Command-Shift-S).
To resize the parts of the window: ▪︎ Drag one of the dividers between the parts.
Full Screen View Lightkey’s user interface is ideally suited for the macOS full screen view. By default, the window expands to the entire screen when you open a project and shrinks back to a window when you close a project. In full screen view, move the pointer to the top of the screen to show the menu bar.
Here are ways to zoom the Lightkey window to the full screen:
▪︎ Click the zoom button (green dot) in the top-left corner of the window.
▪︎ Choose View > Enter Full Screen (or press Command-F).
Here are ways to return to regular view:
▪︎ Move the pointer to the top of the screen, then click the zoom button (green dot) in the top-left corner.
▪︎ Choose View > Exit Full Screen (or press Command-F).
To change the behavior when opening and closing a project:
1 Choose Lightkey > Preferences… (or press Command-Comma) and click General.
2 Select “Enter full screen when opening a project” to automatically expand the window to the entire screen when you open a project and shrink it back when you close the project.
Dual Windows If you have a second display connected to your computer, you can show the Live view on the second display.
To show the Live view on a second display: 1 Choose View > Dual Windows.
The Live view appears in a second window titled Live.
2 Drag the Live window to the second display.
Lightkey User Guide26

3 Click in the Live window to make sure it’s selected, then choose View > Enter Full Screen to expand the window to the full screen.
Lightkey restores the two windows on their respective screens when you quit and reopen the application. To return the Live view to the main window, choose View > Single Window.
Adaptive Background Color By default, the background of Lightkey’s window adapts itself to the predominant light color.
To change the adaptive background color: 1 Choose Lightkey > Preferences… and click General.
2 Select or deselect “Adaptive background color”.
Lock Lightkey You can protect your projects and preferences against changes with a password or Touch ID (if available on your Mac). Only people who know the password can:
▪︎ edit presets, sequences, or cues, ▪︎ patch fixtures and universes,
▪︎ edit external control configurations, ▪︎ change settings in the Preferences window.
To lock Lightkey with a password: 1 Click in the toolbar or choose Lightkey > Lock.
2 In the dialog that appears, enter a password in the Password field, then enter it again in the Verify field.
3 Enter a hint to help you remember the password. The hint appears if you enter the wrong password three consecutive times.
4 Select “Allow unlocking with Touch ID” to allow unlocking Lightkey with your fingerprint (if Touch ID is available on your Mac).
5 Click Lock.
Note that the lock icon in the toolbar is now closed.
To unlock Lightkey:
1 Click in the toolbar or choose Lightkey > Unlock…
2 Enter your password and click Unlock, or place your finger on the Touch ID sensor. Note that the lock icon in the toolbar is now open. Lightkey remains unlocked until you quit the application or lock it again.
To lock Lightkey again:
▪︎ Click in the toolbar or choose Lightkey > Lock.
Lightkey User Guide27

To permanently remove the password protection: 1 Choose Lightkey > Remove Lock.
2 Enter your password (only if Lightkey is currently locked).
Lightkey User Guide28

6Preview ➤ The centerpiece of Lightkey’s user interface is a two-dimensional
view of your lighting installation. You can extend it from simple fixture icons to a visual representation of your venue, complete with virtual light beams.
You begin creating the Preview when you first set up your project, as described in chapter 3, “Set Up Your Lights”, but you can always come back and complement it later. Lightkey includes a flexible graphics editor which lets you create a detailed view of your venue quickly and effortlessly. This chapter covers all tools and techniques for building the Preview.
The Preview is part of a project. In this chapter we assume that a project is already open.
Edit the Preview Before you can change the objects in the Preview, you must put the Preview into edit mode. The remainder of this chapter assumes that the Preview is in edit mode.
Here are ways to enter or exit edit mode:
▪︎ To enter edit mode, click Edit in the toolbar. To exit edit mode, click Done.
▪︎ Choose View > Edit Preview (or press Command-J).
▪︎ Control-click a blank part of the Preview and choose Edit Preview from the shortcut menu.
▪︎ Hold down the Command key and double-click a blank part of the Preview.
While the Preview is in edit mode, a grid is shown in the background which helps you to align objects.
Lightkey User Guide29

Edit Objects The Preview contains various types of objects: Fixture icons, shapes (rectangles, rounded rectangles, ovals, lines, and various types of trusses), text, and images. This section covers basic editing techniques common to all objects.
Select Objects
Here are ways to select and deselect objects: ▪︎ To select a single object, click anywhere on the object.
▪︎ To select additional objects, hold down the Shift key and click each object. ▪︎ To remove an object from the selection, hold down the Shift key and click the selected
object.
▪︎ To select a fixture that is part of a group, double-click the fixture.
▪︎ To select multiple objects at once, press the mouse button over a blank part of the Preview and drag it over the objects. (Hold down the Option key to select outward from the starting point.)
▪︎ To add or remove multiple objects to/from the selection, hold down the Shift key, press the mouse button over a blank part of the Preview, and drag it over the objects.
▪︎ To select all objects in the Preview, choose Edit > Select All (or press Command-A). ▪︎ To deselect all objects in the Preview, choose Edit > Deselect All (or press Command-
Shift-A or Esc) or click a blank part of the Preview.
Move Objects
Here are ways to move objects within the Preview:
▪︎ Press the mouse button over an object and drag it to a new location. To move multiple objects, select the objects and then drag them to a new location.
As you drag objects, Lightkey shows smart alignment and spacing guides that help you to precisely align objects.
▪︎ To disable alignment and spacing guides, hold down the Command key as you drag.
▪︎ To constrain the motion to horizontal or vertical, drag the object(s) while holding down the Shift key.
▪︎ To move objects in small steps, select the objects and press one of the arrow keys. To move objects in larger steps, hold down the Shift key while pressing an arrow key.
Align Objects You can quickly align objects relative to one another.
To align objects:
1 Select the objects you want to align.
Align Middle
Lightkey User Guide30

2 Do one of the following:
▪︎ Choose Layout > Align and then choose one of the options in the submenu.
▪︎ Click in the toolbar and choose one of the options in the menu.
▪︎ Control-click one of the objects and choose one of the options in the Align submenu of the shortcut menu.
Space Objects Evenly You can quickly place objects with even horizontal or vertical spacing.
To space objects evenly: 1 Select the objects.
2 Do one of the following:
▪︎ Choose Layout > Distribute and then choose one of the options in the submenu.
▪︎ Click in the toolbar and choose one of the options in the menu.
▪︎ Control-click one of the objects and choose one of the options in the Distribute submenu of the shortcut menu.
Resize and Rotate Objects Resizable objects show handles when they are selected. You can resize multiple objects of the same kind at once. Some fixtures can’t be resized and have no handles.
Here are ways to resize one or more objects:
▪︎ Select one or more objects and then drag one of the blue selection handles. To resize objects in one direction, drag a side handle instead of a corner handle.
▪︎ To resize objects from their center, press the Option key as you drag.
▪︎ To maintain the proportions of a rectangle or oval, hold down the Shift key as you drag.
▪︎ To constrain a curved truss to a circle segment, hold down the Shift key as you drag. ▪︎ To constrain a line’s or straight truss’s angle to 45°, hold down the Shift key as you
drag. ▪︎ When you resize an image or round truss, the proportions are automatically
maintained. To resize these objects disproportionally, hold down the Command key as you drag.
▪︎ To disable alignment and spacing guides, hold down the Command key while you resize objects.
Rectangles, rounded rectangles, ovals, and images can also be rotated freely. You can rotate multiple objects at once.
To rotate an object: 1 Select one or more objects.
Distribute Horizontally
Lightkey User Guide31

2 Hold down the Command key and drag one of the blue selection handles around it. Hold down Shift to constrain the angle to 45°.
Edit Fixtures This section discusses editing actions pertaining to fixtures.
Size and Rotate Fixture Icons LED fixtures can be represented in various ways, depending on the number of beams and their arrangement (as defined by the fixture profile) and the shape you choose for their icon. You can also change the icon size and orientation to reflect the fixture’s physical size. Here are various types of icons for LED fixtures:
You can also change the size and orientation of PAR or moving head arrays.
To change the shape of an LED fixture and the size of the beams:
1 Click the fixture icon to select it.
2 Do one of the following: ▪︎ Click the fixture’s name, choose Shape from the shortcut menu and then select one
of the shapes. ▪︎ Choose Layout > Shape and select one of the shapes.
To resize or rotate a fixture icon: ▪︎ Click the fixture icon to select it, then drag one of the blue selection handles around it.
Hold down the Shift key to constrain the angle to 45°. Hold down Option to rotate around the center.
To rotate an LED ring or matrix: 1 Click the fixture icon to select it.
2 Hold down the Command key and drag one of the blue selection handles around it. Hold down Shift to constrain the angle to 45°.
Select multiple fixtures to resize or rotate them at once, provided they are of the same type.
Set Beam Directions Lightkey displays virtual light beams for PARs, moving lights, and similar fixtures as well as LED bars. They are represented by circles in the Preview. For moving lights, an arrow indicates the current pan angle:
Lightkey User Guide32

Lightkey needs some information about the positioning of your fixtures in order to render its virtual light beams. ▪︎ For each fixture with a moving light beam, you need to tell Lightkey the home angle,
rotation direction, and perspective. Optionally you can also limit the pan and tilt ranges.
▪︎ For each fixture with a fixed light beam, you need to tell Lightkey the direction of the light beam.
To calibrate the position of a fixture with a movable light beam: 1 Click the fixture icon to select it.
2 Do one of the following:
▪︎ Click in the toolbar.
▪︎ Click the fixture’s name and choose Calibrate Position… from the shortcut menu.
▪︎ Choose Layout > Calibrate Position… (or press Command-Shift-Option-P). 3 Click each of the tabs on the left and make the appropriate changes:
▪︎ Home: This step tells Lightkey how the fixture is positioned in relation to the Preview. The fixture moves to its center pan angle (home angle) and a tilt angle of 90°. Imagine you are looking in the direction of the pan axis, and drag the arrow to the position which best matches where the fixture currently points.
▪︎ Rotation: This step tells Lightkey in which direction the fixture turns when the pan value changes. The fixture slowly rotates around its pan axis. Assuming the same perspective as in the previous step, click the arrows until their movement matches that of the fixture.
Viewing direction onto position control
Position control
Pan axis
Pan rotation
Lightkey User Guide33

▪︎ Limits: In this step you can limit the allowed ranges for pan and tilt. For example, if a moving light is close to a wall, you may not want it to point directly at the wall. Drag the red handles to set the minimum pan and tilt angles, and the green handles to set the maximum angles.
▪︎ Perspective: This step only affects how light beams are rendered in the Preview. The fixture moves to a tilt angle of 0°. Choose how the light beam direction relates to the viewing direction of the Preview.
4 Click Done.
To set the beam direction of a fixture with a fixed light beam:
1 Click the fixture icon to select it.
2 Do one of the following:
▪︎ Click in the toolbar.
▪︎ Click the fixture’s name and choose Set Beam Direction… from the shortcut menu.
▪︎ Choose Layout > Set Beam Direction… (or press Command-Shift-Option-P).
3 Follow the instructions, then click Done.
By selecting multiple fixtures you can set their beam positions at once.
Set Beam Colors For fixtures whose color is not DMX-controlled—such as a PAR with a color gel—, you can choose the color of the virtual light beam. The color is also displayed as a dot inside the fixture icon.
To set a fixture’s beam color: 1 Click the fixture icon to select it.
2 Do one of the following:
▪︎ Click in the toolbar.
▪︎ Click the fixture’s name and choose Set Beam Color… from the shortcut menu.
▪︎ Choose Layout > Set Beam Color… (or press Command-Shift-Option-C). 3 Choose a color.
By selecting multiple fixtures you can set their beam colors at once.
Group Fixtures Grouped fixtures can be quickly selected at once, although it is still possible to select them individually. You should group fixtures with the same type and in the same location—for example, a row of blinders above the stage.
To create a fixture group:
1 Select the fixtures to group. 2 Do one of the following:
▪︎ Click in the toolbar.
Lightkey User Guide34

▪︎ Control-click one of the fixtures and choose Group from the shortcut menu.
▪︎ Choose Layout > Group (or press Command-Option-G).
Grouped fixtures are enclosed by a dashed frame when they are selected.
To ungroup grouped fixtures: 1 Select the fixture group.
2 Do one of the following:
▪︎ Click in the toolbar.
▪︎ Control-click one of the fixtures in the group and choose Ungroup from the shortcut menu.
▪︎ Choose Layout > Ungroup (or press Command-Option-G).
Locate Fixtures If you are not sure which fixture a particular icon belongs to, you can use Highlight Mode. When Highlight Mode is enabled, the selected fixture(s) will light up.
To enable Highlight Mode:
▪︎ Click in the toolbar or choose Layout > Highlight Mode (or press Command-Shift-H).
Disable Fixtures If a fixture is temporarily disconnected, broken, or simply not in use, you can disable it in Lightkey. A disabled fixtures appears dimmed in the Preview, and its DMX channels are all set to zero.
Here are ways to disable or enable a fixture: ▪︎ Click the fixture’s name and choose Disable in the shortcut menu.
▪︎ Select one or more fixtures and choose Layout > Disable.
❖ Note: If multiple fixtures are patched to the same DMX address, you can disable each one individually. When all fixtures are disabled, the corresponding DMX channels are set to zero.
Add or Remove Fixtures You can add or remove fixtures in the Fixture Manager. You can also add multiple icons in the Preview for a single fixture, which is useful if you patched several identical fixtures to the same DMX address. See chapter 12, “Manage Fixtures”, for more information.
Edit Images, Shapes, and Text This section discusses editing actions pertaining to built-in or custom images, shapes, and text labels. Shapes include rectangles, rounded rectangles, ovals, lines, and various types of trusses.
Lightkey User Guide35

Add an Image, Shape or Text Use the icons on the left side of the stage to add objects.
To add a built-in image: ▪︎ Click the topmost icon on the left, then drag an image to the desired location in the
Preview.
Here are ways to add a custom image:
▪︎ Choose Layout > Insert Image File…, select an image file, and click Insert. ▪︎ To add an image from another application, copy the image to the Clipboard, go to
Lightkey, and choose Edit > Paste.
▪︎ Drag an image file from the Finder to the Preview area and position it where you want it.
Here are ways to add a shape:
▪︎ Place the mouse pointer over one of the shape icons on the left and drag it to the desired position on the Preview.
▪︎ Choose Layout > Insert (name of shape).
Here are ways to add text:
▪︎ Place the pointer over the icon and drag it to the desired location in the Preview.
▪︎ Choose Layout > Insert Text. Double-click the text label to begin editing, then type. To start a new line, press Option-Return. Click outside the text label or press Return to finish editing. To edit an existing text label, double-click the text label or select it and press Return.
Copy and Paste Images, Shapes, and Text You can copy images, shapes, and text labels to the Clipboard and paste them again later, as common in many Mac apps. You can also copy and paste images between applications.
Here are ways to cut or copy an object:
▪︎ Select the object(s) and choose Edit > Cut or Edit > Copy (or press Command-X or Command-C).
▪︎ Control-click the object and choose Cut or Copy from the shortcut menu.
Here are ways to paste objects from the Clipboard:
▪︎ Choose Edit > Paste (or press Command-V).
▪︎ Control-click anywhere in the Preview and choose Paste from the shortcut menu.
Duplicate Images, Shapes, and Text
Here are ways to duplicate objects:
▪︎ Select the object(s) and choose Edit > Duplicate (or press Command-Shift-D). ▪︎ Control-click an object and choose Duplicate from the shortcut menu.
T
Lightkey User Guide36

▪︎ Hold down the Option key while you drag an object.
▪︎ Hold down the Option key and press one of the arrow keys. The new object will be offset from the original by one unit in the arrow direction.
Delete Images, Shapes, and Text
To delete an object: ▪︎ Select the object(s) and press the Delete key.
If you accidentally delete an object, choose Edit > Undo Delete.
Order Images, Shapes, and Text The order or layering of images, shapes, and text determines whether objects appear above or below other objects. Note that fixtures always appear on top of other objects.
To change the order of objects:
1 Select one or more objects. 2 Do one of the following:
▪︎ Choose Layout > Order and then choose one of the options in the submenu.
▪︎ Control-click one of the objects and choose one of the options in the Order submenu of the shortcut menu.
Change the Style of Built-in Images and Shapes You can change attributes like stroke width, stroke color, and fill color for built-in images and shapes.
Here are ways to change the style of an image or shape: ▪︎ Select the object(s) and choose Layout > Stroke Width, Layout > Stroke Color, or
Layout > Fill Color, then choose an item from the submenu.
▪︎ Control-click the object and choose Stroke Width, Stroke Color, or Fill Color from the shortcut menu, then choose an item from the submenu.
Adjust Shape Features Some shapes have specific features which you can change with special selection handles.
To adjust the corner radius of a rounded rectangle:
1 Select the rounded rectangle.
2 Drag the green selection handle near its top-left corner.
To change the starting or ending angle of a curved truss:
1 Select the curved truss. 2 Drag one of the green selection handles at each end. Hold down the Shift key as you
drag to constrain the angle to 45°.
Lightkey User Guide37

Change Text Formatting You can change fonts, font sizes, and other text attributes like in many other Mac applications.
To change the formatting of a text label:
1 Select one or more text labels. To change only a part of the text, double-click a text label and select the desired range.
2 Do one of the following:
▪︎ Click in the toolbar or choose Edit > Font > Show Fonts. Select a font, font size, and other options in the Font window.
▪︎ Choose Edit > Font > Bold, Underline, Italic to change the text style. ▪︎ Choose Edit > Font > Show Colors, then select a color in the Color window.
▪︎ Choose Edit > Alignment, then choose one of the options in the submenu to change the alignment of the label.
A
Lightkey User Guide38

7Fixture Properties ➤ A fixture property comprises one or more features of a fixture that
can be controlled through DMX—for example, Dimmer, Color, and Position. This chapter describes how you change these properties in Lightkey.
Changing a fixture property generally comprises two steps:
▪︎ Select one or more fixtures (or an individual light beam). ▪︎ Change the selected fixtures’ properties.
Fixture properties that you manually set are applied directly to the fixture, overriding any properties applied by presets, sequences, or cues. If at least one property has been manually defined (or “overridden”), a blue dot appears to the left of the fixture name.
You can define fixture properties for multiple fixtures at once, even if the fixtures are of different types. Lightkey will do its best to find the closest matching value for each individual fixture.
Select Fixtures Since you will often need to select fixtures as you create a light show, Lightkey provides manifold ways to do so quickly using the keyboard, mouse, and other hardware. They are described in this section. A light frame around the icon indicates that a fixture is selected.
The fixture has overridden properties
The frame shows that the fixture is selected
Lightkey User Guide39

Select All Fixtures
Here are ways to select or deselect all fixtures:
▪︎ To select all fixtures, choose Edit > Select All (or press Command-A). ▪︎ To deselect all fixtures, choose Edit > Deselect All (or press Command-Shift-A or Esc)
or click a blank part of the Preview.
Select Fixtures by Location
Here are ways to select and deselect fixtures by their location in the Preview:
▪︎ To select a single fixture, click its icon. ▪︎ To select all fixtures in a group, click the icon of one of the fixtures. To select an
individual fixture in a group, double-click its icon.
▪︎ To select additional fixtures, hold down the Shift key and click each fixture.
▪︎ To remove a fixture from the selection, hold down the Shift key and click the selected fixture.
▪︎ To select multiple fixtures at once, press the mouse button over a blank part of the Preview and drag it over the fixtures. (Hold down the Option key to select outward from the starting point.)
▪︎ To add or remove multiple fixtures to/from the selection, hold down the Shift key, press the mouse button over a blank part of the Preview, and drag it over the fixtures.
▪︎ To select the nearest fixture in any direction, press one of the arrow keys. ▪︎ To extend the fixture selection in any direction, hold down the Shift key and press one
of the arrow keys.
Select Fixtures by Type When a single fixture is selected, you can quickly extend the selection to all other fixtures of the same type (for example, all moving heads or all blinders).
To select fixtures by type:
1 Select a single fixture. 2 Choose Edit > Select All [fixture type] (for example, Select All Moving Heads) (or press
Command-Option-A).
Select Fixtures by Name You can quickly select a fixture by typing its short name, or select multiple fixtures by typing a common prefix of their short names. You can also traverse fixtures in alphabetical order.
To select fixture(s) by their short name:
▪︎ Type one or more letters or numbers. Do not use the Shift key or any other modifier keys.
Lightkey User Guide40

Example: Suppose there are fixtures with the following types and short names.
Moving heads: MH1, MH2, MH3, MH4, MH5, MH6 PARs on left side of stage: PL1, PL2, PL3, PL4
PARs on right side of stage: PR1, PR2, PR3, PR4 Here are examples how you can select these fixtures using type selection:
Here are ways to traverse fixtures in alphabetical order:
▪︎ To select the next fixture in alphabetical order, press Control-Tab. ▪︎ To select the previous fixture in alphabetical order, press Control-Shift-Tab.
Select Fixtures Through External Control You can set up bindings to select fixtures through DMX-In, MIDI, or custom keyboard shortcuts. See chapter 14, “External Control”, for more information.
Select Light Beams Some fixtures have multiple light beams which can be controlled individually—for example, an LED matrix or a scanner with multiple heads. To change properties for individual beams, you first select the beam(s) and then change the fixture properties. For some types of fixtures the icon in the Preview shows the individual beams:
❖ Note: Only the Dimmer, Color, Shutter/Strobe, and Position properties can be defined for individual beams.
Type this … … to select these fixtures
M All moving heads
MH2 MH2
P All PARs
PL PARs on the left side of the stage
PR PARs on the right side of the stage
PR1 PR1
LED strip with 6 beams LED ring with 6 beams LED matrix with 12 beams
LED bar with 4 segments LED PAR with 7 beams Moving head array with 4 heads
Lightkey User Guide41

To select one or more light beams:
1 Select a fixture with multiple light beams. 2 Do one of the following:
▪︎ If the fixture’s icon shows the light beams, click one of the beams in the icon. ▪︎ Click the fixture’s name and choose Beams from the shortcut menu, then choose
one of the items from the submenu.
▪︎ Choose Fixture > Beams, then choose one of the items from the submenu.
To select an additional beam or remove a beam from the selection, hold down the Command key and select a beam as described above.
To select a range of beams, click one of the beams in the fixture’s icon, then hold down the Shift key and click another beam. This selects the two clicked beams and all beams in between.
Fixture Properties A fixture property comprises one or more features of a fixture that can be controlled through DMX—for example, Dimmer, Color, and Position. There are several places where you control properties of the selected fixture(s): ▪︎ The Design view below the Preview (see the image below) controls most fixture
properties, for example, Dimmer, Color, and Shutter/Strobe. The Design view adapts itself to the fixtures in the current project: Only properties which are supported by your fixtures are visible, and individual controls may be hidden if they don’t apply to your fixtures.
▪︎ Heads-up displays (or HUDs) in the Preview control Position, Focus, Zoom, and Iris.
▪︎ The fixture’s shortcut menu and the menu bar contain commands to control the Lamp and Command properties.
The lighter background shows the Color property is selected
xx Click here to show the Design view
The blue dot indicates that the
Dimmer property is defined
Lightkey User Guide42

Here are ways to show the Design view: ▪︎ Click Design below the Preview.
▪︎ Choose View > Design (or press Command-D).
Select a Fixture Property Most fixture properties can be selected. While a property is selected, you can use specific keyboard shortcuts to control the property. These shortcuts are listed in the following sections; you also see them in the Shortcuts view when the property is selected. For example, if the Color property is selected, the Shortcuts view’s title reads “Shortcuts – Color”.
A property with a HUD is selected when the HUD is open. Only properties that are supported by at least one of the selected fixtures can be selected. All other properties are disabled.
❖ Note: You can’t select properties that have been hidden from the Design view. See “Reorder and Hide Custom Properties” below on how to show or hide properties in the Design view.
There are several ways to select fixture properties.
To select a fixture property: 1 Select one or more fixtures which support the property.
2 Do one of the following:
▪︎ Click a fixture’s name and select the property from the shortcut menu.
▪︎ Click in the toolbar and choose Select Property from the menu, then select a property.
▪︎ Choose Fixture > Select Property, then select a property from the menu.
Fixture properties in the Design view are automatically selected when you click one of their controls. For example, the Shutter/Strobe property is selected when you click one of the shutter states. The selected property in the Design view has lighter background. Many fixture properties have a keyboard shortcut (a letter) which selects the property in the Design view or opens the property’s HUD. After using the shortcut to select the property, you can use property-specific keyboard shortcuts to change its value. This way you can control most fixture properties solely by using the keyboard.
A HUD for controlling the Zoom
property
Lightkey User Guide43

To select a fixture property using keyboard shortcuts:
1 Select one or more fixtures which support the property. 2 Do one of the following:
▪︎ Hold down the Shift key and press the letter for the fixture property.
▪︎ Press only the letter for the fixture property until the property is selected in the Design view or until a HUD appears.
To cycle the fixture properties in the Design view:
1 Make sure the Design view is visible (see above).
2 Select one or more fixtures. 3 Press the Tab key to select the next (or first) enabled property in the Design view, or
press Shift-Tab to select the previous enabled property.
Here are ways to deselect any fixture property:
▪︎ Press Return, Enter, or Esc.
▪︎ Click the empty area at the top of the Design view.
▪︎ Click a blank part of the Preview. (This will also deselect all fixtures.)
★ Tip: If your Mac has a Touch Bar, you can use it to conveniently control any fixture property. Select the fixture property as described above, then change its value with the Touch Bar.
Define a Fixture Property When you manually set a fixture property’s values in the Design view or the property’s HUD, the property is said to be defined or overridden. In this state the property values are applied directly to the fixture, overriding any presets, sequences, and cues. If a fixture property is not defined, the fixture’s state depends on the active presets, sequences, and cues.
Fixture property Letter
Dimmer D
Color, Color Wheel C
Gobo Wheel G
Shutter/Strobe S
Position P
Focus F
Zoom Z
Iris I
Prism M
Frost R
Fog O
Lightkey User Guide44

A blue dot to the left of a property’s name indicates that the property is defined. A gray dot means that that the property is defined for some but not all of the selected fixtures. When you change the value of a property (for example, by dragging the Dimmer slider), the property is automatically marked as defined.
Here are ways to clear a defined fixture property:
▪︎ Click the blue (or gray) dot to the left of the property’s name in the Design view or the property’s HUD.
▪︎ Select the property and press the Space or Delete key.
For more information see “View Overridden Fixture Properties” and “Clear Fixture Properties” later in this chapter.
Effects When an effect has been applied to a fixture property, the property’s value is defined by the effect. In this case you see an icon in place of the property’s controls in the Design view. Click the icon to edit the effect. See chapter 9, “Effects”, for more information about effects.
To remove an effect for a fixture property:
▪︎ Click the blue (or gray) dot to the left of the property’s name in the Design view.
▪︎ Select the property and press the Space or Delete key.
Dimmer The Dimmer property controls a fixture’s intensity (or brightness).
To select the Dimmer property: 1 Select one or more fixtures which support the Dimmer property.
2 Do one of the following:
▪︎ Click one of the fixtures’ names and choose Dimmer from the shortcut menu.
▪︎ Press Shift-D or press D until the Dimmer property is selected.
The keyboard shortcuts in this section require that the Dimmer property is selected.
Here are ways to change a fixture’s intensity:
▪︎ Drag the Dimmer slider in the Design view. ▪︎ Place the pointer over the Dimmer slider and scroll up or down.
▪︎ Press the Up/Down Arrow keys or Plus/Minus keys to increase/decrease the intensity by 10%.
▪︎ Hold down the Option key and press the Up/Down Arrow keys or Plus/Minus keys to increase/decrease the intensity by 1%.
▪︎ Type a number to set the intensity to an exact value. (Type a single digit to set the value in steps of 10%. Type two or three digits to set an exact percent value.)
Lightkey User Guide45

▪︎ Hold down the Command key and scroll up or down while the pointer is over the Preview. (This gesture can be changed in the Preferences window. See “Multi-Touch Gestures” in chapter 14, “External Control”.) The Dimmer property needs not be selected for this.
❖ Note: As a convenience, when you select an intensity greater than zero and the shutter state is closed, Lightkey automatically changes the shutter state to open (for fixtures which support the Shutter property).
To choose how intensities are applied to multiple fixtures:
▪︎ Click Dimmer and choose one of the following options from the menu:
▪︎ Absolute: All fixtures are assigned the same intensity, regardless of their previous state.
▪︎ Relative: This mode maintains the relative distances between the fixtures’ intensi- ties. For example, if you increase the intensity by 10%, all fixtures’ intensities increase by 10% from the previous value.
You may note that the Dimmer property is also available for fixtures with no explicit Dimmer DMX channel. If a fixture supports the RGB color model (see “Color” below), Lightkey will also display the Dimmer property which then affects the color’s brightness. This feature has several advantages, for example:
▪︎ It allows dimming fixtures of different types at once, whether they have a Dimmer channel or not.
▪︎ Fixtures with no explicit Dimmer support are also affected by the Master Dimmer (see below).
▪︎ It allows controlling the intensity separately from the color, e.g. in different presets.
Master Dimmer Apart from the Dimmer property, the intensity of all fixtures is also affected by the Master Dimmer. You can tell Lightkey to ignore the Master Dimmer for individual fixtures.
Here are ways to change the Master Dimmer:
▪︎ Click Live to show the Live view, then drag the Master Dimmer slider. Alternatively, place the pointer over the slider and scroll up or down.
▪︎ Place the pointer over the Preview and swipe up or down with four fingers on your trackpad. (This gesture requires that four-finger gestures are not assigned to other actions in the System Preferences. It can be changed in the Preferences window. See “Multi-Touch Gestures” in chapter 14, “External Control”.)
❖ Note: The Master Dimmer only affects fixtures that can be dimmed.
To ignore the Master Dimmer for individual fixtures:
1 Click Edit in the toolbar or choose View > Edit Preview to edit the Preview.
2 Select one or more fixtures.
Lightkey User Guide46

3 Choose Layout > Ignore Master Dimmer, or click a fixture’s name and choose Ignore Master Dimmer from the menu.
4 Click Done in the toolbar.
Color The Color property mixes a fixture’s light color by combining a set of three base colors in varying degrees. Traditionally color mixing uses the CMY (Cyan, Magenta, Yellow) model. With the advent of LED fixtures the RGB (Red, Green, Blue) model is becoming common. Some fixtures support additional colors like amber, white, or ultraviolet.
For fixtures that use the CMY or RGB models, the Design view shows a round control comprised of three sliders which control the color’s hue (outer ring), satu- ration (left inner slider), and brightness (right inner slider). Behind the scenes, Lightkey translates these components to the matching RGB or CMY values.
Some fixtures provide additional color components:
▪︎ Cool or warm white ▪︎ Amber
▪︎ Lime ▪︎ Ultraviolet
Additional features may include: ▪︎ Color temperature: The tint of white light, in degrees Kelvin.
▪︎ Green/magenta saturation: The shift from the neutral point to full minus green or full plus green, in percent.
▪︎ Xfade to Color: Transition between pure white (0%) and full color (100%).
To select the Color property: 1 Select one or more fixtures which support the Color property.
2 Do one of the following: ▪︎ Click one of the fixtures’ names and choose Color from the shortcut menu.
▪︎ Press Shift-C or press C until the Color property is selected.
The keyboard shortcuts in this section require that the Color property is selected.
Here are ways to choose the color’s hue:
▪︎ Drag the Hue slider in the Design view.
▪︎ Place the pointer over the Hue slider and scroll up or down.
▪︎ Press the Up/Down Arrow keys or Plus/Minus keys to increase/decrease the hue by 10°.
▪︎ Hold down the Option key and press the Up/Down Arrow keys or Plus/Minus keys to increase/decrease the hue by 1°.
Lightkey User Guide47

▪︎ Type a number between 0 and 360 to change the hue.
▪︎ Hold down the Command and Option keys and scroll up or down while the pointer is over the Preview. (This gesture can be changed in the Preferences window. See “Multi-Touch Gestures” in chapter 14, “External Control”.) The Color property needs not be selected for this.
Here are ways to choose the color’s saturation: ▪︎ Drag the Saturation slider (left).
▪︎ Place the pointer over the Saturation slider and scroll up or down.
▪︎ Press the Left/Right Arrow keys to decrease/increase the saturation by 10%.
▪︎ Hold down the Option key and press the Left/Right Arrow keys to decrease/increase the saturation by 1%.
▪︎ Hold down the Command, Shift, and Option keys and scroll up or down while the pointer is over the Preview. (This gesture can be changed in the Preferences window. See “Multi-Touch Gestures” in chapter 14, “External Control”.) The Color property needs not be selected for this.
Here are ways to choose the color’s brightness:
▪︎ Drag the Brightness slider (right). ▪︎ Place the pointer over the Brightness slider and scroll up or down.
To change the color using the system color window: 1 Click the current color in the center of the color control.
The system color window opens. 2 Choose a color in the color window.
To change additional colors and features:
▪︎ Drag the sliders to the right of the main color control, or place the pointer over a slider and scroll up or down. (If no sliders are visible then the patched fixtures don’t support these features.)
You can enlarge the sliders for additional colors and features for more precise control.
To change the size of the sliders for additional colors/features: ▪︎ Click Color and choose Small Sliders or Large Sliders from the menu.
Why are my lights blue? If a fixture’s Color property is not defined—that is, it’s neither overridden nor defined by any active preset, cue, or sequence—then Lightkey applies its default color. For RGB and CMY fixtures the default color is normally blue. Therefore, if the fixture’s Dimmer is open (or cannot be dimmed), the light beam is blue. You can change the default color to any other color, including black. See “Default Values” later in this chapter for more information.
Lightkey User Guide48

Color Wheel The Color Wheel property controls a fixture’s color wheel, which contains colored gels to create a tinted beam of light. Some fixtures have multiple superimposed color wheels; in this case there are multiple Color Wheel properties which can be controlled independently. For each color wheel, the Design view shows a grid of the available colors. If multiple fixtures are selected, the grid contains the union of all available colors for the fixtures. Some fixtures support “special” colors which also appear in the grid:
▪︎ “Split colors” are created by stopping the color wheel at a position where two adjacent color gels are in front of the light source.
▪︎ Color correction gels appear as “CTO” (Color Temperature Orange) or “CTB” (Color Temperature Blue) and may contain a color temperature in Kelvin.
▪︎ Numbers represent “unknown” colors that have not been specified in the fixture profile.
▪︎ Some fixtures support “random color” or “sound-controlled color” features. They are represented by icons (cube or musical note, respectively) in the color grid. The exact semantics of these features depend on the fixture.
▪︎ Many fixtures can rotate their color wheel continuously, creating a “rainbow effect”. In this case one or two rainbow icons appear at the end of the grid. Most fixtures also allow changing the rotation speed.
To select the Color Wheel property:
1 Select one or more fixtures with a color wheel. 2 Do one of the following:
▪︎ Click one of the fixtures’ names and choose Color Wheel from the shortcut menu.
▪︎ Press Shift-C or press C until the Color Wheel property is selected.
The keyboard shortcuts in this section require that the Color Wheel property is selected.
Here are ways to select a color:
▪︎ Click one of the colors in the grid. ▪︎ Press an arrow key.
▪︎ Type a number to select a color by its index.
If multiple kinds of fixtures are selected and the selected color is not available on all fixtures, Lightkey tries to apply the closest matching color.
To change the speed of the rainbow effect:
▪︎ Press the mouse button over one of the rainbow icons at the end of the color grid, and drag up or down.
Lightkey User Guide49

Gobo Wheel The Gobo Wheel property controls a fixture’s gobo wheel. A gobo is a stencil that is placed in front of the light source, projecting an image onto a surface. The term is an acronym for “GOes Before Optics”. Similar to a color wheel, multiple gobos are arranged on a wheel so that they can be moved sequentially through the light beam. Some fixtures have multiple superimposed gobo wheels; in this case there are multiple Gobo Wheel properties which can be controlled independently. For each gobo wheel, the Design view shows a grid of the available gobos. If multiple fixtures are selected, the grid contains the union of all available gobos for the fixtures.
To select the Gobo Wheel property:
1 Select one or more fixtures with a gobo wheel. 2 Do one of the following:
▪︎ Click one of the fixtures’ names and choose Gobo Wheel from the shortcut menu.
▪︎ Press Shift-G or press G until the Gobo Wheel property is selected.
The keyboard shortcuts in this section require that the Gobo Wheel property is selected.
Here are ways to select a gobo:
▪︎ Click one of the gobos. ▪︎ Press an arrow key.
▪︎ Type a number to select a gobo by its index.
Gobo Cycle Some fixtures support a gobo cycle effect which continuously rotates the gobo wheel in clockwise or counterclockwise direction at a fixed or variable speed.
To apply a gobo cycle effect:
1 Select the clockwise or counterclockwise gobo cycle effect from the gobo grid (only available if the selected fixtures support gobo cycle).
2 Drag the Speed slider to change the cycle speed (only available if the selected fixtures support variable cycle speeds). Alternatively, place the pointer over the slider and scroll left or right.
Gobo States Many fixtures support some or all of the following gobo states:
▪︎ Rotation: Continuous rotation in clockwise or counterclockwise direction.
▪︎ Bouncing: Continuous rotation with alternating direction.
▪︎ Indexing: Changes the gobo’s angle.
▪︎ Shake: Rotates the gobo wheel slightly backward and forward.
Lightkey User Guide50

Here are ways to change a gobo’s rotation state:
▪︎ Click or press R. Repeat to reverse the rotation direction, and repeat again to stop the rotation.
▪︎ If the fixture supports gobo rotation with variable speed: Press the mouse button over and drag up or down to adjust the speed, or press the Minus/Plus keys. Press Option-Minus or Option-Plus for fine control.
Here are ways to change a gobo’s bounce state:
▪︎ Click or press B. Repeat to stop the gobo from bouncing.
▪︎ If the fixture supports gobo bouncing with variable speed: Press the mouse button over and drag up or down to adjust the speed, or press the Minus/Plus keys. Press Option-Minus or Option-Plus for fine control.
Here are ways to rotate a gobo (indexing):
▪︎ Press the mouse button over and drag up or down to adjust the angle. Click again to disable gobo indexing.
▪︎ Press I to turn indexing on or off. Press the Minus/Plus keys to change the angle; press Option-Minus or Option-Plus for fine control.
Here are ways to change a gobo’s shake state: ▪︎ Click or press S. Repeat to stop the gobo from shaking.
▪︎ If the fixture supports gobo shake with variable speed: Press the mouse button over and drag up or down to adjust the speed, or press the Minus/Plus keys. Press Option-Minus or Option-Plus for fine control.
❖ Note: Rotation, bounce, and indexing are not available for the open gobo.
Shutter/Strobe The Shutter/Strobe property can control two slightly different things:
▪︎ A fixture’s shutter, which can be moved in front of the light source so that no light is emitted. Often the shutter can also be used to create stroboscope (strobe) effects (regular or irregular flashes of light) or pulse effects (gradually increasing the amount of light and abruptly reducing it, or vice versa).
▪︎ A stroboscope (strobe) effect, which may or may not be realized through a shutter (it may also be realized by a xenon flash lamp, for example).
To select the Shutter/Strobe property: 1 Select one or more fixtures which support the Shutter/Strobe property.
2 Do one of the following:
▪︎ Click one of the fixtures’ names and choose Shutter/Strobe from the shortcut menu.
▪︎ Press Shift-S or press S until the Shutter/Strobe property is selected.
Lightkey User Guide51

The keyboard shortcuts in this section require that the Shutter/Strobe property is selected.
Here are ways to open or close the shutter:
▪︎ Click Open or Closed. ▪︎ Press O to open or C to close the shutter.
❖ Note: As a convenience, Lightkey automatically sets the shutter state to open when you apply a non-zero Dimmer value if the shutter was previously closed.
Here are ways to control strobe effects:
▪︎ Click Strobe or press S to enable strobing (if supported by the fixture). Repeat to select synchronized strobe, random strobe, or random synchronized strobe (if supported by the fixture).
▪︎ Press the mouse over the Strobe button and drag up or down to adjust the strobe speed (if the fixture supports variable strobe speeds).
▪︎ If the fixture supports a sound-controlled strobing, drag the mouse up until the label reads “Sound-Active”.
▪︎ Press the Up/Down Arrow keys or Minus/Plus keys to decrease/increase the strobe speed. (Press Option-Up/Down Arrow or Option-Minus/Plus for fine control.)
Here are ways to control shutter pulse effects:
▪︎ Click Pulse or press P to enable the pulse effect (if supported by the fixture). Repeat to change the pulse style. The button cycles between the following states if they are supported by the selected fixtures:
▪︎ Press the mouse over the Pulse button and drag up or down to adjust the pulse speed (if the fixture supports variable pulse speeds).
▪︎ Press the Up/Down Arrow keys or Minus/Plus keys to decrease/increase the pulse speed. (Press Option-Up/Down Arrow or Option-Minus/Plus for fine control.)
Position The Position property controls a moving light’s pan and tilt angles.
Lightkey’s position control is a circular area which reflects the physical position of the fixture. A point represents the current fixture position. The point’s angle shows the fixture’s pan angle, and the distance from the center shows the tilt angle. Imagine looking in the direction of the pan axis:
Pulse opening
Pulse closing
Pulse alternating
Burst pulse
Random pulse closing
Random pulse alternating
Random pulse opening
Random burst pulse
Lightkey User Guide52

Before you use the position control, you should calibrate the fixture’s beam direction, as described in “Set Beam Directions” in chapter 6, “Preview”. This makes sure that the angles in the position control match the virtual Preview.
Lightkey measures pan angles from the center of the pan range, which is called the home angle. For example, if the pan range is 540° then the pan angles range between –270° and +270°. The home angle is always at 0°. In clockwise direction from the home angle are negative angles, in counterclockwise direction are positive angles.
Likewise, tilt angles are measured from the center of the tilt range. For example, if the tilt range is 320° then the tilt angles range between –160° and +160°. If the tilt angle is 0°, the fixture is parallel to the pan axis.
If a fixture’s pan range exceeds 360° then some points in the position control may correspond to two different pan angles, just like one physical fixture direction can relate to different pan angles (for example, –90° and +270°). You can still use all pan angles (within a total range of 700°) by starting at the home (center) position and moving the fixture from there to the desired pan angle.
Viewing direction onto position control
Position control
Pan axis
Pan rotation
Home angle
Current position
Tilt
Pan
Lightkey User Guide53

To open the Position HUD:
1 Select one or more fixtures which support the Position property. 2 Do one of the following:
▪︎ Click one of the fixtures’ names and choose Position from the shortcut menu. ▪︎ Press Shift-P or press P until the Position HUD appears.
If you have a trackpad which supports Force Touch, you can also force click a fixture icon to open the Position HUD. Otherwise you can press the mouse button over a fixture icon for about 0.5 seconds until the Position HUD appears. These gestures can be configured in Lightkey’s Preferences window. For more information, see “Multi-Touch Gestures” in chapter 14, “External Control”.
The following tasks in this section require that the Position HUD is open.
Here are general ways to change the fixture position:
▪︎ Click inside the position control (the circle around the selected fixture’s icon). ▪︎ To keep the current pan angle, hold down the Command key as you click or drag.
▪︎ To keep the current tilt angle, hold down the Shift key as you click or drag. ▪︎ To disable snapping to some pan/tilt angles, hold down the Control key as you drag.
▪︎ To reverse the sign of the pan or tilt value, Control-click the position control and choose Flip Pan or Flip Tilt from the shortcut menu.
▪︎ To quickly change the fixture position when the Position HUD is not open, press the mouse button while the pointer is over a fixture’s icon. When the Position HUD opens, drag the pointer to a point in the position control, then release the mouse button.
Here are additional ways to change the pan angle:
▪︎ Place the pointer over the position control and scroll up or down.
▪︎ Press a number key to set the pan angle according to the location of the key.
▪︎ Press the Left/Right Arrow keys to increase/decrease the pan angle by 1°. ▪︎ Hold down the Shift key and press the Left/Right Arrow keys to increase/decrease the
pan angle by 10°.
8
2
4 6
7 9
1 3
Lightkey User Guide54

To select a pan angle if the fixture’s pan range exceeds 360°:
▪︎ If a fixture’s pan range exceeds 360° then some points in the position control may correspond to two different pan angles—a negative and a positive angle, for example, –90° and +270°. To select the positive pan angle, move the fixture to the home pan angle, then drag the pointer in the positive direction (counterclockwise) until you get to the desired angle. To select the negative pan angle, move the fixture to the home pan angle, then drag the pointer in the negative direction (clockwise) until you get to the desired angle.
Here are additional ways to change the tilt angle:
▪︎ Place the pointer over the position control, hold down the Command key and scroll.
▪︎ Press the Up/Down Arrow keys to increase/decrease the tilt angle by 1°.
▪︎ Hold down the Shift key and press the Up/Down Arrow keys to increase/decrease the tilt angle by 10°.
Here are ways to select a negative tilt angle:
▪︎ Hold down the Command key to lock the pan angle and drag the pointer across the center of the position control.
▪︎ Press the Down Arrow key to decrease the tilt angle until it becomes negative. (Hold down the Shift key while pressing the Down Arrow key to increase the steps.)
▪︎ Control-click the position control and choose Flip Tilt. This will reverse the sign of the tilt angle.
To choose how angles are applied to multiple fixtures: ▪︎ Click Position and choose one of the following options from the menu:
▪︎ Absolute: All fixtures point in the same direction, regardless of their home position and rotation direction (as long as the position is within their range). For example, if you select a position where the beam points upwards in the Preview, all fixtures will point upwards.
▪︎ Relative to Home Position: All fixtures are assigned the same pan and tilt angles (as long as they are within the fixtures’ ranges). For example, if you select a pan angle of +30°, all fixtures move to a pan angle of +30° relative to their respective home position.
▪︎ Relative to Current Position: This mode maintains the relative distances between the fixtures. For example, if you increase the pan angle by 15° then all fixtures move by 15° from their current position.
Some fixtures allow infinite rotation around the pan or tilt axis with variable speed.
To enable infinite pan or tilt rotation:
1 Click (pan) or (tilt). Repeat to reverse the rotation direction.
2 Drag the Pan Speed or Tilt Speed slider to adjust the rotation speed.
Lightkey User Guide55

Here are ways to close the Position HUD:
▪︎ Click anywhere outside the HUD. ▪︎ Press Return, Enter, or Esc.
Movement Speed The Movement Speed property (sometimes called “Mspeed”) controls a moving light’s movement when the Position property (pan and tilt) changes. Some fixtures support multiple speed modes like Tracking or Vector. Other fixtures simply let you change the speed from slow to fast.
To select the Movement Speed property: 1 Select one or more fixtures which support the Movement Speed property.
2 Click one of the fixtures’ names and choose Movement Speed from the shortcut menu.
The keyboard shortcuts in this section require that the Movement Speed property is selected.
To change the speed mode (if available):
1 Click the button below the words “Movement Speed”. (The button is only visible if your fixtures support different speed modes.)
2 Select one of the available options. (Lightkey only shows the options that your fixtures support).
▪︎ Tracking: The fixture follows the position sent by Lightkey as closely as possible. This mode is appropriate for most situations. Always use this mode if the position is controlled by a movement path or sequence. (You can quickly select this mode by pressing T.)
▪︎ Tracking, Slow/Medium/Fast Speed: Some fixtures provide specialized algorithms for slow, medium, and fast movements. See your fixture’s documentation for more information.
▪︎ Vector: The fixture uses an internal algorithm to calculate a smooth movement between the positions sent by Lightkey. The speed can be controlled with the Speed slider. Using this mode is usually not necessary because Lightkey can generate continuous fixture movements. (You can quickly select this mode by pressing V.)
▪︎ Blackout During Pan/Tilt Movement: Like tracking, but the dimmer or shutter close while the fixture is in motion. (You can quickly select this mode by pressing B.)
▪︎ Blackout During Wheel Movement: Like tracking, but the dimmer or shutter close during color or gobo wheel transitions.
▪︎ Blackout During Pan/Tilt & Wheel Movements: Like tracking, but the dimmer or shutter close while the fixture moves and during color or gobo wheel transitions.
To change the movement speed (if available): 1 If the selected fixtures support multiple speed modes, make sure Vector is selected.
Lightkey User Guide56

2 Do one of the following to change the vector speed:
▪︎ Drag the Speed slider. Alternatively, place the pointer over the slider and scroll left or right.
▪︎ Press the Left/Right Arrow keys or Minus/Plus keys to decrease/increase the speed. (Press Option-Left/Right Arrow or Option-Minus/Plus for fine control.)
Focus The Focus property adjusts the beam so that the light is concentrated on the focal point.
To open the Focus HUD: 1 Select one or more fixtures which support the Focus property.
2 Do one of the following:
▪ Click one of the fixtures’ names and choose Focus from the shortcut menu.
▪ Press Shift-F or press F until the Focus HUD appears.
As a shortcut, you can configure Lightkey to open the Focus HUD when you pinch on the trackpad using two fingers (requires a multi-touch trackpad or Apple Magic Trackpad). For more information, see “Multi-Touch Gestures” in chapter 14, “External Control”.
The following tasks in this section require that the Focus HUD is open.
Here are ways to change the focus:
▪︎ Click inside the focus control (the circle around the selected fixture’s icon).
▪︎ Place the pointer over the focus control and scroll.
▪︎ Place the pointer over the focus control and pinch on the trackpad using two fingers (requires a multi-touch trackpad or Apple Magic Trackpad).
▪︎ Press the Up/Down Arrow keys or Plus/Minus keys to increase/decrease the focus by 10°.
▪︎ Hold down the Option key and press the Up/Down Arrow keys to increase/decrease the focus by 1°.
▪︎ Type a number to set the focus to an exact value. (Type a single digit to set the value in steps of 10°. Type two digits to set an exact value in degrees.)
To choose how the focus is applied to multiple fixtures:
▪︎ Click Focus and choose one of the following options from the menu: ▪︎ Absolute: All fixtures are assigned the same focus value, regardless of their
previous state.
▪︎ Relative: This mode maintains the relative distances between the fixtures’ focus values. For example, if you increase the focus by 10%, all fixtures’ focus values increase by 10% from the previous value.
Lightkey User Guide57

Here are ways to close the Focus HUD:
▪︎ Click anywhere outside the HUD. ▪︎ Press Return, Enter, or Esc.
Zoom The Zoom property controls the size (or spread) of the light beam by moving a lens back and forward inside the fixture.
To open the Zoom HUD: 1 Select one or more fixtures which support the Zoom property.
2 Do one of the following:
▪ Click one of the fixtures’ names and choose Zoom from the shortcut menu.
▪ Press Shift-Z or press Z until the Zoom HUD appears.
As a shortcut, you can configure Lightkey to open the Zoom HUD when you pinch on the trackpad using two fingers (requires a multi-touch trackpad or Apple Magic Trackpad). For more information, see “Multi-Touch Gestures” in chapter 14, “External Control”.
The following tasks in this section require that the Zoom HUD is open.
Here are ways to change the zoom angle:
▪︎ Click inside the zoom control (the circle around the selected fixture’s icon). ▪︎ Place the pointer over the zoom control and scroll.
▪︎ Place the pointer over the zoom control and pinch on the trackpad using two fingers (requires a multi-touch trackpad or Apple Magic Trackpad).
▪︎ Press the Up/Down Arrow keys or Plus/Minus keys to increase/decrease the zoom angle by 1°.
▪︎ Type a number to set the zoom angle to an exact value.
To choose how zoom angles are applied to multiple fixtures:
▪︎ Click Zoom and choose one of the following options from the menu:
▪︎ Absolute: All fixtures are assigned the same zoom angle (as long as it is within their zoom ranges), regardless of their previous state.
▪︎ Relative: This mode maintains the relative distances between the fixtures’ zoom angles. For example, if you increase the angle by 20°, all fixtures’ zoom angles increase by 20° from the previous value.
Here are ways to close the Zoom HUD:
▪︎ Click anywhere outside the HUD.
▪︎ Press Return, Enter, or Esc.
Lightkey User Guide58

Iris The Iris property controls a set of shutters which change the size of the light beam.
To open the Iris HUD: 1 Select one or more fixtures which support the Iris property.
2 Do one of the following:
▪ Click one of the fixtures’ names and choose Iris from the shortcut menu.
▪ Press Shift-I or press I until the Iris HUD appears.
As a shortcut, you can configure Lightkey to open the Iris HUD when you pinch on the trackpad using two fingers (requires a multi-touch trackpad or Apple Magic Trackpad). For more information, see “Multi-Touch Gestures” in chapter 14, “External Control”.
The following tasks in this section require that the Iris HUD is open.
Here are ways to change the iris size:
▪︎ Click inside the iris control (the circle around the selected fixture’s icon).
▪︎ Place the pointer over the iris control and scroll. ▪︎ Place the pointer over the iris control and pinch on the trackpad using two fingers
(requires a multi-touch trackpad or Apple Magic Trackpad). ▪︎ Press the Up/Down Arrow keys or Plus/Minus keys to increase/decrease the iris size
by 10%. ▪︎ Hold down the Option key and press the Up/Down Arrow keys to increase/decrease
the iris size by 1%.
▪︎ Type a number to set the iris size to an exact value. (Type a single digit to set the value in steps of 10%. Type two digits to set an exact percent value.)
To choose how iris sizes are applied to multiple fixtures:
▪︎ Click Iris and choose one of the following options from the menu:
▪︎ Absolute: All fixtures are assigned the same iris size (as long as it is within their iris ranges), regardless of their previous state.
▪︎ Relative: This mode maintains the relative distances between the fixtures’ iris sizes. For example, if you increase the size by 10%, all fixtures’ iris sizes increase by 10% from the previous value.
Here are ways to close the Iris HUD:
▪︎ Click anywhere outside the HUD.
▪︎ Press Return, Enter, or Esc.
Lightkey User Guide59

Prism The Prism property multiplies the light beam by passing it through a faceted glass lens. Each facet produces a copy of the beam at a slightly different focus. Many fixtures support rotating prisms at fixed or variable speeds. Some fixtures have multiple super- imposed prisms; in this case there are multiple Prism properties which can be con- trolled independently.
To select the Prism property: 1 Select one or more fixtures which support the Prism property.
2 Do one of the following:
▪︎ Click one of the fixtures’ names and choose Prism from the shortcut menu.
▪︎ Press Shift-M or press M until the Prism property is selected.
The keyboard shortcuts in this section require that the Prism property is selected.
Here are ways to select a prism type:
▪︎ Click a prism icon. (Only the prism types that are supported by your fixtures are shown.)
▪︎ Type a number.
Here are ways to change the prism rotation state:
▪︎ Click or press R. Repeat to reverse the rotation direction, and repeat again to stop the rotation. (The symbol is only visible if the fixture supports prism rotation.)
▪︎ If the fixture supports prism rotation with variable speed: Press the mouse button over and drag up or down to adjust the speed, or press the Minus/Plus keys. Press Option-Minus or Option-Plus for fine control.
Here are ways to rotate the prism (indexing):
▪︎ Press the mouse button over and drag up or down to adjust the angle. Click again to disable prism indexing. (The symbol is only visible if the fixture supports prism indexing.)
▪︎ Press I to turn indexing on or off. Press the Minus/Plus keys to change the angle; press Option-Minus or Option-Plus for fine control.
Frost The Frost property controls a diffusion filter which softens the light beam. Some fixtures allow control over the degree of softening, others simply let you control if the effect is on or off. Some fixtures also support a frost pulse effect (gradually increasing the frost amount and abruptly reducing it, or vice versa).
To select the Frost property: 1 Select one or more fixtures which support the Frost property.
2 Do one of the following:
▪︎ Click one of the fixtures’ names and choose Frost from the shortcut menu.
Lightkey User Guide60

▪︎ Press Shift-R or press R until the Frost property is selected.
The keyboard shortcuts in this section require that the Frost property is selected.
To enable or disable the frost filter:
▪︎ Click On or Off or press O.
To control the degree of softening:
1 Click Linear or press L. 2 Do one of the following to change the frost amount:
▪︎ Drag the Amount slider. Alternatively, place the pointer over the slider and scroll left or right.
▪︎ Press the Left/Right Arrow keys or Minus/Plus keys to decrease/increase the frost amount by 10%.
▪︎ Hold down the Option key and press the Left/Right Arrow keys or Minus/Plus keys to decrease/increase the frost amount by 1%.
▪︎ Type a number to set the frost amount to an exact value. (Type a single digit to set the value in steps of 10%. Type two digits to set an exact percent value.)
To apply a frost pulse effect:
1 Click Pulse or press P. Do this again to change the pulse direction (if the fixture supports both increasing and decreasing pulse effects).
2 Do one of the following to change the pulse speed:
▪︎ Drag the Pulse Speed slider. Alternatively, place the pointer over the slider and scroll left or right.
▪︎ Press the Left/Right Arrow keys or Minus/Plus keys to decrease/increase the speed. (Press Option-Left/Right Arrow or Option-Minus/Plus for fine control.)
Fog The Fog property controls the amount of fog or haze produced by a fog machine or hazer.
To select the Fog property: 1 Select one or more fixtures which support the Fog property.
2 Do one of the following:
▪︎ Click one of the fixtures’ names and choose Fog from the shortcut menu.
▪︎ Press Shift-O or press O until the Fog property is selected.
The keyboard shortcuts in this section require that the Fog property is selected.
Here are ways to change the fog amount:
▪︎ Drag the Amount slider. Alternatively, place the pointer over the slider and scroll left or right.
Lightkey User Guide61

▪︎ Press the Left/Right Arrow keys or Minus/Plus keys to decrease/increase the fog amount by 10%.
▪︎ Hold down the Option key and press the Left/Right Arrow keys or Minus/Plus keys to decrease/increase the fog amount by 1%.
▪︎ Type a number to set the fog amount to an exact value. (Type a single digit to set the value in steps of 10%. Type two digits to set an exact percent value.)
Custom Fixture Properties Many fixtures have additional, non-standard properties which can be controlled in the Design view. These properties can take three forms:
The Design view shows only the custom properties that pertain to the selected fixtures.
To select a custom fixture property: 1 Select one or more fixtures which support the property.
2 Click one of the fixtures’ names and choose the property name from the shortcut menu.
The keyboard shortcuts in this section require that the property is selected.
Slider If the property is represented by a slider, its value may be a percent value (0–100%) or DMX value (0–255).
Here are ways to change the property’s value: ▪︎ Drag the slider. Alternatively, place the pointer over the slider and scroll left or right.
▪︎ If the slider’s value is a percent value:
▪︎ Press the Left/Right Arrow keys or Minus/Plus keys to decrease/increase the property value by 10%.
▪︎ Hold down the Option key and press the Left/Right Arrow keys or Minus/Plus keys to decrease/increase the property value by 1%.
▪︎ Type a number to set the value to an exact value. (Type a single digit to set the property value in steps of 10%. Type two digits to set an exact percent value.)
Slider List of options List of options with slider
Fan Speed
Strawberry
Vanilla
Strawberry
Chocolate
Vanilla
Strawberry
Strawberry
Chocolate
Lightkey User Guide62

▪︎ If the slider’s value is a DMX value:
▪︎ Press the Left/Right Arrow keys or Minus/Plus keys to decrease/increase the property value by 1.
▪︎ Type a number to set the value to an exact value.
List of Options If the property is represented by a list of options, you can choose one of the options from the list. The property may also have a slider, whose meaning usually depends on the selected option and which may not be available for all options.
To select an option and change the slider value (if available): 1 Do one of the following:
▪︎ Click the property’s button.
▪︎ Press Return or Enter (when the property is selected).
The list of options appears.
2 Do one of the following: ▪︎ Click an option.
▪︎ Type the first letters of an option’s name. ▪︎ Press the Up/Down Arrow keys to select the previous/next option.
3 If a slider is visible and enabled, do one of the following: ▪︎ Drag the slider. Alternatively, place the pointer over the slider and scroll left or right.
▪︎ Press the Left/Right Arrow keys or Minus/Plus keys to decrease/increase the value. 4 Press Return or Enter to hide the list of options.
★ Tip: Double-click an option to select it and hide the options.
Reorder and Hide Custom Properties By default, custom properties are ordered as they appear in the fixture profile, but you can reorder or hide properties as you like. For example, you can hide properties you don’t need to save space. You can’t reorder or hide the built-in standard fixture properties.
To reorder or hide custom properties: 1 Click Edit in the top-right of the Design view. Alternatively, choose View > Edit Design
View… or press Command-Shift-Option-D. A dialog appears showing a list of the available fixture properties for the current project.
2 Make changes as appropriate:
▪︎ To change the order of the custom properties, drag them up or down in the list.
▪︎ To hide a custom property, deselect it.
You can see the result of your changes in the Design view immediately. 3 Click Done.
Lightkey User Guide63

To quickly hide a fixture property:
▪︎ Click the fixture property’s name in the Design view and select Hide This Property from the menu.
Lamp The Lamp property allows turning a fixture’s lamp on or off. Lightkey automatically turns the lamp on when you start the application or open a project, and you can tell it to turn the lamp off when you quit the application or close the project. You will rarely need to use this property during normal operation. Note that only some fixtures support the Lamp property.
❖ Note: The Lamp property can’t be stored in presets.
Here are ways to manually turn a fixture’s lamp on or off:
▪︎ Click the fixture’s name and choose Lamp > On or Lamp > Off from the shortcut menu.
▪︎ Select the fixture and choose Fixture > Lamp > On or Fixture > Lamp > Off.
To automatically turn the lamp off when you quit Lightkey or close the project:
1 Choose Lightkey > Preferences… (or press Command-Comma) and click General. 2 Select “Send Lamp Off to fixtures” and choose how long the “lamp off” value should
be sent. You can find the required duration in your fixtures’ documentation.
Command The Command property can be used to send various commands to a fixture. (Technically, this is done by setting a DMX channel to a certain value for a short amount of time.) The available commands depend on your fixtures; common commands are:
▪︎ Reset
▪︎ Reset Pan/Tilt
▪︎ Enable blackout during pan/tilt movement
▪︎ Disable blackout during pan/tilt movement
❖ Note: The Command property can’t be stored in presets.
Here are ways to send a command: ▪︎ Click the fixture’s name, choose Command from the shortcut menu and then choose
one of the commands from the submenu. ▪︎ Select the fixture, choose Fixture > Command and then choose one of the commands
from the submenu.
Lightkey User Guide64

Default Values Lightkey uses sensible default values for fixture properties that aren’t defined. For example, it sets the Shutter property to “closed” and the Movement Speed to the fastest speed. You can change those default values if necessary. You can also choose different defaults for each fixture.
To change a fixture property’s default values:
1 Select one or more fixtures in the Preview. The new defaults will only affect those fixtures.
2 Change the fixture property in the Design view or a HUD. 3 Click the fixture property name in the Design view or HUD and choose Set as Default
Value from the menu.
To reset a fixture property’s default values to the built-in values: 1 Select one or more fixtures in the Preview. The change will only affect those fixtures.
2 Click the fixture property name and choose Reset Default Values.
Copy and Paste Fixture Properties You can copy the properties of the selected fixture to the Clipboard and then paste them to other fixtures. Only overridden properties (that is, properties that you manually defined in the Design view or HUDs) are copied, but not properties which are defined by presets, sequences, or cues. You can copy properties between fixtures of different kinds, assuming that the involved fixtures support them. Lightkey tries to convert the values if necessary. For example, if you copy a CMY fixture’s Color property to an RGB fixture, Lightkey calculates the corresponding RGB color. If you copy a color from a CMY or RGB fixture to a color wheel fixture, Lightkey picks the closest matching color on the wheel. If you copy the Prism property to a fixture with different prism types, Lightkey chooses the closest matching type that the destination fixture supports.
To copy and paste fixture properties:
1 Do one of the following: ▪︎ Click a fixture’s name and choose Copy Properties from the shortcut menu, then
choose an item from the submenu. Choose All to copy all overridden properties.
▪︎ Select a single fixture, then click in the toolbar and choose Copy Properties and then choose an item from the menu. Choose All to copy all overridden properties.
▪︎ Select a single fixture, then choose Fixture > Copy Properties and choose an item from the submenu (or press Command-Option-C). Choose All to copy all overridden properties.
▪︎ Select one or more fixtures, then click the name of a fixture property in the Design view or a HUD and select Copy (property name) from the menu. This will only copy a single fixture property.
Lightkey User Guide65

To copy the properties of an individual light beam, select only that beam. Only overridden fixture properties can be copied.
2 Select one or more fixtures you want to apply the properties to. If you want to paste the properties to individual light beams only, select those beams.
3 Do one of the following:
▪︎ Click one of the fixtures’ names and choose Paste Properties from the shortcut menu.
▪︎ Click in the toolbar and choose Paste Properties from the menu.
▪︎ Select Fixture > Paste Properties (or press Command-Option-V). ▪︎ Click the name of a fixture property in the Design view or a HUD and select Paste
Properties from the menu.
❖ Note: The menu for copying fixture properties does not include properties that have been hidden from the Design view. See “Reorder and Hide Custom Properties” earlier in this chapter on how to show or hide properties in the Design view.
View Overridden Fixture Properties Lightkey can give you a quick overview of the fixture properties that are currently overridden.
Here are ways to show the overridden fixture properties:
▪︎ Click Overrides in the toolbar. ▪︎ Click the blue dot next to a fixture’s name.
▪︎ Choose Fixture > Show Properties (or press Command-P). ▪︎ Control-click in a blank part of the Preview and choose Show Properties from the
shortcut menu.
Lightkey will display the names of the overridden properties next to the fixtures’ icons. You can quickly select one of the properties for editing or clear a property.
To hide the overridden fixture properties:
▪︎ Click anywhere in the Preview or press Esc, Return, or Enter.
Clear Fixture Properties You can quickly clear (or “undefine”) some or all overridden properties. This will also remove effects and fanning.
To clear a single fixture property:
1 Select one or more fixtures.
Move the pointer over a property and click the “x” icon to clear the property for the fixture. Hold down the Option key to clear the property for all fixtures
Click a property to select and edit it
Lightkey User Guide66

2 Do one of the following:
▪︎ Click the blue (or gray) dot to the left of the property’s name in the Design view or the property’s HUD.
▪︎ Select a fixture property and press the Space key or Delete key.
To clear all overridden fixture properties for a set of fixtures:
1 Select one or more fixtures. 2 Do one of the following:
▪︎ Click one of the fixtures’ names and choose Clear Properties from the shortcut menu.
▪︎ Click in the toolbar and choose Clear Properties from the menu.
▪︎ Select Fixture > Clear Properties (or press Command-Delete).
Here are ways to clear all overridden properties from all fixtures:
▪︎ Click in the toolbar.
▪︎ Select Fixture > Clear Properties for All Fixtures (or press Command-Shift-Delete). ▪︎ Control-click a blank part of the Preview and choose Clear Properties for All Fixtures
from the shortcut menu.
After all properties have been cleared, the blue dots to the left of the fixtures’ names in the Preview disappear.
Undo Changes If you inadvertently changed a fixture property, you can undo the change. You can also redo changes that you have undone.
To undo a change:
▪︎ Choose Edit > Undo (or press Command-Z).
To redo a change:
▪︎ Choose Edit > Redo (or press Command-Shift-Z).
Fanning Fanning (also called “spreading”) lets you create interesting looks by spreading fixture property values evenly across a range of fixtures. When you use fanning, you define the property values for at least two fixtures (usually the first and last), and Lightkey will calculate the values for the fixtures in between. Like normal property values, fanned properties can be stored in presets, sequences, and cues, while staying fully editable at any time.
Fanning can be used for the following fixture properties: ▪︎ Dimmer ▪︎ Color (RGB and additional colors) ▪︎ Position
Lightkey User Guide67

▪︎ Focus ▪︎ Zoom ▪︎ Iris ▪︎ Frost ▪︎ Fog ▪︎ Any custom property represented by a slider
Values can be fanned not only across fixtures but also across the individual beams of LED fixtures. In the following, the term pixel will be used for the smallest unit which can be individually controlled—either a fixture or a beam.
Example: By fanning colors across the beams of LED strips you can easily create color gradients.
Example: Pan angles spread over a row of moving lights.
To fan a fixture property:
1 Select at least three fixtures, or an LED fixture with at least three beams. 2 Do one of the following to select a fixture property:
▪︎ Click one the fixture’s names and select a property from the shortcut menu.
▪︎ Choose Fixture > Select Property, then select a property from the menu.
3 Click the fixture property’s name in the Design view or the property’s HUD, then choose Add (property name) Fanning… from the menu. Lightkey displays the Fanning HUD around the fixtures’ icons in the Preview.
Lightkey User Guide68

In the example above, the fixtures are ordered from left to right. There are other possibilities for ordering fixtures and beams which highly affect the result of the fanning.
To change the order of fixtures (or beams):
1 When the Fanning HUD is visible, click Fixture Order. As you move the mouse pointer over an item in the menu, Lightkey shows the resulting
fixture order in the Preview. 2 Select an option as appropriate:
▪︎ Left to Right: Sort the fixtures or beams from left to right as they appear in the Preview.
▪︎ Right to Left: Sort the fixtures or beams from right to left as they appear in the Preview.
▪︎ Top to Bottom: Sort the fixtures or beams from top to bottom as they appear in the Preview.
▪︎ Bottom to Top: Sort the fixtures or beams from bottom to top as they appear in the Preview.
▪︎ By Short Name: Sort the fixtures alphabetically by their short name, either ascending or descending. Beams are sorted by their index.
▪︎ By Address: Sort the fixtures by their universe and DMX address, either ascending or descending. Beams are sorted by their index.
▪︎ Select Fixtures: Treat all beams of a fixture as a single pixel.
▪︎ Select Beams: For fixtures with multiple beams, treat the beams as individual pixels.
Example: Colors fanned across multiple fixtures with the “Left to Right” fixture order.
The blue dots indicate that positions have been defined for the outer fixtures
The positions in between are calculated automatically
Select whether the pan angle, tilt angle, or both should be fanned (Position property only)
P1 P2 P3 P4 P5 P6 P7 P8
P9 P10 P11 P12 P13 P14 P15 P16
Lightkey User Guide69

If the “By Short Name” option is selected instead, the result would look like this:
Example: Colors fanned from left to right across four LED matrixes using the Fixtures option. All beams of each fixture have the same color.
If the Beams option is selected instead, fanning includes the individual beams:
To define the value for a fixture or beam:
▪︎ Click the fixture or beam, then choose a value. A blue dot near the fixture or beam indicates that a value has been defined. The values for the fixtures or beams in between are calculated automatically.
To remove the defined value for a fixture or beam:
▪︎ Click the blue dot near the fixture or beam. You can’t remove the last two defined values.
When a fixture property is controlled by fanning, the fixture property’s area in the Design view shows an icon instead of the normal controls. You can open the Fanning HUD and edit the fanning settings at any time.
Here are ways to edit a fanned fixture property:
▪︎ Click the icon in the Design view.
▪︎ Click a fixture’s name in the Preview, then select a fixture property from the shortcut menu. Fanned properties are marked with an icon.
▪︎ Click Overrides in the toolbar. The names of the overridden properties appear next to the fixtures’ icons, and an icon marks fanned properties. Click a fixture property’s name to edit it.
Here are ways to remove fanning:
▪︎ While the Fanning HUD is open, click the title at the upper-left and choose Delete Fanning from the menu.
▪︎ If the fixture property appears in the Design view, select the fixtures and then click the blue dot to the left of the property’s name in the Design view.
P1 P2 P3 P4 P5 P6 P7 P8
P9 P10 P11 P12 P13 P14 P15 P16
Lightkey User Guide70

▪︎ Click in the toolbar or choose Fixture > Clear Properties for All Fixtures (or press Command-Shift-Delete). This will also remove any other overridden properties from all fixtures.
Lightkey User Guide71

8Presets and Sequences ➤ Presets and sequences are the basic building blocks of your light
show. They are also the basis for cues, which will be introduced in the next chapter.
A preset stores an arbitrary combination of fixture properties for a set of fixtures. For example, a preset could include colors and intensities for a number of moving heads, or their pan/tilt positions. A preset can contain different properties for different fixtures. Presets are generally static because they contain fixed values for fixture properties. However, presets can also include effects which are treated like a special value for a fixture property.
Although the concept of presets is deliberately flexible, there are common patterns for using them. You may want to create “looks” for groups of related fixtures and store each one in a preset. Later you can use these presets to combine different fixture groups to a complete look. Or, if you prefer a more modular approach, you can create presets which define a single property for a given group of fixtures. You will end up with one set of “color” presets, another set of “gobo” presets and so on which you can reuse later to quickly compose a look on the stage.
Whichever way you prefer, it is a good idea to organize similar presets in groups. Here’s an example of three typical preset groups:
A sequence contains a number of presets (also called steps) which are activated one after the other. Each step has a duration which determines how long it remains active. Lightkey can crossfade between two succeeding steps, which can be the basis for interesting effects. There are various settings which control the order and timing of sequences. You can also synchronize sequences to music, which means that they will advance to the next step in sync to the beat.
Moving Head Colors Deep Blue Deep Blue Lime Green Color Change
Moving Head Gobos Spiral Spiral (rotating) Heart Flower (shaking)
LED Bars Magenta Orange Yellow
Green
Lightkey User Guide72

Presets and sequences appear in the Preset Palette at the right side of the main window.
If you don’t see the Preset Palette:
▪︎ Choose View > Show Preset Palette.
Create a Preset There are two basic ways to create a preset: You can define some fixture properties and then save the result as a preset. Or you can begin with an empty preset and then define its fixture properties.
To create a preset from the overridden fixture properties: 1 Select one or more fixtures and change their properties. (See chapter 7, “Fixture
Properties”, for more information.) Fixtures with overridden properties display a blue dot to the left to their name in the Preview.
2 Do one of the following:
▪︎ Click in the toolbar.
▪︎ Choose Preset > New Preset (or press Command-N).
▪︎ Control-click an item in the Preset Palette and choose New Preset from the shortcut menu. (If the clicked item is a group or sequence, the new preset is added at the end of the group or sequence. If the clicked item is a preset, the new preset is inserted after the preset.)
A new preset appears in the Preset Palette, containing the overridden properties of all fixtures. Lightkey automatically creates an icon and proposes a name for the preset depending on its content.
3 If you want to keep the proposed name, simply press Return. Otherwise type a different name and then press Return.
To create a preset that is initially empty: 1 Click in the toolbar or choose Fixture > Clear Properties for All Fixtures to make
sure no fixture properties are overridden.
2 Click in the toolbar, or use one of the alternatives listed above.
A new, empty preset appears in the Preset Palette.
3 Select one or more fixtures and change their properties. 4 Click the checkmark next to the preset’s name in the Preset Palette.
View Preset Contents Lightkey can give you a quick overview of the fixtures and fixture properties affected by a given preset.
Lightkey User Guide73

Here are ways to show the contents of a preset:
▪︎ Click the preset in the Preset Palette. (This will also activate the preset, as described below.)
▪︎ Control-click the preset and choose Show Properties from the shortcut menu.
Lightkey will display the names of the properties defined for each fixture next to the fixture icons in the Preview.
Here are ways to hide the contents of a preset:
▪︎ Click anywhere in the Preview.
▪︎ Press Esc, Return, or Enter.
Activate Presets When you activate a preset, its contained fixture properties are applied to the fixtures. A preset is active when it is selected in the Preset Palette. Note that any overridden fixture properties always take precedence over active presets.
To activate a preset:
▪︎ Click the preset in the Preset Palette.
To activate a range of presets:
1 Click the first preset.
2 Hold down the Shift key and click the last preset.
To change a preset’s active state:
▪︎ Hold down the Command key and click the preset.
Here are ways to deactivate all presets:
▪︎ Press Esc.
▪︎ Click in the empty margin on the left of the Preset Palette.
Edit a Preset You can always change the fixture properties stored in a preset after it has been created.
To edit the fixture properties in a preset:
1 Do one of the following: ▪︎ Move the pointer over the preset in the Preset Palette and click Edit.
▪︎ Hold down the Command key and double-click the preset. ▪︎ Click the preset in the Preset Palette and choose Preset > Edit (or press Command-
Shift-E). ▪︎ Control-click the preset and choose Edit from the shortcut menu.
White you are editing a preset, its name appears in the center area of the toolbar.
Lightkey User Guide74

2 Make changes to the fixture properties. (See chapter 7, “Fixture Properties”, for more information.)
3 Click Update next to the preset’s name in the Preset Palette, or press Return. (To discard your changes and return to the preset’s previous state, hold down the Option key and click Cancel next to the preset’s name, choose Preset > Cancel Editing, or press Esc).
Lightkey will update the preset’s contents and icon. If the preset’s name has been automatically assigned by Lightkey, it is updated too.
Presets and Overridden Properties You can add the contents of a preset—that is, the fixture properties it defines—to the overridden fixture properties. When you do this, the fixture properties in the preset replace any previous values for those properties. Fixture properties not defined by the preset remain unchanged.
Here are ways to add the contents of presets to the overridden properties: ▪︎ Select one or more presets in the Preset Palette and choose Preset > Apply.
▪︎ Control-click a preset and choose Apply from the shortcut menu. ▪︎ Select one or more presets and drag them to the Preview area.
You can use the same technique to merge two presets.
To merge two presets:
1 Move the pointer over the first preset in the Preset Palette and click Edit. 2 Control-click the second preset and choose Apply from the shortcut menu.)
3 Click the checkmark next to the first preset’s name in the Preset Palette, or press Return.
If some fixture properties are defined by both presets, the properties from the second preset will replace those from the first preset. In reverse, you can also add the overridden fixture properties to one or more existing presets. In this case the overridden properties replace any previous values in the presets. Fixture properties that aren’t overridden remain unchanged.
This technique is an alternative to editing the preset, as described earlier. It is especially useful when you need to change multiple presets at once.
To add the overridden fixture properties to one or more presets: 1 Select one or more fixtures and change their properties. (See chapter 7, “Fixture
Properties”, for more information.) Fixtures with overridden properties display a blue dot to the left to their name in the Preview.
2 Do one of the following:
▪︎ Select one or more presets in the Preset Palette and choose Preset > Add Overrides.
Lightkey User Guide75

▪︎ Control-click a preset and choose Add Overrides from the shortcut menu.
▪︎ To add the overridden properties for the selected fixtures only, hold down the Option key as you perform one of the preceding steps. The command changes to Add Overrides for Selected Fixtures.
Create a Preset Group As your list of presets grows, you may find it easier to create groups of similar presets, which can be collapsed and expanded as necessary. Apart from presets, groups can also contain sequences and other groups.
To create an empty preset group: 1 Do one of the following:
▪︎ Press the mouse button over the symbol in the toolbar until a menu appears, then choose New Group.
▪︎ Choose Preset > New Group (or press Command-Shift-N).
▪︎ Control-click an item in the Preset Palette and choose New Group from the shortcut menu.
2 Enter a name for the group and then press Return.
To create a group from existing items:
1 Select some presets, sequences, or groups in the Preset Palette. (Hold down the Shift or Command key to select multiple items.)
2 Do one of the following:
▪︎ Press the mouse button over the symbol in the toolbar until a menu appears, then choose New Group From Selection.
▪︎ Choose Preset > New Group From Selection (or press Command-Option-Shift-N). 3 Enter a name for the group and then press Return.
Here are ways to expand or collapse a group:
▪︎ Click the disclosure triangle to the left of the group name. ▪︎ Click the group in the Preset Palette and choose Preset > Expand/Collapse Group (or
press Command-Left/Right Arrow).
Create a Sequence Sequences look similar to groups in the Preset Palette; you can distinguish them by their icon to the left of the name. Like groups, they can be collapsed and expanded. Sequences contain a list of presets, but unlike groups, they cannot contain groups or other sequences. The presets in a sequence are also called steps.
To create an empty sequence:
1 Do one of the following:
Lightkey User Guide76

▪︎ Press the mouse button over the symbol in the toolbar until a menu appears, then choose New Sequence.
▪︎ Choose Preset > New Sequence (or press Command-Control-N).
▪︎ Control-click an item in the Preset Palette and choose New Sequence from the shortcut menu.
2 Type a name for the sequence and then press Return.
To create a sequence from existing presets:
1 Select the presets in the Preset Palette. (Hold down the Shift or Command key to select multiple presets.)
2 Do one of the following:
▪︎ Press the mouse button over the symbol in the toolbar until a menu appears, then choose New Sequence From Selection.
▪︎ Choose Preset > New Sequence From Selection (or press Command-Control-Option-N).
3 Type a name for the sequence and then press Return.
View Sequence Contents Lightkey can give you a quick overview of the fixtures and fixture properties affected by a given sequence—or, more precisely, all fixture properties affected by any preset in the sequence.
Here are ways to show the contents of a sequence:
▪︎ Click the sequence in the Preset Palette.
▪︎ Control-click the sequence and choose Show Properties from the shortcut menu.
Lightkey will display the names of the properties defined for each fixture next to the fixture icons in the Preview.
Here are ways to hide the contents of a sequence:
▪︎ Click anywhere in the Preview. ▪︎ Press Esc, Return, or Enter.
Run Sequences
Here are ways to run a sequence or stop a running sequence:
▪︎ Click or to the right of the sequence’s name in the Preset Palette.
▪︎ Click the sequence in the Preset Palette and choose Preset > Start Sequence or Preset > Stop Sequence.
Lightkey User Guide77

Sequence Order There are various options which determine the order in which the steps in a sequence are activated. As an example, consider a sequence with four steps which define different fixture colors:
Name Blue Green Yellow Red
If you run the sequence with the default settings, each step is activated once, from top to bottom:
To change a sequence’s order:
1 Do one of the following: ▪︎ Double-click the sequence in the Preset Palette.
▪︎ Control-click the sequence and choose Get Info from the shortcut menu. 2 In the window that appears, click Options at the top and change the settings as
appropriate:
▪︎ Repeat: Choose how many times the sequence repeats before it stops. Click the arrow in the text field and choose “inf” from the menu to make the sequence repeat infinitely.
▪︎ Backwards: If selected, the steps will be activated in reverse order (from bottom to top).
▪︎ Autoreverse: If selected, the sequence will reverse its direction after each pass. (The repeat count must be greater than one for this to have an effect.) If the Backwards option is selected, the first pass will be backwards; otherwise the first pass will be forwards.
▪︎ Freeze on completion: If selected, the last step will remain active when the sequence has finished.
time
time
time
time
Lightkey User Guide78

3 Click Done.
❖ Note: The options for Pan/Tilt movements in this window are described below in “Create Fixture Movements With Sequences”.
Sequence Timing A sequence can either use manual timing or beat-controlled timing.
Manual Timing When using manual timing, each step in a sequence has a hold time which determines how long the step remains active when the sequence runs. Consider the example from the previous section with the following hold times:
Name Hold Time Blue 00:02.0 Green 00:04.0 Yellow 00:02.0 Red 00:04.0
If you run the sequence, it would look like this:
Lightkey can crossfade (or blend) between consecutive steps. During the crossfade, fixture property values gradually change from the old to the new state. Crossfading only works for some fixture properties: For example, Lightkey can fade between two Dimmer or two Focus values but not between Shutter states. If a property doesn’t support crossfading, its value will change instantly in the middle of the crossfade period. When crossfading between two steps, Lightkey can only fade fixture properties which are defined in both steps. For example, to have a fixture gradually light up from off to full intensity, the first preset must define the Dimmer property with a value of 0% and the second step must define it with a value of 100%. The duration of a crossfade is called the fade time; it is added to the hold time. By default the fade time is zero, so all property values change instantly as in the previous example.
Example: The above sequence with a fade time of 1 second.
When you use crossfading, a common technique is to set the hold times to zero, thus creating a continuous animation. In our example, this would result in a “rainbow” effect.
00:00 00:02 00:04 00:06 00:08 00:10 00:12
00:00 00:02 00:04 00:06 00:08 00:10 00:12 00:14 00:16
hold fade hold fade fadehold hold
Lightkey User Guide79

Example: Fade times are 00:02.0, hold times are zero.
A sequence has a default hold time and default fade time. These values are initially applied to all steps in the sequence but can be overridden for individual steps, as described below.
❖ Note: The fade time for the last step in the sequence is only meaningful if the sequence repeats. In this case it defines the time to blend between the last and the first step.
When using manual timing, you can quickly change the overall speed of a sequence through its speed rate. All hold and fade times are multiplied by this factor. Its default value is 1.
Example: The original sequence with a speed rate of 0.5.
Example: The original sequence with a speed rate of 1.5.
Beat-Controlled Timing With beat-controlled timing, you can synchronize a sequence to music. By default, the sequence advances to the next step on each beat:
You can change how often the sequence is advanced using the beat multiplier, which is 1 by default. For example, if you set the the beat multiplier to “÷ 2”, the sequence is advanced on each half beat:
With beat-controlled timing, you cannot set hold times, but you can still set fade times. In this case the fade begins on each beat. For information on how to set the beat, see chapter 11, “Beat Control”.
00:00 00:02 00:04 00:06 00:08 00:10 00:12
fade fade fade
00:00 00:02 00:04 00:06 00:08 00:10 00:12
00:00 00:02 00:04 00:06 00:08 00:10 00:12 00:14 00:16 00:18
00:00 00:02 00:04 00:06 00:08 00:10 00:12
Beat Beat Beat Beat
00:00 00:02 00:04 00:06 00:08 00:10 00:12
Beat Beat Beat Beat
Lightkey User Guide80

To change a sequence’s timing options:
1 Do one of the following: ▪︎ Double-click the sequence in the Preset Palette.
▪︎ Control-click the sequence and choose Get Info from the shortcut menu. 2 In the window that appears, click Timing at the top and change the settings as
appropriate according to the foregoing discussion. Select “Individual fade times” to allow individual steps to override the default fade time, as described below.
3 Click Done.
To change the hold or fade time of individual steps:
1 Select one or more steps. (Hold down the Command or Shift key as you click to select multiple steps.) By selecting multiple steps you can change their hold or fade times at once.
2 Click the hold or fade time (to the right of the step name). The fade time is only visible if the sequence timing option “Individual fade times” is selected.
3 Enter a new value. You can press the Up/Down Arrow keys to increase/decrease the time by one second. Leave the field empty to use the sequence’s default hold or fade time.
4 Press Return to end editing.
★ Tip: When editing hold or fade times, press Tab or Shift-Tab to quickly jump to the next or previous field.
You can change the initial hold and fade times for newly created sequences in Lightkey’s Preferences window. You can also increase the precision (number of decimal places shown) for hold and fade times.
To change the hold and fade times for newly created sequences: 1 Choose Lightkey > Preferences… (or press Command-Comma) and click General.
2 Change the values in the fields for the sequence hold and fade time. (To revert a value to the standard value, delete the field contents and press Return.)
To change the precision for hold and fade times:
1 Choose Lightkey > Preferences… (or press Command-Comma) and click General. 2 Select an option from the “Time precision” pop-up menu.
Create Fixture Movements With Sequences If the steps in a sequence define different pan/tilt positions, your fixtures will move between these positions as the sequence runs. Lightkey provides different options to control the exact movement of the fixtures.
Lightkey User Guide81

❖ Note: Another way to generate fixture movements are movement effects, as described in chapter 9, “Effects”. Each technique has its advantages and drawbacks. A movement effect is quick to create, easy to reuse on different fixtures, and provides a better visual impression of how the fixture moves. On the other hand, a sequence lets you combine the fixture movement with other property changes and gives you more control over timing.
As an example, consider a sequence with five steps which define positions for a fixture:
Name Hold Time Fade Time Position 1 (P1) 00:01.0 00:02.0 Position 2 (P2) 00:01.0 00:06.0 Position 3 (P3) 00:01.0 00:04.0 Position 4 (P4) 00:01.0 00:02.0 Position 5 (P5) 00:01.0 00:00.0
The following graph shows when the fixture reaches the different positions if no special options are applied. In the graph, the vertical dimension represents the fixture position (which actually consists of two dimensions, pan and tilt). During the crossfade periods, Lightkey linearly interpolates the fixture positions between the previous and next step.
If we change all hold times to zero to create a continuous movement, the fixture moves like this:
The fixture moves on the direct way from one position to the next, changing its movement direction at each point. If you want a smoother movement instead, you can select the option “Smooth movements”.
P1
P2
P3P4
P5
00:00 00:02 00:04 00:06 00:08 00:10 00:12 00:14 00:16 00:18
00:00 00:02 00:04 00:06 00:08 00:10 00:12 00:14
P1
P2
P3P4
P5
Lightkey User Guide82

Lightkey will calculate a curve which passes all five fixture positions at the times determined by the steps’ hold and fade times. For example, the time it takes to move from P1 to P2 is the sum of the first step’s hold and fade times (with this option there is no longer a difference between hold and fade time).
The movement speed from each position to the next may vary—it depends on the hold/fade times and the distance between the positions. In the example, P1 and P2 are relatively far apart, but the fade time is short, so the fixture moves at a high speed. To create a uniform movement, select the option “Constant pace”.
Lightkey will adjust the time at which each position is reached so that the fixture moves at (approximately) constant speed (ignoring the individual hold/fade times). The total time for moving through the sequence is still the same (that is, it is determined by the total hold and fade times).
Organize Presets and Sequences Here are ways to organize presets, groups, and sequences in the Preset Palette.
To move a preset, group, or sequence:
▪︎ Drag the item up or down in the Preset Palette. You can move items in and out of groups and sequences (however, sequences can’t contain groups or other sequences).
To reorder multiple presets, groups, or sequences:
1 Select the items in the Preset Palette. Hold down the Shift or Command key to select multiple items.
2 Drag the selected items to the desired position.
To rename a preset, preset group, or sequence:
1 Click the preset, preset group, or sequence in the Preset Palette to select it.
2 Do one of the following: ▪︎ Click the item’s name in the Preset Palette.
00:00 00:02 00:04 00:06 00:08 00:10 00:12 00:14
P1
P2
P3P4
P5
00:00 00:02 00:04 00:06 00:08 00:10 00:12 00:14
P1
P2
P3 P4
P5
Lightkey User Guide83

▪︎ Choose Edit > Rename (or press Return).
▪︎ Control-click the item and choose Rename from the shortcut menu. 3 Enter a new name and then press Return.
To duplicate a preset, preset group, or sequence: 1 Click the preset, preset group, or sequence in the Preset Palette to select it.
2 Choose Edit > Duplicate (or press Command-Shift-D). Lightkey will create a copy of the item below the original item.
After duplicating a preset, Lightkey will automatically begin to edit it (see “Edit a Preset”).
To duplicate a preset, preset group, or sequence by dragging:
▪︎ Hold down the Option key and drag the preset, preset group, or sequence. Lightkey will add a copy of the item at the target location.
After duplicating a preset, Lightkey will automatically begin to edit it (see “Edit a Preset”).
To delete a preset, preset group, or sequence: 1 Click the item in the Preset Palette to select it. (Hold down the Shift or Command key
to select multiple items.) 2 Do one of the following:
▪︎ Choose Edit > Delete.
▪︎ Control-click the item and choose Delete from the shortcut menu.
▪︎ Press Delete.
3 If the preset or sequence is part of a cue, an alert message will appear. Click Delete to delete the item and remove it from any cues.
If you accidentally deleted an item, choose Edit > Undo Delete.
Find Items in the Preset Palette You can find items in the Preset Palette by their name. Only items whose name contains the search text will be shown.
To find items in the Preset Palette:
1 Do one of the following:
▪︎ Click in the toolbar.
▪︎ Choose Edit > Find Presets… (or press Command-Option-F).
2 Enter the text to search for in the search field above the Preset Palette.
Lightkey User Guide84

Reorder Sequence Steps Lightkey provides two useful commands to quickly reverse the order of steps in a sequence or to reorder them randomly (shuffle).
Here are ways to reverse of shuffle all steps in a sequence:
▪︎ Select the sequence in the Preset Palette, then choose Preset > Reverse Presets or Presets > Shuffle Presets.
▪︎ Control-click the sequence and choose Reverse Presets or Shuffle Presets from the shortcut menu.
To reverse or shuffle some of the steps in a sequence: 1 Select some steps in the same sequence. (Hold down the Shift or Command key to
select multiple items.) 2 Do one of the following:
▪︎ Choose Preset > Reverse Presets or Presets > Shuffle Presets.
▪︎ Control-click one of the selected steps and choose Reverse Presets or Shuffle Presets from the shortcut menu.
Lightkey User Guide85

9Effects ➤ Lightkey’s powerful effects engine makes it easy and fun to create
dynamic looks. It comes with over 50 effect templates or lets you build your own effects for almost any fixture property. You can synchronize effects to music and overlay multiple effects for limitless possibilities.
An effect controls the output of a fixture property for a set of fixtures. Like “static” property values, effects can be stored in presets, sequences, and cues, while staying fully editable at any time. Effects can be applied to the individual beams of an LED fixture, or across multiple fixtures.
There are three basic kinds of effects which apply to different fixture properties:
Pattern Effects A pattern effect generates a pattern from a set of predefined values. Pattern effects can be applied to either the Dimmer or the Color property, so the term value refers to either an intensity value (0–100%) or a color. You can choose from a number of patterns such as a chase. Some patterns are entirely deterministic and repeating whereas others have random elements.
Curve Effects A curve effect uses a repeating mathematical function—for example, as a sine wave—to calculate the value of the fixture property. The output depends on the time and a number of adjustable parameters.
Effect Use for
Pattern Dimmer, Color (RGB and additional colors)
Curve Dimmer, Color (RGB and/or additional colors), Position, Focus, Zoom, Iris, Frost, Fog, any custom property represented by a slider
Movement Position
Lightkey User Guide86

Most of the fixture properties that can be controlled by curve effects consist of a single numeric value, usually in the range 0 through 100%. In this case the result of the mathematical function directly determines the value of the fixture property.
There are two fixture properties with more complex values which consist of multiple components. Separate mathematical functions are used to calculate each component which are then combined to form the value of the fixture property. These properties are:
▪︎ Color: A color usually consists of at three components which depend on the color model. Color models are HSB (hue, saturation, brightness), RGB (red, green, blue), CMY (cyan, magenta, yellow). In addition, the following components may be added if they’re supported by the fixture: cool white, warm white, amber, lime, ultraviolet.
▪︎ Position: A position consists of the pan angle and the tilt angle.
Movement Effects A movement effect describes the continuous pan and tilt movement of a moving light along a predefined closed path—for example, a circle or a figure eight. A movement path consists of two or more control points from which Lightkey interpolates the fixture’s position at any given time.
Lightkey allows you to design movement paths in a natural way: The points on the path give an indication of where the light beam points in reality, and the path’s shape (although only in 2D) resembles the actual movement. This is different from some other applications which show movement paths in a Cartesian coordinate system, with little resemblance to the actual fixture movement. As a consequence, the same fixture movement may look entirely different in Lightkey than in other applications.
❖ Note: This also means that you can’t create some paths which look (on the screen) like a certain path in Cartesian coordinates. For example, you can’t create a perfect circle because moving lights with a finite pan range can’t (indefinitely) move in a circle. In such a situation, think about how you want the fixture to move and create your path accordingly. Lightkey allows you to build any movement path that can be created in a Cartesian coordinate system.
Lightkey comes with a set of built-in movement paths which you can freely edit and build upon. Whenever you change a built-in path, Lightkey creates a copy. Those self-created paths are stored in the project.
❖ Note: Another way to generate fixture movements are sequences, as described in “Create Fixture Movements With Sequences” in chapter 8, “Presets and Sequences”. Each technique has its advantages and drawbacks. A movement effect is quick to create, easy to reuse on different fixtures, and provides a better visual impression of how the fixtures move. On the other hand, a sequence lets you combine the fixture movement with other property changes and gives you more control over timing.
Lightkey User Guide87

Add an Effect
To add an effect:
1 Select one or more fixtures for the effect. Make sure the fixtures’ light beams are visible (that is, their shutters and dimmers are open).
2 Do one of the following:
▪︎ Click in the toolbar and choose a fixture property from the menu.
▪︎ Choose Fixture > Add Effect, then choose a fixture property (or press Command-Option-E).
▪︎ Click a fixture property’s name in the Design view or in a property’s HUD and choose Add [property name] Effect… from the menu.
3 Select the appropriate options in the area below the Preview.
To start from an effect template: ▪︎ Click one of the available templates. When a template is selected, Lightkey shows a
preview of the effect. Templates which don’t apply to the selected fixtures appear gray.
▪︎ The icon indicates that an effect is beat-controlled.
▪︎ Enter text in the search field at the top-right to filter the displayed templates by name.
▪︎ Move the pointer over an effect template and click Add to add the effect to the selected fixtures. You can edit the effect’s properties later.
To add a custom effect: ▪︎ Click Custom Effect.
▪︎ Select a fixture property and the kind of effect. The available effect types depend on the fixture property you selected.
▪︎ Click Add Effect. 4 If there’s already an effect for the same fixture property, an alert message appears.
▪︎ Click Replace to replace the existing effect.
▪︎ Click Overlay to overlay the new effect with the existing one. See “Overlaying Effects” later in this chapter.
Lightkey adds the effect to the selected fixtures and shows its settings in the area below the Preview.
Edit an Effect When a fixture property is controlled by an effect, the fixture property’s area in the Design view shows an effect icon instead of the normal controls. You can edit an effect’s settings at any time.
Here are ways to edit an effect:
▪︎ Click the effect icon in the Design view.
Lightkey User Guide88

▪︎ Click a fixture’s name in the Preview, then select a fixture property from the shortcut menu. Properties with an effect are marked with an icon.
▪︎ Click Overrides in the toolbar. The names of the overridden properties appear next to the fixtures’ icons, and an icon marks properties with an effect. Click a fixture property’s name to edit the effect.
When you edit an effect, Lightkey displays its settings in the area below the Preview. They are described in the following sections.
Edit the Effect Timing An effect either has a fixed duration or is synchronized to the beat (beat-controlled).
▪︎ Fixed duration: You can choose the duration of the effect, that is, the time after which the effect repeats. When you add an effect to a cue, the duration is multiplied by the cue’s Speed modifier. Note that some randomized pattern effects do not repeat and don’t have a duration.
▪︎ Beat-controlled timing: You can choose the beat multiplier, which controls how often the effect repeats per beat. For example, if you set the the beat multiplier to “÷ 2”, the effect repeats twice during each beat. Beat synchronization is available for curve effects and some pattern effects.
You can set the timing options in the area below the Preview:
Edit the Fixture Order When you assign an effect to multiple fixtures or to fixtures with multiple beams (e.g. LED bars, strips, or matrixes), the order of the fixtures (or beams) has an important impact on the effect. In the following, the term pixel will be used for the smallest unit which can be individually controlled—either a fixture or a beam. You can change the order of the fixtures (or beams) when you edit an effect. You can also add fixtures to an effect or remove fixtures after the effect has been created.
To change the order of fixtures (or beams) for an effect:
1 Edit an effect, then click Fixture Order in the area below the Preview. As you move the mouse pointer over an item in the menu, Lightkey shows the resulting
fixture order in the Preview. 2 Select an option as appropriate:
▪︎ Left to Right: Sort the fixtures or beams from left to right as they appear in the Preview.
Fixed duration Beat-controlled timing
Lightkey User Guide89

▪︎ Right to Left: Sort the fixtures or beams from right to left as they appear in the Preview.
▪︎ Top to Bottom: Sort the fixtures or beams from top to bottom as they appear in the Preview.
▪︎ Bottom to Top: Sort the fixtures or beams from bottom to top as they appear in the Preview.
▪︎ By Short Name: Sort the fixtures alphabetically by their short name, either ascending or descending. Beams are sorted by their index.
▪︎ By Address: Sort the fixtures by their universe and DMX address, either ascending or descending. Beams are sorted by their index.
▪︎ Random: Sort the fixtures or beams randomly. A new random order is generated each time you select this option.
▪︎ Start to End: Use the order as described above.
▪︎ From Center: Based on the order as described above, number the fixtures from the center to the edges. An index can be shared by two fixtures or beams—one on each side from the center. This option can’t be used with random order.
▪︎ To Center: Based on the order as described above, number the fixtures from the edges to the center. An index can be shared by two fixtures or beams—one on each side from the center. This option can’t be used with random order.
▪︎ Select Fixtures: Treat all beams of a fixture as a single pixel.
▪︎ Select Beams: For fixtures with multiple beams, treat the beams as individual pixels. ▪︎ Grouping: Treat several adjacent fixtures or beams as a group that acts like a single
pixel. For example (grouping set to 3): 1 / 1 / 1 / 2 / 2 / 2 / 3 / 3 / 3 / 4 / 4 / 4.
▪︎ Repeat: Repeat pixel indexes on every 2nd, 3rd, 4th … fixture or beam. For example (repeat set to 3): 1 / 2 / 3 / 1 / 2 / 3 / 1 / 2 / 3 / 1 / 2 / 3.
To change the fixtures that participate in an effect:
1 Edit an effect, then click Fixture Order in the area below the Preview and choose Select Fixtures… from the menu.
2 Select the fixtures to participate in the effect in the Preview.
3 Click Done.
Edit Pattern Effects Pattern effects generate a pattern from a set of predefined values. In the following, the term value refers to either an intensity value (0–100%) or a color, depending on the fixture property.
The area below the Preview contains the values for the pattern:
Lightkey User Guide90

To reorder the values:
▪︎ Drag a value to the left or right.
To duplicate a value:
▪︎ Hold down the Option key and drag the value to the left or right.
Here are ways to remove a value:
▪︎ Control-click a value and choose Delete from the shortcut menu.
▪︎ Drag the value outside the values area and release the mouse button.
The available patterns and their options are described in the following.
Chase The pixels cyclically take on the predefined values. This pattern supports beat control. In this case the chase is advanced on each beat (can be adjusted with beat multiplier).
Drag the sliders to change the value
Click a value to edit it
Click to add a new value
Click to select a pattern
Steps per Value The number of chase steps before a pixel takes on the next value (see examples below).
Phase Controls where the chase begins when the effect becomes active, relative to its duration. For example, a phase of 50% makes the chase begin half way through the duration. This setting is especially useful when you overlay multiple effects.
Time Offset Manual timing: Controls when the pixels change to the next value. A time offset of 0% means that all pixels change their value at the same time. Higher offsets mean that a pixel changes its value later than the preceding pixel (see “Edit the Fixture Order” above). This is similar to the Delay parameter except at the beginning of the effect (see examples below).
Delay Manual timing: Introduces a delay for each pixel to change its value, relative to the preceding pixel. At the beginning of the effect each pixel starts at the first value (see examples below).
Smoothness A smoothness value greater than zero lets Lightkey blend between consecutive values (see examples below).
Lightkey User Guide91

Example: A chase pattern with four colors, no time offset or delay.
The chase with a time offset of 100%.
The original chase with a delay of 100%.
The chase with a time offset of 100%, 2 steps per value.
The following diagram illustrates the effect of different smoothness values:
Fill A pattern which successively fills all pixels with a fixed value. The first value defines the background, the remaining values are used in succession for filling.
Example: A fill pattern with a background color and two fill colors.
time
Pixel 1Pixel 2Pixel 3Pixel 4Pixel 5
time
Pixel 1Pixel 2Pixel 3Pixel 4Pixel 5
time
Pixel 1Pixel 2Pixel 3Pixel 4Pixel 5
time
Pixel 1Pixel 2Pixel 3Pixel 4Pixel 5
time
0%33%
100%
time
Pixel 1Pixel 2Pixel 3Pixel 4Pixel 5
Lightkey User Guide92

Rain Produces moving streaks on a static background. The first value defines the back- ground, the remaining values are used in succession for the streaks. This pattern supports beat control. In this case a new streak is launched on each beat (can be adjusted with beat multiplier).
Example: A rain pattern with a background value and two foreground values (length = 4, distance = 2, smoothness = 100%).
Sparkle Random pixels light up on a static background. The first value defines the background, the remaining values are used for the “sparkles”.
Length The length of each streak (number of pixels).
Distance The distance between successive streaks (number of pixels).
Phase Controls where the pattern begins when the effect becomes active, relative to its duration. For example, a phase of 50% makes the chase begin half way through the duration. This setting is especially useful when you overlay multiple effects.
Smoothness If greater than zero, each streak fades out towards the background value.
Pixel 1Pixel 2Pixel 3Pixel 4Pixel 5Pixel 6Pixel 7Pixel 8
time
Pixel 9
Distance
Length
Interval The time interval in which new sparkles are created (in seconds).
Lifetime The time each sparkle remains visible (in seconds).
Smoothness If greater than zero, each sparkle fades out towards the background value.
Use values as palette If selected, each sparkle will pass thru all values (except the background value) during its lifetime. In other words, the values act like a color palette for colorizing the sparkles. Otherwise, each sparkle uses one of the non-background values (in succession) and fades out towards the background value.
Lightkey User Guide93

Example: A sparkle pattern with a background color and four foreground colors (smoothness = 100%). The locations of new sparkles are chosen randomly.
Fire Resembles a burning flame. The values are interpreted as a color palette for the fire, with the “hottest” values towards the right. This pattern looks best on LED strips with 20 or more pixels.
Jellyfish Generates a pattern of elements which move along the pixels while pulsating like a jellyfish. The first value defines the background, the remaining values are used for the “jellyfish”. This pattern looks best on LED strips with 20 or more pixels.
Edit Curve Effects Curve effects use a mathematical function to calculate the value of the fixture property. When you edit a curve effect Lightkey shows a graphical representation of the function below the Preview. For fixture properties with multiple components (Color, Position), each component has its own curve.
Pixel 1Pixel 2Pixel 3Pixel 4Pixel 5
timeNew sparkle
Lifetime
Interval
Speed Controls the speed of the effect.
Sparking Controls how fast a flame cools down. More cooling means shorter flames.
Cooling Controls how often a new spark will ignite at the bottom of the fire. A higher value makes the fire more active.
Count The maximum number of jellyfish visible at a time.
Size Controls the size of the jellyfish.
Speed Controls the speed by which the jellyfish move.
Smoothness Controls how the jellyfish fade out towards the edges.
Use values as palette If selected, the values (except the background value) are used as a color palette for colorizing the jellyfish. Otherwise, each jellyfish uses one of the non-background values (in succession) and fades out towards the background value.
Lightkey User Guide94

Here are ways to transform the selected curve:
▪︎ Press the pointer over the curve and drag up or down to move the curve vertically (previously “Y Shift” parameter). You can also press the Up/Down Arrow keys.
▪︎ Press the pointer over the curve and drag left or right to move the curve horizontally (previously “X Shift” parameter). You can also press the Left/Right Arrow keys.
▪︎ Hold down the Command key and drag up or down to scale the curve (previously “Scale” parameter). You can also press Command and the Up/Down Arrow keys. By scaling the curve beyond zero you flip it vertically.
▪︎ To change the curve’s high (maximum) or low (minimum) values, move the pointer over the curve area and drag one of the markers at the top and bottom of the curve.
▪︎ To resize a curve segment, move the pointer over the curve area and drag one of the horizontal section markers (some curve types only).
▪︎ To flip the curve vertically, Control-click the curve area and choose Flip Vertically from the shortcut menu.
▪︎ To reset the curve’s position and scaling, Control-click the curve area and choose Reset Curve from the shortcut menu.
Additional options appear to the right of the curve:
Some options are available for the Position property only. To change them, click the Options button in the lower-left.
Click a component to edit its curveSelect a color model (color effects only)
The dot shows the current location on the selected curve
Curve Type Choose one of the built-in curve types.
Divider Divides the duration into equal subdivisions and applies the function to each subdivision. This is useful when there are multiple curves (for fixture properties with multiple components).
Time Offset Time offset between two consecutive fixtures (or beams), in percent of the duration. For example, with a duration of 10 seconds and a time offset of 5%, the second fixture will perform the effect 0.5 seconds later than the first, the third fixture will be 1 second later than the first, and so on. See “Edit the Fixture Order” above.
Lightkey User Guide95

Edit Movement Effects Movement effects define the pan and tilt movement of a moving light using movement paths (or simply paths). When you edit a movement effect, the built-in movement paths and those stored in the project appear in the area below the Preview. Click a path to use it for the effect. Movement paths are stored independently of the effect, so you can reuse them for other effects. When you edit a movement path later, the changes will affect all effects and fixtures to which the path was applied. You can prevent this by duplicating the path before editing it. When you begin editing a built-in path it is automatically duplicated.
Here are ways to duplicate a path:
▪︎ Control-click a path and choose Duplicate from the shortcut menu, then type a name for the new path and press Return.
▪︎ Hold down the Option key and drag a path.
Here are ways to rename a user path:
▪︎ Control-click a path and choose Rename from the shortcut menu. Type the new name and press Return.
▪︎ Select a path and press Return.
To delete a user path:
▪︎ Control-click a path and choose Delete… from the shortcut menu. In the dialog that appears, click Delete.
Mirror pan Mirror tilt
If you use the “From Center” fixture order option (see “Edit the Fixture Order” above), Lightkey can “mirror” the pan and/or tilt angles on one side of the center (that is, reverse their sign). Here’s an example of mirrored pan angles: –30° / –15° / 0° / +15° / +30°.
Relative If you select this option, the effect’s pan and tilt values are added to the pan/tilt values defined elsewhere. For example, you could have two cues active at the same time: One cue defines “absolute” positions for some fixtures and the other adds a relative effect “on top”.
All built-in paths and user paths appear
here. You can reorder the user
paths by dragging
The frame shows the path that is used for the movement effect
Lightkey User Guide96

The following table describes the options for movement effects.
Additional options are shown when you click the Options button in the lower-left:
You can edit any of the built-in and self-created movement paths—for example, you can move, add, or remove points and flip or transform the path. When you begin to edit a built-in path, a copy is created. Whenever you make a mistake as you edit a path, you can choose Edit > Undo to undo the last change.
To begin editing a movement path:
▪︎ Click one of the effect’s fixtures in the Preview. The Position HUD appears and shows the movement path.
Edit Points Every movement path consists of two or more control points. The point where the movement starts is marked with a dot.
Control points can be selected, indicated by a green or red color. When a point is selected, the fixture moves to the position represented by the point, and follows it as you move the point. When you clear the selection, the fixture resumes to move along the path, starting at the point that was previously selected.
Time Offset Time offset between two consecutive fixtures, in percent of the duration. For example, with a duration of 10 seconds and a time offset of 5%, the second fixture will perform the movement 0.5 seconds later than the first, the third fixture will be 1 second later than the first, and so on. See “Edit the Fixture Order” above.
Pan Offset Adds an offset (in degrees) to the pan angle between two consecutive fixtures. For example, if the pan offset is 10° then the pan angle of the second fixture will always be 10° larger than the pan angle of the first, and the pan angle of the third fixture will be 20° larger than the pan angle of the first, and so on. See “Edit the Fixture Order” above.
Tilt Offset Adds an offset (in degrees) to the tilt angle between two consecutive fixtures.
Mirror pan Mirror tilt
If you use the “From Center” fixture order option (see “Edit the Fixture Order” above), Lightkey can “mirror” the pan and/or tilt angles on one side of the center (that is, reverse their sign). Here’s an example of mirrored pan angles: –30° / –15° / 0° / +15° / +30°.
Relative If you select this option, the effect’s pan and tilt values are added to the pan/tilt values defined elsewhere. For example, you could have two cues active at the same time: One cue defines “absolute” positions for some fixtures and the other adds a relative effect “on top”.
Lightkey User Guide97

Here are ways to select a control point:
▪︎ Click a point to select it.
▪︎ Press the Tab key to select the following point in path order, or Shift-Tab to select the preceding point.
▪︎ Press the Esc key or click in a blank part of the position control to clear the selection.
Here are ways to move a control point:
▪︎ Drag the point with the mouse. As you drag, you can use the following modifier keys: ▪︎ To keep the current pan angle, hold down the Command key.
▪︎ To keep the current tilt angle, hold down the Shift key. ▪︎ To disable snapping hold down the Control key.
▪︎ Click a control point to select it, then do one of the following to move the point: ▪︎ Place the pointer over the position control and scroll up or down to change the pan
angle. Hold down the Command key as you scroll to change the tilt angle instead. ▪︎ Press the Left/Right Arrow keys to increase/decrease the pan angle by 1°.
▪︎ Hold down the Shift key and press the Left/Right Arrow keys to increase/decrease the pan angle by 10°.
▪︎ Press the Up/Down Arrow keys to increase/decrease the tilt angle by 1°.
▪︎ Hold down the Shift key and press the Up/Down Arrow keys to increase/decrease the tilt angle by 10°.
To deal with fixtures whose pan range exceeds 360° or to apply negative tilt angles, you can use the techniques described in “Position” in chapter 7, “Fixture Properties”.
Here are ways to add a control point: ▪︎ If the path has connection lines between the points (curve and line types), double-click
anywhere on a connection line. ▪︎ If the path has no connection lines (points type), double-click anywhere in the position
control. ▪︎ Control-click a point and choose Insert Point from the shortcut menu. This will insert a
control point between the clicked point and the next.
Here are ways to remove a control point:
▪︎ Click a point to select it, then press the Delete key.
Selected control point
Starting point
Pan and tilt angles of selected point
Lightkey User Guide98

▪︎ Control-click a point and choose Delete Point from the shortcut menu.
To change the starting point: ▪︎ Control-click a point and choose Make Starting Point from the shortcut menu.
To reverse the points in a path: ▪︎ Click Options and choose Reverse Path from the menu.
Transform Paths You can move a path’s control points in two dimensions: ▪︎ By changing their pan values: This will move the points around the center.
▪︎ By changing their tilt values: This will change the points’ distance from the center. Likewise, you can “scale” the path in the same two dimensions. Finally, you can “flip” the pan or tilt angles of the points in the path, which reverses their signs.
To move or scale a path:
1 Click (or press T) to enter Transform mode.
A green outline with handles appears around the control points. 2 Do one of the following to move the path:
▪︎ Hold down the Shift key and drag around the center of the position control to change the pan values.
▪︎ Hold down the Command key and drag away from the center or towards the center of the position control to change the tilt values.
▪︎ If you press neither the Shift nor Command keys as you drag, Lightkey will change either the pan or tilt values, depending on the mouse movement.
▪︎ Place the pointer over the position control and scroll up or down to change the pan angles. Hold down the Command key as you scroll to change the tilt angles instead.
▪︎ Press the Left/Right Arrow keys to increase/decrease the pan angles by 1°. ▪︎ Hold down the Shift key and press the Left/Right Arrow keys to increase/decrease
the pan angles by 10°. ▪︎ Press the Up/Down Arrow keys to increase/decrease the tilt angles by 1°.
▪︎ Hold down the Shift key and press the Up/Down Arrow keys to increase/decrease the tilt angles by 10°.
3 Drag one of the four green handles at the edges of the path outline to scale the path. Hold down the Option key as you resize the path from its center.
4 Click again (or press T or Esc) to exit Transform mode.
To flip the pan or tilt angle of each point in the path: ▪︎ Click Options and choose Flip Pan Values or Flip Tilt Values from the menu.
Lightkey User Guide99

Path Types There are three different ways how Lightkey can interpolate the path positions between the control points. The following graphs illustrate these types for a movement path with four control points. In the graphs, the vertical dimension represents the fixture position (which actually consists of two dimensions, pan and tilt). ▪︎ Smooth: The fixture moves smoothly between the control points. The time for
moving from one point to the next depends on the distance between the points.
▪︎ Line: The fixture moves on the direct way from one control point to the next, changing its movement direction at each control point. The time for moving from one point to the next depends on the distance between the points.
▪︎ Points: The fixture moves instantly from one control point to the next, with maximum speed. It remains at each control point for an equal time. (This is often used in conjunction with the “Blackout during pan/tilt movement” feature of many moving lights.)
To change a path’s type:
▪︎ Click Options and choose Curve, Lines, or Points from the menu.
Duration
Duration
Duration
Lightkey User Guide100

Copy and Paste Effects Because an effect is like a special value for a fixture property, you can copy effects between fixtures in the same way as you can copy fixture property values. When you copy and paste an effect the new effect is independent of the original one. If you want to add more fixtures to an effect instead, see “Edit the Fixture Order” earlier in this chapter.
To copy an effect between fixtures: 1 Click the name of a fixture with an effect and choose Copy Properties from the
shortcut menu, then choose a fixture property. An icon marks properties with an effect. 2 Select one or more fixtures you want to apply the effect to.
3 Click one of the fixtures’ names and choose Paste Properties from the shortcut menu.
Delete an Effect When you delete an effect, it is removed from all fixtures. If you want to remove individual fixtures from an effect instead, see “Edit the Fixture Order” earlier in this chapter.
Here are ways to delete an effect:
▪︎ While you’re editing an effect, click the effect’s name below the Preview and choose Delete from the menu.
▪︎ If the fixture property appears in the Design view, select the fixtures and then click the blue dot to the left of the property’s name in the Design view.
▪︎ Click in the toolbar or choose Fixture > Clear Properties for All Fixtures (or press Command-Shift-Delete). This will also remove any other overridden properties from all fixtures.
Overlaying Effects You can overlay multiple effects for the same fixture property to create entirely new looks. If there are multiple effects for a fixture property, Lightkey adds their output values to determine the final output. If the values are colors, Lightkey uses the “screen” blend mode to blend the output colors of the individual effects.
To overlay an existing effect with a new effect:
1 Select one or more fixtures with an effect. Choose Fixture > Add Effect and choose a fixture property, then select a new effect for the same property (see “Add an Effect” earlier in this chapter).
2 Click Add Effect. 3 In the alert message that appears, click Overlay.
Effect 1Effect 2
Result
Lightkey User Guide101

To overlay an effect by duplicating:
1 Edit an effect. 2 Click the effect’s name below the Preview and choose Duplicate from the menu.
A second effect is added with the same parameters. You can now modify the new effect’s settings.
To switch between multiple effects during editing:
▪︎ Click the edited effect’s name below the Preview and choose a different effect from the menu.
Save an Effect Template You can save an effect as a template which appears in the Effects Chooser.
To save an effect as a template: 1 Edit an effect.
2 Click the effect’s name below the Preview and choose Save as Template… from the menu.
3 In the dialog that appears, enter a name and click Save.
To rename an effect template: 1 Choose Fixture > Add Effect, then choose a fixture property to open the Effects
Chooser. 2 Control-click an effect template and choose Rename from the shortcut menu.
3 Type a new name, then press Return.
The built-in effect templates cannot be renamed.
To remove an effect template:
1 Choose Fixture > Add Effect, then choose a fixture property to open the Effects Chooser.
2 Control-click an effect template and choose Delete… from the shortcut menu. 3 In the dialog that appears, click Delete.
The built-in effect templates cannot be deleted.
Lightkey User Guide102

10Live Control ➤ Lightkey supports two kinds of live control: You can build a custom-
tailored control panel with buttons and faders to activate arbitrary lighting cues on the fly, or you can use a cuelist to recall cues in a specific order.
The central element in both cases is a cue, which consists of a combination of presets and sequences from the Preset Palette.
Live View Pages The Live view is the primary place for controlling your lights during a live show. The Live view can have multiple pages, but only one of them is visible at a time. Only the cues on the current page have an effect on the output. There are two types of pages—control panels and cuelists—which will be explained in the following sections. Although the Live view is the central place for controlling your show, it is still possible to override fixture properties on the fly or activate presets and sequences. Overridden fixture properties always take precedence over active cues, presets, and sequences.
Here are ways to show the Live view:
▪︎ Click Live below the Preview. ▪︎ Choose View > Live (or press Command-L).
❖ Note: If you have a second display connected to your computer, you can show the Live view on the second display. See “Dual Windows” in chapter 5, “The Lightkey Window”, for more information.
To manage Live view pages:
1 Do one of the following:
▪︎ Choose View > Manage Live Pages…
▪︎ Click Live at the top of the Live view and choose Manage Live Pages… from the menu (or press Command-Shift-Option-L).
2 In the dialog that appears, make changes as appropriate:
Lightkey User Guide103

▪︎ To add a control panel or cuelist: Click “+” and choose an item from the menu. Enter a name for the new page and press Return.
▪︎ To reorder the pages: Drag the rows in the list up or down.
▪︎ To rename a page: Select the page, then click the gear icon and choose Rename from the menu. Alternatively, select the page and click its name. Type a new name and press Return.
▪︎ To duplicate a page: Select a page, then click the gear icon and choose Duplicate from the menu. Enter a name for the new page and press Return.
▪︎ To delete a page: Select the page and click “–” or press the Delete key, then click Delete in the dialog that appears.
3 Click Done.
To change the visible page:
▪︎ Click Live at the top of the Live view, then select a page from the menu.
Control Panels A control panel can contain an unlimited number of buttons which you can freely arrange, resize, attach, and place in frames. Each button is associated with a cue. A button can take one of two forms:
▪︎ Push button: A push button simply activates or deactivates a cue.
▪︎ Fader: A fader lets you control a cue’s intensity between 0% and 100%, like on a traditional lighting console. The intensity determines to what degree a cue affects the fixtures’ properties. There are horizontal and vertical faders.
You can also add text labels to a control panel.
See “Live View Pages” earlier in this chapter to learn how to create a control panel.
Edit a Control Panel Before you can change keys and cues, you must put the control panel into edit mode.
If you attach multiple buttons, only one of them can be active. The buttons’ colors
are automatically chosen to reflect
their contents
Indicates a beat-controlled cue
Modifiers control various aspects of a cue
Enclose buttons in frames for visual separation
Lightkey User Guide104

Here are ways to enter or exit edit mode:
▪︎ To enter edit mode, click Edit at the top-right of the Live view. To exit edit mode, click Done.
▪︎ Choose View > Edit Control Panel (or press Command-Option-J). ▪︎ Control-click a blank part of the control panel and choose Edit Control Panel from the
shortcut menu. ▪︎ Hold down the Command key and double-click a blank part of the control panel.
▪︎ Press Command-Return to exit edit mode.
While the control panel is in edit mode, a grid is shown in the background which helps you to align buttons and faders. The remainder of this section assumes that the control panel is in edit mode.
Create a Button When you create a button, Lightkey automatically adds the active presets and sequences to its cue. If there are any overridden fixture properties, it also adds a special preset named “Ad hoc properties” which contains those properties. This preset does not exist in the Preset Palette.
To add a button:
1 Do one of the following: ▪︎ Choose Live > New Button.
▪︎ Control-click a blank part of the control panel and choose New Button from the shortcut menu.
▪︎ While the control panel is in edit mode, click “+” at the top-right of the Live view. The control panel changes to edit mode and a new button appears.
2 Type a name for the button, then press Return. The cue inspector appears.
3 Drag presets and sequences from the Preset Palette to the Contents tab.
4 Edit the button’s other properties in the inspector, as described in “Edit Cue Contents and Options” later in this chapter.
To create a button from one or more presets and sequences: ▪︎ Select one or more presets and/or sequences in the Preset Palette and drag them to a
blank part of the control panel. Drag the presets or sequences onto a frame (but not onto a button) to create a new button inside the frame.
Lightkey creates a new button which contains the dragged objects.
Create a Text Label
To add a text label:
1 Do one of the following:
▪︎ While the control panel is in edit mode, click at the top-right of the Live view. T
Lightkey User Guide105

▪︎ Control-click a blank part of the control panel and choose Insert Text from the shortcut menu.
2 Drag the text label to where you want it.
3 Double-click the text label to begin editing, then type. To start a new line, press Option-Return.
4 Click outside the text label or press Return to finish editing.
To edit an existing text label, double-click the text label or select it and press Return.
Select Objects The following actions pertain to both buttons and text labels.
Here are ways to select and deselect objects:
▪︎ To select a single object, click it.
▪︎ To select additional objects, hold down the Shift key and click each object. ▪︎ To remove an object from the selection, hold down the Shift key and click the selected
object. ▪︎ To select multiple objects at once, press the mouse button over a blank part of the
control panel and drag it over the objects. (Hold down the Option key to select outward from the starting point.)
▪︎ To add or remove multiple objects to/from the selection, hold down the Shift key, press the mouse button over a blank part of the control panel, and drag it over the objects.
▪︎ To select all objects in the control panel, choose Edit > Select All (or press Command-A).
▪︎ To deselect all objects in the control panel, choose Edit > Deselect All (or press Command-Shift-A or Esc) or click a blank part of the control panel.
When an object is selected, it shows handles at its corners and edges.
Move Objects You can freely arrange buttons and text labels in the control panel.
Here are ways to move objects in the control panel:
▪︎ Press the mouse button over an object and drag it to a new location. To move multiple objects, select the objects and then drag them to a new location.
By default, objects snap to the grid in the background as you drag. Lightkey also shows smart alignment guides that help you to precisely align them.
▪︎ To disable alignment guides and grid snapping, hold down the Command key as you drag.
▪︎ To constrain the motion to horizontal or vertical, drag the object(s) while holding down the Shift key.
▪︎ To move the objects by one grid unit, select the objects and press one of the arrow objects. To move objects by five units, hold down the Shift key while pressing an arrow key.
Lightkey User Guide106

Attach Buttons By default you can activate as many buttons as you like, independent of each other. You can attach a number of buttons so they form a group where only one button can be active at a time.
To attach buttons:
▪︎ Move two or more buttons together so their borders touch (see “Move Objects” above).
To detach a button from others:
▪︎ Move the button away from the others.
Resize Objects You can freely resize the buttons and text labels in a control panel. You can even resize multiple objects at once.
Here are ways to resize objects:
▪︎ Select one or more objects and then drag one of the blue selection handles. To resize the objects in one direction, drag a side handle instead of a corner handle.
▪︎ To resize the objects from their center, press the Option key as you drag. ▪︎ To disable alignment guides, hold down the Command key while you resize objects.
Rename a Button
To rename a button: 1 Click the button to select it.
2 Do one of the following:
▪︎ Click the button’s name.
▪︎ Select the button and choose Edit > Rename (or press Return).
▪︎ Control-click the button and choose Rename from the shortcut menu. 3 Type a new name and then press Return.
Duplicate Objects
To duplicate an object: 1 Done one of the following:
▪︎ Select the object and choose Edit > Duplicate (or press Command-Shift-D). ▪︎ Control-click the object and choose Duplicate from the shortcut menu.
▪︎ Hold down the Option key while you drag an object.
By default buttons are activated
independently
Front Lights
Back Lights
House Lights
Red/Blue
Peachblow
Purple
Attach multiple buttons to create a group where only one button can be active at a time
Lightkey User Guide107

2 After duplicating a button, type a name for the new button and then press Return.
Copy and Paste Objects You can copy buttons and text labels to the Clipboard and paste them again later. You can also copy and paste buttons/cues between different control panels or cuelists.
Here are ways to cut or copy an object: ▪︎ Select the object(s) and choose Edit > Cut or Edit > Copy (or press Command-X or
Command-C). ▪︎ Control-click an object and choose Cut or Copy from the shortcut menu.
Here are ways to paste objects from the Clipboard:
▪︎ Choose Edit > Paste (or press Command-V).
▪︎ Control-click anywhere in the control panel and choose Paste from the shortcut menu.
Delete Objects
To delete an object:
1 Click an object to select it. (Hold down the Shift or Command key to select multiple objects.)
2 Do one of the following:
▪︎ Choose Edit > Delete. ▪︎ Control-click the object and choose Delete from the shortcut menu.
▪︎ Press Delete.
If you accidentally deleted an object, choose Edit > Undo Delete.
Change Text Formatting You can change fonts, font sizes, and other text attributes like in many other Mac applications.
To change the formatting of a text label: 1 Select one or more text labels. To change only a part of the text, double-click a text
label and select the desired range.
2 Do one of the following: ▪︎ Choose Edit > Font > Show Fonts. Select a font, font size, and other options in the
Font window. ▪︎ Choose Edit > Font > Bold, Underline, Italic, Outline to change the text style.
▪︎ Choose Edit > Font > Show Colors, then select a color in the Color window. ▪︎ Choose Edit > Alignment, then choose one of the options in the submenu to
change the alignment of the label.
Lightkey User Guide108

Frames You can enclose related buttons in a frame and assign a title to it. Apart from the visual separation, frames provide Previous/Next controls which activate the enclosed buttons in succession.
To create a frame: 1 Select two or more buttons.
2 Do one of the following:
▪︎ Choose Live > Add Frame.
▪︎ Control-click one of the buttons and choose Add Frame from the shortcut menu.
▪︎ Click near the top-right of the Live view.
3 Type a title for the frame, then press Return.
Here are ways to add buttons to an existing frame: ▪︎ Drag one or more buttons onto a frame and release the mouse button.
▪︎ Drag one or more buttons over a frame and rest the mouse until the frame flashes. The frame is extended to include the dragged buttons, and you can continue to drag them to their final position.
Here are ways to remove buttons from a frame:
▪︎ Select one or more buttons and choose Live > Remove from Frame.
▪︎ Control-click a button and select Remove from Frame from the shortcut menu. You can only remove buttons from a frame if at least two buttons remain in the frame. Otherwise you must remove the entire frame, as described below.
To reveal Previous/Next controls for a frame:
1 Do one of the following: ▪︎ Click a blank part of the frame to select it and choose Live > Get Info.
▪︎ Control-click a blank part of the frame and select Get Info from the shortcut menu. ▪︎ Double-click a frame.
2 In the window that appears, select Show Previous/Next buttons. Two arrow buttons appear in the top-right corner of the frame which activate the
previous or next button, respectively. The order is determined by the locations of the buttons.
3 Click Done.
To change a frame’s title: 1 Do one of the following:
▪︎ Click a blank part of the frame to select it, then click the frame’s title. ▪︎ Click a blank part of the frame to select it and choose Edit > Rename (or press
Return).
▪︎ Control-click a blank part of the frame and select Rename from the shortcut menu.
Lightkey User Guide109

3 Type a new title, then press Return.
Here are ways to remove a frame: ▪︎ Click a blank part of the frame to select it and choose Live > Remove Frame.
▪︎ Control-click a blank part of the frame and select Remove Frame from the shortcut menu.
Cuelists Use a cuelist when you want to recall lighting cues in a specific order during a show. A cuelist contains a number of cues which can be arranged in groups for a better overview. Only one cue in a cuelist can be active at a time. During a show, you click a button or press the Space key to go to the next cue. Or you can define a time after which the next cue should automatically be activated. Lightkey can also crossfade between consecutive cues.
It is often useful to number your cues so you can quickly refer to them. To do this simply add a number before the cues’ names, e.g. “001 My cue”. When you add a new cue or duplicate a cue, Lightkey will automatically use the next number for the new cue.
See “Live View Pages” earlier in this chapter to learn how to create a cuelist.
Create a Cue When you create a cue, Lightkey automatically adds the active presets and sequences to the cue. If there are any overridden fixture properties, it also adds a special preset named “Ad hoc properties” which contains those properties. This preset does not exist in the Preset Palette.
To add a cue:
1 Do one of the following:
▪︎ Click “+” next to an item in the cuelist. A new cue is inserted below the item. (To insert a cue above the clicked item, hold down the Shift key as you click “+”.)
▪︎ Choose Live > New Cue (or press Command-Plus). A new cue is inserted below the selection, or at the end of the cuelist if no items are selected.
▪︎ Control-click anywhere in the cuelist and choose New Cue from the shortcut menu. A new cue is inserted below the clicked item.
2 Type a name for the cue, then press Return. The cue inspector appears.
3 Drag presets and sequences from the Preset Palette to the Contents tab. 4 Edit the cue’s other properties in the inspector, as described in “Edit Cue Contents and
Options” later in this chapter.
5 Click Done.
Lightkey User Guide110

To create a cue from one or more presets and sequences:
▪︎ Select one or more presets and/or sequences in the Preset Palette and drag them to a blank part of the cuelist or in between two rows.
Lightkey creates a new cue which contains the dragged objects.
Create a Cue Group For a better overview you can organize your cues in groups which can be collapsed and expanded as necessary. Whether a group is expanded or not has no effect on playback order. Groups can also contain other groups.
To create an empty cue group: 1 Do one of the following:
▪︎ Choose Live > New Group (or press Command-Shift-Plus). A new group is inserted below the selection, or at the end of the cuelist if no items are selected.
▪︎ Control-click anywhere in the cuelist and choose New Group from the shortcut menu. A new group is inserted below the clicked item.
2 Enter a name for the group and then press Return.
To create a cue group from existing items: 1 Select some items in the cuelist. (Hold down the Shift or Command key to select
multiple items.) 2 Do one of the following:
▪︎ Choose Live > New Group From Selection (or press Command-Shift-Option-Plus).
▪︎ Control-click one of the items and choose New Group From Selection from the shortcut menu.
3 Enter a name for the group and then press Return.
To expand or collapse a cue group:
▪︎ Click the disclosure triangle to the left of the group name.
Cuelist Timing Each cue in a cuelist can have a hold time after which the cue is deactivated and the next cue is activated (possibly with a crossfade) when you play back the cuelist. Alternatively you can click a button or press the Space key to advance to the next cue. In addition, each cue has a fade time which determines the duration of the crossfade to the next cue. If the fade time is zero then the next cue is activated instantly.
Lightkey User Guide111

Example: Cue 1 has a hold time. Cue 2 has no hold time and remains active until is pressed.
If a cue contains one or more sequences with a fixed loop count, Lightkey will automatically proceed to the next cue in the cuelist when all sequences have finished (even when the cue has no hold time or when the hold time has not yet elapsed).
To change a cue’s hold or fade time: 1 Select one or more cues. (Hold down the Command or Shift key as you click to select
multiple cues.) By selecting multiple cues you can change their hold or fade times at once.
2 Click in the Hold Time or Fade Time column and type a new value. You can also use the following keyboard shortcuts:
▪︎ Up/Down Arrow: Increase/decrease the time by one second.
▪︎ Option-Up/Down Arrow: Increase/decrease the time by 0.1 seconds. ▪︎ Shift-Up/Down Arrow: Increase/decrease the time by 10 seconds.
Leave the hold time field empty if you want to advance to the next cue manually. 3 Press Return to end editing.
★ Tip: When editing hold or fade times, press Tab or Shift-Tab to quickly jump to the next or previous field.
Manual Crossfading Instead of assigning fade times to each cue, you can also perform crossfades manually by dragging a slider. This is especially useful with external control hardware like a MIDI controller.
To enable manual crossfading:
▪︎ Choose View > Show Xfade Slider.
The Xfade slider appears to the right of the cuelist.
❖ Note: You can bind the Xfade slider to an external hardware fader. See chapter 14, “External Control”, for more information.
Select Cues for Playback Sometimes you may want to skip a cue during playback. For example, if you want to retain two versions of a cue but you want to use only one of them. Each cue has a checkbox to the left of its name. To skip a cue during playback, you can deselect its checkbox.
Hold Time 1 Fade Time 1 Fade Time 2
Cue 1 Cue 2 Cue 3
Lightkey User Guide112

Organize Cues Here are ways to organize cues in a cuelist.
To move a cue or group: ▪︎ Drag the item up or down in the cuelist.
To reorder multiple cues or groups: 1 Select the items in the cuelist. Hold down the Shift or Command key to select multiple
items. 2 Drag the selected items to the desired position.
To rename a cue or group: 1 Click the item in the cuelist to select it.
2 Do one of the following:
▪︎ Click the item’s name. ▪︎ Choose Edit > Rename (or press Return).
▪︎ Control-click the item and choose Rename from the shortcut menu. 3 Enter a new name and then press Return.
To renumber cues: 1 Rename the first of the cues that you would like to renumber and add a number before
its name, for example, “010 My cue”. This determines where the cue numbers begin. 2 Select all cues that you would like to renumber, including the cue you just changed.
3 Do one of the following:
▪︎ Choose Live > Renumber. ▪︎ Control-click one of the cues and choose Renumber from the shortcut menu.
Lightkey adds increasing numbers before the names of the cues (or updates any existing numbers).
To duplicate a single cue or group:
▪︎ Hold down the Option key and click “+” next to an item in the cuelist.
Lightkey will create a copy of the item below the original.
To duplicate multiple cues or groups:
1 Select the items in the cuelist. (Hold down the Command or Shift key as you click to select multiple items.)
2 Do one of the following:
▪︎ Choose Edit > Duplicate (or press Command-Shift-D). ▪︎ Control-click one of the items and choose Duplicate from the shortcut menu.
Lightkey will create a copy of the items below the original items.
Lightkey User Guide113

To duplicate cues or groups by dragging:
1 Select the items in the cuelist. Hold down the Command or Shift key and click to select multiple items.
2 Hold down the Option key and drag the items up or down. Lightkey will add copies of the items at the target location.
To delete a single cue or group:
▪︎ Click “–” next to an item in the cuelist.
To delete multiple cues or groups: 1 Select the items in the cuelist. (Hold down the Command or Shift key as you click to
select multiple items.)
2 Do one of the following: ▪︎ Choose Edit > Delete.
▪︎ Control-click one of the items and choose Delete from the shortcut menu. ▪︎ Press Delete.
If you accidentally deleted an item, choose Edit > Undo Delete.
Copy and Paste Cues You can copy cues and entire cue groups to the Clipboard and paste them again later. You can also copy and paste cues between different cuelists or control panels.
Here are ways to cut or copy a cue or group:
▪︎ Select the items in the cuelist and choose Edit > Cut or Edit > Copy (or press Command-X or Command-C).
▪︎ Control-click a cue or group and choose Cut or Copy from the shortcut menu.
Here are ways to paste cues from the Clipboard:
▪︎ Choose Edit > Paste (or press Command-V).
▪︎ Control-click anywhere in the cuelist and choose Paste from the shortcut menu.
Edit Cue Contents and Options You can edit the contents and other options for cues in the cue inspector. You can even edit multiple cues at once. Most of this section applies to both control panels and cuelists.
Here are ways to open the cue inspector in a control panel: ▪︎ Place the pointer over a button and hold down the Command key, then click Get Info.
▪︎ Control-click a button and choose Get Info from the shortcut menu.
▪︎ While the control panel is in edit mode, select a button and choose Live > Get Info (or press Command-I).
▪︎ While the control panel is in edit mode, double-click a button.
Lightkey User Guide114

▪︎ Force click a button (requires a trackpad with Force Touch support).
Here are ways to open the cue inspector for multiple cues in a control panel: ▪︎ While the control panel is in edit mode, select one or more buttons, then Control-click
a button and choose Get Info for N Cues from the shortcut menu. ▪︎ While the control panel is in edit mode, select one or more buttons and choose Live >
Get Info for N Cues (or press Command-I).
Here are ways to open the cue inspector in a cuelist:
▪︎ Place the pointer over a cue and hold down the Command key, then click Get Info.
▪︎ Control-click a cue and choose Get Info from the shortcut menu.
▪︎ Select a cue and choose Live > Get Info (or press Command-I).
▪︎ Force click a cue (requires a trackpad with Force Touch support).
Here are ways to open the cue inspector for multiple cues in a cuelist:
▪︎ Select one or more cues, then Control-click one of the cues cue and choose Get Info for N Cues from the shortcut menu.
▪︎ Select one or more cues, then choose Live > Get Info for N Cues (or press Command-I).
Edit Cue Contents You can easily change the presets and sequences in a cue by drag and drop.
To edit a cue’s contents:
1 Make sure that only a single cue is selected. (You cannot edit the contents of multiple cues.)
2 Open the cue inspector and click Trigger. 3 Edit the cue’s contents:
▪︎ To add a preset or sequence to the cue, drag it from the Preset Palette to the Contents tab.
▪︎ To remove a preset or sequence from the cue, click the “x” to the right of it. Alternatively, drag the item outside the inspector or Control-click the item and choose Remove From Cue from the shortcut menu.
▪︎ To show the fixture properties defined by a preset or sequence, select it in the cue inspector. Lightkey will display the names of the defined properties next to the fixture icons in the Preview.
▪︎ To show a preset or sequence from the cue in the Preset Palette, Control-click the preset or sequence in the cue inspector and choose Show in Palette from the shortcut menu.
▪︎ To edit a preset in a cue, double-click the preset in the cue inspector. Alternatively, Control-click the preset and choose Edit from the shortcut menu. See “Edit a Preset” in chapter 8, “Presets and Sequences”.
4 Click Done.
Lightkey User Guide115

To quickly add presets or sequences to a cue:
▪︎ Drag one or more presets or sequences from the Preset Palette to a button in a control panel or to a cue in a cuelist.
View Cue Contents Lightkey can give you a quick overview of the fixtures and fixture properties affected by a cue.
Here are ways to show the contents of a cue: ▪︎ Place the pointer over a cue and hold down the Command and Option keys, then click
Properties.
▪︎ Control-click a button in a control panel or a cue in a cuelist and choose Show Properties from the shortcut menu.
▪︎ Select a button in a control panel (this assumes that the control panel is in edit mode) or a cue in a cuelist, then choose Live > Show Properties. Lightkey will display the names of the properties defined for each fixture next to the fixture icons in the Preview.
Here are ways to hide the contents of a cue:
▪︎ Click anywhere in the Preview.
▪︎ Press Esc, Return, or Enter.
Edit Ad Hoc Properties Apart from presets and sequences from the Preset Palette, a cue can also contain fixture properties that have been overridden when the cue was created. These appear in the cue inspector as a special preset called “Ad hoc properties”. You can edit a cue’s ad hoc properties after the cue has been created.
To edit the ad hoc properties in a cue:
1 Do one of the following:
▪︎ Control-click a button in a control panel or a cue in a cuelist and choose Edit Ad Hoc Properties from the shortcut menu.
▪︎ Select a button in a control panel (this assumes that the control panel is in edit mode) or a cue in a cuelist, then choose Live > Edit Ad Hoc Properties.
An item which represents the ad hoc properties is added to the Preset Palette while the properties are being edited.
2 Make changes to the fixture properties. (See chapter 7, “Fixture Properties”, for more information.)
3 Click the green checkmark next to the “Ad hoc properties” item in the Preset Palette or in the toolbar (or press Return). (To discard your changes and return to the preset’s previous state, click the “x” icon instead, choose Preset > Cancel Editing, or press Esc).
After editing, the item for the ad hoc properties disappears from the Preset Palette.
Lightkey User Guide116

Alternatively you can merge the currently overridden fixture properties into the ad hoc properties of one or more cues. This technique is especially useful when you want to change the ad-hoc properties of multiple cues at once.
To add the overridden fixture properties to one or more cues: 1 Select one or more fixtures and change their properties. (See chapter 7, “Fixture
Properties”, for more information.) Fixtures with overridden properties display a blue dot to the left to their name in the Preview.
2 Do one of the following:
▪︎ Control-click a button in a control panel or a cue in a cuelist and choose Add Overrides from the shortcut menu.
▪︎ Select one or more buttons in a control panel (this assumes that the control panel is in edit mode) or one or more cues in a cuelist, then choose Live > Add Overrides.
▪︎ To add the overridden properties for the selected fixtures only, hold down the Option key as you perform one of the preceding steps. The command changes to Add Overrides for Selected Fixtures.
Edit Cue Options
To edit cue options:
1 Open a cue’s inspector (as described earlier in this section) and click Options. 2 Change the settings as appropriate:
▪︎ Fade-In, Fade-Out (control panels only): Controls the time for fading the cue in or out when you activate or deactivate it. Set this to zero to (de-)activate the cue instantly.
▪︎ Hold Time, Fade Time (cuelists only): The cue’s hold and fade times. See “Cuelist Timing” earlier in this chapter for more information.
▪︎ Priority (control panels only): Controls the cue’s priority in relation to other cues in the control panel. If multiple cues define the same property of a fixture, the cue with the highest priority takes precedence. If two cues have equal priority, the most recently activated cue takes precedence. See “Output Order of Precedence” later in this chapter.
▪︎ Speed: This setting allows you to modify the speed of sequences and effects in the cue. For example, if you set the speed rate to 2.0, sequences and effects will run at twice the speed. This option is only available if the cue contains any sequences or effects.
3 Click Done.
You can change the initial hold and fade times for newly created cues in Lightkey’s Preferences window. You can also increase the precision (number of decimal places shown) for hold and fade times.
To change the hold and fade times for newly created cues: 1 Choose Lightkey > Preferences… (or press Command-Comma) and click General.
Lightkey User Guide117

2 Change the values in the fields for the cue hold and fade time. (To revert a value to the standard value, delete the field contents and press Return.)
To change the precision for hold and fade times:
1 Choose Lightkey > Preferences… (or press Command-Comma) and click General. 2 Select an option from the “Time precision” pop-up menu.
Edit Button Appearance and Behavior There are different types of buttons which are described earlier in this chapter. This section applies to control panels only.
To change button options: 1 Open the inspector for a cue in a control panel and click Button.
2 Change the settings as appropriate:
▪︎ Button Type: Changes the button’s type, as described at the beginning of this chapter.
▪︎ Color: Allows you to choose the color in which the button appears in the Live view. If you choose Automatic, Lightkey tries to find a color based on the cue’s contents.
▪︎ Behavior: Allows you to choose how a push button activates its cue. There are two options:
▪︎ Toggle: Clicking the button once activates the cue, clicking it again deactivates the cue.
▪︎ Flash: The cue is activated when you press the mouse button over the button and deactivated when you release the mouse.
▪︎ Activate: Lightkey can automatically activate one or more buttons in the selected control panel when you start the application or open a project. This way you can define a default state for your lights. (Note: This setting will be ignored if the option “Restore active cues, modifiers, and Master Dimmer“ is selected in the Preferences window. See “Startup State” later in this chapter.)
Lightkey can also activate one or more buttons just before you quit the application or close the project. Their cues will be active for 0.5 seconds, which is useful to turn your fixtures off: Simply define a cue which sets the intensity to 0% for all fixtures. The cue may also do things like move your moving lights to their home positions etc.
3 Click Done.
Edit Cue Modifiers A modifier is a parameter which alters a cue’s output in some way. You can quickly change a modifier’s value in the Live view or from a fader on an external control device while you run your show.
Modifiers are applied to the final output of the cue, whether it comes from fixture properties defined in the cue, sequences in the cue, fanning, or effects. This makes modifiers a powerful way to change the look of a cue on the fly.
Lightkey User Guide118

Some modifiers are multiplied with the value of a fixture property. Here’s an example showing the results of the Dimmer modifier at 150%:
Dimmer Dimmer Fixture in cue output FX1 50% 75% FX2 40% 60% FX3 100% 100%
Other modifiers are added to the value of a fixture property. The following example shows the results of the Pan Angle modifier at +30°:
Pan angle Pan angle Fixture in cue output FX1 −120° −90° FX2 +50° +80° FX3 −90° −60°
The following modifiers are available: ▪︎ Speed: Affects the speed of the cue. For example, setting the speed to 2.0× makes
the cue run at twice the normal speed. You can choose exactly which aspects of the cue are affected by the modifier. For example, you may want to control the speed of a movement effect but not the gobo rotation speed. See below for more information.
Setting the Speed modifier to 0 pauses the cue, and changing it to a positive value resumes seamlessly from where it left off.
▪︎ Dimmer: The Dimmer values in the cue are multiplied by the modifier.
▪︎ Hue: Applies to fixtures with RGB or CMY color mixing. The modifier value (between 0° and 360°) is added to the hue values in the cue.
▪︎ Color Temperature: The modifier value (between −5000K and +5000K) is added to the color temperatures in the cue.
▪︎ Green Saturation: The modifier value (between −100% and +100%) is added to the green saturation values in the cue.
▪︎ Xfade to Color: The xfade to color values in the cue are multiplied by the modifier.
▪︎ Pan Angle, Tilt Angle: The modifier values (between −180° and +180°) are added to the pan and tilt angles defined in the cue.
▪︎ Focus: The focus values in the cue are multiplied by the modifier.
▪︎ Zoom Angle: The zoom angles in the cue are multiplied by the modifier.
▪︎ Iris Size: The iris sizes in the cue are multiplied by the modifier.
▪︎ Frost Amount: The frost amounts in the cue are multiplied by the modifier. ▪︎ Fog Amount: The fog amounts in the cue are multiplied by the modifier.
You can choose which aspects of the cue are affected by the Speed modifier:
Lightkey User Guide119

▪︎ Sequence Speed: Affects the speed of any sequences in the cue with manual timing.
▪︎ Effect Speed: Affects the speed of any effects in the cue with manual timing.
▪︎ Rainbow Speed: Affects the speed of any rainbow effects (color wheel rotation).
▪︎ Vector Speed: Affects the speed of pan/tilt movements in vector mode.
▪︎ Infinite Pan/Tilt Speed: Affects the speed of any infinite pan or tilt movement.
▪︎ Gobo Rotation Speed: Affects the gobo rotation speed. ▪︎ Gobo Shake Speed: Affects the gobo shake speed.
▪︎ Gobo Change Speed: Affects the gobo change speed (gobo wheel rotation). ▪︎ Strobe Speed: Affects the speed of strobe effects.
▪︎ Shutter Pulse Speed: Affects the speed of shutter pulse effects.
▪︎ Prism Rotation Speed: Affects the prism rotation speed.
To select which modifiers are visible:
1 Open a cue’s inspector (as described earlier in this section) and click Modifiers. 2 Select the modifiers you’d like to control. Only modifiers which apply to the cue are
enabled (for example, Pan Angle is only available if the cue defines the Position property for at least one fixture).
3 To select which aspects are affected by the Speed modifier, click Options and choose items from the menu. Only options which apply to the cue are enabled (for example, Gobo Rotation Speed is only available if at least one fixture in the cue has a rotating gobo).
Live Control With Control Panels This section describes how you use a control panel during a live show to activate cues, change their intensity, and change modifiers. For the tasks in this section the control panel should not be in edit mode.
❖ Note: All actions in this section can also be performed through external hardware, such as a MIDI controller, or through custom keyboard shortcuts. See chapter 14, “External Control”, for more information.
To activate or deactivate a cue with a push button and “toggle” behavior:
▪︎ Click the button.
To activate a cue with a push button and “flash” behavior:
▪︎ Press the mouse button over the button.
The cue is activated until you release the mouse.
Ballyhoo
Lightkey User Guide120

While the cue is active, the button’s color changes to reflect its state. If the cue contains a sequence, the button also shows the sequence’s progress. Depending on the cue’s options, the cue will either activate/deactivate instantly or fade in and out (see “Edit Cue Options” earlier in this chapter). If the button is attached to other buttons, their cues will be deactivated.
To change a cue’s intensity with a fader:
▪︎ Drag the fader to the very left (or bottom) to deactivate the cue, or to the very right (or top) to fully activate the cue. The fader values in between gradually change the cue’s intensity.
To successively activate the buttons in a frame: ▪︎ Click the arrows at the top-right of the frame to activate the previous or next button.
The order is determined by the locations of the buttons. (The arrows are only visible if the frame option “Show Previous/Next buttons” is selected. See “Frames” earlier in this chapter.)
Cues generally remain active until you deactivate them, except for the following cases where Lightkey automatically deactivates cues:
▪︎ If you activate a button that is attached to other buttons, then the other buttons are automatically deactivated. (See “Attach Buttons” earlier in this chapter for more information.)
▪︎ If a cue contains one or more sequences, it is automatically deactivated when all sequences have finished. (If at least one sequence repeats infinitely or has its “Freeze on completion” option selected, the sequence never finishes and the cue is not automatically deactivated.)
To change the value of a cue’s modifier: ▪︎ Press the mouse button over the modifier’s icon, then drag the mouse up or down.
Front Lights
Red/Blue
Peachblow
Purple
Colors
Front Lights
Lightkey User Guide121
Live Control With Cuelists This section describes how you run a light show from a cuelist. The cues in a cuelist are typically activated one by one in sequential order, although it’s possible to skip to a random cue at any time. Whether groups are expanded or not doesn’t affect the playback order. If the checkbox to the left of a cue’s name is not selected, the cue is skipped.
During playback, the name of the active cue is displayed in the center area of the toolbar.
To start playback:
▪︎ Click .
Lightkey will activate the first cue in the cuelist. If the cue has a hold time, it will begin to run.
To pause or resume playback:
▪︎ Click . When playback is paused, the hold time of the current cue stops running. Pausing has no effect unless the current cue has a hold time.
To activate the next cue:
▪︎ Click or press the Space key.
Lightkey will activate the next cue (possibly with a crossfade). If there is no next cue, the current cue will be deactivated.
To activate the previous cue: ▪︎ Hold down the Shift key and click or press Shift-Space.
To manually crossfade between cues: ▪︎ Drag the Xfade slider from its current position to the opposite end. (“Manual Cross-
fading” earlier in this chapter explains how to show the Xfade slider.) This starts a crossfade from the current cue to the next, regardless of the cue’s fade time. The crossfade ends when the slider has reached the opposite endpoint. If you move the slider all the way back to the original endpoint while the fade is in progress you can cancel the crossfade.
After the crossfade has completed, move the Xfade slider in the opposite direction to begin the next crossfade.
Here are ways to jump to a specific cue instantly: ▪︎ Control-click a cue and choose Activate from the shortcut menu.
▪︎ Double-click a cue. ▪︎ Select a cue and press Command-Return.
Here are ways to skip to a specific cue with a fade: ▪︎ Control-click a cue and choose Activate With Fade from the shortcut menu. This fades
to the cue according to the previous cue’s fade time.
Lightkey User Guide122

▪︎ Hold down the Option key and double-click a cue.
▪︎ Select a cue and press Command-Option-Return.
To jump to a specific cue by name:
1 Choose Live > Go to Cue… (or press Command-G). 2 Start typing the name of the desired cue. (If you use cue numbers, simply type the
cue’s number.) 3 When the completed name matches the cue that you want to select, click Go. (Hold
down the Option key to enable crossfading.)
To change the value of a cue’s modifier:
▪︎ Press the mouse button over the modifier’s icon to the right of the cue name, then drag the mouse up or down.
To stop playback:
▪︎ Click . Lightkey will deactivate all cues in the cuelist.
❖ Note: The actions in this section can also be performed through external hardware, such as a MIDI controller, or through custom keyboard shortcuts. See chapter 14, “External Control”, for more information.
Blind Mode Blind mode allows you to make changes without affecting the DMX output. You can still see the results of your changes in the Preview. Once you exit blind mode, all changes are applied to the DMX output at once.
To enter blind mode:
▪︎ Click in the toolbar or choose View > Blind Mode (or press Command-B).
While in blind mode, any active cuelists, sequences, and effects continue to run in the DMX output. You can make the following changes without affecting the DMX output:
▪︎ Activate/deactivate presets, sequences, and cues ▪︎ Change the overridden fixture properties
▪︎ Change a cue’s intensity or modifiers ▪︎ Change the Master Dimmer
To exit blind mode and apply your changes:
▪︎ Click in the toolbar or choose View > Blind Mode (or press Command-B).
Here are ways to exit blind mode and revert any changes you made:
▪︎ Choose View > Cancel Blind Mode.
▪︎ Hold down the Option key and click in the toolbar.
Lightkey User Guide123

❖ Note: You can also enter or exit blind mode through external hardware, such as a MIDI controller, or through custom keyboard shortcuts. See chapter 14, “External Control”, for more information.
Freeze Output When you freeze the output, Lightkey stops updating the DMX output and the Preview. This pauses any running cuelists, sequences, and effects.
To freeze or unfreeze the output:
▪︎ Click in the toolbar or choose View > Freeze Output (or press Command-Period).
To briefly freeze the output:
▪︎ Press and hold the mouse button over the button in the toolbar. Release the mouse button to unfreeze the output.
When you unfreeze the output, cuelists, sequences, and effects will continue to run seamlessly from where they left off.
❖ Note: You can also freeze or unfreeze the output through external hardware, such as a MIDI controller, or through custom keyboard shortcuts. See chapter 14, “External Control”, for more information.
Startup State By default, Lightkey presents the same default state each time you start the application or open a project:
▪︎ The first live page is selected. ▪︎ No presets, sequences, or cues are active except for the cues you chose to be
active at startup (see below). ▪︎ All cue modifiers are at their neutral values.
▪︎ The Master Dimmer is at 100%. You can tell Lightkey to automatically activate one or more control panel buttons at startup. (This is not available in cuelists.) See “Edit Button Appearance and Behavior” earlier in this chapter.
To automatically activate a cue at startup: 1 Open the cue inspector and click Button.
2 Select “At startup”.
Alternatively, you can tell Lightkey to remember the state before quitting or closing a project. This will restore the selected live page, active cues, modifier values, and Master Dimmer. In this case the “Activate at startup” option for cues is ignored.
To restore the last state at startup:
1 Choose Lightkey > Preferences… (or press Command-Comma) and click General.
Lightkey User Guide124

2 Select “Restore active cues, modifiers, and Master Dimmer”.
❖ Note: To have Lightkey reopen the last project when you start the application, make sure that “Close windows when quitting an app” is turned off in the General pane of the System Preferences.
Output Order of Precedence When a fixture property is defined at multiple points, the final output is determined in the following order: 1.Overridden fixture properties.
2.Selected presets and running sequences in the Preset Palette, in order of activation.
3. If a control panel is selected: Active cues in the control panel, ordered by the cues’ priorities. If multiple cues have equal priority, the most recently activated cues take precedence.
If a cuelist is selected: The active cue in the cuelist.
Lightkey User Guide125

11Beat Control ➤ Lightkey allows you to run sequences and play effects in sync with
music. This chapter describes the various ways to input the beat interval for music.
There are three ways to set the beat: ▪︎ Tap: Repeatedly press the mouse button or a key so Lightkey can “learn” the beat
of the current song.
▪︎ Exact: Enter the exact beats per minute.
▪︎ MIDI: Synchronize the beat with a DJ software, mixer, or audio analysis tool through MIDI beat clock signals.
Beat-Controlled Sequences Making a sequence beat-controlled is easy. When a sequence is beat-controlled, it advances to the next step on each beat. You can no longer change the hold times of its steps as the timing is controlled only by the beats. Therefore the hold times column in the Preset Palette disappears and the Speed slider in the sequence inspector is disabled.
To make a sequence beat-controlled: 1 Double-click a sequence in the Preset Palette to open its inspector.
2 Click Timing and then select Beat-controlled.
For more information see “Sequence Timing” in chapter 8, “Presets and Sequences”.
Beat-Controlled Effects Some effects can be synchronized to the beat. This is true for pattern effects (some patterns only) and curve effects. The exact behavior of those effects is described in chapter 9, “Effects”.
Lightkey User Guide126

To make an effect beat-controlled:
▪︎ Edit the effect, then select the icon in the Timing Mode options. If the icon isn’t visible or is inactive, the effect does not support beat control.
Set the Beat There are three different ways to set the beat.
Set the Beat by Tapping You can set the beat by repeatedly clicking or pressing a key on each beat. Lightkey will “learn” the beat and continue it in the same interval.
To set the beat by tapping:
1 Do one of the following:
▪︎ Click the Beat control at the bottom-left of the Live view. ▪︎ Choose View > Set Beat (or press Shift-B).
2 Click Tap. 3 Click or press the Space bar four times on each beat.
4 Check if the animation in the beat control is in sync with the music. If not, repeat step 3.
5 Click Done or press Return.
❖ Note: You can also tap the beat through external hardware, such as a MIDI controller, or through custom keyboard shortcuts. See chapter 14, “External Control”, for more information.
Set the Beats per Minute You can manually specify the beats per minute.
To set the beats per minute: 1 Do one of the following:
▪︎ Click the Beat control at the bottom-left of the Live view.
▪︎ Choose View > Set Beat (or press Shift-B).
2 Click Exact.
3 Do one of the following: ▪︎ Click the beats per minute field, type a new value, and press Return.
▪︎ Click “−” or “+” to decrease or increase the beats per minute. 4 Click Done or press Return.
Lightkey User Guide127

Set the Beat Through MIDI You can synchronize the beat with other software or external hardware which sends MIDI beat clock signals. MIDI (Musical Instrument Digital Interface) is a standard protocol that allows a wide variety of electronic music devices, control surfaces, and software to send and receive performance data. MIDI beat clock (or MIDI clock) is a clock signal that is broadcast via MIDI to synchronize MIDI-enabled hardware and software. You can synchronize the beat with the following kinds of software or hardware. Lightkey itself does not perform audio analysis.
▪︎ DJ software like Traktor or DJ mixers which detect the beats per minute. This is usually the most accurate form of BPM detection because the software can determine the beats per minute in advance.
▪︎ Audio analysis software such as Waveclock or Wavetick which analyzes audio as it is played.
Lightkey lets you choose if one beat should correspond to a quarter note, half note, or whole note. For most purposes quarter note is the right choice. This setting works together with the “beat multiplier” setting of beat-controlled sequences. For example, if a beat corresponds to a quarter note and the sequence’s beat multiplier is “÷ 2” then the sequence is advanced on each eighth note. See chapter 8, “Presets and Sequences”, for more information. There are generally two ways to establish a connection between the source software or hardware and Lightkey: ▪︎ Some sources create a MIDI source port on which they send MIDI clock signals.
You select this port in Lightkey.
▪︎ Other sources require that you specify a MIDI destination port to which they send MIDI clock signals. In this case Lightkey can create a MIDI destination port.
To set the beat through MIDI:
1 Do one of the following:
▪︎ Click the Beat control at the bottom-left of the Live view. ▪︎ Choose View > Set Beat (or press Shift-B).
2 Click MIDI. 3 Select an input source from the first pop-up menu.
▪︎ If your MIDI source creates a MIDI source port, select it from the pop-up menu.
▪︎ If your MIDI source requires a destination port, select Lightkey Input. Lightkey creates a MIDI destination port which you can select in the source.
When MIDI clock signals are received, the status below the pop-up menu changes to “Receiving MIDI clock”, and the animation in the beat control should be in sync with the music.
4 In the second pop-up menu, choose whether one beat should correspond to a quarter note, half note, or whole note. For most purposes quarter note is the right choice.
5 Click Done or press Return.
Lightkey User Guide128

Examples The following examples show you how to synchronize the beat with selected software through MIDI beat clock.
Synchronize with Logic Pro
To synchronize Lightkey with Logic Pro:
1 In Lightkey, click the beat control, click MIDI, and choose Lightkey Input. 2 Open Logic Pro and choose Logic Pro X > Preferences > Synchronization.
3 Next to Transmit MIDI Clock, select one of the two destinations and choose Lightkey Input from the pop-up menu.
Synchronize with Ableton Live
To synchronize Lightkey with Ableton Live:
1 In Lightkey, click the beat control, click MIDI, and choose Lightkey Input. 2 Open Ableton Live and choose Live > Preferences… > MIDI Sync.
3 Under MIDI Ports, locate “Output: Lightkey Input” and select Sync: On.
Synchronize with Traktor
To synchronize Lightkey with Traktor:
1 Open Traktor, choose Traktor > Preferences…, and select Controller Manager on the left.
2 Create a new generic MIDI device. As Out-Port, select Traktor Virtual Output.
3 Click MIDI Clock on the left, then select Send MIDI clock.
Lightkey User Guide129

4 Open the Master Clock panel in Traktor’s Global Section by clicking the metronome icon. (If you can’t see the Master Clock / FX Panel, choose to Traktor > Preferences… > Global Settings and select Show Global Section.)
5 To start sending a MIDI Clock signal, click the Play/Pause button. The button appears blue when MIDI clock is active.
6 In Lightkey, click the beat control, click MIDI, and choose Traktor Virtual Output.
Synchronize with Waveclock Waveclock by Wavesum is an audio analysis tool which converts music to MIDI beat clock signals in real time. You can use it if you play music through an app that does not perform beat detection (like iTunes or Spotify) or a CD deck.
To synchronize Lightkey with Waveclock: 1 In Lightkey, click the beat control, click MIDI, and choose Lightkey Input.
2 Open Waveclock. Choose Waveclock > Preferences… and select Lightkey Input as output device. Close the Waveclock I/O Settings window.
3 In the Waveclock window, select MIDI Clock.
Lightkey User Guide130

12Manage Fixtures ➤ Lightkey controls your lights through the DMX512 communication
standard. For this, you need to provide some basic information about your DMX equipment.
DMX512 or simply DMX (Digital Multiplex) is a standard for communication networks which enables a controller (in this case, Lightkey) to control the features of a wide range of DMX-compatible devices or fixtures. Fixtures are connected to the controller using a DMX connection, which consists of a series of DMX cables between the controller and the fixtures in the form of a “daisy chain” (that is, each fixture links to the previous and next fixture or the controller). The DMX signal stream is unidirectional from the controller to the fixtures.
(“Fixture” refers to any DMX512-compatible device that can be controlled by Lightkey. The term is not confined to lighting fixtures but can include fog machines, relays, or motors.) All fixtures on a single daisy chain form a universe. In many cases an installation will consist of only one universe, but depending on your license, Lightkey can output DMX to up to four universes (and receive input from up to two universes).
The fixtures on a universe are controlled by 512 channels, each of which can have a unitary value between 0 and 255 which controls a property of a fixture. Each fixture is assigned a consecutive range of channels: Simple fixtures like dimmers require only a single channel while some intelligent lights can require 20 or more channels. The number of the first channel that controls a fixture is called the fixture’s address.
In order to know which fixture property is controlled by which channel, Lightkey needs a fixture profile. This is a file which contains a description of the fixture’s capabilities and the way they are controlled. Lightkey comes with a built-in library of fixture profiles from many different manufacturers, and it can import thousands of freely available profiles in the formats SSL2, FXT, and PFF. You can also create your own profiles using the built-in fixture editor.
In summary, in order to control a fixture you need to tell Lightkey its universe and address and provide a fixture profile. You manage this information in the Fixture Manager.
Lightkey User Guide131

Here are ways to open the Fixture Manager: ▪︎ Click in the toolbar.
▪︎ Choose Lightkey > Manage Fixtures… (or press Command-Shift-Down Arrow). ▪︎ Click a fixture’s short name in the Preview, then click the fixture’s address (e.g.
“Universe 1, channels 1 – 10”) in the shortcut menu. This will open the Fixture Manager and show information about the clicked fixture.
Here are ways to close the Fixture Manager:
▪︎ Click Done in the toolbar.
▪︎ Choose Lightkey > Manage Fixtures… (or press Command-Shift-Up Arrow).
On the left of the Fixture Manager is the fixture library which contains all built-in, imported, and user-created fixture profiles. The first column lists the manufacturers, the second column shows the profiles for the selected manufacturer. The library also contains a number of generic profiles which don’t relate to a specific fixture model.
On the right is a grid representing the 512 channels in a DMX universe. Depending on your license, you may not be able to use all channels. You can switch between universes using the buttons at the top. For information on how to configure a universe for output or input, see “Configure Universes” in chapter 13, “DMX Output and Input”.
Find Fixture Profiles For each of your fixtures you need a matching fixture profile. For simple fixtures you may find a matching generic profile. For more complex fixtures you need a profile specific to the fixture. For more information, see “Find Fixture Profiles” in chapter 3, “Set Up Your Lights”.
Lightkey User Guide132
Fixture library
DMX channels and fixtures in the selected universe
Click a universe to select itClick the arrow to configure a universe for output or input

Add Fixtures Adding (or “patching”) fixtures is easy.
To add a fixture: 1 Select the universe which the new fixture is connected to.
2 Select a fixture profile in the library on the left. You can use the search field at the top to search for a manufacturer or model name.
3 Do one of the following:
▪︎ Drag the fixture profile from the library to the channel grid. The first occupied channel should match the fixture’s DMX address. Fixtures must not overlap.
▪︎ Double-click the fixture profile in the library. The fixture will be added at the first available DMX address.
The fixture will appear in the channel grid with a dashed outline. Below it there is a window with additional options.
4 If the fixture has different operation modes (or “personalities”), select a mode from the menu below the fixture name. Be sure to select the same mode as is set on the fixture, or Lightkey will not be able to control the fixture! If no menu is shown then the fixture has no modes.
5 To correct the fixture’s start address, change the value in the field “Start at”. (You can increase/decrease the start address by pressing the Up/Down Arrow keys while the insertion point is in the “Start at” field.)
6 Assign a short name to the fixture. Short names appear in Lightkey’s Preview; they can be up to four characters long and usually include one or two letters and a number.
Pick a naming scheme that is suitable for your lighting installation. For example, if you have a row of PAR cans on the floor and one at the ceiling, you can name them F1, F2, F3, … and C1, C2, C3, … Lightkey already proposes a short name based on the fixture type.
If you add multiple fixtures at once, Lightkey will automatically increment the number for each fixture. For example, if you add four moving heads and enter “MH6”, their names will be “MH6”, “MH7”, “MH8”, and “MH9”.
7 If you assigned the same DMX address to multiple identical fixtures, enter their number in the Count field. Lightkey will then display multiple instances of the fixture in the Preview. Those instances always share the same fixture properties.
8 To patch multiple fixtures of the same type with consecutive DMX addresses, enter their number in the field labelled “Patch consecutive fixtures”. (You can increase/decrease the number by pressing the Up/Down Arrow keys while the insertion point is in the field.)
9 Click Patch (or press Return).
Lightkey User Guide133

Edit Fixtures
View and Edit Fixture Information
To view and edit information about a fixture:
1 Do one of the following: ▪︎ Double-click a fixture in the channel grid.
▪︎ Control-click a fixture in the channel grid and choose Get Info from the shortcut menu.
▪︎ Force click a fixture in the channel grid (requires a trackpad with Force Touch support).
2 Below the fixture the following information appears:
To reveal one or more fixtures in the Preview:
1 Select one or more fixtures in the channel grid. (Hold down the Command or Shift key as you click to select multiple fixtures.)
2 Control-click one of the fixtures and choose Show in Preview from the shortcut menu.
To reveal a fixture’s profile in the library:
▪︎ Control-click a fixture in the channel grid and choose Show Profile in Library from the shortcut menu.
Change a Fixture’s DMX Address or Universe You can change a fixture’s DMX address or universe at any time. All presets, sequences, and cues containing the fixture will continue to work.
To change the DMX address of one or more fixtures: 1 Select one or more fixtures in the channel grid. (Hold down the Command or Shift key
as you click to select multiple fixtures.)
2 Do one of the following: ▪︎ Drag the fixtures in the channel grid.
▪︎ Double-click a fixture, then change the value in the “Start at” field.
Lightkey User Guide134
The fixture’s DMX address as decimal
number and DIP switch (Dual In-line
Package) values
The mode currently in use (if the fixture profile contains multiple modes) and the corresponding number of channelsNumber of instances displayed in the Preview
Click to add comments (they’re also visible when you print the patched fixtures)
The short name is used to identify the fixture in the Preview
Manufacturer and fixture name
(from fixture profile)

To change the DMX universe of one or more fixtures:
1 Select one or more fixtures in the channel grid. 2 Drag the fixtures to one of the universes at the top. You can’t drag fixtures to an input
universe.
Duplicate Fixtures You can duplicate fixtures to quickly create new, independent fixtures of the same kind. Optionally, the new fixtures can adopt the properties of the existing ones which are stored in presets. This can be useful if you extend your lighting installation: For example, assume you have a row of PARs for which you have created various presets, sequences, and cues. You can easily add another PAR to the row which behaves exactly like the others without making changes to your light show.
To duplicate fixtures:
1 Select one or more fixtures in the channel grid. (Hold down the Command or Shift key as you click to select multiple fixtures.)
2 Do one of the following:
▪︎ Control-click one of the fixtures and choose Duplicate from the shortcut menu. ▪︎ Hold down the Option key and drag the fixtures in the channel grid.
3 In the dialog that appears, select or deselect the option “Adopt fixture properties in presets”.
If the option is selected, Lightkey will copy all properties for the existing fixtures which are stored in presets to the new fixtures. In other words, the new fixtures will behave exactly like the existing fixtures (until you make changes to the presets).
If the option is not selected, Lightkey will simply create new fixtures with the same fixture profiles and modes.
4 Click Duplicate.
Edit a Fixture Profile You can conveniently edit fixture profiles in Lightkey’s fixture editor. The fixture editor is built into the application so changes take effect immediately as you close the fixture profile.
Here are ways to edit a fixture’s profile:
▪︎ Control-click a fixture in the channel grid and choose Edit Profile from the shortcut menu.
▪︎ Hold down the Option key and double-click a fixture in the channel grid.
▪︎ Click a fixture’s short name in the Preview, then click the fixture profile name in the shortcut menu.
▪︎ Select a fixture in the Preview and choose Fixture > Edit Fixture Profile (or press Command-Shift-Option-Down Arrow).
▪︎ Hold down the Option key and double-click a fixture in the Preview.
Lightkey User Guide135

❖ Note: Fixture profile information for the fixtures in a project is also stored in the project file, so you can use the project even if you don’t have the fixture profiles. If a fixture’s profile is not in your library, you can easily add it by editing the fixture’s profile as described above.
Reassign Fixture Profiles You can assign a different fixture profile to an existing fixture. Lightkey will try to retain information about the fixture in presets, sequences, and cues, as long as the stored properties exist in the new profile.
To reassign a fixture profile: 1 Drag a fixture profile from the library to a fixture in the channel grid.
2 In the alert message that appears, select “Change all fixtures with profile profile name” if you want to change all fixtures with this profile.
3 Click Change.
Delete Fixtures When you delete a fixture from the project all information about the fixture is removed from presets, sequences, and cues. If you don’t want to permanently delete the fixture you can disable it instead (see “Disable Fixtures” in chapter 6, Preview).
To delete fixtures:
1 Select one or more fixtures in the channel grid. (Hold down the Command or Shift key as you click to select multiple fixtures.)
2 Do one of the following:
▪︎ Drag a fixture out of the channel grid. ▪︎ Control-click a fixture and choose Delete… from the shortcut menu.
▪︎ Press the Delete key. 3 In the alert message that appears, click Delete (or press Command-Delete).
▲ Warning: Deleting a fixture cannot be undone. Any information about the fixture—for example, in presets, sequences, and cues—is removed from the project.
Print the Patched Fixtures You can print a list of all fixtures in your project, including patching information and comments. This can be convenient when setting DMX addresses on the fixtures or when working with equipment hiring companies.
To print a list of the fixtures in a project:
1 Click the icon in the toolbar.
2 In the dialog that appears, click Print.
Lightkey User Guide136

Work With Fixture Profiles The fixture library on the left side of the Fixture Manager contains all built-in, imported, and user-created fixture profiles.
Edit a Fixture Profile You can edit fixture profiles in Lightkey’s built-in fixture editor. Changes take effect immediately as you close the fixture profile.
❖ Note: You can view built-in profiles in the fixture editor but you cannot make changes. Instead, you can duplicate the profile.
Here are ways to edit a fixture profile:
▪︎ Select a fixture profile in the library, then click and choose Edit Profile from the menu.
▪︎ Control-click a fixture profile in the library and choose Edit Profile from the shortcut menu.
▪︎ Hold down the Option key and double-click a fixture profile in the library.
The fixture editor opens. A complete discussion of the fixture editor is beyond the scope of this User Guide.
To close the fixture profile, click the “x” to the left of its name (at the top).
Import a Fixture Profile You can import any Lightkey fixture profile into your library. You can also import profiles in the formats SSL2 (Sunlite) and FXT or PFF (DMX FreeStyler).
To import a fixture profile:
1 Click at the top of the fixture library and then choose Import Profile… from the menu.
2 Select a fixture profile in one of the supported file formats (.lightkeyfxt, .ssl2, .fxt, .pff) and click Import.
3 If you’re importing an SSL2 profile, enter the manufacturer and fixture name in the dialog that appears, then click Import.
4 If the profile already exists in your library, Lightkey will display a warning. You can either replace the existing profile or keep both profiles.
★ Tip: A quick way to import a fixture profile is to drag the file to the fixture library.
Create a Fixture Profile Lightkey’s built-in fixture editor lets you create your own fixture profiles.
To create a fixture profile:
▪︎ Click at the top of the fixture library and then choose New Profile from the menu.
Lightkey User Guide137

An interactive assistant will appear and ask you about the basic information for the fixture profile. Then Lightkey creates the fixture profile and opens it in the fixture editor. A complete discussion of the fixture editor is beyond the scope of this User Guide.
Duplicate a Fixture Profile You can duplicate a fixture profile and use it as a starting point for new profiles. Another reason to duplicate fixture profiles may be that you want to make changes to a built-in profile.
To duplicate a fixture profile:
▪︎ Control-click a fixture profile in the library and choose Duplicate Profile from the shortcut menu.
A copy of the profile is added to the library, which you can then edit in the fixture editor.
Delete a Fixture Profile You can move user-created fixture profiles to the Trash. Built-in profiles cannot be removed.
To move a fixture profile to the Trash:
1 Control-click a fixture profile in the library and choose Move to Trash… from the shortcut menu.
2 In the alert message that appears, click Move to Trash.
Lightkey User Guide138

13DMX Output and Input ➤ There are various ways how Lightkey can output and input DMX.
Lightkey supports USB–DMX interfaces from numerous manufac- turers, as well as the network protocols Art-Net, sACN (also called E1.31), and ESP Net.
An alternative way is to manually install a copy of the Open Lighting Architecture (OLA). You can then run your own OLA server and connect Lightkey to it. You configure DMX output/input settings in two places:
▪︎ The Preferences window contains general settings for the various DMX output/input methods.
▪︎ The Fixture Manager allows you to patch each DMX universe to a particular output or input method.
DMX Output Preferences The DMX Output preferences contain general settings for the various DMX output/input methods. These settings are global to the application and not specific to a particular project.
To change DMX Output preferences:
1 Choose Lightkey > Preferences… and click DMX Output.
2 Select an output method from the left, then change the settings on the right as appropriate.
3 Click Apply to apply your changes, or click Revert to revert the settings to the previous state.
Serial USB Interfaces The Serial USB Interfaces output method includes the following USB–DMX interfaces: DMXking ultraDMX devices, Enttec DMX USB Pro, Jese DMX-TRI, Robe Universal Interface.
Lightkey User Guide139

These interfaces cannot be used together with Open DMX interfaces or the Eurolite USB-DMX512-PRO MK2. Only one of these three output methods can be enabled at a time. A green dot next to “Serial USB Interfaces” indicates that the method is enabled.
To enable Serial USB Interfaces: ▪︎ Select Serial USB Interfaces on the left and click Enable.
Open DMX Interfaces The Open DMX Interfaces output method includes the Enttec Open DMX USB interface and similar devices (but not the Enttec OpenDMX Ethernet interface).
These interfaces cannot be used together with serial USB interfaces or the Eurolite USB-DMX512-PRO MK2. Only one of these three output methods can be enabled at a time. A green dot next to “Open DMX Interfaces” indicates that the method is enabled. Unlike most other USB–DMX interfaces, Open DMX devices don’t include a microprocessor to create the DMX stream. Instead they rely on the computer to send DMX frames in regular intervals. If the computer can’t provide the DMX data at a high enough speed, you may experience flicker. In this case you should try to reduce the DMX refresh rate.
To enable Open DMX Interfaces:
▪︎ Select Open DMX Interfaces on the left and click Enable.
To change the rate at which DMX data is sent:
▪︎ Select an option from the Refresh rate pop-up menu.
❖ Note: When you enable the Open DMX Interfaces output method, Lightkey will ask for an administrator password each time you start the application. Therefore you should not enable this option unless you actually use an Open DMX USB interface.
Eurolite USB-DMX512-PRO MK2 Enable this output method for the Eurolite USB-DMX512-PRO MK2 interface. This interface cannot be used together with serial USB or Open DMX interfaces. Only one of these three output methods can be enabled at a time. A green dot next to “Eurolite USB-DMX512-PRO MK2” indicates that the method is enabled.
❖ Note: When you enable the Eurolite USB-DMX512-PRO MK2 output method, Lightkey will ask for an administrator password each time you start the application. Therefore you should not enable this option unless you actually use a Eurolite USB-DMX512-PRO MK2 interface.
Other USB Interfaces This output method includes the following USB–DMX interfaces: Eurolite USB-DMX512-PRO, and Stage-Profi devices. No settings are required for these interfaces.
Lightkey User Guide140

Art-Net Art-Net is a communication protocol which allows distributing DMX data over a local network. It was developed by Artistic Licence and has been placed in the public domain. Art-Net can carry a large number of DMX universes, and Ethernet cabling is useful for covering long distances. You need an Ethernet–DMX interface (also called an Art-Net node) to translate Art-Net to DMX. As Art-Net is an open standard, you can use Art-Net nodes from any manufacturer as long as they conform to the Art-Net standard. Lightkey is compatible with Art-Net versions 1 through 3. Art-Net nodes are grouped into nets (0–127) and subnets (0–15). A node can have up to four ports, each of which can input or output one DMX universe. Lightkey can connect to a single Art-Net interface with up to four ports, so you can use up to four DMX universes for output or input. Your computer must be in the same local network and the same IP subnet as the Art-Net node. Art-Net devices usually require some configuration which is often done through software configuration tools provided by the manufacturer. This includes: ▪︎ The node’s IP address.
▪︎ The node’s net and subnet values. ▪︎ The DMX universe assigned to each input/output port of the device.
Assigning DMX universes can be tricky because some devices number universes differently from Lightkey (which uses numbers 1 through 6):
▪︎ Some Art-Net interfaces (e.g. Enttec Open DMX Ethernet) begin numbering universes with 0, which is often the default. Lightkey has no universe 0, so you have to change this to a number between 1 and 6.
▪︎ Some interfaces (e.g. DMXking eDMX) use universe numbers which are offset by one from Lightkey’s:
Lightkey universe number Device universe number 1 2 2 3 ⋮ ⋮ 6 7 In this case you must add 1 to Lightkey’s universe numbers when you configure your Art-Net node.
You configure Art-Net output in the Art-Net section of Lightkey’s DMX Output preferences.
Lightkey User Guide141

There are two ways how Lightkey can find Art-Net nodes: In automatic mode Lightkey finds all Art-Net nodes in your local network. In case this doesn’t work you can use manual mode where you can enter a node’s net and subnet values.
To set up DMX output through Art-Net using automatic mode: 1 Select Art-Net on the left.
2 Select the network interface which your Art-Net interface is connected to. Your computer usually has multiple network interfaces such as Wi-Fi, the built-in Ethernet port etc. If you are not sure it may help to look at the Network pane of System Preferences and check which network interfaces are in use (click Open Network Preferences…).
Each network interface has its own IP address. The selected interface’s IP address is shown below the network interface.
3 Select Automatic. 4 Click Find Nodes.
Lightkey finds any Art-Net nodes that are connected to the selected network interface and on the same local IP network. If your interface does not appear you may need to check its (or your computer’s) IP address.
5 Select an Art-Net interface from the list. 6 Click Apply.
To set up DMX output through Art-Net using manual mode: 1 Select Art-Net on the left.
2 Select the network interface which your Art-Net interface is connected to.
3 Select Manual. 4 Fill in the following information:
▪︎ Net: The Art-Net net of your interface (0–127).
▪︎ Subnet: The Art-Net subnet of your interface (0–15).
Lightkey User Guide142

▪︎ Options: These are advanced options which should not be selected in most cases.
▪︎ Use broadcast mode: Select this option for older Art-Net interfaces which only support Art-Net version 1. When selected, DMX data is sent to all devices on the network. This may significantly increase the network load and reduce the network’s performance.
▪︎ Use limited broadcast: Select this option to use the limited broadcast address (255.255.255.255) rather than the subnet-directed broadcast address when broadcasting. Some devices which don’t follow the Art-Net specification require this.
▪︎ Use loopback device: Select this if you want to receive the DMX data on the same computer.
5 Click Apply.
Example: Set Up an Enttec Open DMX Ethernet This example will walk you through all steps required to configure an Enttec Open DMX Ethernet interface (ODE) for output from Lightkey. It assumes that you use the interface for the first time—some steps may not be necessary if your device is already set up and integrated into your network. The NME (Node Management Utility) program is used to configure the device; it is available for free from Enttec. For the initial setup it is best to connect the device directly to your computer.
To set up an Enttec Open DMX interface: 1 Connect the Open DMX interface directly to your Mac using an Ethernet (cat5) cable.
2 Open System Preferences > Network. On the left, select the Ethernet interface your Art-Net device is connected to (usually Built-in Ethernet or Thunderbolt Ethernet). Assign your computer a static IP address (a good choice is 10.0.0.1) and set the subnet mask to 255.0.0.0. Disable all other network interfaces, such as Wi-Fi. This makes sure the NMU utility can find your Art-Net node.
3 Open the NMU application and click Discover. NMU should now be able to find your
DMX interface.
4 Select the Open DMX Ethernet interface and click Configure… 5 Change the device information:
▪︎ Device Name: You can enter an arbitrary name to identify your DMX interface in the NMU app.
Lightkey User Guide143

▪︎ IP Address: The Open DMX Ethernet interface only supports static IP addresses, so you have to manually assign it an IP address. In most cases you can stick with the factory-set IP address, but depending on your network configuration you may need to choose a different address which must not be used by any other device on the network. We will use the address 10.0.1.201.
▪︎ Protocol: In this example we will use Art-Net.
▪︎ Subnet: Since we only configure a single device, we don’t need Art-Net subnets and leave this value at 0.
▪︎ Universe: Select a universe between 1 and 6, as Lightkey supports up to six universes. You cannot use universe 0 with Lightkey. In this example, we will use universe 1.
▪︎ Port Direction: We will select Output DMX.
▪︎ Refresh Rate: Leave this at the default setting.
6 Click Save Config.
7 Open Lightkey, choose Lightkey > Preferences…, and click DMX Output. Select Art-Net on the left.
8 Select Automatic, then click Find Nodes. Lightkey should now find the Open DMX Ethernet interface.
9 Click Apply.
10 Click in the toolbar or choose Lightkey > Manage Fixtures… 11 Click the button below the universe that you would like to use for output. This is the
same universe you selected in step 5 (in this example, universe 1). 12 Select the following options:
▪︎ Select Output.
▪︎ Output via: Choose Art-Net.
▪︎ Refresh rate: You should choose the same rate as in step 5.
Lightkey User Guide144

13 Click Done at the top-right to close the Fixture Manager. Lightkey will now send DMX data on universe 1 to your Enttec Open DMX Ethernet interface.
sACN (E1.31) Streaming ACN (sACN or ANSI E1.31) is a communication protocol for transferring DMX data over a local network. It was developed by ESTA (Entertainment Services and Technology Association, now PLASA). You can use an Ethernet–DMX interface to translate sACN data to DMX.
To set up DMX output through sACN: 1 Select sACN (E1.31) on the left.
2 Select the network interface which your sACN interface is connected to. Your computer usually has multiple network interfaces such as Wi-Fi, the built-in Ethernet port etc. If you are not sure it may help to look at the Network pane of System Preferences and check which network interfaces are in use (click Open Network Preferences…).
Each network interface has its own IP address. The selected interface’s IP address is shown below the network interface.
3 Fill in the following information:
▪︎ DSCP value: You can specify a DSCP (differentiated services code point) value to tag the IP packets with. This is an advanced feature; in most cases you should enter 0.
▪︎ Options: These are advanced options that you will not need in most cases. 4 Click Apply.
ESP Net ESP (Enttec Show Protocol) is a DMX-over-Ethernet communication protocol developed by Enttec.
To set up DMX output through ESP Net:
1 Select ESP Net on the left.
Lightkey User Guide145

2 Select the network interface which your ESP Net interface is connected to. Your computer usually has multiple network interfaces such as Wi-Fi, the built-in Ethernet port etc. If you are not sure it may help to look at the Network pane of System Preferences and check which network interfaces are in use (click Open Network Preferences…).
Each network interface has its own IP address. The selected interface’s IP address is shown below the network interface.
3 Click Apply.
Connect to an External OLA Server Lightkey outputs DMX through the Open Lighting Architecture (OLA), an open-source framework developed by the Open Lighting Project. You can install your own version of OLA on your computer, run an OLA server (olad) and redirect Lightkey’s DMX output to it. This will open up additional DMX output and input options.
▲ Warning: Running Lightkey with an external OLA server is considered an experimental feature. There is no guarantee that it will work because the OLA client built into Lightkey may not be compatible with other OLA versions. Monospace does not provide support for this scenario.
To direct Lightkey’s DMX output to an external OLA server: 1 Make sure your olad instance is running.
2 In the DMX Output preferences, click Advanced Settings… 3 Select “Connect to an existing OLA server”. If the server does not use OLA’s default
port number (9010), enter a different port number in the text field. The server must be running on the same computer.
4 Click OK.
Lightkey will attempt to patch the OLA server’s universes according to the settings in the Fixture Manager. If you want to patch a universe through another way (for example, OLA’s web or command-line interface), select “No output” or “No input” in the Fixture Manager. In this case Lightkey will still send or receive DMX but not re-patch the universe. This way you can use output or input methods that are not available in Lightkey, such as other OLA plug-ins.
Configure Universes In order to output or input DMX, you need to map or “patch” a DMX universe to a USB–DMX interface or one of the supported network protocols.
If you can’t patch a universe to ESP Net
If ESP Net does not appear in the list of output methods for a universe, make sure the Enttec “Node Management Utility” (NMU) is not running. If it is, quit the NME application, then choose Lightkey > Reset DMX Output, and try again.
Lightkey User Guide146

The number of universes you can use for output depends on your Lightkey license. You can use up to two universes for input.
To patch a universe:
1 Click in the toolbar or choose Lightkey > Manage Fixtures to open the Fixture Manager.
At the top of the Fixture Manager you see the six DMX universes and the output or input method they are patched to.
2 Move the pointer over a universe and click the arrow on the right. 3 Click Output or Input.
4 For output universes, the following options are available:
▪︎ Output via: Select a USB–DMX interface or one of the network protocols (Art-Net, sACN, or ESP Net interfaces do not appear in the menu). If your USB interface is not in the menu, see “If Your USB–DMX Interface Does Not Appear” below.
▪︎ Refresh rate: This controls how often Lightkey generates new DMX values for the universe. For best results this should match the rate at which your DMX interface outputs DMX frames.
If you are using an Open DMX interface then the refresh rate always matches the rate at which the interface sends DMX frames, so it cannot be changed.
For input universes, the following option is available:
▪︎ Input via: Select a USB–DMX interface or one of the network protocols. If your USB interface is not in the menu, see “If Your USB–DMX Interface Does Not Appear” below.
5 Click Done in the toolbar to close the Fixture Manager and apply your changes. (Your changes won’t take effect until you close the Fixture Manager.)
If Your USB–DMX Interface Does Not Appear Here are some helpful tips if your USB–DMX interface does not appear in a universe’s “Output via” or “Input via” menus:
▪︎ Check if your interface is on the list of supported interfaces. Interfaces that are not listed may not work with Lightkey.
▪︎ Connect the USB–DMX interface to your computer, then choose Reset DMX Output from the Lightkey menu. Now check if your device is found.
▪︎ Lightkey requires a number of device drivers to work with the various USB–DMX interfaces, which are installed by the Lightkey installer. If a driver is missing, a warning will appear in the DMX Output section of Lightkey’s Preferences window. When in doubt, run the Lightkey installer again.
▪︎ If you have an Open DMX (or similar) interface, make sure the output method “Open DMX Interfaces” is enabled in the “DMX Output“ pane of Lightkey’s Preferences window. On the other hand, if you have a serial USB interface, make sure the output method “Serial USB Interfaces” is enabled. Only one of these methods can be enabled at a given time.
Lightkey User Guide147

▪︎ Sometimes it is necessary to restart your computer after installing Lightkey, to make sure the device drivers are properly loaded. This is usually necessary only once after installing Lightkey.
▪︎ In some cases it helps to unplug the device and replug it after about one minute. Sometimes it helps to plug the interface into a different USB port.
▪︎ There may be conflicts if other applications try to access your DMX interface. Please quit all other lighting control applications, then choose Lightkey > Reset DMX Output. If your interface still doesn’t appear, restart your computer and then open Lightkey again.
Monitor DMX Output You can observe the current DMX output values for a universe and even for individual fixtures. This is useful to locate problems if, for example, a fixture does not react to property changes as expected.
To view the DMX output:
1 Do one of the following to show the DMX Output window:
▪︎ Click in the toolbar.
▪︎ Choose Window > DMX Output (or press Command-Shift-Option-O).
2 Select a universe or fixture from the pop-up menu at the top. 3 Rest the pointer over one of the DMX channels. A help tag appears showing the
corresponding fixture and property.
To view the DMX output for a particular fixture: ▪︎ Select the fixture (and no other fixtures) and choose Fixture > Show DMX Output (or
press Command-Shift-Option-O).
Lightkey User Guide148

14External Control ➤ During live performances it often helps to have physical controls to
efficiently run your light show. To accomplish this Lightkey can be “remote-controlled” through DMX consoles, MIDI controllers, and user-defined keyboard shortcuts.
In a live show you’ll usually use these input devices to trigger or fade cues. But in fact they can bind virtually any application feature to an external device—for example, you can change the various properties of the selected fixtures while you design your light show. Lightkey can also send feedback to connected MIDI controllers, e.g. to provide visual feedback when a cue is active or to move a fader to match the software value. Some MIDI controllers support multi-color feedback.
Furthermore, Lightkey can be controlled by any software which sends DMX data or MIDI messages. The Live Triggers feature makes it especially convenient to control cues from Ableton Live. There are three ways how Lightkey can receive external input:
▪︎ DMX-In: Many USB–DMX interfaces and Ethernet–DMX interfaces provide one or more input ports to feed DMX into your computer. This way you can remote-control Lightkey from DMX consoles or other hard- or software which sends DMX data.
▪︎ MIDI: MIDI (Musical Instrument Digital Interface) is a standard protocol that allows a wide variety of electronic music devices, control surfaces, and software to send and receive performance data. Lightkey can be remote-controlled from any hardware or software that is compatible to Apple’s Core MIDI technology.
Many controllers and other MIDI devices connect to your computer via the USB port. If a MIDI device has MIDI-In and Out ports rather than a USB port, you can connect it through a MIDI interface.
▪︎ Keyboard: In addition to the extensive built-in keyboard shortcuts, you can define your own custom shortcuts. This is especially useful to activate specific buttons in a control panel.
Lightkey User Guide149

Lightkey’s external control system is fully configurable, allowing you to custom-tailor it to your specific setup and requirements. You can save multiple external control “configurations”, e.g. for different environments or users.
External control settings are stored as part of your project, because actions such as activating a cue are often specific to the project. You can export and import configura- tions to transfer them between projects.
Quickly Assign Triggers Lightkey provides a quick and convenient way to assign triggers to many elements in the user interface. For example, this works for cues in the Live view and many sliders in the Design view.
A more comprehensive way to edit triggers and their actions is the External Control window, which is described in the following section.
To quickly assign a trigger to an element: 1 Control-click an element in the user interface (e.g. a button or slider) and choose
External Control > Add Trigger… from the shortcut menu. This command is only available for elements which support external control.
2 Do one of the following:
▪︎ Operate a fader on a connected DMX console. ▪︎ Operate a fader or button on a connected MIDI controller.
▪︎ Press a key on the keyboard (possibly with modifier keys).
Triggers assigned though this method will also appear in the External Control window, which is described in the following section.
To quickly replace a trigger:
1 Control-click an element in the user interface and choose External Control > Replace Trigger… from the shortcut menu.
2 Operate a new trigger.
❖ Note: The Replace Trigger… command is only available when the element has exactly one trigger. If it has more then you must replace them in the External Control window.
To quickly remove a trigger: ▪︎ Control-click an element in the user interface and choose External Control > Remove
Trigger from the shortcut menu.
❖ Note: This command is only available when the element has exactly one trigger. If it has more then you must remove them in the External Control window.
Lightkey User Guide150

If you have a MIDI controller with feedback LEDs, Lightkey can show you which hardware button a user interface element is bound to.
To see which hardware button a user interface element is bound to:
▪︎ Control-click an element in the user interface and choose External Control, then move the pointer over a trigger in the menu. The corresponding LED on your MIDI controller flashes.
To view a trigger in the External Control window:
▪︎ Control-click an element in the user interface and choose External Control, then select a trigger from the menu.
The External Control Window The central place for configuring Lightkey’s external control system is the External Control window.
Here are ways to open the External Control window:
▪︎ Click in the toolbar.
▪︎ Choose Window > External Control (or press Command-E).
The External Control window is divided into three “tabs”, visible at the top—DMX-In, MIDI, and Keyboard. Below the tabs is a pop-up menu where you can select and edit configurations for the current tab. The main part of the window shows a list of the trigger–action bindings for the selected configuration.
Configurations For each category of external control devices (DMX-In, MIDI, Keyboard) you can save multiple configurations of external control settings. This is useful if your control hardware changes or you use Lightkey in different scenarios or by several people. Only one configuration per category can be active at a time. Configurations can be exported to a file and imported again, which allows you to move them between projects or share them with others.
The Configuration pop-up menu shows you the control configurations for the selected category. The selected configuration is the one currently in effect.
Switch between settings for DMX-In, MIDI, or Keyboard
Select and manage control configura-
tions for the current device category (for
example, DMX-In)
Lightkey User Guide151

To manage configurations:
1 Choose Manage Configurations… from the Configurations pop-up menu. A window with a list of configurations appears.
2 Do one of the following: ▪︎ To add a new, empty configuration: Click “+”, then enter a name for the new
configuration and press Return.
▪︎ To reorder configurations: Drag the rows in the list up or down.
▪︎ To rename a configuration: Select the configuration, then click the gear icon and and choose Rename from the menu. Alternatively, select the configuration and click its name.
▪︎ To duplicate a configuration: Select the configuration, then click the gear icon and and choose Duplicate from the menu. Enter a name for the new configuration and press Return.
▪︎ To export a configuration to a file: Select the configuration, then click the gear icon and and choose Export… from the menu. In the dialog that appears, enter a filename, choose a location and click Save.
▪︎ To import a configuration file: Click the gear icon and Choose Import… from the menu. In the dialog that appears, navigate to the configuration file and click Import. If a previous version of the configuration already exists in the project, Lightkey will display a warning. You can either replace the existing configuration or keep both.
▪︎ To delete a configuration: Select the configuration and click “−” or press the Delete key.
3 Click Done.
❖ Note: The configuration named “Live Triggers” is a special configuration for communi- cating with Ableton Live. It is created automatically and can’t be edited. You cannot delete this configuration unless you disable Live Triggers in the Preferences window. For more information see “Live Triggers” later in this chapter.
Bindings A control configuration is made up of several trigger–action pairs called bindings. A trigger describes an operation on an external control device, like pushing a button on a MIDI controller or operating a fader on a DMX console. An action describes a change in Lightkey which occurs in response to a trigger, like activating of a cue. There are two general types of bindings:
Keyboard bindings are always button-type bindings.
Button: A button binding can have one of two states, on or off. Example: A key on a MIDI keyboard or a computer keyboard (trigger) which activates a cue (action).Fader: A fader binding has a value in a defined range. Example: A channel fader on a DMX console (trigger) which controls a fixture’s intensity (action).
Lightkey User Guide152

Depending on the binding type, different actions are available (some actions only work with button triggers, other actions only with fader triggers). See “Actions” later in this chapter for a description.
When you operate a trigger that matches an existing binding, the binding is selected in the External Control window.
❖ Note: Before you can create DMX-In bindings, you need to configure at least one universe for DMX input. This connects the universe to a DMX interface’s input port. See “Configure Universes” in chapter 13, “DMX Output and Input” for more information.
Here are ways to create a binding:
▪︎ Lightkey automatically adds a binding when you operate a trigger while the correspon- ding tab in the External Control window is visible. Make sure the Auto-create button is selected, then:
▪︎ DMX-In: Operate a fader or button on a DMX console. Lightkey creates a matching binding and automatically detects the binding type (button or fader).
▪︎ MIDI: Press a button or move a fader on a MIDI controller. Lightkey creates a matching binding and automatically detects the binding type (button or fader).
▪︎ Keyboard: Press a key on the keyboard. Lightkey creates a button-type binding for that key. You can use all letters, numbers, punctuation characters and the function keys (F1, F2, …) in combination with the following modifier keys: Shift, Control, Option. (The Command key is reserved for Lightkey’s standard keyboard shortcuts.)
▪︎ To insert a binding at a certain position, click “+” next to a binding. A new binding is inserted below the clicked one. Then operate a trigger to assign it to the new binding.
▪︎ To duplicate an existing binding, hold down the Option key and click “+” next to the binding.
After creating a binding you should select an action for it (see “Actions” below).
To change a binding’s type: ▪︎ Click the icon in the Type column on the left. Note that Keyboard bindings are always
button-type bindings.
To reorder bindings in a configuration:
▪︎ Press the mouse button over the three horizontal bars at the right of a binding and drag up or down.
Binding type Trigger parameters Action parameters
Binding
Lightkey User Guide153

Here are ways to delete a binding:
▪︎ Click “−” next to the binding. ▪︎ Click the binding to select it, then press the Delete key.
If you accidentally delete a binding, choose Edit > Undo Remove Binding.
Triggers Most of the time Lightkey will simply “capture” triggers when you operate them (e.g. by pressing a button on a connected MIDI controller) and create a matching binding. This section describes how you can change a binding’s trigger later and view or edit its parameters.
To change a binding’s trigger:
1 Click next to the trigger.
2 Operate the new trigger: ▪︎ DMX-In: Operate a fader or button on a connected DMX console.
▪︎ MIDI: Press a button or move a fader on a connected MIDI controller.
▪︎ Keyboard: Press a key on the keyboard.
To manually edit trigger parameters (DMX-In and MIDI triggers only): 1 Click next to the trigger.
2 Change the trigger parameters as appropriate. The parameters for the each trigger type are described below. DMX-in triggers: DMX triggers have the following parameters:
▪︎ Universe: The DMX universe which Lightkey should observe. Only input universes can be selected. See “Configure Universes” in chapter 13, “DMX Output and Input” on how to configure universes for DMX input.
▪︎ Channel: The DMX channel in the universe to observe (1–256). ▪︎ Value (button bindings only): The channel value which should trigger the action.
Lightkey performs the action whenever the DMX channel changes to this value. ▪︎ Values (fader bindings only): The range of DMX values in which the value will be,
often 0 – 255. For example, if the range is 128 – 255 and the action controls a fixture’s intensity, then a DMX value of 128 means 0% intensity and a DMX value of 255 means 100% intensity.
MIDI triggers: MIDI triggers have the following parameters:
▪︎ Command: The MIDI command which should trigger the action. The available commands depend on the binding type; see the table below.
▪︎ Channel: The MIDI channel of your MIDI controller (1–15). (Note: MIDI channel 16 is reserved for use by Live Triggers.)
Lightkey User Guide154

The remaining parameters depend on the binding type and the selected command:
Actions After adding a binding you should choose the corresponding action on the right. The following table shows the different actions and their parameters. The available actions depend on the type of the binding.
Binding type MIDI command Parameters
Button Note On/Off Note: The MIDI note to trigger the action.
Button Control Change Control: A control number identifying a physical control on your MIDI controller (0–127). Value: The control value which should trigger the action (0–127). On/off: Select this if the button sends a single message when pressed. Otherwise the button is expected to send one message when pressed and another (with value 0) when released.
Button Program Change Program: A MIDI program number which should trigger the action (0–127).
Fader Control Change Control: A control number identifying a physical control on your MIDI controller (0–127). 14-bit: The fader sends 14-bit (high-resolution) values.
Fader Pitch Wheel —
Any Any Shift: The trigger only applies when the Shift button on the MIDI controller is held down (see “MIDI Shift button” below).
Action Binding type Description MIDI feedback
Activate/Deactivate Preset
Button Activate or deactivate a preset. The exact behavior is controlled by the Behavior option: ▪︎ Toggle: Change the preset’s “active” state (from
active to inactive or vice versa) whenever the trigger’s state changes to on—for example, when a button on a MIDI controller or a key on the keyboard is pressed.
▪︎ Flash: Activate the preset when the trigger’s state is on, for example, when a button or key is pressed. Deactivate the preset when the trigger’s state is off, for example, when a button or key is released.
▪︎ Activate: Activate the preset when the trigger’s state is on.
▪︎ Deactivate: Deactivate the preset when the trigger’s state is on.
Yes
Deactivate All Presets
Button Deactivate all active presets. n/a
Lightkey User Guide155

Start/Stop Sequence
Button Start or stop a sequence. The Behavior option works analogous to the Activate/deactivate preset action.
Yes
Stop all Sequences Button Stop all running sequences. n/a
Activate/Deactivate Cue
Button Activate or deactivate a cue. The Behavior option works analogous to the Activate/deactivate preset action.
Yes
Previous/Next Cue in Fame
Button Activate the previous or next cue in a frame. n/a
Cuelist: Start/Stop Button Start or stop playback in the a cuelist. Yes
Cuelist: Pause/Resume
Button Pause or resume playback in a cuelist. Yes
Cuelist: Next Cue Button Activate the next cue in a cuelist. Yes
Cuelist: Previous Cue
Button Activate the previous cue in a cuelist. n/a
Cuelist: Xfade Fader Crossfade to the next cue in a cuelist, as by dragging the Xfade slider.
—
Change Cue Intensity
Fader Change a cue’s intensity, as with a fader in the Live view.
Yes
Change Cue Modifier
Fader Change one of a cue’s modifiers. If you select “All cues” then the action will affect all cues on the current live page with this modifier.
Yes
Deactivate All Cues
Button Deactivate all active cues. n/a
Select Fixtures Button Select one or more fixtures. You can choose to select: ▪︎ All or no fixtures; ▪︎ The previous or next fixture (by short name); ▪︎ A particular fixture (if the fixture is in a group you
can optionally select the entire group); ▪︎ All fixtures with a particular profile.
n/a
Change Fixture Property
Button/Fader Change a fixture property, as in the Design view or the HUDs. The available options depend on the selected property. You can choose if the changes should affect the selected fixture(s) or a particular fixture or set of fixtures.
For most fixture properties
Clear Properties Button Clear the overridden fixture properties. —
Blind Mode Button Enable or disable blind mode. Yes
Freeze Output Button Freeze or unfreeze the output. Yes
Master Dimmer Fader Control the Master Dimmer, as by dragging the Master Dimmer slider in the Live view.
Yes
Tap Beat Button Set the beat by tapping, as with the Beat control in the Live view.
Yes
Action Binding type Description MIDI feedback
Lightkey User Guide156

MIDI Shift Button Some MIDI controllers provide a designated Shift button which acts similarly to the keyboard Shift key: When the Shift button is held down while another button is pressed or a fader is moved, a different action can be performed. Before you can use this feature, you need to tell Lightkey which button should act as Shift.
To designate a button as Shift button: 1 In the External Control window, click MIDI.
2 Press the Shift button on your MIDI controller.
A new binding appears whose trigger matches the Shift button. 3 Choose Shift as the binding’s action.
Live Triggers Ableton Live is a music sequencer and digital audio workstation (DAW) software used by many musicians and DJs. Live Triggers are a quick and convenient way to trigger lighting cues directly from the Ableton Live timeline, perfectly synchronized to the music. This enables live performers to run a fully automated light show without the need for manual operation. This section assumes that you are familiar with the basics of Ableton Live and already have a Lightkey project with cues (in a control panel or cuelist) that will be triggered from Ableton Live. Lightkey and Ableton Live need to run on the same computer. It is up to you how you organize your cues. For example, can use a cuelist for each song and step through the cues one by one. Or you can use a control panel and activate one or multiple cues at various points in the timeline. For more information on control panels and cuelists, see chapter 10, “Live Control”.
To set up communication between Ableton Live and Lightkey:
1 In Lightkey, choose Lightkey > Preferences…, click General, and make sure Control from Ableton Live is selected.
2 In Ableton Live, choose Live > Preferences… and then click Link MIDI. 3 Locate the row “Output: Lightkey Input” in the MIDI Ports list (this row is only visible
when Lightkey is open).
4 Make sure the button in the Track column reads “On”.
Select Live Page Button Select a Live view page. You can choose to select: ▪︎ The previous of next page (in the order in which
they appear in the menu); ▪︎ A particular page.
Yes
Shift Button Designates the trigger as the Shift button. See “MIDI Shift Button” below.
n/a
Action Binding type Description MIDI feedback
Lightkey User Guide157

After setting up the communication, you’ll add one or more MIDI tracks to your set from which you’ll control your lighting cues. (To activate more than one cue at a time, it is necessary to use multiple tracks.)
To add a MIDI track to your project: 1 In Ableton Live, go to Arrangement View.
2 Choose Create > Insert MIDI Track. 3 Make sure the In/Out section is visible (choose View > In/Out), then configure the
options in the track’s In/Out section:
▪︎ In the Input Type menu, select No Input.
▪︎ In the Output Type menu, select Lightkey Input.
▪︎ In the Output Channel menu, select “Ch. 16”.
Now you’re ready to add lighting cues to your Ableton Live set. You’ll do that by dragging prepared MIDI clips to the MIDI track.
To add clips to a MIDI track:
1 Make sure that Ableton Live’s browser is visible (choose View > Show Browser).
2 Locate and expand the item User Library > Lightkey in the browser. 3 Expand the item for the current Lightkey project. It contains the following groups:
▪︎ Actions: This contains clips for generic actions.
▪︎ One group for each Live view page: These groups contain clips for every cue on the page (control panel or cuelist). There’s also a clip which selects the page in Lightkey’s Live view.
4 Drag clips to the MIDI track.
Generic actions for controlling cuelist playback
Cues from this page
Cues from this page
Select live page
Select live page
Lightkey User Guide158

5 Drag the right edge of the clips to adjust their duration, if necessary:
▪︎ Cues in a control panel: The cue is activated at the beginning of the clip and remains active for its entire duration. Adjust the clip’s duration to the time you would like the cue to stay active.
▪︎ Cues in a cuelist: The cue is activated at the beginning of the clip and remains active until another cue is activated. You don’t need to adjust the clip’s duration.
▪︎ Other clips: The action is performed at the beginning of the clip. You don’t need to adjust the clip’s duration.
6 Play back the set. When playback reaches the beginning of a clip, the corresponding cue activates in Lightkey.
When you use a control panel, a clip’s duration determines how long the corresponding cue remains active. You can activate multiple cues at once by adding more MIDI tracks.
➤ Important: Always drag the right end of a clip to change its duration, never the left end. (At the beginning of a clip a MIDI message is sent to Lightkey which activates the cue. When you drag the left end of a clip then either that message is sent too late or no message is sent.)
If you accidentally dragged the left end of a clip, you can fix it as follows:
To fix a clip whose cue does not activate correctly:
1 Double-click the clip. The MIDI Note Editor appears in the Details view. 2 Drag the Start Marker in the MIDI Note Editor to the very left.
Cues in a control panel remain active for the duration of the clip.
Cues in a cuelist remain active until another cue is activated.
Do not drag this end.
Always drag this end to change the clip duration.
Lightkey User Guide159

When you use a cuelist, you can either use the clip “Cuelist: Next Cue” to step through the cues sequentially, or you can jump to a specific cue by dragging a cue to the timeline. The “Select Page” clips can be used to explicitly switch to a control panel or cuelist. Usually this is not necessary: Lightkey automatically switches to the respective Live view page when a cue is activated.
How Live Triggers Work Live Triggers work through MIDI messages. Lightkey sets up a number of external control bindings which bind MIDI messages to actions like activating a cue. It then creates a MIDI clip in Ableton Live for each binding. To view these bindings, choose Window > External Control, click MIDI, and select Live Triggers from the Configuration pop-up menu. This special configuration cannot be edited. If you keep the External Control window open you will see that the bindings flash when a matching MIDI message arrives.
MIDI messages for Live Triggers are always sent on MIDI channel 16. This channel is reserved for messages between Ableton Live and Lightkey, you cannot use it for your own MIDI bindings.
Disable Live Triggers By default Lightkey automatically creates Live Trigger bindings for every project and makes them available to Ableton Live. You can disable this feature if you don’t use it.
To disable Live Triggers:
1 Choose Lightkey > Preferences… and then click External Control. 2 Deselect the option “Enable Live Triggers”. This disables Live Triggers for all projects.
Live Triggers Troubleshooting Here are some helpful tips if Live Triggers don’t work as expected:
▪︎ If your Lightkey project doesn’t appear in Ableton Live’s browser: Make sure Live Triggers are enabled in Lightkey’s Preferences window. See “Disable Live Triggers” earlier in this section.
▪︎ If a change in Lightkey doesn’t show in Ableton Live’s browser: Select the Live Triggers configuration in the MIDI tab of the External Control window and click Update.
Start Marker
Lightkey User Guide160

▪︎ If Lightkey shows no response to triggers: Check if the MIDI track has the correct input, output, and channel settings, as discussed earlier in this section. To check if Lightkey receives MIDI messages, select the Live Triggers configuration in the External Control window. When a message arrives the matching bindings flash.
▪︎ If a single clip does not activate its cue, or if the cue activates too late: You may have accidentally dragged the left edge of the clip. This can be fixed in the MIDI Note Editor for the clip, as described earlier in this section.
Trigger Actions From ProPresenter ProPresenter is a presentation software especially popular among houses of worship. The following example shows how to trigger lighting cues from ProPresenter by means of MIDI messages. In order to send MIDI messages from ProPresenter you need the Communication Module or MIDI Module, which are separate purchases on the ProPresenter website. This example assumes that Lightkey and ProPresenter run on the same computer.
To set up communication from ProPresenter to Lightkey:
1 Make sure that Lightkey is open. 2 In ProPresenter, open the Preferences window and click Communications. (The
Communications pane is only visible if the MIDI or Communication module have been activated.)
3 Click Add Device… and choose MIDI from the menu. 4 In the dialog that appears, make the following changes:
5 Click Save. A new MIDI “device” appears.
6 Click Connect.
Enter a label for the connection.
Enable Lightkey Input.
Lightkey User Guide161
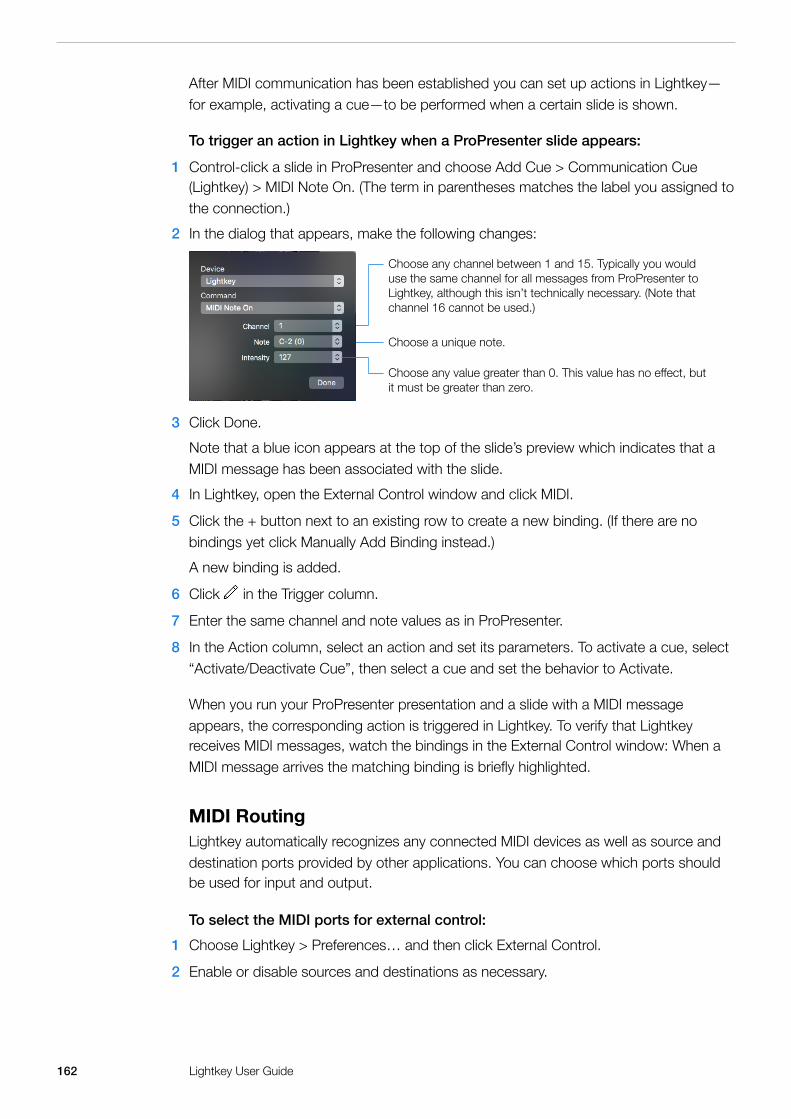
After MIDI communication has been established you can set up actions in Lightkey—for example, activating a cue—to be performed when a certain slide is shown.
To trigger an action in Lightkey when a ProPresenter slide appears:
1 Control-click a slide in ProPresenter and choose Add Cue > Communication Cue (Lightkey) > MIDI Note On. (The term in parentheses matches the label you assigned to the connection.)
2 In the dialog that appears, make the following changes:
3 Click Done. Note that a blue icon appears at the top of the slide’s preview which indicates that a
MIDI message has been associated with the slide. 4 In Lightkey, open the External Control window and click MIDI.
5 Click the + button next to an existing row to create a new binding. (If there are no bindings yet click Manually Add Binding instead.)
A new binding is added.
6 Click in the Trigger column.
7 Enter the same channel and note values as in ProPresenter.
8 In the Action column, select an action and set its parameters. To activate a cue, select “Activate/Deactivate Cue”, then select a cue and set the behavior to Activate.
When you run your ProPresenter presentation and a slide with a MIDI message appears, the corresponding action is triggered in Lightkey. To verify that Lightkey receives MIDI messages, watch the bindings in the External Control window: When a MIDI message arrives the matching binding is briefly highlighted.
MIDI Routing Lightkey automatically recognizes any connected MIDI devices as well as source and destination ports provided by other applications. You can choose which ports should be used for input and output.
To select the MIDI ports for external control: 1 Choose Lightkey > Preferences… and then click External Control.
2 Enable or disable sources and destinations as necessary.
Choose any channel between 1 and 15. Typically you would use the same channel for all messages from ProPresenter to Lightkey, although this isn’t technically necessary. (Note that channel 16 cannot be used.)
Choose a unique note.
Choose any value greater than 0. This value has no effect, but it must be greater than zero.
Lightkey User Guide162

To receive MIDI messages from other software, Lightkey creates a MIDI port named Lightkey Input. You can select this port as a destination in other applications when Lightkey is open.
Multi-Touch Gestures Lightkey supports some configurable Multi-Touch gestures as an alternative way to quickly and conveniently change frequently-used fixture properties. You configure these gestures in Lightkey’s Preferences window.
To configure Multi-Touch gestures:
▪︎ Choose Lightkey > Preferences… and click Gestures.
You can use gestures to control the following fixture properties:
▪︎ Dimmer: Change the selected fixture’s Dimmer property.
▪︎ Master dimmer: Change the Master Dimmer.
▪︎ Color hue: Change the hue component of the selected fixture’s color (if the fixture supports color mixing).
▪︎ Color saturation: Change the saturation component of the selected fixture’s color (if the fixture supports color mixing).
You can control the fixture properties by scrolling or by swiping up or down with three or four fingers while the pointer is over the Preview area. These gestures can be combined with modifier keys. The swipe gestures require a Multi-Touch trackpad.
➤ Important: Three- or four finger swipes can only be recognized when they are not assigned to another action in the Trackpad pane of System Preferences (even when combined with modifier keys).
If you have a Multi-Touch trackpad, you can also pinch with two fingers while the pointer is over the Preview to open one of the HUDs for Position, Focus, Zoom, or Iris. This is especially useful for the Focus, Zoom, or Iris HUDs where pinching also changes the property value. You should assign this gesture to the fixture property which you most frequently use. If you choose Automatic, Lightkey will assign the gesture to the property supported by most of your fixtures.
If your trackpad supports Force Touch, you can force click a fixture icon to use one of the HUDs. This gesture is assigned to the Position HUD by default.
Lightkey User Guide163

Lightkey User Guide164
© 2020 Monospace UG (haftungsbeschränkt). All rights reserved. Every effort has been made to ensure that the information in this manual is accurate. Monospace assumes no responsibility or liability for any errors or inaccuracies that may appear in this manual. Any company and product names mentioned herein may be trademarks of their respective companies. Mention of third-party products is for informational purposes only and constitutes neither an endorsement nor a recommendation. Monospace assumes no responsibility with regard to the performance or use of these products. Rev. 3.2.
ENJOY LIGHTKEY! Thank you for choosing Lightkey: We hope that it enhances your creative process and wish you lots of fun creating exciting light shows.
If you have any questions that were not answered in this User Guide, need technical support, or want to share your feedback about Lightkey, get in touch at [email protected].
We’re happy to help!


