Page 1
Copyright © 2018, Westerly Media Limited Page | 1
LightUp Studio™
Evaluation Guide
CONTENTS
Introduction ....................................................................................................................................................................................... 2
Creating Integrated App Launcher Tiles and Help Desk Links to the Training Portal .......................................... 3
Controlling the Visibility of Libraries in the Training Portal ............................................................................................ 8
Managing Library Grouping in the Training Portal ............................................................................................................ 8
Library Administration.................................................................................................................................................................. 10
Video Administration ................................................................................................................................................................... 11
Learning Path Administration ................................................................................................................................................... 13
Creating Learning Campaigns .................................................................................................................................................. 15
Tracking & Analysis ....................................................................................................................................................................... 16
Branding ............................................................................................................................................................................................ 18
Managing Administrative Users for LightUp Studio™ .................................................................................................... 20
Building a Learning Center with LightUp Studio™ ........................................................................................................... 21
Feedback and Support ................................................................................................................................................................. 25
Page 2
Copyright © 2018, Westerly Media Limited Page | 2
Introduction Welcome to the Evaluation Guide for LightUp 365™
The goals of LightUp 365™ are to:
• Increase user adoption of Office 365.
• Actively drive usage of Office 365, for both new users and experienced users.
• Reduce your training costs for Office 365 end users.
• Reduce your help-desk incidents, especially when users have 'How do I' questions.
In this guide, you will follow specific procedures that build learning experiences and
communication campaigns for Office 365 end users.
Organization Keys
In various procedures below, you will be instructed to use a combination of Organization
Name and Key. The name and keys are only required to perform administrative functions. Your
end users never need the keys, so you should not provide them the details you use as an
administrator.
You should have been provided with your own combination of name and key by LightUp 365
or one of its partners. If you do not have this information, please
contact support at: [email protected]
Page 3
Copyright © 2018, Westerly Media Limited Page | 3
Creating Integrated App Launcher Tiles and Help Desk Links to
the Training Portal You can provide quick and easy access to the training libraries and learning paths via an Office
365 App Launcher Tile, and via the Help pane throughout all of Office 365. The Training Portal
is available to all users regardless of where they are working in Office 365 (such as in Mail,
Tasks, Calendars, Delve, SharePoint Sites, and so on).
Add the LightUp 365™ App Tile
The first step is to add the LightUp 365™ tile to your organization’s tiles.
1. Browse to https://portal.office.com/home
2. Log in as a user who has administrative privileges.
3. From the App Launcher, click Admin.
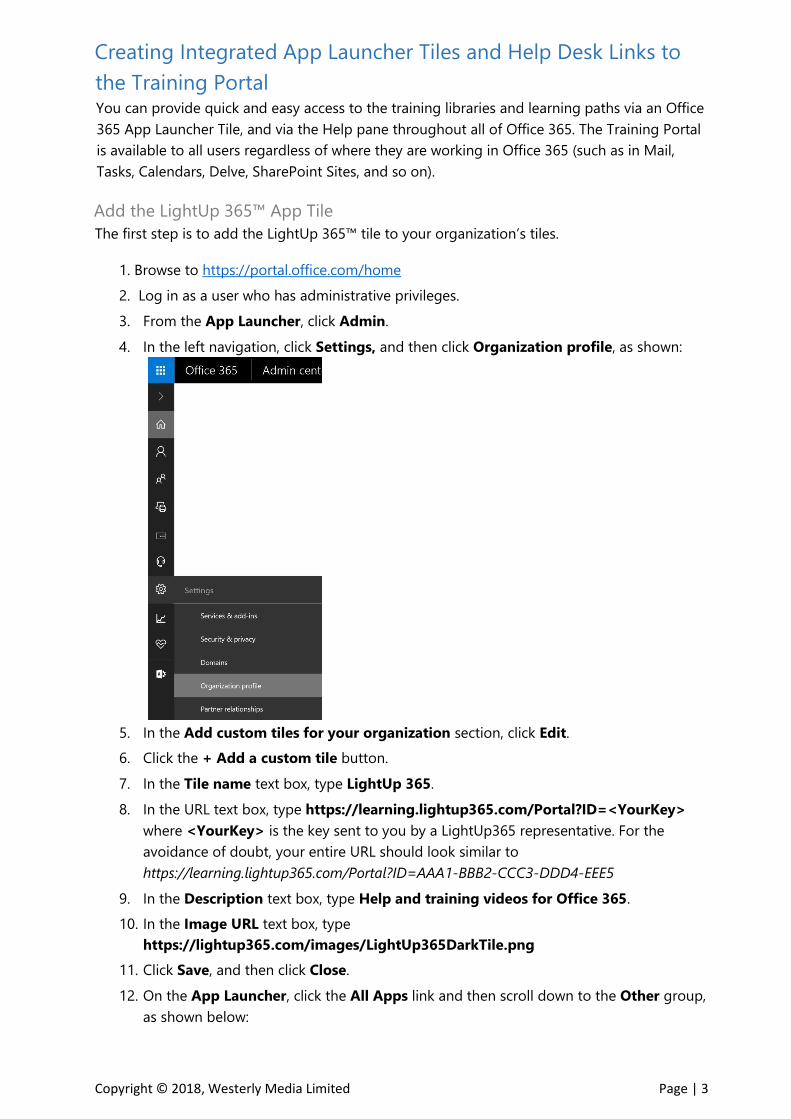
4. In the left navigation, click Settings, and then click Organization profile, as shown:
5. In the Add custom tiles for your organization section, click Edit.
6. Click the + Add a custom tile button.
7. In the Tile name text box, type LightUp 365.
8. In the URL text box, type https://learning.lightup365.com/Portal?ID=<YourKey>
where <YourKey> is the key sent to you by a LightUp365 representative. For the
avoidance of doubt, your entire URL should look similar to
https://learning.lightup365.com/Portal?ID=AAA1-BBB2-CCC3-DDD4-EEE5
9. In the Description text box, type Help and training videos for Office 365.
10. In the Image URL text box, type
https://lightup365.com/images/LightUp365DarkTile.png
11. Click Save, and then click Close.
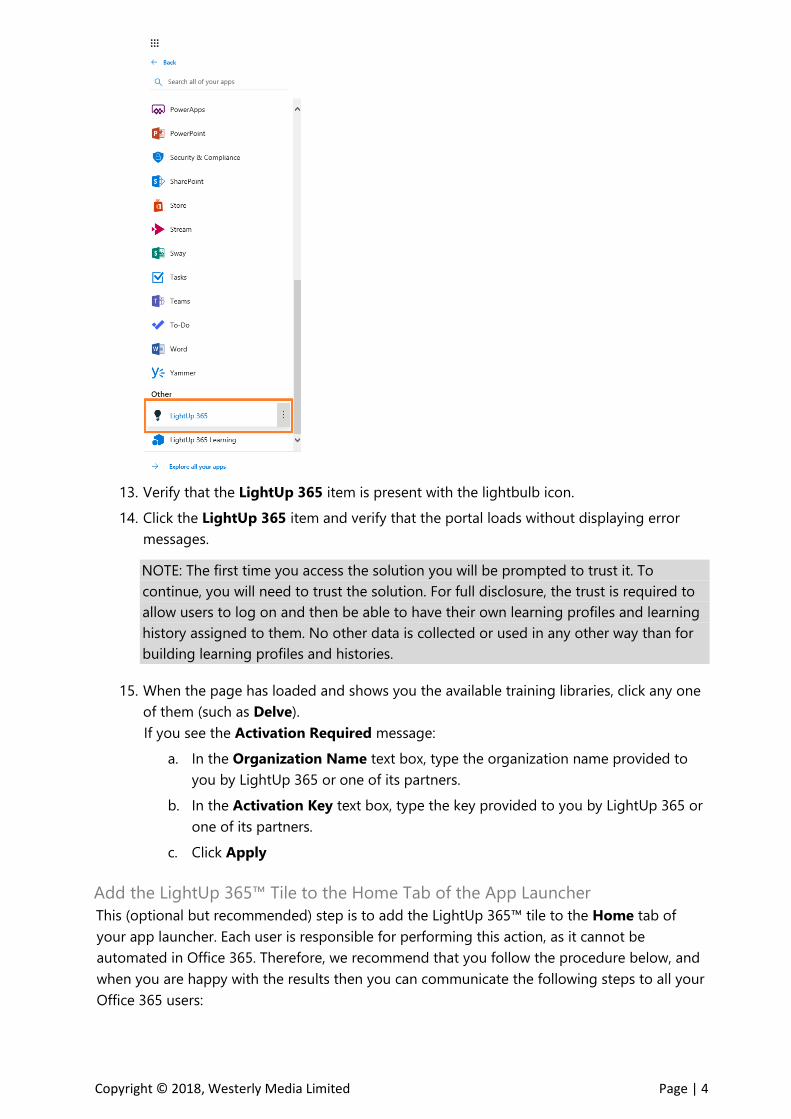
12. On the App Launcher, click the All Apps link and then scroll down to the Other group,
as shown below:
Page 4
Copyright © 2018, Westerly Media Limited Page | 4
13. Verify that the LightUp 365 item is present with the lightbulb icon.
14. Click the LightUp 365 item and verify that the portal loads without displaying error
messages.
NOTE: The first time you access the solution you will be prompted to trust it. To
continue, you will need to trust the solution. For full disclosure, the trust is required to
allow users to log on and then be able to have their own learning profiles and learning
history assigned to them. No other data is collected or used in any other way than for
building learning profiles and histories.
15. When the page has loaded and shows you the available training libraries, click any one
of them (such as Delve).
If you see the Activation Required message:
a. In the Organization Name text box, type the organization name provided to
you by LightUp 365 or one of its partners.
b. In the Activation Key text box, type the key provided to you by LightUp 365 or
one of its partners.
c. Click Apply
Add the LightUp 365™ Tile to the Home Tab of the App Launcher
This (optional but recommended) step is to add the LightUp 365™ tile to the Home tab of
your app launcher. Each user is responsible for performing this action, as it cannot be
automated in Office 365. Therefore, we recommend that you follow the procedure below, and
when you are happy with the results then you can communicate the following steps to all your
Office 365 users:
Page 5
Copyright © 2018, Westerly Media Limited Page | 5
1. Browse to https://portal.office.com/home
2. Log in with your usual Office 365 credentials.
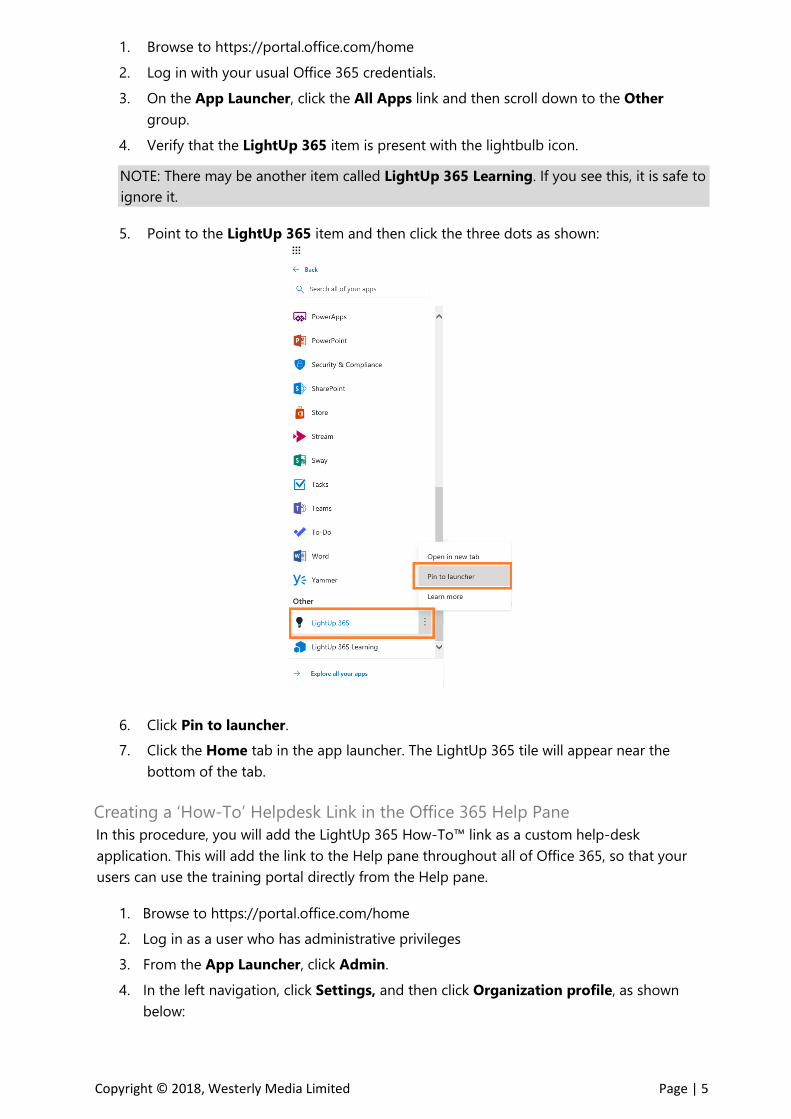
3. On the App Launcher, click the All Apps link and then scroll down to the Other
group.
4. Verify that the LightUp 365 item is present with the lightbulb icon.
NOTE: There may be another item called LightUp 365 Learning. If you see this, it is safe to
ignore it.
5. Point to the LightUp 365 item and then click the three dots as shown:
6. Click Pin to launcher.
7. Click the Home tab in the app launcher. The LightUp 365 tile will appear near the
bottom of the tab.
Creating a ‘How-To’ Helpdesk Link in the Office 365 Help Pane
In this procedure, you will add the LightUp 365 How-To™ link as a custom help-desk
application. This will add the link to the Help pane throughout all of Office 365, so that your
users can use the training portal directly from the Help pane.
1. Browse to https://portal.office.com/home
2. Log in as a user who has administrative privileges
3. From the App Launcher, click Admin.
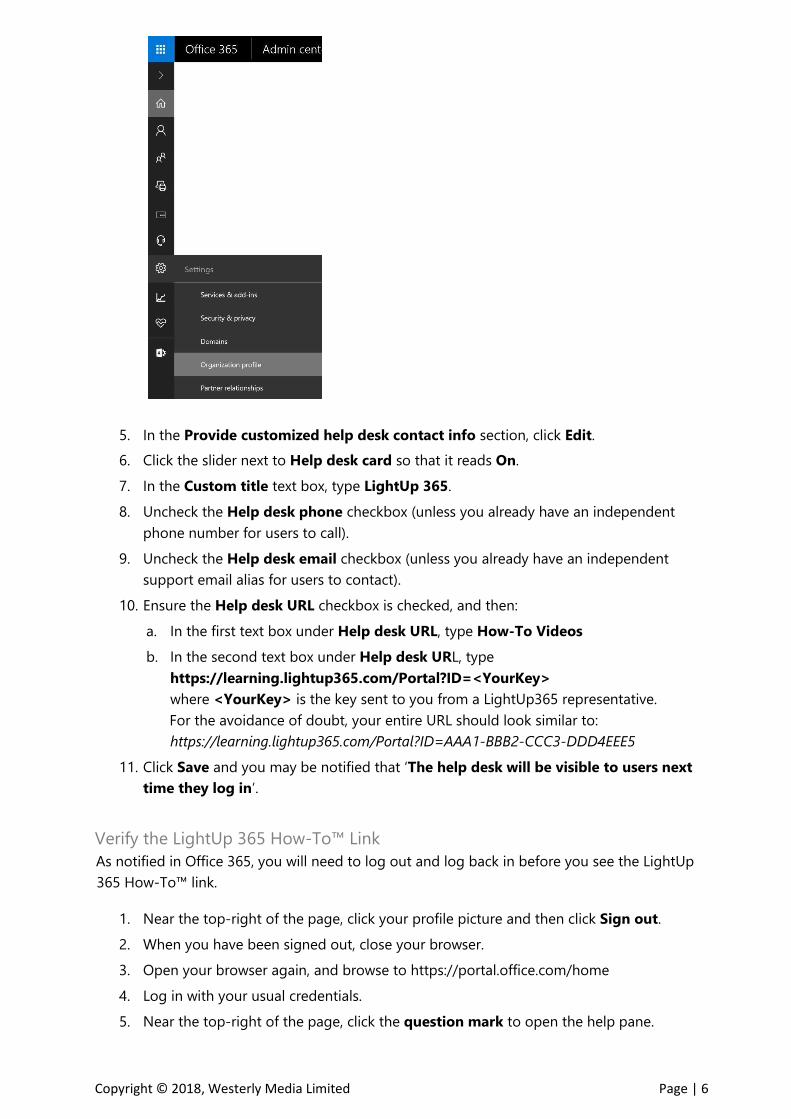
4. In the left navigation, click Settings, and then click Organization profile, as shown
below:
Page 6
Copyright © 2018, Westerly Media Limited Page | 6
5. In the Provide customized help desk contact info section, click Edit.
6. Click the slider next to Help desk card so that it reads On.
7. In the Custom title text box, type LightUp 365.
8. Uncheck the Help desk phone checkbox (unless you already have an independent
phone number for users to call).
9. Uncheck the Help desk email checkbox (unless you already have an independent
support email alias for users to contact).
10. Ensure the Help desk URL checkbox is checked, and then:
a. In the first text box under Help desk URL, type How-To Videos
b. In the second text box under Help desk URL, type
https://learning.lightup365.com/Portal?ID=<YourKey>
where <YourKey> is the key sent to you from a LightUp365 representative.
For the avoidance of doubt, your entire URL should look similar to:
https://learning.lightup365.com/Portal?ID=AAA1-BBB2-CCC3-DDD4EEE5
11. Click Save and you may be notified that ‘The help desk will be visible to users next
time they log in’.
Verify the LightUp 365 How-To™ Link
As notified in Office 365, you will need to log out and log back in before you see the LightUp
365 How-To™ link.
1. Near the top-right of the page, click your profile picture and then click Sign out.
2. When you have been signed out, close your browser.
3. Open your browser again, and browse to https://portal.office.com/home
4. Log in with your usual credentials.
5. Near the top-right of the page, click the question mark to open the help pane.
Page 7
Copyright © 2018, Westerly Media Limited Page | 7
6. Verify that the LightUp 365 section is present, and that it contains the How-To Videos
link.
7. Click the How-To Videos link and verify that the Training Portal page loads without
displaying error messages.
8. Leave the Training Portal page open – you will use it in the next procedure.
Page 8
Copyright © 2018, Westerly Media Limited Page | 8
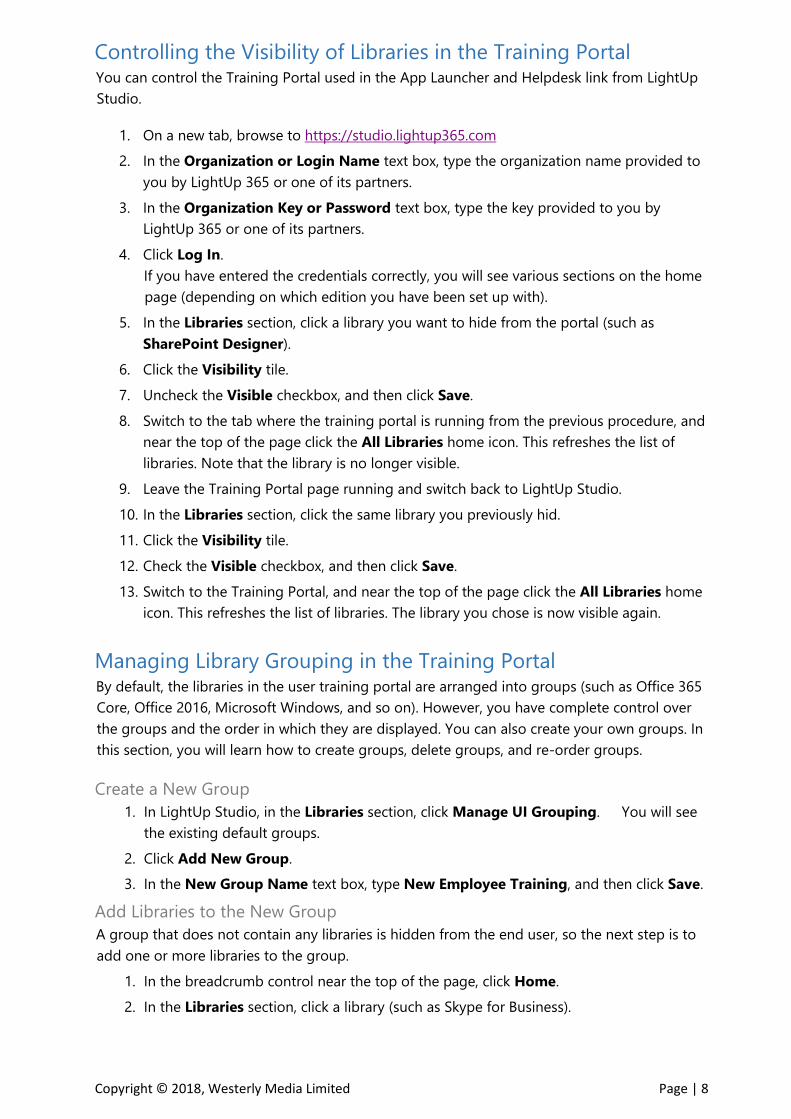
Controlling the Visibility of Libraries in the Training Portal You can control the Training Portal used in the App Launcher and Helpdesk link from LightUp
Studio.
1. On a new tab, browse to https://studio.lightup365.com
2. In the Organization or Login Name text box, type the organization name provided to
you by LightUp 365 or one of its partners.
3. In the Organization Key or Password text box, type the key provided to you by
LightUp 365 or one of its partners.
4. Click Log In.
If you have entered the credentials correctly, you will see various sections on the home
page (depending on which edition you have been set up with).
5. In the Libraries section, click a library you want to hide from the portal (such as
SharePoint Designer).
6. Click the Visibility tile.
7. Uncheck the Visible checkbox, and then click Save.
8. Switch to the tab where the training portal is running from the previous procedure, and
near the top of the page click the All Libraries home icon. This refreshes the list of
libraries. Note that the library is no longer visible.
9. Leave the Training Portal page running and switch back to LightUp Studio.
10. In the Libraries section, click the same library you previously hid.
11. Click the Visibility tile.
12. Check the Visible checkbox, and then click Save.
13. Switch to the Training Portal, and near the top of the page click the All Libraries home
icon. This refreshes the list of libraries. The library you chose is now visible again.
Managing Library Grouping in the Training Portal By default, the libraries in the user training portal are arranged into groups (such as Office 365
Core, Office 2016, Microsoft Windows, and so on). However, you have complete control over
the groups and the order in which they are displayed. You can also create your own groups. In
this section, you will learn how to create groups, delete groups, and re-order groups.
Create a New Group
1. In LightUp Studio, in the Libraries section, click Manage UI Grouping. You will see
the existing default groups.
2. Click Add New Group.
3. In the New Group Name text box, type New Employee Training, and then click Save.
Add Libraries to the New Group
A group that does not contain any libraries is hidden from the end user, so the next step is to
add one or more libraries to the group.
1. In the breadcrumb control near the top of the page, click Home.
2. In the Libraries section, click a library (such as Skype for Business).
Page 9
Copyright © 2018, Westerly Media Limited Page | 9
4. Click the Visibility tile.
5. In the Library Group section, select New Employee Training from the dropdown list,
and then click Save.
6. Switch to the Training Portal, and near the top of the page click the All Libraries home
icon. This refreshes the list of libraries. The new group is now visible and contains the
library you just added to it.
Reorder Groups
1. In the breadcrumb control near the top of the page, click Home.
2. Click Manage UI Grouping.
3. Click Manage Group Order.
4. Select the New Employee Training item and then click the upwards point arrow two
times.
5. Click Save.
You will see that the new group has moved up two places in LightUp Studio.
6. Switch to the Training Portal, and near the top of the page click the All Libraries home
icon. This refreshes the list of libraries.
The new group has also been moved up in the end user portal.
Rename Groups
1. Switch back to LightUp Studio.
2. In the breadcrumb control near the top of the page, click Home.
3. Click Manage UI Grouping.
4. Click the pen icon to the left of the New Employee Training item.
5. In the Group Name text box, change the text so that it reads New Employees and
then click Save.
6. Switch to the Training Portal, and near the top of the page click the All Libraries home
icon. You will see that the group has been renamed.
Delete Groups
You can only delete a group if it does not contain any libraries, so the first step is to remove
the library you added to the new group.
1. Switch back to LightUp Studio.
2. In the breadcrumb control near the top of the page, click Home.
3. In the Libraries section, click the library that you added to the New Employees group.
4. Click the Visibility tile.
5. In the Library Group section, select Office 2016 from the dropdown list, and then click
Save.
6. In the breadcrumb control near the top of the page, click Home.
7. Click Manage UI Grouping.
8. Click the trashcan icon to the right of the New Employees item.
9. Click Yes.
The group is now deleted.
Page 10
Copyright © 2018, Westerly Media Limited Page | 10
Library Administration
To Create a Library
1. Switch to LightUp Studio, and in the breadcrumb control click Home.
2. In the Libraries section, click Add New Library.
3. In the Library Name text box, type Onboarding (or any other name you want).
4. Optionally, in the Description text box type a description (such as Training for New
Employees).
5. In the Group dropdown list, select a group where you want the new library to appear in
the end user training portal.
6. Click Save.
The new library is now included in the Libraries section.
7. Switch to the Training Portal, and near the top of the page click the All Libraries home
icon. You will see that the new library is visible.
To Edit a Library
1. In the Libraries section, click Onboarding (or whatever you called your new library in
the previous procedure).
2. Click Edit.
3. Make any changes you want to for the Library Name or Description, and then click
Save.
4. In the breadcrumb control, click Home.
To Delete a Library
NOTE: You can only delete libraries that you have created.
1. In the Libraries section, click Onboarding (or whatever you called your new library).
2. Click the Delete tile.
3. Read the message, but in this case click No.
You will continue to work with the library in further procedures.
Page 11
Copyright © 2018, Westerly Media Limited Page | 11
Video Administration
To Edit Video Metadata
1. In the Libraries section, click SharePoint Sites (or any other library).
2. Click the Asset Bin tile.
3. Click the Edit icon to the left of any video.
4. Review the options available to you.
Note: Search Tags can be used to add additional tags, although the entire contents of
the Transcript text box is also used in search. The difference between the two is that the
text in the Transcript text box is also displayed when the user clicks the Transcript
button while they are watching a video.
5. In the breadcrumb control, click Home.
To Upload New Videos
1. In the Libraries section, click Onboarding (or whatever you called your new library).
2. Click Asset Bin.
3. Click Add your own content.
4. In the Add a new asset section, click Upload.
5. Browse to a video file that you want to upload, and select it.
NOTE: MP4 formats or other HTML5-compliant videos are the best formats to work
with.
6. Click Open.
7. Click Save, and wait until the video has been uploaded.
8. Click the Edit icon to the left of your new video.
9. Edit the Friendly Name text box, and then click Save.
10. In the breadcrumb control, click Home
To Link to Existing Videos
1. In the Libraries section, click Onboarding (or whatever you called your new library).
2. Click Asset Bin.
3. Click Add your own content.
4. In the Add a new asset section, click Link.
5. In the Friendly Name text box, type a name.
6. In the URL text box, type the URL to a video that is accessible in a Web browser. For
example, the video may be in a SharePoint document library or similar location.
7. Click Save.
NOTE: If you plan on sharing a video as part of a learning campaign, you should
consider using the Upload approach rather than this Link method. Otherwise, the
video may not be accessible to all users.
Page 12
Copyright © 2018, Westerly Media Limited Page | 12
To Embed Videos from External Systems
In this procedure, you will use a YouTube video as an example but you can use any other
system that supports embed codes.
1. In a new browser tab or window, browse to http://www.youtube.com
2. Search for a suitable training video for Office 365.
3. Beneath the video, click Share.
4. Click Embed.
5. Press CTRL+C to copy the embed code to the clipboard.
6. Switch back to LightUp Studio.
7. In the Libraries section, click Onboarding (or whatever you called your new library).
8. Click Asset Bin.
9. Click Add your own content.
10. In the Add a new asset section, click Embed.
11. In the Friendly Name text box, type a name.
12. In the Embed Data text box, paste the embed code that you copied from YouTube.
13. Click Save.
NOTE: If you plan on sharing an embedded video as part of a learning campaign, you
should ensure the source system is accessible. For example, YouTube will work fine, but
if your system is an internal-only solution it may be better to use the Upload approach
rather than this Embed method.
Page 13
Copyright © 2018, Westerly Media Limited Page | 13
Learning Path Administration Learning paths are a collection of videos that you want your users to learn from together.
LightUp Studio already includes many different learning paths, most of them organized to
teach users how to perform related tasks in Office 365.
You can create your own learning paths, and you can even modify the ones included in
LightUp Studio.
To Create a Learning Path
1. In the Libraries section, click SharePoint Sites (or any other library).
2. Click the Learning Paths tile.
3. Click Add Learning Path.
4. In the Learning Path name text box, type A Quick Primer 5. In the Description text
box, type A few simple 'how-to' videos
6. Click Save.
7. In the right-hand pane, check the checkboxes for at least four videos.
8. Click the left pointing arrow to move the selected videos to the left-hand pane.
9. Click Save.
You now have a new learning path that will be visible when users browse a library. You can
also use the learning path in a campaign, as described previously in this evaluation guide.
To Edit a Learning Path
1. Click the Edit icon to the left of your new learning path.
2. Check the checkbox for the final video in the learning path, and then click the right-
pointing arrow to remove it from the left-hand pane.
3. Check the checkbox for the first video in the left-hand pane, and then click the
downward pointing arrow to move the selected video down the list.
4. Click Save.
Changes to learning paths are reflected immediately to end users.
To Use Content Channeling in a Learning Path
1. Click the Edit icon to the left of your new learning path.
2. In the right-hand pane, in the Source Library dropdown list, select a different library.
The video list in the right-hand pane is updated.
3. In the right-hand pane, check the checkboxes for a few videos.
4. Click the left pointing arrow to move the selected videos to the left-hand pane.
5. Click Save.
Note: You can channel content from any library to any other this way, even for libraries
that you may have created. This enables you to build specific learning paths for
different groups of users who may require tailored training depending on their roles.
Page 14
Copyright © 2018, Westerly Media Limited Page | 14
To Delete a Learning Path
Note: You can only delete Learning Paths that you have created.
1. Click the Delete icon to the right of your new learning path.
2. When prompted, click Yes.
NOTE: Only the definition of the learning path is deleted. The assets that may have
been contained in the learning path still remain in the asset bins of their respective
libraries.
To Hide a Learning Path
1. In the breadcrumb control click Home.
2. In the Libraries section, click SharePoint Sites.
3. Click Learning Paths.
4. Click My Sites.
5. Uncheck the Visible checkbox.
6. Click Save.
Note: The only effect of hiding a learning path is that it is not visible when a user is
browsing a library.
To Unhide a Learning Path
1. In the breadcrumb control click Home.
2. In the Libraries section, click SharePoint Sites.
3. Click Learning Paths.
4. Click My Sites.
5. Check the Visible checkbox.
6. Click Save.
To Reorder Learning Paths
1. In the breadcrumb control click Home.
2. In the Libraries section, click SharePoint Sites.
3. Click Learning Paths.
4. Click Reorder Learning Paths.
5. Select the All New SharePoint Experience item.
6. Click the downward-pointing arrow three times, and then click Save.
Page 15
Copyright © 2018, Westerly Media Limited Page | 15
Creating Learning Campaigns Learning campaigns are a way to drive usage of Office 365 by communicating training to your
users, even if they are not yet using Office 365. In effect, you can encourage users to learn and
then practice specific actions by surfacing learning campaigns to them via email, social
networks, or any other external system you choose.
To Create a Learning Campaign Based on an Entire Library
1. Switch to LightUp Studio, and in the breadcrumb control click Home.
2. In the Libraries section, click a library tile of your choice.
3. Click the Integration tile.
4. In the Public Sharing section, next to the URL click the Copy button. You may be
prompted to allow access to the clipboard.
5. You can now email the link you have copied, or include it in a Yammer post (or even a
tweet).
6. To test the link, open a new tab or browser window, and paste it into the address bar.
NOTE: You may need to provide your Office 365 credentials and you may be prompted
to trust the application if you haven’t already done so.
To Create a Learning Campaign Based on a Learning Path
1. Switch to LightUp Studio, and in the breadcrumb control click Home.
2. In the Libraries section, click a library tile of your choice (such as SharePoint Sites).
3. Click the Learning Paths tile.
4. Locate a learning path of your choice, and near the right side of the page click the
Integration Points icon.
5. In the Public Sharing section, next to the URL click the Copy button. You may be
prompted to allow access to the clipboard.
6. You can now email the link you have copied, or include it in a Yammer post (or even a
tweet).
7. To test the link, open a new tab or browser window, and paste it into the address bar.
To Create a Learning Campaign Based on an Individual Video
1. Switch to LightUp Studio, and in the breadcrumb control click Home.
2. In the Libraries section, click a library tile of your choice (such as Sites).
3. Click the Asset Bin tile.
4. Locate a video of your choice, and near the right side of the page click the Integration
Points icon.
5. In the Public Sharing section, next to the URL click the Copy button. You may be
prompted to allow access to the clipboard.
6. You can now email the link you have copied, or include it in a Yammer post (or even a
tweet).
7. To test the link, open a new tab or browser window, and paste it into the address bar.
Page 16
Copyright © 2018, Westerly Media Limited Page | 16
Tracking & Analysis In brief, every single view of every single video by every single user is tracked. This data
provides the basis for our rich analytics and reporting features. It's unlikely that you will have
generated much data so far if you are evaluating the product, but do feel free to explore the
analysis features. Out of interest, the most commonly-run reports are:
1. User Tracking Analysis. A full log of each user and the videos they have watched is
analyzed. The data for each user can be viewed as a timeline or as a list.
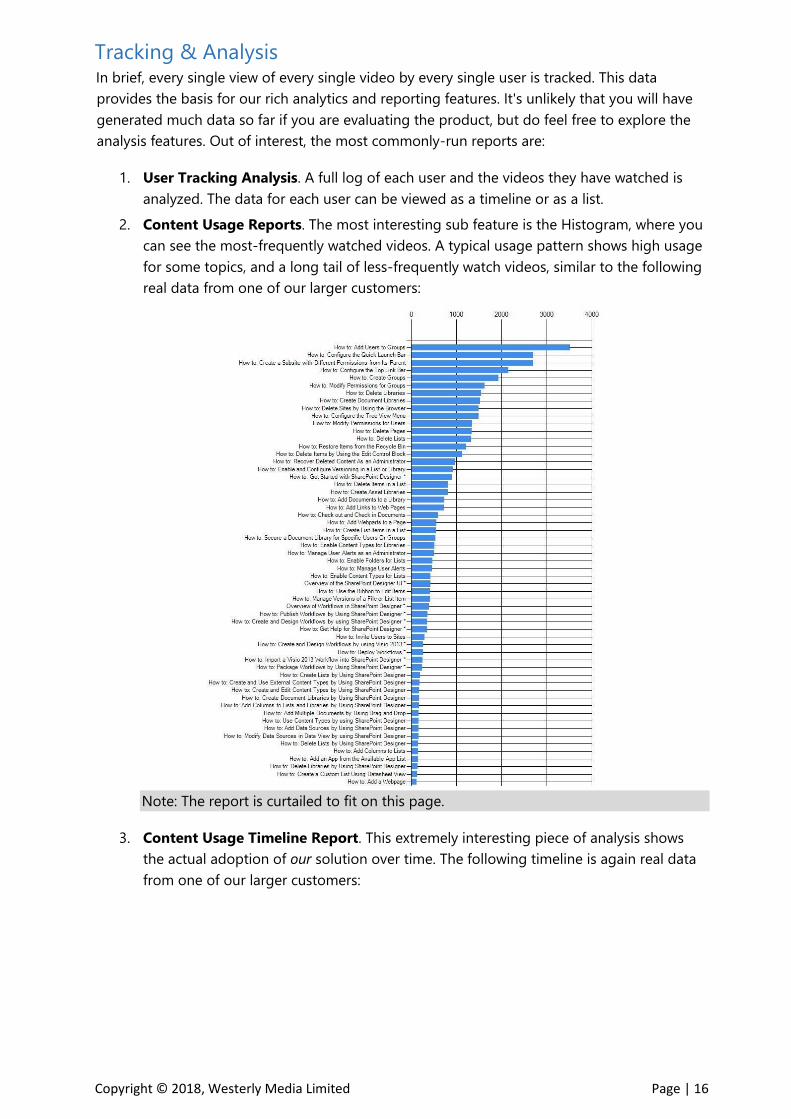
2. Content Usage Reports. The most interesting sub feature is the Histogram, where you
can see the most-frequently watched videos. A typical usage pattern shows high usage
for some topics, and a long tail of less-frequently watch videos, similar to the following
real data from one of our larger customers:
Note: The report is curtailed to fit on this page.
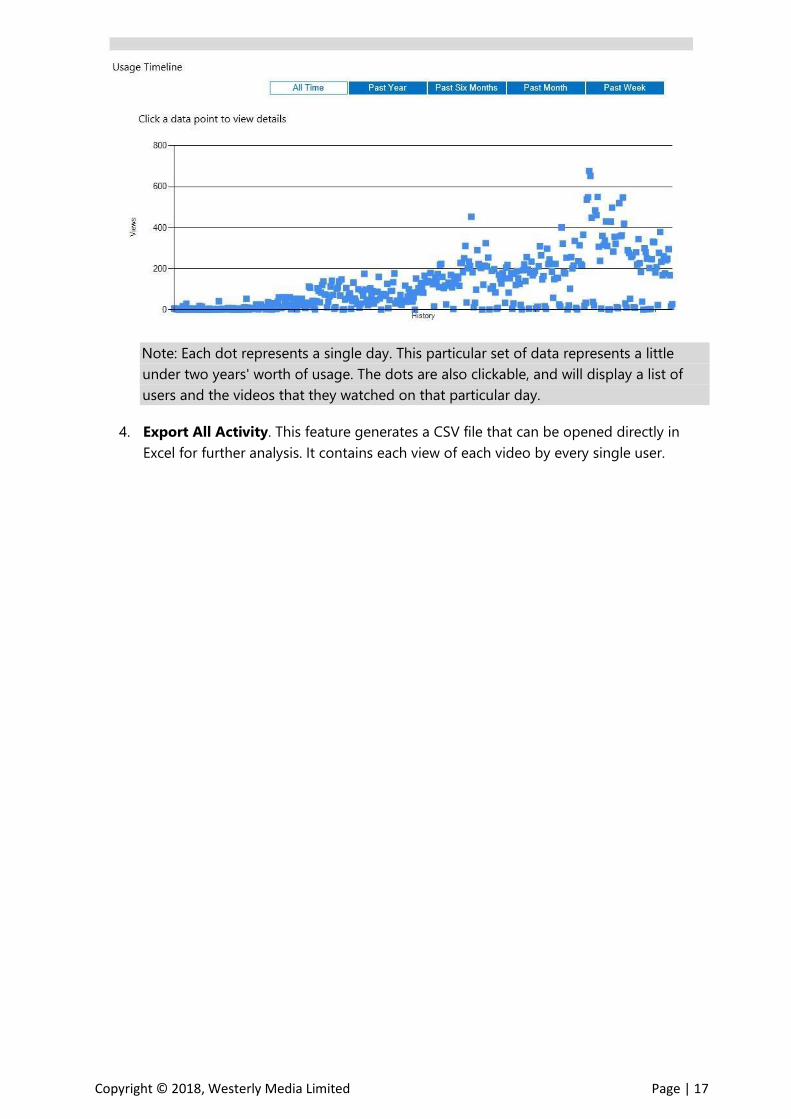
3. Content Usage Timeline Report. This extremely interesting piece of analysis shows
the actual adoption of our solution over time. The following timeline is again real data
from one of our larger customers:
Page 17
Copyright © 2018, Westerly Media Limited Page | 17
Note: Each dot represents a single day. This particular set of data represents a little
under two years' worth of usage. The dots are also clickable, and will display a list of
users and the videos that they watched on that particular day.
4. Export All Activity. This feature generates a CSV file that can be opened directly in
Excel for further analysis. It contains each view of each video by every single user.
Page 18
Copyright © 2018, Westerly Media Limited Page | 18
Branding You can brand the external page that is used in learning campaigns, and the external Training
Portal page that is used in custom App Launcher tiles and Helpdesk links.
To Apply Your Own Branding for the End User Experience
1. Switch to the training portal.
2. Near the top-right of the page, click the menu, and then click About. The default
branding is displayed. It includes:
a. A company name.
b. A logo, which is also a link to an external Web site.
c. A tagline.
d. Subtext.
e. An image to the left of the page that consists of a wall of light glass windows.
All of these items are customizable.
3. Switch back to LightUp Studio and in the breadcrumb control click Home.
4. Scroll down until you can see the Branding section.
5. In the Company Name text box, type your company name.
6. In the Logo Link text box, type a URL to your company Web site. NOTE: You must
include http:// or https:// for this URL.
7. In the Tag Line text box, type a few words that you want to use as a tag line. Hint: The
default tag line is Light Up The Cloud — Drive adoption & usage for Office 365
8. In the Subtext text box, type a few words you want to use a subtext.
Hint: The default subtext is The best 'Just-in-Time Learning' for Office 365 users
9. Click Save before continuing.
10. Click the ellipsis button to the right of the Logo Image text box.
11. Click Browse and then locate a logo image with the approximate dimensions indicated.
Then click Save.
12. If you have an image that you would like to use in place of the light glass windows
image, click the ellipsis button to the right of the Spotlight Image text box.
13. Click Browse and then locate an image with the approximate dimensions indicated.
Then click Save.
14. Switch back to the training portal, and refresh the page.
15. Near the top-right of the page, click the menu, and then click About.
Your custom branding is displayed.
To Apply Color Schemes
1. Switch back to LightUp Studio, and scroll down to the Branding section.
2. In the Pick a Portal Color Scheme section, click a different scheme to the one that is
already selected.
3. Switch back to the training portal, and refresh the page. The color scheme has been
applied.
Page 19
Copyright © 2018, Westerly Media Limited Page | 19
To Apply Custom Office 365 Links and Help Desk Links
The Branding section in LightUp 365 enables you to provide a further link to a help desk or
support system if your organization has one. It also enables you to provide a custom URL for
your Office 365 landing page. To apply either of these links, you simply need to enter them in
the appropriate text boxes in the Branding section.
NOTE: For either of these URLs, you must include http:// or https:// in the URLs.
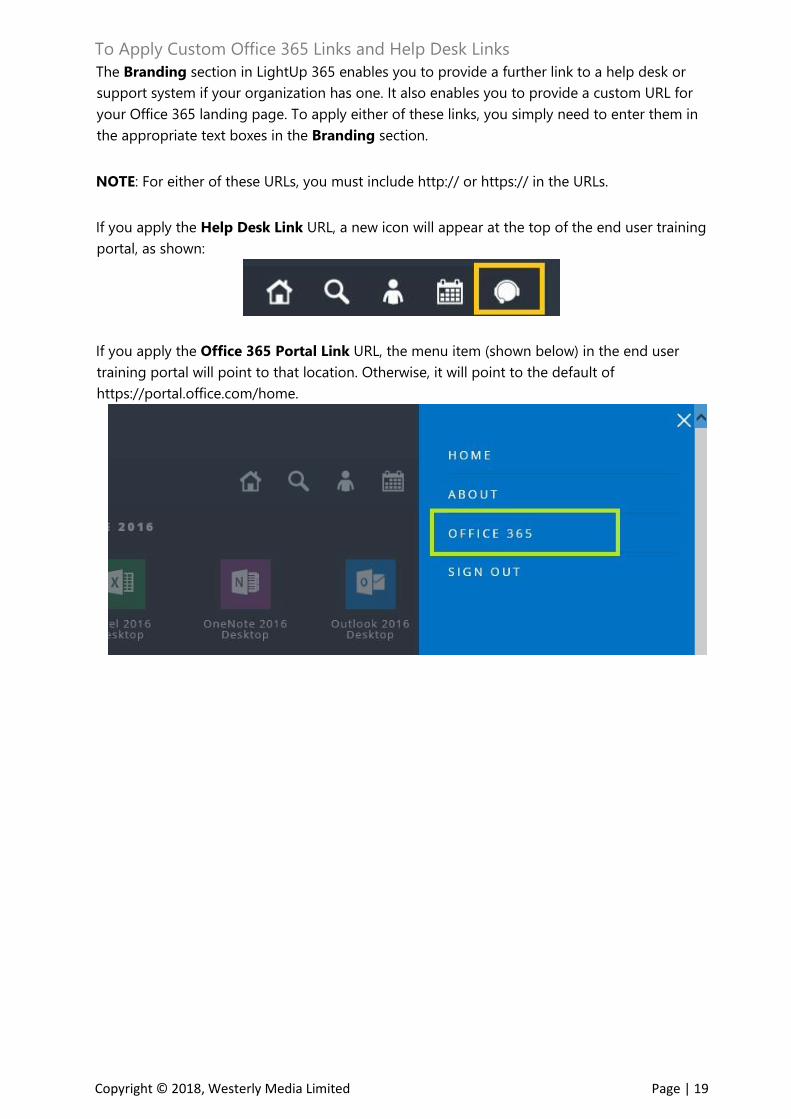
If you apply the Help Desk Link URL, a new icon will appear at the top of the end user training
portal, as shown:
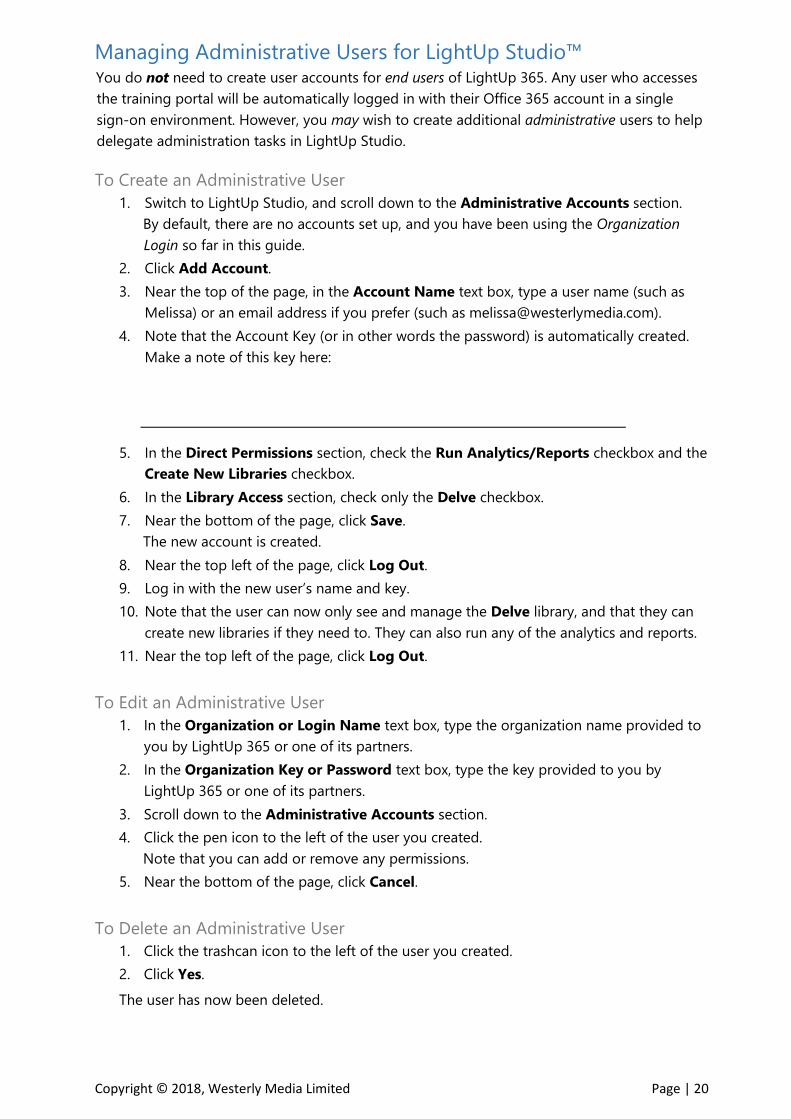
If you apply the Office 365 Portal Link URL, the menu item (shown below) in the end user
training portal will point to that location. Otherwise, it will point to the default of
https://portal.office.com/home.
Page 20
Copyright © 2018, Westerly Media Limited Page | 20
Managing Administrative Users for LightUp Studio™ You do not need to create user accounts for end users of LightUp 365. Any user who accesses
the training portal will be automatically logged in with their Office 365 account in a single
sign-on environment. However, you may wish to create additional administrative users to help
delegate administration tasks in LightUp Studio.
To Create an Administrative User
1. Switch to LightUp Studio, and scroll down to the Administrative Accounts section.
By default, there are no accounts set up, and you have been using the Organization
Login so far in this guide.
2. Click Add Account.
3. Near the top of the page, in the Account Name text box, type a user name (such as
Melissa) or an email address if you prefer (such as [email protected] ).
4. Note that the Account Key (or in other words the password) is automatically created.
Make a note of this key here:
5. In the Direct Permissions section, check the Run Analytics/Reports checkbox and the
Create New Libraries checkbox.
6. In the Library Access section, check only the Delve checkbox.
7. Near the bottom of the page, click Save.
The new account is created.
8. Near the top left of the page, click Log Out.
9. Log in with the new user’s name and key.
10. Note that the user can now only see and manage the Delve library, and that they can
create new libraries if they need to. They can also run any of the analytics and reports.
11. Near the top left of the page, click Log Out.
To Edit an Administrative User
1. In the Organization or Login Name text box, type the organization name provided to
you by LightUp 365 or one of its partners.
2. In the Organization Key or Password text box, type the key provided to you by
LightUp 365 or one of its partners.
3. Scroll down to the Administrative Accounts section.
4. Click the pen icon to the left of the user you created.
Note that you can add or remove any permissions.
5. Near the bottom of the page, click Cancel.
To Delete an Administrative User
1. Click the trashcan icon to the left of the user you created.
2. Click Yes.
The user has now been deleted.
Page 21
Copyright © 2018, Westerly Media Limited Page | 21
Building a Learning Center with LightUp Studio™ If you have SharePoint sites as part of your Office 365 subscription, we recommend that you
create a full learning center. This should take you much less than an hour to create an
extremely comprehensive experience for your users, so it is well worth the effort. The first step
you will need to perform is to log into LightUp Studio™
To Create a Learning Page in a SharePoint Site
1. In LightUp Studio™, in the Libraries section, click the SharePoint Sites tile.
2. Click the Integration tile.
3. In the Embed in a SharePoint Learning Center section, click Embedded Application.
A client-side dialog appears.
4. Click into the large text box, and then press CTRL+A to select the entire contents of the
box.
5. Press CTRL+C to copy the text to the clipboard, and then close the clientside dialog.
6. In a new tab or browser window, log into and navigate to a SharePoint site where you
want to build a learning center.
7. On the Settings menu, click Site contents.
8. Near the bottom of the page, in the Contents list, click Site Pages.
9. Click New. If you are using the modern-style SharePoint UI, then also click Wiki Page.
10. Type a name for the page, such as SharePointTraining.
11. Click Create.
A new blank page is created and shown in edit mode.
12. On the ribbon, click the Insert tab.
13. On the ribbon, click Embed Code.
14. Ensure the cursor is in the large text box, and then press CTRL+V to paste the code you
previously copied.
15. Click Insert.
16. On the ribbon, click Save.
17. Make a note of the page URL in the table on the following page. You will need it later
in this exercise.
Page 22
Copyright © 2018, Westerly Media Limited Page | 22
Page URL:
Page URL:
Page URL:
Page URL:
Page URL:
Page URL:
Page URL:
Page URL:
Page URL:
Page URL:
Page URL:
Page URL:
Page URL:
Page URL:
Page URL:
Page URL:
Page URL:
Page URL:
Page 23
Copyright © 2018, Westerly Media Limited Page | 23
To Activate your Subscription
If you see the Activation Required message, follow the steps below. If you don’t see the
message, then you can continue with the procedure called To Create
Additional Learning Pages in the SharePoint Site)
1. In the Organization Name text box, type the organization name provided to you by
LightUp 365 or one of its partners.
2. In the Activation Key text box, type the key provided to you by LightUp 365 or one of
its partners.
NOTE: These are the same details that you used to log into LightUp Studio™
3. Click Apply.
If activation is successful you will simply see a list of Learning Paths for the Sites library.
Otherwise you will be presented with an appropriate error message.
To Create Additional Learning Pages in the SharePoint Site
1. Repeat the steps in the procedure named To Create a Learning Page in a SharePoint
Site for any other libraries that you want to include in your learning center.
2. Ensure you make a note of each page URL in the table on the previous page
To Create a Learning Center UI
1. In your SharePoint site, click the Settings menu and click Add an app.
2. Near the top of the page, in the Find an app text box type Promoted and then press
[Enter].
3. In the search results, click Promoted Links.
4. In the dialog, in the Name box, type Office 365 Learning Center.
5. Click Create.
6. In the Lists, Libraries, and other Apps section, click the new Office 365 Learning
Center.
7. Click All Promoted Links.
8. Click new item.
9. In the Title textbox, type SharePoint
10. Leave the SharePoint page open and switch to LightUp Studio (in a different tab or
browser window).
11. Near the top of the page, in the breadcrumb control click Home.
12. In the Resources section, click Image Resources.
13. Select the URL in the text box next to the SharePoint logo, and then press CTRL+C to
copy it to the clipboard.
14. Switch back to your SharePoint site.
15. In the Background Image Location text box, press CTRL+V to paste the URL.
16. In the Type the description text box, type Help and Training for SharePoint
17. In the Description text box, type Help and Training for SharePoint
Page 24
Copyright © 2018, Westerly Media Limited Page | 24
18. In the Link Location text box, enter the Page URL for the appropriate page you noted
in the table on page 3.
19. In the Type the description text box, type Help and Training for SharePoint
20. In the Launch Behavior dropdown list, select In page navigation.
21. In the Order text box, type 1
22. Click Save.
23. Repeat steps 8 through 22 to include additional links to each of pages you noted in the
table on page 22.
NOTE: Use the appropriate image URL from LightUp Studio, and use appropriate
descriptions for each link that you add. Also, increment the number you type in the
Order text box each time.
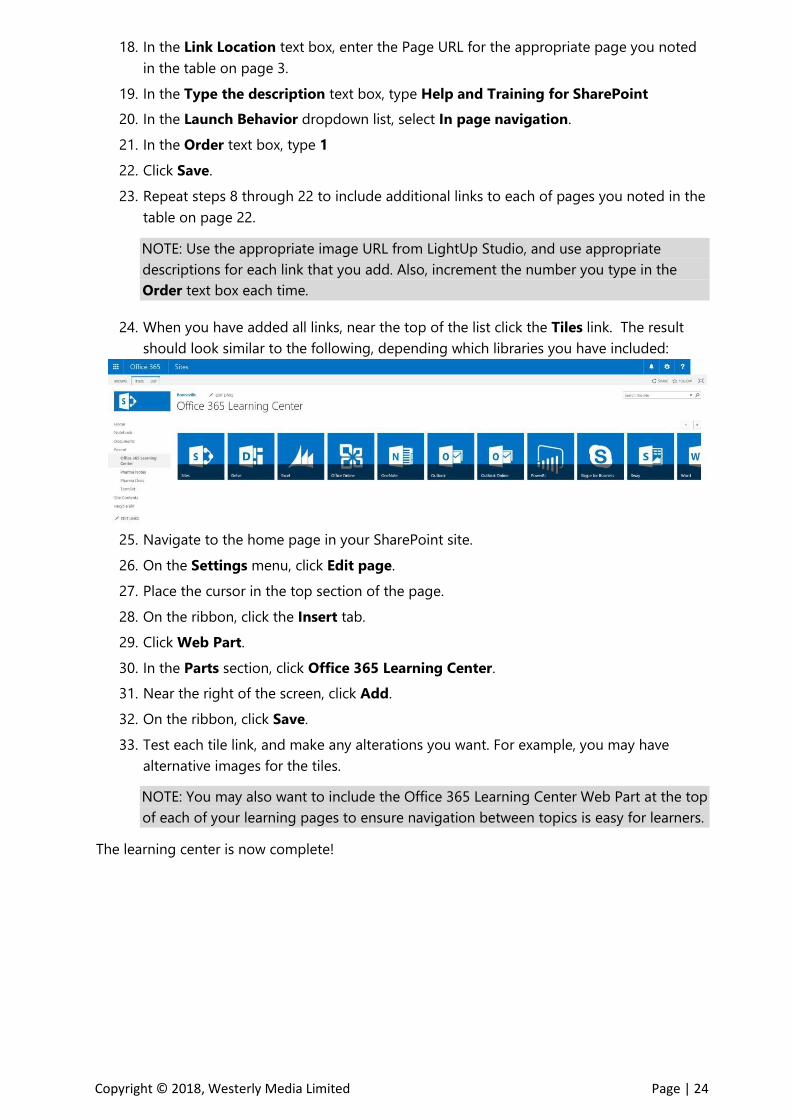
24. When you have added all links, near the top of the list click the Tiles link. The result
should look similar to the following, depending which libraries you have included:
25. Navigate to the home page in your SharePoint site.
26. On the Settings menu, click Edit page.
27. Place the cursor in the top section of the page.
28. On the ribbon, click the Insert tab.
29. Click Web Part.
30. In the Parts section, click Office 365 Learning Center.
31. Near the right of the screen, click Add.
32. On the ribbon, click Save.
33. Test each tile link, and make any alterations you want. For example, you may have
alternative images for the tiles.
NOTE: You may also want to include the Office 365 Learning Center Web Part at the top
of each of your learning pages to ensure navigation between topics is easy for learners.
The learning center is now complete!
Page 25
Copyright © 2018, Westerly Media Limited Page | 25
Feedback and Support We are always interested in feedback on the quality of documents and solutions that we
produce. If you have any comments or need assistance in any way please contact
[email protected] . Thank you!