LiNC-NXG for Windows 8 Professional, Windows 7 Professional, Vista Business Edition and XP Professional Installation Guide for LiNC-NXG 33-10067-001 REV: C PCSC 3541 Challenger Street Torrance, CA 90503 Phone: (310) 303-3600 FAX: (310) 303-3600 www.1pcsc.com
Transcript
LiNC-NXG for Windows 8 Professional, Windows 7 Professional, Vista Business Edition and XP Professional Installation Guide for LiNC-NXG 33-10067-001 REV: C PCSC 3541 Challenger Street Torrance, CA 90503 Phone: (310) 303-3600 FAX: (310) 303-3600 www.1pcsc.com
Page ii of 102 LiNC-NXG for Windows 8 Pro, 7 Pro, Vista Business and XP Pro Install Manual 33-10067-001-C
Page iii of 102 LiNC-NXG for Windows 8 Pro, 7 Pro, Vista Business and XP Pro Install Manual 33-10067-001-C
0.2 Table of Contents
0.2 Table of Contents ........................................................................................... iii
1.0 Introduction .............................................................................................. 4 1.1 Installation and Setup ..................................................................................... 4
2.0 Before You Begin - Installation Requirements ..................................... 5 2.1 Software ........................................................................................................... 5 2.2 Hardware .......................................................................................................... 5
3.0 Creating a New Database ........................................................................ 6 3.1 Creating the DBRW and DBO Logins .......................................................... 12
3.1.1 Creating the DBRW Login ........................................................................ 12 3.5 Creating the DBO Login ............................................................................... 15
4.0 SQL Server Network Configuration ..................................................... 18 4.1 Assignment of TCP/IP Ports ........................................................................... 18 4.2 Enabling Named Pipes ................................................................................. 24 4.3 Restarting SQL Server Services .................................................................. 28
5.2.1 Registering via the Internet. ..................................................................... 57 5.2.2 Registering NXG without an Internet Connection. ................................... 60
5.3 Finalizing the Install with Copy Options ..................................................... 61 5.4 Upgrading LiNC-NXG .................................................................................... 64
6.2.1 Registering via the Internet. ..................................................................... 91 6.2.2 Registering NXG without an Internet Connection. ................................... 94
6.3 Finalizing the Install with Copy Options ..................................................... 95 6.4 Updating the LiNC-NXG for a New Workstation ......................................... 98
7.0 Importing a Database .......................................................................... 101
Page 4 of 102 LiNC-NXG for Windows 8 Pro, 7 Pro, Vista Business and XP Pro Install Manual 33-10067-001-C
1.0 Introduction Welcome to the LiNC-NXG for Windows 8 Professional, Windows 7 Professional, Vista Business Edition and XP Professional, the enterprise programming software from PCSC. This user-friendly, PC-based access control manager is simple to operate and provides Help screens along the way to make operation even easier. The LiNC-NXG manuals are designed to provide both written and visual instructions while installing the system in its Host or Workstation modes. LiNC-NXG operates using the Microsoft Windows 8 Professional, Windows 7 Professional, Vista Business Edition, XP Professional or Windows Server 2008R2 operating systems and uses Microsoft SQL Server 2012, SQL Server 2012 Express, SQL Server R2, and SQL Server R2 Express for its database. LiNC-NXG is compatible with both 32-bit and 64-bit processors. The host PC should be dedicated to the access control system to ensure security integrity and management efficiency. Other Windows applications should not be running concurrently with LiNC-NXG. This manual was designed to provide the information necessary to install LiNC-NXG and should be used in conjunction with the SQL Installation Guide and/or SQL (P/N 33-40006-001) Installation Guide. To obtain a complete understanding of LiNC-NXG, this manual should be used in conjunction with the LiNC-NXG for Windows 7 Professional, Vista Business Edition and XP Professional User Guide (P/N 37-10056-001). The Help menus provided on-screen will usually be sufficient to enter the proper data. This manual augments those screens and will detail certain fields, definitions, and procedures where needed. 1.1 Installation and Setup Along with the Help screens, this guide describes how to setup your system quickly and easily. After the initial system foundation has been setup, refer to the LiNC-NXG for Windows 8 Professional, Windows 7 Professional, Vista Business Edition and XP Professional User Guide. (P/N 37-10056-001) for the day-to-day operation and maintenance of your system. The User Guide provides information on entering data regarding card assignment, time periods, downloading records to the Panel(s), and door operations.
Page 5 of 102 LiNC-NXG for Windows 8 Pro, 7 Pro, Vista Business and XP Pro Install Manual 33-10067-001-C
2.0 Before You Begin - Installation Requirements 2.1 Software To install LiNC-NXG for Windows 8 Professional, Windows 7 Professional, Vista Business Edition and XP Professional, the following requirements must be met:
• Windows 8 Professional, Windows 7 Professional, Windows Vista Business Edition (SP1 or higher) or Windows XP Professional (SP3 or higher) on 32-bit or 64-bit processors must be installed on the host computer.
• User must have knowledge of mouse and keyboard use in the Windows 8 Professional, Windows 7 Professional, Windows Vista Business Edition Professional or Windows XP Professional environment.
• Microsoft SQL Server 2012, Microsoft SQL Server 2012 Express with Advanced Features, Microsoft SQL Server 2008 R2, Microsoft SQL Server 2008 R2 Express with Advanced Features
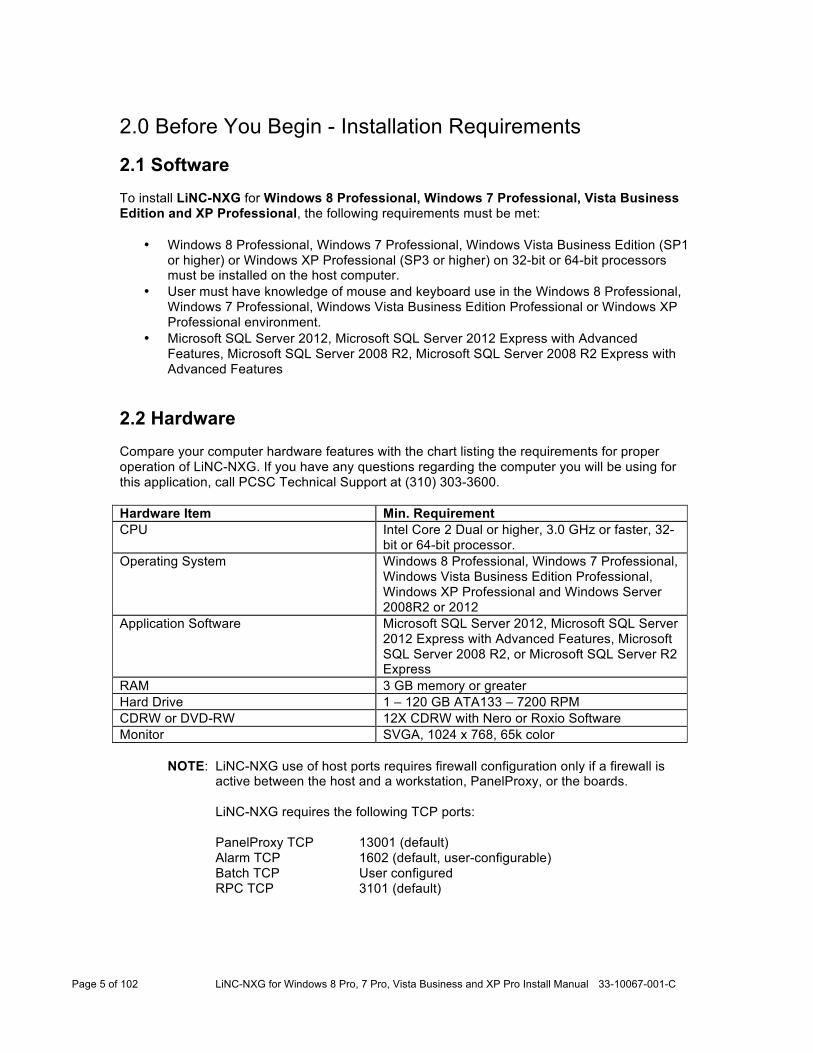
2.2 Hardware Compare your computer hardware features with the chart listing the requirements for proper operation of LiNC-NXG. If you have any questions regarding the computer you will be using for this application, call PCSC Technical Support at (310) 303-3600. Hardware Item Min. Requirement CPU Intel Core 2 Dual or higher, 3.0 GHz or faster, 32-
bit or 64-bit processor. Operating System Windows 8 Professional, Windows 7 Professional,
Windows Vista Business Edition Professional, Windows XP Professional and Windows Server 2008R2 or 2012
Application Software Microsoft SQL Server 2012, Microsoft SQL Server 2012 Express with Advanced Features, Microsoft SQL Server 2008 R2, or Microsoft SQL Server R2 Express
RAM 3 GB memory or greater Hard Drive 1 – 120 GB ATA133 – 7200 RPM CDRW or DVD-RW 12X CDRW with Nero or Roxio Software Monitor SVGA, 1024 x 768, 65k color
NOTE: LiNC-NXG use of host ports requires firewall configuration only if a firewall is active between the host and a workstation, PanelProxy, or the boards. LiNC-NXG requires the following TCP ports:
Page 6 of 102 LiNC-NXG for Windows 8 Pro, 7 Pro, Vista Business and XP Pro Install Manual 33-10067-001-C
3.0 Creating a New Database
NOTE: It is only necessary to create a new database if you want to store the data and log files in a specific location, otherwise they will be located in the default SQL folder. If you wish to skip this step, proceed to Section 3.1.
1. From the Start Menu, open the SQL Server Management Studio from the Start/ SQL
Server Management Studio (Windows 8) or Start/ All Programs/ Microsoft SQL Server/ SQL Server Management Studio (Window 7, Vista, XP).
2. The Connect to Server window will appear. If you are using Windows Authentication, press the Connect button.
NOTE: If you are using SQL Server Authentication, add in your User name and
Password, then press the Connect button.
Page 7 of 102 LiNC-NXG for Windows 8 Pro, 7 Pro, Vista Business and XP Pro Install Manual 33-10067-001-C
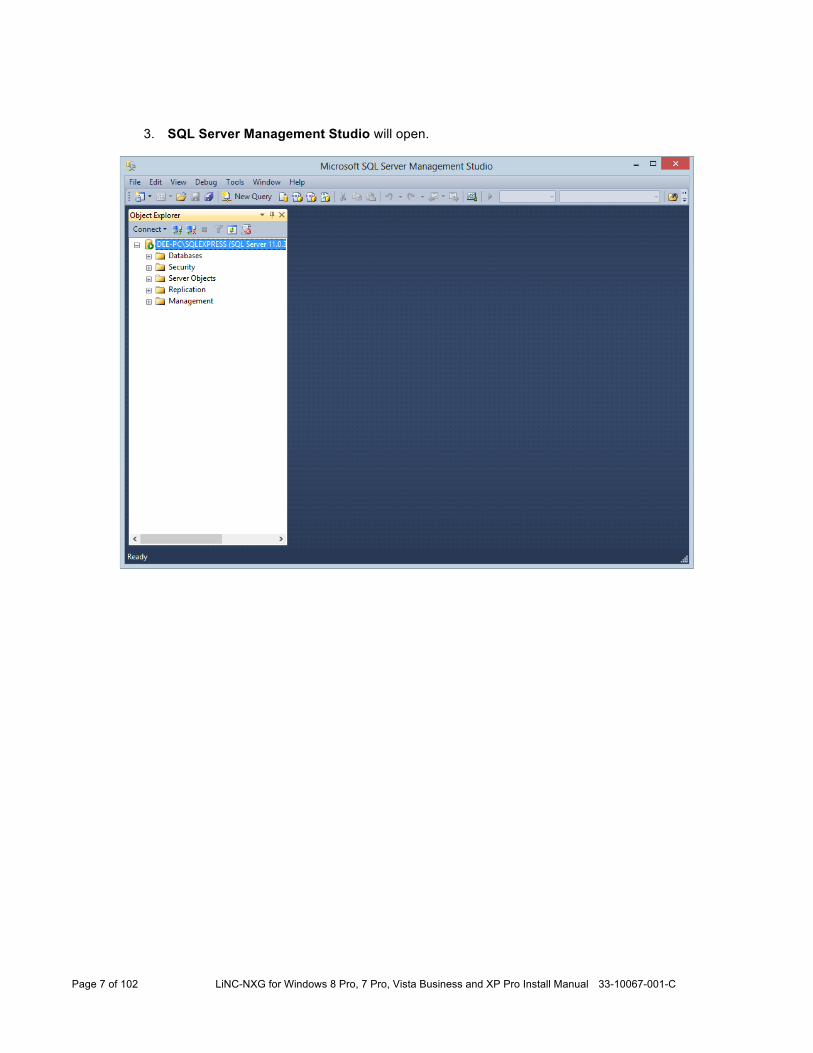
3. SQL Server Management Studio will open.
Page 8 of 102 LiNC-NXG for Windows 8 Pro, 7 Pro, Vista Business and XP Pro Install Manual 33-10067-001-C
4. In Object Explorer, right -click on Database.
5. From the drop-down menu, select New Database.
Page 9 of 102 LiNC-NXG for Windows 8 Pro, 7 Pro, Vista Business and XP Pro Install Manual 33-10067-001-C
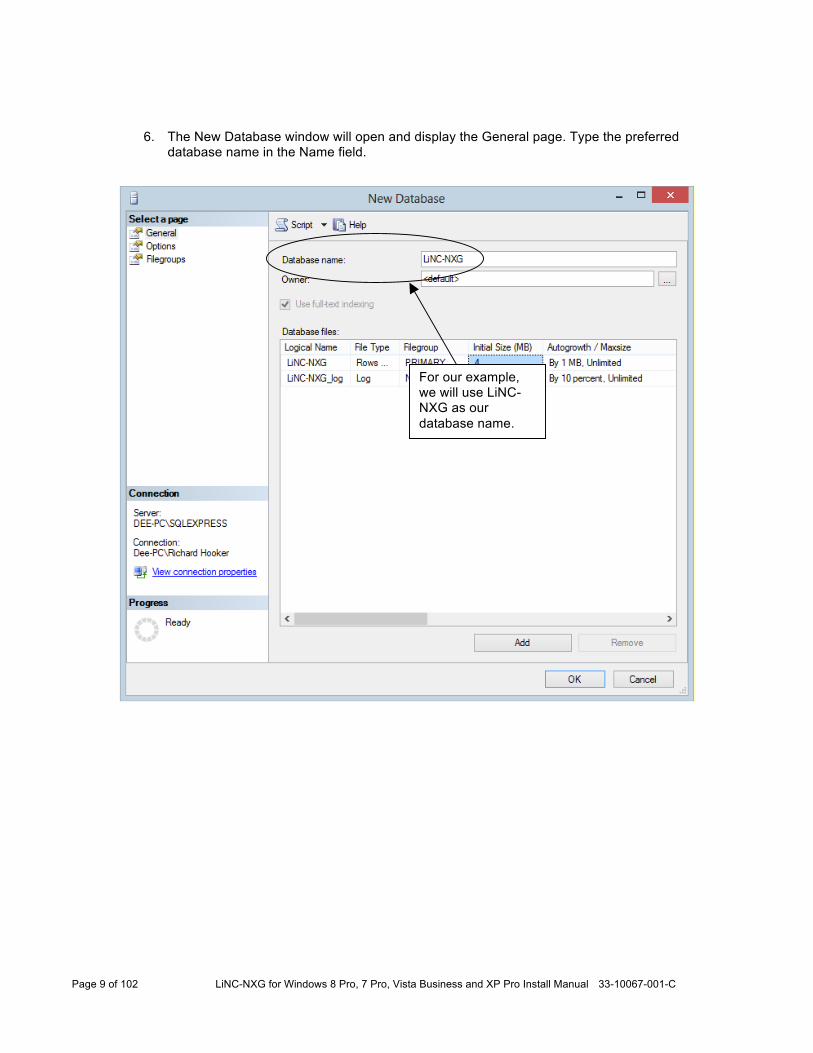
6. The New Database window will open and display the General page. Type the preferred database name in the Name field.
For our example, we will use LiNC-NXG as our database name.
Page 10 of 102 LiNC-NXG for Windows 8 Pro, 7 Pro, Vista Business and XP Pro Install Manual 33-10067-001-C
7. In the Data Files table, find the Path column which will display the directory location
where the Data will be stored.
NOTE: The locations listed in the “Path” fields are the default locations.
8. If it is preferable to use the SQL default for your Data Files Path, do not change. If there is an alternate location to use for the Path, press the Browse button to navigate to the desired location.
Page 11 of 102 LiNC-NXG for Windows 8 Pro, 7 Pro, Vista Business and XP Pro Install Manual 33-10067-001-C
9. In the Data Files table, find the Path column which will display the directory location
where the Transaction logs will be stored. 10. If it is preferable to use the SQL default for your Transaction Log Path, do not change. If
there is an alternate location to use for the Path, press the Browse button to navigate to the desired location.
11. Press the OK button to create the database.
Page 12 of 102 LiNC-NXG for Windows 8 Pro, 7 Pro, Vista Business and XP Pro Install Manual 33-10067-001-C
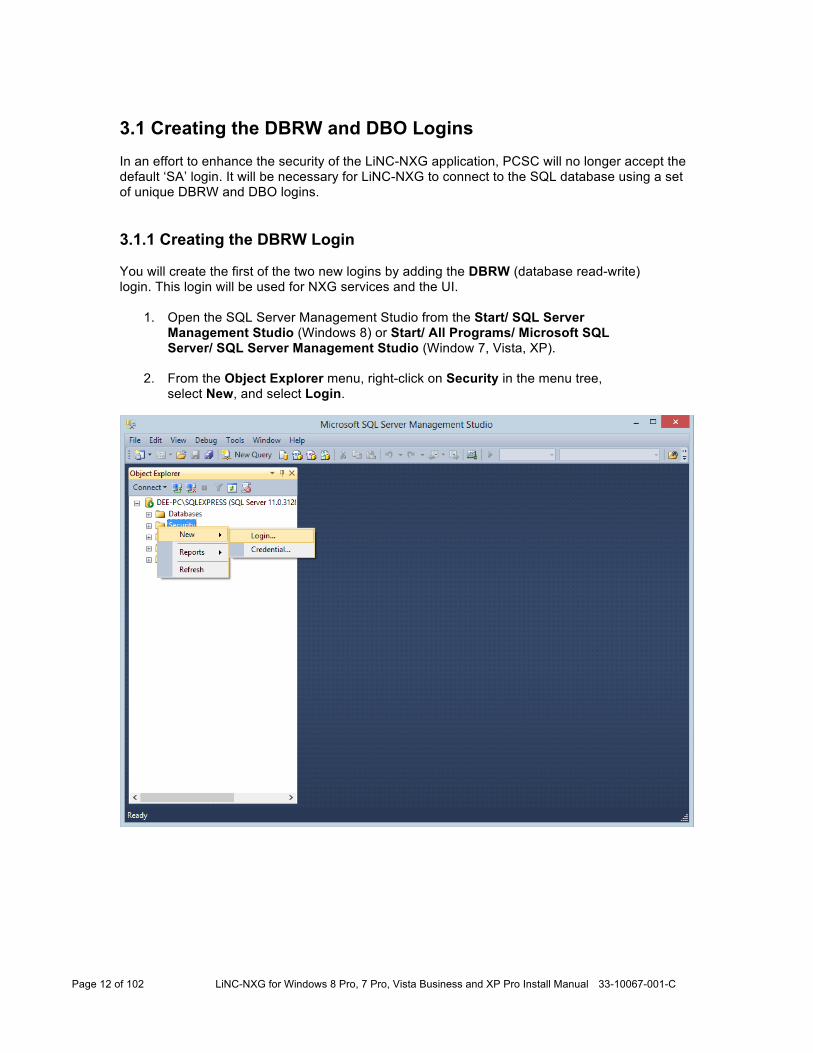
3.1 Creating the DBRW and DBO Logins In an effort to enhance the security of the LiNC-NXG application, PCSC will no longer accept the default ‘SA’ login. It will be necessary for LiNC-NXG to connect to the SQL database using a set of unique DBRW and DBO logins. 3.1.1 Creating the DBRW Login You will create the first of the two new logins by adding the DBRW (database read-write) login. This login will be used for NXG services and the UI.
1. Open the SQL Server Management Studio from the Start/ SQL Server Management Studio (Windows 8) or Start/ All Programs/ Microsoft SQL Server/ SQL Server Management Studio (Window 7, Vista, XP).
2. From the Object Explorer menu, right-click on Security in the menu tree, select New, and select Login.
Page 13 of 102 LiNC-NXG for Windows 8 Pro, 7 Pro, Vista Business and XP Pro Install Manual 33-10067-001-C
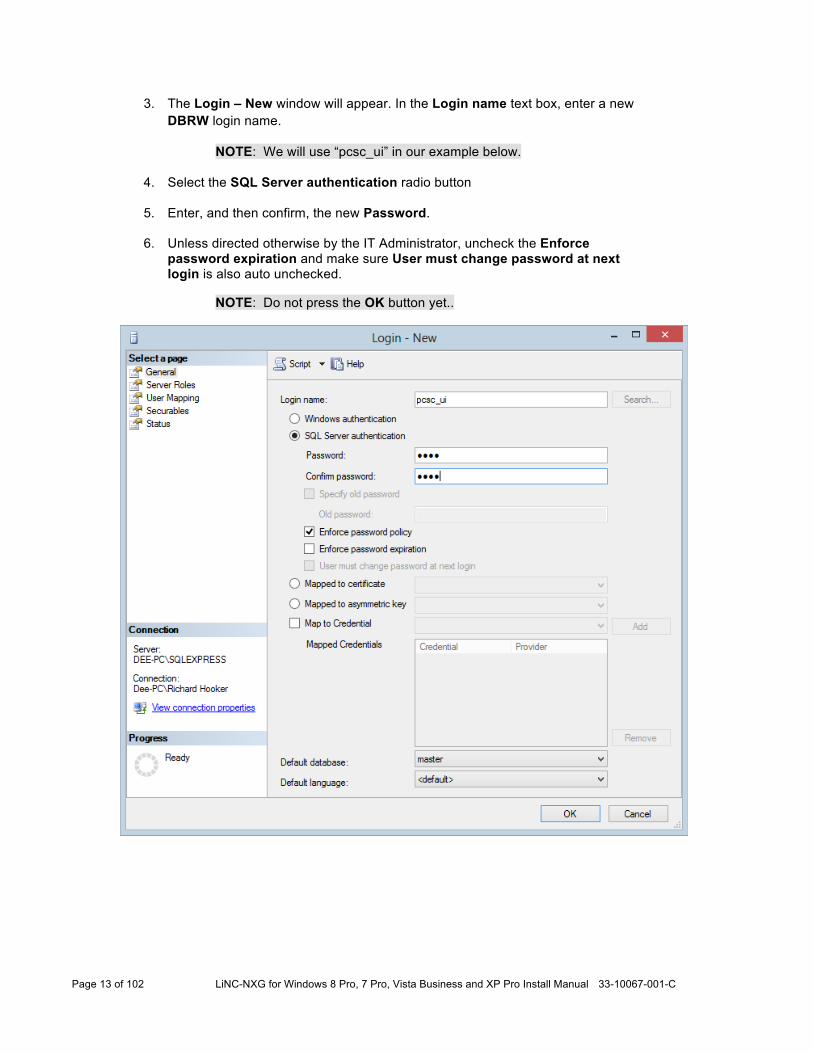
3. The Login – New window will appear. In the Login name text box, enter a new DBRW login name.
NOTE: We will use “pcsc_ui” in our example below.
4. Select the SQL Server authentication radio button
5. Enter, and then confirm, the new Password.
6. Unless directed otherwise by the IT Administrator, uncheck the Enforce password expiration and make sure User must change password at next login is also auto unchecked.
NOTE: Do not press the OK button yet..
Page 14 of 102 LiNC-NXG for Windows 8 Pro, 7 Pro, Vista Business and XP Pro Install Manual 33-10067-001-C
7. From the Select a page left-hand menu, select User Mapping.
8. Check the checkbox next to your LiNC-NXG database in the Users mapped to
this login section.
9. In the Database role membership for <database name> select the “db_datareader” (DBR) and the “db_datawriter” (DBW).
10. Press the OK button. You have created the pcsc_ul login with the DBRW roles and have mapped it to your LiNC-NXG database.
11. Go to Section 3.1.2 to create the DBO Login.
Page 15 of 102 LiNC-NXG for Windows 8 Pro, 7 Pro, Vista Business and XP Pro Install Manual 33-10067-001-C
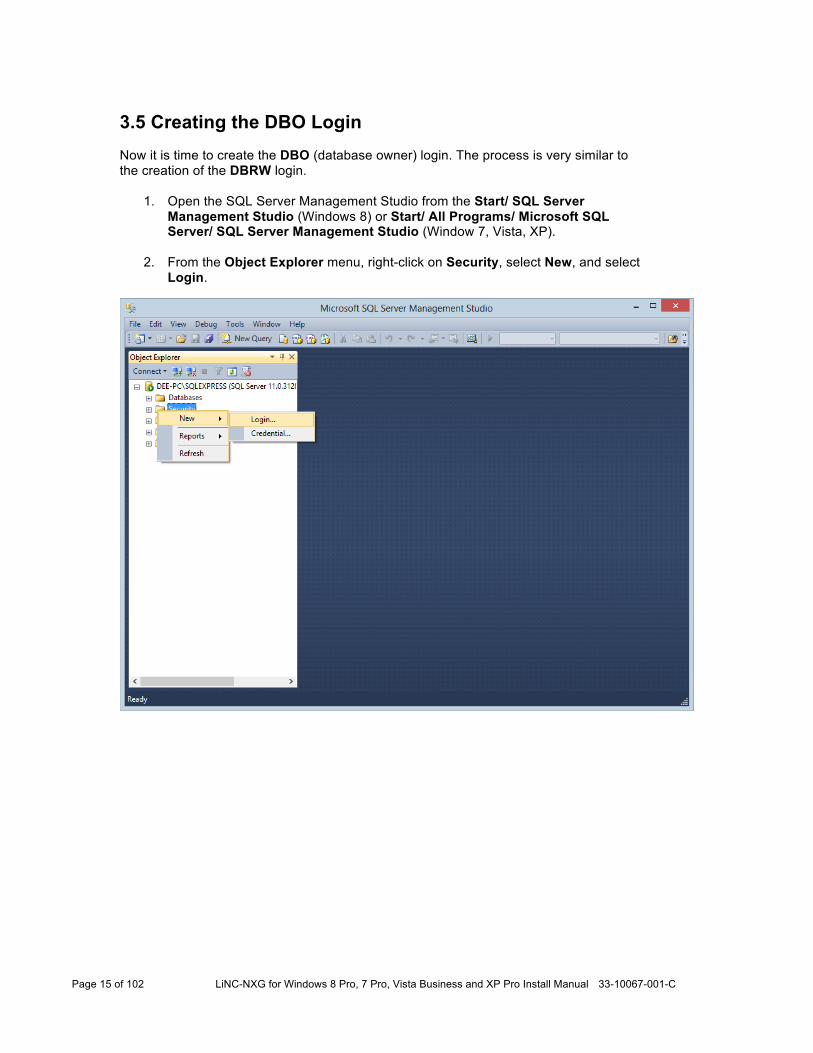
3.5 Creating the DBO Login Now it is time to create the DBO (database owner) login. The process is very similar to the creation of the DBRW login.
1. Open the SQL Server Management Studio from the Start/ SQL Server Management Studio (Windows 8) or Start/ All Programs/ Microsoft SQL Server/ SQL Server Management Studio (Window 7, Vista, XP).
2. From the Object Explorer menu, right-click on Security, select New, and select Login.
Page 16 of 102 LiNC-NXG for Windows 8 Pro, 7 Pro, Vista Business and XP Pro Install Manual 33-10067-001-C
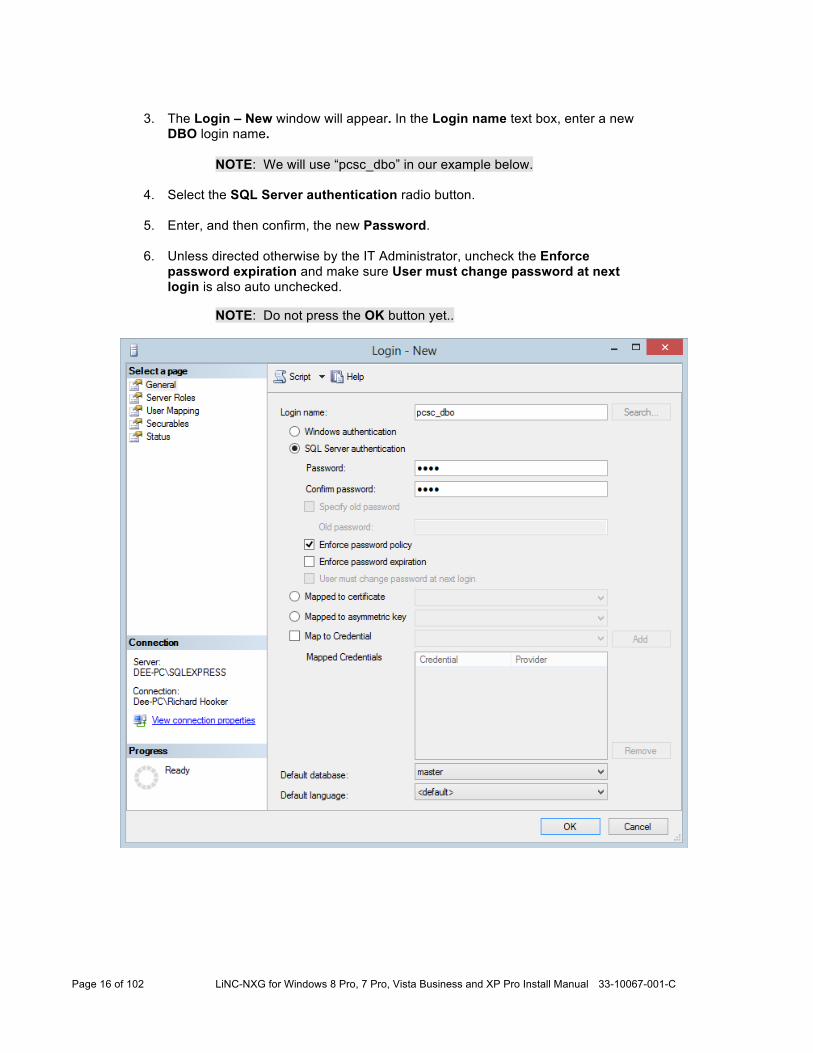
3. The Login – New window will appear. In the Login name text box, enter a new
DBO login name.
NOTE: We will use “pcsc_dbo” in our example below.
4. Select the SQL Server authentication radio button.
5. Enter, and then confirm, the new Password.
6. Unless directed otherwise by the IT Administrator, uncheck the Enforce password expiration and make sure User must change password at next login is also auto unchecked.
NOTE: Do not press the OK button yet..
Page 17 of 102 LiNC-NXG for Windows 8 Pro, 7 Pro, Vista Business and XP Pro Install Manual 33-10067-001-C
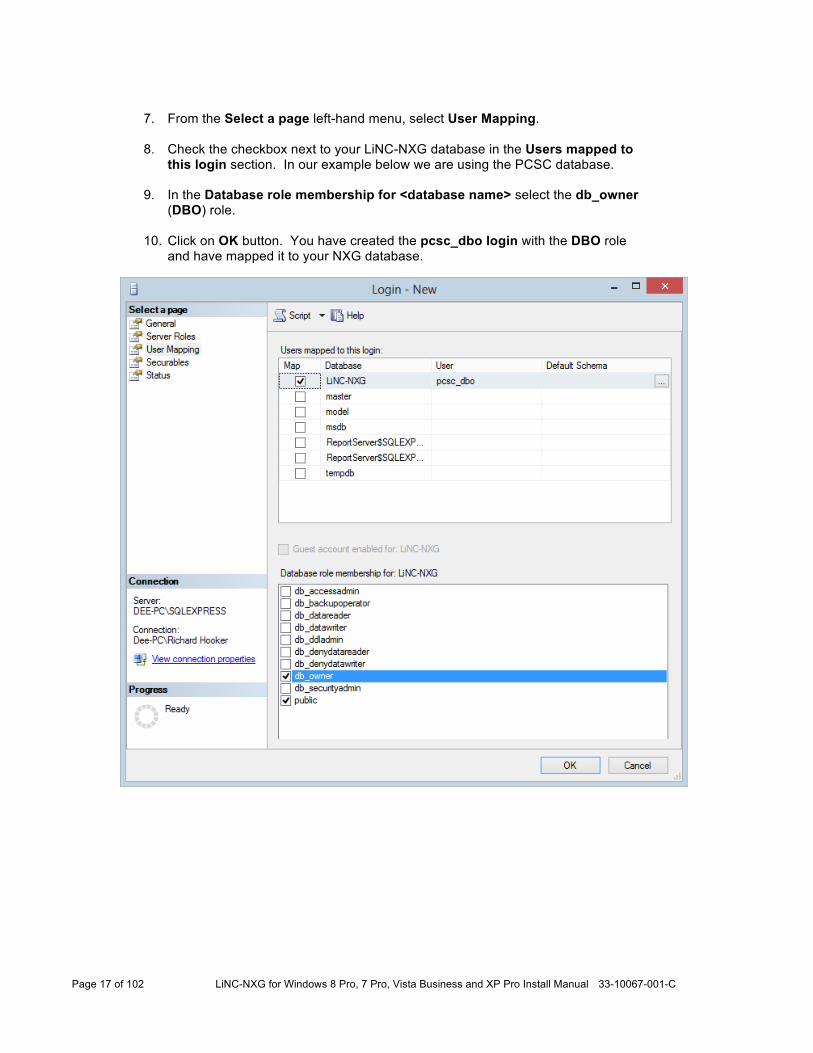
7. From the Select a page left-hand menu, select User Mapping.
8. Check the checkbox next to your LiNC-NXG database in the Users mapped to
this login section. In our example below we are using the PCSC database.
9. In the Database role membership for <database name> select the db_owner (DBO) role.
10. Click on OK button. You have created the pcsc_dbo login with the DBO role and have mapped it to your NXG database.
Page 18 of 102 LiNC-NXG for Windows 8 Pro, 7 Pro, Vista Business and XP Pro Install Manual 33-10067-001-C
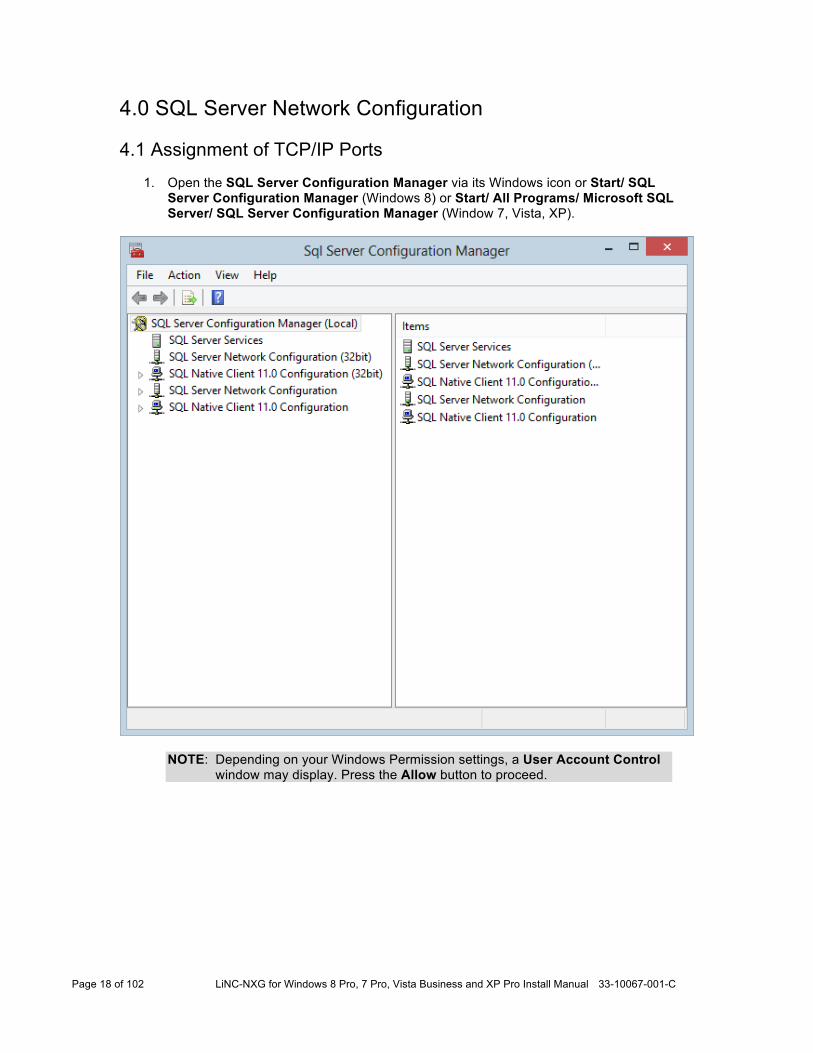
4.0 SQL Server Network Configuration 4.1 Assignment of TCP/IP Ports
1. Open the SQL Server Configuration Manager via its Windows icon or Start/ SQL Server Configuration Manager (Windows 8) or Start/ All Programs/ Microsoft SQL Server/ SQL Server Configuration Manager (Window 7, Vista, XP).
NOTE: Depending on your Windows Permission settings, a User Account Control window may display. Press the Allow button to proceed.
Page 19 of 102 LiNC-NXG for Windows 8 Pro, 7 Pro, Vista Business and XP Pro Install Manual 33-10067-001-C
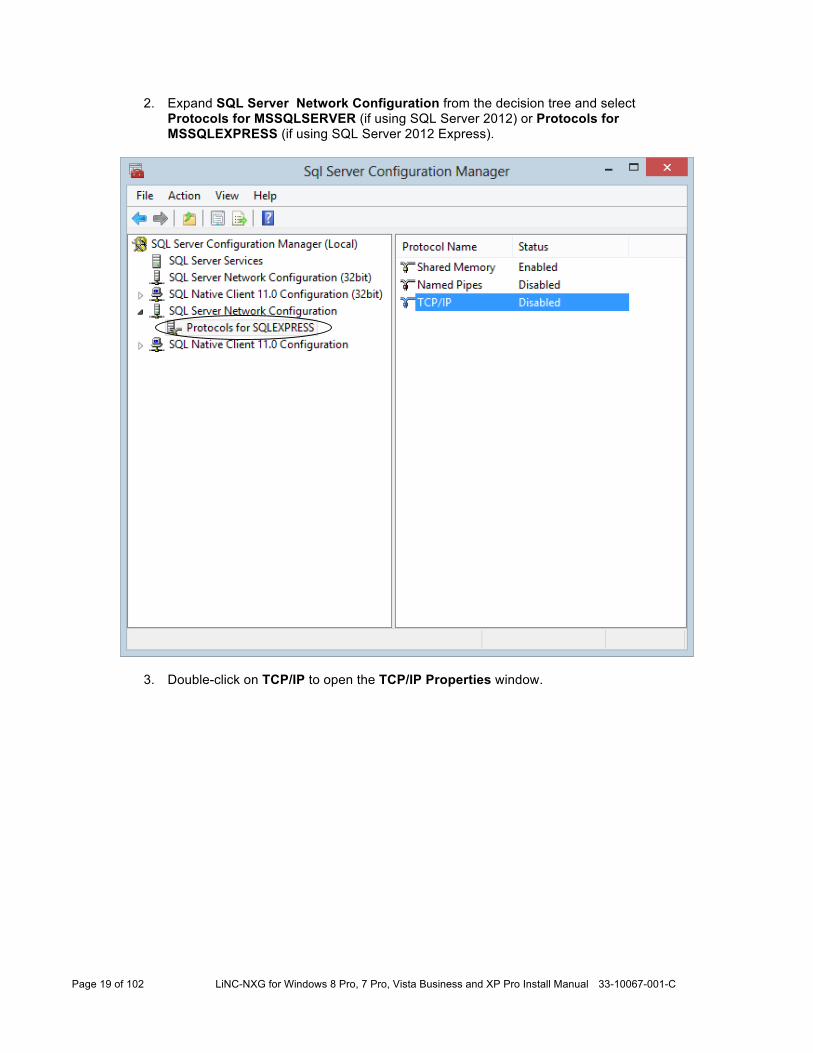
2. Expand SQL Server Network Configuration from the decision tree and select Protocols for MSSQLSERVER (if using SQL Server 2012) or Protocols for MSSQLEXPRESS (if using SQL Server 2012 Express).
3. Double-click on TCP/IP to open the TCP/IP Properties window.
Page 20 of 102 LiNC-NXG for Windows 8 Pro, 7 Pro, Vista Business and XP Pro Install Manual 33-10067-001-C
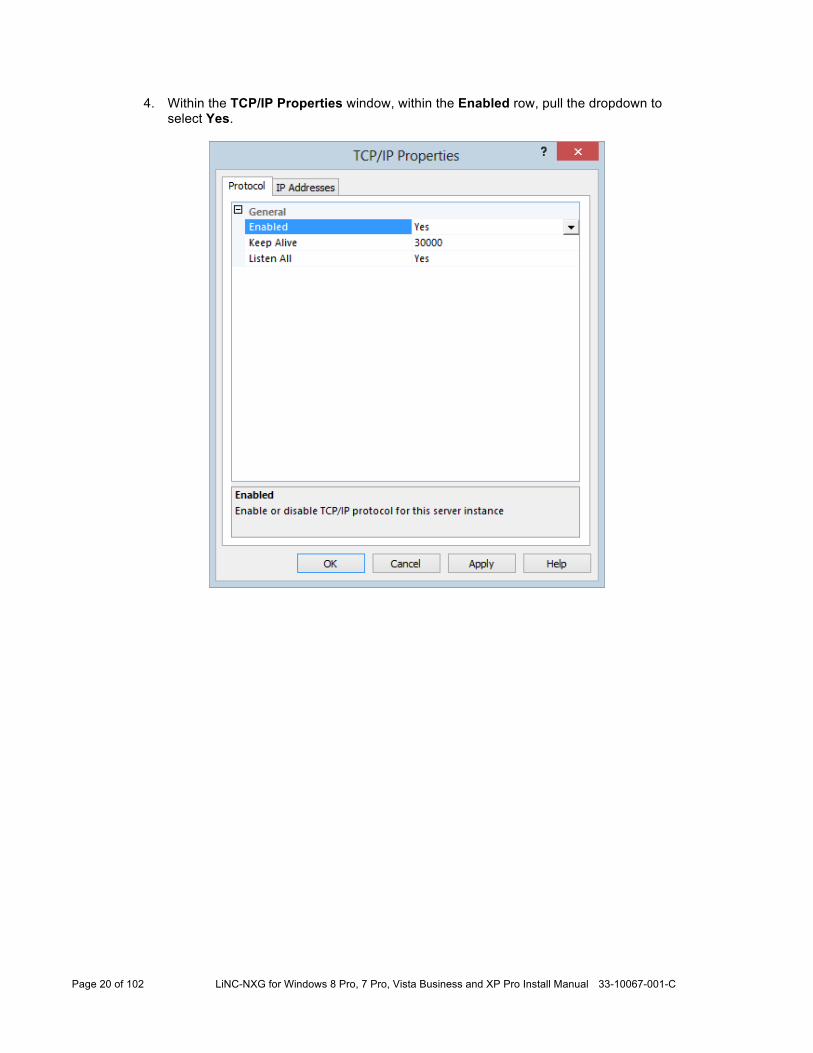
4. Within the TCP/IP Properties window, within the Enabled row, pull the dropdown to select Yes.
Page 21 of 102 LiNC-NXG for Windows 8 Pro, 7 Pro, Vista Business and XP Pro Install Manual 33-10067-001-C
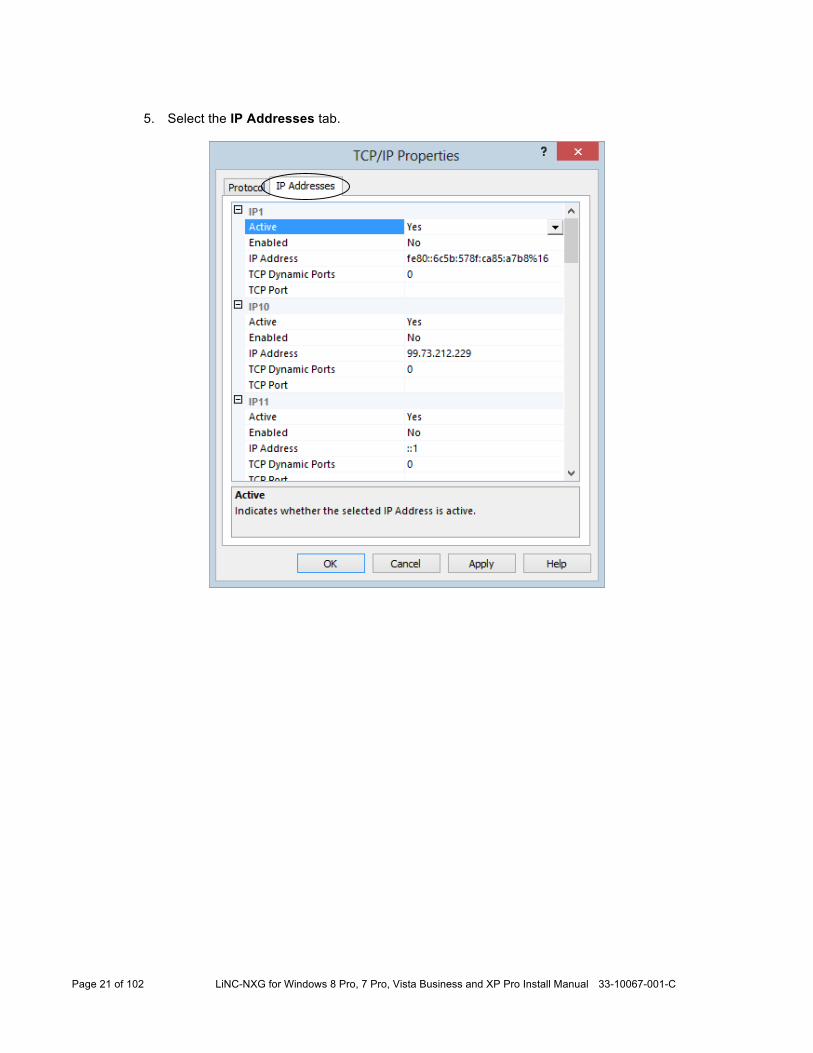
5. Select the IP Addresses tab.
Page 22 of 102 LiNC-NXG for Windows 8 Pro, 7 Pro, Vista Business and XP Pro Install Manual 33-10067-001-C
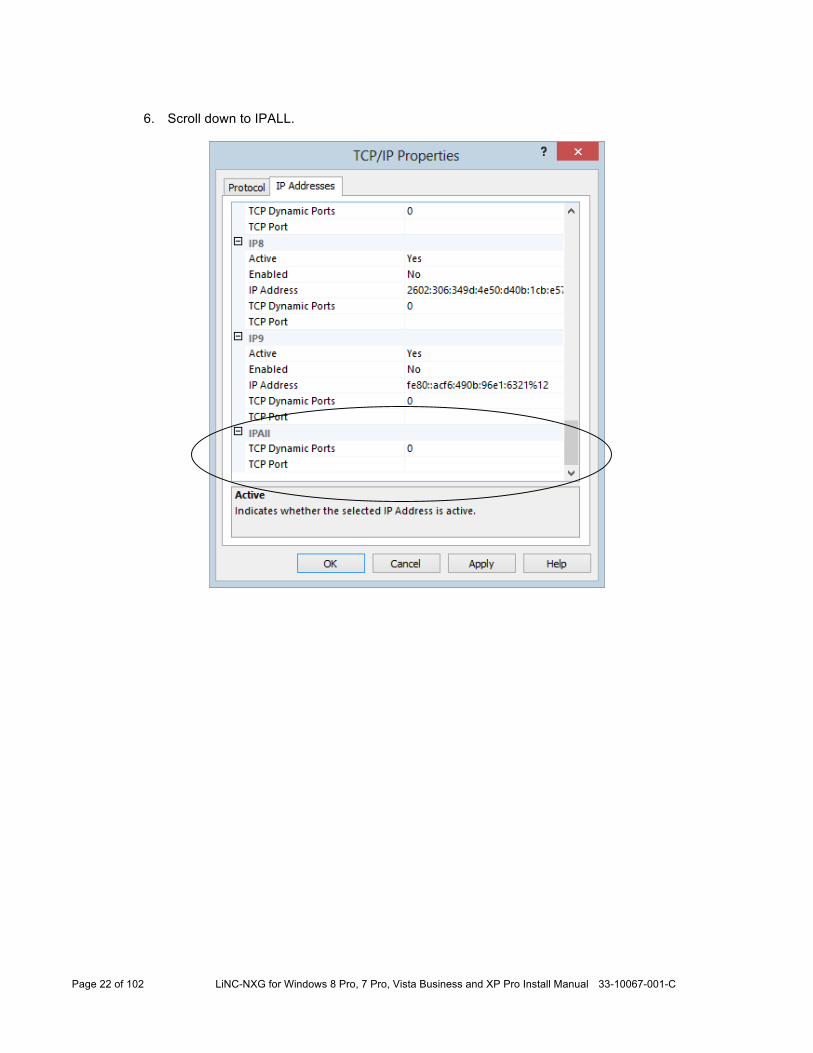
6. Scroll down to IPALL.
Page 23 of 102 LiNC-NXG for Windows 8 Pro, 7 Pro, Vista Business and XP Pro Install Manual 33-10067-001-C
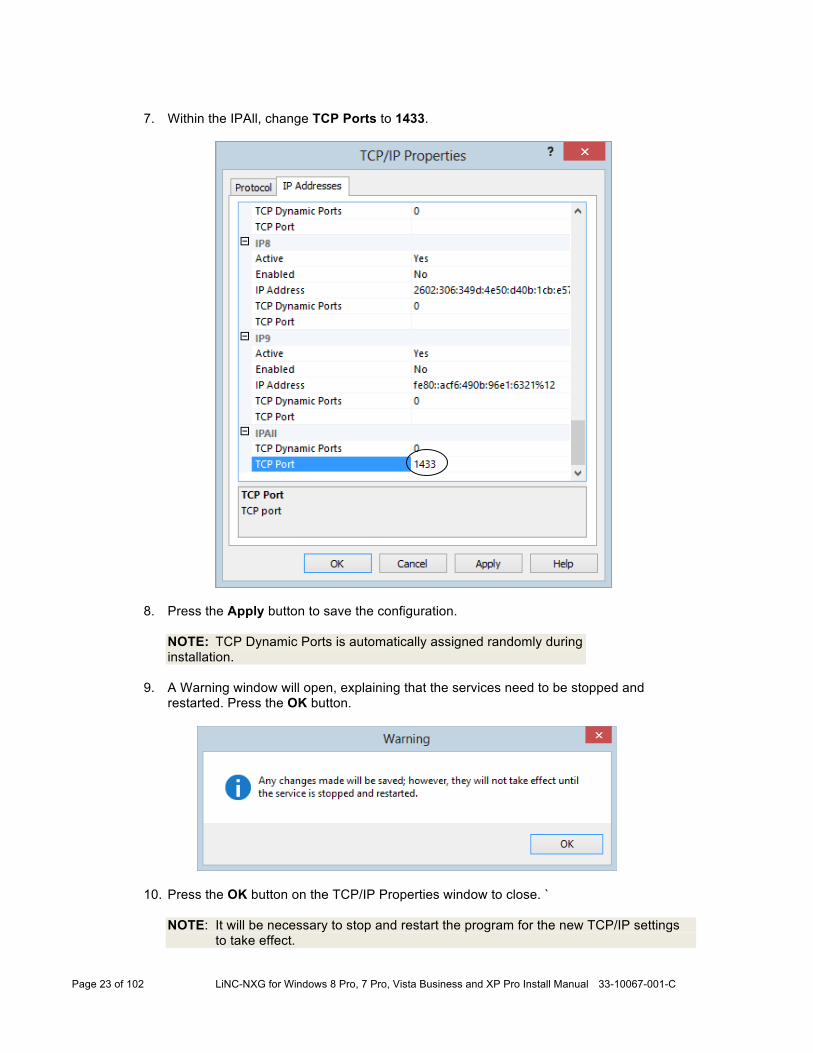
7. Within the IPAll, change TCP Ports to 1433.
8. Press the Apply button to save the configuration.
NOTE: TCP Dynamic Ports is automatically assigned randomly during installation.
9. A Warning window will open, explaining that the services need to be stopped and
restarted. Press the OK button.
10. Press the OK button on the TCP/IP Properties window to close. ` NOTE: It will be necessary to stop and restart the program for the new TCP/IP settings
to take effect.
Page 24 of 102 LiNC-NXG for Windows 8 Pro, 7 Pro, Vista Business and XP Pro Install Manual 33-10067-001-C
4.2 Enabling Named Pipes
1. Open the SQL Server Configuration Manager via Start/ SQL Server Configuration Manager (Windows 8) or Start/ All Programs/ Microsoft SQL Server/ SQL Server Configuration Manager (Window 7, Vista, XP).
Page 25 of 102 LiNC-NXG for Windows 8 Pro, 7 Pro, Vista Business and XP Pro Install Manual 33-10067-001-C
2. Expand SQL Server Network Configuration from the decision tree and select
Protocols for SQLEXPRESS (if using SQL 2012 Express) or Protocols for MSSQLSERVER (if using SQL 2012).
3. Double-click on Named Pipes to open the Named Pipes Properties window.
Page 26 of 102 LiNC-NXG for Windows 8 Pro, 7 Pro, Vista Business and XP Pro Install Manual 33-10067-001-C
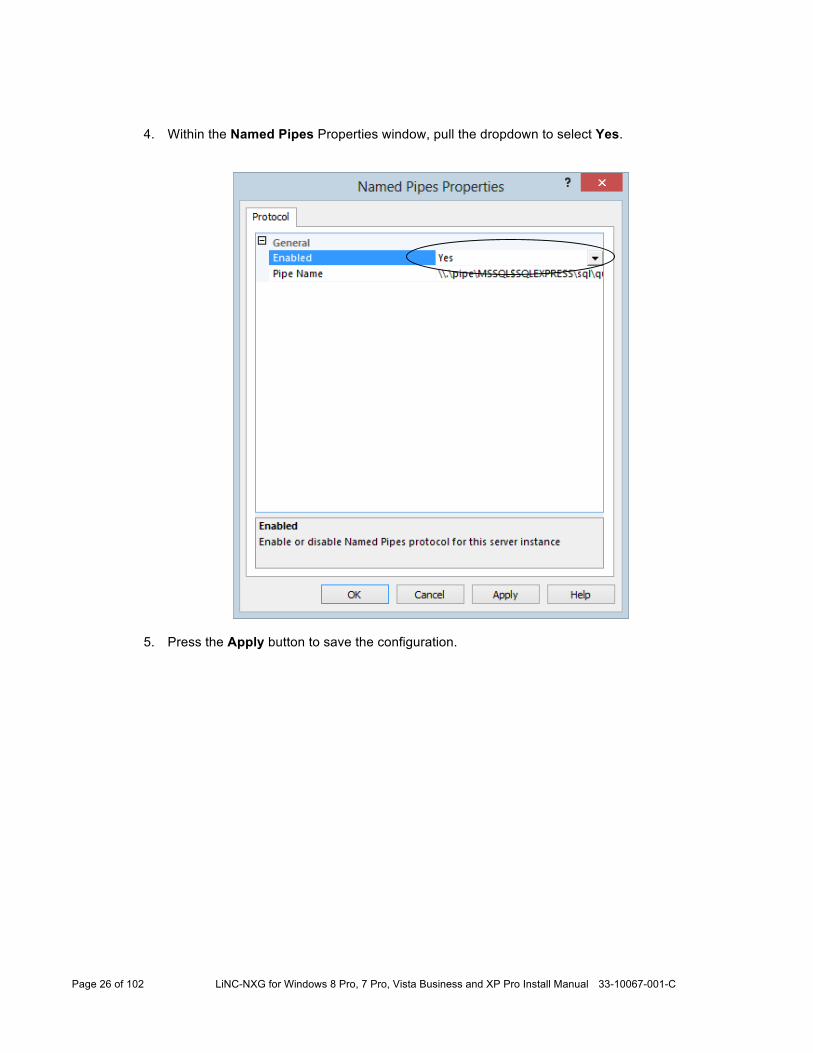
4. Within the Named Pipes Properties window, pull the dropdown to select Yes.
5. Press the Apply button to save the configuration.
Page 27 of 102 LiNC-NXG for Windows 8 Pro, 7 Pro, Vista Business and XP Pro Install Manual 33-10067-001-C
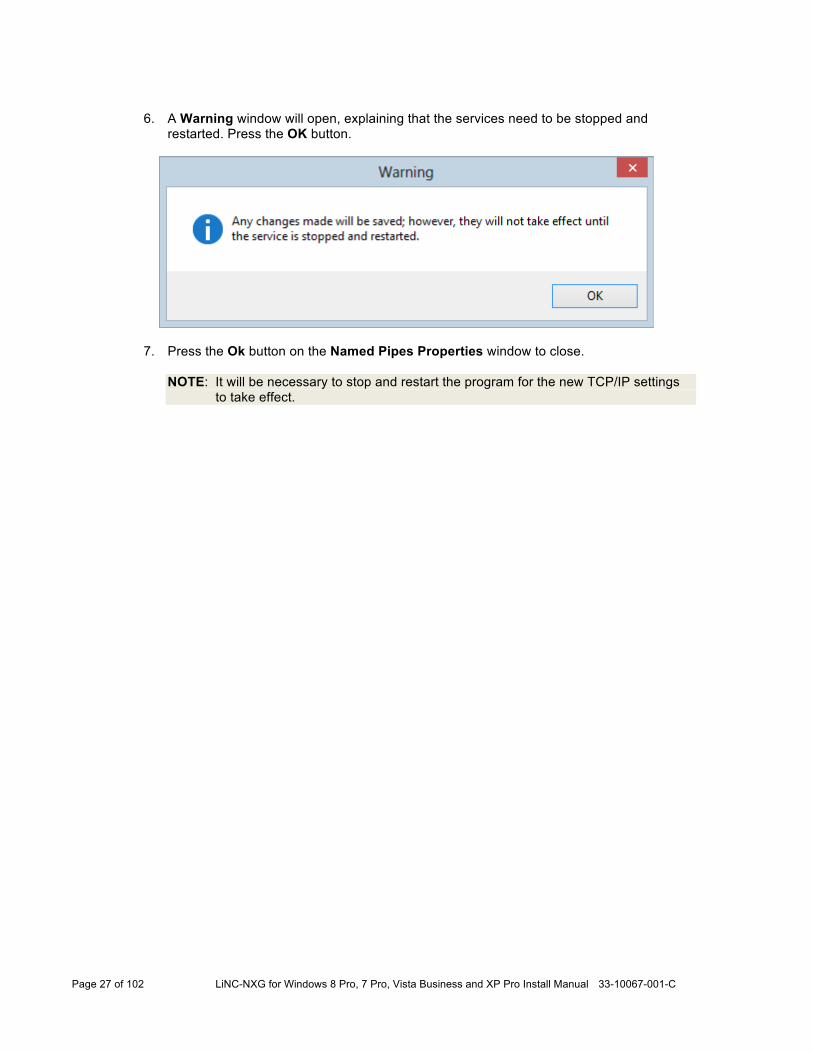
6. A Warning window will open, explaining that the services need to be stopped and
restarted. Press the OK button.
7. Press the Ok button on the Named Pipes Properties window to close.
NOTE: It will be necessary to stop and restart the program for the new TCP/IP settings to take effect.
Page 28 of 102 LiNC-NXG for Windows 8 Pro, 7 Pro, Vista Business and XP Pro Install Manual 33-10067-001-C
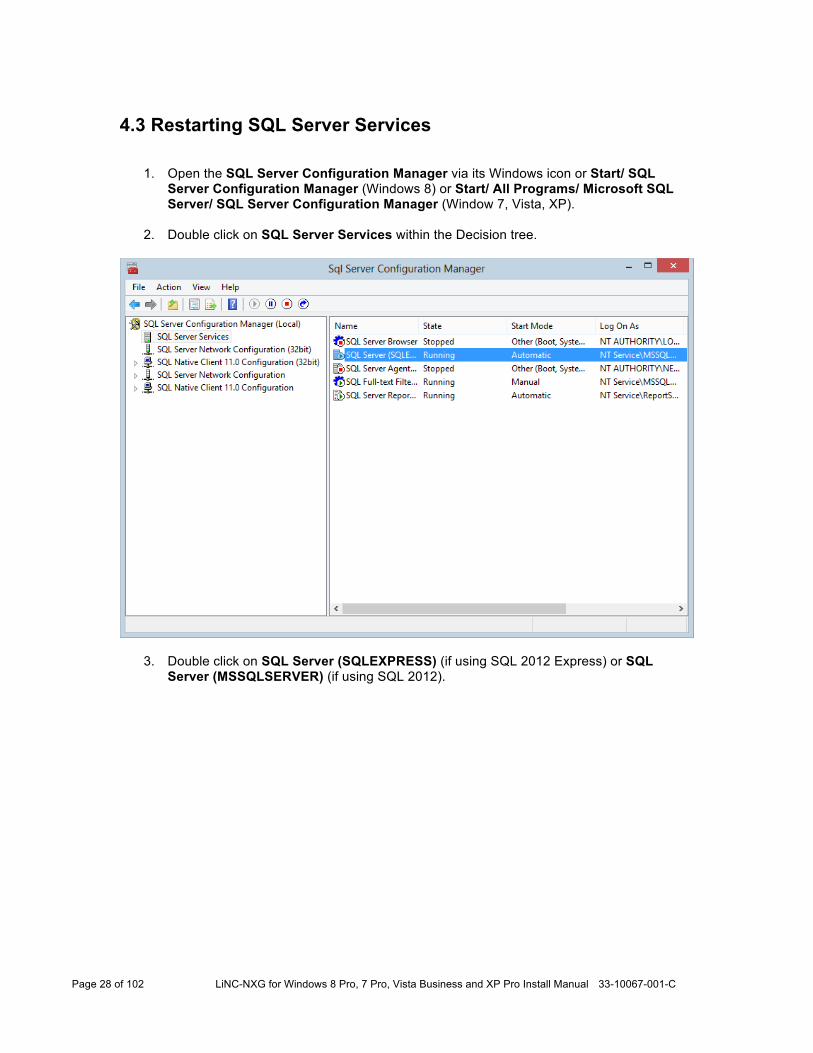
4.3 Restarting SQL Server Services
1. Open the SQL Server Configuration Manager via its Windows icon or Start/ SQL Server Configuration Manager (Windows 8) or Start/ All Programs/ Microsoft SQL Server/ SQL Server Configuration Manager (Window 7, Vista, XP).
2. Double click on SQL Server Services within the Decision tree.
3. Double click on SQL Server (SQLEXPRESS) (if using SQL 2012 Express) or SQL Server (MSSQLSERVER) (if using SQL 2012).
Page 29 of 102 LiNC-NXG for Windows 8 Pro, 7 Pro, Vista Business and XP Pro Install Manual 33-10067-001-C
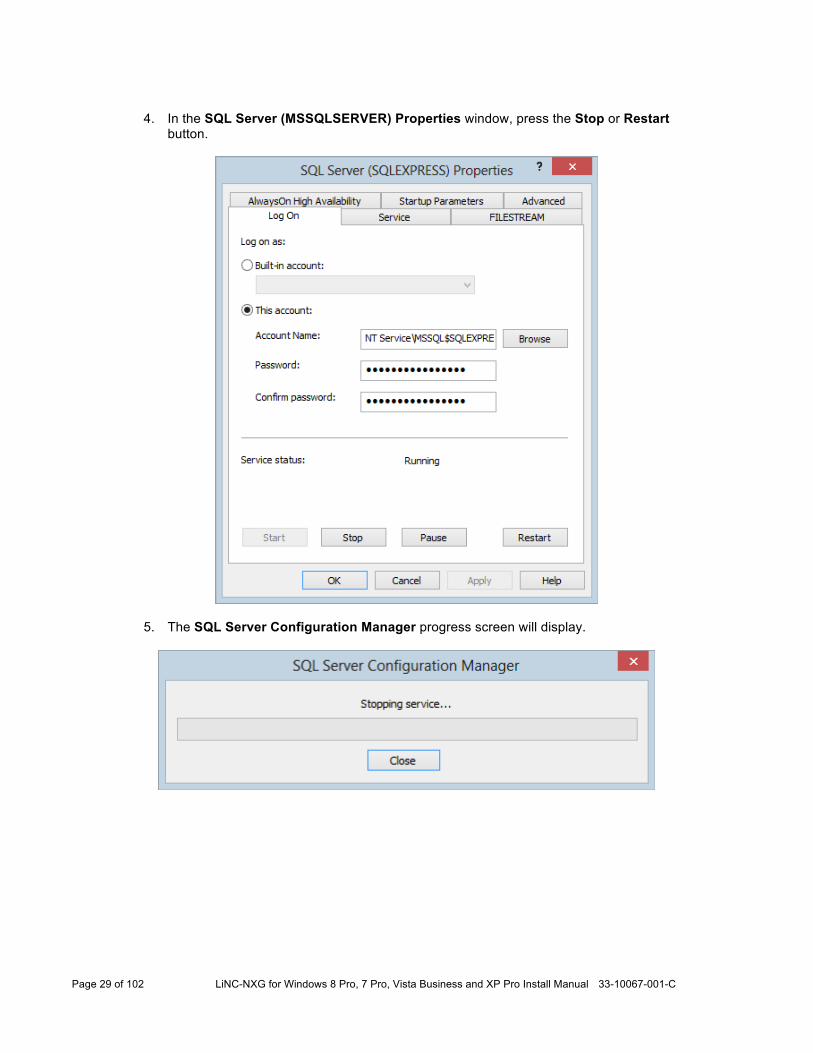
4. In the SQL Server (MSSQLSERVER) Properties window, press the Stop or Restart
button.
5. The SQL Server Configuration Manager progress screen will display.
Page 30 of 102 LiNC-NXG for Windows 8 Pro, 7 Pro, Vista Business and XP Pro Install Manual 33-10067-001-C
6. If you pressed Stop, press the Start button to restart services
7. The SQL Server Configuration Manager progress bar will return.
8. Press the OK button to close the SQL Server Properties window.
9. Select File from the pull-down menu and then Exit to close SQL Server Configuration Manager screen. NOTE: The Restart Button will both Stop and Restart SQL Server in one action.
Page 31 of 102 LiNC-NXG for Windows 8 Pro, 7 Pro, Vista Business and XP Pro Install Manual 33-10067-001-C
5.0 Installing LiNC-NXG
NOTE: The system should have a functional version of SQL Server 2012, SQL Server 2012 Express, SQL Server 2008 R2, or SQL Server 2008 R2 Express prior to starting this installation.
1. Insert the LiNC-NXG DVD into the DVD-ROM drive or download the appropriate files
from the PCSC Server. 2. If using a DVD, LiNC-NXG will activate an AutoPlay of the LiNC-NXG Installer. If you
choose, you can instead press the Open folder to view files icon.
Page 32 of 102 LiNC-NXG for Windows 8 Pro, 7 Pro, Vista Business and XP Pro Install Manual 33-10067-001-C
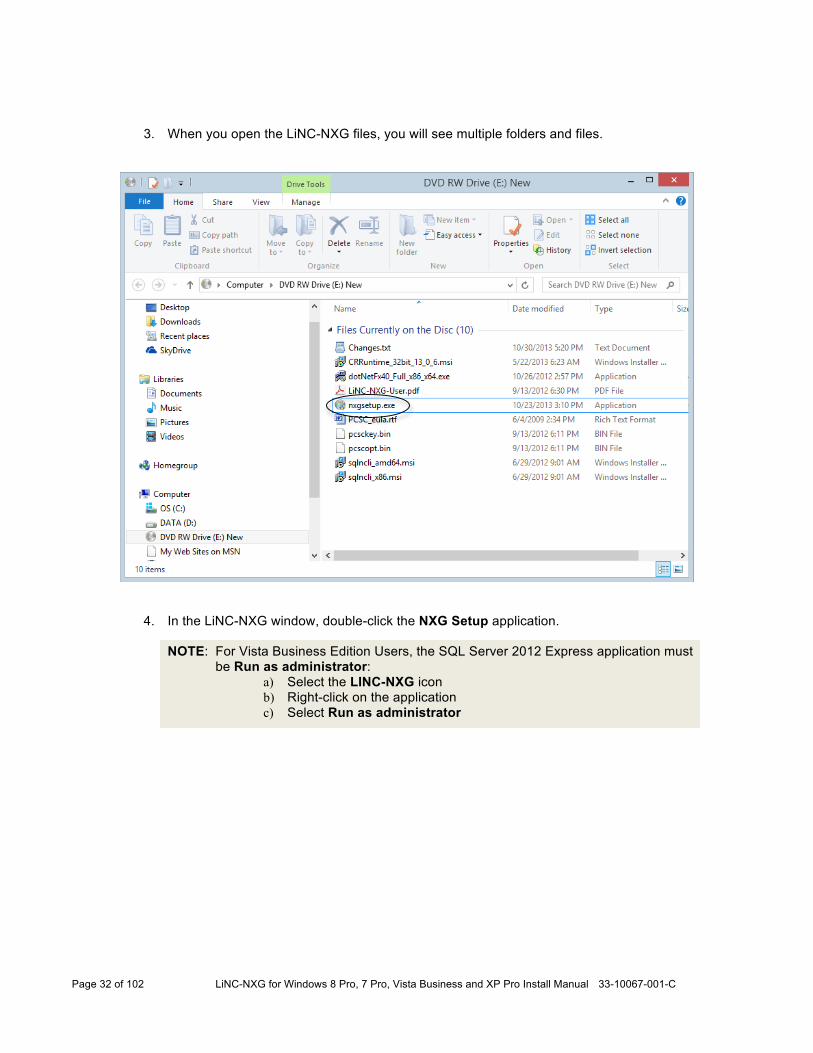
3. When you open the LiNC-NXG files, you will see multiple folders and files.
4. In the LiNC-NXG window, double-click the NXG Setup application.
NOTE: For Vista Business Edition Users, the SQL Server 2012 Express application must be Run as administrator:
a) Select the LINC-NXG icon b) Right-click on the application c) Select Run as administrator
Page 33 of 102 LiNC-NXG for Windows 8 Pro, 7 Pro, Vista Business and XP Pro Install Manual 33-10067-001-C
5. If the computer does not have Microsoft .NET Framework 4 installed, it will automatically
start the installation with that software. Press the Install button to continue.
6. This will bring you to the Microsoft .NET Framework 4 – Installation Progress window.
Page 34 of 102 LiNC-NXG for Windows 8 Pro, 7 Pro, Vista Business and XP Pro Install Manual 33-10067-001-C
7. Once complete, the Installation is Complete window will appear. Press the Finish button.
Page 35 of 102 LiNC-NXG for Windows 8 Pro, 7 Pro, Vista Business and XP Pro Install Manual 33-10067-001-C
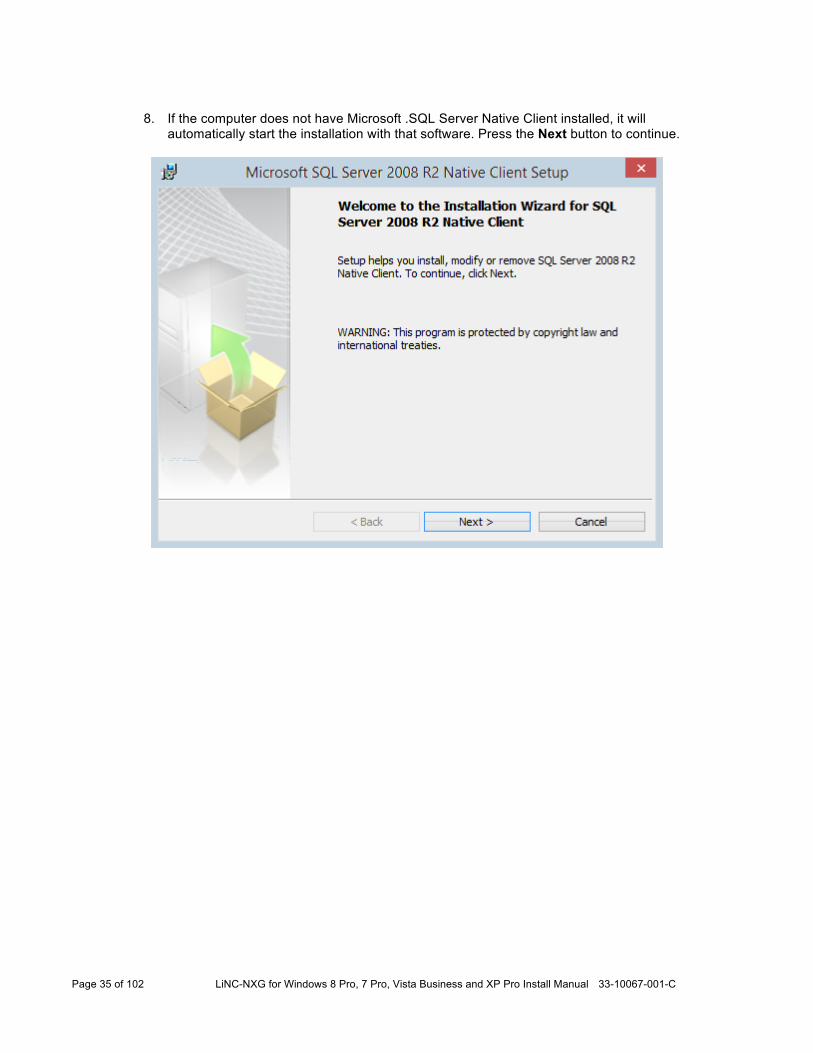
8. If the computer does not have Microsoft .SQL Server Native Client installed, it will
automatically start the installation with that software. Press the Next button to continue.
Page 36 of 102 LiNC-NXG for Windows 8 Pro, 7 Pro, Vista Business and XP Pro Install Manual 33-10067-001-C
9. The License Agreement window loads. Select the “I accept the terms of the license agreement” radio box and click Next to continue.
Page 37 of 102 LiNC-NXG for Windows 8 Pro, 7 Pro, Vista Business and XP Pro Install Manual 33-10067-001-C
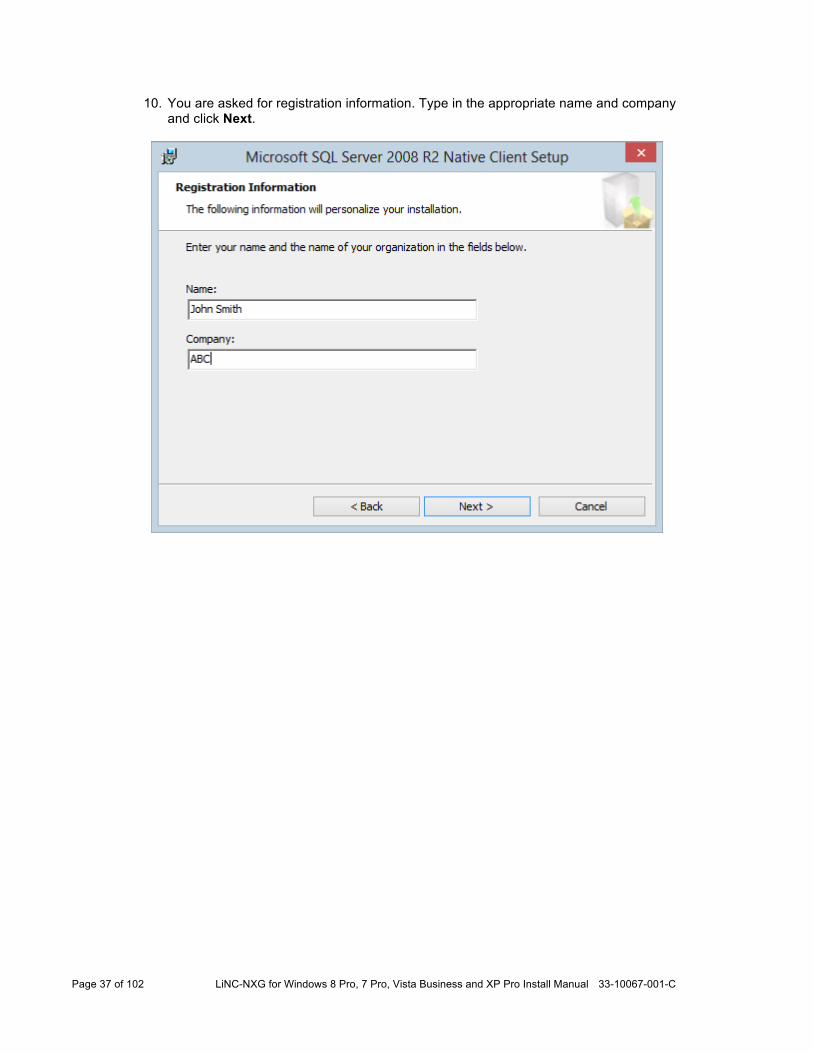
10. You are asked for registration information. Type in the appropriate name and company and click Next.
Page 38 of 102 LiNC-NXG for Windows 8 Pro, 7 Pro, Vista Business and XP Pro Install Manual 33-10067-001-C
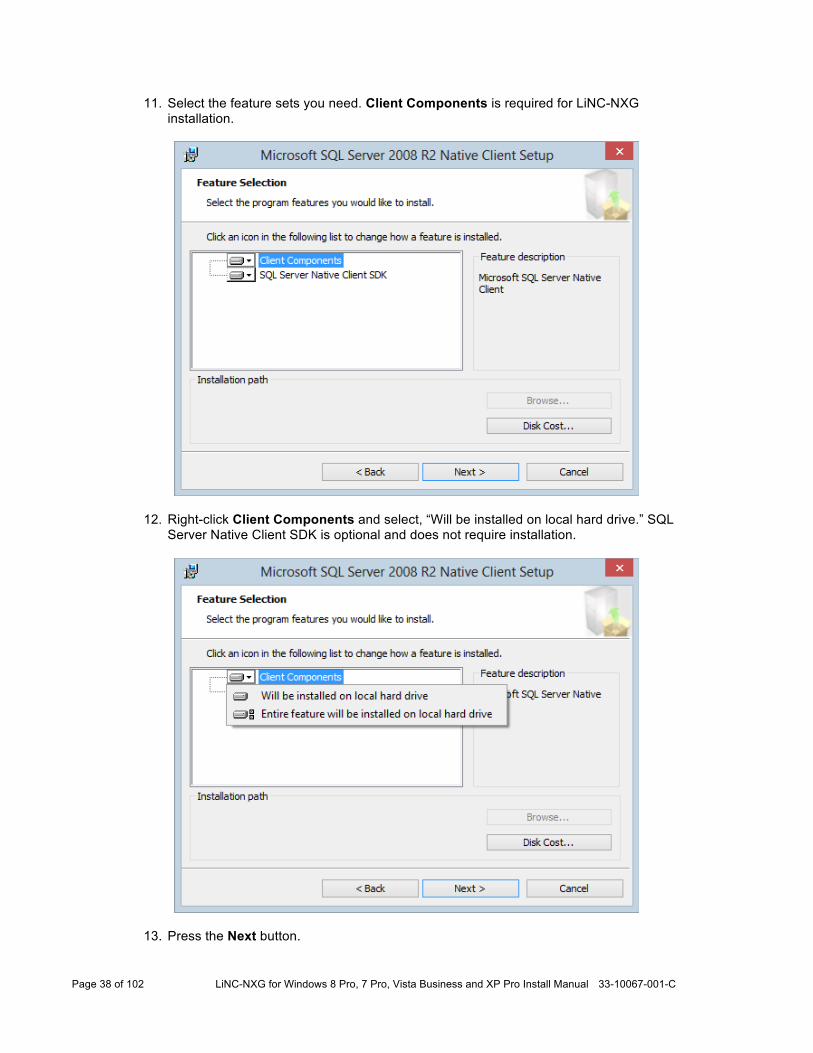
11. Select the feature sets you need. Client Components is required for LiNC-NXG installation.
12. Right-click Client Components and select, “Will be installed on local hard drive.” SQL Server Native Client SDK is optional and does not require installation.
13. Press the Next button.
Page 39 of 102 LiNC-NXG for Windows 8 Pro, 7 Pro, Vista Business and XP Pro Install Manual 33-10067-001-C
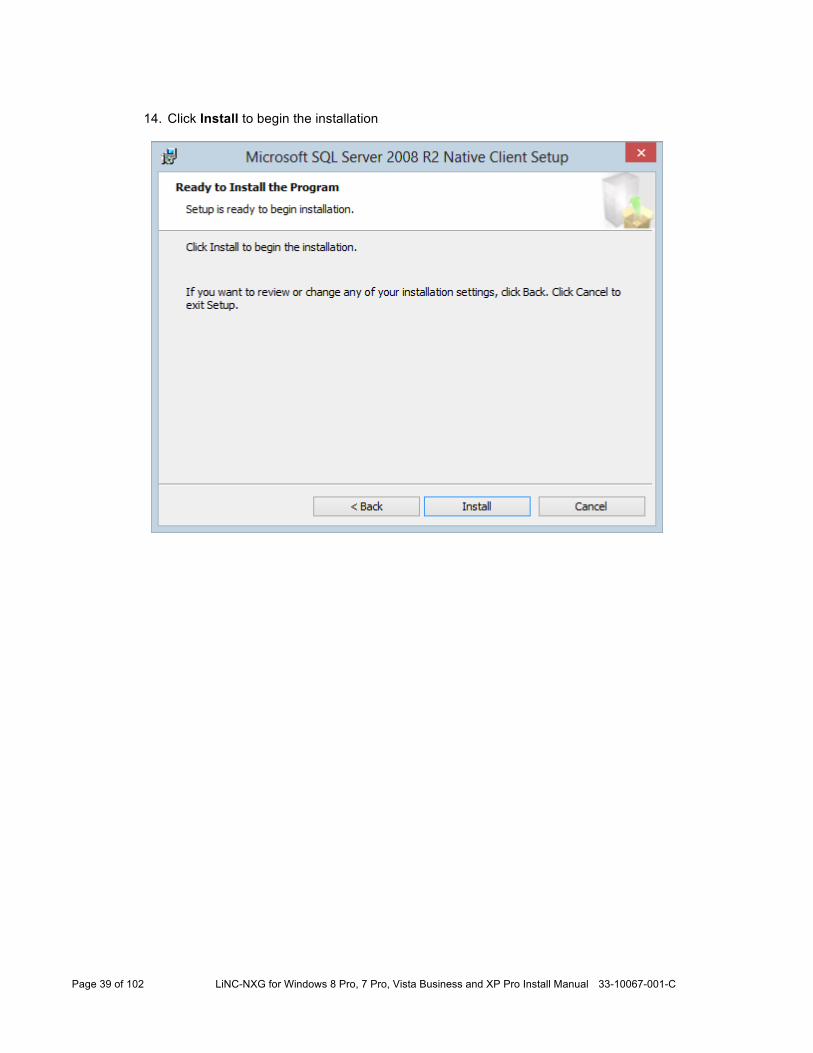
14. Click Install to begin the installation
Page 40 of 102 LiNC-NXG for Windows 8 Pro, 7 Pro, Vista Business and XP Pro Install Manual 33-10067-001-C
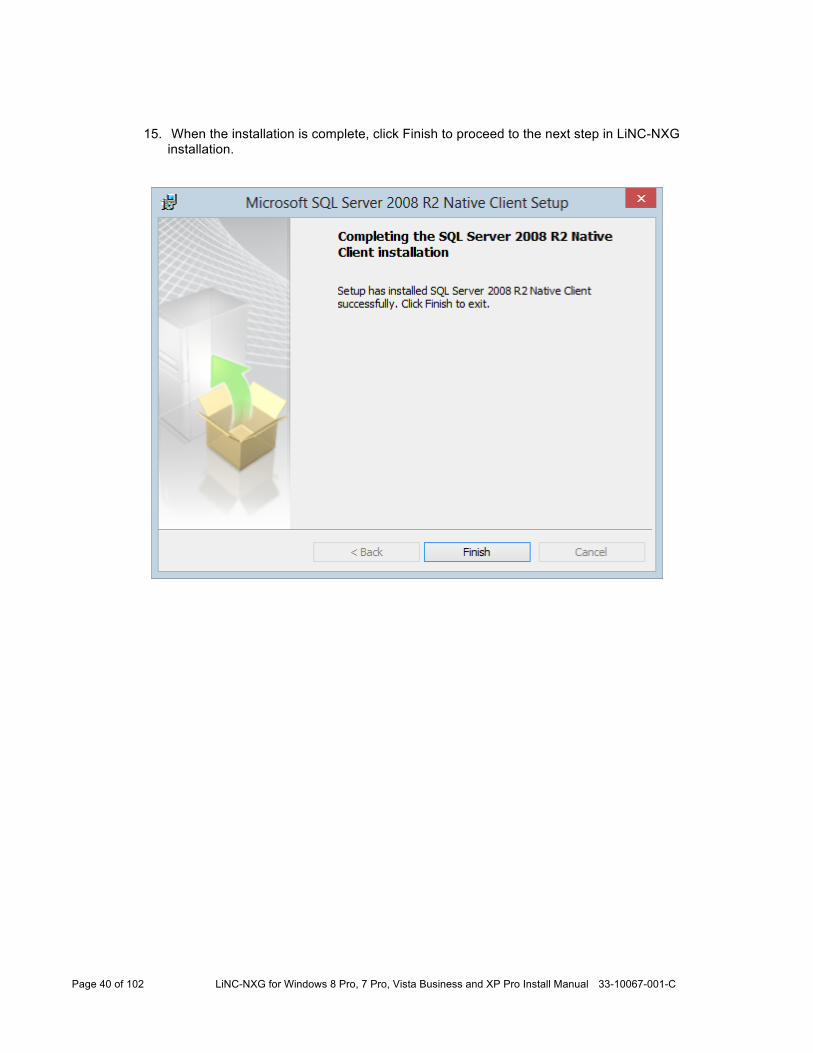
15. When the installation is complete, click Finish to proceed to the next step in LiNC-NXG installation.
Page 41 of 102 LiNC-NXG for Windows 8 Pro, 7 Pro, Vista Business and XP Pro Install Manual 33-10067-001-C
16. Once the .NET installation is complete, the system will install the latest version of SAP Crystal Reports. Press the Next button.
Page 42 of 102 LiNC-NXG for Windows 8 Pro, 7 Pro, Vista Business and XP Pro Install Manual 33-10067-001-C
17. The SAP Crystal Reports – License Agreement will appear. Select the “I accept the
License Agreement” radio button and press the Next button.
Page 43 of 102 LiNC-NXG for Windows 8 Pro, 7 Pro, Vista Business and XP Pro Install Manual 33-10067-001-C
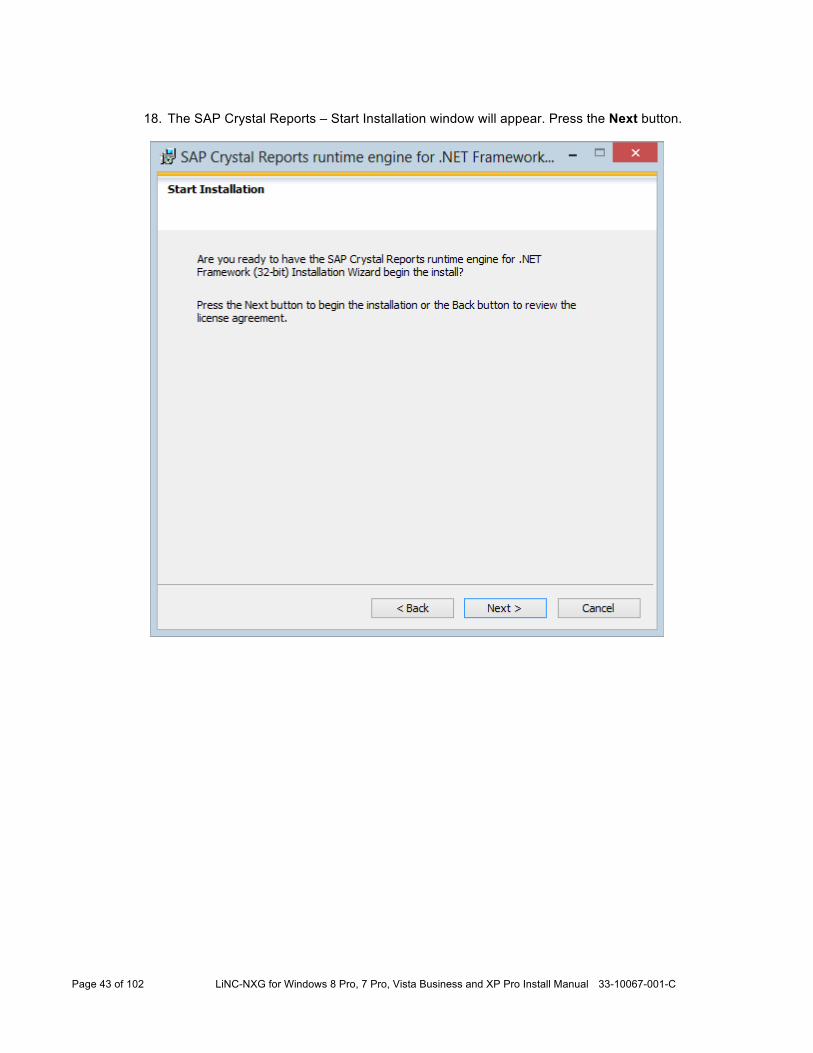
18. The SAP Crystal Reports – Start Installation window will appear. Press the Next button.
Page 44 of 102 LiNC-NXG for Windows 8 Pro, 7 Pro, Vista Business and XP Pro Install Manual 33-10067-001-C
19. The installer will now install SAP Crystal Reports and all its components.
Page 45 of 102 LiNC-NXG for Windows 8 Pro, 7 Pro, Vista Business and XP Pro Install Manual 33-10067-001-C
20. When SAP Crystal Reports installion is complete, click Finish to launch the LiNC-NXG
Installation Wizard.
Page 46 of 102 LiNC-NXG for Windows 8 Pro, 7 Pro, Vista Business and XP Pro Install Manual 33-10067-001-C
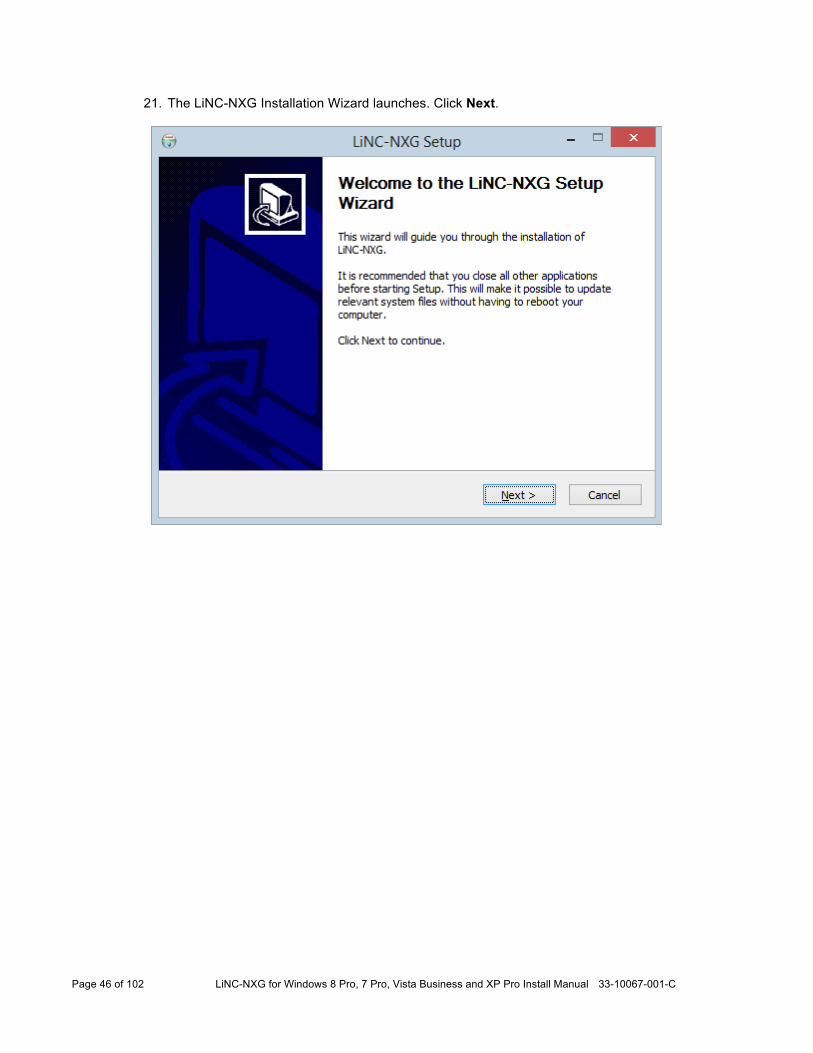
21. The LiNC-NXG Installation Wizard launches. Click Next.
Page 47 of 102 LiNC-NXG for Windows 8 Pro, 7 Pro, Vista Business and XP Pro Install Manual 33-10067-001-C
22. The LiNC-NXG License Agreement will appear. Press the I Agree button
Page 48 of 102 LiNC-NXG for Windows 8 Pro, 7 Pro, Vista Business and XP Pro Install Manual 33-10067-001-C
23. The Customer Information window will load. Fill in the Name and Organization fields. Additionally, fill in the Serial number of the program that you received from PCSC or your PCSC-approved dealer.
NOTE: Please reference the LiNC-NXG software DVD for the serial
number.
NOTE: PCSC provides a Temporary License number within the LiNC-NXG install disk. The Temporary License will register the PC and will allow LiNC-NXG to be operational for 30 days before the program reverts back to a 48hr. DEMO mode.
NOTE: If you do not have a serial number (or Temporary License number), entering all
zeros (0) will allow you to use the system within a 48hr. DEMO mode. NOTE: In ‘DEMO’ mode, the default Site Code is 255.
NOTE: In ‘DEMO’ mode, the system is limited to the number of readers and cards that
can be defined and also has a.default Site Code of 255.
24. Press the Next button to continue.
Page 49 of 102 LiNC-NXG for Windows 8 Pro, 7 Pro, Vista Business and XP Pro Install Manual 33-10067-001-C
25. You will be asked to choose which components of LiNC-NXG you wish to have installed. Select Host as the type of install (the other types of install are “Workstation” and “Concentrator”).
Page 50 of 102 LiNC-NXG for Windows 8 Pro, 7 Pro, Vista Business and XP Pro Install Manual 33-10067-001-C
26. In the Choose Components window, the Installation Wizard will automatically choose the necessary components for the installation. Click Next to continue.
Page 51 of 102 LiNC-NXG for Windows 8 Pro, 7 Pro, Vista Business and XP Pro Install Manual 33-10067-001-C
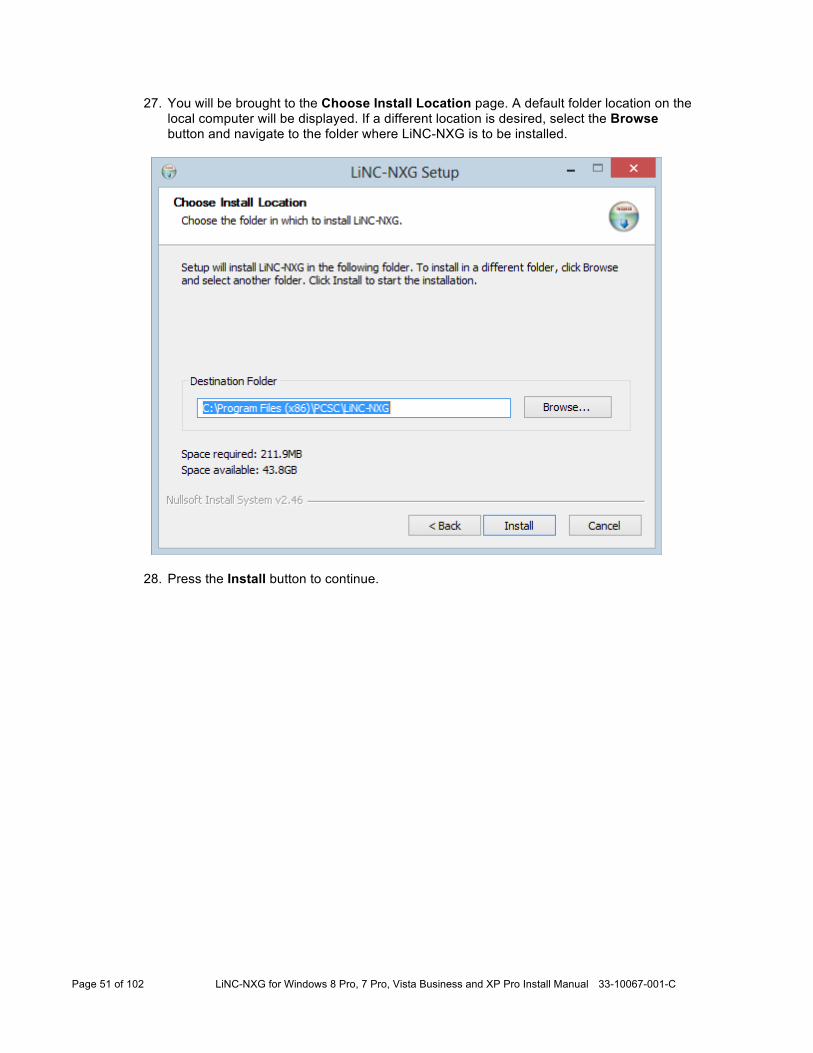
27. You will be brought to the Choose Install Location page. A default folder location on the local computer will be displayed. If a different location is desired, select the Browse button and navigate to the folder where LiNC-NXG is to be installed.
28. Press the Install button to continue.
Page 52 of 102 LiNC-NXG for Windows 8 Pro, 7 Pro, Vista Business and XP Pro Install Manual 33-10067-001-C
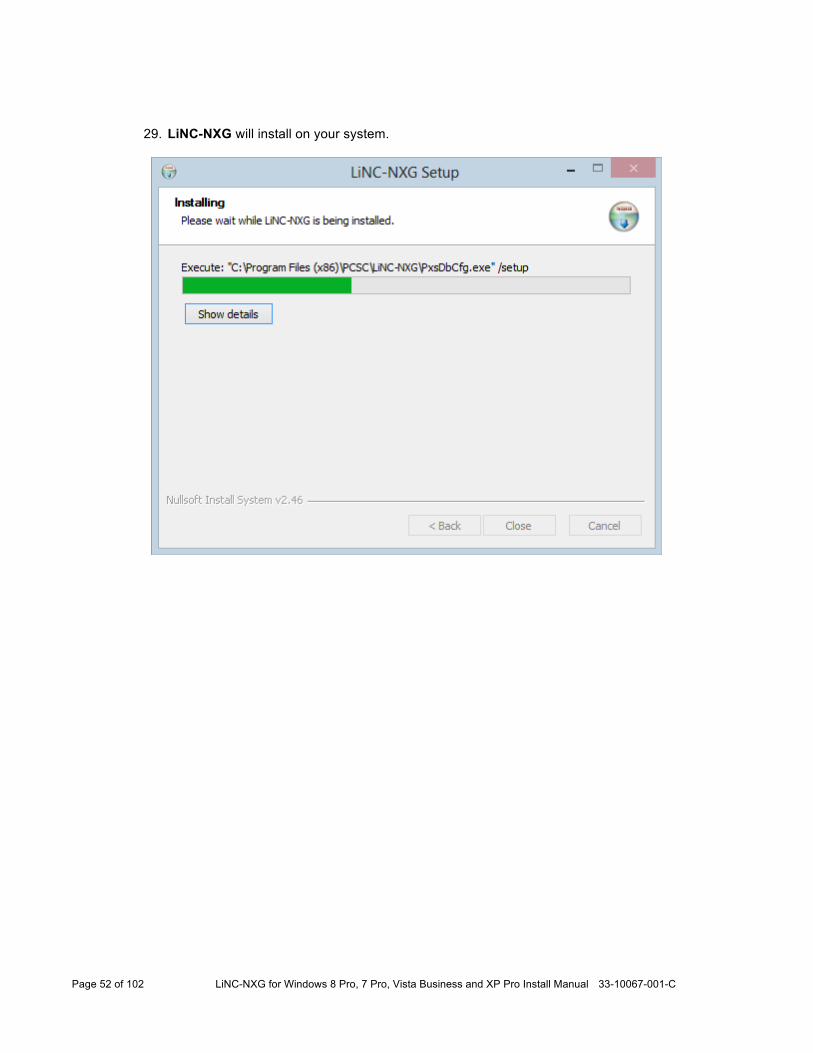
29. LiNC-NXG will install on your system.
Page 53 of 102 LiNC-NXG for Windows 8 Pro, 7 Pro, Vista Business and XP Pro Install Manual 33-10067-001-C
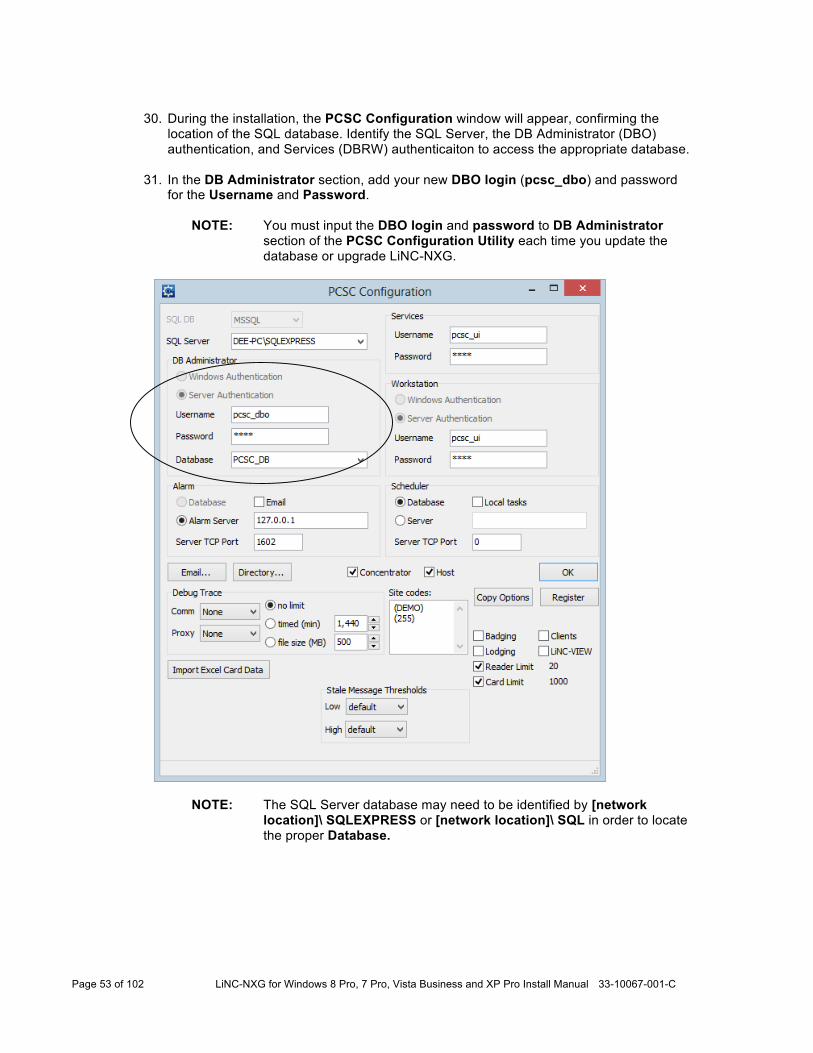
30. During the installation, the PCSC Configuration window will appear, confirming the
location of the SQL database. Identify the SQL Server, the DB Administrator (DBO) authentication, and Services (DBRW) authenticaiton to access the appropriate database.
31. In the DB Administrator section, add your new DBO login (pcsc_dbo) and password for the Username and Password.
NOTE: You must input the DBO login and password to DB Administrator
section of the PCSC Configuration Utility each time you update the database or upgrade LiNC-NXG.
NOTE: The SQL Server database may need to be identified by [network location]\ SQLEXPRESS or [network location]\ SQL in order to locate the proper Database.
Page 54 of 102 LiNC-NXG for Windows 8 Pro, 7 Pro, Vista Business and XP Pro Install Manual 33-10067-001-C
32. In the Services and the Workstation (UI) sections, add the DBRW login (pcsc_ui) and password for the Username and Password.
Page 55 of 102 LiNC-NXG for Windows 8 Pro, 7 Pro, Vista Business and XP Pro Install Manual 33-10067-001-C
33. In the Scheduler section, a select the following: • Select the Database radio button if the computer is monitoring the database
(standalone/host) • Select the Server radio button if the computer is NOT monitoring the
database (workstation) • Check the Local Tasks checkbox if the computer is going to run local tasks
such as running reports.
NOTE: Within the Alarm section, the Alarm Server will have the IP Address of the Host Computer. All Workstations should have the Host Computer IP Address also. Check with your IT Administrator for the correct settings.
NOTE: To learn about how to set up alarm notifications via email, see PCSC
technical bulletin, Setting up an Alarm Notification Email within LiNC-NXG (P/N 39-40011-001)..
34. Press the OK button.
35. When the Installation is finished, the Installation Complete page will display. Press the
Close button. You will be brought back to your Windows™ desktop.
Page 56 of 102 LiNC-NXG for Windows 8 Pro, 7 Pro, Vista Business and XP Pro Install Manual 33-10067-001-C
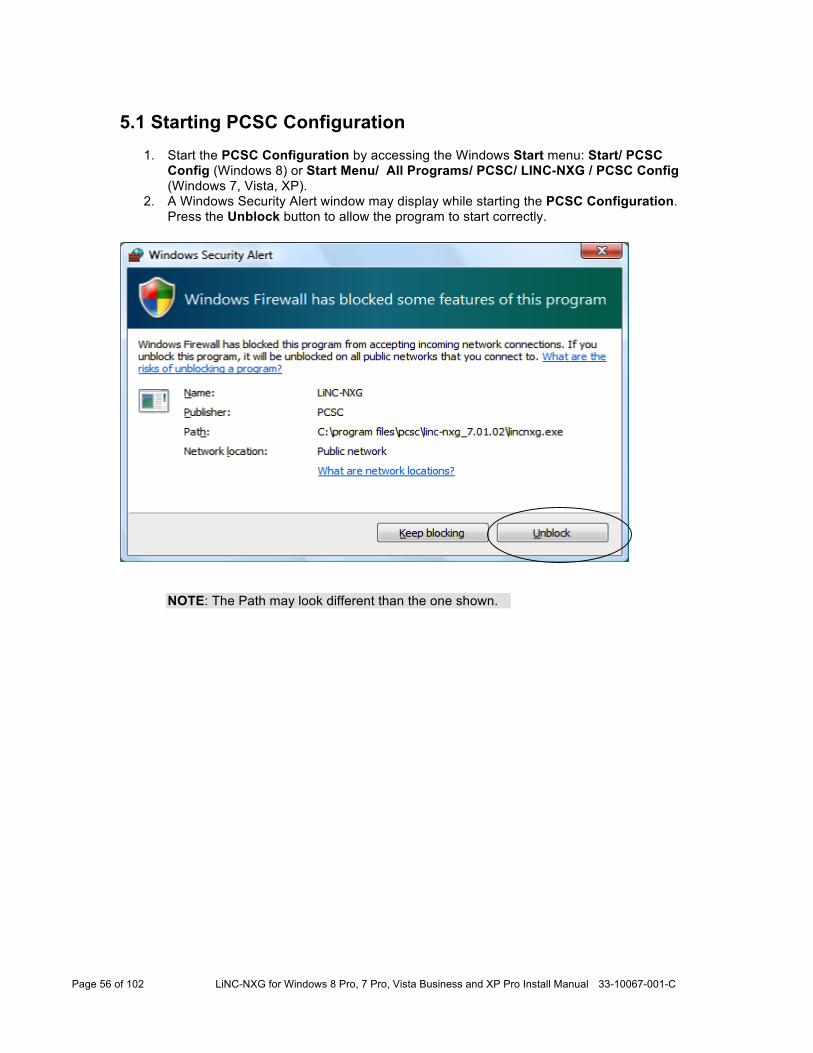
5.1 Starting PCSC Configuration
1. Start the PCSC Configuration by accessing the Windows Start menu: Start/ PCSC
Config (Windows 8) or Start Menu/ All Programs/ PCSC/ LINC-NXG / PCSC Config (Windows 7, Vista, XP).
2. A Windows Security Alert window may display while starting the PCSC Configuration. Press the Unblock button to allow the program to start correctly.
NOTE: The Path may look different than the one shown.
Page 57 of 102 LiNC-NXG for Windows 8 Pro, 7 Pro, Vista Business and XP Pro Install Manual 33-10067-001-C
5.2 Registering the LiNC-NXG Software Each copy of LiNC-NXG needs to be registered with PCSC prior to its proper use with the system. 5.2.1 Registering via the Internet.
NOTE: An Internet connection is required to complete the Registration process. Should an Internet connection not be available, please see Section 5.2.2.
1. Open the PCSC Configuration window. 2. In the lower right hand corner press on the Register button.
Page 58 of 102 LiNC-NXG for Windows 8 Pro, 7 Pro, Vista Business and XP Pro Install Manual 33-10067-001-C
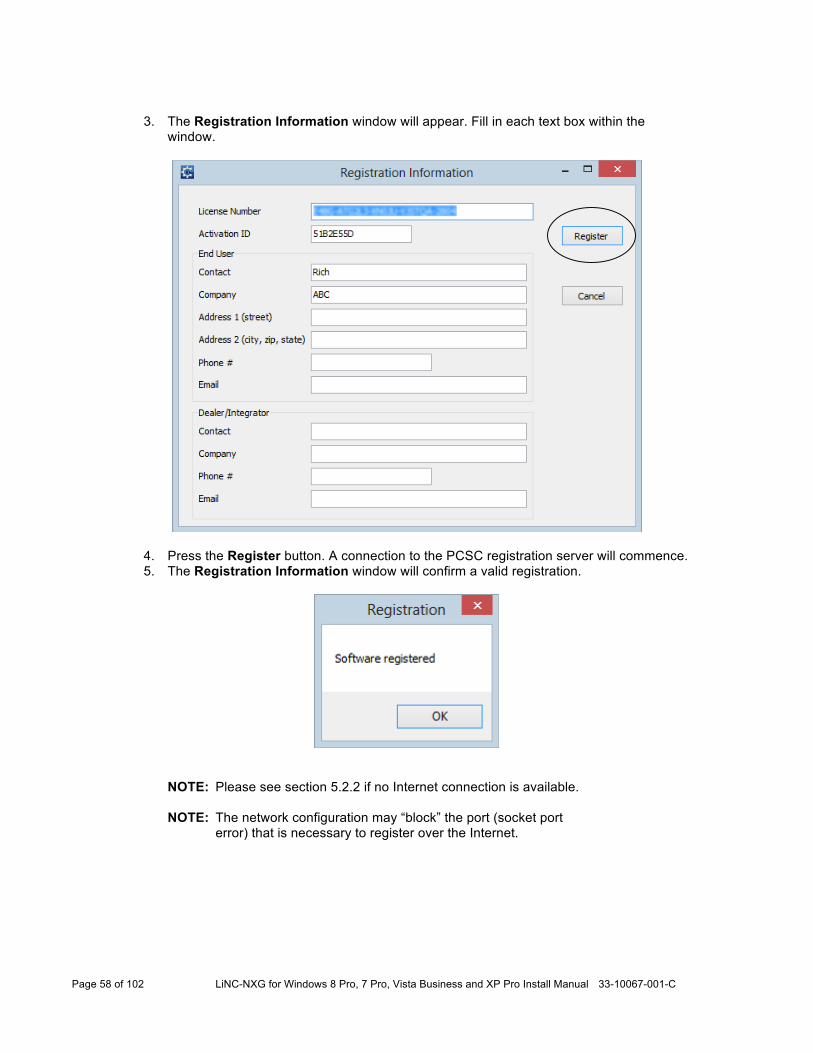
3. The Registration Information window will appear. Fill in each text box within the
window.
4. Press the Register button. A connection to the PCSC registration server will commence. 5. The Registration Information window will confirm a valid registration.
NOTE: Please see section 5.2.2 if no Internet connection is available.
NOTE: The network configuration may “block” the port (socket port error) that is necessary to register over the Internet.
Page 59 of 102 LiNC-NXG for Windows 8 Pro, 7 Pro, Vista Business and XP Pro Install Manual 33-10067-001-C
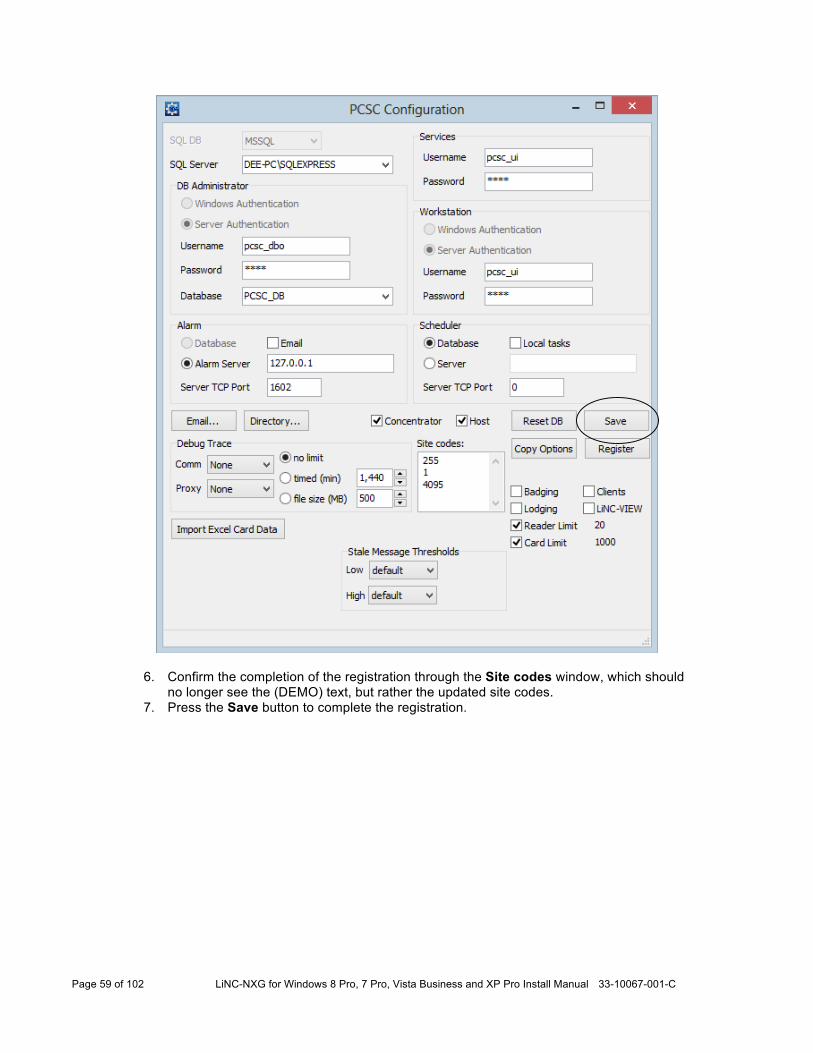
6. Confirm the completion of the registration through the Site codes window, which should no longer see the (DEMO) text, but rather the updated site codes.
7. Press the Save button to complete the registration.
Page 60 of 102 LiNC-NXG for Windows 8 Pro, 7 Pro, Vista Business and XP Pro Install Manual 33-10067-001-C
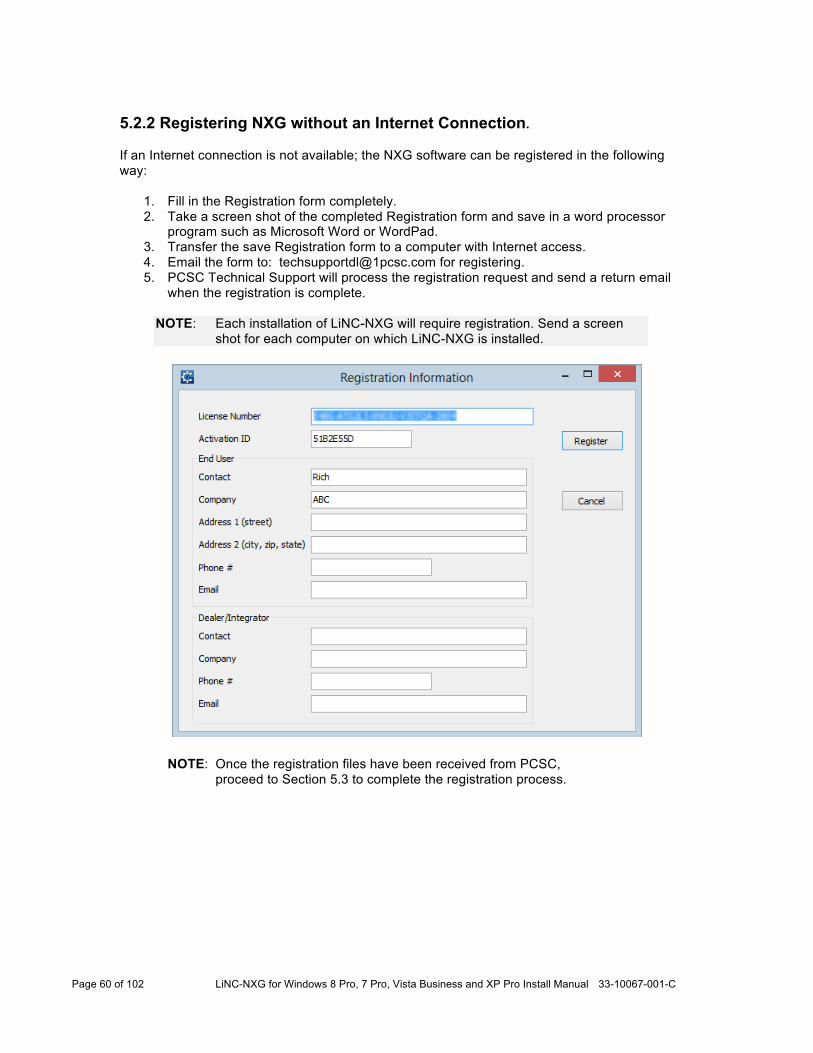
5.2.2 Registering NXG without an Internet Connection. If an Internet connection is not available; the NXG software can be registered in the following way:
1. Fill in the Registration form completely. 2. Take a screen shot of the completed Registration form and save in a word processor
program such as Microsoft Word or WordPad. 3. Transfer the save Registration form to a computer with Internet access. 4. Email the form to: [email protected] for registering. 5. PCSC Technical Support will process the registration request and send a return email
when the registration is complete.
NOTE: Each installation of LiNC-NXG will require registration. Send a screen shot for each computer on which LiNC-NXG is installed.
NOTE: Once the registration files have been received from PCSC, proceed to Section 5.3 to complete the registration process.
Page 61 of 102 LiNC-NXG for Windows 8 Pro, 7 Pro, Vista Business and XP Pro Install Manual 33-10067-001-C
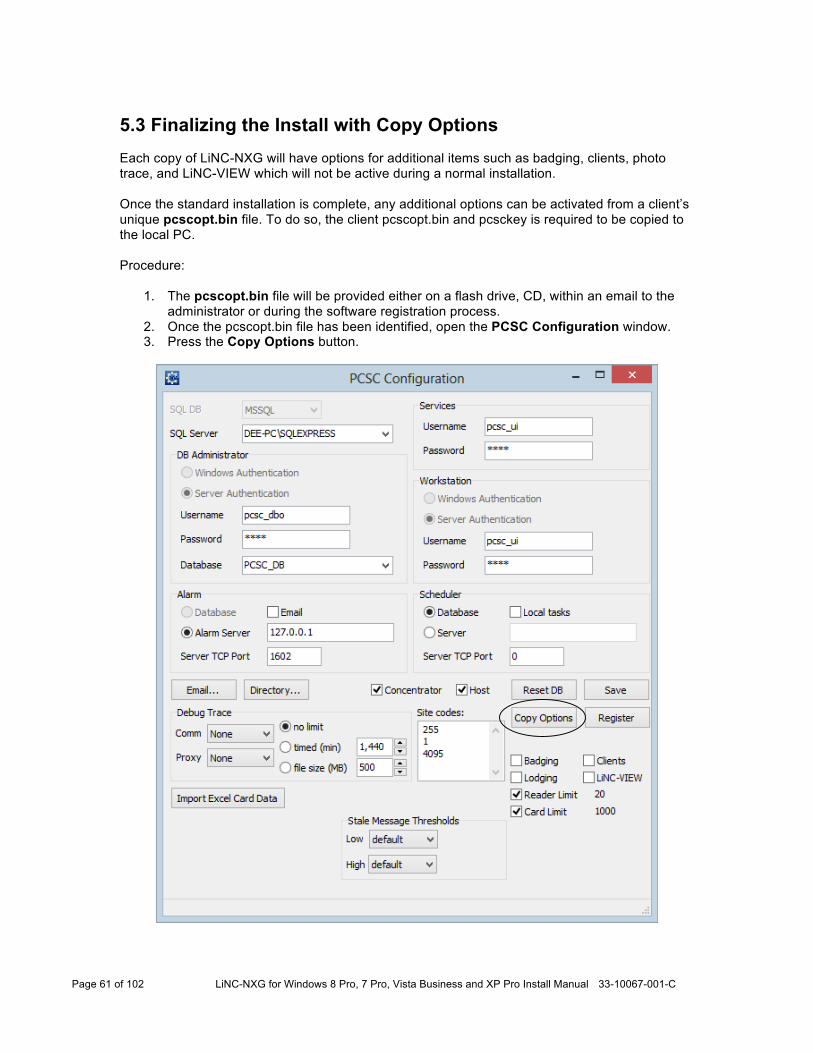
5.3 Finalizing the Install with Copy Options Each copy of LiNC-NXG will have options for additional items such as badging, clients, photo trace, and LiNC-VIEW which will not be active during a normal installation. Once the standard installation is complete, any additional options can be activated from a client’s unique pcscopt.bin file. To do so, the client pcscopt.bin and pcsckey is required to be copied to the local PC. Procedure:
1. The pcscopt.bin file will be provided either on a flash drive, CD, within an email to the administrator or during the software registration process.
2. Once the pcscopt.bin file has been identified, open the PCSC Configuration window. 3. Press the Copy Options button.
Page 62 of 102 LiNC-NXG for Windows 8 Pro, 7 Pro, Vista Business and XP Pro Install Manual 33-10067-001-C
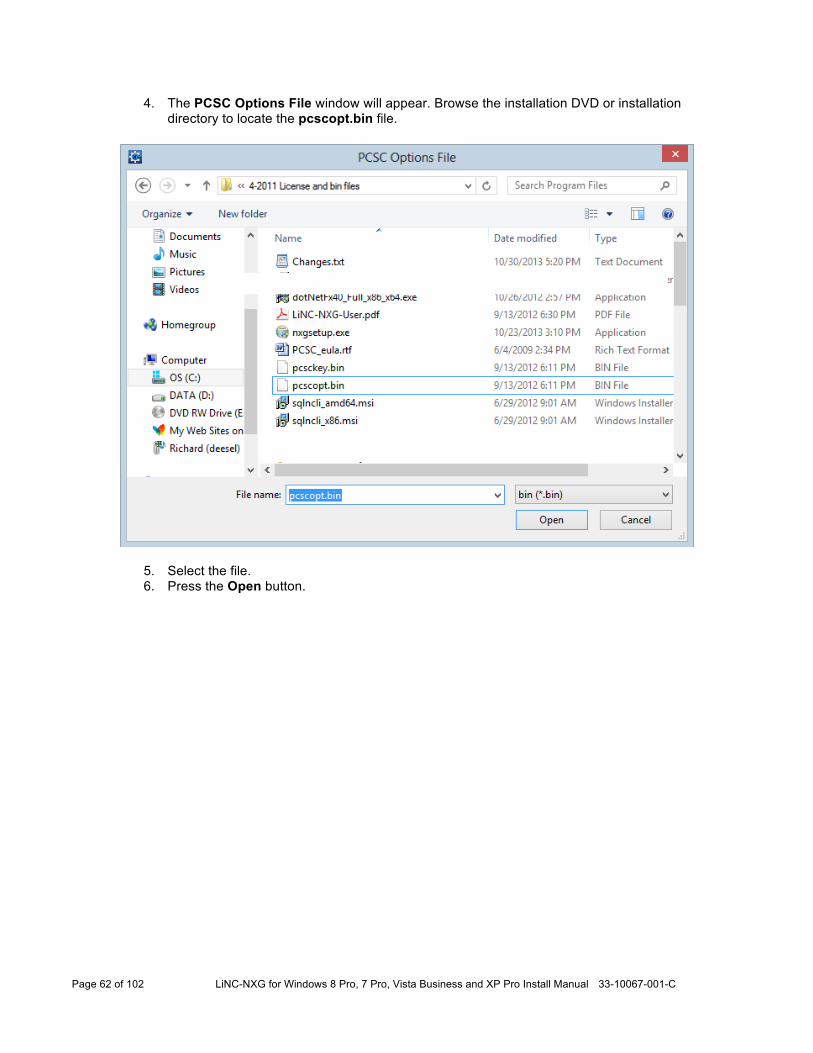
4. The PCSC Options File window will appear. Browse the installation DVD or installation directory to locate the pcscopt.bin file.
5. Select the file. 6. Press the Open button.
Page 63 of 102 LiNC-NXG for Windows 8 Pro, 7 Pro, Vista Business and XP Pro Install Manual 33-10067-001-C
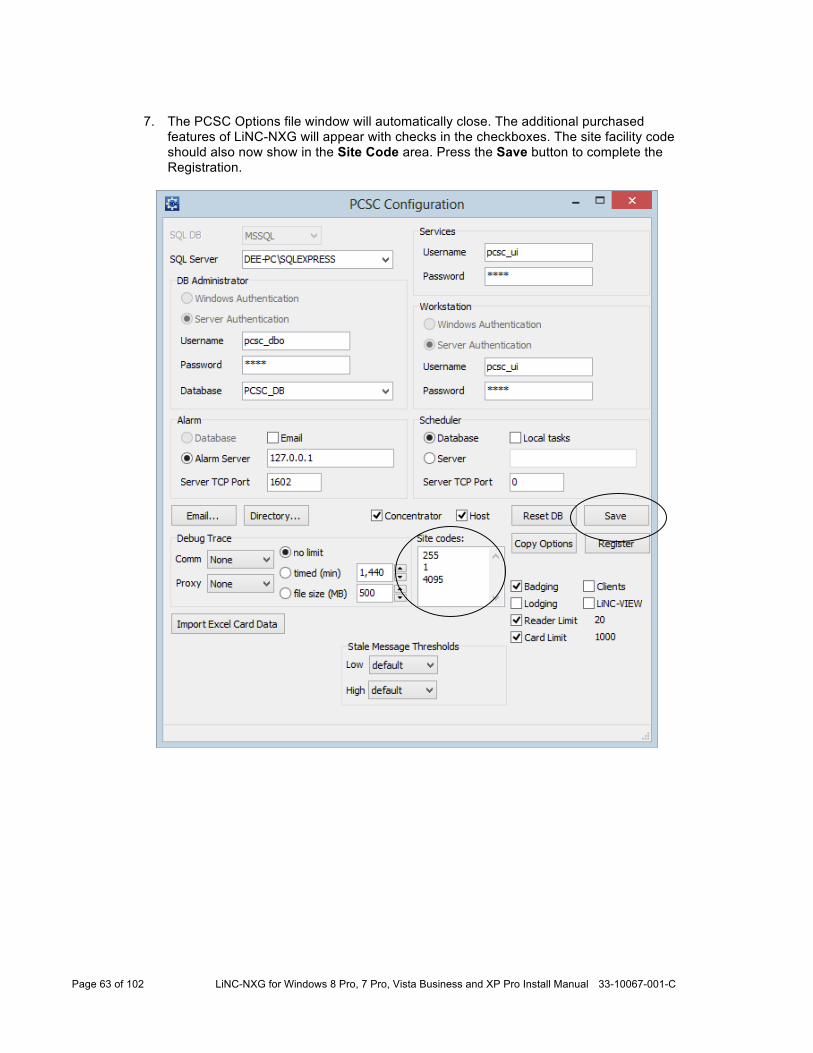
7. The PCSC Options file window will automatically close. The additional purchased
features of LiNC-NXG will appear with checks in the checkboxes. The site facility code should also now show in the Site Code area. Press the Save button to complete the Registration.
Page 64 of 102 LiNC-NXG for Windows 8 Pro, 7 Pro, Vista Business and XP Pro Install Manual 33-10067-001-C
5.4 Upgrading LiNC-NXG To upgrade to the most recent version of LiNC-NXG, it is not necessary to uninstall the current version of LiNC-NXG. Insert the new LiNC-NXG DVD and run the Setup procedure. Follow the steps in Section 5.0 to install the new version.
Page 65 of 102 LiNC-NXG for Windows 8 Pro, 7 Pro, Vista Business and XP Pro Install Manual 33-10067-001-C
6.0 Installing LiNC-NXG Workstation
NOTE: A workstation will require the same hardware specifications as a standard installation. Please see the Hardware Specifications at Section 2.2 for more information.
1. Insert the LiNC-NXG DVD into the CD-ROM drive or download the appropriate files from
the PCSC Server. 2. If using a DVD, LiNC-NXG will activate an AutoPlay of the LiNC-NXG Installer. If you
choose, you can instead press the Open folder to view files icon.
Page 66 of 102 LiNC-NXG for Windows 8 Pro, 7 Pro, Vista Business and XP Pro Install Manual 33-10067-001-C
3. When you open the LiNC-NXG files, you will see multiple folders and files.
4. In the LiNC-NXG window, double-click the NXG Setup application.
NOTE: For Vista Business Edition Users, the SQL Server 2012 Express application must be Run as administrator:
d) Select the LINC-NXG icon e) Right-click on the application f) Select Run as administrator
Page 67 of 102 LiNC-NXG for Windows 8 Pro, 7 Pro, Vista Business and XP Pro Install Manual 33-10067-001-C
5. If the computer does not have Microsoft .NET Framework 4 installed, it will automatically
start the installation with that software. Press the Install button to continue.
6. This will bring you to the Microsoft .NET Framework 4 – Installation Progress window.
Page 68 of 102 LiNC-NXG for Windows 8 Pro, 7 Pro, Vista Business and XP Pro Install Manual 33-10067-001-C
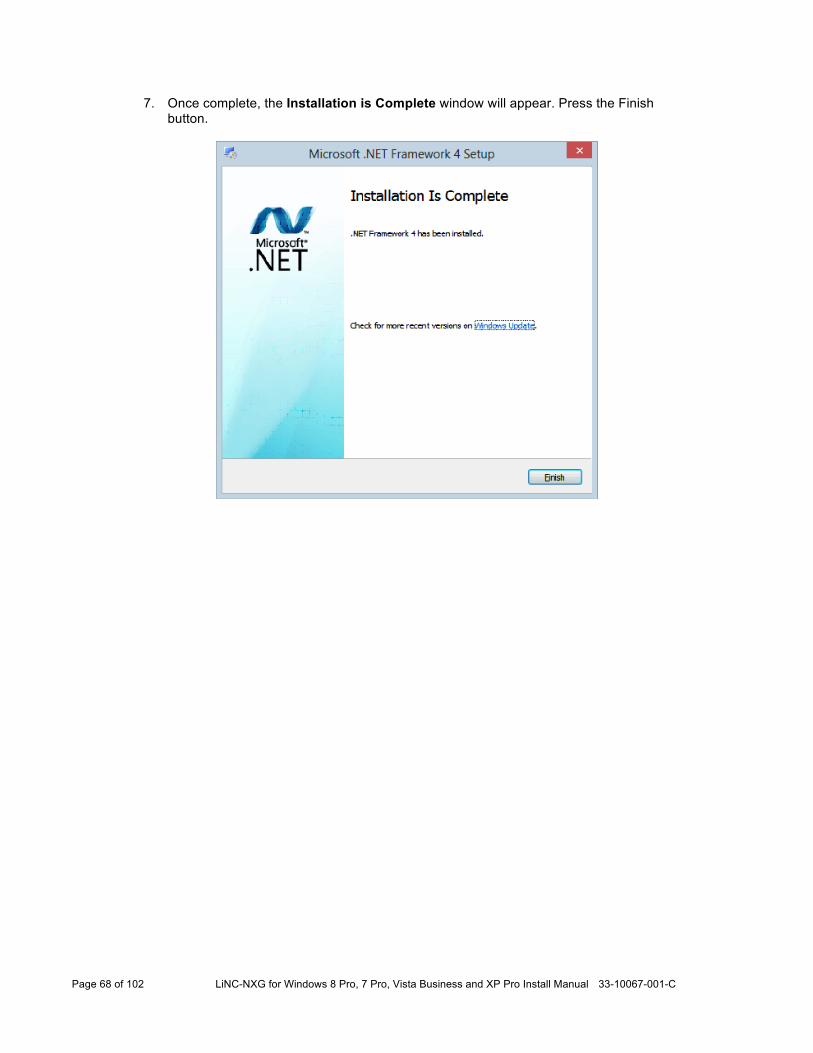
7. Once complete, the Installation is Complete window will appear. Press the Finish button.
Page 69 of 102 LiNC-NXG for Windows 8 Pro, 7 Pro, Vista Business and XP Pro Install Manual 33-10067-001-C
8. If the computer does not have Microsoft .SQL Server Native Client installed, it will
automatically start the installation with that software. Press the Next button to continue.
Page 70 of 102 LiNC-NXG for Windows 8 Pro, 7 Pro, Vista Business and XP Pro Install Manual 33-10067-001-C
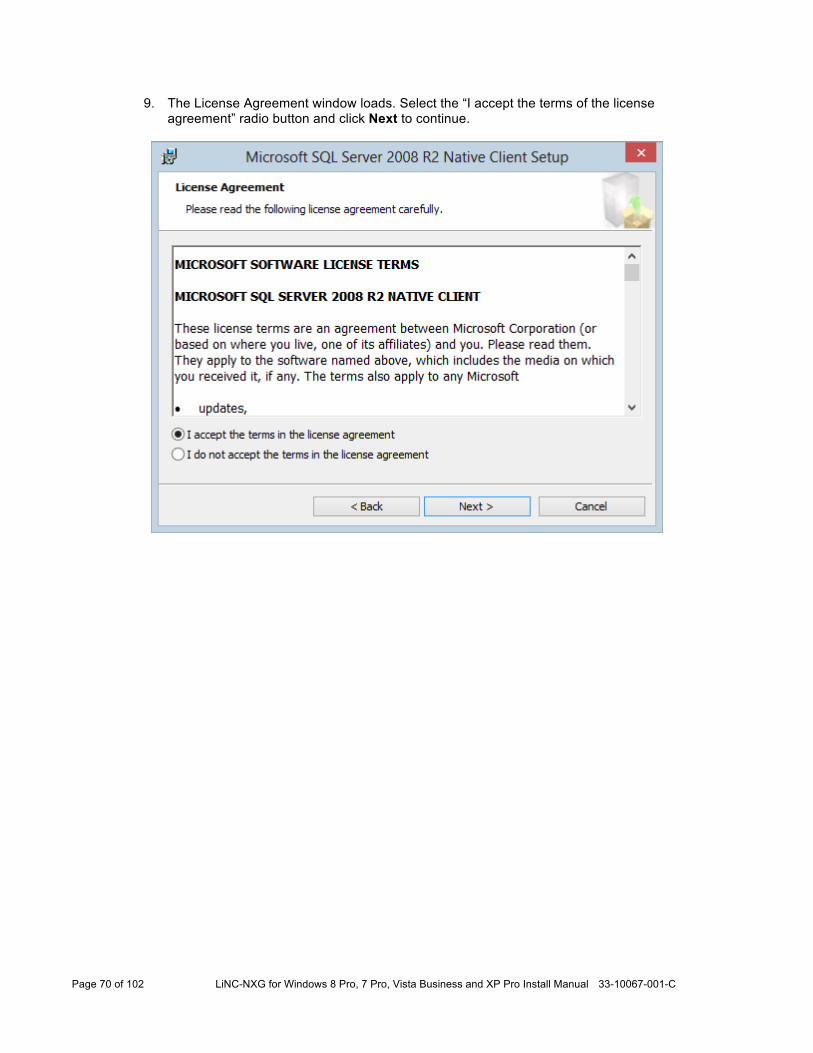
9. The License Agreement window loads. Select the “I accept the terms of the license agreement” radio button and click Next to continue.
Page 71 of 102 LiNC-NXG for Windows 8 Pro, 7 Pro, Vista Business and XP Pro Install Manual 33-10067-001-C
10. You are asked for registration information. Type in the appropriate name and company and click Next.
Page 72 of 102 LiNC-NXG for Windows 8 Pro, 7 Pro, Vista Business and XP Pro Install Manual 33-10067-001-C
11. Select the feature sets you need. Client Components is required for LiNC-NXG installation.
12. Right-click Client Components and select, “Will be installed on local hard drive.” SQL Server Native Client SDK is optional and does not require installation. Click Next.
Page 73 of 102 LiNC-NXG for Windows 8 Pro, 7 Pro, Vista Business and XP Pro Install Manual 33-10067-001-C
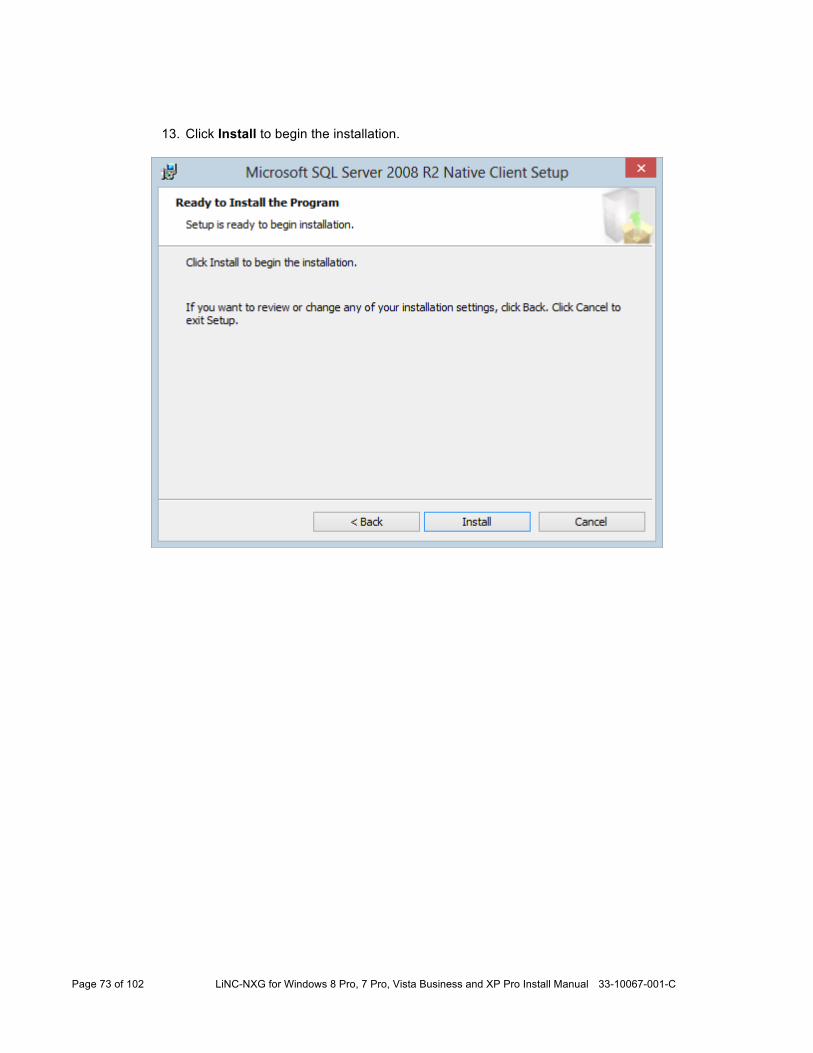
13. Click Install to begin the installation.
Page 74 of 102 LiNC-NXG for Windows 8 Pro, 7 Pro, Vista Business and XP Pro Install Manual 33-10067-001-C
14. When the installation is complete, click Finish to proceed to the next step in LiNC-
NXG installation.
Page 75 of 102 LiNC-NXG for Windows 8 Pro, 7 Pro, Vista Business and XP Pro Install Manual 33-10067-001-C
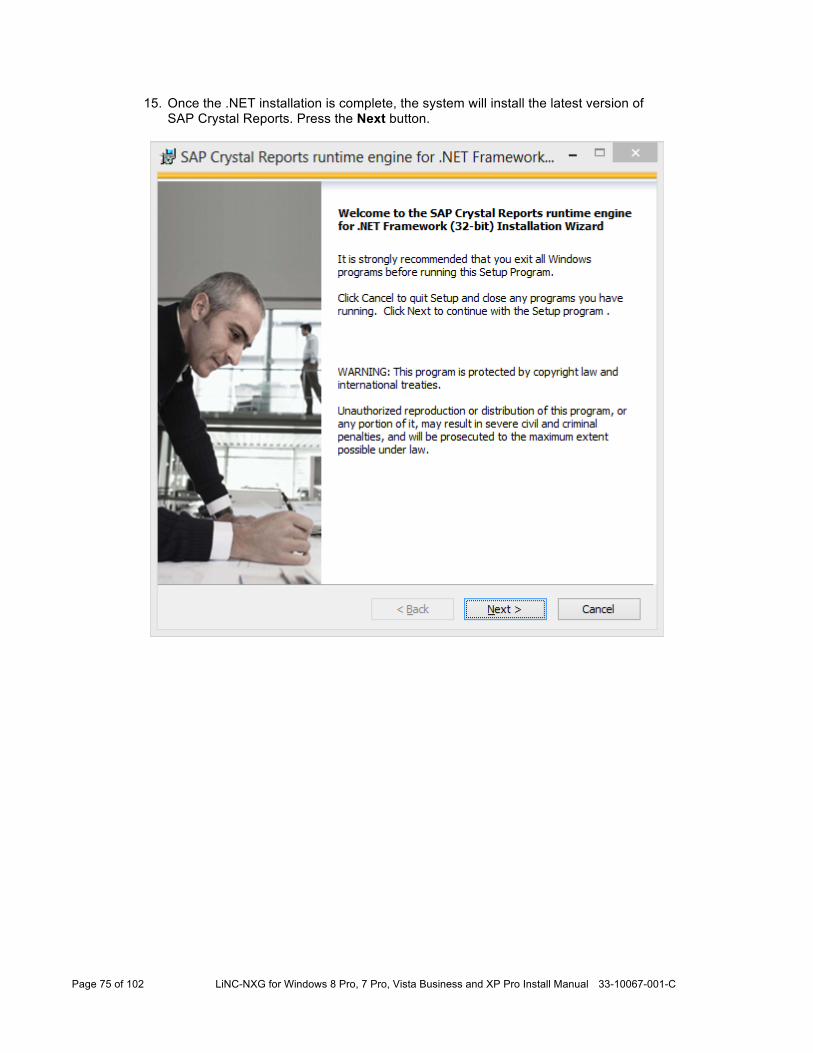
15. Once the .NET installation is complete, the system will install the latest version of SAP Crystal Reports. Press the Next button.
Page 76 of 102 LiNC-NXG for Windows 8 Pro, 7 Pro, Vista Business and XP Pro Install Manual 33-10067-001-C
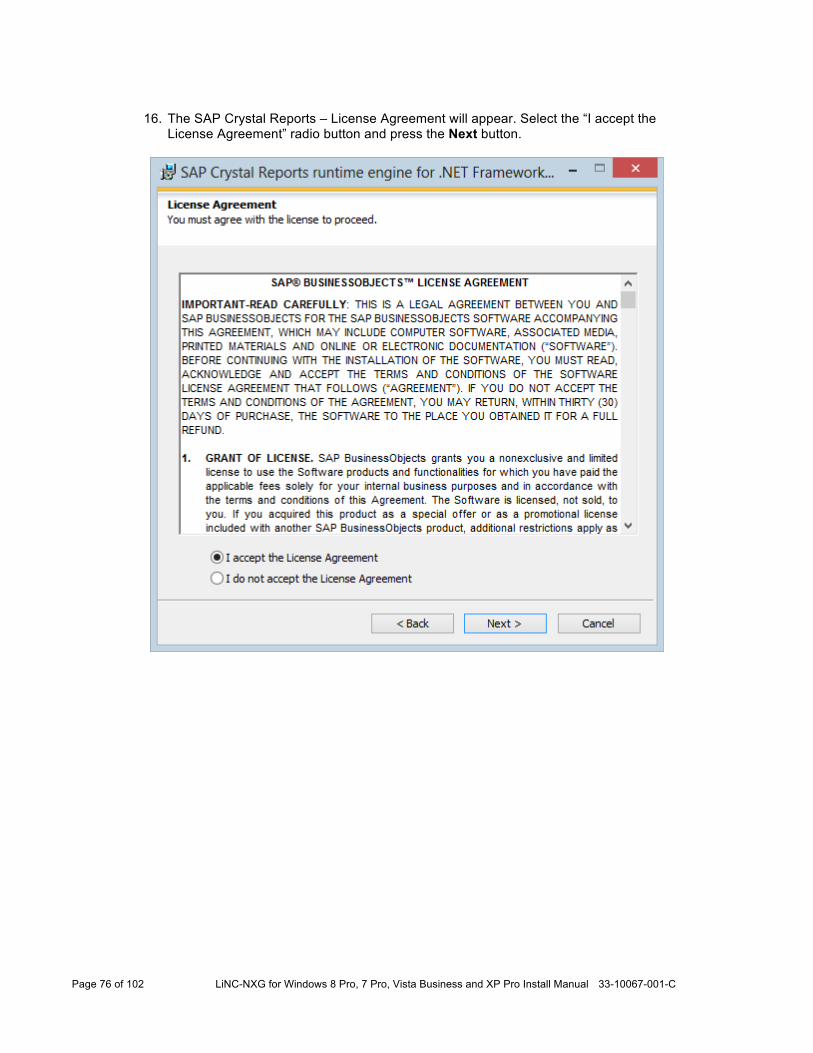
16. The SAP Crystal Reports – License Agreement will appear. Select the “I accept the
License Agreement” radio button and press the Next button.
Page 77 of 102 LiNC-NXG for Windows 8 Pro, 7 Pro, Vista Business and XP Pro Install Manual 33-10067-001-C
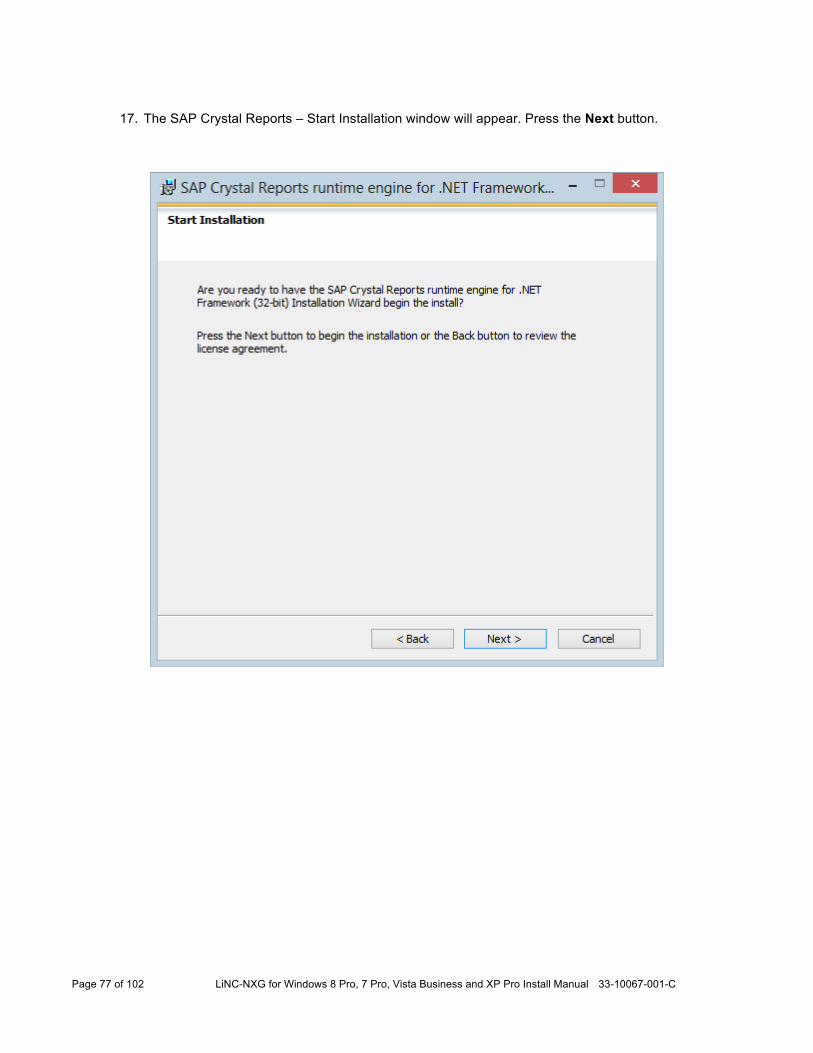
17. The SAP Crystal Reports – Start Installation window will appear. Press the Next button.
Page 78 of 102 LiNC-NXG for Windows 8 Pro, 7 Pro, Vista Business and XP Pro Install Manual 33-10067-001-C
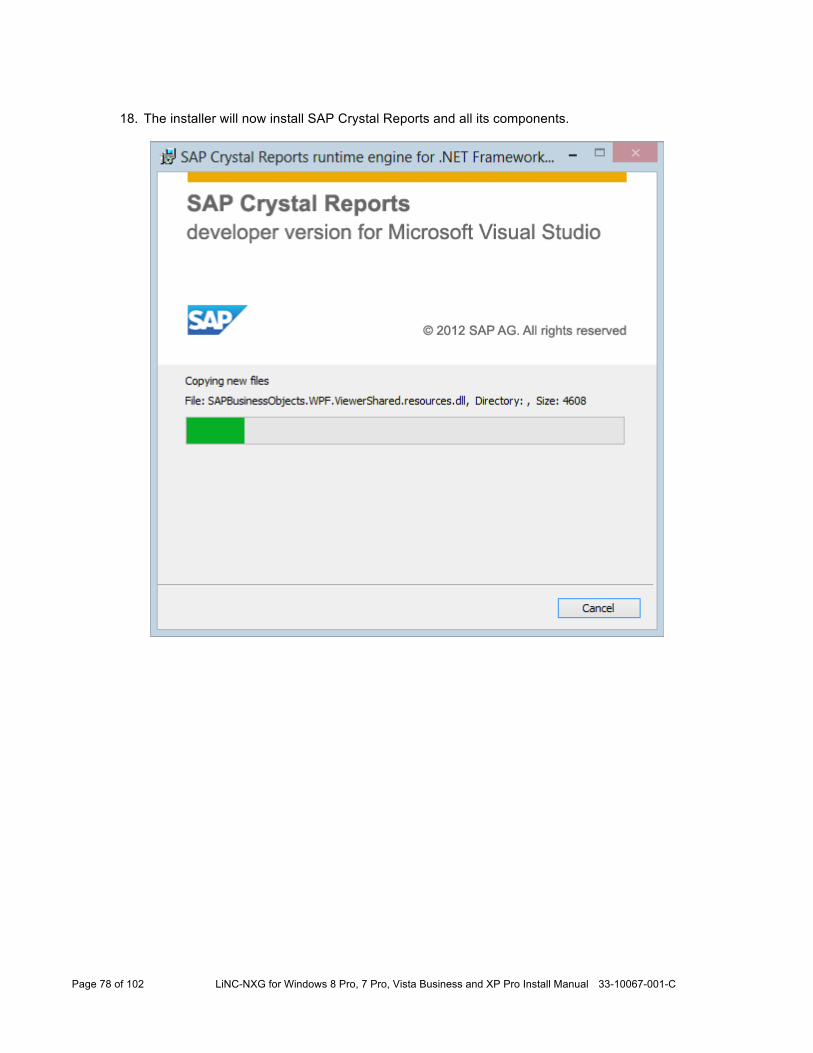
18. The installer will now install SAP Crystal Reports and all its components.
Page 79 of 102 LiNC-NXG for Windows 8 Pro, 7 Pro, Vista Business and XP Pro Install Manual 33-10067-001-C
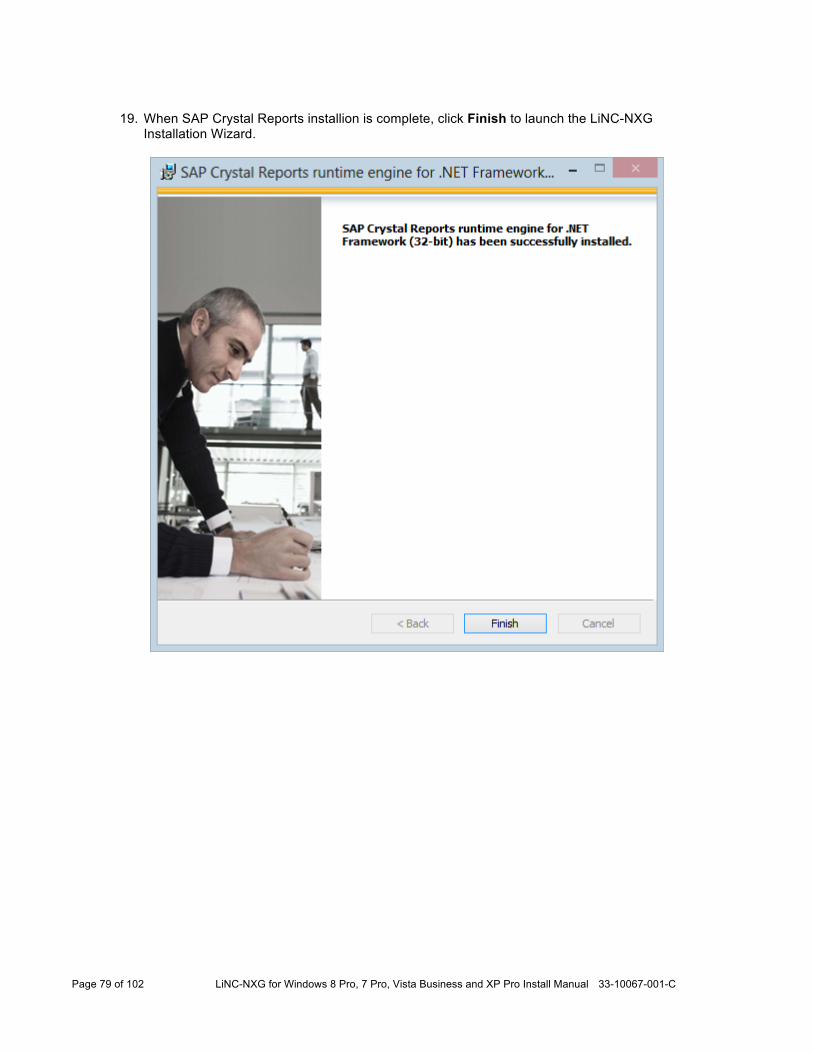
19. When SAP Crystal Reports installion is complete, click Finish to launch the LiNC-NXG
Installation Wizard.
Page 80 of 102 LiNC-NXG for Windows 8 Pro, 7 Pro, Vista Business and XP Pro Install Manual 33-10067-001-C
20. The LiNC-NXG Installation Wizard launches. Click Next.
Page 81 of 102 LiNC-NXG for Windows 8 Pro, 7 Pro, Vista Business and XP Pro Install Manual 33-10067-001-C
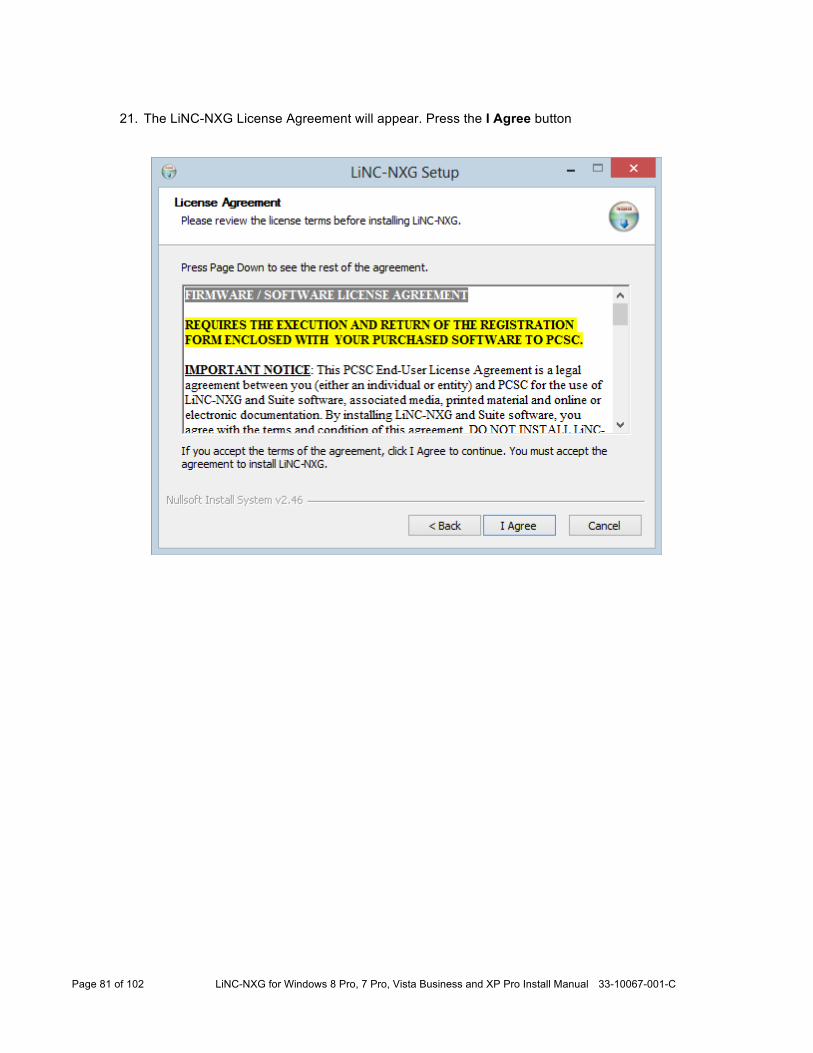
21. The LiNC-NXG License Agreement will appear. Press the I Agree button
Page 82 of 102 LiNC-NXG for Windows 8 Pro, 7 Pro, Vista Business and XP Pro Install Manual 33-10067-001-C
22. The Customer Information window will load. Fill in the Name and Organization fields.
Additionally, fill in the Serial number of the program that you received from PCSC or your PCSC-approved dealer.
NOTE: Please reference the LiNC-NXG software DVD for the serial number.
NOTE: PCSC provides a Temporary License number within the LiNC-NXG install disk. The Temporary License will register the PC and will allow LiNC-NXG to be operational for 30 days before the program reverts back to a 48hr. DEMO mode.
NOTE: If you do not have a serial number (or Temporary License number), entering all
zeros (0) will allow you to use the system within a 48hr. DEMO mode. 23. Press the Next button to continue.
Page 83 of 102 LiNC-NXG for Windows 8 Pro, 7 Pro, Vista Business and XP Pro Install Manual 33-10067-001-C
24. You will be asked to choose which components of LiNC-NXG you wish to have installed. Select Workstation as the type of install (the other types of install are “Host” and “Concentrator”).
Page 84 of 102 LiNC-NXG for Windows 8 Pro, 7 Pro, Vista Business and XP Pro Install Manual 33-10067-001-C
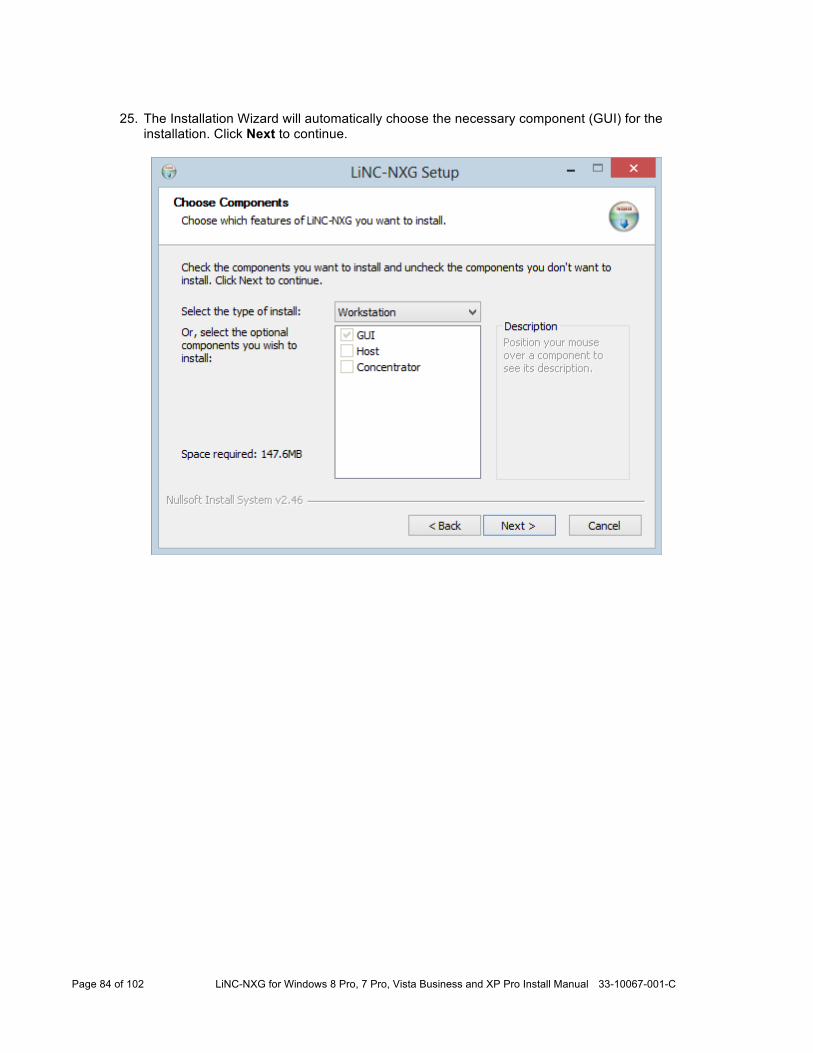
25. The Installation Wizard will automatically choose the necessary component (GUI) for the
installation. Click Next to continue.
Page 85 of 102 LiNC-NXG for Windows 8 Pro, 7 Pro, Vista Business and XP Pro Install Manual 33-10067-001-C
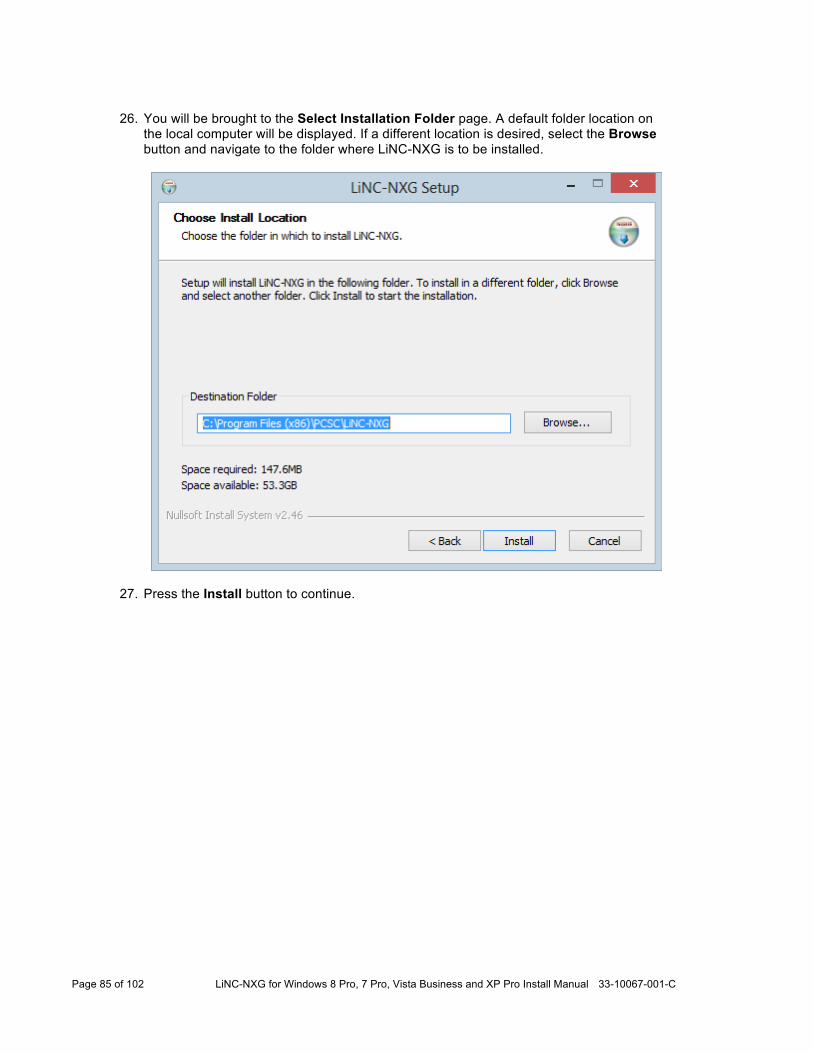
26. You will be brought to the Select Installation Folder page. A default folder location on
the local computer will be displayed. If a different location is desired, select the Browse button and navigate to the folder where LiNC-NXG is to be installed.
27. Press the Install button to continue.
Page 86 of 102 LiNC-NXG for Windows 8 Pro, 7 Pro, Vista Business and XP Pro Install Manual 33-10067-001-C
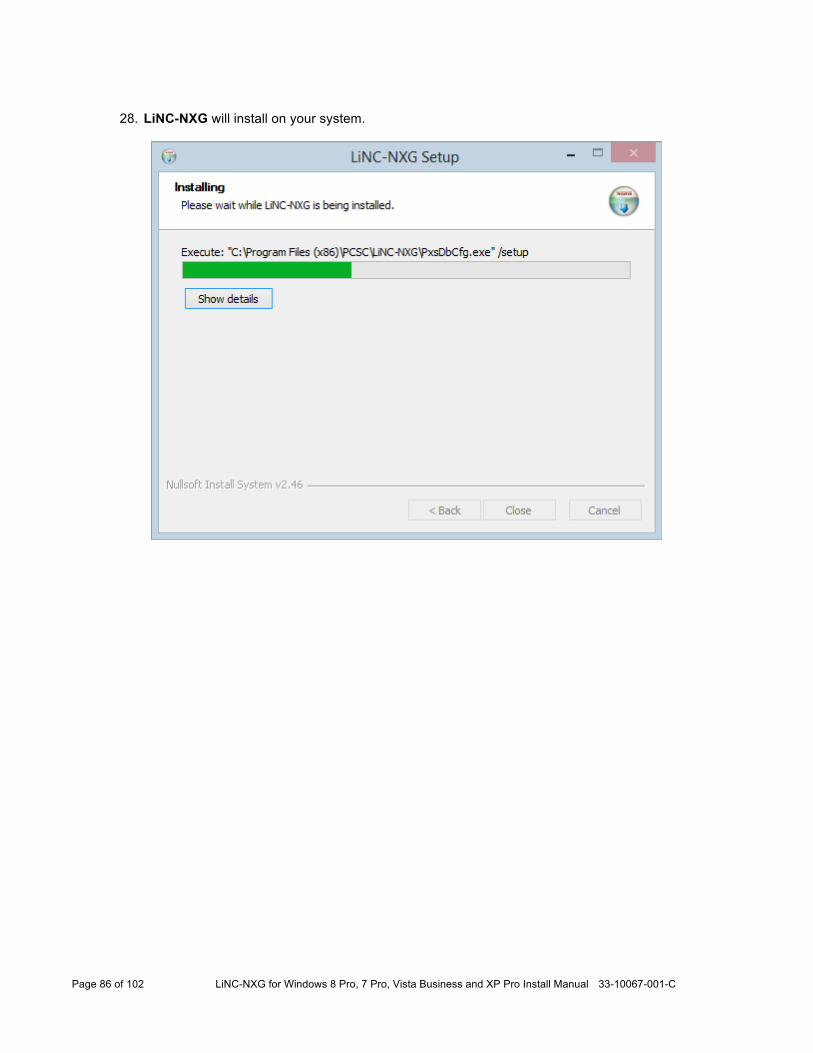
28. LiNC-NXG will install on your system.
Page 87 of 102 LiNC-NXG for Windows 8 Pro, 7 Pro, Vista Business and XP Pro Install Manual 33-10067-001-C
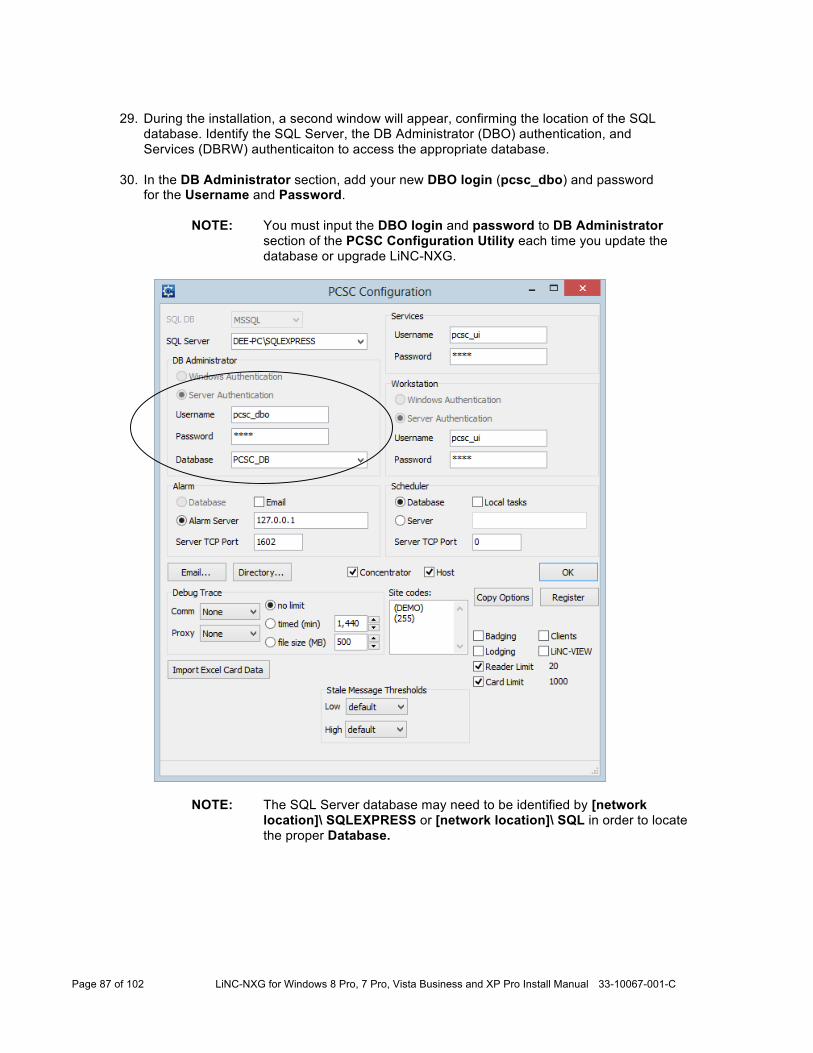
29. During the installation, a second window will appear, confirming the location of the SQL
database. Identify the SQL Server, the DB Administrator (DBO) authentication, and Services (DBRW) authenticaiton to access the appropriate database.
30. In the DB Administrator section, add your new DBO login (pcsc_dbo) and password for the Username and Password.
NOTE: You must input the DBO login and password to DB Administrator
section of the PCSC Configuration Utility each time you update the database or upgrade LiNC-NXG.
NOTE: The SQL Server database may need to be identified by [network location]\ SQLEXPRESS or [network location]\ SQL in order to locate the proper Database.
Page 88 of 102 LiNC-NXG for Windows 8 Pro, 7 Pro, Vista Business and XP Pro Install Manual 33-10067-001-C
31. In the Services and the Workstation (UI) sections, add the DBRW login (pcsc_ui) and
password for the Username and Password.
NOTE: Within the Alarm section, the Alarm Server will have the IP Address of the Host Computer. All Workstations should have the Host Computer IP Address also. Check with your IT Administrator for the correct settings.
NOTE: To learn about how to set up alarm notifications via email, see PCSC
technical bulletin, Setting up an Alarm Notification Email within LiNC-NXG (P/N 39-40011-001)..
32. Press the OK button.
Page 89 of 102 LiNC-NXG for Windows 8 Pro, 7 Pro, Vista Business and XP Pro Install Manual 33-10067-001-C
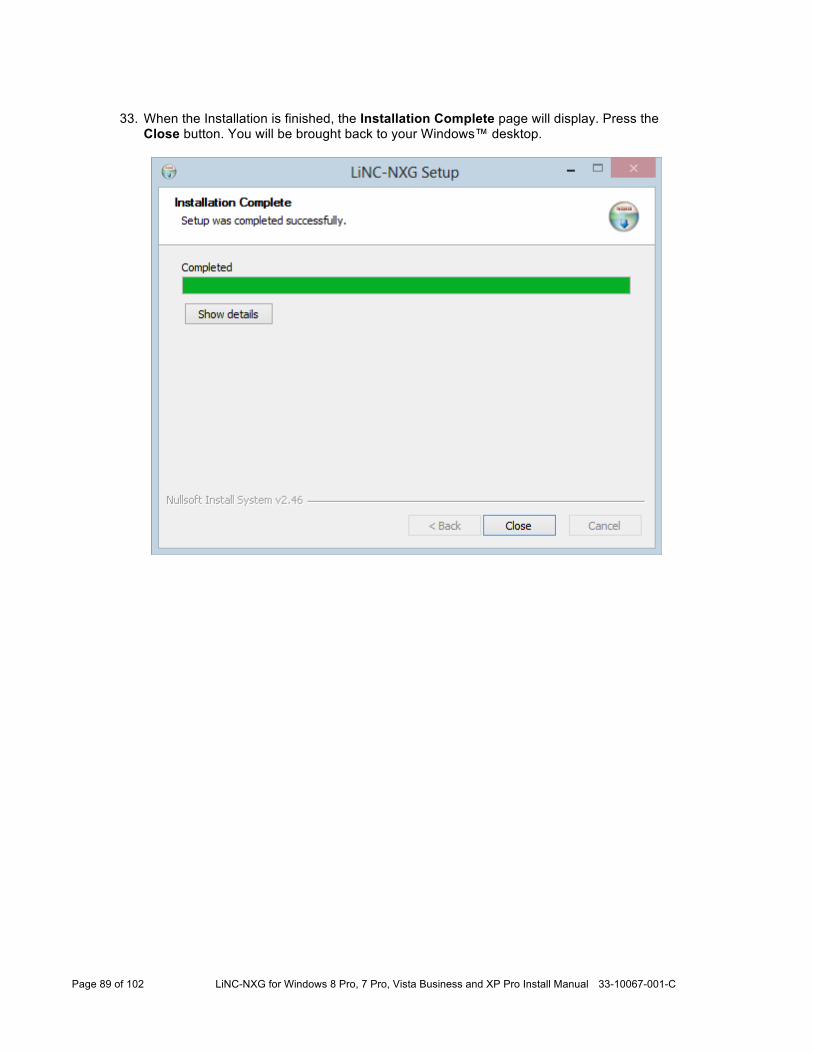
33. When the Installation is finished, the Installation Complete page will display. Press the
Close button. You will be brought back to your Windows™ desktop.
Page 90 of 102 LiNC-NXG for Windows 8 Pro, 7 Pro, Vista Business and XP Pro Install Manual 33-10067-001-C
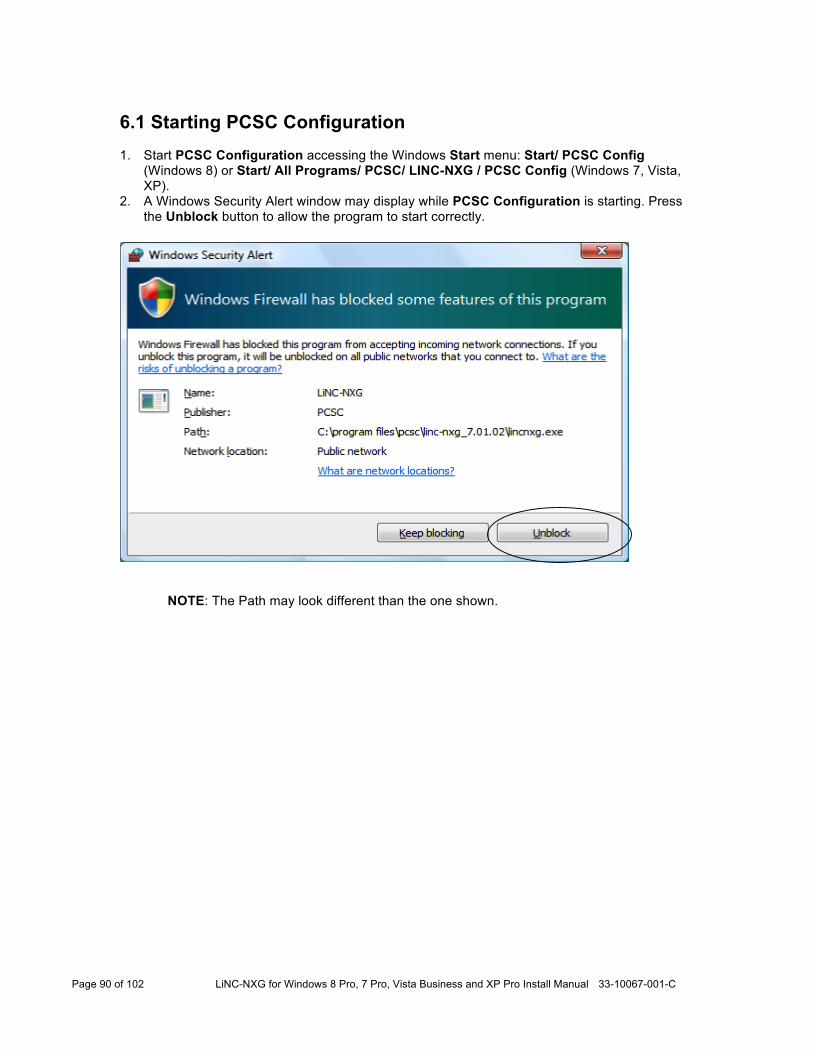
6.1 Starting PCSC Configuration
1. Start PCSC Configuration accessing the Windows Start menu: Start/ PCSC Config
(Windows 8) or Start/ All Programs/ PCSC/ LINC-NXG / PCSC Config (Windows 7, Vista, XP).
2. A Windows Security Alert window may display while PCSC Configuration is starting. Press the Unblock button to allow the program to start correctly.
NOTE: The Path may look different than the one shown.
Page 91 of 102 LiNC-NXG for Windows 8 Pro, 7 Pro, Vista Business and XP Pro Install Manual 33-10067-001-C
6.2 Registering the LiNC-NXG Software Each copy of LiNC-NXG needs to be registered with PCSC prior to its proper use with the system. 6.2.1 Registering via the Internet.
NOTE: An Internet connection is required to complete the Registration process. Should an Internet connection not be available, please see Section 6.2.2.
1. Open the PCSC Configuration window. 2. In the lower right hand corner press on the Register button.
Page 92 of 102 LiNC-NXG for Windows 8 Pro, 7 Pro, Vista Business and XP Pro Install Manual 33-10067-001-C
3. The Registration Information window will appear. Fill in each text box within the window.
4. Press the Register button. A connection to the PCSC registration server will commence. 5. The Registration Information window will confirm a valid registration.
NOTE: Please see section 6.2.2 if no Internet connection is available.
NOTE: The network configuration may “block” the port (socket port error) that is necessary to register over the Internet.
Page 93 of 102 LiNC-NXG for Windows 8 Pro, 7 Pro, Vista Business and XP Pro Install Manual 33-10067-001-C
6. The updated PCSC Configuration screen will appear with a “WS” in the “site codes:” text
box.
7. Press the Save button to complete the registration.
Page 94 of 102 LiNC-NXG for Windows 8 Pro, 7 Pro, Vista Business and XP Pro Install Manual 33-10067-001-C
6.2.2 Registering NXG without an Internet Connection. If an Internet connection is not available; the NXG software can be registered in the following way:
1. Fill in the Registration form completely. 2. Take a screen shot of the completed Registration form and save in a word processor
program such as Microsoft Word or WordPad. 3. Transfer the save Registration form to a computer with Internet access. 4. Email the form to: [email protected] for registering. 5. PCSC Technical Support will process the registration request and send a return email
when the registration is complete.
NOTE: Each installation of LiNC-NXG will require registration. Send a screen shot for each computer on which LiNC-NXG is installed.
NOTE: Once the registration files have been received from PCSC, proceed to Section 6.3 to complete the registration process.
Page 95 of 102 LiNC-NXG for Windows 8 Pro, 7 Pro, Vista Business and XP Pro Install Manual 33-10067-001-C
6.3 Finalizing the Install with Copy Options Each copy of LiNC-NXG will have options for additional items such as badging, clients, photo trace, and LiNC-VIEW which will not be active during a normal installation. Once the standard installation is complete, any additional options can be activated from a client’s unique pcscopt.bin file. To do so, the client pcscopt.bin and pcsckey is required to be copied to the local PC. Procedure:
1. The pcscopt.bin file will be provided either on a flash drive, CD, within an email to the administrator or during the software registration process.
2. Once the pcscopt.bin file has been identified, open the PCSC Configuration window. 3. Press the Copy Options button.
Page 96 of 102 LiNC-NXG for Windows 8 Pro, 7 Pro, Vista Business and XP Pro Install Manual 33-10067-001-C
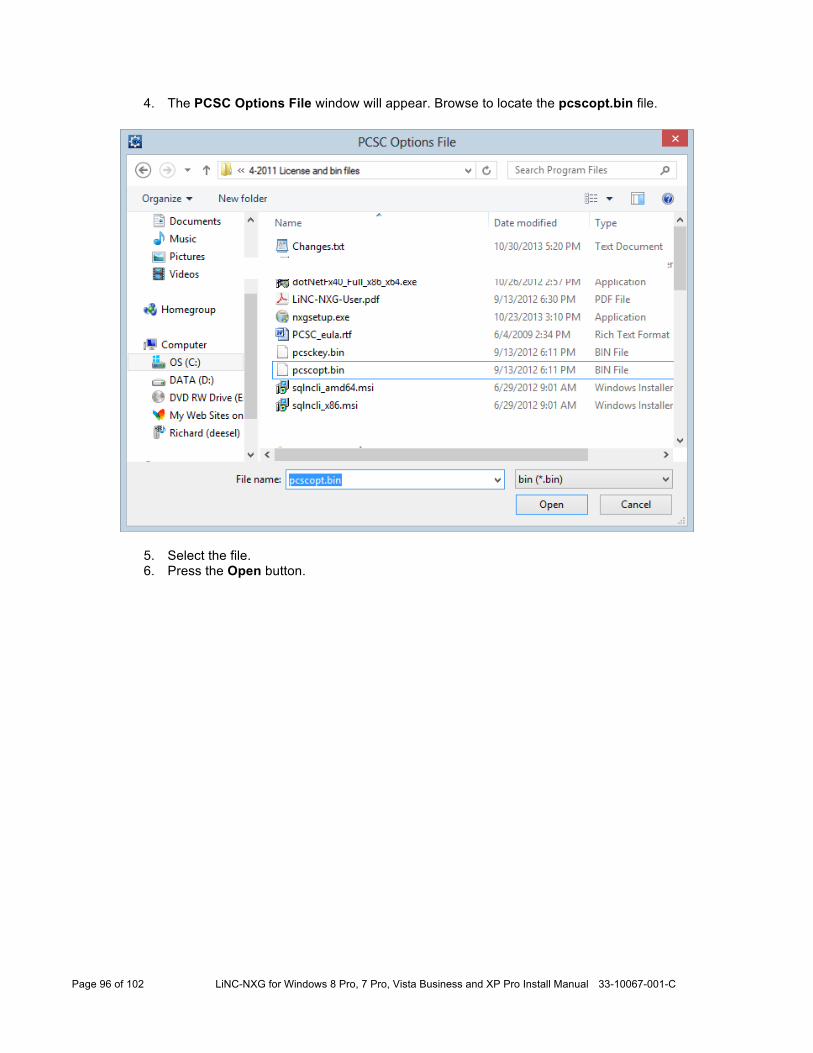
4. The PCSC Options File window will appear. Browse to locate the pcscopt.bin file.
5. Select the file. 6. Press the Open button.
Page 97 of 102 LiNC-NXG for Windows 8 Pro, 7 Pro, Vista Business and XP Pro Install Manual 33-10067-001-C
7. The PCSC Options file window will automatically close. The additional purchased
features of LiNC-NXG will appear with checks in the checkboxes. The site code should still show (WS) in the Site Code area. Press the Save button to complete the Registration.
Page 98 of 102 LiNC-NXG for Windows 8 Pro, 7 Pro, Vista Business and XP Pro Install Manual 33-10067-001-C
6.4 Updating the LiNC-NXG for a New Workstation
1. On the Host computer, Start LiNC-NXG. 2. Select the System Configuration menu. 3. Select Site Configuration icon. The Site Manager window will appear. 4. Select the Computers tab. 5. Press the Add button.
6. A second computer will be added to the list.
Page 99 of 102 LiNC-NXG for Windows 8 Pro, 7 Pro, Vista Business and XP Pro Install Manual 33-10067-001-C
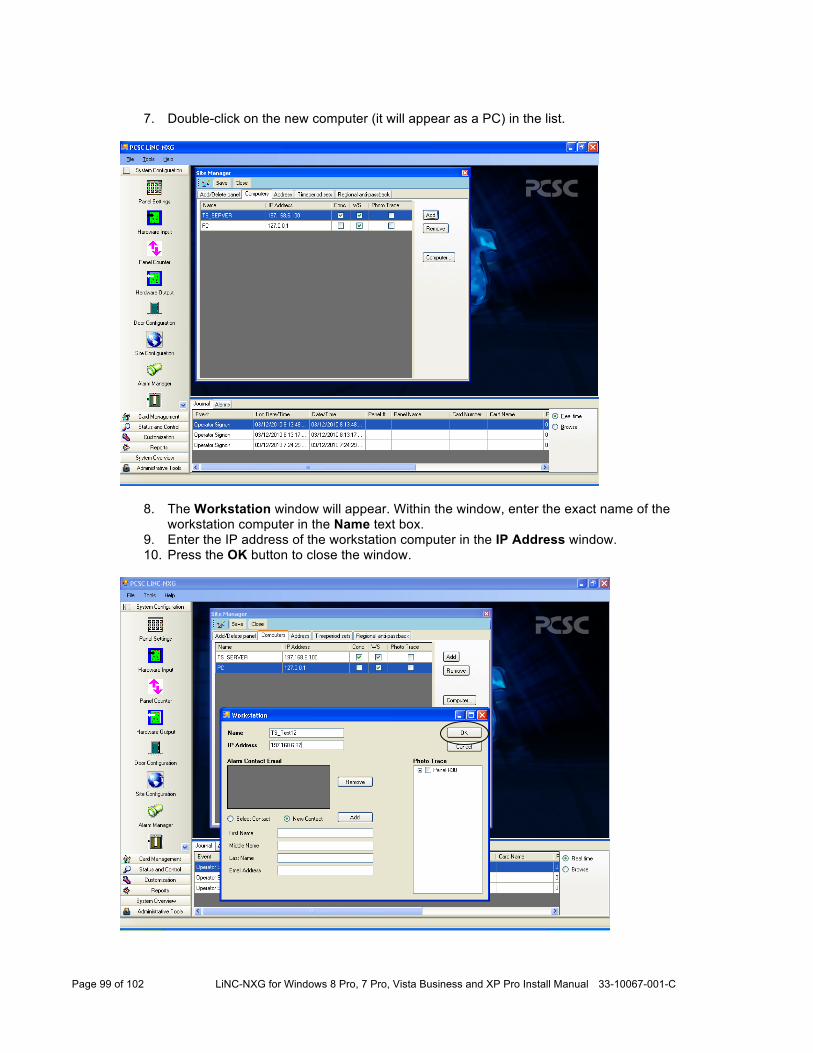
7. Double-click on the new computer (it will appear as a PC) in the list.
8. The Workstation window will appear. Within the window, enter the exact name of the workstation computer in the Name text box.
9. Enter the IP address of the workstation computer in the IP Address window. 10. Press the OK button to close the window.
Page 100 of 102 LiNC-NXG for Windows 8 Pro, 7 Pro, Vista Business and XP Pro Install Manual 33-10067-001-C
11. The workstation with its correct computer name and IP address will appear in the computer list.
NOTE: Please note the newly added computer will only show if the ‘WS’ checkbox
selected.
12. Press the Save button to save the settings. 13. Press the Close button to close the window.
The LiNC-NXG workstation is now ready.
14. Start LiNC-NXG on the workstation and verify proper operation.
Page 101 of 102 LiNC-NXG for Windows 8 Pro, 7 Pro, Vista Business and XP Pro Install Manual 33-10067-001-C
7.0 Importing a Database
Currently all existing database transfers from LiNC-NET to LiNC-NXG are imported for clients by PCSC or authorized personnel. If you have any questions regarding database importing, please call PCSC Engineering at (310) 303-3600.
Page 102 of 102 LiNC-NXG for Windows 8 Pro, 7 Pro, Vista Business and XP Pro Install Manual 33-10067-001-C