Date post: | 27-Dec-2015 |
Category: |
Documents |
Upload: | colin-kohrs |
View: | 22 times |
Download: | 2 times |
Link®’s Gauntlets
(from The Legend of Zelda: Ocarina of Time) by Emily Hastings
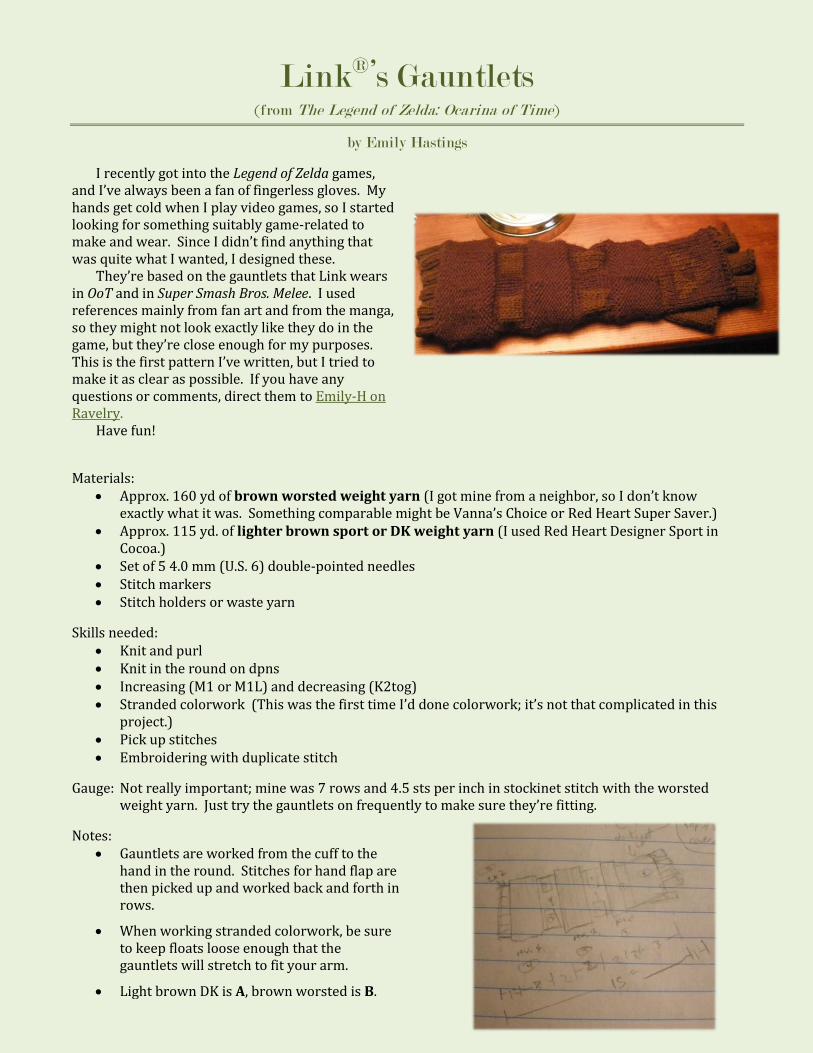
I recently got into the Legend of Zelda games, and I’ve always been a fan of fingerless gloves. My hands get cold when I play video games, so I started looking for something suitably game-related to make and wear. Since I didn’t find anything that was quite what I wanted, I designed these.
They’re based on the gauntlets that Link wears in OoT and in Super Smash Bros. Melee. I used references mainly from fan art and from the manga, so they might not look exactly like they do in the game, but they’re close enough for my purposes. This is the first pattern I’ve written, but I tried to make it as clear as possible. If you have any questions or comments, direct them to Emily-H on Ravelry.
Have fun!
Materials: Approx. 160 yd of brown worsted weight yarn (I got mine from a neighbor, so I don’t know
exactly what it was. Something comparable might be Vanna’s Choice or Red Heart Super Saver.) Approx. 115 yd. of lighter brown sport or DK weight yarn (I used Red Heart Designer Sport in
Cocoa.) Set of 5 4.0 mm (U.S. 6) double-pointed needles Stitch markers Stitch holders or waste yarn
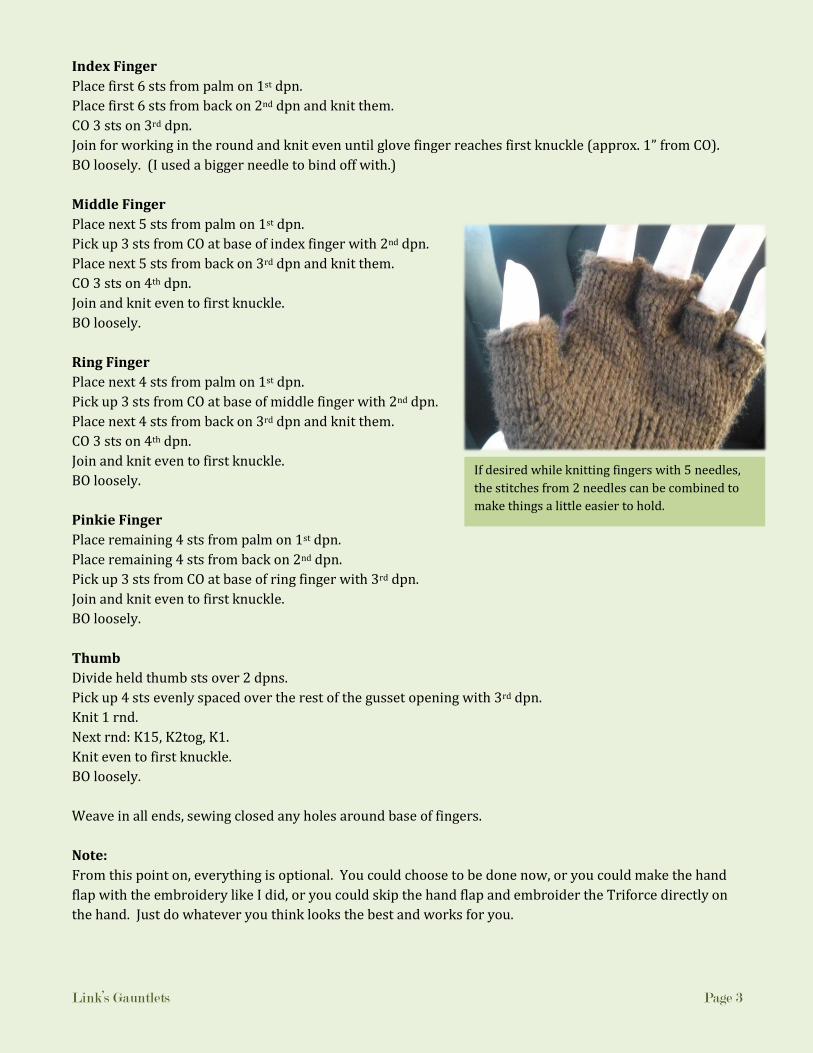
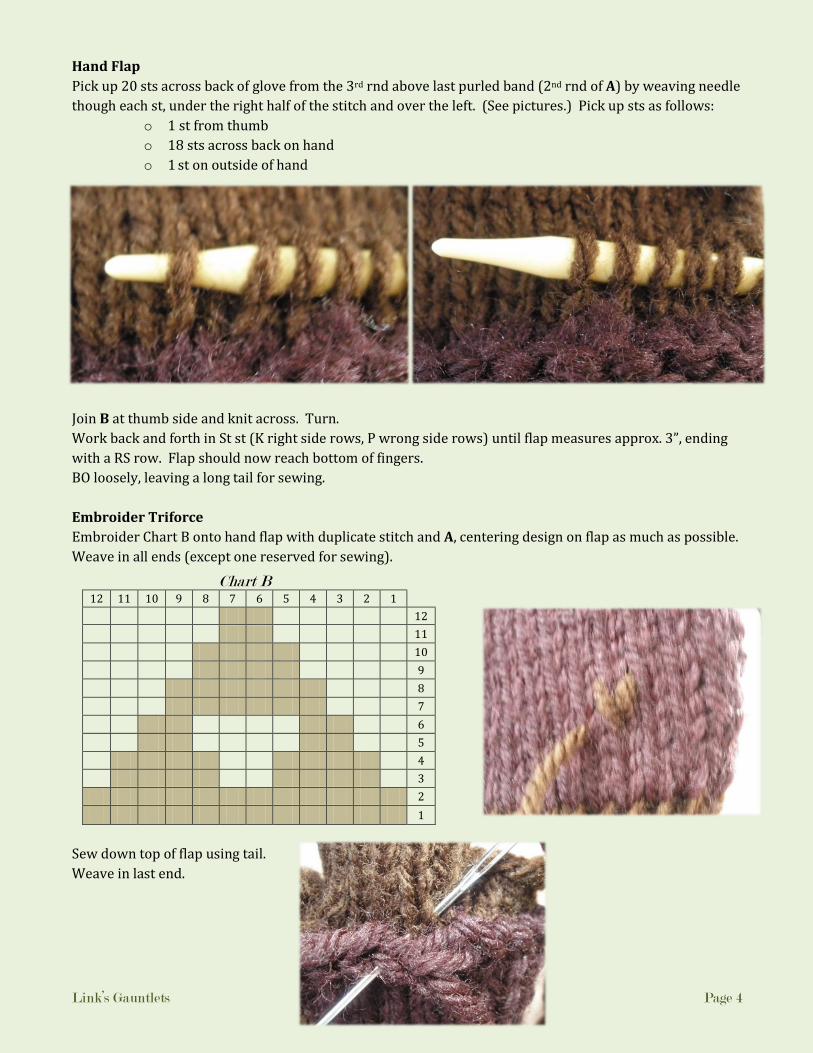
Skills needed: Knit and purl Knit in the round on dpns Increasing (M1 or M1L) and decreasing (K2tog) Stranded colorwork (This was the first time I’d done colorwork; it’s not that complicated in this
project.) Pick up stitches Embroidering with duplicate stitch
Gauge: Not really important; mine was 7 rows and 4.5 sts per inch in stockinet stitch with the worsted weight yarn. Just try the gauntlets on frequently to make sure they’re fitting.
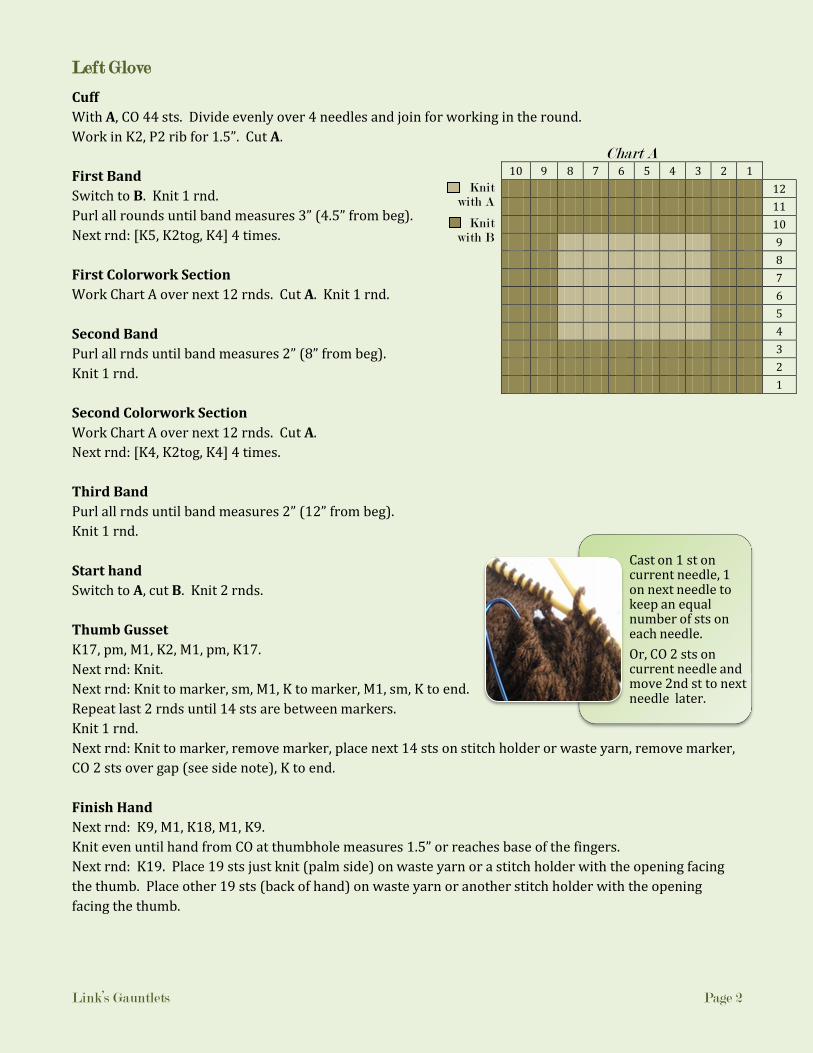
Notes: Gauntlets are worked from the cuff to the
hand in the round. Stitches for hand flap are then picked up and worked back and forth in rows.
When working stranded colorwork, be sure to keep floats loose enough that the gauntlets will stretch to fit your arm.
Light brown DK is A, brown worsted is B.
Link’s Gauntlets Page 2
Left Glove
Cuff
With A, CO 44 sts. Divide evenly over 4 needles and join for working in the round.
Work in K2, P2 rib for 1.5”. Cut A.
First Band
Switch to B. Knit 1 rnd.
Purl all rounds until band measures 3” (4.5” from beg).
Next rnd: [K5, K2tog, K4] 4 times.
First Colorwork Section
Work Chart A over next 12 rnds. Cut A. Knit 1 rnd.
Second Band
Purl all rnds until band measures 2” (8” from beg).
Knit 1 rnd.
Second Colorwork Section
Work Chart A over next 12 rnds. Cut A.
Next rnd: [K4, K2tog, K4] 4 times.
Third Band
Purl all rnds until band measures 2” (12” from beg).
Knit 1 rnd.
Start hand
Switch to A, cut B. Knit 2 rnds.
Thumb Gusset
K17, pm, M1, K2, M1, pm, K17.
Next rnd: Knit.
Next rnd: Knit to marker, sm, M1, K to marker, M1, sm, K to end.
Repeat last 2 rnds until 14 sts are between markers.
Knit 1 rnd.
Next rnd: Knit to marker, remove marker, place next 14 sts on stitch holder or waste yarn, remove marker,
CO 2 sts over gap (see side note), K to end.
Finish Hand
Next rnd: K9, M1, K18, M1, K9.
Knit even until hand from CO at thumbhole measures 1.5” or reaches base of the fingers.
Next rnd: K19. Place 19 sts just knit (palm side) on waste yarn or a stitch holder with the opening facing
the thumb. Place other 19 sts (back of hand) on waste yarn or another stitch holder with the opening
facing the thumb.
Chart A 10 9 8 7 6 5 4 3 2 1
Knit with A
12
11
Knit
with B 10
9
8
7
6
5
4
3
2
1
Cast on 1 st on current needle, 1 on next needle to keep an equal number of sts on each needle.
Or, CO 2 sts on current needle and move 2nd st to next needle later.
Link’s Gauntlets Page 3
Index Finger
Place first 6 sts from palm on 1st dpn.
Place first 6 sts from back on 2nd dpn and knit them.
CO 3 sts on 3rd dpn.
Join for working in the round and knit even until glove finger reaches first knuckle (approx. 1” from CO).
BO loosely. (I used a bigger needle to bind off with.)
Middle Finger
Place next 5 sts from palm on 1st dpn.
Pick up 3 sts from CO at base of index finger with 2nd dpn.
Place next 5 sts from back on 3rd dpn and knit them.
CO 3 sts on 4th dpn.
Join and knit even to first knuckle.
BO loosely.
Ring Finger
Place next 4 sts from palm on 1st dpn.
Pick up 3 sts from CO at base of middle finger with 2nd dpn.
Place next 4 sts from back on 3rd dpn and knit them.
CO 3 sts on 4th dpn.
Join and knit even to first knuckle.
BO loosely.
Pinkie Finger
Place remaining 4 sts from palm on 1st dpn.
Place remaining 4 sts from back on 2nd dpn.
Pick up 3 sts from CO at base of ring finger with 3rd dpn.
Join and knit even to first knuckle.
BO loosely.
Thumb
Divide held thumb sts over 2 dpns.
Pick up 4 sts evenly spaced over the rest of the gusset opening with 3rd dpn.
Knit 1 rnd.
Next rnd: K15, K2tog, K1.
Knit even to first knuckle.
BO loosely.
Weave in all ends, sewing closed any holes around base of fingers.
Note:
From this point on, everything is optional. You could choose to be done now, or you could make the hand
flap with the embroidery like I did, or you could skip the hand flap and embroider the Triforce directly on
the hand. Just do whatever you think looks the best and works for you.
If desired while knitting fingers with 5 needles,
the stitches from 2 needles can be combined to
make things a little easier to hold.
Link’s Gauntlets Page 4
Hand Flap
Pick up 20 sts across back of glove from the 3rd rnd above last purled band (2nd rnd of A) by weaving needle
though each st, under the right half of the stitch and over the left. (See pictures.) Pick up sts as follows:
o 1 st from thumb
o 18 sts across back on hand
o 1 st on outside of hand
Join B at thumb side and knit across. Turn.
Work back and forth in St st (K right side rows, P wrong side rows) until flap measures approx. 3”, ending
with a RS row. Flap should now reach bottom of fingers.
BO loosely, leaving a long tail for sewing.
Embroider Triforce
Embroider Chart B onto hand flap with duplicate stitch and A, centering design on flap as much as possible.
Weave in all ends (except one reserved for sewing).
Chart B 12 11 10 9 8 7 6 5 4 3 2 1
12
11
10
9
8
7
6
5
4
3
2
1
Sew down top of flap using tail.
Weave in last end.
Link’s Gauntlets Page 5
Right Glove
Work as for left glove to fingers. (Or you can just use the left glove pattern if you swap the words “palm”
and “back” wherever they occur. That’s what I did, since the gloves before the hand flaps are identical.)
Index Finger
Place first 6 sts from back on 1st dpn.
Place first 6 sts from palm on 2nd dpn and knit them.
CO 3 sts on 3rd dpn.
Join for working in the round and knit even until glove finger reaches first knuckle (approx. 1” from CO).
BO loosely. (I used a bigger needle to bind off with.)
Middle Finger
Place next 5 sts from back on 1st dpn.
Pick up 3 sts from CO at base of index finger with 2nd dpn.
Place next 5 sts from palm on 3rd dpn and knit them.
CO 3 sts on 4th dpn.
Join and knit even to first knuckle.
BO loosely.
Ring Finger
Place next 4 sts from back on 1st dpn.
Pick up 3 sts from CO at base of middle finger with 2nd dpn.
Place next 4 sts from palm on 3rd dpn and knit them.
CO 3 sts on 4th dpn.
Join and knit even to first knuckle.
BO loosely.
Pinkie Finger
Place remaining 4 sts from back on 1st dpn.
Place remaining 4 sts from palm on 2nd dpn.
Pick up 3 sts from CO at base of ring finger with 3rd dpn.
Join and knit even to first knuckle.
BO loosely.
Work thumb as for left glove.
Work hand flap as for left glove, joining yarn at side opposite thumb instead of thumb side.
Enjoy!
Abbreviations
approx = approximately
beg = beginning
BO = bind off
CO = cast on
dpn(s) = double-pointed needle(s)
K = knit
K2tog = knit 2 together
M1 = make 1
P = purl
pm = place marker
rnd = round
sm = slip marker
St st = Stockinet stitch
st(s) = stitch(es)
References:
http://kyuumu.deviantart.com/gallery/#/diudos
http://forcebewitya.deviantart.com/gallery/#/d1s0bnt
http://unlimitedgamer.net/image.php?id=coverage/oot/
images/zelda_oot_wallpapers_006.jpg
I’m sure that I also drew inspiration from a lot of other
fan art, the manga, and the games.
Just to be clear, I don’t own any of the above listed pictures, Ocarina of Time, Super Smash Bros. Melee, Link,
Zelda, or the Triforce. I did write this pattern, though, so please don’t sell it or anything you make from it.
Feel free to make these for yourself, for gifts, or for charity, though.
If you have any questions or comments or if you find any errors in the pattern, please contact Emily-H on
Ravelry. Thanks for knitting my design, and have fun playing!