34
73-7125-250 11/14 Lionel Legacy System Utility User's Guide Lionel Legacy System Utility User's Guide Version 2

73-7125-250 11/14
Lionel Legacy System Utility
User's Guide
Lionel Legacy System Utility
User's GuideVersion 2
2
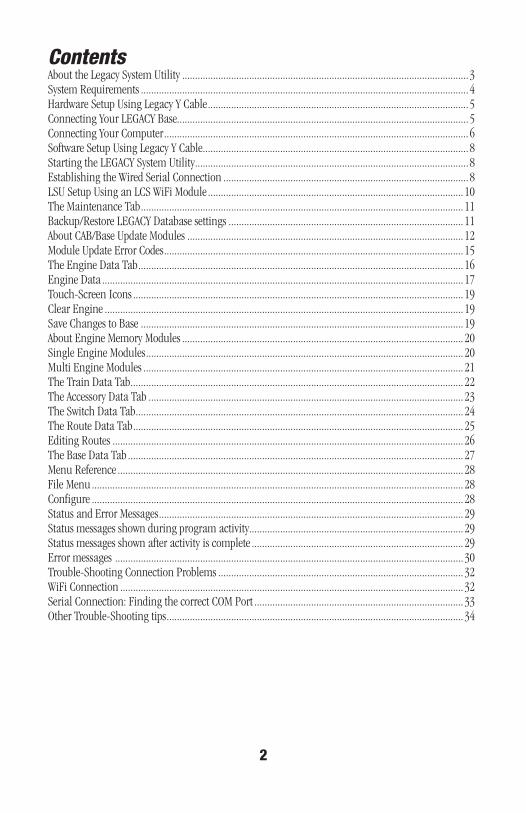
ContentsAbout the Legacy System Utility ............................................................................................................... 3System Requirements ............................................................................................................................... 4Hardware Setup Using Legacy Y Cable ..................................................................................................... 5Connecting Your LEGACY Base................................................................................................................. 5Connecting Your Computer ...................................................................................................................... 6Software Setup Using Legacy Y Cable ....................................................................................................... 8Starting the LEGACY System Utility .......................................................................................................... 8Establishing the Wired Serial Connection ............................................................................................... 8LSU Setup Using an LCS WiFi Module ................................................................................................... 10The Maintenance Tab ............................................................................................................................. 11Backup/Restore LEGACY Database settings ........................................................................................... 11About CAB/Base Update Modules ........................................................................................................... 12Module Update Error Codes .................................................................................................................... 15The Engine Data Tab .............................................................................................................................. 16Engine Data ............................................................................................................................................ 17Touch-Screen Icons ................................................................................................................................ 19Clear Engine ........................................................................................................................................... 19Save Changes to Base ............................................................................................................................. 19About Engine Memory Modules ............................................................................................................. 20Single Engine Modules ........................................................................................................................... 20Multi Engine Modules ............................................................................................................................ 21The Train Data Tab ................................................................................................................................. 22The Accessory Data Tab .......................................................................................................................... 23The Switch Data Tab ............................................................................................................................... 24The Route Data Tab ................................................................................................................................ 25Editing Routes ........................................................................................................................................ 26The Base Data Tab .................................................................................................................................. 27Menu Reference ...................................................................................................................................... 28File Menu ................................................................................................................................................ 28Configure ................................................................................................................................................ 28Status and Error Messages ...................................................................................................................... 29Status messages shown during program activity................................................................................... 29Status messages shown after activity is complete .................................................................................. 29Error messages ....................................................................................................................................... 30Trouble-Shooting Connection Problems ............................................................................................... 32WiFi Connection ..................................................................................................................................... 32Serial Connection: Finding the correct COM Port ................................................................................. 33Other Trouble-Shooting tips ................................................................................................................... 34

3
About the Legacy System Utility
The Legacy System Utility connects your Windows computer to your Legacy Base, either via the Legacy Serial Y cable or wirelessly through the LCS WiFi module. (It will NOT connect through an LCS SER2). Once connected, you can:
• BackuporrestoreyourLEGACYBase’sDatabasesettingsincludingallengines,trains,switches, routes, etc., to a single file on your computer.
• Useyourcomputertoeditroadname,numberandtouch-screeniconsinformationforanylocomotive and view the changes on your CAB-2.
• Viewand/ormodifystoredinformationonTrains,Switches,AccessoriesandRoutes.
The LEGACY System Utility (LSU) does not run your locomotives, switches, or accessories. It is designed for the setup and maintenance of your LEGACY System, not its operation. With the purchase of a 6-37125 LEGACY Writable Utility Module, you can also use LSU to:
• DownloadlatestsoftwarefromLionel’swebsiteandupdateyourLEGACYBaseandCAB-2Remote Controllers.
• Createnew,customizedEngineMemoryModulestouseonanyLEGACYlayout.
TheLEGACYWritableUtilityModuledoesnotstoreLEGACYdatabasebackups.Customizedengine modules do not include Train assignments or momentum settings.
PLEASE NOTEThe LEGACY System Utility is provided free of charge. NO TECHNICAL SUPPORT is available for this software. Use of this software can erase user settings in your LEGACY system. Before using this program to modify any data, make a backup of your LEGACY Base settingsusing this program. Lionel LLC assumes no responsibility for the use of this software.
The following Lionel marks are used throughout this Owner’s Manual and are protected under law. All rights reserved.
Lionel®, LEGACY™, FasTrack™, TrainMaster®, Odyssey®, RailSounds®, CrewTalk™, TowerCom™, DynaChuff™, StationSounds™, Pullmor®, ElectroCoupler™, Magne-Traction®, CAB-1® Remote Controller, American Flyer®, Lionel ZW®, ZW®, MagniVision®, TMCC®, Lionelville®, Wireless Tether™, Powerhouse™, LionMaster®, Conventional Classics™, Postwar Celebration Series™, TruRail™, PH-1 Powerhouse®, Powermaster®, Powerstation-Powerhouse®, Accessory Motor Controller™, AMC™, Accessory Switch Controller™, ASC™, Action Recorder Controller™, ARC™, Track Power Controller 300™, TPC 300™, Track Power Controller 400™, TPC 400™, Block Power Controller™, BPC™, Operating Track Controller™, OTC™, FatBoy™, Lionel Lines®, Joshua Lionel Cowen Series™, Lockon®, TrainSounds™, MultiHorn™, MultiWhistle™, Choo-Choo™
4
System Requirements
• ALEGACYBaseandCAB-2remoterunningsoftwareversion1.3orhigher.• AcomputerrunningtheWindowsXPoperatingsystemServicePack3(SP3)orlater,Vista,
Windows 7 or Windows 8. • TheLSUsoftware,Lionelpart73-1725-S01downloadedfromtheLionelwebsite.Either...• Theblack"Y"serialdatacableincludedwithyourLEGACYsystem,Lionelpart61000RS232
and an available 9-pin serial port on your computer, or an available USB port and USB-to-serial adapter,
OR• a6-81325LCSWiFiModuleandthe6-81499LCSDB-9CablewithPowerSupply
• Andanoptional6-37125LEGACYWritableUtilityModule(aka“BlackModule”,requiredfor making custom engine memory modules and performing Cab and Base software upgrades).
To use the full functionality of the LSU software, LEGACY Software version 1.52 or higher should be installed on your CAB-2 and LEGACY Base.
The LCS SER2 cannot be used by the Legacy System Utility. To use LSU, your computer must either be directly connected to your Legacy Command Base using the Legacy Y Cable, or connected wirelessly via a Layout Control System LCS WiFi module.
Note!
5
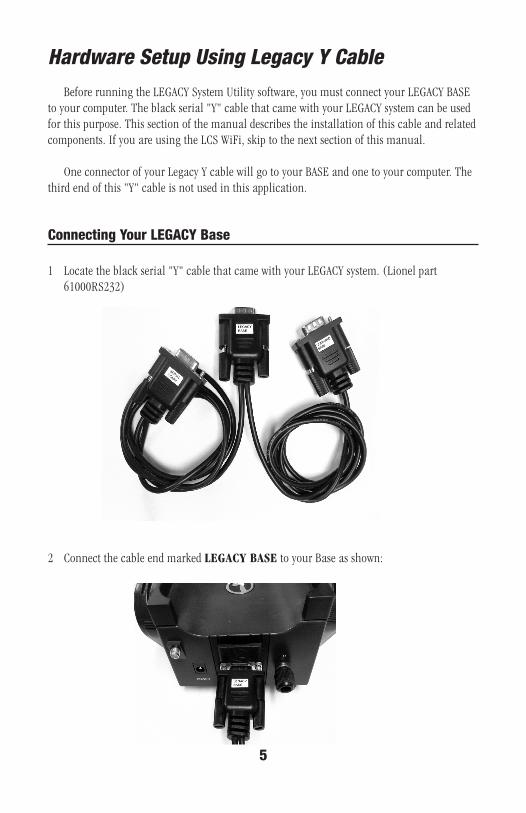
Hardware Setup Using Legacy Y CableBefore running the LEGACY System Utility software, you must connect your LEGACY BASE
toyourcomputer.Theblackserial"Y"cablethatcamewithyourLEGACYsystemcanbeusedfor this purpose. This section of the manual describes the installation of this cable and related components. If you are using the LCS WiFi, skip to the next section of this manual.
One connector of your Legacy Y cable will go to your BASE and one to your computer. The thirdendofthis"Y"cableisnotusedinthisapplication.
Connecting Your LEGACY Base
1 Locatetheblackserial"Y"cablethatcamewithyourLEGACYsystem.(Lionelpart61000RS232)
2 Connect the cable end marked LEGACY BASE to your Base as shown:
6
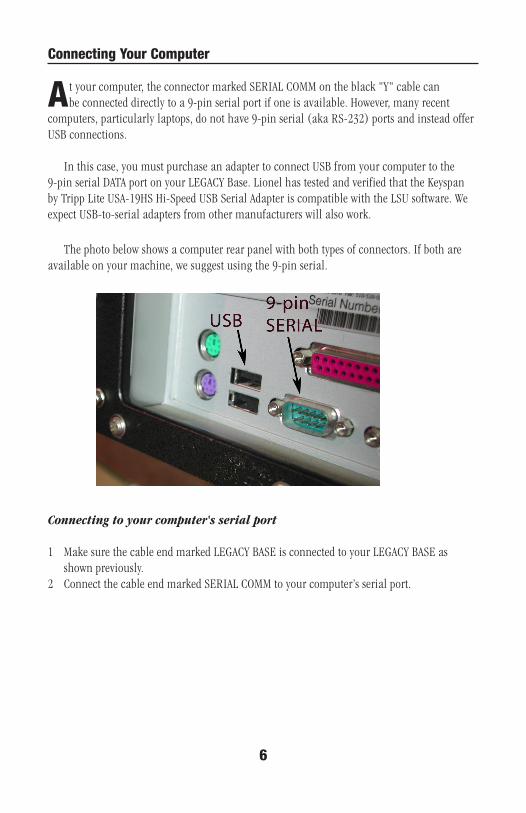
Connecting Your Computer
A tyourcomputer,theconnectormarkedSERIALCOMMontheblack"Y"cablecanbe connected directly to a 9-pin serial port if one is available. However, many recent
computers, particularly laptops, do not have 9-pin serial (aka RS-232) ports and instead offer USB connections.
In this case, you must purchase an adapter to connect USB from your computer to the 9-pin serial DATA port on your LEGACY Base. Lionel has tested and verified that the Keyspan by Tripp Lite USA-19HS Hi-Speed USB Serial Adapter is compatible with the LSU software. We expect USB-to-serial adapters from other manufacturers will also work.
The photo below shows a computer rear panel with both types of connectors. If both are available on your machine, we suggest using the 9-pin serial.
Connecting to your computer's serial port
1 Make sure the cable end marked LEGACY BASE is connected to your LEGACY BASE as shown previously.
2 ConnectthecableendmarkedSERIALCOMMtoyourcomputer’sserialport.

7
Connecting to your computer's USB port
1 Make sure the cable end marked LEGACY BASE is connected to your LEGACY BASE as shown previously
2 Connect the cable end marked SERIAL COMM to your Keyspan (or other) USB-to-serial adapter as shown:
3 Connect the square-ended plug of a standard USB cable to the other end of the Keyspan Adapter.
4 Connect the thin USB cable end to your computer.
8
Software Setup Using Legacy Y CableNow that your LEGACY Base and computer are connected, it's time to install the LEGACY
System Utility software and set it up for use.
1 Download the LEGACY System Utility from the Lionel website: http://www.lionel.com/legacyutilitydownload.html
2 Run the LSU Setup program and follow the on-screen installation instructions.
3 If an earlier version of the LEGACY System Utility was installed on your computer and you have any difficulty installing a new one, un-install the old and then re-install the latest version.
Note! The first time you connect a USB-to-serial adapter to your computer, you may need togothroughtheWindows"FoundNewHardware"setupprocedure.Followtheinstallation instructions provided with your USB-to-serial adapter.
Starting the LEGACY System Utility
Double-click the LSU icon, or click through Windows Start > All Programs > Lionel > LEGACY System Utility.
Establishing the Wired Serial Connection
When you run the LEGACY System Utility for the first time, you will be asked to set your Com Port Properties. This will establish communication between the LEGACY
Base and your computer. It does not matter if you are using a serial cable or a USB-to-serial adapter—this step is required for both types of connections.
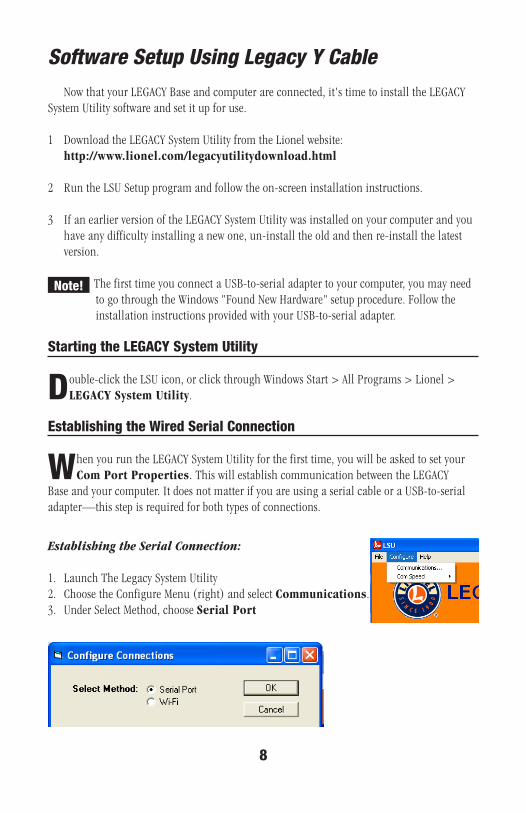
Establishing the Serial Connection:
1. Launch The Legacy System Utility2. Choose the Configure Menu (right) and select Communications.3. Under Select Method, choose Serial Port

9
Choosing the correct Com Port:1. If you know what Com Port you are connected to, choose it from the Serial Port Config
drop-downmenu.Ifyouaren’tsure,choosethelowest-numberedport.
2. Click OK.3. In the lower-left corner of the LSU window, you should see display below:
4. If it reads Com Port x Open and Base: Connected (see above), the LSU is ready to roll.
5. If you see Base: Not Detected (shown below), try another port.
6. Try the next highest-numbered port by choosing the Configure menu, Com Port...7. If you try all ports and still have not connected, it may be that your serial cable is
unpluggedortheUSB-Serialdeviceisn’tworkingcorrectly.Seethetroubleshootingsectionat the end of this manual for more information.
Com Speed
Note! If the LSU connects to the Base, but then reports any communication errors, choose the option Configure Menu > Com Speed > Low.

10
LSU Setup Using an LCS WiFi ModuleTo use the Legacy System Utility wirelessly, your computer must be connected to the WiFi
networkcreatedby(or"joinedto")theLCSWiFimodule.RefertotheLCSWiFiOwner'sManual for details on installation of the LCS WiFi. Refer to your computer's operating system manual for information about connecting to wireless networks.
If your LCS WiFi is set to Access Point mode, be aware that connecting your computer to the LCS WiFi may also have disconnected your computer from your normal WiFi network. This would temporarily disable your internet access. Once your use of the Legacy System Utility is complete, you may wish to restore your previous wireless network settings.
Establishing the WiFi Connection:1. Launch The Legacy System Utility2. Choose the Configure Menu (see below) and select Communications.
3. Under Select Method, choose WiFi4. Click SEARCH
5. TheLSUsoftwarewillbeginsearchingforanLCSWiFimodule.Watchforthemessage"xx.xx.xx.xxisvalid."ThenclickOK
6. Your Status Bar should indicate WiFi: Connected and Base: Connected as shown below. If not, press the Search button (see step 4 above) and LSU will find the next available WiFi network. Repeat this process until you establish a connection.

11
The Maintenance Tab
The Maintenance Tab has two sections: Make CAB/Base Update Module and Backup/Restore LEGACY Database Settings.
Backup/Restore LEGACY Database settings
Yourlayout’ssettings,includingenginenames,switches,routesandtrainassignments,are viewed from your CAB-2 Remote, but this information is stored in your LEGACY
Base.Backingupthesettings(collectivelycalled“thedatabase”)protectsitagainstloss.This backup is saved to your computer's disk drive (not a memory module). You may store multipledatabasebackupsonyourcomputer,justbesuretogiveeacharecognizablefilename so you know which one you are restoring. Note that LEGACY CAB recordings are not backed up.
Backing up your LEGACY Base’s entire database to your computer's disk drive:
1 Click the Backup Database button.2 Wait as your database (all LEGACY Base settings) are copied to your computer.3 A“save”dialogboxwillappear.Chooseanameandlocationforyourdatabasebackupfile
and click OK.
Note! Only databases created while using LEGACY System Software version 1.3 or later can be backed up and restored. Hit the CTC button on your CAB-2 to see your system's current software revision. If it is revision 1.2 or earlier, contact customer service for an upgrade at (586) 949-4100, extension 2.

12
Restoring your LEGACY Base settings/database:
Note! This operation will overwrite the current contents of your LEGACY Base with the settings stored in your backup file.
1 Click the Restore Database button.2 An“openfile…”dialogboxwillappear.Navigatetothedirectorycontainingyour
previously stored database backup file and click OK.3 Wait as your database is copied from your computer into your LEGACY Base.
About CAB/Base Update Modules
From time to time, Lionel will release new versions of the LEGACY CAB-2 and Base software. These software updates can add new features (for example, new engine types), or provide
other enhancements. The CAB and Base must be updated individually. It is recommended that all your CAB-2s and LEGACY Base are running the same software version.
Note! Be sure to backup your LEGACY Base settings before upgrading your LEGACY Software. Some software updates will reset your Base to its original factory settings, erasing your user settings. With a backup of your Base settings, it is a simple matter to restore your layout following a software update. Remember that backups of your LEGACY Base are stored on your computer's disk drive, not on a memory module.
The latest version of LEGACY software can be found on the Lionel website. To locate CAB and BASE software updates, go to www.lionel.com and use the Product Finder to navigate to the LEGACY system page by entering 6-14295 in the search field on the web site. Scroll down to view and download the latest software updates.

13
Creating a LEGACY CAB Software Update Module
1 Go to the Lionel website (see About CAB/BASE Update Modules above) and download the latest LEGACY CAB-2 software. Save this file on your computer in the location of your choice.
2 Insert a black LEGACY Writable Utility Module into your LEGACY Base (not the CAB!) as shown.
3 Click the Make Cab Module button on the Maintenance tab of the LSU software.4 A dialog box will open, asking you to point to the CAB-2 software update file that you
downloadedinstep1.Thisfile’snamewillendwiththeextension“.cab2.”5 Navigate to the folder where you saved the file, highlight it and click OK. 6 Wait as the CAB-2 software is copied from your computer into the LEGACY Writable Module.7 NOW, remove the LEGACY Writable Module from your Base.
You may now exit the LSU program and perform the steps below to copy the CAB software from the LEGACY Writable Module into your CAB-2.
8 TurnyourCAB-2’spoweroffusingtheCentralTrainControlButton(CTC).9 Remove the Module port cover from the top of the LEGACY CAB. Then insert the CAB
Update Module into the Module port.10 Press and Hold the SET Button on the bottom of the LEGACY CAB. 11 While holding down the SET button, press the CTC Button to turn the Power on to begin
the update.12 The red indicator light will start to flash rapidly.13 Release the SET button.14 Once the red indicator light stops, the CAB-2 will self-start. Your CAB-2 will now be
updated. The update will be displayed in the Central Train Control scrolling screen.15 Remove the LEGACY Writable Utility Module from your CAB-2.
Note! Once your CAB-2 update is complete, it is strongly recommended that you update your LEGACY Base software to the most recent version.
14
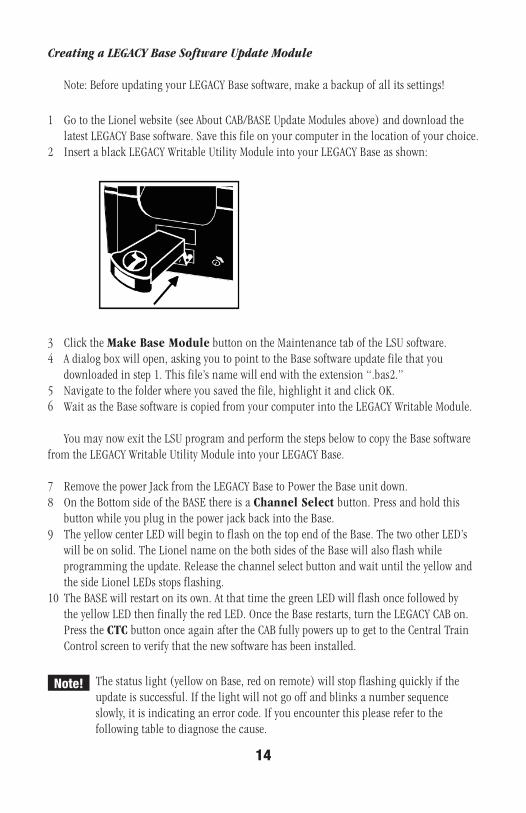
Creating a LEGACY Base Software Update Module
Note: Before updating your LEGACY Base software, make a backup of all its settings!
1 Go to the Lionel website (see About CAB/BASE Update Modules above) and download the latest LEGACY Base software. Save this file on your computer in the location of your choice.
2 Insert a black LEGACY Writable Utility Module into your LEGACY Base as shown:
3 Click the Make Base Module button on the Maintenance tab of the LSU software.4 A dialog box will open, asking you to point to the Base software update file that you
downloadedinstep1.Thisfile’snamewillendwiththeextension“.bas2.”5 Navigate to the folder where you saved the file, highlight it and click OK. 6 Wait as the Base software is copied from your computer into the LEGACY Writable Module.
You may now exit the LSU program and perform the steps below to copy the Base software from the LEGACY Writable Utility Module into your LEGACY Base.
7 Remove the power Jack from the LEGACY Base to Power the Base unit down.8 On the Bottom side of the BASE there is a Channel Select button. Press and hold this
buttonwhileyoupluginthepowerjackbackintotheBase.9 TheyellowcenterLEDwillbegintoflashonthetopendoftheBase.ThetwootherLED’s
will be on solid. The Lionel name on the both sides of the Base will also flash while programming the update. Release the channel select button and wait until the yellow and the side Lionel LEDs stops flashing.
10 The BASE will restart on its own. At that time the green LED will flash once followed by the yellow LED then finally the red LED. Once the Base restarts, turn the LEGACY CAB on. Press the CTC button once again after the CAB fully powers up to get to the Central Train Control screen to verify that the new software has been installed.
Note! The status light (yellow on Base, red on remote) will stop flashing quickly if the update is successful. If the light will not go off and blinks a number sequence slowly, it is indicating an error code. If you encounter this please refer to the following table to diagnose the cause.
15
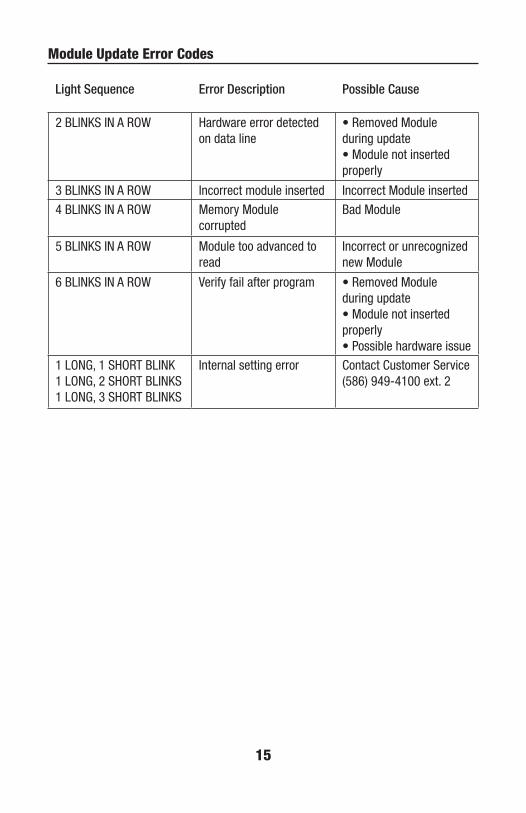
Module Update Error Codes
Light Sequence Error Description Possible Cause
2 BLINKS IN A ROW Hardware error detected on data line
• Removed Module during update • Module not inserted properly
3 BLINKS IN A ROW Incorrect module inserted Incorrect Module inserted
4 BLINKS IN A ROW Memory Module corrupted
Bad Module
5 BLINKS IN A ROW Module too advanced to read
Incorrect or unrecognized new Module
6 BLINKS IN A ROW Verify fail after program • Removed Module during update • Module not inserted properly • Possible hardware issue
1 LONG, 1 SHORT BLINK 1 LONG, 2 SHORT BLINKS 1 LONG, 3 SHORT BLINKS
Internal setting error Contact Customer Service (586) 949-4100 ext. 2

16
The Engine Data Tab
You can view and change locomotive information using the The Engine Data tab. The
first time you open this tab, data for every engine used in your layout is copied from LEGACY Base to computer. This info includes the type of locomotive, its road name, number, control type and Touch-Screen icons settings.
Oneengine"record"isshownatatime.Bymouse-clickorenteringanengineIDnumber,you can step through every engine in your database. Existing engines can be modified; new onescanbecreated.Ofcourse,CAB-2candothistoo,butthere’soneexception—onlyLSUcan change Touch-Screen icons.
Changing these settings does not create new features where none previously existed. For example,changingControlTypeofanolderTMCCengineto“LEGACY”won’t"upgrade"yourengine.Instead,yourhornandbellwillceasetofunction!Soit’simportantthattheseoptionsaresetcorrectlysoeachengineoperatestoitsfullpotential.Thatsaid,youwon’tdamageanything by experimenting. In the worst case, you can always use your CAB-2 to delete an engine record and start over manually, or use an Engine Memory Module to restore default settings for a given locomotive.
To use the Edit Engine Data tab, navigate to the Engine # you wish to change and edit settings using mouse and keyboard. Then, if you choose, click Save Changes to Base. To abandon the changes made to a record, simply navigate to a different engine number and answer“Yes”whenaskedifyouwanttolosethechangesyou’vemade.

17
Note! Be sure to backup your database (using the Maintenance Tab) before editing engine records. If your computer crashes while updating the base, you could corrupt the settings in the database and have to re-create your layout settings from scratch. With a backup of your database, you can easily restore your entire layout and loco roster to your previously stored settings.
Engine DataEngine #
As you know, individual engines are controlled by their TMCC engine ID number and your LEGACY system can store up to 99 engine IDs.
TheLEGACYSystemUtility’sEditEngineDatascreenshowsoneoftheseEngineID’satatime. You may type a number (between 1 and 99) directly into the Engine # box to navigate to a particular engine.
You can also use the left and right arrow buttons to step from one Engine ID to the next. Ifthe“Showactiveenginesonly”boxischecked,clickingthearrowbuttonswillskipover"empty,"unassignedengineIDs.Leavingthisbuttonuncheckedwillcausethearrowbuttonsto advance through all engine IDs whether they are currently in use or not. To create a brand-new engine, un-check this box and navigate to an unused number.
Engine Name: Entertheroadnameofyourlocomotive(“UnionPacific,”“ATSF,”etc.),upto31
characters in length. Note that all characters will be converted to UPPERCASE.
Engine Road#Typicallythissettingshouldbeusedtomatchthenumberonyourengine’snumber
boards. Up to four digits from 0-9 may be entered.
Locomotive TypeChoose the type that most closely matches your engine or operating accessory. The type of
engine determines the icons displayed on your CAB-2 and other operating parameters. Refer to your Lionel LEGACY System Manual for more information.

18
Control TypeFor best performance, choose the type that most closely matches your engine or operating
accessory. Choose the highest number (1-4 in the following table) that your locomotive will support. Refer to your Lionel LEGACY System Manual for more information.
Control Type Best For
1 CAB1 Choose CAB1 only when R100 or TMCC is not supported. Provides relative speed control. Will run all command-equipped engines, but other control types offer more features and superior speed performance.
2 R100 Sends 100 speed-step relative commands. Choose for engines with Electric Railroad or other after-market cruise systems with 100 speed step operation.
3 TMCC Best for all non-LEGACY Lionel TMCC engines. Provides superior speed control compared to CAB1 mode.
4 LEGACY Best for all LEGACY-equipped locomotives
Sound TypeFor best performance, choose the type that most closely matches your engine or operating
accessory. Choose the highest number (1-3) that your locomotive will support. Refer to your Lionel LEGACY System Manual for more information.
Sound Type Best For
1 RS Railsounds 2, 3 or 4. If your locomotive has unintelligible crew chatter when you press the "2" key, choose this option.
2 RS5 Railsounds 5.0 If your engine produces an intelligible conversation between engineer and dispatcher when you press the "2" key, choose this option.
3 LRS LEGACY Railsounds. Best for all LEGACY-equipped locomotives with Railsounds 5.5, 6.0 or RSL sound systems. Supports quilling whistle. NOTE: If you choose LRS and your whistle stops working, try RS5 instead.

19
Touch-Screen Icons
Touch-screen icons provide easy access to special LEGACY-only features. These icons are always set in pairs, like on/off, open/closed, etc. When Lionel creates a new LEGACY
product, its two most commonly-requested special features are tagged in the included Orange Engine Memory Module. When that Engine Memory Module is loaded into your CAB-2, these icons appear in the Touch-Screen area, the bottom two keys one the left and right side of your CAB-2 touch-screen:
In some cases, your engine may have more than two special features. Using LSU, you can substitute your choice of Left or Right icons to access the special feature of your choice. For example, the Lionel Milwaukee Road #261 S3 steam locomotive (6-11229) includes a red Mars light.Ifyou’dprefertohavemanualcontroloverthemarslightinsteadofoneofthedefaultsset by the Orange Memory Module, Choose Mars Light from the Touch-Screen icons drop-down menu.
Note! Addinganicontoanenginewillnotaddnewfeaturestoyourlocomotive,itjustprovides access to features already built in! To read more about which Touch-Screen icons are appropriate for various engine types, refer to your Lionel LEGACY System Manual.
Clear EngineBy clicking the Clear Engine button, you may completely remove an engine definition
from your command base and all connected CAB-2 hand-held remotes and any other device which displays the Legacy engine roster. Only the currently visible engine record will be deleted. After clicking this button, a confirming warning message will be displayed. Click Cancel to abort or click OK to remove the engine permantly.
This function is equivilent to using the Clear Engine function on your Legacy handheld remote.
Save Changes to BaseWhen you edit any information for an engine, the Save Changes to Base button will
highlight. Click this button if you want to save your changes. If you should try to navigate to anotherenginenumberwithoutsaving,youwillbewarnedifyou’vegotunsavedchangesonthe current page. You may save or discard changes as you wish. You can also force a re-load of all engine data from your Base using the File > Reload Engine Data menu.
The information displayed on your CAB-2 will be updated once your changes are saved to the Base.

20
About Engine Memory ModulesEngine Memory Modules provide a quick way to load all the important details of LEGACY
locomotive into your CAB-2 and LEGACY system. Using the LSU software, you can program yourowncustomizedEngineMemoryModules.
Single Engine Modules
A single engine module is, as the name suggests, a Memory Module containing information forjustoneindividuallocomotive.TheorangeMemoryModulesshippedwithmany
LEGACY locomotives are examples of a single engine memory module. Create your own Single Engine module if an Orange Module is unavailable, or if you have made changes to the to engine data and want to share your custom modifications.
Single Engine Memory Modules created by the LEGACY System Utility are compatible with all versions of CAB-2 software and can be used on virtually any LEGACY layout.
Note! Train assignments and custom momentum settings are not written to the module. Thesemustbemanuallyre-enteredoncetheengine’s‘personality’hasbeenloadedfrom your Module while visiting a friend's or club layout.
To create a standard, single engine Memory Module:
1 Select the Edit Engine Data tab 2 Type a number into the Engine # field, or use the buttons to navigate to the engine data
you want to copy into the Memory module3 Insert a LEGACY Writable Module into your LEGACY Base.4 Click the Make Single Engine Module button. The status section of the LSU screen
willshowtheprogressastheoperationcompletes.Itwilltakejustafewseconds.5 A message indicating the engine module was successfully written should be displayed. If
the write fails, make sure that the Memory Module is firmly pressed into the base. If it still doesn’twork,refertothetroubleshootingsectionofthisdocument.
21
Multi Engine Modules
Multi Engine Memory Modules store information for all the locomotives recorded in your Legacy command base. Multi Engine modules are ideal when taking two or more
enginestoafriend’slayout.UsetheirCAB-2whenyouarriveandretrieveyourcustomenginedata for each stored locomotive. Each time you create a Multi Engine Module, any previously stored engines on your Black Writable Utility Module are cleared.
Note! Reading Engine Information from a Multi Engine Memory Module requires a LEGACY CAB-2 with version 1.5 software or higher. When loading engines onto your friend’sCAB-2fromaMultiEngineModule,becarefultoselectonlyunusedEngineID numbers on his LEGACY System. Train assignments and custom momentum settings are not written to the module and must be manually re-entered once the engine’s‘personality’hasbeenloadedfromaMultiEngineModule.
Creating a Multi Engine Memory Module:
1 Select the Edit Engine Data tab 2 Insert a Black Writable Utility Module into your LEGACY Base.3 Click the Make Multi Engine Module button. The status section of the LSU screen will
show the progress as the operation completes. The time to complete this operation will varydependingonhowmanyenginesareselected,butforafewengines,ittakesjustamoment.
4 A message indicating the engine module was successfully written should be displayed. Otherwise, refer to the troubleshooting section of this document.
To load individual engine data into a CAB-2, insert the Multi Engine Memory Module into the CAB-2 and refer to the LEGACY System v1.5x documentation for further instructions.
22
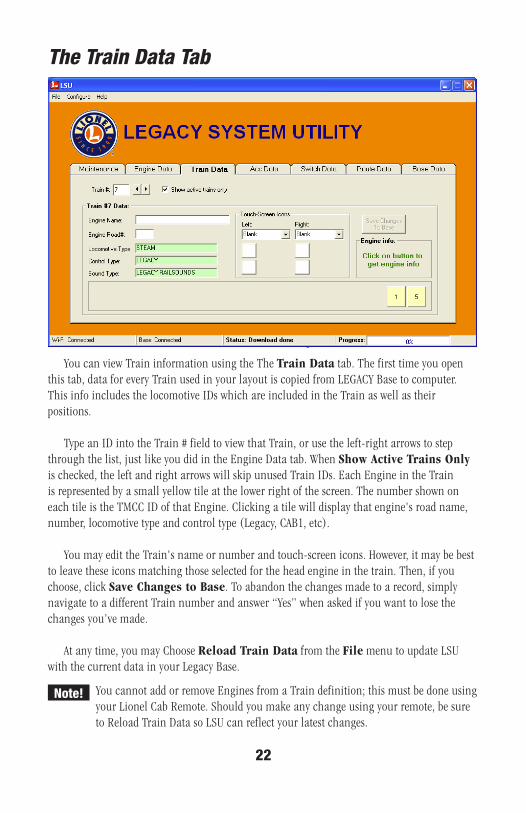
The Train Data Tab
You can view Train information using the The Train Data tab. The first time you open this tab, data for every Train used in your layout is copied from LEGACY Base to computer. This info includes the locomotive IDs which are included in the Train as well as their positions.
Type an ID into the Train # field to view that Train, or use the left-right arrows to step throughthelist,justlikeyoudidintheEngineDatatab.WhenShow Active Trains Only is checked, the left and right arrows will skip unused Train IDs. Each Engine in the Train is represented by a small yellow tile at the lower right of the screen. The number shown on each tile is the TMCC ID of that Engine. Clicking a tile will display that engine's road name, number, locomotive type and control type (Legacy, CAB1, etc).
You may edit the Train's name or number and touch-screen icons. However, it may be best to leave these icons matching those selected for the head engine in the train. Then, if you choose, click Save Changes to Base. To abandon the changes made to a record, simply navigatetoadifferentTrainnumberandanswer“Yes”whenaskedifyouwanttolosethechangesyou’vemade.
At any time, you may Choose Reload Train Data from the File menu to update LSU with the current data in your Legacy Base.
You cannot add or remove Engines from a Train definition; this must be done using your Lionel Cab Remote. Should you make any change using your remote, be sure to Reload Train Data so LSU can reflect your latest changes.
Note!

23
The Accessory Data Tab
You can view and change Accessory information using the The Acc Data tab. The first time you open this tab, data for every Accessory used in your layout is copied from LEGACY Base to computer.
Type an ID into the Accessory # field to view that Accessory, or use the left-right arrows to stepthroughthelist,justlikeyoudidintheEngineDatatab.
You may edit the Accessory name or reference/road number (this is not the same as the TMCC ID). Then, if you choose, click Save Changes to Base. To abandon the changes madetoarecord,simplynavigatetoadifferentAccessorynumberandanswer“Yes”whenaskedifyouwanttolosethechangesyou’vemade.
At any time, you may Choose Reload Accessory Data from the File menu to update LSU with the current data in your Legacy Base.

24
The Switch Data Tab
You can view and change Switch information using the The Switch Data tab. The first
time you open this tab, data for every Switch used in your layout is copied from LEGACY Base to computer.
Type an ID into the Switch # field to view that Switch, or use the left-right arrows to step throughthelist,justlikeyoudidintheEngineDatatab.
You may edit the Switch name. Then, if you choose, click Save Changes to Base. To abandon the changes made to a record, simply navigate to a different Switch number and answer“Yes”whenaskedifyouwanttolosethechangesyou’vemade.
At any time, you may Choose Reload Switch Data from the File menu to update LSU with the current data in your Legacy Base.

25
The Route Data Tab
You can view and edit Route information using the The Route Data tab. The first time you open this tab, data for every Route used in your layout is copied from LEGACY Base to computer.
Type an ID into the Route # field to view that Route, or use the left-right arrows to step throughthelist,justlikeyoudidintheEngineDatatab.WhenShow Active Routes Only is checked, the left and right arrows will skip unused Route IDs.
Each Switch within a Route is shown as a yellow tile. Its TMCC ID and throw position within this Route is displayed.
You may add and change the switches within the Route as well as the route name. At any time, you may Choose Reload Route Data from the File menu to update LSU
with the current data in your Legacy Base.
26
Editing Routes
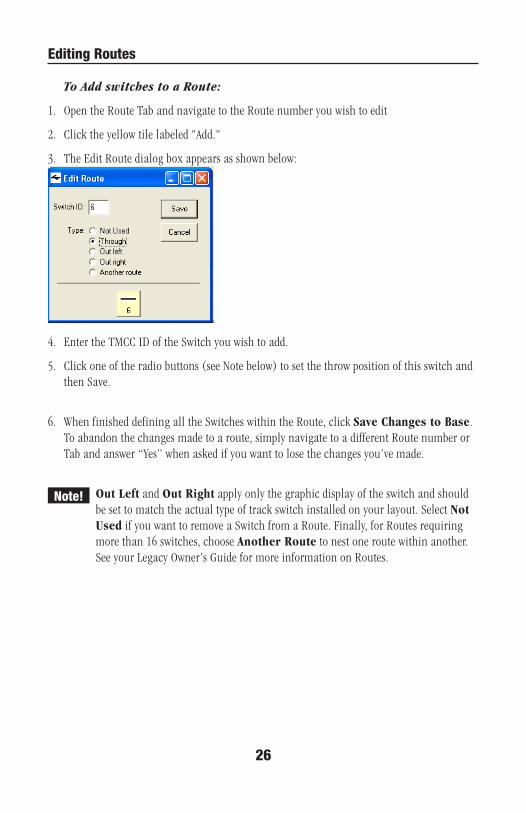
To Add switches to a Route:
1. Open the Route Tab and navigate to the Route number you wish to edit
2. Clicktheyellowtilelabeled"Add."
3. The Edit Route dialog box appears as shown below:
4. Enter the TMCC ID of the Switch you wish to add.
5. Click one of the radio buttons (see Note below) to set the throw position of this switch and then Save.
6. When finished defining all the Switches within the Route, click Save Changes to Base. To abandon the changes made to a route, simply navigate to a different Route number or Tabandanswer“Yes”whenaskedifyouwanttolosethechangesyou’vemade.
Out Left and Out Right apply only the graphic display of the switch and should be set to match the actual type of track switch installed on your layout. Select Not Used if you want to remove a Switch from a Route. Finally, for Routes requiring more than 16 switches, choose Another Route to nest one route within another. See your Legacy Owner's Guide for more information on Routes.
Note!
27
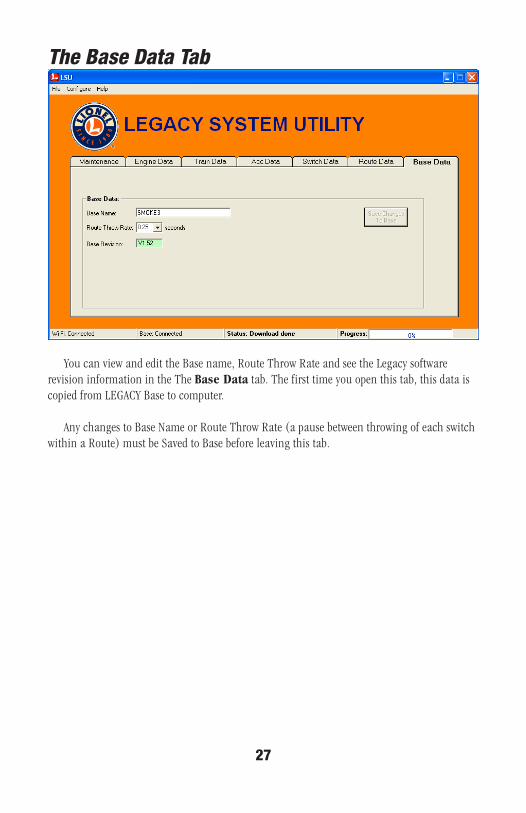
The Base Data Tab
You can view and edit the Base name, Route Throw Rate and see the Legacy software revision information in the The Base Data tab. The first time you open this tab, this data is copied from LEGACY Base to computer.
Any changes to Base Name or Route Throw Rate (a pause between throwing of each switch within a Route) must be Saved to Base before leaving this tab.
28
Menu ReferenceFile MenuReload (engine, train, accessory, switch, route) Data
LSU will re-load information from the LEGACY Base, discarding any un-saved changes you’vemadetothecurrentlydisplayedTab.
ConfigureCommunications
Selects between the LCS WiFi module or serial COM (and serial port number) used by the LSU to communicate with the LEGACY Base. See Troubleshooting Serial Connection Problems in this manual for more information.
Speed(Serial connections only.)If you are getting repeated communication error messages,
change to the Low speed setting, otherwise the default High speed should be used.
The speed setting applies only when your computer is connected via a wired serial connection to your Legacy command base. Changing this value has no effect when your commputer is connected via an LCS WiFi module.
Note!

29
Status and Error MessagesThe following tables describe various status and error messages that can be displayed,
along with a description and in some cases, suggestions as to how to correct an error condition.
Status messages shown during program activity
Message Description
Cancelled User cancelled action
Connecting Connecting to base and setting it up for modification
Idle No activityReading database Reading the database from the baseReading ... data Reading all engine (train, switch, route or accessory)
data from baseRestoring database Writing the database to the base Writing ... data Updating base/cab with new engine (train, switch,
route or accessory) dataWriting engine module Writing single or multiple engine memory module
Writing memory module Writing a memory module with base or cab firmware
Status messages shown after activity is complete
Download done Transfer was successful, database has been saved.Engine module creation done Successfully wrote engine memory module
Module creation done Successfully wrote memory module containing base or cab firmware
Restore done Database successfully restored! You must power cycle the LEGACY Base before the new database will be used.
Update done Successfully updated engine record data in base/cab
30
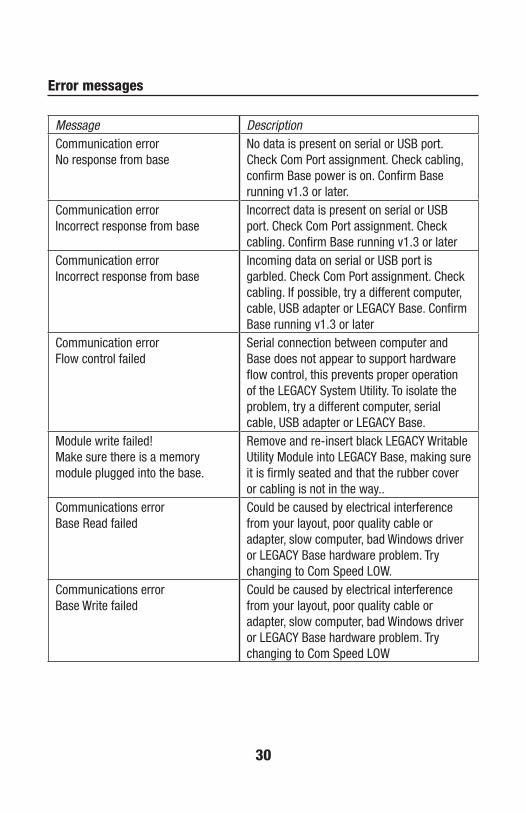
Error messages
Message DescriptionCommunication error No response from base
No data is present on serial or USB port. Check Com Port assignment. Check cabling, confirm Base power is on. Confirm Base running v1.3 or later.
Communication error Incorrect response from base
Incorrect data is present on serial or USB port. Check Com Port assignment. Check cabling. Confirm Base running v1.3 or later
Communication error Incorrect response from base
Incoming data on serial or USB port is garbled. Check Com Port assignment. Check cabling. If possible, try a different computer, cable, USB adapter or LEGACY Base. Confirm Base running v1.3 or later
Communication error Flow control failed
Serial connection between computer and Base does not appear to support hardware flow control, this prevents proper operation of the LEGACY System Utility. To isolate the problem, try a different computer, serial cable, USB adapter or LEGACY Base.
Module write failed! Make sure there is a memory module plugged into the base.
Remove and re-insert black LEGACY Writable Utility Module into LEGACY Base, making sure it is firmly seated and that the rubber cover or cabling is not in the way..
Communications error Base Read failed
Could be caused by electrical interference from your layout, poor quality cable or adapter, slow computer, bad Windows driver or LEGACY Base hardware problem. Try changing to Com Speed LOW.
Communications error Base Write failed
Could be caused by electrical interference from your layout, poor quality cable or adapter, slow computer, bad Windows driver or LEGACY Base hardware problem. Try changing to Com Speed LOW

31
Communications error Base NVM update failed
NVM, or Non-volatile Memory is where the Base stores layout information that is retained even when the Base is powered off. Could be caused by electrical interference from your layout, poor quality cable or adapter, slow computer, bad Windows driver or LEGACY Base hardware problem. Try changing to Com Speed LOW
Communications error Base RAM update failed
RAM Memory is where the Base stores temporary operating information that is not saved when the Base is powered off. Could be caused by electrical interference from your layout, poor quality cable or adapter, slow computer, bad Windows driver or LEGACY Base hardware problem. Try changing to Com Speed LOW
Base ack failed - Baud change. Could be caused by electrical interference from your layout, poor quality cable or adapter, slow computer, bad Windows driver or LEGACY Base hardware problem. Try changing to Com Speed LOW
LSU Help File No application is associated with this file type
Install Adobe Reader or another application capable of viewing a PDF document onto your computer.

32
Trouble-Shooting Connection ProblemsWiFi Connection
Most WiFi connection failures are most likely caused when your computer itself is not connected to the wireless network you think it is. If you are also using an LCS App, such
as the Lionel LCS App or Lionel iCab, check to see that your Apple device is communicating successfully with your LCS WiFi module. Re-check the name of the wireless network your computer is connected to and make sure it is the same named network your LCS WiFi module is on.
Ifyou’rehavingtroublegettingLSUtocommunicatewithyourLEGACYBase,trythefollowing and re-check for communication after each step:
1. Make sure there is only one instance of LSU running on your computer (serial connections only).
2. Quit and restart the LEGACY System Utility (LSU) program3. Unplug the power to your LEGACY Base, wait a few seconds and turn it back on4. Unplug the LCS Power Supply from the LCS DB-9 to PDI Cable (6-81499), leave it
disconnected for 5 seconds and plug it back in. Re-connect to the named wireless network which includes in the LCS WiFi module and try again (serial connections only).
33
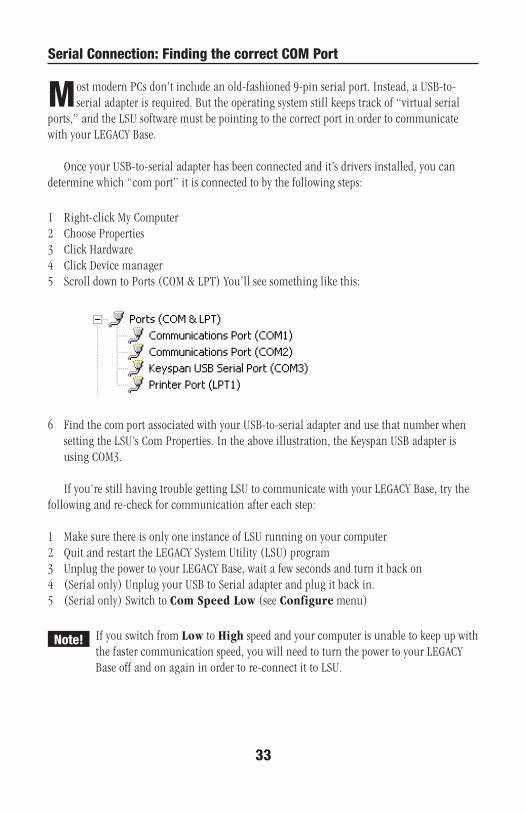
Serial Connection: Finding the correct COM Port
MostmodernPCsdon’tincludeanold-fashioned9-pinserialport.Instead,aUSB-to-serialadapterisrequired.Buttheoperatingsystemstillkeepstrackof“virtualserial
ports,”andtheLSUsoftwaremustbepointingtothecorrectportinordertocommunicatewith your LEGACY Base.
OnceyourUSB-to-serialadapterhasbeenconnectedandit’sdriversinstalled,youcandeterminewhich“comport”itisconnectedtobythefollowingsteps:
1 Right-click My Computer2 Choose Properties3 Click Hardware4 Click Device manager5 ScrolldowntoPorts(COM&LPT)You’llseesomethinglikethis:
6 Find the com port associated with your USB-to-serial adapter and use that number when settingtheLSU’sComProperties.Intheaboveillustration,theKeyspanUSBadapterisusing COM3.
Ifyou’restillhavingtroublegettingLSUtocommunicatewithyourLEGACYBase,trythefollowing and re-check for communication after each step:
1 Make sure there is only one instance of LSU running on your computer2 Quit and restart the LEGACY System Utility (LSU) program3 Unplug the power to your LEGACY Base, wait a few seconds and turn it back on4 (Serial only) Unplug your USB to Serial adapter and plug it back in.5 (Serial only) Switch to Com Speed Low (see Configure menu)
Note! If you switch from Low to High speed and your computer is unable to keep up with the faster communication speed, you will need to turn the power to your LEGACY Base off and on again in order to re-connect it to LSU.

34
Other Trouble-Shooting tips
I fyou’regettingerrorswhenwritingorreadingfromaMemoryModule,removeandre-insert the module. Make that the rubber covering or cabling is not preventing the
Memory Module from being fully inserted into its slot.


