36
LiveProfessor The Audio Processor User manual - Version 1.0 Manual revision 5 Sept - 2012

LiveProfessorThe Audio Processor
User manual - Version 1.0
Manual revision 5Sept - 2012
ContentsIntroduction 4Installation and setup 5
System requirements 5First run 5
Audio settingsPlugins
Updates 5The Basics 6
Adding a plugin to your project 6The plugin window 6Audio routing and gain 7
Routing in the plugin windowRouting using the patch windowInput and output gain
Plugin Snapshots 8Creating a snapshot Recalling a snapshotRenaming and deleting a snapshotCopying snapshots
Bypassing/Turn off a plugin 8Tempo sync 9
Setting the project tempo Transport controlsMidi Beat Clock
Workspaces and window layouts 10Horizontal menu barStack modeSave and recall workspaces
Plugin manager 12Adding new plugins 12
Plugin status:DelayI/O
Organizing plugins 12Removing a pluginBanning a plugin
Navigator 14Global snapshots 15
Creating a global snapshotUpdatingSnapshot filterFire cueRecalling a Global Snapshot in a cue
Patch View 16ConnectionsLabels
Cue lists 17Introduction to cue listsCreating your first cue
Cue actions 17Adding actionsMoving and deleting actionsEditing actions
Descriptions of the available actions: 18Editing the cue list 20
Moving cuesCopying cuesRenaming and re-numbering cues

Deleting cuesSorting the cue list
Controlling the cue list 20Using the mouseUsing the keyboardUsing MIDI hardware controllersIndividual MIDI TriggersUsing MIDI Show Control
The Global cue tool 21Wait and fade times 22Cue list panel 22
MIDI 23MIDI routing 23
General MIDI routingMIDI ChainMIDI MutePatching MIDI using cuesMIDI Thru
MIDI Modifiers 24MIDI filter 24MIDI Show control 24
Editing Cue and List numbersHardware controllers 26
Creating a new controller 26Mapping MIDI
Mapping controls to plugins 27Creating a new controller mapQuick assignMapping using the editor
Mapping controls to program functions 27Switching controller maps using cues 28Control transformation 28
Input transformationReverseRelativeToggleIgnore button upUse single message
Transformation in controller maps 30Switch point
Library 31Custom keyboard shortcuts 32List of default shortcuts 32
Multi-client operation 34Troubleshooting 35
Missing MIDI devices 35Restoring program settings 35

4
IntroductionWelcome to LiveProfessor - The Audio Processor.LiveProfessor is designed to enable you to use VST-plugins in live audio.The uses of LiveProfessor vary from working as an additional effect rack to a keyboard rack or a guitar rig.
As with all ifoundasound software, it has been created by sound engineers with the help and ideas of the users.If you got any questions that this documentation does not cover please contact us at www.ifoundasound.com
5
Installation and setupSystem requirementsLiveProfessor does not have any special system requirements but the more power your PC has the more plugins you can run and the lower latency you get.You need a PC running Windows XP, Vista or Windows 7 and an ASIO sound device.Download the installer package (msi file) from our website and install the program
First run
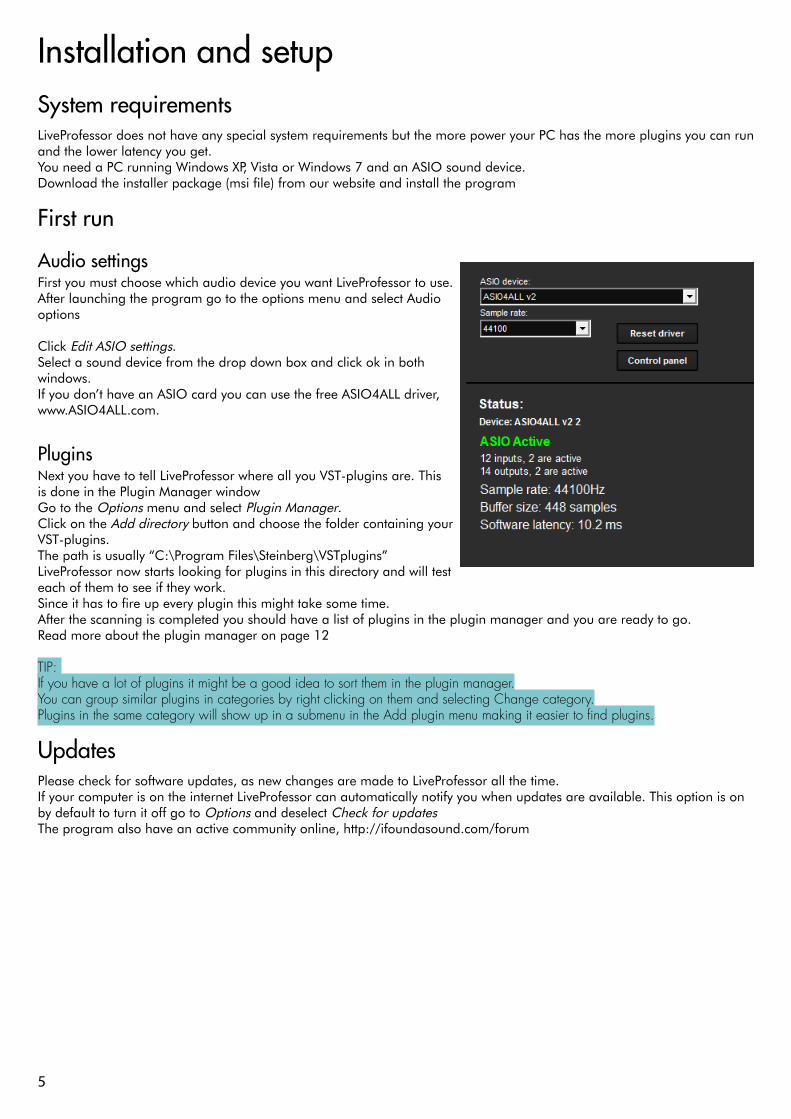
Audio settingsFirst you must choose which audio device you want LiveProfessor to use.After launching the program go to the options menu and select Audio options
Click Edit ASIO settings.Select a sound device from the drop down box and click ok in both windows.If you don’t have an ASIO card you can use the free ASIO4ALL driver, www.ASIO4ALL.com.
Plugins Next you have to tell LiveProfessor where all you VST-plugins are. This is done in the Plugin Manager windowGo to the Options menu and select Plugin Manager.Click on the Add directory button and choose the folder containing your VST-plugins.The path is usually “C:\Program Files\Steinberg\VSTplugins”LiveProfessor now starts looking for plugins in this directory and will test each of them to see if they work.Since it has to fire up every plugin this might take some time.After the scanning is completed you should have a list of plugins in the plugin manager and you are ready to go.Read more about the plugin manager on page 12
TIP: If you have a lot of plugins it might be a good idea to sort them in the plugin manager.You can group similar plugins in categories by right clicking on them and selecting Change category.Plugins in the same category will show up in a submenu in the Add plugin menu making it easier to find plugins.
Updates Please check for software updates, as new changes are made to LiveProfessor all the time.If your computer is on the internet LiveProfessor can automatically notify you when updates are available. This option is on by default to turn it off go to Options and deselect Check for updates The program also have an active community online, http://ifoundasound.com/forum
6
The BasicsAdding a plugin to your projectTo add a VST plugin to your project, click Add unit in the main menu. The plugin list shows all you plugins ordered alphabetically and grouped by category and folder.On the top of the list is a search field to help you find plugins.Click on the plugin you want to add.
The plugin window
Each plugin-unit you add to your project gets its own window. This window contains the plugin user interface and all LiveProfessor settings for this plugin.On the left of the window you have several drop down menus.
• Audiorouting – How audio comes in and go out, including gain.• Midi – Selection of midi device, and other midi settings• Snapshots– Manages all the snapshots for this plugin.• Controllermaps– Holds the controller maps for this plugin.• Meters – Input and output peak meters• Presets – Factory presets for this plugin
On the top of the plugin window, starting from the left you see the name of this plugin-unit.Double click this to rename the unit. Under the name you can see that this plugin has 2 inputs and 2 outputs.
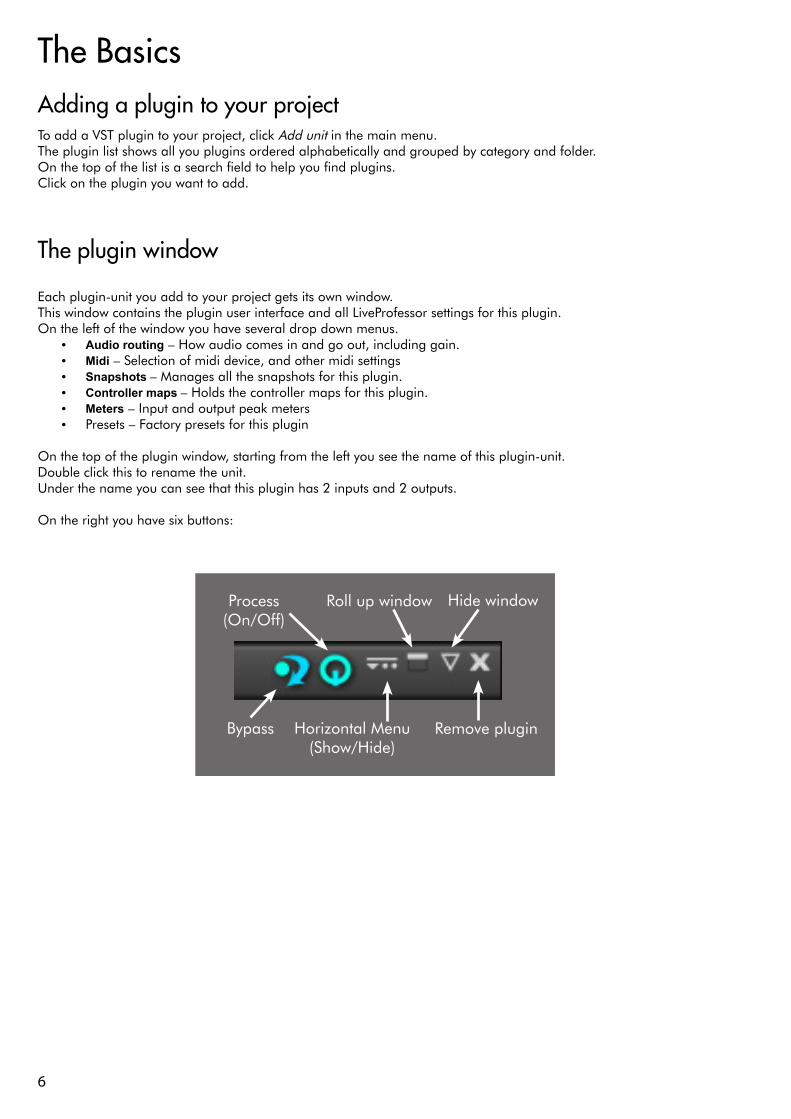
On the right you have six buttons:
Process (On/Off)
Bypass Horizontal Menu(Show/Hide)
Hide windowRoll up window
Remove plugin
7
Audio routing and gainThere are to ways to change the audio routing in LiveProfessor, in the window of each plugin or in the patch window.
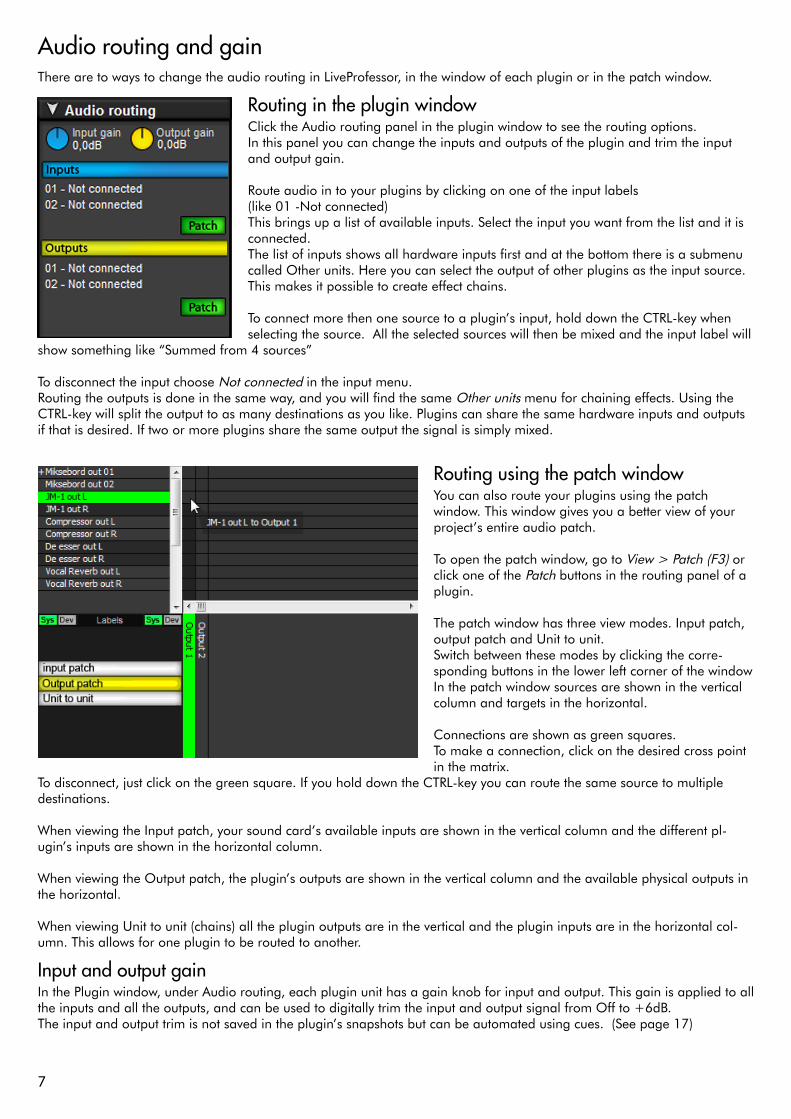
Routing in the plugin windowClick the Audio routing panel in the plugin window to see the routing options.In this panel you can change the inputs and outputs of the plugin and trim the input and output gain.
Route audio in to your plugins by clicking on one of the input labels(like 01 -Not connected) This brings up a list of available inputs. Select the input you want from the list and it is connected. The list of inputs shows all hardware inputs first and at the bottom there is a submenu called Other units. Here you can select the output of other plugins as the input source. This makes it possible to create effect chains.
To connect more then one source to a plugin’s input, hold down the CTRL-key when selecting the source. All the selected sources will then be mixed and the input label will
show something like “Summed from 4 sources”
To disconnect the input choose Not connected in the input menu. Routing the outputs is done in the same way, and you will find the same Other units menu for chaining effects. Using the CTRL-key will split the output to as many destinations as you like. Plugins can share the same hardware inputs and outputs if that is desired. If two or more plugins share the same output the signal is simply mixed.
Routing using the patch windowYou can also route your plugins using the patch window. This window gives you a better view of your project’s entire audio patch.
To open the patch window, go to View > Patch (F3) or click one of the Patch buttons in the routing panel of a plugin.
The patch window has three view modes. Input patch, output patch and Unit to unit. Switch between these modes by clicking the corre-sponding buttons in the lower left corner of the window In the patch window sources are shown in the vertical column and targets in the horizontal.
Connections are shown as green squares. To make a connection, click on the desired cross point in the matrix.
To disconnect, just click on the green square. If you hold down the CTRL-key you can route the same source to multiple destinations.
When viewing the Input patch, your sound card’s available inputs are shown in the vertical column and the different pl-ugin’s inputs are shown in the horizontal column.
When viewing the Output patch, the plugin’s outputs are shown in the vertical column and the available physical outputs in the horizontal.
When viewing Unit to unit (chains) all the plugin outputs are in the vertical and the plugin inputs are in the horizontal col-umn. This allows for one plugin to be routed to another.
Input and output gainIn the Plugin window, under Audio routing, each plugin unit has a gain knob for input and output. This gain is applied to all the inputs and all the outputs, and can be used to digitally trim the input and output signal from Off to +6dB.The input and output trim is not saved in the plugin’s snapshots but can be automated using cues. (See page 17)
8
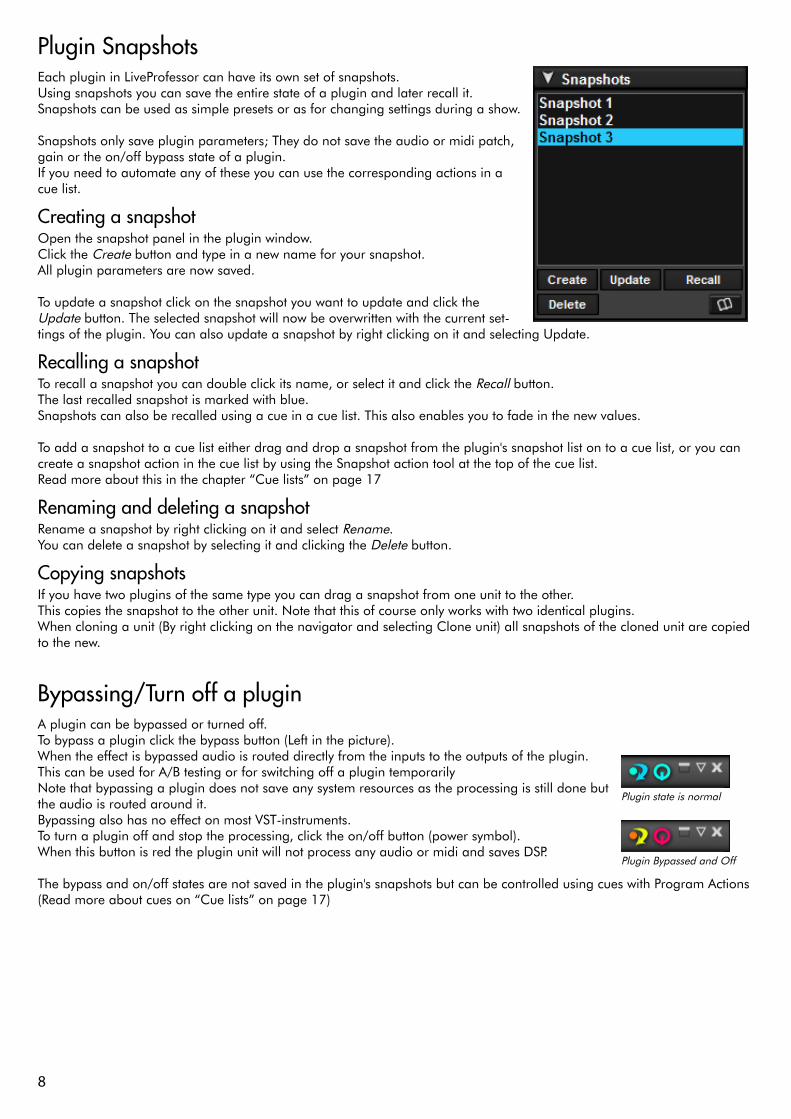
Plugin SnapshotsEach plugin in LiveProfessor can have its own set of snapshots.Using snapshots you can save the entire state of a plugin and later recall it. Snapshots can be used as simple presets or as for changing settings during a show.
Snapshots only save plugin parameters; They do not save the audio or midi patch, gain or the on/off bypass state of a plugin.If you need to automate any of these you can use the corresponding actions in a cue list.
Creating a snapshot Open the snapshot panel in the plugin window. Click the Create button and type in a new name for your snapshot.All plugin parameters are now saved.
To update a snapshot click on the snapshot you want to update and click the Update button. The selected snapshot will now be overwritten with the current set-tings of the plugin. You can also update a snapshot by right clicking on it and selecting Update.
Recalling a snapshotTo recall a snapshot you can double click its name, or select it and click the Recall button.The last recalled snapshot is marked with blue.Snapshots can also be recalled using a cue in a cue list. This also enables you to fade in the new values.
To add a snapshot to a cue list either drag and drop a snapshot from the plugin's snapshot list on to a cue list, or you can create a snapshot action in the cue list by using the Snapshot action tool at the top of the cue list. Read more about this in the chapter “Cue lists” on page 17
Renaming and deleting a snapshotRename a snapshot by right clicking on it and select Rename.You can delete a snapshot by selecting it and clicking the Delete button.
Copying snapshotsIf you have two plugins of the same type you can drag a snapshot from one unit to the other. This copies the snapshot to the other unit. Note that this of course only works with two identical plugins.When cloning a unit (By right clicking on the navigator and selecting Clone unit) all snapshots of the cloned unit are copied to the new.
Bypassing/Turn off a plugin A plugin can be bypassed or turned off.To bypass a plugin click the bypass button (Left in the picture).When the effect is bypassed audio is routed directly from the inputs to the outputs of the plugin.This can be used for A/B testing or for switching off a plugin temporarilyNote that bypassing a plugin does not save any system resources as the processing is still done but the audio is routed around it.Bypassing also has no effect on most VST-instruments.To turn a plugin off and stop the processing, click the on/off button (power symbol).When this button is red the plugin unit will not process any audio or midi and saves DSP.
The bypass and on/off states are not saved in the plugin's snapshots but can be controlled using cues with Program Actions (Read more about cues on “Cue lists” on page 17)
Plugin Bypassed and Off
Plugin state is normal

9
Tempo syncSetting the project tempo Some plugins can sync to a tempo value (BPM). To set the project tempo in LiveProfessor, open the Tempo panel by clicking view - Tempo panel. Click on the tempo value to type in a new value or use the + and - buttons to increase or decrease the current tempo.Use the tap button to “Tap in” an unknown value. You will need to click the tap button 4 times to set the value.Project tempo can also be automated via the cue lists and using a MIDI hardware controller
Transport controlsAlthough LiveProfessor don’t have a built in timeline or sequencer, you still have access to transport controls such as Play, Pause, Forward etc.These controls will control plugins such as sequencers, arpeggios, loop-players etc, and start and stop them at the same time.
Midi Beat ClockLiveProfessor can sync tempo and transport controls to incoming MIDI beat clock (MC or MBC) To enable MIDI clock sync go, to Options > MIDI setup and select MIDI clock.Select the MIDI input device that the clock is coming from and select Enable MIDI clock.Once the sync is setup you can turn it on/off with the sync button in the Tempo panel (View > Tempo panel)
10
Workspaces and window layoutsLiveProfessor lets you customize your project's layout to fit your needs.
The main menu on the left in each plugin window can be hidden by clicking the Hide button
This enables you to view only the plugin user interface, making room for more plugins.To show the menu again click the arrow to the left in the plugin window.
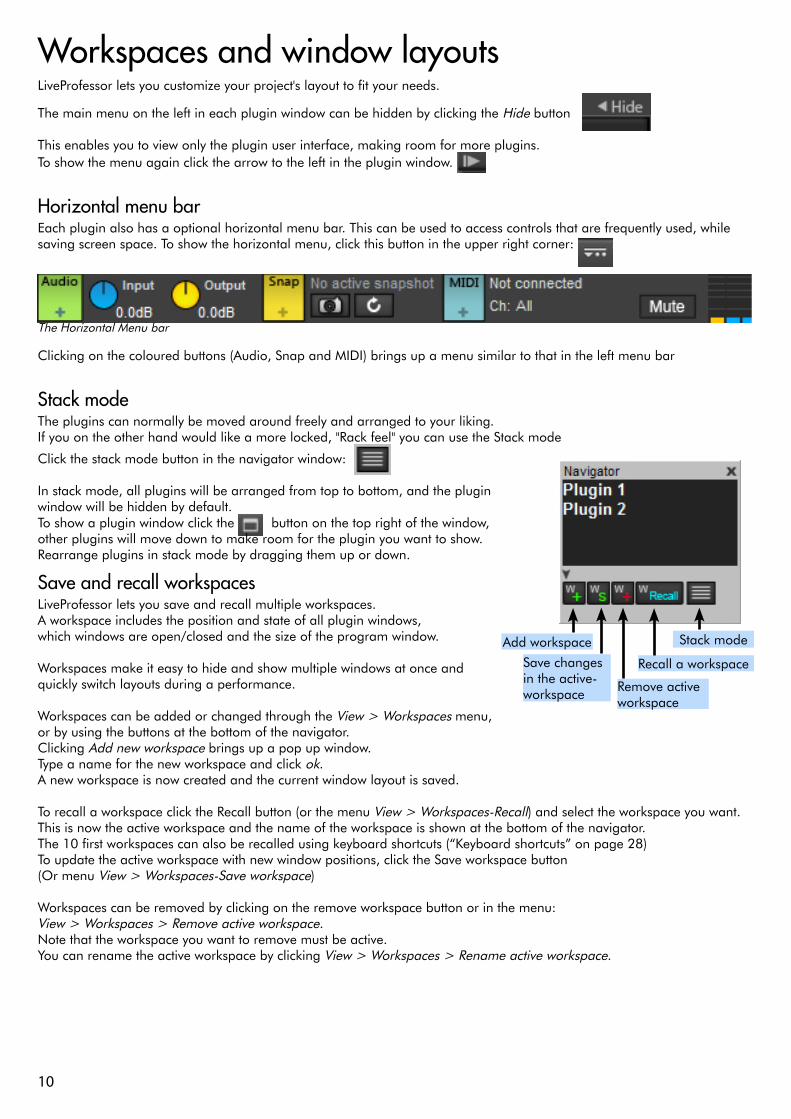
Horizontal menu barEach plugin also has a optional horizontal menu bar. This can be used to access controls that are frequently used, while saving screen space. To show the horizontal menu, click this button in the upper right corner:
Clicking on the coloured buttons (Audio, Snap and MIDI) brings up a menu similar to that in the left menu bar
Stack modeThe plugins can normally be moved around freely and arranged to your liking.If you on the other hand would like a more locked, "Rack feel" you can use the Stack mode
Click the stack mode button in the navigator window:
In stack mode, all plugins will be arranged from top to bottom, and the plugin window will be hidden by default.To show a plugin window click the button on the top right of the window, other plugins will move down to make room for the plugin you want to show.Rearrange plugins in stack mode by dragging them up or down.
Save and recall workspacesLiveProfessor lets you save and recall multiple workspaces. A workspace includes the position and state of all plugin windows, which windows are open/closed and the size of the program window.
Workspaces make it easy to hide and show multiple windows at once and quickly switch layouts during a performance.
Workspaces can be added or changed through the View > Workspaces menu,or by using the buttons at the bottom of the navigator. Clicking Add new workspace brings up a pop up window. Type a name for the new workspace and click ok. A new workspace is now created and the current window layout is saved.
To recall a workspace click the Recall button (or the menu View > Workspaces-Recall) and select the workspace you want. This is now the active workspace and the name of the workspace is shown at the bottom of the navigator.The 10 first workspaces can also be recalled using keyboard shortcuts (“Keyboard shortcuts” on page 28)To update the active workspace with new window positions, click the Save workspace button (Or menu View > Workspaces-Save workspace)
Workspaces can be removed by clicking on the remove workspace button or in the menu: View > Workspaces > Remove active workspace. Note that the workspace you want to remove must be active.You can rename the active workspace by clicking View > Workspaces > Rename active workspace.
The Horizontal Menu bar
Add workspace
Save changesin the active-workspace Remove active
workspace
Recall a workspace
Stack mode

11
Workspaces with MIDI or Cue listThe first 5 workspaces can be recalled directly using a hardware controller This is setup in menu Controllers > Control Program actions. (Read more in the chapter “Hardware controllers” on page 26)
Any workspace can also be recalled using a cue list. This is done by placing a Program Action in the cue list.In the editor that pops up select Recall a workspace in the Change Action combo box.Now select the workspace you want to recall in the list to the left. (Read more about cues on page 17)
12
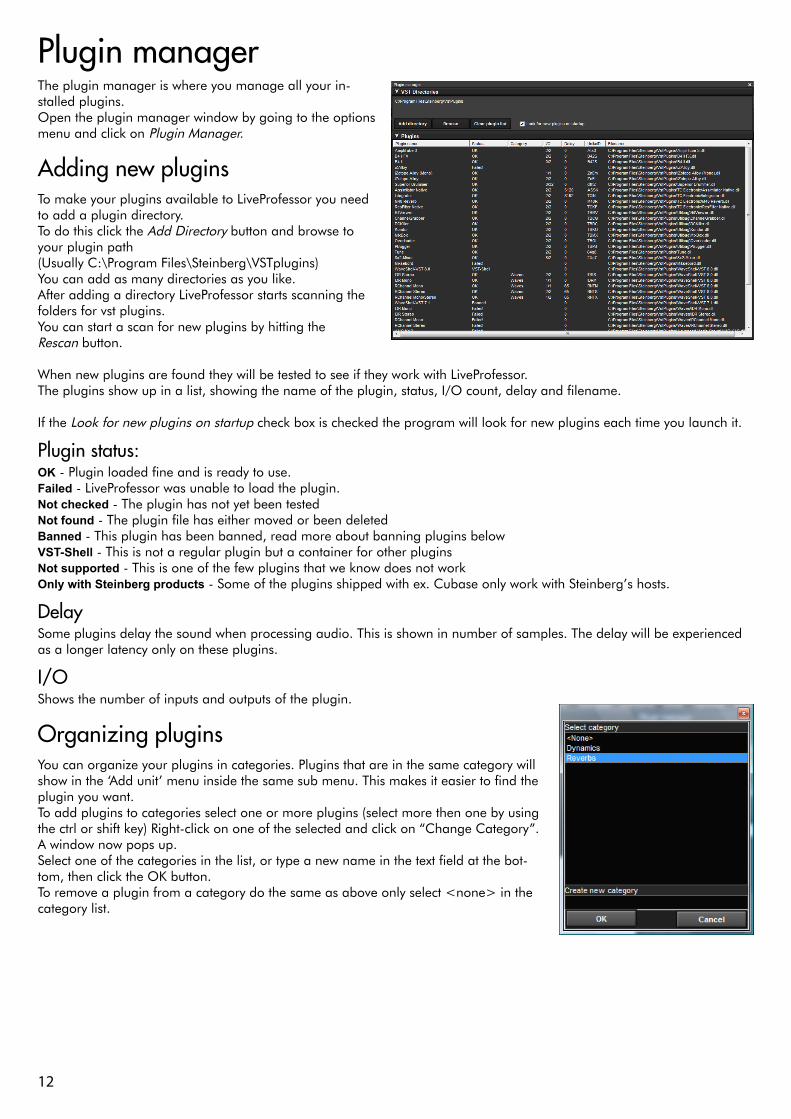
Plugin managerThe plugin manager is where you manage all your in-stalled plugins.Open the plugin manager window by going to the options menu and click on Plugin Manager.
Adding new pluginsTo make your plugins available to LiveProfessor you need to add a plugin directory.To do this click the Add Directory button and browse to your plugin path (Usually C:\Program Files\Steinberg\VSTplugins)You can add as many directories as you like.After adding a directory LiveProfessor starts scanning the folders for vst plugins. You can start a scan for new plugins by hitting the Rescan button.
When new plugins are found they will be tested to see if they work with LiveProfessor.The plugins show up in a list, showing the name of the plugin, status, I/O count, delay and filename.
If the Look for new plugins on startup check box is checked the program will look for new plugins each time you launch it.
Plugin status:OK - Plugin loaded fine and is ready to use.Failed - LiveProfessor was unable to load the plugin.Notchecked - The plugin has not yet been testedNotfound - The plugin file has either moved or been deletedBanned - This plugin has been banned, read more about banning plugins belowVST-Shell - This is not a regular plugin but a container for other pluginsNotsupported - This is one of the few plugins that we know does not workOnlywithSteinbergproducts - Some of the plugins shipped with ex. Cubase only work with Steinberg’s hosts.
DelaySome plugins delay the sound when processing audio. This is shown in number of samples. The delay will be experienced as a longer latency only on these plugins.
I/OShows the number of inputs and outputs of the plugin.
Organizing pluginsYou can organize your plugins in categories. Plugins that are in the same category will show in the ‘Add unit’ menu inside the same sub menu. This makes it easier to find the plugin you want.To add plugins to categories select one or more plugins (select more then one by using the ctrl or shift key) Right-click on one of the selected and click on “Change Category”.A window now pops up.Select one of the categories in the list, or type a new name in the text field at the bot-tom, then click the OK button.To remove a plugin from a category do the same as above only select <none> in the category list.
13
Removing a pluginTo remove a plugin right click on it and choose “Remove plugin”The plugin will be added the next time the folder is scanned, unless you “ban” the plugin from coming back
Banning a pluginYou can ban a plugin so it does not come back in the list on the next scan.Select the plugin and choose “Ban”. A banned plugin will never be loaded and will not get back in the plugin list after it has been removed.The list of banned plugins is stored in a text file called “Banned.txt” in the program folder.You can open this file in Notepad to remove or add plugins manually.If one or more plugins should cause LiveProfessor not to start you can ban them manually by adding the file name as a line in the Banned.txt file like: plugin-name.dll.
14
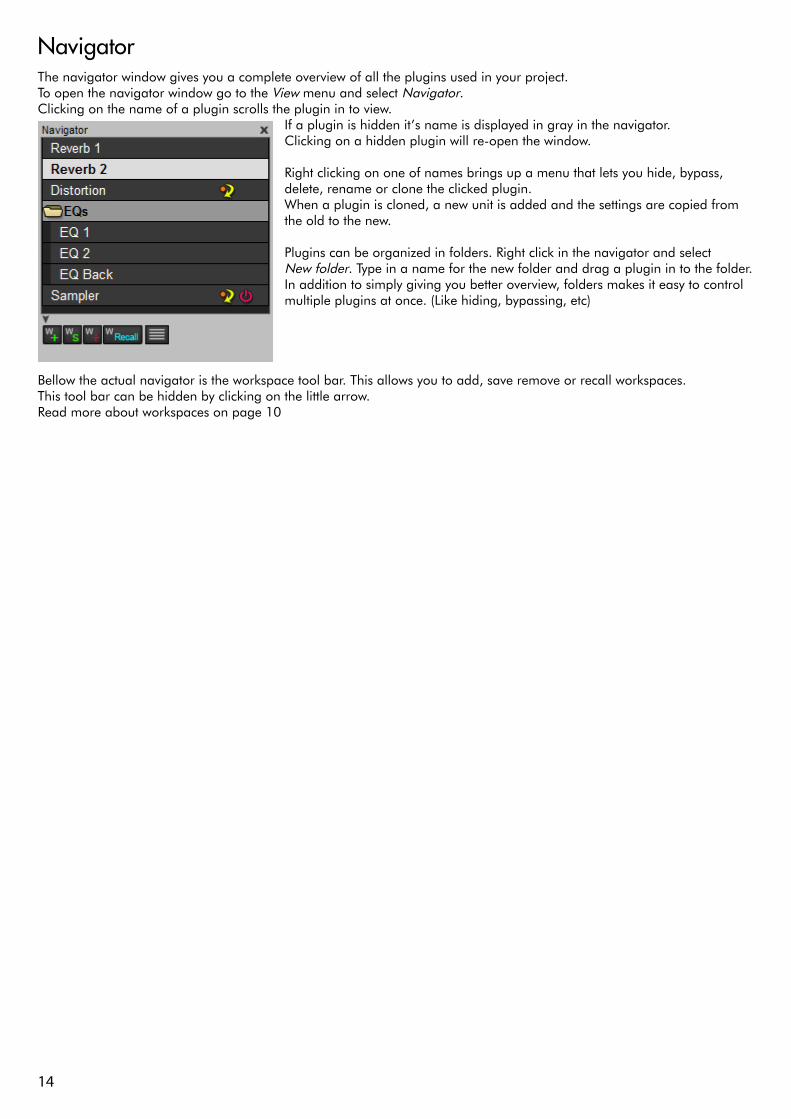
NavigatorThe navigator window gives you a complete overview of all the plugins used in your project.To open the navigator window go to the View menu and select Navigator. Clicking on the name of a plugin scrolls the plugin in to view.
If a plugin is hidden it’s name is displayed in gray in the navigator. Clicking on a hidden plugin will re-open the window.
Right clicking on one of names brings up a menu that lets you hide, bypass, delete, rename or clone the clicked plugin.When a plugin is cloned, a new unit is added and the settings are copied from the old to the new.
Plugins can be organized in folders. Right click in the navigator and select New folder. Type in a name for the new folder and drag a plugin in to the folder.In addition to simply giving you better overview, folders makes it easy to control multiple plugins at once. (Like hiding, bypassing, etc)
Bellow the actual navigator is the workspace tool bar. This allows you to add, save remove or recall workspaces.This tool bar can be hidden by clicking on the little arrow.Read more about workspaces on page 10
15
Global snapshotsPlugin snapshots are great if you just want to store and recall the settings of a single plugin. But often you want to store multiple complete setups with in the same project. This is where Global Snapshots come to use.A Global Snapshot is a single snapshot that stores :
• Plugin settings for all the loaded plugins.• Input/Output gain and the Bypass and On/Off buttons for all loaded plugins.• MIDI patch, Modifiers, and Filter for each plugin• Controller map for each plugin and for the program actions.• The entire audio patch• Tempo settings• The window layout
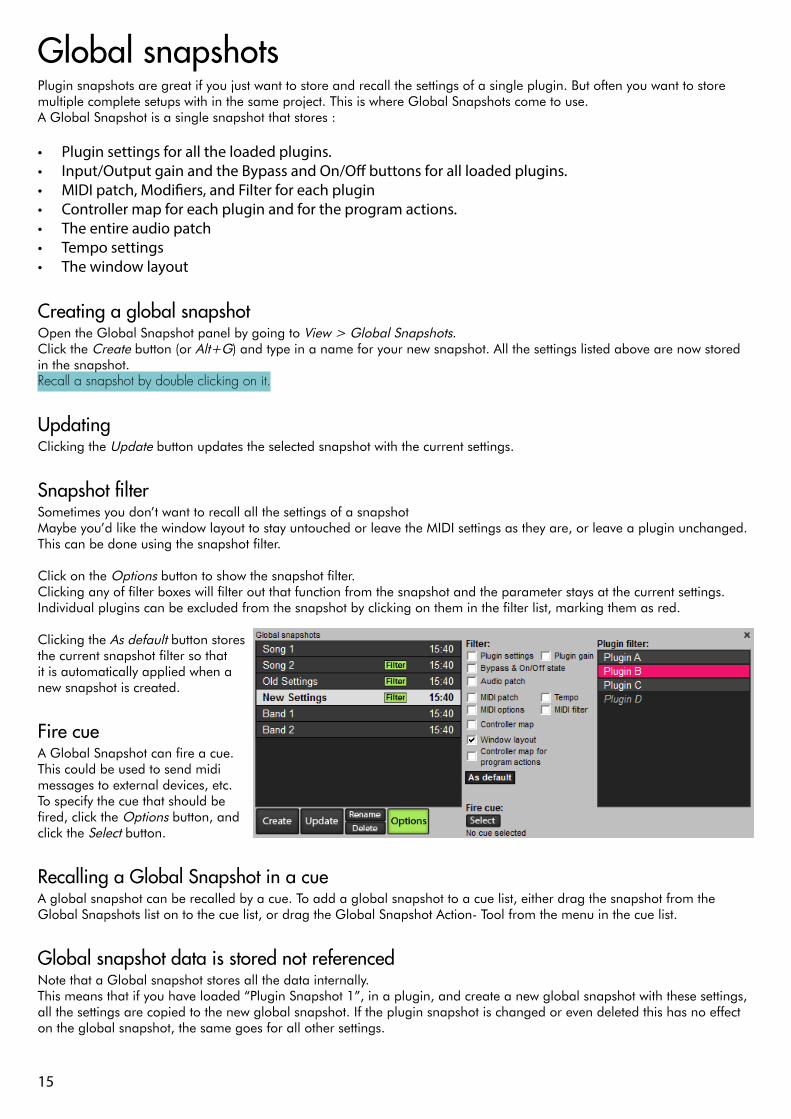
Creating a global snapshotOpen the Global Snapshot panel by going to View > Global Snapshots.Click the Create button (or Alt+G) and type in a name for your new snapshot. All the settings listed above are now stored in the snapshot. Recall a snapshot by double clicking on it.
UpdatingClicking the Update button updates the selected snapshot with the current settings.
Snapshot filterSometimes you don’t want to recall all the settings of a snapshot Maybe you’d like the window layout to stay untouched or leave the MIDI settings as they are, or leave a plugin unchanged. This can be done using the snapshot filter.
Click on the Options button to show the snapshot filter.Clicking any of filter boxes will filter out that function from the snapshot and the parameter stays at the current settings.Individual plugins can be excluded from the snapshot by clicking on them in the filter list, marking them as red.
Clicking the As default button stores the current snapshot filter so that it is automatically applied when a new snapshot is created.
Fire cueA Global Snapshot can fire a cue.This could be used to send midi messages to external devices, etc.To specify the cue that should be fired, click the Options button, and click the Select button.
Recalling a Global Snapshot in a cueA global snapshot can be recalled by a cue. To add a global snapshot to a cue list, either drag the snapshot from the Global Snapshots list on to the cue list, or drag the Global Snapshot Action- Tool from the menu in the cue list.
Global snapshot data is stored not referencedNote that a Global snapshot stores all the data internally. This means that if you have loaded “Plugin Snapshot 1”, in a plugin, and create a new global snapshot with these settings, all the settings are copied to the new global snapshot. If the plugin snapshot is changed or even deleted this has no effect on the global snapshot, the same goes for all other settings.
16
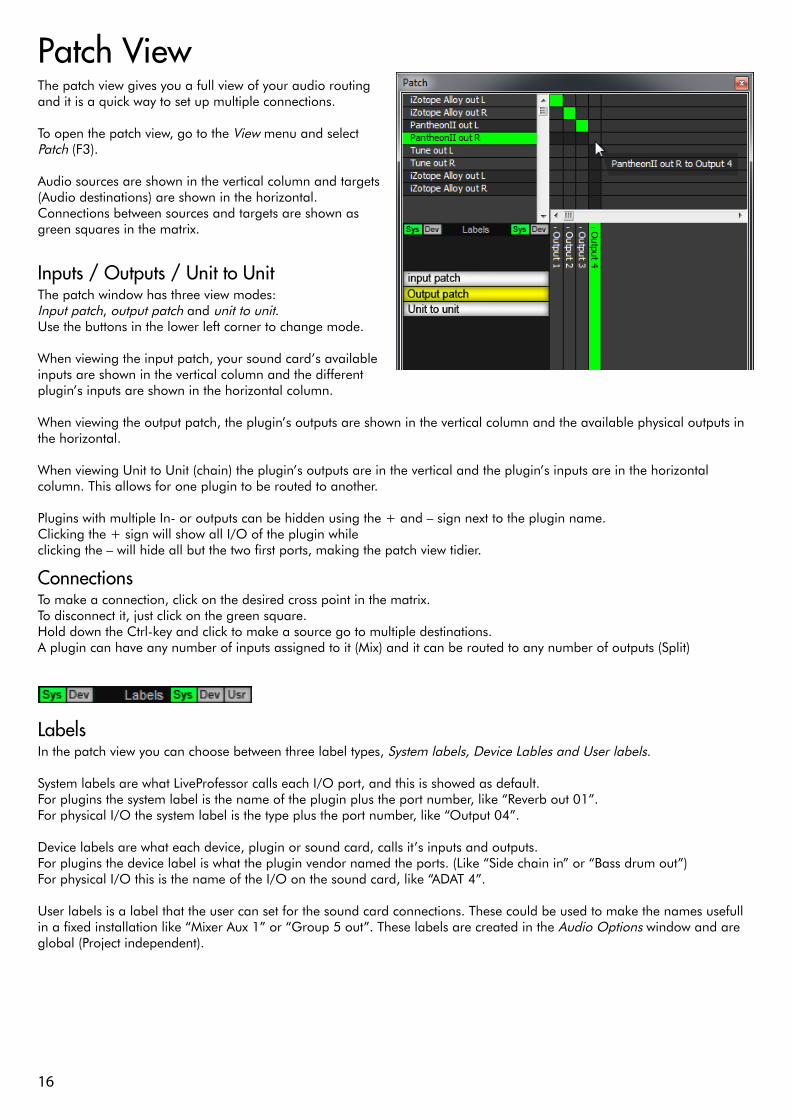
Patch ViewThe patch view gives you a full view of your audio routing and it is a quick way to set up multiple connections.
To open the patch view, go to the View menu and select Patch (F3).
Audio sources are shown in the vertical column and targets (Audio destinations) are shown in the horizontal.Connections between sources and targets are shown as green squares in the matrix.
Inputs / Outputs / Unit to UnitThe patch window has three view modes:Input patch, output patch and unit to unit. Use the buttons in the lower left corner to change mode.
When viewing the input patch, your sound card’s available inputs are shown in the vertical column and the different plugin’s inputs are shown in the horizontal column.
When viewing the output patch, the plugin’s outputs are shown in the vertical column and the available physical outputs in the horizontal.
When viewing Unit to Unit (chain) the plugin’s outputs are in the vertical and the plugin’s inputs are in the horizontal column. This allows for one plugin to be routed to another.
Plugins with multiple In- or outputs can be hidden using the + and – sign next to the plugin name.Clicking the + sign will show all I/O of the plugin while clicking the – will hide all but the two first ports, making the patch view tidier.
ConnectionsTo make a connection, click on the desired cross point in the matrix. To disconnect it, just click on the green square. Hold down the Ctrl-key and click to make a source go to multiple destinations.A plugin can have any number of inputs assigned to it (Mix) and it can be routed to any number of outputs (Split)
LabelsIn the patch view you can choose between three label types, System labels, Device Lables and User labels.
System labels are what LiveProfessor calls each I/O port, and this is showed as default.For plugins the system label is the name of the plugin plus the port number, like “Reverb out 01”.For physical I/O the system label is the type plus the port number, like “Output 04”.
Device labels are what each device, plugin or sound card, calls it’s inputs and outputs.For plugins the device label is what the plugin vendor named the ports. (Like “Side chain in” or “Bass drum out”)For physical I/O this is the name of the I/O on the sound card, like “ADAT 4”.
User labels is a label that the user can set for the sound card connections. These could be used to make the names usefull in a fixed installation like “Mixer Aux 1” or “Group 5 out”. These labels are created in the Audio Options window and are global (Project independent).
17
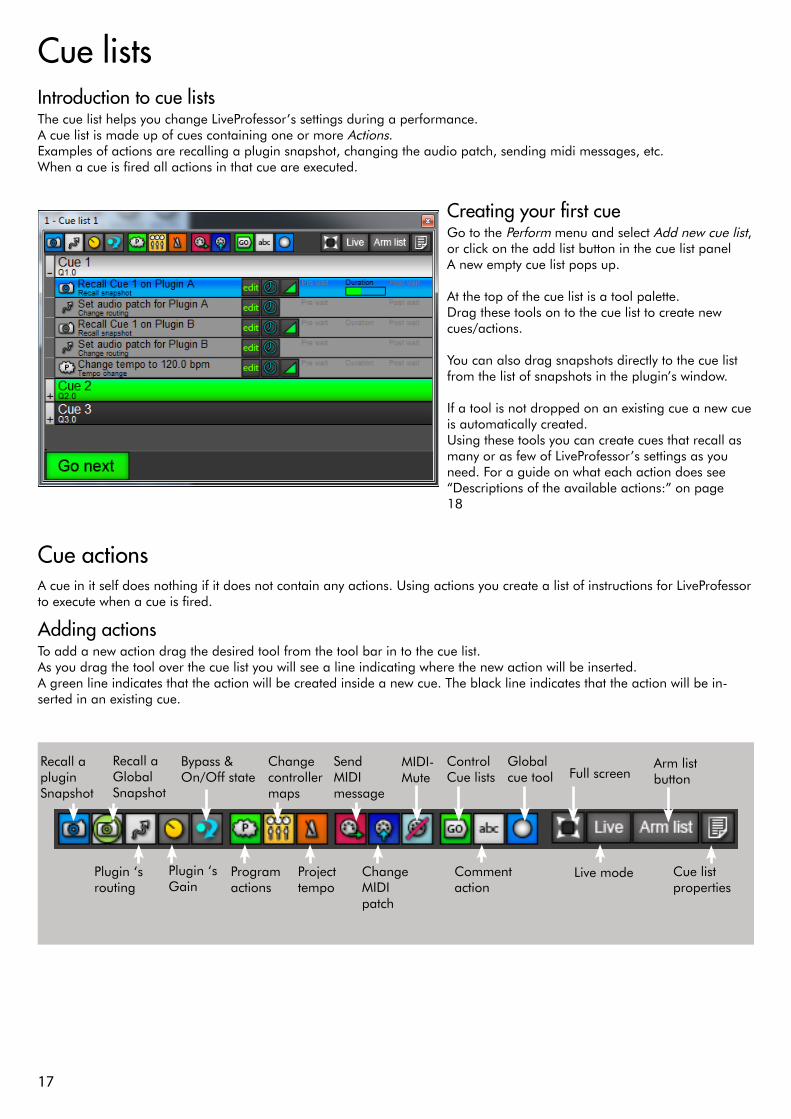
Cue listsIntroduction to cue listsThe cue list helps you change LiveProfessor’s settings during a performance.A cue list is made up of cues containing one or more Actions.Examples of actions are recalling a plugin snapshot, changing the audio patch, sending midi messages, etc.When a cue is fired all actions in that cue are executed.
Creating your first cueGo to the Perform menu and select Add new cue list, or click on the add list button in the cue list panel A new empty cue list pops up.
At the top of the cue list is a tool palette. Drag these tools on to the cue list to create new cues/actions. You can also drag snapshots directly to the cue list from the list of snapshots in the plugin’s window.
If a tool is not dropped on an existing cue a new cue is automatically created. Using these tools you can create cues that recall as many or as few of LiveProfessor’s settings as you need. For a guide on what each action does see “Descriptions of the available actions:” on page 18
Cue actionsA cue in it self does nothing if it does not contain any actions. Using actions you create a list of instructions for LiveProfessor to execute when a cue is fired.
Adding actionsTo add a new action drag the desired tool from the tool bar in to the cue list.As you drag the tool over the cue list you will see a line indicating where the new action will be inserted.A green line indicates that the action will be created inside a new cue. The black line indicates that the action will be in-serted in an existing cue.
Recall a plugin Snapshot
Plugin ‘s routing
Plugin ‘s Gain
Bypass & On/Off state
Program actions
Change controller maps
Project tempo
Send MIDI message
Change MIDI patch
Control Cue lists
Comment action
Global cue tool Full screen
Live mode
Arm list button
Cue list properties
Recall a Global Snapshot
MIDI-Mute
18
Moving and deleting actionsActions are executed in the order they appear in the cue (from top to bottom). You can move the actions by simply clicking and dragging them around. If you want to remove an action right click it and select Delete selected actions.
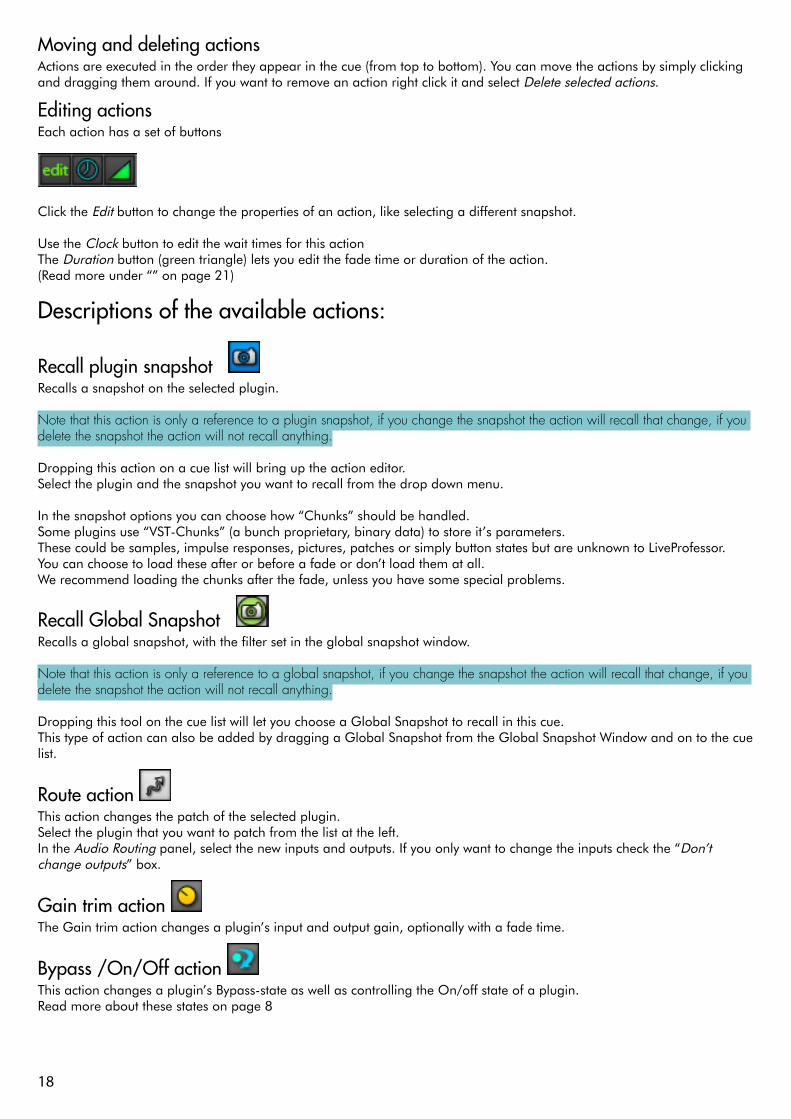
Editing actionsEach action has a set of buttons
Click the Edit button to change the properties of an action, like selecting a different snapshot.
Use the Clock button to edit the wait times for this action The Duration button (green triangle) lets you edit the fade time or duration of the action. (Read more under “” on page 21)
Descriptions of the available actions:
Recall plugin snapshot Recalls a snapshot on the selected plugin.
Note that this action is only a reference to a plugin snapshot, if you change the snapshot the action will recall that change, if you delete the snapshot the action will not recall anything.
Dropping this action on a cue list will bring up the action editor.Select the plugin and the snapshot you want to recall from the drop down menu.
In the snapshot options you can choose how “Chunks” should be handled.Some plugins use “VST-Chunks” (a bunch proprietary, binary data) to store it’s parameters.These could be samples, impulse responses, pictures, patches or simply button states but are unknown to LiveProfessor.You can choose to load these after or before a fade or don’t load them at all.We recommend loading the chunks after the fade, unless you have some special problems.
Recall Global Snapshot Recalls a global snapshot, with the filter set in the global snapshot window.
Note that this action is only a reference to a global snapshot, if you change the snapshot the action will recall that change, if you delete the snapshot the action will not recall anything.
Dropping this tool on the cue list will let you choose a Global Snapshot to recall in this cue.This type of action can also be added by dragging a Global Snapshot from the Global Snapshot Window and on to the cue list.
Route action This action changes the patch of the selected plugin.Select the plugin that you want to patch from the list at the left. In the Audio Routing panel, select the new inputs and outputs. If you only want to change the inputs check the “Don’t change outputs” box.
Gain trim action The Gain trim action changes a plugin’s input and output gain, optionally with a fade time.
Bypass /On/Off action This action changes a plugin’s Bypass-state as well as controlling the On/off state of a plugin. Read more about these states on page 8
19
Program action These actions can control program functions such as• Change the on/off or bypass state of a plugin• Change the input and output gain on a plugin• Recall a workspace• Set project tempo
Controller action This action sets the active controller map for a plugin or for the program functions. Select the plugin, and the controller map that you want to change to. Read more about hardware controllers on page 26
Tempo action This action changes the project tempo. Read more about the project tempo and sync on page 9.
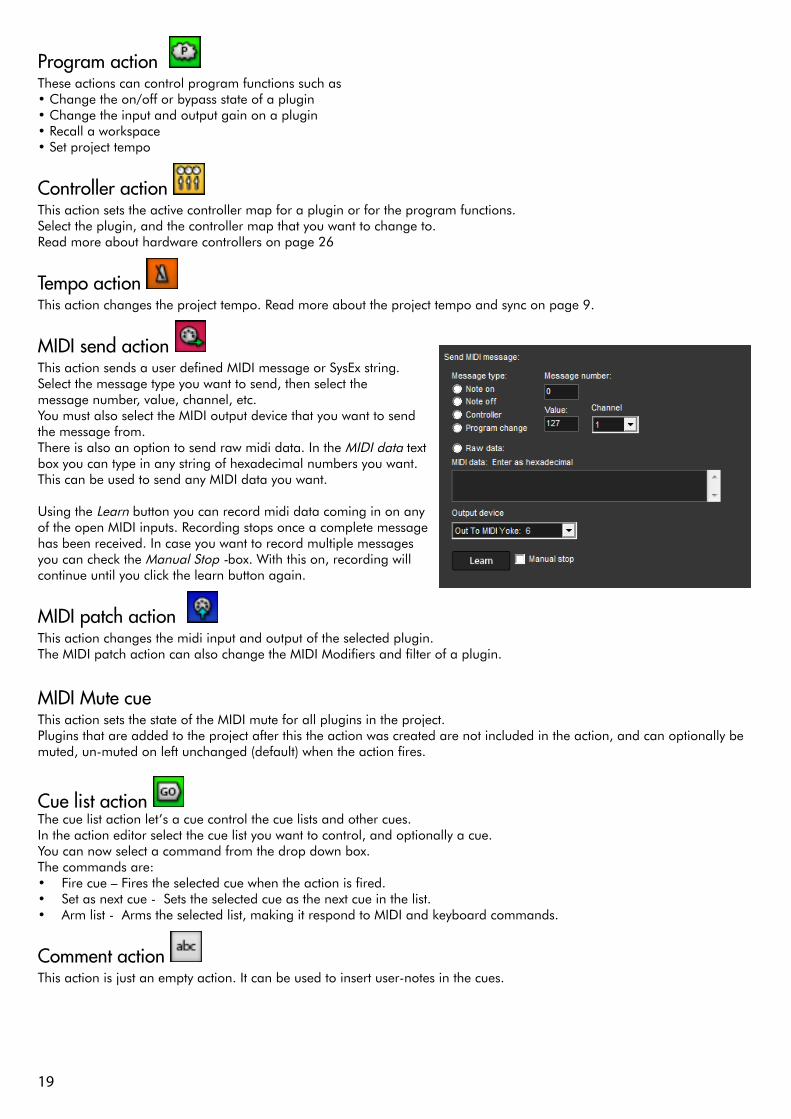
MIDI send action This action sends a user defined MIDI message or SysEx string. Select the message type you want to send, then select the message number, value, channel, etc. You must also select the MIDI output device that you want to send the message from. There is also an option to send raw midi data. In the MIDI data text box you can type in any string of hexadecimal numbers you want. This can be used to send any MIDI data you want.
Using the Learn button you can record midi data coming in on any of the open MIDI inputs. Recording stops once a complete message has been received. In case you want to record multiple messages you can check the Manual Stop -box. With this on, recording will continue until you click the learn button again.
MIDI patch action This action changes the midi input and output of the selected plugin.The MIDI patch action can also change the MIDI Modifiers and filter of a plugin.
MIDI Mute cueThis action sets the state of the MIDI mute for all plugins in the project.Plugins that are added to the project after this the action was created are not included in the action, and can optionally be muted, un-muted on left unchanged (default) when the action fires.
Cue list action The cue list action let’s a cue control the cue lists and other cues. In the action editor select the cue list you want to control, and optionally a cue. You can now select a command from the drop down box.The commands are:• Fire cue – Fires the selected cue when the action is fired.• Set as next cue - Sets the selected cue as the next cue in the list.• Arm list - Arms the selected list, making it respond to MIDI and keyboard commands.
Comment action This action is just an empty action. It can be used to insert user-notes in the cues.
20
Editing the cue listSelect more then one cue or action by holding down the shift or ctrl-keys while selecting items.
Moving cuesBoth cues and actions can be moved around using the mouse by clicking and dragging.While dragging a cue or an action a line indicates where the cue will be placed once you drop it.The green line is inside the cue list and the black line indicates that it is inside another cue.You can move and copy cues between cue lists by dragging them between the lists
Copying cuesTo copy cues or actions hold down the Alt-key before starting the drag operation.
Renaming and re-numbering cuesTo rename a cue or change the cue number, right click on the cue and select Rename cue or Change cue number.Actions can also be renamed by selecting Rename action
Deleting cuesTo delete a cue or an action select the items you want to delete, right click on one of them and select Delete selected cue or Delete selected actions.
Sorting the cue listYou can sort your cues either by name or by cue number. Click on the list menu in the upper right corner of the cue list.In the Sort- submenu select either Sort by name or Sort by cue number
Controlling the cue listHow you navigate and control the cue list will depend on the kind of work you do, so LiveProfessor supports several control methods.All of these methods, except the mouse and MIDI-triggers require the cue list to be armed. To arm a cue list click the Arm list button in the upper right corner of the cue list. Note that only one cue list can be armed at a time.
Using the mouseThe easiest way of firing a cue is to double click it. The cue will execute all it’s actions and the next cue in the list will become green, indicating that it is the next cue in the list to run.You can fire the next cue by hitting the Go Next button.To select which cue should be set as “Next cue” you right click on a cue and select Set as next cue this will mark it green, and the next time the Go Next button is clicked this cue will fire.
Using the keyboardYou can assign keyboard shortcuts to step up, down or fire the next cue in the cue list.These shortcuts are assigned in the Options > Keyboard shortcuts menu under Perform.
Using MIDI hardware controllersThe step up, down and fire next controls can be assigned a MIDI message using a MIDI controller map under Perform. Note that the cue list needs to be “Armed“ in other for the list ro respond, this lets you control multiple lists by changing the Arm state of the lists. Read more about MIDI hardware controllers on page 26
Individual MIDI TriggersYou can also assign a MIDI message to each individual cue. This will fire the cue regardless of which cue is set as the next.To assign a MIDI message, you must first select the MIDI input device you want to use.
Click on the Cue list menu and select Properties, then select a device under MIDI device used for triggers.
After you have selected the device, move the mouse over the cue that you want to trigger and click the MIDI button .
In the dialog that pops up select the expected MIDI message that should trigger the cue. You can also use the Learn button to set the message. Click Learn, send the message to LiveProfessor and it will be set up.
Once a cue is assigned a MIDI trigger it gets a yellow MIDI icon. Note that the list does NOT need to be armed for this
21
to work.
Using MIDI Show ControlThe Cue list can also be controlled using the MIDI show control standard. See page 24For Show control to be activated you have to set the Device ID and select the MIDI input device in the MIDI options menu
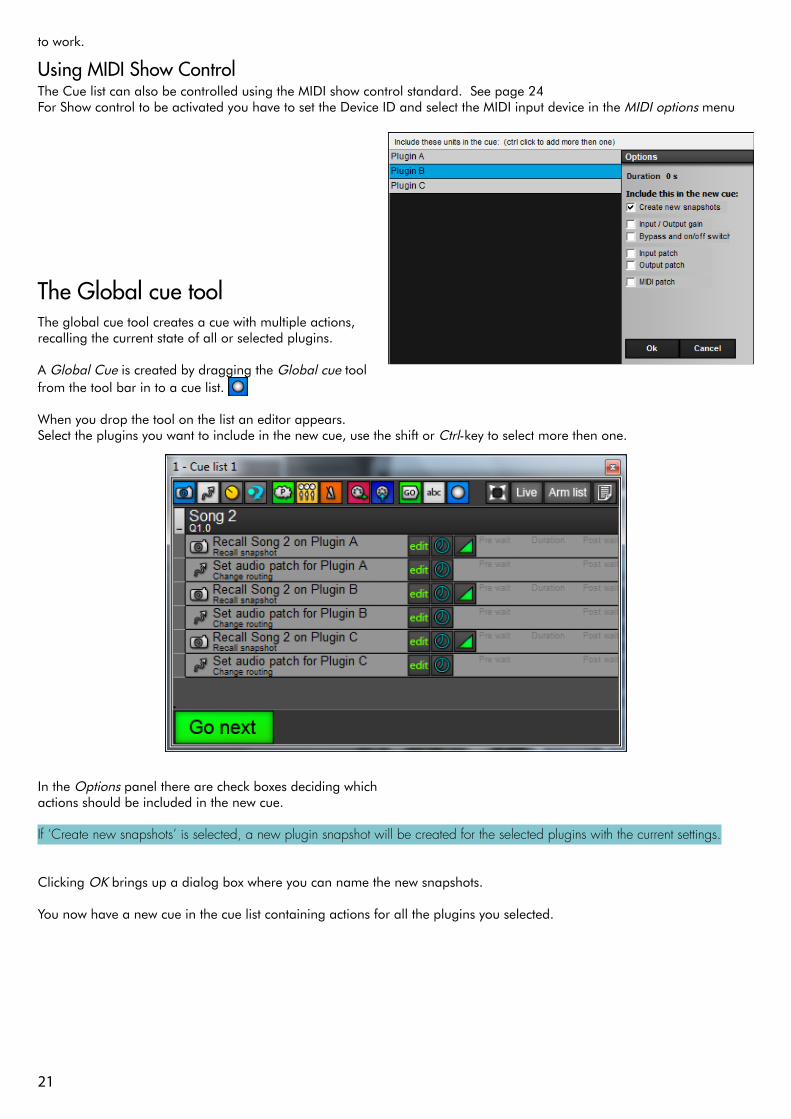
The Global cue toolThe global cue tool creates a cue with multiple actions, recalling the current state of all or selected plugins.
A Global Cue is created by dragging the Global cue tool from the tool bar in to a cue list.
When you drop the tool on the list an editor appears.Select the plugins you want to include in the new cue, use the shift or Ctrl-key to select more then one.
In the Options panel there are check boxes deciding which actions should be included in the new cue.
If ‘Create new snapshots’ is selected, a new plugin snapshot will be created for the selected plugins with the current settings.
Clicking OK brings up a dialog box where you can name the new snapshots.
You now have a new cue in the cue list containing actions for all the plugins you selected.
22
Wait and fade timesFade time is used to fade a parameter over time. Set the fade time by clicking the Duration button (Green triangle) and typ-ing a value in seconds. Not all actions have fade times because they simply can’t be faded, like a for instance a patch change.
All actions can have a pre- and a post-wait time to delay the execution of actions. These are set by clicking on the clock symbol on the action or in the action editor by double clicking on the time values.
Pre-wait adds a delay before the action is executed. All following actions will wait for the pre-wait time to finish, then fire as normal.
Post wait is the delay after the action is done fading before the next action is triggered. The action will start fading, after the fade the post wait starts to count, after the post wait the next action in the cue is fired.
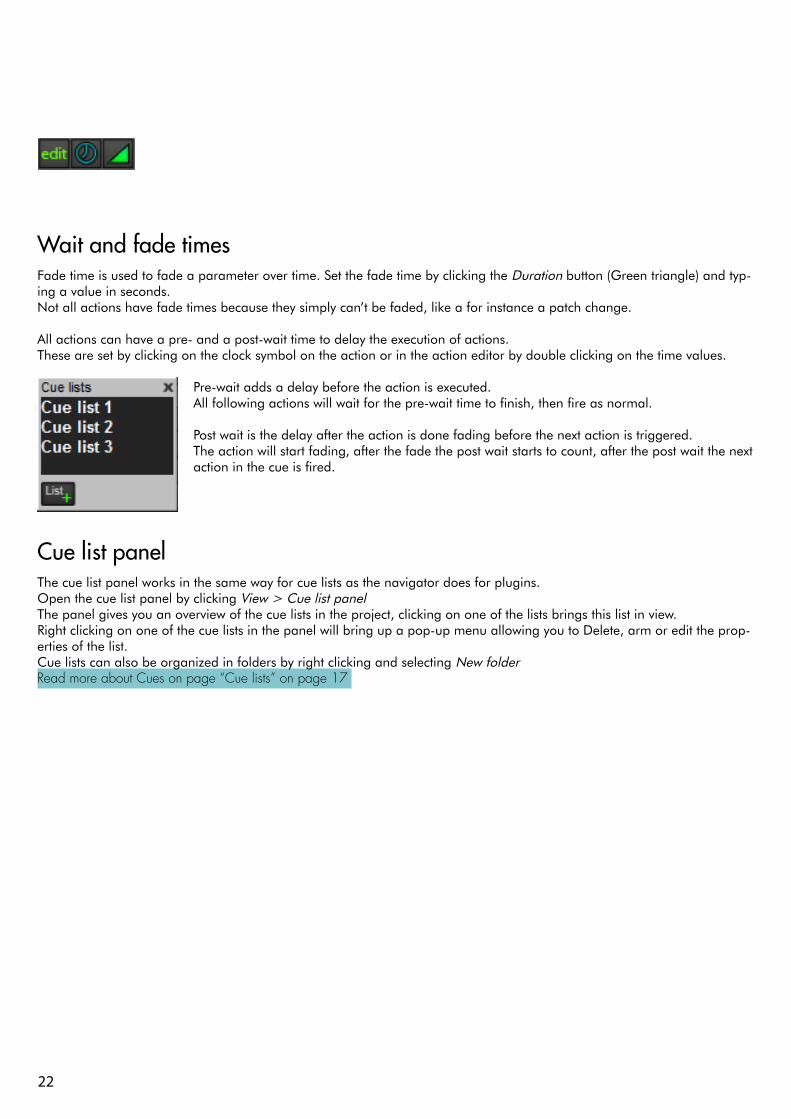
Cue list panelThe cue list panel works in the same way for cue lists as the navigator does for plugins. Open the cue list panel by clicking View > Cue list panel The panel gives you an overview of the cue lists in the project, clicking on one of the lists brings this list in view. Right clicking on one of the cue lists in the panel will bring up a pop-up menu allowing you to Delete, arm or edit the prop-erties of the list.Cue lists can also be organized in folders by right clicking and selecting New folderRead more about Cues on page “Cue lists” on page 17

23
MIDIMIDI routing
General MIDI routingAll Plugins that accept MIDI input has a drop down panel on the left labelled MIDIClick on Input to select the MIDI input device you want to connect to this plugin.The input device is split so you can route the same device to as many plugins you want.
If you want this plugin to only receive messages on a specific MIDI channel, click on Input channel and select a channel from 1-16. If it should listen to all channels select All.
If the plugin has MIDI output you can send this to a hardware output by clicking Output and selecting the device you want.
MIDI ChainIf you want to chain to or more plugins, like sending a arpeggio-plugin’s MIDI output to a synth plugin, go to the synth plugin (receiver), click Input, select Other units and select the arpeggio (sender). Note that the output of the sender plugin is also split so it can be sent to as many plugins as you like.
MIDI MuteMIDI mute is primarily intended for keyboard players. When MIDI mute is enabled the plugin does not respond to MIDI messages. This way you can have two instruments with two sounds on the same MIDI-keyboard and switch between them by turning on/off the MIDI mute.Right clicking on the MIDI-mute button of a plugin turns mute off on that plugin and on, on all others, sort of like a solo -switch.A unique feature with the MIDI Mute is that Note-Off messages are still sent to the plugin.This allows you to hold a chord while switching sounds. The sound does not actually change until you press the keys again.
Default MIDI patchBy default all plugins are added with no MIDI connected. If you want to change the default MIDI patch go to Options > MIDI setup and select the Default MIDI patch tab. This setting is global and is the same for all projects.
Patching MIDI using cuesThe MIDI patch of a plugin can also be changed using the cue lists. To change the MIDI patch of a plugin in a cue, drop a MIDI patch action in the cue list. In the editor that pops up select the unit you want to patch and set up the new patch in the action editor. Read more about cues on page 17
MIDI ThruWith MIDI thru enabled the incoming MIDI signal is sent to the selected output. Note that the MIDI filter and Modifiers also affect the MIDI thru output. There is also a global MIDI thru function that simply routes one or more inputs to a output. This can be enabled under Op-tions > MIDI Options > MIDI Devices

24
MIDI Modifiers Clicking the MIDI Modifier check box enables some special controls for keyboard players. Transpose, transposes the MIDI input up or down in semi tones.Enable Keyzone limits the area of the MIDI keyboard where this plugin responds. Click the learn buttons and hit a key on your keyboard to set the lower and upper notes of the zone. Combined with the transpose function this enables you to split your MIDI keyboard in to several zones for each plugin.
The MIDI Modifiers can be changed in a cue by using the MIDI patch action. See page 17
MIDI filter The MIDI filter allows you to filter out MIDI messages that you don’t want the plugin to respond to.These could be controller messages or program change message, etc. Click edit to bring up a list of the filtered messages.
Select the message type you want to filter out and enter the message number.If you want to filter out all messages of this type click the All box. Click Add to add this message to the list. To remove a message from the filter, select the message that you want to remove in the list and select remove.
The MIDI filter of each plugin can be changed in the cue list by using a MIDI patch action. See page 19.
MIDI Show controlThe cue lists in LiveProfessor can be controlled using MIDI show control. LiveProfessor responds to the GO, Standby + , Standby - and Open Cue List commands.
For a reference of the MSC protocol please go to: http://www.richmondsounddesign.com/docs/midi-show-control-specification.pdf
SetupTo enable and setup MSC go to the Options menu and select MIDI Options then select MIDI Show control tab.For MSC to work you need to check the Enable MIDI show control check box and select the MIDI input device used for incoming commands from the Input Device list.
Select a device id between 0 and 255. This is the device id LiveProfessor gets it the system, and should not be the same as any other connected device.
LiveProfessor only responds to the command format “Sound” (10h). (See MSC reference). Please note that when sending cue and list numbers, cue number “1” is not the same as “01” or “1.0”, so you have to send the exact text.
When sending a Go command without a cue number and cue list, the next cue in the armed list is fired.
25
Editing Cue and List numbersIn the cue list each cue has a cue number, shown under the description like “Q2.0” for cue 2.0 to change the cue number right click on a cue and select Change cue number.
The cue lists have list numbers. These numbers are used to send commands to specific lists. The list number is shown in the caption bar of the cue list like “1 - My Cue list” for a cue list with list number 1.
To change the list number, go to the list menu in the upper right corner of the cue list and select properties.Here you can enter both a new name for the cue list and a new list number.
26
Hardware controllersLiveProfessor has an extensive system for using hardware controllers to control plugin parameters and program functions. We have tried to make the system as flexible as possible, but at the same time making it quick and easy to use.
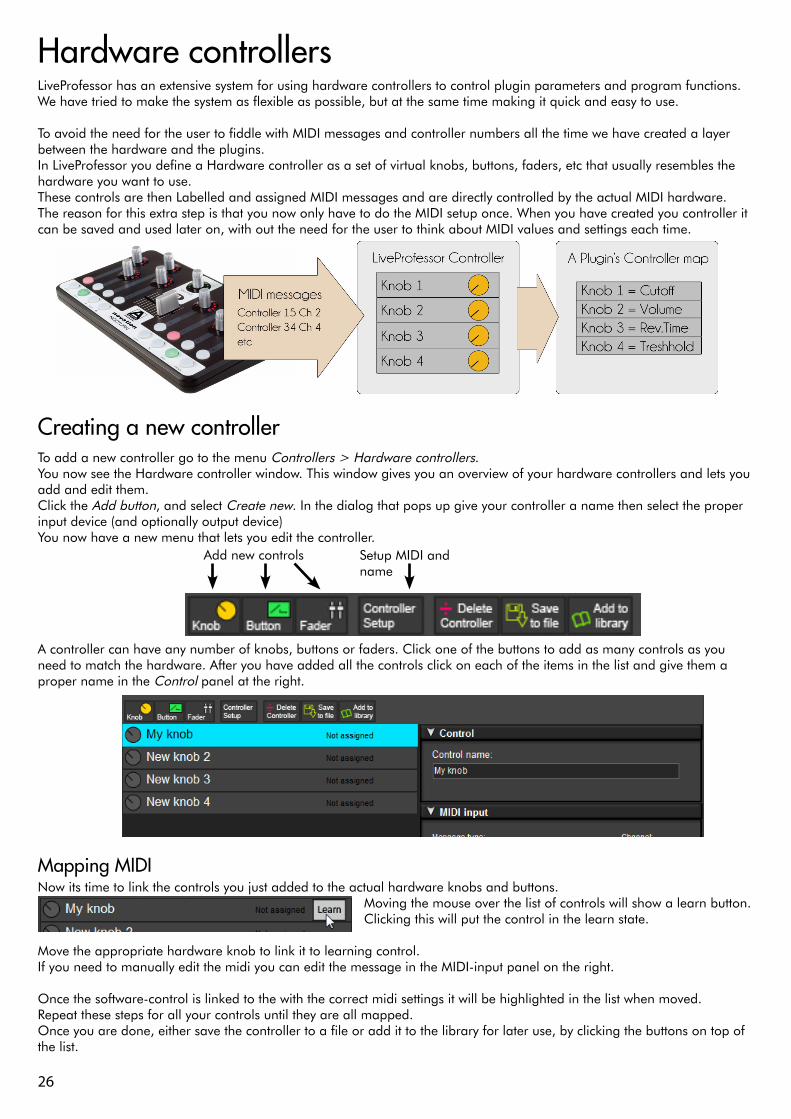
To avoid the need for the user to fiddle with MIDI messages and controller numbers all the time we have created a layer between the hardware and the plugins.In LiveProfessor you define a Hardware controller as a set of virtual knobs, buttons, faders, etc that usually resembles the hardware you want to use. These controls are then Labelled and assigned MIDI messages and are directly controlled by the actual MIDI hardware. The reason for this extra step is that you now only have to do the MIDI setup once. When you have created you controller it can be saved and used later on, with out the need for the user to think about MIDI values and settings each time.
Creating a new controllerTo add a new controller go to the menu Controllers > Hardware controllers.You now see the Hardware controller window. This window gives you an overview of your hardware controllers and lets you add and edit them.Click the Add button, and select Create new. In the dialog that pops up give your controller a name then select the proper input device (and optionally output device)You now have a new menu that lets you edit the controller.
A controller can have any number of knobs, buttons or faders. Click one of the buttons to add as many controls as you need to match the hardware. After you have added all the controls click on each of the items in the list and give them a proper name in the Control panel at the right.
Mapping MIDINow its time to link the controls you just added to the actual hardware knobs and buttons.
Moving the mouse over the list of controls will show a learn button. Clicking this will put the control in the learn state.
Move the appropriate hardware knob to link it to learning control.If you need to manually edit the midi you can edit the message in the MIDI-input panel on the right.
Once the software-control is linked to the with the correct midi settings it will be highlighted in the list when moved.Repeat these steps for all your controls until they are all mapped.Once you are done, either save the controller to a file or add it to the library for later use, by clicking the buttons on top of the list.
Add new controls Setup MIDI and name
27
Mapping controls to pluginsPlugin parameters, such as Cutoff, reverb-time, etc can be controlled by the hardware controller through Controller maps. Each plugin has it’s own maps, and can have as many maps as you need.The Controller maps simply says which hardware should control which parameter, for example Knob 1 should control Reverb-time on Plugin A, and Knob 2 should control cutoff on plugin B, and so on.
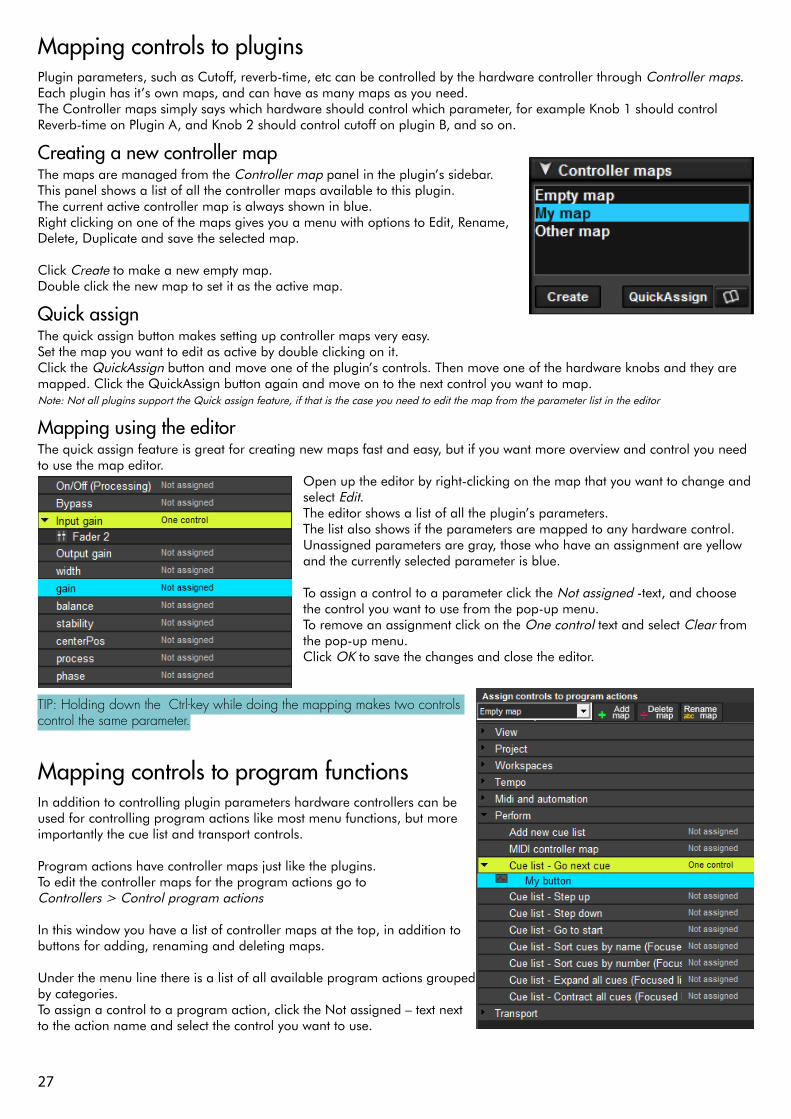
Creating a new controller mapThe maps are managed from the Controller map panel in the plugin’s sidebar.This panel shows a list of all the controller maps available to this plugin. The current active controller map is always shown in blue. Right clicking on one of the maps gives you a menu with options to Edit, Rename, Delete, Duplicate and save the selected map.
Click Create to make a new empty map.Double click the new map to set it as the active map.
Quick assignThe quick assign button makes setting up controller maps very easy. Set the map you want to edit as active by double clicking on it.Click the QuickAssign button and move one of the plugin’s controls. Then move one of the hardware knobs and they are mapped. Click the QuickAssign button again and move on to the next control you want to map.Note: Not all plugins support the Quick assign feature, if that is the case you need to edit the map from the parameter list in the editor
Mapping using the editorThe quick assign feature is great for creating new maps fast and easy, but if you want more overview and control you need to use the map editor.
Open up the editor by right-clicking on the map that you want to change and select Edit.The editor shows a list of all the plugin’s parameters. The list also shows if the parameters are mapped to any hardware control. Unassigned parameters are gray, those who have an assignment are yellow and the currently selected parameter is blue.
To assign a control to a parameter click the Not assigned -text, and choose the control you want to use from the pop-up menu. To remove an assignment click on the One control text and select Clear from the pop-up menu.Click OK to save the changes and close the editor.
TIP: Holding down the Ctrl-key while doing the mapping makes two controls control the same parameter.
Mapping controls to program functionsIn addition to controlling plugin parameters hardware controllers can be used for controlling program actions like most menu functions, but more importantly the cue list and transport controls.
Program actions have controller maps just like the plugins. To edit the controller maps for the program actions go to Controllers > Control program actions
In this window you have a list of controller maps at the top, in addition to buttons for adding, renaming and deleting maps.
Under the menu line there is a list of all available program actions grouped by categories. To assign a control to a program action, click the Not assigned – text next to the action name and select the control you want to use.

28
Switching controller maps using cuesYou can switch between controller maps using cues. This makes it possible to have the same knob control one parameter in song A and another in song B, or to have the same controller control different plugins in different cues. In the last case It is a good idea that each plugin has a empty map so that can be applied when the plugin should not receive controller data.
To change the controller map of a plugin drag the Controller map action tool in to the cue list or a existing cue.In the editor that pops up select the plugin and the map you want to load and click OK.In the plugin list there is also an entry called Program actions that lets you change the active controller map for all program functions (See page 27).
Controller transformation and special settingsSometimes just mapping a hardware control to a plugin parameter directly is not enough; you also want to tweak how the knob or button responds. LiveProfessor has several options for changing the response and behaviour of the hardware controller through what we call controller transformation. The transformation can be done at two stages; on the control or on the individual mappings.
Control transformationIn the Hardware controller window (Controllers > Hardware controllers) select the controller you want to edit from the up-per menu, then select the control you want to edit from the control list.
Each control (Button, Knob or fader) has a transformation-panel. The options in the transformation panel can vary depending on the type of control but most are common.
Input transformationIn this section you can specify how the range of the hardware should be used. For input transformation to work it must be activated by checking the Active-box.MIDI rangeBy moving these tow sliders you can specify what part of the midi message should be used. The software control will only respond to messages inside this range (Yellow bar) this can be used to limit the range of a knob or fader.Parameter rangeMoving these sliders you can specify the range that the hardware control should cover.The range is shown in percent, and represent the value of the plugin controlled.

29
This is best explained with an example. Let’s say we have a simple hardware knob and leave the MIDI-range at it’s, default, full extent (0-127). Then we set the parameter range to 0% - 50%. When the hardware knob is turned all the way up, the plugin parameter will now only have reached 50%.In the same way if we set the parameter range to 20% - 100% moving the hardware knob to full also sets the plugin pa-rameter to full, but if we turn the hardware knob all the way off, the plugin parameter only reaches 20%.This can be useful if you want to change the feel and response of a plugin parameter. Maybe you want a knob that only changes a filters cutoff slightly and not all the way from 0 to 20K The best way to understand these transformations is to just play with them a bit.
ReverseThe Reverse-checkbox makes the control go the other way. ForaknobWhen the knob is turned to 100% the plugin’s parameter will be at 0% and visa versa.ForabuttonThe software button will be turned on when the hardware button is released (off)ForafaderWhen the hardware fader is a 100% the software fader is at 0% and visa versa.
RelativeThis only applies to knobs and faders. When this is on the knob is not set to an absolute position but simply increased or decreased depending on the incoming signal. This might be used for some hardware that sends for example a Note on message when ever the knob is turned clockwise and note off when it is turned counter-clockwise.
ToggleThis option only applies to buttons. When toggle is enable the software switch changes value each time the hardware button is pressed. Press once and the software button is turned on, press again and it is turned off.
Ignore button upThis only applies to buttons. When this option is on the message sent when the hardware button is released is ignored. This is most often used together with the toggle option.
Use single messageThis applies to buttons. When this option is on the message received must match exactly. Example: “Controller: 5, Value: 12”This is useful if a button for instance sends a program change message with only a single value.
30
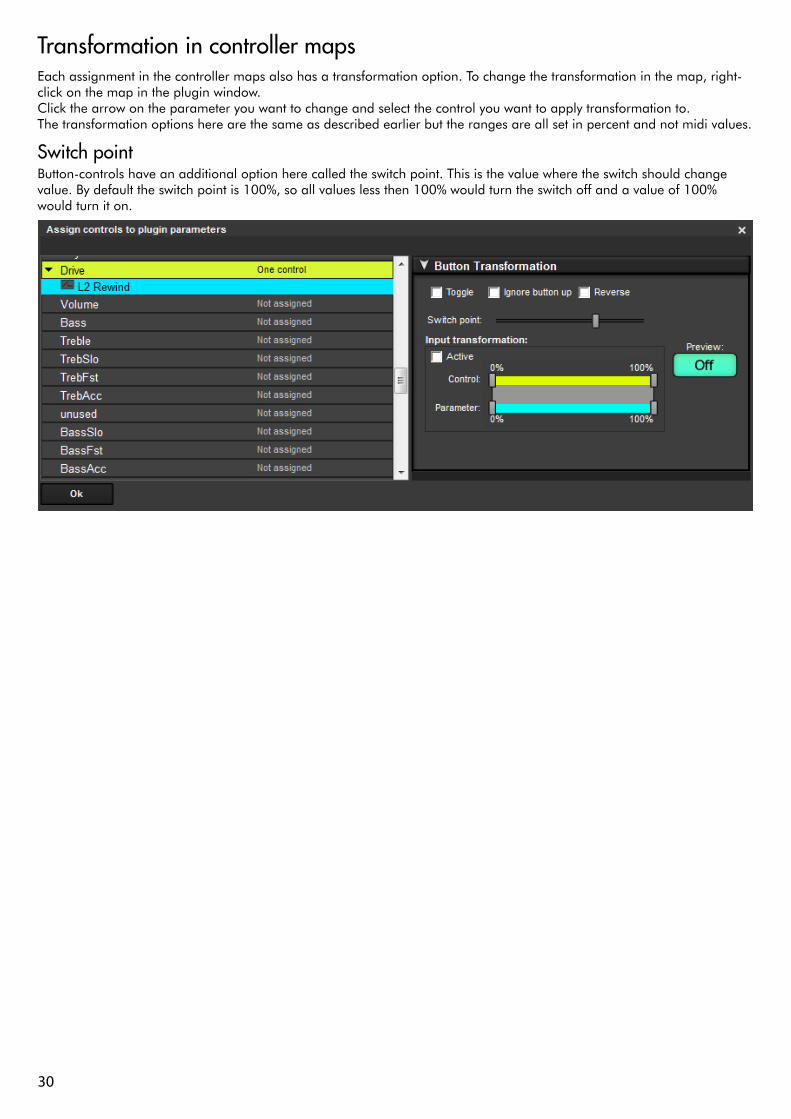
Transformation in controller mapsEach assignment in the controller maps also has a transformation option. To change the transformation in the map, right-click on the map in the plugin window. Click the arrow on the parameter you want to change and select the control you want to apply transformation to.The transformation options here are the same as described earlier but the ranges are all set in percent and not midi values.
Switch pointButton-controls have an additional option here called the switch point. This is the value where the switch should change value. By default the switch point is 100%, so all values less then 100% would turn the switch off and a value of 100% would turn it on.
31
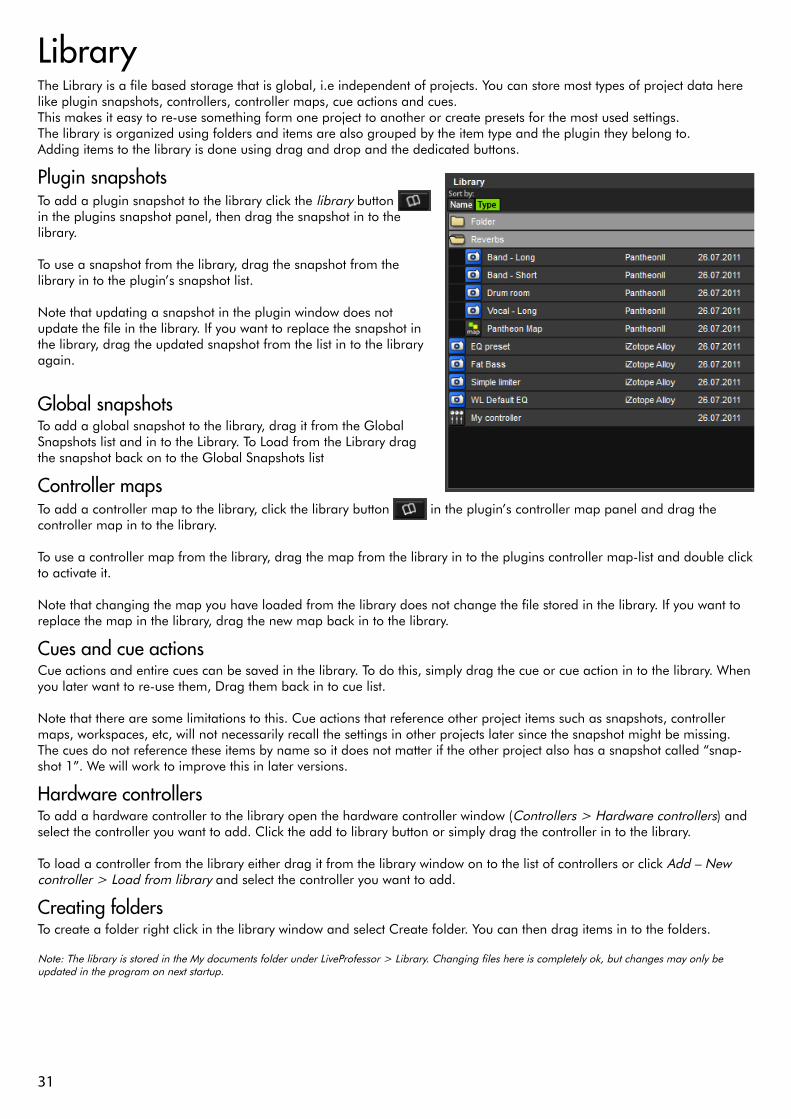
LibraryThe Library is a file based storage that is global, i.e independent of projects. You can store most types of project data here like plugin snapshots, controllers, controller maps, cue actions and cues.This makes it easy to re-use something form one project to another or create presets for the most used settings.The library is organized using folders and items are also grouped by the item type and the plugin they belong to.Adding items to the library is done using drag and drop and the dedicated buttons.
Plugin snapshotsTo add a plugin snapshot to the library click the library button in the plugins snapshot panel, then drag the snapshot in to the library.
To use a snapshot from the library, drag the snapshot from the library in to the plugin’s snapshot list.
Note that updating a snapshot in the plugin window does not update the file in the library. If you want to replace the snapshot in the library, drag the updated snapshot from the list in to the library again.
Global snapshotsTo add a global snapshot to the library, drag it from the Global Snapshots list and in to the Library. To Load from the Library drag the snapshot back on to the Global Snapshots list
Controller mapsTo add a controller map to the library, click the library button in the plugin’s controller map panel and drag the controller map in to the library.
To use a controller map from the library, drag the map from the library in to the plugins controller map-list and double click to activate it.
Note that changing the map you have loaded from the library does not change the file stored in the library. If you want to replace the map in the library, drag the new map back in to the library.
Cues and cue actionsCue actions and entire cues can be saved in the library. To do this, simply drag the cue or cue action in to the library. When you later want to re-use them, Drag them back in to cue list.
Note that there are some limitations to this. Cue actions that reference other project items such as snapshots, controller maps, workspaces, etc, will not necessarily recall the settings in other projects later since the snapshot might be missing. The cues do not reference these items by name so it does not matter if the other project also has a snapshot called “snap-shot 1”. We will work to improve this in later versions.
Hardware controllersTo add a hardware controller to the library open the hardware controller window (Controllers > Hardware controllers) and select the controller you want to add. Click the add to library button or simply drag the controller in to the library.
To load a controller from the library either drag it from the library window on to the list of controllers or click Add – New controller > Load from library and select the controller you want to add.
Creating foldersTo create a folder right click in the library window and select Create folder. You can then drag items in to the folders.
Note: The library is stored in the My documents folder under LiveProfessor > Library. Changing files here is completely ok, but changes may only be updated in the program on next startup.
32
Keyboard shortcuts
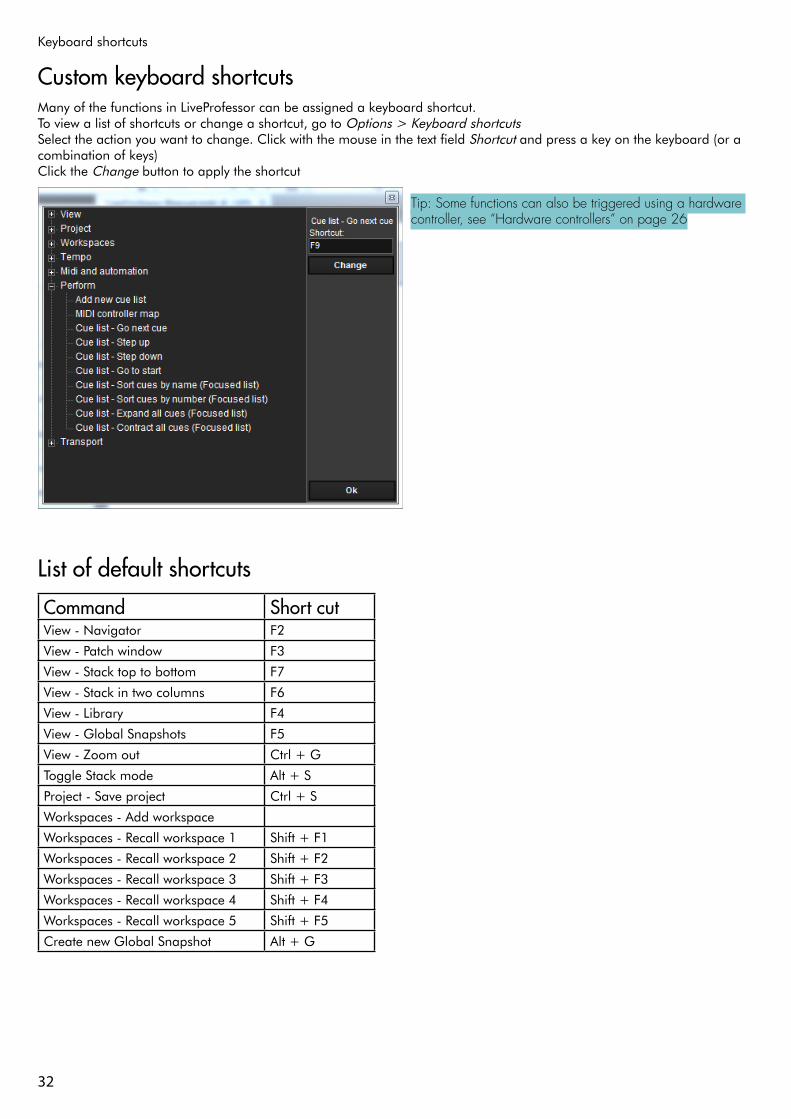
Custom keyboard shortcutsMany of the functions in LiveProfessor can be assigned a keyboard shortcut.To view a list of shortcuts or change a shortcut, go to Options > Keyboard shortcutsSelect the action you want to change. Click with the mouse in the text field Shortcut and press a key on the keyboard (or a combination of keys)Click the Change button to apply the shortcut
Tip: Some functions can also be triggered using a hardware controller, see “Hardware controllers” on page 26
List of default shortcuts
Command Short cutView - Navigator F2
View - Patch window F3
View - Stack top to bottom F7
View - Stack in two columns F6
View - Library F4
View - Global Snapshots F5
View - Zoom out Ctrl + G
Toggle Stack mode Alt + S
Project - Save project Ctrl + S
Workspaces - Add workspace
Workspaces - Recall workspace 1 Shift + F1
Workspaces - Recall workspace 2 Shift + F2
Workspaces - Recall workspace 3 Shift + F3
Workspaces - Recall workspace 4 Shift + F4
Workspaces - Recall workspace 5 Shift + F5
Create new Global Snapshot Alt + G

33
34
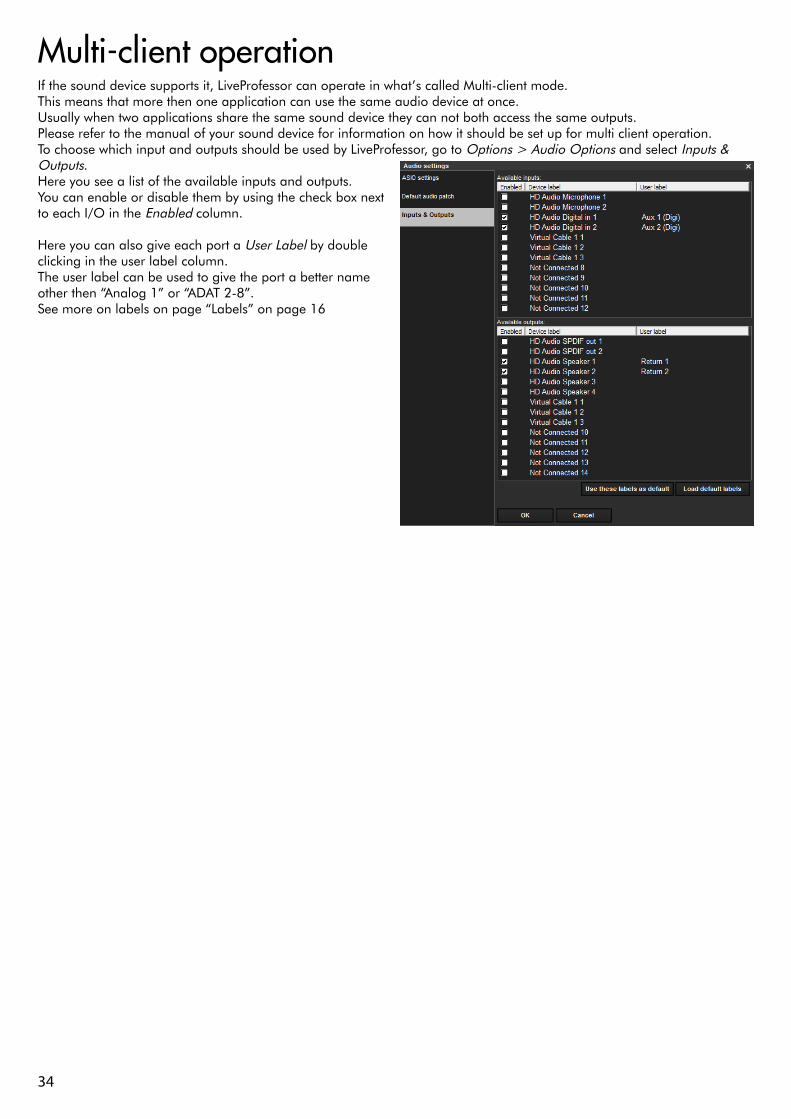
Multi-client operationIf the sound device supports it, LiveProfessor can operate in what’s called Multi-client mode.This means that more then one application can use the same audio device at once.Usually when two applications share the same sound device they can not both access the same outputs. Please refer to the manual of your sound device for information on how it should be set up for multi client operation.To choose which input and outputs should be used by LiveProfessor, go to Options > Audio Options and select Inputs & Outputs.Here you see a list of the available inputs and outputs. You can enable or disable them by using the check box next to each I/O in the Enabled column.
Here you can also give each port a User Label by double clicking in the user label column.The user label can be used to give the port a better name other then “Analog 1” or “ADAT 2-8”. See more on labels on page “Labels” on page 16
35
TroubleshootingMissing MIDI devicesIf you unplug or change a MIDI device, or move your project to a new system, LiveProfessor will try to look for the exact same MIDI device as the last saved settings.
You will receive a message like: “Can’t find the MIDI input Motu-Midi-in 1 that was connected to Hammond organ. Do you want to replace this MIDI input with another device?”
Clicking yes will present you with a list of available MIDI devices and selecting one will replace the missing device with the new. The new device will then used in all other cases where the missing device should have been used.
Note: USB MIDI interfaces need to be connected before LiveProfessor starts.This function can be bypassed by going to Options > Midi setup > Midi devices and checking “Don’t look for missing MIDI devices”
Restoring program settingsIf for some reason you want to restore all the program settings to the default values, simply re-installing the software will not help.The user settings are preserved even after a re-install of the program.To remove the user settings follow this short guide:
Windows 7Click on the start menu, in the search field type %Appdata%\LiveProfessor and hit Enter.Delete the file Settings.iniIf you also want to remove the list of Plugins, delete the file Plugins.xml
Windows XP:Open the folder C:\Documents And Settings\<UserName>\Application Data\LiveProfessor\
If you can not see this folder, from My Computer go to Tools > Folder Options> View and select Show hidden files and folders.
Delete the file Settings.iniIf you also want to remove the list of Plugins, delete the file Plugins.xml

36
Thank you
If you have any more questions please contact us:
Email: [email protected] are always happy to receive email from the users
Web forum : http://ifoundasound.com/forumThe forum is alive with many users talking about the development of LiveProfessor
Twitter: http://twitter.com/#!/ifoundasoundWe tweet when there are updates and news.
© 2012 Nikolai Bergstrømifoundasound
Maridalsveien 64 A 0458 Oslo


