46
APG R Doc #9004258 Rev C, 04/16 LOE Ultrasonic Level Sensors User Manual Web Enabled Controller, Series B
| Date post: | 18-Jun-2018 |
| Category: |
Documents |
| Upload: | dinhnguyet |
| View: | 225 times |
| Download: | 0 times |

APGR
Doc #9004258Rev C, 04/16
LOE Ultrasonic Level SensorsUser Manual
Web Enabled Controller, Series B

ii Tel: 1/888/525-7300 • Fax: 1/435/753-7490 • www.apgsensors.com • [email protected]
Table of Contents
Introduction ................................................................................................................ iii
Warranty and Warranty Restrictions .................................................................... iv
Chapter 1: Specifications and Options..................................................................... 1 Dimensions ........................................................................................................................................1 Specifications ............................................................................................................................... 2-3 Model Number Configurator .......................................................................................................... 3 System Wiring Diagrams ........................................................................................................... 4-6
Chapter 2: Installation and Removal Procedures and Notes ..............................7 Tools Needed ..................................................................................................................................... 7 Connection Notes ............................................................................................................................. 7 Electrical Installation ..................................................................................................................... 7 Installation Notes ............................................................................................................................ 8 Mounting Instructions ................................................................................................................... 8 Software Setup ............................................................................................................................9-13 Removal Instructions ................................................................................................................... 13
Chapter 3: Programming with Modbus TCP/IP ................................................... 14 Modbus Polling via Ethernet with Modbus TCP/IP ........................................................... 14-15 LOE Generic Modbus Register List .............................................................................................15 Modbus Programming of Individual Sensors .......................................................................... 16
Chapter 4: LOE Embedded Web Server .................................................................. 16 Accessing the LOE Embedded Web Server ............................................................................. 16 Navigating the LOE Embedded Web Server ........................................................................ 16-17 LOE Sensor Input Configuration Submenus .......................................................................18-32 Modbus Sensor Configuration Registers ............................................................................ 33-35 LOE Utility Menus ................................................................................................................... 36-39
Chapter 5: Maintenance .......................................................................................... 40 General Care ....................................................................................................................................40 Troubleshooting .............................................................................................................................40 Calibration ....................................................................................................................................... 41 Repair and Returns ........................................................................................................................ 41

iiiTel: 1/888/525-7300 • Fax: 1/435/753-7490 • www.apgsensors.com • [email protected]
IntroductionThank you for purchasing an LOE Ultrasonic Level Sensor and Web Enabled Controller from APG. We appreciate your business! Please take a few minutes to familiarize yourself with your LOE and this manual.
The LOE Ultrasonic Level Sensor and Web Enabled Controller offers a wide degree of integrated, flexible, remote and local control and monitoring for your system. The LOE can control up to 10 APG Modbus sensors--any combination of level, pressure, magnetostrictive and ultrasonic--and two input or output relay terminals. All readings are available for control and monitoring via TCP/IP for local or remote network access. The LOE also had flexible power options: it can use either POE or an independent 12-28 VDC power source.
Reading your labelEvery APG controller comes with a label that includes the controller’s model number, part number, and serial number. The LOE label also indicates the default IP address, subnet mask, and mac address. Please ensure that the model number on your label matches your order.

iv Tel: 1/888/525-7300 • Fax: 1/435/753-7490 • www.apgsensors.com • [email protected]
Warranty and Warranty RestrictionsThis product is covered by APG’s waranty to be free from defects in material and workmanship under normal use and service of the product for 24 months. For a full explanation of our Warranty, please visit https://www.apgsensors.com/about-us/terms-conditions. Contact Technical Support to recieve a Return Material Authorization before shipping your product back.
Scan the QR code below to read the full explanation of our Warranty on your tablet or smartphone.

1Tel: 1/888/525-7300 • Fax: 1/435/753-7490 • www.apgsensors.com • [email protected]
Chapter 1: Specifications and Options
• Dimensions
6.05”153.7mm
5.50”139.7mm
6.05”153.7mm
5.50”139.7mm
3.00”76.2mm
3” NPT
3.86”98.0mm
2.40”61.0mm
4.00”101.6mm
2” NPT
2.00”50.8mm
2.40”61.0mm
2.30”58.4mm
4.00”101.6mm
LOE-2126, LOE-6126
LOE-3136

2 Tel: 1/888/525-7300 • Fax: 1/435/753-7490 • www.apgsensors.com • [email protected]
Performance Operating Range 0.6 - 15.0 ft. / 7 in. - 180 in. / 178mm - 4572mm (6126) 1.0 - 25.0 ft. / 12 in. - 300 in. / 305mm - 7620mm (2126) 1.5 ft. - 40 ft. / 18 in. - 480 in. / 458mm - 12192mm (3136) Beam Pattern 9° off axis Transducer Frequency 43 kHz (3136) / 69 kHz (2126, 6126) Response Time Programmable, 5 Hz maximum (200 ms)
Communications Digital Output Ethernet TCP/IP Modbus Ethernet TCP/IP via embedded webserver (LAN only) Ethernet TCP/IP to APG-provided website 0-2 Isolated Solid State Relays Inputs RS-485 Modbus (up to 10 slave sensors) 0-2 Discrete Switches
Electrical Operational Supply Voltage (at sensor) 48 VDC via POE (requires injector or switch) 12-28 VDC Current Draw 40 mA @ 48 VDC 80 mA @ 24 VDC Power Rating (LOE) 2.0 W Max Isolated SS Relays 120V, 120 mA Max
Accuracy Accuracy ±0.25% of detected range Resolution 0.1 inch (2.54 mm)
Environmental Operating Temperature -40 to 60°C (-40 to 140°F) Internal Temperature Compensation Yes Enclosure Protection IP65
Materials of Construction Transducer Housing PVDF Upper Housing PC/PET Transducer Type Ceramic, PVDF faced
• Specifications

3Tel: 1/888/525-7300 • Fax: 1/435/753-7490 • www.apgsensors.com • [email protected]
Mounting LOE-2126 2” Ø NPT LOE-3136 3” Ø NPT LOE-6126 2” Ø NPT
Compatible APG Modbus Senors Ultrasonic MNU Magnetostrictive MPX-E1, MPX-R1 Pressure PT-400-L5, PT-400-L31, PT-500-L5, PT-500-L31 Controllers DCR-1006A, MND
• Model Number Configurator
Model Number: LOE - _____ - _____ A B
A. Model 2126 1 - 25 ft. (305mm - 7620mm); 69 kHz; 2” NPT threads 3136 1.5 - 40 ft. (458mm - 12192mm); 43 kHz; 3” NPT threads 6126 0.6 - 15 ft. (178mm - 4572mm); 69 kHz; 2” NPT threads
B. Relay Configuration 0000 2 relay outputs 0010 1 relay output, 1 switch input 0110 2 switch inputs

4 Tel: 1/888/525-7300 • Fax: 1/435/753-7490 • www.apgsensors.com • [email protected]
External 12-28 VDC Source Wiring
• System Wiring Diagrams
COM OK
SEND/RESET
24V B A GNDRS-485
24V B A GNDRS-485
To 12-28 VDC Power Supply
+ -
ETHERNETPORT
TR1 TR1 TR2 TR2
NOTE: Power terminals for 24V andGND can only be used to power Modbussensors if LOE is powered via POE.If LOE is powered via 12-28 VDC supply,Modbus sensors must be poweredindependently.
POE (Power over Ethernet) Wiring
POWER
LAN + DCLAN
To Network
Connection
To AC power
POEPower
Injector
Terminal inside housing supplies 24 Vdc to power attached Modbus devices when powering the LOE from a POE source.
24V B A GNDRS-485

5Tel: 1/888/525-7300 • Fax: 1/435/753-7490 • www.apgsensors.com • [email protected]
Modbus Sensor Daisy-chain Wiring
270 Ωterminating
resistor atlast sensor
Sensor 3
V+AB
GN
D
Trunk Line
Sensor 1V+AB
GN
D
Sensor 2
V+AB
GN
D
Use shielded cable
Sensor Line Drops
270 Ω terminatingresistor NOT internal
to LOE
Note: Terminating resistor size recommendedbased on input resistance of LOE. Lengthof cable and overall impedence of network maynecessitate a different size resistor.
NOTE: Power terminals for 24V andGND can only be used to power Modbussensors if LOE is powered via POE.If LOE is powered via 12-28 VDC supply,Modbus sensors must be poweredindependently.
24VBAGNDRS-485
TR1TR1TR2TR2

6 Tel: 1/888/525-7300 • Fax: 1/435/753-7490 • www.apgsensors.com • [email protected]
System Overview - LOE with Modbus network, SSR’s and Internet Connection
Network / Internet Connection
Computeron
Local Network
Computer on
Internet
MNU Ultrasonic Sensors MP Magnetostrictive Float Level Sensors
Solid State Relays
ModbusInput
Connection toInternet
Server HostingWebsite and Logged Data

7Tel: 1/888/525-7300 • Fax: 1/435/753-7490 • www.apgsensors.com • [email protected]
Chapter 2: Installation and Removal Procedures and Notes
• Connection Notes
• Up to 10 Modbus sensors can be connected to the LOE in any combination.• Output SSR’s are rated for 120V, 120mA max.
• Flat head screwdriver to remove knockouts for cables.• If you are using a stand pipe to mount your LOE, you will probably need tools to install the stand pipe.• For any attached Modbus sensors, please consult each sensor’s user manual for installation notes and
instructions.
• Tools Needed
• Use flat head screwdriver to remove knockouts on either side of LOE housing.• Insert included cable fittings in knockout holes.• Connect any relays first.• Connect LOE to Ethernet/network.• Connect independent 12-28 VDC supply if not using POE.• Connect and set up one Modbus sensor at a time.
• Electrical Installation
NOTE: For any APG sensor user manual, please visit http://apgsensors.com/support.
IMPORTANT: Each Modbus sensor must be connected to the network individually and assigned a unique Sensor Number before the next sensor can be added.
IMPORTANT: Multiple Modbus sensors added to the network simultaneously are all assigned the same Modbus address/sensor number: 1. Sensors MUST be added to the network individually.

8 Tel: 1/888/525-7300 • Fax: 1/435/753-7490 • www.apgsensors.com • [email protected]
• Installation Notes
• Mount your LOE sensor so that it has a clear, perpendicular sound path to the surface being moni-tored. Your sensor should be mounted away from tank or vessel walls and inlets. (See Figure 2.1)
• The sound path should be free from obstructions and as open as possible for the 9° off axis beam pattern.
• If you are using a stand pipe, please see our guide to stand pipes on our website: http://www.apgsensors.com/about-us/blog/how-to-install-a-stand-pipe.
Figure 2.1
NOTE: Do not mount the sensor where the beam will intersect objects such as fill streams, pipes, ladder rungs, wall seams, or corrugated tank walls.
• Mounting Instructions
Mounting your LOE is easy if you follow a few simple steps:
• Never over-tighten the sensor.• Always screw in your sensor by hand to avoid cross-threading. Thread failure can be a problem if you
damage threads by over-tightening them or by crossing threads.
IMPORTANT: Do not over tighten! The sensor should be threaded in only hand tight.

9Tel: 1/888/525-7300 • Fax: 1/435/753-7490 • www.apgsensors.com • [email protected]
Initial setup of the LOE and individual Modbus sensors is done via an embedded web server. The embedded server can be accessed by using either the serial number or local IP address of the LOE and a web browser (Internet Explorer, Chrome, Firefox, etc).
• Software Setup
The easier way to access the embedded web server is to type loe_xxx into a web browser on a computer connected to the same local network as the LOE. xxx represents the numeric portion of the LOE’s serial number. See Figures 2.2 and 2.3.
Accessing LOE Embedded Web Server via Serial Number
NOTE: If your web browser performs a web search for “loe_xxx” istead of accessing the server, type “http://loe_xxx”.
Figure 2.2
Figure 2.3
Some networks will block this direct access to the LOE. If this is the case, you will need to use the IP address of your LOE to access the embedded web server. The IP address can be obtained two ways: ask your local network administrator, or logon to your APG-provided website, www.levelandflow.com.
NOTE: Port 6700 must be open on your local network for the LOE to connect.

10 Tel: 1/888/525-7300 • Fax: 1/435/753-7490 • www.apgsensors.com • [email protected]
Figure 2.4
Figure 2.5
Log on to your APG-provided website, and a list of sites will be displayed on your screen (see Figure 2.4). Select the site where the new LOE is installed. From the list of sensors at thie site, select the sensor with the serial number that matches the new LOE. (See Figure 2.5)
Accessing LOE Embedded Web Server via Local IP Address

11Tel: 1/888/525-7300 • Fax: 1/435/753-7490 • www.apgsensors.com • [email protected]
Figure 2.6
On the Sensor Information screen you will see the IP Address of the newly installed LOE. (See Figure 2.6.)
Type the LOE’s IP address into your browser’s address bar (See Figure 2.7).
Figure 2.7
Logging on to the LOE Embedded Web Server
The LOE’s embedded webpage should now be open, showing the Main Display page (See Figure 2.8). This page lists the LOE, any Modbus sensors attached to the LOE, and displays each sensor’s current reading. The LOE is displayed as sensor #11. The configured sensor number for each Modbus sensor will show as its Sensor Number. Every new Modbus sensor defaults to sensor number 1.
IMPORTANT: Multiple Modbus sensors added to the network simultaneously are all assigned the same sensor number: 1. Sensors must be added to the network individually.
Figure 2.8
NOTE: For further information on using your APG-provided remote website, please visit www.apgsensors.com/support for a user manual, or contact us at 1-888-525-7300.

12 Tel: 1/888/525-7300 • Fax: 1/435/753-7490 • www.apgsensors.com • [email protected]
Click on Home to bring up the Menu page (See Figure 2.9). The first menu link clicked during each session will prompt a User Name and Password login for the LOE (See Figure 2.10). The default User Name is admin, and the default Password is password.
Figure 2.9 Figure 2.10
Assigning Modbus Senor Numbers
Click on RS-485 Network Settings to bring up the RS485 Settings page (See Figure 2.11). See section RS-485 Network Settings for a full description of each parameter in this menu (Page 38).
Figure 2.11
NOTE: See the Security Setting Menu (Page 37) to change this user name and pass-word.

13Tel: 1/888/525-7300 • Fax: 1/435/753-7490 • www.apgsensors.com • [email protected]
IMPORTANT: None of parameters in the RS485 Settings menu automatically update. Each one must be manually configured.
• Disconnect power to the LOE first.• Disconnect network connection.• Disconnect any sensors, relays, and switched inputs.• Remove the LOE and store it in a dry place, at a temperature between -40° F and 180° F.
• Removal Instructions
NOTE: If you control the power to each Modbus sensor seperately, powering up a new sensor after assigning a Modbus address to the previous sensor will allow you to assign an address to the new sensor without leaving the RS845 Settings Menu.
Change Numb of Sensors On Line to reflect the total number of Modbus sensors you will be connecting to your LOE. Click Change (or press Enter) to send the new value to the LOE.
With Sensor Number to View set to 1 (for the latest sensor added to the Modbus network), set New Sensor Number to the highest available number. Click Change (or press Enter) to send the new value to the LOE.
Repeat this process for each Modbus sensor as it is added to the network.

14 Tel: 1/888/525-7300 • Fax: 1/435/753-7490 • www.apgsensors.com • [email protected]
Chapter 3: Programming with Modbus TCP/IP
Using the LOE’s IP address, and port number 502, readings can be polled from the LOE for any attached sensors via RS-485 Modbus commands. Up to 14 16-bit Input Registers, beginning with register 299, can be polled with a single command. Below is a sample Modbus command illustrating the necessary syntax.
Example:00 01 : Transaction Identifier00 00 : Protocol Identifier00 06 : Message Length (6 bytes to follow)0B : The Reporting Unit Identifier [sensor number] (0B hex = 11) 04 : The Function Code (04 = read Input Registers)01 2E : The Data Address of the first register requested. (12E hex + 1 = 303)00 02 : The total number of registers requested. (read 2 registers, i.e. 303 to 304)
Byte order (hex values)00 01 00 00 00 06 0B 04 01 2E 00 02
Notes: • Reporting Unit indicates the sensor reading being polled from the LOE, in hex. 01 - 0A are for Modbus
sensors 1 - 10 attached to the LOE. 0B (i.e. sensor 11) reads the values from the LOE sensor (See Figure 2.8). Unused registers (i.e., those not associated to an attached sensor) will return zeros when polled.
• Function Code 04 reads the Input Registers. No other functionality (e.g., polling from or writing to Hold-ing Registers) is supported via Modbus TCP/IP with the LOE. Complete control functionality is available through the embedded web server and through your APG-provided website (www.levelandflow.com).
• Data Address of registers, decimal to “hex minus 1” conversion: Decimal Address Hex minus 1 Decimal Address Hex minus 1 299 12A 306 131 300 12B 307 132 301 12C 308 133 302 12D 309 134 303 12E 310 135 304 12F 311 136 305 130 312 137
• Modbus Polling via Ethernet with Modbus TCP/IP

15Tel: 1/888/525-7300 • Fax: 1/435/753-7490 • www.apgsensors.com • [email protected]
• Total number of registers requested, up to 14, given in hex: # of Registers Hex equivalent # of Registers Hex equivalent 01 01 08 08 02 02 09 09 03 03 10 0A 04 04 11 0B 05 05 12 0C 06 06 13 0D 07 07 14 0E
• LOE Generic Modbus Register List
Input Registers (0x04)
Register Returned Data30299 Sensor Type30300 Distance/Level 1, Top (in mm, unsigned)30301 Distance/Level 2, Bottom (in mm, unsigned)30302 Sensor Temperature Reading (in 0C, signed)30303-30304 Calculated 1 (raw) 30305-30306 Calculated 2 (raw)30307 (upper bits) Version30307 (lower bits) Signal Strength30308 Battery Voltage30309 (upper bits) Sensor Trip 1 Alarm30309 (lower bits) Sensor Trip 1 Status30310 (upper bits) Sensor Trip 2 Alarm30310 (lower bits) Sensor Trip 2 Status30311 (upper bits) Sensor Trip 3 Alarm30311 (lower bits) Sensor Trip 3 Status30312 (upper bits) Sensor Trip 4 Alarm30312 (lower bits) Sensor Trip 4 Status
This is the list of generic Input Registers for polling the LOE and any connected sensors. Actual registers used vary by sensor. Please see the user manual for each sensor for a full and accurate list of registers.
NOTE: For more information about Modbus RTU, please visit www.modbus.org.

16 Tel: 1/888/525-7300 • Fax: 1/435/753-7490 • www.apgsensors.com • [email protected]
The LOE does NOT support full Modbus programming of attached sensors. Full control and configuration of individual sensors is supported through the LOE’s embedded web server and through your APG-provided webpage, www.levelandflow.com.
• Modbus Programming of Individual Sensors
NOTE: For any APG sensor user manual, please visit http://apgsensors.com/support.
Chapter 4: LOE Embedded Web Server
See the Software Setup section of chapter 2 (pages 9 - 11) for instructions for accessing and signing into the LOE embedded web server.
• Accessing the LOE Embedded Web Server
The LOE embedded web server has two primary screens--the Main Display Page (Figure 4.1) and Menu Page (Figure 4.2)--and a screen for each of 9 submenus. The submenus can be understood in three groups:
• LOE Sensor Input Configuration Submenus Application Parameters Basic Parameters• Modbus Sensor Configuration Registers RS-485 Modbus Input Reg RS-485 Modbus Holding 1 RS-485 Modbus Holding 2• LOE Utility Menus Network Security Label RS-485 Network Settings
The Menu Page also has a link back to the Main Display Page.
• Navigating the LOE Embedded Web Server

17Tel: 1/888/525-7300 • Fax: 1/435/753-7490 • www.apgsensors.com • [email protected]
Figure 4.1
Figure 4.2
18 Tel: 1/888/525-7300 • Fax: 1/435/753-7490 • www.apgsensors.com • [email protected]
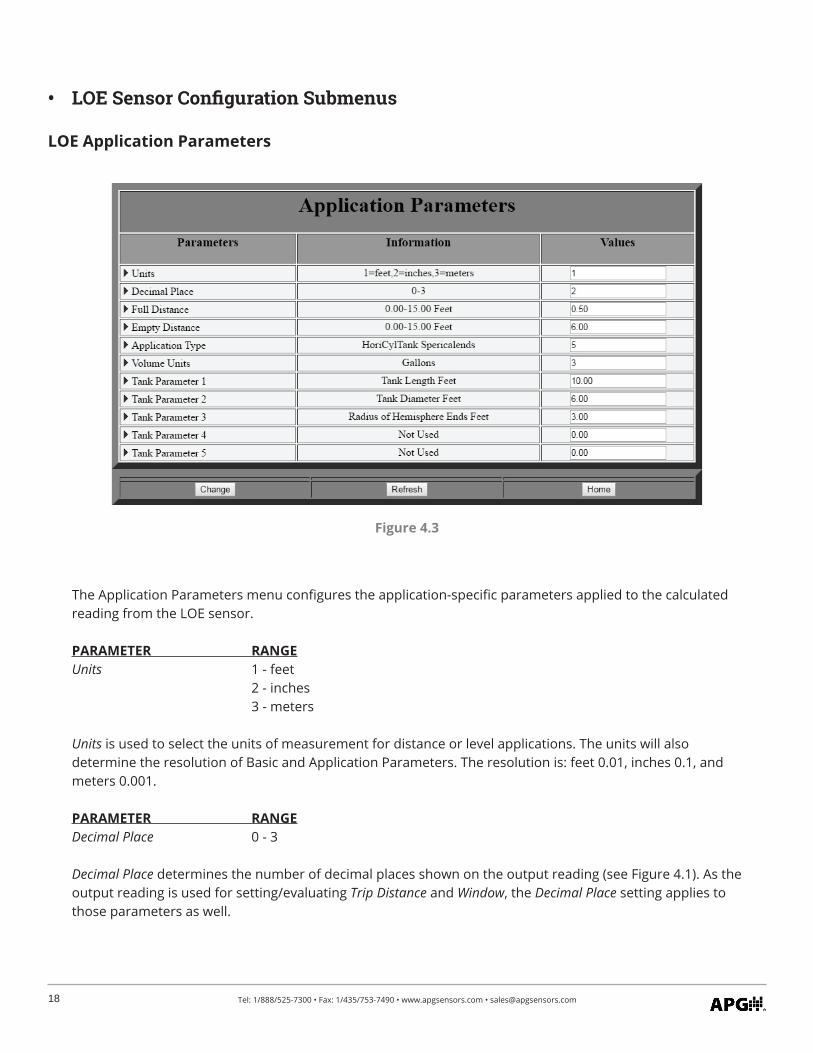
LOE Application Parameters
Figure 4.3
The Application Parameters menu configures the application-specific parameters applied to the calculated reading from the LOE sensor.
PARAMETER RANGEUnits 1 - feet 2 - inches 3 - meters
Units is used to select the units of measurement for distance or level applications. The units will also determine the resolution of Basic and Application Parameters. The resolution is: feet 0.01, inches 0.1, and meters 0.001.
PARAMETER RANGEDecimal Place 0 - 3
Decimal Place determines the number of decimal places shown on the output reading (see Figure 4.1). As the output reading is used for setting/evaluating Trip Distance and Window, the Decimal Place setting applies to those parameters as well.
• LOE Sensor Configuration Submenus

19Tel: 1/888/525-7300 • Fax: 1/435/753-7490 • www.apgsensors.com • [email protected]
PARAMETER RANGEFull Distance 0 - Sensor Maximum
Full Distance sets the distance from the LOE sensor Zero Point (See Figures 4.5 - 4.7) to the full level of the vessel being monitored. Not used when Application Type is set to 0 (Value).
PARAMETER RANGEEmpty Distance 0 - Sensor Maximum
Empty Distance sets the distance from the LOE sensor Zero Point (See Figure 4.5 - 4.7) to the empty level of the vessel being monitored. Not used when Application Type is set to 0 (Value).
PARAMETER RANGEApplication Type 0 = Value (Distance) 1 = Level 2 = Volume of Standing Cylindrical Tank with or without Hemispherical Bottom 3 = Volume of Standing Cylindrical Tank with or without Conical Bottom 4 = Volume of Standing Rectangular Tank with or without Chute Bottom 5 = Volume of Horizontal Cylindrical Tank with or without Spherical Ends 6 = Volume of Spherical Tank 7 = Pounds (Linear Scaling) 8 = User Defined Units 9 = Volume of Vertical Oval Tank 10 = Volume of Horizontal Oval Tank 11 = Polynomial (Strapping Chart)
Application Type is used to choose the parameter configuration to convert the distance of Distance into the configured reading on the Main Display Page (See Figure 4.1; also, Calc Dist,Level,Volume on Figure 4.4). After selecting an Application Type and clicking “Change” or pressing Enter, the Application Parameters menu up-dates to reflect the parameters of the chosen application.
See Tank Parameters for an explaination of each Application Type and its associated parameters.
PARAMETER RANGEVolume Units 1 = Feet3 2 = Million Feet3 3 = Gallons 4 = Meters3 5 = Liters 6 = Inches3
7 = Barrels
Volume Units selects the units of measure for the configured reading on the Main Display Page (See Figure 4.1) when a volumetric application is selected. The settings is not used when the Application Type is set to 0, 1, 7, or 8.

20 Tel: 1/888/525-7300 • Fax: 1/435/753-7490 • www.apgsensors.com • [email protected]
Tank Parameters
Application Type Tank Parameter Function0 - Distance Parameter 1 Not Used Parameter 2 Not Used Parameter 3 Not Used Parameter 4 Not Used Parameter 5 Not Used
Distance (factory default) measures the distance from the Zero Point of the LOE sensor to the target surface.
Application Type Tank Parameter Function1 - Level Parameter 1 Not Used Parameter 2 Not Used Parameter 3 Not Used Parameter 4 Not Used Parameter 5 Not Used
Level calculates the depth (level) of the vessel being monitored, based on the Full Distance and Empty Distance.
Application Type Tank Parameter Function2 - Standing Cylindrical Parameter 1 Tank Diameter Tank with Parameter 2 Bottom Radius Hemispherical Parameter 3 Not Used Bottom Parameter 4 Not Used Parameter 5 Not Used
Diameter
EmptyDistance
BottomRadius
or
FullDistance
Distance
Level

21Tel: 1/888/525-7300 • Fax: 1/435/753-7490 • www.apgsensors.com • [email protected]
Application Type Tank Parameter Function3 - Standing Cylindrical Parameter 1 Tank Diameter Tank with Parameter 2 Bottom Radius Conical Parameter 3 Cone Length (Height) Bottom Parameter 4 Not Used Parameter 5 Not Used
Application Type Tank Parameter Function4 - Standing Rectangular Parameter 1 Tank X Dimension Tank with Parameter 2 Tank Y Dimension Chute Parameter 3 Chute X Dimension Parameter 4 Chute Y Dimension Parameter 5 Chute Length (Height)
Application Type Tank Parameter Function5 - Horizontal Cylindrical Parameter 1 Tank Length Tank with Parameter 2 Tank Diameter Spherical Ends Parameter 3 Radius of Ends Parameter 4 Not Used Parameter 5 Not Used
Diameter
EmptyDistance
Cone Length
ConeDiameter
FullDistance
Tank X
ChuteLength
Tank Y
EmptyDistance
orChute Y
Chute X
FullDistance
Diameter
Length
EmptyDistance
End Radius
FullDistance

22 Tel: 1/888/525-7300 • Fax: 1/435/753-7490 • www.apgsensors.com • [email protected]
EmptyDistance
Depth
Length
Width
FullDistance
Application Type Tank Parameter Function6 - Spherical Tank Parameter 1 Tank Diameter Parameter 2 Not Used Parameter 3 Not Used Parameter 4 Not Used Parameter 5 Not Used
Application Type Tank Parameter Function7 - Pounds Parameter 1 Multiplier (Linear Scaling) Parameter 2 Unit Definition (label) Parameter 3 Not Used Parameter 4 Not Used Parameter 5 Not Used
Pounds allows for a multiplier (Parameter 1) to be applied to the calculated level measurement, creating a linear scalar as the output to configured read-ing on the Main Display Page. Such a multplier could convert the distance or level measurement of a tank with simple geometry into a measurement of weight.
Application Type Tank Parameter Function8 - User Defined Units Parameter 1 Not Used Parameter 2 Not Used Parameter 3 Not Used Parameter 4 Not Used Parameter 5 Not Used
User Defined Units is not used by the LOE. Application Type 8 can be selected, but after leaving the Application Parameters Menu, Application Type reverts to 0.
Application Type Tank Parameter Function9 - Vertical Oval Parameter 1 Tank Length Tank Parameter 2 Tank Depth Parameter 3 Tank Width Parameter 4 Not Used Parameter 5 Not Used
EmptyDistance Diameter
FullDistance

23Tel: 1/888/525-7300 • Fax: 1/435/753-7490 • www.apgsensors.com • [email protected]
Application Type Tank Parameter Function10 - Horizontal Oval Parameter 1 Tank Length Tank Parameter 2 Tank Depth Parameter 3 Tank Width Parameter 4 Not Used Parameter 5 Not Used
Application Type Tank Parameter Function11 - Polynomial Parameter 1 X^3 Coefficient (Strapping Chart) Parameter 2 X^2 Coefficient Parameter 3 X^1 Coefficient Parameter 4 X^0 Coefficient Parameter 5 Not Used
Length
Width
Depth EmptyDistance
FullDistance
Basic Parameters
Figure 4.4

24 Tel: 1/888/525-7300 • Fax: 1/435/753-7490 • www.apgsensors.com • [email protected]
PARAMETER RANGEBlanking Determined by sensor model Blanking sets the blanking distance, which is the zone from the Zero Point of the sensor to the point from which the first echo will be accepted. While blanking distance can be used to ignore unwanted targets--such as welds, seams, pipe fittings, or gaskets--between the sensor and the closest acceptable target level, such objects generally create additional reflections and echoes, which are hard to filter out. More often, blanking distance is used for a sensor installed in a stand pipe.
Because of the physical properties of an ultrasonic sensor, objects cannot be detected closer than approximately 1 foot from the face of most transducers (5 inches for LOE-7126, 7 inches for LOE-6126). However, this distance varies according to how much energy is being transmitted (Pulses) and the installation.
IMPORTANT: Blanking is always measured from the Zero Point of the sensor. See Fig-ures 4.5 - 4.7.
PARAMETER RANGESensitivity 0 - 100% Sensitivity sets the level of gain that is applied to the echo. When operating in AutoSense, Hard-Target, or Soft-Target (see Gain Control), Sensitivity sets an upper limit for the amplification that can be applied to the echo. If operating in Manual, this parameter sets the gain.
When using manual gain control, set Sensitivity to the minimum value that will allow the target to be reliably tracked through the full range of expected environmental conditions.
IMPORTANT: Parameter values stored on the LOE will not update until the “Change” button is clicked or the Enter key is pressed.

25Tel: 1/888/525-7300 • Fax: 1/435/753-7490 • www.apgsensors.com • [email protected]
PARAMETER RANGEPulses 0-20 Pulses sets the maximum number of pulses the sensor can transmit when operating in AutoSense, Hard-Target, or Soft-Target (see Gain Control), or sets the number of pulses when operating in Manual. The more pulses that are sent in a burst, the stronger the returning echo.
When operating in Manual, increase the strength of the transmission by increasing Pulses for detecting soft targets in damping environments. In acoustically active environments or small enclosed areas, decrease Pulses to reduce multiple echoes.
PARAMETER RANGEGain Control 0 = Manual 1 = AutoSense 2 = Hard-Target 3 = Soft-Target 4 = Auto-Soft Target 5 = Auto-Hard Target
Gain Control selects the control mode for the LOE sensor’s gain settings (Sensitivity and Pulses). In AutoSense, the sensor automatically adjusts the sensitivity and pulses for the best quality return signal. Manual, Hard Target, and Soft Target are user controlled scenarios. In Manual, the user is in full control of Sensitivity and Pulses. For Hard and Soft Target, the user sets maximum Sensitivity and Pulses, but the overall gain is either ramped up slowly (Hard Target) or quickly (Soft Target) by the sensor.
PARAMETER RANGEAverage 1-32 Average sets the number of qualified samples to average for the displayed reading. Qualified samples are placed in a first-in, first-out buffer, the contents of which are averaged for Distance. The larger the number of qualified samples being averaged, the smoother the Distance reading will be, and the slower the reading will be to react to quick changes.
ZeroPoint
SensorMax.
Distance
Blanking
EffectiveMeasurement Zone
Offset = 0
ZeroPoint
SensorMax.
Distance
Blanking
EffectiveMeasurement Zone
Offset > 0
Offset
ZeroPoint
SensorMax.Distance
Blanking
EffectiveMeasurement Zone
Offset < 0
Offset
SensorMax. minus
Offset
Figure 4.5 Figure 4.6 Figure 4.7

26 Tel: 1/888/525-7300 • Fax: 1/435/753-7490 • www.apgsensors.com • [email protected]
PARAMETER RANGEOut of Range Samples 0-250
Out of Range Samples sets the number of consecutive samples outside the Window necessary to automatically adjust the current Distance and move the Window.
PARAMETER RANGESample Rate 1 - 20 Hz
Sample Rate is the number of sample readings taken by the LOE every second.
PARAMETER RANGEMultiplier 0 - 1.999
Multiplier is used to calibrate the LOE sensor for variations in the speed of sound due to variations in atmospheres. The default of 1.000 is used for most applications.
PARAMETER RANGETemp Comp. 0 = Off 1 = On
Temperature Compensation activates or deactivates the LOE’s internal temperature compensation circuit. The speed of sound changes with changes in temperature, therefore changes in temperature can affect distance measurements. These effects can be minimized by activating temperature compensation.
Figure 4.8
PARAMETER RANGEWindow 0 - Sensor Maximum Window determines the corresponding physical range for qualified samples, based on the current Distance. Samples beyond the +/- Window range of the current Distance will not qualify unless the average moves. Samples outside the extents of the Window are written to the Out of Range Samples buffer. (See Figure 4.8.)
Example: Window = 6 Inches Out of Range Samples = 10
Min. Reading Max. Reading
6” 6”
Current valueof Distance
All samplesare accepted
within this areaSamples are rejected within this area unless they persist for 10 consecutive samples
Samples are rejected within this area unless they persist for 10 consecutive samples

27Tel: 1/888/525-7300 • Fax: 1/435/753-7490 • www.apgsensors.com • [email protected]
PARAMETER RANGEOffset -10 ft - + 10ft
Offset is used to change the Zero Point of the LOE sensor. The Zero Point of the sensor is the point from which the calculated distance is measured. When the Offset is set to 0, the Zero Point of the sensor is at the face of the transducer (See Figure 4.5). A positive setting will move the Zero Point forward, in front of the sensor face (See Figure 4.6). Setting the Offset to a negative number will move the Zero Point backward, behind the sensor face (See Figure 4.7).
In all cases, Blanking is measured from the end of Offset, and the effective measurement zone of the sensor begins at the forward end of Blanking. If Offset is more negative than Blanking is positive, the net difference will be a loss in sensor maximum range (See Figure 4.7).
PARAMETER RANGEMax Distance Determined by sensor model Maximum Distance sets the maximum acceptable signal range (up to the physical maximum of the sensor), measured from the Zero Point. Signals beyond the Maximum Distance are ignored. Under Loss of Echo conditions, the Distance reading will display the Maximum Distance.
Reading Type RangeDistance Determined by model Distance displays the distance from the sensor to the detected target in the units selected in the Units parameter in the Application Parameters Menu (See Figure 4.3). This reading is always Distance, regardless of the Application Type selected in the Application Parameters Menu. Distance is used for Average and Window.
Reading Type RangeCalc. Dist,Level,Volume Determined by vessel being measured Calc. Dist,Level,Volume displays the configured output of the sensor. This is also shown on the Main Display. Calc. Dist,Level,Volume is used for Trip measurements.
LOE Readings
Figure 4.9

28 Tel: 1/888/525-7300 • Fax: 1/435/753-7490 • www.apgsensors.com • [email protected]
The LOE can have up to 2 output relays that can be configured to turn on or off based on the Calc. Dist,Level,Volume reading of the sensor.
Trip Type Outputs are configured with two independent digits: the first for Alarm Type (Blank, 1, or 2), and the second for Trip Condition (0-5, 7, or 9).
PARAMETER RANGETrip Distance 0 - Sensor Max Distance Trip Distance sets the value of the primary trip position, which is closest to the Zero Point of the sensor.
PARAMETER RANGETrip Window 0 - Sensor Max Distance Trip Window sets the value from the primary trip position to the secondary trip position, which is farther from the sensor’s Zero Point.
Alarm Type Blank_ - No Alarm Designates that no alarm is to be activated or deactivated on the remote APG-provided website (i.e., www.levelandflow.com) for the indicated Trip Condition. To initiate only the visual Trip Status indicator (See Figure 4.11) for Trip Condition 3, Trip Type would be set to 3.
Figure 4.10
Figure 4.11
LOE Trip Outputs and Settings
Reading Type RangeSignal Strength 0 - 100 Signal Strength displays the strength of the signal being received by the sensor. 0 represents the lowest quality signal, and 100 represents the highest quality.
Reading Type RangeTemperature Temperature displays the current temperature of the thermal device in the LOE sensor body.

29Tel: 1/888/525-7300 • Fax: 1/435/753-7490 • www.apgsensors.com • [email protected]
Figure 4.12
ON OFF
ON OFF ON
ONON
OFF
OFF
OFF ON
OFF ON OFF
OFF
ON
ON
OFF
TRIPDISTANCE
TRIPWINDOW
TRIP TYPE 0NEAR
TRIP TYPE 1EXCLUSIVE
TRIP TYPE 2HYSTERESISNEAR
TRIP TYPE 3FAR
TRIP TYPE 5HYSTERESISFAR
TRIP TYPE 4INCLUSIVE
Alarm Type 1_ - Active Alarm Designates the active trip point as a web alarm condition. To initiate web alarm whenever the Trip Condition 3 is ON, Trip Type would be set to 13.
Alarm Type 2_ - Inactive Alarm Designates an inactive trip point as a web alarm condition. To initiate a web alarm whenever the Trip Condition 3 is OFF, Trip Type would be set to 23.
Trip Condition 0 - Near Near activates the Trip whenever the Calc. Dist,Level,Volume is less than the Trip Distance setting.
Trip Condition 1 - Exclusive Exclusive activates the Trip whenever the Calc. Dist,Level,Volume is less than the Trip Distance setting OR greater than the Trip Distance + Trip Window settings.
Trip Condition 2 - Hysteresis Near
Hysteresis Near activates the Trip whenever the Calc. Dist,Level,Volumebecomes less than than the Trip Distance setting. The Trip remains activated until the Calc. Dist,Level,Volume becomes greater than the Trip Distance + Trip Window settings. The Trip then remains off until the Calc. Dist,Level,Volume becomes less than the Trip Distance setting again.
Trip Condition 3 - Far
Far activates the Trip whenever the Calc. Dist,Level,Volume is greater than the Trip Distance setting.
Trip Condition 4 - Inclusive Inclusive activates the Trip whenever the Calc. Dist,Level,Volume is greater than the Trip Distance setting AND less than the Trip Distance + Trip Window settings.

30 Tel: 1/888/525-7300 • Fax: 1/435/753-7490 • www.apgsensors.com • [email protected]
“ON” TIME(in seconds)
Relay “ON” (closed)
Relay “OFF”(open)
INTERVAL TIME(in minutes)
Figure 4.13
Trip Condition 5 - Hysteresis Far Hysteresis Far activates the Trip whenever the Calc. Dist,Level,Volume becomes greater than the Trip Distance + Trip Window settings. The Trip remains activated until the Calc. Dist,Level,Volume becomes less than the Trip Value setting. The Trip remains off until the Calc. Dist,Level,Volume becomes greater than the Trip Distance + Trip Window settings again.
Trip Condition 6 - Disable Trip Relay16 - Turn on Trip Relay26 - N/A Disable de-activates the Trip or SS Relay output.
Trip Condition 7 - Loss of Echo Loss of Echo activates the output when the maximum calculated reading is reached.
Trip Condition 8 - Timed Interval Timed Interval activates the output for a set amount of seconds every set amount of minutes (See Figure 4.13). When Trip Type is set to 8, Trip Distance and Trip Window are changed to “Interval Time (minutes)” and “On Time (seconds)”.
Trip Condition 9 - Abrupt Change Abrupt Change activates the output whenever a user-defined maximum rate of level change (change in distance or level divided by elapsed time) is exceeded. Trip Distance defines the distance and Trip Window defines the time.
Figure 4.12
ON OFF
ON OFF ON
ONON
OFF
OFF
OFF ON
OFF ON OFF
OFF
ON
ON
OFF
TRIPDISTANCE
TRIPWINDOW
TRIP TYPE 0NEAR
TRIP TYPE 1EXCLUSIVE
TRIP TYPE 2HYSTERESISNEAR
TRIP TYPE 3FAR
TRIP TYPE 5HYSTERESISFAR
TRIP TYPE 4INCLUSIVE

31Tel: 1/888/525-7300 • Fax: 1/435/753-7490 • www.apgsensors.com • [email protected]
The LOE can have up to 2 input relays that can be tied to alarms on the remote APG-provided website. There are three alarm configurations for Trip Inputs: Alarm On on Input, Alarm Off on Input, and Relay On Time Check Limit.
Alarm Type 18 - Alarm on ON Trip Input Alarm on ON Trip Input activates the alarm when the input circuit is closed.
Alarm Type 28 - Alarm on OFF Trip Input Alarm on OFF Trip Input activates the alarm when the input circuit is opened.
Alarm Type 30 - Relay On Time Check Limit Relay On Time Check Limit generates an alarm when the input circuit has been closed past the time limit (in seconds) set in the Trip Dist (See Figure 4.14). Trip Window contains a running counter of the time (in seconds) the input circuit has been closed. The counter is cleared when the input circuit opens.
Figure 4.14
LOE Trip Outputs and Settings

32 Tel: 1/888/525-7300 • Fax: 1/435/753-7490 • www.apgsensors.com • [email protected]
External Website Communication Status
The LOE embedded web server includes one parameter, a button, and two status reports for communication with the remote APG-provided website (i.e., www.levelandflow.com).
PARAMETER RANGERetry Time 30 - 180 Seconds Retry Time sets the time delay (in seconds) between attempts by the LOE to contact the external website.
BUTTON Call In
Call In forces the LOE to call in to the external website.
DISPLAY RANGERemote Call in Time 1 - 86400 Seconds
Remote Call in Time displays the duration of the last communication between the LOE and the external website.
DISPLAY RANGERemote Bytes 8 or 160 Bytes
Remote Bytes displays the number of bytes of data sent in the last communication between the LOE and the external website. 8 bytes indicates a normal, successful transmission. 160 bytes indicates an error occured in the transmission.
Figure 4.15

33Tel: 1/888/525-7300 • Fax: 1/435/753-7490 • www.apgsensors.com • [email protected]
• Modbus Sensor Configuration Registers
RS-485 Modbus Input Registers
Figure 4.16
This display-only menu shows the contents of the Input Registers for the selected Modbus sensor (See Figure 2.8). Registers used vary by sensor type. Please see the user manual for each sensor for a full list of registers.
• Detected Sensor Type Number and Sensor Model Number List: Sensor Type Model Number Sensor Type Model Number 0 LOE-2126 9 PT-400/PT-500-L31 (Level) 1 LOE-6126 10 PT-400/PT-500-L5 (Pressure) 2 LOE-3136 11 DCR-1006A 3 LOE-7126 12 LPD 4 RST-5001 13 MND 5 MPX-E1/R1 (2 floats) 14 RST-5003/4 6 MPX-E1/R1 (1 float) 15 AUS-7123 7 PG-7 16 MTM-1000 8 PG-10
Note: This list represents sensors that interface with various APG Modbus software packages. Not all interface with the LOE.
34 Tel: 1/888/525-7300 • Fax: 1/435/753-7490 • www.apgsensors.com • [email protected]
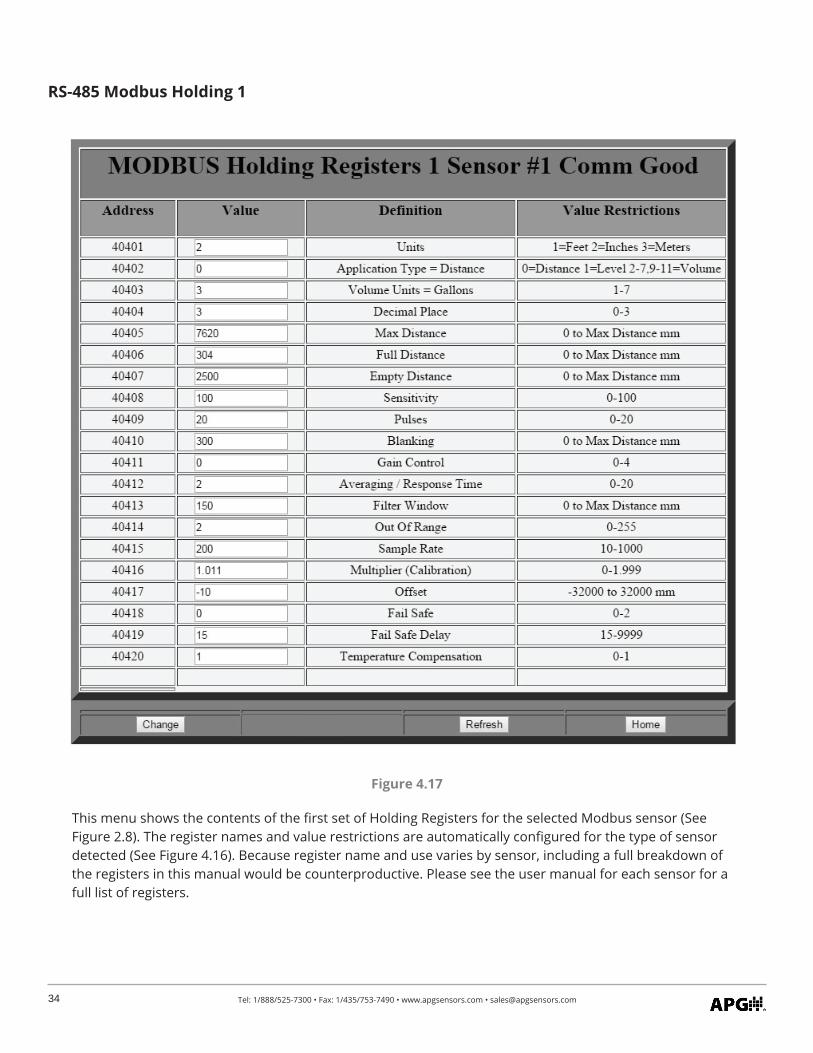
RS-485 Modbus Holding 1
Figure 4.17
This menu shows the contents of the first set of Holding Registers for the selected Modbus sensor (See Figure 2.8). The register names and value restrictions are automatically configured for the type of sensor detected (See Figure 4.16). Because register name and use varies by sensor, including a full breakdown of the registers in this manual would be counterproductive. Please see the user manual for each sensor for a full list of registers.

35Tel: 1/888/525-7300 • Fax: 1/435/753-7490 • www.apgsensors.com • [email protected]
RS-485 Modbus Holding 2
Figure 4.18
This menu shows the contents of the second set of Holding Registers for the selected Modbus sensor (See Figure 2.8). The register names and value restrictions are automatically configured for the type of sensor detected (See Figure 4.16). Because register name and use varies by sensor, including a full breakdown of the registers in this manual would be counterproductive. Please see the user manual for each sensor for a full list of registers.

36 Tel: 1/888/525-7300 • Fax: 1/435/753-7490 • www.apgsensors.com • [email protected]
• LOE Utilty Menus
Network Settings
Figure 4.19
The Network Settings are provided for advanced users only and should not normally require changes. Each LOE ships with the DHCP enabled, which means it will automatically connect to the the APG-provided re-mote website (usually www.levelandflow.com) and configure its own Network Settings when plugged into a port providing direct internet access.

37Tel: 1/888/525-7300 • Fax: 1/435/753-7490 • www.apgsensors.com • [email protected]
Security Settings
Figure 4.20
The Security Settings allow users to set their own user name and password for logging into the embedded webpage.
Labels
Figure 4.21
The Labels menu allow users to create custom labels for the Main Menu, the LOE, and the sensors attached to the LOE.

38 Tel: 1/888/525-7300 • Fax: 1/435/753-7490 • www.apgsensors.com • [email protected]
Figure 4.22
When labels are created in the Labels menu, they will be reflected on the Main Menu page (See Figure 4.22).
RS-485 Network Settings
Figure 4.23

39Tel: 1/888/525-7300 • Fax: 1/435/753-7490 • www.apgsensors.com • [email protected]
The RS-485 (Modbus) Settings menu controls the settings for the Modbus sensors (up to 10) attached to the LOE.
PARAMETER RANGEBaud Rate Checkbox 9600 Baud
Baud Rate Checkbox is used to select the baud rate of the of the sensors connected to the LOE. All APG Modbus sensors communicate at 9600 Baud.
PARAMETER RANGENumb of Sensors On Line 0 - 10
Numb of Sensors On Line sets the number Modbus sensors connected to the LOE. This setting is not automatically populated or updated. The user must change the setting manually. Numb of Sensors On Line must always be equal or greater than the number of actual sensors attached to the LOE.
NOTE: For best results, set Numb of Sensors On Line to the highest number of num-ber of sensor TO BE connected. No further adjustments will be needed as those sensors are connected to the LOE.
PARAMETER RANGESensor Number to View 1 - 10
Sensor Number to View selects number of the sensor for the LOE to poll for populating the Main Menu and for editing parameters in the Modbus Holding Register menus.
PARAMETER RANGENew Sensor Number 0 = No Change 1 - 10
New Sensor Number changes the sensor number assigned to the sensor selected by Sensor Number to View.
IMPORTANT: When “Change” is pressed to assign a new sensor number, Sensor Num-ber to View DOES NOT update.
PARAMETER RANGERS485 Sample Rate 1 - 20 Seconds
RS485 Sample Rate determines how often the LOE polls the selected Modbus sensor.

40 Tel: 1/888/525-7300 • Fax: 1/435/753-7490 • www.apgsensors.com • [email protected]
Your LOE series controller is very low maintenance and will need little care as long as it is installed correctly. However, in general, you should:
• Avoid applications for which the sensor was not designed, such as extreme temperatures, contact with incompatible corrosive chemicals and fumes, or other damaging environments.
• Inspect the threads whenever you remove the sensor from duty or change its location.
Chapter 5: Maintenance
• General Care
Should you have problems with your LOE Ultrasonic Sensor, here are some troubleshooting steps.• Check the received signal strength (See Figure 4.9). If the signal strength is low, alternately increase
Pulses and Sensitivity (See Figure 4.4) until the signal strength improves.• Ensure Temperature Compensation (See Figure 4.4) is On (set to 1).• Set the Gain Control to AutoSense (See Figure 4.4).• Ensure that Blanking (See Figure 4.4) is accurately set to account for any unwanted targets between the
sensor and the closest acceptable target (See Figures 4.5 - 4.7).
Should you have problems with your LOE Modbus Network Controller, here are some troubleshooting steps.
• Check the Modbus Network connections at the LOE and at each of the attached sensors.• Ensure that each attached sensor has been assigned a unique Sensor Number (Figure 4.23; Assigning
Modbus Sensor Numbers, page 12).• Check the Holding Register Settings for each attahed sensor (Figures 4.17 and 4.18).
• Troubleshooting

41Tel: 1/888/525-7300 • Fax: 1/435/753-7490 • www.apgsensors.com • [email protected]
Should your LOE require service, please contact the factory via phone, email, or online chat. We will issue you a Return Material Authorization (RMA) number with instructions.
• Phone: 888-525-7300• Email: [email protected]• Online chat at www.apgsensors.com
Please have your LOE’s part number and serial number available. See Warranty and Warranty Restrictions for more information.
• Repair and Returns
This procedure uses targets at known distances to calibrate the LOE sensor’s accuracy. A wall or other large, flat object is recommended for the long range target.
• Point the sensor at a target at a known distance near the maximum range of the sensor (See Figure 5.1).
• Adjust the Multiplier value until the distance reading on the sensor matches the actual measured dis-tance to the target (See Figure 4.4).
• Point the sensor at a target near the minimum measurement range, 1’ plus any Blanking distance (See Figure 5.2).
• Adjust the Offset value until the distance reading on the sensor matches the actual measured distance to the target (See Figure 4.4).
• Repeat previous two steps until no further adjustment is required.
• Calibration
Figure 5.1 Figure 5.2
measure
measure

Automation Products Group, Inc.Tel: 1/888/525-7300 • Fax: 1/435/753-7490 • www.apgsensors.com • [email protected]
APGR


