43
LogiCORE IP AXI Interrupt Controller (INTC) v4.0 Product Guide for Vivado Design Suite PG099 October 2, 2013

LogiCORE IP AXI Interrupt Controller (INTC) v4.0Product Guide for Vivado Design Suite
PG099 October 2, 2013

AXI INTC v4.0 Product Guide www.xilinx.com 2PG099 October 2, 2013
Table of ContentsIP Facts
Chapter 1: OverviewFeature Summary. . . . . . . . . . . . . . . . . . . . . . . . . . . . . . . . . . . . . . . . . . . . . . . . . . . . . . . . . . . . . . . . . . 6Licensing and Ordering Information . . . . . . . . . . . . . . . . . . . . . . . . . . . . . . . . . . . . . . . . . . . . . . . . . . . 7
Chapter 2: Product SpecificationPerformance. . . . . . . . . . . . . . . . . . . . . . . . . . . . . . . . . . . . . . . . . . . . . . . . . . . . . . . . . . . . . . . . . . . . . . 8Resource Utilization. . . . . . . . . . . . . . . . . . . . . . . . . . . . . . . . . . . . . . . . . . . . . . . . . . . . . . . . . . . . . . . . 8Port Descriptions . . . . . . . . . . . . . . . . . . . . . . . . . . . . . . . . . . . . . . . . . . . . . . . . . . . . . . . . . . . . . . . . . 10Register Space . . . . . . . . . . . . . . . . . . . . . . . . . . . . . . . . . . . . . . . . . . . . . . . . . . . . . . . . . . . . . . . . . . . 15
Chapter 3: Designing with the CoreClocking. . . . . . . . . . . . . . . . . . . . . . . . . . . . . . . . . . . . . . . . . . . . . . . . . . . . . . . . . . . . . . . . . . . . . . . . . 23Resets . . . . . . . . . . . . . . . . . . . . . . . . . . . . . . . . . . . . . . . . . . . . . . . . . . . . . . . . . . . . . . . . . . . . . . . . . . 23Programming Sequence. . . . . . . . . . . . . . . . . . . . . . . . . . . . . . . . . . . . . . . . . . . . . . . . . . . . . . . . . . . . 23Cascade Mode Interrupt . . . . . . . . . . . . . . . . . . . . . . . . . . . . . . . . . . . . . . . . . . . . . . . . . . . . . . . . . . . 24Timing Diagrams . . . . . . . . . . . . . . . . . . . . . . . . . . . . . . . . . . . . . . . . . . . . . . . . . . . . . . . . . . . . . . . . . 28
Chapter 4: Customizing and Generating the CoreVivado Integrated Design Environment . . . . . . . . . . . . . . . . . . . . . . . . . . . . . . . . . . . . . . . . . . . . . . . 30Output Generation. . . . . . . . . . . . . . . . . . . . . . . . . . . . . . . . . . . . . . . . . . . . . . . . . . . . . . . . . . . . . . . . 34
Chapter 5: Constraining the Core
Chapter 6: Simulation
Chapter 7: Synthesis and Implementation
Appendix A: Migrating and UpgradingMigrating to the Vivado Design Suite. . . . . . . . . . . . . . . . . . . . . . . . . . . . . . . . . . . . . . . . . . . . . . . . . 38Upgrading in the Vivado Design Suite . . . . . . . . . . . . . . . . . . . . . . . . . . . . . . . . . . . . . . . . . . . . . . . . 38
Send Feedback

AXI INTC v4.0 Product Guide www.xilinx.com 3PG099 October 2, 2013
Appendix B: DebuggingFinding Help on Xilinx.com . . . . . . . . . . . . . . . . . . . . . . . . . . . . . . . . . . . . . . . . . . . . . . . . . . . . . . . . . 39Debug Tools . . . . . . . . . . . . . . . . . . . . . . . . . . . . . . . . . . . . . . . . . . . . . . . . . . . . . . . . . . . . . . . . . . . . . 41Interface Debug . . . . . . . . . . . . . . . . . . . . . . . . . . . . . . . . . . . . . . . . . . . . . . . . . . . . . . . . . . . . . . . . . . 41
Appendix C: Additional ResourcesXilinx Resources . . . . . . . . . . . . . . . . . . . . . . . . . . . . . . . . . . . . . . . . . . . . . . . . . . . . . . . . . . . . . . . . . . 42References . . . . . . . . . . . . . . . . . . . . . . . . . . . . . . . . . . . . . . . . . . . . . . . . . . . . . . . . . . . . . . . . . . . . . . 42Revision History . . . . . . . . . . . . . . . . . . . . . . . . . . . . . . . . . . . . . . . . . . . . . . . . . . . . . . . . . . . . . . . . . . 43Notice of Disclaimer. . . . . . . . . . . . . . . . . . . . . . . . . . . . . . . . . . . . . . . . . . . . . . . . . . . . . . . . . . . . . . . 43
Send Feedback

AXI INTC v4.0 Product Guide www.xilinx.com 4PG099 October 2, 2013 Product Specification
IntroductionThe LogiCORE™ IP AXI Interrupt Controller (INTC) core receives multiple interrupt inputs from peripheral devices and merges them to a single interrupt output to the system processor. The registers used for storing interrupt vector addresses, checking, enabling and acknowledging interrupts are accessed through the AXI4-Lite interface.
Features• Register access through the AXI4-Lite
interface.
• Fast Interrupt mode.
• Supports up to 32 interrupts. Cascadable to provide additional interrupt inputs.
• Single interrupt output.
• Priority between interrupt requests is determined by vector position. The least signif icant bit (LSB, in this case bit 0) has the highest priority
• Interrupt Enable Register for selectively enabling individual interrupt inputs
• Master Enable Register for enabling interrupts request output
• Each input is configurable for edge or level sensitivity
• Output interrupt request pin is configurable for edge or level generation
• Configurable Software Interrupt capability
IP Facts
LogiCORE IP Facts Table
Core SpecificsSupported Device Family(1) Zynq®-7000, Virtex®-7, Kintex®-7, Artix®-7
Supported User Interfaces AXI4-Lite
Resources See Table 2-2 to Table 2-4.
Provided with CoreDesign Files RTL
Example Design Not Provided
Test Bench Not Provided
Constraints File Not Applicable
Simulation Model Not Applicable
Supported S/W Driver(2) Standalone
Tested Design Flows(3)
Design EntryVivado® Design Suite
IP Integrator
Simulation For supported simulators, see the XilinxDesign Tools: Release Notes Guide.
Synthesis Vivado Synthesis
SupportProvided by Xilinx @ www.xilinx.com/support
Notes: 1. For a complete list of supported devices, see the Vivado
IP catalog.2. Standalone driver details can be found in the SDK directory
(<install_directory>/doc/usenglish/xilinx_drivers.htm). Linux OS and driver support information is available from wiki.xilinx.com.
3. For the supported versions of the tools, see the Xilinx Design Tools: Release Notes Guide.
Send Feedback

AXI INTC v4.0 Product Guide www.xilinx.com 5PG099 October 2, 2013
Chapter 1
OverviewThe LogiCORE™ IP INTC core concentrates multiple interrupt inputs from peripheral devices to a single interrupt output to the system processor. The registers used for checking, enabling, and acknowledging interrupts are accessed through the AXI4-Lite interface.
Figure 1-1 illustrates the top-level block diagram for the AXI INTC core. The three main blocks in the AXI INTC core are described in this section.
• Registers Block : This block contains control and status registers. They are accessed through the AXI4-lite slave interface. For a detailed description of the AXI INTC core registers, see Register Space.
• Interrupt Detection: This block detects the interrupts input. It can be configured for either level or edge detection for each interrupt input.
• Interrupt Generation: This block performs the following functions:
X-Ref Target - Figure 1-1
Figure 1-1: AXI INTC Core Block Diagram
Send Feedback

AXI INTC v4.0 Product Guide www.xilinx.com 6PG099 October 2, 2013
Chapter 1: Overview
° Generates the final output interrupt from the interrupt controller core.
° Interrupt sensitivity is determined by the configuration parameters.
° Checks for enable conditions in control registers (MER and IER) for interrupt generation.
° Resets the interrupt after acknowledge.
° Writes the vector address of the active interrupt in IVR register and enables the IPR register for pending interrupts.
Feature SummaryInterrupt conditions are captured by the AXI INTC core and retained until explicitly acknowledged. Interrupts can be enabled/disabled either globally or individually. The processor is signaled with an interrupt condition when all interrupts are globally enabled, and at least one captured interrupt is individually enabled.
Edge-Sensitive and Level-Sensitive ModesTwo modes of interrupts are supported.
• Edge-sensitive: Records a new interrupt condition when an active edge occurs on the interrupt input, and an interrupt condition does not already exist. (The polarity of the active edge, rising or falling, is a per-input option.)
• Level-sensitive: Records an interrupt condition any time the input is at the active level and the interrupt condition does not already exist. (The polarity of the active level, High or Low, is as per-input option.)
X-Ref Target - Figure 1-2
Figure 1-2: Schemes for Generating Edges
Scheme 1
Scheme 3
Scheme 2
InterruptOccurs
InterruptAcknowledge
Send Feedback

AXI INTC v4.0 Product Guide www.xilinx.com 7PG099 October 2, 2013
Chapter 1: Overview
Fast Interrupt ModeEach device connected to the AXI INTC core can use either normal or fast interrupt mode, based on the latency requirement. Fast interrupt mode can be chosen for designs requiring lower latency. Fast interrupt mode is enabled by setting the corresponding bit in the Interrupt Mode register (IMR). The interrupt is acknowledged through processor_ack ports driven by the processor for interrupts configured in fast interrupt mode. The IRQ generated is cleared based on the processor_ack signal, and the corresponding IAR bit is updated after acknowledgement is received by processor_ack .
Cascade ModeWhen the system requires more than 32 interrupts, it is necessary to expand the AXI INTC core capability to handle more interrupt. This can be achieved by setting the parameters related to Cascade Mode in the core. For more description, see Cascade Mode Interrupt in Chapter 3.
Software InterruptsThe core also supports a configurable number of software interrupts, which are primarily intended for inter-processor interrupts in multi-processor systems. These interrupts are triggered by software writing to the Interrupt Status Register.
Licensing and Ordering InformationThis Xilinx LogiCORE IP module is provided at no additional cost with the Xilinx Vivado® Design Suite under the terms of the Xilinx End User License.
Information about this and other Xilinx LogiCORE™ IP modules is available at the Xilinx Intellectual Property page. For information on pricing and availability of other Xilinx LogiCORE IP modules and tools, contact your local Xilinx sales representative.
Send Feedback

AXI INTC v4.0 Product Guide www.xilinx.com 8PG099 October 2, 2013
Chapter 2
Product SpecificationThe AXI INTC core receives multiple interrupt inputs from peripheral devices and merges them to a single interrupt output to the system processor. The registers used for storing interrupt vector addresses, checking, enabling and acknowledging interrupts are accessed through the AXI4-Lite interface.
PerformancePerformance characterization of this core has been done using the margin system methodology. The details of the margin system characterization methodology is described in “IP Characterization and fMAX Margin System Methodology”, in the Vivado Design Suite User Guide: Designing With IP (UG896) [Ref 1].
Maximum FrequenciesThe maximum frequencies for the AXI INTC core are provided in Table 2-1.
Resource UtilizationThe AXI INTC core resource utilization for various parameter combinations were measured with Virtex-7 (Table 2-2), Kintex-7 (Table 2-3)and Artix-7 devices (Table 2-4).
Note: Resources numbers for Zynq®-7000 devices are expected to be similar to 7 series device numbers.
Table 2-1: Maximum Frequencies
Family Fmax (MHz)
Virtex®-7 180
Kintex®-7 150
Artix®-7 120
Send Feedback

AXI INTC v4.0 Product Guide www.xilinx.com 9PG099 October 2, 2013
Chapter 2: Product Specification
Table 2-2: Device Utilization - Virtex-7 FPGAs (XC7VX485T ffg1761-3)
Parameter Values Device Resources
No. ofPeripheralInterrupts
EnableInterruptPendingRegister
Enable SetInterruptPendingRegister
Enable ClearInterruptPendingRegister
EnableInterrupt
VectorRegister
LUTs FFs Slices Fmax(MHz)
16 1 1 1 1 247 250 163 508
32 1 1 1 1 407 427 287 524
8 1 1 1 1 167 161 84 524
8 1 1 1 1 167 161 84 524
32 1 1 1 1 407 427 287 524
32 1 1 1 1 407 427 287 524
32 1 1 1 1 407 427 287 524
8 1 1 1 1 167 161 84 524
8 1 1 1 1 167 161 84 524
32 1 1 1 1 407 427 287 524
8 1 1 1 1 167 161 84 524
16 1 1 1 1 247 250 163 508
16 1 1 1 1 247 250 163 508
Table 2-3: Device Utilization - Kintex-7 FPGAs (XC7K325T ffg900-3)
Parameter Values Device Resources
No. ofPeripheralInterrupts
EnableInterruptPendingRegister
Enable SetInterruptPendingRegister
Enable ClearInterruptPendingRegister
EnableInterrupt
VectorRegister
LUTs FFs Slices Fmax(MHz)
8 1 1 1 1 166 161 77 531
16 1 1 1 1 248 250 165 500
16 1 1 1 1 248 250 165 500
8 1 1 1 1 166 161 77 531
32 1 1 1 1 407 427 287 538
8 1 1 1 1 166 161 77 531
32 1 1 1 1 407 427 287 538
32 1 1 1 1 407 427 287 538
32 1 1 1 1 407 427 287 538
8 1 1 1 1 166 161 77 531
8 1 1 1 1 166 161 77 531
32 1 1 1 1 407 427 287 538
16 1 1 1 1 248 250 165 500
Send Feedback

AXI INTC v4.0 Product Guide www.xilinx.com 10PG099 October 2, 2013
Chapter 2: Product Specification
Port DescriptionsThis section describes both the input and output ports and the design parameters that are used to tailor the AXI INTC core for your design.
I/O SignalsThe AXI INTC core I/O signals are listed and described in Table 2-5.
Table 2-4: Device Utilization - Artix-7 FPGAs (XC7A100T fgg676-3)
Parameter Values Device Resources
No. ofPeripheralInterrupts
EnableInterruptPendingRegister
Enable SetInterruptPendingRegister
Enable ClearInterruptPendingRegister
EnableInterrupt
VectorRegister
LUTs FFs Slices Fmax(MHz)
16 1 1 1 1 267 250 155 320
8 1 1 1 1 176 161 78 360
16 1 1 1 1 267 250 155 320
8 1 1 1 1 176 161 78 360
32 1 1 1 1 406 427 280 320
32 1 1 1 1 406 427 280 320
32 1 1 1 1 406 427 280 320
32 1 1 1 1 406 427 280 320
8 1 1 1 1 176 161 78 360
32 1 1 1 1 406 427 280 320
8 1 1 1 1 176 161 78 360
16 1 1 1 1 267 250 155 320
8 1 1 1 1 176 161 78 360
Table 2-5: I/O Signal Description
Signal Name Interface I/O InitialState Description
AXI Global System Signals
s_axi_aclk S_AXI I - AXI Clock
s_axi_aresetn AXI I - AXI Reset, active-Low
AXI Interface Signals
s_axi_* AXI I -For a description of AXI4, AXI4-Lite and AXI Stream signals, see the AXI Reference Guide (UG761) [Ref 2].
Send Feedback

AXI INTC v4.0 Product Guide www.xilinx.com 11PG099 October 2, 2013
Chapter 2: Product Specification
INTC Interface Signals
intr[No. ofperipheral interrupts - 1:0](1)(3) INTC I - Interrupt inputs
irq INTC O 0x1 Interrupt request output
interrupt_address[31:0](2) INTC O 0x0 Interrupt address output
processor_ack[1:0] INTC I -
Interrupt acknowledgement input.00 - No interrupt received01 - Set when processor branches to interrupt routine10 - Set when processor returns from interrupt routine by executing RTID11 - Set when processor enables interrupts
processor_clk INTC I - MicroBlaze™ processor clock
processor_rst INTC I - MicroBlaze processor reset, active-High
interrupt_address_in[31:0] INTC I -
This port is applicable only when Enable Cascade Interrupt Mode and Enable Fast Interrupt Logic are selected in GUI.This port should be connected to the downstream AXI INTC instances Interrupt_address port and available only when Enable Fast Interrupt Logic is checked in GUI (for secondary instance(s) of AXI INTC.)
processor_ack_out[1:0] INTC O 0x0
This port is applicable to the instance of AXI INTC only when Enable Cascade Interrupt Mode and Enable Fast Interrupt Logic are selected in GUI. The main AXI INTC instance passes these port values obtained from the processor when the 31st bit, which is the cascaded interrupt, is served by the processor (for a secondary instance of the AXI INTC.)
Notes: 1. Intr(0) is always the highest priority interrupt and each successive bit to the left has a corresponding lower
interrupt priority.2. Interrupt_address always drives the vector address of highest priority interrupt.3. Each of the interrupt inputs is treated as synchronous to the AXI clock unless the corresponding bit in the
parameter C_ASYNC_INTR is set. In that case, the input is synchronized with the number of flip-flops defined by the parameter C_NUM_SYNC_FF.
Table 2-5: I/O Signal Description (Cont’d)
Signal Name Interface I/O InitialState Description
Send Feedback

AXI INTC v4.0 Product Guide www.xilinx.com 12PG099 October 2, 2013
Chapter 2: Product Specification
Design ParametersTo allow you to obtain an AXI INTC core that is uniquely tailored for your system, certain features can be parameterized in the AXI INTC design. This allows you to configure a design that uses the resources required by the system only and that operates with the best possible performance. The features that can be parameterized in the AXI INTC core are as shown in Table 2-6.
.
Table 2-6: Design Parameters
Generic Feature/Description Parameter Name AllowableValues
DefaultValue
VHDLType
System Parameter
G1 Target FPGA family C_FAMILY zynq, virtex7,kintex7, artix7 kintex7 string
AXI Parameters
G2 AXI address bus width C_S_AXI_ADDR_WIDTH 9 9 integer
G3 AXI data bus width C_S_AXI_DATA_WIDTH 32 32 integer
INTC Parameters
G4 Number of interrupt inputs C_NUM_INTR_INPUTS 1-32 1 integer
G5 Type of interrupt for each input(1) C_KIND_OF_INTR 1 = Edge
0 = Level ALL 1s std_logic_vector
G6 Type of each edge sensitive input(1) C_KIND_OF_EDGE
1 = Rising0 = FallingValid if C_KIND_OF_INTR = 1s
ALL 1s std_logic_vector
G7 Type of each level sensitive input(1) C_KIND_OF_LVL
1 = High0 = LowValid if C_KIND_OF_INTR = 0s
ALL 1s std_logic_vector
G8 Indicates the presence of IPR C_HAS_IPR 0 = Not Present
1 = Present 1 integer
G9 Indicates the presence of SIE C_HAS_SIE 0 = Not Present
1 = Present 1 integer
G10 Indicates the presence of CIE C_HAS_CIE 0 = Not Present
1 = Present 1 integer
G11 Indicates the presence of IVR C_HAS_IVR 0 = Not Present
1 = Present 1 integer
G12 Indicates level or edge active Irq C_IRQ_IS_LEVEL 0 = Active Edge
1 = Active Level 1 integer
G13 Indicates the sense of the Irq output C_IRQ_ACTIVE 0 = Falling/Low
1 = Rising/High 1 std_logic
G14 Indicates if processor clockis connected to INTC(3)(4)
C_MB_CLK_NOT_CONNECTED
0 = Connected1 = Not Connected 1 integer
Send Feedback

AXI INTC v4.0 Product Guide www.xilinx.com 13PG099 October 2, 2013
Chapter 2: Product Specification
G15 Indicates the presence ofFAST INTERRUPT logic(4) C_HAS_FAST 0 = Not Present
1 = Present 0 integer
G16 Use synchronizers in design(5)
C_DISABLE_SYNCHRONIZERS
1 = Not Used0 = Used 1 integer
G17 Enable Cascade modeinterrupt(6) C_EN_CASCADE_MODE
0 = Default1 = Enable Cascade Mode
0 integer
G18 Make cascade mode interruptcore instance as primary(7) C_CASCADE_MASTER
0 = No Cascade Mode Master1 = Cascade Mode Master
0 integer
G19 Number of software interrupts C_NUM_SW_INTR 0-31 0 integer
G20 Asynchronous interrupt for each input(1) C_ASYNC_INTR 0=Synchronous
1=Asynchronous All 1s std_logic_vector
G21 Number of synchronizationflip-flops C_NUM_SYNC_FF 0-7 2 integer
Notes: 1. The interrupt input is a little-endian vector with the same width as the data bus and contains either a 0 or 1 in each position.2. Synchronizers in the design can be disabled if the processor clock and AXI clock are identical. This reduces the core area and
latencies introduced by the synchronizers in passing the IRQ to the processor.3. C_MB_CLK_NOT_CONNECTED should be set to 1 when the processor clock is not connected to the AXI INTC core. When the
processor clock is not connected, the IRQ to the processor is generated on an AXI clock. This flexibility is given for backward compatibility of the core. The synchronizers in the design are disabled when the processor clock is not connected.
4. When processor_clk is connected, a DRC error is generated if the same clock is not connected to both the processor and the AXI INTC core.
5. The C_DISABLE_SYNCHRONIZERS parameter, by default, adds the necessary synchronizer logic for internal signals.6. C_EN_CASCADE_MODE should be set to 1 when there are more than 32 interrupts to handle in the system. For each
successive addition of 32 more interrupts, one new AXI INTC core has to be instantiated. For each instance of AXI INTC this parameter should be set to 1. Only the last instance of AXI INTC (which has less than 32 interrupts to handle) should have this parameter set to 0.
7. C_CASCADE_MASTER should be set to 1, only with the master instance of the AXI INTC core. Setting of this parameter is applicable only when the C_EN_CASCADE_MODE parameter is set to 1. This instance directly interfaces with the processor. None of the other instances of the AXI INTC core interface with processor even though these are configured in the Cascade mode. See Cascade Mode Interrupt for more information.
Table 2-6: Design Parameters (Cont’d)
Generic Feature/Description Parameter Name AllowableValues
DefaultValue
VHDLType
Send Feedback

AXI INTC v4.0 Product Guide www.xilinx.com 14PG099 October 2, 2013
Chapter 2: Product Specification
Dependencies Between Parameters and I/O SignalsThe dependencies between the AXI INTC core design parameters and I/O signals are described in Table 2-7. In addition, when certain features are parameterized out of the design, the related logic is no longer a part of the design. The unused input signals and related output signals are set to a specified value.
Table 2-7: Parameter-I/O Signal Dependencies
Generic or Port Name Affects Depends
On Relationship Description
Design Parameters
G2 C_S_AXI_ADDR_WIDTH P3, P13 - Defines the width of the ports
G3 C_S_AXI_DATA_WIDTH P6, P7, P16 - Defines the width of the ports
G15 C_HAS_FAST P22, P23, P26, P27 - Ports are valid if the generic
C_HAS_FAST = 1
G15 C_HAS_FAST G14 -C_MB_CLK_NOT_CONNECTED has to be 0 when C_HAS_FAST is set to 1.
G17 C_EN_CASCADE_MODE P26, P27 -This parameter should be set only when the Cascade mode of interrupt is set.
G18 C_CASCADE_MASTER P26, P27 -This parameter should be set only for the master instance of AXI INTC core.
I/O Signals
P3 S_AXI_AWADDR[C_S_AXI_ADDR_WIDTH-1:0] - G2 Port width depends on the generic C_S_AXI_ADDR_WIDTH
P6 S_AXI_WDATA[C_S_AXI_DATA_WIDTH-1:0] - G3 Port width depends on the generic C_S_AXI_DATA_WIDTH
P7 S_AXI_WSTB[C_S_AXI_DATA_WIDTH/8-1:0] - G3 Port width depends on the generic C_S_AXI_DATA_WIDTH
P13 S_AXI_ARADDR[C_S_AXI_ADDR_WIDTH -1:0] - G2 Port width depends on the generic C_S_AXI_ADDR_WIDTH
P16 S_AXI_RDATA[C_S_AXI_DATA_WIDTH -1:0] - G3 Port width depends on the generic C_S_AXI_DATA_WIDTH
P22 Interrupt_address[31:0] - G15 Port is valid if the generic C_HAS_FAST = 1
P23 Processor_ack[1:0] - G15 Port is valid if the generic C_HAS_FAST = 1
P26 Interrupt_address_in[31:0] - G15, G17, G18
Port existence is depend upon the FAST Mode interrupt as well as Cascade mode interrupt
P27 Processor_ack_out[1:0]- G15, G17,
G18
Port existence is depend upon the FAST Mode interrupt as well as Cascade mode interrupt
Send Feedback

AXI INTC v4.0 Product Guide www.xilinx.com 15PG099 October 2, 2013
Chapter 2: Product Specification
Register SpaceAll AXI INTC registers listed in Table 2-8 are accessed through the AXI4-Lite interface. Each register is accessed on a 4-byte boundary. The AXI INTC registers are read as little-endian data.
Interrupt Status Register (ISR)When read, the contents of this register indicate the presence or absence of an active interrupt signal. Bits that are 0 are not active. Each bit in this register that is set to a 1 indicates an active interrupt. This is an active interrupt signal on the corresponding hardware interrupt input for bits up to Number of Peripheral Interrupts defined in the Customize IP dialog box in the Vivado Design Suite (parameter C_NUM_INTR_INPUTS). The number of remaining bits is defined by Number of Software Interrupts in the Customize IP dialog box in the Vivado Design Suite (parameter C_NUM_SW_INTR). These bits provide the ability to generate software interrupts by writing to the ISR. The total number of bits in the register is Number of Peripheral Interrupts + Number of Software Interrupts.
The bits in the ISR are independent of the interrupt enable bits in the IER. See the Interrupt Enable Register (IER), page 17 for the interrupt status bits that are masked by disabled interrupts.
The ISR register bits up to Number of Peripheral Interrupts is writable by software until the Hardware Interrupt Enable (HIE) bit in the MER has been set, whereas the remaining bits (if any) can still be set by software. After that bit has been set, the software can no longer write to the ISR. Given these restrictions, when this register is written to, any data bits that are set to 1 activate the corresponding interrupt. For the bits up to Number of Peripheral Interrupts, this has the same effect as if a hardware input became active. Data bits that are zero have no effect.
Table 2-8: Register Address Mapping
Address Offset Register Name Description
00h ISR Interrupt Status Register (ISR)
04h IPR Interrupt Pending Register (IPR)
08h IER Interrupt Enable Register (IER)
0Ch IAR Interrupt Acknowledge Register (IAR)
10h SIE Set Interrupt Enables (SIE)
14h CIE Clear Interrupt Enables (CIE)
18h IVR Interrupt Vector Register (IVR)
1Ch MER Master Enable Register (MER)
20h IMR Interrupt Mode Register (IMR)
100h to 170h IVAR Interrupt Vector Address Register (IVAR)
Send Feedback

AXI INTC v4.0 Product Guide www.xilinx.com 16PG099 October 2, 2013
Chapter 2: Product Specification
This allows the software to generate interrupt to test purposes until the HIE bit has been set and to generate software interrupts at any time. After HIE has been set (enabling the hardware interrupt inputs), then writing to the bits up to Number of Peripheral Interrupts in this register does nothing.
If there are fewer interrupt inputs than the width of the data bus, writing a 1 to a non-existing interrupt input does nothing and reading it returns 0. The Interrupt Status Register (ISR) is shown in Figure 2-1 and the bits are described in Table 2-9.
Interrupt Pending Register (IPR)This is an optional read-only register in the AXI INTC and can be set in Vivado Design Suite Customize IP dialog box by checking Enable Interrupt Pending Register (parameter C_HAS_IPR). Reading the contents of this register indicates the presence or absence of an active interrupt that is also enabled. This register is used to reduce interrupt processing latency by reducing the number of reads of the INTC by one.
Each bit in this register is the logical AND of the bits in the ISR and the IER. If there are fewer interrupt inputs than the width of the data bus, reading a non-existing interrupt returns zero. The Interrupt Pending Register (IPR) is shown in Figure 2-2 and the bits are described in Table 2-10.
X-Ref Target - Figure 2-1
Figure 2-1: Interrupt Status Register (ISR)
Table 2-9: Interrupt Status Register Bit Definitions
Bits Name Reset Value Access Description
(w(1)-1):0 INT(n)-INT(0)(n<= w-1) 0x0 Read / Write
Interrupt (n) - Interrupt (0)0 - Not Active1 - Active
Notes: 1. w - Width of Data Bus
X-Ref Target - Figure 2-2
Figure 2-2: Interrupt Pending Register
w-2w-1 012345
INT(4)
INT(n-1) - INT(5)
INT(2) INT(0)INT(n)
INT(3) INT(1)
Note: w - width of Data Bus
w-2w-1 012345
INT(4)
INT(n-1) - INT(5)
INT(2) INT(0)INT(n)
INT(3) INT(1)
Note: w - width of Data Bus
Send Feedback

AXI INTC v4.0 Product Guide www.xilinx.com 17PG099 October 2, 2013
Chapter 2: Product Specification
Interrupt Enable Register (IER)This is a read/write register. Writing a 1 to a bit in this register enables the corresponding ISR bit to cause assertion of the INTC output. An IER bit set to 0 does not inhibit an interrupt condition for being captured, just reported. Writing a 0 to a bit disables, or masks, the generation of interrupt output for the corresponding interrupt.
Disabling an interrupt input is not the same as clearing an interrupt. Disabling an interrupt means the interrupt event occurs but does not pass to the processor. Clearing an interrupt means that after an interrupt has been generated and then passed to the processor, it reads the Interrupt Status Register and clears the interrupt bit to serve the interrupt. Disabling an active interrupt blocks that interrupt from reaching the Irq output, but as soon as it is re-enabled the interrupt immediately generates a request on the Irq output.
An interrupt must be cleared by writing to the Interrupt Acknowledge Register as described below. Reading the IER indicates which interrupt inputs are enabled, where a 1 indicates the input is enabled and a 0 indicates the input is disabled.
If there are fewer interrupt inputs than the width of the data bus, writing a 1 to a non-existing interrupt input does nothing and reading it returns 0. The Interrupt Enable Register (IER) is shown in Figure 2-3 and the bits are described in Table 2-11.
Table 2-10: Interrupt Pending Register Bit Definitions
Bits Name Reset Value Access Description
(w(1)-1):0 INT(n)-INT(0)(n<= w-1) 0x0 Read / Write
Interrupt (n) - Interrupt (0)0 - Not Active1 - Active
Notes: 1. w - Width of Data Bus
X-Ref Target - Figure 2-3
Figure 2-3: Interrupt Enable Register
Table 2-11: Interrupt Enable Register Bit Definitions
Bits Name Reset Value Access Description
(w(1)-1):0 INT(n)-INT(0)(n<= w-1) 0x0 Read / Write
Interrupt (n) - Interrupt (0)0 - Not Active1 - Active
Notes: 1. w - Width of Data Bus
w-2w-1 012345
INT(4)
INT(n-1) - INT(5)
INT(2) INT(0)INT(n)
INT(3) INT(1)
Note: w - width of Data Bus
Send Feedback

AXI INTC v4.0 Product Guide www.xilinx.com 18PG099 October 2, 2013
Chapter 2: Product Specification
Interrupt Acknowledge Register (IAR)The IAR is a write-only location that clears the interrupt request associated with selected interrupt. Writing 1 to a bit in IAR clears the corresponding bit in the ISR, and also clears the same bit itself in IAR.
In fast interrupt mode, bits in the IAR are cleared by the sensing the acknowledgement pattern over the processor_ack port. In normal interrupt mode, the IAR is cleared by the acknowledgement received over the AXI interface.
Writing a 1 to a bit location in the IAR clears the interrupt request that was generated by the corresponding interrupt input. An interrupt that is active and masked by writing a 0 to the corresponding bit in the IER remains active until cleared by acknowledging it. Unmasking an active interrupt causes an interrupt request output to be generated (if the ME bit in the MER is set).
Writing 0s does nothing as does writing a 1 to a bit that does not correspond to an active input or for which an interrupt does not exist. The IAR is shown in Figure 2-4 and the bits are described in Table 2-12.
Set Interrupt Enables (SIE)SIE is a location used to set the IER bits in a single atomic operation, rather than using a read / modify / write sequence. Writing a 1 to a bit location in SIE sets the corresponding bit in the IER. Writing 0s does nothing, as does writing a 1 to a bit location that corresponds to a non-existing interrupt. The SIE is optional in the AXI INTC core and can be set by selecting Enable Set Interrupt Enable Register in the Vivado Design Suite Customize IP dialog box (parameter C_HAS_SIE).
X-Ref Target - Figure 2-4
Figure 2-4: Interrupt Acknowledge Register
Table 2-12: Interrupt Acknowledge Register Bit Definitions
Bits Name Reset Value Access Description
(w(1)-1):0 INT(n)-INT(0)(n<= w-1) 0x0 Read / Write
Interrupt (n) - Interrupt (0)0 - Not Active1 - Active
Notes: 1. w - Width of Data Bus
w-2w-1 012345
INT(4)
INT(n-1) - INT(5)
INT(2) INT(0)INT(n)
INT(3) INT(1)
Note: w - width of Data Bus
Send Feedback

AXI INTC v4.0 Product Guide www.xilinx.com 19PG099 October 2, 2013
Chapter 2: Product Specification
The SIE register is shown in Figure 2-5 and the bits are described in Table 2-13.
Clear Interrupt Enables (CIE)CIE is a location used to clear IER bits in a single atomic operation, rather than using a read/modify/write sequence. Writing a 1 to a bit location in CIE clears the corresponding bit in the IER. Writing 0s does nothing, as does writing a 1 to a bit location that corresponds to a non-existing interrupt. The CIE is also optional in the AXI INTC core and can be set by selecting Enable Clear Interrupt Enable Register in the Vivado Design Suite Customize IP dialog box (parameter C_HAS_CIE). The Clear Interrupt Enables (CIE) register is shown in Figure 2-6 and the bits are described in Table 2-14.
X-Ref Target - Figure 2-5
Figure 2-5: Set Interrupt Enable (SIE) Register
Table 2-13: Set Interrupt Enable (SIE) Register Bit Definitions
Bits Name Reset Value Access Description
(w(1)-1):0 INT(n)-INT(0)(n<= w-1) 0x0 Read / Write
Interrupt (n) - Interrupt (0)0 - Not Active1 - Active
Notes: 1. w - Width of Data Bus
X-Ref Target - Figure 2-6
Figure 2-6: Clear Interrupt Enable (CIE) Register
Table 2-14: Clear Interrupt Enable Register Bit Definitions
Bits Name Reset Value Access Description
(w(1)-1):0 INT(n)-INT(0)(n<= w-1) 0x0 Read / Write
Interrupt (n) - Interrupt (0)0 - Not Active1 - Active
Notes: 1. w - Width of Data Bus
w-2w-1 012345
INT(4)
INT(n-1) - INT(5)
INT(2) INT(0)INT(n)
INT(3) INT(1)
Note: w - width of Data Bus
w-2w-1 012345
INT(4)
INT(n-1) - INT(5)
INT(2) INT(0)INT(n)
INT(3) INT(1)
Note: w - width of Data Bus
Send Feedback

AXI INTC v4.0 Product Guide www.xilinx.com 20PG099 October 2, 2013
Chapter 2: Product Specification
Interrupt Vector Register (IVR)The IVR is a read-only register and contains the ordinal value of the highest priority, enabled, and active interrupt input. INT0 (always the LSB) is the highest priority interrupt input and each successive input to the left has a correspondingly lower interrupt priority. If no interrupt inputs are active then the IVR contains all 1s. This IVR acts as an index for giving the correct Interrupt Vector Address along with IRQ. The Interrupt Vector Register (IVR) is shown in Figure 2-7 and described in Table 2-15
Master Enable Register (MER)This is a 2-bit, read / write register. The two bits are mapped to the two least signif icant bits of the location. The least signif icant bit contains the Master Enable (ME) bit and the next bit contains the Hardware Interrupt Enable (HIE) bit. Writing a 1 to the ME bit enables the Irq output signal. Writing a 0 to the ME bit disables the Irq output, effectively masking all interrupt inputs.
The HIE bit is a write-once bit. At reset, this bit is reset to 0, allowing the software to write to the ISR to generate hardware interrupts for testing purposes, and disabling any hardware interrupt inputs. Writing a 1 to this bit enables the hardware interrupt inputs and disables the software generated inputs. However, any software interrupts configured with C_NUM_SW_INTR remain writable. Writing a 1 also disables any further changes to this bit until the device has been reset. Writing 1s or 0s to any other bit location does nothing. When read, this register reflects the state of the ME and HIE bits. All other bits read as 0s. All other bits read as 0. The Master Enable Register (MER) is shown in Figure 2-8 and is described in Table 2-16.
X-Ref Target - Figure 2-7
Figure 2-7: Interrupt Vector Register (IVR)
Table 2-15: Interrupt Vector Register (IVR) Bit Definitions
Bits Name Reset Value Access Description
(w(1)-1):0 Interrupt Vector Number 0x0 Read Ordinal of highest priority, enabled,
active interrupt input
Notes: 1. w - Width of Data Bus
X-Ref Target - Figure 2-8
Figure 2-8: Master Enable Register (MER)
w-1 0
Note: w - width of Data BusInterrupt Vector Number
ReservedNote: w - width of Data Bus
1 0
HIE ME
Send Feedback

AXI INTC v4.0 Product Guide www.xilinx.com 21PG099 October 2, 2013
Chapter 2: Product Specification
Interrupt Mode Register (IMR)This register exists only when Enable Fast Interrupt Mode Logic is selected in the Customize IP dialog box in the Vivado Design Suite (parameter C_HAS_IMR). IMR register is used to set the interrupt mode of the connected interrupts. All the interrupts can be set in any mode by setting the corresponding interrupt bit position in IMR. Writing 0 to any bit position processes the corresponding interrupt in normal interrupt mode. Writing 1 to any bit position processes the corresponding interrupt in fast interrupt mode. Unused bit positions in the IMR register return zero. The Interrupt Mode Register (IMR) is shown in Figure 2-9 and is described in Figure 2-17.
Table 2-16: Master Enable Register Bit Definitions
Bits Name Reset Value Access Description
(w(1)-1):2 Reserved 0x0 N/A Reserved
1 HIE 0 Read / Write
Hardware Interrupt Enable0 = Read - Generating HW interrupts from SW enabledWrite - No effect1 = Read - HW interrupts enabledWrite - Enable HW interrupts
0 ME 0 Read / WriteMaster IRQ Enable0 = Irq disabled - All interrupts disabled1 = Irq enabled - All interrupts can be enabled
Notes: 1. w - Width of Data Bus
X-Ref Target - Figure 2-9
Figure 2-9: Interrupt Mode Register (IMR)
Table 2-17: Interrupt Mode Register (IMR) Bit Definitions
Bits Name Reset Value Access Description
(w(1)-1):0 INT(n)-INT(0) (n<= w-1) 0x0 Read / Write
Interrupt (n) - Interrupt (0)0 – Normal Interrupt mode1 – Fast Interrupt mode
Notes: 1. w - Width of Data Bus
w-1 0
Note: w - width of Data BusInterrupt Vector Number
Send Feedback

AXI INTC v4.0 Product Guide www.xilinx.com 22PG099 October 2, 2013
Chapter 2: Product Specification
Interrupt Vector Address Register (IVAR)These are 32-bit wide read/write registers and are specif ied by Number of Peripheral Interrupts + Number of Software Interrupts in the Customize IP dialog box in the Vivado Design Suite (parameters C_NUM_INTR_INPUTS and C_NUM_SW_INTR). The registers are only available when Enable Fast Interrupt Logic is selected (parameter C_HAS_FAST).
Each interrupt connected to the Interrupt controller has a unique Interrupt vector address that the processor jumps to for servicing that particular interrupt. In normal interrupt mode of operation (IMR(i) = 0), the interrupt vector addresses are taken by the drivers/application. In fast interrupt mode (IMR(i) = 1), the service routine address is driven by the interrupt controller along with the IRQ. IVAR registers are programmed with the corresponding peripheral interrupt vector address during software initialization.
These registers store the interrupt vector addresses of all the Number of Peripheral Interrupts + Number of Software Interrupts. Address of the interrupt with highest priority is transmitted out along with IRQ.
If not all the 32 interrupts are used, any read on the unused register address returns zero. Writing 1s or 0s to any bit location does nothing. The IVAR can be accessed through the AXI interface. IVAR registers are in the AXI clock domain and are used in the processor clock domain to give the INTERRUPT_ADDRESS along with IRQ. These are not synchronized to the processor clock domain. So, it is expected that writing to these registers should be done when ME is 0 (MER(0) = 0).
The Interrupt Vector Address Register (IVAR) is shown in Figure 2-10 and is described in Table 2-18.
X-Ref Target - Figure 2-10
Figure 2-10: Interrupt Vector Address Register (IVAR)
Table 2-18: Interrupt Vector Address Register (IVAR) Bit Definitions
Bits Name Reset Value Access Description
(w(1)-1):0 Interrupt Vector Address 0x0 Read / Write Interrupt vector address of the active
interrupt with highest priority
Notes: 1. w - Width of Data Bus
w-1 0
Note: w - width of Data BusInterrupt Vector Number
Send Feedback

AXI INTC v4.0 Product Guide www.xilinx.com 23PG099 October 2, 2013
Chapter 3
Designing with the Core
ClockingThe AXI INTC core uses the AXI clock in default mode. When the processor clock is connected, the interrupt output is synchronized to the processor clock.
ResetsThe AXI INTC uses axi_aresetn, which is active-Low. When the processor clock is connected, part of the AXI INTC logic gets reset through the processor_rst input signal.
Programming SequenceDuring power-up or reset, the AXI INTC core is put into a state where all interrupt inputs and the interrupt request output are disabled. In order for the AXI INTC core to accept interrupts and request service, the following steps are required:
1. Each bit in the IER corresponding to an interrupt must be set to 1. This allows the AXI INTC core to begin accepting interrupt input signals and software interrupts. INT0 has the highest priority, and it corresponds to the least significant bit (LSB) in the IER.
2. The MER must be programmed based on the intended use of the AXI INTC core. There are two bits in the MER: the Hardware Interrupt Enable (HIE) and the Master IRQ Enable (ME). The ME bit must be set to enable the interrupt request output.
3. If software testing of hardware interrupts is to be performed, the HIE bit must remain at its reset value of 0. Software testing can now proceed by writing a 1 to any bit position in the ISR that corresponds to an existing interrupt input. A corresponding interrupt request is generated if that interrupt is enabled, and interrupt handling proceeds normally.
4. After software testing of hardware interrupts has been completed, or if testing is not performed, a 1 is written to the HIE bit, which enables the hardware interrupt inputs and disables any further software generated hardware interrupts.
5. After 1 is written to the HIE bit, any further writes to this bit have no effect.
Send Feedback

AXI INTC v4.0 Product Guide www.xilinx.com 24PG099 October 2, 2013
Chapter 3: Designing with the Core
Cascade Mode InterruptThis functionality is enabled when the system needs more than 32 interrupts. A single instance of the AXI INTC can handle a maximum of 32 interrupts. Both Enable Cascade Interrupt Mode and Cascade Mode Master (parameters C_EN_CASCADE_MODE and C_CASCADE_MASTER), need to be set in this mode. In cascade mode, there are two or more AXI INTC instances in the system.
IMPORTANT: The 31st interrupt bit of the main AXI INTC instance must be used to cascade to the lower order AXI INTC instance.
Table 3-1 shows the parameter combination used for cascade mode.
Table 3-1: Parameter Combination and Use in Cascade Interrupt Mode
Enable Cascade Interrupt Mode
Cascade ModeMaster Mode of Operation for the AXI INTC Instances
0 0N/A. In this mode, there is no cascade interrupt feature available. Only one instance is allowed in system.
0 1N/A. Cascade Mode Master can be set only after Enable Cascade Interrupt Mode is set.
1 0
This is applicable only for the lower instance of the AXI INTC module. Depending on the parameter settings for this instance, the ports are connected to the primary or upstream instance of the AXI INTC core.Bit 31 of INTR is the cascaded interrupt bit. No other bits should be connected for use in cascade mode. (If there is such a connection, the particular INTR pin is treated as a general interrupt pin).
1 1
This is applicable only when cascade mode is enabled. The parameter settings are applicable to the primary instance of AXI INTC in the system.Bit 31 of INTR is the cascaded interrupt bit. No other bits can be connected for use in cascade mode.
Send Feedback

AXI INTC v4.0 Product Guide www.xilinx.com 25PG099 October 2, 2013
Chapter 3: Designing with the Core
Figure 3-1 shows how Cascade Mode interacts in a system.
Depending on the type of interrupt chosen, such as Standard Mode or Fast Interrupt Mode, additional signals are enabled with the core instances. These modes are defined as follows:
• Cascade Mode with Standard Interrupt: In this mode, there are no special ports enabled in the system.
• Cascade Mode with Fast Interrupt : In this mode, there are two new ports enabled with each instance of the core. These ports are interrupt_address_in and processor_ack_out.
See Port Descriptions for more information about these ports.
RECOMMENDED: For Cascade Mode interrupts, Xilinx recommends that all AXI INTC core instances are the same interrupt type, either Standard Mode or Fast Interrupt Mode.
Cascade Mode Interrupt BehaviorThe cascade mode of interrupts can be set by using the Enable Cascade Interrupt Mode and Cascade Mode Master parameters. As described in Table 3-1, there are three types of AXI INTC instantiations possible when cascade mode is considered.
X-Ref Target - Figure 3-1
Figure 3-1: Cascade Mode
Send Feedback

AXI INTC v4.0 Product Guide www.xilinx.com 26PG099 October 2, 2013
Chapter 3: Designing with the Core
The master instance of AXI INTC first addresses all interrupts set between INTR(0) to INTR(30). Then, it provides service only to the INTR(31) bit in the case of cascade mode.
TIP: The combination of Enable Cascade Interrupt Mode=0 and Cascade Mode Master=1 is not permitted, and Design Rule Check (DRC) errors are issued.
Enable Cascade Interrupt Mode = 1 and Cascade Mode Master = 1
This parameter set is intended only when there are more than 32 interrupts present in the system. Use this parameter combination for the first instance of the AXI INTC core which directly communicates with the processor. No other instances of AXI INTC should be allowed to communicate with the processor directly.
The first instance of AXI INTC is considered as Cascade Mode Master that directly communicates with the processor. The remaining AXI INTC instances are considered secondary instances.
Enable Cascade Interrupt Mode = 1 and Cascade Mode Master = 0
This parameter set is intended only when there are more than 32 interrupts present in the system. Use this parameter combination for the second and subsequent instances of the AXI INTC core that still have lower-level instances of AXI INTC. This core instance communicates with the top-level master AXI INTC instance as well as lower level instances of the core.
Enable Cascade Interrupt Mode = 0 and Cascade Mode Master = 0
This parameter set is intended for use only for the last instance of the AXI INTC core.
Setting the Enable Fast Interrupt Mode and MicroBlaze Clock Connected Parameters
RECOMMENDED: Assign Disable Synchronizers when the processor clock and core clock are different. All AXI INTC instances should receive the same AXI clock.
AXI INTC Use in Cascade Mode
RECOMMENDED: Use the same parameter configurations for all AXI INTC instances when used in Cascade Mode.
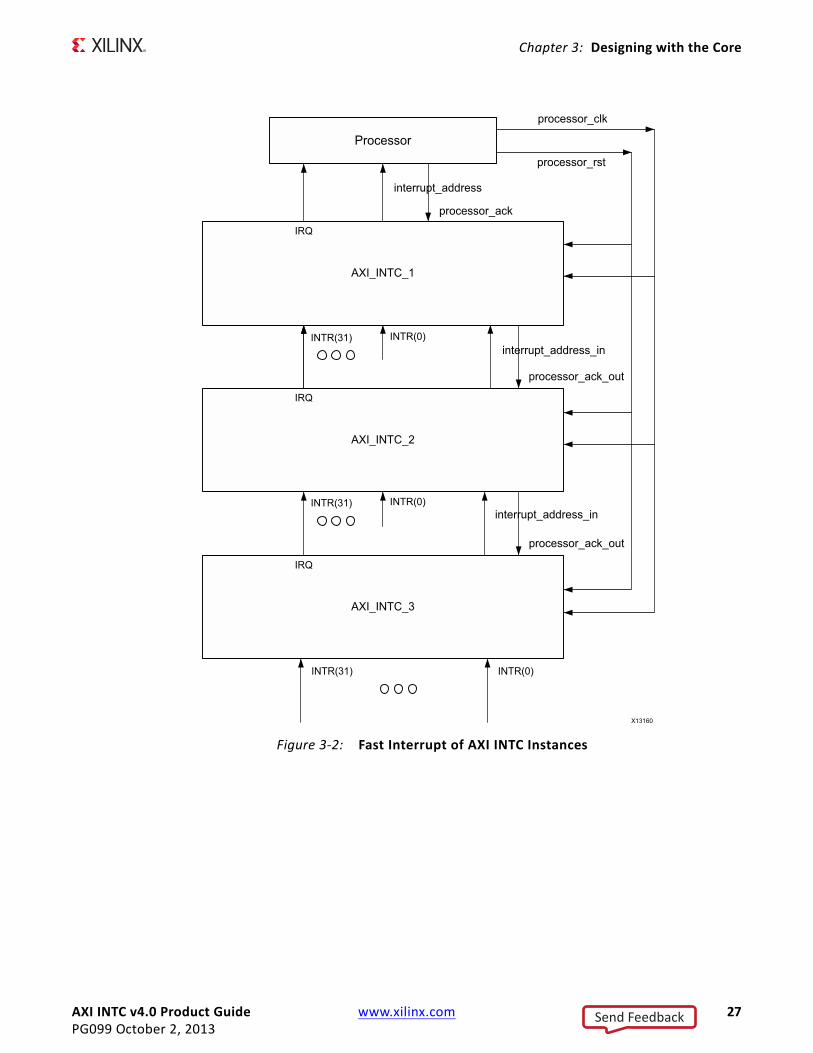
Figure 3-2 shows how the fast interrupt of AXI INTC instances is configured in a given system. This is one of the reference modes for using the core in a system.
Send Feedback
AXI INTC v4.0 Product Guide www.xilinx.com 27PG099 October 2, 2013
Chapter 3: Designing with the Core
X-Ref Target - Figure 3-2
Figure 3-2: Fast Interrupt of AXI INTC Instances
Send Feedback

AXI INTC v4.0 Product Guide www.xilinx.com 28PG099 October 2, 2013
Chapter 3: Designing with the Core
Timing DiagramsThe timing diagrams in this section illustrate the functionality of the core.
Figure 3-3 shows the timing diagram with the following core settings:
• Configured Input Interrupt (INTR) for edge sensitive (rising)
• Output Interrupt Request (IRQ) to level sensitive (active-High)
• Disabled fast interrupt logic
Figure 3-4 shows the timing diagram with the following core settings:
• Configured Input Interrupt (INTR) for Edge sensitive (rising)
• Output Interrupt Request (IRQ) to Edge sensitive (rising)
• Disabled fast interrupt logic.
X-Ref Target - Figure 3-3
Figure 3-3: Input - Rising Edge Sensitive, Output - High Level Sensitive
X-Ref Target - Figure 3-4
Figure 3-4: Input - Rising Edge Sensitive, Output - Rising Edge Sensitive, Fast Interrupt Logic Disabled
Send Feedback

AXI INTC v4.0 Product Guide www.xilinx.com 29PG099 October 2, 2013
Chapter 3: Designing with the Core
Figure 3-5 shows the timing diagram with the following core settings:
• Configured Input Interrupt (INTR) for Edge sensitive (rising)
• Enable fast interrupt logic
• Mode set to fast interrupt mode (IMR(i) = 1)X-Ref Target - Figure 3-5
Figure 3-5: Input - Rising Edge Sensitive, Fast Interrupt Logic Enabled and IMR(i) = 1
Send Feedback

AXI INTC v4.0 Product Guide www.xilinx.com 30PG099 October 2, 2013
Chapter 4
Customizing and Generating the CoreThis chapter includes information about how to customize and generate the core in the Vivado® Design Suite.
If you are customizing and generating the core in the Vivado IP Integrator, see the Vivado Design Suite User Guide: Designing IP Subsystems using IP Integrator (UG994) [Ref 3] for detailed information. IP Integrator might auto-compute certain configuration values when validating or generating the design. To check whether the values do change, see the description of the parameter in this chapter. To view the parameter value you can run the validate_bd_design command in the tcl console.
Vivado Integrated Design EnvironmentYou can customize the IP for use in your design by specifying values for the various parameters associated with the IP core using the following steps:
1. Select the IP from the IP catalog.
2. Double-click the selected IP or select the Customize IP command from the toolbar or popup menu.
For details, see the sections, “Working with IP” and “Customizing IP for the Design” in the Vivado Design Suite User Guide: Designing with IP (UG896) [Ref 1] and the “Working with the Vivado IDE” section in the Vivado Design Suite User Guide: Getting Started (UG910) [Ref 4].
Note: Figures in this chapter are illustrations of the AXI INTC core GUI in the Vivado Integrated Design Environment (IDE). This layout might vary from the current version.
Send Feedback

AXI INTC v4.0 Product Guide www.xilinx.com 31PG099 October 2, 2013
Chapter 4: Customizing and Generating the Core
Basic TabThe parameters in the Basic tab are shown in Figure 4-1 and are described in this section.
Number of Peripheral Interrupts
This option enables selection of number of peripheral interrupt inputs. In IP Integrator, this value is automatically determined from the number of connected interrupt signals.
Enable Fast Interrupt Logic
This option enables AXI INTC to work in Fast Interrupt mode. In this mode, AXI INTC acknowledges an interrupt through Processor_ack signal.
Peripheral Interrupts Type
Interrupts type - Edge or Level
This option is used to set the input interrupts to be either Edge or Level type.
• 0 - Level
• 1 - Edge
X-Ref Target - Figure 4-1
Figure 4-1: AXI INTC Basic Tab
Send Feedback

AXI INTC v4.0 Product Guide www.xilinx.com 32PG099 October 2, 2013
Chapter 4: Customizing and Generating the Core
Width of this f ield is equal to Number of Peripheral Interrupts selected. This 32-bit f ield is directly mapped to interrupt inputs. For example, bit0 setting affects Intr(0), bit31 setting affects Intr(31), and so on.
In IP Integrator, this value is normally automatically determined from the connected interrupt signals, but can be set manually if necessary.
Level type - High or Low
This option is used to set the input Level type interrupts to be either High or Low.
• 0 - Low
• 1 - High
Width of this f ield is equal to Number of Peripheral Interrupts selected. This 32-bit f ield is directly mapped to interrupt inputs. For example, bit0 setting affects Intr(0), bit31 setting affects Intr(31), and so on.
In IP Integrator, this value is normally automatically determined from the connected interrupt signals, but can be set manually if necessary.
Edge type - Rising or Falling
This option is used to set the input Edge type interrupts to be either Rising or Falling edge.
• 0 - Falling edge
• 1 - Rising edge
Width of this f ield is equal to Number of Peripheral Interrupts selected. This 32-bit f ield is directly mapped to interrupt inputs. For example, bit0 setting affects Intr(0), bit31 setting affects Intr(31), and so on.
In IP Integrator, this value is normally automatically determined from the connected interrupt signals, but can be set manually if necessary.
Processor Interrupt Type
Interrupt type
This option is used to set the output interrupt to be either Edge or Level type.
• 0 - Level
• 1 - Edge
Send Feedback

AXI INTC v4.0 Product Guide www.xilinx.com 33PG099 October 2, 2013
Chapter 4: Customizing and Generating the Core
Level type
This option is used to set the output Level type interrupts to be either High or Low. It is shown when Interrupt type is set to Level.
• 0 - Active-Low
• 1 - Active-High
Edge type
This option is used to set the output Edge type interrupts to be either Rising or Falling edge. It is shown when Interrupt type is set to Edge.
• 0 - Falling edge
• 1 - Rising edge
Advanced TabThe parameters in the Advanced tab are shown in Figure 4-2 and are described in this section.
X-Ref Target - Figure 4-2
Figure 4-2: AXI INTC Advanced Tab
Send Feedback

AXI INTC v4.0 Product Guide www.xilinx.com 34PG099 October 2, 2013
Chapter 4: Customizing and Generating the Core
Enable Set Interrupt Enable Register
Setting this option includes Set Interrupt Enable Register.
Enable Clear Interrupt Enable Register
Setting this option includes Clear Interrupt Enable Register.
Enable Interrupt Vector Register
Setting this option includes Interrupt Vector Register.
Enable Interrupt Pending Register
Setting this option includes Interrupt Pending Register.
Enable Cascade Interrupt Mode
Setting this option enables AXI INTC in cascade mode.
Cascade Mode Master
Setting this option enables AXI INTC as a cascade mode master.
Enable Asynchronous Clock Operation
Enabling this option allows the AXI clock and processor clk to run asynchronously.
• Check box selected - asynchronous mode
• Check box not selected - synchronous mode
In IP Integrator, this value is automatically determined depending on the connected clocks, but the user can override the value if necessary.
Number of Software Interrupts
This option enables selection of number of software interrupts. The maximum number of interrupts, Number of Peripheral Interrupts + Number of Software Interrupts, is 32.
Output GenerationFor details, see “Generating IP Output Products” in the Vivado Design Suite User Guide: Designing with IP (UG896) [Ref 1].
Send Feedback

AXI INTC v4.0 Product Guide www.xilinx.com 35PG099 October 2, 2013
Chapter 5
Constraining the CoreThere are no constraints associated with this core.
Send Feedback

AXI INTC v4.0 Product Guide www.xilinx.com 36PG099 October 2, 2013
Chapter 6
SimulationFor comprehensive information about Vivado® simulation components, as well as information about using supported third party tools, see the Vivado Design Suite User Guide: Logic Simulation (UG900) [Ref 5].
Send Feedback

AXI INTC v4.0 Product Guide www.xilinx.com 37PG099 October 2, 2013
Chapter 7
Synthesis and ImplementationFor details about synthesis and implementation in the Vivado® Design Suite, see “Synthesizing IP” and “Implementing IP” in the Vivado Design Suite User Guide: Designing with IP (UG896) [Ref 1].
Send Feedback

AXI INTC v4.0 Product Guide www.xilinx.com 38PG099 October 2, 2013
Appendix A
Migrating and UpgradingThis appendix contains information about migrating a design from ISE® to the Vivado® Design Suite, and for upgrading to a more recent version of the IP core. For customers upgrading in the Vivado Design Suite, important details (where applicable) about any port changes and other impact to user logic are included.
Migrating to the Vivado Design SuiteFor information on migrating from the Xilinx ISE® Design Suite tools to the Vivado® Design Suite, see the ISE to Vivado Design Suite Migration Guide (UG911) [Ref 6].
Upgrading in the Vivado Design SuiteThis section provides information about any changes to the user logic or port designations that take place when you upgrade to a more current version of this IP core in the Vivado Design Suite.
When upgrading to AXI Interrupt Controller v4.0, the ports processor_clk and processor_rst are disabled when C_HAS_FAST is not set, because they are not needed in this case, and should not be connected.
Send Feedback

AXI INTC v4.0 Product Guide www.xilinx.com 39PG099 October 2, 2013
Appendix B
DebuggingThis appendix includes details about resources available on the Xilinx Support website and debugging tools.
Finding Help on Xilinx.comTo help in the design and debug process when using the AXI INTC, the Xilinx Support web page (www.xilinx.com/support) contains key resources such as product documentation, release notes, answer records, information about known issues, and links for obtaining further product support.
DocumentationThis product guide is the main document associated with the AXI INTC core. This guide, along with documentation related to all products that aid in the design process, can be found on the Xilinx Support web page (www.xilinx.com/support) or by using the Xilinx Documentation Navigator.
Download the Xilinx Documentation Navigator from the Design Tools tab on the Downloads page (www.xilinx.com/download). For more information about this tool and the features available, open the online help after installation.
Answer RecordsAnswer Records include information about commonly encountered problems, helpful information on how to resolve these problems, and any known issues with a Xilinx product. Answer Records are created and maintained daily ensuring that users have access to the most accurate information available.
Answer Records for this core a can be located using the Search Support box on the main Xilinx support web page. To maximize your search results, use proper keywords such as
• Product name
• Tool messages
• Summary of the issue encountered
Send Feedback

AXI INTC v4.0 Product Guide www.xilinx.com 40PG099 October 2, 2013
Appendix B: Debugging
A filter search is available after results are returned to further target the results.
Master Answer Record for the AXI INTC
AR: 54423
Contacting Technical SupportXilinx provides technical support at www.xilinx.com/support for this LogiCORE™ IP product when used as described in the product documentation. Xilinx cannot guarantee timing, functionality, or support of product if implemented in devices that are not defined in the documentation, if customized beyond that allowed in the product documentation, or if changes are made to any section of the design labeled DO NOT MODIFY.
To contact Xilinx Technical Support:
1. Navigate to www.xilinx.com/support.
2. Open a WebCase by selecting the WebCase link located under Additional Resources.
When opening a WebCase, include:
• Target FPGA including package and speed grade.
• All applicable Xilinx Design Tools and simulator software versions.
• Additional f iles based on the specif ic issue might also be required. See the relevant sections in this debug guide for guidelines about which f ile (or f iles) to include with the WebCase.
Note: Access to WebCase is not available in all cases. Login to the WebCase tool to see your specif ic support options.
Send Feedback

AXI INTC v4.0 Product Guide www.xilinx.com 41PG099 October 2, 2013
Appendix B: Debugging
Debug ToolsThere are many tools available to debug AXI INTC design issues. This section indicates which tools are useful for debugging the various situations encountered.
Vivado Lab ToolsVivado® lab tools inserts logic analyzer and virtual I/O cores directly into your design. Vivado lab tools allow you to set trigger conditions to capture application and integrated block port signals in hardware. Captured signals can then be analyzed. This feature represents the functionality in the Vivado IDE that is used for logic debugging and validation of a design running in Xilinx devices in hardware.
The Vivado lab tools logic analyzer is used to interact with the logic debug LogiCORE IP cores, including:
• ILA 2.0 (and later versions)
• VIO 2.0 (and later versions)
See Vivado Design Suite User Guide: Programming and Debugging (UG908) [Ref 7].
Interface Debug
AXI4-Lite InterfacesRead from a register that does not have all 0s as a default to verify that the interface is functional. Output s_axi_arready asserts when the read address is valid, and output s_axi_rvalid asserts when the read data/response is valid. If the interface is unresponsive, ensure that the following conditions are met:
• The s_axi_aclk input is connected and toggling.
• The interface is not being held in reset, and s_axi_aresetn is an active-Low reset.
• The main core clocks are toggling and that the enables are also asserted.
• All required interrupts are connected to the INTR input of the core and the IRQ (and other Fast Mode signals) are tied to the interrupt interface of the processor.
• The AXI INTC core is configured properly for the target application.
To debug the AXI INTC core, read all the application registers of the core to verify that all are functioning correctly.
Send Feedback
AXI INTC v4.0 Product Guide www.xilinx.com 42PG099 October 2, 2013
Appendix C
Additional Resources
Xilinx ResourcesFor support resources such as Answers, Documentation, Downloads, and Forums, see the Xilinx Support website at:
www.xilinx.com/support
For a glossary of technical terms used in Xilinx documentation, see:
www.xilinx.com/company/terms.htm
ReferencesThese documents provide supplemental material useful with this product guide:
1. Vivado® Design Suite User Guide: Designing With IP (UG896)
2. AXI Reference Guide (UG761)
3. Vivado Design Suite User Guide: Designing IP Subsystems Using IP Integrator (UG994)
4. Vivado Design Suite User Guide: Getting Started (UG910)
5. Vivado Design Suite User Guide - Logic Simulation (UG900)
6. ISE® to Vivado Design Suite Migration Guide (UG911)
7. Vivado Design Suite User Guide: Programming and Debugging (UG908)
Send Feedback

AXI INTC v4.0 Product Guide www.xilinx.com 43PG099 October 2, 2013
Appendix C: Additional Resources
Revision HistoryThe following table shows the revision history for this document.
Notice of DisclaimerThe information disclosed to you hereunder (the “Materials”) is provided solely for the selection and use of Xilinx products. To the maximum extent permitted by applicable law: (1) Materials are made available “AS IS” and with all faults, Xilinx hereby DISCLAIMS ALL WARRANTIES AND CONDITIONS, EXPRESS, IMPLIED, OR STATUTORY, INCLUDING BUT NOT LIMITED TO WARRANTIES OF MERCHANTABILITY, NON-INFRINGEMENT, OR FITNESS FOR ANY PARTICULAR PURPOSE; and (2) Xilinx shall not be liable (whether in contract or tort, including negligence, or under any other theory of liability) for any loss or damage of any kind or nature related to, arising under, or in connection with, the Materials (including your use of the Materials), including for any direct, indirect, special, incidental, or consequential loss or damage (including loss of data, profits, goodwill, or any type of loss or damage suffered as a result of any action brought by a third party) even if such damage or loss was reasonably foreseeable or Xilinx had been advised of the possibility of the same. Xilinx assumes no obligation to correct any errors contained in the Materials or to notify you of updates to the Materials or to product specifications. You may not reproduce, modify, distribute, or publicly display the Materials without prior written consent. Certain products are subject to the terms and conditions of the Limited Warranties which can be viewed at http://www.xilinx.com/warranty.htm; IP cores may be subject to warranty and support terms contained in a license issued to you by Xilinx. Xilinx products are not designed or intended to be fail-safe or for use in any application requiring fail-safe performance; you assume sole risk and liability for use of Xilinx products in Critical Applications: http://www.xilinx.com/warranty.htm#critapps.© Copyright 2012 - 2013 Xilinx, Inc. Xilinx, the Xilinx logo, Artix, ISE, Kintex, Spartan, Virtex, Vivado, Zynq, and other designated brands included herein are trademarks of Xilinx in the United States and other countries. AMBA, AMBA Designer, ARM, ARM1176JZ-S, CoreSight, Cortex, and PrimeCell are trademarks of ARM in the EU and other countries. All other trademarks are the property of their respective owners.
Date Version Revision
12/18/2012 1.0• Initial product guide release. Replaces LogiCORE IP AXI INTC Data Sheet
(DS747).• Added Cascade Mode.
3/20/2013 2.0• Updated for core v3.0 and Vivado Design Suite only support.• Updated signal names, and timing diagrams.
6/19/2013 3.1• Updated for core v3.1.• Added description of software interrupt.
10/02/2013 4.0• processor_clk and processor_rst pins hidden when fast interrupt is not enabled• synchronization flip-flops added on asynchronous interrupt inputs.
Send Feedback


