Be careful, some transmitters offer better resolution than others. If your ESC will not respond to “Neutral” throttle, make this setting larger.
Setting 1: Large—0.1500 ms
Setting 2: Normal—0.1000 ms (Default)
Setting 3: Small—0.0750 ms
Setting 4: Very Small—0.0500 ms
Setting 5: Smallest—0.0250 ms
7. Cutoff Voltage Sets the voltage at which the ESC lowers or removes power to the motor in order to either keep the battery at a safe minimum voltage (Lithium Polymer cells) or the radio system working reliably (NiCad/NiMH cells).
Setting 1: None Does not cut off or limit the motor due to low voltage. Do not use with any Lithium Polymer packs.
Applications: Any racing or bashing situation with 6–8 cell NiCad or NiMH packs.
Use this setting ONLY with NiCad or NiMH packs. With continued driving, the radio system may eventually cease to deliver pulses to the servo and ESC, potentially causing the vehicle to lose control.
You will irreversibly damage Lithium Polymer packs with this setting.
Setting 2: Auto-LiPo (Default) This setting automatically detects the number of LiPo cells you have plugged in. It will automatically set the cut-off to 3.2 volts per cell. It will beep the number of cells in your LiPo pack between the initialization tones and the arming tones on initial power up the controller.
Setting 3: 5V Cuts off/limits the motor speed/acceleration when the pack gets down to 5 volts. A good setting for racing or bashing in any vehicle using 8–12 NiMH or NiCad packs.
Setting 4: 6V Cuts off/limits acceleration when the pack gets down to 6 volts.
A MUST USE setting for 2-cell (7.4V) Lithium Polymer packs. You will irreversibly damage your packs using a lower cutoff voltage.
Setting 5: 9V Cuts off/limits acceleration when the pack gets down to 9 volts.
A MUST USE setting for 3-cell (11.1V) Lithium Polymer packs. You will irreversibly damage your packs using a lower cutoff voltage.
Setting 6: 12V Cuts off/limits acceleration when the pack gets down to 12 volts.
A MUST USE setting for 4-cell (14.8V) Lithium Polymer packs. You will irreversibly damage your packs using a lower cutoff voltage. Use of a 4-cell LiPo pack is covered under warranty ONLY on Monster Max ESCs.
8. Motor Timing Advancing the timing on an electric motor can have varying effects. Lowering the timing advance will reduce the amp draw, increase runtime, reduce motor/battery temperature, and may slightly reduce top speed and punch. Raising the timing advance will increase amp draw, decrease runtime, increase motor/battery temperature, and may slightly increase top speed and punch.
If you are after maximum top speed, it’s better to “gear up” to get it rather than advance the timing too far.
For brushed motors, always keep this setting on NORMAL and use the end bell of the motor to “tweak” it to max RPM per the motor’s instructions.
Setting 1: Lowest A maximum efficiency setting giving long runtimes and cooler motor temps. Very useful with high Kv (low turn) motors to increase motor life and reduce motor/battery temperatures.
Setting 2: Normal (Default) The best mix of speed, punch and efficiency for all motors.
Setting 3: Highest Increases amp draw, reduces runtimes, increases motor/battery temperatures and may increase top speed/punch slightly.
Use with care and monitor motor and battery temps often. DO NOT use any setting above “normal” with 6000Kv or higher motors.
9. Motor Type This setting sets which type of motor you will be using with the Losi ESC. The ESC may be damaged if this setting does not match the motor type/hook-up method in the car, and this damage is not covered under warranty.
Setting 1: Brushless (Default) (See Brushless Motor Setup section) Uses all three of the ESC motor wires connected to all three of the brushless motor wires. If the motor spins the wrong way with forward throttle, swap any two of the wires
to get the correct direction.
Setting 2: Brushed Reversing (See Reversing Brushed Motor Setup section) Uses the Red and Black ESC motor wires to connect to the (+) and (-) side of the brushed motor. If the motor spins in the wrong direction with forward throttle, reverse the motor wires for correct motor direction.
Setting 3: Brushed High Power (See High Power Brushed Motor Setup section) Connect all three of the ESC motor wires to the negative (-) side of the motor. You can either use a “Y” harness from the ESC battery input positive wire to connect to both the battery and the positive side of the motor, or use a single wire from the positive ESC input to the positive battery pole and then continue to the positive (+) side of the motor.
TroubleshootingIf you’re still having difficulties with your Losi ESC after trying the suggestions offered here, please contact Losi Service Center at the e-mail or phone number listed below.
Problem: My Losi ESC may or may not arm, but it will not calibrate to my transmitter.
Solution: Most calibration issues can be solved by changing settings on the transmitter. Make sure you have both your throttle and brake endpoints (called EPA or ATV on your radio) on the throttle channel out to between 100 to 120%. Make sure if you have a Futaba or Futaba made transmitter to have the throttle channel set to the reversed position.
Problem: My ESC calibrates for the full throttle and full brake positions, but won’t calibrate to the neutral throttle position (yellow LED keeps flashing).
Solution: Try moving the throttle trim one way, then the other (usually towards the throttle side is best). If your transmitter has a 50/50 and 70/30 setting for the throttle, set it for 50/50 and retry calibration. Also, if you have changed the dead band to a narrower band you may want to try going back to the “normal” setting.
Problem: My vehicle acts like it has “turbo lag” (poor acceleration/punch for the first few feet or yards, and then it “kicks in”).
Solution: Make sure you’re using high quality batteries and a battery connector capable of high amp flow (40–100 amps). This behavior is very typical of a battery pack that is having difficulty providing the power your vehicle/system requires for top performance.
Use copper bars to connect cells rather than welded tabs. Copper bars have a much lower resistance.
Problem: My battery pack is plugged into the ESC and nothing is working - no steering and no throttle.
Solution: Make sure the ESC’s receiver plug is plugged into channel 2 on the receiver, and that it’s plugged in with the correct orientation. Double check your solder connections on the battery plug, and make sure the battery is showing good voltage.
LIMITED WARRANTY What this Warranty Covers Horizon Hobby, Inc. (“Horizon”) warrants to the original purchaser that the product purchased (the "Product") will be free from defects in materials and workmanship at the date of purchase.
What is Not Covered This warranty is not transferable and does not cover (i) cosmetic damage, (ii) damage due to acts of God, accident, misuse, abuse, negligence, commercial use, or due to improper use, installation, operation or maintenance, (iii) modification of or to any part of the Product, (iv) attempted service by anyone other than a Horizon Hobby authorized service center, or (v) Products not purchased from an authorized Horizon dealer. OTHER THAN THE EXPRESS WARRANTY ABOVE, HORIZON MAKES NO OTHER WARRANTY OR REPRESENTATION, AND HEREBY DISCLAIMS ANY AND ALL IMPLIED WARRANTIES, INCLUDING, WITHOUT LIMITATION, THE IMPLIED WARRANTIES OF NON-INFRINGEMENT, MERCHANTABILITY AND FITNESS FOR A PARTICULAR PURPOSE. THE PURCHASER ACKNOWLEDGES THAT THEY ALONE HAVE DETERMINED THAT THE PRODUCT WILL SUITABLY MEET THE REQUIREMENTS OF THE PURCHASER’S INTENDED USE.
Purchaser’s Remedy Horizon’s sole obligation and purchaser’s sole and exclusive remedy shall be that Horizon will, at its option, either (i) service, or (ii) replace, any Product determined by Horizon to be defective. Horizon reserves the right to inspect any and all Product(s) involved in a warranty claim. Service or replacement decisions are at the sole discretion of Horizon. Proof of purchase is required for all warranty claims. SERVICE OR REPLACEMENT AS PROVIDED UNDER THIS WARRANTY IS THE PURCHASER’S SOLE AND EXCLUSIVE REMEDY.
Limitation of Liability HORIZON SHALL NOT BE LIABLE FOR SPECIAL, INDIRECT, INCIDENTAL OR CONSEQUENTIAL DAMAGES, LOSS OF PROFITS OR PRODUCTION OR
COMMERCIAL LOSS IN ANY WAY, REGARDLESS OF WHETHER SUCH CLAIM IS BASED IN CONTRACT, WARRANTY, TORT, NEGLIGENCE, STRICT LIABILITY OR ANY OTHER THEORY OF LIABILITY, EVEN IF HORIZON HAS BEEN ADVISED OF THE POSSIBILITY OF SUCH DAMAGES. Further, in no event shall the liability of Horizon exceed the individual price of the Product on which liability is asserted. As Horizon has no control over use, setup, final assembly, modification or misuse, no liability shall be assumed nor accepted for any resulting damage or injury. By the act of use, setup or assembly, the user accepts all resulting liability. If you as the purchaser or user are not prepared to accept the liability associated with the use of the Product, purchaser is advised to return the Product immediately in new and unused condition to the place of purchase.
Law These terms are governed by Illinois law (without regard to conflict of law principals). This warranty gives you specific legal rights, and you may also have other rights which vary from state to state. Horizon reserves the right to change or modify this warranty at any time without notice.
WARRANTY SERVICES
Questions, Assistance, and ServicesYour local hobby store and/or place of purchase cannot provide warranty support or service. Once assembly, setup or use of the Product has been started, you must contact your local distributor or Horizon directly. This will enable Horizon to better answer your questions and service you in the event that you may need any assistance. For questions or assistance, please direct your email to [email protected], or call 877.504.0233 toll free to speak to a Product Support representative. You may also find information on our website at www.horizonhobby.com.
Inspection or Services If this Product needs to be inspected or serviced, please use the Horizon Online Service Request submission process found on our website or call Horizon to obtain a Return Merchandise Authorization (RMA) number. Pack the Product securely using a shipping carton. Please note that original boxes may be included, but are not designed to withstand the rigors of shipping without additional protection. Ship via a carrier that provides tracking and insurance for lost or damaged parcels, as Horizon is not responsible for merchandise until it arrives and is accepted at our facility. An Online Service Request is available at http://www.horizonhobby.com under the Support tab. If you do not have internet access, please contact Horizon Product Support to obtain a RMA number along with instructions for submitting your product for service. When calling Horizon, you will be asked to provide your complete name, street address, email address and phone number where you can be reached during business hours. When sending product into Horizon, please include your RMA number, a list of the included items, and a brief summary of the problem. A copy of your original sales receipt must be included for warranty consideration. Be sure your name, address, and RMA number are clearly written on the outside of the shipping carton.
NoTICE: Do not ship LiPo batteries to Horizon. If you have any issue with a LiPo battery, please contact the appropriate Horizon Product Support office.
Warranty Requirements For Warranty consideration, you must include your original sales receipt verifying the proof-of-purchase date. Provided warranty conditions have been met, your Product will be serviced or replaced free of charge. Service or replacement decisions are at the sole discretion of Horizon.
Non-Warranty Service Should your service not be covered by warranty service will be completed and payment will be required without notification or estimate of the expense unless the expense exceeds 50% of the retail purchase cost. By submitting the item for service you are agreeing to payment of the service without notification. Service estimates are available upon request. You must include this request with your item submitted for service. Non-warranty service estimates will be billed a minimum of ½ hour of labor. In addition you will be billed for return freight. Horizon accepts money orders and cashiers checks, as well as Visa, MasterCard, American Express, and Discover cards. By submitting any item to Horizon for service, you are agreeing to Horizon’s Terms and Conditions found on our website http://www.horizonhobby.com/Service/Request/.
Compliance Information for the European Union
Declaration of Conformity (in accordance with ISO/IEC 17050-1)
No. HH2011110302 Product(s): LOS TEN-SCTE RTR ESC Item Number(s): LOSB9504
The object of declaration described above is in conformity with the requirements of the specifications listed below, following the provisions of the European EMC Directive 2004/108/EC:
EN61000-6-1:2007 EN61000-6-3:2007
Signed for and on behalf of: Horizon Hobby, Inc. Champaign, IL USA Nov 3, 2011
Instructions for Disposal of WEEE by Users in the European UnionThis product must not be disposed of with
other waste. Instead, it is the user’s responsibility to dispose of their waste equipment by handing it over to a designated collection point for the recycling of waste electrical and electronic equipment. The separate collection and recycling of your waste equipment at the time of disposal will help to conserve natural resources and ensure that it is recycled in a manner that protects human health and the environment. For more information about where you can drop off your waste equipment for recycling, please contact your local city office, your household waste disposal service or where you purchased the product.
LoSB9504 MSC-MXPRo BRUSHLESS ESC
NoTICE
All instructions, warranties and other collateral documents are subject to change at the sole discretion
of Horizon Hobby, Inc. For up-to-date product literature, visit www.horizonhobby.com and click on
the support tab for this product.
Meaning of Special Language
The following terms are used throughout the product literature to indicate various levels of potential harm when operating this product:
NoTICE: Procedures, which if not properly followed, create a possibility of physical property damage AND little or no possibility of injury.
CAUTIoN: Procedures, which if not properly followed, create the probability of physical property damage AND a possibility of serious injury.
WARNING: Procedures, which if not properly followed, create the probability of property damage, collateral damage, and serious injury OR create a high probability of superficial injury.
WARNING: Read the ENTIRE instruction manual to become familiar with the features of the
product before operating. Failure to operate the product correctly can result in damage to the product, personal property and cause serious injury.
This is a sophisticated hobby product and NOT a toy. It must be operated with caution and common sense and requires some basic mechanical ability. Failure to operate this Product in a safe and responsible manner could result in injury or damage to the product or other property. This product is not intended for use by children without direct adult supervision. Do not attempt disassembly, use with incompatible components or augment product in any way without the approval of Horizon Hobby, Inc. This manual contains instructions for safety, operation and maintenance. It is essential to read and follow all the instructions and warnings in the manual, prior to assembly, setup or use, in order to operate correctly and avoid damage or serious injury.
Age Recommendation• Not for Children under 14 years.
This is not a toy.
Features• Easy calibration
• Compact footprint
• Pre-wired with EC3™ battery plug
• Low-Voltage Cutoff for 2S 7.4V Li-Po, Ni-MH and Ni-Cd battery packs
• Forward/Brake function for racing and Forward/Brake/Reverse function for sport driving
• Adjustable drag brake
• ROAR Legal for Non-Timing Spec Classes
SpecificationsMotor Type Sensored and Sensorless
BrushlessLow-Voltage Cutoff Automatic DetectionInput Voltage LiPo 2–4S or 8.4V–16.8VFull on Resistance .0018 OhmMotor Limit 4.5T 550 SensoredMotor output 13AWG Lead AWG Motor Connector 4.0mm Bullet PlugBattery Input 13AWG Lead AWG Battery Connector EC3™ TypeDimensions 45.5 x 36.5 x 21.5mm
(1.79 x 1.44 x .85 in)Weight 81 g (2.8 oz) (without wires)BEC output 5.5–7.0V
Power WiringYour ESC has motor connectors on the motor wires and the battery input wires.
Proper polarity is essential. Make absolutely certain that positive (+) connects to positive (+), and negative (-) connects to negative (-) when you plug in your battery. If reverse polarity is applied to your ESC from the battery, it WILL damage your ESC. This WILL NOT be covered under warranty.
ConnectionsBrushless Motor Wiring For brushless motor connection, the three wires from the ESC to the motor have no polarity. Connect the red, white and black motor wires to the three wires coming from the motor. If you are using a motor other than a Losi LOSB9444 motor, you may need to either solder on matching male bullet plugs to your motor, or solder the ESC wires directly to the motor wires.
Since there is no polarity on the three ESC-to-motor wires, do not worry about how you connect them initially. You may find it necessary to swap two wires if the motor runs in reverse. This will be explained later.
Connectcontrollerand motor
usingsupplied
connectors
Connectto throt tle
channel
Steering Servoin CH1
Losi ESCin CH2
Receiver
Bat teryPack
Use a high qualityconnector only
On/OffSwitch
SteeringServo
BrushlessMotor
MSC-MXPRO ESC
Brushed Motor Wiring Reversing Brushed Motor Mode: Use this mode if you wish to use reverse. Use only the red and black motor wires from the ESC. In most applications, the red wire from the ESC will connect to the red wire (or positive (+) side hood) on your motor, and the black wire to the black wire (or negative (–) side hood) of the motor. The white motor wire is not used. After calibration (explained below), you may need to swap the two motor wires to get the wheels to spin in the desired direction.
Black ESCmotor wire
to Motor (-)
White motorwire not used
Red ESCmotor wireto Motor (+)
Connectto throttlechannel
Steering Servoin CH1
Losi ESCin CH2
Receiver
BatteryPack
Use a high qualityconnector only
On/OffSwitch
SteeringServo
MSC-MXPRO ESC
BrushedMotor
High Power Brushed Motor Mode: (See Figure 3: High Power Brushed Motor Setup) Connect all three of the ESC motor wires to the negative (-) side of the motor. You can either use a “Y” harness from the ESC battery input positive wire to connect to both the battery and the positive side of the motor, or use a single wire from the positive ESC input to the positive battery pole and then continue to the positive (+) side of the motor.
Battery (+)to
Motor (+)Motor
Tab(+)
MotorTab(-)
All ESCmotor wiresto Motor (-)
Connect tothrottlechannel
Steering Servoin CH1
Losi ESCin CH2
Receiver
BatteryPack
Use a high qualityconnector only
On/OffSwitch
SteeringServo
BrushedMotor
MSC-MXPRO ESC
Radio ConnectionYour Losi ESC plugs into the throttle channel of your receiver. This is usually channel 2. Your Losi ESC provides 5 volts to the receiver to power the receiver and the steering servo. No separate receiver battery is needed to power the radio system.
Losi ESC receiver plugs are made to be used with any receiver, so you will need to make sure the polarity is correct. The signal wire is orange, the positive wire is red and the negative is brown. Some radio systems use the white for signal, red for positive and black for negative color scheme. Check your receiver documentation for correct connection polarity if it’s not marked. (Most receivers use negative to the outside of the case and signal towards the inside of the case.)
ESC SetupESC/Radio Calibration Individual transmitter’s signals for neutral, full and full brake vary. You must calibrate the ESC so that it will operate most effectively with your transmitter. Anytime the ESC is powered up with a new transmitter or with different throttle channel settings, it will need to be calibrated to “know” what the transmitter’s throttle settings are. It will also need to be calibrated after updating with new software via Castle Link.
If you are using a Futaba or Futaba OEM brand transmitter, you will need to set the transmitter’s throttle channel direction to the REVERSE (Rev) position. This is either an external micro switch on the transmitter or an
option available within the computer programming of the transmitter’s throttle channel.
Please start by zeroing out any throttle trim that you may have set in your transmitter.
Don’t plug in the battery yet. Make sure that the battery polarity and input polarity on the ESC are correct. Check the on/off switch of the Losi ESC to make sure that it is in the OFF position (“ON” is marked in small letters on one side).
We recommend removing your pinion gear before calibration as a safety precaution.
How to Calibrate the ESCSTEP 1: Start with the transmitter ON and the ESC switched OFF and not connected to the battery.
STEP 2: Plug a battery into your Losi ESC.
STEP 3: Hold full throttle on the transmitter and turn the ESC’s switch ON. Keep holding full throttle on the transmitter. If all your connections are correct, you will hear one multi-toned initialization “ring” from the motor (all tones are played by the ESC vibrating the motor).
STEP 4: After a second or two, the green LED on the ESC will blink rapidly and the motor will “ring” 4 times rapidly in a row (accepting the full throttle endpoint). After the green LED flashes and tones, the red LED on the ESC will blink. At this point, the full throttle endpoint has been set within the ESC and now it’s looking for the full brake endpoint (red LED blinking).
STEP 5: Move the throttle trigger to the full brake position and hold full brake. After a few seconds, the red LED on the ESC will flash and ring 4 times rapidly (accepting full brake endpoint).
STEP 6: After accepting the full brake endpoint, the yellow LED on the ESC will blink. Relax the trigger to the neutral position. The ESC will now ring 4 times and flash the yellow LED rapidly to accept the neutral position.
After accepting the neutral position, the ESC will ring twice and all the LEDs will flash. This is the arming tone and LED indication that the ESC is now ARMED and the car will respond to throttle inputs from your transmitter.
From this point on, when you connect the battery and turn the switch on, the ESC will give the initialization tone and flash. Then the arming tone will ring a second or two later. If the ESC is programmed for the Auto-LiPo setting, it will beep the number of cells in your LiPo pack between the initialization tones and the arming tones. After the arming tone plays, the ESC is ACTIVE and will respond to throttle application.
If you have problems calibrating your transmitter with the Losi ESC, please contact the appropriate Horizon Hobby Service Center. Once you are calibrated and armed, do one last check before going out and experiencing the Losi brushless difference. Slowly advance the throttle and check the rotation direction of the motor and the color of the LEDs on the ESC. If the motor is spinning in the right direction and the GREEN LED is blinking, then you are ready for a test run before going into the settings of the ESC. If the ESC displays the green LED with throttle but the wheels spin in the wrong direction, you’ll need to switch any two of the motor wires (example: switch from red to red and black to black to red to black and black to red).
Manual ProgrammingFollow these steps to change settings on the ESC without a computer.
Remove your pinion gear before calibration and manual programming as a safety precaution.
STEP 1: Start with the transmitter ON and the ESC switched OFF and not connected to the battery.
STEP 2: Plug a battery into the ESC. Hold full throttle on the transmitter and turn the ESC switch ON. After a few seconds you will hear four rings signaling full throttle calibration. Continue holding full throttle. After a few more seconds, you will hear another four rings. After the second group of four rings, relax the throttle to neutral. If you have successfully entered programming mode, the ESC will beep twice, pause, and repeat the two beeps.
STEP 3: The programming sequence is always presented in sequential order and always starts with the first setting (Reverse Lockout) within the first section (Reverse Type). The first beep(s) signifies which section of the programming you are in and the second beep(s) signifies which setting is waiting for a “yes” or “no” answer.
As you cycle through the options, you will need to answer “yes” by holding full throttle or answer “no” by holding full brake until the ESC accepts your answer by beeping rapidly. Once an answer has been accepted, relax the throttle back to neutral for the next question. After a “no” answer is accepted, the ESC will present you with the next option in that section. After a “yes” answer is accepted, the ESC skips to the first option in the next section.
Settings & ExplanationsThe ESC is extremely flexible and may be “tuned” like any other part of your car or truck. The following section explains all the settings available to you via manual programming and what each one does to change the reactions of the ESC in order to tune it to your specific preferences.
1. Brake/Reverse Type Sets whether reverse is enabled and how it can be accessed.
Setting 1: Reverse Lockout (Default) This setting allows the use of reverse only after the ESC senses two seconds of neutral throttle. Use it for race practice sessions and bashing, but check with your race director to see if this setting is allowed for actual racing.
Setting 2: Forward/Brake Only Use this setting for actual sanctioned racing events. Reverse cannot be accessed under any circumstances with this setting.
Setting 3: Forward/Brake/Reverse Reverse or forward is accessible at any time after the ESC brakes to zero motor RPM (if the vehicle is moving).
2. Brake Amount Sets what percentage of available braking power is applied with full brake.
Setting 1: 25% Power Allows only 25% of available braking power at full brake.
Setting 2: 50% Power (Default) Allows only 50% of available braking power at full brake.
Setting 3: 75% Power Allows 75% of available braking power at full brake.
Setting 4: 100% Power Allows all available braking power at full brake.
3. Reverse Amount Sets how much power will be applied in the reverse direction, if reverse is enabled.
Setting 1: 25% Power Allows only 25% power in reverse.
Setting 2: 50% Power (Default) Allows only 50% power in reverse.
Setting 3: 75% Power Allows only 75% power in reverse.
Setting 4: 100% Power Allows 100% power in reverse.
4. Punch/Traction Control This setting controls how fast the throttle position within the ESC can be changed over time. This smoothes high power starts and limits punch somewhat. As explained previously, acceleration is a matter of battery capability, but you may not want 100% of what the battery can deliver in every situation.
This setting is crucial to drag racing as it can be used as a “traction control” to match traction conditions.
The lower the setting, the less throttle change limiting there is. For pure burnout and wheelie action, use a very low setting or the disabled setting. For softer acceleration or for a low-grip surface, raise it up to a higher setting.
Setting 1: High Very limited acceleration. Good for 2WD vehicles on hard dirt, or for general bashing when you want to be gentle on the transmission.
Setting 2: Medium Medium acceleration limiting. Good for 2WD vehicles on soft dirt, and 4WD vehicles on hard dirt.
Setting 3: Low Light acceleration limiting. Good for 4WD vehicles on soft dirt.
Setting 4: Lowest Very light acceleration limiting. Good for most situations including 4WD vehicles on dirt and asphalt, and 2WD vehicles on asphalt.
Setting 5: Disabled (Default) Acceleration is only limited by battery ability. This setting is good for 4WD sedans on carpet, high traction drag racing, or bashing where unlimited wheelie power is desired.
5. Drag Brake Sets the amount of drag brake applied at neutral throttle to simulate the braking effect of a neutral brushed motor while coasting.
Setting 1: Drag Brake OFF (Default) Vehicle will coast with almost no resistance from the motor at neutral throttle.
Setting 2: Drag Brake 10% Low amount of braking effect from the motor at neutral throttle.
Setting 3: Drag Brake 20% More braking effect from the motor at neutral throttle.
Setting 4: Drag Brake 30% Fairly high braking effect from the motor at neutral throttle.
Setting 5: Drag Brake 40% High braking effect from the motor at neutral throttle.
6. Dead Band You may adjust the neutral throttle “width” of the controller with this setting. Smaller values make the controller enter forward or brake/reverse with a smaller movement of your throttle trigger for finer control.
7. Abschaltspannung Stellt die Spannung ein, bei der der Regler die Motorleistung verringert oder ganz wegnimmt um eine sichere Mindestspannung zu halten (für LiPo Zellen) oder damit die RC Anlage betriebsfähig bleibt. (bei NiCad/NiMH Akkus)
Einstellung 1: Keine Schaltet den Motor nicht ab. Verwenden Sie diese Einstellung nie bei LiPo Akkus.
Anwendung: jede Racing oder Bashing Situation mit 6 - 8 Zellen NiCad oder NiMh Pack.
Verwenden Sie die Einstellung nur bei NiCad oder NiMh Akku Packs.
Fahren Sie mit leeren Akku weiter kann die RC Anlage den Empfang einstellen was den Regler und die Servos nicht mehr ansteuerbar macht und zu potentiellen Kontrollverlust führt.
Mit dieser Einstellung beschädigen Sie LiPo Akkus ireparabel.
Einstellung 2: Auto LiPo (Standard) Diese Einstellung zählt die angeschlossenen LiPo Zellen und stellt automatisch die Abschaltspannung auf 3,2 Volt pro Zelle ein. Sie hören zwischen der Initalisierung und dem Armierton die Zellenanzahl als Pieptöne.
Einstellung 3: 5 Volt Trennt / limitiert die Motorspannung wenn die Akkuspannung unter 5 Volt geht. Eine gute Einstellung für Racing oder Bashing in jedem Fahrzeug das 8 -12 NiMh oder NiCad Packs benutzt.
Einstellung 4: 6V Trennt / limitiert die Motorspannung wenn die Akkuspannung auf 6 Volt sinkt.
Diese Akkuspannung MÜSSEN Sie verwenden wenn Sie 2 S (7,4V ) LiPo Packs verwenden.
Verwenden Sie eine niedrigere Abschaltspannung beschädigen Sie die LiPo Akkus irreparabel.
Einstellung 5: 9V Trennt / limitiert die Motorspannung wenn die Akkuspannung auf 9 Volt sinkt.
Diese Akkuspannung MÜSSEN Sie verwenden wenn Sie 3 S (11,1V) LiPo Packs verwenden.
Verwenden Sie eine niedrigere Abschaltspannung beschädigen Sie die LiPo Akkus irreparabel.
Einstellung 6: 12V Trennt / limitiert die Motorspannung wenn die Akkuspannung auf 12 Volt sinkt.
Diese Akkuspannung MÜSSEN Sie verwenden wenn Sie 4 S (14,8V) LiPo Packs verwenden.
Verwenden Sie eine niedrigere Abschaltspannung beschädigen Sie die LiPo Akkus irreparabel.
Die Verwendung von 4 S LiPo Packs ist nur unter Garantie bei Monster Max Reglern.
8. Motor Timing Das Verändern des Timings eines Elektro Motors bewirkt verschiedene Änderungen. Ein verringern des Timings reduziert die Stromaufnahme (Ampere), verlängert die Fahrzeit, reduziert Motor und Akku Temperatur und kann etwas die Beschleunigung und den Top Speed verringern. Ein erhöhen des Timing, erhöht den Stromverbrauch, verringert die Fahrzeit, erhöht die Akku- und Motortemperatur und kann etwas die Höchstgeschwindigkeit und Beschleunigung verbessern.
Sollten Sie mehr Höchstgeschwindigkeit wünschen, ist es sinnvoller die Übersetzung zu wechseln, als zu sehr das Timing zu verändern.
Lassen Sie bei Bürstenmotoren die Reglereinstellung immer auf Normal und optimieren mit der Motorglocke nach den Herstelleranweisungen den Motor auf maximale Drehzahl.
Einstellung 1: Kleinste Eine Einstellung für maximale Effektivität die lange Fahrzeiten und geringe Motortemperaturen. Sehr nützlich bei Motoren mit hohen KV´s (wenig Turns) um die Lebensdauer zu verlängern und die Motor / Akku Temperaturen zu verringern.
Einstellung 2. Normal (Standard) Die beste Mischung aus Geschwindigkeit, Beschleunigung und Effektivität für alle Motoren.
Einstellung 3. Höchste Erhöht den Stromverbrauch, reduziert die Fahrzeit. erhöht die Motor und Akkutemperatur und könnte etwas die Höchstgeschwindigkeit erhöhen.
Verwenden Sie diese Einstellung sehr vorsichtig und bebachten dabei Motor und Akkutemperaturen. Verwenden Sie KEINE Einstellung über -Normal- bei Motoren mit 6000 Kv oder höher.
9. Motor Typ In dieser Einstellung wählen Sie den Motor Typ der an den Losi Regler angeschlossen ist. Bei der Wahl des falschen Motortyps kann der Regler beschädigt werden und ist nicht durch die Garantie abgedeckt.
Einstellung 1: Brushless (Standard)
Sehen Sie bitte Brushless Motor Setup nach. Dabei sind alle drei Motoranschlußkabel mit den drei Regleranschlußkabeln verbunden.
Sollte der Motor in die falsche Richtung drehen tauschen Sie zwei der drei Kabel.
Einstellung 2: Bürstenmotor Reverse (Sehen Sie bitte dazu im Abschnitt Reverse Bürstenmotor nach)
Verwenden Sie das schwarze und rote Regleranschlußkabel um diese an das schwarze und rote Motoranschlußkabel anzuschließen. Sollte der Motor in die falsche Richtung drehen tauschen Sie die Motorkabel um die richtige Drehrichtung zu erhalten.
Einstellung 3 Bürstenmotor High Power (Sehen Sie bitte dazu Abschnitt High Power Bürstenmotor nach)
Verbinden Sie alle drei Reglerkabel mit dem negativen (-) Anschluß des Motors. Sie können ebenfalls ein Y- Kabel verwenden, um den Regler Akkuanschluß mit dem Akku und dem positiven Anschluß des Motors zu verwenden . Sie können auch ein Kabel vom positiven Regleranschluß zu dem positiven Akkuanschluß und dann weiter zu dem positiven (+) Anschluß des Motors verwenden.
ProblemlösungSollten Sie nach den hier aufgeführten Lösungen noch Probleme haben den Losi Regler in Betrieb zu nehmen, wenden Sie sich bitte an den technischen Service per E-Mail oder telefonisch unter aufgeführten Nummer.
Problem: Der Regler armiert oder armiert nicht, läßt sich aber nicht über den Sender kalibrieren.
Lösung: Die meisten Probleme mit der Kalibrierung lassen sich über Einstellungen am Sender lösen. Stellen Sie sicher, dass der Gas- und Bremsendpunkt (auch EPA oder ATV genannt) zwischen 100% und 120 % liegen. Haben Sie einen Futaba Sender müssen Sie den Gaskanal reversieren.
Problem: Der Regler ist auf Vollgas und Vollbremspunkte zu kalibrieren aber nicht auf die Neutral Postion (gelbe LED blinkt)
Lösung: Trimmen Sie erst einen Weg dann den anderen. (Normalerweise erst in Richtung Gas)
Sollte der Sender eine Möglichkeit zur 50/50 und 70/30 Einstellung haben, stellen Sie bitte auf 50/50 und wiederholen die Kalibrierung. Auch wenn sie die Totbandeinstellung kleiner gemacht haben, ist es sinnvoll zurück auf normale Einstellung zu gehen.
Problem: Das Fahrzeug reagiert als habe es ein "Turboloch" = schlechte Beschleunigung auf den ersten Metern und dann kommt starke Beschleunigung.
Lösung: Stellen Sie bitte sicher, dass Sie Akkus mit hoher Qualität verwenden mit einem hochwertigen Anschluß der für eine Belastung von 40 - 100 Ampere ausgelegt ist. Dieses Verhalten ist sehr typisch für einen Akkupack der nicht die benötigte Leistung bereitstellen kann. Verwenden Sie Kupferakkuverbinder, da diese weniger Wiederstand bieten.
Problem: Der Akkupack ist an den Regler angeschlossen, aber Gas und Lenkung arbeiten nicht.
Lösung: Stellen Sie sicher, dass der Regler in den Kanal 2 des Empfängers gesteckt wurde und das der Stecker richtig herum eingesteckt wurde. Prüfen Sie doppelt die Akkuverbinder und die Spannung des Akkus um ganz sicher zu gehen.
GARANTIE UND SERVICE INFoRMATIoNEN Warnung Ein ferngesteuertes Modell ist kein Spielzeug. Es kann, wenn es falsch eingesetzt wird, zu erheblichen Verletzungen bei Lebewesen und Beschädigungen an Sachgütern führen. Betreiben Sie Ihr RC-Modell nur auf freien Plätzen und beachten Sie alle Hinweise der Bedienungsanleitung des Modells wie auch der Fernsteuerung.
Garantiezeitraum Exklusive Garantie ¬ Horizon Hobby Inc (Horizon) garantiert, dass das gekaufte Produkt (Produkt) frei von Material- und Montagefehlern ist. Der Garantiezeitraum entspricht den gesetzlichen Bestimmung des Landes, in dem das Produkt erworben wurde. In Deutschland beträgt der Garantiezeitraum 6 Monate und der Gewährleistungszeitraum 18 Monate nach dem Garantiezeitraum.
Einschränkungen der Garantie (a) Die Garantie wird nur dem Erstkäufer (Käufer) gewährt und kann nicht übertragen werden. Der Anspruch des Käufers besteht in der Reparatur oder dem Tausch im Rahmen dieser Garantie. Die Garantie erstreckt sich ausschließlich auf Produkte, die bei einem autorisierten Horizon Händler erworben wurden. Verkäufe an dritte werden von dieser Garantie nicht gedeckt. Garantieansprüche werden nur angenommen, wenn ein gültiger Kaufnachweis erbracht wird. Horizon behält sich das Recht vor, diese Garantiebestimmungen ohne Ankündigung zu ändern oder modifizieren und
widerruft dann bestehende Garantiebestimmungen.
(b) Horizon übernimmt keine Garantie für die Verkaufbarkeit des Produktes, die Fähigkeiten und die Fitness des Verbrauchers für einen bestimmten Einsatzzweck des Produktes. Der Käufer allein ist dafür verantwortlich, zu prüfen, ob das Produkt seinen Fähigkeiten und dem vorgesehenen Einsatzzweck entspricht.
(c) Ansprüche des Käufers Es liegt ausschließlich im Ermessen von Horizon, ob das Produkt, bei dem ein Garantiefall festgestellt wurde, repariert oder ausgetauscht wird. Dies sind die exklusiven Ansprüche des Käufers, wenn ein Defekt festgestellt wird.
Horizon behält sich vor, alle eingesetzten Komponenten zu prüfen, die in den Garantiefall einbezogen werden können. Die Entscheidung zur Reparatur oder zum Austausch liegt nur bei Horizon. Die Garantie schließt kosmetische Defekte oder Defekte, hervorgerufen durch höhere Gewalt, falsche Behandlung des Produktes, falscher Einsatz des Produktes, kommerziellen Einsatz oder Modifikationen irgendwelcher Art aus.
Die Garantie deckt Schäden, die durch falschen Einbau, falsche Handhabung, Unfälle, Betrieb, Service oder Reparaturversuche, die nicht von Horizon ausgeführt wurden, aus. Rücksendungen durch den Käufer direkt an Horizon oder eine seiner Landesvertretung bedürfen der schriftlichen.
Schadensbeschränkung Horizon ist nicht für direkte oder indirekte Folgeschäden, Einkommensausfälle oder kommerzielle Verluste, die in irgendeinem Zusammenhang mit dem Produkt stehen nicht verantwortlich, unabhängig ab ein Anspruch im Zusammenhang miteinem Vertrag, der Garantie oder der Gewährleistung erhoben werden. Horizon wird darüber hinaus keine Ansprüche aus einem Garantiefall akzeptieren, die über den individuellen Wert des Produktes hinaus gehen. Horizon hat keine Einfluss auf den Einbau, die Verwendung oder die Wartung des Produktes oder etwaiger Produktkombinationen, die vom Käufer gewählt werden. Horizon übernimmt keine Garantie und akzeptiert keine Ansprüche für in der folge auftretende Verletzungen oder Beschädigungen. Mit der Verwendung und dem Einbau des Produktes akzeptiert der Käufer alle aufgeführten Garantiebestimmungen ohne Einschränkungen und Vorbehalte.
Wenn Sie als Käufer nicht bereit sind, diese Bestimmungen im Zusammenhang mit der Benutzung des Produktes zu akzeptieren, werden Sie gebeten, dass Produkt in unbenutztem Zustand in der Originalverpackung vollständig bei dem Verkäufer zurückzugeben.
Sicherheitshinweise Dieses ist ein hochwertiges Hobby Produkt und kein Spielzeug. Es muss mit Vorsicht und Umsicht eingesetzt werden und erfordert einige mechanische wie auch mentale Fähigkeiten. Ein Versagen, das Produkt sicher und umsichtig zu betreiben kann zu Verletzungen von Lebewesen und Sachbeschädigungen erheblichen Ausmaßes führen. Dieses Produkt ist nicht für den Gebrauch durch Kinder ohne die Aufsicht eines Erziehungsberechtigten vorgesehen. Die Anleitung enthält Sicherheitshinweise und Vorschriften sowie Hinweise für die Wartung und den Betrieb des Produktes. Es ist unabdingbar, diese Hinweise vor der ersten Inbetriebnahme zu lesen und zu verstehen. Nur so kann der falsche Umgang verhindert und Unfälle mit Verletzungen und Beschädigungen vermieden werden.
Fragen, Hilfe und Reparaturen Ihr lokaler Fachhändler und die Verkaufstelle können eine Garantiebeurteilung ohne Rücksprache mit Horizon nicht durchführen. Dies gilt auch für Garantiereparaturen. Deshalb kontaktieren Sie in einem solchen Fall den Händler, der sich mit Horizon kurz schließen wird, um eine sachgerechte Entscheidung zu fällen, die Ihnen schnellst möglich hilft.
Wartung und Reparatur Muss Ihr Produkt gewartet oder repariert werden, wenden Sie sich entweder an Ihren Fachhändler oder direkt an Horizon. Packen Sie das Produkt sorgfältig ein. Beachten Sie, dass der Originalkarton in der Regel nicht ausreicht, um beim Versand nicht beschädigt zu werden. Verwenden Sie einen Paketdienstleister mit einer Tracking Funktion und Versicherung, da Horizon bis zur Annahme keine Verantwortung für den Versand des Produktes übernimmt.
Bitte legen Sie dem Produkt einen Kaufbeleg bei, sowie eine ausführliche Fehlerbeschreibung und eine Liste aller eingesendeten Einzelkomponenten.
Weiterhin benötigen wir die vollständige Adresse, eine Telefonnummer für Rückfragen, sowie eine Email Adresse.
Garantie und Reparaturen Garantieanfragen werden nur bearbeitet, wenn ein Originalkaufbeleg von einem autorisierten Fachhändler beiliegt, aus dem der Käufer und das Kaufdatum hervorgeht. Sollte sich ein Garantiefall bestätigen wird das Produkt repariert oder ersetzt. Diese Entscheidung obliegt einzig Horizon Hobby.
Kostenpflichtige Reparaturen Liegt eine kostenpflichtige Reparatur vor, erstellen
wir einen Kostenvoranschlag, den wir Ihrem Händler übermitteln. Die Reparatur wird erst vorgenommen, wenn wir die Freigabe des Händlers erhalten. Der Preis für die Reparatur ist bei Ihrem Händler zu entrichten. Bei kostenpflichtigen Reparaturen werden mindestens 30 Minuten Werkstattzeit und die Rückversandkosten in Rechnung gestellt.
Sollten wir nach 90 Tagen keine Einverständniserklärung zur Reparatur vorliegen haben, behalten wir uns vor, das Produkt zu vernichten oder anderweitig zu verwerten.
Achtung: Kostenpflichtige Reparaturen nehmen wir nur für Elektronik und Motoren vor. Mechanische Reparaturen, besonders bei Hubschraubern und RC-Cars sind extrem aufwendig und müssen deshalb vom Käufer selbst vorgenommen werden.
Europäische Union:
Elektronik und Motoren müssen regelmäßig geprüft und gewartet werden. Für Servicezwecke sollten die Produkt an die folgende Adresse gesendet werden:
Horizon Technischer Service Christian-Junge-Straße 1 25337 Elmshorn, Germany
Bitte rufen Sie +04121 2655 100 an oder schreiben Sie uns ein Email an [email protected] um jede mögliche Frage zum Produkt oder der Garantieabwicklung zu stellen.
Konformitätserklärung laut Allgemeine Anforderungen (ISo/IEC 17050-1:2004, korrigierte Fassung 2007-06-15); Deutsche und Englische Fassung EN ISo/IEC 17050-1:2010
Declaration of conformity (in accordance with ISO/IEC 17050-1)
erklärt das Produkt: LOS TEN-SCTE RTR ESC LOSB9504
declares the product LOS TEN-SCTE RTR ESC LOSB9504
den grundlegenden Anforderungen und den übrigen einschlägigen Bestimmungen des EMV Directive 2004/108/EC. complies with the essential requirements and other relevant provisions of the EMC Directive 2004/108/EC.
Es gelten unsere allgemeinen Geschäftsbedingungen, die in unseren Geschäftsräumen eingesehen werden können. Ware bleibt bis zur vollständigen Bezahlung
Eigentum der Horizon Hobby GmbH
Entsorgung in der Europäischen Union
Dieses Produkt darf nicht über den Hausmüll entsorgt werden. Es ist die Verantwortung des Benutzers, dass Produkt an einer registrierten Sammelstelle für Elektroschrott abzugeben diese Verfahren stellt sicher, dass die Umwelt geschont wird und natürliche Ressourcen nicht über die Gebühr beansprucht werden. Dadurch wird das Wohlergehen der menschlichen Gemeinschaft geschützt. Für weitere Informationen, wo der Elektromüll entsorgt werden kann, können Sie Ihr Stadtbüro oder Ihren lokalen Entsorger kontaktieren.
LoSB9504 MSC-MXPRo BRUSHLESS ESC
HINWEIS
Alle Anweisungen, Garantien und dazugehörigen Dokumente können ohne Ankündigung von Horizon Hobby Inc. geändert werden. Eine aktuelle Version
ersehen Sie bitte im Support Feld unter: http://www.horizonhobby.com.
ERKLÄRUNG DER BEGRIFFE
Die folgenden Begriffe erklären die Gefährdungsstufen im Umgang mit dem Produkt:
HINWEIS: Wenn diese Verfahren nicht korrekt befolgt werden, können sich möglicherweise Sachschäden UND geringe oder keine Gefahr von Verletzungen ergeben.
ACHTUNG: Wenn diese Verfahren nicht korrekt befolgt werden, ergeben sich wahrscheinlich Sachschäden UND die Gefahr von schweren Verletzungen.
WARNUNG: Wenn diese Verfahren nicht korrekt befolgt werden, ergeben sich wahrscheinlich Sachschäden, Kollateralschäden und schwere Verletzungen ODER mit hoher Wahrscheinlichkeit oberflächliche Verletzungen.
WARNUNG: Lesen Sie sorgfältig die gesamte Bedienungsanleitung durch und machen sich vor
dem Betrieb mit dem Produkt vertraut. Falscher und oder nicht sachgemäßer Umgang kann zu Beschädigungen am Produkt, eigenen und fremden Eigentum und ernsthaften Verletzungen führen.
Bitte beachten Sie, dass dieses Produkt ein hoch entwickeltes Hobby Produkt und kein Spielzeug ist. Es erfordert bei dem Betrieb Aufmerksamkeit und grundlegende mechanische Fähigkeiten. Falscher, nicht sachgemäßer Umgang kann zu Beschädigungen an eigenem oder fremden Eigentum oder zu Verletzungen an sich selbst oder Dritter führen. Versuchen Sie nicht dieses Produkt auseinander zu bauen, oder es mit Komponenten zu betreiben die nicht ausdrücklich mit Genehmigung von Horizon Hobby dafür geeignet sind. Dieses Produkt ist nicht für den Gebrauch von Kindern ohne direkte Aufsicht durch ihre Eltern bestimmt. Die Bedienungsanleitung enthält Anweisungen und wichtige Informationen für die Sicherheit und Betrieb. Es ist daher notwendig, allen darin enthaltenen Anweisungen und Warnungen Folge zu leisten und diese Anleitung vor dem Zusammenbau und Inbetriebnahme sorgfältig durch zu lesen.
Altersempfehlung• Nicht geeignet für Kinder unter 14 Jahren. Dies
ist kein Spielzeug.
Eigenschaften• Einfache Kalibrierung.
• Kompakte Maße.
• Vorverkabelt mit EC3 Akku Stecker.
• Vorwärts / Bremsfunktion für den Racingeinsatz und Vorwärts/Bremse/ Rückwärts für den Sporteinsatz.
Eingangsspannung : LiPo 2–4S oder 8.4V–16.8VInnenwiederstand: 0018 OhmMotor Limit: 4,5T 550 SensorMotorkabel: 13AWGMotor Anschluß: 4.0mm Bullet Akkukabel: 13AWGAkkuanschluss: EC3™Maße: 45.5 x 36.5 x 21.5mmGewicht: 81 g (ohne Kabel)BEC Ausgangsleistung: 5.5–7.0VPower Wiring
Akku / Regler VerkabelungIhr Regler (ESC) ist mit Motor- und Akkuanschlüssen ausgestattet.
Die Wahl der richtigen Polarität ist äußerst wichtig. Stellen Sie absolut sicher, dass der Positive (+) Regleranschluß mit dem positiven Anschluß des Akkus verbunden wird und der Negative (-) Regleranschluß mit dem Negativen (-) Anschluß des Akkus verbunden wird. Sollten Sie die Polarität dieser Verbindung falsch stecken, WIRD der der Regler beschädigt. Dieses ist NICHT durch die Garantie abgedeckt.
AnschlüsseVerkabelung Brushless Motor Die drei Anschlußkabel zum Motor haben keine Polarität. Verbinden Sie dieses nach Wunsch. Sollte der Motor nach Anschluß rückwärts laufen, tauschen Sie bitte einfach zwei Kabel. Dieses wird später noch beschrieben.
Sollten Sie einen anderen Motor als den Losi LOSB9444 Motor verwenden, kann es notwendig sein, dass Sie an die Motorkabel noch Stecker oder diese direkt an die Reglerkabel löten müssen.
Verbinden Sie den Motor und Regler mit den mitgeliefer ten
Anschlüssen
BrushlessMotor
MSC-MXPRO ESC
Verbindungzum
Gaskanal
Lenkservoin Kanal 1
Losi Reglerin Kanal 2
Empfänger
Akkupack
Verwenden Sie nur qualitativ hochwertige Anschlüsse
Ein/AusSchalter
Lenkservo
Anschluß Bürstenmotor
Bürstenmotoranschluß mit Reverse Verwenden Sie diesen Anschluß wenn Sie die Funktion reversieren möchten. Verwenden Sie nur die roten und schwarzen Anschlußkabel des Reglers. In den meisten Fällen wird das rote Anschlußkabel des Reglers an das rote Anschlußkabel des Motors und schwarze Reglerkabel an das schwarze Motorkabel angeschlossen.
Das weisse Motorkabel wird nicht benötigt. Nach der Kalibrierung (Beschreibung siehe unten) kann es notwendig sein die Motorkabel zu tauschen um die Räder in die richtige Richtung drehen zu lassen.
Schwarzes Reglerkabel zu Motor (-)
Kabel/Anschluß
Weisses Motorkabel wird
nicht benötigt
Rotes Reglerkabel zu Motor (+)
Kabel/Anschluß
MSC-MXPRO ESC
Alle Regler MotorAnschlüsse an Motor (-)
Verbindungzum
Gaskanal
Lenkservoin Kanal 1
Losi Reglerin Kanal 2
Empfänger
Akkupack
Verwenden Sie nur qualitativ hochwertige Anschlüsse
Ein/AusSchalter
Lenkservo
Bürstenmotor
High Power Bürstenmotor Mode (Siehe Abbildung 3) Schließen Sie alle drei Kabel des Reglers an den negativen (-) Anschluß des Motors an. Sie können für den Anschluß des positiven Akkuanschluß an Regler und Motor ein Y- Kabel verwenden. Alternativ können Sie ein einzelnes Kabel vom Regler zum Akku und dann weiter zum Motor verwenden.
Akku (+) an Motor (+)
Motor (+) Motor (-)
Alle Regler MotorAnschlüsse an Motor (-)
Verbindungzum
Gaskanal
Lenkservoin Kanal 1
Losi Reglerin Kanal 2
Empfänger
Akkupack
Verwenden Sie nur qualitativ hochwertige Anschlüsse
Ein/AusSchalter
Lenkservo
Bürstenmotor
MSC-MXPRO ESC
RC AnschlußIhr Losi Fahrtenregler wird in den Gaskanal des Empfängers gesteckt. Dieses ist normalerweise der Kanal 2. Der Regler liefert 5 Volt zur Stromversorgung des Empfängers und des Lenkservos. Sie benötigen daher kein separates Akku zur Empfängerstromversorgung.
Die Reglerstecker sind so gefertigt , dass sie in jedes Empfängersystem passen. Bitte achten Sie daher unbedingt auf die Polarität. Das Signalkabel ist Orange, das positive Kabel ist Rot und das negative Kabel ist schwarz. Einige RC Systeme nutzen die Farbe Weiss für Signal, Rot für positiv und Schwarz für negativ.
Bitte sehen Sie in der Bedienungsanleitung des Empfängers nach wenn diese nicht markiert sind. (Die meisten Empfänger sind zur Gehäuseaußenseite negativ und zur Innenseite positiv belegt.)
Regler SetupKalibrierung Die Signale für Neutral, Vollgas und Vollbremsung variieren von Sender zu Sender. Daher ist es notwendig den Regler zu kalibrieren. Jedes mal wenn der Regler mit einem neuem Sender in Betrieb genommen wird oder mit verschiedenen Gaseinstellungen gearbeitet wird, ist es wichtig den Regler zu kalibrieren damit dieser die Einstellungen lernt.
Sollten Sie einen Futaba oder Futaba OEM Sender verwenden müssen Sie den Sender Gas Kanal reversieren.
Dieses kann entweder durch einen Mikroschalter am Sender oder mit einen Programmpunkt in der Sendersoftware geschehen.
Kalibrieren des ReglersSchritt 1: Schalten Sie den Sender ein, der Regler bleibt AUS und ist nicht mit dem Akku verbunden.
Schritt 2: Verbinden Sie den Akku mit dem Regler.
Schritt 3: Halten Sie Vollgas und schalten den Regler ein. Sind alle Anschlüsse korrekt hören Sie jetzt ein Mehrton "Ring" Dieser Ton wird durch Motorvibrationen erzeugt.
Schritt 4: Nach ein oder zwei Sekunden, fängt die grüne LED auf dem Regler schnell an zu blinken und Sie hören 4 mal einen Klingelton in der Reihe. (Dieses steht für die Erkennung des Vollgasendpunktes)
Nach dem Blinken der grünen LED und der Tonfolge fängt die rote LED an zu blinken. Zu diesem Zeitpunkt sucht der Regler den Bremspunkt.
Schritt 5: Bewegen Sie den Gashebel auf Vollbremsposition und halten diese. Nach einigen Sekunden wird die rote LED blinken und 4 mal ein schnelles Ring zu hören sein. (Dieses steht für die Erkennung des Vollbremsendpunktes)
Schritt 6: Nach dem Erkennen der Vollgasposition blinkt die gelbe LED auf dem Regler. Stellen Sie jetzt den Gashebel auf Neutral.
Nach einigen Sekunden wird die gelbe LED blinken und 4 mal ein schnelles Ring zu hören sein. (Dieses steht für die Erkennung der Neutralposition)
Nach der Erkennung der Neutral Position wird der Regler zwei Mal ringen und die LED blinken.
Das ist das Anzeichen, dass der Regler JETZT scharfgeschaltet ist und das Fahrzeug bei Gaseingabe reagiert.
Von diesem Zeitpunkt an wird sich der Regler wenn ein Akku angeschlossen ist initialisieren und blinken. Der Ton, der das Armieren (scharf schalten) anzeigt folgt ein oder zwei Sekunden später. Sollte der Regler auf die Auto Lipo Erkennung programmiert sein, gibt er durch Pieptöne die Anzahl der angeschlossenen Zellen an. Diese geschieht nach dem Initialisieren und vor dem Scharfschalten.
Sollten Sie Probleme mit dem Kalibrieren Ihres Senders mit dem Losi Regler haben, kontaktieren Sie bitte den technischen Service von Horizon Hobby.
Bitte überprüfen Sie nach der Einstellung die Laufrichtung der Räder. Erhöhen Sie dazu langsam die Geschwindigkeit. Prüfen Sie die Drehrichtung der Räder und die Farbe der LED auf dem Regler. Dreht der Motor in die richtige Richtung und die grüne LED blinkt, sind sie bereit für einen Testlauf. Sollte die grüne LED blinken und die Räder in die falsche Richtung drehen, müssen Sie zwei der drei Motorkabel tauschen .(Zum Beispiel: tauschen Sie rot auf schwarz und schwarz auf rot)
Manuelle ProgrammierungFolgen Sie diesen Schritten um die Einstellungen an ihrem Regler manuell zu ändern.
Entfernen Sie das Ritzel aus Sicherheitgründen vor der Kalibrierung und Programmierung.
Schritt 1: Starten Sie mit eingeschalteten Sender. Der Regler ist Aus (OFF) und nicht an ein Akku angeschlossen.
Schritt 2: Schließen Sie ein Akku an, halten Sie Vollgas und schalten den Regler ein (ON). Nach einigen Sekunden hören Sie 4 Ringtöne die Ihnen die Erkennung der Vollgasposition anzeigen. Halten Sie weiter die Vollgaspostion. Nach einigen Sekunden hören Sie weitere vier Ringtöne. Lassen Sie jetzt den Gashebel auf Neutral los.
Haben Sie jetzt den Programmiermode aktiviert wird der Regler zwei mal piepen, eine Pause machen und zwei mal piepen.
Schritt 3: Die Programmiersequenz erfolgt der Reihe nach und startet immer mit der ersten Einstellung (Reverse Lockout) in der ersten Auswahl (Reverse Typ). Der /die erste(n) Piepton /töne zeigen an in welchen Auswahlmenü Sie sich befinden und die zweiten Töne welche Einstellung von Ihnen die Eingabe Ja oder Nein erwartet.
Bei der Auswahl im Menü wählen Sie mit Vollgas ein Ja oder mit Vollbremsung ein Nein. Ist die Antwort akzeptiert, gehen Sie mit dem Gashebel auf Neutral für die nächste Frage. Ist ein Nein akzeptiert, wählen Sie mit der nächsten Auswahl die weitere Option in dem Menü Haben Sie Ja gewählt springt der Regler in die erste Auswahl des nächsten Menüs.
Einstellungen und ErklärungenDer Regler ist in seinen Möglichkeiten extrem flexibel und kann wie andere Teile am Fahrzeug passend eingestellt werden. Das folgenden Kapitel erklärt alle möglichen Einstellungen der manuellen Programmierung und seine Auswirkungen auf den Regler, so dass Sie die passenden Einstellung finden.
1. Einstellung Bremse/Reverse (Rückwärts) Typ
Aktiviert die Rückwärtsfahrfunktion.
Diese Einstellung erlaubt die Rückwärtsfunktion nachdem der Gashebel 2 Sekunden auf Neutral
gestanden hat. Nutzen Sie diese Funktion für das Training oder Bashing. Bitte fragen Sie den Rennleiter ob bei dem Training diese Einstellung erlaubt ist.
Einstellung 2 Vorwärts / Nur Bremse Nutzen Sie diese Einstellung für den Rennbetrieb. Die Reversefunktion kann in dieser Einstellung unter keinen Umständen aktiviert werden.
Einstellung 3: Vorwärts/Bremse/Rückwärts. Rückwärts oder Vorwärts ist nach Stillstand des Motors möglich.
2. Bremsanteil Hier stellen Sie den Anteil der Bremskraft ein der bei Vollbremsung aktiviert wird.
Einstellung 1: 25 % Bremsleistun Ermöglicht nur 25% der verfügbaren Bremsleistung bei einer Vollbremsung.
Einstellung 2: 50% Bremsleistung (Standard) Ermöglicht 50% der verfügbaren Bremsleistung bei einer Vollbremsung.
Einstellung 3: 75% Bremsleistung. Ermöglicht 75% der verfügbaren Bremsleistung bei einer Vollbremsung.
Einstellung 4: 100% Bremsleistung Ermöglicht 100% der verfügbaren Bremsleistung bei einer Vollbremsung.
3. Rückwärtsanteil Hier stellen Sie den Anteil der Rückwärtsleistung ein wenn diese Funktion aktiv ist.
Einstellung 1: 25 % Rückwärtsleistung Ermöglicht nur 25% der verfügbaren Rückwärtsleistung.
Einstellung 3: 75% Rückwärtsleistung Ermöglicht 75% der verfügbaren Rückwärtsleistung.
Einstellung 4: 100 % Rückwärtsleistung Ermöglicht 100% der verfügbaren Rückwärtsleistung.
4. Traktionskontrolle Diese Einstellung gibt an wie schnell Änderungen in der Gaseinstellungen von dem Regler durchgeführt werden. Dieses kann die Beschleunigung durch bessere Traktion glätten. Wie bereits vorher erwähnt ,ist die mögliche Beschleunigung von der Leistungsfähigkeit des Akkus abhängig. Es gibt jedoch auch Strecken wo eine 100% Beschleunigung ungünstig ist und diese Einstellung als Traktionskontrolle verwendet werden kann.
Je niedriger die Einstellung, desto weniger wird die Gaseinstellung limitiert. Für Burn Out und Wheelie Action verwenden Sie bitte eine sehr niedrige oder deaktivierte Einstellung. Für eine weiche Beschleunigung auf einer wenig griffigen Oberfläche wählen Sie bitte eine höhere Einstellung.
Einstellung 1: Hoch Sehr limitierte Beschleunigung. Gut für 2WD Fahrzeuge auf trockener Strecke oder beim Bashing wenn Sie den Antrieb schonen wollen.
Einstellung 2: Mittel Mittel limitierte Beschleunigung. Gut für 2WD Fahrzeuge auf weicher Strecke und 4 WD Fahrzeuge auf harter Strecke.
Einstellung 3: Klein Etwas limitierung . Gut für 4WD Fahrzeuge auf weichen Boden.
Einstellung 4: Kleinste Sehr wenig limitierung. Geeignet für die meisten Situationen inklusive 4WD Fahrzeuge auf Asphalt oder Dirt oder 2 WD Fahrzeuge auf Asphalt.
Einstellung 5: Deaktiviert (Standard) Diese Einstellung ist für 4 WD Antrieb auf Teppich, Drag Racing mit hoher Traktion oder bei dem Bashing mit unlimitierter Wheelie Power.
5. Wiederstandsbremse (Drag Brake) Dieses Einstellung stellt den Anteil des Wiederstandes ein den der Motor bei Neutralstellung erzeugt.
Einstellung 1: Wiederstandsbremse AUS (Standard)
Einstellung 2: Wiederstandsbremse 10% Wenig Bremseffekt des Motors bei Neutralstellung.
Einstellung 3: Wiederstandsbremse 20% Mehr Bremseffekt des Motors bei Neutralstellung.
Einstellung 4: Wiederstandsbremse 30% Großer Bremseffekt des Motors bei Neutralstellung.
Einstellung 5: Wiederstandsbremse 40% Größter Bremseffekt des Motors bei Neutralstellung.
6. Totband (Deadband) Mir dieser Einstellung können Sie den Neutralbereich definieren. Kleinere Werte lassen den Gashebel vorwärts oder Bremse/Rückwärts mit weniger für Bewegung reagieren.
Bitte seien Sie aber bei der Einstellung vorsichtig, da einige Sender eine höhere Auflösung haben. Sollte Ihr Sender nicht auf die Neutral Stellung reagieren, stellen Sie die Einstellung größer.
Applications : Loisir ou course avec des batteries NiCad ou Nimh de 6 à 8 éléments.
Utilisez UNIQUEMENT des batteries Nicad ou Nimh. En cas d'utilisation prolongée le récepteur risque de ne plus être alimenté, vous risquez donc une perte de contrôle de véhicule.
Vous risquez d'endommager de manière irréversible des batteries Li-po avec ce mode.
Choix 2 : Auto Li-po (par défaut) Ce paramètre permet une détection automatique du nombre d'éléments li-po que vous avez branché. La coupure va être automatiquement réglées à 3.2V par élément. Un nombre de bips correspondant au nombre d'éléments va être émis entre l'innitialisation et l'armement.
Choix 3 : 5V La coupure interviendra quand la tension de pack descendra à 5V. Idéal pour une utilisation avec des batteries NiMH ou NiCad
Choix 4 : 6V La coupure interviendra quand la tension de pack descendra à 6V.
A utiliser avec une batterie LiPo 2S 7.4V. En utilisant une coupure plus basse vous endommagerez votre batterie de façon irréversible.
Choix 5 : 9V La coupure interviendra quand la tension de pack descendra à 9V.
A utiliser avec une batterie LiPo 3S 11.1V. En utilisant une coupure plus basse vous endommagerez votre batterie de façon irréversible.
Choix 6 : 12V La coupure interviendra quand la tension de pack descendra à 12V.
A utiliser avec une batterie LiPo 4S 14.8V. En utilisant une coupure plus basse vous endommagerez votre batterie de façon irréversible. L'utilisation de batterie Lipo 4S est couverte par la garantie SEULEMENT pour les contrôleurs Monster Max.
8. Avance L'avance à beaucoup d'effets sur les moteurs électriques. Une baisse de l'avance, permet de réduire la consommation, baisse de la température, augmentation de l'autonomie, mais une baisse des performances. Une augmentation de l'avance, augmente la consommation, la température, diminue l'autonomie , mais augmente les performances.
Si vous recherchez une vitesse de pointe maximale, il conseillé de changer en premier les pignons avant d'augmenter l'avance.
Pour les moteurs à balais il faut toujours laisser ce paramètre sur NORMAL et utilisez le réglage de l'orientation de la cage sur le moteur pour faire varier l'avance.
Choix 1 : Bas Idéal pour avoir une plus grande autonomie et une température de fonctionnement basse. Conseillé pour une utilisation avec les moteurs aux Kv élevés , cela permet d'augmenter la durée de vie du moment et de baisser la température de fonctionnement de la batterie et du moteur.
Choix 2 : Normal (par défaut)
Choix 3 : Haut Augmente la consommation, réduit l'autonomie, augmente la température en fonctionnement et les performances.
A utiliser avec précautions, contrôlez très souvent la température du moteur et de la batterie. Ne jamais utiliser ce paramètre avec de moteur de 6000Kv ou plus.
9. Type de moteur Ce paramètre permet d'indiquer le type de moteur branché au contrôleur Losi. Le contrôleur risque d'être endommagé si ce paramètre n'est pas réglé correctement. Ces dommages ne sont pas couverts par la garantie.
Choix 1 : Brushless (par défaut) (Consultez la section moteur brushless.) Branchez les trois câbles du contrôleur aux trois câble du moteur. Si le moteur tourne en sens inverse, il suffit de permuter le branchement de deux câble pour inverser le sens.
Choix 2 : Moteur à balais (Consultez la section relative aux moteurs à balais) Reliez le câble rouge du contrôleur à la borne + du moteur et le câble noir à la borne - du moteur. Inversez le branchement des câbles si le moteur ne tourne pas dans un sens correct.
Choix 3 : Moteur à balais haute puissance. (Consultez la section relative aux moteurs à balais hautes puissances) Branchez les trois câbles du contrôleur à la borne - de moteur. Vous pouvez utiliser un cordon Y ou un simple câble afin de relier le positif de la batterie à la borne positive du contrôleur et à la borne (+) du moteur.
DépannageSi vous rencontrez toujours des difficultés avec votre contrôleur après avoir consulté cette section, veuillez contacter votre revendeur ou le service technique Horizon Hobby.
Problème : Mon contrôleur ne s'arme pas et ne se calibre pas.
Solution : La majorité des soucis de calibrage se résolvent en changeant des paramètres de l'émetteur. Vérifiez que les fins de course de gaz et frein (EPE et ATV) sont entre 100 et 120%. Si vous avez un émetteur Futaba , vérifez que le voie est bien inversée..
Problème : Lors du calibrage la position gaz à fond et la position frein à fond sont bien reconnues, mais le neutre ne l'est pas (DEL jaune reste clignotante)
Solution : placez le trim des gaz au neutre. Si vos émetteur possède un mode 50/50 et 70/30, passez en mode 50/50 et refaites un calibrage. Si vous avez changé le débattement de la zone de neutre, retournez au paramètre par défaut.
Problème : Ma voiture réagit comme si elle un avait retard de puissance, manque de puissance sur les premiers mètres puis accélère ensuite.
Solution : Vérifiez que vos batteries sont de bonne qualité et que vos connecteurs sont capables de supporter 40-100A.
Utilisez des barettes de cuivre pour assurer le contact entre les éléments de la batterie, afin de limiter la résistance interne.
Problème : Ma batterie est branchée au contrôleur, mais rien ne fonctionne.
Solution : Vérifiez que le contrôleur est bien branché à la voie 2 du récepteur et que les polarités sont respectées. Contrôlez les soudures de la prise de la batterie et contrôler sa tension.
GARANTIE ET RÉPARATIoNSDurée de la garantie Garantie exclusive - Horizon Hobby, Inc. (Horizon) garantit que le Produit acheté (le « Produit ») sera exempt de défauts matériels et de fabrication à sa date d’achat par l’Acheteur. La durée de garantie correspond aux dispositions légales du pays dans lequel le produit a été acquis. La durée de garantie est de 6 mois et la durée d’obligation de garantie de 18 mois à l’expiration de la période de garantie.
Limitations de la garantie (a) La garantie est donnée à l’acheteur initial (« Acheteur ») et n’est pas transférable. Le recours de l’acheteur consiste en la réparation ou en l‘échange dans le cadre de cette garantie. La garantie s’applique uniquement aux produits achetés chez un revendeur Horizon agréé. Les ventes faites à des tiers ne sont pas couvertes par cette garantie. Les revendications en garantie seront acceptées sur fourniture d’une preuve d’achat valide uniquement. Horizon se réserve le droit de modifier les dispositions de la présente garantie sans avis préalable et révoque alors les dispositions de garantie existantes.
(b) Horizon n’endosse aucune garantie quant à la vendabilité du produit ou aux capacités et à la forme physique de l’utilisateur pour une utilisation donnée du produit. Il est de la seule responsabilité de l’acheteur de vérifier si le produit correspond à ses capacités et à l’utilisation prévue.
(c) Recours de l’acheteur – Il est de la seule discrétion d‘Horizon de déterminer si un produit présentant un cas de garantie sera réparé ou échangé. Ce sont là les recours exclusifs de l’acheteur lorsqu’un défaut est constaté.
Horizon se réserve la possibilité de vérifier tous les éléments utilisés et susceptibles d’être intégrés dans le cas de garantie. La décision de réparer ou de remplacer le produit est du seul ressort d’Horizon. La garantie exclut les défauts esthétiques ou les défauts provoqués par des cas de force majeure, une manipulation incorrecte du produit, une utilisation incorrecte ou commerciale de ce dernier ou encore des modifications de quelque nature qu’elles soient.
La garantie ne couvre pas les dégâts résultant d’un montage ou d’une manipulation erronés, d’accidents ou encore du fonctionnement ainsi que des tentatives d’entretien ou de réparation non effectuées par Horizon. Les retours effectués par le fait de l’acheteur directement à Horizon ou à l’une de ses représentations nationales requièrent une confirmation écrite.
Limitation des dégâts Horizon ne saurait être tenu pour responsable de dommages conséquents directs ou indirects, de pertes de revenus ou de pertes commerciales, liés de quelque manière que ce soit au produit et ce, indépendamment du fait qu’un recours puisse être formulé en relation avec un contrat, la garantie ou l’obligation de garantie. Par ailleurs, Horizon n’acceptera pas de recours issus d’un cas de garantie lorsque ces recours dépassent la valeur unitaire du produit. Horizon n’exerce aucune influence sur le montage, l’utilisation ou la maintenance du produit ou sur d’éventuelles combinaisons de
produits choisies par l’acheteur. Horizon ne prend en compte aucune garantie et n‘accepte aucun recours pour les blessures ou les dommages pouvant en résulter. En utilisant et en montant le produit, l’acheteur accepte sans restriction ni réserve toutes les dispositions relatives à la garantie figurant dans le présent document.
Si vous n’êtes pas prêt, en tant qu’acheteur, à accepter ces dispositions en relation avec l’utilisation du produit, nous vous demandons de restituer au vendeur le produit complet, non utilisé et dans son emballage d’origine.
Indications relatives à la sécurité Ceci est un produit de loisirs perfectionné et non un jouet. Il doit être utilisé avec précaution et bon sens et nécessite quelques aptitudes mécaniques ainsi que mentales. L’incapacité à utiliser le produit de manière sûre et raisonnable peut provoquer des blessures et des dégâts matériels conséquents. Ce produit n’est pas destiné à être utilisé par des enfants sans la surveillance par un tuteur. La notice d’utilisation contient des indications relatives à la sécurité ainsi que des indications concernant la maintenance et le fonctionnement du produit. Il est absolument indispensable de lire et de comprendre ces indications avant la première mise en service. C’est uniquement ainsi qu’il sera possible d’éviter une manipulation erronée et des accidents entraînant des blessures et des dégâts.
Questions, assistance et réparations Votre revendeur spécialisé local et le point de vente ne peuvent effectuer une estimation d’éligibilité à l’application de la garantie sans avoir consulté Horizon. Cela vaut également pour les réparations sous garantie. Vous voudrez bien, dans un tel cas, contacter le revendeur qui conviendra avec Horizon d’une décision appropriée, destinée à vous aider le plus rapidement possible.
Maintenance et réparation Si votre produit doit faire l’objet d’une maintenance ou d‘une réparation, adressez-vous soit à votre revendeur spécialisé, soit directement à Horizon. Emballez le produit soigneusement. Veuillez noter que le carton d‘emballage d’origine ne suffit pas, en règle générale, à protéger le produit des dégâts pouvant survenir pendant le transport. Faites appel à un service de messagerie proposant une fonction de suivi et une assurance, puisque Horizon ne prend aucune responsabilité pour l’expédition du produit jusqu’à sa réception acceptée. Veuillez joindre une preuve d’achat, une description détaillée des défauts ainsi qu’une liste de tous les éléments distincts envoyés. Nous avons de plus besoin d’une adresse complète, d’un numéro de téléphone (pour demander des renseignements) et d’une adresse de courriel.
Garantie et réparationsLes demandes en garantie seront uniquement traitées en présence d’une preuve d’achat originale émanant d’un revendeur spécialisé agréé, sur laquelle figurent le nom de l’acheteur ainsi que la date d’achat. Si le cas de garantie est confirmé, le produit sera réparé Cette décision relève uniquement de Horizon Hobby.
Réparations payantes En cas de réparation payante, nous établissons un devis que nous transmettons à votre revendeur. La réparation sera seulement effectuée après que nous ayons reçu la confirmation du revendeur. Le prix de la réparation devra être acquitté au revendeur. Pour les réparations payantes, nous facturons au minimum 30 minutes de travail en atelier ainsi que les frais de réexpédition. En l’absence d’un accord pour la réparation dans un délai de 90 jours, nous nous réservons la possibilité de détruire le produit ou de l’utiliser autrement.
ATTENTION: nous n’effectuons de réparations payantes que pour les composants électroniques et les moteurs. Les réparations touchant à la mécanique, en particulier celles des hélicoptères et des voitures radiocommandées, sont extrêmement coûteuses et doivent par conséquent être effectuées par l’acheteur lui-même.
INFoRMATIoNS DE CoNFoRMITÉ PoUR L’UNIoN EURoPÉENNE
Déclaration de Conformité(conformément à la norme ISO/IEC 17050-1)
No. HH2011110302
Product(s): LOS TEN-SCTE RTR ESC Item Number(s): LOSB9504
L’objet de la déclaration décrit ci-dessus est en conformité avec les exigences des spécifi cations énumérées ci-après, suivant les conditions de la directive CEM Directive 2004/108/EC:
EN61000-6-1:2007 EN61000-6-3:2007
Signé en nom et pour le compte de: Horizon Hobby, Inc. Champaign, IL USA 03.11.2011
Elimination dans l’Union EuropéenneCe produit ne doit pas être éliminé avec
les ordures ménagères. Il est de la responsabilité de l‘utilisateur de remettre le produit à un point de collecte officiel des déchets d’équipements électriques. Cette procédure permet de garantir le respect de l’environnement et l’absence de sollicitation excessive des ressources naturelles. Elle protège de plus le bien-être de la communauté humaine. Pour plus d’informations quant aux lieux d’éliminations des déchets d‘équipements électriques, vous pouvez contacter votre mairie ou le service local de traitement des ordures ménagères.
LoSB9504 MSC-MXPRo BRUSHLESS ESC
REMARQUE
Toutes les instructions, garanties et autres documents de garantie sont sujets à la seule discrétion de Horizon Hobby, Inc. Veuillez, pour une littérature produits bien
à jour, faire un tour sur www.horizonhobby.com et cliquez sur l’onglet de support de ce produit.
SIGNIFICATIoN DE CERTAINS MoTS
Les termes suivants servent, tout au long de la littérature produits, à désigner différents niveaux de blessures potentielles lors de l’utilisation de ce produit:
REMARQUE: Procédures, qui si elles ne sont pas suivies correctement, créent une probabilité potentielle de dégâts matériels physiques ET un risque faible ou inexistant de blessures.
ATTENTIoN: Procédures, qui si elles ne sont pas suivies correctement, créent une probabilité potentielle de dégâts matériels physiques ET un risque de blessures graves.
AVERTISSEMENT: Procédures, qui si elles ne sont pas suivies correctement, créent une probabilité potentielle de dégâts matériels} physiques, de dégâts collatéraux et un risque de blessures graves OU créent une probabilité élevée de risque de blessures superficielles.
AVERTISSEMENT: Lisez la TOTALITE du manuel d’utilisation afi n de vous familiariser avec les
caractéritiques du produit avant de le faire fonctionner. Une utilisation incorrecte du produit peut avoir comme résultat un endommagement du produit lui-même, celui de propriétés personnelles voire entraîner des blessures graves.
Ceci est un produit de loisirs perfectionné et NON PAS un jouet. Il doit être manipulé avec prudence et bon sens et requiert quelques aptitudes de base à la mécanique. L’incapacité à manipuler ce produit de manière sûre et responsable peut provoquer des blessures ou des dommages au produit ou à d’autres biens. Ce produit n’est pas destiné à être utilisé par des enfants sans la surveillance directe d’un adulte. Ne pas essayer de désassembler le produit, de l’utiliser avec des composants incompatibles ou d’en améliorer les performances sans l’approbation de Horizon Hobby, Inc. Ce manuel comporte des instructions de sécurité, de mise en oeuvre et d’entretien. Il est capital de lire et de respecter toutes les instructions et avertissements du manuel avant l’assemblage, le réglage ou l’utilisation afi n de le manipuler correctement et d’éviter les dommages ou les blessures graves.
Recommandation sur l'âge• 14 ans et plus. Ceci nest pas un jouet.
Caractéristiques• Calibrage facile
• Format compact
• Equipé de prise EC3
• Coupure basse tension pour les batteries LiPo 7.4V 2S, Ni-MH et Ni-Cd
• Fonction avant/frein pour la course et fonction avant/frein/arrière pour les loisirs
• Frein moteur réglable
• Homologué ROAR pour les catégories à avance fixe.
Caractéristiques techniquesType de moteur Sensored et Sensorless
BrushlessCoupure basse Détection automatique tensionTension LiPo 2–4S ou 8.4V–16.8V d'alimentationRésistance interne .0018 OhmLimite moteur 4.5T 550 SensoredCâbles sortie 2.63mm² moteurConnecteur moteur PK 4mmCâbles batterie 2.63mm² Prise de batterie EC3™Dimensions 45.5 x 36.5 x 21.5mm
(1.79 x 1.44 x .85 in)Masse 81 g (2.8 oz) (sans les câbles)Sortie BEC 5.5–7.0V
Câbles d'alimentationVotre contrôleur possède des câble de sortie moteur et des câble d'alimentation batterie.
Le respect des polarités est essentiel. Vérifiez absolument que quand vous branchez votre batterie que le positif (+) et le négatif (-) sont respectés. En cas de non respect de cette consigne, le contrôleur sera endommagé. Ces dommages ne sont pas couverts par la garantie.
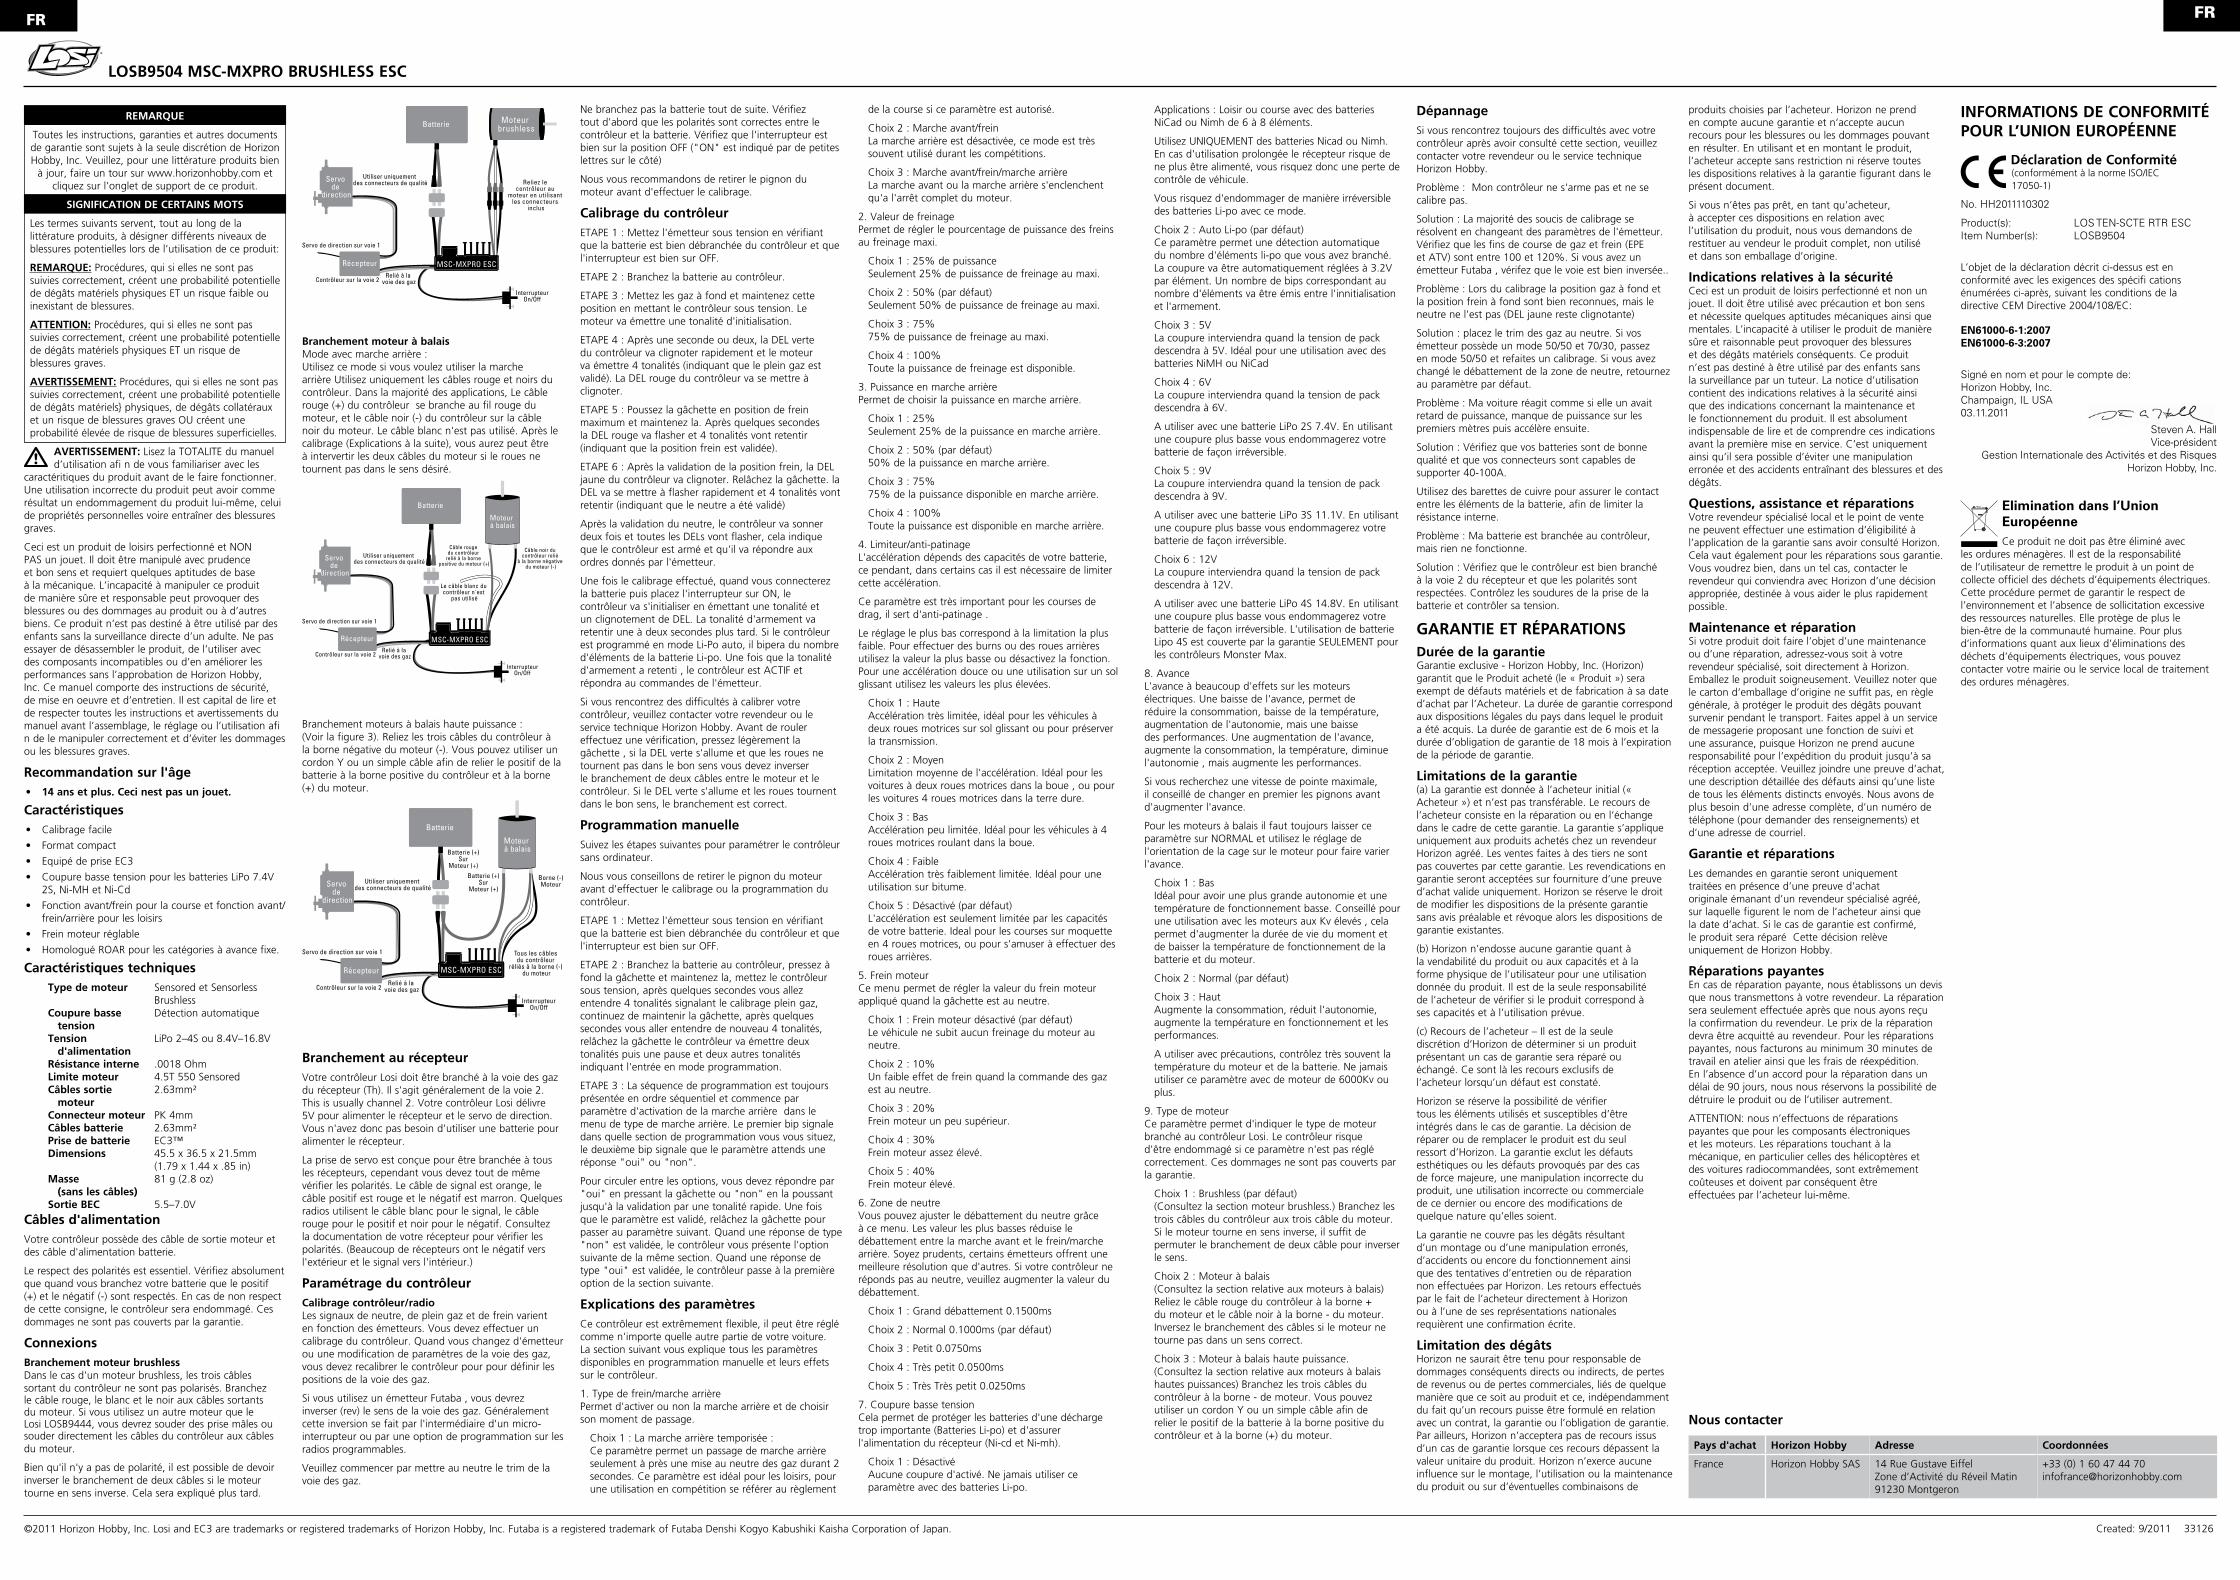
ConnexionsBranchement moteur brushless Dans le cas d'un moteur brushless, les trois câbles sortant du contrôleur ne sont pas polarisés. Branchez le câble rouge, le blanc et le noir aux câbles sortants du moteur. Si vous utilisez un autre moteur que le Losi LOSB9444, vous devrez souder des prise mâles ou souder directement les câbles du contrôleur aux câbles du moteur.
Bien qu'il n'y a pas de polarité, il est possible de devoir inverser le branchement de deux câbles si le moteur tourne en sens inverse. Cela sera expliqué plus tard.
Reliez le contrôleur au
moteur en utilisant les connecteurs
inclus
Moteur brushless
MSC-MXPRO ESCRelié à la
voie des gaz
Servo de direction sur voie 1
Contrôleur sur la voie 2
Récepteur
Batterie
Utiliser uniquement des connecteurs de qualité
InterrupteurOn/Off
Servo de
direction
Branchement moteur à balais Mode avec marche arrière : Utilisez ce mode si vous voulez utiliser la marche arrière Utilisez uniquement les câbles rouge et noirs du contrôleur. Dans la majorité des applications, Le câble rouge (+) du contrôleur se branche au fil rouge du moteur, et le câble noir (-) du contrôleur sur la câble noir du moteur. Le câble blanc n'est pas utilisé. Après le calibrage (Explications à la suite), vous aurez peut être à intervertir les deux câbles du moteur si le roues ne tournent pas dans le sens désiré.
Câble noir du contrôleur relié
à la borne négative du moteur (-)
Le câble blanc du contrôleur n'est
pas utilisé
Câble rouge du contrôleur
relié à la borne positive du moteur (+)
Relié à la voie des gaz
Servo de direction sur voie 1
Contrôleur sur la voie 2
Récepteur
Batterie
Utiliser uniquement des connecteurs de qualité
InterrupteurOn/Off
Servo de
direction
MSC-MXPRO ESC
Moteur à balais
Branchement moteurs à balais haute puissance : (Voir la figure 3). Reliez les trois câbles du contrôleur à la borne négative du moteur (-). Vous pouvez utiliser un cordon Y ou un simple câble afin de relier le positif de la batterie à la borne positive du contrôleur et à la borne (+) du moteur.
Batterie (+)Sur
Moteur (+)Batterie (+)
SurMoteur (+)
Borne (-)Moteur
Tous les câbles du contrôleur
réliés à la borne (-) du moteurMSC-MXPRO ESC
Relié à la voie des gaz
Servo de direction sur voie 1
Contrôleur sur la voie 2
Récepteur
Batterie
Utiliser uniquement des connecteurs de qualité
InterrupteurOn/Off
Servo de
direction
Moteur à balais
Branchement au récepteurVotre contrôleur Losi doit être branché à la voie des gaz du récepteur (Th). Il s'agit généralement de la voie 2. This is usually channel 2. Votre contrôleur Losi délivre 5V pour alimenter le récepteur et le servo de direction. Vous n'avez donc pas besoin d'utiliser une batterie pour alimenter le récepteur.
La prise de servo est conçue pour être branchée à tous les récepteurs, cependant vous devez tout de même vérifier les polarités. Le câble de signal est orange, le câble positif est rouge et le négatif est marron. Quelques radios utilisent le câble blanc pour le signal, le câble rouge pour le positif et noir pour le négatif. Consultez la documentation de votre récepteur pour vérifier les polarités. (Beaucoup de récepteurs ont le négatif vers l'extérieur et le signal vers l'intérieur.)
Paramétrage du contrôleurCalibrage contrôleur/radio Les signaux de neutre, de plein gaz et de frein varient en fonction des émetteurs. Vous devez effectuer un calibrage du contrôleur. Quand vous changez d'émetteur ou une modification de paramètres de la voie des gaz, vous devez recalibrer le contrôleur pour pour définir les positions de la voie des gaz.
Si vous utilisez un émetteur Futaba , vous devrez inverser (rev) le sens de la voie des gaz. Généralement cette inversion se fait par l'intermédiaire d'un micro-interrupteur ou par une option de programmation sur les radios programmables.
Veuillez commencer par mettre au neutre le trim de la voie des gaz.
Ne branchez pas la batterie tout de suite. Vérifiez tout d'abord que les polarités sont correctes entre le contrôleur et la batterie. Vérifiez que l'interrupteur est bien sur la position OFF ("ON" est indiqué par de petites lettres sur le côté)
Nous vous recommandons de retirer le pignon du moteur avant d'effectuer le calibrage.
Calibrage du contrôleurETAPE 1 : Mettez l'émetteur sous tension en vérifiant que la batterie est bien débranchée du contrôleur et que l'interrupteur est bien sur OFF.
ETAPE 2 : Branchez la batterie au contrôleur.
ETAPE 3 : Mettez les gaz à fond et maintenez cette position en mettant le contrôleur sous tension. Le moteur va émettre une tonalité d'initialisation.
ETAPE 4 : Après une seconde ou deux, la DEL verte du contrôleur va clignoter rapidement et le moteur va émettre 4 tonalités (indiquant que le plein gaz est validé). La DEL rouge du contrôleur va se mettre à clignoter.
ETAPE 5 : Poussez la gâchette en position de frein maximum et maintenez la. Après quelques secondes la DEL rouge va flasher et 4 tonalités vont retentir (indiquant que la position frein est validée).
ETAPE 6 : Après la validation de la position frein, la DEL jaune du contrôleur va clignoter. Relâchez la gâchette. la DEL va se mettre à flasher rapidement et 4 tonalités vont retentir (indiquant que le neutre a été validé)
Après la validation du neutre, le contrôleur va sonner deux fois et toutes les DELs vont flasher, cela indique que le contrôleur est armé et qu'il va répondre aux ordres donnés par l'émetteur.
Une fois le calibrage effectué, quand vous connecterez la batterie puis placez l'interrupteur sur ON, le contrôleur va s'initialiser en émettant une tonalité et un clignotement de DEL. La tonalité d'armement va retentir une à deux secondes plus tard. Si le contrôleur est programmé en mode Li-Po auto, il bipera du nombre d'éléments de la batterie Li-po. Une fois que la tonalité d'armement a retenti , le contrôleur est ACTIF et répondra au commandes de l'émetteur.
Si vous rencontrez des difficultés à calibrer votre contrôleur, veuillez contacter votre revendeur ou le service technique Horizon Hobby. Avant de rouler effectuez une vérification, pressez légèrement la gâchette , si la DEL verte s'allume et que les roues ne tournent pas dans le bon sens vous devez inverser le branchement de deux câbles entre le moteur et le contrôleur. Si le DEL verte s'allume et les roues tournent dans le bon sens, le branchement est correct.
Programmation manuelleSuivez les étapes suivantes pour paramétrer le contrôleur sans ordinateur.
Nous vous conseillons de retirer le pignon du moteur avant d'effectuer le calibrage ou la programmation du contrôleur.
ETAPE 1 : Mettez l'émetteur sous tension en vérifiant que la batterie est bien débranchée du contrôleur et que l'interrupteur est bien sur OFF.
ETAPE 2 : Branchez la batterie au contrôleur, pressez à fond la gâchette et maintenez la, mettez le contrôleur sous tension, après quelques secondes vous allez entendre 4 tonalités signalant le calibrage plein gaz, continuez de maintenir la gâchette, après quelques secondes vous aller entendre de nouveau 4 tonalités, relâchez la gâchette le contrôleur va émettre deux tonalités puis une pause et deux autres tonalités indiquant l'entrée en mode programmation.
ETAPE 3 : La séquence de programmation est toujours présentée en ordre séquentiel et commence par paramètre d'activation de la marche arrière dans le menu de type de marche arrière. Le premier bip signale dans quelle section de programmation vous vous situez, le deuxième bip signale que le paramètre attends une réponse "oui" ou "non".
Pour circuler entre les options, vous devez répondre par "oui" en pressant la gâchette ou "non" en la poussant jusqu'à la validation par une tonalité rapide. Une fois que le paramètre est validé, relâchez la gâchette pour passer au paramètre suivant. Quand une réponse de type "non" est validée, le contrôleur vous présente l'option suivante de la même section. Quand une réponse de type "oui" est validée, le contrôleur passe à la première option de la section suivante.
Explications des paramètresCe contrôleur est extrêmement flexible, il peut être réglé comme n'importe quelle autre partie de votre voiture. La section suivant vous explique tous les paramètres disponibles en programmation manuelle et leurs effets sur le contrôleur.
1. Type de frein/marche arrière Permet d'activer ou non la marche arrière et de choisir son moment de passage.
Choix 1 : La marche arrière temporisée : Ce paramètre permet un passage de marche arrière seulement à près une mise au neutre des gaz durant 2 secondes. Ce paramètre est idéal pour les loisirs, pour une utilisation en compétition se référer au règlement
de la course si ce paramètre est autorisé.
Choix 2 : Marche avant/frein La marche arrière est désactivée, ce mode est très souvent utilisé durant les compétitions.
Choix 3 : Marche avant/frein/marche arrière La marche avant ou la marche arrière s'enclenchent qu'a l'arrêt complet du moteur.
2. Valeur de freinage Permet de régler le pourcentage de puissance des freins au freinage maxi.
Choix 1 : 25% de puissance Seulement 25% de puissance de freinage au maxi.
Choix 2 : 50% (par défaut) Seulement 50% de puissance de freinage au maxi.
Choix 3 : 75% 75% de puissance de freinage au maxi.
Choix 4 : 100% Toute la puissance de freinage est disponible.
3. Puissance en marche arrière Permet de choisir la puissance en marche arrière.
Choix 1 : 25% Seulement 25% de la puissance en marche arrière.
Choix 2 : 50% (par défaut) 50% de la puissance en marche arrière.
Choix 3 : 75% 75% de la puissance disponible en marche arrière.
Choix 4 : 100% Toute la puissance est disponible en marche arrière.
4. Limiteur/anti-patinage L'accélération dépends des capacités de votre batterie, ce pendant, dans certains cas il est nécessaire de limiter cette accélération.
Ce paramètre est très important pour les courses de drag, il sert d'anti-patinage .
Le réglage le plus bas correspond à la limitation la plus faible. Pour effectuer des burns ou des roues arrières utilisez la valeur la plus basse ou désactivez la fonction. Pour une accélération douce ou une utilisation sur un sol glissant utilisez les valeurs les plus élevées.
Choix 1 : Haute Accélération très limitée, idéal pour les véhicules à deux roues motrices sur sol glissant ou pour préserver la transmission.
Choix 2 : Moyen Limitation moyenne de l'accélération. Idéal pour les voitures à deux roues motrices dans la boue , ou pour les voitures 4 roues motrices dans la terre dure.
Choix 3 : Bas Accélération peu limitée. Idéal pour les véhicules à 4 roues motrices roulant dans la boue.
Choix 4 : Faible Accélération très faiblement limitée. Idéal pour une utilisation sur bitume.
Choix 5 : Désactivé (par défaut) L'accélération est seulement limitée par les capacités de votre batterie. Ideal pour les courses sur moquette en 4 roues motrices, ou pour s'amuser à effectuer des roues arrières.
5. Frein moteur Ce menu permet de régler la valeur du frein moteur appliqué quand la gâchette est au neutre.
Choix 1 : Frein moteur désactivé (par défaut) Le véhicule ne subit aucun freinage du moteur au neutre.
Choix 2 : 10% Un faible effet de frein quand la commande des gaz est au neutre.
Choix 3 : 20% Frein moteur un peu supérieur.
Choix 4 : 30% Frein moteur assez élevé.
Choix 5 : 40% Frein moteur élevé.
6. Zone de neutre Vous pouvez ajuster le débattement du neutre grâce à ce menu. Les valeur les plus basses réduise le débattement entre la marche avant et le frein/marche arrière. Soyez prudents, certains émetteurs offrent une meilleure résolution que d'autres. Si votre contrôleur ne réponds pas au neutre, veuillez augmenter la valeur du débattement.
Choix 1 : Grand débattement 0.1500ms
Choix 2 : Normal 0.1000ms (par défaut)
Choix 3 : Petit 0.0750ms
Choix 4 : Très petit 0.0500ms
Choix 5 : Très Très petit 0.0250ms
7. Coupure basse tension Cela permet de protéger les batteries d'une décharge trop importante (Batteries Li-po) et d'assurer l'alimentation du récepteur (Ni-cd et Ni-mh).
Choix 1 : Désactivé Aucune coupure d'activé. Ne jamais utiliser ce paramètre avec des batteries Li-po.
Gestion Internationale des Activités et des RisquesHorizon Hobby, Inc.
IT
al comando in posizione neutra, bisogna allargare l'ampiezza del comando.
Regolazione 1: Larga > 0,15 ms
Regolazione 2: Normale > 0,10 ms
Regolazione 3: Piccola > 0,075 ms
Regolazione 4: Molto piccola > 0,05 ms
Regolazione 5: Piccolissima > 0,025 ms
7. Tensione di cut-off Imposta la tensione a cui l'ESC riduce o toglie potenza al motore per mantenere la batteria ad una tensione di sicurezza (celle LiPo) o il radiocomando in condizioni di funzionare correttamente (celle NiCd/NiMH).
Regolazione 1: Nessuna L'ESC non interviene a limitare o spegnere il motore anche se la tensione della batteria scende troppo. Non usare con batterie LiPo.
Applicazioni: Utilizzare con pacchi batteria da 6-8 celle NiCd/NiMH. Usare questa impostazione solo con batterie NiCd o NiMH, tenendo presente che ad un certo punto il radiocomando potrebbe cessare di funzionare e causare la perdita di controllo del veicolo.
In questa situazione le batterie LiPo potrebbero subire un danno irreversibile.
Regolazione 2: Auto-LiPo (default) Questa impostazione rileva automaticamente il numero di celle LiPo collegate e imposta la tensione minima a 3,2 V per cella. Emetterà una serie di beep pari al numero di celle, tra i toni di inizializzazione e quelli di armamento, quando si accende il regolatore.
Regolazione 3: 5 V L'ESC interviene a limitare o spegnere il motore quando la tensione della batteria arriva a 5 V. È una buona impostazione su veicoli che usano pacchi con 8-12 celle NiCd/NiMH.
Regolazione 4: 6 V L'ESC interviene a limitare o spegnere il motore quando la tensione della batteria arriva a 6 V.
Impostazione valida con 2 celle (7,4 V) LiPo. Se in questo caso si arrivasse ad una tensione più bassa di 6 V si potrebbe danneggiare irreversibilmente la batteria.
Regolazione 5: 9 V L'ESC interviene a limitare o spegnere il motore quando la tensione della batteria arriva a 9 V. Impostazione valida con 3 celle (11,1 V) LiPo. Se in questo caso si arrivasse ad una tensione più bassa di 9 V si potrebbe danneggiare irreversibilmente la batteria.
Regolazione 6: 12 V L'ESC interviene a limitare o spegnere il motore quando la tensione della batteria arriva a 12 V.
Impostazione valida con 4 celle (14,8 V) LiPo. Se in questo caso si arrivasse ad una tensione più bassa di 12 V si potrebbe danneggiare irreversibilmente la batteria. L'uso di una batteria LiPo da 4 celle è coperto da garanzia solo sugli ESC Monster Max.
8. Anticipo del motore Avanzare l'anticipo su di un motore elettrico può avere vari effetti. Abbassare l'avanzamento dell'anticipo riduce il consumo di corrente, aumenta il tempo di funzionamento, riduce la temperatura di motore e batteria e può ridurre leggermente la velocità massima e l'accelerazione. In caso contrario se si aumenta l'avanzamento dell'anticipo aumenta il consumo di corrente, diminuisce il tempo di funzionamento, aumenta la temperatura di motore e batteria e può aumentare leggermente la velocità massima e l'accelerazione. Se ci sono problemi di velocità è meglio intervenire sugli ingranaggi piuttosto che aumentare troppo l'anticipo. Per motori a spazzole conviene lasciare questa regolazione su Normal e intervenire meccanicamente sul motore, secondo le sue istruzioni.
Regolazione 1: Molto basso Una impostazione per la massima efficienza poiché si hanno tempi di funzionamento più lunghi e un motore più freddo. Utile con motori ad alto Kv (poche spire) per prolungarne la vita e ridurre la temperatura sia del motore che della batteria.
Regolazione 2: Normale (default) Il miglior compromesso tra velocità, accelerazione ed efficienza valido per tutti i motori.
Regolazione 3: Massimo Aumenta la corrente assorbita, riduce il tempo di funzionamento, aumenta la temperatura di motore e batteria e può incrementare leggermente velocità e accelerazione. Da usare con attenzione controllando spesso la temperatura di motore e batteria. Non usare una regolazione oltre il "Normal" con motori che abbiano un Kv superiore a 6000.
9. Tipo di motore Con questa funzione si può impostare il tipo di motore che si sta usando con il Losi ESC. Se l'impostazione del tipo/collegamento di motore non corrisponde al motore in uso, il regolatore (ESC) si potrebbe danneggiare e questo danno non è coperto da garanzia.
Regolazione 1: Brushless (default) (Vedi la sezione riguardante le impostazioni del motore brushless). Utilizza tutti i tre fili dell'ESC
collegati ai tre fili del motore brushless. Se il motore non gira nel verso giusto, scambiare due fili qualsiasi.
Regolazione 2. Motore a spazzole con inversione (Vedi la sezione riguardante le impostazioni del motore a spazzole con inversione) Usa solo i fili rosso e nero da collegare al (+) e (-) del motore. Se il motore non gira nel verso giusto, scambiare i fili rosso e nero.
Regolazione 3: Motore a spazzole alta potenza (Vedi la sezione riguardante le impostazioni del motore a spazzole alta potenza) Collegare insieme i tre fili per il motore al polo negativo (-) del motore. Al polo positivo (+) collegare direttamente il positivo della batteria con un adattatore che permetta di collegare anche l'ingresso del regolatore (ESC).
TroubleshootingSoluzione dei problemi Se continuate ad avere difficoltà con il vostro ESC Losi dopo aver provato ad applicare i suggerimenti qui esposti, potete rivolgervi al Centro Assistenza Losi, contattandolo all'indirizzo e-mail o al numero telefonico elencati qui sotto.
Problema: il mio ESC Losi si può armare o no, però non si calibra con il mio trasmettitore.
Soluzione: molti problemi di calibrazione si possono risolvere cambiando le impostazioni del trasmettitore. Verificare di avere i fine corsa di motore e freno (denominati EPA o ATV sul vostro radiocomando) regolati tra 100 e 120%. Controllare anche, se avete una radio Futaba o Robbe, che il canale del motore sia sulla posizione Reverse.
Problema: il mio ESC fa la calibrazione del massimo di freno e motore, ma non fa la calibrazione del punto neutro (LED giallo lampeggiante).
Soluzione: provare a muovere il trim in un senso e poi nell'altro (normalmente dal lato del motore è meglio). Se il vostro trasmettitore ha le posizioni 50/50 e 70/30 sul comando motore, scegliete il 50/50 e riprovate a calibrare. Inoltre se avete modificato la "dead band" restringendola, provate a ritornare sulla posizione "normale" e riprovate a calibrare.
Problema: il mio veicolo si comporta come se avesse un "ritardo turbo" (per i primi metri ha scarsa accelerazione e poi scatta violentemente in avanti).
Soluzione: controllare se si stanno usando batterie di buona qualità e connettori che sopportano alte correnti (40-100 A). Questo comportamento è tipico di batterie che non sono in grado di fornire tutta la potenza che il veicolo richiede per le massime prestazioni. Usare barrette di rame per collegare le celle invece delle linguette puntate. Le barrette di rame hanno una resistenza molto più bassa.
Problema: la mia batteria è collegata al regolatore (ESC) ma non funziona nulla (né sterzo, né motore).
Soluzione: verificare che il connettore dell'ESC sia collegato al canale 2 del ricevitore e che sia orientato correttamente. Doppio controllo sulle saldature dei connettori della batteria e controllare che abbia la giusta tensione.
Periodo di garanzia Garanzia esclusiva - Horizon Hobby, Inc., (Horizon) garantisce che i prodotti acquistati (il “Prodotto”) sono privi di difetti relativi ai materiali e di eventuali errori di montaggio. Il periodo di garanzia è conforme alle disposizioni legali del paese nel quale il prodotto è stato acquistato. Tale periodo di garanzia ammonta a 6 mesi e si estende ad altri 18 mesi dopo tale termine.
limiti della garanzia (a) La garanzia è limitata all’acquirente originale (Acquirente) e non è cedibile a terzi. L’acquirente ha il diritto a far riparare o a far sostituire la merce durante il periodo di questa garanzia. La garanzia copre solo quei prodotti acquistati presso un rivenditore autorizzato Horizon. Altre transazioni di terze parti non sono coperte da questa garanzia. La prova di acquisto è necessaria per far valere il diritto di garanzia. Inoltre, Horizon si riserva il diritto di cambiare o modificare i termini di questa garanzia senza alcun preavviso e di escludere tutte le altre garanzie già esistenti.
(b) Horizon non si assume alcuna garanzia per la disponibilità del prodotto, per l’adeguatezza o l’idoneità del prodotto a particolari previsti dall’utente. è sola responsabilità dell’acquirente il fatto di verificare se il prodotto è adatto agli scopi da lui previsti.
(c) Richiesta dell’acquirente – spetta soltanto a Horizon, a propria discrezione riparare o sostituire qualsiasi prodotto considerato difettoso e che rientra nei termini di garanzia. queste sono le uniche rivalse a cui l’acquirente si può appellare, se un prodotto è difettoso.
Horizon si riserva il diritto di controllare qualsiasi componente utilizzato che viene coinvolto nella rivalsa di garanzia. Le decisioni relative alla sostituzione o alla riparazione avvengono solo in base alla discrezione di Horizon. Questa garanzia non copre dei danni superficiali o danni per cause di forza maggiore, uso errato del prodotto, negligenza, uso ai fini commerciali, o una qualsiasi modifica a qualsiasi parte del prodotto.
Questa garanzia non copre danni dovuti ad una installazione errata, ad un funzionamento errato, ad una manutenzione o un tentativo di riparazione
non idonei a cura di soggetti diversi da Horizon. La restituzione del prodotto a cura dell’acquirente, o da un suo rappresentante, deve essere approvata per iscritto dalla Horizon.
Limiti di danno Horizon non si riterrà responsabile per danni speciali, diretti, indiretti o consequenziali; perdita di profitto o di produzione; perdita commerciale connessa al prodotto, indipendentemente dal fatto che la richiesta si basa su un contratto o sulla garanzia. Inoltre la responsabilità di Horizon non supera mai in nessun caso il prezzo di acquisto del prodotto per il quale si chiede la responsabilità. Horizon non ha alcun controllo sul montaggio, sull’utilizzo o sulla manutenzione del prodotto o di combinazioni di vari prodotti. Quindi Horizon non accetta nessuna responsabilità per danni o lesioni derivanti da tali circostanze. Con l’utilizzo e il montaggio del prodotto l’utente acconsente a tutte le condizioni, limitazioni e riserve di garanzia citate in questa sede. Qualora l’utente non fosse pronto ad assumersi tale responsabilità associata all’uso del prodotto, si suggerisce di di restituire il prodotto intatto, mai usato e immediatamente presso il venditore.
Indicazioni di sicurezza Questo è un prodotto sofisticato di hobbistica e non è un giocattolo. Esso deve essere manipolato con cautela, con giudizio e richiede delle conoscenze basilari di meccanica e delle facoltà mentali di base. Se il prodotto non verrà manipolato in maniera sicura e responsabile potrebbero risultare delle lesioni, dei gravi danni a persone, al prodotto o all’ambiente circostante. Questo prodotto non è concepito per essere usato dai bambini senza una diretta supervisione di un adulto. Il manuale del prodotto contiene le istruzioni di sicurezza, di funzionamento e di manutenzione del prodotto stesso. È fondamentale leggere e seguire tutte le istruzioni e le avvertenze nel manuale prima di mettere in funzione il prodotto. Solo così si eviterà un utilizzo errato e di preverranno incidenti, lesioni o danni.
Domande, assistenza e riparazioni Il vostro negozio locale e/o luogo di acquisto non possono fornire garanzie di assistenza o riparazione senza previo colloquio con Horizon. questo vale anche per le riparazioni in garanzia. Quindi in tale casi bisogna interpellare un rivenditore, che si metterà in contatto subito con Horizon per prendere una decisione che vi possa aiutare nel più breve tempo possibile.
Manutenzione e riparazione Se il prodotto deve essere ispezionato o riparato, si prega di rivolgersi ad un rivenditore specializzato o direttamente ad Horizon. il prodotto deve essere Imballato con cura. Bisogna far notare che i box originali solitamente non sono adatti per effettuare una spedizione senza subire alcun danno. Bisogna effettuare una spedizione via corriere che fornisce una tracciabilità e un’assicurazione, in quanto Horizon non si assume alcuna responsabilità in relazione alla spedizione del prodotto. Inserire il prodotto in una busta assieme ad una descrizione dettagliata degli errori e ad una lista di tutti i singoli componenti spediti. Inoltre abbiasmo bisogno di un indirizzo completo, di un numnero di telefono per chiedere ulteriori domande e di un indirizzo e-mail.
Garanzia a riparazione Le richieste in garanzia verranno elaborate solo se è presente una prova d’acquisto in originale proveniente da un rivenditore specializzato autorizzato, nella quale è ben visibile la data di acquisto. Se la garanzia viene confermata, allora il prodotto verrà riparato o sostituito. Questa decisione spetta esclusivamente a Horizon Hobby.
Riparazioni a pagamento Se bisogna effettuare una riparazione a pagamento, effettueremo un preventivo che verrà inoltrato al vostro rivenditore. La riparazione verrà effettuata dopo l’autorizzazione da parte del vostro rivenditore. La somma per la riparazione dovrà essere pagata al vostro rivenditore. Le riparazioni a pagamento avranno un costo minimo di 30 minuti di lavoro e in fattura includeranno le spese di restituzione. Qualsiasi riparazione non pagata e non richiesta entro 90 giorni verrà considerata abbandonata e verrà gestita di conseguenza.
ATTENZIONE: Le riparazioni a pagamento sono disponibili solo sull’elettronica e sui motori. Le riparazioni a livello meccanico, soprattutto per gli elicotteri e le vetture RC sono molto costose e devono essere effettuate autonomamente dall’acquirente.
INFoRMAzIoNI SULLA CoNFoRMITà PER L’UNIoNE EURoPEA
Dichiarazione di conformità(in conformità con ISO/IEC 17050-1)
No. HH2011110302
Product(s): LOS TEN-SCTE RTR ESC Item Number(s): LOSB9504
Gli oggetti presentati nella dichiarazione sopra citata sono conformi ai requisiti delle specifi che elencate qui di seguito, seguendo le disposizioni della direttiva europea EMC Directive 2004/108/EC:
EN61000-6-1:2007 EN61000-6-3:2007 Signed for and on behalf of: Horizon Hobby, Inc. Champaign, IL USA 3.11.2011
Smaltimento all’interno dell’Unione EuropeaQuesto prodotto non deve essere smaltito assieme ai rifiuti domestici. Al contrario, è responsabilità dell’utente lo smaltimento di
tali rifiuti, che devono essere portati in un centro di raccolta designato per il riciclaggio di rifiuti elettrici e apparecchiature elettroniche. La raccolta differenziata e il riciclaggio di tali rifiuti provenienti da apparecchiature nel momento dello smaltimento aiuteranno a preservare le risorse naturali e garantiranno un riciclaggio adatto a proteggere il benessere dell’uomo e dell’ambiente. Per maggiori informazioni sui punti di riciclaggio si prega di contattare il proprio ufficio locale, il servizio di smaltimento rifiuti o il negozio presso il quale è stato acquistato il prodotto.
LoSB9504 MSC-MXPRo BRUSHLESS ESC
AVVISo
Tutte le istruzioni, le garanzie e gli altri documenti pertinenti sono soggetti a cambiamenti a totale
discrezione di Horizon Hobby, Inc. Per una documentazione aggiornata sul prodotto, visitare il
sito www.horizonhobby.com e fare clic sulla sezione Support per questo prodotto.
SIGNIFICATo DEI TERMINI PARTICoLARI
In tutta la documentazione relativa al prodotto sono utilizzati i seguenti termini per indicare vari livelli di potenziale pericolo durante il funzionamento:
AVVISo: Procedure che, se non sono seguite correttamente, possono creare danni materiali E nessuna o scarsa possibilità di lesioni.
ATTENzIoNE: Procedure che, se non sono seguite correttamente, possono creare danni materiali E possibili gravi lesioni.
AVVERTENzA: Procedure che, se non debitamente seguite, espongono alla possibilità di danni alla proprietà fisica o possono omportare un’elevata possibilità di provocare ferite superficiali.
AVVERTENzA: Leggere TUTTO il manuale di istruzioni e prendere familiarità con le caratteristiche del prodotto, prima di farlo funzionare. Un utilizzo scorretto del prodotto può causare danni al prodotto stesso, alle persone o alle cose, provocando gravi lesioni.
Questo è un prodotto di hobbistica sofisticato e NON un giocattolo. È necessario farlo funzionare con cautela e responsabilità e avere conoscenze basilari di meccanica. Se questo prodotto non è utilizzato in maniera sicura e responsabile potrebbero verificarsi lesioni o danni al prodotto stesso o ad altre proprietà. Non è un prodotto adatto a essere utilizzato dai bambini senza la diretta supervisione di un adulto. Non tentare di smontare il prodotto, di utilizzare componenti incompatibili o di potenziarlo in alcun modo senza previa approvazione di Horizon Hobby, Inc. Questo manuale contiene le istruzioni per un funzionamento e una manutenzione sicuri. È fondamentale leggere e seguire tutte le istruzioni e le avvertenze del manuale prima di montare, configurare o far funzionare il Prodotto, al fine di utilizzarlo correttamente e di evitare danni o lesioni gravi.
Età Raccomandazione• Almeno 14 anni. Non è un giocattolo.
Caratteristiche• Calibrazione semplificata
• Dimensioni compatte
• Connettore batteria tipo EC3™ già collegato
• Spegnimento con bassa tensione per batterie 2S 7.4V Li-Po, Ni-MH e Ni-Cd
• Funzione avanti/freno per le gare e funzione avanti/freno/indietro per divertimento e sport
• Potenza della frenata regolabile
• ROAR Legal per Non-Timing Spec Classes
Dati tecnici Tipo di motore Sensored e Sensorless
BrushlessTaglio per Rilevamento automatico bassa tensione Tensione in ingresso LiPo 2–4S or 8.4V–16.8VResistenza .0018 OhmLimiti del motore 4.5T 550 SensoredSezione cavi per 2,6 mmq il motoreConnettore del 4.0mm Bullet Plug motoreSezione cavi per 2,6 mmq batteria Connettore batteria EC3™ tipoDimensioni 45.5 x 36.5 x 21.5mm
(1.79 x 1.44 x .85 in)Peso (senza cavi) 81 g (2.8 oz)Uscita BEC 5.5–7.0V
Impianto di alimentazioneQuesto regolatore (ESC) ha dei connettori sia sui fili per il motore che su quelli per la batteria. È importante rispettare la polarità. Bisogna essere assolutamente certi che, quando si collega la batteria, il positivo (+) si colleghi al positivo (rosso) e che il negativo (-) si colleghi al negativo (nero). Se si inverte la polarità, il regolatore (ESC) si danneggia e questo danno non è coperto dalla garanzia..
CollegamentiCollegamento al motore brushless Per il collegamento al motore i tre cavi non hanno polarità e quindi si possono collegare senza problemi. Se si usa un motore diverso dal Losi LOSB9444, bisogna saldargli i connettori corrispondenti a quelli del regolatore (ESC); oppure si possono saldare direttamente i cavi tra di loro.
Inizialmente i tre cavi si possono collegare casualmente, però potrebbe essere necessario scambiare tra di loro due cavi nel caso il motore girasse al contrario. Questo verrà spiegato più avanti.
Per il collegamento
usare i connet tori
forniti
Losi ESCin CH2
Motorebrushless
MSC-MXPRO ESCCollegareal canale
del motore
Servo sterzonel CH1
Usare solo connettoridi buona qualità
InterruttoreOn/Off
Ricevitore
Batteria
Servosterzo
Collegamento al motore a spazzole Modalità con retromarcia: Si usa quando si deve utilizzare la retromarcia. Collegare al motore solo i fili rosso e nero provenienti dal regolatore, in corrispondenza del (+) e del (-) del motore. Il filo bianco non viene usato. Dopo la calibrazione (spiegata qui di seguito) potrebbe essere necessario invertire i due fili del motore per avere la rotazione nel verso giusto.
Cavo nero ESC al (-) del motore
Cavo bianco del motore
non utilizzato
Cavo rosso ESC al (+) del motore
Collegareal canale
del motore
Servo sterzonel CH1
Losi ESCin CH2
Usare solo connettoridi buona qualità
InterruttoreOn/Off
MSC-MXPRO ESCRicevitore
Batteria
Servosterzo
Motorecon
spazzole
Modalità alta potenza: (per lo schema di collegamento vedi fig. 3) Collegare tutti i tre fili provenienti dall'ESC per il motore, al negativo (-) del motore. Il positivo del motore (+) va collegato direttamente al positivo della batteria usando un adattatore a Y o qualche altro sistema.
(+) della batteria al (+) del motore
MotoreTab(+)
MotoreTab(-)
Tutti i 3 cavi dell'ESC al
(-) del motore
Collegareal canale
del motore
Servo sterzonel CH1
Losi ESCin CH2
Ricevitore
Batteria
Usare solo connettori di buona qualità
InterruttoreOn/Off
Servosterzo
Motorecon
spazzole
MSC-MXPRO ESC
Collegamenti alla radioIl regolatore (ESC) Losi si deve collegare al canale riservato al motore; normalmente è il canale 2. Questo regolatore Losi fornisce la tensione a 5 V necessaria per alimentare la ricevente e il servo dello sterzo; non sono necessarie altre batterie.
Il connettore del regolatore Losi è adatto per qualsiasi ricevitore, però bisogna accertarsi che le polarità siano corrette. Il filo del segnale è arancio, quello del positivo è rosso e quello del negativo è marrone. Alcuni tipi di radio usano il bianco per il segnale, il rosso per il positivo e il nero per il negativo. Verificare la documentazione della radio per identificare correttamente le polarità. (Molti ricevitori usano il negativo verso l'esterno e il segnale verso l'interno del contenitore).
Impostazione del regolatore (ESC) Calibrazione ESC/Radio I segnali dei vari trasmettitori per il neutro e i fine corsa, possono cambiare, pertanto bisogna calibrare l'ESC in modo che possa operare regolarmente con il vostro trasmettitore. Tutte le volte che si usa un nuovo trasmettitore, o una nuova impostazione, con questo ESC, deve essere calibrato, per fargli conoscere quali sono le impostazioni del comando motore.
Se si sta usando un radiocomando Futaba o Robbe, bisogna invertire il canale del motore. Per fare questo ci si può servire di un interruttore oppure di una funzione prevista nella programmazione del trasmettitore.
Per prima cosa bisogna portare a zero i trim relativi al motore.
Non collegare ancora la batteria. Accertarsi che le polarità di batteria e regolatore corrispondano. Controllare che l'interruttore del regolatore Losi sia su
OFF (ON è segnato in piccole lettere su di un lato).
Per sicurezza si raccomanda di togliere il pignone dal motore prima di fare questa calibrazione.
Come calibrare il regolatore (ESC) Punto 1: iniziare con il trasmettitore acceso (ON) e l'ESC su OFF e non collegato alla batteria.
Punto 2: Collegare la batteria all'ESC Losi.
Punto 3: Mettere il comando motore del trasmettitore completamente al massimo e accendere l'ESC. Continuare a mantenere il motore al massimo. Se tutto è a posto si potranno ascoltare una serie di toni provenienti dal motore (i suoni sono generati dall'ESC facendo vibrare il motore).
Punto 4: dopo uno o due secondi il LED sull'ESC lampeggia velocemente e il motore "suona" 4 volte consecutive rapidamente (conferma la corsa massima del motore). Dopo che il LED verde ha lampeggiato e si sono uditi i toni, il LED rosso dell'ESC lampeggia. A questo punto il massimo è stato impostato sull'ESC ed ora si passa alla regolazione del freno (LED rosso lampeggiante).
Punto 5: muovere il grilletto del trasmettitore in posizione di massima frenata e tenerlo in questa posizione. Dopo pochi secondi il LED rosso sull'ESC lampeggia e vengono emessi 4 "suoni" in rapida sequenza (conferma la corsa massima del freno).
Punto 6: dopo aver accettato la corsa massima del freno, il LED giallo sull'ESC lampeggia. Rilasciando il grilletto nella posizione neutra, l'ESC emette 4 suoni e il LED giallo lampeggia rapidamente per accettare la posizione neutra.
Dopo aver accettato la posizione neutra, l'ESC suona 2 volte e tutti i LED lampeggiano. Questo indica che adesso l'ESC è armato e quindi il motore dell'auto risponderà ai comandi del trasmettitore.
Da questo momento, tutte le volte che si connette la batteria e si mette l'interruttore su ON, l'ESC emetterà i toni e il lampeggio di inizializzazione. Dopo uno o due secondi emetterà il tono di armamento. Se l'ESC è impostato su Auto-LiPo, emetterà tanti beep quante sono le celle del pacco LiPo, tra i toni di inizializzazione e quelli di armamento. Dopo i toni di armamento l'ESC è attivo e risponderà ai comandi del motore.
Se avete problemi a programmare il vostro ESC, potete rivolgervi al servizio assistenza Horizon Hobby. Dopo aver fatto la calibrazione e l'armamento bisogna fare ancora un controllo: muovendo lentamente il comando motore verso il massimo, controllare il verso di rotazione del motore e il colore dei LED sull'ESC. Se il motore gira nel verso giusto e il LED verde lampeggia, si può fare una prova di funzionamento prima di entrare nelle impostazioni dell'ESC. Se invece si accende il LED verde sotto motore, ma le ruote girano nel verso sbagliato, bisogna scambiare di posizione due dei tre fili che vanno al motore (per esempio passare da rosso con rosso e nero con nero a rosso con nero e nero con rosso)..
Programmazione manualeSeguire questi punti per cambiare le impostazioni dell'ESC senza usare un computer. Per sicurezza si raccomanda di togliere il pignone dal motore prima di fare la calibrazione e la programmazione manuale.
Punto 1: iniziare con il trasmettitore acceso (ON) e l'ESC su OFF e non collegato alla batteria.
Punto 2: collegare la batteria all'ESC. Tenere il motore al massimo mentre si accende l'ESC (interruttore su ON). Dopo pochi secondi si sentono 4 suoni per segnalare la calibrazione del motore al massimo. Dopo alcuni secondi si sente di nuovo un gruppo di 4 suoni. Dopo questo secondo gruppo rilasciare il grilletto al centro. Se si è entrati correttamente in modalità programmazione, l'ESC emette due beep, pausa, poi altri due beep.
Punto 3: la sequenza di programmazione è sempre presentata in ordine sequenziale e parte sempre con la prima impostazione (reverse lockout) entro la prima sezione (tipo di reverse). Il primo beep significa in quale sezione di programmazione ci si trova, e il secondo beep significa quale impostazione sta aspettando una risposta "SI" o "NO".
Passando attraverso le opzioni, bisogna rispondere "SI" tenendo il motore al massimo o "NO" con il freno al massimo finché l'ESC non accetta la risposta con una serie di suoni veloci. Accettata la risposta si rilascia il grilletto al centro per la prossima domanda. Dopo aver accettato una risposta "NO", l'ESC presenta la prossima opzione in quella sezione. Dopo aver accettato una risposta "SI", l'ESC passa alla prima opzione della sezione successiva.
Impostazioni & spiegazioniIl regolatore (ESC) è molto flessibile e si può regolare come ogni altra parte del veicolo. La sezione seguente spiega tutte le regolazioni disponibili con la programmazione manuale e cosa fa ognuna nelle reazioni dell'ESC, per poterlo regolare meglio in base alle varie esigenze.
1. Tipo di freno/retromarcia Imposta la retromarcia e come utilizzarla.
Regolazione 1: retromarcia bloccata (default) Questa regolazione permette l'uso della retromarcia
solo dopo che il comando motore è rimasto al centro per 2 secondi. Si usa nell'allenamento alle gare in caso di urti, ma è meglio sentire il direttore di gara se questo sistema è permesso.
Regolazione 2: solo marcia avanti/freno Si usa in certe gare; si tenga conto che con questa regolazione non è possibile andare in retromarcia in alcun modo.
Regolazione 3: avanti/freno/indietro Marcia avanti o indietro sono accessibili in qualsiasi momento dopo che l'ESC frena con il motore fermo (se il veicolo è in moto).
2. Intensità di frenata Imposta la percentuale di potenza frenante disponibile che viene applicata in frenata.
Regolazione 1: potenza 25% Utilizza solo il 25% della potenza frenante disponibile con il freno al massimo.
Regolazione 2: potenza 50% (default) Utilizza solo il 50% della potenza frenante disponibile con il freno al massimo.
Regolazione 3: potenza 75% Utilizza il 75% della potenza frenante disponibile con il freno al massimo.
Regolazione 4: potenza 100% Utilizza tutta la potenza frenante disponibile con il freno al massimo.
3. Intensità della retromarcia Imposta quanta potenza viene applicata alla retromarcia.
Regolazione 1: potenza 25% Utilizza solo il 25% della potenza in retromarcia.
Regolazione 2: potenza 50% (default) Utilizza solo il 50% della potenza in retromarcia.
Regolazione 3: potenza 75% Utilizza il 75% della potenza in retromarcia
Regolazione 4: potenza 100% Utilizza il 100% della potenza in retromarcia
4. Controllo dell'accelerazione Questa regolazione controlla quanto velocemente intervenga il comando motore sull'ESC. Questo limita la potenza nelle partenze. Come già spiegato, l'accelerazione dipende dalla capacità della batteria, ma si può limitare la potenza che può fornire la batteria. Questa regolazione è importante nelle gare di trascinamento poiché si può usare come "controllo della trazione" per adattarla alle condizioni attuali.
Più basso è il valore impostato, minore è la limitazione nelle variazioni del comando motore. Per un'accelerazione bruciante usare un valore basso o nullo. Per accelerazioni morbide o per superfici con poca aderenza, portarlo invece verso il massimo.
Regolazione 1: Alta Accelerazione molto limitata. Valido per veicoli 2WD su pista molto sporca o in generale quando si vuole risparmiare la trasmissione.
Regolazione 2: Media Limitazione media dell'accelerazione. Valido per veicoli 2WD su pista non molto sporca e per 4WD su pista molto sporca.
Regolazione 3: Bassa Leggera limitazione dell'accelerazione. Valido per veicoli 4WD su pista poco sporca
Regolazione 4: Molto bassa Limitazione dell'accelerazione molto leggera. Valido per molte situazioni tra cui veicoli 4WD su sporco e asfalto e 2WD su asfalto.
Regolazione 5: Escluso (default) L'accelerazione è limitata solo dalla capacità della batteria. Questa regolazione è valida per berline 4WD su moquette o per quelle applicazioni dove si richiede un'alta trazione o dove non c'è limite alla potenza.
5. Freno motore Regola la quantità di freno motore applicata quando il comando motore è in posizione neutra per simulare l'effetto frenante di un motore con spazzole mentre va a ruota libera.
Regolazione 1: Freno motore escluso (default) Il veicolo va a ruota libera con quasi nessuna resistenza da parte del motore con il comando in posizione neutra.
Regolazione 2: Freno motore al 10% Basso effetto frenante da parte del motore con il comando in posizione neutra.
Regolazione 3: Freno motore al 20% Maggiore effetto frenante da parte del motore con il comando in posizione neutra.
Regolazione 4: Freno motore al 30% Effetto frenante abbastanza alto da parte del motore con il comando in posizione neutra.
Regolazione 5: Freno motore al 40% Alto effetto frenante da parte del motore con il comando in posizione neutra.
6. Dead band Regola l'ampiezza dell'escursione del grilletto nel punto neutro. Piccoli valori fanno entrare subito il comando del freno/retromarcia con un piccolo movimento del grilletto. Attenzione perché alcuni trasmettitori danno una risoluzione migliore di altri. Se l'ESC non risponde