What's new in IBM Lotus Notes 6.5? IBM Lotus Notes 6.5 offers a several new features that better enable you to complete your day-to-day tasks. Periodic updates to Notes client Help are available on the Web. To download the latest Notes client Help file, go to http://www.lotus.com/ldd/doc . In the "Documentation Links" section, click "by product," then "Notes," and finally under Notes Client Help versions, click 6.5, or if there is a later release, its number. For information on new features that Notes has offered since Notes 6.0, see the topic What's new in IBM Lotus Notes 6?. Calendar New features and enhancements added to Calendar and Scheduling let you: Reschedule repeating meetings with different start and end times Drag and drop To-Do items , Calendar entries , or mail messages to create new To-Do items, Calendar entries, or mail messages Mail New features and enhancements added to Mail let you: Use instant messaging and awareness features without installing a separate Lotus Instant Messaging client Manage junk mail Mark mail messages for follow-up action Use reply-to and forwarded indicators Use the unread messages view Time column has been added to mail views Printing New printing features and enhancements let you: Choose whether to print the entire list of names in the To or CC fields of a mail message Security New security features and enhancements let you: Import Internet certificates from a Smartcard Sharing information with other applications New features for sharing information with other applications let you: Export Notes view data in CSV file format "Workplace" Welcome Page option A new Welcome Page feature lets you replace the default Welcome Page with a portal-like page called "Workplace." The Workplace has multiple panes that display your Mail, Calendar, To Do list, and so on. In other panes, you can easily display frequently used Notes databases and Web sites -- helping you to organize and manage all your daily tasks and communications with others in your company What's new in IBM Lotus Notes 6? IBM Lotus Notes 6 offers a multitude of new features that better enable you to complete your day-to-day tasks.
Transcript
What's new in IBM Lotus Notes 6.5? IBM Lotus Notes 6.5 offers a several new features that better enable you to complete your day-to-day tasks.
Periodic updates to Notes client Help are available on the Web. To download the latest Notes client Help file, go to http://www.lotus.com/ldd/doc. In the "Documentation Links" section, click "by product," then "Notes," and finally under Notes Client Help versions, click 6.5, or if there is a later release, its number.
For information on new features that Notes has offered since Notes 6.0, see the topic What's new in IBM Lotus Notes 6?.
Calendar
New features and enhancements added to Calendar and Scheduling let you:
Reschedule repeating meetings with different start and end times
Drag and drop To-Do items, Calendar entries, or mail messages to create new To-Do items, Calendar entries, or mail messages
Mail
New features and enhancements added to Mail let you:
Use instant messaging and awareness features without installing a separate Lotus Instant Messaging client
Manage junk mail
Mark mail messages for follow-up action
Use reply-to and forwarded indicators
Use the unread messages view
Time column has been added to mail views
Printing
New printing features and enhancements let you:
Choose whether to print the entire list of names in the To or CC fields of a mail message
Security
New security features and enhancements let you:
Import Internet certificates from a Smartcard
Sharing information with other applications
New features for sharing information with other applications let you:
Export Notes view data in CSV file format
"Workplace" Welcome Page option
A new Welcome Page feature lets you replace the default Welcome Page with a portal-like page called "Workplace." The Workplace has multiple panes that display your Mail, Calendar, To Do list, and so on. In other panes, you can easily display frequently used Notes databases and Web sites -- helping you to organize and manage all your daily tasks and communications with others in your company What's new in IBM Lotus Notes 6? IBM Lotus Notes 6 offers a multitude of new features that better enable you to complete your day-to-day tasks.
For information on new features and enhancements specific to Notes 6.5, see the topic What's new in IBM Lotus Notes 6.5?.
Periodic updates to Notes client Help are available on the Web. To download the latest Notes client Help file, go to http://www.lotus.com/ldd/doc. In the "Documentation Links" section, click "by product," then "Notes," and finally under Notes Client Help versions, click the number for the latest release.
Click any link to learn more about specific new features and enhancements for Notes 6:
Calendar
Documents
Internet standards support
Mail
Navigation
One-stop connection setup
Preferences
Printing
Remote use and roaming
Search
Security
TeamRoom
Welcome Page
Calendar
New features and enhancements added to Calendar and Scheduling let you:
Color-code entries
Display a variety of new views (work month, work week, summary)
Customize information displayed in each entry
Switch days, weeks, months, and years more easily
Display an additional time zone
Select a time zone for a meeting
Display a localized, secondary calendar
View and print participant status information for a meeting
Update scheduled meetings more easily
Documents
New features and enhancements within documents let you:
Modify Spell Check so that it ignores words that contain numbers or all uppercase letters
Identify and mark languages within a document
Drag and drop files within Notes and between your operating system and Notes
Place a border around a selected paragraph
Change the color and edge of buttons
Set button widths regardless of the font setting in User Preferences or the length of the button
Rearrange a list by moving items up or down
Hide paragraphs from mobile devices
Place tabs on any side of a tabbed table
Select and move (cut and paste) an entire table of data
Copy a view as a table
Use keyboard shortcuts to move the contents in a table row up or down
Create a table with row captions
Lock a document to prevent replication and save conflicts
Internet standards support
Notes embraces Internet messaging standards so now you can view Internet mail messages, Web pages, and newsgroups with full fidelity (because of MIME and HTML support) and security (using SSL, S/MIME, and X.509 certificates).
You can read and send messages to any IMAP or POP3 server (your ISP, for example). You can read and post messages to an NNTP newsgroup, search any LDAP directory, such as bigfoot.com. This is especially helpful when you are in the middle of addressing a mail message and you need to look up an e-mail address quickly.
Mail
You can use Notes as the client for either Notes mail or Internet mail.
You can take advantage of Internet address searching and newsgroups, with a redesigned easy-to-use interface for mail configuration.
You can streamline your replies and forwarded messages by stripping pictures and attachments and format these types of messages Internet-style.
Deletions are immediate, no longer requiring a view refresh, and folders display the number of unread messages.
Your address book is compatible with electronic business cards (vCards).
Archiving becomes more powerful with organization-wide policies crafted by your administrator.
You can more easily delegate access to your mail or manage mail databases for others.
You can customize your mail views with your mouse, rearranging or hiding columns, and setting colors to identify senders. Notes remembers your sorting and color preferences.
Navigation
New features and enhancements to bookmarks and the Notes user interface let you:
Customize the information displayed in a view
Select multiple bookmarks and bookmark folders
Locate bookmarks with the keyboard
Display your bookmarks as a grid like the workspace
Locate a document, view, database, or Web page you visited several days ago
Reorder window tabs by dragging
One-stop connection setup
After you install and open the Notes client for the first time, Notes guides you through setting up initial connections. Notes prompts you for the type of mail connection you need -- Notes mail on a Domino server, Internet mail from an Internet server, or both -- and the type of physical connection you need -- local area network (which includes broad band) or dialup -- and automatically creates the necessary configuration documents in your Personal Address Book. You'll also have an opportunity to choose a NNTP server for Internet newsgroups and an LDAP server for Internet name lookups. See Setting up Notes for the first time for more information.
After you've set up initial connections, you can choose File - Preferences - Client Reconfiguration Wizard any time to modify existing connections or add new ones. Notes updates your configurations and creates or modifies all necessary documents in your personal address book.
Preferences
New features and enhancements added to user preferences let you:
Use a Window menu option to switch between windows
Enable a MIME save warning
Show in-line MIME images as attachments
Specify a particular format for time or date input by a user
Use the language of the form when the text language is unspecified
Invoke Notes on vCard files
Printing
New features added to printing let you:
Print in the background while you continue working
Specify time ranges within the "rolling print" option when printing your calendar
Print multiple time zones as they appear in the Calendar view
Print your Calendar views (daily, weekly, and monthly) as a single document on trifold panels
Print your address book contacts as labels
Print framesets
Also, printing has been enhanced to allocate space more efficiently. For example, when printing a monthly Calendar view, days/weeks with entries are given more room than days/weeks without entries.
Remote use and roaming
It's easier than ever to use Notes outside your office, at home, when you travel, when you're disconnected from a network or phone line, and on multiple computers. The redesigned Replicator page lets you drag and drop databases or selected documents to create local replicas on your computer that Notes can rapidly synchronize with server-based databases. You can group replica entries in folders and customize the page to display as a slide-out panel like the bookmarks or to fit more entries at once. Several templates now include custom forms for selective replication.
Additionally, your Domino administrator can set you up as a "roaming user" so that using Notes on multiple computers becomes easier. When you work as a roaming user, your personal address book, bookmarks, and other information automatically replicate to all the computers you use. As a roaming user with improved replication for all databases, you can have your own personalized Notes setup and all the latest information with you wherever you use Notes.
Search
You can now search the results of a search.
Security
New features added to security let you:
Find all the Notes security settings in User Security
Log in to Notes using a Smartcard
View a person or server's effective access for a database
Reset your Execution Control Lists (ECLs) to the administrator's defaults
Synchronize your Notes and Domino web/Internet password, if allowed by your administrator
Change your password with greater convenience
TeamRoom
New features and enhancements added to TeamRoom let you:
Create announcements for the entire team in the Announcements page view
Update the ACL for team members quickly and easily
Write individual status reports
Gain fast access to selected documents through use of the Preview pane
Welcome Page
The Welcome Page provides new features that let you:
Use a wizard to personalize your page display
Launch bookmarks from the Welcome Page (launch pad)
Change the content of your frames
Use Quick Notes to create and send a mail message, add a contact to your Personal Address Book, write an entry to your personal journal, or set up a reminder in your calendar without having to open a database.
Follow Up Shows all messages that are currently flagged for follow
Trash Shows messages that you marked for deletion in your mail.
For information, see Deleting mail.
Views - All Documents Shows all messages that are currently in your mail database.
Views - Mail Threads Shows all messages grouped with their replies so you can view an entire conversation at once.
Folders Shows a list of all personal folders you create.
Tools - Rules Shows all rules that you create to filter new messages.
For information, see Filtering new mail using rules
Tools - Stationery Shows all stationery that you create for sending messages.
For information, see Creating and using stationery for mail
Tools - Archive Appears only if archiving is set up for your mail. Shows all your archive policies, and lets you open the archive database.
To prevent orphaned response documents
If the database has hierarchical views with "parent" and "child" (response) documents, allowing parent documents to be archived can "orphan" the responses. Responses that are not archived disappear from any hierarchical view (become orphaned) but still exist, keeping the database you're archiving larger. To prevent orphaned response documents, leave the default "Do not delete documents that have responses" selected; or, if you deselect it, make sure sets of archiving criteria that include any main document also include its responses. Examples of databases with hierarchical (response) views include Discussion and Mail (which has a Mail Threads view).
Note This option does not apply when you pre-select documents for archiving. Creating, editing, and enabling sets of archive cri teria On the Settings panel of the Archive Settings dialog box, you can examine sets of archive criteria provided by your organization and select the set you want to use. The box below the list of sets summarizes the features of each set. If you are archiving mail and your organization allows you to create criteria sets, you may also add or edit them.
If the Archive Settings dialog box is not open, choose File - Database - Properties and click "Archive Settings." Then click Settings.
Tip A single database can have multiple sets of criteria that archive to separate databases. If all the criteria sets archive to the same database, consider carefully how the options for each set interact, because all the criteria will be applied each time you archive.
Click any of these topics:
To check a database's archive criteria
To create or edit a set of archive criteria
To enable a set of archive criteria
To check a database's archive criteria
1. Open the database.
2. From the menu, choose File - Database - Properties and click "Archive Settings."
3. Click Settings, and see what set of criteria is selected.
4. Click the set of criteria to see its details, including the name and location of the archive database for each set.
To create or edit a set of archive criteria
For any database (except mail if prohibited by an archive policy), you can create and edit private criteria sets. In mail, criteria sets you can't edit appear with lock icons.
1. Open a database you want to archive (for example, your mail).
To edit a set, select one of the existing sets of criteria in the list, if any exist that you want to use.
To create a new set, click Add, and enter a name for your new private criteria set.
5. See Setting options for a set of archive criteria for details on refining this set of criteria.
6. Select "Enable archiving," and click OK.
7. (Optional) Click Advanced to specify archiving for documents that have responses, and to set up an archive log. The Advanced settings apply to all sets of criteria.
8. Click OK to close the Archive Settings dialog box.
After you create or edit a set of archive criteria, you can return to the Settings page and click Edit to edit the set.
To enable a set of archive criteria
Notes uses only archive criteria sets that are enabled. If no set is enabled and you ask for a database to be archived, nothing is archived.
1. Select a set of criteria in the list, or click Add to create one if there is no set listed.
2. (Optional) To edit one of your private sets before enabling it, click Edit.
3. Select "Enable archiving" to put the selected set of criteria into effect.
4. Click OK. Setting up a network server connection manually If you have remote access service (RAS) software in your operating system, such as Microsoft Dial-Up Networking, Notes can use that software to call a network server and connect from there to Domino servers in your organization, to Web servers on the Internet, or to both. You may have access to a network server either through an ISP, through your organization's intranet, or both. Ask your organization's network administrator whether there is a network server you can use.
Note Some organizations call this type of server a "remote LAN" or "remote access" server.
Notes saves information about network servers in Network Dialup Server Connection documents. You can edit a Network Dialup Server Connection document at any time, for example if the phone number for the network server changes.
The simplest way to configure a network server connection for either Domino mail, Internet mail, newsgroups, or Internet (LDAP) directories is to choose File - Preferences - Reconfiguration Wizard and select the Network Dialup option. Or, you can create a Network Dialup Server Connection document manually.
For information on replicating using a network server connection, see To replicate with a selected server and To create a call entry.
To create or edit a Network Dialup Server Connectio n document manually
1. From the menu, choose File - Mobile - Server Phone Numbers. Notes opens the Connection view of your Personal Address Book.
2. Do one of the following:
To create a new Connection document, click the "New" button and choose "Server Connection."
To edit an existing Connection document, select the network server name and click the "Edit Connection" button. (Make whatever changes you want on the Basics or "Network Dialup" tabs.)
3. Click the Basics tab.
4. In the "Connection type" field, select "Network Dialup."
5. In the "Server name" field, enter the name of the server you want to access, for example, [email protected].
6. In the "Use LAN port" field, specify an enabled port that uses the same protocol driver as the network server. For example, if the network server uses TCP/IP, specify TCP/IP.
7. Click the "Network Dialup" tab.
8. In the "Choose a service type" field, select Microsoft Dial-Up Networking.
9. Fill in the fields in the Configuration section. If you are unsure of the necessary information, contact your service provider or organization 's network administrator. You can click "Edit Configuration" as a shortcut to make changes to this section.
Tip This configuration information is specified in your operating system software.
10. (Optional) Click the Comments tab to add information for your own reference.
11. (Optional) Click the Advanced tab to specify additional settings such as a dedicated location for this connection, or login scripts.
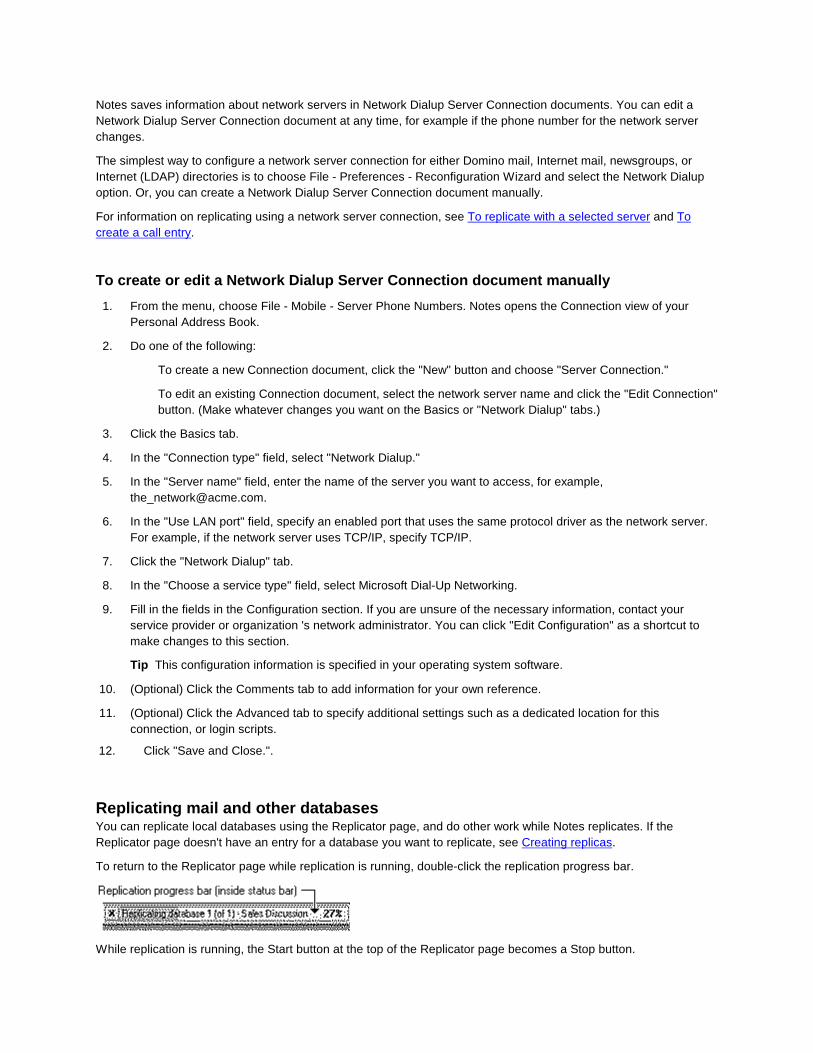
12. Click "Save and Close.". Replicating mail and other databases You can replicate local databases using the Replicator page, and do other work while Notes replicates. If the Replicator page doesn't have an entry for a database you want to replicate, see Creating replicas.
To return to the Replicator page while replication is running, double-click the replication progress bar.
While replication is running, the Start button at the top of the Replicator page becomes a Stop button.
Tip If you want to replicate your address book to a different computer that you use, consider becoming a roaming user instead, so that Notes can automate replication of personal information including your address book.
Click any of these topics:
To replicate a single database
To replicate your mail only
To replicate multiple databases
To replicate with a selected server
To replicate only high-priority databases
To replicate a single database
1. Click the Replicator icon in the Bookmark bar.
2. Select the entry on the Replicator page for the database you want to replicate.
3. From the menu, choose Actions - Replicate Selected Database.
4. (Optional) To stop replication, click the Stop button at the top of the Replicator.
To replicate your mail only
When you replicate your mail database, you can send mail only or send and receive mail. Your Calendar and To Do list are part of your mail, so replicating your mail also updates them.
You can choose to hold your mail in an outgoing mailbox for sending at intervals. If you hold mail, then during replication Notes sends outgoing Notes mail from your local MAIL.BOX database to the server and deletes the mail from MAIL.BOX, or sends outgoing mail to and from your SMTP.BOX if your mail is Internet mail. This setting is specified separately for each location.
For more information, see Using an outgoing mailbox.
1. Click the Replicator icon in the Bookmark bar.
2. Do one of the following:
From the menu, choose Actions - Send Outgoing Mail to replicate your outgoing mail database.
From the menu, choose Actions - Send and Receive Mail to replicate your mail database.
3. (Optional) To stop replication, click the Stop button at the top of the Replicator.
To replicate multiple databases
1. Click the Replicator icon in the Bookmark bar.
2. In the "On" column, make sure check marks appear next to the entries for the databases you want to replicate.
3. Click the "Start Now" button.
4. (Optional) To stop replicating the current database and begin replicating the next one, click the Next button at the bottom left of the Replicator. To stop replication altogether, click the Stop button at the top of the Replicator.
Tip To make sure a group of databases always replicates together, put them in a folder and replicate the folder entry by selecting it and then choosing Actions - Replicate Selected Database.
To replicate with a selected server
You can replicate one or more databases with a selected server. You may want to do this if you have a dialup connection to a single server that can't pass through to other servers.
1. Click the Replicator icon in the Bookmark bar.
2. In the "On" column, make sure check marks appear next to the database entries you want to replicate.
3. From the menu, choose Actions - Replicate with Server.
4. Select the server.
5. Click OK.
6. (Optional) To stop replicating the current database and begin replicating the next one, click the Next button at the bottom left of the Replicator. To stop replication altogether, click the Stop button at the top of the Replicator.
To replicate only high-priority databases
High-priority databases have a special schedule that lets them replicate more frequently than most databases; their entries appear with a double clock icon.
To specify a database's replication priority, right-click (Macintosh users, CTRL+click) the database entry and choose "Options." Then click Other and specify the priority. Or, right-click and choose "High Priority" to switch high priority on and off.
1. Click the Replicator icon in the Bookmark bar.
2. From the menu, choose Actions - Replicate High Priority Databases.
3. (Optional) To stop replicating the current database and begin replicating the next one, click the Next button at the bottom left of the Replicator. To stop replication altogether, click the Stop button at the top of the Replicator.
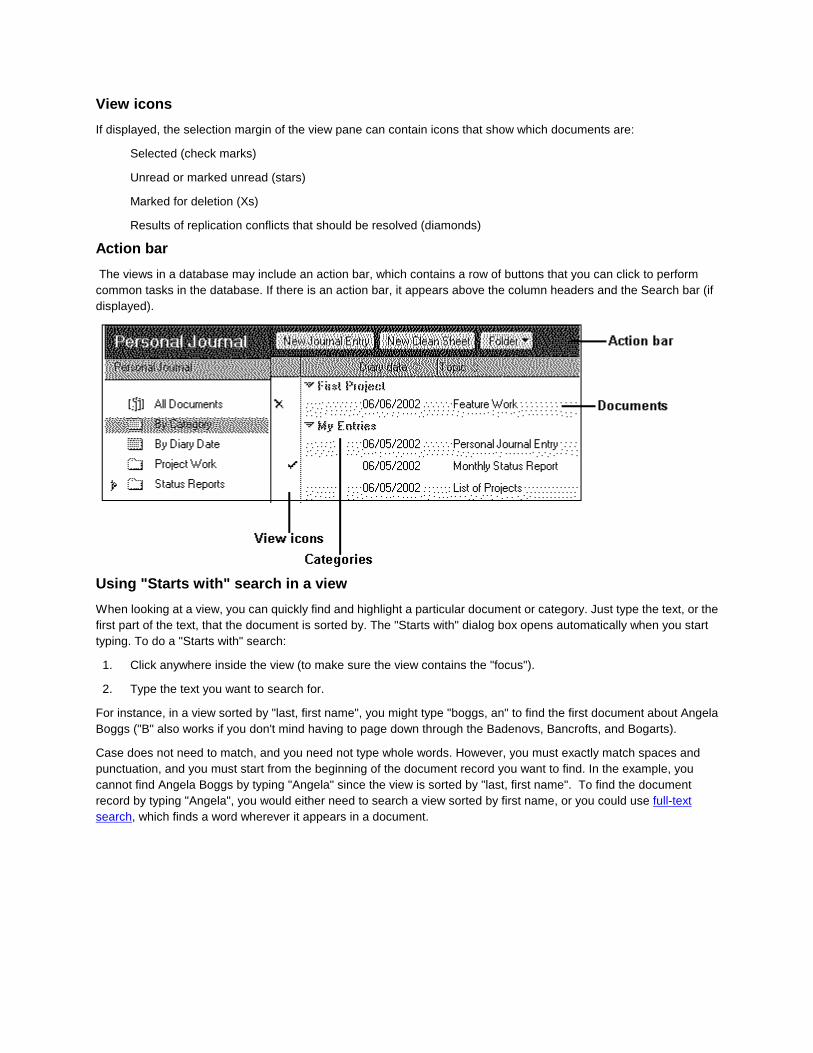
Elements of a view Views are lists of documents in a Notes database. Views let you select, sort, or categorize documents. Views can also show information about the documents listed in them, such as the name of an author or the date of creation. A view may show all documents in a database, or only a selection of documents.
A view pane shows:
Rows for each category or document record
Columns for each type of information about a document, such as the name of the author, the date created, and the size
View icons
If displayed, the selection margin of the view pane can contain icons that show which documents are:
Selected (check marks)
Unread or marked unread (stars)
Marked for deletion (Xs)
Results of replication conflicts that should be resolved (diamonds)
Action bar
The views in a database may include an action bar, which contains a row of buttons that you can click to perform common tasks in the database. If there is an action bar, it appears above the column headers and the Search bar (if displayed).
Using "Starts with" search in a view
When looking at a view, you can quickly find and highlight a particular document or category. Just type the text, or the first part of the text, that the document is sorted by. The "Starts with" dialog box opens automatically when you start typing. To do a "Starts with" search:
1. Click anywhere inside the view (to make sure the view contains the "focus").
2. Type the text you want to search for.
For instance, in a view sorted by "last, first name", you might type "boggs, an" to find the first document about Angela Boggs ("B" also works if you don't mind having to page down through the Badenovs, Bancrofts, and Bogarts).
Case does not need to match, and you need not type whole words. However, you must exactly match spaces and punctuation, and you must start from the beginning of the document record you want to find. In the example, you cannot find Angela Boggs by typing "Angela" since the view is sorted by "last, first name". To find the document record by typing "Angela", you would either need to search a view sorted by first name, or you could use full-text search, which finds a word wherever it appears in a document.
Replication and save conflicts A replication conflict occurs when two or more users edit in the same document in different replicas between one replication and the next. A save conflict occurs when two or more users edit the same document in a database on a server at the same time.
You can avoid replication conflicts by locking documents you edit in a replica. For more information, see Locking documents.
To fix conflicts that do occur (if you are the person in charge of eliminating conflicts in a database), examine each conflict and decide whether you want to keep the main document or the response, depending on which is more timely and accurate. Then delete either the main document or the response as described below.
Click any of these topics:
How Notes treats replication conflicts
How Notes treats save conflicts
To save information from a response in the main document and delete the response
To delete the main document and make a response the main document
How Notes treats replication conflicts
After two or more users edit and save the same document, at the next replication Notes designates the most frequently edited and saved document as the main document. (If each has been edited and saved the same number of times, Notes designates the most recently saved document as the main document.) Notes shows the other(s) as responses to the main document with a diamond symbol in the left margin.
Deletions are a special case. If one user edits and saves a document in a replica and another user then deletes it, the deletion takes precedence. If, however, a document is edited and saved more than once, or if the document is edited and saved after the deletion, the edited document takes precedence.
Note A database designer can specify that Notes merge conflicting edits into a single document whenever possible. In this case, if two users edit different fields in the same document, Notes saves the editorial changes to each field in a single document. However, if two users edit the same field in the same document, Notes saves one document as a main document and the other as a response as described above.
How Notes treats save conflicts
When more than one user opens the same document to edit, Notes designates the document that has been saved first as the main document. When another user tries to save the same document, Notes prompts the user to save it
as a Save Conflict document. If the user does, Notes shows it as a response to the main document with a diamond symbol in the left margin.
To save information from a response in the main doc ument and delete the response
1. Open the response document that contains information you want to save.
2. Select the information you want to copy and choose Edit - Copy.
3. Open the main document in Edit mode.
4. Place the cursor where you want the information and choose Edit - Paste.
5. Choose File - Save to save the main document.
6. Select the response document.
7. Choose Edit - Delete.
8. In a non-mail database, choose View - Refresh to delete the response document.
To delete the main document and make a response the main document
1. Edit the response you want to make the main document.
2. Choose File - Save to save the response. It becomes a main document.
3. If there are other response documents, do the following:
Select the other response documents and choose Edit - Cut.
Select the document you saved in Step 2.
Choose Edit - Paste. The documents now become responses to the document you're keeping.
4. Select the document you don't want to keep.
5. Choose Edit - Delete.
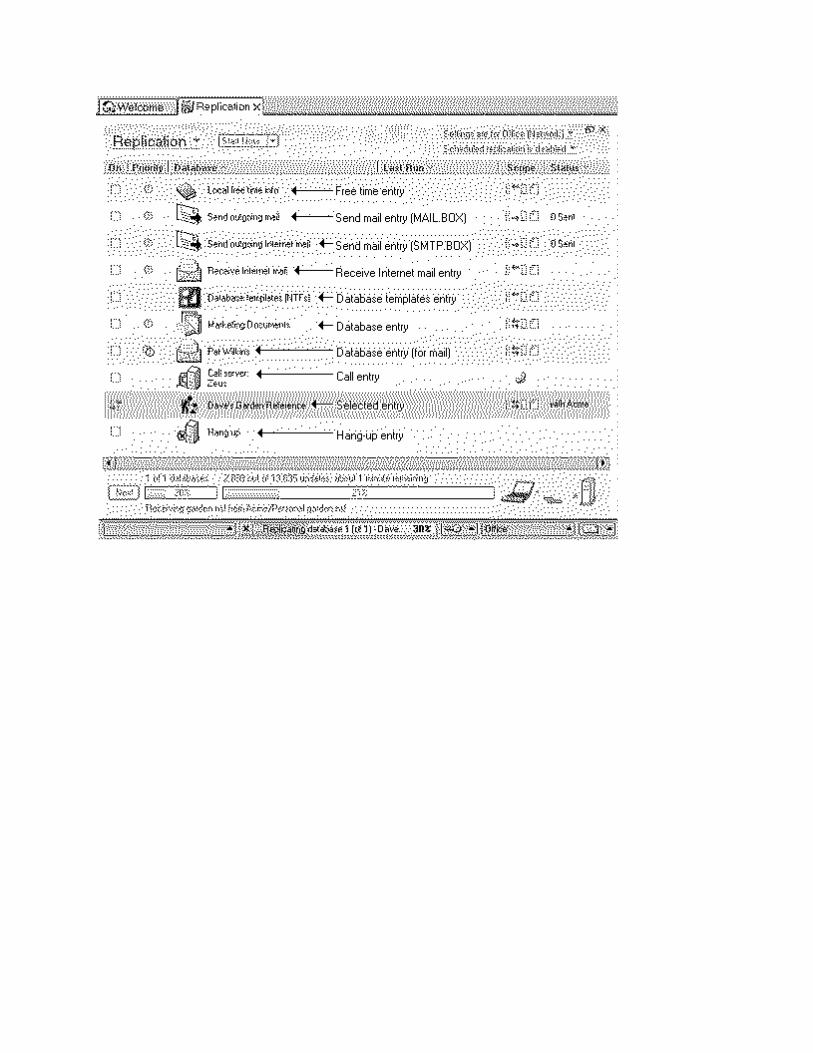
6. In a non-mail database, choose View - Refresh to delete the unwanted main document. Managing replication using the Replicator page The Replicator page lets you manage replication of all your local databases. Using it, you can replicate one or more databases with one or more servers, and continue other work while Notes replicates.
Click this icon in the Bookmark bar to open the Replicator page:
The Replicator page shows settings for the current location, with:
An entry for each item (database entry, call entry, hang-up entry) or group of items (folder entry) to be replicated. An entry consists of a row on the Replicator page. Entries determine the order in which databases replicate. You can drag the entries into a different sequence so that they replicate in a different order, and customize each entry so that different databases replicate in different ways. You can also delete entries to stop databases from replicating.
Drop-down menus for checking the location where replication will run, and specifying a schedule for the current location.
An area that shows progress through each entry in the list during replication and status of each entry after replication.
A drop-down menu for changing the way the Replicator page displays. The Replicator also provides additional ways to replicate; for example, you can make some databases high priority so that they replicate more frequently.
Setting up the page for different locations
The Replicator page shows replication settings for the current location. To see which location is current, click the "Settings are for location" button at the top right of the Replicator.
Note This menu does not switch your actual location in Notes - to do that, from the menu, choose File - Mobile - Choose Current Location.
Notes lets you customize the Replicator page for each of your locations. For example:
You could set up a database entry at your Office location so that it sends and receives documents when you're at the office and you could deselect the same database entry at your Travel location so that it never replicates when you're on the road.
You could replicate all of your local databases on a schedule at your Office location and replicate only your mail on an as-needed basis at your Home location.
You could arrange database entries in one order at your Travel location and arrange them in a different order at your Home location so that you replicate in a different order at each location.
The following three examples show different ways to set up the Replicator page for a location. For each, suppose you are Pat Wilkins, your mail database and database templates are on the server Apollo, the Marketing Documents database is on the server Artemis, and the Sales Discussion database is on the server Athena.
For more information on entries such as call entries and template entries, see Refining the sequence of replication on the Replicator page.
Example 1
The following example shows how you could set up the Replicator at a Network or Network Dialup location to replicate selected databases.
When you click the "Start Now" button, Notes skips the "Send outgoing mail" entry and your mail database entry because they are not checked. When Notes reaches the "Database templates" entry, it connects to Apollo over the network and receives database template changes from the server. When Notes reaches the Sales Discussion entry, it connects to Athena and receives documents from the server.
Example 2
The following example shows how you could set up the Replicator page at a Notes Direct Dialup location when a passthru server is available. Suppose your administrator has set up the passthru server Zeus to provide access to the servers Apollo and Artemis.
When you click the "Start Now" button, Notes calls Zeus. When Notes reaches the "Send outgoing mail" entry, it connects to Apollo through Zeus and sends your outgoing mail. When Notes reaches your mail database entry, it stays connected to Apollo and receives mail from your database on the server. When Notes reaches the Marketing Documents database entry, it connects to Artemis through Zeus and sends and receives documents from Marketing Documents on the server. When Notes reaches the hang-up entry, it ends the connection to Zeus.
Example 3
The following example shows how you could set up the Replicator page at a Network location to perform scheduled replication.
When "Scheduled Replication is enabled" appears in the menu at the top right of the page, Notes replicates the Marketing Documents and Sales Discussion databases according to the schedule you specify.
Seeing replication progress and results
While you replicate, the area at the bottom of the Replicator shows the database currently being replicated, and the number of updates that have been replicated.
For information on using the Next and Stop buttons while replicating, see Replicating mail and other databases.
After replication, the Replicator shows replication statistics for each entry in the Status column, for example, the replicated server or the date and time of replication. In dialup locations, this column also shows call attempt information.
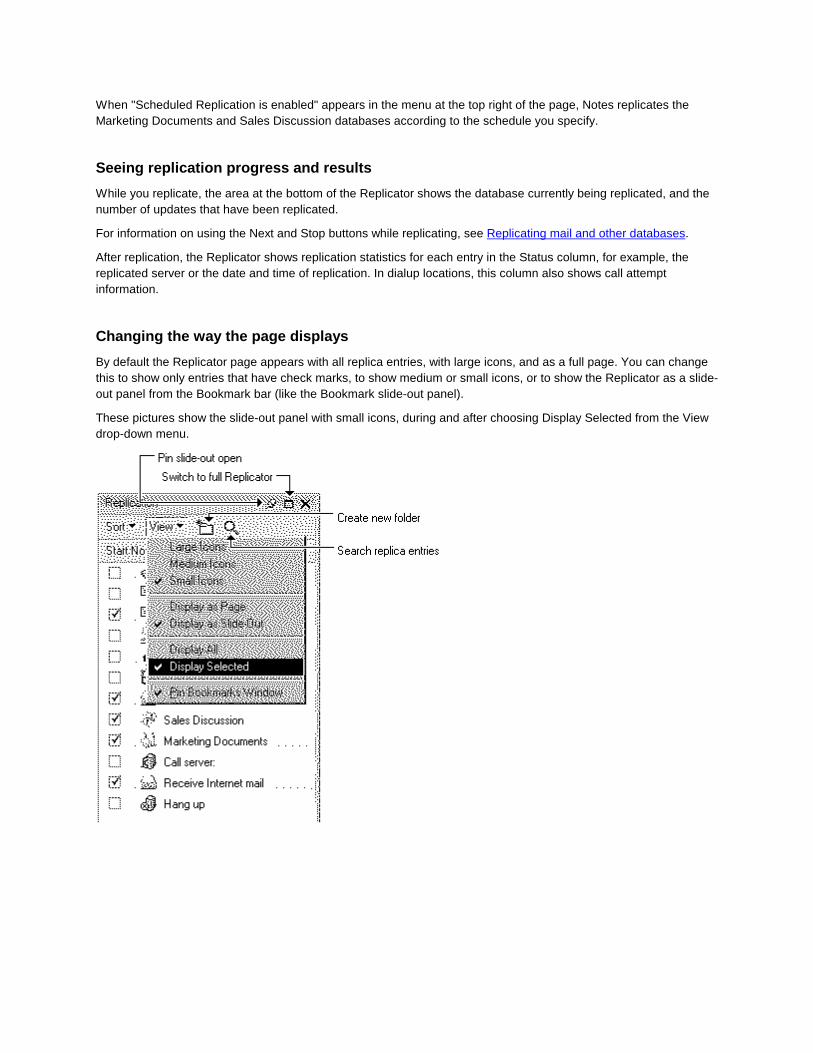
Changing the way the page displays
By default the Replicator page appears with all replica entries, with large icons, and as a full page. You can change this to show only entries that have check marks, to show medium or small icons, or to show the Replicator as a slide-out panel from the Bookmark bar (like the Bookmark slide-out panel).
These pictures show the slide-out panel with small icons, during and after choosing Display Selected from the View drop-down menu.
To change the way the page displays
1. Click the down arrow to the right of the "Replication" button at the top left of the Replicator.
2. To change icons, choose "Large Icons" or "Medium Icons."
3. To show only entries that are ready to replicate, choose "Display Selected." To return to showing all entries, choose "Display All."
4. To show the Replicator vertically like the bookmarks, choose "Display as Slide-Out."
Tip You can click the icons at the top right of the Replicator slide-out panel or page to toggle between the page and slide-out panel displays. Refining the sequence of replication on the Replica tor page Entries on the Replicator page represent items to be replicated, and their order in the list determines the order Notes replicates them. Each time you create a replica of a database, Notes adds the equivalent entry to the page. The first time you switch to any location other than Office, Notes may add other types of entries, such as outgoing mail entries, or call and hang-up entries, depending on the type of location and the type of mail you use in it. You can create and add call or hang-up entries yourself at any time.
Type of entry Locations Use Deletable?
Database All To replicate or open the equivalent database. To open a database, double-click its entry.
yes
Send outgoing mail Any Notes Direct Dialup location (such as Home or Travel). Notes also adds this entry to any location where you specify local mail use.
To send all pending Notes mail messages from your local MAILBOX database.
no
Receive Internet mail
Any location where you have an Internet POP or IMAP mail account
Send outgoing Internet mail
Any location where you have an Internet SMTP mail account
To send all pending Internet mail messages from your local SMTP.BOX database.
no
Local free time info All To refresh Calendar information updated in your mail database. You can check the schedules of selected individuals from the busy time database, while you are working offline. Right-click the "Local free time info" entry and choose Options. The Local Free Time Settings dialog box opens. From the drop-down menus, choose the names and length of time you want to check, as well as how often you want to refresh the information.
no
Database templates (.NTFs)
All To refresh the designs of template-based databases such as Mail and Discussion.
no
Call Any Notes Direct Dialup location (such as Home or Travel)
To connect to a server. yes
Hang up Any Notes Direct Dialup location (such as Home or Travel)
To disconnect from a server.
yes
You can customize settings for most types of entries on the Replicator page by right-clicking (Macintosh users, CTRL+click) the entry and choosing Settings. For example, you can specify whether you want Notes to send
information to or receive information from the server, or both. You can also specify a server to replicate with, and modify a full replica to become a partial replica.
When you're ready, you can replicate all entries, or any entries or folders of entries you select, by right-clicking (Macintosh users, CTRL+click) and choosing Replicate Selected Database. You can also deselect entries in the On column to skip replicating them temporarily.
For more information, see Replicating mail and other databases.
Click any of the following:
To change the order in which entries replicate
To create a call entry
To specify the server to call from a call entry
To create a hang-up entry
To delete an entry
To change the order in which entries replicate
You can rearrange entries on the Replicator page so that Notes will replicate them in the order you want. Drag any entry to the position you want it. You can press SHIFT and select a set of consecutive entries, or press CTRL to select multiple entries.
To keep a set of entries together so you can more easily move them, put them into a folder. Notes still replicates the entries in the same order when it processes the list; folders are merely for convenience. To see entries in a closed folder, click the triangle next to the folder. For further organization, you can drag folders into folders.
1. From the menu, choose Create - Folder Entry.
2. Enter a name for the folder and click OK.
3. Select entries you want to put into the folder and drag them to the folder.
Tip You can use the type-ahead feature to locate an entry on the Replicator page. Type the first letter or two of the entry you are looking for. Notes automatically selects the first entry beginning with those letters.
To create a call entry
In a location where you call Notes servers directly (Notes Direct Dialup), a call entry attempts to call the specified server and establish a connection. Notes stays connected to that server as it processes each entry on the Replicator page, until it reaches another call entry or a hang-up entry.
If you use a passthru server, create a call entry for the passthru server at the top of the list on the Replicator page. The passthru server call entry probably allows you to connect to all the servers you need so that Notes can process all the other entries in the list without making additional calls. If there is a server that your passthru server can't reach, create a hang-up entry for the passthru server at the end of the list of entries and then add a call entry for the other server after it (the final call entry doesn't need a hang-up entry).
Note If you use a network server (Network Dialup), you may or may not need a call entry for it. Ask your Domino administrator for assistance.
1. If necessary, switch to a Notes Direct Dialup location (such as Home or Travel).
2. Click where you want the call entry. Notes adds the call entry immediately above the entry you click.
3. From the menu, choose Create - Call Entry. By default, Notes creates the entry for your home server.
4. (Optional) To specify a different server, double-click the phone button on the call entry, select the server you want to call, and click OK.
Note Notes lists the servers for which you have already specified phone numbers. To add a server to the list or specify a different phone number, choose File - Mobile - Server Phone Numbers.
Tip You can replicate over a modem without using call entries. When Notes processes a database entry, it automatically tries to call the server the database last replicated with. If that server is a passthru server specified for all your database entries, Notes can stay connected with the same call until replication is finished.
To specify the server to call from a call entry
For a call entry on the Replicator page, you can specify a different server to call.
1. Click the Replicator icon in the Bookmark bar.
2. Click the phone button on the call entry.
3. Select the server you want to call. Notes lists the servers for which you have already specified phone numbers. To add a server to the list or specify a different phone number, choose File - Mobile - Server Phone Numbers.
4. Click OK.
To create a hang-up entry
You can create a hang-up entry that automatically disconnects from a server when you replicate over a modem. You need only one hang-up entry at the end of the list, even if you have more than one call entry. (When Notes reaches a new call entry, it automatically hangs up the current call.)
1. Click the Replicator icon in the Bookmark bar.
2. If necessary, switch to a Notes Direct Dialup location (such as Home or Travel).
3. Click where you want the hang-up entry.
Note Notes adds the hang-up entry immediately above the entry you click.
4. From the menu, choose Create - Hangup Entry.
5. (Optional) To make the hang-up entry the last entry, drag the hang-up entry to the last position.
To delete an entry
You can delete a database, call, or hang-up entry by selecting the entry, right-clicking (Macintosh users, CTRL+click), and choosing Remove. However, if you think you may still use the entry though you don't want to replicate it at present, deselect it in the On column instead of deleting it. When you delete a database entry in any location, Notes deletes the entry from all locations.
Note Deleting an entry for a database does not delete the associated replica. You delete a replica the same way you delete any database.
For more information, see To delete a database.
Scheduling replication Using a replication schedule, you can replicate local databases on a regular basis automatically. You can set up different replication schedules for different locations. For example, you could set up a replication schedule for your Office location only, or specify different replication schedules for your Office and Home locations.
When you start Notes, Notes checks to see if replication is scheduled for the current location. If it is, Notes replicates based on that schedule. If Notes fails to perform a scheduled replication, Notes tries to replicate again each minute until the attempt is successful.
If your local databases contain time-sensitive information, it may be useful to do the following:
Schedule replication shortly before you normally start using Notes and shortly before you normally finish using Notes at a particular location. This way, you can get the most up-to-date information from servers at the beginning of the day and provide information you've updated to servers at the end of the day.
If you replicate over a phone line, schedule replication during the middle of the night when telephone calls are cheapest and servers are not as busy. Leave Notes and your computer running and the phone line available when you stop work.
If you specify certain databases as high-priority, Notes will replicate them on an additional, more frequent schedule than other databases. For example, you might set your mail database as high-priority. Then you can specify the additional interval for your mail database as part of the overall schedule. For example, if most databases replicate every hour, you could set high-priority databases to replicate every half hour.
High-priority database entries on the Replicator page appear with a double clock icon.
For information on setting databases as high priority, see To add a replica to the schedule and set its priority. For information on replicating them, see To replicate only high-priority databases.
Note If your administrator gives you roaming user privileges, Notes automatically enables the schedule (see step 5 in the procedure below) and sets replication to occur on startup (step 7) and shutdown (step 10). For more information, see Managing your roaming user information.
To specify a replication schedule
1. Open any local replica database.
2. From the menu, choose File - Replication - Settings.
3. Click "Change Schedule."
Note You can set up the same replication schedule from the Replication tab of the current Location document in your Personal Address Book, or from the "Scheduled replication is disabled" menu at the top right of the Replicator page.
4. Select "Replication is enabled for this location."
5. (Optional) If you want the schedule to begin as soon as you finish setting it, select "Immediately." Otherwise, select "Next Replication."
6. (Optional) Select "Replicate when Notes starts." With this setting, Notes prompts you at startup to begin replication, so you have the chance to cancel. Select "Don't prompt" if you want Notes to replicate at startup without giving you a chance to cancel.
7. Select "Replication Interval" and specify the primary schedule:
In the "Replicate daily between" field, specify start and end times that define the period of the day during which you want replication to occur.
In the "Repeat every" field, specify the number of minutes you want to elapse between replication sessions.
For example, suppose you have scheduled replication for 8 AM to 6 PM Monday through Friday with a 360-minute (6 hours) repeat interval. If you start Notes at 9 AM on Tuesday, Notes immediately replicates, and replicates again 6 hours later.
In the "Days of week" field, specify the days on which you want replication to occur.
8. (Optional) Select "Additional interval for high-priority databases" and specify the additional schedule as in the previous step.
9. (Optional) Select "Prompt to replicate when Notes shuts down" and an option:
"If anything is waiting to be sent" replicates when any local database has changes.
"If outbox is not empty" replicates only when there is outgoing mail to be sent.
10. Click OK to return to the Replication Settings dialog box.
Note If you're editing the schedule directly in the Location document instead of in a dialog box, click "Save & Close."
11. (Optional) To use the same schedule for all locations, select "Apply changes to all locations" at the bottom of the Basics page of the Replication Settings dialog box. This also applies any other changes you make on this page to all locations.
12. Click OK.
13. On the Replicator page, in the "On" column, make sure the database entries you want to replicate on schedule have check marks.
14. At the top right of the Replicator page, make sure the drop-down menu says "Scheduled replication is enabled," and if it doesn't, choose Enable Scheduled Replication in the menu.
Creating or editing a Location document manually Location documents in your address book specify settings such as the server where your mail resides, whether you work online or offline with an outgoing mailbox, and whether you use a passthru server. When you move to a different physical location, such as your home, where you change the way you connect to servers, you can make adjustments automatically by selecting a different Location document. For more information, see To switch to a different location.
During installation, Notes automatically creates six Location documents: Office (Network), Home (Notes Direct Dialup), Home (Network Dialup), Travel (Notes Direct Dialup), Internet, and Island (Disconnected). During configuration, Notes populates these Location documents, as well as any necessary Connection or Account documents, based on information you supply.
When you choose File - Preferences - Client Reconfiguration Wizard, Notes enters complete and accurate configuration data in the current Location document, as well as automatically creating any necessary server Connection or Account documents for the type of connection method you are configuring. You usually never have to create or edit any locations manually, but you can if you need an unusual type of location. Ask your administrator for assistance in creating any new Location documents manually.
To create or edit a Location document manually
1. Ask your Domino administrator for the following before you begin:
The name of your home (mail) server
Whether you can use a network server and the name of that server
Whether you use a passthru server and the name of that server
Whether you use a Domino directory server and the name of that server
Whether you use a domain search server (for searching multiple databases in your organization) and the name of that server
Whether you use a Sametime (instant messaging) server and the name of that server
Whether your organization uses a proxy server for connection to the Internet, and the settings to specify for that server
2. From the menu, choose File - Mobile - Locations. Notes opens the Locations view of your Personal Address Book.
3. Do one of the following:
To create a Location document, click the "New" button and choose "Location."
To edit a Location document, select the location and click the "Edit Location" button.
4. On the Basics tab in the "Location name" field, enter a name for this location.
5. In the "Location type" field, do one of the following:
To use a LAN (for example at your office), a cable modem, or a DSL phone line, select "Local Area Network."
To connect to a Domino server with a dialup modem over a telephone line, but using a network server to give you LAN access, select "Network Dialup."
To connect to a Domino server with a dialup modem over a telephone line, select "Notes Direct Dialup."
To connect to an Internet Service Provider with a dialup modem over a telephone line, select "Network Dialup."
To create your own location (if none of the supplied locations suits your purpose), select "Custom."
To stay disconnected (for example if you always work locally at this location and don’t replicate), select "No connection."
Note Notes shows different options depending on the location type you select.
6. Enter an e-mail address in the "Internet mail address" field. This can be either the Internet version of your organizational Notes mail address, for example [email protected], or an e-mail address assigned to you by an Internet Service Provider, for example [email protected].
Tip If you want to use two identities over the Internet, create two locations with different names, and use different e-mail addresses for each.
7. (Optional) In the "Prompt for time/date/phone" field, select Yes if you want Notes to ask you for location-specific information when you use the location. For example, you may want to supply the phone number for a hotel when you use the Travel location.
8. In the Proxy field (does not appear for Notes Direct Dialup locations), specify options for connecting to the Internet through a proxy server if your organization uses one.
For more information on proxy servers, see Setting up your Web connection.
9. Click the Servers tab.
In the "Home/mail server" field, enter the name of your Domino home server.
(Optional) In the "Passthru server" field, specify a passthru server for the location.
(Optional) In the "Catalog/domain search server" field, specify a domain search server for the location.
(Optional) In the "Domino directory server" field, enter the name of your Domino directory server.
(Optional) In the "Sametime server" field, enter the name of your Sametime server.
10. Click Ports and select at least one of the ports that Notes lists.
Note You can enable additional ports using File - Preferences - User Preferences. If you are unsure which port to use, check with your Domino administrator for a network connection, or your hardware documentation for a dialup modem connection (usually a port beginning with COM).
11. Click the Mail tab and specify mail settings for the location, especially whether you want to keep mail on the server and work online or work offline in a local mail database and replicate changes.
12. (Optional) Click the "Internet Browser" tab and select a browser to use at this location--Notes, Notes with
Internet Explorer, Netscape NavigatorTM, Microsoft Internet Explorer, or Other. If you select Other, click the flashlight icon under "Internet browser path" to specify the location of the application in your operating system. The default is Notes.
13. (Optional) Click the Replication tab and set up a replication schedule for this location. The replication schedule is disabled by default. This is the same schedule you can set up on the Replicator page or by choosing File - Replication - Settings and clicking "Change Schedule."
14. Click the "Phone Settings" tab if this is a Dialup location, and specify phone dialing information.
15. (Optional) Click the Advanced tab to specify additional settings such as Web retrieval, Java applet security, and MIME.
16. Click "Save & Close." Dragging and dropping You can drag and drop items within Notes, between Notes and your operating system, and between Notes and applications.
Depending on what you are dragging and dropping, when you drag and drop a file, you are creating a copy of the file, or you may be moving it from one place to another. For example, when you drag a meeting invitation from one day to another, you are moving the meeting to a different day which reschedules the meeting.
To drag and drop files
1. Depending on what you are dragging and dropping, minimize and then re-size Notes so you can see the operating system's desktop, file system, an application, or an Internet browser simultaneously, by moving your cursor to the bottom right corner of the Notes window until you see a double-sided arrow, then drag the window upward toward the top left of your screen.
2. To drag and drop an item, select the item from the place that you are dragging it from by left-clicking the item and holding down the mouse button, drag the item to the place you want to drop it, then release the mouse button to drop the file.
Tip If you are using Notes with Windows, you can right-click an item from the Windows desktop or from a Windows folder and select to either copy the item or embed the item as an OLE object (if that application is installed).
3. Click any of the following areas for drag and drop information, and then follow the procedures in the corresponding tables:
Mail and Personal Address Book
Calendar and Scheduling
Documents and applications
Bookmarks
Replicator
Other Notes options
Mail and Personal Address Book
What do you want to do? Procedure
Create a contact document from a vCard file From the operating system's desktop or file system select a vCard file, and drag the file to the Contacts view in your Personal Address Book.
Move a mail message from one folder to another
From the Mail database, select a mail message from any view, and drag the document to the appropriate folder.
Move a mail folder into another mail folder From the Mail database, select a folder, and drag the folder to another folder.
Rearrange the columns in the Mail database From the Mail database, select a column header, and drag the column to the position you want.
Archive a mail message In the Mail database, click Tools in the navigation pane so you can see the Archive folder.
From any view, select a mail message, and drag the document to the Archive folder.
Calendar and Scheduling
What do you want to do? Procedure
Reschedule a Calendar entry that you own to a different time and date
From the Calendar view, with time slots displayed, select any Calendar entry that you own, and drag the entry to the date and time you want to reschedule it to in the Calendar.
Reschedule a Calendar entry that you own to a different date
From the Calendar view, select any Calendar entry that you own, and drag the entry to the date you want to reschedule it to in the Calendar.
Propose a new date and time for a meeting that you were invited to
From the Calendar view, select any meeting that you were invited to, and drag the entry to the date you want to reschedule it to in the Calendar.
Reschedule the Start or End time of an appointment or meeting that you own Change the Start or End time of an appointment or meeting that you own
From the Day view in the Calendar, with time slots displayed, select a meeting or appointment that you own, and drag the top (Start time) or bottom (End time) border to the new Start or End time.
Propose a new Start or End time of an appointment or meeting that you were invited to
From the Day view in the Calendar, with time slots displayed, select a meeting or appointment that you were invited to, and drag the top (Start time) or bottom (End time) border to the new Start or End time.
Documents and applications
What do you want to do? Procedure
Create an attachment in a document from a file in your operating system
Put the open document in Edit mode.
From the operating system's desktop or file system, select a file, and drag the file to the open document.
Copy a document to your operating system
Note Dragging window tabs to the Macintosh operating system is not supported.
From Notes, select a document's window tab (Windows only) or a document from a database view, and drag the document to the operating system's desktop or file system.
Copy an attachment from a document to the operating system or into an application (such as Lotus 1-2-3)
From a document, select an attachment and drag the attachment to the operating system's desktop, file system, or an application.
Copy a URL address from an Internet browser into a document
Put the open document in Edit mode.
From an Internet browser, drag the bookmark icon of the URL from the address bar, and drag the URL to the document.
Create an OLE object in a document Put the open document in Edit mode.
From the operating system's desktop or file system, select a file by right-clicking the file, then drag the file to the document.
From the pop-up menu, choose "Create Embedded Object here."
Copy a document from one folder or view to another folder or view
From the navigation pane, select a folder or view, press and hold CTRL, and drag to another folder or view.
Note To select multiple documents, click in the column to the left of the documents to display check marks next to the documents. Drag one of the selected documents and the rest follow.
Move a document from one folder or view to another folder or view
From the navigation pane, select a folder or view, and drag to another folder or view.
Note To select multiple documents, click in the column to the left of the documents to display check marks next to the documents. Drag one of the selected documents and the rest follow.
Bookmarks
What do you want to do? Procedure
Copy a file from the operating system to the Bookmark bar or a Bookmark folder
From the operating system's desktop or file system, select a file, and drag the file to the Bookmark bar or Bookmark folder.
Launch an application from the Notes Bookmark bar or a Bookmark folder
Note Dragging applications from the Macintosh to the Bookmark bar or a Bookmark folder is not supported.
From the operating system's desktop or file system, select an application's executable or shortcut, and drag the file to the Bookmark bar or Bookmark folder.
Copy a document or database from the Bookmark bar or a Bookmark folder to the operating system
From Notes, select a bookmarked document or database from the Bookmark bar or a Bookmark folder, and drag the file to the operating system's desktop or file system.
Copy a document or database window tab from the window tab bar to the Bookmark bar or Bookmark folder
From Notes, select a document's or database's window tab, and drag the window tab to the Bookmark bar or a Bookmark folder.
Copy an attachment from a document to the Bookmark bar or a Bookmark folder
From a document, select the attachment, and drag the attachment to the Bookmark bar or a Bookmark folder.
Copy a bookmark from one Bookmark folder to another
Select a bookmark from a Bookmark folder, press and hold CTRL, and drag to another Bookmark folder.
Move a bookmark from one Bookmark folder to another
Select a bookmark from a Bookmark folder, and drag to another Bookmark folder
Replicator
What do you want to do? Procedure
Create a database replica Select a database from the Workspace, Bookmark bar, or Bookmark folder, and drag the database to the Replicator bookmark or Replicator page.
Replicate an existing replica already on your Replicator page
Select a database from the Workspace, Bookmark bar, or Bookmark folder, and drag the database to the Replicator bookmark or Replicator page.
Replicate a document to an existing replica Select a document's window tab or a document from a database view, and drag the document to the replica on the Replicator page.
Rearrange or file database entries listed in the Replicator page
From the Replicator page, select a database entry, and drag the database to the position you want or to the folder you are adding it to.
Other Notes options
What do you want to do? Procedure
Rearrange the order of window tabs Select a document's or database's window tab, and drag the window tab to the position you want .
Copy a database from the Workspace to the operating system
Select a database from the Workspace, and drag the database to the operating system's desktop or file system.
Connections and Replication troubleshooting Why can't I access a server on the network?
When you choose File - Database - Open, the server list displays only the names of servers for which you have databases listed in your bookmark bar. If the server you want to access is not in the list, click Other to see more servers.
If you still can't see the server name, you may be using the wrong protocol, or you may not have access rights to the server. Try typing the name of the server, and if that doesn't work, check with the server administrator.
Why can't I connect to a server at the office from outside?
To connect to a server at the office from outside the office, you must first set up Notes to connect over a phone line, cable/broadband, or DSL connection.
If you use a phone line, the server to which you want to connect must also have a modem, or you must be able to connect to it through another dial-up server. If you choose File - Preferences - Client Reconfiguration Wizard (Macintosh OS X users, Notes - Preferences - Client Reconfiguration Wizard) to add a telephone line connection, make sure you supply the correct server name or TCP/IP address when prompted. If you don't have this information, contact your Internet service provider, Domino administrator, or remote access service provider. You can also click the "Connection Configuration Wizard" button near the top of a Location document to create a server Connection document in your Personal Address Book. Make sure you specify the correct passthru server for a dial-up connection.
Once Notes is set up correctly, make sure to switch to the correct location (for example Home or Travel) and that you have supplied the correct phone number for the server.
Why can't I have more than one phone number for a s erver?
To specify more than one phone number for a server in a Connection document in your Personal Address Book, enter each phone number separated by a semicolon. This way, each time you call the server, Notes lets you select the number to dial.
Why are all the servers I try to call busy or causi ng my call timer to expire?
If you create your own server Connection document, check your dialing prefix in your current Location document. For example, if the service on the phone line you're using has been changed to remove call waiting, you shouldn't be using a prefix to bypass call waiting.
Why can't I hold a connection after dialing in?
If you have call waiting and someone calls the line you're using, call waiting can automatically disconnect you from a server. To disable call waiting before you make a call, you can dial *70 in many areas of the United States.
Also, Notes will hang up if it remains idle for a certain amount of time. If you want to change how long your client remains connected to a Domino or Internet server when data is not being transmitted, enter a different number of minutes in the "Hangup if idle" field in the Hangup dialog box.
In addition, random interference on the phone lines can interrupt a connection. Try dialing again.
Why can't I initialize the modem?
If you are unable to initialize the modem, the communication port or the modem may be set up incorrectly. To reset the communication port and the modem, choose File - Tools - User Preferences, click Ports, and select the options you need.
Note If your exact modem is not listed, see Why can't I locate my modem in the list?
Why can't I locate my modem in the list?
If your exact modem is not listed, select the closest match by brand and speed.
If there's no match and your modem is not 100% Hayes-compatible, you may need to edit an existing modem command file or create a new one. For information about your modem, see your modem documentation. For information about editing modem command files, see Lotus Domino Administrator 6 Help or your Domino administrator.
Select "Auto Configure" only temporarily, if you have no way of getting a modem command file immediately. This option, if it works with your modem, gives you limited, but slow, communication.
Why can't I see any servers when I call?
In order to call a server over a phone line, you must enable a modem port on your computer. Once a modem port is enabled, and you have at least one dialup Location document in your Personal Address Book, you must change to a non-office location before you make the call.
Why can't I see a specific server in the list of se rvers?
When you choose File - Database - Open, the dialog box lists the names of all the servers for which you have databases listed in your Bookmark bar. If the server you want to access is not in the list, click Other to see more servers.
If you still can't see the server name, you may be using the wrong protocol, or you do not have access rights to the server. Try typing the name of the server, and if that doesn't work, check with the server administrator.
Why can't I see all the databases on the server I'm connected to?
When you choose File - Database - Open, the databases you are looking for may be located in a subdirectory; double-click the subdirectory name to see databases within it.
The database manager may have specified that the database not be displayed in the "Open Database" dialog box. If you need access to a database that you don't see listed, see your Domino administrator.
Why can't I replicate?
Following are several common reasons that replication fails:
No changes have been made. Replication occurs only when there are changes to replicate.
The database is not scheduled to replicate. See the topic on scheduling replication.
Replication is temporarily disabled for the database you're using. To enable replication, choose File - Replication - Settings, click Other, and deselect "Temporarily disable replication."
The replica IDs of the two databases you want to replicate are not the same. (Databases with different replica IDs cannot replicate.) Examine the replica ID for each database and make sure they match. If the replica IDs don't match, create a new replica and then clear the replication history on any other replicas to ensure that the next replication is a full replication.
The access control list on one of the replicas may have changed since the replicas were created so that you no longer have the same access level to both replicas.
The destination server is out of hard disk space.
You replicate at a Notes Direct Dialup or Network Dialup location, and you see "Skipping replication due to previous call failure" on the Replicator page. Check to see that your phone connection has not been lost.
How can I limit the documents I receive when I repl icate?
To limit the documents you receive when you replicate, select the replica, choose File - Replication - Settings, click "Space Savers," and select the options you want.
How can I change which documents are replicated to my local drive?
To change which documents are replicated to your local drive, select the replica, choose File - Replication - Settings, click "Space Savers," and select the options you want.
What are the duplicate documents with the diamond s ymbols in the database on the server?
Documents with a diamond symbol are the result of conflicts when more than one person edits the same document. You can avoid replication conflicts by locking documents you edit in shared databases on servers. But if conflicts occur, you can correct them.
For more information, see Replication and save conflicts and Locking documents.
Why can't I find the Replicator icon in the bookmar ks?
If you inadvertently remove the Replicator icon from the Bookmark bar, you can restore the icon by clicking any Bookmark folder (for example, Favorite Bookmarks) in the Bookmark bar, and then choosing Restore Defaults from the View drop-down menu at the top of the bookmarks list.
Why are the replication settings dim?
Some or all of the options in the Replication Settings dialog box may be unavailable, depending on the database you have selected when you open the box.
If the selected local database is not a replica, the whole box is dim. If you have less than Manager access to the selected server-based database, all pages except the Advanced page, which controls settings for all replicas of the database, are dim.
Specifying delivery options for mail
Delivery options are available when you create a new or forward an existing Notes mail message. Some delivery options may also work in Internet mail, depending on whether your recipients' mail programs support them.
If the Delivery Options dialog box is not open, create a mail message and choose Actions - Delivery Options.
For information on the Security Options section of this dialog box, see To add a digital signature to a message and To encrypt a message.
Tip You can also specify some of these delivery options by clicking this icon in a new mail message and selecting the options from lists. You can specify the importance, the priority, the digital signature, and the return receipt.
Click any of these links:
To set the importance of a message
To confirm delivery of a message
To change the delivery priority of a Notes mail message
To confirm that a message is opened (return receipt)
To prevent copying or forwarding of a Notes mail message
To spell check mail before delivery
To prevent receipt of out-of-office messages from others
To add a mood stamp to a Notes mail message
To set the importance of a message
All messages are of Normal importance by default. Setting a message as High importance displays an exclamation point next to the message in the recipient(s)' views, and a red envelope next to the message in your views. Importance does not change the order in or speed with which Notes delivers messages.
1. Create a message and choose Actions - Delivery Options.
2. On the Basic tab, under Importance, select High or Low (Normal is the default), and click OK.
To confirm delivery of a message
Notes uses delivery reports to confirm delivery of messages to the recipient(s)' mail server(s).
1. Create a message and choose Actions - Delivery Options.
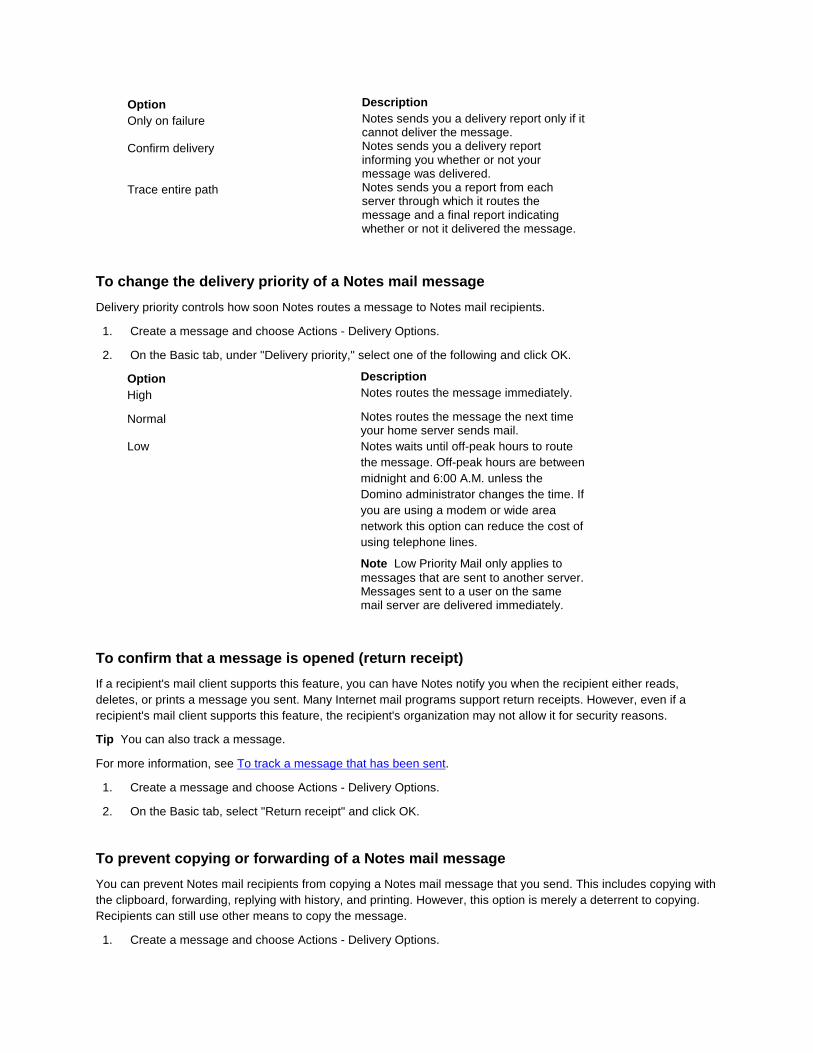
2. On the Basic tab, under "Delivery report," select one of the following and click OK.
Option Description
Only on failure Notes sends you a delivery report only if it cannot deliver the message.
Confirm delivery Notes sends you a delivery report informing you whether or not your message was delivered.
Trace entire path Notes sends you a report from each server through which it routes the message and a final report indicating whether or not it delivered the message.
To change the delivery priority of a Notes mail mes sage
Delivery priority controls how soon Notes routes a message to Notes mail recipients.
1. Create a message and choose Actions - Delivery Options.
2. On the Basic tab, under "Delivery priority," select one of the following and click OK.
Option Description
High Notes routes the message immediately.
Normal Notes routes the message the next time your home server sends mail.
Low Notes waits until off-peak hours to route the message. Off-peak hours are between midnight and 6:00 A.M. unless the Domino administrator changes the time. If you are using a modem or wide area network this option can reduce the cost of using telephone lines.
Note Low Priority Mail only applies to messages that are sent to another server. Messages sent to a user on the same mail server are delivered immediately.
To confirm that a message is opened (return receipt )
If a recipient's mail client supports this feature, you can have Notes notify you when the recipient either reads, deletes, or prints a message you sent. Many Internet mail programs support return receipts. However, even if a recipient's mail client supports this feature, the recipient's organization may not allow it for security reasons.
Tip You can also track a message.
For more information, see To track a message that has been sent.
1. Create a message and choose Actions - Delivery Options.
2. On the Basic tab, select "Return receipt" and click OK.
To prevent copying or forwarding of a Notes mail me ssage
You can prevent Notes mail recipients from copying a Notes mail message that you send. This includes copying with the clipboard, forwarding, replying with history, and printing. However, this option is merely a deterrent to copying. Recipients can still use other means to copy the message.
1. Create a message and choose Actions - Delivery Options.
2. On the Basic tab, select "Prevent copying" and click OK.
To spell check mail before delivery
You can have Notes automatically spell check your message before delivery.
1. Create a message and choose Actions - Delivery Options.
2. On the Basic tab, select "Auto spellcheck" and click OK.
Note You can also turn on automatic spell checking for all mail messages.
To prevent receipt of out-of-office messages from o thers
If you know that a colleague or friend is on vacation, and want to be able to send the person messages without receiving out-of-office replies, you can have Notes refuse this type of reply.
1. Create a message and choose Actions - Delivery Options.
2. On the Basic tab, select "Do not notify me if recipient(s) are running Out of Office" and click OK.
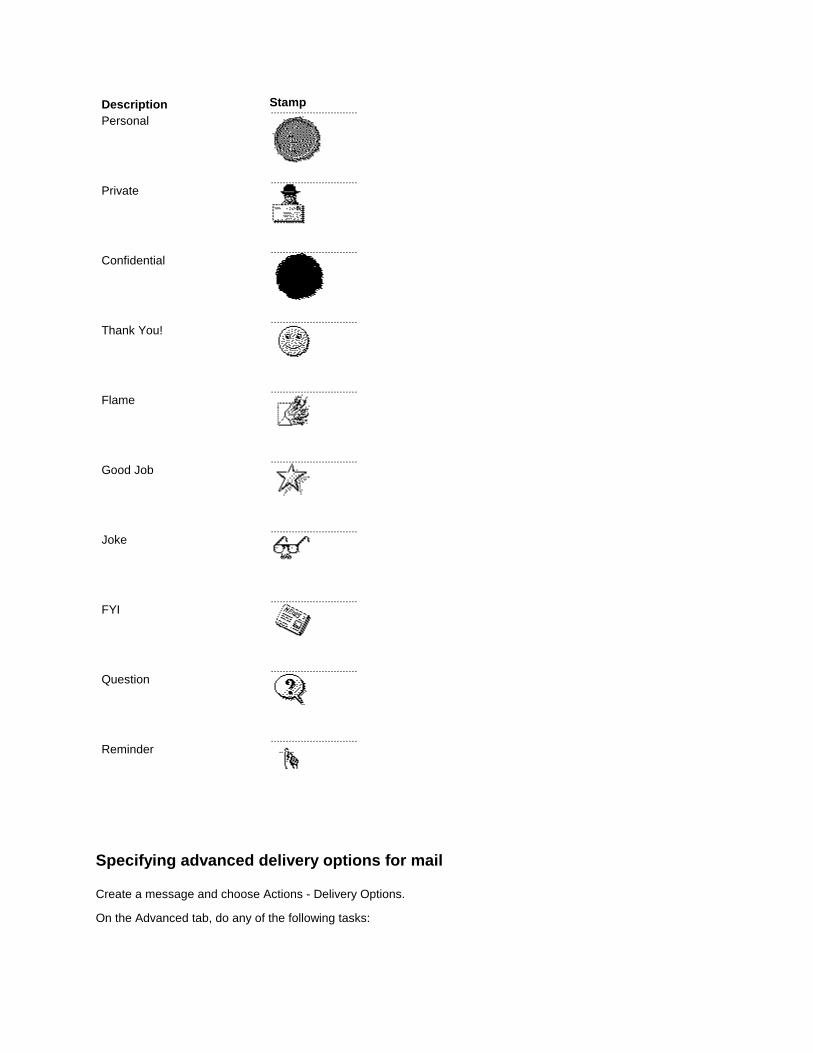
To add a mood stamp to a Notes mail message
You can use a mood stamp to indicate that a Notes mail message is a particular type of message, such as a personal message or thank you message. Notes shows the stamp next to the message in the recipient's view and at the top of the rich-text area in the message itself.
1. Create a message and choose Actions - Delivery Options.
2. On the Basic tab, in the drop-down list under "Mood Stamp," select a stamp style and click OK. To show no mood stamp, leave Normal selected.
Description Stamp
Personal
Private
Confidential
Thank You!
Flame
Good Job
Joke
FYI
Question
Reminder
Specifying advanced delivery options for mail Create a message and choose Actions - Delivery Options.
On the Advanced tab, do any of the following tasks:
What do you want to do? Procedure
Ask recipients to reply to a message by a specified date
Specify a date in the "Stamp message with a 'Please reply by' date" field. Notes adds a line to the message asking the recipients to reply by the date and adds the message to the recipient's To Do view.
Add an expiration date to a message Specify a date in the "Expiration date" field.
Notes uses expiration dates for archiving. This also lets the recipient know the message is not important after the date.
Route replies to a message to others Specify a name or names in the "Replies to this memo should be addressed to" box. To select a name from an address book, click the button to the right of the box.
Specify a language character set for the message
Select a language character set from the "MIME Character Set" drop-down list. For example, if your recipient is using Notes in Hebrew, select one of the Hebrew options.
Send this mail to other Notes users through the Internet and preserve delivery options.
Select the check box at the bottom of the tab. When your Location document specifies sending outgoing mail directly to the Internet, choosing this option lets you preserve delivery options that normally do not work with mail sent over the Internet.
For more information on the Location document, see To create or edit a Location document manually.
Addressing mail You can address a message either by selecting recipient names from an address book or by entering names or addresses directly into a message. If you enter names directly, you can set Notes to use a type-ahead feature that completes names based on the first few letters you type.
Click any of these topics:
To enter a name or address manually
To use the type-ahead feature
To customize or disable the type-ahead feature
To enter a name or address manually
To address a message, type each recipient's name or address in at least one of the To, carbon copy (cc), or blind carbon copy (bcc) fields. If you type more than one name in a field, press ENTER after each name, or separate the names with commas.
To see whether Notes recognizes a name you type in an address field, choose View - Refresh. Notes searches all appropriate address books for each name in the field, supplying addresses for the names it recognizes. For unknown names, Notes may open a list of similar names you can select from.
Note Everyone who receives the message can see and reply to names in the cc: list. Each person in the bcc: list sees only his or her own name in that field, and recipients in the To or cc lists see nothing in the bcc field.
Go to top
When to use a name only and when to use a full addr ess
You can enter just a recipient's name as an address if the Domino directory on your home server, or your Personal Address Book, contains address information for the recipient. If the recipient's name is not in the Domino directory or any Personal Address Book, you must type the full address of the recipient. For example, if the recipient uses Notes mail and your organization uses domains, the full address Jane Q Public @ Marketing tells Notes to route the message to Jane Q Public in the domain named Marketing. If you know the recipient does not use Notes mail, enter her Internet e-mail address, for example [email protected].
Tip You can also save addresses of people and groups in your address book so that you can type the recipient's name instead of the full address.
Go to top
To use the type-ahead feature
By default, Notes uses type-ahead to complete names you type, displaying each name as soon as you type enough letters for a match. This convenience can save you time when typing a lot of names.
When Notes shows a name while you're typing, do one of the following:
To decline the name Notes shows, continue typing the name or address. If Notes doesn't show a match, type the full name or address.
To keep the name Notes shows, press ENTER and start typing the next name or address. If there are no more names to add to the field, click another field.
Go to top
To customize or disable the type-ahead feature
Notes looks up names in your address book first, then in a Domino directory on your home server. You can customize type-ahead to look in your address book only, or you can disable type-ahead.
1. From the menu, choose File - Mobile - Edit Current Location.
2. Click the Mail tab.
3. In the "Recipient name type-ahead" field, select:
"Local only" to look for names in your local address book only.
"Local then Server" to look first in your local address book, then on your home server.
"Disabled" to turn off type-ahead.
4. If you choose "Local only" or "Local then Server," in the "Activate recipient name type-ahead" field select:
"On Each Character" to search after each character you type.
"On Delimiter" to search only after you type a delimiter such as a comma or the ENTER key.
4. Click "Save & Close." Mail settings for a location You can specify mail settings, such as whether to use your mail on a server or use your local replica, from the Mail tab of a Location document.
Field Information to enter
Mail file location Select "on Server" to use your mail file directly on a server at the location or select Local to use a local replica of your mail file at the location. When you use a local replica, Notes stores mail you send in an outgoing mailbox until replication occurs.
Mail file The path to your mail file. Notes opens the mail file you have specified in this field when you:
choose a mail command from the main menu click the Mail icon in the Bookmark bar or Welcome page
forward a mail message. Domino mail domain The mail file's domain.
Internet domain for Notes addresses when connecting directly to the Internet
The Internet domain to use if you have set up any Internet mail accounts
Recipient name type-ahead Select Disabled if you don't want to have Notes automatically suggest full names when you type mail addresses while this location is current. Select "Local Only" to have Notes look for names in your Personal Address Book when you type mail addresses. Select "Local then Server" to have Notes look for names in your Personal Address Book and then the Domino Directory on your home server when you type mail addresses.
Activate recipient name type-ahead Select "On Each Character" to have Notes look for a name with each letter you type (for example find Johnson if you type Joh), or "On Delimiter" to have Notes look only when you’ve typed an entire name.
Recipient name lookup Select "Stop after first match" to have Notes find only the first name that matches the recipient name when you send mail from this location. Select "Exhaustively check all address books" to have Notes find all of the names that match the recipient name and ask you which one to use.
Mail addressing This field appears only if you have specified Local for "Mail file location."
Select "Local and Server" to show any Domino directories on your home server in the "Choose address book" list in various dialog boxes that let you select people, for example, Select Addresses or Select Names.
Note The local address books that appear in this list are specified in your User Preferences, Mail. For more information, see To change your address book.
Send outgoing mail Select "through Domino Server" to send mail through your home server. Select "directly to Internet" to send mail through an
Internet account. Format for messages addressed to Internet addresses
Select "Notes Rich Text Format" to allow all messages over the Internet to be sent as plain text. Select "MIME Format" to keep as much formatting as possible, depending on the recipient’s mail, when mailing to non-Notes users.
Transfer outgoing mail if This field appears only if you have specified Local for "Mail file location."
Type the number of messages which must accumulate before Notes automatically sends mail.
Note If you stop replication while it is in progress, or see any errors when sending mail, Notes may delay sending your outgoing mail even when there are more messages in your outbox than specified in this field. You can force all mail to be sent by replicating the Send Outgoing Mail entry on the Replicator page.
Accessing servers using certificates Stored in your User ID, a certificate is an electronic stamp, like a stamp on a passport, which verifies to a server that you are who you say you are. When you first receive your User ID from your administrator, it contains a Notes certificate. You may decide to use Internet certificates as well. (You may see Internet certificates being referred to as X.509 certificates.)
You can view all of the certificates in your User ID by choosing File - Security - User Security (Macintosh OS X users : Notes - Security - User Security), and then clicking Your Identity - Your Certificates.
What are Notes certificates?
When you want to access any Domino server, whether it be your mail server or an HR server in your company, you need a certificate to identify yourself to that server, and the server needs a certificate to identify you.
Notes certificates in Notes Release 5 and later use hierarchical names, so the certificate authority's name is part of the certificate's name. (The certificate authority, or CA, is the entity that created your certificate and issued it to you.) For example, your certificate might look like this: Joe User/ACME, where Joe User is your name and ACME is your CA's name.
There are three types of Notes certificates you can have in your User ID:
Notes Multi-purpose certificates are used to identify you for most Notes purposes, such as logging in to Notes and accessing Notes databases on Domino servers. Your Notes multi-purpose certificates allow for strong cryptography -- for example, you receive mail protected with strong encryption when your Notes multi-purpose certificate is used to send you encrypted mail. The certificates contain a public key, which is used to sign and encrypt messages, the name of the CA that issued your certificate, the name of the person or server the certificate is issued to, the date the certificate was made, and the certificate's expiration date. Most users use Notes Multi-purpose certificates only.
Notes International certificates are used for encryption only. They allow anyone who can't use "strong encryption" to send you encrypted mail. They are generally not for your personal use. You always have an International certificate in your User ID, even if it is not used.
Flat certificates were used in Notes 4.6 and earlier and are used to access pre-Release 5 servers that still use flat certificates to identify themselves. Flat certificates do not have hierarchical names. You cannot create new flat certificates in Notes 5 or later. In order to have a flat certificate to be used as your Notes login certificate in your User ID, you had to have already had it when you upgraded to Notes 5 or later.
What are Internet certificates?
When you want to access a secure Web site that requires an SSL connection, such as https://www.verisign.com, or you want to encrypt or sign mail that is sent over the Internet, you need an Internet certificate. Usually you store Internet certificates in a Web browser, such as Netscape or Internet Explorer; however, you can also store Internet certificates in your User ID to be used with the Notes browser or with Notes mail. Internet certificates often contain an e-mail address. Because Internet certificate names are lengthy, Notes displays the e-mail address in a short format as a way of showing who the certificate belongs to. If there isn't an e-mail address available, Notes displays the most significant part of the Internet certificate name. For example, you could have an Internet certificate that looks similar to this: CN=ACME Internet CA/O=ACME/S=MASS/C=US. The portion of this certificate Notes displays is "ACME Internet CA."
Note If you need to see the entire name associated with your personal Internet certificate, you can choose File - Security - User Security (Macintosh OS X users : Notes - Security - User Security), click Your Identity - Your Certificates, select "Your Internet Certificates" from the drop-down list, and click the "Advanced Details" button. To see details of other people's Internet certificates, see Certificates for people or services.
Your Internet certificates are identified by Notes as Internet Multi-purpose certificates. Within Notes, this type of certificate is used to access secure Web pages using the Notes browser, to send and receive secure mail using Internet-style Notes mail (S/MIME), and to secure connections to Internet services using Secure Socket layer (SSL) connections.
Unlike Notes certificates, you can use one Internet certificate to sign messages and another Internet certificate for encryption. See Using dual Internet certificates for encryption and signatures for more information. Retrieving certificates and cross certificates from your home server To access Notes servers in other domains, to verify digital signatures, or to encrypt messages using S/MIME, you must have cross certificates in your Personal Address Book. You can add to your Personal Address Book Internet certificates and Notes and Internet cross certificates from the Domino Directory on your home/mail server.
You can do any of the following to retrieve certificates and cross certificates from your home server.
To retrieve your administrator's cross certificates for Notes and Internet certificates
1. Choose File - Security - User Security.
Macintosh OS X users : Notes - Security - User Security.
2. Click Identity of Others - People, Services.
3. Click "Find more about people/services."
4. Click "Download administrative trust defaults." Notes copies Notes and Internet cross certificates only if the cross certificate was issued by a common ancestor (any certifier listed in the certificate chain).
To retrieve all Internet certificates from the Domi no Directory
1. Open your Personal Address book.
2. Choose Actions - Retrieve Certificates from Home Server.
Note Retrieving all certificates from your home server may take several minutes to complete. The progress of the certificates being copied over to your Address Book is displayed in the status bar.
To retrieve a Notes cross certificate or Internet c ross certificate from the Domino Directory
1. In the Domino Directory, open the Servers - Certificates view.
2. Select one or more Notes or Internet cross certificate and click the "Copy to Personal Address Book" action button in the action bar.