MIXING CEMENT LOW STRENGTH CONCRETE: 15 MPa (Used for un-reinforced foundations for houses and walls) 2 CEMENT BAGS SAND STONE 2 bags of cement + 4 wheelbarrows of coarse sand + 4 wheelbarrows of stone = 0,39 m 3 of low-strength concrete + 4 + 4 MEDIUM STRENGTH CONCRETE: 25 MPa (Suitable for reinforced foundations and slabs, light-duty house floors, paths, patios, steps, driveways and garage floors) 2 CEMENT BAGS SAND STONE 2 bags of cement + 3 wheelbarrows of coarse sand + 3 wheelbarrows of stone = 0,3 m 3 of medium-strength concrete + 3 + 3 HIGH STRENGTH CONCRETE: 25 MPa (Used for suspended structural beams and slabs, pre-cast items such as flagstones and heavy duty floors such as workshop floors) 2 CEMENT BAGS SAND STONE 2 bags of cement + 2 1/2 wheelbarrows of coarse sand + 2 1/2 wheelbarrows of stone = 0,26 m 3 of high-strength concrete + 2 1/2 + 2 1/2 BRICK LAYING: (Exterior areas or areas exposed to dampness) 2 CEMENT BAGS SAND 2 bags of cement + 4 1/2 wheelbarrows of building sand = 0,24 m 3 + 4 1/2 BRICK LAYING: (Interior or dry areas) 2 CEMENT BAGS SAND 2 bags of cement + 6 wheelbarrows of building sand = 0,3 m 3 + 6 PLASTERING: (Exterior areas or areas exposed to dampness) 2 CEMENT BAGS SAND 2 bags of cement + 4 1/2 wheelbarrows of plaster sand = 0,25 m 3 + 4 1/2 PLASTERING: (Interior or dry areas) 2 CEMENT BAGS SAND 2 bags of cement + 6 wheelbarrows of plaster sand = 0,3 m 3 + 6
Transcript
Zone 01A Page 10 Selected products could differ from picture shown and may not be available in all stores
REPLACE A SHOWER HEAD
Shower head
Shower arm
Adjustable wrench
Plumber s̒ tape
Clear cauk
Shower head
Shower arm
Adjustable wrench
Plumber s̒ tape
CALCULATING LITRES OF PAINT
TOTAL LITRES OF PAINT REQUIRED
24m2 = 4 LITRES
WALLS
H4 X W6 = 24m2
W
H 4
6
CEILINGS
L 6 X W 4 = 24m2
LW4 6
RUST PROOFING AND PAINTING PALISADE
Paint Brushes
Newspaper
Paint remover
Sand paper
Rust treatment
Enamel Paint
INSTRUCTIONS ON INSTALLATION OF CEILING TILES
TYPES OF SURFACES - Ceiling tiles can be fixed onto dry plaster, concrete, aerated concrete, plaster boards, chipboards and wood.
SURFACE PREPARATION - The surface must be dry, free of grease,hard, quite smooth and absorbant, free of old wallpaper and glue. Very absorbant surfaces must be sealed with a primer of DECOR adhesivediluted with water in a 1:6 ratio. Flaking plaster must also be sealed with primer. A surface that has been affected by fungus needs to be thoroughly cleaned.
FITTING THE CEILING TILES - For fixing ceiling tiles to the ceiling use DECOR adhesive.
STEP 1. Draw straight lines dividing the ceiling into four equal rectangles by starting with a cross in the middle. All lines should be parallel to the walls.
STEP 2. Put DECOR adhesive on the back of the tile in all four corners and in the middle as shown in the illustration.
STEP 3. Place the tile on the cross in the middle of the ceiling and press lightly against the ceiling, so that the glue sticks firmly.
CAUTION! WIPE EXCESS GLUE AWAY IMMEDIATELY WITH WATER AND A SPONGE.
STEP 4. Work your way towards the walls. Finish the edges off with moulded cornices.
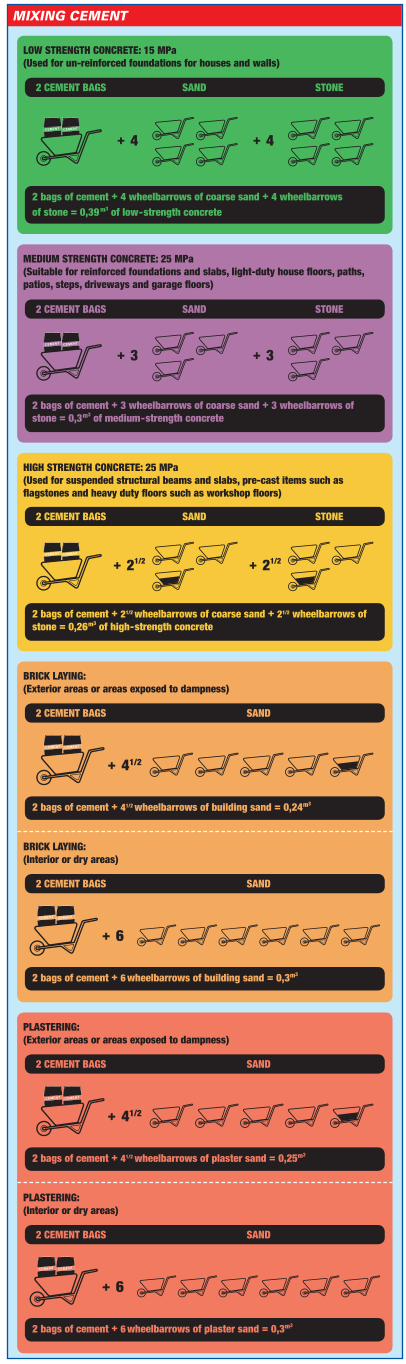
MIXING CEMENT
LOW STRENGTH CONCRETE: 15 MPa(Used for un-reinforced foundations for houses and walls)
2 CEMENT BAGS SAND STONE
2 bags of cement + 4 wheelbarrows of coarse sand + 4 wheelbarrowsof stone = 0,39m3 of low-strength concrete
+ 4 + 4
MEDIUM STRENGTH CONCRETE: 25 MPa(Suitable for reinforced foundations and slabs, light-duty house fl oors, paths, patios, steps, driveways and garage fl oors)
2 CEMENT BAGS SAND STONE
2 bags of cement + 3 wheelbarrows of coarse sand + 3 wheelbarrows of stone = 0,3m3 of medium-strength concrete
+ 3 + 3
HIGH STRENGTH CONCRETE: 25 MPa(Used for suspended structural beams and slabs, pre-cast items such as fl agstones and heavy duty fl oors such as workshop fl oors)
2 CEMENT BAGS SAND STONE
2 bags of cement + 21/2 wheelbarrows of coarse sand + 21/2 wheelbarrows of stone = 0,26m3 of high-strength concrete
+ 21/2 + 21/2
BRICK LAYING:(Exterior areas or areas exposed to dampness)
2 CEMENT BAGS SAND
2 bags of cement + 41/2 wheelbarrows of building sand = 0,24m3
+ 41/2
BRICK LAYING:(Interior or dry areas)
2 CEMENT BAGS SAND
2 bags of cement + 6 wheelbarrows of building sand = 0,3m3
+ 6
PLASTERING:(Exterior areas or areas exposed to dampness)
2 CEMENT BAGS SAND
2 bags of cement + 41/2 wheelbarrows of plaster sand = 0,25m3
+ 41/2
PLASTERING:(Interior or dry areas)
2 CEMENT BAGS SAND
2 bags of cement + 6 wheelbarrows of plaster sand = 0,3m3
+ 6
COVERAGE1L = 6m2
STEP 7- Turn on the water supply and test your newshower head.
STEP 5- Screw the new shower head onto the plumber’s tape on the new shower arm’s thread by turning in a clockwise direction.
STEP 4- Thread plumber’s tape onto the thread of the newshower arm in a clockwise direction.This will prevent leaks.
STEP 3- Use an adjustable wrench or locking pliers to
carefully unscrew the arm from the wall by turning in an anti-clockwise direction.
STEP 2- Unscrew the old shower head by turning in a
clockwise direction.- Wait for the shower to run dry.
STEP 1- Turn off the shower tap.
EASYPROJECT RATING:
VERY EASYPROJECT RATING:
STEP 5- Make sure that there is nothing that causes a
build-up of water underneath your palisade fence,as this will cause the fence to rust.
- Repair chipped paint as soon as you notice it - thiswill prolong the life of your fence and save time.
STEP 4- Allow the primer to dry thoroughly.- When the primer is completely dry, apply good
quality enamel based paint to the palisade. Dulux and Duram gloss enamels are both ideal paints for palisade fences.
STEP 3- Clean the section thoroughly and apply a metal
primer like Medal Dual Steel Primer.- Always start painting at the top of the fence so that
you can fi x any drips or runs as you work your way down.
STEP 2- Sand and smooth the surface, then apply a good rust treatment. Duram Rustbuster is recommended for rust removal. Do not use a rust treatment on galvanised iron.
STEP 1- First, protect your painted plaster and surrounding
gardens with newspaper or pvc sheets. - Remove flaking paint with a quality paint remover
such as Alcolin or Fixit paint stripper and follow the manufacturer’s instructions carefully.
It is important to seal these areas properly because this helps prevent moisture from getting into your walls and floors.
MODERATEPROJECT RATING:
STEP 5- Put the nozzle of the gaulking gun directly onto
the surface that you are sealing and squeeze the trigger until the silicone starts to come out.
- Move the nozzle along the surface as evenly as possible and using one single movement to cover the whole area.
- Do not stop and start as this will leave a very uneven fi nish.
STEP 7- Remove the masking tape.
STEP 6- Wet your fi nger with dish washing liquid and use your fi nger to smooth the silicone.
- Use soap and water to clean your fi ngers onceyou have fi nished smoothing the silicone.
STEP 4- Apply a line of masking tape above and belowwhere you want to apply the silicone sealant.
STEP 3- Clean the surface with lacquer thinners to
ensure that it is perfectly clean where the silicone will be applied.
STEP 2- Use a knife blade to cut the existing sealant into sections.- Loosen the existing sealant with the same knife blade.- Pull sections away from the bath surface.
STEP 1- Fill the bath or basin with water. The weight of the water in the bath will ensure that the silicone is applied in the right place.
INSTALLING CEILING TILES
1. 2. 3. 4.
REPLACING A SHOWER HEADHOW TO SEAL AROUND A BATH TUB OR BASIN
Silicone sealant
Caulking gun
Dishwashing liquid
Knife blade
Masking tape
Lacquer thinners
Cleaning cloth
STEP 2
CALCULATING ROOF PAINTSTEP 1- Calculate the fl at square metre area of your roof.
HIGH PITCHED ROOF: LENGTH X BREADTH + 40%
NORMAL PITCHED ROOF:LENGTH X BREADTH + 30%
LB40%
LB30% 20%
LB
LOW PITCHED ROOF: LENGTH X BREADTH + 20%
PAINTING TIPS
OPEN WINDOWS TO ALLOW ENOUGH AIRFLOW
WEAR OLD CLOTHES, PAINTER’S HAT & GLOVES
WEAR A MASK IF SANDING OR USING SPRAY PAINT
PREPARING THE SURFACE:
- Fill small holes and cracks using a crackfi ller such as Powerfi x, Fixitor Polyfi lla multi-purpose crackfi ller.
- Remove all loose or flaking paint with a scraper.
- Scrape off mould and treat with anti-mould or anti-fungal products.
- Mould is often found in bathrooms, near toilets and in kitchens.
- Try to determine what is causing the build up of moisture in theseareas and fi x that as well.
- Look for problems such as old or broken gutters or leaking waterpipes or taps.

![Soil Piling Mats - Building Temporary Roads Soil type RoadCem Cement Stiffness Minimum Thickness Strain Safety factor [E : MPa] dyn [N/mm 3] [kg/m ] [kg/m3] [E dyn: MPa] [cm] [mm/m]](https://static.documents.pub/doc/80x56/5af7dfac7f8b9ae94890b4bf/soil-piling-mats-building-temporary-soil-type-roadcem-cement-stiffness-minimum.jpg)


![cvut.czmech.fsv.cvut.cz/wiki/images/c/c7/SP-PPMA-2018-Dohnalova-text.pdf · % cube %for sealed % for type I or normal curing in air with initial cement 11 cement 111 cement 96 [1/MPa]](https://static.documents.pub/doc/80x56/6012752f342f5018df2badb8/cvut-cube-for-sealed-for-type-i-or-normal-curing-in-air-with-initial-cement.jpg)