74


i
CONTENTS
Getting StartedINTRODUCTION AND SAFE OPERATION .. .... .... .... .... .... .... .... .... .... .... 2GENERAL PRECAUTIONS ...... .... .... .... .... .... .... .... .... .... .... .... .... .... .... .... .... 4WARRANTY INFORMATION ..... .... .... .... .... .... .... .... .... .... .... .... .... .... .... .... 5GENERAL DESCRIPTION .. ..... .... .... .... .... .... .... .... .... .... .... .... .... .... .... .... .... 6KEYBOARD & LCD DISPLAY .... .... .... .... .... .... .... .... .... .... .... .... .... .... .... .... 7BATTERIES .. .... .... .... .... .... .... ..... .... .... .... .... .... .... .... .... .... .... .... .... .... .... .... .... 8OPTIONAL AC ADAPTER... ..... .... .... .... .... .... .... .... .... .... .... .... .... .... .... .... .... 9TAPE CASSETTE ..... .... .... .... ..... .... .... .... .... .... .... .... .... .... .... .... .... .... .... .... .. 10LABEL CODE ... .... .... .... .... .... ..... .... .... .... .... .... .... .... .... .... .... .... .... .... .... .... .. 11LAMINATED INDUSTRIAL TAPE SEPARATOR TOOL ..... .... .... .... .. 12PRINT HEAD & ROLLERS ...... .... .... .... .... .... .... .... .... .... .... .... .... .... .... .... .. 13TAPE CUTTER ..... .... .... .... .... ..... .... .... .... .... .... .... .... .... .... .... .... .... .... .... .... .. 15CARRYING CASE .... .... .... .... ..... .... .... .... .... .... .... .... .... .... .... .... .... .... .... .... .. 16
For Your InformationPOWER KEY ..... .... .... .... .... .... ..... .... .... .... .... .... .... .... .... .... .... .... .... .... .... .... .. 18CODE & CAPS KEYS .. .... .... ..... .... .... .... .... .... .... .... .... .... .... .... .... .... .... .... .. 19CURSOR KEYS .... .... .... .... .... ..... .... .... .... .... .... .... .... .... .... .... .... .... .... .... .... .. 21SPACE KEY .. .... .... .... .... .... .... ..... .... .... .... .... .... .... .... .... .... .... .... .... .... .... .... .. 23RETURN KEY ... .... .... .... .... .... ..... .... .... .... .... .... .... .... .... .... .... .... .... .... .... .... .. 24BACKSPACE KEY ... .... .... .... ..... .... .... .... .... .... .... .... .... .... .... .... .... .... .... .... .. 27CLEAR FUNCTION ..... .... .... ..... .... .... .... .... .... .... .... .... .... .... .... .... .... .... .... .. 29ACCENT FUNCTION ... .... .... ..... .... .... .... .... .... .... .... .... .... .... .... .... .... .... .... .. 30SYMBOL FUNCTION .. .... .... ..... .... .... .... .... .... .... .... .... .... .... .... .... .... .... .... .. 32LENGTH FUNCTION ... .... .... ..... .... .... .... .... .... .... .... .... .... .... .... .... .... .... .... .. 34SIZE FUNCTION .. .... .... .... .... ..... .... .... .... .... .... .... .... .... .... .... .... .... .... .... .... .. 36UNDERLINE FUNCTION .... ..... .... .... .... .... .... .... .... .... .... .... .... .... .... .... .... .. 39FRAME FUNCTION ..... .... .... ..... .... .... .... .... .... .... .... .... .... .... .... .... .... .... .... .. 40HORIZONTAL ALIGNMENT FUNCTION ..... .... .... .... .... .... .... .... .... .... .. 42MIRROR PRINTING FUNCTION .... .... .... .... .... .... .... .... .... .... .... .... .... .... .. 43PRINT KEY, COPIES & FEED FUNCTIONS .. .... .... .... .... .... .... .... .... .... .. 44SERIALIZATION FUNCTION ..... .... .... .... .... .... .... .... .... .... .... .... .... .... .... .. 45ROTATE LEGEND FUNCTION ... .... .... .... .... .... .... .... .... .... .... .... .... .... .... .. 47REPEAT LEGEND FUNCTION ... .... .... .... .... .... .... .... .... .... .... .... .... .... .... .. 49LINE DRAWING FUNCTION .. .... .... .... .... .... .... .... .... .... .... .... .... .... .... .... .. 51PAGE FUNCTION .... .... .... .... ..... .... .... .... .... .... .... .... .... .... .... .... .... .... .... .... .. 53MEMORY FILE FUNCTIONS .. .... .... .... .... .... .... .... .... .... .... .... .... .... .... .... .. 55BARCODE FUNCTION ... .... ..... .... .... .... .... .... .... .... .... .... .... .... .... .... .... .... .. 60TROUBLESHOOTING ..... .... ..... .... .... .... .... .... .... .... .... .... .... .... .... .... .... .... .. 65ERROR MESSAGE LIST ..... ..... .... .... .... .... .... .... .... .... .... .... .... .... .... .... .... .. 66SPECIFICATIONS .... .... .... .... ..... .... .... .... .... .... .... .... .... .... .... .... .... .... .... .... .. 70TECHNICAL SUPPORT CONTACTS ..... .... .... .... .... .... .... .... .... .... .... .... .. 70

ii

1
Getting started

2
INTRODUCTION AND SAFE OPERATION
The LS7 printer was designed specifical ly to make cable, patch panel, faceplate and facili tymarking effortless. This palm-sized printer combines high qual ity thermal transfer print, fas tloading tape cassettes and industrial label materials to el iminate concerns about labels fall ingoff.
This manual will guide you step by step through the set-up, operat ion, and troubleshooting ofthe LS7 Printer. If you have problems not covered herein, contact your local Panduit SalesRepresentative or call Panduit Technical Support at 866-871-4571 (outside the US, refer topage 70 for contact information).
SAFE OPERATION PRACTICESThe following general safety practices supplement the specific warnings and cautionsdepicted elsewhere in this manual. They are recommended precautions that must beunderstood and applied during the operation and maintenance of this printer.
Do Not Operate In An Explosive Environment Do not operate the printer in the presence of flammable gases or fumes. Operation of thisprinter in such an environment cons titutes a definite safety hazard.
Do Not Operate In Wet Or Damp Areas Do not operate this printer in wet or damp areas. Operat ion of the printer in such anenvironment constitutes a defini te safety hazard.
Do Not Substitute Parts Or Modify Equipment Because of the danger of introducing additional hazards, do not install substi tute parts orperform an unauthorized modification to the printer or i ts accessories. The propercomponents for service and repair may be obtained from Panduit Corp.
WARNING: When the printer has been in use for an extended period of time, the printer motor maybecome hot. DO NOT touch the printer motor with bare hands.
Patent numbers and patent publicat ion numbers which are related to this product are asfol lows: USP4839742, USP4927278, USP4976558, USP4983058, USP5009530,USP5069557, USP5120147

3
Information to USA UsersNOTE: This printer has been tested and found to comply with the limits for a Class A digitaldevice, pursuant to Part 15 of FCC rules. These limits are designed to provide reasonableprotection against harmful interference when the printer is operated in a commercialenvironment. This printer generates, uses, and can radiate radio frequency energy and, if notused in accordance with this instruction manual, may cause harmful interference to radiocommunications . Operation of this printer in a residential area is likely to cause interferencein which case the user wil l be required to correct the interference at his own expense.
Information to Canadian UsersThis Class A digi tal apparatus complies with Canadian ICES-003.
Cet appareil numérique de la class A est conforme à la norme NMB-003 du Canada.
It is poss ible that infrequent electrical phenomena (static discharge, power line fluctuations)may cause printer function to be temporarily interrupted. In this case, the printer will usual lyreset itself. In extreme cases, the user should remove then re-apply power (battery and/or ACAdapter).

4
GENERAL PRECAUTIONS
WARNING: Observe the following warnings in order to avoid damage to theLS7 or its accessories.
Use only Panduit LS7 tapes with this machine (green colored cassettes).
Use only the LS7-ACS, AC adapter designed exclusively for this machine. Use of anyother adapter will void the warranty.
Do not use the machine in dusty places, and keep it out of both direct sunlight and rain.
Do not expose the machine to high temperatures or high humidity. Never leave i t on thedashboard or in the back of your car.
Do not touch the print head mechanism. If the head is touched, clean i t immediately witha cotton swab to avoid permanent damage.
Do not pull on the tape being fed from the LS7. This may damage the tape cassette.
CAUTION: Observe the following cautions in order to prevent malfunction ofthe LS7.
When the AC adapter (LS7-ACS) is connected, unplugging the adapter from the electri-cal out let before unplugging it from the machine can delete all text files in the memory,even if bat teries are installed.
Use six AA (AM3, LR6) alkaline batteries in this machine.

5
WARRANTY INFORMATION
Our products are warranted to be free from defects in material and workmanship at the timeof sale but our obl igat ion under this warranty is l imited to the replacement of any productproved to be defective within 6 months (for product) or 90 days (for printers ) from the dateof delivery. Printer warranty is void if Panduit printers are modified, altered or misused inany way. Use of Panduit printers with any product other than the specified Panduit productsfor which the printer was designed, consti tutes misuse. Before using, user shall determine thesuitabili ty of the product for his intended use and user assumes al l risk and liabili tywhatsoever in connection therewith.
This warranty is made in lieu of and excludes all other warranties, expressed or implied.THE IMPLIED WARRANTIES OF MERCHANTABILITY AND FITNESS FOR APARTICULAR USE ARE SPECIFICALLY EXCLUDED. Neither sel ler nor manufacturershal l be liable for any other injury, loss or damage, whether direct or consequential , aris ingout of the use of, or the inabili ty to use the product.
The information contained in this literature is based on our experience to date and is believedto be reliable. It is intended as a guide for use by persons having technical ski ll at their owndiscretion and risk. We do not guarantee favorable results or assume any l iabi lity inconnect ion with its use. Dimensions contained herein are for reference purposes only. Forspecific dimens ional requirements consult the factory. This publicat ion is not to be taken as alicense to operate under, or a recommendation to infringe any existing patents. Thissupersedes and voids all previous literature, etc.

6
GENERAL DESCRIPTION
TOP VIEW
BOTTOM VIEW
Tape cutte r lever
Tape release lever
Print head
Tape exit slot
Batterycompartment
Tape compartment
AC adapter connector
Ba ck cover

7
KEYBOARD & LCD DISPLAY
Line ClearSize FrameLine Underline
PageLength
)(
Align Mirror Accent
Serialize BarcodeRepeatLegend
Feed
End
Home
File
?
;&
[ ]
@
#"'
!
/ - %
$ ¢
:
Copies
Rotate
2 4 6 8 0
31 9 BS5 7
Z C B M .
VCode
Caps
N Space
W R I PY
E ?Q OUT
D !A LJ
F
G
X
S K ,H
Sym.Print
Rotate
Underline
Frame
Auto
Length
Line drawing keys
Symbol key
Tape cutter lever
Cursor keys
Return / File memory key
Backspace key
Power key
Space / Rotate key
RepeatLegend
LS7
Length key
Page key
Repeat legend keySerialize key

8
BATTERIES
This lightweight and portable machine can be used anywhere by instal ling six (6) AA (AM3,LR6) alkaline batteries. When changing the bat teries, always replace al l six at the sametime.
To change the batteries:1 Remove the back cover by pressing in on the rough area at the top end of the machine
and pulling off the cover. Pull ing off the back cover lifts up the tape release lever.
2 If batteries are already installed, remove them.
3 Insert six new bat teries, making sure that they face the direction shown in the illustra-tion on the bottom of the battery compartment. The positive ends of the three batteriesin the bottom row point towards the bottom of the machine, while the positive ends ofthe top three batteries point in the opposite direction.
4 Attach the back cover by inserting the tab on the bottom end of the cover into the sloton the bottom end of the machine, then pushing down firmly on the top end of thecover until it snaps into place.
Be sure to insert the new batteries within f ive minutes of removing the old ones, oth-erwise the text shown in the LCD display and any text files stored in the memory wil lbe lost (unless the machine is plugged into an electrical outlet with the AC adapter).
If alkal ine batteries are not used, large fonts and barcodes cannot be printed.

9
OPTIONAL AC ADAPTER
The AC adapter (LS7-ACS) al lows you to use this machine wherever there is an electricaloutlet.
To connect the optional AC adapter:1 Insert the plug on the adapter cord into the connector marked DC IN 9.5V on the bot-
tom end of the machine.
2 Insert the plug on the adapter into the nearest standard electrical outlet.
Only use the AC adapter (par t no. LS7-ACS) designed exclusively for this machine.
When the AC adapter is connected, unplugging the adapter from the electrical outletbefore unplugging it from the machine can delete all text files in the memory, even i fbatteries are installed.
It is recommended that you use the AC adapter when pr inting large fonts and bar-codes on 3/4” (18-mm)-wide tape since these operations can quickly drain the bat-teries .

10
TAPE CASSETTE
A single LS7 tape cassette is supplied with this uni t. This machine has been designed toal low the tape casset te to be changed quickly and easily.
To change the LS7 tape cassette:1 Remove the back cover by pressing in on the rough area at the top end of the machine
and pulling off the cover. Pull ing off the back cover lifts up the tape release lever.
2 If a tape cassette is already installed, remove it by pulling it straight out.
3 If the ink ribbon in the other tape cassette is loose, use your finger to wind the toothedwheel in the direction of the arrow on the casset te unt il there is no slack in the ribbon.
If you are using a new tape cassette provided with a stopper, be sure to removethe stopper before install ing the cassette.
Make sure that the end of the tape feeds under the cassette tape guides.
4 Insert the tape casset te firmly into the tape compartment, making sure that the entireback of the cassette touches the bottom of the compartment.
When inserting the tape casset te, make sure that the inner ribbon does not catchon the corner of the metal guide.
5 Attach the back cover by inserting the tab on the bottom end of the cover into the sloton the bottom end of the machine, then pushing down firmly on the top end of thecover until it snaps into place.
6 Turn on the machine if it is off, and then feed the tape to remove any slack by holding
down and pressing once.
7 Press in the tape cutter lever to cut off any excess tape.
Code
Feed
Sym.

11
LABEL CODE
The “LABEL CODE ” message appears on the display when the following tape cassettes areloaded:
The Label Code must be entered in order for the printer to funct ion with the tape cassettelisted. Future parts may require Label Code entry.
The Label Code is printed on the cassette and can be viewed with the cassette eitherunloaded or loaded in the printer.
The majority of tape cassettes do not require manual entry of a Label Code.
EXAMPLE
Part Number Tape Width Color Label Code
LS7-50-1 1/2" (12 mm) Black/White 1
LS7-50-2 1/2" (12 mm) Black/Clear 1
Future — —See Tape Cassette
To enter a Labe l Code using LS7-50-1:
Press . Printer is now re ady
for operation.
Caps
Length
Rotate A A A A A Auto
Underline
Frame
RepeatLegend
_LABEL CODE
Caps
Length
Rotate A A A A A Auto
Underline
Frame
RepeatLegend
1:
1
Size File

12
LAMINATED INDUSTRIAL TAPE SEPARATOR TOOL
LAMINATED INDUSTRIAL TAPEThe enclosed tape separator enables you to easi ly remove the backing from labels printed onlaminated tapes.
1 Hold the tape in one hand, with the printed surface facing up, and hold the tape separa-tor in your other hand.
2 Pass the tape halfway through the long narrow hole in the tape separator.
3 Turn the tape separator three-quarters of a turn towards you, and then pull the tape sep-arator away from you as shown below.
4 Peel off the label backing.
GH
ABCDEF
ABCDEF

13
PRINT HEAD & ROLLERS
Occasionally, specks of dust or dirt become attached to the machine’s print head and rollers.This is part icularly likely when you are using the unit outdoors or in a very dus tyenvironment. If a section of the print head is covered with dust , a blank horizontal streakmay appear through the label text. Therefore, the machine’s head may need to be cleanedfrom t ime to time.
To clean the print head and rollers:1 Turn off the machine.
2 Remove the back cover, and then remove the tape cassette if one is installed. The printhead and rol lers are located in the tape compartment .
3 Print head: Use a dry cotton swab to gently wipe the print head with an up-and-downmotion.
Rollers: Use a dry cot ton swab to wipe each rol ler with an up-and-down motion whilerotating them with your finger.
4 Install a tape cassette, at tach the back cover, and then try print ing again.
5 If dus t stil l remains, use Panduit Cleaning Cassette (LS7-CLN).
If none of the above works, contact Technical Support at 866-871-4571.

14
Print headPrint head
Rollers
Cotton swab
Gently wipe off thisblack line.

15
TAPE CUTTER
With use, the tape cutter may become covered with adhesive, making it difficult to cut thetape. If the tape cannot be cut correctly, clean the tape cutter blades as explained below.
To avoid injuries, be extremely careful not touch the cutter blades with bare hands.
To clean the tape cutter blades:1 Turn off the machine.
2 Remove the back cover, and then remove the tape cassette if one is installed. The tapecutter is located near the tape exit slot.
3 Using a cotton swab dipped in isopropyl (rubbing) alcohol, wipe the tape cutter bladeswith an up-and-down motion.
Be careful not to touch the cutter blades with bare hands.
Tape cutter blade
Cotton swab
Tape c utter blade

16
CARRYING CASE
The enclosed hard case is designed to protect your LS7 and its accessories while you store orcarry them. Therefore, keep them in this carrying case whenever they are not being used.
Before opening the carrying case, be sure that the side with the Panduit logo faces upward.
1 LS7
2 Six AA batteries
3 Tape cassette
Stand up the tape cassettes so that theend with the label attached face supwards.
This c ompartment can store up to five1/4” (6-mm)-, 3/8” (9-mm)- or 1/2”(12-mm)-wide c asse tte s, four 3/4”(18-mm)-wide cassettes, or a combi-nation of three 1/2” (12-mm)- and two3/4” (18-mm)-wide c asse tte s.
4 Tape Separator Tool
5 AC adapter
This compartment can store theoptional AC adapte r (model LS7-ACS), designed exclusively for theLS7.
6 Operator’s Manual (LS7-MAN-A)

17
For yourinformation

18
POWER KEY
The power key ( ) is located in the top right-hand corner of the keyboard. If batteries
have been installed or the machine has been plugged in using the optional AC adapter, theprevious session’s information is displayed when the machine is turned on. This featureal lows you to stop work on a label, turn off the machine, and return to it later without havingto re-enter the text .
The machine will automatical ly turn off if no key is pressed within 5 minutes. The machine’sinternal memory s tores the current session’s information and displays it when you turn on themachine again.
To turn on the machine:
Press . The previous session’s information appears in the LCD display.
To turn off the machine:
Press . The current session’s information is stored in the internal memory.

19
CODE & CAPS KEYS
Most characters can be entered simply by pressing their keys. However, to use special func-tions or to enter capital letters, accented characters and some symbols, the following specialkeys are necessary.
CODE KEYTo use a function or type in characters printed either above or below a key:
Hold down and press the key either immediately below or immediately above
the desired function or character written in orange.
EXAMPLE
To star t the accent function:
Hold down a nd press once.
Code
Caps
Length
Rotate A A A A A Auto
Underline
Frame
RepeatLegend
a-u/A-U?ACCENT
Code O
Accent

20
CAPS KEYTo type capital letters continuous ly:
1 Press until the Caps indicator ( ) on the left side of the display l ights up.
2 Press the keys of the desired letters.
To exi t Caps mode, press unti l the Caps indicator goes off.
EXAMPLE
To type in “JOHN”:
1 Press once.
2 Press , , , then
onc e ea ch.
Caps Caps
Caps
Length
Rotate A A A A A Auto
Underline
Frame
RepeatLegend
1:_Caps
Caps
Length
Rotate A A A A A Auto
Underline
Frame
RepeatLegend
1:JOHN_Caps
J
"
O
Accent
HN
Barcode

21
CURSOR KEYS
The machine’s LCD display shows two rows of 11 characters; however, the text that you cre-ate can be up to 99 characters long. You can review and edit your text by using the cursor
keys ( , , , ) to move the cursor so that different parts are shown in the
display.
LEFT CURSOR KEYTo move the cursor one character to the left:
Press once.
To move the cursor several characters to the left:
Hold down unt il the cursor moves to the desired position.
To move the cursor to the beginning of the current l ine:
Hold down and press .
RIGHT CURSOR KEYTo move the cursor one character to the right:
Press once.
To move the cursor several characters to the right:
Hold down until the cursor moves to the desired posit ion.
To move the cursor to the end of the current line:
Hold down and press .
Home
End
Code
Code

22
UP CURSOR KEYTo move the cursor up to the previous line:
Press once.
To move the cursor up several lines:
Hold down unti l the cursor moves to the desired pos ition.
To move the cursor to the beginning of the entire text:
Hold down and press .
DOWN CURSOR KEYTo move the cursor down to the following line:
Press once.
To move the cursor down several lines:
Hold down until the cursor moves to the desired posi tion.
To move the cursor to the end of the entire text:
Hold down and press .
Home
Home
CodeHome
End
End
CodeEnd

23
SPACE KEY
The Space key lets you add blank spaces between characters in your text . It is different from
the right cursor key ( ), which just moves the cursor without adding blank spaces.
To add a space:
Press .
EXAMPLE
To add a space:
Press .
Space
Rotate
Length
Rotate A A A A A Auto
Underline
Frame
RepeatLegend
1:JOHN_Caps
Space
Rotate

24
RETURN KEY
Like on a typewriter or word processor, this machine’s return key ( ) is used to end a
line of text and start another one. When you have finished entering one line of text , press the
return key to add a return mark ( ) to the end of the line and start a new one.
A maximum of four text lines can be entered. If you press when the cursor is
located in the four th line, the error message “4 LINE LIMIT!” wi ll appear.
The number of text lines that can be printed on the instal led tape depends on the tapewidth.
The return key can also be used to select an item from a list (e.g., add a symbol or accentedcharacter to the text) or to apply a selected set ting.
Some quest ion asking you to confirm a command may appear on the LCD display, especial lywhen the function that you have chosen wil l delete or affect text. In these cases, press ing
is the same as answering “yes”.
To answer “no”, press . Refer to BACKSPACE KEY on pages 27 and 28.
Tape widthMaximum number of
lines that can be printed
1/4” (6 mm) 1
3/8” (9 mm) 2
1/2” (12 mm) 2
3/4” (18 mm) 4
All WidthsRotated Legend
10
File
File
File
Clear
BS

25
To add a new line of text:
1 Press , , or to position the cursor to the right of the character that
will end the line.
2 Press . The return mark ( ) appears at the end of the l ine and the cursor moves
to the new l ine.
EXAMPLE
To add a second line of text:
Press .
Home
End
File
Caps
Length
Rotate A A A A A Auto
Underline
Frame
RepeatLegend
1:John Smith
Caps
Length
Rotate A A A A A Auto
Underline
Frame
RepeatLegend
2:1:John Smith
File

26
To apply a selected item:
Press once.
EXAMPLE
To add “ ” to your text:
Press once
Then selec t ,
Then
File
Caps
Length
Rotate A A A A A Auto
Underline
Frame
RepeatLegend
1:DATA_ +=
Caps
Length
Rotate A A A A A Auto
Underline
Frame
RepeatLegend
Caps
Length
Rotate A A A A A Auto
Underline
Frame
RepeatLegend
Feed
Sym.
File

27
BACKSPACE KEY
The backspace key ( ) allows you to remove characters to the left of the cursor’s current
position. It differs from the left cursor key ( ), which only moves the cursor without
deleting any characters.
The backspace key can also be used to quit most functions and return to the previous displaywithout changing the text.
The backspace key cannot be used to qui t the barcode function. To quit the barcode
function, hold down and press .
Some quest ions asking you to confirm a command may appear on the LCD display, espe-cially when the function that you have chosen wil l delete or affect text . In these cases, press-
ing is the same as answering “no”.
To answer “yes”, press . Refer to RETURN KEY on pages 24 to 26.
To delete one character:
1 Press , , or to position the cursor below the character immedi-
ately to the right of the one that you wish to delete.
2 Press once.
To delete a sequence of characters:
1 Press , , or to position the cursor below the character immedi-
ately to the right of the last character that you wish to delete.
2 Hold down until all of the characters that you wish to delete are deleted.
EXAMPLE
To delete “9” in lege nd “012-345-6789”:
Clear
BS
CodeN
Barcode
Clear
BS
File
Home
End
Clear
BS
Home
End
Clear
BS
Caps
Length
Rotate A A A A A Auto
Underline
Frame
RepeatLegend
1:2-345-6789

28
To quit a function without changing your text:
Press to return to your text.
EXAMPLE
1 Press once .
To delete “-678”:
2 Hold down until “-678” are
deleted.
To quit the symbol function without adding a symbol to your text:
Press .
Caps
Length
Rotate A A A A A Auto
Underline
Frame
RepeatLegend
1:12-345-678
Clear
BS
Caps
Length
Rotate A A A A A Auto
Underline
Frame
RepeatLegend
1:012-345
Clear
BS
Clear
BS
Caps
Length
Rotate A A A A A Auto
Underline
Frame
RepeatLegend
1:DATA_ +=
Caps
Length
Rotate A A A A A Auto
Underline
Frame
RepeatLegend
1:DATA
Clear
BS

29
CLEAR FUNCTION
The clear funct ion is used to remove al l characters from the display so that you can beginentering new text. Although all of the text is erased, the Caps mode does not change.
To delete al l of the text:
Hold down and press . All of the text is erased from the display.
EXAMPLE
To clear the display:
Hold down and press .
Code
Clear
BS
Caps
Length
Rotate A A A A A Auto
Underline
Frame
RepeatLegend
Caps
Length
Rotate A A A A A Auto
Underline
Frame
RepeatLegend
Code
Clear
BS

30
ACCENT FUNCTION
The accent function can be used to add accented characters to your text. The accentedcharacters are grouped according to the capital or lowercase letter that they are combinedwith. The following accented characters are available:
To type in an accented character:
1 Hold down and press . The message “ACCENT a–u/A–U?” appears on
the display.
2 Press the key of the letter in the desired accented character.
If you wish to type in a capital letter, press to enter Caps mode (the Caps
indicator lights up) before pressing the letter key.
3 Press or unt il the desired accented character flashes.
4 Press . The accented character is added to the text .
To type in a ser ies of accented characters, hold down before pressing
. Then, continue adding accented characters by selecting them as explained
in steps 2 and 3, and holding down while pressing . Press just
after select ing the last character in the series.
Letter Accented characters Letter Accented characters
a à á ä â ã æ I Í Ï Î
A À Á Ä Â Ã Æ n ñ
c ç N Ñ
C Ç o ó ö ô õ
e è é ë ê e O Ó Ö Ô Õ
E È É Ë Ê E u ù ú ü û
i í ï î U Ù Ú Ü Û
Code O
Accent
Caps
File
Code
File
Code
File
File

31
EXAMPLE
To add the ac cented character “Ë”:
1 Hold down and press .
2 Press .
3 Press .
4 Press until “ Ë” flashes.
5 Press .
Caps
Length
Rotate A A A A A Auto
Underline
Frame
RepeatLegend
a-u/A-U?ACCENT
Code O
Accent
Length
Rotate A A A A A Auto
Underline
Frame
RepeatLegend
a-u/A-U?ACCENT
Caps
Caps
Length
Rotate A A A A A Auto
Underline
Frame
RepeatLegend
1:NOÈÉËÊE
Caps
˜
E
Page
Length
Rotate A A A A A Auto
Underline
Frame
RepeatLegend
1:NOÈÉËÊE
Caps
˜
Length
Rotate A A A A A Auto
Underline
Frame
RepeatLegend
1:NOËCaps
File

32
SYMBOL FUNCTION
In addition to the let ters, symbols and numerals on the key tops, there are 9 additional marksavailable with the symbol function. These symbols are shown below.
To type in a symbol:
1 Press . A row of symbols appears in the display.
2 Press or unt il the desired symbol flashes.
3 Press . The symbol appears in the text.
To type in a series of symbols, hold down before press ing . Then,
continue adding symbols by select ing them as explained in steps 2 and 3, and
holding down while pressing . Press jus t after selecting the
last symbol in the series.
Symbols
+ =Data Fax
Fiber Optic
Phone Plus Equals CautionShock Hazard
Ground
Feed
Sym.
File
Code
File
Code
File File

33
EXAMPLE
To add the symbol “ ”:
1 Press .
2 Press or until “ ”
flashes.
3 Press .
Feed
Sym.
Length
Rotate A A A A A Auto
Underline
Frame
RepeatLegend
1:PHONE Caps
+=
Length
Rotate A A A A A Auto
Underline
Frame
RepeatLegend
1:PHONE Caps
File

34
LENGTH FUNCTION
Although the length of the printed label automatically adjusts to fit the length of the enteredtext, there may be times when you wil l want to make a label with a specific length. Thelength function allows you to set the label length between 0.25" and 11.80" (6.4 and 299.7mm).
The defaul t length set ting is OFF. If ON is selected, the Length indicator at the bottom ofthe display l ights up. The default length when ON is 0.65" (16.5 mm) - the width of aPanduit Modular Jack.
To turn on or off the length function:
1 While holding down , press once to display the current set ting (ON or
OFF).
2 While stil l holding down , continue pressing until the desired label length
setting is displayed.
The Length indicator lights up when ON is selected.
3 Release . If ON was selected, the current label length set ting is displayed.
To set the length of the label:
4 Use the number keys to enter a length.
5 Press .
Cut marks are printed on the labels when Length Function is set.
Code Q
Length
Code Q
Length
Code
File

35
EXAMPLE
To select a labe l length of 10.5":
1 Hold down and press
once.
2 Keep held down and continue
pre ssing until ON is displayed.
3 Relea se .
4 Press "1050".
5 Press .
Caps
Length
Rotate A A A A A Auto
Underline
Frame
RepeatLegend
OFFLENGTH inch
Code Q
Length
Caps
Length
Rotate A A A A A Auto
Underline
Frame
RepeatLegend
ONLENGTH inch
Code
Q
Length
Caps
Length
Rotate A A A A A Auto
Underline
Frame
RepeatLegend
00.65LENGTH inch
Code
Caps
Length
Rotate A A A A A Auto
Underline
Frame
RepeatLegend
10.50LENGTH inch
File

36
SIZE FUNCTION
The character size of the entire text can be adjus ted using the size function. Since thecharacter s ize that can be used depends on the width of the tape, the following table showsthe character sizes that can be used with each tape width.
The default s ize setting is AUTO . The current ly selected size setting is always shown by theindicators at the top of the display.
With the AUTO size setting, the machine compares your text with the width of the installedtape and automatically adjusts the characters to the largest size possible. However, six otherpoint sizes are also avai lable.
If the AUTO size setting is selected and only one line of characters has been entered,the text can be printed with a character size sl ightly larger than the maximum for theinstal led tape under any of the fol lowing conditions.
Tape width Sizes (in points)
1/4" (6 mm) 12, 9
3/8" (9 mm) 18, 12, 9
1/2" (12 mm) 24, 18, 12, 9
3/4" (18 mm) 36, 24, 18, 12, 9
Setting(in points )
Size
36 ABC24 ABC18 ABC
12 ABC
9 ABC
6 ABC• O nly font
available for Rotate d Tex t O N.

37
•1/2” (12-mm)- or 3/4” (18-mm)-wide tape is installed and the text contains onlycapital letters
•3/4” (18-mm)-wide tape is installed and the characters are not formatted (i .e., theunderline or frame setting is not applied)
To change the size setting:
1 While holding down , press once, and keep held down to display
the current s ize setting.
2 While stil l holding down , continue pressing until the desired size setting
is displayed.
The current character size sett ing is also shown by the size indicators above thedisplay.
3 Release to apply the selected size setting to the entire text .
EXAMPLE
Tapewidth
Textlines
1/4”(6 mm)
3/8”(9 mm)
1/2”(12 mm)
3/4”(18 mm)
1 12 pts 18 ptsAll caps: 29 ptsNot all caps: 24 pts
A ll caps, not formatted: 57 ptsA ll caps, formatted: 45 ptsN ot all c aps, not formatted: 45 ptsN ot all c aps, formatted: 36 pts
2 N/A 9 pts 12 pts 18 pts
3 N/A N/A N/A 12 pts
4 N/A N/A N/A 9 pts
Le ngth Dependent
6 pts (only font size available) for Rota ted Legend or Repe at Legend ON
To se le ct the 24 point size setting:
1 While holding down , press
once, and keep held
down.
Code 1
Size
Code
Code 1
Size
Code
Caps
Length
Rotate A A A A A Auto
Underline
Frame
RepeatLegend
AUTOSIZE
Code
1
Size
Code

38
To se le ct the 24 point size setting:
2 While still holding down , con-
tinue pressing until 24 is displayed.
3 Release .
Caps
Length
Rotate A A A A A Auto
Underline
Frame
RepeatLegend
24SIZE
Code
1
Size
Code
39
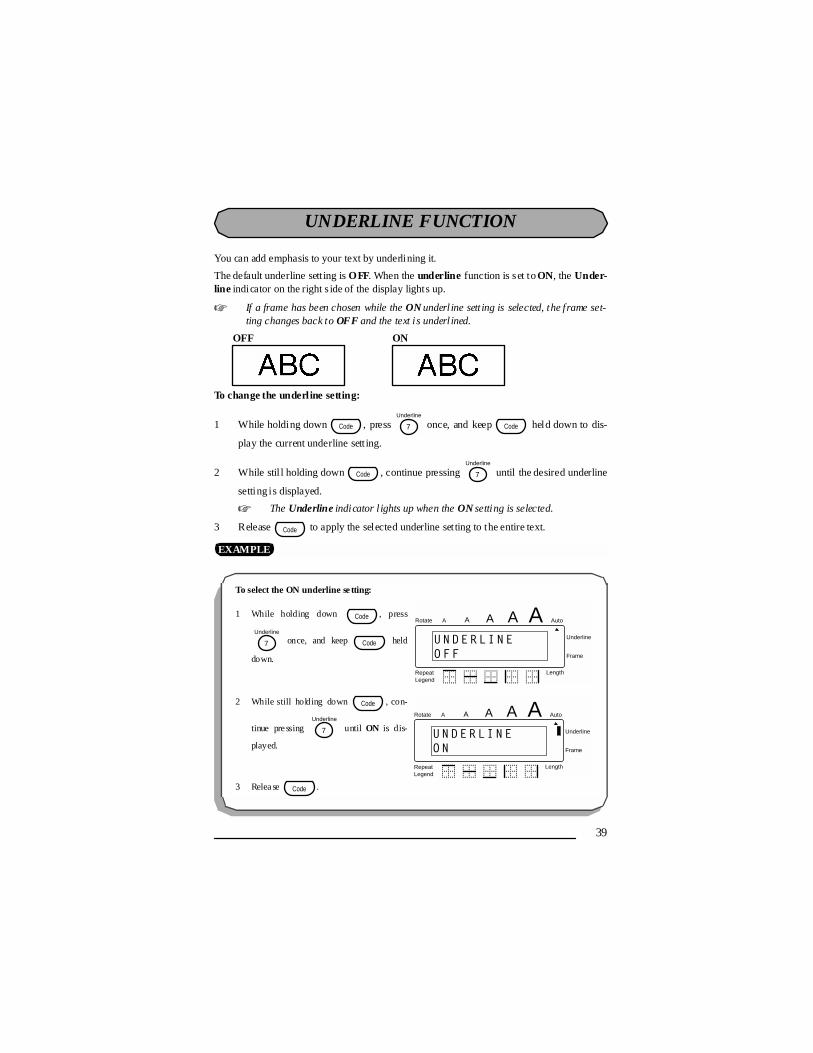
UNDERLINE FUNCTION
You can add emphasis to your text by underlining it.
The default underline sett ing is OFF. When the underline function is set to ON, the Under-line indicator on the right s ide of the display lights up.
If a frame has been chosen while the ON underl ine sett ing is selected, the frame set-ting changes back to OFF and the text is underl ined.
OFF ON
To change the underline setting:
1 While holding down , press once, and keep held down to dis-
play the current underline sett ing.
2 While stil l holding down , continue pressing until the desired underline
setting is displayed.
The Underline indicator l ights up when the ON setting is selected.
3 Release to apply the selected underline set ting to the entire text.
EXAMPLE
To select the ON underline se tting:
1 While holding down , press
once, and keep held
down.
2 While still holding down , con-
tinue pre ssing until ON is dis-
played.
3 Relea se .
Code 7
Underline
Code
Code 7
Underline
Code
Caps
Length
Rotate A A A A A Auto
Underline
Frame
RepeatLegend
OFFUNDERLINE
Code
7
Underline
Code
Caps
Length
Rotate A A A A A Auto
Underline
Frame
RepeatLegend
ONUNDERLINE
Code
7
Underline
Code

40
FRAME FUNCTION
With the frame function, you can choose from various frames and highlights to make moredecorative or emphasized text.
The following frame settings are available:
The defaul t frame setting is OFF. When any setting other than OFF is selected, the Frameindicator on the right side of the display l ights up.
If the ON under line setting has been chosen when a frame is selected, the underlineset ting changes back to OFF and the text is framed.
To change the frame setting:
1 While holding down , press once, and keep held down to display
the current frame setting.
2 While sti ll holding down , continue pressing until the desired frame set-
ting is displayed.
The Frame indicator lights up when any sett ing other than OFF is selected.
3 Release to apply the selected frame setting to the entire text .
OFF DIAMOND
ROUND SLANT
DOT
Code 9
Frame
Code
Code 9
Frame
Code

41
EXAMPLE
To select the DOT frame setting:
1 While holding down , press
once , and keep held
down.
2 While still holding down , con-
tinue pressing until DOT is dis-
played.
3 Relea se .
Caps
Length
Rotate A A A A A Auto
Underline
Frame
RepeatLegend
OFFFRAME
Code
9
Frame
Code
Caps
Length
Rotate A A A A A Auto
Underline
Frame
RepeatLegend
DOTFRAME
Code
9
Frame
Code

42
HORIZONTAL ALIGNMENT FUNCTION
You can choose to align lines in the text in one of three ways. In addit ion, if the length func-tion was used to set the length of the label, the text will align within the label according tothe selected horizontal alignment set ting.
The defaul t horizontal alignment set ting is CENTER; however, two other set tings are alsoavailable:
To change the horizontal alignment setting:
1 While holding down , press once, and keep held down to display
the current horizontal alignment setting.
2 While sti ll holding down , continue pressing until the desired horizontal
alignment setting is displayed.
3 Release to apply the selected horizontal alignment sett ing to the entire text.
EXAMPLE
LEFT CENTER RIGHT
To select the RIGHT hor iz ontal alignment sett ing:
1 While holding down , press
once, and keep held
down.
2 While still holding down , con-
tinue pressing until RIGHT is dis-
played.
3 Relea se .
Code TAlign
Code
Code TAlign
Code
Caps
Length
Rotate A A A A A Auto
Underline
Frame
RepeatLegend
LEFTH.ALIGNMENT
Code
TAlign
Code
Caps
Length
Rotate A A A A A Auto
Underline
Frame
RepeatLegend
RIGHTH.ALIGNMENT
Code
TAlign
Code

43
MIRROR PRINTING FUNCTION
With this function, you can print your text so that the characters can be read from the adhe-sive side of the tape. If mirror-printed labels are attached to glass or some other clear mate-rial, they can be read correctly from the opposi te s ide.
The default mirror printing setting is OFF.
OFF ON
To change the mirror printing setting:
1 While holding down and press once, and keep held down to dis-
play the current mirror printing setting.
2 While sti ll holding down , continue pressing until the des ired mirror
printing sett ing is displayed.
3 Release to apply the selected mirror printing setting to the entire text.
EXAMPLE
To select the ON mirror printing setting:
1 While holding down , press
once, and keep held
down.
2 While still holding down , con-
tinue pressing until ON is dis-
played.
3 Relea se .
Code U
Mirror
Code
Code U
Mirror
Code
Caps
Length
Rotate A A A A A Auto
Underline
Frame
RepeatLegend
OFFMIRROR
Code
U
Mirror
Code
Caps
Length
Rotate A A A A A Auto
Underline
Frame
RepeatLegend
ONMIRROR
Code
U
Mirror
Code

44
PRINT KEY, COPIES & FEED FUNCTIONS
After you have entered your text and chosen the desired format sett ings, you are ready toprint the label.
To print a label:
Press once. The message “COPIES 01/01” is displayed while the label is being
printed. The label is fed out of the tape exit slot at the top end of the machine.
To print copies of a label:
Hold down and press . The message “COPIES 01” is displayed. Enter
between 01 and 99 copies .
Press .
To feed the tape:
Hold down and press . The message “FEED” appears while 1” (24 mm) of
tape is fed out.
To cut the tape:
Press in the tape cutter lever.
In order to prevent damaging the tape, do not try to cut it while printing orfeeding. Pressing in the tape cut ter lever too far may break it .
Check your cassette before printing a large number of copies to ensure sufficient tape is available.
EXAMPLE
To make 3 copies of a label:
1 Hold down and press .
2 Enter “03” a nd press .
PrintPrint
Copies
Code PrintPrint
Copies
File
Code
Feed
Sym.
Caps
Length
Rotate A A A A A Auto
Underline
Frame
RepeatLegend
03COPIES
Code PrintPrint
Copies
File

45
SERIALIZATION FUNCTION
This function can be used to print many copies of the same text while increasing a certainvalue in the text after each label is printed. This type of automatic incrementation is very use-ful when printing serial number labels , patch panel labels or other labels requiring ascendingcodes.
To use the numbering function:
1 Hold down and press . The message “SERIALIZE NUMERIC”
appears in the display. Continue to hold down and press to toggle
between NUMERIC and ALPHABETIC serialization.
2 When you release , the message “START VALUE” appears in the dis-
play. Type the number or letter of the first value to be printed and press .
3 The message “END VALUE” appears in the display. Type the number or letter of
the last value to be printed and press .
4 The message “INCREMENT BY” appears in the display. Type the number of the
increment value desired and press .
5 The serialization will be denoted on the display as a “ΩΩΩΩ" for a one digit serializat ionand “ΩΩΩΩΩΩΩΩ“ for a two digit serialization.
Check your cassette before printing a large serialization to ensure suf ficient tape isavailable.
To print a four position patch panel label for Building A:
1 Position the cursor next to the “A”.
CodeV
Serialize
CodeV
Serialize
Code
File
File
File
Caps
Length
Rotate A A A A A Auto
Underline
Frame
RepeatLegend
1:A_

46
2 Hold down and press .
3 Relea se .
4 Press .
5 Press
6 Press
7 Serialization is displayed as ΩΩ.ΩΩ.ΩΩ.ΩΩ.
Caps
Length
Rotate A A A A A Auto
Underline
Frame
RepeatLegend
NUMERICSERIALIZE...
CodeV
Serialize
Code
Caps
Length
Rotate A A A A A Auto
Underline
Frame
RepeatLegend
01START VALUE
0 1
Size File
Caps
Length
Rotate A A A A A Auto
Underline
Frame
RepeatLegend
04END VALUE
0 4
$ File
Caps
Length
Rotate A A A A A Auto
Underline
Frame
RepeatLegend
01INCREMENT BY
0 1
Size File
Caps
Length
Rotate A A A A A Auto
Underline
Frame
RepeatLegend
1:AΩΩ

47
ROTATE LEGEND FUNCTION
The rotate legend function is used when a label mus t be oriented vertically yet read horizon-tally. A common need for this funct ion is terminal block labeling.
To enable the rotate legend function:
1 Hold down and press until “ON” appears in the display.
When Rotate Legend is enabled, the largest font size available is 6 pt.
The number of characters is limited by the tape width:3/4" 10 characters1/2" 6 characters3/8" 5 characters1/4" 3 characters
Uses: Terminal Block Labeling, Vertical Labels
EXAMPLE
To print a ter minal block label numbered 1-10:
1 Hold down and press
until ON is displa yed. Release .
2 Hold down and press
until ON is displayed. Relea se .
Press
.
Code Space
Rotate
Caps
Length
Rotate A A A A A Auto
Underline
Frame
RepeatLegend
ONROTATE LEGND
Code Space
Rotate
Code
Caps
Length
Rotate A A A A A Auto
Underline
Frame
RepeatLegend
00.25LENGTH inch
Code Q
Length
Code
0 0 2
@
5
Line
File

48
3 Hold down and press
until NUMERIC is displayed.
4 Release .
5 Press .
6 Press .
7 Press .
8 Serialization is displayed a s ΩΩ.ΩΩ.ΩΩ.ΩΩ.
9 Press .
Caps
Length
Rotate A A A A A Auto
Underline
Frame
RepeatLegend
NUMERICSERIALIZE...
CodeV
Serialize
Code
Caps
Length
Rotate A A A A A Auto
Underline
Frame
RepeatLegend
01START VALUE
0 1
Size File
Caps
Length
Rotate A A A A A Auto
Underline
Frame
RepeatLegend
10END VALUE
1
Size
0
File
Caps
Length
Rotate A A A A A Auto
Underline
Frame
RepeatLegend
01INCREMENT BY
0 1
Size File
Caps
Length
Rotate A A A A A Auto
Underline
Frame
RepeatLegend
1:ΩΩ
PrintPrint
Copies

49
REPEAT LEGEND FUNCTION
The repeat legend funct ion is used to duplicate a legend over the length of a label. Using thecombined functionality of rotated legend and repeat legend produces an excellent quali tylabel for marking cables and wires prior to or after ins tallation.
To enable the repeat legend function for marking wires or other curved surfaces:
1 Hold down and press until “ON” appears in the display.
2 Hold down and press until “ON” appears in the display.
When Repeat Legend is enabled, Length must be ON and the largest font avail-
able is 6 pt.
Uses: Wire and cable marking
EXAMPLE
To print a wire marker with length of 1.0” that reads “D101” using LS7-75-1 cassette:
1 Hold down and press
until ON is displa yed. Release .
2 Hold down and press
until ON is displa yed. Release .
CodeX
RepeatLegend
CodeSpace
Rotate
Q
Length
Length
Rotate A A A A A Auto
Underline
Frame
RepeatLegend
ONREPEAT LEGND
CodeX
RepeatLegend
Code
Length
Rotate A A A A A Auto
Underline
Frame
RepeatLegend
ONROTATE LEGND
CodeSpace
Rotate
Code

50
3 Hold down and press
until ON is displayed. Release .
4 Press
.
5 Press .
6 Press .
Caps
Length
Rotate A A A A A Auto
Underline
Frame
RepeatLegend
ONLENGTH inch
Code Q
Length
Code
Caps
Length
Rotate A A A A A Auto
Underline
Frame
RepeatLegend
01.00LENGTH inch
0 1
Size
0 0
File
Caps
Length
Rotate A A A A A Auto
Underline
Frame
RepeatLegend
1:D101
D 1
Size
0 1
Size
PrintPrint
Copies

51
LINE DRAWING FUNCTION
The line function is used to separate legends for easier recognition. The line function has twovertical line posi tions (left and right edge) and three horizontal posi tions (label top, everyline and label bottom).
To enable/disable the l ine function:
1 Hold down and press either or to toggle between the line posi-
tions. Release when the desired line position is displayed.
Can be combined with the length, serialization and symbol functions.
Uses: Faceplate, patch panel and 110 block marking
EXAMPLE
To print a four position patch panel label ser ialized 100 thru 103 divided by lines:
1 Hold down and press until
LENGTH ON is displayed. Release
. Press
.
2 Hold down and press
until LEFT EDGE is displayed. Release
.
3 Hold down and press
until RIGHT EDGE is displayed.
Relea se .
Code3
Line
5
Line
Code
Caps
Length
Rotate A A A A A Auto
Underline
Frame
RepeatLegend
00.65LENGTH inch
Code Q
Length
Code 0 0 6
¢
5
LineFile
Caps
Length
Rotate A A A A A Auto
Underline
Frame
RepeatLegend
LEFT EDGEVERTCL LINE
Code3
Line
Code
Caps
Length
Rotate A A A A A Auto
Underline
Frame
RepeatLegend
RIGHT EDGEVERTCL LINE
Code3
Line
Code

52
4 Press .
5 Hold down and press .
Release .
6 Press .
7 Press .
8 Press .
9 Press .
Caps
Length
Rotate A A A A A Auto
Underline
Frame
RepeatLegend
1:1_
1
Size
Caps
Length
Rotate A A A A A Auto
Underline
Frame
RepeatLegend
NUMERICSERIALIZE...
CodeV
Serialize
Code
Caps
Length
Rotate A A A A A Auto
Underline
Frame
RepeatLegend
00START VALUE
0 0
File
Caps
Length
Rotate A A A A A Auto
Underline
Frame
RepeatLegend
03END VALUE
0 3
Line File
Caps
Length
Rotate A A A A A Auto
Underline
Frame
RepeatLegend
01INCREMENT BY
0 1
Size File
Caps
Length
Rotate A A A A A Auto
Underline
Frame
RepeatLegend
1:1ΩΩ
PrintPrint
Copies

53
PAGE FUNCTION
The page function is used to group multiple labels in a file. A file is a document consisting ofup to 8 pages (labels). The page function is useful when labeling a group of items that havenon-serialized unique legends and must be grouped together.
To enable the page function:
1 Hold down and press to move to pages 1 thru 8. Release to
enter text onto a page.
Default position is page 1 of any label fi le.
A page with no data is pr inted when Length funct ion is set.A page with no data is not printed, but the margin between the pages is printed, whenLength function is not set .
Uses: Faceplate, patch panel and 110 block marking
EXAMPLE
To print a four posit ion faceplate label with the legend A205, A207, B101, C506 separatedby lines:
1 Hold down and press until
LENGTH ON is displayed. Release
. Press
.
2 Hold down and press
until RIGHT EDGE is displayed.
Relea se .
Code E
Page
Code
Caps
Length
Rotate A A A A A Auto
Underline
Frame
RepeatLegend
00.65LENGTH inch
Code Q
Length
Code 0 0 6
¢
5
LineFile
Caps
Length
Rotate A A A A A Auto
Underline
Frame
RepeatLegend
RIGHT EDGEVERTCL LINE
Code3
Line
Code

54
3 Press (page 1) .
4 Hold down and press
until LABEL PAGE 2 is displayed.
Release .
5 Press .
6 Hold down and press
until LABEL PAGE 3 is displayed.
Release . Press
.
7 Hold down and press
until LABEL PAGE 4 is displayed.
Release . Press
.
8 Press .
Caps
Length
Rotate A A A A A Auto
Underline
Frame
RepeatLegend
1:A205
A 2
@
0 5
Line
Caps
Length
Rotate A A A A A Auto
Underline
Frame
RepeatLegend
2LABEL PAGE
CodeE
Page
Code
Caps
Length
Rotate A A A A A Auto
Underline
Frame
RepeatLegend
1:A207_
A 2
@
0 7
Underline
Caps
Length
Rotate A A A A A Auto
Underline
Frame
RepeatLegend
1:B101_
CodeE
Page
Code B 1
Size
0 1
Size
Caps
Length
Rotate A A A A A Auto
Underline
Frame
RepeatLegend
1:C506_
CodeE
Page
Code C5
Line
0 6
¢
PrintPrint
Copies

55
MEMORY FILE FUNCTIONS
You can use the memory to store your most frequently used text files. The text remains in thememory, even after all characters are removed from the display using the clear funct ion (seepage 29).
When a file is s tored, i t is given a number to make recalling it eas ier. A maximum of 9 textfi les or about 300 characters can be s tored in the memory. A stored text file can contain amaximum of 99 characters.
Since a copy of the stored text file is recal led when the recall function is used, the text can beedited or printed without changing the originally stored file. When a file is no longer neededor more space is necessary, the memory delete function can be used to delete it.
When inser ting new batteries, be sure to insert the new ones within five minutes ofremoving the old ones, otherwise any text fi les stored in the memory will be los t(unless the machine is plugged into an electrical outlet with the AC adapter).
STORING TEXTTo store a text file:
1 Hold down and press .
2 Press or until STORE flashes on the display.
3 Press . The message “STORE SELECT 1–9?” appears on the display.
4 Press the key ( to ) of the fi le number where you wish to store the text. The
text is stored under the selected file number and the text previously shown in the dis-play reappears .
If a f ile is already s tored under the selected file number, the message “OVER-WRITE?” appears in the display and you must decide whether or not to over-write it (delete i t from the memory and store the new one).
If 300 characters have already been stored, the error message “MEMORY FULL!”appears in the display. If this occurs, an existing text file must be deleted before thenew one can be stored.
To quit the store function without storing the text, hold down and press
(or press just ).
Code
File
File
1
Size
9
Frame
Code
File Clear
BS

56
To overwrite the stored file with the new one:
Press to delete the previously s tored file and store the new one under the selected
number.
To go back and choose another file number without overwriting the text f ile,
press , and then select a dif ferent file number.
RECALLING TEXTTo recall a text file:
1 Hold down and press .
2 Press or until RECALL flashes on the display.
3 Press . The message “RECALL SELECT 1–9?” appears on the display.
To quit the recall funct ion without recalling the text fi le, hold down and
press (or press just ).
4 Press the key ( to ) of the file number containing the text that you wish to
recal l. The text stored under the selected file number is shown.
To see other parts of the displayed text file, press or .
To display the text stored under other fi le numbers, press or , or the
key of a di fferent fi le number.
5 Press . Any text previous ly entered in the display is erased and the text stored
under the selected fi le number is recal led into the display.
DELETING A FILETo delete a text file:
1 Hold down and press .
2 Press or until CLEAR flashes on the display.
3 Press . The message “CLEAR SELECT 1–9?” appears on the display.
File
Clear
BS
Code
File
File
Code
File Clear
BS
1
Size
9
Frame
Home
End
File
Code
File
File

57
To quit the file delete function without deleting the text f ile, hold down
and press (or press just ).
4 Press the key ( to ) of the file number containing the text that you wish to
delete. The text stored under the selected file number is shown.
To see other parts of the selected text fi le, press or .
To display the text stored under other fi le numbers, press or , or the
key of a different f ile number.
5 Press to delete the text file that was selected.
EXAMPLE
To store text under file number 8:
1 Hold down and press .
2 Press .
3 Press .
Code
File Clear
BS
1
Size
9
Frame
Home
End
File
Length
Rotate A A A A A Auto
Underline
Frame
RepeatLegend
STORE FILE
Code
File
Caps
Length
Rotate A A A A A Auto
Underline
Frame
RepeatLegend
SELECT 1-9?STORE
File
Caps
Length
Rotate A A A A A Auto
Underline
Frame
RepeatLegend
1:AΩΩ
8

58
To recall the te xt from file number 4:
1 Hold down and press .
2 Press until RECALL flashes on
the display.
3 Press .
4 Press .
5 Pre ss .
Screen 104? ??
Length
Rotate A A A A A Auto
Underline
Frame
RepeatLegend
STORE FILE
Code
File
Length
Rotate A A A A A Auto
Underline
Frame
RepeatLegend
RECALL FILE
Caps
Length
Rotate A A A A A Auto
Underline
Frame
RepeatLegend
SELECT 1-9?RECALL
File
Caps
Length
Rotate A A A A A Auto
Underline
Frame
RepeatLegend
[4]John SmitRECALL
4
$
Caps
Length
Rotate A A A A A Auto
Underline
Frame
RepeatLegend
1:John Smith
File

59
To delete the te xt stored under file number 8:
1 Hold down and press .
2 Press until CLEAR f lashes on the
display.
3 Press .
4 Press .
5 Press .
Screen 104? ??
Length
Rotate A A A A A Auto
Underline
Frame
RepeatLegend
STORE FILE
Code
File
Length
Rotate A A A A A Auto
Underline
Frame
RepeatLegend
CLEAR FILE
Caps
Length
Rotate A A A A A Auto
Underline
Frame
RepeatLegend
SELECT 1-9?CLEAR
File
Caps
Length
Rotate A A A A A Auto
Underline
Frame
RepeatLegend
[8]AΩΩCLEAR
8
Caps
Length
Rotate A A A A A Auto
Underline
Frame
RepeatLegend
1:John Smith
File

60
BARCODE FUNCTION
The barcode function enables barcodes to be printed as part of labels. Four different param-eters enable you to create custom barcodes .
The default settings are CODE 39 PROTOCOL, LARGE WIDTH , HUMAN READ-ABLE set to ON, and CHECK DIG. set to OFF.
Barcodes must be entered according to the fol lowing rules:
To use the barcode function:
1 Hold down and press .
To change the data or parameters of a barcode that has already been created,
position the cursor below the barcode mark ( ) before holding down
and pressing .
A label can only contain one barcode. If a barcode has already been entered
when is held down and is pressed, the error message “1 BAR
CODE / LABEL” wil l appear.
To quit the barcode function without making any changes, hold down
Parameter Settings
PROTOCOL CODE 39
WIDTH (barcode width) LARGE, SMALL
HUMAN READABLE (numbers printed below bar-code)
ON, OFF
CHECK DIG. (check digi t) OFF, ON
ProtocolNumber of digits (includ-ing check digits and start
and stop codes)
Characters that can be used
Notes
CODE 39 4 through 22
Numbers, letters, spaces, and symbols –, $, /, +, and %.
The as terisk (*) is not needed as s tart and stop codes.
CodeN
Barcode
Code
N
Barcode
CodeN
Barcode
Code

61
and press .
2 Type in the new barcode data or edit the old data.
To change the barcode parameter settings:
1 Press .
To return to the barcode data display without changing any parameter settings,
press .
2 Press or until the parameter that you wish to change appears.
3 Press or until the desired setting is displayed.
4 Repeat steps 2 and 3until all parameters are set as you wish.
5 Press .
To add a special character to the barcode data:
1 Press or until the cursor is below the character immediately to the right of
where you want to add special character.
2 Press .
3 Press or until the desired special character is displayed.
4 The following special characters can only be entered when using protocols CODE 39.
5 Press to add the selected special character to the barcode data.
To add the barcode to your text:
1 Press .
Symbol Character
1 +
2 $
N
Barcode
Home
Clear
BS
Home
End
File
Feed
Sym.
Home
End
File
File

62
To delete the barcode from your text:
1 Press , , or unt il the cursor is posit ioned ei ther below the right
half of the barcode mark or immediately to the right of the ent ire barcode mark.
2 Press . The message “OK TO CLEAR? ”.
3 Press .
Home
End
Clear
BS
File

63
EXAMPLE
To add a barcode to the label:
1 Hold down and press .
2 Press .
3 Press until the CHECK DIG.
parameter is displayed.
4 Press or until ON is dis-
playe d.
5 Press .
Length
Rotate A A A A A Auto
Underline
Frame
RepeatLegend
** CODE 39
CodeN
Barcode
Length
Rotate A A A A A Auto
Underline
Frame
RepeatLegend
SMALL WIDTH
Home
Length
Rotate A A A A A Auto
Underline
Frame
RepeatLegend
OFF CHECK DIG.
Length
Rotate A A A A A Auto
Underline
Frame
RepeatLegend
ON CHECK DIG.
Home
End
Length
Rotate A A A A A Auto
Underline
Frame
RepeatLegend
* * CODE 39
File

64
6 Press , , , , then
.
7 Press .
Length
Rotate A A A A A Auto
Underline
Frame
RepeatLegend
12345F* * CODE 39
1
Size
2
@
3
Line
4
$
5
Line
Caps
Length
Rotate A A A A A Auto
Underline
Frame
RepeatLegend
1:
File

65
TROUBLESHOOTINGProblem Remedy
1. The printer is asking for “LABEL CODE”.
• Enter LABEL CODE printed on tape cassette.
2. The display stays blank after you have turned on the machine.
• Check that the correct AC adapter (LS7-ACS) is being used and that it is connected correct ly.
• If you are using alkaline batteries, check that they are correctly inserted.
• If the batteries are low, replace them with new ones.
3. The machine does not print or the printed characters are blurred.
• Check that the correct AC adapter (LS7-ACS) is being used and that it is connected correct ly.
• Check that the tape cassette has been inserted properly.
• If the tape cassette is empty, replace i t with a new one.
• Make sure that the back cover has been attached.
4. The text files that you stored in the memory are no longer there.
• If the batteries are low, replace them with new ones.
5. The printed characters are not formed properly.
• If you are using alkaline batteries, they may be low. Try using the AC adapter or replace the batteries with new ones .
• Check that the correct AC adapter (LS7-ACS) is being used and that it is connected correct ly.
6. A blank horizontal white line appears through the printed label.
• Clean the print head as explained on page 13 and 14.
7. Striped tape appears . • You have reached the end of the tape. Replace the tape cassette with a new one.
8. The machine has “locked up” (i.e., nothing happens when a key is pressed).
• Turn off the machine, and then while holding
down and , turn the machine back
on. WARNING: The text in the display, al l format settings, and all text files s tored in the memory are erased.
Code
Clear
BS

66
ERROR MESSAGE LIST
ErrorMessage
Cause Remedy
1 BAR CODE/ LABEL
• This message appears i f a barcode has already been added to the label when you
hold down and press
.
• Limit the number of barcodes in the text to one.
1 SERIALIZELIMIT!
• This message appears i f a serializat ion has already been added to the label when
you hold down and
press .
• Limit the number of serializations in the text to one.
10 LINE LIMIT!
• This message appears i f ten lines already exist when you
press us ing the Rotate
function.
• Limit the number of lines in the text to ten.
4 DIGITMIN.!
• This message appears when less than the minimum four digits are entered as barcode data.
• Enter a minimum of four
digi ts before pressing .
4 LINELIMIT!
• This message appears if four lines already exist when you
press .
• Limit the number of lines in the text to four.
BATTERIESWEAK!
• This message appears when the installed alkaline bat teries become weak.
• Replace the batteries or use the AC adapter.
Code
N
Barcode
Code
V
Serialize
File
File
File

67
BUFFEREMPTY!
• This message appears if you try to print, but no text has been entered.
• Enter text before printing.
• This message appears if you try to store a text file in the memory, but no text has been entered in the display.
• Enter text before storing.
BUFFERFULL!
• This message appears if you try to enter a character, symbol, barcode, return or space after 99 characters have already been entered.
• Delete some existing text so that more can be entered.
CAN’THERE!
• This message appears if a character, symbol, space or return is entered while the cursor is located below the right half of a barcode and “ΩΩΩΩ" mark.
• Move the cursor or delete the barcode and “ΩΩΩΩ" mark before entering the character, symbol or return.
CHANGEADAPTER
• This message appears if a high-voltage adapter is being used.
• Remove the high-voltage adapter and connect the AC adapter (LS7-ACS).
CHECK TAPE!
• This message appears if you try to print a label or feed the tape when a tape casset te is not installed.
• Install a tape cassette.
• This message appears if you install a non-Panduit tape cassette.
• Install a Panduit (green colored) tape cassette.
• This message appears if the tape cassette is not properly seated.
• Remove the back cover of the printer and re-install cassette in printer.
ErrorMessage
Cause Remedy

68
FUNCTION NOT ALLOWED!
• This message appears i f Size, Frame or Barcode is set when Rotate function is being selected.
• Delete Rotate function.
• This message appears i f Size is set when Repeat Legend function is being selected.
• Delete Repeat Legend funct ion.
INVALIDVALUE
• This message appears i f you input the wrong value for the function selected.
• Re-input valid value.
LABEL CODE • This message appears i f the tape cassette in the printer requires manual entry of a label code.
• Enter the label code printed on the tape cassette.
LINELIMIT!
• This message appears i f the number of lines in the text is greater than the maximum number of lines possible for the installed tape.
• Reduce the number of lines or install a tape of greater width.
MEMORYFULL!
• This message appears i f you try to store a text file after 300 characters have already been stored in the memory.
• Delete an unwanted fi le to make room for the new one.
NOFILES!
• This message appears i f you try to recall or delete a text fi le from the memory when none are stored.
• Store a text file first.
REPLACEBATTERIES!
• This message appears i f the installed alkaline batteries are about to run out.
• Replace the batteries or use the AC adapter.
ROMPROBLEM!
• This message appears i f there is a problem with the machine’s read only memory.
• Contact Technical Support at 866-871-4571 (outside the US, refer to page 70 for contact information).
ErrorMessage
Cause Remedy

69
SETLENGTH!
• This message appears if length has not been set when Rotate and Repeat Legend are selected.
• Set length between 0.25" and 11.80" (6.4 and 299.7 mm).
SYSTEMERROR!
• This message appears if there is a problem with the machine’s software.
• Contact Technical Support at 866-871-4571 (outside the US, refer to page 70 for contact information).
TEXTTOO HIGH!
• This message appears if the size of the text is larger than the width of the instal led tape.
• Reduce the size of the characters or install a wider tape.
TEXTTOO LONG!
• This message appears if the length of the text is longer than the label length that has been set using the Length function.
• Delete some of the text or increase the set label length.
• This message appears if the number of characters is more than the limit of an installed tape when Rotate function is selected.
• Delete Rotate function.
VALUE TOO SMALL!
• This message appears if the last value set to be printed is less than the selected value in the text using the Serialize funct ion.
• Press the key of the value that is greater than the value in the text.
ErrorMessage
Cause Remedy

70
SPECIFICATIONS
HARDWARE
SOFTWARE
TECHNICAL SUPPORT CONTACTSFor technical support in the U.S., cal l 866-871-4571. For other countries , contact the PanduitHeadquarters nearest you:
Input device: Keyboard with 52 keys (including the power key)
LCD: 12 characters × 2 l ines (7 × 5 dots/character)17 indicators
Print tape: LS7 TapeFour widths available:
1/4” (6 mm)3/8” (9 mm)1/2” (12 mm)3/4” (18 mm)
Power supply: Six AA (AM3, LR6) alkal ine batteries or optional AC adapter (LS7-ACS)Auto power-off if no key is pressed for 5 minutes
Print head: 128 dot/180 dpi
Dimensions: 4 3/4” (121 mm) (W) × 7 31/64” (190 mm) (D) × 2 51/64” (71 mm) (H)
Weight: 1.1 lbs. (520 g) (without a tape cassette and batteries installed)
Buffer size: Maximum 99 characters
Memory size: 300 characters
Character size: Five sizes (9, 12, 18, 24 and 36 points) + AUTO for non-rotated textOne size (6 point) for rotated text
Headquarters Location Phone
PANDUIT Canada Markham, Ontario (905) 475-6922
PANDUIT Latin America Jal isco, Mexico (52) 3 666 2501
PANDUIT Europe Ltd. Westgate, London UK (44) 208 601 7200
PANDUIT Asia Pacific Pte. Ltd. Singapore (65) 379 6700
PANDUIT Australia Pty. Ltd. Victoria, Austral ia (61) 3 9794 9020
PANDUIT Japan Tokyo, Japan (81) 3 3767 7011


