LUBRICANT DEVICE l t t OQO OQO OQO ., Before using the product.please the careful Reading this product instruction booklet USER' S MANUAL Th e Company reserves the right to change the design without notice
Transcript
LUBRICANT DEVICE
l t t
回E 圆圆圆圆 雯OQO OQO OQO .,
Before using the product.please the careful
Reading this product instruction booklet
USER' S MANUAL The Company reserves the right to change the design without notice
E: check the pressure range (2. 2kg/ cm2 -2 . 5kg/c m2 )
(2)Turn on the power , Lubricant your setting
handpiece according to the panel and your needs.
(3)Digital display control area description
回回回 q••• ••• ...., A. Push the button "SET" to set the oil- time
of the connector , when the corresponding digital
display tube blinks , Push " +" or " 一 " setting the
lubricanting time. You can select time from Os to
50s. We suggest to set 20 seconds. Then push "SET"
again. If the time display "00" , means this
corresponding connector does not work;
B. Push button "START" , the lubricator start
to work.
_ USER' S MANUAL
C. Push the button"AIR气 then the lubricator starts
to blow the selected connector, cleaning the useless
oi l. D. The display bar in lower-left corner of the
panel shows the current oil volume. Oil should be
added when the volume reaches thegreen line. Oil
should be added below the red line.
E. The knob in the upperleft corner of the panel
is the cover of oil taηk.
6 <Safety instructions >(l)Warning marks:
ι上飞A: \斗/ That' s the earthing sign.
B: Symbolic explanation of the package:
tt This side up
T Fragile, handle with care
干 Guard against rain
(2)Do not insert or pull out the plug with wet
hand. Pull out the power plug when it is not used.
(3)Lubricator shall be in the horizontal indoor
6
USE R' S MANUAL _ _ USE R' S MANUAL
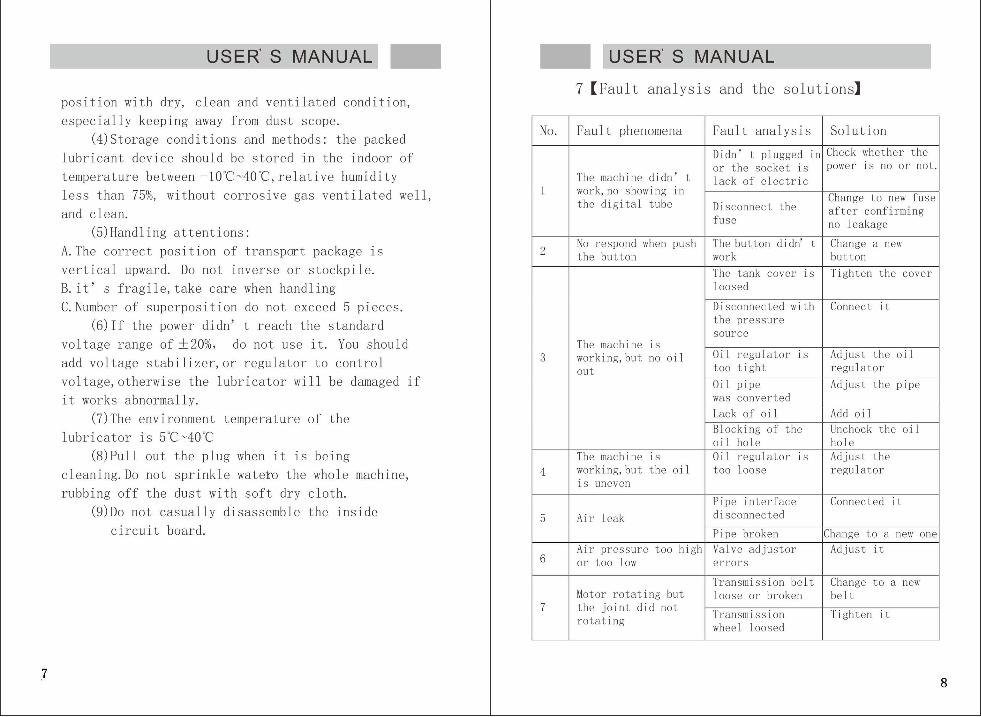
7 <Fault analysis and the solutions>position with dry , clean and ventilated condition,
especially keeping away from dust scope .
(4)Storage conditions and methods: the packed
lubricant device should be stored in the indoor of temperature between -1 0 oC~40oC , relative humidity
less than 75%, without corrosive gas ventilated well ,
and clean.
(5)Handling attentions:
A. The correct position of transport package is
vertical upward. Do not inverse or stockpile.
B. it' s fragile , take care when handling
C.Number of superposition do not exceed 5 pieces.
(6)If the power didn' t reach the standard
voltage range of 士 20% , do not use it. You should
add voltage stabilizer, or regulator to control
voltage , otherwise the lubricator will be damaged if
it works abnormally.
(7)The environment temperature of the lubricator is 50C~40oC
(8)Pull out the plug when it is being
cleaning. Do not sprinkle wateto the whole machine ,
rubbing off the dust with soft dry cloth.
(9)Do not casually disassemble the inside
circui t board.
No. I Faul t phenomena
牛L
eo hn +L
r ro OL
iho
n-tn
3
-e
-tu
--咀
S
t
-mi
u-kr
-i
-ce
o-ew
s
-m归
-n
s-is
--τdi
cd
一ρU
y-Et
--L
-060L
L
二
L
-
ULA
W刷一时
m
cι
-
PO
-+L
•tu
-
oolv L
lL
一'h
ji-nt
d比
一-AU
a
一·μr
F
-Dσ
work , no showing in the digita1 tube
The machine didn' t I 1ack of e1ectric
2 No respond when push the button
The tank cover is I Tighten the cover 100sed
3 The machine is working , but no oil out
Disconnect the fuse
Change to new fuse after confirming no 1eakage
Change a new button
The button didn' t work
Disconnect巳d with I Connect it the pressure source
Oi1 regu1ator is I Adjust the oi1 t00 tight I regu1ator Oi1 pipe I Adjust the pipe was converted Lack of oil B10cking of the oil ho1e
Add oil Unchock the oi1 ho1e
4 lS uneven
The machine is I Oi1 regu1ator is I Adjust the workin~but the oi1 I too 100se I regu1ator
Pipe interface I Connected it Air 1eakdisconnected
Pipe broken IChange to a new one Air pressure too highl Va1ve adjustor I Adjust it or too 10w I errors
5
6
Transmission be1t I Change to a new 100se or broken I be1t
7 Motor rotating but the joint did not rotatlng Transmission I Tighten i t
whee1 100sed
7 8
Product warranty certificate
Name Tel I Mobile I
Add. Province City County
Model manufacture IprodU川J巾rlDate of Warranty purchase Inqulrles Purchase Province City County address
Maintenancel Maintenance I Maintenance I Maintenance I Maint Numbe I d~t~"~' ,~, , v~1 phenomenon I ~~-;;i~~ï~' .vv I ~~ii
2
3
Note:
Note: Please bring this card together
when the product is repaired
9
XJ
(8 joint) product tracking service card
(Return to the company)
Name
Add. Province City
|叫le I County
Model Date of manufacture I l:ml
Date of purchase
Purchase address
Respected user
Province
Warranty mqumes
City
In order to protect your interests , the Company established product tracking service , please carefully fill in the required contents ofthe card sent back to the Company to establish product tracking service card Simultaneously. I urge you to the Division I products for their valuable comments and suggestions
County
Division I so that continuous improvement and improvement and dedication to good cooperation and work! Acknowledgments! Thank you!