PRV-LX1 DVD Menu Maker GUIDE TO DESIGNING MENU LAYOUTS FOR THE PRV-LX1 RECORDER USING THE DVD MENU MAKER APPLICATION Table of Contents 1.0 INTRODUCTION ............................................................................................................. 2 2.0 BACKGROUND LAYER................................................................................................... 3 3.0 HIGHLIGHT AREA LAYER .............................................................................................. 4 4.0 BUTTON AREA LAYER .................................................................................................. 4 4.1 Button Area Locations ................................................................................................. 5 4.2 Button Area Colors ...................................................................................................... 5 5.0 BUTTON IMAGE LAYER ................................................................................................. 6 6.0 BUTTON MASK LAYER .................................................................................................. 7 7.0 THUMBNAIL AREA LAYER ............................................................................................. 7 8.0 THUMBNAIL MASK LAYER ............................................................................................. 8 9.0 TEXT AREA LAYER ....................................................................................................... 9 10.0 COLOR TABLE LAYER ................................................................................................. 10 11.0 CONVERT MENU FROM PHOTOSHOP USING THE PRV-LX1 DVD MENU MAKER ............. 13 11.1 Create The Import Folder/Files ................................................................................. 14 11.2 Inspect the Custom Menu.......................................................................................... 14 11.2.1 Change Highlight Colors from within the Application ................................................. 18 11.2.2 Change Button Actions from within the Application ................................................... 18 11.2.3 Change Text/Labels from within the Application ........................................................ 19 11.2.4 Create The Custom Menu .......................................................................................... 19 11.3 Import Your Custom Menu ........................................................................................ 20 11.4 Select Your Custom Menu ......................................................................................... 20 12.0 HELPFUL HINTS ......................................................................................................... 21 August 2005 Technical Publication #T502208 Pioneer Electronics (USA) Inc. all rights reserved Page 1 of 24
Transcript
PRV-LX1 DVD Menu Maker
GUIDE TO DESIGNING MENU LAYOUTS FOR THE PRV-LX1 RECORDER
USING THE DVD MENU MAKER APPLICATION Table of Contents
9.0 TEXT AREA LAYER....................................................................................................... 9
10.0 COLOR TABLE LAYER ................................................................................................. 10
11.0 CONVERT MENU FROM PHOTOSHOP USING THE PRV-LX1 DVD MENU MAKER ............. 13
11.1 Create The Import Folder/Files ................................................................................. 14
11.2 Inspect the Custom Menu.......................................................................................... 14 11.2.1 Change Highlight Colors from within the Application ................................................. 18 11.2.2 Change Button Actions from within the Application ................................................... 18 11.2.3 Change Text/Labels from within the Application ........................................................ 19 11.2.4 Create The Custom Menu .......................................................................................... 19
11.3 Import Your Custom Menu ........................................................................................ 20
11.4 Select Your Custom Menu......................................................................................... 20
Pioneer Electronics (USA) Inc. all rights reserved
Page 1 of 24
PRV-LX1 DVD Menu Maker
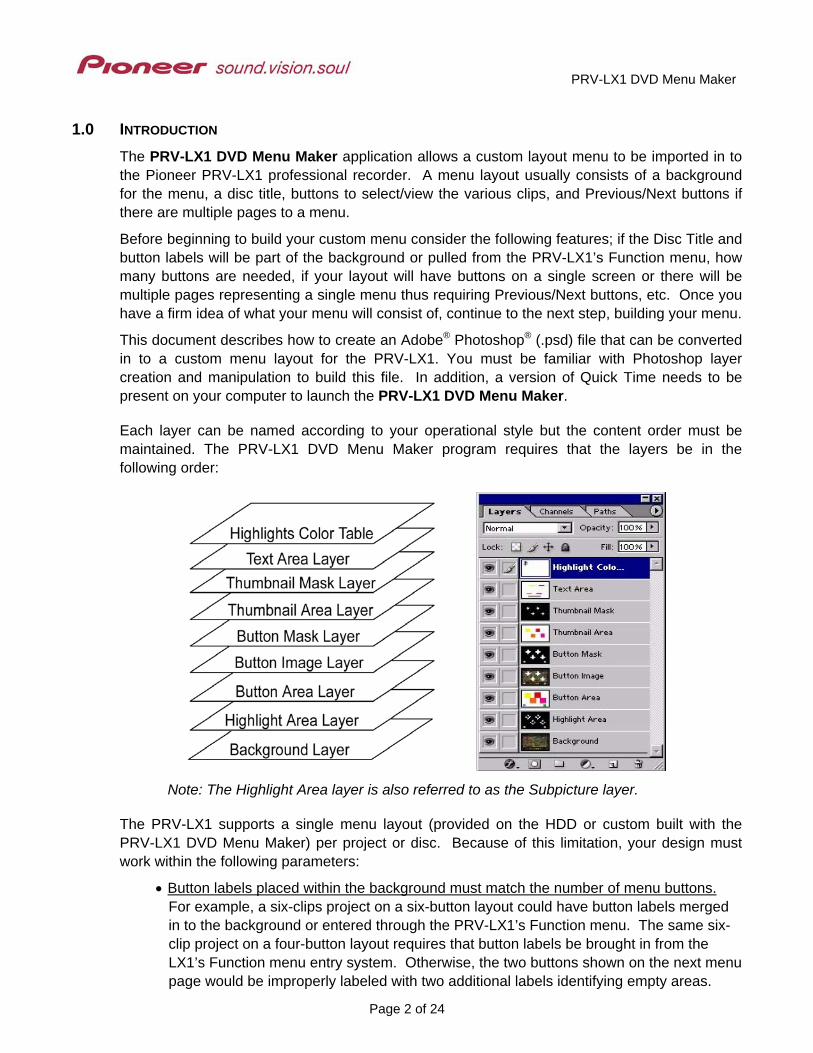
1.0 INTRODUCTION The PRV-LX1 DVD Menu Maker application allows a custom layout menu to be imported in to the Pioneer PRV-LX1 professional recorder. A menu layout usually consists of a background for the menu, a disc title, buttons to select/view the various clips, and Previous/Next buttons if there are multiple pages to a menu.
Before beginning to build your custom menu consider the following features; if the Disc Title and button labels will be part of the background or pulled from the PRV-LX1’s Function menu, how many buttons are needed, if your layout will have buttons on a single screen or there will be multiple pages representing a single menu thus requiring Previous/Next buttons, etc. Once you have a firm idea of what your menu will consist of, continue to the next step, building your menu.
This document describes how to create an Adobe® Photoshop® (.psd) file that can be converted in to a custom menu layout for the PRV-LX1. You must be familiar with Photoshop layer creation and manipulation to build this file. In addition, a version of Quick Time needs to be present on your computer to launch the PRV-LX1 DVD Menu Maker.
Each layer can be named according to your operational style but the content order must be maintained. The PRV-LX1 DVD Menu Maker program requires that the layers be in the following order:
Note: The Highlight Area layer is also referred to as the Subpicture layer.
The PRV-LX1 supports a single menu layout (provided on the HDD or custom built with the PRV-LX1 DVD Menu Maker) per project or disc. Because of this limitation, your design must work within the following parameters:
• Button labels placed within the background must match the number of menu buttons. For example, a six-clips project on a six-button layout could have button labels merged in to the background or entered through the PRV-LX1’s Function menu. The same six-clip project on a four-button layout requires that button labels be brought in from the LX1’s Function menu entry system. Otherwise, the two buttons shown on the next menu page would be improperly labeled with two additional labels identifying empty areas.
Page 2 of 24
PRV-LX1 DVD Menu Maker
• A Disc Title label placed within the background must anticipate all button locations including the Previous menu page and Next menu page buttons for multi-page menus. Multi-page menus would require Previous menu page and Next menu page buttons. However, not all projects will have multiple menu pages. To build a layout usable for multiple projects, create a Disc Title layer in a separate file then ‘duplicate’ the layer over the Background layer before the layout is flattened.
Other file guidelines are as follows:
File dimension must be 720 pixels (W) x 480 pixels (H)
Black (RGB: 0,0,0) is equivalent to hiding material on a particular layer
White (RGB: 255,255,255) indicates a transparent area that allows another layer’s data to show through
Layers not used for a particular menu must still be present for the conversion
Per DVD specifications, button and thumbnail areas must be squares or rectangles (however, button/thumbnail shapes may be any polygon, see sample layout for example)
Button and Thumbnail Areas must be a particular color as this delineates the button order (more information on these colors is available later in this document)
Custom menu name (folder name) may include dashes or underscores between characters but spaces in the name cause the PRV-LX1 import function to fail
PRV-LX1 DVD Menu Maker is compatible with operating systems Microsoft® Windows® 2000 and XP® and with Photoshop 6.0 or newer
This document details what elements are required in each layer. To further assist with menu layout design, please download LX1_Sample-Layout.psd from the Pioneer website before beginning to build a menu. The file is located under Service & Support / Business Products Support / DVD Players & Recorders / PRV-LX1.
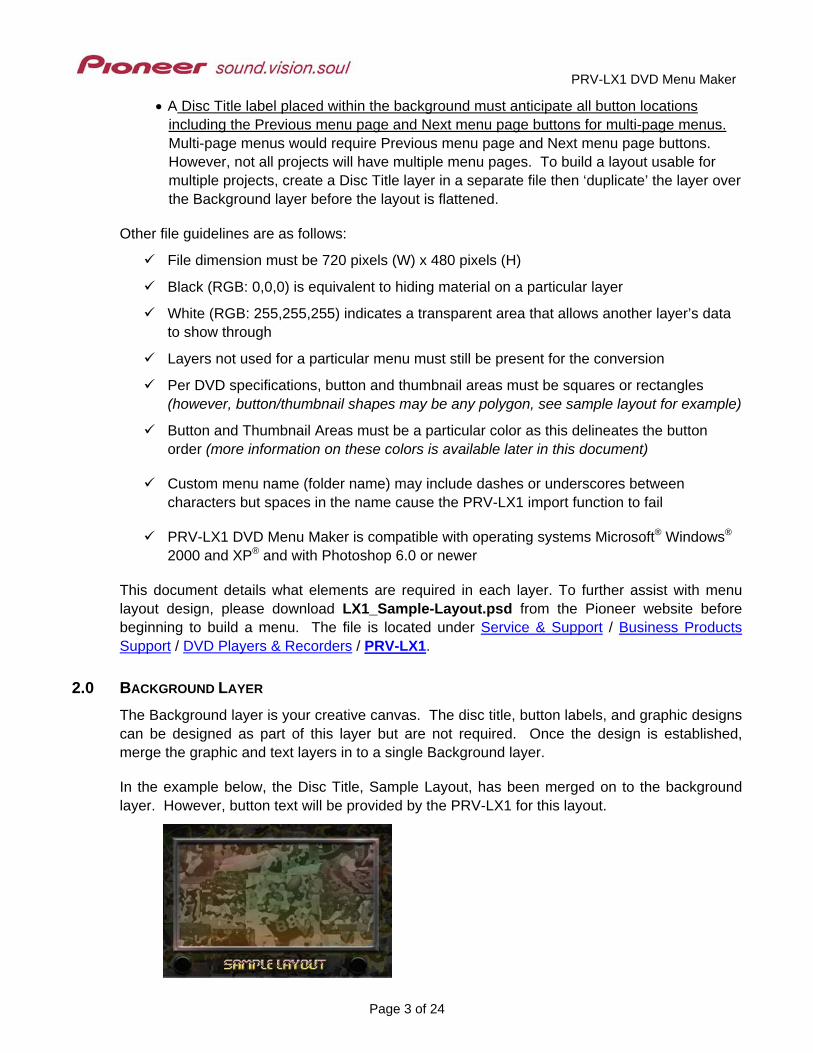
2.0 BACKGROUND LAYER The Background layer is your creative canvas. The disc title, button labels, and graphic designs can be designed as part of this layer but are not required. Once the design is established, merge the graphic and text layers in to a single Background layer.
In the example below, the Disc Title, Sample Layout, has been merged on to the background layer. However, button text will be provided by the PRV-LX1 for this layout.
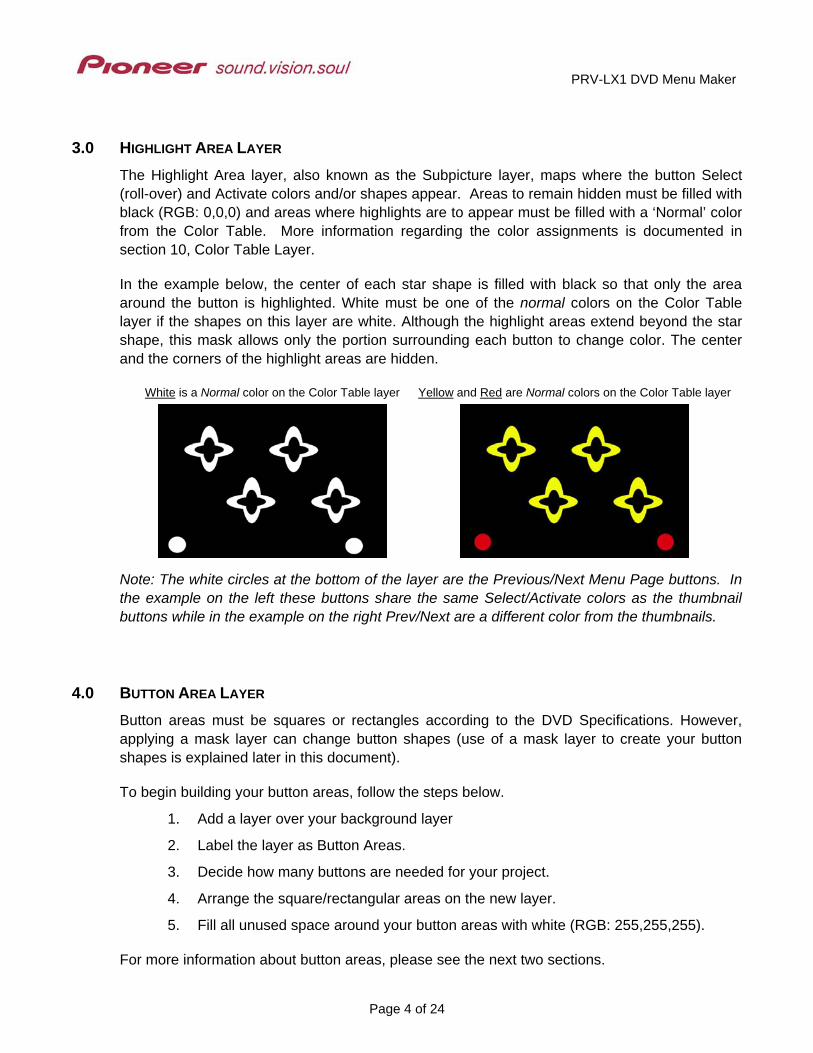
3.0 HIGHLIGHT AREA LAYER The Highlight Area layer, also known as the Subpicture layer, maps where the button Select (roll-over) and Activate colors and/or shapes appear. Areas to remain hidden must be filled with black (RGB: 0,0,0) and areas where highlights are to appear must be filled with a ‘Normal’ color from the Color Table. More information regarding the color assignments is documented in section 10, Color Table Layer.
In the example below, the center of each star shape is filled with black so that only the area around the button is highlighted. White must be one of the normal colors on the Color Table layer if the shapes on this layer are white. Although the highlight areas extend beyond the star shape, this mask allows only the portion surrounding each button to change color. The center and the corners of the highlight areas are hidden.
White is a Normal color on the Color Table layer Yellow and Red are Normal colors on the Color Table layer
Note: The white circles at the bottom of the layer are the Previous/Next Menu Page buttons. In the example on the left these buttons share the same Select/Activate colors as the thumbnail buttons while in the example on the right Prev/Next are a different color from the thumbnails.
4.0 BUTTON AREA LAYER Button areas must be squares or rectangles according to the DVD Specifications. However, applying a mask layer can change button shapes (use of a mask layer to create your button shapes is explained later in this document).
To begin building your button areas, follow the steps below.
1. Add a layer over your background layer
2. Label the layer as Button Areas.
3. Decide how many buttons are needed for your project.
4. Arrange the square/rectangular areas on the new layer.
5. Fill all unused space around your button areas with white (RGB: 255,255,255).
For more information about button areas, please see the next two sections.
Page 4 of 24
PRV-LX1 DVD Menu Maker
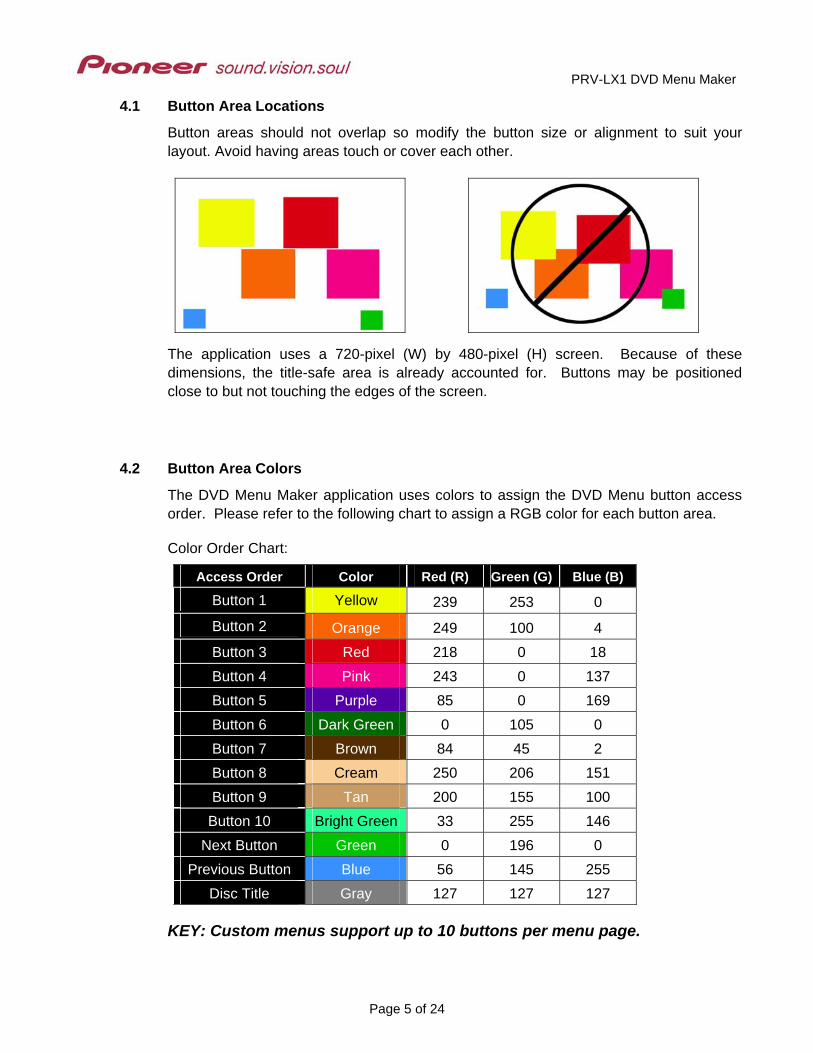
4.1 Button Area Locations
Button areas should not overlap so modify the button size or alignment to suit your layout. Avoid having areas touch or cover each other.
The application uses a 720-pixel (W) by 480-pixel (H) screen. Because of these dimensions, the title-safe area is already accounted for. Buttons may be positioned close to but not touching the edges of the screen.
4.2 Button Area Colors
The DVD Menu Maker application uses colors to assign the DVD Menu button access order. Please refer to the following chart to assign a RGB color for each button area.
Button 10 Bright Green 33 255 146 Next Button Green 0 196 0
Previous Button Blue 56 145 255 Disc Title Gray 127 127 127
KEY: Custom menus support up to 10 buttons per menu page.
Page 5 of 24
PRV-LX1 DVD Menu Maker
5.0 BUTTON IMAGE LAYER The Button Image layer exists to add individual or group visual effects to the buttons. To test different looks to your buttons, follow the steps below.
1. With the Background layer selected, click on Layer from the main menu bar.
2. Select the Duplicate Layer command.
3. Change the name of this layer from Background copy to Button Image.
4. Move the Button Image layer to above the Button Area layer. The stacking order from top to bottom should now be Button Image, Button Area, Highlight Area (or Subpicture) and Background.
5. Duplicate the Highlight (or Subpicture) layer using the same method as described above in steps 1 and 2. This layer is merged with the Button Image layer shortly so it is unnecessary to change the name of the layer.
6. Use the Clear command to remove all the black areas from this temporary layer. Use the Magic Wand ( ) tool to select the black areas. The Clear command is under the Edit menu options.
7. Select the button area(s) to be modified.
8. Alter the button image(s) to suit your custom menu layout. To affect all buttons, try using the Blending Options for the layer. To alter selected buttons, try applying a filter or a fill affect to just those buttons.
9. Merge temporary layers down in to the Button Image layer.
In the example below, the button shapes were designed with 50% transparency then blended with an outer glow in yellow, inner-beveled with black, and contoured with a 20% double-spike element. The Previous/Next menu buttons were also individually filled with 30% transparency rainbow angles.
Page 6 of 24
PRV-LX1 DVD Menu Maker
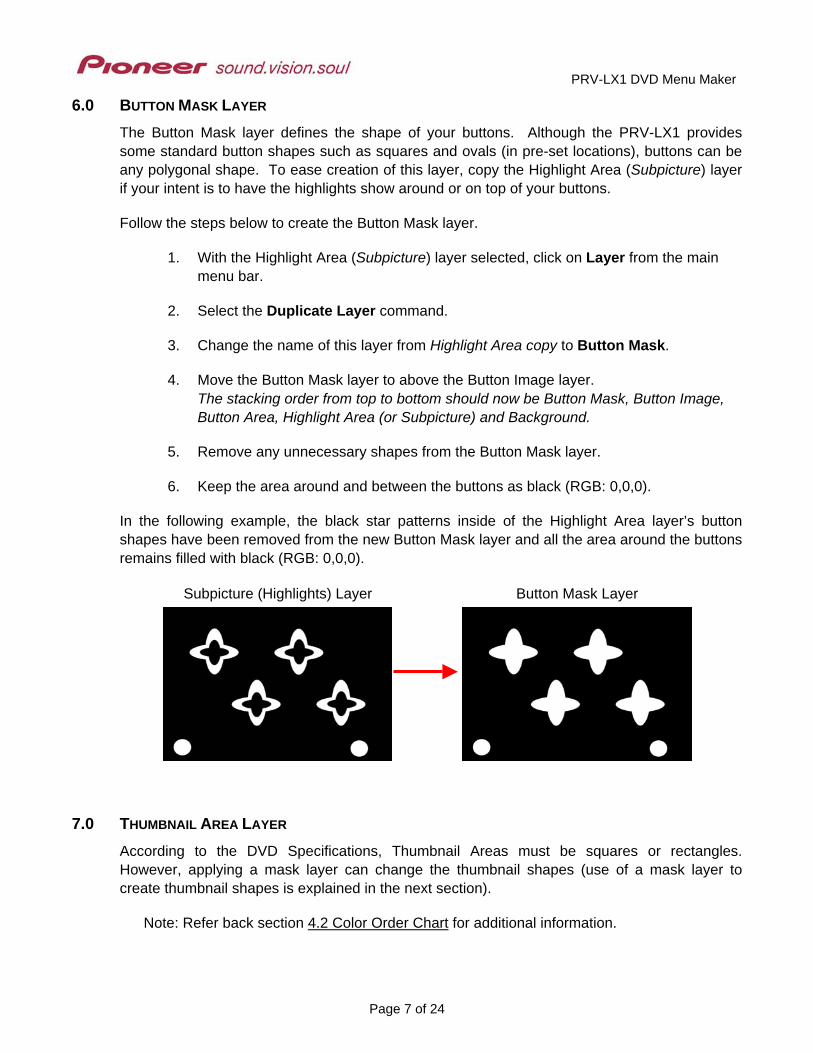
6.0 BUTTON MASK LAYER The Button Mask layer defines the shape of your buttons. Although the PRV-LX1 provides some standard button shapes such as squares and ovals (in pre-set locations), buttons can be any polygonal shape. To ease creation of this layer, copy the Highlight Area (Subpicture) layer if your intent is to have the highlights show around or on top of your buttons.
Follow the steps below to create the Button Mask layer.
1. With the Highlight Area (Subpicture) layer selected, click on Layer from the main menu bar.
2. Select the Duplicate Layer command.
3. Change the name of this layer from Highlight Area copy to Button Mask.
4. Move the Button Mask layer to above the Button Image layer. The stacking order from top to bottom should now be Button Mask, Button Image, Button Area, Highlight Area (or Subpicture) and Background.
5. Remove any unnecessary shapes from the Button Mask layer.
6. Keep the area around and between the buttons as black (RGB: 0,0,0).
In the following example, the black star patterns inside of the Highlight Area layer’s button shapes have been removed from the new Button Mask layer and all the area around the buttons remains filled with black (RGB: 0,0,0).
Subpicture (Highlights) Layer Button Mask Layer
7.0 THUMBNAIL AREA LAYER According to the DVD Specifications, Thumbnail Areas must be squares or rectangles. However, applying a mask layer can change the thumbnail shapes (use of a mask layer to create thumbnail shapes is explained in the next section).
Note: Refer back section 4.2 Color Order Chart for additional information.
Page 7 of 24
PRV-LX1 DVD Menu Maker
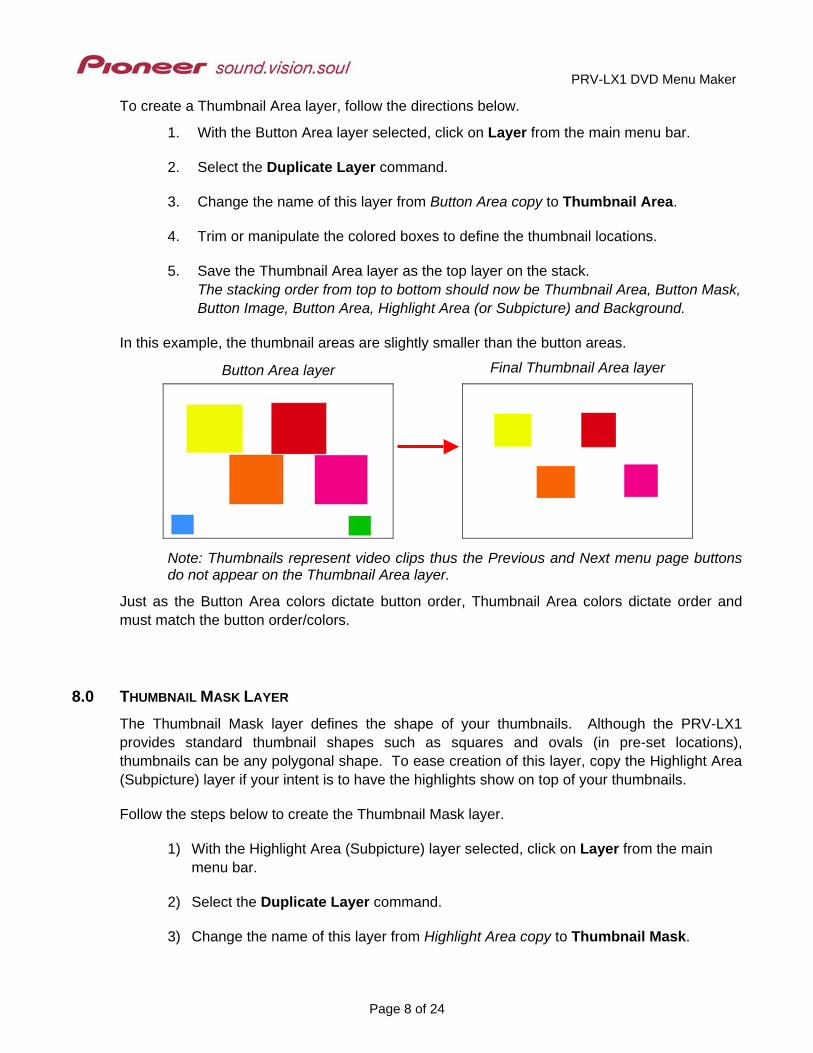
To create a Thumbnail Area layer, follow the directions below.
1. With the Button Area layer selected, click on Layer from the main menu bar.
2. Select the Duplicate Layer command.
3. Change the name of this layer from Button Area copy to Thumbnail Area.
4. Trim or manipulate the colored boxes to define the thumbnail locations.
5. Save the Thumbnail Area layer as the top layer on the stack. The stacking order from top to bottom should now be Thumbnail Area, Button Mask, Button Image, Button Area, Highlight Area (or Subpicture) and Background.
In this example, the thumbnail areas are slightly smaller than the button areas.
Button Area layer Final Thumbnail Area layer
Note: Thumbnails represent video clips thus the Previous and Next menu page buttons do not appear on the Thumbnail Area layer.
Just as the Button Area colors dictate button order, Thumbnail Area colors dictate order and must match the button order/colors.
8.0 THUMBNAIL MASK LAYER The Thumbnail Mask layer defines the shape of your thumbnails. Although the PRV-LX1 provides standard thumbnail shapes such as squares and ovals (in pre-set locations), thumbnails can be any polygonal shape. To ease creation of this layer, copy the Highlight Area (Subpicture) layer if your intent is to have the highlights show on top of your thumbnails.
Follow the steps below to create the Thumbnail Mask layer.
1) With the Highlight Area (Subpicture) layer selected, click on Layer from the main menu bar.
2) Select the Duplicate Layer command.
3) Change the name of this layer from Highlight Area copy to Thumbnail Mask.
Page 8 of 24
PRV-LX1 DVD Menu Maker
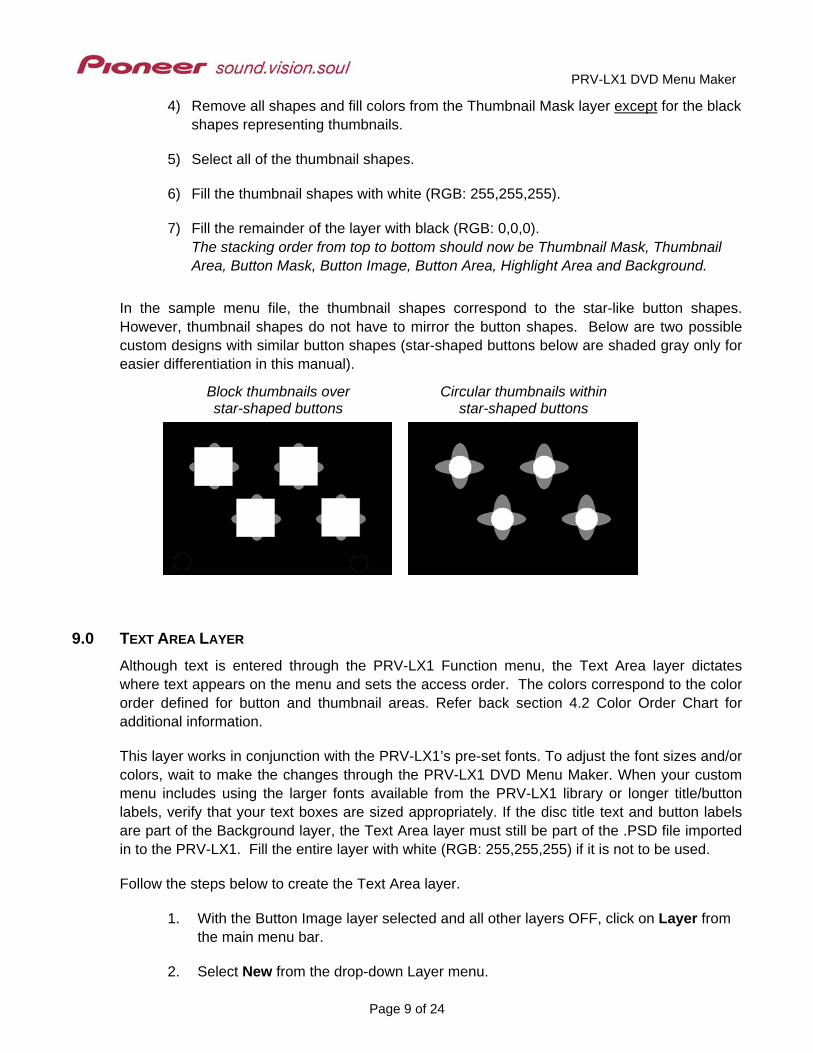
4) Remove all shapes and fill colors from the Thumbnail Mask layer except for the black shapes representing thumbnails.
5) Select all of the thumbnail shapes.
6) Fill the thumbnail shapes with white (RGB: 255,255,255).
7) Fill the remainder of the layer with black (RGB: 0,0,0). The stacking order from top to bottom should now be Thumbnail Mask, Thumbnail Area, Button Mask, Button Image, Button Area, Highlight Area and Background.
In the sample menu file, the thumbnail shapes correspond to the star-like button shapes. However, thumbnail shapes do not have to mirror the button shapes. Below are two possible custom designs with similar button shapes (star-shaped buttons below are shaded gray only for easier differentiation in this manual).
Block thumbnails over star-shaped buttons
Circular thumbnails within star-shaped buttons
9.0 TEXT AREA LAYER Although text is entered through the PRV-LX1 Function menu, the Text Area layer dictates where text appears on the menu and sets the access order. The colors correspond to the color order defined for button and thumbnail areas. Refer back section 4.2 Color Order Chart for additional information.
This layer works in conjunction with the PRV-LX1’s pre-set fonts. To adjust the font sizes and/or colors, wait to make the changes through the PRV-LX1 DVD Menu Maker. When your custom menu includes using the larger fonts available from the PRV-LX1 library or longer title/button labels, verify that your text boxes are sized appropriately. If the disc title text and button labels are part of the Background layer, the Text Area layer must still be part of the .PSD file imported in to the PRV-LX1. Fill the entire layer with white (RGB: 255,255,255) if it is not to be used.
Follow the steps below to create the Text Area layer.
1. With the Button Image layer selected and all other layers OFF, click on Layer from the main menu bar.
2. Select New from the drop-down Layer menu.
Page 9 of 24
PRV-LX1 DVD Menu Maker
3. Choose Layer from the submenu.
4. Enter the name of this layer as Text Area.
5. Using the Rectangular Marquee tool ( ), outline an area for button text.
6. Fill the area with the appropriate color. Refer to the Color Order Chart in section 4.2 of this manual.
7. Repeat steps 4 and 5 as needed for your custom layout.
8. Fill the remaining space around the text areas with white (RGB: 255,255,255).
9. Move the Text Area layer to above the Thumbnail Mask layer. The stacking order from top to bottom should now be Text Area, Thumbnail Mask, Thumbnail Area, Button Mask, Button Image, Button Area, Highlight Area (or Subpicture) and Background.
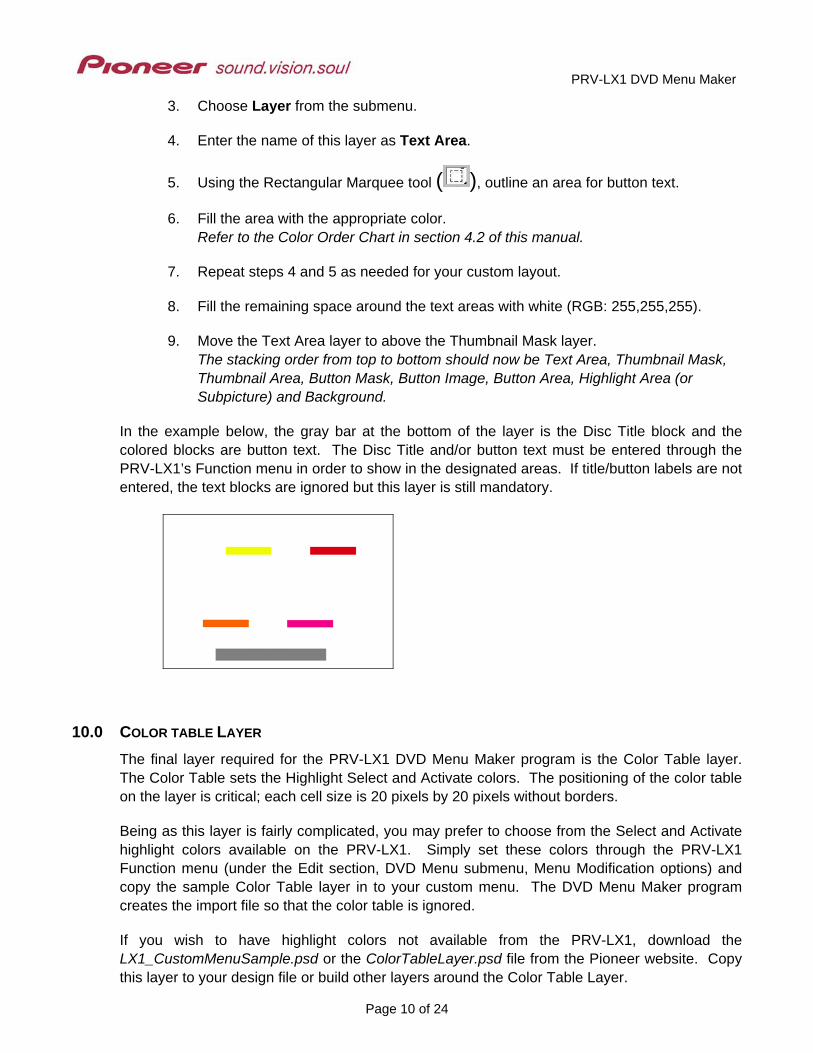
In the example below, the gray bar at the bottom of the layer is the Disc Title block and the colored blocks are button text. The Disc Title and/or button text must be entered through the PRV-LX1’s Function menu in order to show in the designated areas. If title/button labels are not entered, the text blocks are ignored but this layer is still mandatory.
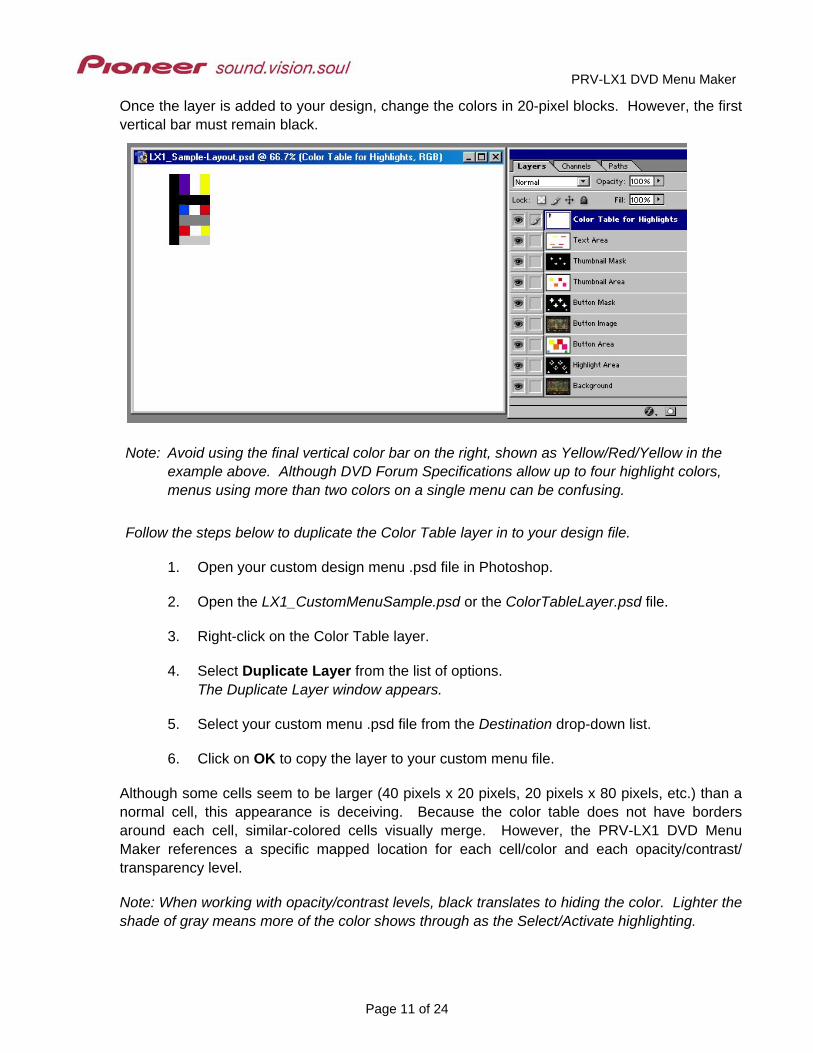
10.0 COLOR TABLE LAYER The final layer required for the PRV-LX1 DVD Menu Maker program is the Color Table layer. The Color Table sets the Highlight Select and Activate colors. The positioning of the color table on the layer is critical; each cell size is 20 pixels by 20 pixels without borders.
Being as this layer is fairly complicated, you may prefer to choose from the Select and Activate highlight colors available on the PRV-LX1. Simply set these colors through the PRV-LX1 Function menu (under the Edit section, DVD Menu submenu, Menu Modification options) and copy the sample Color Table layer in to your custom menu. The DVD Menu Maker program creates the import file so that the color table is ignored.
If you wish to have highlight colors not available from the PRV-LX1, download the LX1_CustomMenuSample.psd or the ColorTableLayer.psd file from the Pioneer website. Copy this layer to your design file or build other layers around the Color Table Layer.
Page 10 of 24
PRV-LX1 DVD Menu Maker
Once the layer is added to your design, change the colors in 20-pixel blocks. However, the first vertical bar must remain black.
Note: Avoid using the final vertical color bar on the right, shown as Yellow/Red/Yellow in the example above. Although DVD Forum Specifications allow up to four highlight colors, menus using more than two colors on a single menu can be confusing.
Follow the steps below to duplicate the Color Table layer in to your design file.
1. Open your custom design menu .psd file in Photoshop.
2. Open the LX1_CustomMenuSample.psd or the ColorTableLayer.psd file.
3. Right-click on the Color Table layer.
4. Select Duplicate Layer from the list of options. The Duplicate Layer window appears.
5. Select your custom menu .psd file from the Destination drop-down list.
6. Click on OK to copy the layer to your custom menu file.
Although some cells seem to be larger (40 pixels x 20 pixels, 20 pixels x 80 pixels, etc.) than a normal cell, this appearance is deceiving. Because the color table does not have borders around each cell, similar-colored cells visually merge. However, the PRV-LX1 DVD Menu Maker references a specific mapped location for each cell/color and each opacity/contrast/ transparency level.
Note: When working with opacity/contrast levels, black translates to hiding the color. Lighter the shade of gray means more of the color shows through as the Select/Activate highlighting.
Page 11 of 24
PRV-LX1 DVD Menu Maker
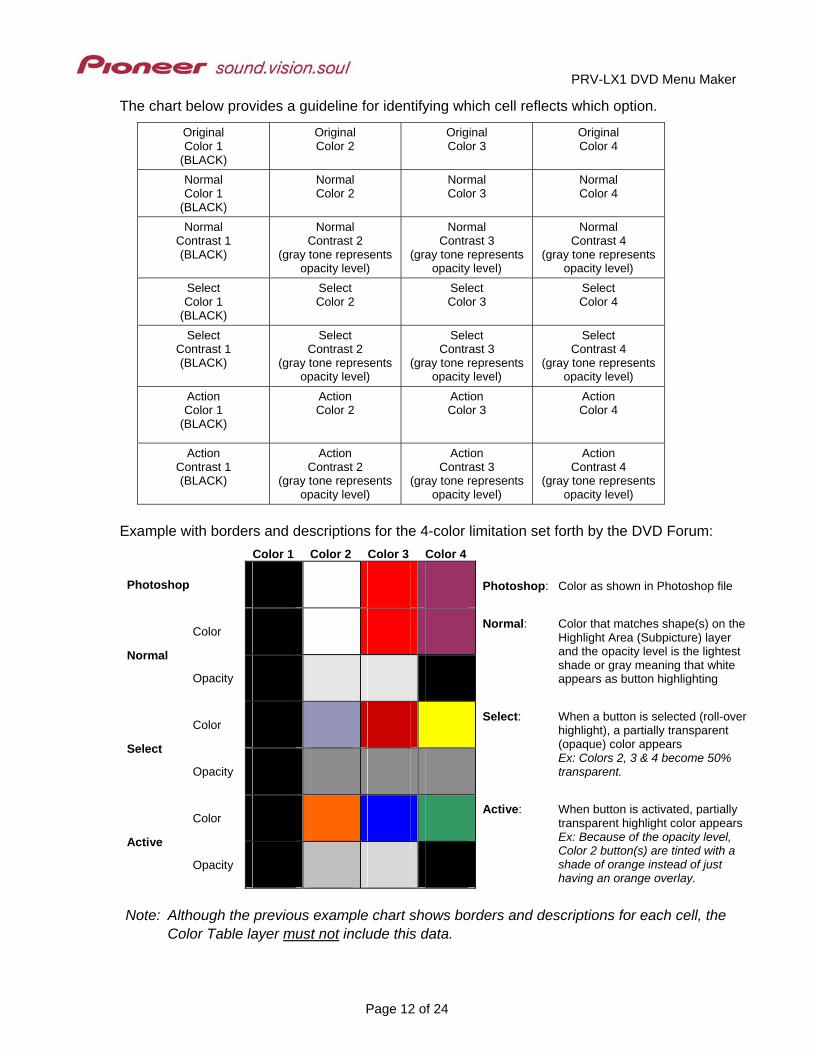
The chart below provides a guideline for identifying which cell reflects which option.
Original Color 1
(BLACK)
Original Color 2
Original Color 3
Original Color 4
Normal Color 1
(BLACK)
Normal Color 2
Normal Color 3
Normal Color 4
Normal Contrast 1 (BLACK)
Normal Contrast 2
(gray tone represents opacity level)
Normal Contrast 3
(gray tone represents opacity level)
Normal Contrast 4
(gray tone represents opacity level)
Select Color 1
(BLACK)
Select Color 2
Select Color 3
Select Color 4
Select Contrast 1 (BLACK)
Select Contrast 2
(gray tone represents opacity level)
Select Contrast 3
(gray tone represents opacity level)
Select Contrast 4
(gray tone represents opacity level)
Action Color 1
(BLACK)
Action Color 2
Action Color 3
Action Color 4
Action Contrast 1 (BLACK)
Action Contrast 2
(gray tone represents opacity level)
Action Contrast 3
(gray tone represents opacity level)
Action Contrast 4
(gray tone represents opacity level)
Example with borders and descriptions for the 4-color limitation set forth by the DVD Forum: Color 1 Color 2 Color 3 Color 4
Photoshop
Color
Normal
Opacity
Color
Select
Opacity
Color
Active
Opacity
Photoshop: Color as shown in Photoshop file
Normal: Color that matches shape(s) on the Highlight Area (Subpicture) layer and the opacity level is the lightest shade or gray meaning that white appears as button highlighting
Select: When a button is selected (roll-over highlight), a partially transparent (opaque) color appears Ex: Colors 2, 3 & 4 become 50% transparent.
Active: When button is activated, partially transparent highlight color appears Ex: Because of the opacity level, Color 2 button(s) are tinted with a shade of orange instead of just having an orange overlay.
Note: Although the previous example chart shows borders and descriptions for each cell, the Color Table layer must not include this data.
Page 12 of 24
PRV-LX1 DVD Menu Maker
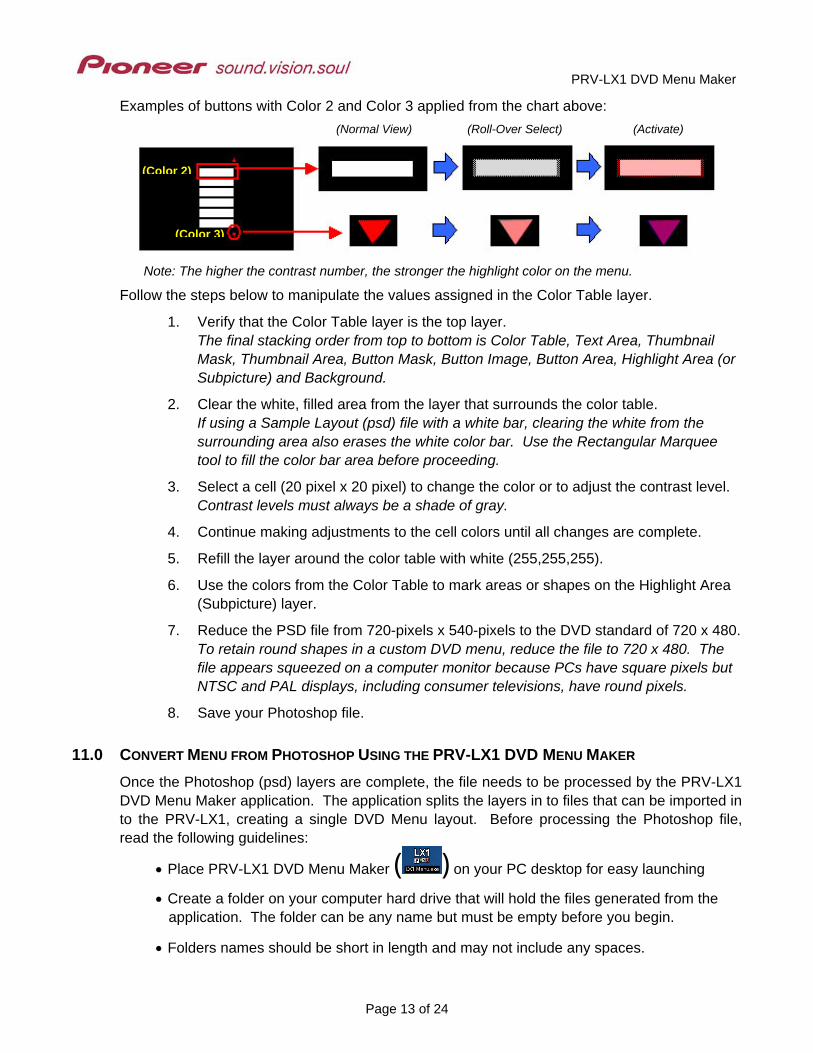
Examples of buttons with Color 2 and Color 3 applied from the chart above: (Normal View) (Roll-Over Select) (Activate)
Fo
11.0 CO
OnDVto rea
(Color 2)
Note
llow t
NVE
ce thD Mthe Pd the
•
•
•
(Color 3)
: The higher the contrast number, the stronger the highlight color on the menu.
he steps below to manipulate the values assigned in the Color Table layer.
1. Verify that the Color Table layer is the top layer. The final stacking order from top to bottom is Color Table, Text Area, Thumbnail Mask, Thumbnail Area, Button Mask, Button Image, Button Area, Highlight Area (or Subpicture) and Background.
2. Clear the white, filled area from the layer that surrounds the color table. If using a Sample Layout (psd) file with a white bar, clearing the white from the surrounding area also erases the white color bar. Use the Rectangular Marquee tool to fill the color bar area before proceeding.
3. Select a cell (20 pixel x 20 pixel) to change the color or to adjust the contrast level. Contrast levels must always be a shade of gray.
4. Continue making adjustments to the cell colors until all changes are complete.
5. Refill the layer around the color table with white (255,255,255).
6. Use the colors from the Color Table to mark areas or shapes on the Highlight Area (Subpicture) layer.
7. Reduce the PSD file from 720-pixels x 540-pixels to the DVD standard of 720 x 480. To retain round shapes in a custom DVD menu, reduce the file to 720 x 480. The file appears squeezed on a computer monitor because PCs have square pixels but NTSC and PAL displays, including consumer televisions, have round pixels.
8. Save your Photoshop file.
RT MENU FROM PHOTOSHOP USING THE PRV-LX1 DVD MENU MAKER e Photoshop (psd) layers are complete, the file needs to be processed by the PRV-LX1
enu Maker application. The application splits the layers in to files that can be imported in RV-LX1, creating a single DVD Menu layout. Before processing the Photoshop file, following guidelines:
Place PRV-LX1 DVD Menu Maker ( ) on your PC desktop for easy launching
Create a folder on your computer hard drive that will hold the files generated from the application. The folder can be any name but must be empty before you begin.
Folders names should be short in length and may not include any spaces.
Page 13 of 24
PRV-LX1 DVD Menu Maker
11.1 Create The Import Folder/Files
Follow the steps below to create your import folder/file.
1. Create a new folder to receive the custom menu files. The folder name becomes the menu name when imported in to the PRV-LX1. This name cannot have spaces and should have fewer than 12 characters.
2. Launch the Pioneer PRV-LX1 DVD Menu Maker.
3. Locate your custom Photoshop file on the hard drive.
4. Click on the Open button to select your .psd file. A new window entitled Browse for Folder replaces the existing folder/file window.
5. Locate and select the new folder you created to hold the import files. PRV-LX1 DVD Menu Maker window replaces the Browse for Folder window.
6. Click on the drop-down menu to check each layer of your custom menu layout. Clicking on the OK button saves the file but also closes the application. Once the application is closed, no further modifications are allowed. Return to your Photoshop file to make corrections listed as Preview-Only layers.
11.2 Inspect the Custom Menu
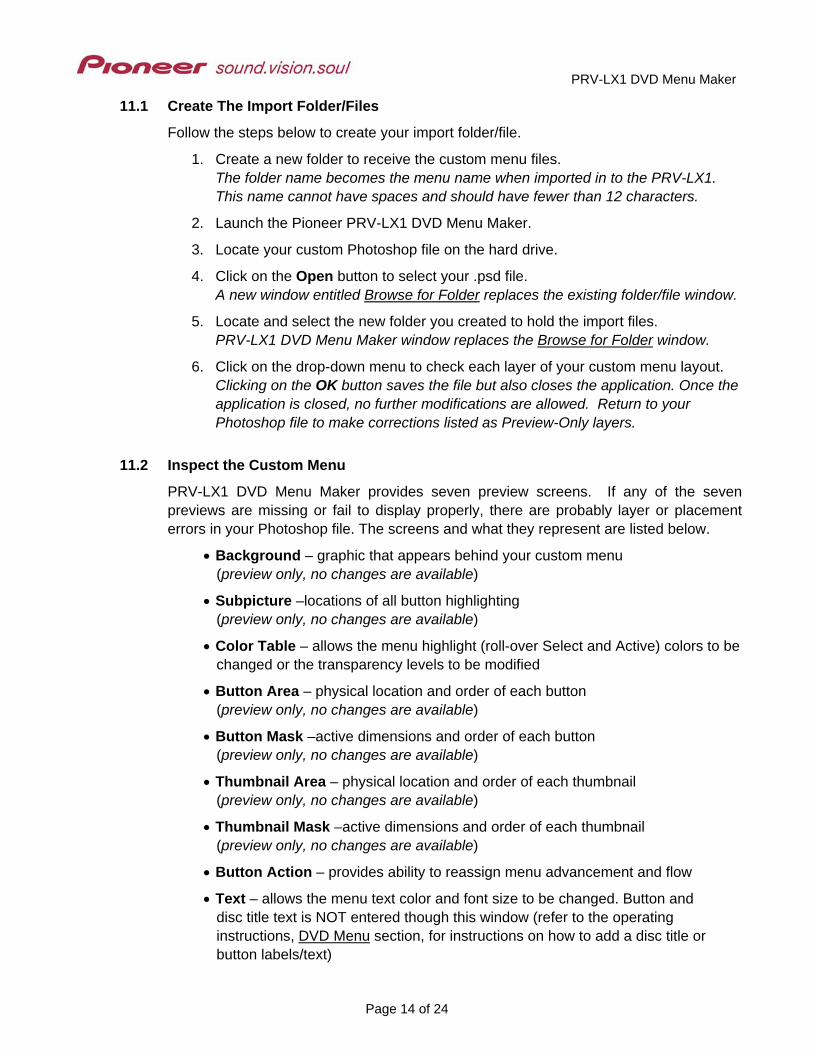
PRV-LX1 DVD Menu Maker provides seven preview screens. If any of the seven previews are missing or fail to display properly, there are probably layer or placement errors in your Photoshop file. The screens and what they represent are listed below.
• Background – graphic that appears behind your custom menu (preview only, no changes are available)
• Subpicture –locations of all button highlighting (preview only, no changes are available)
• Color Table – allows the menu highlight (roll-over Select and Active) colors to be changed or the transparency levels to be modified
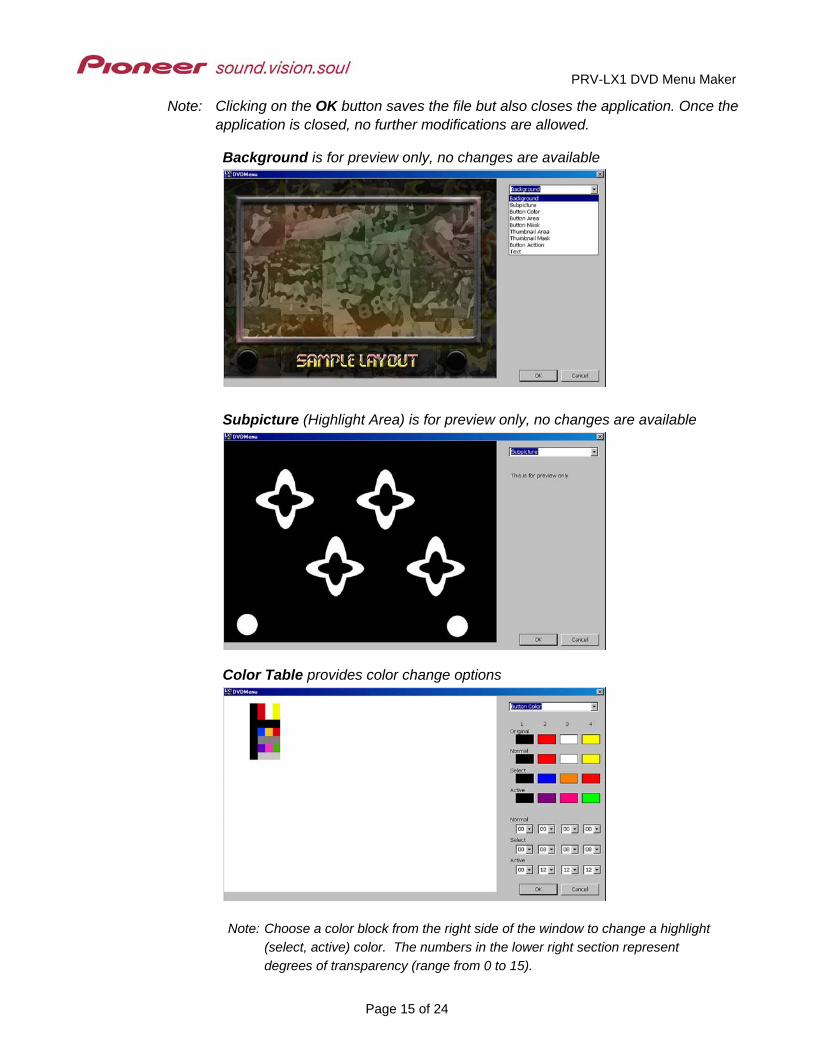
• Button Area – physical location and order of each button (preview only, no changes are available)
• Button Mask –active dimensions and order of each button (preview only, no changes are available)
• Thumbnail Area – physical location and order of each thumbnail (preview only, no changes are available)
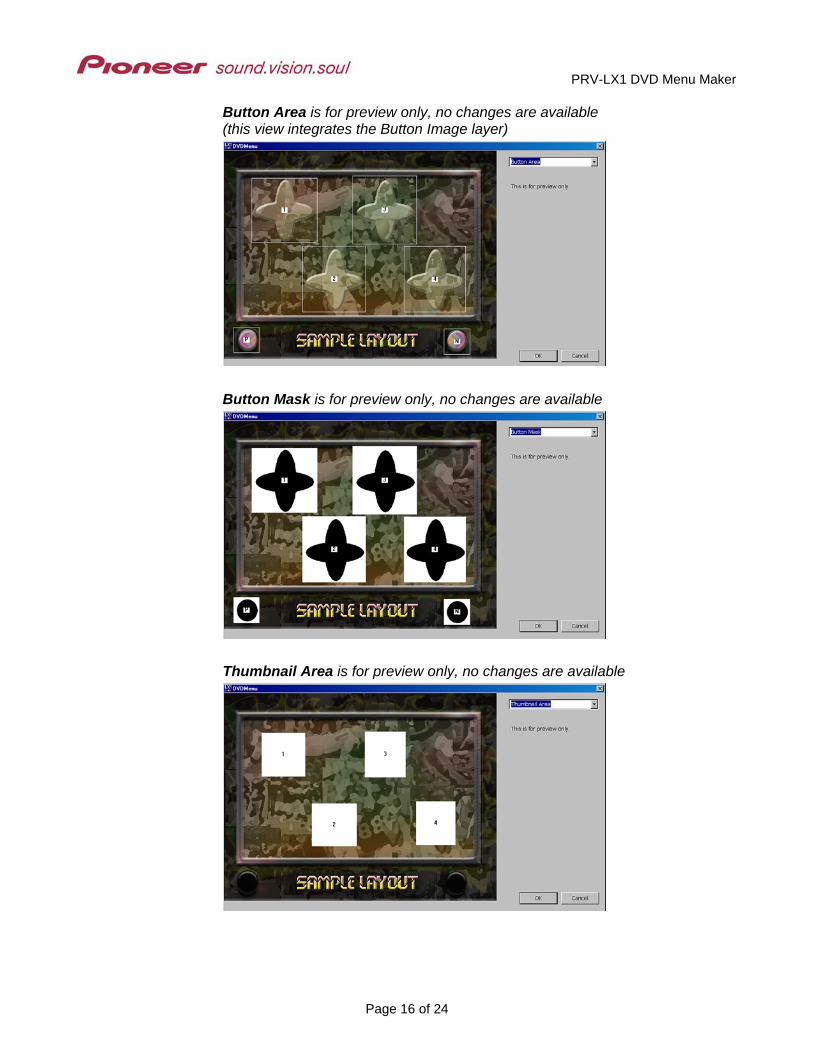
• Thumbnail Mask –active dimensions and order of each thumbnail (preview only, no changes are available)
• Button Action – provides ability to reassign menu advancement and flow
• Text – allows the menu text color and font size to be changed. Button and disc title text is NOT entered though this window (refer to the operating instructions, DVD Menu section, for instructions on how to add a disc title or button labels/text)
Page 14 of 24
PRV-LX1 DVD Menu Maker
Note: Clicking on the OK button saves the file but also closes the application. Once the application is closed, no further modifications are allowed.
Background is for preview only, no changes are available
Subpicture (Highlight Area) is for preview only, no changes are available
Color Table provides color change options
Note: Choose a color block from the right side of the window to change a highlight (select, active) color. The numbers in the lower right section represent degrees of transparency (range from 0 to 15).
Page 15 of 24
PRV-LX1 DVD Menu Maker
Button Area is for preview only, no changes are available (this view integrates the Button Image layer)
Button Mask is for preview only, no changes are available
Thumbnail Area is for preview only, no changes are available
Page 16 of 24
PRV-LX1 DVD Menu Maker
Thumbnail Mask is for preview only, no changes are available
Button Action allows directional and button advancement order changes
Text allows changes to the Disc Title and/or Button fonts when using labels generated from the PRV-LX1 Function Menu
Page 17 of 24
PRV-LX1 DVD Menu Maker
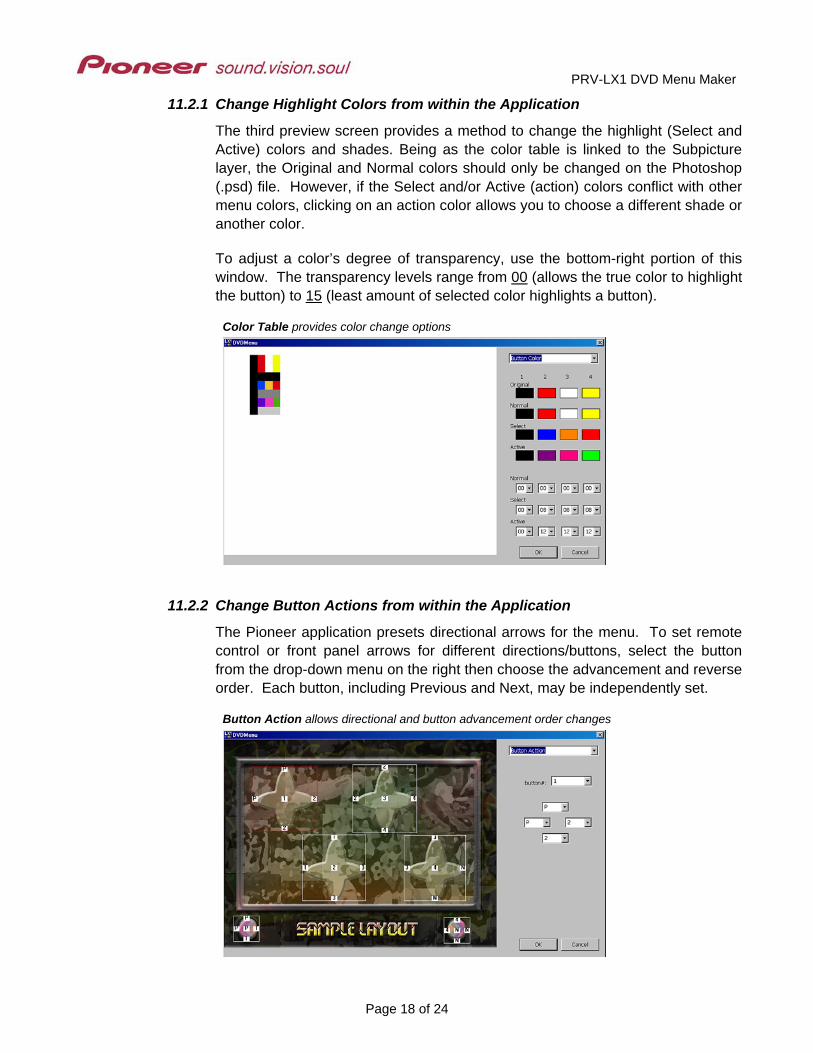
11.2.1 Change Highlight Colors from within the Application
The third preview screen provides a method to change the highlight (Select and Active) colors and shades. Being as the color table is linked to the Subpicture layer, the Original and Normal colors should only be changed on the Photoshop (.psd) file. However, if the Select and/or Active (action) colors conflict with other menu colors, clicking on an action color allows you to choose a different shade or another color.
To adjust a color’s degree of transparency, use the bottom-right portion of this window. The transparency levels range from 00 (allows the true color to highlight the button) to 15 (least amount of selected color highlights a button).
Color Table provides color change options
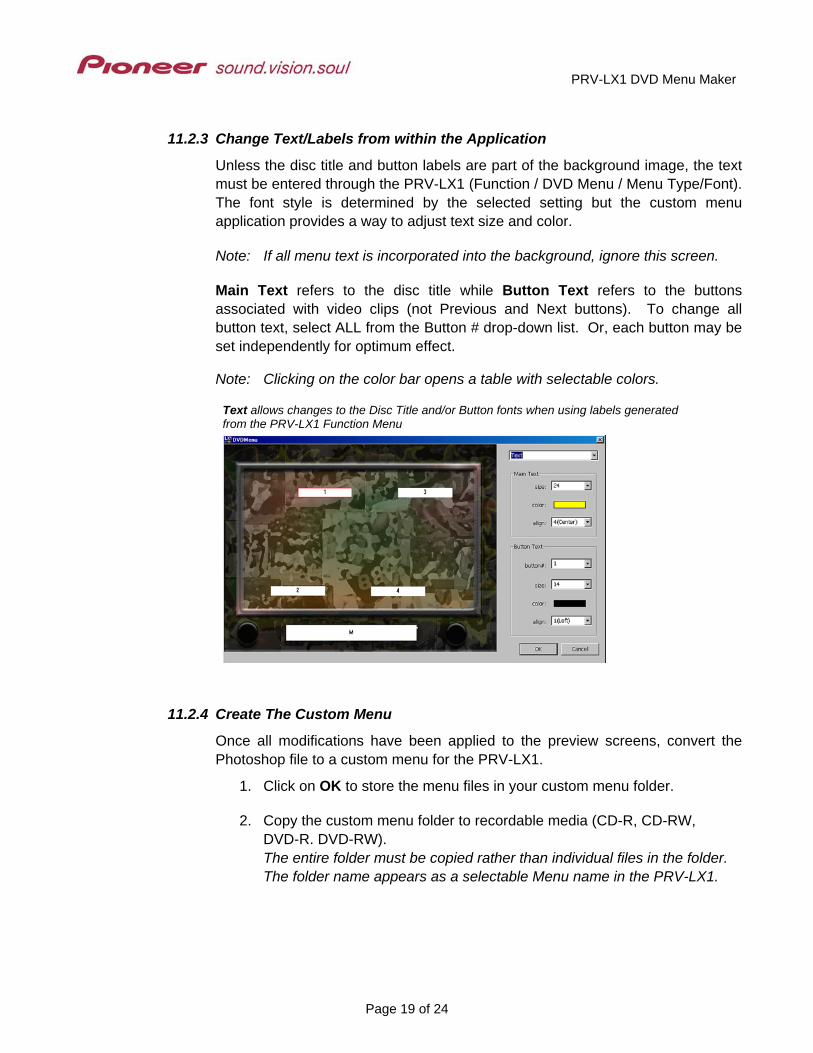
11.2.2 Change Button Actions from within the Application
The Pioneer application presets directional arrows for the menu. To set remote control or front panel arrows for different directions/buttons, select the button from the drop-down menu on the right then choose the advancement and reverse order. Each button, including Previous and Next, may be independently set.
Button Action allows directional and button advancement order changes
Page 18 of 24
PRV-LX1 DVD Menu Maker
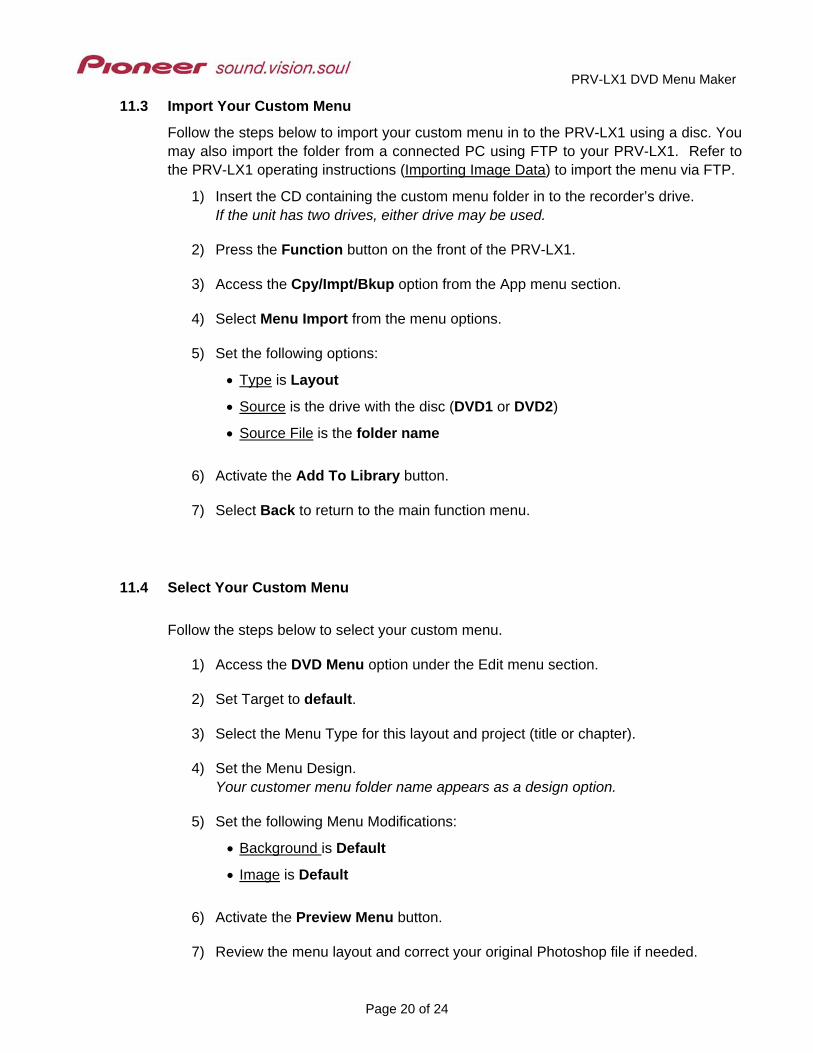
11.2.3 Change Text/Labels from within the Application
Unless the disc title and button labels are part of the background image, the text must be entered through the PRV-LX1 (Function / DVD Menu / Menu Type/Font). The font style is determined by the selected setting but the custom menu application provides a way to adjust text size and color.
Note: If all menu text is incorporated into the background, ignore this screen.
Main Text refers to the disc title while Button Text refers to the buttons associated with video clips (not Previous and Next buttons). To change all button text, select ALL from the Button # drop-down list. Or, each button may be set independently for optimum effect.
Note: Clicking on the color bar opens a table with selectable colors.
Text allows changes to the Disc Title and/or Button fonts when using labels generated from the PRV-LX1 Function Menu
11.2.4 Create The Custom Menu
Once all modifications have been applied to the preview screens, convert the Photoshop file to a custom menu for the PRV-LX1.
1. Click on OK to store the menu files in your custom menu folder.
2. Copy the custom menu folder to recordable media (CD-R, CD-RW, DVD-R. DVD-RW). The entire folder must be copied rather than individual files in the folder. The folder name appears as a selectable Menu name in the PRV-LX1.
Page 19 of 24
PRV-LX1 DVD Menu Maker
11.3 Import Your Custom Menu
Follow the steps below to import your custom menu in to the PRV-LX1 using a disc. You may also import the folder from a connected PC using FTP to your PRV-LX1. Refer to the PRV-LX1 operating instructions (Importing Image Data) to import the menu via FTP.
1) Insert the CD containing the custom menu folder in to the recorder’s drive. If the unit has two drives, either drive may be used.
2) Press the Function button on the front of the PRV-LX1.
3) Access the Cpy/Impt/Bkup option from the App menu section.
4) Select Menu Import from the menu options.
5) Set the following options:
• Type is Layout
• Source is the drive with the disc (DVD1 or DVD2)
• Source File is the folder name
6) Activate the Add To Library button.
7) Select Back to return to the main function menu.
11.4 Select Your Custom Menu
Follow the steps below to select your custom menu.
1) Access the DVD Menu option under the Edit menu section.
2) Set Target to default.
3) Select the Menu Type for this layout and project (title or chapter).
4) Set the Menu Design. Your customer menu folder name appears as a design option.
5) Set the following Menu Modifications:
• Background is Default
• Image is Default
6) Activate the Preview Menu button.
7) Review the menu layout and correct your original Photoshop file if needed.
Page 20 of 24
PRV-LX1 DVD Menu Maker
12.0 HELPFUL HINTS This final section deals with common issues you may experience when creating custom menu designs. As you build button layouts, refer to this section for hints or further clarification.
• PRV-LX1 DVD Menu Maker will not launch (open) on my computer 1 – Verify that the free Quick Time 6 player (from Apple) is installed on your computer. 2 – Confirm that Picture Viewer and File Converter are included in the installation.
• Highlight colors are not appearing in the right place 1 – Review the Highlight Area (Subpicture) and Button Mask layers for proper alignment. 2 – Verify that the color table layer is the top layer in the stack. 3 – Check that the highlight colors within the PRV-LX1’s Function menu are set to Auto. If the highlights are still incorrect, manually set your Select and Activate colors through the Function menu/DVD Menu (under Edit)/Menu Modification color selection options.
• Text characters are being cut off (top, bottom, or sides) 1 – Check that the text boxes (Text layer) are large enough to accommodate your fonts. 2 – Adjust the font size to work within a smaller space.
• Thumbnail images are not filling the buttons 1 – Adjust the color blocks on the Thumbnail Area layer. 2 – Decrease the size of the thumbnail shapes on the Thumbnail Mask layer.
• Thumbnails are not showing on the menu 1 – Check the stacking order of the layers. 2 – Confirm that the color blocks on the Thumbnail Area layer are accurate.
• Thumbnail images are too big/small when compared with the buttons 1 – Adjust the shapes within the Thumbnail Mask layer to fit the buttons. 2 – Create larger buttons to encompass the thumbnail images. 3 – Modify the shapes for a cleaner, more defined look.
• Squares (solid or outlined) show around each thumbnail image on the menu 1 – Check the stacking order of the layers. 2 – Refill the area around the shapes on the Thumbnail Mask layer with Black (0,0,0).
• Buttons and/or thumbnails are not centered to each other 1 – Adjust the Button Area-Image-Mask layers to align with the Thumbnail layers. 2 – Adjust the Thumbnail Area-Mask layers to align with the Button layers.
• Some or all buttons are not showing on the menu 1 – Check the stacking order of the layers. 2 – Confirm that the color blocks on the Button Area layer are accurate. 3 – Verify that the Button Image layer is built upon a copy of the Background layer.
Page 21 of 24
PRV-LX1 DVD Menu Maker
• Highlights are not showing on the Previous/Next buttons 1 – Verify that Previous/Next buttons are part of the Highlight Area (Subpicture) layer. 2 – Check that the Previous/Next button shapes are included on the Button Image layer.
• Button text/labels are missing 1 – Enter the text through the PRV-LX1 Function menu/DVD Menu option. 2 – Add button labels to the background if there will be only a single DVD menu page
• Custom menu or button images are truncated or cut off 1 – Confirm that the full menu image size is 720 pixels (W) x 480 pixels (H). 2 – Verify that empty areas in each layer are filled appropriately, with Black or White.
• Thumbnail images are always the first frame from each clip or show as black 1 – Check that the Thumbnail Area and Thumbnail Mask layers align properly. 2 – A thumbnail defaults as a clip’s first frame but can be changed through the Function menu. Refer to the operating instructions for capturing a frame to represent a thumbnail.
• Application window disappears after clicking on OK (the program closes) 1 – If no modifications are required continue with copying the folder to disc. 2 – All modifications have been incorporated into the menu files and the custom menu folder is ready to copy to disc for importation to the PRV-LX1. 3 – Re-launch the menu application and start again if the application was closed in error.
Page 22 of 24
PRV-LX1 DVD Menu Maker
Files may be downloaded from the Business Products Support section of the Pioneer website (under the Service & Support tab). Select the DVD Players & Recorders option then choose PRV-LX1. Manuals are under Documents and free applications are under Utilities on the Support page: http://www.pioneerelectronics.com/pna/links/list/0,,2076_4247,00.html.
Additional product information is available from the main Pioneer website: www.pioneerelectronics.com
For help with this procedure or other PRV-LX1 questions please contact a Pioneer Service technician (800) 421–1613, sales & technical staff ([CA] 310-952-2000 or [NJ] 201-327-6400) or send an email summarizing the situation to mailto:[email protected]