M FACSIMILE OPERATION MANUAL 1. INSTALLATION 2. INITIAL SETTINGS 3. PRINTING SETUP 4. BASIC OPERATIONS 5. ANSWERING MACHINE HOOK-UP 6. SPECIAL FUNCTIONS 7. OPTIONAL SETTINGS 8. PRINTING OUT REPORTS AND LISTS 9. MAINTENANCE 10. TROUBLESHOOTING SPECIFICATIONS QUICK REFERENCE GUIDE INDEX
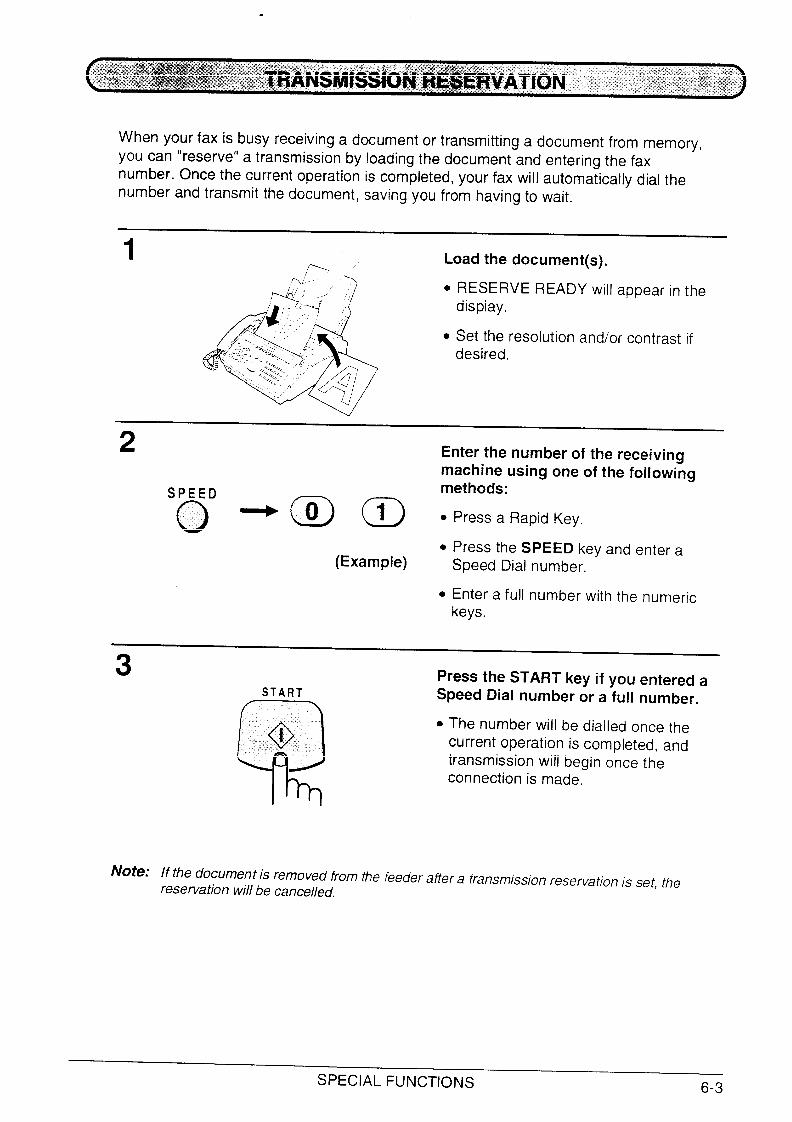
Transcript
MFACSIMILE
OPERATION MANUAL
1. INSTALLATION
2. INITIAL SETTINGS
3. PRINTING SETUP
4. BASIC OPERATIONS
5. ANSWERING MACHINE HOOK-UP
6. SPECIAL FUNCTIONS
7. OPTIONAL SETTINGS
8. PRINTING OUT REPORTS AND LISTS
9. MAINTENANCE
10. TROUBLESHOOTING
SPECIFICATIONS
QUICK REFERENCE GUIDE
INDEX
WARNING — AUSTEL Regulations state that no unauthorised changes or modifications to thisequipment are permitted.
Note: Complies with the AUSTEL standards TS 002-1990 regarding Emission of Electro-magnetic interference.
These limits are designed to provide reasonable protection against interference in aninstallation. This equipment generates, uses and can radiate radio frequency energy and, ifnot installed and used in accordance with the instructions, may cause interference. However,there is no guarantee that interference will not occur in a particular installation. If thisequipment does cause interference to radio or television reception, which can be determinedby turning the equipment off and on, the user is encouraged to try to correct the interferenceby one or more of the following measures:
— Reorient or relocate the receiving antenna.
— Increase the separation between the equipment and the receiver.
— Connect the equipment into an outlet on a circuit different from that to which the receiveris connected.
— Consult the dealer or an experienced radio/TV technician for help.
FOR YOUR RECORDS
Please record the model number and serial number below, for easy reference, incase of loss or theft. These numbers are located on the rear side of the unit.Space is also provided for other relevant information.
Model Number
Serial Number
Date of Purchase
Place of Purchase
‘. .
.\
Welcome to the F-2700M, arid thank you for choosing Sharp!
The F-2700M is a combination facsimile and laser printer. In addition to a full range offax functions designed to increase the scope and power of your communications, theF-2700M features fast, high-quality printing of documents created with your computersoftware applications.
All printing functions are controlled from easy-to-use graphical controls on yourcomputer screen. All fax and copying functions are controlled from the operation panelof the F-2700M. Faxes can be sent while printing is in progress, and if a fax isreceived during a printing job, it will be printed immediately, after which the printing jobwill resume.
This manual gives you instructions for installing the F-2700M, installing the printersoftware in your computer, and performing fax and copying operations. For detailedinformation about printing functions, see the Help file on your computer screen whichis included in your printer software.
The F-2700M is designed to operate in Australia and New Zealand only.
If YOUhave any questions or problems which cannot be solved by reading this manual,please contact your Sharp dealer.
Trademarkacknowledgements
Microsoft, Windows, MS-DOS, Windows NT, Windows 95, and Windows PrintingSystem are trademarks of Microsoft Corporation in the U.S.A. and other countries.
TrueType is a trademark of Apple Computer, Inc.
IBM, PC/AT, and 0S/2 are trademarks of International Business MachinesCorporation.
Hewlett-Packard, HP, LaserJet, and PCL are trademarks of Hewlett-PackardCompany.
All other trademarks and copyrights are the property of their respective owners.
+ Importantsafety information
●
●
●
●
●
●
Never install telephone wiring during a lightning storm.
Never install telephone jacks in wet locations unless the jack is specifically designed forwet locations.
Never touch uninsulated telephone wires or terminals unless the telephone line hasbeen disconnected at the network interface.
Installing or modifying telephone lines should only be done by an Austel licensedserviceman.
Do not use a telephone to report a gas leak in the vicinity of the leak.
Your fax machine and the telephone system
The Austel Registration Number and Ringer Equivalence Number (REN) for thisequipment are shown on the label on the back of the machine. The telephonecompany may require these numbers.
The sum of all Ringer Equivalence Numbers on your telephone line should be three orless in order to assure proper service from the telephone company.
For your safety, if any of your equipment is not operating properly or should anyphysical damage occur to the equipment where internal parts may become exposed,the equipment should be immediately disconnected from the phone line and then thepower line and returned to a SHARP authorised Service Centre for inspection, repair,or disposal.
Take the fax machine out of the box carefully, and remove all packing material. Makesure you have all the items listed below. If any are missing, contact your dealer.
Original document
‘up’”” -Received documentsupport
Paper tray cover
o
Paper tray
*.
H//’
/“
Rapid key labelsImaging cartridge
I =Warran’card
& minstal,ationrBusiness products dealer
\*
Operation manual-.
.
Handset lead
‘andSet %
Drum cartridge/@WPS Driver
software v
+ In addition to the above items, you should have an F080TP adaptor (fax line cord).This is supplied separately by your dealer.
Precautionsbefore setting up
The printing unit in the fax generates a small amount of ozone during operation. Theamount is not large enough to be harmful; however, the fax should only be installedin a well-ventilated room.
The fax must be installed on a level surface.
Keep the fax away from air conditioners, heaters, direct sunlight, and dust.
Provide easy access to the front, back, and sides of the fax. In particular, keep thearea in front of the fax clear, or the original document may jam as it comes out afterscanning.
Keep liquids away from the fax. Liquids spilled on the fax can damage the internalcircuitry.
If the fax is moved from a cold to a warm place, it is possible that condensation mayform on the reading glass, preventing proper scanning of documents fortransmission. To remove the condensation, turn on the power and waitapproximately 2 hours before using the fax.
INSTALLATION 1-1
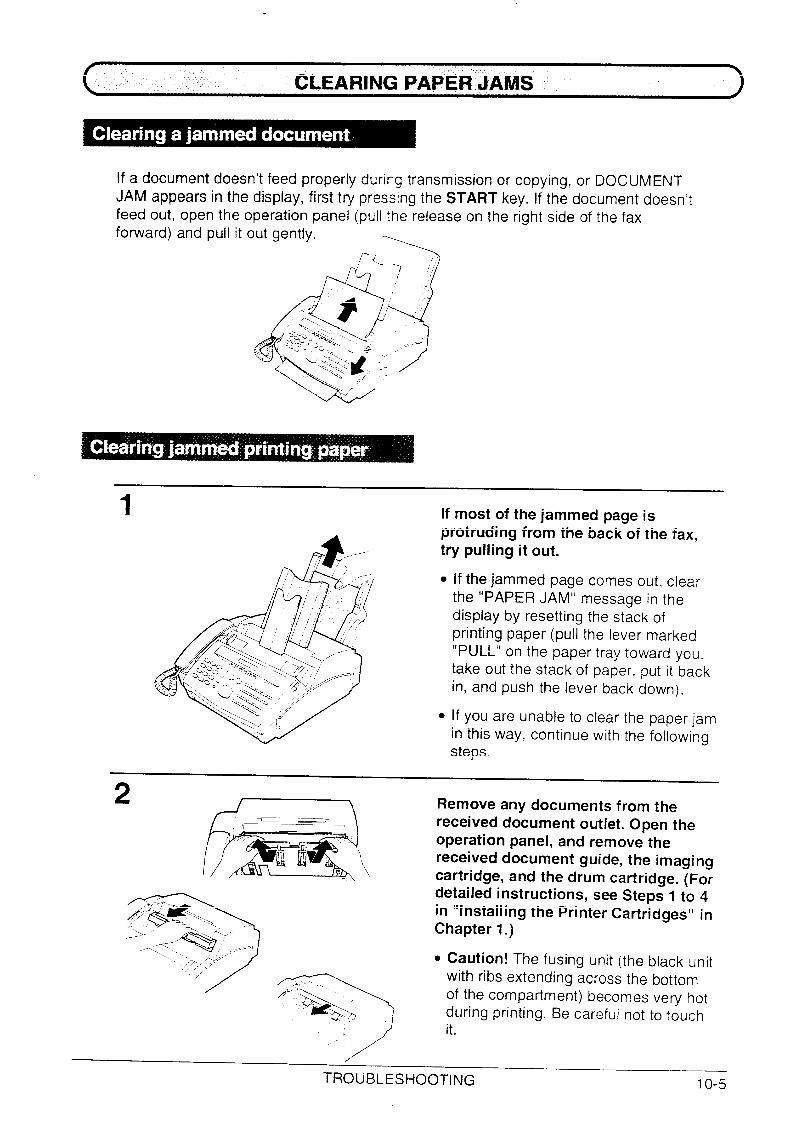
The laser printer in your fax creates printed text and images by applying toner to thepage with a photoconductive drum. Follow the steps below to install or replace theimaging cartridge (which contains the toner) and the drum cartridge.
2 Grasp the top of the receiveddocument guide and pull it so that itrotates toward you. Lift the guidestraight up and out of the printingcompartment.
● If you are installing the cartridges forthe first time, go to Step 5.
3 If you are replacing the cartridges,grasp the finger hold on the imagingcartridge handle (marked “PUSH”)and pull the handle out. Rehold thehandle, and pull the imaging cartridgeout of the compartment.
●
●
●
Caution! The fusing unit (the black unitwith ribs extending across the bottomof the compartment) becomes very hotduring printing. Be careful not to touchit.
If you are only replacing the drumcartridge, place the imaging cartridgeon a piece of paper on a horizontalsurface. Make sure that the cartridgelies flat.
If you are only replacing the imagingcartridge, go to Step 8.
1-2 INSTALLATION
‘\ .
.
INSTALLING THE PRINTER CARTRIDGES
4 Grasp the two finger holds onsection of the drum cartridge,it out of the compartment.
/
the blueand pull
5 Unfold the end of the drum cafiridgebag, and remove the new drumcartridge.
●
●
Do not use a sharp object to cut thebag.
Do not remove the sheet of blackprotective paper yet.
6 Grasp the two finger holds on the bluesection of the drum cartridge, andinsert it into the compartment. Makesure it fits into place on top of the
:::;;::::ottom of the.
● if you have removed a used drumcartridge, place it in the empty drumcatiridge bag, seal the bag, anddispose of it in a way that conforms toany local regulations that may exist inyour area.
7 Grasp the protruding end of theprotective paper, and pull the paperout of the cartridge.
● Be sure not to leave any pieces of tornpaper in the printing compatiment.
. If you are not replacing the imagingcartridge, go to Step 10.
INSTALLATION 1-3
INSTALLING THE PRINTER CARTRIDGES
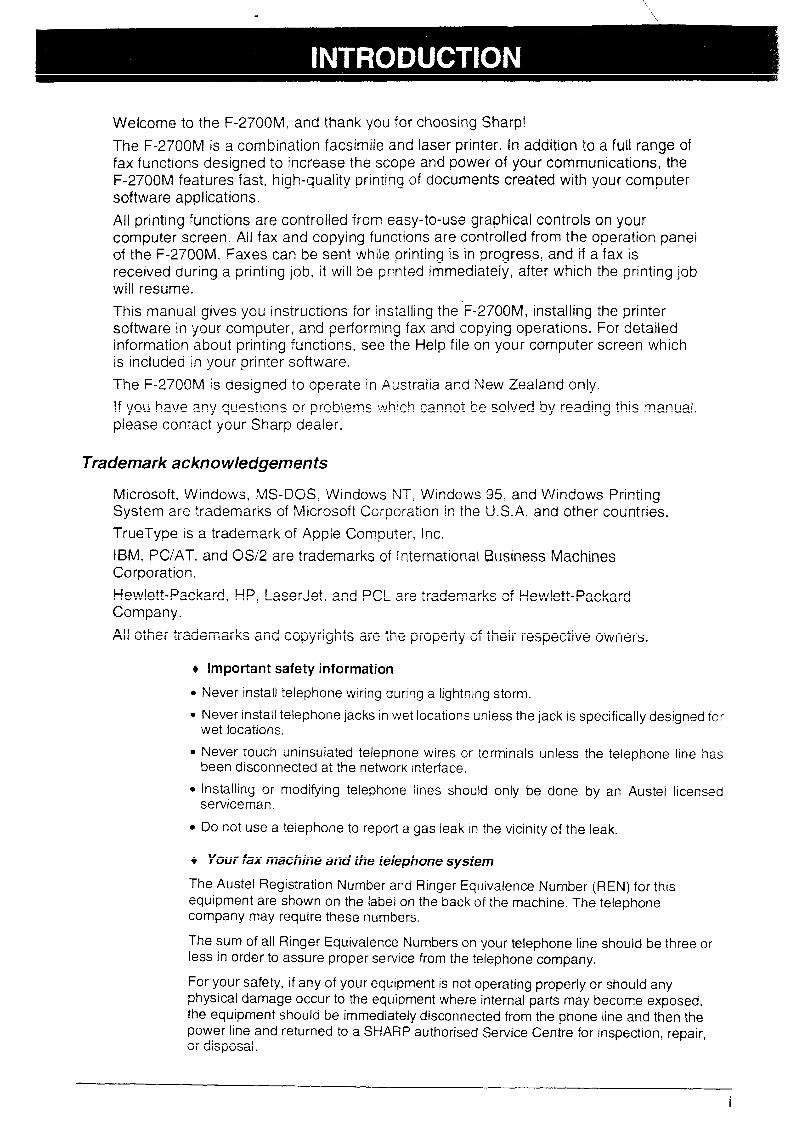
8 Remove the imaging cartridge from its
*+
n * bag, and shake it 4 or 5 times in a,/ ““”% horizontal direction.
/’.-’ # “~ ● This ensures that the toner is well~
/“ /’” distributed inside the cartridge./
9 Remove the white cover.
● Remove the white cover and pull outthe black rubber strip which is attachedto the white cover
10 Grasp the handle of the imagingcartridge so that the stampedmarkings are facing upwards, andinseti the cartridge into the printingcompartment.
11 Place your thumb on the centre of thehandle where it is marked “PUSH”,and push the handle slightly up and inso that the cartridge fits into place.
● If you have removed a used imagingcartridge, place it in the empty imagingcartridge bag, seal the bag, anddispose of it in a way that conforms toany local regulations that may exist inyour area.
12 Hold the received document guidevertically, and insert it into itscompartment so that the tabs on eachside of the guide go into the slots onthe sides of the compartment.
1-4 INSTALLATION
INSTALLING THE PRINTER CARTRIDGES
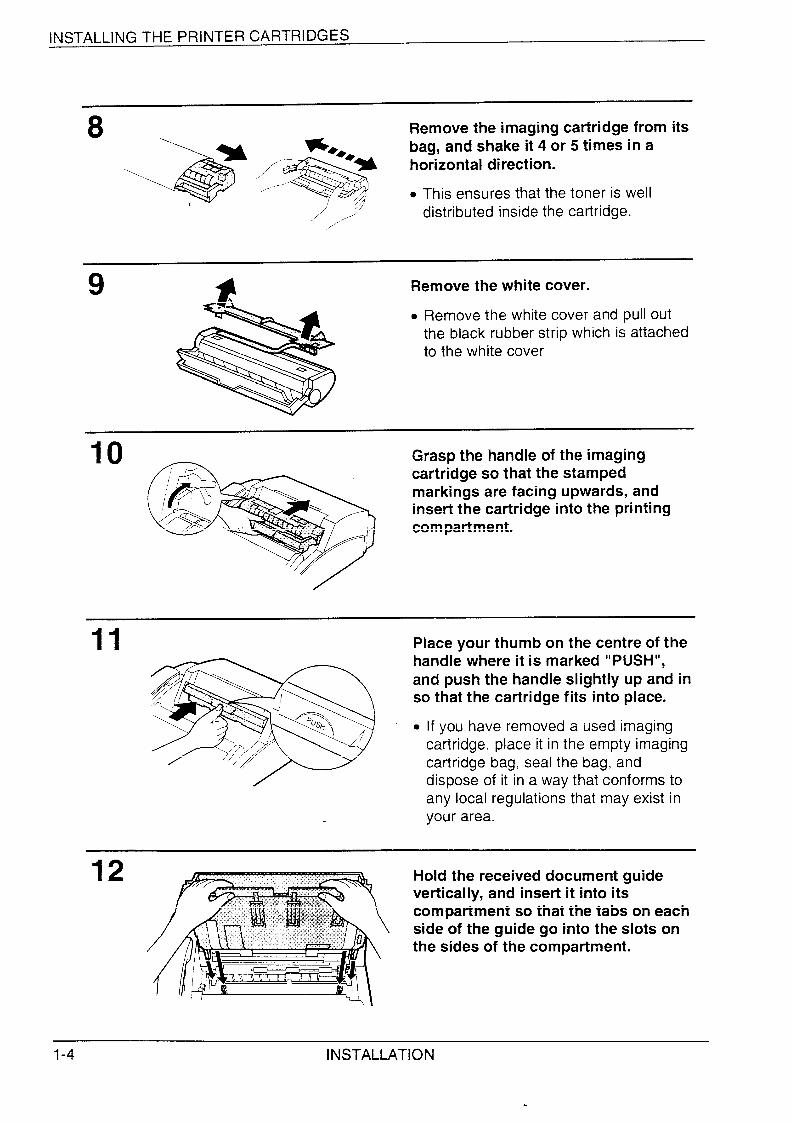
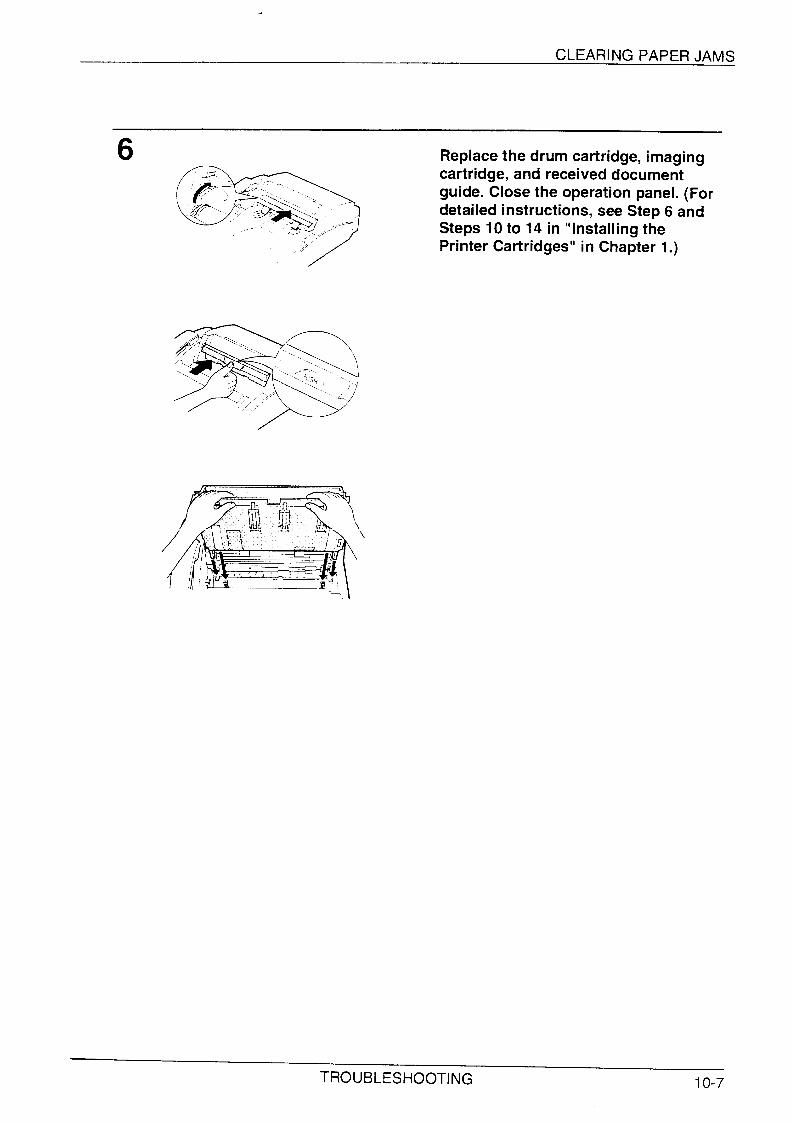
13 Make sure that the received documentguide is positioned so that the arm onthe left side of the guide will go intothe hole. Place your thumbs on bothsides of the guide where it is marked“PUSH”, and push the guide forwarduntil it fits into place.
14/
Close the operation panel.
Replacing the cartridges
Your fax uses the following imaging cartridge and drum cartridge. These can beobtained from your dealer or retailer.
FO-26DC IMAGING CARTRIDGE
FO-26DR DRUM CARTRIDGE
The imaging cartridge is capable of printing approximately 2000 pages if A4 sizepaper is used and 470 of each page is covered wit! toner. When the cartridge nearsempty (about 250 pages can still be printed), the ~ indicator on the operation panelwill begin to blink. When the cartridge is empty, the indicator will light steadily andTONER EMPTY will appear in the display. Replace the cartridge as described above.
To assure printing quality, we recommend that you replace the drum cartridge after20,000 pages have been printed. YOU can check the total number of pages printed inthe display by pressing the FUNCTION key and then the “#” key.
Connect the handset lead to thehandset and the fax as shown.
o The ends of the handset lead areidentical, so they will go into eithersocket.
Place the handset
Use the handset to make ordinaryphone calls, or to transmit andreceive documents manually.
on the handset rest.
%
u
For Australia
For New Zealand
Plug the power lead into a50 Hz, grounded (3-prong)
Press the power switch topower.
230-240 V,AC outlet.
turn on the
. Caution: When disconnecting theF-2700M, unplug the telephone linecord before unplugging the power lead.
Insert the small modular plug whichterminates the F080TP adaptor linecord into the socket on the side of thefax marked “TEL. LINE”. Plug theF080TP adaptor into the telephonesocket on the wall.
* Be sure to plug the line cord into theTEL. LINE socket on the fax. Do notplug it into the TEL. SET socket,
1-6 INSTALLATION
.
ASSEMBLY AND CONNECTIONS
Comments:
●
●
●
Your fax is set for tone diailing. If you are on a pulse only dial line, you must reset it for pulsedialling by changing Option Setting 16. Thisprocedure is describedin Chapter 7, “OptionalSettings”.
if you intend to use a computer fax modem on the same phone line, you must reset OptionSetting 10 to OFFin order to prevent transmission and reception errors. This procedure isdescribedin Chapter 7, “Optional Settings
If your area experiences a high incidence of lightning or power surges, we recommend thatyou install surge protectors for the power and telephone lines. Surge protectors can bepurchased from your dealer or at most telephone specialty stores.
WARNING NOTICE: For all units installed in New Zealand, only the T setting for tone dialling ispermitted. The P setting for pulse dialling does not operate properly and must not be used.
Moving your fax and reconnecting
Should it be necessary to move your fax to a new location, first disconnect thetelephone line cord before disconnecting the power lead. When reconnecting, it isnecessary to connect the power lead before connecting the telephone line cord.
Adjust the volume of the speaker for on-hook dialling as follows:
1 SPEAKERFUNCTION Press the FUNCTION key and then the
( o SPEAKER key.
2 m or o* Press the “#” key to turn the volumeup, or the “*” key to turn it down.
3 START
o0I
Press the START key.
To adjust the volume of the ringer, reset Option Setting 19 as described in Chapter 7,“Optional Settings”. (Note that the volume of the handset receiver is adjustedautomatically.)
INSTALMTlON 1-7
ASSEMBLY AND CONNECTIONS
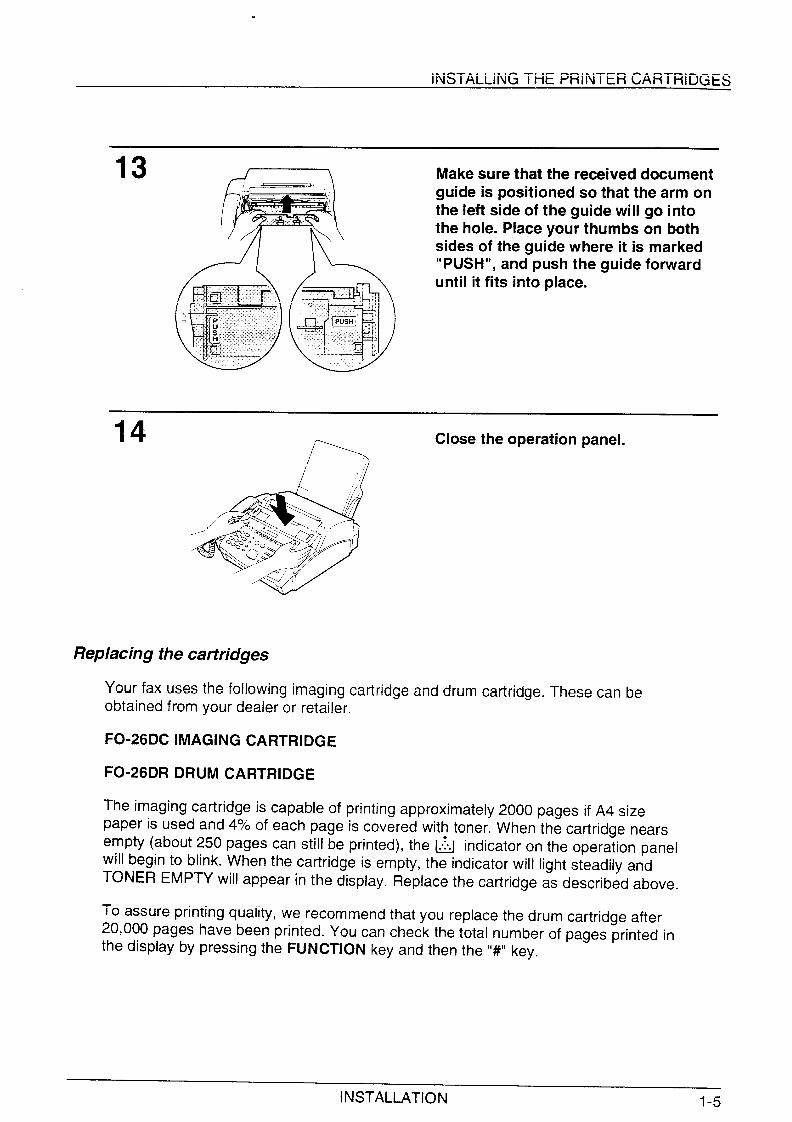
Attach the paper tray by inserting thetabs into the holes at the rear of thefax.
Place the paper cover on the papertray so that the notches on each sideof the cover fit onto the catches oneach side of the tray.
Attach the original document supportand the received document support tothe top of the fax as shown.
1-8 INSTALLATION
ASSEMBLY AND CONNECTIONS
if desired, you can connect either an answering machine or an extension phone toyour fax.
Connecting an answering machine to the fax will allow you to receive both voice andfax messages on the same line while you are out. For details on using this feature,see Chapter 5.
You can connect an extension phone to the fax to make and receive calls like anyother extension phone on your line. For details on receiving faxes from an extensionphone, see “Receiving Documents” in Chapter 4.
Insert one end of the answeringmachine or extension phone lineeither into the socket on the back sideof the F080TP adaptor, or into thesocket marked “TEL. SET” on the fax(first remove the seal from the socket).
or
Important:If you are connecting ananswering machine, make sure the lineplug is insertedinto the answeringmachine’stelephone line socket, not itstelephonesocket.
Important:
● In New Zealand, not all standard telephones and answering machines will respondto incoming ringing when connected to the extension socket of the equipment.
INSTALLATION 1-9
,-. ,... ~ ,CONNECTINGTHE INTERFACECABLE
To use your fax as a printer, you must connect it to your computer with a properparallel interface cable. The cable can be purchased from your dealer (it is notprovided with your fax).
The cable connector must be a female 36-pin DDK 57LE-40360-730B (D29)connector or equivalent.
The cable should be a high-quality shielded cable which is IEEE-1284 compliant,and it should be less than 3 meters long.
Follow the steps below to connect the cable.
1 Make sure that the power switches ofboth the computer and the fax areturned off.
2~,
Plug the cable into the parallel
a%
interface port on the rear side offax.
%
B
\q ~
your
3 Fasten the bail clips at each end ofthe parallel interface port over theends of the cable connector to holdthe connector in place.r ‘.:.\,“\ \, ~,
‘ ,.
*
ql ,,, ‘“=-Ky. .\-
k “,A
4 Plug the other end of the cable intothe parallel interFace port on yourcomputer. (See your computer manualfor details.)
Note: The F-2700hhsends and receives data bidirectionally athigh speed. Some switchboxes cannot suppoti high-speed, bidirectional transfer of data, and using them maycause printing errors to occur.
1-10 INSTALLATION
‘,-\‘\
.
LOADINGPRINTINGPAPER
The paper tray holds the paper on which received documents and copies are printed.Up to 100 sheets of A4 size paper from 60 to 90 glm2 can be loaded in the tray.
Comments:
●
●
●
Plain paper has a ‘print” side which should be used to obtain the bestprint quality. me printside is not visible to the naked eye, so check the label on the end of the package beforeremoving the paper. The print side will be indicated by an arrow,,symbol, or wording. Loadthe paper in the tray print side up as described below.
Best printing results can be obtained from using clean, unused paper. We do not recommendthat you use paper that has already been printed on one side, as print quality problems orpaper jams may result. Some photocopier machines use toner that fuses at a lowertemperature than that used in your printer. If you run these through the printer, the tonerwhich is already on the paper may fuse onto the roller in the fusing unit.
Some pre-printed sheets also use inks or coatings that maybe atiected by the heat from thefusing unit. If possible, check with the suppiierbefore using such papers. Moreover, printquality cannot be guaranteed for paper with a particularly rough texture or embossing.
1 Remove the paper tray cover.
2 Fan the paper, and then tap the edgeagainst a flat surface to even thestack.
3 Pull the lever on the right side of thepaper tray (marked “PULL”) towardyou.
A i!
INSTALLATION 1-11
4 Insert the paper into the tray, printside up.
5 // Make sure that the right edge of thepaper is aligned against the rightpaper guide, and then move the leftpaper guide until it fits into theposition marked “A4”.
. To move the guide, pinch the leveragainst the guide.
6 Push the lever on the right side of thepaper tray down to set the paper.
7 Replace the paper tray cover.
Note: When adding paper to the paper tray, you must first take outanyremaining paper,combine it into one stack with the new paper, and then put the stack in the tray. If youdo not remove the remaining paper and simply place new paper on top of it, doublefeeding may result.
1-12 INSTALLATION
.
Before you can begin using your fax, there are some settings which must be madeusing the keys on the operation panel. First take a moment to familiarize yourself withthe operation panel, and then make the settings as described on the following pages.
PAPERCHECK light RESOLUTIONkeyThis light comes on Press this key to adjust the
resolution and contrast BROADCASTkeywhen you are out of
before sending or copying Press this key to send apaper or when the paper a document document to a group ofsize setting is incorrect.
II
receiving fax machines.Toner empty indicator MEMORY keyThis blinks when the Press this key to scan a /imag~g cartridge-is-near document into memorythe end of its life, and before transmitting it.lights steadily when it /
must be replaced.
Service indicatorThis lights when aproblem occurs whichmust be fixed by aservice engineer.
(COPY keyPress thiskey to _ AUTO MANUAL ANS
make a 000
copy of adocument.
Display / SEARCH DIAL kevThis displays various
/
Press this key to sgarchmessages during ‘uNcTiON ‘ey for an automatic diallingoperation and Press this key to number
programming. select variousI special functions./
000000
Number keysUse these keys to dialnumbers, and enternumbers and lettersduring number/namestoring procedures.
HOLD keyPress this key to putthe other party on holdduring a telephoneconversation.
SPEAKER key /Press this key to dial anumber without pickingup the handset.
RED
, I I ! Jf 1 I I i \
\
RECEPTIONMODE kevPress this key to select -the mode of reception.
Receptionmode ~ightsOne of these lights willcome on to indicatewhich reception modehas been selected.
- STOP keyPress this key to stopoperations before theyare completed.
\ Rapid Dial KeysSTART key Press one of these keys toPress this key to dial a fax or voice numbersend or receive a automatically. (Note thatdocument. you must attach the Rapid
Key labels.)
SPEED keyPress this key to diala 2-digit Speed Dialnumber.
L kevPress this k;y toautomatically rediai thelast number dialled.
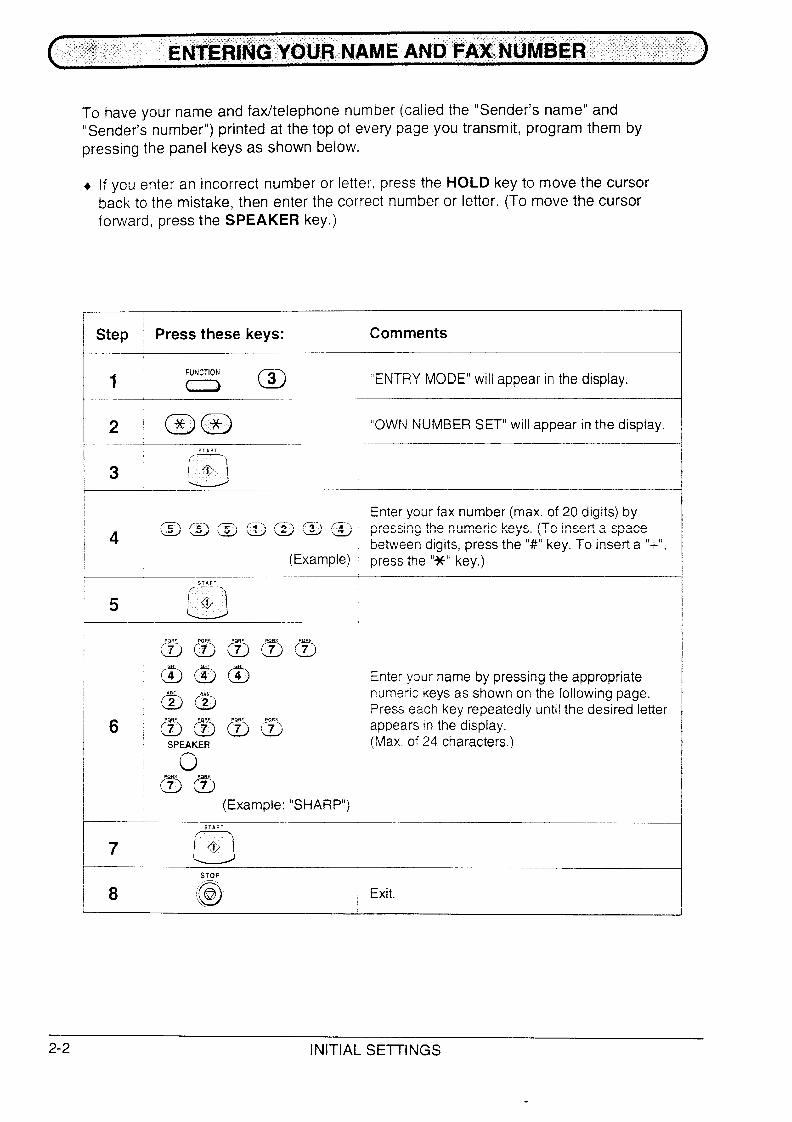
TO have your name and fatitelephone number (called the “Sender’s name” and“Sender’s number”) printed at the top of evew page YOUtransmit, program them bypressing the panel keys as shown below.
+ If you enter an incorrect number or letter press the HOLD key to move the cursorback to the mistake, then enter the correct number or letter. (To move the cursorforward, press the SPEAKER key.)
Step ~ Press these keys: Comments,
1FUNCTION( } m “ENTRYMODE” will appear in the display.
2 W@ “OWN NUMBER SET” will appear in the display.
START
3 0@
Enteryour fax number (max. of 20 digits) by
4 @ @ @ @ m @ @ Pressin9the numeric keYs.(To inse~ a sPacebetweendigits,press the “#” key. To insert a “+”,
(Example) press the “*” key.)
START
5 0@
55m55GH1 GH’ GH’
‘a @ @ Enter your name by pressing the appropriateABC ABC
am
numeric keys as shown on the following page.Press each key repeatedly until the desired letter
6 ,amaa appears in the display.SPEAKER (Max. of 24 characters.)
oBB
(Example: “SHARP”)
START
7 0@
STOP,/-
8 Q(@ Exit.
2-2 INITIAL SE~iNGS
“
ENTERINGLEITERS FOR NAMES - ,,,.,,,,-,+y,.~
Names are programmed by pressing Thenumeric keys. You will notice that letters areindicated above each of the number keys “2” through “9”. To enter a letter (ornumber), press the appropriate key one or more times until the letter appears in thedisplay (the number will appear first, foilowed by the letters in the order indicatedabove the key). The keys used for entering letters and editing are shown below.
Lettersand numbersTo enter a letter or number, pressthe appropriate key repeatedly until
Space the desired number/letter appearsPress this key twice to in the display (the number appearsenter a space. first. then the letters in the order
4
shown above the key).
I
Delete
letter highlighted by the cursor(if the cursor is to the right of
i6-rEY(3?i ‘ti;i~~~~~:~:~ast
~(7] CQ (9]j ‘~—.urs.r,e.-—---- 1 1-- ----
Symb’olsPress either key repeatedly untilthe desired symbol appears (seethe symbol list below).
Press this key to move thecursor to the left.
Cursor rightPress this key to move thecursor to the right.
Comments:
. To enter two letters in succession which require using the same key, press the SPEAKERkey once after entering the first letter, then enter the second letter.
To change one individual letter to another, move the cursor to that Ietterand enter thedesired letter. The new letter will simply replace the old one.
Symbol listTo enter a symbol from the list below, press the “#” key or the “*” key repeatedlyuntil the desired symbol appears.
I
INITIAL SETTINGS 2-3
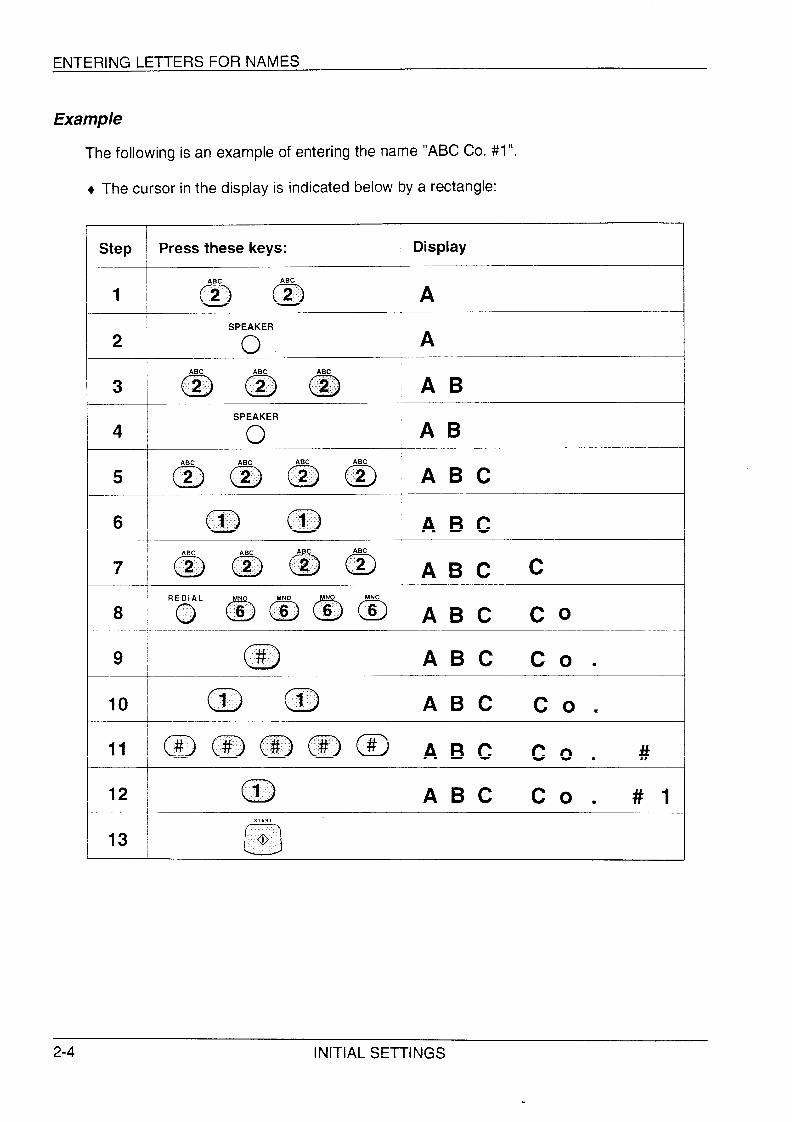
ENTERING LETTERS FOR NAMES
Example
The following is an example of entering the name “ABC Co. #l”.
+ The cursor in the display is indicated below by a rectangle:
I
Step ~ Press these keys: Display
I1
1 ~ A
21SPEAKER
o AABC ABC ABC
3 mB@ AB
ABC co .
ABC co.
ABC CO. #1
2-4 INITIAL SETTINGS
‘,,
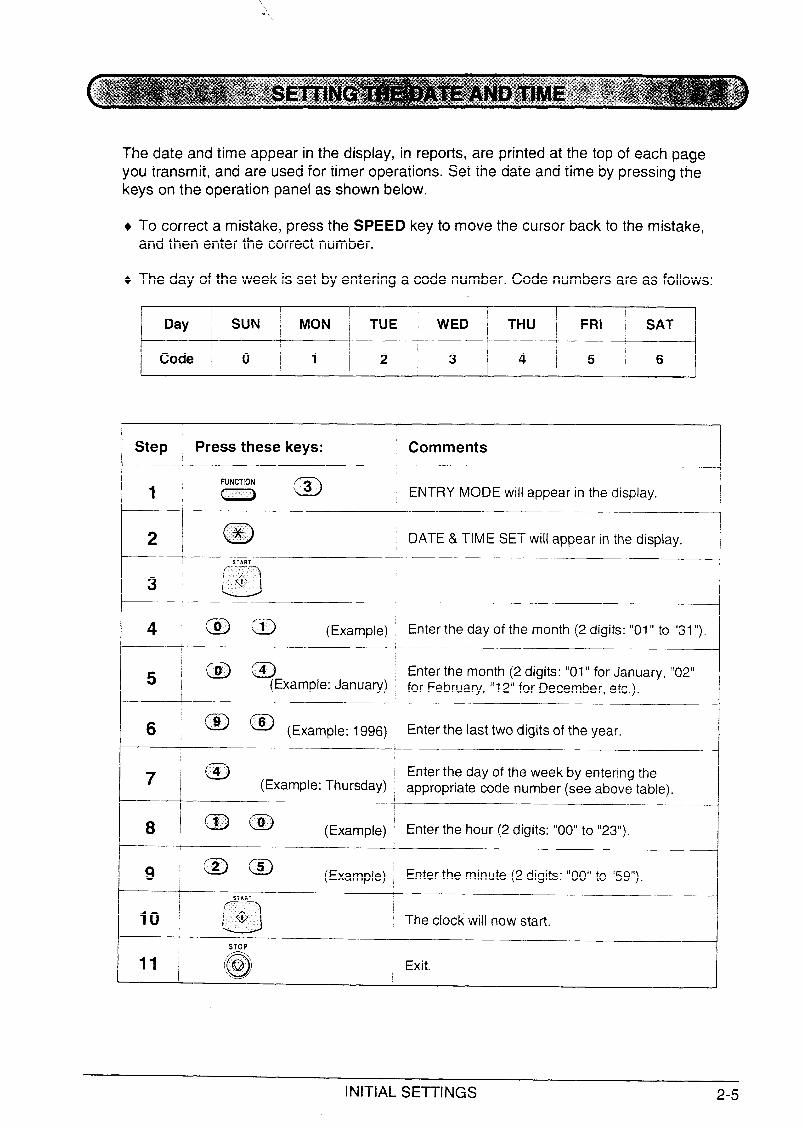
The date and time appear in the display, in reports, are printed at the top of each pageyou transmit, and are ”used for timer-operations. Set the dakeys on the operation panel as shown below.
+ To correct a mistake,
e and time by pressing th-e
press the SPEED key to move the cursor back to the mistake,and then enter the correct number.
+ The day of the week is set by entering a code number. Code numbers are as follows:
Step Press these keys: Comments
FUNCTION1 ( ) @ ENTRY MODE will appear in the display,
2~ @ I DATE& TIME SET will appear in the display.
(Example) Enter the day of the month (2 digits: “01” to “31“),
I
:~a5 , Enter the month (2 digits: “01” for January, “02”(Example:January) for February, “12” for December,etc.).
I
6 ~ @ a (Example: 1996) Enter the last two digits of the year,
7 ~ @ Enter the day of the week by entering the(Example: Thursday) appropriatecode number (see above table).
(Example) i Enter the hour (2 digits: “00” to “23”).,
(Example) ‘ Enter the minute (2 digits: “00” to “59”).I
START
10 ~ o@ ~The clock will now start.
~ Exit.
INITIAL SETTINGS 2-5
Your fax has three modes for receiving incoming calls and faxes:
MANUAL mode: This is the most convenient mode for receiving phone calls. You canalso receive faxes; however, all calls must first be answered by picking up the fax’shandset or an extension phone connected to the same line.
AUTO mode: Select this mode when you only want to receive faxes on your line. Thefax machine will automatically answer all calls and receive incoming faxes. AutomaticFax/Phone Changeover, a special function for receiving both faxes and voice calls,also operates in this mode.
ANS. mode: Select this mode when an answering machine is connected to the faxand you want the answering machine to answer all calls. This allows you to receiveboth voice messages and faxes while you are out.
Setting the reception mode
Press the RECEPTION MODE key untilthe light under the desired modecomes on.
AUTO MANUAL ANS.RE;;;:ON 000
)
‘h
o
For more information on receiving faxes in AUTO mode and MANUAL mode, see“Receiving Documents” in Chapter 4. For more information on using ANS. mode, seeChapter 5.
2-6 INITIAL SEnlNGS
.
If you subscribe to a distinctive ringing service from your telephone company, you willneed to reset Option Setting 17 to turn on the Distinctive Ringing function. When thisis done, your fax machine will signal voice calls by the normal ringing pattern, and faxtransmissions by a special ringing pattern. In the case of a fax transmission, your faxmachine will automatically answer the call after 2 rings and receive the fax. To resetOption Setting 17, see Chapter 7.
Important:
The Distinctive Ringing function can only be used if you subscribe to a distinctive ringingservice from your telephone company. Do not set Option Setting 17 to YES if you are on anormal line, as the fax machine will not operate properly.
If you turn on Distinctive Ringing, Automatic FatiPhone Changeover will turn offautomatically (Option Setting 6).
INITIAL SETTINGS 2-7
Automatic dialling is a quick and convenient way of dialling which is performed byeither pressing a Rapid Key (Rapid Key Dialling), or pressing the SPEED key andentering a 2-digit number (Speed Dialling). It can be used for both fax transmissionsand voice calls.
To use Automatic Dialling, you must first store the full number in your fax. The wayyou store it depends on whether you want to use it for Rapid Key Dialling or SpeedDialling:
Rapid Key Dialling: You assign a full fax number to a Rapid Key. You can alsostore a name, a voice number (dialled as described in “Making telephone calls” inChapter 3), and a back-up fax number which is automatically dialled if the first faxnumber is busy. 20 Rapid Keys are available.
Speed Dialling: You assign a full fax or voice number to a 2-digit Speed Dialnumber. You can also store a name. 30 Speed Dial numbers are available. (SpeedDial numbers are independent of Rapid Keys. )
Chain Dial/ing for long numbers
The maximum number of digits which may be entered when storing a telephone or faxnumber is 20. If you need to store a number which is longer than 20 digits, use ChainDialling.
Chain Dialling allows you to combine two or more automatic dialling numbers, or usean automatic diailing number followed by additional digits entered manually with thenumeric keys, to dial a single number. In addition to being convenient for storing longnumbers, it allows you to store an area code or access code as an automatic diallingnumber.
For example, to store a 36-digit number for automatic dialling, you would need tobreak it into two parts:
1.
2.
Store the first 20 digits into one Speed Dial number (“01”, for example) using thestoring procedure on the following page, and press “1” in Step 11 of that procedureto specify it as a Chain Dialling number (when dialling, this tells the machine to waitfor the remainder of the telephone number when you use the Speed Dial number“01 “).
Store the remaining 16 digits into a separate Speed Dial number (“02”, for example),and this time press “2” in Step 11 of the storing procedure to specify that it is not aChain Dial number (this tells the machine that the final part of the number has beendial led).
In this way, you specify all parts of the number except the last as Cha n Dial numbers.
Chain Dialling is+ The maximum number of digits which can be dialled at one time by50.
2-8 INITIAL SEITINGS
.
STORING NUMBERS FOR AUTOMATIC DIALLING
Comments:
● You may need to add a pause between ceflain digits in the number to allow time forconnection. For example, if you are on a PBX telephone system that requires an accessnumber to be diailed (such as “9’~ to access an outside line, you will need to enter a pausebetween the access number and the telephone/fax number of the other party. Pauses areentered by pressing the REDIAL key (2 seconds per pause). If necessary, severaipausescan be entered in a row.
● To enter letters for names or correct a mistake, see “Entering letters for names” in thischapter.
Step Press these keys: Comments
1 FUNC~ON1 {-2 @ ENTRY MODE will appear in the display.
I
FAX~EL # MODE will appear in the display.
3’ o SelectSET.
I!I L To store a Rapid Key number, press a Rapid
4: Key.I To store a Speed Dial number, press two1 (Example) , numeric keys (“01” to “30”).
5~cm ~ ~ ~ ~ ‘a m Enter the fax number (max. of 20 digits including
(Example) ‘ pauses) using the numeric keys.
;T ART
~ If you are storing a Speed Dial number, go toStep 9 after pressing START.
a ‘~ @ ‘~ ~ @ ~ i Enter a full voice number (max. of 20 digits),7’ : If you don’t want to enter a voice number, skip
(Example) , this step.,
START I
8~ 3f @ II
I1Enter the name of the location or party by
9~ @ @ @ .. . @ : pressing numeric keys as described in “Entering
: Letters for Names” in this chapter (max. of 20I characters). If you don’t want to enter a name,
(Example) ~ skip this step.
INITIAL SETTINGS 2-9
STORING NUMBERS FOR AUTOMATIC DIALLING
START
1
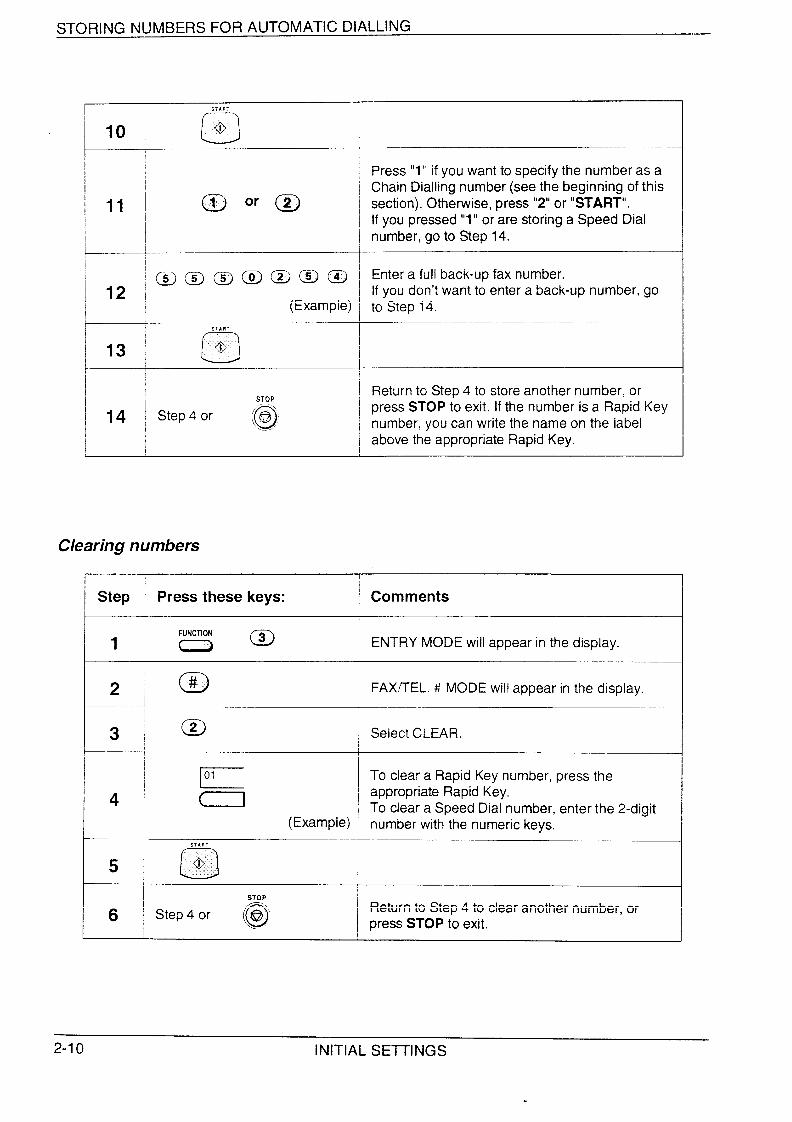
10 o@ !II
i ~ Press “l”if you want to specify the number as aI ~ Chain Dialling number (see the beginning of this
~ , ~ @ or @ ~ section).Othewi$e, press “2” or “START”.[ If you pressed”1” or are storing a Speed DialI number, go to Step 14.
1
@ @ @ @ @ @ @ ~ Enter a full back-up fax number.12 i i If you don’t want to enter a back-up number, go
(Example) ~ to Step 14.
START
13 o@
I I
~ Return to Step 4 to store another number, or, STOP
14 Q! Step 4 or ‘-’~ press STOP to exit. If the number is a Rapid Key
~@ ~ number, you can write the name on the label~ above the appropriate Rapid Key.
! 1
Clearingnumbers
Step ~ Press these keys: Comments
FUNCTION1 ( > m ENTRY MODE will appear in the display.
2 @ \ FAX~EL.# MODE will appear in the display.
3, a ~ SelectCLEAR.
/; approp,ate Rapid Key
To clear a Rapid Key number, press the
4 : ~ To clear a Speed Dial number, enter the 2-digt (Example) I numberwith the numerickeys.I
START
o
5; @I
STOP
6; QStep 4 or @‘ Return to Step 4 to clear another number, orpress STOP to exit,
2-10 INITIAL SE~lNGS
STORING NUMBERS FOR AUTOMATIC DIALLING
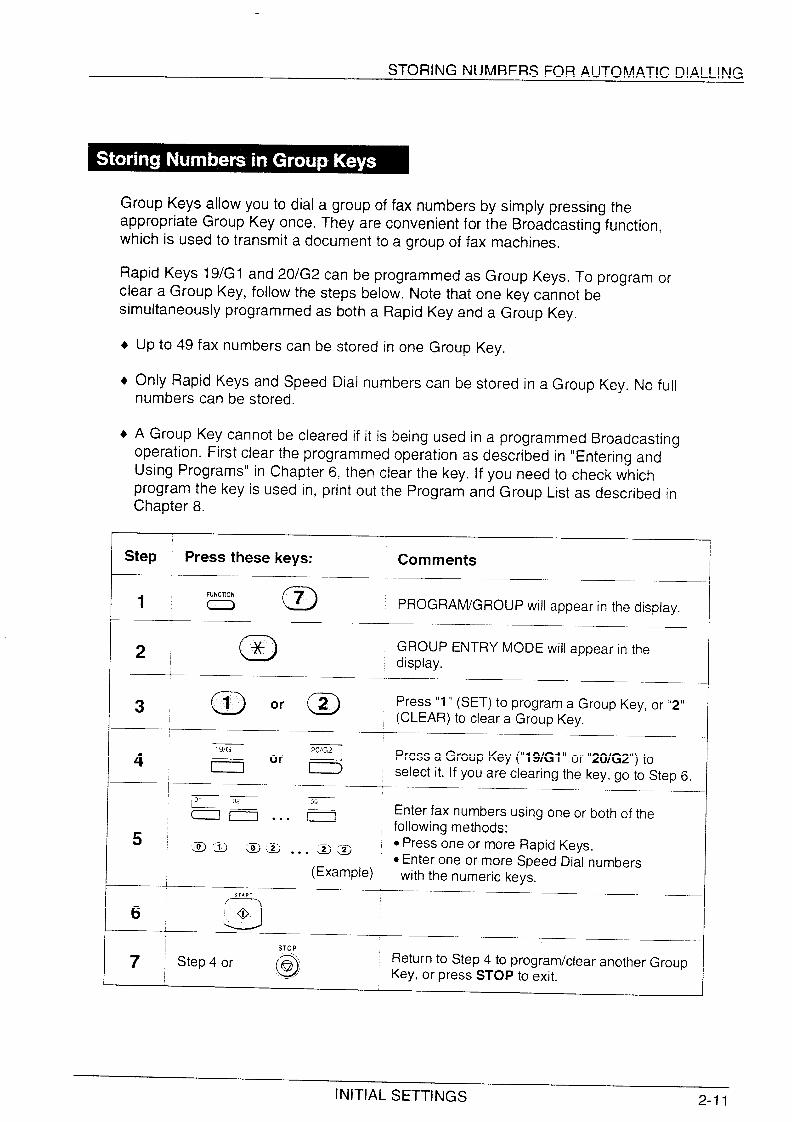
Group Keys allow you to dial a group of fax numbers by simply pressing theappropriate Group Key once. They are convenient for the Broadcasting function,which is used to transmit a document to a group of fax machines.
Rapid Keys 19/Gl and 20/G2 can be programmed as Group Keys. To program orclear a Group Key, follow the steps below. Note that one key cannot besimultaneously programmed as both a Rapid Key and a Group Key.
+ Up to 49 fax numbers can be stored in one Group Key.
+ Only Rapid Keys and Speed Dial numbers can be stored in a Group Key. No fullnumbers can be stored.
+ A Group Key cannot be cleared if it is being used in a programmed Broadcastingoperation. First clear the programmed operation as described in “Entering andUsing Programs” in Chapter 6, then clear the key. If you need to check whichprogram the key is used in, print out the Program and Group List as described inChapter 8.
I Step Press these keys: Comments 11
1FUNCTION
m PROGRAM/GROUP will appear in the display.
GROUP ENTRY MODE will appear in thedisplay.
3 a or @Press “1”(SET) to program a Group Key, or “2”(CLEAR) to clear a Group Key.
4 +[ or 3 Press a Group Key (“19/GI” or “20/G2”) toselect it. If you are clearing the key, go to Step 6.
; ET —a [1 . . . l~J Enter fax numbers using one or both of the
following methods:5 ‘m‘= m a . ● ● a a “ ● Press one or more Rapid Keys.
. Enter one or more Speed Dial numbers(Example) with the numeric keys.
START
6 ~3; @
1STOP
7[ Step 4 orI Q6)
Return to Step 4 to program/clear another GroupKey, or press STOP to exit.
INITIAL SETTINGS 2-11
STORING NUMBERS FOR AUTOMATIC DIALLING
Notes
It
2-12 INITIAL SE~lNGS
.
\. \
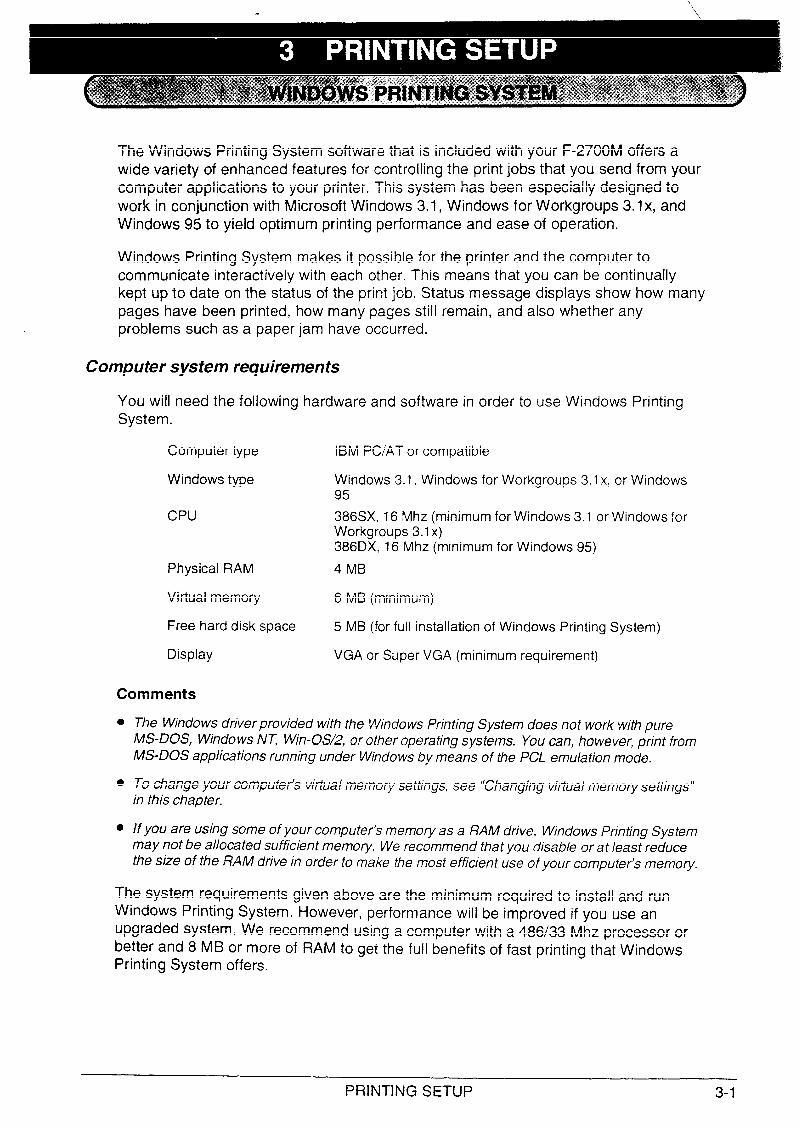
The Windows Printing System software that is included with your F-2700M offers awide variety of enhanced features for controlling the print jobs that you send from yourcomputer applications to your printer. This system has been especially designed towork in conjunction with Microsoft Windows 3.1, Windows for Workgroups 3. lx, andWindows 95 to yield optimum printing performance and ease of operation.
Windows Printing System makes it possible for the printer and the computer tocommunicate interactively with each other. This means that you can be continuallykept up to date on the status of the print job. Status message displays show how manypages have been printed, how many pages still remain, and also whether anyproblems such as a paper jam have occurred.
Computer system requirements
You will need the following hardware and software in order to use Windows PrintingSystem.
Computer type IBM PC/AT or compatible
Windows type Windows 3.1, Windows for Workgroups 3.1x. or Windows95
CPU 386SX, 16 Mhz (minimumfor Windows 3.1 or Windows forWorkgroups 3.1x)386DX, 16 Mhz (minimum for Windows 95)
Physical RAM 4 MB
Virtual memory 6 MB (minimum)
Free hard disk space 5 MB (for full installation of Windows Printing System)
Display VGA or Super VGA (minimum requirement)
Comments
●
●
●
The Windows driver provided with the Windows Printing System does not work with pureMS-DOS, Windows NT Win-OS/2, orotheroperating systems. You can, however, print fromMS-DOS applications running under Windows by means of the PCL emulation mode.
To change your computer’s vitiual memory settings, see “Changing viflual memory settings”in this chapter.
If you are using some of your computer’s memory as a RAM drive, Windows PrintinQ Systemmay not be allocated sufficient memory. We recommend that you disable or at least reduce
-.
the size of the RAM drive in order to make the most efficient use of your computer’s memory.
The system requirements given above are the minimum required to install and runWindows Printing System. However, performance will be improved if you use anupgraded system. We recommend using a computer with a 486/33 Mhz processor orbetter and 8 MB or more of RAM to get the full benefits of fast printing that WindowsPrinting System offers.
PRINTING SETUP 3-1
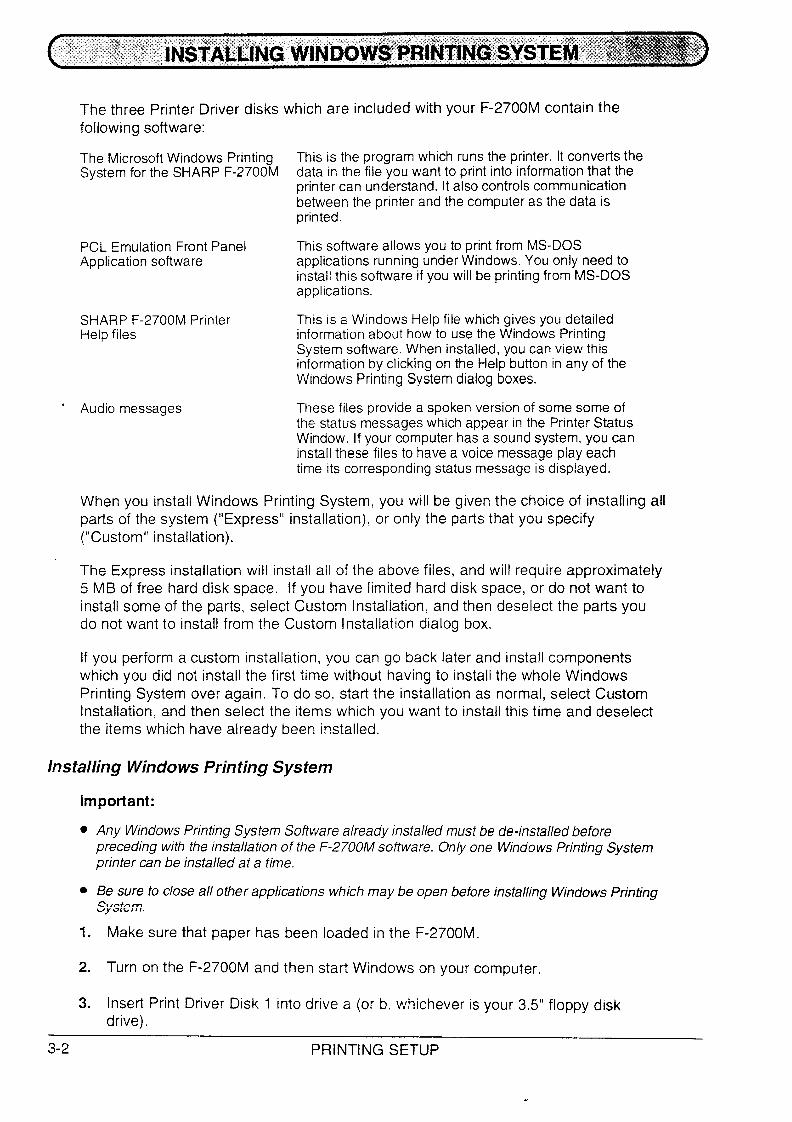
The three Printer Driver disks which are included with your F-2700M contain thefollowing software:
The Microsoft Windows PrintingSystem for the SHARP F-2700M
PCL Emulation Front PanelApplication software
SHARP F-2700M PrinterHelp files
“ Audio messages
This is the program which runs the printer. It converts thedata in the file you want to print into informationthat theprintercan understand.It alsocontrolscommunicationbetweenthe printerand the computeras the data isprinted.
This softwareallows you to print from MS-DOSapplications running under Windows. You only need toinstall this software if you will be printingfrom MS-DOSapplications.
This is a Windows Help file which gives you detailedinformation about how to use the Windows PrintingSystem software. When installed, you can view thisinformation by clicking on the Help button in any of theWindows Printing System dialog boxes.
These files provide a spoken version of some some ofthe status messages which appear in the Printer StatusWindow. If your computer has a sound system, you caninstall these files to have a voice message play eachtime its corresponding status message is displayed.
When you install Windows Printing System, you will be given the choice of installing allparts of the system (“Express” installation), or only the parts that you specify(“Custom” installation).
The Express installation will install all of the above files, and will require approximately5 MB of free hard disk space. If you have limited hard disk space, or do not want toinstall some of the parts, select Custom Instaliation, and then deselect the parts youdo not want to install from the Custom Installation dialog box.
If you perform a custom installation, you can go back later and install componentswhich you did not install the first time without having to install the whole WindowsPrinting System over again. To do so, start the installation as normal, select CustomInstallation, and then select the items which you want to install this time and deselectthe items which have already been installed.
Installing WindowsPrinting System
Important:
●
●
1.
2.
3.
Any Windows Printing System Sofiware already installed must be de-installed beforepreceding with the installation of the F-2700M so~are. Only one Windows Printing Systemprinter ~n be installed at a time.
Be sure to close all other applications which maybe open before installing Windows PrintingSystem.
Make sure that paper has been loaded in the F-2700M.
Turn on the F-2700M and then start Windows on your computer.
Insert Print Driver Disk 1 into drive a (or b. whichever is your 3.5” floppy diskdrive).
3-2 PRINTING SETUP
.
WINDOWS PRINTING SYSTEM
4. Windows 3.1 and Windows for VVorkgroups 3.1x:
Choose File from the menu bar in Program Manager, and then choose the Hun...command.
Windows 95:
Click the Start button and then choose the Run icon.
5. Type a:\setup (or b:\setup, depending on which drive is your 3.5” floppy diskdrive) in the box, and then click the OK button..
6. Follow the instructions which appear in the installation window.
When “Which Installation Method?” appears, select Express or Custom asdescribed above.
. If you selected Custom, deselect ~heparts you don’t want to install by clickingthe corresponding boxes in the Custom Installation window.
. If you only want to install certain audio messages, click the Sound button in theCustom Installation window. To add a message to the Sounds to Install box,click the message in the Sounds Available box, and then click the Add button.To remove a message from the Sounds to Install box, click the message inthe Sounds to Install box, and then click the Remove buttion.
7. Remove all floppy disks from the disk drives, and then click the Restart Windowsbutton.
8. After Windows has restarted, the Print a Test Page window will appear. Click theOK button to print out a test page.
. This window will not appear if the F-2700M is turned on after you have com-pleted Steps 5 and 6.
9. When the Test Page verification window appears, Windows Printing System hasinstalled successfully. Click the Printed OK button.
. Keep the test page in a safe place. It contains useful information that could beof assistance if a problem occurs with the printer.
. If the print quality is poor, or if you have any other problem with printing, clickthe Help button for on-screen information to help you solve the problem.
10. When the final window appears, click the OK button to complete the installationprocess.
PRINTING SETUP 3-3
WINDOWS PRINTING SYSTEM
11. Before printing any documents, you must set the paper size to A4. Do so asfollows:
Windows 3.1 and Windows for Workgroup 3.1x:
Double click the Control Panel icon, and then double click the Printers icon in theControl Panel window. Make sure that F-2700M is selected in the InstalledPrinters box, and then click the Setup button to open the Printer Setup dialog box.Click the A4 icon in the Paper Size box, and then click the OK button.
Windows 95:
Click the Start button. Select Settings and then click Printers in the Settingsgroup. Click the SHARP F-2700M icon with the right mouse button to open theFile menu, and then click Properties. Click the Details tab in the Propertieswindow, and then click the A4 icon in the Paper Size box. Click the OK button.
Note: Ifa power failure occurs during printing or the power is accidentally turned ofl theprinting data will be lost. If this happens, reprint the pages which have not been printed.
The online Help file which comes with Windows Printing System provides detailedinformation about printing and how to use Windows Printing System.
You can refer to this information by clicking the Help button in any of the WindowsPrinting System dialog boxes. You can also select contents or Search for Help on...from the Help menu in the Printer Status window. For help with a particular feature orsituation you encounter, press the FI key.
For more information on using Help, select How to Use Help from the Help menu atthe top of the Help window.
Printer Manager stores print jobs on your hard disk, and then sends them to the printerin the order received, This allows you to resume your work more quickly.
Follow the steps below to turn Printer Manager on.
1. Double-click the Control Panel icon in the Main group of Program Manager, andthen double-click the Printers icon. The Printers dialog box will open.
2. Check the Use Printer Manager box (if it is not already checked) by clicking it.
3. Click the Close button (click the Cancel button if you didn’t change any settings).
3-4 PRINTING SETUP
.‘\\
Virtual memory is space on the hard disk which your computer uses as if it wererandom access memory (random access memory, or RAM, is the working memoryyour computer uses to run applications, etc.). Virtual memory allows you to work withfiles that would otherwise be too big for your computer’s physical RAM.
if your computer does not have enough physical RAM to run Windows Printing Systemefficiently, you can improve petiormance by increasing the amount of virtual memory.
Note: If Windows does notallowyou to set vitiualrnemory to a sufficiently large size, it maybe that there is not enough room on your hard disk. See your Microsoft Windows UserGuide for information on how to fix this and further details on vitiual memory.
Windows3.1 and Windowsfor Workgroup 3.1x
1.
2.
3.
4.
5.
6.
Double-click the Control Panel icon in the Main program group, and thendouble-click the 386 Enhanced icon.
In the 386 Enhanced dialog box, click the Virtual Memory button.
In the Virtual Memory dialog box, click the Change button.
Enter the desired virtual memory size (we recommend at least 6 MB) in the NewSize box, and select Permanent in the Type box.
. Selecting Permanent in the Type box will give the best performance; however,the maximum size may not be as large as when the Type is set to Temporary.If the maximum size is not large enough, select Temporary in the Type box.
Click the OK button. When the window appears asking you to confirm yourchanges, click the Yes button.
To make the changes go into effect, restart Windows.
Windows95
1. Click the Start button in the task bar.
2. Select Settings and then click Control Panel in the Settings group.
3. In the Control Panel window, double-click the System icon.
4. In the System Properties dialog box, click the Performance tab.
5. Click the Virtual Memory button under Advanced Settings.
PRINTING SETUP 3-5
WINDOWS PRINTING SYSTEM
6. Click the Let me specify my own virtual memory settings radio button to selectit, and then type in the desired amount of vifiual memory (we recommend at least6 MB) in the Minimum box.
7. Choose the OK button, and then click the Yes button, the Close button, and theYes button in the dialog boxes which subsequently appear. Windows will restart,and your new settings will go into effect.
3-6 PRINTING SETUP
.
If you connect the F-2700M to your computer and turn it on before you install theWindows Printing System software, the F-2700M’s printer driver will automatically beset to the parallel port being used (usually LPT1) when the installation process iscompleted. The printer drivers which were set to this port before the Windows PrintingSystem was installed will all be set to File.
If you need to change the port setting for the F-2700M, follow the steps below.
Windows3.1 and Windowsfor Workgroups3. lx
1. Double-click the Control Panel icon in the Main window of Program Manager.
2. Double-click the Printers icon. The Printers window will open.
3. If another printer is already installed on the port on which you want to install theF-2700M, select that printer from the installed Printers box, and then click theConnect button (otherwise, go to Step 5).
4. Select File from the Ports box, and then click the OK button. You will return to thePrinters window.
5. Select the F-2700M from the Installed Printers box, and then click the Connectbutton.
6. Select the port you want to use from the Ports box, and then click the OK button.
7. Click the
Windows95
1.
2.
3.
4.
5.
6.
Click the
Set As Default Printer button, and then click the Close button.
Start button in the task bar.
Select Settings and then click Printers in the Settings group.
If another printer is already installed on the port on which you want to install theF-2700M, click its icon with the right mouse button, and then click Properties(otherwise, go to Step 5).
Click the Details tab in the Properties window, select File: from the Print to thefollowing port box, and then click the OK button. You will return to the Printerswindow.
Click the icon for the F-2700M with the right mouse button, and then clickProperties.
Click the Details tab in the Properties window, select the port, and then click theOK button.
PRINTING SETUP 3-7
The Windows Printing System can be used to print documents from MS-DOSapplications as well as from Windows applications. It does this by means of a specialmode called PCL Emulation. When you select the Print command from yourapplication, Windows Printing System will recognize that the job is coming from anMS-DOS application and will switch to PCL Emulation by itself.
To print from an MS-DOS application, it must be running under Windows. Youcannot print from an application that is running from native MS-DOS.
If the PCL Emulation Front Panel Application software hasn’t been installed, you willneed to install it before you can print from an MS-DOS application. You can install itwithout having to install the entire Windows Printing System again. See “installingWindows Printing System” in this chapter.
Before printing, select HP LaserJet Series II from the list of available printers in yourMS-DOS application.
Changingprint settings
PCL Emulation has its own “Front Panel” window which you can use to change avariety of print settings, including number of copies, page orientation, font, printer port,lines per page, and size. These are the same settings that would be made on the frontpanel of the HP LaserJet Series II printer.
To open the PCL Emulation Front Panel window, double-click the PCL EmulationFront Panel icon in the SHARP F-2700M Printing Group window. For detailedinformation on making the settings, click the Help button.
3-8 PRINTING SETUP
.
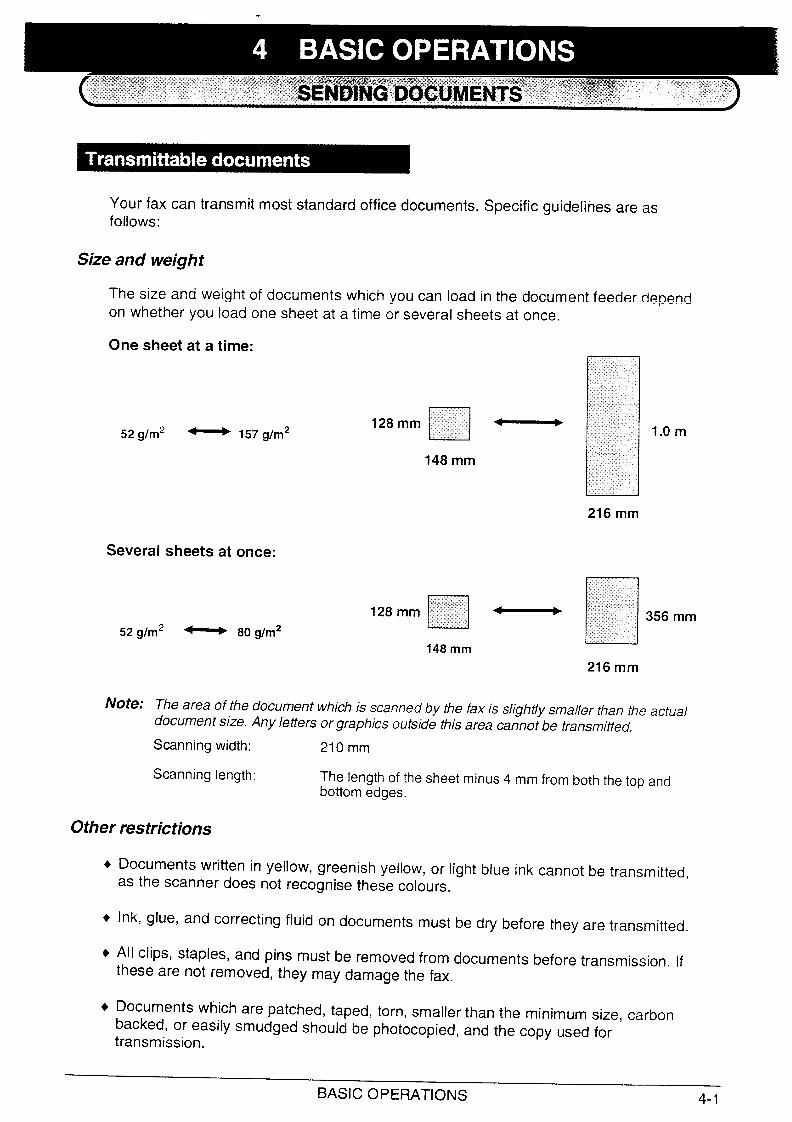
Your fax can transmit most standard office documents. Specific guidelines are asfollows:
Size and weight
The size and weight of documents which you can load in the document feeder dependon whether you load one sheet at a time or several sheets at once.
One sheet at a time:
52g/m2 ~ 157g/m2 1.0 m
216 mm
Several sheets at once:
52g/m2 ~ 80g/m2
Note:
128 mmn“
‘n
356 mm
148mm
216 mm
The area of the document which is scanned by the fax is slightly smaller than the actualdocument size. Any letters or graphics outside this area ca;notbe transmitted.
Scanningwidth: 210 mm
Scanning length: The length of the sheet minus 4 mm from both the top andbottom edges.
Other restrictions
Documents written in yellow, greenish yellow, or light blue ink cannot be transmitted,as the scanner does not recognise these colours.
Ink, glue, and correcting fluid on documents must be dry before they are transmitted.
All clips, staples, and pins must be removed from documents before transmission. Ifthese are not removed, they may damage the fax.
Documents which are patched, taped, torn, smaller than the minimum size, carbonbacked, or easily smudged should be photocopied, and the copy used fortransmission.
BASIC OPERATIONS 4-1
SENDING DOCUMENTS
Up to 20 pages can be placed in the feeder at one time. The pages will beautomatically fed into the fax starting from the page on the bottom.
If you need to send or copy more than 20 pages, place the additional pages gentlyand carefully in the feeder just before the last page is scanned. Do not try to forcethem in, as this may cause double-feeding or jamming.
If your document consists of several large or thick pages which must be loaded oneat a time, insert each page into the feeder as the previous page is being scanned.Insert gently to prevent double-feeding.
1 Adjust the document guides to thewidth of your document.
2 / // /,/ Place the document face down and,//.
&(?”:?
push it gently into the document‘/ feeder. The top edge of the document
should enter the fa-xfirst.
The feeder will draw the leading edgeof the document into the fax.SEND/COPY READY will appear in thedisplay.
3 You can now either make resolutionand/or contrast settings as describedin the foiiowing section, or diai theother party as described in thesection, “Diaiiing and transmission”.
important:If you need to remove the document from the feeder before transmission or copying, first openthe operation panel by pulling the panel release on the right side of the fax forward, and thenremove the document. If you try to pull the document out without opening the operation panel,you may damage the feeder mechanism.
4-2 BASIC OPERATIONS
.
SENDING DOCUMENTS
If desired, there are several transmission settings which you can make before diallingand transmitting the document.
Note: To make the settings. the document must firstbe loaded in the feeder.
Resolution
Your fax has 4 resolution settings:
STANDARD: Use STANDARD for ordinary documents. This settinggives you the fastest and most economical transmission.
FINE: Use FINE for improved reproduction, especially with docu-ments containing small letters or fine drawings.
SUPER FINE: Use SUPER FINE when you need the highest quality ofreproduction.
HALF TONE: Use HALF TONE for photographs and illustrations. Theoriginal will be reproduced in 32 shades of grey.
If you do not make a setting, the fax will automatically send the document inSTANDARD.
In order to transmit with FINE or SUPER FINE resolution, the receiving fax machinemust also have that resolution. If it doesn’t, the next best available setting will beused.
The default resolution (the resolution the fax uses if you do not make a resolutionsetting) can be changed to FINE by changing Option Setting 1. See Chapter 7,“Optional Settings”.
Contrast
The contrast is normally set to AUTO, which means that the fax automatically controlsthe contrast, but for faint documents you can change the setting to DARK.
Setting the resolution and contrast
Press the RESOLUTION key one ormore times until the desired
PAPER resolution and contrast settingsCHECKo appear in the display.
RESOLUTIONMEMORYBROADCAST
Ho(n)n
● The first time you move through the listof resolution settings, the contrast
lb setting AUTO will appear next to eachresolution setting. The second time youmove through the list, the contrastsetting DARK will appear.
BASIC OPERATIONS 4-3
SENDING DOCUMENTS
Cover Sheet
YOU can have your fax generate a cover sheet and send it as the last page of thetransmission. The cover sheet includes the date and time, the sender’s name andnumber, and the receiver’s name and number if an automatic dialling number is used.The total number of pages sent is indicated on the bottom.
+ Your name and number must be programmed in order for them to appear on thecover sheet. (See “Entering Your Name and Fax Number” in Chapter 2.)
+ Cover Sheet cannot be selected when you use the Relay Request Function.
To include a cover sheet with only a single transmission, press the panel keys asshown below. In this case, you can also select a message which will appear at the topof the cover sheet. If you want the fax to automatically send a cover sheet with everytransmission, set Option Setting 11 to YES as described in Chapter 7, “OptionalSettings” (no message can be selected in this case).
I
Step Press these keys: ~ CommentsI
,
FUNCTION1 ~ Q @
COVER SHEET MODE will appear in thedisplay.I
, @ or @2 1Press”1” to turn the coversheetfunction on, or“2” to turn it off.
If you pressed“1” in the previousstep, selectaI message by enteringa numberfrom “2” to “5” as~ shown below, or enter”1” if you don’t want to
include a message.
3 ; “1“: NO MESSAGE( “2”: URGENTI “3”: IMPORTANT!
] “4”: CONFIDENTIAL‘ “5”: PLS. DISTRIBUTE
(Example)
. .. ...... .,..1:, . . ..:
4-4 BASIC OPERATIONS
‘.,\
.
SENDING DOCUMENTS
Batch Page Numbering (Page Counter)
This setting is used to change the page numbering of the transmitted document fromsimple numbering (“P.1”, “P.2”, etc.) to batch numbering, which means that a slashand the total number of pages being sent is added after each page number (forexample, “P. 1/5”, “P.2/5”, etc.). This allows the receiver to check for any missingpages.
+
+
+
If you are sending a cover sheet, do not include the cover sheet in the total numberof pages. Your fax will adjust the number to include the cover sheet automatically.
If you need to cancel a batch number entry, remove the document from the feederor press the STOP key.
If the number of pages actually transmitted does not coincide with the batch numberentered, the alarm will sound and PAGE COUNT ERROR will appear in the display.“PAGE E“ will also appear in the “NOTE” column of the Transaction Report if it hasbeen set to print out.
Step 1 Press these keys: Comments
FUNCTION
o1 ~ Q * PAGECOUNTER SET will appear in the display.
* j @ @ ~Examp,e)
Enter the total number of pages (2 digits - “01” to“99”) by pressing the numeric keys.
BASIC OPERATIONS 4-5
SENDING DOCUMENTS
Once you have loaded the document and made any desired contrast/resolutionsettings, you are ready to dial the number of the receiving fax machine and transmitthe document. There are several ways of dialling, and you can select the one whichbest suits your needs.
Normal Dialling
With Normal Dialling, you pick up the handset (or press the SPEAKER key) and dialas you would to make a telephone call. If the receiving machine is set to receive faxesmanually (this means that the receiving party first answers your call vocally, and thenpresses their Start key to begin fax reception), you can talk with them before sendingthe fax.
SPEAKER Pick up the handset or press the
q ~, ~
SPEAKER key. Listen for the dial tone.
2 ABc DEF
@@@Dial the number of the receiving
@@@ machine by pressing the numeric
B;@
L
keys.
)
3 Wait for the connection. Dependingon the setting of the receivingmachine, you will either hear afacsimile reception tone or the otherperson will answer.
. If the other pa~y answers, ask them topress their Start key (if you pressed theSPEAKER key, pick up the handset tospeak with them). This causes thereceiving machine to issue a receptiontone.
4 START
Q
When you hear the reception tone,
@press the START key. Replace thehandset if you used it.
. When transmission is completed, thefax will beep.
4-6 BASIC OPERATIONS
.
SENDING DOCUMENTS
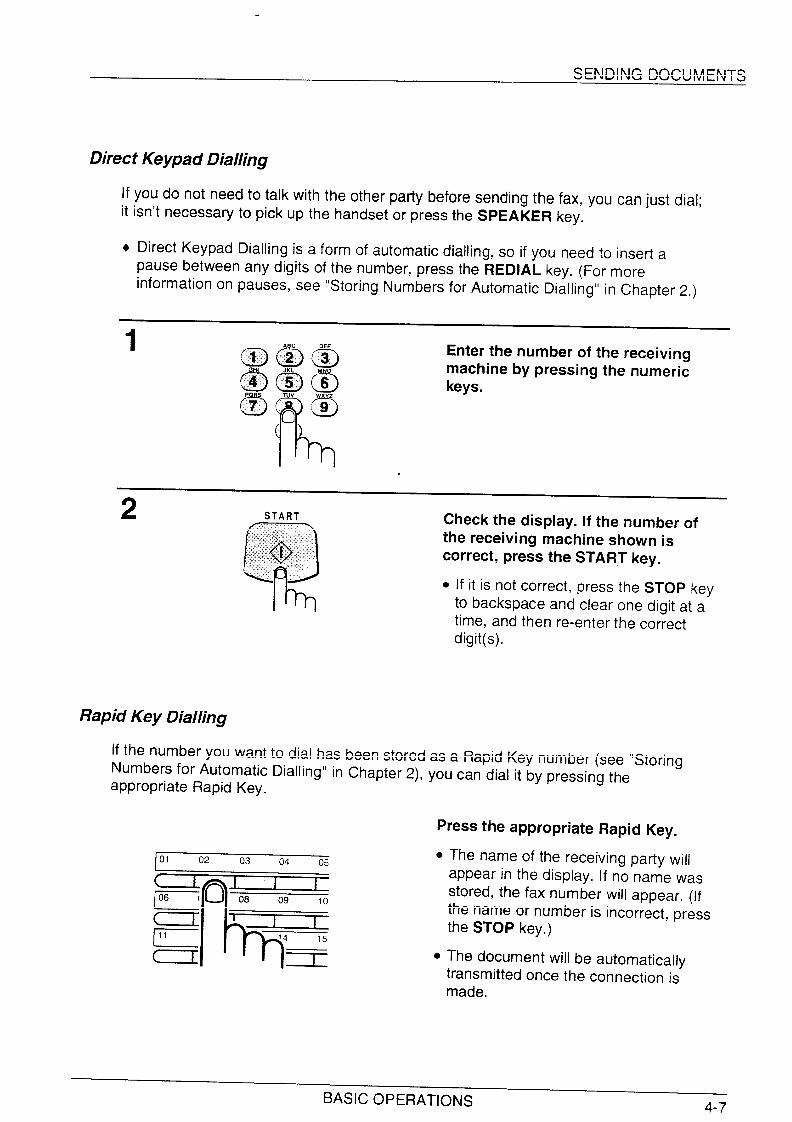
Direct Keypad Dialling
If you do not need to talk with the other party before sending the fax, you can just dial;it isn’t necessary to pick up the handset or press the SPEAKER key.
+ Direct Keypad Dialling is a form of automatic dialling, so if you need to insert apause between any digits of the number, press the REDIAL key. (For moreinformation on pauses, see “Storing Numbers for Automatic Dialling” in Chapter 2.)
1~@.@ Enter the number of the receiving
GUI machine by pressing the numeric~--mkeys.~ ~ ,3
k
()
.
2 START
n
Check the display. [f the number ofthe receiving machine shown is
,“@ correct, press the START key.
h
. If it is not correct, press the STOP keyto backspace and clear one digit at atime, and then re-enter the correctdigit(s).
Rapid Key Dialling
If the number you want to dial has been stored as a Rapid Key number (see “StoringNumbers for Automatic Dialling” in Chapter 2), you can dial it by pressing theappropriate Rapid Key.
Press the appropriate Rapid Key.
01 02 03 04 05●
●
The name of the receiving party willappear in the display. If no name wasstored, the fax number will appear. (Ifthe name or number is incorrect, pressthe STOP key.)
The document will be automaticallytransmitted once the connection ismade.
BASIC OPERATIONS4-7
SENDING DOCUMENTS
Speed Dialling
If the number you want to dial has been stored as a Speed Dial number, you can dialit by pressing the SPEED key and then entering the 2-digit number (see “StoringNumbers for Automatic Dialling” in Chapter 2).
1SPEED
ABC DEF
mmJKL MNO
ma
R
*V
o a‘9()
Press the SPEED key and then enterthe two digits of the Speed Dialnumber by pressing the number keys.
. To enter numbers 1 through 9, firstenter Oand then the number.
2 START Check the display. If the name or
n
number shown is correct, press the
oSTART key. (If not, press the STOP
h
key and then repeat Step 1.)
Chain Dialling
An automatic dialling number set for Chain Dialling (see “Storing Numbers forAutomatic Dialling” in Chapter 2) can be combined with another automatic diallingnumber or digits entered manually with the numeric keys to dial one phone number upto 50 digits long. The following are some examples of how this can be done:
Press appropriate Rapid Keys in the proper order. For example, press Rapid Key01, then Rapid Key 02.
Enter Speed Dial numbers in the proper order. For example, press the SPEED keyand “22”, then the SPEED key and “23”. Press the START key after the finalnumber to begin transmission.
Press a Rapid Key and then manually enter a number by pressing appropriatenumeric keys. Press the START key after the final numeric key to begintransmission. (Use this method, for example, when you have stored a long distanceaccess code into a Rapid Key, and want to dial this in combination with a numberwhich hasn’t been stored as an automatic dialling number. )
4-8 BASIC OPERATIONS
.
.
SENDING DOCUMENTS
Using the SEARCH D/AL key
If you don’t remember the Rapid Key or Speed Dial number in which you have storeda particular fax number, you can search for the number by following the steps below.Once you have found the number, you can dial it and transmit the loaded documentby simply pressing the START key.
1S;;;:H
Press the SEARCH DIAL key.
‘h
o
2 Enter the first letter of the storedname by pressing the appropriatenumber key (the key which
~@ corresponds to the required letter)one or more times until the letterappears in the display. If the namebegins with a special-character or
(Example: “B”) number, press “1”.
. If you don’t remember the first letter,go to Step 3 (you will scroll through thelist from the beginning).
. If a name wasn’t stored for the number,press “O”.This will cause numbers, notnames, to appear when you scroll.
. To access voice numbers stored inRapid Keys which have no name,press “O”twice (note that Speed Dialnumbers will also appear).
nPress the “#” key or the “*” key to
“ ~ ‘r ~scroll through the names (numbers ifyou pressed “O”).Stop when thedesired name appears in the display.
● If no names have been stored thatbegin with the entered letter, you willscroll from the next name, inalphabetical order, in the list. If nonames/numbers have been stored atall, NO DATA will appear.
BASIC OPERATIONS 4-9
SENDING DOCUMENTS
4 START Press the START key. The document
c)
will be automatically transmitted once
@the connection is made.
Note: The SEARCH DIAL key can be used to access the first numberin a Chain Diallingsequence, but not subsequent numbers.
Automatic redialling
If you use automatic dialiing (including Direct Keypad Dialling) and the line is busy,your fax will automatically redial the number. Up to 2 redialling attempts will be madeat intervals of 5 minutes.
+ To stop automatic redia!ling, press the STOP key.
Using the REDIAL key
You can press the REDIAL key to redial the last number dialled. To send a document,proceed from Step 3 of Normal Dialling. Note that the speaker will be automaticallyactivated, so you do not need to pick up the handset immediately.
4-10 BASIC OPERATIONS
.
RECEIVINGDOCUMENTS
When the reception mode is set to AUTO (press the RECEPTION MODE key until theAUTO light comes on), your fax automatically answers all calls on 1 ring and receivesincoming documents,
You can changechanging Option“O” to “4” can be
the number of rings on which the fax answers incoming calls bySetting 2 (see Chapter 7, “Optional Settings”). Any number fromselected. (Select “O” to have your fax answer calls without ringing.)
If you pick up the handset before your fax answers, you can talk to the other partyand/or receive a document as described below in “U-sing MANUAL mode”,
Note: Documents sent to your fax in Superfine resolution are printed in Fine resolution.
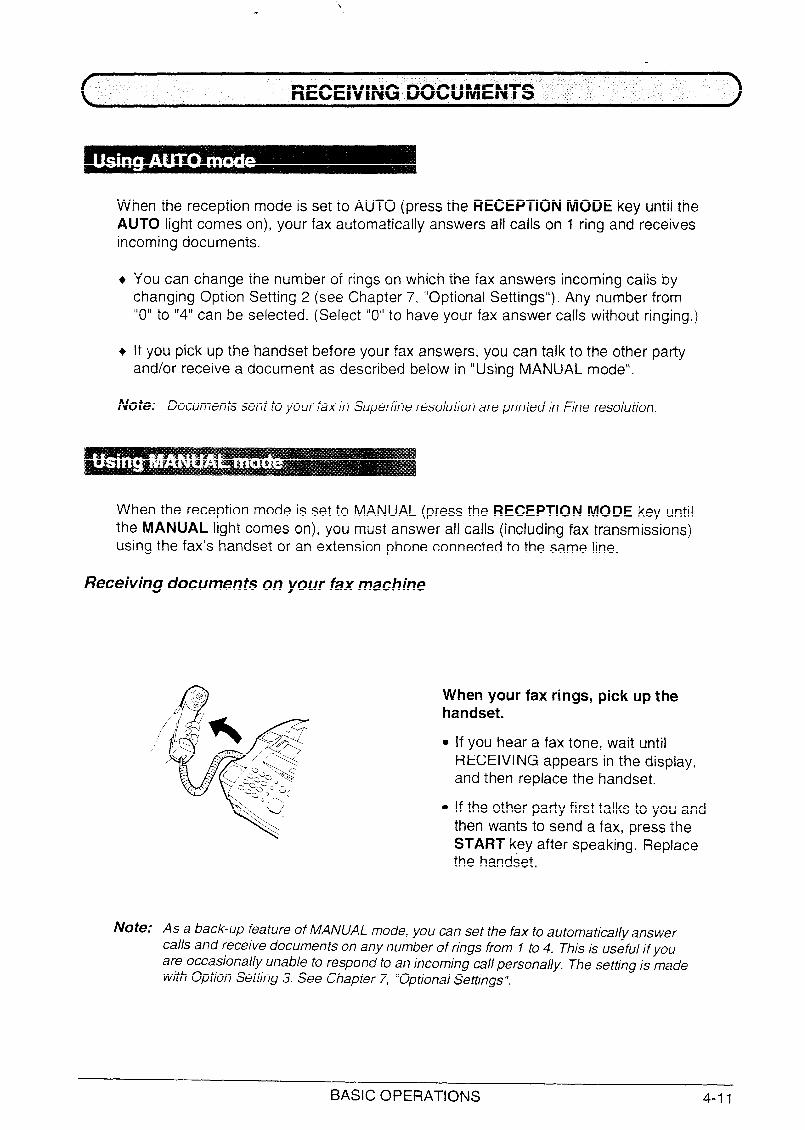
When the reception mode is set to MANUAL (press the RECEPTION MODE key untilthe MANUAL light comes on), you must answer all calls (including fax transmissions)using the fax’s handset or an extension phone connected to the same line.
Receivingdocuments on your fax machine
When your fax rings, pick up thehandset.
. If you hear a fax tone, wait untilRECEIVING appears in the display,and then replace the handset.
. If the other party first talks to you andthen wants to send a fax, press theSTART key after speaking. Replacethe handset,
Note: As a back-up feature of MANUAL mode, you can set the fax to automatically answercalls and receive documents on any number of rings from 1 to 4. This is useful if youare occasionally unable to respond to an incoming call personally. The setting is madewith Option Setting 3. See Chapter 7, “Optional Settings”.
BASIC OPERATIONS 4-11
RECEIVING DOCUMENTS
Receivingdocuments on an extensionphone
If you hear a fax tone when you answer an extension phone, wait until your faxanswers (the extension phone will go dead), and then hang up. Your fax willautomatically receive the document.
Note: If your fax does not respond within 5 seconds, noise on the line maybe preventing itfrom detecting the fax tone. In this case, manually activate fax reception as described inthe following paragraph.
If the other party first talks to you and then wants to send a document, press “5”, “*”and “*” if you are on a tone dial phone. If you are on a pulse dial phone, set thehandset down (do not hang up), walk over to the fax, pick up the handset, and pressthe START key.
Note: Your fax will not accept the signal to begin reception (’5”, “*”, and”%”) ifa document isloaded in its feeder.
Comments:
● If you have set Option Setting 10 to “OFF’f and hear a fax tone when you answer theextension phone, you must press “5”,“*”, and “*” if you are on a tone dial phone, or walkover to the fax, pick up the handset, and press the START keyif you are on a pulse dial onlyphone.
@ The code used to activate fax reception from a tone dial extension phone (“5”, “*”, and”*can be changed if desired. See Option Setting 8 (’fTel/Fax Remote Number’:) in Chapter 7,“Optional Settings’[.
@ If you do not intend to use the code for activating fax reception, you can turn detection of thecode off by rese~ing Option Setting 9, This will ensure that the fax never mistakenly afiemptsto begin reception ifit detects a signal which it perceives to be similar to “5”. “*”, and “*”while you are talking on an extension phone.
In New Zealand, not all standard telephones and answering machines will respond toincoming ringing when connected to the socket of the equipment.
4-12 BASIC OPERATIONS
.
RECEIVING DOCUMENTS
This is a special function in AUTO reception mode which is convenient for receivingboth faxes and voice calls. When it is turned on, your fax will detect whether anincoming call is a voice call (including manually dialled fax transmissions), or anautomatically dialled fax. If it is a voice call, the fax will make a special ringing soundto alert you to answer. If it is an automatically dialled fax transmission. reception willbegin automatically.
Caution! -
● Automatic FatiPhone Changeover will not route voice ca~lsto extension phone on the sameline as the fax machine. Do not use Automatic FatiPhone Changeover if you !ntend to useone or more extension phone together with the fax machine.
TurningAutomatic FadPhone Changeoveron
Automatic FatiPhone Changeover is turned on by setting Option Setting 6 to “YES”.The procedure for doing this is described in Chapter 7, “Option Settings”.
+ Make sure the reception mode is set to AUTO.
Note: If Option Setting 2 is set to a large number of rings, your faxiwaynotbe able to receivedocuments sent by automatic dialling. if you have difficulty receiving documents,change the setting of Option Setting 2 to a lesser number of rings.
How the function operates
When a call comes in, your fax will answer it after the number of rings set with OptionSetting 2. After answering, the fax monitors the line for about 5 seconds to see if a faxtone is being sent.
If your fax detects a fax tone (this means that the call is an automatically dialledfax), it will automatically begin reception of the incoming document.
If your fax doesn’t detect a fax tone (this means that the call is a voice call ormanually dialled fax), it will make a special ringing sound (called pseudo ringing) for15 seconds to alert you to answer. if you don’t answer within this time, your fax willsend a fax tone to the other machine to allow the calling party to send a faxmanually if they desire.
Note: The duration of pseudo ringing can be adjusted with Option Setting 7. See Chapter 7,“Optional Settings”.
Silent ring fax recording system
You can also set your fax machine to receive faxes silenty, but ring to alert you to voice call. Todo so, set Option Setting 2 to “O”, and turn Option Setting 7 on (this procedure is described inChapter 7). When a voice call comes in, a special ringer on the fax machine will ring. Note thatextension telephones will not ring.
BASIC OPERATIONS 4-13
MAKINGCOPIES
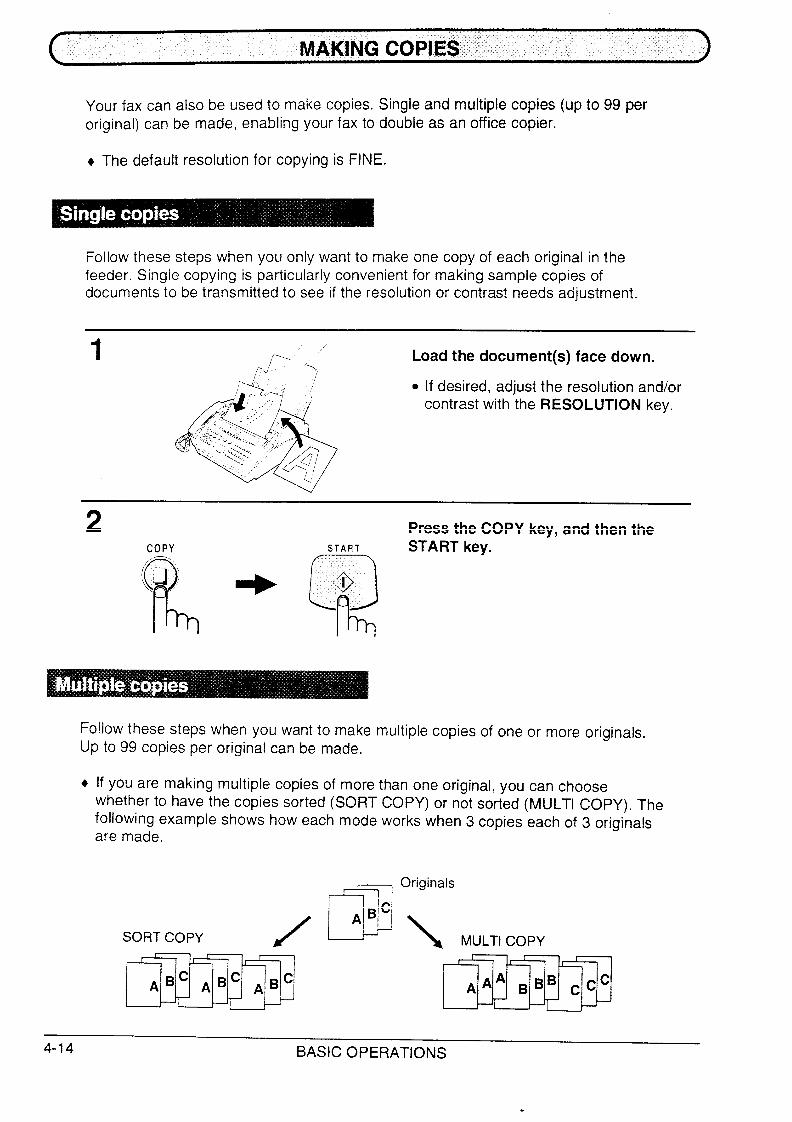
Your fax can also be used to make copies. Single and multiple copies (up to 99 peroriginal) can be made, enabling your fax to double as an office copier.
+ The default resolution for copying is FINE,
Follow these steps when you only want to make one copy of each original in thefeeder. Single copying is particularly convenient for making sample copies ofdocuments to be transmitted to see if the resolution or contrast needs adjustment.
1/,+ Load the document(s) face down.
ru’ \/
. If desired, adjustcontrast with the
the resolution and/orRESOLUTION key,
2 Press the COPY key, and then theCOPY START START key.
P,(0
k
/ +
Q
o
Follow these steps when you want to makeUp to 99 copies per original can be made.
multiple copies of one or more originals.
+ If you are making multiple copies of more than one original, you can choosewhether to have the copies sorted (SORT COPY) or not sorted (MULTI COPY). Thefollowing example shows how each mode works when 3 copies each of 3 originalsare made.
4-14 BASIC OPERATIONS
.
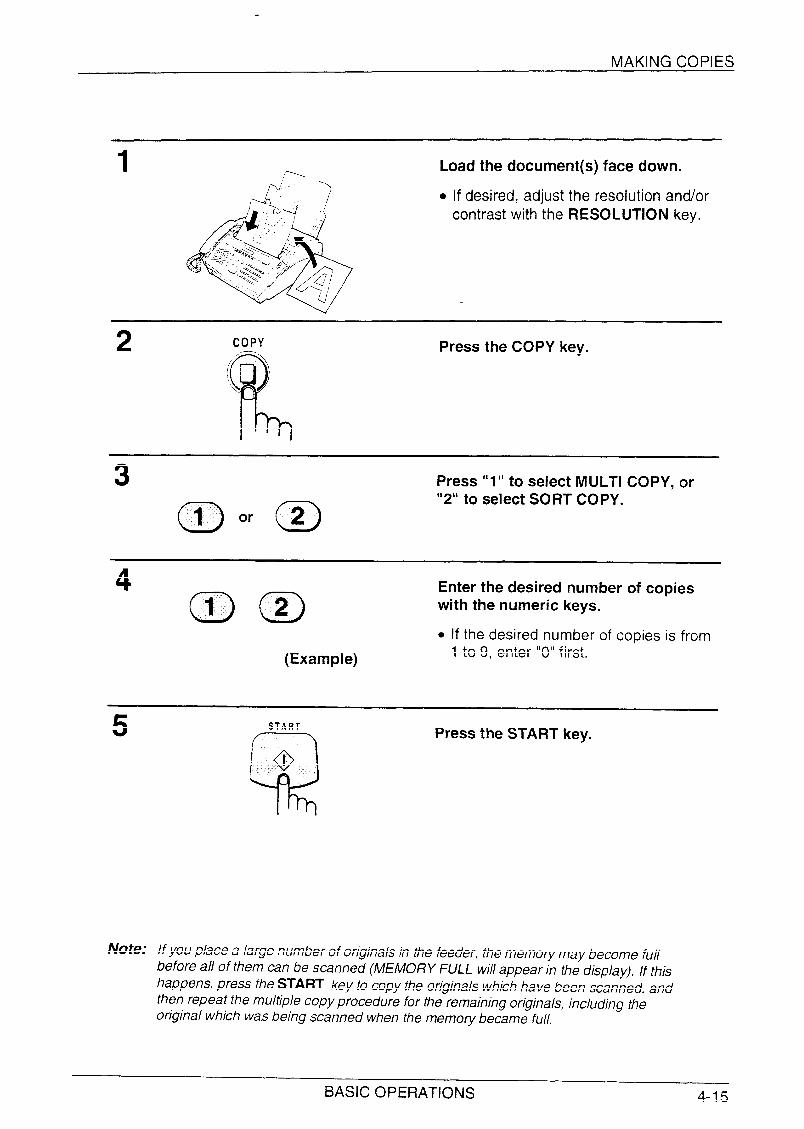
MAKING COPIES
1 Load the document(s) face down.
. If desired, adjustcontrast with the
the resolution and/orRESOLUTION key.
2 COPY Press the COPY key.
@
/{\\
k
3 Press “l” to select MULTI COPY, or“2” to select SORT COPY.
4 OmEnter the desired number of copieswith the numeric keys.
. if the desired number of copies is from
(Example) 1 to 9, enter “O” first.
5 START
Q
@
Press the START key.
Note: lfyou place a large number of originals in the feeder, the memory may become fullbefore all of them can be scanned (MEMORY FULL will appear in the display). If thishappens, press the START key to copy the originals which have been scanned, andthen repeat the multiple copy procedure for the remaining originals, including theoriginal which was being scanned when the memory became full.
BASIC OPERATIONS 4-15
MAKING’TELEPHONECALLS
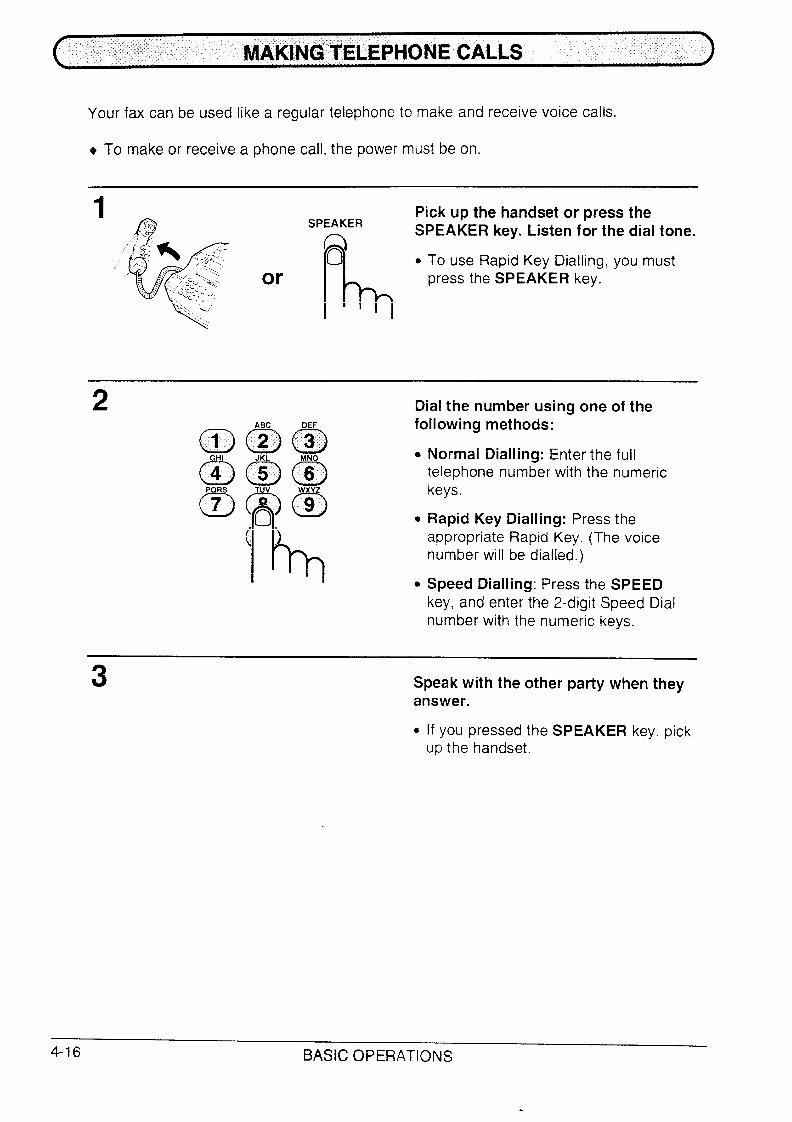
Your fax can be used like a regular telephone to make and receive voice calls.
+ To make or receive a phone call, the power must be on.
1 Pick up the handset or press theSPEAKER
nSPEAKER key. Listen for the dial tone.
h
o *To use Rapid Key Dialling, you mustor press the SPEAKER key.
2 Dial the number using one of the
aGHI
a
o
P RS
7
following methods:
e
●
e
Normal Dialling: Enter the fulltelephone number with the numerickeys.
Rapid Key Dialling: Press theappropriate Rapid Key. (The voicenumber will be dialled. )
Speed Dialling: Press the SPEEDkey, and enter the 2-digit Speed Dialnumber with the numeric keys.
3 Speak with the other party when theyanswer.
* If you pressed the SPEAKER key. pickup the handset,
4-16 BASIC OPERATIONS
.
MAKING TELEPHONE CALLS
Using the SEARCH key
You can use the SEARCH key to search for a Rapid Key or Speed Dial number. Firstsearch for the number as described in “Using the SEARCH key” in “SendingDocuments” in this chapter, and then pick up the handset or press the SPEAKER key.The number will be dialled automatically after you do so (do not press the START key).
Redial
The last number called can be redialled by pressing the REDIAL key (it is notnecessary to pick up the handset or press the SPEAKER key). When the other partyanswers, pick up the handset.
Hold
You can put the other party on hold during a conversation by pressing the HOLD key.When this is done, they cannot hear you. You can put the handset back in the cradlewithout breaking the connection. When you are ready to speak with them again, pickup the handset. If you did not put the handset back in the cradle, press the HOLD keyone more time.
BASIC OPERATIONS 4-17
MAKING TELEPHONE CALLS
4-18 BASIC OPERATIONS
If you have connected an answering machine to your fax as described in “Assemblyand Connections” in Chapter 1, you can receive both voice messages and faxtransmissions on the same line while you are out. To use the connection, first changethe outgoing message of your answering machine, and then set the reception mode ofyour fax to ANS. when you go out.
The outgoing message (OGM) of your answering machine should be changed toinform callers who want to send a fax to press their Start key, For example, yourmessage might go as follows:
“Hello. You’ve reached the ABC company. No one is available to take your call rightnow. Please leave a message after the beep or press your facsimile Start key to senda fax. Thank you for calling. ”
Comments:
● it is advisable to keep the length of the message under 10 seconds. If it is too long, you mayhave difficulty receiving faxes sent by automatic dialling.
● Your callers can even leave a voice message and send a fax message on the same cal/.Modify your outgoing message to explain that they can first leave a voice message, and thenpress their Start key to send a fax.
1 Set the reception mode of your fax toANS. by pressing the RECEPTIONMODE key.
AUTO MANUAL ANSRE;;;;ON 00.
J
‘h
o
ANSWERING MACHINE CONNECTION 5-1
USING THE CONNECTION
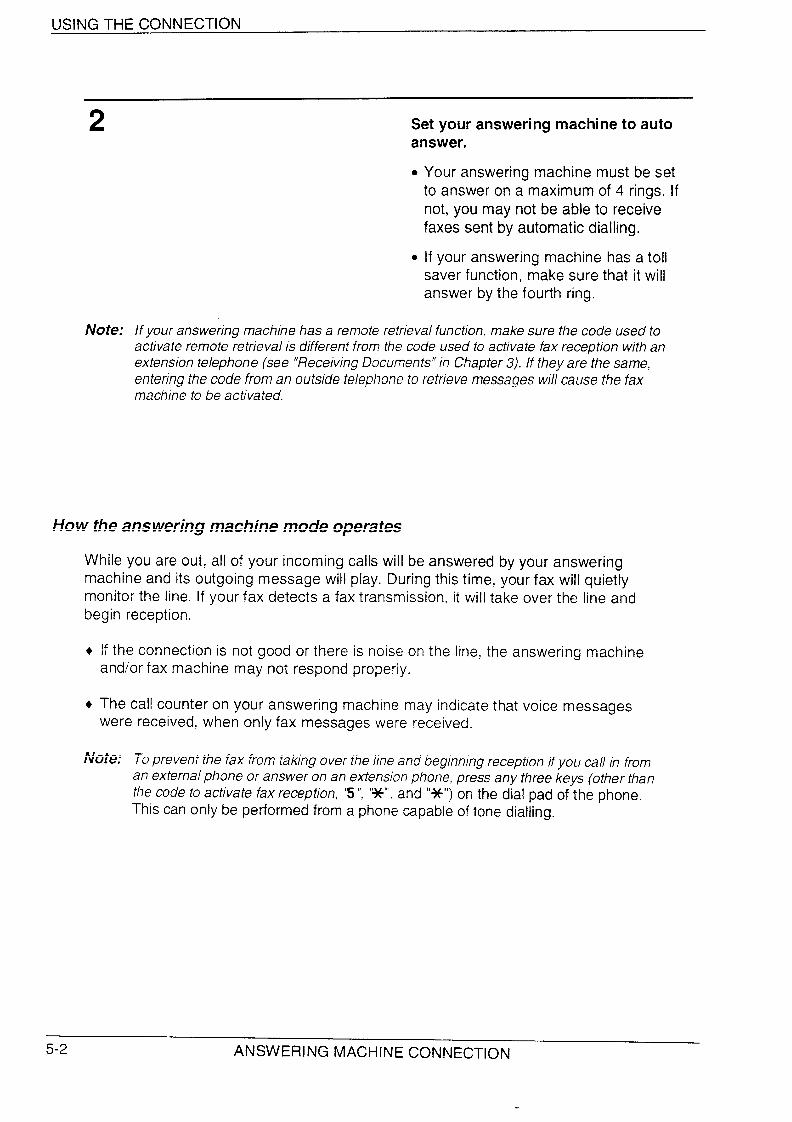
2
Note:
Set your answering machine to autoanswer.
Your answering machine must be setto answer on a maximum of 4 rings. Ifnot, you may not be able to receivefaxes sent by automatic dialling.
If your answering machine has a tollsaver function, make sure that it willanswer by the fourth ring.
if your answering machine has a remote retrieval function, make sure the code used toactivate remote retrieval is different from the code used to activate fax reception with anextension telephone (see “Receiving Documents” in Chapter 3). If they are the same,entering the code from an outside telephone to retrieve messages will cause the faxmachine to be activated.
How the answering machine mode operates
While you are out, all of your incoming calls will be answered by your answeringmachine and its outgoing message will play. During this time, your fax will quietlymonitor the line. If your fax detects a fax transmission, it will take over the line andbegin reception.
+ If the connection is not good or there is noise on the line, the answering machineand/or fax machine may not respond properiy.
+ The call counter on your answering machine may indicate that voice messageswere received, when only fax messages were received.
Note: To prevent the fax from taking over the line and beginning reception if you call in froman external phone or answer on an extension phone, press any three keys (other thanthe code to activate fax reception, ‘5”, “*”, and “*”) on the dial pad of the phone.This can only be performed from a phone capable of tone dialling.
5-2 ANSWERING MACHINE CONNECTION
.
USING THE CONNECTION
If the connection doesn’t operate properly, first check the following:
+ Is the answering machine connected properly to the fax? One end of the answeringmachine line should be inserted in ihe “TEL. SET” socket on the fax. and the otherend in the answering machine’s telephone line socket.
+ Is the reception mode set to ANS. ?
if the above settings and connections are correct and the connection still doesn’toperate properly, the timing with which the answering machine and the fax operateare probably not well synchronized. Some common synchronization problems andtheir solutions are described below.
In addition, read the following section, “HOWfax transmissions are detected”, to gain abetter understanding of how the fax operates when an answering machine isconnected. This will help you determine what course of action to take.
Are callers who want to leave a voice message being interrupted by the fax beforethey can do so?
The fax is set to take over the line and begin reception if it detects a specified durationof silence (called “Quiet Detect Time”). If your outgoing message contains a pauseor the caller pauses while leaving a message, and the pause is longer than thespecified duration, the fax will interrupt.It is best to shorten or eliminate such pauses, but if necessary you can also trylengthening the Quiet Detect Time setting. This procedure is described in “OptionalA.M. Connection Settings” at the end of this chapter.
Are callers who want to send a fax manually having trouble doing so after youranswering machine’s outgoing message plays?
If so, the answering machine may be disconnecting the line (hanging up) before yourfax has a chance to take over the line and begin reception. You can make your faxactivate sooner by shortening the Quiet Detect Time setting. This procedure isdescribed in “Optional A.M. Connection Settings” at the end of this chapter.
Are you having trouble receiving documents sent by automatic diailing?
Make sure that your answering machine’s outgoing message is less than 10 secondslong, and that your answering machine is set to answer on between 2 and 4 rings,Inserting a short pause at the beginning of your answering machine’s outgoingmessage might also help, as this gives your fax a chance to clearly hear and detectthe fax “calling” tone which the transmitting fax sends in the case of automatic dialling.
ANSWERING MACHINE CONNECTION 5-3
USING THE CONNECTION
How fax transmissionsare detected:
Your fax detects fax transmissions in two ways when an answering machine isconnected, depending on whether the document is being sent automatically ormanually:
Automatic dialling: If the document is sent using a form of automatic dialling, suchas Rapid Key or Speed Dialling, the transmitting fax machine will send a “calling tone”at 3-second intervals for a period of about 30 to 40 seconds after dialling. When yourfax detects this tone, it will disconnect the answering machine. send a “reception tone”in response, and begin receiving the transmission.
If the transmitting fax does not receive a reception tone from your fax within 30 to 40seconds after dialling, it will usually hang up and automatically redial several minuteslater.
Since your fax may not be able to detect the transmitting fax’s calling tone until afterthe outgoing message ends, it is important that the answering machine answers theca!l within 4 ringsand the outgoingmessage does not last too long. Otherwise, yourfax may not be able to establish communication with the transmitting fax before thelatter hangs up.
Manual dialling: If the document is being sent by normal (manual) dialling, thetransmitting fax machine does not send a calling tone. Instead, the person faxingnormally waits until they hear a reception tone and then presses their Start key. In thecase of an answering machine connection, they will hear your outgoing messageinstead of a reception tone, and then press their Start key.
However, this does not signal a fax transmission to your fax. Instead, it must use afunction called “Quiet Detect Time” to detect the transmission. This function causesyour fax to disconnect the answering machine and begin reception if it detects acertain duration of silence.
Your fax is set to automatically begin fax reception if it detects a duration of silence of6 seconds. When the person faxing presses their Start key, the line will go quiet, andthe transmitting fax machine will wait for a reception tone from your fax. Your fax willdisconnect the answering machine 6 seconds after the key is pressed, and send areception tone to tell the other fax machine to begin transmission.
If your answering machine has a fast disconnect time and disconnects the line before6 seconds elapses, fax reception will not be possible. in this case, you must shortenthe Quiet Detect Time setting as described on the following page. On the other hand,if the Quiet Detect Time setting is too short. your fax may interrupt voice callers if theypause during their message or if there is a period of silence in your outgoing message.
If necessary, you can use the following settings to improve the response of theanswering machine connection to incoming calls.
This function causes the fax machine to take over the line and begin reception if acertain duration of silence is detected after the answering machine answers.
Time selections for the period of silence are 1 to 10 seconds. Quiet Detect Time hasbeen set to 4 seconds at the factory. This gives the best performance with most
answering machines; however, you may need to adjust this setting depending on thedisconnect time of your answering machine.
Some answering machines may have unusually fast disconnect times (equal to orvery slightly less than 4 seconds), which means that the answering machine maydisconnect the line before fax reception can begin. In this case, try a Quiet DetectTime setting of about 3 seconds.
If the fax machine is interrupting callers before they can leave a message, try alonger Quiet Detect Time setting. If your outgoing message includes a period ofsilence, make sure that the setting is longer than that period of silence, or re-recordyour outgoing message to shorten the silence,
Note: Quiet Detect ~me can be turned off by entering “00” for the time. Note, however, thatthe fax machine ‘wiilnot be able to receive faxes sent manually by Normal Dialling.
I Step ‘ Press these keys: Comments——
FUNCTION
1 ; (—- o A.M. MODEwill appear in the display.,
I
2’ m QUIET DETECTTM. will appear in the display.
-i
Iam
Set the time by entering a two-digit number3 equal to the number of seconds (“01” to “1O“
(Example) seconds), or enter “()()” to turn off the function— —— .——
STOP
4 : o6 ~ Exit.—
ANSWERING MACHINE CONNECTION 5-5
OPTIONAL. A.M. CONNECTION SETTINGS
lf it still doesn‘t work...
With certain answering machines, it may not be possible to find a Quiet Detect Timesetting which will allow both fax reception and uninterrupted voice message recording.In this case, callers on tone dial lines can still send faxes by pressing “5”, “*”, and “*”on their fax. This is the code for activating fax reception which can be changed byresetting Option Setting 8.
To use this method, turn off Quiet Detect Time by entering “00” in Step 3 of the aboveprocedure, and then change your outgoing message to inform callers with tone dialtelephones that they can send a fax by pressing “5”, “*”, “*”, and then their Start key.The message might go as follows:
“Hello. You’ve reached the ABC company. No one is available to take your call rightnow. After the beep, please leave a message, or, if YOUwant to send a fax and arecalling on a touch-tone line, press ‘five’ once,Stafl key.”
‘asterisk’ twice, and then your facsimile
When this function is turned on, your fax will answer the call after 4 rings if theanswering machine for some reason fails to answer before that time. This ensuresthat you will receive fax messages even if the answering machine’s tape fills up or theanswering machine is not turned on.
+ The factory setting is “NO” (off),
Note: When this function is turned on, make sure that the answering machine is set to answeron 4 rings or less. If it isn’t, the fax will always answer first, preventing callers fromleaving voice messages.
I
~ Step Press these keys: Comments\I I
FUNCTION
~1 ( > @ A.M. MOD~ will appear in the display.~I o!2’ * SELECTAUTO RCV.will appear in the display.
I
3 or Press “1”to turn the function on, or “2” to turn itoff.
STOP,—.
14 ()@ Exit.
5-6 ANSWERING MACHINE CONNECTION
.
Your fax has a memory which can be used to temporarily store both incoming andoutgoing documents.
+ Approximately 28 pages of average content (based on ITU-T Test Chart #l atstandard resolution) can be held in memory if they are all to be transmitted, or 32pages if they are all received (39 received pages if Option Setting 23, ErrorCorrection Mode, is set to NO). Less can be held if any were scanned using fine orhalftone resolution.
+ If you need more memory, a 1 ,MBadd-on option is available from your dealer orretailer which will increase the capacity to 92 transmission pages or 92 receivedpages (99 received pages if Error Correction Mode is set to NO).
With this function, the original document is scanned immediately, stored in memory.and then transmitted once the connection to the receiving machine is made. This isconvenient when transmitting to places where the line is often busy, as it saves youfrom waiting to collect the original document and frees the feeder for other operations.
+ Only one memory transmission can be set at a time.
The amount of memory currently occupied appears as a percentage in the displaywhile the document is being scanned.
1 \ Load the document(s).k?
. Set the resolution and/or contrast ifdesired.
2 MEMORY
~
h
Press the MEMORY key.
3 Enter the number of the receivingSPEED
o -~ @ machine using one of the followingmethods:
. Press a Rapid Key.
(Example) ● Press the SPEED key and enter aSpeed Dial number.
. Enter a full telephone number bypressing the number keys.
SPECIAL FUNCTIONS6-1
MEMORY
4 Press the START key if you entered aSTART
o
Speed Dial number or a full number.
oI ● The document is first scanned andstored in memory. The other machine
h
is then dialled (redialling will beperformed automatically if necessary).When the connection is made,transmission begins. Afterwards, thedocument is cleared from memory and=your fax returns to standby mode.
If the memory becomes full...
If the memory becomes full while the document is being scanned, MEMORY FULL willappear in the display.
Press the START key if you want to transmit the pages which have been stored upto that point in memory. The remaining pages will be ejected from the feeder. Aftertransmission, the memory will be cleared and you can transmit the remainingpages. You will also need to transmit the page which was being scanned when thememory filled up.
Press the STOP key if you want to cancel the entire transmission.
This is a back-up function which is automatically activated if your fax runs out ofpaper, the imaging cartridge needs replacement. or the paper jams.
When you have received a document in memory. FAX RX IN MEMORY will appear inthe display, alternating with CHECK PAPER, REPLACE TONER, or PAPER JAM.When you add paper, replace the imaging cartridge, or clear the jam, the storeddocuments will automatically be printed out.
+ If you received documents in memory because the fax ran out of paper, be sure toadd paper which is the same size as the paper previously used. If not, thedocument print-out size may not match the size of the printing paper.
Caution!
When documents are stored in memory, do not turn the poweroti This will erase all of thecontents,
If documents received in memory are lost due to a power failure or other interruption of thepower suppiy, a “CLEAR REPORT’i will be printed out when the power is restored. ~is givesinformation about the receptions iost, including the fax numbers of the transmitting machinesif they are available.
6-2 SPECIAL FUNCTIONS
When your fax is busy receiving a document or transmitting a document from memory,you can “reserve” a transmission by loading the document and entering the faxnumber. Once the current operation is completed, your fax will automatically dial thenumber and transmit the document, saving you from having to wait.
1 Load the document(s)./-----’. RESERVE READY will appear in the
display.
● Set the resolution and/or contrast ifdesired.
2 Enter the number of the receivingmachine using one of the following
cDCCn methods:
3
Note:
●
Press a Rapid Key.
Press the SPEED key and enter aSpeed Dial number.
Enter a full number with the numerickeys.
Press the START key if you entered aSTART Speed Dial number or a full number.
Q
u
. The number will be dialled once theI current operation is completed, and
transmission will begin once theconnection is made.
If the document is removed from the feeder aftera transmission reservation is set, thereservation will be cancelled.
SPECIAL FUNCTIONS 6-3
This function allows you to send the same document to as many as 50 differentlocations with just one operation. First store the document in memory, then enter thenumbers of the receiving machines. The document will be transmitted to each location.
+ To enter the fax numbers of the receiving machines, you must use Rapid Keys,Speed Dial numbers, or Group Keys; no full numbers can be entered.
1 Load the document(s).
2 BROADCAST
‘h
oPress the BROADCAST key.
3 Dial the receiving units using one ormore of the following methods:
. Press one or more Rapid Keys.
* Enter one or more Speed Dial numbersby pressing the numeric keys.
(Example)* Press one or more Group Keys.
4 START
n
Press the START key.
o1 ● Set the resolution and/or contrast if
k
desired.
5 Press the START key. TransmissionSTART wifi begin.
A Transaction Report is automaticallyprinted out after Broadcasting iscompleted. Check the “Note” column ofthe report to see if any of the locationsare marked “Busy” or have acommunication error code. If so, sendthe document to those locations again.
6-4 SP&CIAL FUNCTIONS
.
BROADCASTING
Broadcasting using a Group Key
If the fax machines to which you want to broadcast have all been programmed intoone Group Key, you can perform the broadcasting operation using the followingsimplified procedure:
1 Load the document(s).I-
Make any desired transmissionsettings (resolution, contrast, etc.),
n
191G1
(Example)
Press the appropriate Group Key.Transmission will begin.
SPECIAL FUNCTIONS 6-5
The Confidential function is used to send documents confidentially. When thereceiving machine receives the document, it stores it in memory instead ofimmediately printing it out. Print-out will not be performed until the receiving partyenters the correct passcode.
Confidential transmission is only possible when the receiving machine is a Sharpmodel with confidential reception capability.
Confidential reception is not possible with the F-2700M.
1 Load the document(s).
● Make any desired transmissionsettings (resolution, contrast, etc.),
2 START Press the FUNCTION key, “6”, and the
o
~NCTIO; * @ ~ ~ “START” key.
● CONF. TX MODE will appear in thedisplay.
3~~
If the receiving machine has multiplemailboxes, enter the appropriate
(Example) 2-digit mailbox number with thenumeric keys (if not, skip this step).
4 START
o
Press the START key.
uI
h
5 Dial the receiving unit using one ofthe following methods:
I01
( I
(Example)
●
●
☛
Press a Rapid Key.
Press the SPEED key and enter aSpeed Dial number. Press the STARTkey.
Enter a full telephone number with thenumeric keys, and press the STARTkey.
I ransmission will take place once theconnection is made,
6-6 SPECIAL FUNCTIONS
-\.\
Polling allows you to request another fax machine to send a document to your faxmachine. In other words, the receiving fax machine, not the transmitting fax machine,activates the transmission. You can use your
To use the polling function, you must first set
fax to both poll and be polled by others.
Rapid Key 16/POLL for use as a pollingkey. This is done by pressing the panel keys as shown below.
+ The polling key-cannot be used for both Rapid Key Dialling and Polling. If it hasalready been programmed for Rapid Key Dialling, you must clear it first asdescribed in “Storing Numbers for Automatic Dialling” in Chapter 2.
Step
1
2
3
4
5
Press these keys:
STOP
:\@
Comments
ENTRY MODE will appear in the display,
POLLING FUNCTION will appear in the display.
Press “1” to turn the polling function on, or “2” toturn it off.
Exit.
SPEED
(Example)
Dial the fax machine you want to pollusing one of the following methods:
. Pick up the handset (or press theSPEAKER key) and dial the fullnumber. Wait for the fax answerbacktone.
. Press the SPEED key and enter a2-digit Speed Dial number.
. Enter the full number using thenumeric keys.
SPECIAL FUNCTIONS 6-7
.
POLLING
2116/POLL\
Press Rapid Key 16/POLL.
. If you used the handset, replace it
Hwhen POLLING appears in the display.Reception will begin.
To let another fax machine poll your fax, simply set the reception mode to AUTO, andload the document(s) to be sent.
Transmission will take place when the other fax machine calls your fax and activatespolling. Automatic reception is possible whilst your fax is on polling standby.
Polling Security allows you to prevent unauthorized polling of your fax. When thisfunction is turned on, polling will only take place when the fax number of the pollingfax machine has been entered in your fax’s list of permitted fax numbers (called“passcode numbers”). The number of the polling fax must also be correctlyprogrammed into itself.
Turning Pol/ing Security
1’1 Step Press these keys: CommentsII
1 FUNCTION
1’0 ~ ENTRYMODEwill appear in the display.II
12 @@@ SECURITY SELECT will appear in the display.i —
6-8 SPECIAL FUNCTIONS
*
POLLING
1
3 ~ m 0’ m~
Press”1” to turn polling security on, or “2” to turnit off.
START
4 : 2~@I STOP
5 ~ o[G’” Exit..>) J
Storingand clearing fax numbers for pulling permission
You can store up to 10 fax numbers in your fax’s list of permitted numbers.
Step ~ Press these keys: Comments
FUNCTION
a1 ~ Q ( 3 ENTRY MODE will appear in the display.
I
2 ~ @ B a PASSCODE # MODE will appear in the display.
3 ~ @ “r@ Press “1” to set a number, or “2” to clear anumber.
1I Storing:Enter a 2-digit number (from 01 to 10).
I ( This number identifies the fax number you will
41 enter in the next step.Clearing:Enter the 2-digit number whichidentifies the fax number you want to clear, and
(Example) go to Step 6.I
5 ; ‘a ‘a ‘3 @ a ‘a aEnter the fax number (max. 20 digits).
1 (Example)II START
61 D@
I1 STOP
7 I o~ Step 4 or ~’~ Return to Step 4 to enter another number, or-. press STOP to exit.
SPECIAL FUNCTIONS 6-9
Relay Request aiiows you to send adocumentta another fax machine and have thatfax broadcast the document toa numberof other fax machines. This function is usefulwhen the relay fax machine is closer to the end fax machines than your fax, as itreduces telephone line costs.
Important:
@ Relay Request can only be used if the intermediate relay machine is a Sharp machine havingthe Relay Broadcast function (note that your fax cannot act as a relay machine).
To make a relay request, you must first enter the relay group. This consists of the faxnumber of the intermediate relay machine and the fax numbers of the end receivingmachines. Only one group can be entered, and this group will remain in memory untilcleared.
Only a Rapid Key number or a Speed Dial number can be entered to specify therelay machine; a full number cannot be entered.
Fax numbers of the end receiving machines can be entered as Rapid Key numbers,Speed Dial numbers, and/or Group Key numbers if they have been stored as suchin the relay machine (not in your fax machine). Check with the operator of the relaymachine for these numbers.
The total number of end receiving machines which can be entered varies with themodel used as the intermediate relay machine. Check with the operator of the relaymachine to find out how many receiving machines can be entered.
A maximum of 400 spaces are availabie in memory for storing the numbers of endreceiving machines. The number of spaces occupied by each number depends onwhat kind of number it is:
Rapid Key number: 4 spaces
Speed Dial number: 2 spaces
Group Key number: 4 spaces (for one group)
Full number: Number of digits in number (e.g. a maximum of 14 fullnumbers can be entered, with a maximum of 30 digits pernumber).
6-10 SPECiAL FUNCTIONS
.
.
RELAY REQUEST
Step Press these keys: Comments-
1 ‘ RELAY FUNCTION will appear in the display.
1
SET RELAY GROUP will appear in the display. ~
00 Enter the fax number of the relay machine by4 pressing a Rapid Key or entering a 2-digit Speed
(Example) Dial number with the numeric keys.
START
3
5 : ~ @
Enter the relay machine’s Rapid Key numbers of
6 @ ~ theendreceivingmachines by pressingnumerickeys (not Rapid Keys). (Skip this step if you
(Example) don’t want to enter Rapid Key numbers.)
STARTr \
(Example)
9
10
11
12
13
14
Enter the relay machine’s Speed Dial numbersof the end receiving machines by pressingnumeric keys. (Skip this step if you don’t want toenter Speed Dial numbers.)
@@Enter numbers of Group Keys for end machinesby pressing numeric keys. (Skip this step if you
(Example) don’t want to enter Group Key numbers.)START
9
/ @
Enter a full fax number (skip this step if you don’t@ ‘= ‘~ @ = ‘= @ want to enter full numbers). Include the area
‘ code (e.g. “201”) if the number is outside of the(Example) callingarea of the relay unit.
START
a
I
lo‘ Press START andgobackto Step 12 if you
want to enter another full number.START
o
@
SPECIAL FUNCTIONS 6-11
RELAY REQUEST
To clear the relay group
Step ~ Press these keys:I
j Comments
FUNCTION
@~ RELAY FUNCTION will appear in the display.
2 0* CLEAR RELAY GRP will appear in the display.
STOPI
I 1
4’ o(G !Exit.‘\
Important:
. To make a relay request, your fax number must be entered into the Relay Passcode List ofthe relay fax machine by the operator of that fax. (Your number must also be correctlyentered in your fax as described in “Entering Your Name and Fax Number” in Chapter 2.)
Load the document.
● Set the resolution and/or contrast ifdesired.
Press the FUNCTION key, the “5” key,and the “#” key.
3START Press the START key.
6-12 SPECIAL FUNCTIONS
.
TIMEROPERATIONS
The timer function allows you to set a transmission or polling operation to beperformed automatically at a time you specify. Up to two transmission operations (onefrom the feeder and one from memory) and one polling operation can be set at anyone time, and the times they will be performed can be specified up to a week inadvance.
You can use this function, for example, to take advantage of off-peak telephone rateswithout having to be there when the operation is petiormed.
For a timer transmission, you can either scan the document into memory when youset the transmission, or leave the document in the feeder before the transmissiontime. Scanning the document into memory is convenient because you don’t have toworry about document mix-ups or forgetting to load the document. If a transmissionfrom the feeder is set, a highlighted “T” will appear at the right of the display.
Code numbers are used to specify days of the week. Refer to the table below whenmaking time settings which include a specified day:
I 1
Day SUN MON TUE WED THU FRI SAT ;
Code o4
1 ~ 2 3 45 6J
Note: Only regular transmissions and polling operations can be set using the proceduredescribed below. If you want to set a broadcast, confidential, or relay request operationto be performed at a specified time, program the operation into a Program Key andinclude a timer setting. This is described in “Entering and Using Programs” in thischapter.
Setting a timer operation
I
Step ~ Press these keys: Comments 1
1FUNCTION
aI
TIMER MODE will appear in the display.
1
.I
2 ~ a Select SET.1I
!
B ‘r m Press “#” to set a transmission operation (SEND ~3 ~8®••8®• MODE), or “*” to set a polling operation
aEnter the code for the day of the operation (skip
6 ; this step if the operation will be performed within(Example) ~ the next 24 hours).
START
71 0 @ ,
Enter the fax number of the other machine using1 @@ one of the following methods:
8 ~ I ● Press a Rapid Key.. Enter a Speed Dial number
1 (Example) ; with the numeric keys.I START
I
9 ;I o@I
1
~
RESOLUTION~ If this is a transmission operation. adjust the
10 ~ ) ~ resolution and/or contrast if desired. (Otherwise,c I skip this step.)I
START
11 ~o@
II
~ Transmissionoperation:If you want to sendthe document from memory, load it now and
1 ~ press MEMORY.Otherwise, press START andSTART load the document any time before the set
o
MEMORY
12 ~ @ transmission time. If a non-memory timer‘r o transmission has already been set (START:,
END OF SET will appear), you must load thedocument now and press START to send it frommemory.
~ ; Pollingoperation:Press START.
6-14 SPECIAL FUNCTIONS
.
TIMER OPERATIONS
To cance/ an operation
If you need to cancel an operation after it has been set, follow the steps
If the operation is a transmission operation, you willassigned to it. If you don’t remember the number (it
Lists”.
rStep
need to know the numberappears in the display when you
set the operation), print out the Timer List, See Chapter 8, “Printing Out Reports and
—Press these keys: Comments
TIMER MODE will appear in the display.
(Exampie}Enter the 1-digit timer number assigned to theoperation.
I START
SPECIAL FUNCTIONS 6-15
ENTERINGAND USINGPROGRAMS
If you frequently perform the same operation involving the same party, you canprogram all the steps of the operation into one Program Key. This allows you toperform the operation by simply pressing that key.
+ Rapid Keys 17/Pi and 18/P2 can be used as Program Keys. However, a keycannot be used if it is already being used for Rapid Key Dialling.
+ Only Rapid Keys, Speed Dial numbers, and Group Keys can be used to enter faxnumbers of receiving machines in Program Keys. Full numbers cannot be entered.
+ You can also include a timer setting in the program to have the operation performedautomatically at a selected time.
+ To clear a mistake, press the STOP key.
To program an operation, first perform the following basic procedure. After you havecompleted it, refer to the procedure for the specific operation you want to program.
+ Code numbers are used to set days of the week. Refer to the table below whenmaking time settings which include a specified day:
! I
Day SUN ~ MON TUE WED TI-IU FRI SAT
Code o i 1 , 2 3 4 5 6
I !
~ Step Press these keys: , CommentsI
1FUNCTION
t )~ PROGRAM/GROUP will appear in the display.
1
I
PROG. ENTRY MODE will appear in the display.I
I
13 ; Select SET.
;171P1 I
4I
0I
Select a ProgramKey by pressingthe(Example) ~ appropriateRapid Key,
ABC DEF
~ @ m @ ● ==
I Enter a name for the program (max.of PO@ I letier~)c (See “Entering Lettersfor Names” ‘n
5 ~ !~Chapter2.)
(Example) \ Skip this step if you don’t want to enter a name.
6-16 SPECIAL FUNCTIONS
“
.
ENTERING AND USING PROGRAMS
6—
7 m m (,xamp,e)Enter the hour (2 digits: “00” to “23”). If you don’twant to make a timer setting, go to Step 10.
9
10START
3
‘Q
(Example) Enter the minute (2 digits - “00” to “59”).
Enter the day of the week by entering theappropriate code number (see previous table).(Skip this step if the operation will be done within
(Examplej 24 hours of pressing the Program Key.).—
11
12
t4II
—
Press the “#” key or “*” key until the desiredoperation appears in the display.The operations will appear in the following order:● Transmission. Polling● confidential transmission● Broadcasting. Relay Request
.START
3
Continue with the specific procedure for your~ @ operation (see the following pages).
(Continued from “Initial procedure”.)
II 1
(Example)
Enter the fax number of the other machine usingone of the following methods:. Press a Rapid Key.● Enter a Speed Dial number with
the numeric kevs.,)
START
14 ‘a‘a
1RESOLUTION
15 Adjustthe resolutionand contrast if desired(othetwiseskip this step).
SPECIAL FUNCTIONS 6-17
ENTERING AND USING PROGRAMS
START
16 0 Q
17 : orSTART
o
-\I
\,
If you want the document to be sent frommemory, press MEMORY.If you want the document to be sent from thefeeder, press START.
18STOP—
o{:@
/Exit.
(Continued from “Initial procedure”.)
II Enter the mailbox number (2 digits). (Skip this
13 m @ 1 step if the receiving machine does not have(Example) ~ mailboxes.)
START
I
14 III~ Enter the fax number of the other machine using
mmone of the following methods:
15 ● Press a Rapid Key.. Enter a Speed Dial number with
(Example) the numeric keys.
START..,.—..
16 u @
RESOLUTION17 Adjust the resolution and contrast if desired
(othetwise skip this step).
START
18 io“~ )
I
~
i If you want the documentto be sent fromSTART
19MEMORY
o
~ memory, press MEMORY.o ‘ro ~If you want the document to be sent from the
~ feeder, press START.
STOPI
20 (@\ ~ Exit.
-“” ,
6-18 SPECIAL FUNCTIONS
.
ENTERING AND USING-PROGRAMS
(Continued from “Initial procedure”.)
I
‘ a a ... lo ,~Enter the numbers of the receiving fax machinesusing one or more of the following methods:
13 ● Press one or more Rapid Keys.. Enter one or more Speed Dial numbers.
(Example) . Press one or more Group Keys.I
STARTI
3
14 ~ j oRESOLUTION
15 ~ Adjust the resolution and contrast if desired(otherwise skip this step).
16 : @ 3STOP
17 0G’; Exit.\—/
13
14
15
16
procedure”.)
RESOLUTIONAdjust the resolution and contrast if desired(otherwise skip this step).
START
3
/ @
If you want the document to be sent fromSTART
MEMORY
3‘ @
memory, press MEMORY.o ‘r ‘ If you want the document to be sent from the
feeder, press START.STOP
Q:G” Exit.
SPECIAL FUNCTIONS 6-19
ENTERING AND USING PROGRAMS
Continued from “Initial procedure”.)
13(Example)
I START
14 D“Q
15STOP
(@/—
Enter the fax number of the other machine usingone of the following methods:. Press a Rapid Key.. Enter a Speed Dial number
the numeric keys.with
Exit.
To clear a Program key, follow these steps:
Step Press these keys: ~ Comments
1FUNCTION
( > a PROGRAM/GROUP will appear in the display.
,
2 m PROG. ENTRY MODE will appear in the displa
a I Select CLEAR.3’ II171P1 ‘
4 I \ (Example) ~ Press the Program Key you want to clear.
START 1
0
1
I
6
I
5’ ~ II
STOP I
6 : @’ ~ Exit.
6-20 SPECIAL FUNCTIONS
.
ENTERING AND USING-PROGRAMS
A programmed operation is performed as follows:
1 Load the document.
2 :17/Pl :I
Press the appropriate Program Key.
(Example)
Note: A maximum of3 timer operations can be set at any one time, including both timeroperations set by pressing a Program Key and operations set as described in “TimerOperations” in this chapter.
If a Program Key has been pressed for a timer operation and you need to cancel theoperation before it is performed, follow these steps:
1 ~17/Pl II
Press the Program Key.
(Example)
2 START Press the START key.
SPECIAL FUNCTIONS 6-21
The Anti Junk Fax function allows you to block reception ofyou specify. This saves paper by not printing out unwanted
To use thisfrom
Turning
whichfunction, first turn it on as shownyou do not want to receive faxes
Anti Junk Fax on and off
Step ~ Press these keys:
STOP
o(sL “
faxes from parties which“junk” faxes.
below, and then enter theas shown on the following
fax numberspage.
Comments
ANTI JUNK FAX will appear in the display.
ANTI JUNK SELECT will appear in the display.
Press “1”to turn Anti Junk Fax on, or “2” to turnit off.
Exit.
6-22 SPECIAL FUNCTIONS
.
ANTI JUNK FAX
Storing and clearingjunk
Comments:
Up to 10numberscan be entered in the Anti Junk Number List.
To clear a number from the Anti Junk Number List, you need to know the 2-digit numberwhich identifies it. If you have forgoflen this number, printout the Anti Junk Number List asdescribed in Chapter 8.
Step ~ Press these keys: CommentsI
FUNCTION
I:c—) m ANTI JUNK FAX will appear in the display,
2 0# JUNK FAX # MODE will appear in the display.
I
3 [ ~ or ~ Press “1”to store a fax number in the Anti JunkFax List, or “2” to clear a fax number from the list.
Storing: Enter a number from “01” to “1O”. This(~ ~ number identifies the fax number you will store
4 in the next step.Clearing:Enter the number which identifies the
(Example) fax number you want to clear, and go to Step 6.
i @ m “a a ‘a ~ @5 ; (Example) Enter the fax number (max. of 20 digits).
,I
START
6! of@
I STOP
7 [ Step 4 orI Q
GReturn to Step 4 to enter (or clear) anothernumber, or press STOP to exit.
SPECIAL FUNCTIONS 6-23
ANTI JUNK FAX
Notes
6-24 SPECIAL FUNCTIONS
A variety of optional settings are available which you can use to fine-tune your fax tobetter suit your needs. The settings are made by pressing the panel keys, and eachsetting is described in the list below.
Step ~ Press these keys: CommentsI
!
FUNCTION
II (-- a OPTION SETTING will appear in the display. I
‘ @ or Q Move through the list ~f settings by pressing “#” [2 to move forward, or “*” to move backward. The
settings will appear in the order listed below.
I, m i~hen the desired setting appears in the display,3 (Example) change it appropriately as described below. ,
STOP
o—\@’ Exit.L ‘4
Setting 1: FINE RESOLUTION PRIORITYThis sets the default resolution (the resolution used if a setting is not made with theRESOLUTION key) for transmitting documents. Press “1”(YES) to set it to FINE, or “2” (NO) toset it to STANDARD.
. Factory setting: “2”
Setting2: NUMBER OF RINGS AUTO RECEPTIONThis sets the number of rings your fax allows before answering an incoming call in AUTOreceive mode. Enter a number from “O”to “4” (if “O” is entered your fax will answer withoutringing).
s Factory setiing: “1”
Setting3: NUMBER OF RINGS MANUAL RECEPTIONThis sets your fax to automatically answer a call after a certain number of rings when it is inmanual reception mode. Any number from “()” to “4” can be entered (enter “O” if you don’t wantyour fax to answer automatically).
● Factory setting: “c)”
OPTIONAL SETTINGS 7-1
OPTIONAL SETTINGS
Setting4: ACTIVITY REPORT AUTO LISTINGPress ““l” (YES)” to have your fax automatically print out an Activity Report once every 30operations. (The list can still be printed out manually when desired.) Press “’’2” (NO)” to turnautomatic print-out off.
. Factory setting: “2”
Setting5: TRANSACTION REPORT PRINT SELECTThis sets the condition for printing out Transaction Repofls. Enter a number from “1”to “5”asfollows:
“1“(ALWAYS PRINTS): Print out after each transmission, reception, or error.
“2” (ERR/’TlMER/MEM.): Print out only after an error, a timer operation, or a memoryoperation.
“3” (SEND ONLY): Print out only after a transmission.
“4” (NEVER PRINT): Never print out.
“5” (ERROR ONLY): Print out only after an error occurs.
. Factory setiing: “5”
Setting6: AUTO FAX/PHONE CHANGEOVERPress”1” (YES) to have your fax detect whether incoming calls are voice calls or faxtransmissions in automatic reception mode. Press “2” (NO) to turn the function off.
. Factory setting: “2”
Setting7: PSEUDO RINGING DURATIONThis sets the duration of pseudo ringing when Automatic FatiPhone Changeover is turned on.Enter a number from “1”to “2” as follows:
“1” (15 SEC.): 15 seconds
“2” (30 SEC.): 30 seconds
. Factory setting: “1”
Setting8: TEUFAX REMOTE NUMBER (TRANSFER CODE)This sets the 1-digit number for activating fax reception from an extension phone, Enter anynumber from “O”to “9”.
● Factory setting: “5”
Setting 9: REMOTE RECEPTION SELECTThis turns detection of the code for activating fax reception from an extension phone on or off.Press “1” to turn detection on, or “2” to turn detection off.
. Factory setting: “1”
Setting10: FAX SIGNAL RECEIVEYour fax is set to automatically begin reception if you hear a high-pitched fax tone afteranswering a call. If you use a computer fax modem on the same line, you must turn this settingoff in order to prevent your fax from mistakenly attempting to receive documents sent from thecomputer fax modem. Press “2” to turn the setting off, or”1” to turn it on.
● Factory setting: “1”
7-2 OPTIONAL S~lNGS
.
OPTIONAL SE~lNGS
Setting 11: AUTO COVER SHEETPress “l”(YES) to have the fax automatically generate a cover sheet and send it as the lastpage of each transmission. Press “2” (NO) to turn the function off.
. Factory setting: “2”
Setting 12: COPY REDUCEThis sets the amount by which copies are reduced before printing to ensure that data on theedges is not cut off. Enter a number from “1” to “3” as follows:
“1 (REDUCE AUTO)”: Automatic reduction depending on the size of the originaland the printing paper.
“2 (REDUCE 100 yO)”: No reduction.
“3 (REDUCE 95 ‘4)”: Reduction of A4 size originals to the printing paper size.
● Factory setting: “2”
Setting 13: RECEIVE REDUCEThis sets the amount by which received documents are reduced before printing to ensure thatdata on the edges is not cut off. Enter a number from “l” to “3” as follows:
“1 (REDUCE AUTO)”: Automatic reduction depending on the size of the originaiand the printing paper.
“2 (REDUCE 100 %)”: No reduction.
“3 (REDUCE 94 Ye)”: Reduction of A4 size originals to the printing paper size.
. Factory setting: “1”
Setting 14: COPY CUT-OFFPress”1” (CONTINUE) to have documents longer than the printing paper be continued on asecond page when copied. Press “2” (CUT-OFF) to have the part outside that length not printed.
● Factory setting: “2”
Setting 15: FOOTER PRINTPress”1” (YES) to have the transmitting machine’s fax number (if provided) together with thedate and time of reception printed at the bottom of each page you receive (this is in addition tosimilar information printed at the top of each page). Press “2” (NO) for no footer printing.
. Factory setting: “2”
Setiing 16: DIAL MODEThis sets the mode of dialling. Press”1” if you are on a tone dial line, or “2” if you are on a pulsedial line.
. Factory setting: “1”
Setting 17: DISTINCTIVERINGINGIf you subscribe to a distinctive ringing service from your telephone company, press “l” (YES) tohave your fax signal voice calls and fax transmissions by different ringing patterns. Press “2” toturn the function off,
● Factory setting: “2”
OPTIONAL S~lNGS 7-3
OPTIONAL SETTINGS
Setting18: ERRORCORRECTIONMODE (ECM)Press “l” (YES) to have any distortions in a transmission due to noise on the telephone line becorrected before print-out at the receiving end. This is only effective when the other machinehas ECM as well. Press “2” (NO) to turn the function off.
. Factory setting: “1”
Setting19: RINGING VOLUMEThis sets the volume of the ringer. Press “l” for low, “2” for middle, or “3” for high.
. Factory setting: “2”
7-4 OPTIONAL SEITINGS
You can print out a variety of lists showing settings and information entered in the fax.You can also have the fax automatically print out a report on transactions after theyare made. Each list and the report is described below.
I Step Press these keys: Comments
LISTING MODE will appear in the display.
2 @ 0’ @Move through the lists by pressing “#” or “*”.Stopwhen the desired list appears in the display.
START
3 2; + Print out the list.
This report shows information on up to 30 of the operations most recently performed.The report is divided into two parts: the TRANSMISSIONS ACTIVITY REPORT, whichshows information on transmissions, and the RECEPTIONS ACTIVITY REPORT,which shows information on receptions.
If Option Setting 3 is set to “1”, a report will be automatically printed out wheneverinformation on 30 operations has accumulated. (A report can still be printed outmanually at any time. )
All information is erased after a repofi is printed out. If automatic print-out isdisabled and print-out has not been performed manually for 30 operations, theinformation on the oldest operation will be overwritten each time a new operation isperformed.
Explanationof headings
SENDER/RECEIVER
START
TX/RX TIME
PAGES
TYPE
PRINTING OUT REPORTS AND LISTS
The name or fax number of the other machine involved in the transaction. If that machinedoes not have an ID function, the communication mode will appear (for example, “G3”).
The time at which transmission/reception started.
Total time taken for transmissionireception.
Number of pages transmitted/received.
CONF. TX - A confidential operation was performed.
RELAY TX - A relay operation was performed.
(T) - A timer operation was performed.
(M) - The memorywas used.
8-1
PRINTING OUT REPORTS AND LISTS
NOTE OK - Transmission/reception was normal
P.FAIL- A power failure occurred.
JAM - A problem with the printing paper or document occurred.
BUSY- The line was busy.
COM.E-O to COM.E-7 - A telephone line error prevented the transaction. Explanationsof the error numbers are given in the following tables, however, these are primarily foruse by service engineers. In general. you will want to simply try the transaction again. Ifnecessary, check with the other party to make sure their machine is functioning properly.
CANCEL - Transmissionwas cancelledbecausethe STOP key was pressed, nodocument was in the feeder, or the other machine requested transmission using afunction which your fax does not have.
CANCEL 3- Confidentialtransmissionwas cancelledbecausethe receiving machinedoes not have a confidential function. a confidential passcode is not programmed in it,its memory is full, or it is not a Sharp model.
CANCEL 4- Confidentialtransmissionwas cancelledbecause an incorrect mailboxnumber was entered for a fax machine with confidential mailboxes.
CANCEL 5- A relayrequestwas not successful because the machine to which therequest was made has no relay function, it is not a Sharp model. or its memory was full.
CANCEL 6- A relayrequestwas notsuccessfulbecauseyour machine’s fax numberhas not been entered into the relay machine’s list of permitted numbers, an automaticdialling number not stored in the relay machine was specified, or your fax number hasnot been entered in your machine as described in Chapter 2.
Transmission errors
E-() ~ .AA~r~orecognise handshake signal, but it has
I cannot recognise the handshake si9na~‘remE-1 ~
the receiverside.
E-2 Linedisconnectedduringtransmission.1
E-3 Linedisconnectedafter modemspeed fall- 1back.
\E-4 Linedisconnectedduringmulti-page
transmission. I
E-6 Cannot recognize the handshake signal for
\next page at receiver side.
E-7 No response from receiver side or “disconnect ‘signal” is received at transmitter side.
Error was not corrected after theE-8 predetermined number of retries because of /
an error In a part of a page.
; Error occurred after or whiist reception by theE-n I remote (receiving) machine was revealed to be
; impossible.I
E-12 Error occurred just after fall-back.
E-13 ~ Error occurred after a response to aretransmission end command was received. ]
Reception errors1
II Able to recognise handshake signal, but it has/ E-O ;
II errors.I
; E-1 ; Line disconnected during reception.I~ E-2 ~ Cannot recognise the handshake signal from
the transmitter side.,~ E-s , Cannot recognise the last handshake signal
from the transmitter side.)i Cannot recognise the handshake signal for~ E-4 next page from the transmitter side in the
case of mode change.I
I E-5 Cannot recognise the handshake signal for ,next page from transmitter side.
~ E-7 No response from transmitter or “disconnectsignal” is received at receiver side.
E-8 Error occurred upon completion of receptionof all pages.
Error occurred when mode was changed or! E-9 transmission/reception switching wasI performed.~ ,: E-10 Error occurred during partial page or physical[ page reception.
Error owurred after or during inquiry from the~ E-II ~ remote (transmitting) machine as to whether
i reception was possible or not.
~ E-12 Error occurred during or just after fallback.
; E-13 Error occurred after retransmission endcommand was received.
~ E-I4 Error occurred after voice communication, command was received.
)
8-2 PRINTING OUT REPORTS AND LISTS
.
PRINTING OUT REPORTS AND LISTS
This list shows the timerwhich are currently set.
operations
This list shows the fax and voicenumbers which have been storedfor automatic dialling, the numbersin the relay group, your name andfax number as entered in your fax,and a sample of the header printedat the top of every page youtransmit.
-.,.... .- ..
..... :..
.— — —’: # .: . . ,.-..
: , ~ --“ ‘,,.
.,:..;;!.,;
This list shows the fax numberswhich have permission to poll you.
This list shows the current status ofthe optional settings,
PRINTING OUT REPORTS AND LISTS 8-3
PRINTING OUT REPORTS AND LISTS
The top part of this list shows theprograms which have beenentered. The bottom pati shows thefax numbers which have beenstored in each Group Key.
This list shows the fax numbersfrom which reception is not allowed.
This report is printed out automatically afier an operation is completed to allow you tocheck the result. Your fax is set at the factory to print out the report only when an erroroccurs, but you can change the setting to have it printed out after every operation,only after certain types of operations, or not at all. This is done by changing OptionSetting 5 as described in Chapter 7
+ The Transaction Repoti shows“Activity Report” in this chapter
f.
the same information as the Activityfor an explanation of the headings.
+ The report cannot be printed out manually.
---
Report. See
8-4 PRINTING OUT REPORTS AND LISTS
. \\,\
Clean the reading glass and rollers frequently to ensure the quality of transmittedimages and copies, Open the operation panel (pull the panel release on the right sideof the fax forward), and clean the parts as shown below.
White backplate Wipe the reading glass, whitebackplate, and rollers with a soft cloth.
. Make sure that all dirt and stains (suchas those of correcting fluid) areremoved, as these will cause verticallines on transmitted images and copies,
Readingglass
Wipe the external parts and sutiace of the machine with a dry cloth.
Caution! .
● Do not use benzene or thinner. These solvents may damage or discolour the machine.
MAINTENANcE 9-1
MAINTENANCE
If some of the characters are missing from the printed page, the surface of the drum inthe drum cartridge may need cleaning. Follow the steps below to clean the drum.
1 f \ Remove any documents from thereceived document outlet. Open theoperation panel, and remove thereceived document guide, the imagingcartridge, and the drum cartridge. (Fordetailed instructions, see Steps 1 to 4in “installing the Printer Cartr-idges” inChapter 1.)
. Caution! The fusing unit (the black unitwith ribs extending across the bottomof the compartment) becomes very hotduring printing. Be careful not to touchit.
2 Place the drum gently on a clean,uncluttered, and level surface.
. Do not touch the green drum in thedrum cartridge, and do not expose thedrum to direct light. Doing so willdamage the surface of the drum.
3 Take a sheet of ciean paper and roll it
m. ~ ** tightly into a tube. Gently tap thesuflace of the drum with the tube topick up any particles of toner whichmay be sticking to the drum.
)\w
. Caution! Do not touch the drumsurface with the edges of the rolled uppaper or wipe the drum with the paper.This will damage the drum.
Replace the drum cartridge, imagingcartridge, and received documentguide. Close the operation panel. (Fordetailed instructions, see Step 6 andSteps 10 to 14 in “installing thePrinter Cartridges” in Chapter 1.)
9-2 MAINTENANCE
PROBLEMSAND SOLUTIONS
.
The problems listed below deal mostly with fax and copy operation. For detailedinformation on printing problems, see “Problem Solving” in online Help in WindowsPrinting System.
I
Problem Check and remedy I
Nothing appears in the display.●
●
m
The fax does not respond when you .press any of its keys.
Make sure the power cord is properly plugged into a poweroutlet.
\
Make sure the power switch has been switched to the ‘correct position.
Connect another electrical appliance to the outlet to confirmthat it has power.
If a beep sound is not made when you press the keys, turnoff the power and then turn it back on several seconds later.
Automatic document feeding does . Check the size and weight of the document (seenot work for transmission or copying. “Transmittable documents” in Chapter 4).
Dialling cannot be performed. ● Make sure the power is on.
. Make sure that the telephone line is properly connected toboth the TEL. LINE socket and the wall socket.
. Make sure that the fax is set to the correct dialling mode foryour telephone line. See OptionSetting 16 in Chapter 7.
Nothing is printed at the receiving ● Make sure that the document for transmission is placed faceend. down in the feeder.
,● Make sure that the printing paper is properly loaded in the
receiving machine.
The power is on, but no ●
transmission takes place.
●
A distorted image is received at the .other end.
●
Make sure that the receiving machine has printing paper.
If the receiving machine is in manual mode with noattendant, reception will not be possible.
If the receiving machine is not a Sharp model, make sure it isG3 compatible.
Check the display for error messages.
Pick up the handset and check for a dial tone. Call the,
receiving machine by nomal (manual) dialling, and confirm /its response. I
Noise on the telephone line may cause distortion. Trysending the document again.
Make a copy of the document on your fax. if the copy is alsodistorted, your fax may have a problem. If the problempersists. call for service.
TROUBLESHOOTING 10-1
PROBLEMS AND SOLUTIONS
The printing paper does not come . The printing paper may be jammed. See “Clearing Jammedout. Printing Paper” in this chapter.
● Make sure that the printing paper is properly loaded in yourmachine.
~ ● Make sure the power is on.
The printing paper comes out blank. Make sure that the document is loaded properly in the feeder
of the transmitting machine. Make a copy to confirm thewhen you try to receive a document. printing ability of your machine.
● Ask the other party to send higher contrast documents. If theThe received document is faint. ‘ contrast is still too low, your fax may have a problem. Make a
copy to check it.
● The imaging cartridge may need replacement.
Received images are distorted.. Noise on the telephone line may cause distortion. Have the
other party try sending the document again.I
. Make a copy of another document on your fax. If the copy isalso distorted. your fax may have a problem. If the problempersists. call for service.
. The photoconductor drum may be damaged. Try a new drumcartridge.
No confidential transmission or . Check the message in the display. See the next section,relay broadcast occurs. “Display Messages”.
. The operation of this equipment on the same line as the
Bell Tinkle telephone or other equipment with audible warning devices
(New Zealand) or automatic ring detectors will give rise to bell tinkle or noiseand may cause problem occur, contact your Sharpauthorised Service Centre for information.
10-2 TROUBLESHOOTING
.
MESSAGESAND SIGNALS
I
CHECK PAPER ~ You are out of printing paper.
CONF REFUSED~ A confidential transmission has been denied because you~ entered an incorrect mailbox number for a machine with
. ‘ mailboxes.
COVER OPEN~ The printer cover (or received document guide) has been1 removed or is open. Replace or close it.!
DOCUMENT JAM; The original document is jammed. See the following section,; “Clearing Paper Jams”.
j A fax has been received in memory because the imaging
FAX RX IN MEMORY ~ cartridge needs replacement, the fax machine has run out of~ printing paper. or the paper is jammed. The fax will be printed
out automatically once the problem is fixed.
FUNCTION MODE The FUNCTIONkey has been pressed.
LINE ERROR ~ Transmission or reception was not successful. Press STOP to; clear the message, and then try again.
MEMORY FULL ; The memory is full. See “Memory” in Chapter 6.
I
MEMORY PRINTING ~ The fax is preparing or printing out a document from memory,I,~ Confidential transmission was cancelled because the receiving
NO CONF. FUNC machine does not have a confidential function, a confidentialII Passcode is not programmed in it, its memory is full, or it is notI a Sharp model.
i~ A relay request has been denied because the other machine
NO RELAY FUNC ~ does not have a relay broadcast function, its memory is full, or~ it is not a Sharp machine.I
PANEL OPEN I The operation panel is open. Close it.
PAPER JAM The printing paper is jammed. See the following section,; “Clearing Paper Jams”.
TROUBLESHOOTING 10-3
MESSAGES AND SIGNALS
ONHOOK DIAL MODEThe SPEAKERkey has been pressed and the fax is waitingfor you to dial.
IA relay request has been denied because your fax numberhas not been entered in the relay machine-s list of permitted
RELAy REFUSED ~ numbers,an automaticdialling numbernot stored in the relay‘ machinewas specified,or your fax number has not been
entered in your machine.
RESERVE READY~ The machine is ready to reserve a transmission (see
“Transmission reservation” in Chapter 6).—..— —
REPLACE TONERThe imaging cartridge needs replacement, or has not beeninstalled.
—
The connection was not made when automatic dialling wasRECALL MODE attempted. The fax will make up to 2 redialling attempts at
intervals of 5 minutes.
Continuoustone 3 secondsindicates the end of transmission, reception, orcopying.
Rapid intermittent tone 0.5 seconds on,0.5 seconds off
indicates that the printer cover is open.
35 secondsRapid intermittent tone (0.7 seconds on, indicates that the handset is off hook.
0.3 seconds off),
10-4 TROUBLESHOOTING
.
CLEARINGPAPERJAMS
if a document doesn’t feed properly during transmission or copying, or DOCUMENTJAM appears in the display, first try pressing the START key, If the document doesn’tfeed out, open the operation panel (pull the release on the right side of the faxforward) and pull it out gently. -.<
1 If most of the jammed page isprotruding from the back of the fax,try pulling it out.
. If the jammed page comes out, clearthe “PAPER JAM” message in thedisplay by resetting the stack ofprinting paper (pull the lever marked“PULL” on the paper tray toward you,take out the stack of paper, put it backin, and push the lever back down).
. If you are unable to clear the paper jamin this way, continue with the followingsteps.
nL Remove any documents from the
received document outlet. Open theoperation panel, and remove thereceived document guide, the imaging1.,I,\ cartridge, and the drum cartridge. (Fordetailed instructions, see Steps 1 to 4in “installing the Printer Cartridges” inChapter 1.)>’-”’
/.- %’.- /~2/ ● Caution! The fusing unit (the black unit..., ?,/ /“/</, with ribs extending across the bottom
of the compartment) becomes very hotduring printing, Be careful not to touch
. it.,
TROUBLESHOOTING 10-5
CLEARING PAPER JAMS
3 Wrap the drum cartridge in a largesheet of paper as shown at left so thatthe green drum section is shieldedfrom light, and place it gently on alevel surface.
●
●
Do not touch the green drum in thedrum cartridge. This will damage thesurface of the drum.
Do not expose the drum to direct light.This will damage the drum.
4 , Fusing unit If the leading edge of the paper has
/’ entered the fusing unit, turn the wheelon the top, right side of the fusing unitin the direction of the arrow until theleading edge of the paper is releasedfrom the unit.
●
●
Wheel
Caution! Do not pull the paper out ofthe fusing unit with your hands. Thismay cause toner smudges onsucceeding pages.
Important: Do not turn the wheel inthe direction opposite that of the arrow.Also, note that the wheel will not turn ifthe drum cartridge has not beenremoved.
5 Grasp the leading edge of the paper,and pull it gently out of thecompartment.
10-6 TROUBLESHOOTING
.
.
CLEARING PAPER JAMS
6
/
Replace the drum cartridge, imagingcartridge, and received documentguide. Close the operation panel. (Fordetailed instructions, see Step 6 andSteps 10 to 14 in “installing thePrinter Cartridges” in Chapter 1.)
ITU-T (CCITT) G3 modeHalf-duplex. desktop transceiver512 KB (approx. 39 average pages with ECM function off)1 MB add-on available as optionModified Huffman and Sharp special modeFlat-bed. solid-state CCDHorizontal\:8 IinesimmVertical:standard — 3.85 lines/mmFine /Halftone- 7.7 Iines/mmSuper fine — 15.4 lines/mmMax. 4 pages/rein. (A4)200 dpi (received and copied documents)300 dpl (pr!nter)7 x 5 dots. I iine by 16-digit displayAuto/Manual/Answering machine9600 bps ,vith automatic fallback to 7200, 4800, or 2400 bpsApprox. 13 seconds (Sharp special mode)202 mm (average)100 sheets60-90 g/m2 (A4)Automatic feeding:Width — 148 to 216 mmLength — 128 to 356 mmManual feeding:Width — 148 to 216 mmLength — 128 to 1000 mm210 mm max.52-157 g~~z (one sheet at a time)52-80 g/m< (several sheets)20 sheets max.32 levelsAutomatic:Dark selectableSingle/Mu iti-copy/Sofl-copy (99 copies/page)Max. 3 communications230-240 \/ AC, 50 Hz10- 30’CStand-by: 7 WTransmission: 25 WReception: 640 WCopy: 680 iNMaximum: 680 WWidth: 360 mmDepth: 412 mmHeight: 169 mm(Without attachments)Approx. 7.2 kg
* Based on ITU-TTest Chart #l at standard resolution in Sharp special mode, excluding time for protocolsignals (i.e., ITU-T phase C time only).
As a pan of our policy of continuous improvement, SHARP reserves the right to make design andspecification changes for product improvement without prior notice. The performance specificationfigures indicated are nominal values of production units. There maybe some deviations from thesevalues in individual units.
IMPORTANT-READ CAREFULL’f 6EFC)RE OPENING SOFTWARE PACKET(S) ANDIC)R USING THESOFIWARE.By openingthesealedpacket(s)containingthe softwareand/orusing the software. you indicateyour acceptance of the following Software License Agreement.
SHARP LICENSE AGREEMENT(Microsoft Windows Printing System Software)
This is a legal agreementbetween you (either an inaiv[dual or an entity) and Sharp Corporation. By opening the seaieasoftware packet(s) and/or using the software. YOUare agreeing fO be bound by the terms Of ~hls agreement if You do ‘?o~agree to the terms of this agreement. promptly return the F-2700M(FACSl MlLE MACHINE), the software pacKet(s; anathe accompanying items (including written materials and binders or othercontainers)to the place you obtained therr ‘or afull refund.
SHARP SOFTWARE LICENSE
1. GRANT OF LICENSE. ThisLicenseAgreemenlpermits you to use the Microsoft software program(s) Inclucec nthis package (the ‘SOFTWARE”) in the foilowlng manner: (a) use the SOFTWARE on a single computer ana ~a~eone copy of the SO~WARE In machine-reacsable~ormfor backup purposes oniy; and (b) make copies of use IbaIportion of the SOFTWARE wnlch Is identified as ‘Host Software” on one or more computers connec~ed ‘c ‘$eFACSIMILE MACHINE.
2. GRANT OF LICENSE FOR FONT SOFIWARE (if included). If the SOF~ARE contains portions vvhlchareidentified as “Font Software”. you may use one copy of the Font Software oniy on a singie computer connec~eato the FACSi MiLE MACHi NE. The Font Software IS“in use” on a computer when it IS ioaded Into the temporar;~memory {i.e., RAM) or instaiied into the permanen~memory (e.g., hard disk, CD-ROM or other storage device I ~fthat computer. in addition, If the Font Software ISpot cooy protected you may either (a) make one coPy of the ;~n:Software soieiy for backup or archivai purpose. or (b) transfer the Font Software to a singie hard disk proviceayou keep the originai soleiy for backup or archival ourpose.
3. COPYRIGHT. The SO~WARE is owned by Microsofi Corporation or Sharp Corporation and is protected by Unl~edStates copyright laws and internationai treaty ~rovisions and other applicable nationai iaws. Therefore. you TUSItreat the SOFIWAR E like any other copyrlghtea materlai. You may not copy the user documentation accompanyingthe SO~WARE.
4. SOWARE MEDIA. You receive the SOFT~VARE on disk. Except as expressiy permitted In SectIons ? ana 2above. you may not use the SOFTWARE In any media on another computer or device or loan. rent, lease. ortransfer the SOFTWARE to another user excep[ as part of the permanent transfer (as provided below) of :heFACSiM iLE MACHiNE and ail SO~WARE and user documentation.
5. OTHER RESTRICTIONS. You may not rent or ease the SOFTWARE, but you may transfer the FACSIM!LEMACHi NE, the SO~WARE, and accompanying user documentation on a permanent bas[s provided you retainno copies and the recipient agrees to the terms cf th!s agreement. You may not reverse engineer, decomplie, ordisassemble the SOFIWARE, uniess otherwise ~rovlded in the WARRANTY AND SPECiAL Provisions. If theSOF~ARE is an update or has been updated. any transfer must inciude the most recent update and aii pr]orversions.
6. U.S. GOVERNMENT RESTRICTED RIGHTS. The SOFTWARE and documentation are provided wi~hRESTRiCTED RiGHTS. Use, duplication. or disclosure by the United States Government is subject to restrlct~onsas set forth in subparagraph (c)(i)(ii) of The Rights In Technlcai Data and Computer Software ciause at DFARS252.227-7013 or subparagraphs (c)(1) and (2) of the Commercial Computer Software -- Restricted Rights at 48CFR 52.227-19, as applicable. Manufacturer s Microsoft Corporation/One Microsoft Way/Redmond, WA98052-6399.
Piease see the WARRANTY AND SPECIALPROVISlONSfor information concerning governing law.
For product support. please contact an authorized representative. Product suppofi for the SOFIWARE is
not provided by Microsoft tirporation or its subsidiaries. Should YOUhave questions concerning this agreement.please contact Sharp Corporation.
LIMITED WARRANTY AND SPECIAL PROVISIONS
LIMITED WARRA~. Sharp warrants that the SOFTWARE will perform substantially In accordance with theaccompanying written materials for a period of ninety (90) days of receipt. Any Implied warranties on theSOFTWARE are limited to ninety (90) days. Some states/jurisdictions do not allow limitations on duration of animplied warranty. sd the above limitation may not apply to you.
CUSTOMER REMEDIES. Sharp’s and its suppller”s entire liability and your exclusive remedy shall be, at Sharp’soption, either (a) return of the price paid, or(b) repair or replacement of the SOFTWAREthat dOeSnotmeetSharpssLimited Warranty and which is returned to Sharp with a copy of your receipt. This Limited Warranty is void if failureof the SO~WARE has resulted from accident, abuse or misapplication. Any replacement SOFTWARE will bewarranted for the remainder of the original warranty period or thirty (30) days, whichever is longer.
NO OTHER WARRANTIES. To the maximum extent permitted by applicable law. Sharp and its suppliers disclaimall other warranties, either express or implied, including. but not limited to implied warranties of merchantabilityand fitness for a particular purpose. with regard to the SOFTWAREandthe accompanyingwrittenmaterials.Thislimited warranty gives you specific legal rights. YOUmay have others which vary from statefiurisdictlon tostate/jurisdiction.
NO LIABILITY FOR CONSEQUENTIAL DAMAGES. To the maximum extent permitted by applicable law. in noevent shall Sharp or its suppliers be liable for any damages whatsoever (including without Iimitation, direct orIndirect damages for personal Injury, loss of business profits, business interruption. loss of business informationor any other pecuniary loss) arising out of the use of or inability to use this Sharp has been advised of the possibilityof such damages. Because some states/jurisdictions do not allow the exclusion or limitation of liability forconsequential or Incidental damages. the above limitation may no?apply to you.
If YOU acquired the SOFTWARE in the United States. the Software License Agreement and this Warranty are governed bythe iaws of the States of Washington. U.S.A. If you acquired the SOFTWARE outside the United States. local law mayapply.
—Notes
‘\‘\.\
.
a
—1 Notes
—
.
SHARP.
SHARP CORPORATIONOF AUSTRALIA PTY.LTD.A.C.N. 003039405