17
2012 Leisto Industrial Co., Limited 2012/2/5 M1000 Automatic Tape Dispenser User Manual

2012
Leisto Industrial Co., Limited
2012/2/5
M1000 Automatic Tape Dispenser User Manual

M1000 Automatic Tape Dispenser User Manual
1 / 16 Back to Table of Content
Leisto Industrial Co., Limited Website: http://www.leisto.net E-mail: [email protected]
Table of contents
1. Warnings
2. Performance Characteristics
3. Components and Functions Description
4. Auto-feed Operating Steps
4.1. Under Semi-auto Condition
4.2. Under Forward Button controlled Condition
4.3. Replace the Tape
4.4. When the Tape Got Stuck
4.5. Replace the Cutting Component
4.6. Replace the Dispense Roller
5. Announcements
6. Troubleshooting
7. Specifications
8. Assembly Drawing
9. Spare Parts List

M1000 Automatic Tape Dispenser User Manual
2 / 16 Back to Table of Content
Leisto Industrial Co., Limited Website: http://www.leisto.net E-mail: [email protected]
Warnings
In order to keep the tape dispenser longer life, the operators should operate the machine following
the instruction manual, that's the do's; below is the six don'ts:
Do not leave the tape dispenser in
direct sunlight.
Do not drop the tape dispenser or
subject it to heavy shocks
Do not use valatile liquids (benzine,
thinner, etc) to clean the tape
dispenser, Wipe with dry cloth only.
Do not use the tape dispenser in
humid or dusty places.
Do not insert bars or plates into the
tape outlet, this will damage the
blades.
Do not insert your fingers into the
tape outlet!
Performance Characteristics Using the tape dispenser, only need to pull the tape to the tape outlet, the machine will
auto dispense the tape at preset length and cut.
LED directly displays the size data, the operation is easy to do, the user only needs to
press or button then the length is set. (Range: 20mm~999mm)

M1000 Automatic Tape Dispenser User Manual
3 / 16 Back to Table of Content
Leisto Industrial Co., Limited Website: http://www.leisto.net E-mail: [email protected]
If need to cut a very long part of tape, keep pressing the button to expect length.
(After set, press button to begin to cut).
Box type cutting parts are convenient to demount and replace. (Simple to deal with the
problem of tape get stuck)
Components and Functions Description
Power Switch Plug in power and start the machine.
Tape Length Display The last digit is MM unit; the first 2 digits are CM unit.
CM and MM button Press the MM button first to set 1 digit millimeter length, and then press the CM button to set 2 digits centimeter digits.
Semi-auto Button Press this button, the tape will auto feed and cut to the preset length
displays on the digital display. (The pressure

M1000 Automatic Tape Dispenser User Manual
4 / 16 Back to Table of Content
Leisto Industrial Co., Limited Website: http://www.leisto.net E-mail: [email protected]
should not exceed 2KG)
Back Button To make the feed roller reverse; use the button can replace the tape.
Forward Button Press this button can make the tape auto feed forward.
Pressure Knob If the pressure setting crimps the tape, please make the pointer point to (H).
Cut Button Press this button can cut the tape.
Reset Button The length will be set to 20mm. If a bug happens, it will stop working.
Auto-feed Operating Steps 1. Plug in power
2. Turn on the power switch (The tape length displays 20)
3. Put the tape to the center of tape base and stick the end part of the tape on the feed
roller surface. Keep pressing the button until the tape’s outputted from the
tape dispenser’s outlet, then pull it by fingers, and done.
If the tape can’t feed freely or the width exceeds 1.5 inch, please comply with the
following procedures:
Fold 1/3 or ½ part at the front end of the tape to make it form a triangle, and stick the
viscous side on the roller until cut smoothly.
4. Press the button to cut the end of the tape.
5. Set the length of the tape. Press button can set the MM length, the
button can set the CM length between 2~99cm. (Under the auto-feed model, the
length is better between 2~20cm.)
6. Set the pressure knob according to the tape type, usually set to S (soft). If the
pressure knob crimps the tape, make the pointer point to (H).
M1000 Automatic Tape Dispenser User Manual
5 / 16 Back to Table of Content
Leisto Industrial Co., Limited Website: http://www.leisto.net E-mail: [email protected]
7. When the auto switch is in the ON position, the tape will auto output and cut to
preset length. When the tape in the outlet is taken, the tape dispenser will auto
output next part of specific length tape.
8. When the machine is on the fly, please make sure auto-feed switch is at close (semi-
auto) status.
9. When operate the machine again, press the button first to cut a little tape, and
press to cut the tape, then set the auto switch to ON status.
Under Semi-auto Condition
1. If the automatic switch is in OFF position, every time the user presses
button, the tape dispenser will output a part of tape with preset length.
2. If need a very long part of tape, the user should take the tape front end from the
outlet when it’s outputted.
Under Forward Button controlled Condition
Keep pressing button until the tape end is outputted, then press button to start
cutting. If need to use a long part of tape, take the tape’s front from the outlet when it’s
outputted.
Replace the Tape
Press button to make the roller reverse, then take out the tape by hand.
When the Tape Got Stuck
When the tape got stuck, it should press the back forward button the reverse the roller,
take out the tape in reverse direction, and then correctly put the tape to the feed roller again. In
addition, take down the cutting components; make sure the tape is not sticked on the blade or
roller.
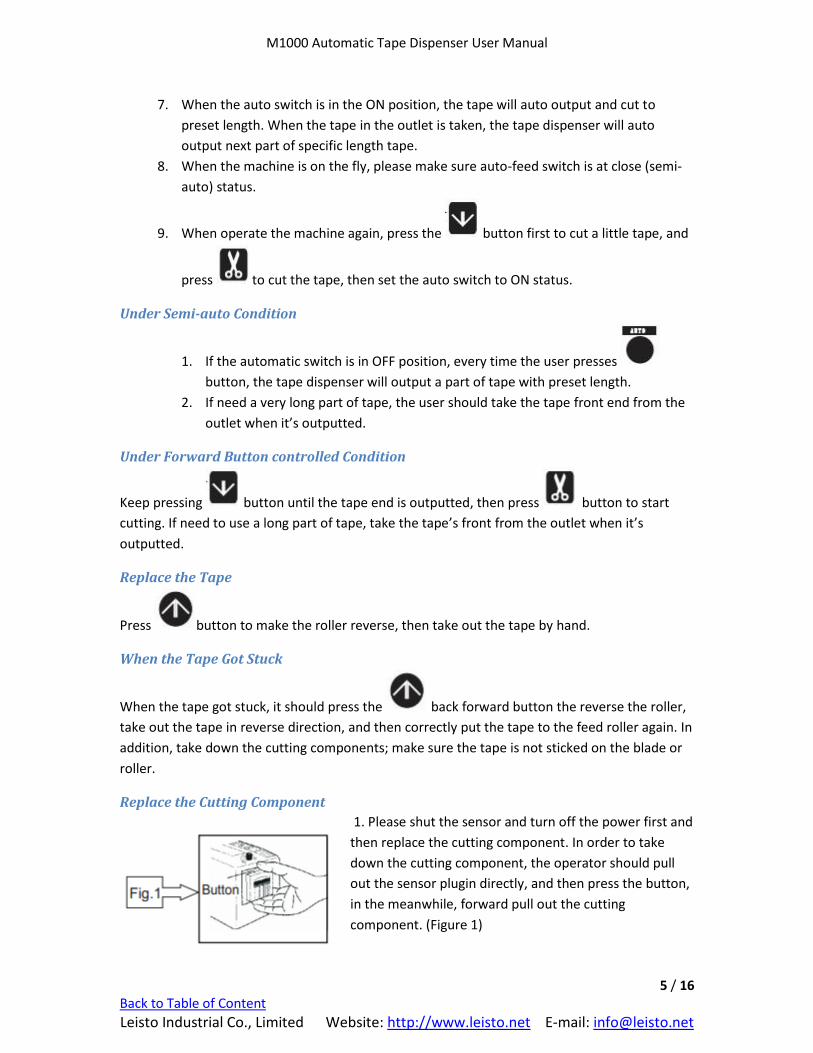
Replace the Cutting Component
1. Please shut the sensor and turn off the power first and
then replace the cutting component. In order to take
down the cutting component, the operator should pull
out the sensor plugin directly, and then press the button,
in the meanwhile, forward pull out the cutting
component. (Figure 1)

M1000 Automatic Tape Dispenser User Manual
6 / 16 Back to Table of Content
Leisto Industrial Co., Limited Website: http://www.leisto.net E-mail: [email protected]
2. Before remount the cutting component on the main
frame, check if the blade is completely dropped. If the
blade doesn’t drop completely, use a screw driver or
sharp end tool to press it down. When remount the
component, adjust the bottom of the component to
make it fit the main frame, then push the upper part to
the frame. (Figure2)
3. Check the insert type of sensor plug; comply with
the correct direction to insert the jack on the main
frame. After the plug is inserted, it will be easy to
mount the cutting component.
Replace the Dispense Roller
When replace the dispense roller, make sure the sensitive switch and power switch are turned
off. Unpin the sensor plug, take down the cutting component, and then use the cross shaped
screw driver to unscrew the 2 screws on Figure 3 marked by arrow.
Then, hold the rubber ring on the middle of the
dispense roller, pull forward to take down the
pedestal body.
Take down the screws on the two sides of roller stand,
then pull out the collar and wheel gear. (Figure 4)
Announcements Comply with the above instructions, put the tape correctly.
If the tape’s front end doesn’t fold when putting the tape, it may got stuck at the outlet.
Applicative Tape Type
Glass paper, manual tape, adhesive plaster, PP paper, double sided tape with interlayer (not
thicker than 0.5mm), fibril paper, aluminum paper and crape paper.
Since the different type of the tape (some are containing tenacity material), so the tape
dispenser may not cut to very exact length as preset. In this case, it needs to adjust the
length properly. If the tape is sticked on the blade, take down the cutting component
and then coat some silicone oil.

M1000 Automatic Tape Dispenser User Manual
7 / 16 Back to Table of Content
Leisto Industrial Co., Limited Website: http://www.leisto.net E-mail: [email protected]
If let the tape dispenser stay in setting status for a long time, it’s probably lead to paper
jam. In this case, press the button to cut a little tape, and then turn on the auto
feed switch.
Troubleshooting If the machine is out of order, please obey the following operating procedures. If the machine is
still out of order, please contact us.
The engine doesn't run. Check the plug and make sure it's plugged in well;
Check the power is turned on
The machine can’t cut tape. Check if all the cutting components are set up correctly.
The digital tube is not lighting.
Check the power switch is turned on;
Check the plug is plugged in well.
The tape can't dispense. Check if the tape is blocked in the roll or cutting components;
Check if the tape is put correctly.
In "Auto Mode" the machine can't work normally.
Check if the plug is plugged in correctly;
Check if the Auto/Semi-auto switch is turned on;
Check if the tape cutting is working correctly;
Check if the sensor is dirty.
The tape can't stop dispensing.
Check if the tape is off normal from the center;
In this case, point the tape to the center of tape outlet, so the sensor can recognize the tape.
Specifications Commodity Name Tape dispenser
Display 3 digits digital tube
Applicative Tape Width 7~50mm
Tape Dimensions Setting Range Automatic range: 20~999mm freely setting
Motor Adopts DC motor to drive the tape Adopts DC motor to drive cutting blade
Color ☐White ☐Gray
Power Consumption 18W
Power ☐AC 110V/60Hz ☐AC220V/50Hz
Circumstance Light Source May happens misoperation under filament lamp, suggest to leave far away. Natural Light: ≤2.000lux
Circumstance Temperature 5~40℃
Circumstance Humidity Less than 80% RH
Size 137mm(W)*218mm(D)*150mm(H)
Weight 2.4KG
M1000 Automatic Tape Dispenser User Manual
8 / 16 Back to Table of Content
Leisto Industrial Co., Limited Website: http://www.leisto.net E-mail: [email protected]
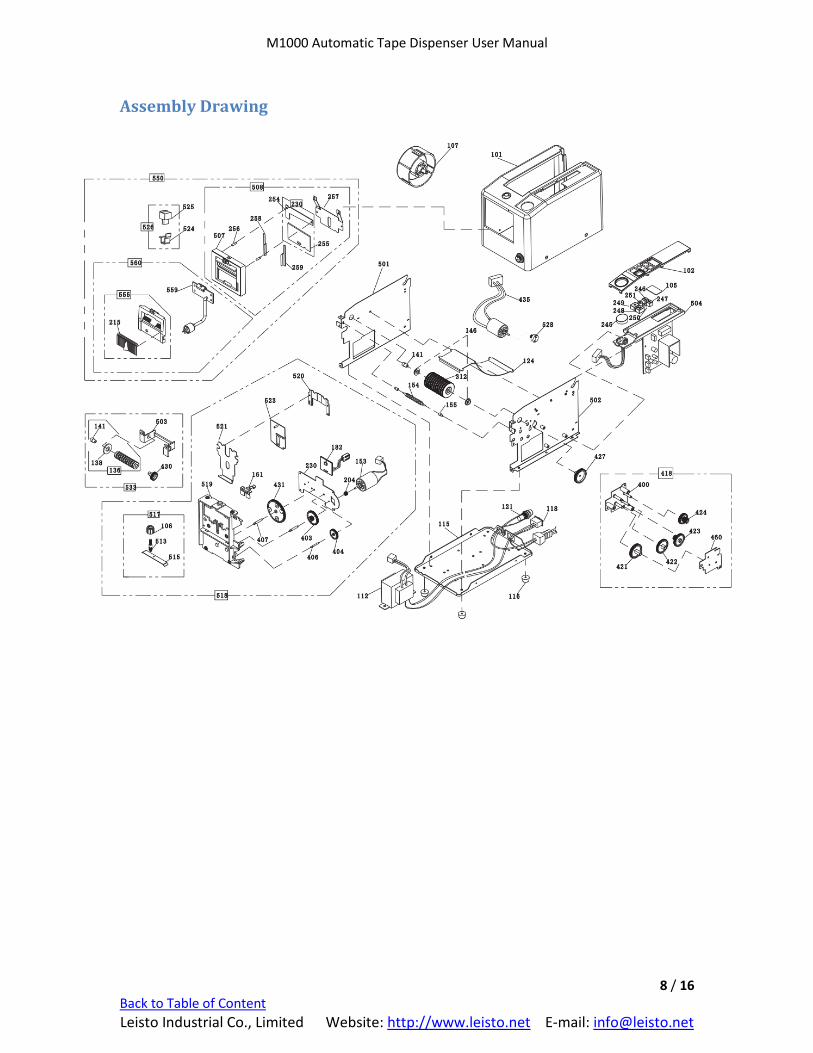
Assembly Drawing

M1000 Automatic Tape Dispenser User Manual
9 / 16 Back to Table of Content
Leisto Industrial Co., Limited Website: http://www.leisto.net E-mail: [email protected]
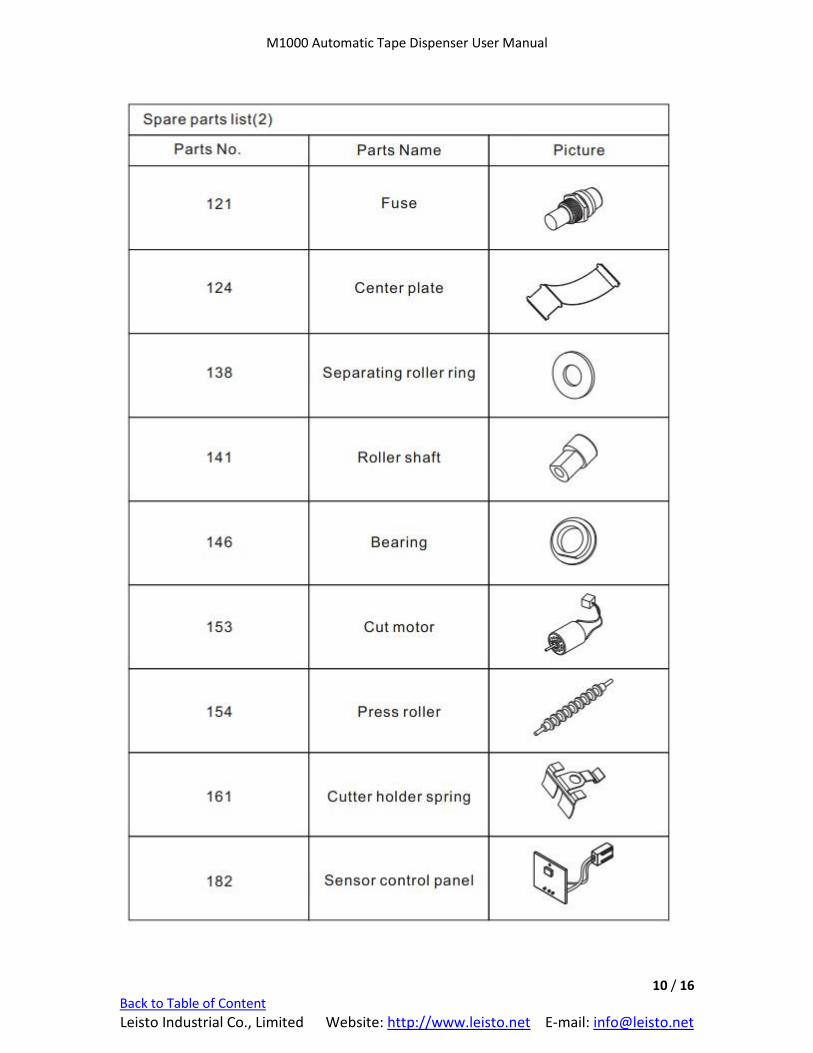
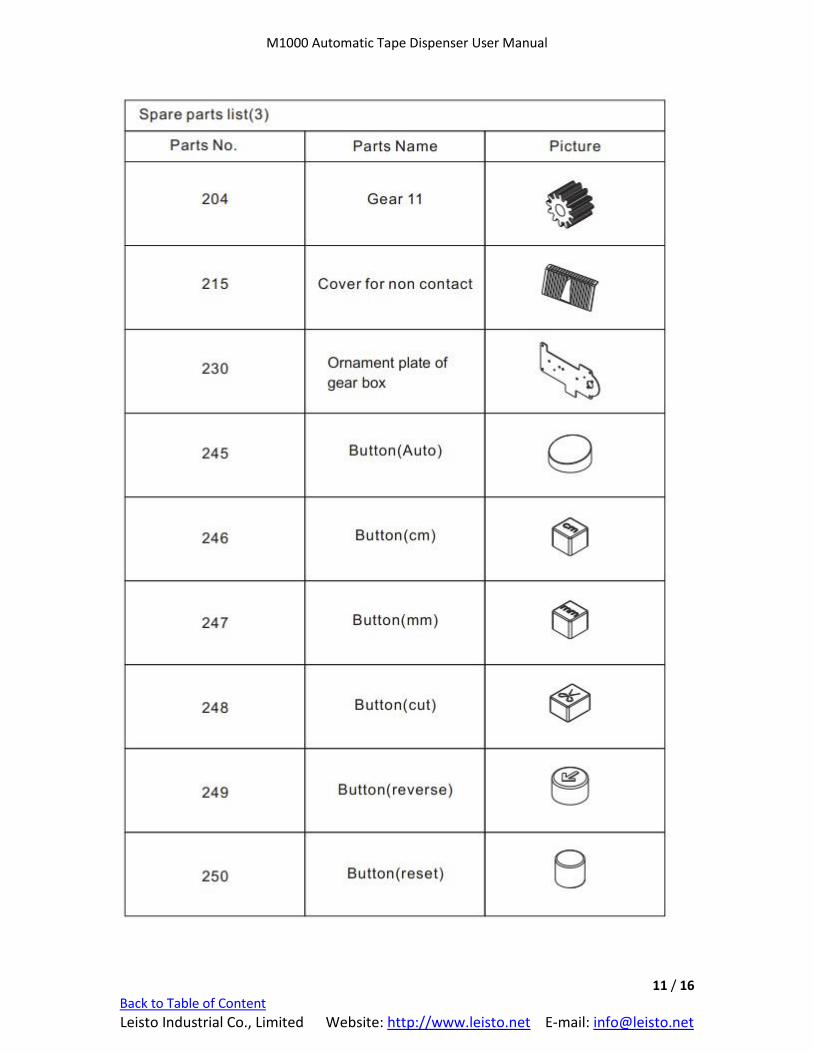
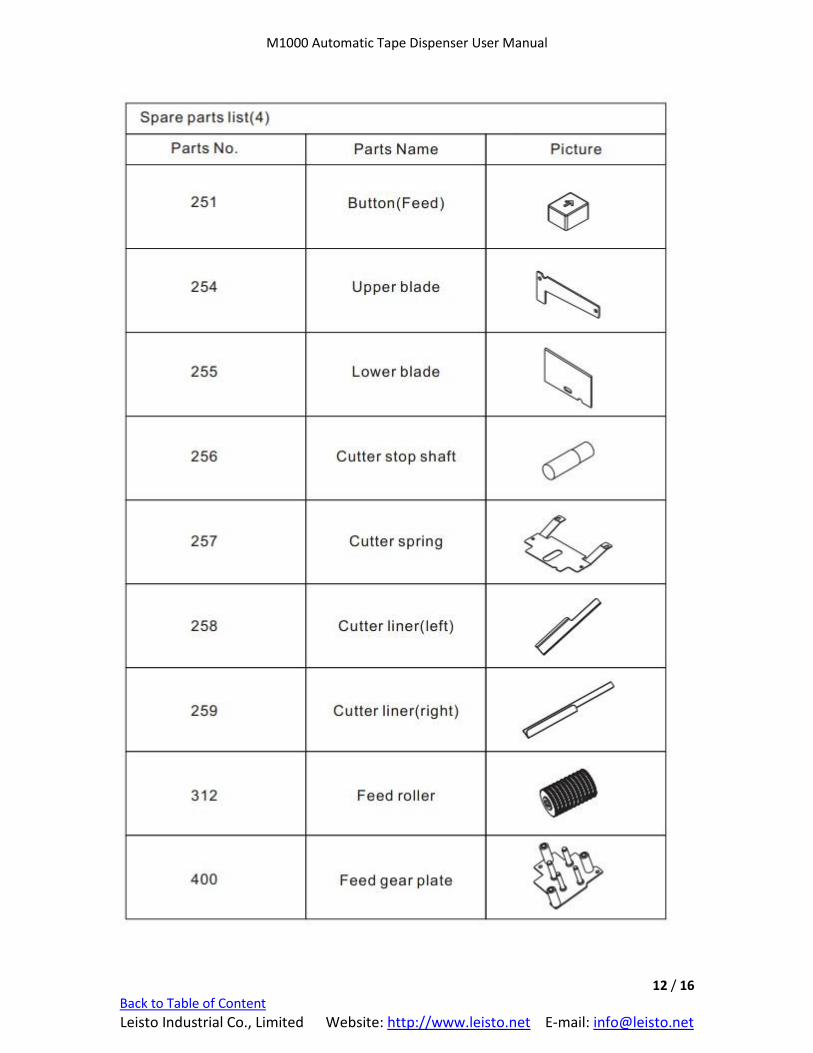
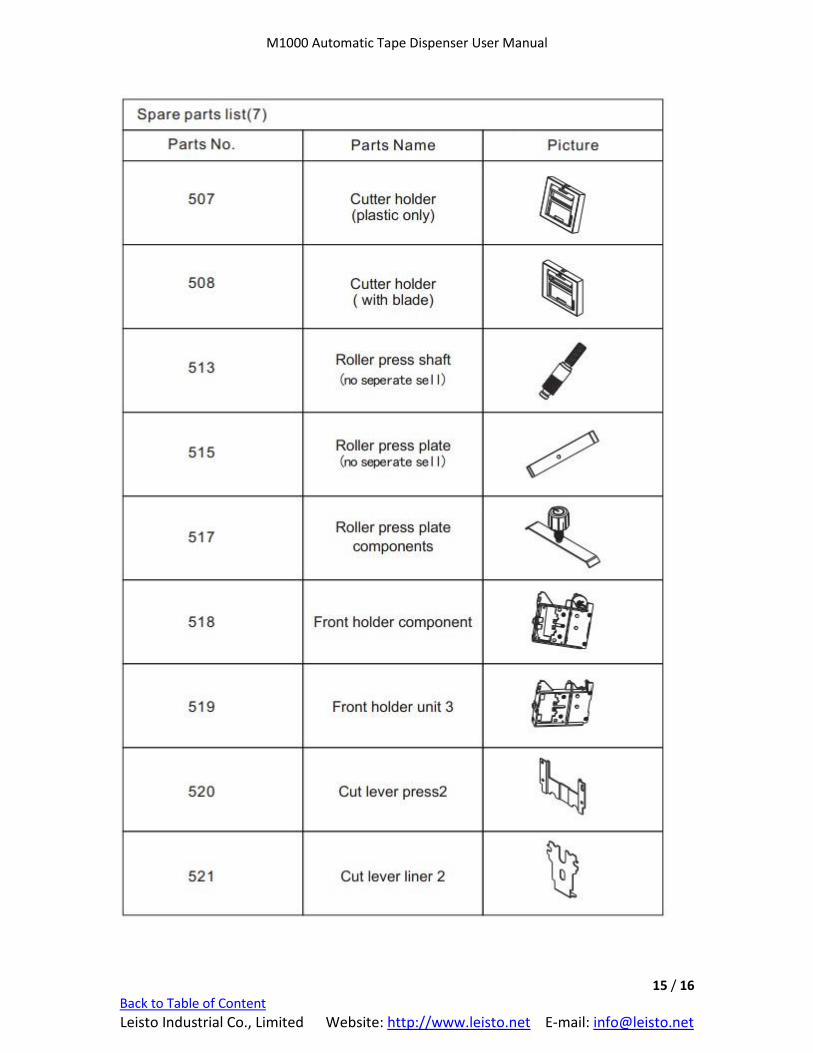
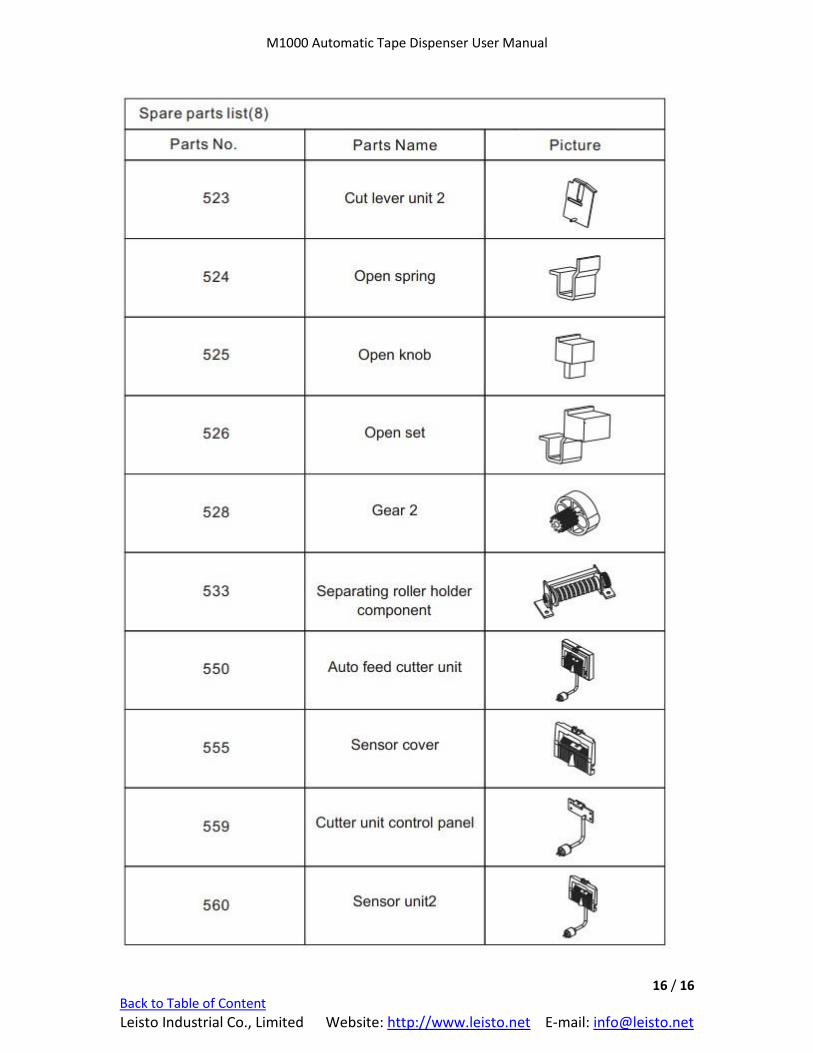
Spare Parts List
M1000 Automatic Tape Dispenser User Manual
10 / 16 Back to Table of Content
Leisto Industrial Co., Limited Website: http://www.leisto.net E-mail: [email protected]
M1000 Automatic Tape Dispenser User Manual
11 / 16 Back to Table of Content
Leisto Industrial Co., Limited Website: http://www.leisto.net E-mail: [email protected]
M1000 Automatic Tape Dispenser User Manual
12 / 16 Back to Table of Content
Leisto Industrial Co., Limited Website: http://www.leisto.net E-mail: [email protected]

M1000 Automatic Tape Dispenser User Manual
13 / 16 Back to Table of Content
Leisto Industrial Co., Limited Website: http://www.leisto.net E-mail: [email protected]

M1000 Automatic Tape Dispenser User Manual
14 / 16 Back to Table of Content
Leisto Industrial Co., Limited Website: http://www.leisto.net E-mail: [email protected]
M1000 Automatic Tape Dispenser User Manual
15 / 16 Back to Table of Content
Leisto Industrial Co., Limited Website: http://www.leisto.net E-mail: [email protected]
M1000 Automatic Tape Dispenser User Manual
16 / 16 Back to Table of Content
Leisto Industrial Co., Limited Website: http://www.leisto.net E-mail: [email protected]


