26
Latthida TRAYMANY ‐ M2 CDMM ‐ Paris 7 Diderot University ‐ November 2009 CamStudio User Guide Version 2.00
Latthida TRAYMANY ‐ M2 CDMM ‐ Paris 7 Diderot University ‐ November 2009
CamStudio User Guide
Version 2.00

2 TABLE OF CONTENTS
CAMSTUDIO USER GUIDE
Table of Contents
About the User Guide .......................................................................... 4Audience ...................................................................................................................4
What you will learn ..................................................................................................4
Before starting ..........................................................................................................4
Typographic Conventions ..................................................................... 5
CamStudio Overview ........................................................................... 6What is it? .................................................................................................................6
What you can do with CamStudio ............................................................................6
Concepts ...................................................................................................................6
CamStudio version ....................................................................................................7
Donation ...................................................................................................................7
Installation .......................................................................................... 8System requirement .................................................................................................8
CamStudio installation .............................................................................................8
Attached applications ...............................................................................................9
Getting Started .................................................................................... 10Launching CamStudio ...............................................................................................10
Interface description ................................................................................................10
Settings ............................................................................................... 12Activating autopan ...................................................................................................12
Setting audio options ...............................................................................................12
Setting audio recording ............................................................................................13
Setting cursor options ..............................................................................................13
Setting program options ...........................................................................................13
Setting SWF options .................................................................................................14
Setting Regions .........................................................................................................14
Setting video options ................................................................................................15
Configuring keyboard shortcuts ...............................................................................16

TABLE OF CONTENTS 3
CAMSTUDIO USER GUIDE
Managing Screen Annotations ............................................................. 17Creating a new shape ...............................................................................................17
Creating a new layout ...............................................................................................19
Editing the image of a shape ....................................................................................20
Editing the text of a shape ........................................................................................20
Managing shapes ......................................................................................................20
Managing layouts .....................................................................................................21
Managing Video Annotations .............................................................. 22
Creating Video Recordings ................................................................... 23Creating an AVI/SWF video recording without screen annotations .........................23
Creating a AVI/SWF video recording with screen annotations ................................24
Converting AVI to SWF format .................................................................................25
Sharing video recordings ..........................................................................................25
Troubleshooting .................................................................................. 26Help ..........................................................................................................................26
FAQ ...........................................................................................................................26

4 ABOUT THE USER GUIDE
CAMSTUDIO USER GUIDE
About the User Guide
Audience
The User Guide is the perfect reference if you are using or planning to use CamStudio.
What you will learn
It provides an overview of CamStudio and its main features. It will take you step by step
through the process of using it.
Follow all of these steps and you will be able to:
create your own videos by recording all screen and audio activity on your computer,
add windows that contain text on your video recordings,
record audio from a microphone or speakers,
share your video recordings.
Before starting
To use the User Guide more easily, printing this document is a good idea. In many tasks, you
need to choose menu commands or compare the result of an action from your screen as it
should appear in CamStudio.
Therefore, a printed version of the User Guide gives you better readability between what
you learn, what you must obtain on your screen and the information given.
TYPOGRAPHIC CONVENTIONS 5
CAMSTUDIO USER GUIDE
Typographic Conventions
Typographic conventions are used with the following meanings:
Component names, such as screen names or an application, are capitalized.
Example: CamStudio
Elements of graphical user interface, such as buttons or field labels and access paths
appear in bold.
Example: Click Submit
URLs are underlined and colored in blue.
Example: http://camstudio.org
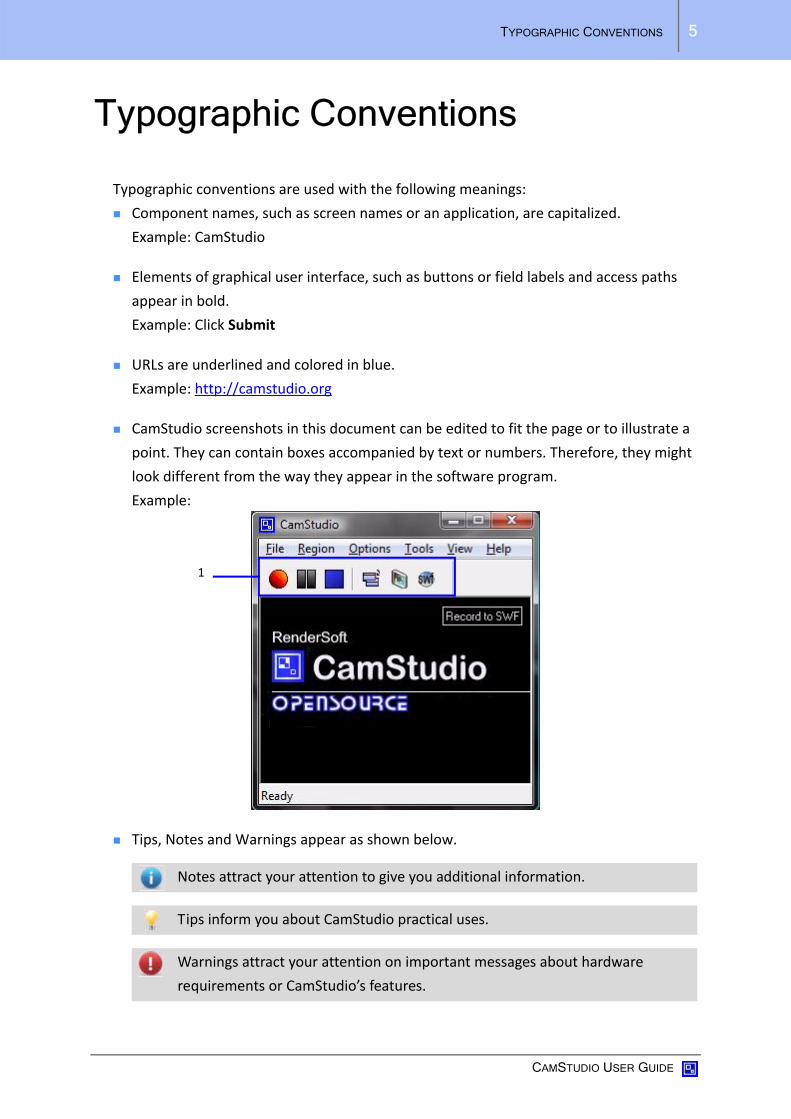
CamStudio screenshots in this document can be edited to fit the page or to illustrate a
point. They can contain boxes accompanied by text or numbers. Therefore, they might
look different from the way they appear in the software program.
Example:
Tips, Notes and Warnings appear as shown below.
Notes attract your attention to give you additional information.
Tips inform you about CamStudio practical uses.
Warnings attract your attention on important messages about hardware
requirements or CamStudio’s features.
1

6 CAMSTUDIO OVERVIEW
CAMSTUDIO USER GUIDE
CamStudio Overview
What is it?
CamStudio is a free streaming video software program which records the screen and audio
activity of your computer for a given time. It is the ideal program for tutorial makers.
The output format of the recording is AVI (Audio Video Interface) or SWF (Small Web
Format) video files.
What you can do with CamStudio
Here are a few ways you can use CamStudio:
demonstrate features of a new software program,
create video tutorials for school or your friends,
view the progress of a program that executes for a long time,
record a movie stream or a problem with your computer to show it to a technical
support.
Concepts
Audio recording
Audio is optional. Therefore, you can both create:
videos without any audio,
videos with sound that comes from speakers or a microphone.
See also “Setting audio recording”, page 13.
Regions
Regions define the video recording area of your video. The 3 possible Regions in CamStudio
enable you to create a video from:
an arbitrary rectangular Region of the screen,
a rectangular Region with predefined dimensions,
the entire screen.
See also “Setting Regions”, page 14.
AVI videos can contain both audio and video data in a file container. SWF videos
are files format vector graphics for publication on the Web.
CAMSTUDIO OVERVIEW 7
CAMSTUDIO USER GUIDE
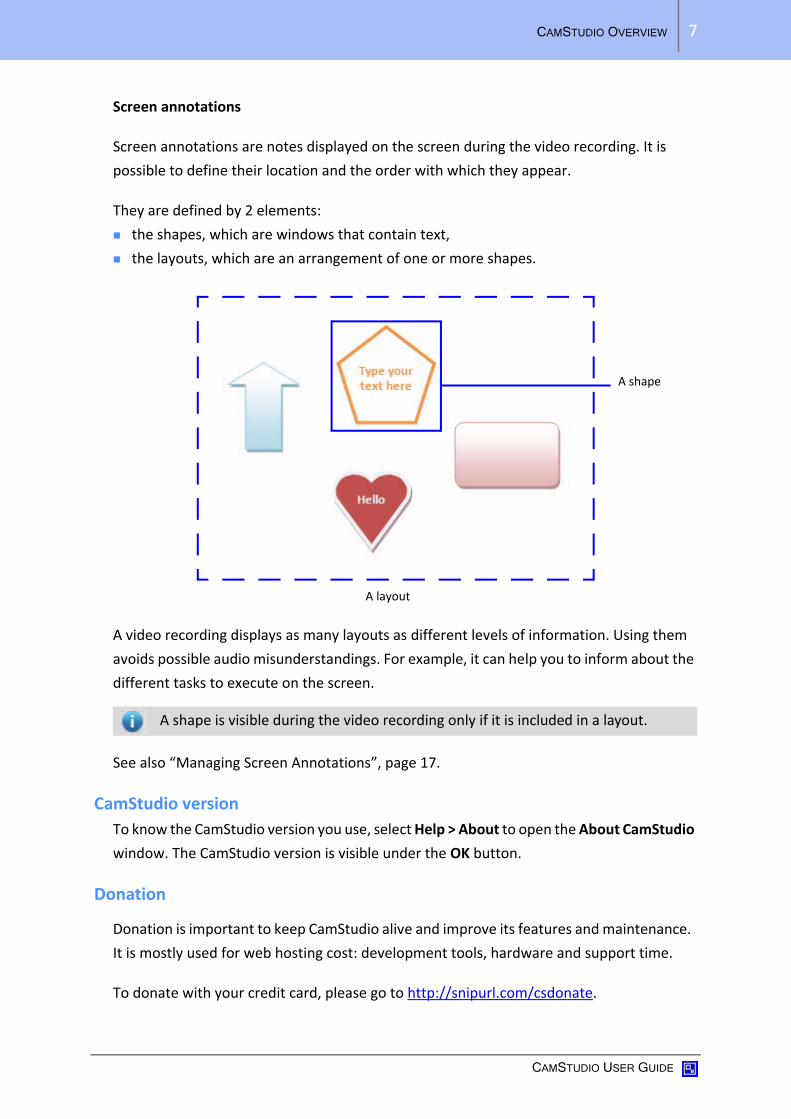
Screen annotations
Screen annotations are notes displayed on the screen during the video recording. It is
possible to define their location and the order with which they appear.
They are defined by 2 elements:
the shapes, which are windows that contain text,
the layouts, which are an arrangement of one or more shapes.
A video recording displays as many layouts as different levels of information. Using them
avoids possible audio misunderstandings. For example, it can help you to inform about the
different tasks to execute on the screen.
See also “Managing Screen Annotations”, page 17.
CamStudio versionTo know the CamStudio version you use, select Help > About to open the About CamStudio
window. The CamStudio version is visible under the OK button.
Donation
Donation is important to keep CamStudio alive and improve its features and maintenance.
It is mostly used for web hosting cost: development tools, hardware and support time.
To donate with your credit card, please go to http://snipurl.com/csdonate.
A shape is visible during the video recording only if it is included in a layout.
A shape
A layout

8 INSTALLATION
CAMSTUDIO USER GUIDE
Installation
System requirement
Your system must meet the following requirements:
Microsoft Windows 95, 98, Me, NT 4.0, 2000, XP,
400 MHz processor,
64 MB recommended,
4 MB of hard‐disk space for program installation.
CamStudio installation
Before installing CamStudio, you need to download the executable file CamStudio.exe from
the following website at http://camstudio.org.
Once it is done, you can follow the procedure below.
To install CamStudio:
1. Double‐click CamStudio.exe.
An Open File – Security Warning popup appears.
2. Click Execute to launch the installation process.
3. Tick the I agree with the above terms and conditions checkbox.
INSTALLATION 9
CAMSTUDIO USER GUIDE
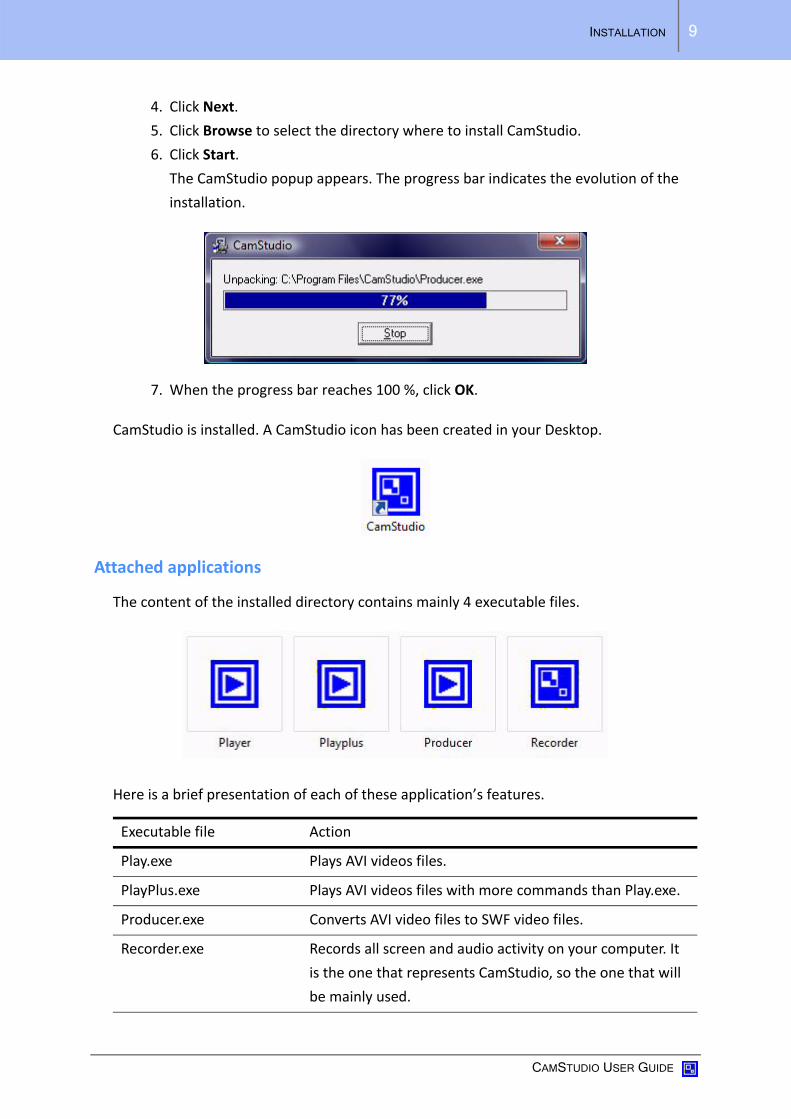
4. Click Next.
5. Click Browse to select the directory where to install CamStudio.
6. Click Start.
The CamStudio popup appears. The progress bar indicates the evolution of the
installation.
7. When the progress bar reaches 100 %, click OK.
CamStudio is installed. A CamStudio icon has been created in your Desktop.
Attached applications
The content of the installed directory contains mainly 4 executable files.
Here is a brief presentation of each of these application’s features.
Executable file Action
Play.exe Plays AVI videos files.
PlayPlus.exe Plays AVI videos files with more commands than Play.exe.
Producer.exe Converts AVI video files to SWF video files.
Recorder.exe Records all screen and audio activity on your computer. It
is the one that represents CamStudio, so the one that will
be mainly used.
10 GETTING STARTED
CAMSTUDIO USER GUIDE
Getting Started
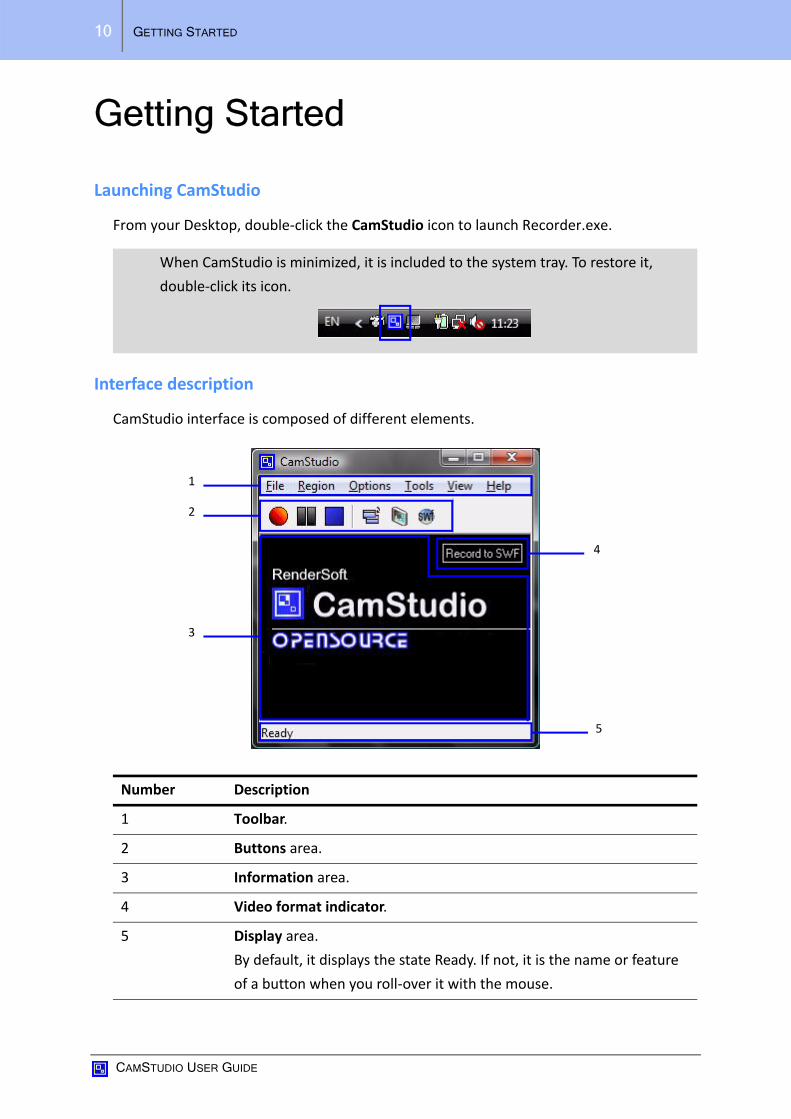
Launching CamStudio
From your Desktop, double‐click the CamStudio icon to launch Recorder.exe.
Interface description
CamStudio interface is composed of different elements.
When CamStudio is minimized, it is included to the system tray. To restore it,
double‐click its icon.
Number Description
1 Toolbar.
2 Buttons area.
3 Information area.
4 Video format indicator.
5 Display area.
By default, it displays the state Ready. If not, it is the name or feature
of a button when you roll‐over it with the mouse.
1
2
3
4
5

GETTING STARTED 11
CAMSTUDIO USER GUIDE
The following table presents each button of the Buttons area.
Icon Button name Action
Record Starts a video recording.
Pause Makes a pause during a video recording.
Stop Stops a video recording.
Toggle View Modifies the appearance of CamStudio
interface to 3 different states: Normal View,
Compact View or Buttons View.
Screen Annotations Displays the Screen Annotations window that
enables you to create and manage shapes and
layouts.
See also “Managing Screen Annotations”,
page 17.
Record Flash / AVI Sets the video file format before recording.

12 SETTINGS
CAMSTUDIO USER GUIDE
Settings
Activating autopan
This option permits the recording to be done by following the cursor wherever it goes on
the screen, so that it is centered in the video recording area.
To activate autopan, select Options > Enable Autopan.
Setting audio options
The following table presents the different audio options.
Activated settings are marked by the following icon in menu commands. To
deactivate a setting, click on it again and the icon will disappear.
Autopan is less visible when the video is a full screen recording.
To control the maximum speed at which the capture area follows the mouse,
select Options > Autopan Speed … .The value is measured in screen pixels.
You need a soundcard with an attached microphone/speakers to use this option.
To Do this
Set your audio options for your
microphone
Select Options > Program Options > Audio Options >
Audio Options for Microphone.
You use it to set the recording format and
compressed format of your audio.
Set your audio options for your
speakers
Select Options > Program Options > Audio Options >
Audio Options for Speakers.
You use it to adjust the volume of your speakers and
the volume of your recording line.
Synchronize the audio and the
video track
Select Options > Program Options > Audio Options >
Audio and Video Synchronization.
The Audio and Video Synchronization option only works when the audio goes
before the video.
For more information, go to http://www.camstudio.org/options/audio.
SETTINGS 13
CAMSTUDIO USER GUIDE
Setting audio recording
The following table presents how to define if your video contains audio or not.
Setting cursor options
Cursor options enable you to draw attention to the area where the actions take place by
customizing the cursor. For example, you can:
hide/use your actual cursor during the video recording,
replace the cursor with a customized cursor,
replace the cursor with a cursor that is loaded from a file,
ave a highlight area around the cursor.
To open the Cursor Options window, select Options > Cursor Options.
Setting program options
Program options are available by selecting Options > Program Options.
These options enable you to set practical options about using CamStudio in general or
during a video recording, and managing AVI video files. For example, you can:
minimize CamStudio when a video starts recording,
hide the flashing rectangle that delineates the video recording area,
automatically save settings on exit,
name your AVI videos by using the system’s date and time of the video recording,
define the action to execute at the end of an AVI recording,
set the directory to use for the temporary files that CamStudio creates while it is
recording.
To record a video Do this
Without any audio Select Options > Do not record audio.
With audio coming from a
microphone
Select Options > Record audio from microphone.
With audio coming from
speakers
Select Options > Record audio from speakers.
For more information, go to http://www.camstudio.org/options/cursor.
The temporary files can crash your system if it has not enough disk space.
For more information, go to http://www.camstudio.org/options/program.

14 SETTINGS
CAMSTUDIO USER GUIDE
Setting SWF options
SWF options are available by selecting Options > Record to Flash Options.
These options enable you to define the action to execute at the end of a SWF recording.
Setting Regions
There are 3 possible Regions. You can choose:
Region, which is an arbitrary rectangular Region of the screen,
Fixed Screen, which is a rectangular Region with predefined,
Full Screen, which is the entire screen.
Region
To define this Region, select Region > Region.
Before the video recording starts, use the pen on cross‐hairs cursor to define the
rectangular region on your screen by clicking‐dragging the left mouse button. A box informs
you about its dimensions.
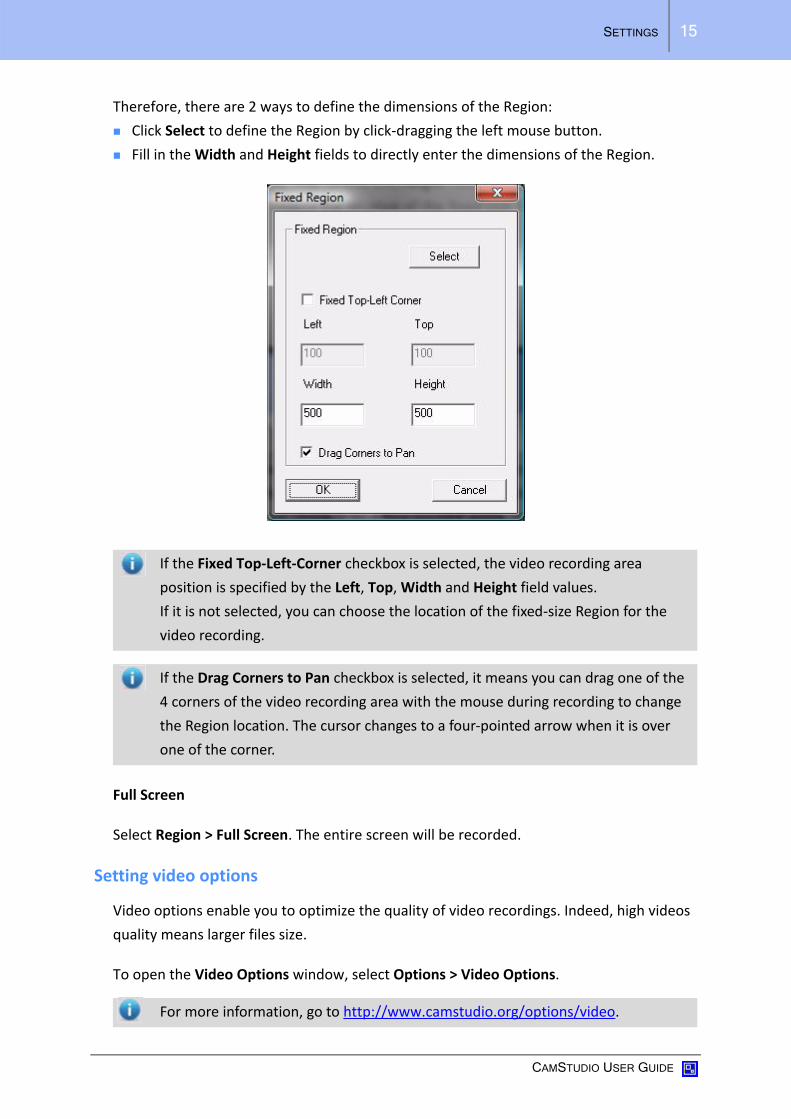
Fixed Region
To open the Fixed Region window, select Region > Fixed Region.
For more information, go to http://www.camstudio.org/options/SWF.
You must set the Region before recording.
SETTINGS 15
CAMSTUDIO USER GUIDE
Therefore, there are 2 ways to define the dimensions of the Region:
Click Select to define the Region by click‐dragging the left mouse button.
Fill in the Width and Height fields to directly enter the dimensions of the Region.
Full Screen
Select Region > Full Screen. The entire screen will be recorded.
Setting video options
Video options enable you to optimize the quality of video recordings. Indeed, high videos
quality means larger files size.
To open the Video Options window, select Options > Video Options.
If the Fixed Top‐Left‐Corner checkbox is selected, the video recording area
position is specified by the Left, Top, Width and Height field values.
If it is not selected, you can choose the location of the fixed‐size Region for the
video recording.
If the Drag Corners to Pan checkbox is selected, it means you can drag one of the
4 corners of the video recording area with the mouse during recording to change
the Region location. The cursor changes to a four‐pointed arrow when it is over
one of the corner.
For more information, go to http://www.camstudio.org/options/video.

16 SETTINGS
CAMSTUDIO USER GUIDE
Configuring keyboard shortcuts
It is useful to associate keyboard shortcuts to the recording commands in order to avoid
CamStudio interface to appear on the screen during a video recording.
To open the Keyboard Shortcuts window, select Options > Keyboard Shortcuts.
The image above is a proposal of configuring keyboard shortcuts. You can modify it
according to what seems easier to you.
As long as CamStudio is open or minimized, your keyboard shortcuts are still on.
Therefore, it is advisable to choose your keyboard shortcuts among those you do
not often use.

MANAGING SCREEN ANNOTATIONS 17
CAMSTUDIO USER GUIDE
Managing Screen Annotations
Creating a new shape
A shape is a floating window that contains text. This helps to explain what happens on the
screen as the video recording goes along. You can either create:
a new shape,
a new shape from a predefined shape.
To create a new shape:
1. From the Buttons area, click .
The Screen Annotations window appears. The Shapes tab contains the list of the
predefined shapes set by default.
2. Right‐click either a predefined shape in the list to display the context menu.
3. Select New Shape.
The New Shape window appears.
4. In the Name area, attribute a name to your shape.
5. Do one of the following.
Predefined shapes are a gain of time because they need fewer changes.
To Do this
Create a new shape In the Image area, select the Blank Image radio
button.
Create a new shape from a
predefined shape
In the Image area, select the Image File radio
button.

18 MANAGING SCREEN ANNOTATIONS
CAMSTUDIO USER GUIDE
6. In the Text area, modify the text of the shape.
7. Click OK.
The new shape is created. It appears both at the end of the Shapes tab and on top of all
other windows on your Desktop.
A shape is visible during the video recording only if it is included in a layout.
Appearance of the created shape

MANAGING SCREEN ANNOTATIONS 19
CAMSTUDIO USER GUIDE
Creating a new layout
A layout is an arrangement of one or more shapes. When they are many of them, you can
define the order with which they appear on the screen.
To create a new layout:
1. From the list of the Shapes tab, double‐click the shape to add to the layout.
The shape appears.
2. Drap and drop the shape where you want it to appear on the screen.
3. Repeat steps 1 and 2 as many times as you need.
4. Once all the shapes are open, right‐click on either shape to select Save Layout.
The layout is created. It appears in the Layout tab.
Before creating a layout, it is advisable to close all visible shapes on your Desktop.
To remove a shape from the layout before saving, right‐click the shape to
display the context menu, and then select Close.
As a layout is composed of shapes, modifying it consists in modifying its shapes.

20 MANAGING SCREEN ANNOTATIONS
CAMSTUDIO USER GUIDE
Editing the image of a shape
You can edit the image of a shape in order to customize it. For example, you can:
apply a background image/background color to your shape,
obtain a non rectangular window by transparency or from a predefined shape.
To open the Edit Image window, right‐click the shape you want to modify in order to display
the context menu, and then select Edit Image.
Editing the text of a shape
You can edit the text of a shape in order to highlight it. For example, you can:
modify the font name, font style, font‐size, font color or alignment of the text,
modify the position of the text in the shape.
To open the Edit Text window, right‐click the shape you want to modify in order to display
the context menu, and then select Edit Text.
Managing shapes
The best way to manage your shapes is to save them in a library. More than a gain of time,
it enables you to load and reuse them later.
The following instructions use the context menu of the Shapes tab. To make it appear,
right‐click anywhere in the tab content.
For more information, go to http://camstudio.org/shapes/s‐annotations/image.
For more information, go to http://camstudio.org/shapes/s‐annotations/text.
To Do this
Create a new shape library Select Shape Library > New Shape Library.
Load a shape library ‐ Select Shape Library > Open Shape Library.
‐ Select the shape library to load.
‐ Click Open.
Save all your shapes into a file
(.shape)
‐ Select Shape Library > Save Shape Library.
‐ Attribute a name to the shape library.
‐ Click Open.
You can restore the default shapes by opening the file ‘default.shapes’ in the
installed directory of CamStudio.

MANAGING SCREEN ANNOTATIONS 21
CAMSTUDIO USER GUIDE
Managing layouts
You can manage your layouts as the same way than your shapes by saving them in a library.
The following instructions use the context menu of the Layout tab. To make it appear, right‐
click anywhere in the tab content.
For more information, go to http://camstudio.org/shapes/s‐annotations/shapes.
To Do this
Create a new layout library Select Layout Library > New Layout Library.
Load a layout library ‐ Select Layout Library > Open Layout Library.
‐ Select the layout library to load.
‐ Click Open.
Save all your layouts into a file
(.layout)
‐ Select Layout Library > Save Layout Library.
‐ Attribute a name to the layout library.
‐ Click Open.
For more information, go to http://camstudio.org/shapes/s‐annotations/layouts.

22 MANAGING VIDEO ANNOTATIONS
CAMSTUDIO USER GUIDE
Managing Video Annotations
It is also possible to record the content of a webcam along with other screen content when
the webcam is inside your video recording area. These videos recordings are called video
annotations.
To create a video annotation, select Tools > Video Annotations. The Video Annotations
window will appear.
Just like screen annotations, video annotations are customizable. For example, you can add
a text caption or make a cutout Region.
To adjust these settings, right‐click the webcam window to display a context menu as the
image below.
You need a webcam installed on your system to use this feature.
For more information, go to http://camstudio.org/shapes/v‐annotations.

CREATING VIDEO RECORDINGS 23
CAMSTUDIO USER GUIDE
Creating Video Recordings
Creating an AVI/SWF video recording without screen annotations
As the following procedure shows, screen annotations are optional.
To create an AVI/SWF video recording without screen annotations:
1. Click .
The Video format indicator displays if the video recording is AVI or SWF.
2. Define the audio recording (See also “Setting audio recording”, page 13).
3. Define the Region See also “Setting Regions”, page 14).
4. Click to start the recording.
The video recording starts. The information about the video recording appears in
the Information area.
If the select Region is Do this
Region Before the video recording starts, click‐drag
the left mouse button to define the video
recording area.
Fixed Region Before the video recording starts, drag and
drop the rectangle where you want the video
recording area to be.
Full Screen Go to step 5.
Video format

24 CREATING VIDEO RECORDINGS
CAMSTUDIO USER GUIDE
5. Click to stop the video recording.
A Save AVI File/Save SWF File popup appears.
6. Select the directory where to save the video file on your computer.
7. Click Save.
Your video file is saved.
Creating a AVI/SWF video recording with screen annotations
The following procedure shows you how to include screen annotations in your video
recording. It uses the keyboard shorcuts of the image page 15.
To create an AVI/SWF video recording with screen annotations:
1. Click to define if the video format is AVI or SWF.
2. Define the audio recording and the Region.
3. Press F1 to start the video recording.
The video recording starts.
4. Press TAB to display the first layout.
5. Do one or more of the following.
6. Press F2 to stop the video recording.
7. Save your video file after selecting the directory where to save it on your
computer.
Your video file is saved.
Program options enable you to name your AVI videos files by using the system’s
date and time of the video recording See also “Setting program options”, page 13
To avoid CamStudio interface to appear on your screen during the video
recording, you can configure keyboard shortcuts See also “Configuring keyboard
shortcuts”, page 16
You must create your screen annotations before recording.
To Do this
Make the layout disappear Press TAB.
Display the previous
layout
Press F3.
Display the next layout Press F4.

CREATING VIDEO RECORDINGS 25
CAMSTUDIO USER GUIDE
Converting AVI to SWF format
CamStudio has the ability to convert AVI video files to SWF video files using Producer.exe.
Sharing video recordings
The following table presents a few examples of the different ways you can share your video
recordings.
For more information, go to http://camstudio.org/applications/producer.
If You can
You have a Website make them accessible using a FTP software program,
inset them into your Web pages for streaming.
You have not a Website send them by email to your friends, family or colleagues,
play them on your computer,
share them with an USB key.

26 TROUBLESHOOTING
CAMSTUDIO USER GUIDE
Troubleshooting
Help
For more information about the topics covered in the User Guide, you can open CamStudio
Help which is available from the Help menu in the toolbar when CamStudio is open.
For complete and up‐to‐date information, including tips, news about the latest features, go
to the following websites at:
http://camstudio.org
http://camstudio.org/blog
FAQ
If you do not find the answers to your questions and want more help, a FAQ (Frequently
Asked Questions) is available at http://camstudio.org/faq.htm.
A forum is also available at http://camstudio.org/forum, so you can communicate and
share your knowledge with other CamStudio’s users.
http://camstudio.org http://camstudio.org/blog