Project Type: Workshop Complexity: Challenging Materials: Available Project Duration: 0.5–1.0 hr Prep, 2.0 hr Build Recommended Team Size: 2-3 Note: optional material is highlighted in red. Workshop: Marimba Purpose The primary purpose of this project is to understand the connection between the length of an unclamped beam and its fundamental resonant frequency. This objective is accomplished by building and playing a marimba made with hardwood bars. An optional goal is to develop an intuitive understanding of the mathematical relationship between the beam length and the fundamental frequency. Extensions of the project could include a discussion of the structure of musical scales.
Background A marimba is a musical instrument in the idiophone (pronounced `id·ē·əә·fōn) category. The name idiophone comes from the Greek word idios, which means “one’s own.” Instruments of this kind are called idiophones because they make their own sound, depending on just the materials and shape of the object. Other idiophones include tubular bells, steel drums and the glockenspiel. The marimba in this workshop consists of a grouping of hardwood bars, each vibrating as an unclamped beam. The fundamental resonant frequency of an object is the frequency that requires the lowest energy to cause the object to vibrate. If an unclamped beam is vibrated at frequencies that include the fundamental resonant frequency, the fundamental frequency will usually be the loudest sound produced. Assuming the fundamental frequency is in the audible range for humans, this frequency will be heard as the pitch of the beam. In idiophones, higher resonant frequencies (overtones) may also be produced. Unlike the instruments in some other categories, these overtones do not have to be multiples of the fundamental frequency. The human ear may hear the overtones, but usually identifies the primary pitch as that of the fundamental frequency. The combination of the resonant frequencies is heard as a small change that musicians refer to as the timbre (pronounced `tam·bəәr) of the instrument.
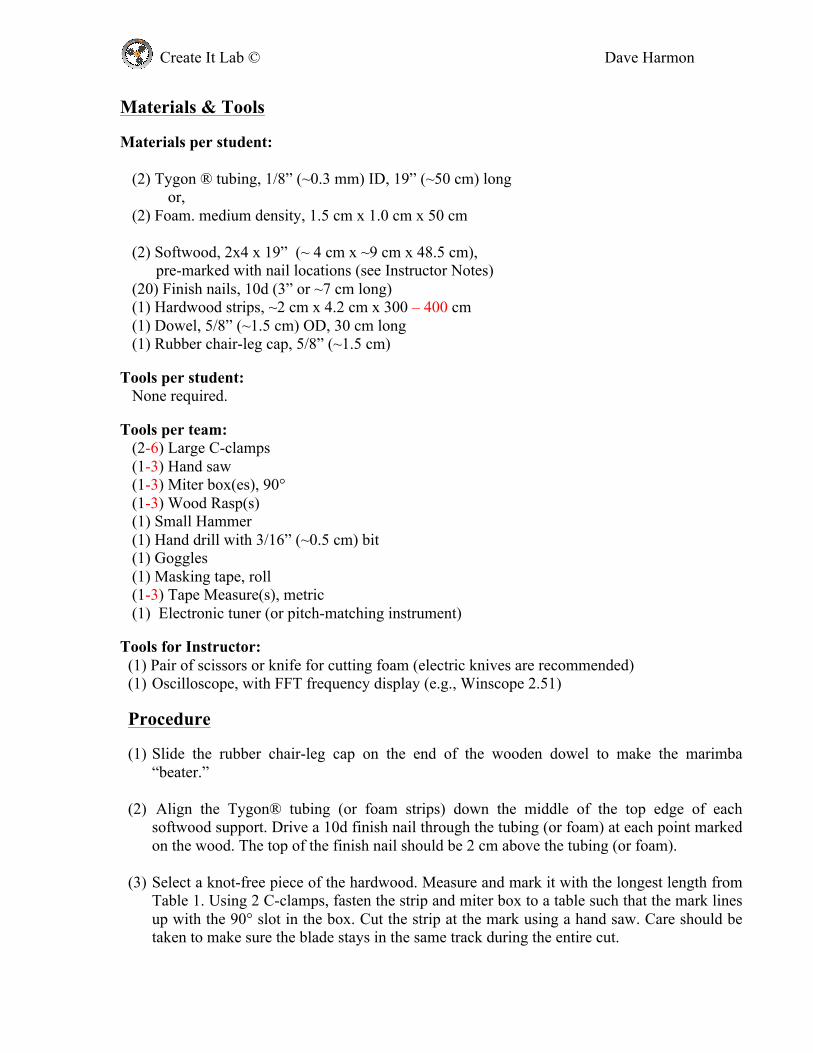
Materials & Tools Materials per student: (2) Tygon ® tubing, 1/8” (~0.3 mm) ID, 19” (~50 cm) long or, (2) Foam. medium density, 1.5 cm x 1.0 cm x 50 cm (2) Softwood, 2x4 x 19” (~ 4 cm x ~9 cm x 48.5 cm), pre-marked with nail locations (see Instructor Notes) (20) Finish nails, 10d (3” or ~7 cm long) (1) Hardwood strips, ~2 cm x 4.2 cm x 300 – 400 cm (1) Dowel, 5/8” (~1.5 cm) OD, 30 cm long (1) Rubber chair-leg cap, 5/8” (~1.5 cm) Tools per student:
None required. Tools per team:
(2-6) Large C-clamps (1-3) Hand saw (1-3) Miter box(es), 90° (1-3) Wood Rasp(s) (1) Small Hammer (1) Hand drill with 3/16” (~0.5 cm) bit (1) Goggles
Tools for Instructor: (1) Pair of scissors or knife for cutting foam (electric knives are recommended) (1) Oscilloscope, with FFT frequency display (e.g., Winscope 2.51)
Procedure (1) Slide the rubber chair-leg cap on the end of the wooden dowel to make the marimba
“beater.” (2) Align the Tygon® tubing (or foam strips) down the middle of the top edge of each
softwood support. Drive a 10d finish nail through the tubing (or foam) at each point marked on the wood. The top of the finish nail should be 2 cm above the tubing (or foam).
(3) Select a knot-free piece of the hardwood. Measure and mark it with the longest length from
Table 1. Using 2 C-clamps, fasten the strip and miter box to a table such that the mark lines up with the 90° slot in the box. Cut the strip at the mark using a hand saw. Care should be taken to make sure the blade stays in the same track during the entire cut.
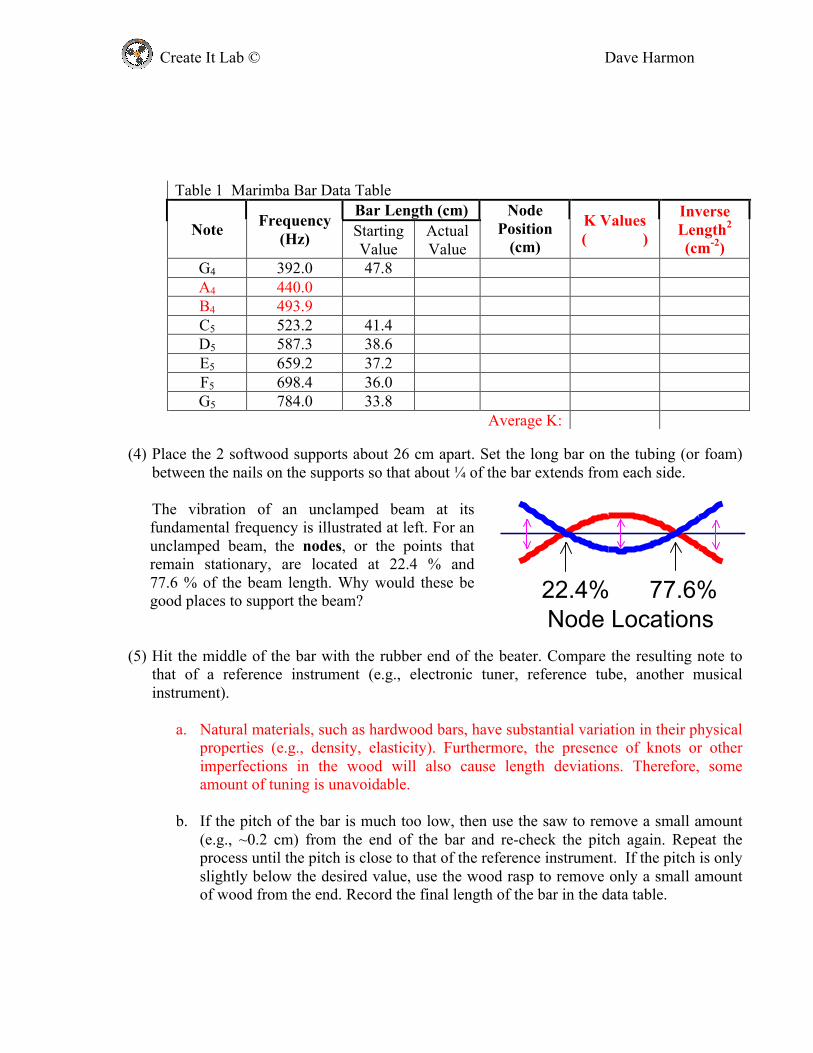
(4) Place the 2 softwood supports about 26 cm apart. Set the long bar on the tubing (or foam)
between the nails on the supports so that about ¼ of the bar extends from each side.
The vibration of an unclamped beam at its fundamental frequency is illustrated at left. For an unclamped beam, the nodes, or the points that remain stationary, are located at 22.4 % and 77.6 % of the beam length. Why would these be good places to support the beam?
(5) Hit the middle of the bar with the rubber end of the beater. Compare the resulting note to
that of a reference instrument (e.g., electronic tuner, reference tube, another musical instrument).
a. Natural materials, such as hardwood bars, have substantial variation in their physical
properties (e.g., density, elasticity). Furthermore, the presence of knots or other imperfections in the wood will also cause length deviations. Therefore, some amount of tuning is unavoidable.
b. If the pitch of the bar is much too low, then use the saw to remove a small amount
(e.g., ~0.2 cm) from the end of the bar and re-check the pitch again. Repeat the process until the pitch is close to that of the reference instrument. If the pitch is only slightly below the desired value, use the wood rasp to remove only a small amount of wood from the end. Record the final length of the bar in the data table.
c. If the pitch of the bar is much too high, then the bar is too short to be used for the note. It should be shortened to make the bar for the next higher frequency.
(6) Repeat steps (3) through (5) for each note in the table and place the bars on the supports in
order of their length. Position the supports so that a quarter of each bar extends out each side (see Fig. 1).
(7) Using the relationship between frequency and bar length for vibrating beams, calculate the
lengths of the A4 and B4 bars.
Frequency = K / Length2, where K is a constant
HINT: Solve for K for each length, average the K values and substitute into the equation to obtain the A4 and B4 lengths. Record the values in Table 1.
What are the units of K?
(8) If there are available materials, make the A4 and B4 bars. Test and adjust them as described
in steps (3) through (5). (9) Calculate the node positions (22.4% of bar length) for all the bars and enter them into the
appropriate column of Table 1.
Node Position = 0.224 * Bar Length (10) Measure the node positions from one end of all the bars and mark them at a point halfway
across the width of the bars. With a small hammer and nail, make a small dent at each mark. Using the drill and a 3/16” (~0.5 cm) drill bit, make holes at these locations.
(11) Place the hole in the longest bar over the first nail on the support that has the fewest nails.
Rest the other end of the bar between the nails on the corresponding end of the other support. Place the other bars in order of length on the supports in the same manner. Each bar should overhang the supports by the same amount on both sides.
(12) Calculate the inverse squares of the bar lengths and enter them into the appropriate column
in Table 1.
Inverse Length2 = 1 / Length2 (13) Plot the frequencies as a function of both the bar length and the inverse square of the length.
Describe and explain the shape of the curves. Why would you want to plot the data as a function of inverse length squared? How can you explain any points that deviate from the curves?
(14) If an oscilloscope with amplitude vs. frequency is available (see Tools for Instructor),
strike one of the bars with a rubber-tipped beater near a microphone connected to the oscilloscope. On the display, identify the fundamental frequency and any overtones. Next, repeat the test but strike the tube with the wooden end of the beater. What do you notice?
(15) Become a marimba player! Try to play a simple tune on your instrument. Even with just
the six basic notes on your marimba, you can play the first part of “Ode to Joy” by Beethoven. Ask your instructor for the music.
Instructor Notes (1) Medium density foam is a commonly used packing material. Cutting it into the correct strips
can be accomplished with scissors or a sharp knife. However, an electric knife is by far the best hand tool for this job.
(2) Pre-marking the nail location for the softwood supports is recommended. For 19” (~48.5 cm)
supports, the nails should be 2” (5.1 cm) apart and centered halfway across the middle of the support. Marks for 9 nails should be made on one support, starting about 3.8 cm from one end. The other support should be marked for 10 nails, starting about 1.3 cm from the end.
(3) Natural materials, such as hardwood bars, have substantial variation in their physical
properties (e.g., density, elasticity). As a result, substantial deviations from the starting lengths in data table are to be expected (Table 1 values were for white oak). Therefore, it is recommended that a new set of starting values be calculated for each batch of hardwood. At least 1 bar should be cut and tuned to the desired frequency. The other starting lengths can be estimated as follows.
Next Length = First Length x (First Frequency)2 / (Next Frequency)2
However, the presence of knots or other imperfection in the wood will also cause length deviations. Therefore, some amount of tuning during the workshop is unavoidable.
(4) Table values and sample frequency vs. tube length plots are shown in Table 2.
Table 2 Sample Marimba Bar Parameters Note Frequency
(Hz) Length
(cm) Node
Positions (cm) K Values (cm2/s)
Inverse Length2 (cm-2)
G4 392.0 47.8 10.7 895657 4.38 x 10⁻⁴ A4 440.0 45.1 10.1 - - B4 493.9 42.6 9.5 - - C5 523.2 41.4 9.3 896744 5.83 x 10⁻⁴ D5 587.3 38.6 8.6 875054 6.71 x 10⁻⁴ E5 659.2 37.2 8.3 912227 7.23 x 10⁻⁴ F5 698.4 36.0 8.1 905126 7.72 x 10⁻³ G5 784.0 33.8 7.6 895673 8.75 x 10⁻³
(5) There are numerous free oscilloscope software packages available on the internet. If a
package with amplitude vs. frequency plotting capability can be obtained, it is useful in identifying the fundamental and harmonic frequencies of most instruments.
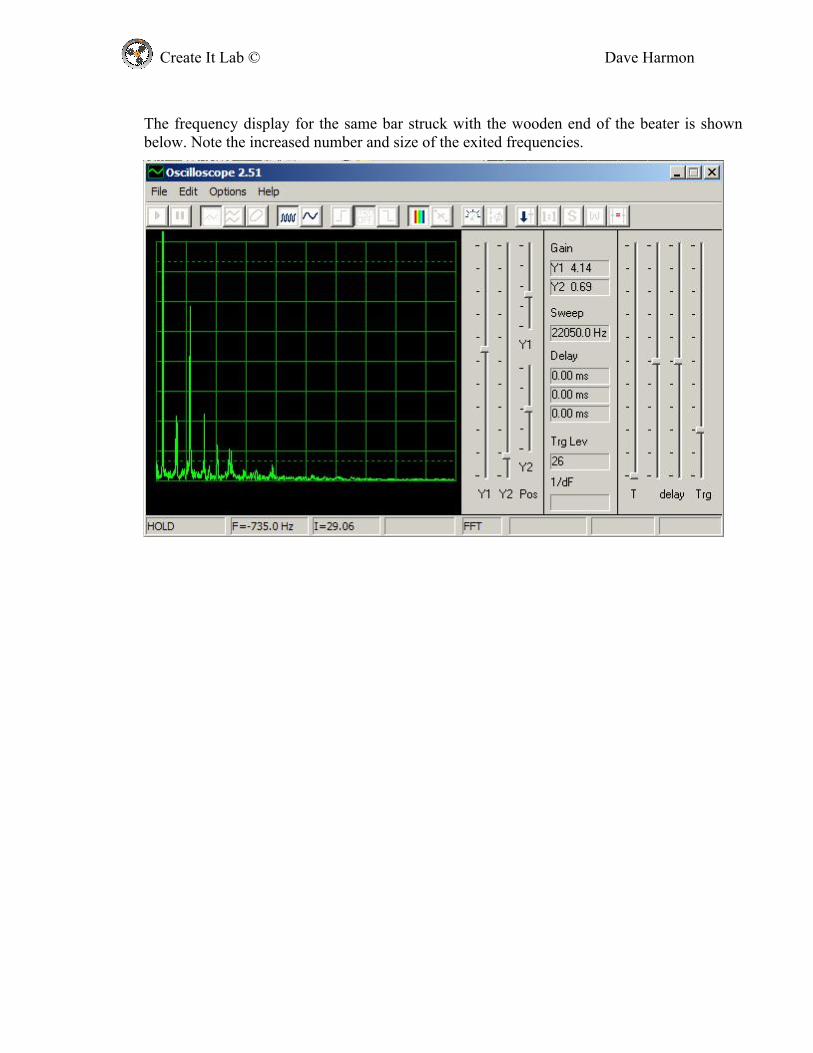
A sample display from Winscope 2.5.1 (by Konstantin Zeldovich) is shown below for a C5 note from a marimba struck with a rubber-tipped beater.
The frequency display for the same bar struck with the wooden end of the beater is shown below. Note the increased number and size of the exited frequencies.