SSHHIIRRTT AA,, BB,, CC11 FRONT A22 SIDE FRONT A33 BACK44 SIDE BACK55 COLLAR66 FRONT FACING A B77 SLEEVE FRONT88 SLEEVE BACK99 FRONT B1100 SIDE FRONT B1111 FRONT C1122 SIDE FRONT C1133 FRONT FACING C
CCAAMMIISSAA AA,, BB,, CC11 FRENTE A22 COSTADO DEL FRENTE A33 ESPALDA44 COSTADO DE LA ESPALDA55 CUELLO66 VISTA DEL FRENTE A B77 FRENTE DE LA MANGA88 ESPALDA DE LA MANGA99 FRENTE B1100 COSTADO DEL FRENTE B1111 FRENTE C1122 COSTADO DEL FRENTE C1133 VISTA DEL FRENTE C
McCALL'S®M6076 FINALLY IT FITS
THE "PERFECT FIT BLOUSE THAT FLATTERS”
FFOOCCUUSS OONN FFUULLLL BBUUSSTT
We have given you three flattering front options. If you are full busted, this blouse hasthe most help for learning to alter for the full bust than we’ve ever put in a pattern. Inaddition, this is the blouse neckline style that Oprah claims is the most flattering. Storeswho had a blouse with this neckline couldn’t keep it in stock. So we are giving you thebest of both—-the neckline that flatters and good fit with a focus on the bust.
VViieeww AA is a shoulder princess front. You could color block with white in the front and adarker color for the sides—the most slimming.
VViieeww BB is an armhole princess front.
VViieeww CC is a darted front with a side panel—- the easiest to alter for a full bust.
The backs are all shoulder princess.
We also love the slits at the lower sides.
FFIITT FFEEAATTUURREESS::
FFIIRRSSTT,, BBUUYY TTHHEE RRIIGGHHTT SSIIZZEE
Measure your high bust and use that in place of bust on themeasurement chart. If between sizes, buy the smaller size asthe pattern has ease to cover you up to the next size.
Don't waste time sewing a garment that doesn't fit! Tissue-fitthe pattern before you cut. To make altering easier, we haveplaced alteration lines on the pattern tissue for the most com-mon adjustments. Tuck or cut and spread at these lines until thepattern fits you. For this pattern, we will focus on how to makea full-bust adjustment. We will also show how to do adjust-ments for high round and broad back, forward shoulders, andfull arm—-all important to a well-fitted shirt. If you are unfamiliarwith altering how-to's, see our book Fit for Real People, avail-able in fabric stores or at www.palmerpletsch.com orwww.mccallpatterns.com. If you like "live action” get our fit DVDor our full bust DVD.
Happy Sewing,
AA NNOOTTEE FFRROOMM PPAATTII:: After teaching princess bust fit in our workshops, Marta Alto and Ihave found that we needed to move Line 1 on the side front closer to the stitching lineto keep Line 4 from opening up too much. We've added or fine tuned other alterationlines on this design, so it will be a little different than in our previous patterns—-hopeful-ly better! FYI, Marta does an amazing job in the full bust DVD showing you how to"think outside the box.”
Pati Palmer and Associates
TRY ON TISSUE
TTIISSSSUUEE FFIITTTTIINNGG IISS AA NNOO GGUUEESSSS MMEETTHHOODD!! Try on. Pin center front and center backto your center front and center back-to your slip that is!
22.. Pull tissue snugly over your bust, but ifpattern won't reach your center front or centerback read on....
Use PERFECT PATTERN PAPER alteration tis-sue from Palmer/Pletsch to fill openings whenadjustments are made.
33.. The center front and back should come to your centerfront and back in the waist and hip area. If you need morewidth or want more ease, unpin the side seam up to theunderarm. Add a chunk of tissue as shown. Try on againand pin the tissue next to your body. Trim excess seamallowance to 5/8“ (1.5cm). (Or, trim it to 1“ if you want tohave the option to have more ease). If you need a full bustadjustment, wait until you have done that alteration as itwill add width.
2
Center frontLa frente central
1
TISSUE FITTING INSTRUCTIONS
BUILT-IN FITThe pattern pieces have BUILT-IN fit help and the alteration lines are printed on the tis-sue.
GETTING THE TISSUE READY
11.. Trim around the tissue OUTSIDEthe black cutting line for your size.Press tissue with a dry iron set atWOOL setting. With tissue RIGHTSIDE UP, tape the following INSIDEthe stitching line to prevent the tis-sue from tearing when trying on:
* front and back armhole
* front and back neckline
* inside curve on back above waist-line and front between notches
Use small pieces of tape aroundcurves, lapping them. Use 1/2“(1.3cm) ScotchTM MagicTM Tape(green box). Clip the curves to thetape. DO NOT CUT TAPE.
Tug lightly on tissue to see if it is taped secure-ly.
Pin seams to OUTSIDE, making adjusting easier.
1
2
3
4
FRENTE A
LINEA DE AJUSTE PARA BUSTO GRANDE LINEA DE AJUSTE
PARA BUSTO GRANDE LINEA DE AJUSTE PARA BUSTO GRANDE
SStteepp 11.. Start with the front. Cut on Line 1 and spreadthe width you need at arrow.
SStteepp 22.. Cut on Line 2 and open until Line 1 loweredges are parallel.
SStteepp 33.. Cut on Line 4. Lower bottom section until hemis even. Fill in Lines 1 and 4 with tissue.
SSIIDDEE FFRROONNTT::
SStteepp 44.. Cut on Line 1 and spread the amountneeded at the arrow.
SStteepp 55.. Cut on Line 2. Lower side edge until Line 1edges are parallel.
2
1
1
4
3
2
1
14
3SIDE
FRONT
COSTADODE LAFRENTE
2
1
4
3
2
1
4
3
FRONT
2
1
4
3
FRENTE
SSIIDDEE FFRROONNTT::
SStteepp 44.. Cut on Line 1. Spread the amount need-ed at the arrow.
SStteepp 55.. Cut on Line 2. Lower side edge until Line 1edges are parallel.
SStteepp 66.. Cut on Line 3. Lower section below untilhem is even. Fill Line 1 and Line 3 with tissue.
SStteepp 77.. Cut from the circle (#4) to Line 2. Close Line 2and Line 4 will open.Fill in Line 4 with tissue.
FFRROONNTT::
SStteepp 88.. Cut at Line 2 across front andspread so Line 2 on FRONT and Line 4on SIDE FRONT match at stitchinglines. Cut the FRONT on Line 3 andlengthen same amount as Line 3 onSIDE FRONT. Fill in Lines 1, 2 and 3with tissue.
NNOOTTEE:: Line 2 on the FRONT will be alittle wider at the seam edge but parallel on the other side of Line 1.Match the FRONT and SIDE FRONT atthe seamline, NOT at the cut edge!
2
1 14
33
1
2
3
4
24
1
1
2
3
4
1
1
2
3
4
1
1
2
3
4
1
1
2
3
4
SIDE FRONT
FRENTE
COSTADODE LA
88.. Lower or raise the bust fullness to match yours. Be sure to "true”the stitching and cutting lines as shown.
99.. Redraw Line 1 and Line 2 as shown.
PRINCESS SEAMLINE PLACEMENT
1100.. Unpin the tissue in your bustarea. If you are very full busted, youmay need to unpin to the hemline.Try on the tissue and pin the centerfront to your CENTER FRONT. If theseam on the FRONT is not centeredover your bust, you will need to addto BOTH FRONT and SIDE FRONT.Decide how much to add to each.In our instructions, we will assumeyou need to add to both. Other-wise, only alter the side front whichis much easier!!!
ABERTURA
Lowering
1
1
2
2
3 3
4
4
Raising
1
1
2
2
4
4
3
Lowering
1
1
2
2
34
4
Raising
2
21
1
4
4
3
Bajar Bajar
Subir Subir
Bajar
Subir
Lowering
lower boxlower box
raise box
newseamlines
newseamlines
Raising
newseamlines
raise box
newseamlines
costura
nuevas lineas de
costura
nuevas lineas de
costura
nuevas lineas
de
costura
nuevas lineas
de
bajar el
cuadrodo
bajar el
cuadrodo
subir el
cuadrodosubir el
cuadrodo
BACK WIDTH
44.. If you have a broad back and hips, adjustBEFORE checking for full bust. Cut on thebroad back alteration line and spread. You willnow have more back shoulder ease or you canadd a back shoulder dart. Adding 3/8“ - 3/4“(1cm -2cm) is common.
55.. If you are narrow only in the back, cut to andalong upper horizontal adjustment line. After lap-ping upper back, true stitching and cutting linessame as for broad back.
FULL BUST
66.. If you have a gap in thearmhole and you can't get thecenter front to meet yours, youneed a bust alteration.
VVIIEEWWSS AA AANNDD BB OONNLLYY
Lower or raise bust fullness to match yours!
77.. Draw a box above and below the notches around the bust area.
V.A. V.B
CENTRO DE SU FRENTE
MEDIRLA
DISTANCIA
ABERTURA
M6076 - Page 2 of 7
VIEW A - SHOULDER PRINCESS FULL BUST ALTERATION
FFRROONNTT::
SStteepp 11.. Start with the front. Cut on Line 1 and spreadthe width you need at arrow.
SStteepp 22.. Cut on Line 2. Lower side edge until Line 1edges are parallel.
SStteepp 33.. Cut on Line 4 and lower bottom section untilhem is even. Fill in Line 1 and 4 with tissue.
2
1 14
33
2
1 14
33
FRONT
2
1 14
3
FRENTE
The hinge: If you after to the edge, the seamlinewill get longer. Instead, cut to the seamlinefrom both sides. The seamline is the "hinge". Itstays the same size after altering.
spread
hingehinge
tissueoverlaps
seamlinespreads
la linea de costura se exitende
bisagrabisagra
sobreponeel papel se
se extiende
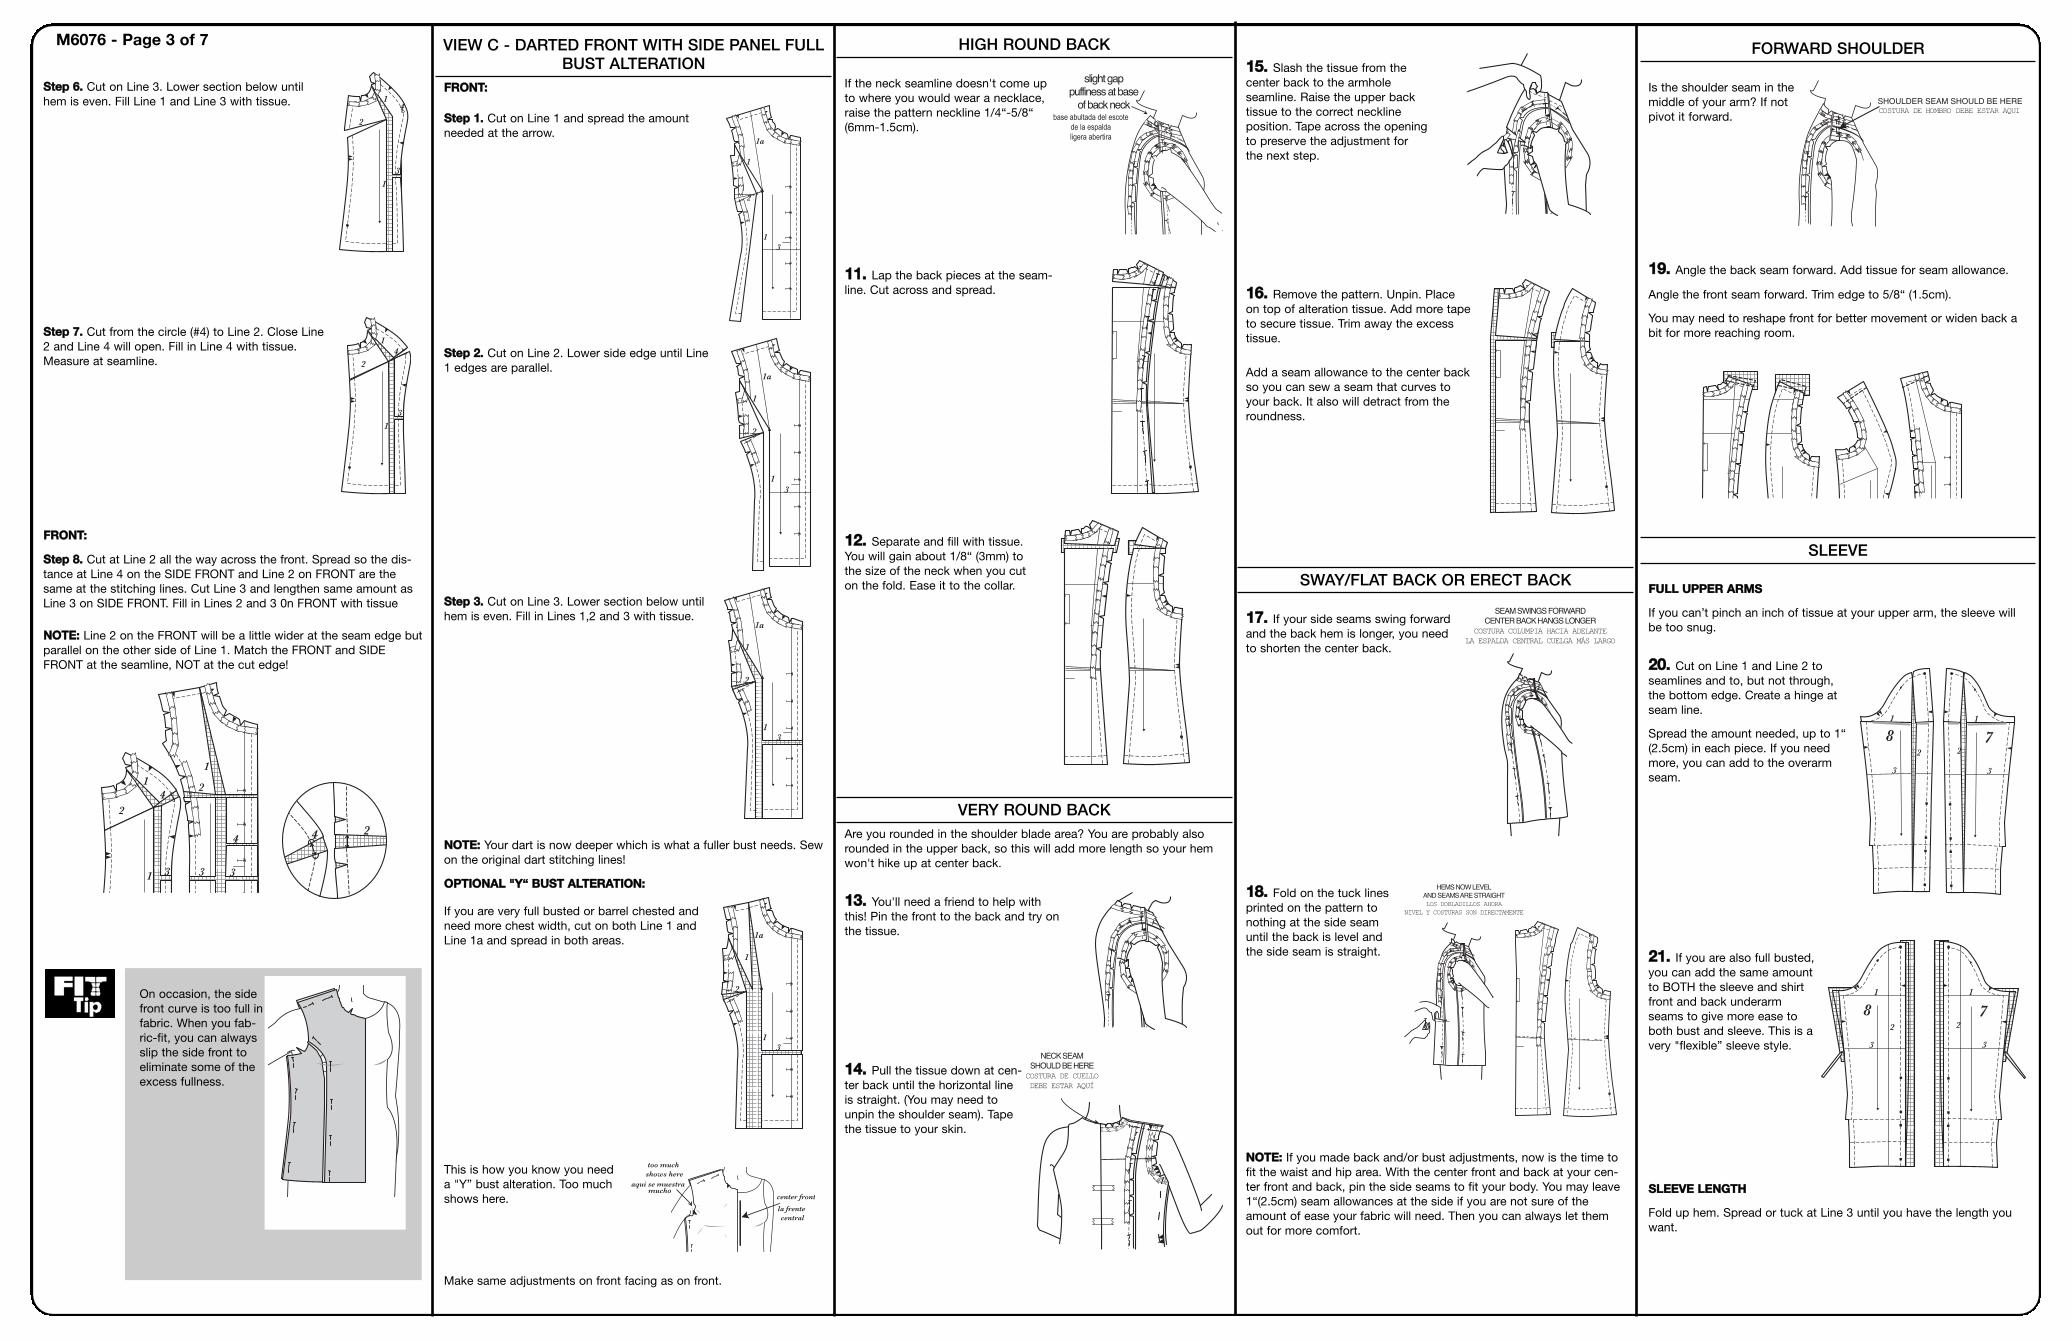
FORWARD SHOULDER
Is the shoulder seam in themiddle of your arm? If notpivot it forward.
1199.. Angle the back seam forward. Add tissue for seam allowance.
Angle the front seam forward. Trim edge to 5/8“ (1.5cm).
You may need to reshape front for better movement or widen back abit for more reaching room.
SLEEVE
FFUULLLL UUPPPPEERR AARRMMSS
If you can’t pinch an inch of tissue at your upper arm, the sleeve willbe too snug.
2200.. Cut on Line 1 and Line 2 toseamlines and to, but not through,the bottom edge. Create a hinge atseam line.
Spread the amount needed, up to 1“(2.5cm) in each piece. If you needmore, you can add to the overarmseam.
2211.. If you are also full busted,you can add the same amountto BOTH the sleeve and shirtfront and back underarmseams to give more ease toboth bust and sleeve. This is avery "flexible” sleeve style.
SSLLEEEEVVEE LLEENNGGTTHH
Fold up hem. Spread or tuck at Line 3 until you have the length youwant.
782 2
3 3
11
72
3
1
82
3
1
COSTURA DE HOMBRO DEBE ESTAR AQUI
1155.. Slash the tissue from thecenter back to the armholeseamline. Raise the upper backtissue to the correct necklineposition. Tape across the openingto preserve the adjustment forthe next step.
1166.. Remove the pattern. Unpin. Placeon top of alteration tissue. Add more tapeto secure tissue. Trim away the excesstissue.
Add a seam allowance to the center backso you can sew a seam that curves toyour back. It also will detract from theroundness.
SWAY/FLAT BACK OR ERECT BACK
1177.. If your side seams swing forwardand the back hem is longer, you needto shorten the center back.
1188.. Fold on the tuck linesprinted on the pattern tonothing at the side seamuntil the back is level andthe side seam is straight.
NNOOTTEE:: If you made back and/or bust adjustments, now is the time tofit the waist and hip area. With the center front and back at your cen-ter front and back, pin the side seams to fit your body. You may leave1“(2.5cm) seam allowances at the side if you are not sure of theamount of ease your fabric will need. Then you can always let themout for more comfort.
VIEW C - DARTED FRONT WITH SIDE PANEL FULLBUST ALTERATION
FFRROONNTT::
SStteepp 11.. Cut on Line 1 and spread the amountneeded at the arrow.
SStteepp 22.. Cut on Line 2. Lower side edge until Line1 edges are parallel.
SStteepp 33.. Cut on Line 3. Lower section below untilhem is even. Fill in Lines 1,2 and 3 with tissue.
NNOOTTEE:: Your dart is now deeper which is what a fuller bust needs. Sewon the original dart stitching lines!
If you are very full busted or barrel chested andneed more chest width, cut on both Line 1 andLine 1a and spread in both areas.
This is how you know you needa "Y” bust alteration. Too muchshows here.
Make same adjustments on front facing as on front.
too muchshows here
center front
la frente central
aqui se muestramucho
2
3
1a
1
1
2
3
1a
1
1
2
3
1a
1
1
2
3
1a
1
1
SStteepp 66.. Cut on Line 3. Lower section below untilhem is even. Fill Line 1 and Line 3 with tissue.
SStteepp 77.. Cut from the circle (#4) to Line 2. Close Line2 and Line 4 will open. Fill in Line 4 with tissue.Measure at seamline.
FFRROONNTT::
SStteepp 88.. Cut at Line 2 all the way across the front. Spread so the dis-tance at Line 4 on the SIDE FRONT and Line 2 on FRONT are thesame at the stitching lines. Cut Line 3 and lengthen same amount asLine 3 on SIDE FRONT. Fill in Lines 2 and 3 0n FRONT with tissue
NNOOTTEE:: Line 2 on the FRONT will be a little wider at the seam edge butparallel on the other side of Line 1. Match the FRONT and SIDEFRONT at the seamline, NOT at the cut edge!
2
1
4
33
2
1 3
14
24
2
13
14
2
1
1
4
3
M6076 - Page 3 of 7 HIGH ROUND BACK
If the neck seamline doesn't come upto where you would wear a necklace,raise the pattern neckline 1/4“-5/8“(6mm-1.5cm).
1111.. Lap the back pieces at the seam-line. Cut across and spread.
1122.. Separate and fill with tissue.You will gain about 1/8“ (3mm) tothe size of the neck when you cuton the fold. Ease it to the collar.
VERY ROUND BACKAre you rounded in the shoulder blade area? You are probably alsorounded in the upper back, so this will add more length so your hemwon't hike up at center back.
1133.. You'll need a friend to help withthis! Pin the front to the back and try onthe tissue.
1144.. Pull the tissue down at cen-ter back until the horizontal lineis straight. (You may need tounpin the shoulder seam). Tapethe tissue to your skin.
slight gappuffiness at base
of back neckbase abultada del escote
de la espaldaligera abertira
On occasion, the sidefront curve is too full infabric. When you fab-ric-fit, you can alwaysslip the side front toeliminate some of theexcess fullness.
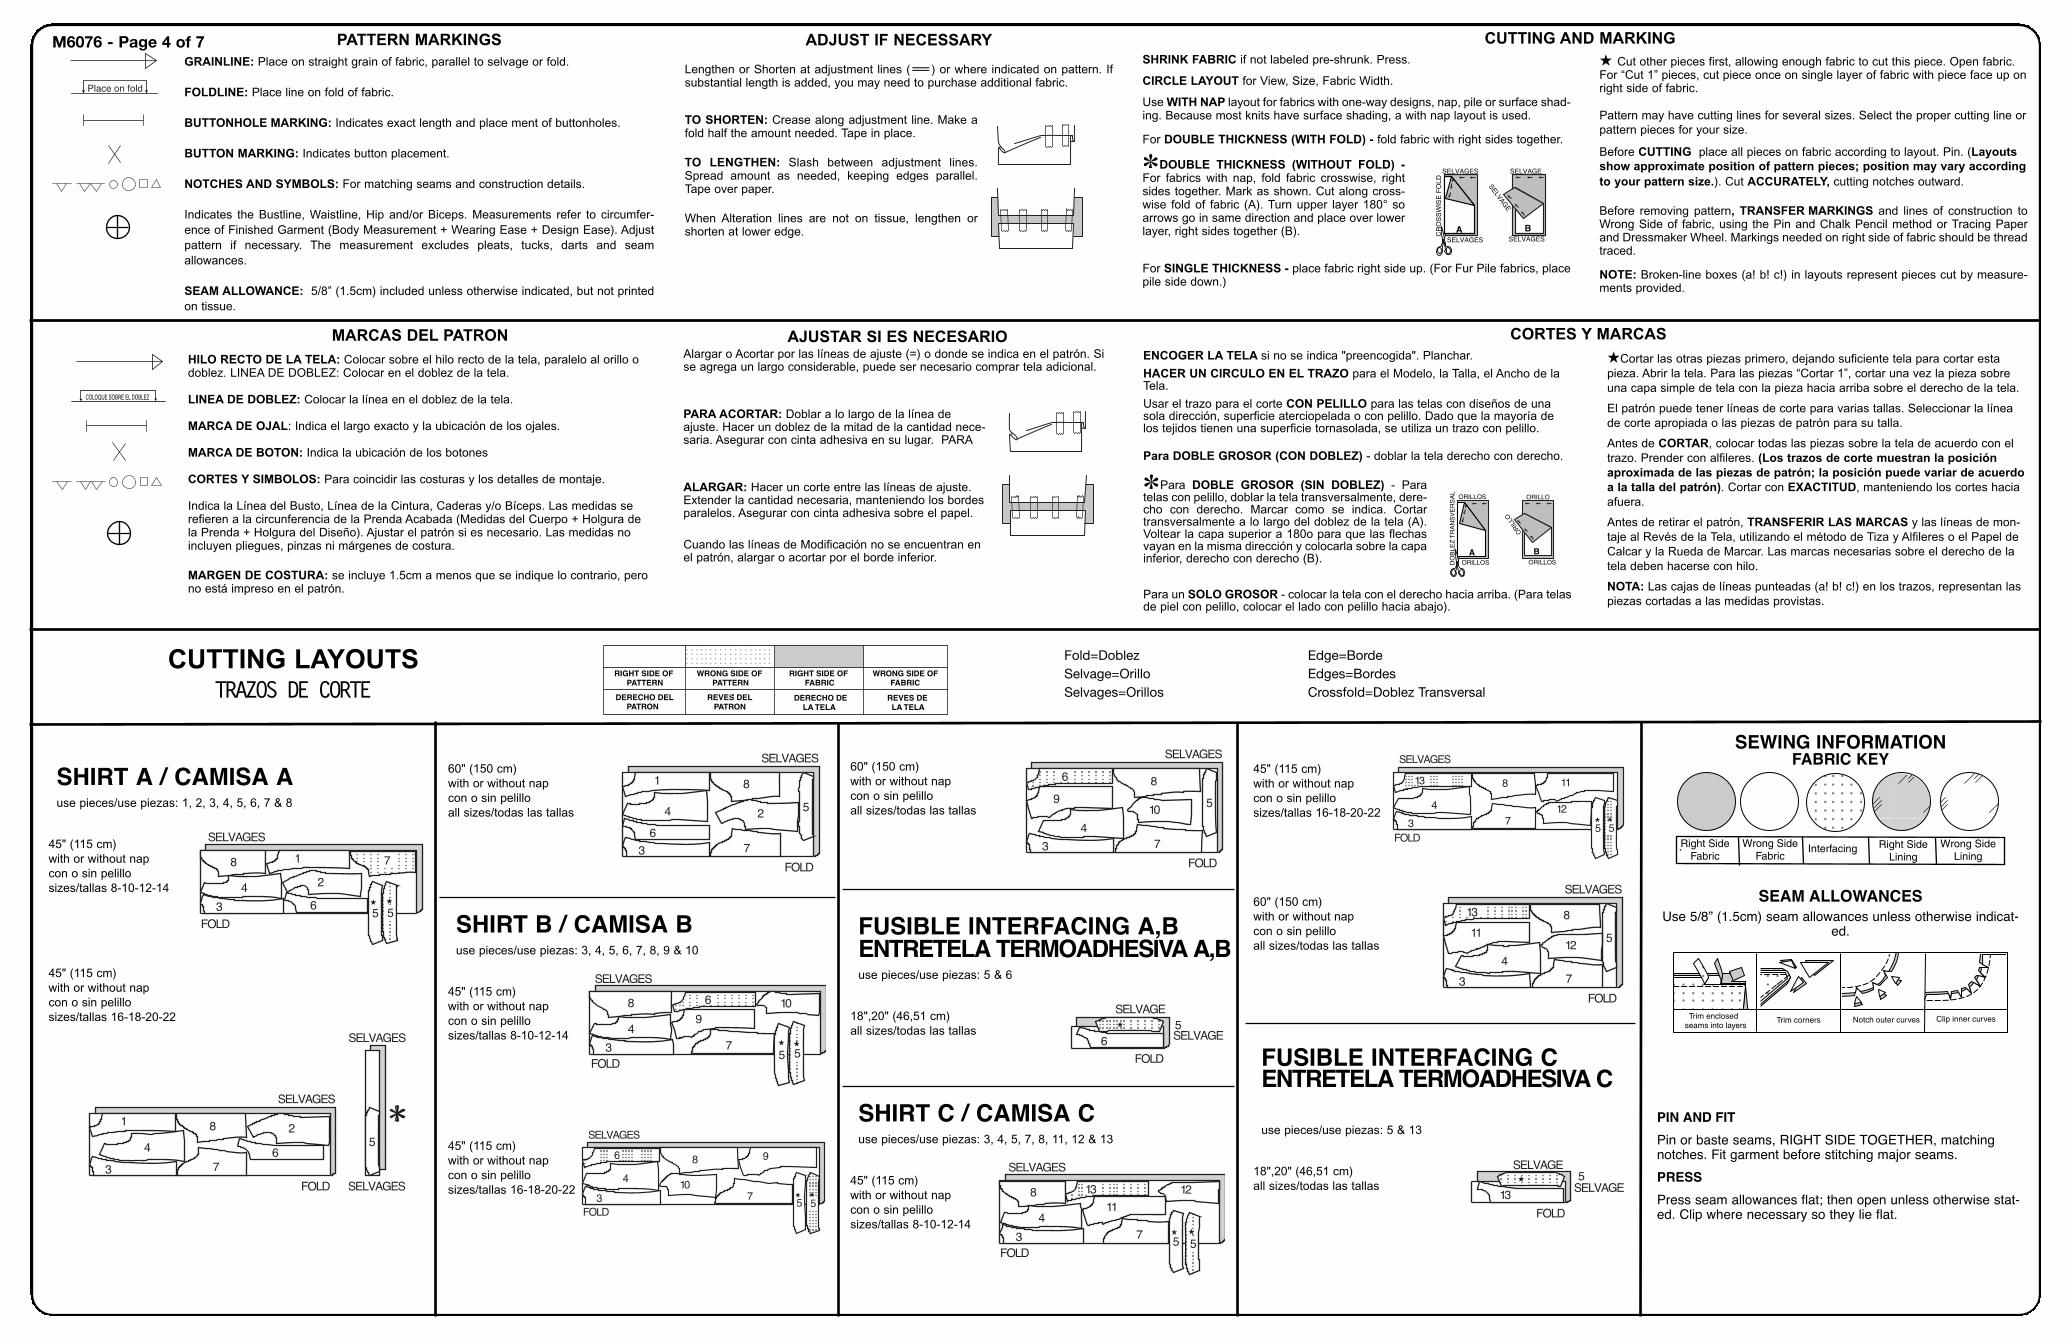
45" (115 cm) with or without napcon o sin pelillosizes/tallas 8-10-12-14
8 13
3
411
12
75 5
FOLD
SELVAGES
65
FOLD
SELVAGE
SELVAGE
3
8
10
6
9
47
5
FOLD
SELVAGES
ADJUST IF NECESSARY
Lengthen or Shorten at adjustment lines (=) or where indicated on pattern. Ifsubstantial length is added, you may need to purchase additional fabric.
TO SHORTEN: Crease along adjustment line. Make afold half the amount needed. Tape in place.
TO LENGTHEN: Slash between adjustment lines.Spread amount as needed, keeping edges parallel.Tape over paper.
When Alteration lines are not on tissue, lengthen orshorten at lower edge.
PATTERN MARKINGSGRAINLINE: Place on straight grain of fabric, parallel to selvage or fold.
FOLDLINE: Place line on fold of fabric.
BUTTONHOLE MARKING: Indicates exact length and place ment of buttonholes.
BUTTON MARKING: Indicates button placement.
NOTCHES AND SYMBOLS: For matching seams and construction details.
Indicates the Bustline, Waistline, Hip and/or Biceps. Measurements refer to circumfer-ence of Finished Garment (Body Measurement + Wearing Ease + Design Ease). Adjustpattern if necessary. The measurement excludes pleats, tucks, darts and seamallowances.
SEAM ALLOWANCE: 5/8” (1.5cm) included unless otherwise indicated, but not printedon tissue.
SHRINK FABRIC if not labeled pre-shrunk. Press.
CIRCLE LAYOUT for View, Size, Fabric Width.
Use WITH NAP layout for fabrics with one-way designs, nap, pile or surface shad-ing. Because most knits have surface shading, a with nap layout is used.
For DOUBLE THICKNESS (WITH FOLD) - fold fabric with right sides together.
DOUBLE THICKNESS (WITHOUT FOLD) -For fabrics with nap, fold fabric crosswise, rightsides together. Mark as shown. Cut along cross-wise fold of fabric (A). Turn upper layer 180° soarrows go in same direction and place over lowerlayer, right sides together (B).
For SINGLE THICKNESS - place fabric right side up. (For Fur Pile fabrics, placepile side down.)
A B
� Cut other pieces first, allowing enough fabric to cut this piece. Open fabric.For “Cut 1” pieces, cut piece once on single layer of fabric with piece face up onright side of fabric.
Pattern may have cutting lines for several sizes. Select the proper cutting line orpattern pieces for your size.
Before CUTTING place all pieces on fabric according to layout. Pin. (Layoutsshow approximate position of pattern pieces; position may vary accordingto your pattern size.). Cut ACCURATELY, cutting notches outward.
Before removing pattern, TRANSFER MARKINGS and lines of construction toWrong Side of fabric, using the Pin and Chalk Pencil method or Tracing Paperand Dressmaker Wheel. Markings needed on right side of fabric should be threadtraced.
NOTE: Broken-line boxes (a! b! c!) in layouts represent pieces cut by measure-ments provided.
CUTTING AND MARKING
AJUSTAR SI ES NECESARIOAlargar o Acortar por las líneas de ajuste (=) o donde se indica en el patrón. Sise agrega un largo considerable, puede ser necesario comprar tela adicional.
PARA ACORTAR: Doblar a lo largo de la línea deajuste. Hacer un doblez de la mitad de la cantidad nece-saria. Asegurar con cinta adhesiva en su lugar. PARA
ALARGAR: Hacer un corte entre las líneas de ajuste.Extender la cantidad necesaria, manteniendo los bordesparalelos. Asegurar con cinta adhesiva sobre el papel.
Cuando las líneas de Modificación no se encuentran enel patrón, alargar o acortar por el borde inferior.
ENCOGER LA TELA si no se indica "preencogida". Planchar.
HACER UN CIRCULO EN EL TRAZO para el Modelo, la Talla, el Ancho de laTela.
Usar el trazo para el corte CON PELILLO para las telas con diseños de unasola dirección, superficie aterciopelada o con pelillo. Dado que la mayoría delos tejidos tienen una superficie tornasolada, se utiliza un trazo con pelillo.
Para DOBLE GROSOR (CON DOBLEZ) - doblar la tela derecho con derecho.
Para DOBLE GROSOR (SIN DOBLEZ) - Paratelas con pelillo, doblar la tela transversalmente, dere-cho con derecho. Marcar como se indica. Cortartransversalmente a lo largo del doblez de la tela (A).Voltear la capa superior a 180o para que las flechasvayan en la misma dirección y colocarla sobre la capainferior, derecho con derecho (B).
Para un SOLO GROSOR - colocar la tela con el derecho hacia arriba. (Para telasde piel con pelillo, colocar el lado con pelillo hacia abajo).
A B
CORTES Y MARCAS
�Cortar las otras piezas primero, dejando suficiente tela para cortar estapieza. Abrir la tela. Para las piezas “Cortar 1”, cortar una vez la pieza sobreuna capa simple de tela con la pieza hacia arriba sobre el derecho de la tela.
El patrón puede tener líneas de corte para varias tallas. Seleccionar la líneade corte apropiada o las piezas de patrón para su talla.
Antes de CORTAR, colocar todas las piezas sobre la tela de acuerdo con eltrazo. Prender con alfileres. (Los trazos de corte muestran la posiciónaproximada de las piezas de patrón; la posición puede variar de acuerdoa la talla del patrón). Cortar con EXACTITUD, manteniendo los cortes haciaafuera.
Antes de retirar el patrón, TRANSFERIR LAS MARCAS y las líneas de mon-taje al Revés de la Tela, utilizando el método de Tiza y Alfileres o el Papel deCalcar y la Rueda de Marcar. Las marcas necesarias sobre el derecho de latela deben hacerse con hilo.
NOTA: Las cajas de líneas punteadas (a! b! c!) en los trazos, representan laspiezas cortadas a las medidas provistas.
MARCAS DEL PATRON
HILO RECTO DE LA TELA: Colocar sobre el hilo recto de la tela, paralelo al orillo odoblez. LINEA DE DOBLEZ: Colocar en el doblez de la tela.
LINEA DE DOBLEZ: Colocar la línea en el doblez de la tela.
MARCA DE OJAL: Indica el largo exacto y la ubicación de los ojales.
MARCA DE BOTON: Indica la ubicación de los botones
CORTES Y SIMBOLOS: Para coincidir las costuras y los detalles de montaje.
Indica la Línea del Busto, Línea de la Cintura, Caderas y/o Bíceps. Las medidas serefieren a la circunferencia de la Prenda Acabada (Medidas del Cuerpo + Holgura dela Prenda + Holgura del Diseño). Ajustar el patrón si es necesario. Las medidas noincluyen pliegues, pinzas ni márgenes de costura.
MARGEN DE COSTURA: se incluye 1.5cm a menos que se indique lo contrario, perono está impreso en el patrón.
45" (115 cm) with or without napcon o sin pelillosizes/tallas 16-18-20-22
60" (150 cm) with or without napcon o sin pelilloall sizes/todas las tallas
FUSIBLE INTERFACING CENTRETELA TERMOADHESIVA C
use pieces/use piezas: 5 & 13
18",20" (46,51 cm) all sizes/todas las tallas
13
5
FOLD
SELVAGE
SELVAGE
3
13 8
11
4
7
125
FOLD
SELVAGES
3
13
4
8
7
11
12
5 5FOLD
SELVAGES
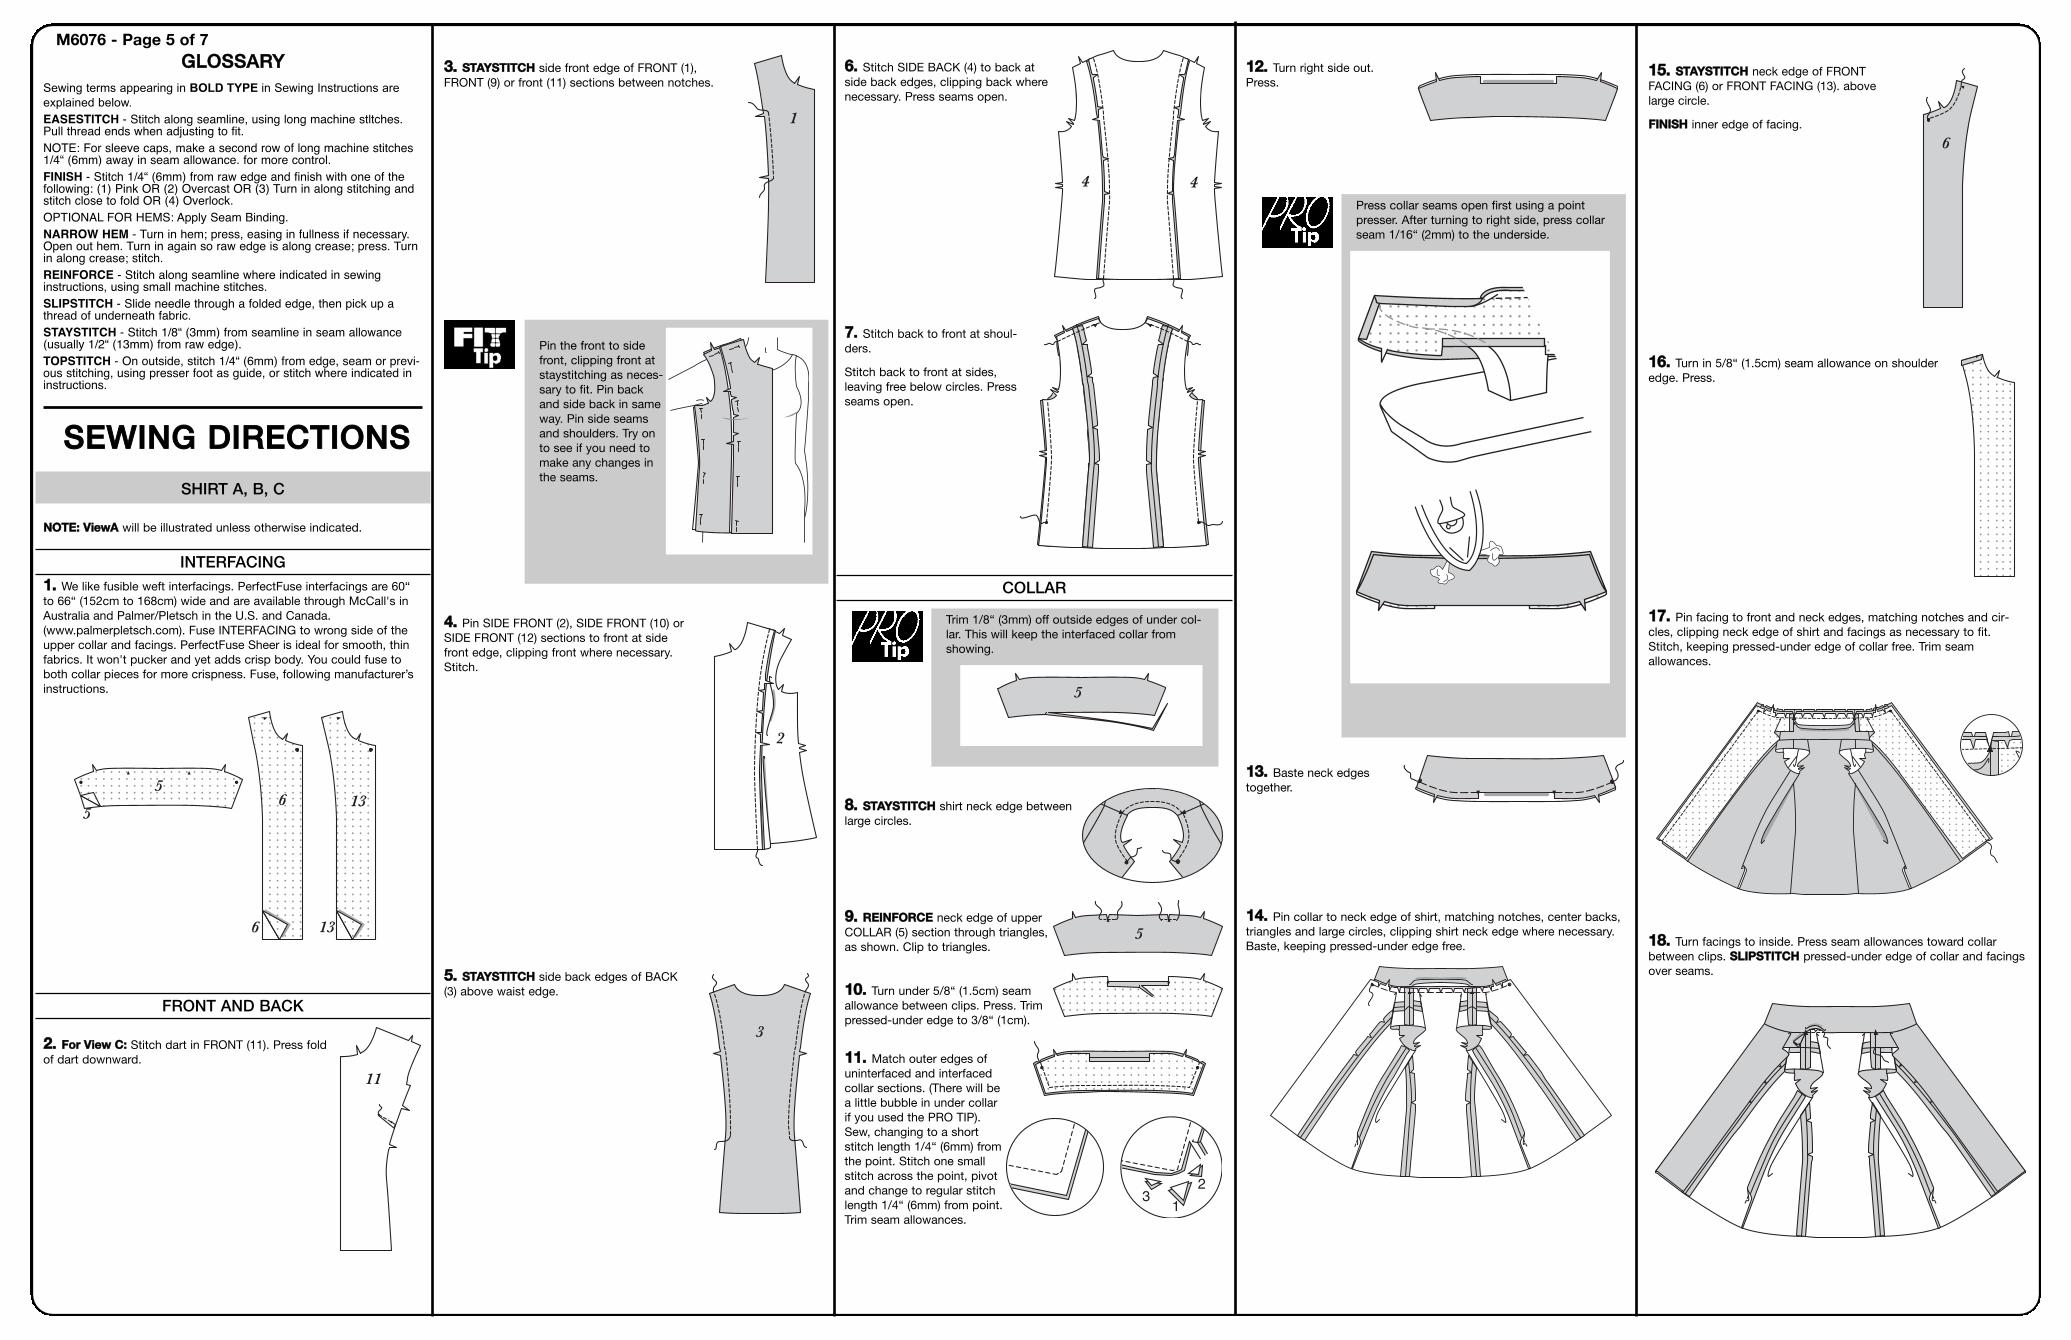
1155.. SSTTAAYYSSTTIITTCCHH neck edge of FRONTFACING (6) or FRONT FACING (13). abovelarge circle.
FFIINNIISSHH inner edge of facing.
1166.. Turn in 5/8“ (1.5cm) seam allowance on shoulderedge. Press.
1177.. Pin facing to front and neck edges, matching notches and cir-cles, clipping neck edge of shirt and facings as necessary to fit.Stitch, keeping pressed-under edge of collar free. Trim seamallowances.
1188.. Turn facings to inside. Press seam allowances toward collarbetween clips. SSLLIIPPSSTTIITTCCHH pressed-under edge of collar and facingsover seams.
6
1122.. Turn right side out.Press.
1133.. Baste neck edgestogether.
1144.. Pin collar to neck edge of shirt, matching notches, center backs,triangles and large circles, clipping shirt neck edge where necessary.Baste, keeping pressed-under edge free.
33.. SSTTAAYYSSTTIITTCCHH side front edge of FRONT (1),FRONT (9) or front (11) sections between notches.
44.. Pin SIDE FRONT (2), SIDE FRONT (10) orSIDE FRONT (12) sections to front at sidefront edge, clipping front where necessary.Stitch.
55.. SSTTAAYYSSTTIITTCCHH side back edges of BACK(3) above waist edge.
3
2
1
GGLLOOSSSSAARRYYSewing terms appearing in BOLD TYPE in Sewing Instructions areexplained below.EASESTITCH - Stitch along seamline, using long machine stltches.Pull thread ends when adjusting to fit. NOTE: For sleeve caps, make a second row of long machine stitches1/4“ (6mm) away in seam allowance. for more control.FINISH - Stitch 1/4“ (6mm) from raw edge and finish with one of thefollowing: (1) Pink OR (2) Overcast OR (3) Turn in along stitching andstitch close to fold OR (4) Overlock.OPTIONAL FOR HEMS: Apply Seam Binding.NARROW HEM - Turn in hem; press, easing in fullness if necessary.Open out hem. Turn in again so raw edge is along crease; press. Turnin along crease; stitch.REINFORCE - Stitch along seamline where indicated in sewinginstructions, using small machine stitches.SLIPSTITCH - Slide needle through a folded edge, then pick up athread of underneath fabric.STAYSTITCH - Stitch 1/8“ (3mm) from seamline in seam allowance(usually 1/2“ (13mm) from raw edge).TOPSTITCH - On outside, stitch 1/4“ (6mm) from edge, seam or previ-ous stitching, using presser foot as guide, or stitch where indicated ininstructions.
SSEEWWIINNGG DDIIRREECCTTIIOONNSSSHIRT A, B, C
NNOOTTEE:: VViieewwAA will be illustrated unless otherwise indicated.
INTERFACING11.. We like fusible weft interfacings. PerfectFuse interfacings are 60“to 66“ (152cm to 168cm) wide and are available through McCall's inAustralia and Palmer/Pletsch in the U.S. and Canada. (www.palmerpletsch.com). Fuse INTERFACING to wrong side of theupper collar and facings. PerfectFuse Sheer is ideal for smooth, thinfabrics. It won't pucker and yet adds crisp body. You could fuse toboth collar pieces for more crispness. Fuse, following manufacturer’sinstructions.
FRONT AND BACK
22.. FFoorr VViieeww CC:: Stitch dart in FRONT (11). Press foldof dart downward.
11
5
56
6
13
13
M6076 - Page 5 of 7
66.. Stitch SIDE BACK (4) to back atside back edges, clipping back wherenecessary. Press seams open.
77.. Stitch back to front at shoul-ders.
Stitch back to front at sides,leaving free below circles. Pressseams open.
99.. RREEIINNFFOORRCCEE neck edge of upperCOLLAR (5) section through triangles,as shown. Clip to triangles.
1100.. Turn under 5/8“ (1.5cm) seamallowance between clips. Press. Trimpressed-under edge to 3/8“ (1cm).
1111.. Match outer edges ofuninterfaced and interfacedcollar sections. (There will bea little bubble in under collarif you used the PRO TIP).Sew, changing to a shortstitch length 1/4“ (6mm) fromthe point. Stitch one smallstitch across the point, pivotand change to regular stitchlength 1/4“ (6mm) from point.Trim seam allowances.
5
44
Pin the front to sidefront, clipping front atstaystitching as neces-sary to fit. Pin backand side back in sameway. Pin side seamsand shoulders. Try onto see if you need tomake any changes inthe seams.
Trim 1/8“ (3mm) off outside edges of under col-lar. This will keep the interfaced collar fromshowing.
5
Press collar seams open first using a pointpresser. After turning to right side, press collarseam 1/16“ (2mm) to the underside.
55.. Si usted es estrecha sólo en la espalda, cortar hasta y a lo largode la línea de ajuste horizontal superior. Después de sobreponer laespalda superior, rectificar las líneas de pespunte y de corte igual quepara la espalda ancha.
BUSTO GRANDE66.. Si tiene una abertura en la sisa y no puede hacer que el centro delfrente llegue al centro del frente de su cuerpo, necesita una modifi-cación de busto.
SOLAMENTE MODELOS A Y B:
Bajar o subir la amplitud del busto para que coincida con su amplitud!
77.. Trazar un cuadrado sobre y debajo de los cortes alrededor de lazona del busto.
88.. Bajar o subir la amplitud del busto para que coincida con suamplitud. Asegúrese de “rectificar” las líneas de pespunte y de cortecomo se indica.
99.. Trazar nuevamente la Línea 1 y la Línea 2 como se indica.
COLOCACION DE LA LINEAS DE COSTURAPRINCESA
1100.. Sacar los alfileres del patrón en la zona del busto. Si tiene elbusto muy grande, debería sacar los alfileres de la línea de dobladillo.Probarse el patrón y prender con alfileres el centro del frente al CEN-TRO DEL FRENTE de su cuerpo. Si la costura en el FRENTE no estácentrada sobre su busto, necesitará aumentar tanto al FRENTE comoal COSTADO DEL FRENTE. Decidir cuánto aumentar a cada uno. Ennuestras instrucciones, suponemos que necesita aumentarle aambos. De otra forma, modificar sólo el costado del frente que esmucho más fácil!!!
PPRROO TTIIPP:: La bisagra: Si modifica hasta el borde, la línea de costuraserá más larga. Por el contrario, cortar hasta la línea de costura desdeambos costados. La línea de costura es la ìbisagra”. Permanece delmismo tamaño después de la modificación.
NNOOTTAA:: No verá las ìbisagras” en las ilustraciones en esta guía.
MODELO A - MODIFICACION PARA BUSTOGRANDE EN HOMBROS PRINCESA
FFRREENNTTEE::
PPaassoo 11.. Comenzar con el frente. Cortar sobre la Línea 1 y extender elancho necesario en la flecha.
PPaassoo 22.. Cortar sobre la Línea 2. Bajar el borde del costado hasta quelos bordes de la Línea 1 estén paralelos.
PPaassoo 33.. Cortar sobre la Línea 4 y bajar la sección inferior hasta que eldobladillo esté parejo. Rellenar la Línea 1 y 4 con papel.
CCOOSSTTAADDOO DDEELL FFRREENNTTEE::
PPaassoo 44.. Cortar sobre la Línea 1. Extender la cantidad necesaria en laflecha.
PPaassoo 55.. Cortar sobre la Línea 2. Bajar el borde del costado hasta quelos bordes de la Línea 1 estén paralelos.
PPaassoo 66.. Cortar sobre la Línea 3. Bajar la sección hasta que eldobladillo esté parejo. Rellenar la Línea 1 y la Línea 3 con papel.
PPaassoo 77.. Cortar desde el círculo (#4) hasta la Línea 2. Cerrar la Línea 2y la Línea 4 se abrirá. Rellenar la Línea 4 con papel.
FFRREENNTTEE::
PPaassoo 88.. Cortar por la Línea 2 a través del frente y extender de modoque la Línea 2 en el FRENTE y la Línea 4 en el COSTADO DELFRENTE coincidan por las líneas de pespunte. Cortar el FRENTE en laLínea 3 y alargar la misma cantidad que en la Línea 3 en el COSTADODEL FRENTE.
NNOOTTAA:: La línea 2 en el FRENTE será un poco más ancha en el bordede la costura pero paralela en el otro costado de la Línea 1. Hacercoincidir el FRENTE y el COSTADO DEL FRENTE por la línea de cos-tura, NO por el borde cortado!
Rellenar con papel las Líneas 2 y 3 en el FRENTE
Feliz Costura!
UUNNAA NNOOTTAA DDEE PPAATTII:: Después de enseñar a entallar un busto prince-sa en nuestros talleres, Marta Alto y yo nos dimos cuenta de queteníamos que mover la Línea 1 en el costado del frente más cerca a lalínea de pespunte para evitar que la Línea 4 se abra demasiado.Hemos agregado o ajustado de forma perfecta otras líneas de modifi-cación en este diseño, de modo que será un poco diferente a nue-stros patrones anteriores—-con suerte será mucho mejor! Para suinformación, Marta hace un trabajo impresionante en el DVD de bustogrande mostrando cómo ìpensar de forma creativa.”
INSTRUCCIONES PARA ENTALLAR EL PATRON
ENTALLE INCORPORADOLas piezas de patrón tienen la ayuda del ENTALLE INCORPORADO:Las líneas de modificación están impresas en el patrón.
Para grafico ver pagina 1.
PREPARACION DEL PATRON
11.. Recortar alrededor del patrón POR AFUERA de la línea de cortenegra para su talla. Planchar el patrón con plancha seca fija en LANA.Con el patrón por el DERECHO, pegar con cinta adhesiva lo siguienteDENTRO de la línea de pespunte para evitar que el patrón se rompaal probárselo:
* sisa del frente y de la espalda
* escote del frente y de la espalda
* curva interior en la espalda sobre la cintura y en el frente entre loscortes
Utilizar piezas pequeñas de cinta adhesiva alrededor de las curvas,sobreponiéndolas. Utilizar cinta adhesiva Scotchô Magicô Tape de1.3cm (caja verde). Hacer piquetes en las curvas hacia la cinta adhe-siva. NO CORTAR LA CINTA.
Jalar suavemente el patrón para ver si está firmemente pegado.
Prender con alfileres las costuras hacia AFUERA, haciendo más fácilel ajuste.
PROBARSE EL PATRONENTALLAR EL PATRON NO ES UN METODO DE ADIVINANZA! Pro-barse el patrón. Prender con alfileres el centro del frente y el centrode la espalda al centro del frente y al centro de la espalda de su cuer-poñes decir a su fustán!
22.. Jalar el patrón firmemente sobre su busto, pero si el patrón noalcanzara el centro del frente o de la espalda de su cuerpo, continuarleyendo....
Utilizar el papel de modificación PERFECT PATTERN PAPER (Papel dePatrón Perfecto) de Palmer/Pletsch para rellenar las aberturas cuandose hagan ajustes.
AMPLITUD EN LAS CADERAS Y CINTURANNOOTTAA:: SSII TTIIEENNEE LLAA EESSPPAALLDDAA AANNCCHHAA oo eell bbuussttoo ggrraannddee,, HHAACCEERRPPRRIIMMEERR EESSOOSS AAJJUUSSTTEESS!! AAuummeennttaarráánn aammpplliittuudd aa llaa cciinnttuurraa yy aallaass ccaaddeerraass..
33.. El centro del frente y de la espalda deben llegar al centro delfrente y de la espalda de su cuerpo en la zona de la cintura y de lascaderas. Si necesita más amplitud o desea más holgura, sacar losalfileres de la costura del costado hasta la parte de abajo del brazo.Agregar bastante papel como se indica. Probarse nuevamente y pren-der con alfileres el patrón cerca a su cuerpo. Recortar el exceso demargen de costura a 1.5cm. (O, recortarlo a 2.5cm si quiere tener laopción de mayor holgura). Si necesita un ajuste para busto grande,espere hasta terminar la modificación porque ésta agregará amplitud.
ANCHO DE LA ESPALDA44.. Si tiene espalda y caderas anchas, ajustar ANTES de verificar elbusto grande. Cortar sobre la línea de modificación de espalda anchay extender. Ahora tendrá más holgura en el hombro de la espalda opuede agregar una pinza en el hombro de la espalda. Es normal agre-gar de 1cm a 2cm .
2244.. TTOOPPSSTTIITTCCHH opening edges of sleeve,squaring stitching above opening.
2255.. EEAASSEESSTTIITTCCHH cap of sleeve between smallcircles.
2266.. With right sides together, pin sleeveinto armhole edge, matching notches,underarm seams, small circles and large cir-cle to shoulder seam. Adjust ease. Stitch.Stitch again 1/4“ (6mm) away in seamallowances. Trim close to second stitching.Press seam allowances flat. Turn seamallowances toward sleeve.
2277.. FFoorr VViieeww AA:: To form cuff, turn 2“ (5cm) to out-side on lower edge of sleeve. Tack at underseamseam.
FINISHINGHHeemmss::
2288.. Turn lower edge of facings to outsidealong seam. Stitch across facing 1“ (2.5cm)above raw edge. Trim as shown.
2299.. Turn facings to inside,continuing to turn under 1“(2.5cm) on remainder of loweredge. Baste close to fold. Turnunder 1/4“ (6mm) on rawedge. Baste hem in placeclose to upper edge. Press.TTOOPPSSTTIITTCCHH hem along upperbasting, continuing to frontedges.
3300.. CATCHSTITCH facings tohem.
SLEEVE
1199.. Pin SLEEVE FRONT (7) toSLEEVE BACK (8) at overarm edge,right sides together, matchingnotches, squares and large circles.Stitch, leaving free betweensquares. Backstitch at squares.Press seams open.
FFIINNIISSHH lower edge of sleeve.
2200.. Turn lower edge of sleeve to out-side, matching squares. Stitch eachside of opening from fold to squares.Trim seam allowances.
2211.. Turn lower edge of sleeve toinside, continuing to turn under 3-1/2“(9cm) hem on remainder of loweredge. Press.
2222.. Stitch sleeve front to sleeve back at under-arm, opening out hem.
2233.. Turn hem to inside again. Press. Hand-sew inneredge of hem in place.
7 8
M6076 - Page 6 of 7
3311.. Finish side openingedges of shirt with a 5/8“(1.5cm) NNAARRRROOWW HHEEMM,squaring stitching aboveopening.
BBuuttttoonnhhoolleess aanndd BBuuttttoonnss::
NNOOTTEE:: Be sure to respace buttonholes if you did a full bust alterationor any lengthening and shortening.
3322.. Make buttonholesin right front at mark-ings.
Lap right front over left,matching centers. Usingbuttonholes as guide,make button markingson left front. Sew but-tons at markings.
Español
FINALMENTE ENTALLA
LA "CAMISA SENTADORA DE ENTALLE PERFECTO”CCEENNTTRRAARRSSEE EENN EELL BBUUSSTTOO GGRRAANNDDEE
Le ofrecemos tres opciones sentadoras de frentes. Si tiene el bustogrande, esta camisa tiene la mejor ayuda sobre cómo aprender amodificar un busto grande que jamás hayamos incluido en un patrón.Además, este es el estilo de escote en una camisa que Oprah procla-ma como el más sentador. Las tiendas que tienen camisas con esteescote no las pueden mantener en stock. Por lo tanto, le estamosofreciendo lo mejor tanto en escote sentador como en buen entalle,centrándonos en el busto grande.
El MMooddeelloo AA tiene un frente con hombros princesa. Puede utilizarcolor blanco en el frente y un color oscuro en los costados—es elmodelo que adelgaza más.
El MMooddeelloo BB tiene un frente con sisas princesa.
El MMooddeelloo CC tiene un frente con pinzas con un panel al costado—-elmás fácil para modificar un busto grande.
Las espaldas son todas con hombros princesa.
También nos gusta las aberturas en los costados inferiores.
Medir su busto alto y utilizarlo en lugar del busto en el cuadro demedidas. Si se encuentra entre dos tallas, compre la talla máspequeña ya que el patrón tiene holgura para cubrir hasta la siguientetalla.
No pierda tiempo cosiendo una prenda que no entalla! Entallar elpatrón antes de cortar. Para hacer la modificación más fácil, hemosagregado líneas de modificación en el papel de patrón para losentalles más comunes. Hacer un pliegue o cortar y extender en estaslíneas hasta que el patrón se entalle a su cuerpo. Para este patrón,nos centraremos en cómo hacer ajustes para un busto grande. Tam-bién mostraremos cómo hacer ajustes para una espalda alta redonday una espalda ancha, hombros hacia adelante y brazos gruesos—todos importantes para una camisa bien entallada. Si usted no estáfamiliarizada con los pasos de modificación, remítase a nuestro libroFit for Real People, disponible en las tiendas de telas o enwww.palmerpletsch.com o www.mccallpatterns.com. Si quiere ìacciónen vivo” obtenga nuestro DVD de entalle o nuestro DVD de bustogrande.
1166.. Doblar hacia adentro un margen de costura de 1.5cm en elborde del hombro. Planchar.
1177.. Prender con alfileres la vista a los bordes del frente y del escote,coincidiendo los cortes y los círculos, haciendo los piquetes necesar-ios en el borde del escote de la camisa y las vistas para encajar.Coser, manteniendo suelto el borde planchado del cuello. Recortar losmárgenes de costura.
Hacer un piquete en el margen de costura del escote (cuello) por losextremos de las vistas, como se indica. Recortar los márgenes decostura.
1188.. Voltear las vistas hacia adentro. Planchar los márgenes de costu-ra hacia el cuello entre los piquetes. Coser el borde planchado delcuello y las vistas sobre las costuras con PPUUNNTTOO DDEE DDOOBBLLAADDIILLLLOO.
MANGA1199.. Prender con alfileres el FRENTE DE LA MANGA (7) a la ESPAL-DA DE LA MANGA (8) por el borde sobre el brazo, derecho con dere-cho, coincidiendo los cortes, los cuadrados y los círculos grandes.Coser, dejando suelto entre los cuadrados. Coser con punto atrás enlos cuadrados. Planchar las costuras abiertas.
AACCAABBAARR el borde inferior de la manga.
2200.. Doblar el borde inferior de la manga hacia afuera, coincidiendolos cuadrados. Coser cada costado de la abertura desde el doblezhasta los cuadrados. Recortar los márgenes de costura.
2211.. Voltear el borde inferior de la manga hacia adentro, continuarhaciendo un dobladillo de 9cm en el resto del borde inferior. Planchar.
2222.. Coser el frente de la manga a la espalda de la manga por debajodel brazo, abriendo el dobladillo.
2233.. Voltear nuevamente el dobladillo hacia adentro. Planchar. Cosera mano el borde interior del dobladillo en su lugar.
2244.. Hacer un PPEESSPPUUNNTTEE DDEE AADDOORRNNOO en los bordes de la aberturade la manga, cosiendo en ángulo recto sobre la abertura.
2255.. CCOOSSEERR PPAARRAA EEMMBBEEBBEERR la cabeza de manga entre los círculospequeños.
2266.. Derecho con derecho prender con alfileres la manga al borde dela sisa, coincidiendo los cortes, las costuras debajo del brazo, los cír-culos pequeños y el círculo grande con la costura del hombro. Embe-ber. Coser. Coser nuevamente a 6mm en los márgenes de costura.Recortar cerca al segundo pespunte. Planchar los márgenes de cos-tura planos. Voltear los márgenes hacia la manga.
2277.. PPaarraa eell MMooddeelloo AA:: Para formar el puño, voltear 5cm hacia afueraen el borde inferior de la manga. Hilvanar por la costura debajo delbrazo.
ACABADODDoobbllaaddiillllooss::
2288.. Doblar el borde inferior de las vistas hacia afuera a lo largo de lacostura. Coser a través de la vista a 2.5cm sobre el borde no termina-do. Recortar como se indica.
2299.. Voltear las vistas hacia adentro, continuar doblando hacia elrevés 2.5cm en el resto del borde inferior. Hilvanar cerca al doblez.Doblar hacia el revés 6mm en el borde no terminado. Hilvanar eldobladillo en su lugar cerca al borde superior. Planchar. Hacer unPPEESSPPUUNNTTEE DDEE AADDOORRNNOO en el dobladillo a lo largo del hilván superi-or, continuar hacia los bordes del frente.
3300.. Coser las vistas al dobladillo con PUNTADA DE ESCAPULARIO.
3311.. Acabar los bordes de la abertura del costado de la camisa conun DDOOBBLLAADDIILLLLOO AANNGGOOSSTTOO de 1.5cm, cosiendo en ángulo rectosobre la abertura.
OOjjaalleess yy BBoottoonneess::
NNOOTTAA:: Asegurarse de volver a distribuir los ojales si hizo una modifi-cación de busto o si alargó o acortó.
3322.. Hacer los ojales en el frente derecho por las marcas.
Sobreponer el frente derecho al izquierdo, coincidiendo los centros.Utilizando los ojales como guía, hacer las marcas de botón en elfrente izquierdo. Coser los botones por las marcas.
INSTRUCCIONES DE COSTURA
CAMISA A, B, CNNOOTTAA:: Se muestra el MMooddeelloo AA a menos que se indique lo contrario.
ENTRETELA11.. Preferimos las entretelas termoadhesivas con trama. Las entretelasPerfectFuse son de 152cm a 168cm de ancho y están disponibles através de McCallís en Australia y Palmer/Pletsch en U.S.A. y Canadá.(www.palmerpletsch.com). Adherir la ENTRETELA por el revés de laparte superior del cuello y de las vistas. La entretela PerfectFuseSheer es ideal para las telas suaves y delgadas. No se fruncirán yademás le agregan un toque de cuerpo firme a las telas. Puedeaplicar entretela a ambas piezas del cuello para mayor firmeza.Adherir, siguiendo las instrucciones del fabricante.
FRENTE Y ESPALDA
22.. PPaarraa eell MMooddeelloo CC:: Coser la pinza en el FRENTE (11). Planchar eldoblez de la pinza hacia abajo.
33.. Hacer un PPEESSPPUUNNTTEE DDEE RREEFFUUEERRZZOO en el borde del costado delfrente de las secciones del FRENTE (1), del FRENTE (9) o del frente(11) entre los cortes.
FFIITT TTIIPP:: Prender con alfileres el frente al costado del frente, haciendolos piquetes necesarios en el frente por el pespunte de refuerzo paraencajar. Prender con alfileres la espalda y el costado de la espalda dela misma forma. Prender con alfileres las costuras del costado y loshombros. Probarse para ver si necesita algún cambio en las costuras.
44.. Prender con alfileres las secciones del COSTADO DEL FRENTE (2),del COSTADO DEL FRENTE (10) o del COSTADO DEL FRENTE (12) alfrente por el borde del costado del frente, haciendo los piquetesnecesarios en el frente. Coser.
55.. Hacer un PPEESSPPUUNNTTEE DDEE RREEFFUUEERRZZOO en los bordes del costadode la espalda de la pieza ESPALDA (3) sobre el borde de la cintura.
66.. Coser el COSTADO DE LA ESPALDA (4) a la espalda por los bor-des del costado de la espalda, haciendo los piquetes necesarios en laespalda. Planchar las costuras abiertas.
77.. Coser la espalda al frente por los hombros.
Coser la espalda al frente por los costados, dejando suelto debajo delos círculos. Planchar las costuras abiertas.
CUELLOPPRROO TTIIPP:: Recortar 3mm de los bordes exteriores del cuello conentretela. Esto evitará que se vea la parte inferior del cuello.
88.. Hacer un PPEESSPPUUNNTTEE DDEE RREEFFUUEERRZZOO en el borde del escote de lacamisa entre los círculos grandes.
99.. RREEFFOORRZZAARR el borde del escote de la sección de la parte superiordel CUELLO (5) a través de los triángulos, como se indica. Hacer unpiquete hacia los triángulos.
1100.. Doblar hacia el revés un margen de costura de 1.5cm entre lospiquetes. Planchar. Recortar el borde planchado a 1cm.
1111.. Coincidir los bordes exteriores de las secciones del cuello sinentretela y con entretela. (Quedará una pequeña burbuja en la parteinferior del cuello si utilizó el PRO TIP). Coser, cambiando a un largode puntada más corto a 6mm de la punta. Hacer una puntadapequeña a través de la punta, girar y cambiar a un largo de puntadaregular a 6mm de la punta. Recortar los márgenes de costura.
1122.. Voltear al derecho. Planchar.
PPRROO TTIIPP:: Planchar primero las costuras del cuello abiertas utilizandouna tabla de planchar para puntas. Después de voltearlas al derecho,planchar la costura del cuello 2mm hacia la parte inferior.
1133.. Hilvanar juntos los bordes del escote.
1144.. Prender con alfileres el cuello al borde del escote de la camisa,coincidiendo los cortes, los centros de la espalda, los triángulos y loscírculos grandes, haciendo los piquetes necesarios en el borde delescote de la camisa. Hilvanar, manteniendo suelto el borde plancha-do.
1155.. Hacer un PPEESSPPUUNNTTEE DDEE RREEFFUUEERRZZOO en el borde del escote dela VISTA DEL FRENTE (6) o de la VISTA DEL FRENTE (13), sobre elcírculo grande.AACCAABBAARR el borde interior de la vista.
ESPALDA MUY REDONDAEs usted redonda en la zona de los omóplatos? Probablemente tam-bién sea redonda en la espalda superior, entonces esto aumentará ellargo de modo que el dobladillo no se subirá en el centro de la espal-da.
1133.. Necesitará que una amiga la ayude con esto! Prender con alfil-eres el frente a la espalda y probarse el patrón.
1144.. Jalar el papel hacia abajo en el centro de la espalda hasta que lalínea horizontal esté recta. (Usted necesitará sacar los alfileres de lacostura del hombro). Adherir el papel a su piel.
1155.. Hacer un corte en el papel desde el centro de la espalda hasta lalínea de costura de la sisa. Levantar el papel de la espalda superiorhasta la posición correcta del escote. Adherir a través de la aberturapara mantener el ajuste para el siguiente paso.
1166.. Retirar el patrón. Sacar los alfileres. Colocar en la parte superiordel papel de modificación. Agregar más cinta para asegurar el papel.Recortar el exceso de papel.
Agregar el margen de costura al centro de la espalda de modo quepueda coser una costura que se amolde a las curvas de su espalda.También disminuirá la redondez.
ESPALDA ARQUEADA/PLANA O ESPALDA RECTA1177.. Si las costuras del costado se balancean hacia adelante y eldobladillo de la espalda es más largo, necesita acortar el centro de laespalda.
1188.. Doblar en las líneas de doblez impresas en el patrón hasta ceroen la costura del costado hasta que la espalda esté pareja y la costu-ra del costado esté recta.
NNOOTTAA:: Si hizo los ajustes de espalda y/o de busto, ahora es elmomento de entallar la cintura y la zona de las caderas. Con el centrodel frente y de la espalda en el centro del frente y de la espalda de sucuerpo, prender con alfileres las costuras del costado para entallar sucuerpo. Puede dejar márgenes de costura de 2.5cm en el costado sino está segura de la cantidad de holgura que necesitará. Entoncessiempre puede dejarlos para mayor comodidad.
HOMBROS HACIA ADELANTEEstá la costura del hombro en el medio de su brazo? Sino gire haciaadelante.
1199.. Haga un ángulo en la costura de la espalda hacia adelante. Agre-gar papel para el margen de costura.
Hacer un ángulo en la costura del frente hacia adelante. Recortar elborde a 1.5cm.
Podría necesitar volver a darle forma al frente para un mejormovimiento o ensanchar la espalda un poco para tener más holgura.
Si no puede pellizcar un centímetro de papel en la parte superior delbrazo, la manga estará demasiado ajustada.
2200.. Cortar en la Línea 1 y la Línea 2 hasta las líneas de costura yhasta, pero no a través del borde inferior. Crear una bisagra en la líneade costura.
Extender la cantidad necesaria, hasta 2.5cm en cada pieza. Si necesi-ta más, puede agregar a la costura sobre el brazo.
2211.. Si también tiene el busto grande, puede agregar la misma canti-dad a las costuras de la manga y debajo del brazo del frente y espal-da de la camisa para dar más holgura al busto y a la manga. Este esun estilo de manga muy “flexible”.
LLAARRGGOO DDEE LLAA MMAANNGGAA
Formar el dobladillo. Extender o doblar en la Línea 3 hasta que tengael largo que desea.
MODELO B - MODIFICACION PARA BUSTOGRANDE EN SISA PRINCESA
FFRREENNTTEE::
PPaassoo 11.. Comenzar con el frente. Cortar sobre la Línea 1 y extender elancho necesario en la flecha.
PPaassoo 22.. Cortar sobre la Línea 2 y abrir hasta que los bordes inferioresde la Línea 1 estén paralelos.
PPaassoo 33.. Cortar sobre la Línea 4. Bajar la sección inferior hasta que eldobladillo esté parejo. Rellenar las Líneas 1 y 4 con papel.
CCOOSSTTAADDOO DDEELL FFRREENNTTEE::
PPaassoo 44.. Cortar sobre la Línea 1 y extender la cantidad necesaria porla flecha.
PPaassoo 55.. Cortar sobre la Línea 2. Bajar el borde del costado hasta quelos bordes de la Línea 1 estén paralelos.
PPaassoo 66.. Cortar sobre la Línea 3. Bajar la sección inferior hasta que eldobladillo esté parejo. Rellenar la Línea 1 y la Línea 3 con papel.
PPaassoo 77.. Cortar desde el círculo (#4) hasta la Línea 2. Cerrar la Línea 2y la Línea 4 se abrirá. Rellenar la Línea 4 con papel. Medir en la líneade costura.
FFRREENNTTEE::
PPaassoo 88.. Cortar en la Línea 2 a través de todo el frente. Extender demodo que la distancia en la Línea 4 en el COSTADO DEL FRENTE yen la Línea 2 en el FRENTE sea la misma que en las líneas depespunte. Cortar la Línea 3 y alargar la misma cantidad que en laLínea 3 en el COSTADO DEL FRENTE.
NNOOTTAA:: La Línea 2 en el FRENTE será un poco más ancha en el bordede la costura pero paralela en el otro costado de la Línea 1. Coincidirel FRENTE y el COSTADO DEL FRENTE por la línea de costura, NOpor el borde cortado!
Rellenar con papel las líneas 2 y 3 en el FRENTE.
FFIITT TTIIPP:: Algunas veces, la curva del costado del frente es demasiadoancha en la tela. Al entallar la tela, siempre puede deslizar el costadodel frente para eliminar algo del exceso de amplitud.
MODELO C - MODIFICACION PARA BUSTOGRANDE EN FRENTE CON PINZAS CON PANEL
LATERALFFRREENNTTEE::
PPaassoo 11.. Cortar en la Línea 1 y extender la cantidad necesaria en laflecha.
PPaassoo 22.. Cortar en la Línea 2. Bajar el borde del costado hasta que losbordes de la Línea 1 estén paralelos.
PPaassoo 33.. Cortar en la Línea 3. Bajar la sección inferior hasta que eldobladillo esté parejo. Rellenar las líneas 1,2 y 3 con papel.
NNOOTTAA:: La pinza ahora es más profunda; es lo que necesita un bustogrande. Coser sobre las líneas de pespunte originales de la pinza!
MMOODDIIFFIICCAACCIIOONN „„YY““ OOPPCCIIOONNAALL PPAARRAA BBUUSSTTOO:: Si tiene el bustomuy grande o es de pecho fuerte y grueso y necesita más amplituden el pecho, cortar sobre la Línea 1a y extender en ambas zonas.
Es así como usted sabrá que necesita una modificación "Y” en elbusto.
Hacer en el frente los mismos ajustes que hizo en la vista del frente.
ESPALDA ALTA REDONDASi la costura del escote no llega a la base de su cuello donde se colo-caría un collar, levantar la línea de escote del patrón de 6mm a 1.5cm.
`
1111.. Sobreponer las piezas de la espalda por la línea del escote. Cor-tar a través y extender.
1122.. Separar y rellenar con papel. Ganará aproximadamente 3mm deltamaño del escote al cortar en el doblez. Embeberlo al cuello.
M6076 - Page 7 of 7
INFORMACION DE COSTURACLAVE DE LA TELA
MARGENES DE COSTURAUtilizar margenes de costura de 1.5cm a menos que se indique
lo contrario.
PRENDER CON ALFILERES Y ENTALLAR
Prender con alfileres o hilvanar las costuras. DERECHO CONDERECHO, coincidiendo los cortes. Entallar la prenda antes decoser las costuras principales.
PLANCHADO
Planchar los margenes de costura planos; luego abrirlos amenos que se indique lo contrario. Hacer los piquetes necesar-ios de modo que queden planos.
GLOSARIOLos términos de costura que aparecen en NEGRITAS en las Instruc-ciones de Costura se explican a continuación.COSER PARA EMBEBER - Coser a lo largo de la línea de costura,utilizando puntadas largas a máquina. Jalar el hilo al ajustar paraencajar.
NOTA: Para las cabezas de manga, hacer una segunda fila de pun-tadas largas a máquina a 6mm del margen de costura para mayorcontrol.
ACABAR - Coser a 6mm del borde no terminado y acabar con una delas siguientes formas: cortar en zigzag, sobrehilar o doblar haciaadentro a lo largo del pespunte y coser cerca al doblez o remallar.
OPCIONAL PARA DOBLADILLOS: Aplicar cinta de extrafort.
DOBLADILLO ANGOSTO - Doblar hacia adentro el dobladillo. Plan-char, embebiendo la amplitud si es necesario. Abrir el dobladillo.Doblar nuevamente hacia adentro de modo que el borde no terminadoquede a lo largo del pliegue. Planchar. Doblar hacia adentro a lo largodel pliegue. Coser.
REFORZAR - Coser a lo largo de la línea de costura donde se indicaen las instrucciones de costura, utilizando puntadas pequeñas amáquina.
PUNTO DE DOBLADILLO - (Este se utiliza para unir dos bordesdoblados o un borde doblado con una superficie plana). Deslizar laaguja a través del borde doblado; luego coger un hilo del doblez o dela superficie opuestos).
PESPUNTE DE REFUERZO - Coser a 3mm de la línea de costura enel margen de costura (por lo general a 1.3cm del borde no terminado).
PESPUNTE DE ADORNO - Por afuera, coser a 6mm del borde, de lacostura o del pespunte anterior, utilizando un pie prensatela como guíao coser donde se indica en las instrucciones.