Note For devices with Approval No. PTB 01 ATEX 2181:
please note the Supplementary Installation and
Operating Instructions H 250/M9-EEx,
Ident. No. 7.02242.21.00.
Safety limits differ from those for the version with
PTB Ex-97.D.2171 certification.
Variable area flowmeters
Vortex flowmeters
Flow controllers
Electromagnetic flowmeters
Ultrasonic flowmeters
Mass flowmeters
Level measuring instruments
Communications engineering
Engineering systems & solutions
Switches, counters, displays and recorders
Heat metering
Pressure and temperature
2 H 250 Installation and operating instructions
Product liability and warranty
H250 variable-area flowmeters are designed for measuring the volumetric or mass flow rate of liquids, gases and vapour. Special codes and regulations are applicable to their use in hazardous areas. Responsibility for suitability and designated use of these flowmeters rests solely with the operator. Improper installation or operation of the flowmeters may lead to loss of warranty. In addition, the “General conditions of sale" forming the basis of the purchase contract are applicable. If flowmeters need to be returned to KROHNE Messtechnik, for instance for repair, please take note of the information given at the end of this manual. Items included with supply
The H 250 variable-area flowmeter, in the version as ordered, includes the supply of:
• installation and operating instructions • declaration of conformity for ATEX • but excludes installation material (stud bolts, flange gasket, cabling)
Special certificates (supplied to order only)
• report on factory settings • test certificate to EN 10204: • hydrostatic test, dye penetration test, radiographic test, leak-tightness test, ultrasonic test,
helium leak detection. • cleaning to factory specification.
CAUTION
Mounting, installation, start-up and maintenance work may only be carried out by personnel
trained in explosion protection.
Maintenance work of a safety-relevant nature within the meaning of explosion protection may only be carried out by the manufacturer, his authorized representative or under the
supervision of authorized inspectors
NOTE
With combustible and readily flammable products, it is not permitted to use easily removable connections such as threaded sockets to DIN 11851; SMS;
Tri-Clamp (e.g. DIN 32676; ISO 2852 Clamp).
H 250 Installation and operating instructions 3
Table of contentsVariable-area flowmeter H 250 with mechanical indicator Seite Seite
0. General 4 0.1 Type code 4 0.2 Marking 5 0.3 Description 6 0.4 Operating principle 7 1. Installation 7 1.1 Installation requirements 7 1.2 Preparation of the pipeline 7 1.3 Installation in the pipeline 8 1.4 Conformity with IP protection category 9 requirements for built-in electrical equipment 2. Start-up 9 2.1 Measurement of liquids 9 2.2 Measurement of gases 10 3. Flow tables 10 3.1 H 250/RR, H 250/HC (Hastelloy C4) 10 3.2 H 250/C (ceramic, PTFE) 11
4. Materials of construction 11 5. Technical data 12 6. Certification 14 6.1 H 250 M9 14 6.2 H 250 M7 14 6.3 Conformity with EC directives 15 7. Dimensions and weights 16 7.1 H 250/RR, H 250/ HC (Hastelloy C4) 16 7.2 H 250/ C (ceramic, PTFE) 19 8. Service 20 8.1 Float replacement 20 8.2 Float damper 20 8.3 List of spares 20
M9 indicator and add-on components9. Contact module Kmin, Kmax, K2 22 Description 22 9.1 Electrical connection 22 9.2 Setting the limits 23 9.3 Definition of switching contacts 24 9.4 Technical data 24 10. Electrical signal output ESK II (HARTTM) 25 Description 25 10.1 Electrical connection 25 10.2 HART communication 26 10.3 Technical data 27 11. Flow totalizer Z 28 Description 28 11.1 Electrical connection 28 11.2 Settings, display mode 29 11.3 Technical data 30
12. Permissible process temperatures, indicator, add-on components 31 13. Service, retrofitting 32 13.1 Plug-in contact module 32 13.2 Electrical signal output ESK II 33 13.2.1 Installing an ESK II 34 13.2.2 Replacing an ESK II 34 13.2.3 Setting the ESK II 35 13.2.4 Retrofitting ESK II, calibration 35 13.2.5 Changes and conversion, ESK II 36 13.3 Flow totalizer Z 37 13.4 High-temperature version 37 13.4.1 Installation 38 13.4.2 Mounting the indicator 38 13.5 List of spares 39 14. Certificate of conformity 39
M7 indicator and add-on components 15. Transport lock 45 16. Limit switches K1 / K2 Description 45 16.1 Electrical connection 45 16.2 Setting the limits 46 16.3 Technical data 46 17. Electrical signal output ESK Description 47 17.1 Electrical connection 47 17.2 Settings 48 17.3 Technical data 48
18. Pneumatic signal output P 49 19. Table of maximum process 50 temperatures 20. Service 51 20.1 Electrical signal output ESK 51 Installation 51 Linearization 51 20.2 List of spares 54 21. Certificate of conformity 55 Maintenance 67
4 H 250 Installation and operating instructions
0 General
0.1 Type code The type code is made up of the following elements: 1)
Example
H250 / RR / - / M9 / - / ESKII / K1 - E Ex
Explosion-protected equipment
Approval to European Standard Limit switches
K1 one limit switch (upper or lower) K2 two limit switches blank without limit switch
Electrical signal output
ESK II with analog signal output 4 …20 mA ESK3-PA field bus output Profibus PA blank without electrical signal output
High-temperature version
HT version with HT extension piece blank standard version
Series, indicator M7
M9 Version, heating jacket
B with heating jacket blank without heating jacket
Materials of wetted parts
RR stainless steel C ceramic, PTFE HC Hastelloy C4
Version, measuring section H250 (1) places for items not needed may be omitted from the type code
H 250 Installation and operating instructions 5
0.2 Marking
The type designation of the complete flowmeter is marked on the nameplates, reproduced below, that are attached to the indicator section (see also type code).
Marking of electrical variant
Marking of mechanical variant
SN: 2/197270.001 SO: 704159/010 KO: 101704159 V251423311011200002510000 AC: P010104111
SN: 2/195034.001 SO: 700276/010 KO: 144360725 V251423782010000000000000 AC: P010103958
SN: Serial number SO : Sales order / item KO: KROHNE order V251 … : Product configurator code AC: Article code MD: Year of manufacture PS: max. operating pressure TS: max. operating temperature Tag-No. Measuring point identifier 0044 Ident number of controlling agencies under EC pressure equipment directive 97/23/EC/DGRL/PED
0044 0044
6 H 250 Installation and operating instructions
Variable-area flowmeters H 250 Modular all-metal flowmeter
0.3 Description In its basic version, the H 250 flowmeter consists of a measuring section and a local indicator. The indicator can optionally be equipped with electrical add-on equipment. The H 250 flowmeter is designed for the flowmetering of liquids, gases and vapour, and operates on the float principle. The measuring section features a tapered metal tube or a standard orifice plate made of high-purity Al203 ceramics, in which an appropriately shaped float is allowed to move freely up and down. Depending on the flow rate, the float will assume a certain vertical position that is transmitted by magnetic coupling to an indicator. The flowmeters are particular suitable for difficult application, operating and environmental conditions. The M7 indicator features a two-axis indicating system to allow linear reading of the flow on the scale. All built-in components are readily accessible through two covers on the side of the housing.
Version H250/.../M7/...
Version H250/.../M9/...
Basic model
H 250 Installation and operating instructions 7
0.4 Operating principle The flowmeter operates on the float measuring principle. The H 250 measuring section features a tapered metal tube, or a standard orifice plate, in which an appropriately shaped float is allowed to move freely up and down. The flowmeters are designed to be installed in a vertical pipe run, with flow from bottom to top. The guided float will assume a certain vertical position such that buoyancy A and form drag W are in equilibrium with weight G (G = A + W) to form a flow-dependent annular gap.
S
AW
G
G = A + W
N
N
S
Flowmeters for gas and vapour are calibrated for a specific pressure. If gas is discharged into the atmosphere downstream of the flowmeter, the gas pressure will drop at the float and cause incorrect measured values. The operating pressure will then be inconsistent with the calibrated pressure specified in the order. In such operating conditions, fit a valve downstream of the flowmeter to set the required operating pressure. The gas will then expand in the valve.
1 Installation of variable-area flowmeters H250
1.1 Installation requirements The actual system operating pressure must not exceed the operating pressure specified in the order. The pressure rating stamped on the measuring section flange is not necessarily equal to the test pressure (see order documents and instrument scale).
• Ensure material of the wetted parts is compatible with the process fluid (for list of materials, refer to Section on Materials for device versions)
• Ambient temperature and process temperature may not exceed specific maximum values (see Technical data H250).
• The variable-area flowmeter must be installed vertically in the pipeline (float measuring principle, flow from bottom to top).
• The nominal size of the flowmeter flanges should be the same as that of the pipeline. • To avoid strain caused by the pipeline, mating flanges should be located in line with the pipe
axis and parallel to each other. 1.2 Preparation of the pipeline
• Suitably support the pipeline to avoid pipe vibration and minimize axial load on the flowmeter. • Recommended are: a straight unimpeded inlet run of 5 x DN (meter size) upstream of the
flowmeter and a straight outlet run of 3 x DN downstream of the flowmeter. • Locate shutoff and control valves downstream of the flowmeter.
Recommendations for installation: see also VDE/VDI Code of Practice 3513, Sheet 3.
• Where combustible and readily flammable products are concerned, it is not permitted to use easily removable connections such as threaded sockets DIN 11851, SMS, Tri-Clamp (e.g. DIN 32676 Clamp; ISO 2852 Clamp).
8 H 250 Installation and operating instructions
1.3 Installation in the pipeline • When installing, make sure that magnetic fields caused by other locally installed equipment
(e.g. heavy-current cables) will not affect measuring results. • Immediately prior to installation, check that the flowmeter is free from foreign bodies. • The flowmeter should not be subjected to any tensile or compressive forces stemming from the
pipeline. • If magnetic filters are used: mounting dimension plus 100 mm for Type F and mounting
dimension plus 50 mm for Type FS filters, excluding gaskets. • Magnetic filters are required when the process fluid contains ferromagnetic particles. The
magnetic filter should be installed upstream of the flowmeter. The filter contains bar magnets in helical arrangement for optimum efficiency at low pressure losses. All magnets are coated with PTFE as protection against corrosion. Two versions are available:
Type F Adapter with flange overall length 100 mm
Type FS Adapter without flange overall length 50 mm
for all nominal sizes; material 1.4571 and others
• Select bolts and gaskets (customer supply) in keeping with the flange pressure rating and operating pressure. Also take note of corrosion resistance and thermal stability. The inside diameter of the flanges deviates from the standard dimensions (see Sect. Dimensions and weights). Enlarge the flange gaskets to the appropriate size.
• Align the gaskets, tighten nuts using the torques specified for the relevant pressure rating. • PTFE is deformable under pressure in the cold state; therefore, for measuring sections with
PTFE liner and those with ceramic liner and PTFE sealing face, tighten the flange bolts using the following max. torques only:
Nominal size to Stud bolts Max. torque
DIN 2501 ANSI B 16.5 ANSI DIN ANSI
150 lbs DN mm PN inches lbs
DIN
150 lbs 300 lbs Nm ft·lbf
Nm ft·lbf
15 40 ½“ 150/300 4 x M 12 4 x ½“ 4 x ½“ 9.3 6.7 3.5 2.5
25 40 1“ 150/300 4 x M 12 4 x ½“ 4 x 5/8“ 22.0 15.9 6.7 4.8
50 40 2“ 150/300 4 x M 16 4 x 5/8“ 8 x 5/8“ 55.0 39.8 24.0 17.4
80 16 3“ 150/300 8 x M 16 4 x 5/8“ 8 x ¾“ 47.0 34.0 43.0 31.1
100 16 4“ 150/300 8 x M 16 8 x 5/8“ 8 x ¾“ 39.0 28.2 34.0 24.6 10 Nm ~ 1.0 kpm ~ 7.23 ft·lbf
Basic model
H 250 Installation and operating instructions 9
1.4 Conformity with IP protection category requirements for built-in electrical equipment To conform to IP protection requirements, please note the following: M9 indicator: cable diameter 5 to 10 mm. After inserting the connecting cable, tighten down union nut on the cable gland. M7 indicator: cable diameter 8 to 13 mm. If the fit of incoming cables is excessively tight, remove the appropriate ring from the seal on the cable entry.
• Do not remove blanking plugs from unused cable glands. • Do not kink cables directly at the cable gland. • Provide a water drip point (U bend in cable). • Do not expose incoming cables to mechanical loads. See Description of electrical add-on
components for M9 indicator, Sect. 9, and for M7 indicator, Sect. 15. 2 Start-up
A transport lock is not required for the M9 indicator. • Movable parts of the M7 indicator system are fixed in place with a “transport lock” (see
Technical Data M7). Remove before start-up. • Operation of the flowmeter requires a specific minimum operating pressure (inlet pressure).
For pressure losses (see start-up H 250), flow tables
• On gas service, a damper (see Sect. 8.2) for TIV floats is recommended under the following conditions (only for H250/RR and H250/HC (Hastelloy C4)).
Meter size to max. operating (inlet) pressure
DIN 2501 ANSI B 16.5
DN mm inches bar
15 ½ ≤ 0.3
25 1 ≤ 0.3
50 2 ≤ 0.2
80 3 ≤ 0.2
• DIV floats for gas service must always be equipped with a float damper (see Sect. 8.2). • Avoid pulsating flow conditions. • During operation, the float is subjected to systematic instability which will cause unsteadiness of
the pointer within the range of the accuracy class (according to VDI 3513). If there is no such dynamic response, this means that either the pointer mechanism is defective (check with external magnets) or that the float is not functioning.
2.1 Measurement of liquids
• Vent the pipeline carefully during start-up to avoid water hammer. • Open valves slowly!
10 H 250 Installation and operating instructions
2.2 Measurement of gases • Increase pressure slowly up to operating pressure. • Basically, vary the flow rate with the aid of adjusting valves so as to prevent the float from
accelerating up to the stop (e.g. in the case of solenoid valves) and possibly damaging the measuring section.
• Flowmeters for measuring the flow of gases may be equipped with a gas damper in order to avoid possible compression-induced oscillation of the float.
• A float damper can also be retrofitted by the user (see Sect. 8.2). • Should the float nevertheless tend to oscillate, this condition can possibly be rectified by
installing a throttle valve or an appropriate orifice plate downstream of the flowmeter.
3 Flow tables
3.1 H 250/RR, H 250/HC (Hastelloy C4) Float material CrNi steel, Hastelloy C4 Float shape Water CIV, DIV Air TIV, DIV Reference conditions Water at 20°C Air at 20°C; 1.013 bar abs. 100% flow values, turn-down ratio 10:1
Meter size DIN ANSI
Water l / h
Air m3/h
Max. pressure drop mbar
DN inches
Cone No.
CIV DIV TIV * DIV CIV TIV DIV 15 1/2" K 15.1 25 - 0.7 - 26 21 - K 15.2 40 - 1.0 - 26 21 - K 15.3 63 - 1.5 - 26 21 - K 15.4 100 - 2.2 - 26 21 - K 15.5 160 - 3.6 - 26 21 - K 15.6 250 - 5.5 - 26 21 - K 15.7 400 - 10 18 28 21 38 K 15.8 630 1000 14 28 32 22 50 25 1" K 25.1 630 - 14 - 32 24 - K 25.2 1000 - 22 - 33 24 - K 25.3 1600 - 35 - 34 25 - K 25.4 2500 - 50 110 38 26 78 K 25.5 4000 6300 80 170 45 30 103** 50 2" K 55.1 6300 - 80 230 74 13 60 K 55.2 10000 - 110 350 77 13 69 K 55.3 16000 25000 150 600 84 13 104 K 55.3 *** - - 180 - - 14 - 80 3" K 85.1 25000 - 350 - 68 16 - K 85.2 40000 - 400 - 89 16 - 100 4" K105.1 63000 100000 - 120 - 220
* not for flowmeters with heating ** 300 mbar with damper (gas service) *** with float shape DIVT The specified pressure losses apply to water and air at maximum flow rate A float damper is recommended:
• for TIV floats with an operating (inlet) pressure of • ≤ 0.3 bar [DN 15, DN 25, DN 80 (1/2", 1", 3")] • ≤ 0.2 bar [DN 50 (2")]
Conversion to other process products or operating data (pressure, temperature, density, viscosity) can be carried out with the aid of the KROHNE calculation program KroVaCal on the basis of VDE /VDI Code 3513.
Basic model
H 250 Installation and operating instructions 11
3.2 H 250/C (ceramic, PTFE) Float material PTFE, ceramic Float shape Type E Reference conditions Water: at 200°C
Air: at 200°C; 1.013 bar abs. 100% flow values, turn-down ratio 10:1
Meter size Float 100% flow rate Max. pressure loss Standard orifice plate
Water Air Water Air DIN ANSI PTFE ceramic ceramic PTFE ceramic ceramic Diameter
DN inches Number l/h l/h m3/h mbar mbar mbar mm 15 ½“ E 17.2 25 30 – 65 62 62 12
E 17.3 40 50 1.8 66 64 64 E 17.4 63 70 2.4 66 66 66 E 17.5 100 130 4.0 68 68 68 E 17.6 160 200 6.5 72 70 70 E 17.7 250 250 9.0 86 72 72 E 17.8 400 – – 111 – –
25 1“ E 27.1 630 500 18 70 55 55 25.6 E 27.2 1000 700 22 80 60 60 E 27.3 1600 1100 30 108 70 70 E 27.4 2500 1600 50 158 82 82 E 27.5 – 2500 75 – 100 100
50 2“ E 57.1 4000 4500 140 81 70 70 46.4 E 57.2 6300 6300 200 110 80 80 E 57.3 10000 11000 350 170 110 110
80 3“ E 87.1 16000 16000 – 81 70 – 72 E 87.2 25000 25000 – 95 85 –
100 4“ E 107.1 40000 – – 100 – – 84 Pressure losses apply to water and air at max. flow rate. Conversion to other process products or operating data (pressure, temperature, density, viscosity) can be carried out using the KROHNE calculation program KroVaCal on the basis of VDE /VDI Code 3513. 4 Materials of construction
H250/C CrNi steel 1.4571 with PTFE liner (PTFE-TFM liner) **
CrNi steel 1.4571 with PTFE liner (PTFE-TFM liner) **
Al2O3 or PTFE or HC4 Parafluorine V 3862-75***
Al2O3 or PTFE
Al2O3
* on request, CrNi steel 1.4571 also available ** materials available on request *** O-ring Kalrez 2035, 4079 available on request
12 H 250 Installation and operating instructions
5 Technical data
Device type H 250 with mechanical indicator Measuring ranges (100% values) Select flow value according to the flow
table Water (20°C) 25 to 100 000 l/h Air (1.013 bar abs., 20°C) 0.7 to 600 m3/h Turn-down ratio 10:1 Accuracy class to VDI/VDE Code 3513, Sheet 2 H250/RR, H250/HC
10K – 20K Clamp connections Companion dimensions to DIN 32676 DN15 – 100,
10 – 16 bar ISO 2852 Size 25 –139.7
10 – 16 bar Screw connections Companion dimensions to DIN11851 DN15 – 100,
25 – 40 bar SMS1146 1“ – 4“, 6 bar Inside thread, welded Companion dimensions to ISO 228 G¾“ –, G1“ PN 50 ANSI B1.20.1 ¾“NPT Inside thread, bolted Companion dimensions to ISO 228 G1/2“ – 1“,
PN 40 - 50 ANSI B1.20.1 ½“ - 1“NPT, Connection for heating system Flanged connection EN 1092-1 DN 15; PN 40 ANSI B16.5 ½“; 150 lbs / RF Pipe connection for Ermeto E12, PN 40 Information on higher pressure ratings and other types of connection supplied on request Measuring tube H250/RR, H250/HC
(Hastelloy C4) Metal tube with tapered measuring section
H250/C (ceramic, PTFE) Measuring tube with standard orifice plate Float shapes
H250/RR, H250/HC (Hastelloy C4):
Liquids CIV, DIV (damping possible)
Gases TIV, DIV, DIVT (damping possible)
H250/C (ceramic, PFTE): Liquids, Gases
conical, Type E
Scale graduation Flow units Overall height with flanged connection (excl. gaskets) 250 mm with connections for the food industry 300 mm (H250/RR only) Max. allowable operating pressure Directive 97/23/ EC of the Council dated 29 April 1999 concerning
transportable pressure equipment (EC pressure equipment directive) applies. The max. allowable operating pressure PS is calculated for the max. allowable operating temperature TS. Both limit values (PS and TS) are given on the nameplate.
Basic model
H 250 Installation and operating instructions 13
Max. process temperature Tp without ESK, ESK-PA, K1, K2, Z: H250/RR/, H250/HC (Hastelloy C4)
at an ambient temperature (Ta) ≤ 120°C 300°C, other temperatures on request
H250/C (ceramic float) at an ambient temperature (Ta) ≤ 120°C
250°C
H250/C (PTFE float) at an ambient temperature (Ta) ≤ 70°C
70°C
Min. process temperature Tp without ESK-PA, K1, K2, Z -80°C, others on request Max. process temperature Tp M9 indicator with ESK, ESK-PA, K1, K2, Z: non-“Ex“ version, without HT < 200°C with HT < 300°C see Sect. 12 Table of max. process/ambient temperatures “Ex“ version, see Sect. 14 Certificate of Conformity H250/.../M9 H250 M9 EEx (ATEX) see Suppl. Install. and Op. Instructions H250 M10 EExd (ATEX) see Suppl. Instructions M10 ATEX The process temperature must be reduced for devices with ATEX certification and devices fitted with
electrical equipment (ESK, ESK-PA, K1, K2, Z and H250/C). Max. process temperature Tp M7 indicator with options (ESK, K, P, ....): non-“Ex“ version, see Sect. 19 Table of max. process/ambient temperatures “Ex“ version, see Sect. 21 Certificate of conformity H250/.../M7 Test pressure PT The test pressure is calculated in accordance with the pressure equipment directive (97/23/EC) and AD 2000-HP30 and in compliance with the maximum allowed operating pressure and the maximum operating temperature. Protection category of indicators M7/M9/M10 to EN 60529 / IEC 60529 IP 65, NEMA 4X
14 H 250 Installation and operating instructions
6 Certification
Use in hazardous areas The following versions of the H 250 flowmeter are certified for use in hazardous areas by the Physikalisch-Technische Bundesanstalt: 6.1 H250 M9 H250 / M9-EEx with certificate of conformity (76/117/EEC)
Device Type Marking General certificate PTB No.
Individual certificate PTB No.
General certificate H250/M9-EEx EEx ia IIC T6 Ex-97.D.2171
Built-in electrical equipment with certificate of conformity (76/117/EEC)
SJ 3,5-SN [Ex] EEx ia IIC T6 Ex-83/2022X Limit contact EX SJ 3,5-S1N [Ex] EEx ia IIC T6 Ex-83/2022X
H250 / M9-EEx with EC type approval certificate (94/9/EC) ATEX
Device Type Marking General certificate PTB No.
Individual certificate PTB No.
General certificate H250/M9-EEx II 2G EEx ia IIC T6 PTB 01 ATEX 2181
Current output ESK II II 2G EEx ia IIC T6 PTB 00 ATEX 2063
Profibus-PA ESK3-PA II 2G EEx ia IIC T6 PTB 00 ATEX 2063 SC 3,5-NO [ATEX] SC 3,5-NO –Y [ATEX] II 2G EEx ia IIC T6 PTB 99 ATEX 2219X
SJ 3,5-SN [ATEX] II 2G EEx ia IIC T6 PTB 00 ATEX 2049X Limit switch ATEX
SJ 3,5-S1N [ATEX] II 2G EEx ia IIC T6 PTB 00 ATEX 2049X
6.2 H 250 M7 H 250 /M7-EEx with certificate of conformity (76/117/EEC)
Device Type Marking General certificate PTB No.
Individual certificate PTB No.
General certificate H ... /M7-EEx EEx ia IIC T6 Ex-94.C.2003 X
ESK EEx ia IIC T6 Ex-94.C.2067 Current output
KINAX 3W2 EEx ia IIC T6 Ex- 91.C.2112X
SC 2-NO [Ex] EEx ia IIC T6 Ex-95.D.2195X Limit switch Ex
SC 3,5-NO [Ex] EEx ia IIC T6 Ex-95.D.2195X
Basic model
H 250 Installation and operating instructions 15
Built-in electrical equipment with certificate of conformity (76/117/EEC) SJ 2-SN [Ex] EEx ia IIC T6 Ex-95.D.2195X Limit switch
EX SJ 2-S1N [Ex] EEx ia IIC T6 Ex-95.D.2195X
Built-in electrical equipment with EC type approval certificate (94/9/EC) ATEX
SC 2-NO [ATEX] II 2G EEx ia IIC T6 PTB 99 ATEX 2219X
SC 3,5-NO [ATEX] II 2G EEx ia IIC T6 PTB 99 ATEX 2219X
SJ 2-SN [ATEX] II 2G EEx ia IIC T6 PTB 00 ATEX 2049X
Limit switch ATEX
SJ 2-S1N [ATEX] II 2G EEx ia IIC T6 PTB 00 ATEX 2049X
Special versions with built-in electrical equipment and their individual certificate, on request. 6.3 Conformity with EC directives The H250 variable-area flowmeter satisfies all requirements of the EC directives applicable to the product. These are:
• EMC Directive (89/336/EEC) EN 50081-1:1992 EN 50 082-2:1995
• ATEX (94/9/EC) EN 50014:1997 +A1 +A2 EN 50020:1994
• PED – pressure equipment directive (97/23/EC)
The variable-area flowmeters fall under the pressure equipment directive (PED) and are classified in various categories [Cat. I to III]. Categorization is according to Article 3, Item 1.3a) Diagram 6, Pipelines for gases in Fluid Group 1. For all categories, the conformity attestation procedure is applied. Devices for low flows (cone 15.x) are not subject to conformity attestation. For these, Article 3.3 of the DGRL is applied. For standard products (repeat jobs) the declaration of conformity can be issued in advance. In the case of customized products, the declaration is supplied on request together with the product. In particular devices with flanges (EN-1092-1; ANSI B 16.5; JIS B 2238) are classified in Category III (suitability for instabile gases).
16 H 250 Installation and operating instructions
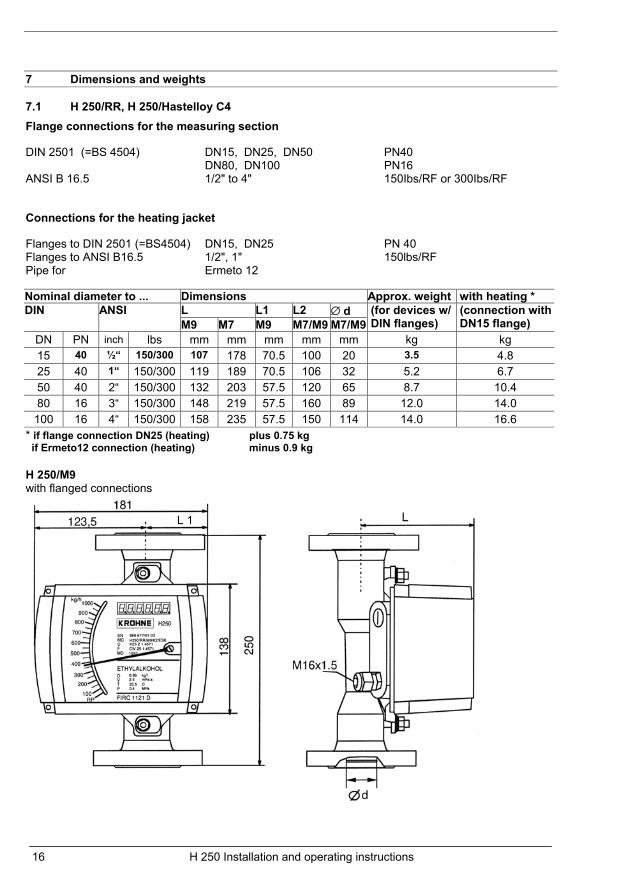
7 Dimensions and weights
7.1 H 250/RR, H 250/Hastelloy C4 Flange connections for the measuring section
DIN 2501 (=BS 4504) DN15, DN25, DN50 PN40 DN80, DN100 PN16 ANSI B 16.5 1/2" to 4" 150Ibs/RF or 300Ibs/RF
Connections for the heating jacket
Flanges to DIN 2501 (=BS4504) DN15, DN25 PN 40 Flanges to ANSI B16.5 1/2", 1" 150lbs/RF Pipe for Ermeto 12 Nominal diameter to ... Dimensions Approx. weight with heating *
L L1 L2 ∅ d DIN ANSI M9 M7 M9 M7/M9 M7/M9
(for devices w/ DIN flanges)
(connection with DN15 flange)
DN PN inch lbs mm mm mm mm mm kg kg 15 40 ½“ 150/300 107 178 70.5 100 20 3.5 4.8 25 40 1“ 150/300 119 189 70.5 106 32 5.2 6.7 50 40 2“ 150/300 132 203 57.5 120 65 8.7 10.4 80 16 3“ 150/300 148 219 57.5 160 89 12.0 14.0 100 16 4“ 150/300 158 235 57.5 150 114 14.0 16.6
* if flange connection DN25 (heating) plus 0.75 kg if Ermeto12 connection (heating) minus 0.9 kg H 250/M9 with flanged connections
L 1
Basic model
H 250 Installation and operating instructions 17
High-temperature version H 250/M9/HT
Measuring section with heating H 250
H 250/M7 with flanged connections
18 Installation and operating instructions
H 250 with sanitary pipe connection (threaded socket) to DIN 11851
Dimensions L L1 ∅ d
Flow nominal dia.
Max. allowed operating pressure M9 M7 M9 M7 / M9
Approx. weight
DN bar mm mm mm mm kg
15 40 107 178 70.5 20 2.0
25 40 119 189 70.5 32 3.5
50 25 132 203 57.5 65 5.0
80 25 148 219 57.5 89 7.6
100 25 158 235 57.5 114 10.3 H 250/M9
H 250/M7
Basic model
H 250 Installation and operating instructions 19
7.2 H250/C (ceramics, PTFE)
Nominal dia. to Dimensions Approx. weight
L ANSI B 16.5 DIN 2501 ANSI B 16.5 M9 M7
DIN 2501 150 lbs 300 lbs
DN PN inches lbs mm mm kg kg kg 15 40 ½“ 150/300 110 178 3.5 3.2 3.5 25 40 1“ 150/300 120 187 5 5.2 6.8 50 40 2“ 150/300 138 202 10 10 11 80 16 3“ 150/300 148 216 13 13 15
100* 16 4“ 150/300 164 222 15 16 17 * only available in PTFE H 250/M9
H 250/M7
20 Installation and operating instructions
8 Service
8.1 Float replacement 1. Remove flowmeter from the pipeline. 2. Remove upper snap ring from measuring section. 3. Remove upper float stop and float from measuring section. 4. Insert new float in the centre hole of the lower stop and then, together with the upper float stop, in
the measuring section. Make sure that the upper float guide rod fits through the centre hole in the stop.
5. Insert the snap ring in the measuring section. 6. Finally, install the flowmeter in the pipeline again.
Note: Measuring error may increase if the device is not recalibrated. 8.2 Float damper Given unstable flow conditions or insufficient operating (inlet) pressure, particularly with gaseous products, the H 250 flowmeter can be retrofitted with a float damper. The damping system has a long service life and is self-centering, and the sleeve is made of high-tech ceramics (Al2O3). A complete retrofit kit is available, consisting of: 2 snap rings (3) 1 ceramic sleeve (4) or PEEK sleeve 1 damping cylinder with float stop (2) Installation 1. Remove flowmeter from the pipeline. 2. Remove upper snap ring (1) from the measuring section. 3. Remove upper float stop and float (5) from the measuring section. 4. Secure snap ring (3) in the lower groove on the float guide rod (5). 5. Slide ceramic sleeve (4) on to the float guide rod (5) and secure with
snap ring (3) in the upper groove. 6. Insert float into the lower float guide in the measuring section. 7. Fit the supplied damping cylinder with integrated float stop (2) in the
measuring section. 8. Insert upper snap ring (1). 9. Install flowmeter in pipeline.
8.3 List of spares Measuring section H 250 – Order numbers
Description The H 250/M9 indicator with built-in rack allows easy fitting and retrofitting of various optional equipment. These modules can be quickly and effortlessly fitted by slipping them sideways onto the rack and positioning them with attachment clips. Screws as fastening elements have been dispensed with.
22 Installation and operating instructions
9 Contact module Kmin, Kmax, K2
Description The H250/M9 variable-area flowmeter can be equipped with a maximum of two electronic limit switches. The limit switch operates with an inductive slot sensor that is actuated by a semicircular metal vane on the pointer. The switching points are set by way of the contact pointer (2). The position of the contact pointer also serves to visually indicate the set limit value. The supply terminals are of the plug-in type and can be detached for connection of the cable.
Two versions are available: 2-wire technology: SC 3,5-N0-Y 3-wire technology: SJ3,5-E2-Y
Limit switches SC3,5-N0-Y have Physikalisch-Technische Bundesanstalt certification and are therefore suitable for use in hazardous areas. They are matched for isolation switching amplifiers with certified intrinsically safe control circuit to NAMUR and DIN 19234. The isolation switching amplifier must be installed outside the hazardous area. For connection, take note of the specifications in VDE 0165 or equivalent national regulations. 9.1 Electrical connection To connect the contact module, remove the housing cover of the M9 indicator. The supply terminals (4) are of the plug-in type and can be detached for connection of the cables. Limit switches SC3,5-N0-Y to be connected in conformity with DIN 19234 (NAMUR). An isolation switching amplifier is required to operate this limit switch in 2-wire technology. Isolation switching amplifier Power supply Channel Order No. KFA6-SR2-Ex1.W 230 V AC 1 5015262000 KFA5-SR2-Ex1.W 115 V AC 1 5015262100 KFD2-SR2-Ex1.W 24 V DC 1 5015262200 KFA6-SR2-Ex2.W 230 V AC 2 5015262300 KFA5-SR2-Ex2.W 115 V AC 2 5015262400 KFD2-SR2-Ex2.W 24 V DC 2 5015262500 These isolation switching amplifiers have PTB No. Ex-94.C.2086
1
2
3
4
5
M 9 indicator
H 250 Installation and operating instructions 23
Electrical connection for hazardous areas
EEx ia or EEx ib certified isolation switching amplifiers with intrinsically safe input circuit (NAMUR), 1 or 2 channels with the following maximum values: U0 ≤ 16V, I0 ≤ 52 mA, P0 ≤ 169mW, per circuit
any receiver instrument, recording device Limit switches SJ3,5-E2 in 3-wire technology have a dc voltage connection of 10 to 30 VDC. They can be operated with any commercially available power supply unit. For further details, see Sect. on Technical data M9.
Contact KMIN KMAX Colour of connector
Black Grey
Labelling 1 2 3 4 5 6 SC3,5-N0-Y - + - + SJ3,5-E2-Y + DC - + DC -
9.2 Setting the limits The limits are set directly by way of the contact pointers (1) without having to dismantle the flowmeter. First remove the housing cover. The contact pointers (1) can be moved to the required switching point through the slot in the scale. If the locking screw (2) is screwed tight, push the scale out of the rack and slacken the screw (2) to adjust the contact pointers (1). Push the scale back into its original position until it snaps into place. Subsequently the contact pointers (1) can, as described above, be set to the switching point. After setting, the contact pointers (1) should be fastened with the locking screw. Replace housing cover and screw down.
receiver
power
EEx ia or EEx ib
control room non-“Ex” area
system “Ex” area
EEx ia or EEx ib
2
1 2 3 4 5 6
Max
. lim
it
Min
. lim
it
1
receiver 2
1
2
1
slot
24 Installation and operating instructions
9.3 Definition of switching contacts K MIN contact (normally open) When the pointer vane (1) dips into the slot (and damps this sensor), this will initiate an alarm. When the vane is outside the slot sensor, any cable break will also initiate an alarm. Option: used as maximum contact In the “alarm“ status the vane is located outside the slot. A cable break is not detected.
K MAX contact (normally open) When the pointer vane (1) dips into the slot (and thus damps this sensor), this will initiate an alarm. When the vane is outside the slot sensor, any cable break will also initiate an alarm. Option: used as minimum contact In the “alarm“ status the vane is located outside the slot. A cable break is not detected. The K2 version features both contact systems: Kmin und Kmax.
9.4 Technical data Limit switches SC 3,5-N0-Y SJ3,5-E2-Y Nominal voltage UB 8 VDC 10 to 30 VDC Power consumption active area clear 3 mA Output active area clear ≤ 0.3 V Power consumption active area obscured 1 mA Output active area obscured ≥ (UB – 3 V) Ambient temperature at limit switch -25 to + 100°C -25 to + 70°C Continuous current 100 mA No-load power consumption 15 mA Electrical characteristics DIN 19234 (NAMUR) Protection category (EN 60529 / IEC 529) IP 67 Electromagnetic compatibility (EMC) to EN 50081-1, EN 50082-2 For ATEX limit switches: Only for connection to intrinsically safe circuits with the following peak values: Built-in equipment Ui [V] Ii [mA] Pi [mW] Ci [nF] Li [µH] SC 3,5-NO [Ex] SC 3,5-NO –Y [Ex] ≤ 16 ≤ 52 ≤ 169 ≤ 150 ≤ 150
*) depending on the isolation switching amplifier used Caution: be aware of temperature classes. Note: limit switch SJ 3,5-E2-Y not for use in hazardous areas!
1
23
1
23
1
1
M 9 indicator
H 250 Installation and operating instructions 25
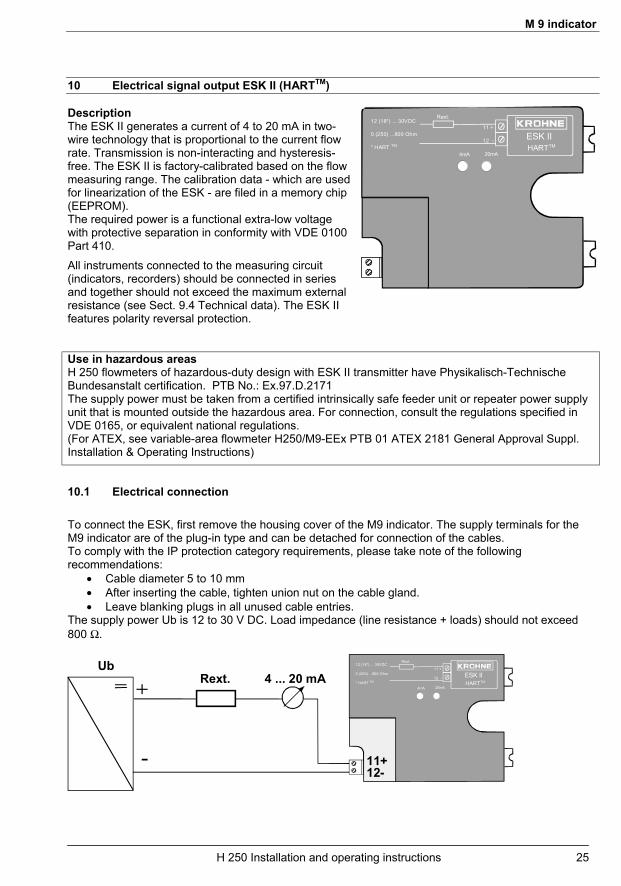
10 Electrical signal output ESK II (HARTTM)
Description The ESK II generates a current of 4 to 20 mA in two-wire technology that is proportional to the current flow rate. Transmission is non-interacting and hysteresis-free. The ESK II is factory-calibrated based on the flow measuring range. The calibration data - which are used for linearization of the ESK - are filed in a memory chip (EEPROM). The required power is a functional extra-low voltage with protective separation in conformity with VDE 0100 Part 410. All instruments connected to the measuring circuit (indicators, recorders) should be connected in series and together should not exceed the maximum external resistance (see Sect. 9.4 Technical data). The ESK II features polarity reversal protection.
Use in hazardous areas H 250 flowmeters of hazardous-duty design with ESK II transmitter have Physikalisch-Technische Bundesanstalt certification. PTB No.: Ex.97.D.2171 The supply power must be taken from a certified intrinsically safe feeder unit or repeater power supply unit that is mounted outside the hazardous area. For connection, consult the regulations specified in VDE 0165, or equivalent national regulations. (For ATEX, see variable-area flowmeter H250/M9-EEx PTB 01 ATEX 2181 General Approval Suppl. Installation & Operating Instructions)
10.1 Electrical connection To connect the ESK, first remove the housing cover of the M9 indicator. The supply terminals for the M9 indicator are of the plug-in type and can be detached for connection of the cables. To comply with the IP protection category requirements, please take note of the following recommendations:
• Cable diameter 5 to 10 mm • After inserting the cable, tighten union nut on the cable gland. • Leave blanking plugs in all unused cable entries.
The supply power Ub is 12 to 30 V DC. Load impedance (line resistance + loads) should not exceed 800 Ω.
Rext.
4mA 20mA
ESK II
12 (18*) ... 30VDC
0 (250) ...800 Ohm
* HART
11 +
12 -HARTTMTM
Rext. 4 ... 20 mAUb Rext.
4mA 20mA
ESK II
12 (18*) ... 30VDC
0 (250) ...800 Ohm
* HART
11 +
12 -HARTTMTM
11+12-
26 Installation and operating instructions
Electrical connection for hazardous areas
EEx ia or EEx ib certified repeater power supply unit with intrinsically safe input circuit and the following peak values: U0 ≤ 30 V, I0 ≤ 100 mA P0 ≤ 1.0W
10.2 HARTTM communication HART communication is not absolutely necessary in order to operate the ESK II. If HART communication is carried out with the ESK II, this will not impair analog data transmission (4...20mA) in any way. An exception is the multidrop mode, when a maximum of 15 devices with HART function are operated in parallel, in which case their current outputs are switched to the inactive mode (I approx. 4mA).
When a HARTTM communicator (type Fisher Rosemount, model 275) or a PC with HARTTM modem is used, the series-connected resistance (Rext.) needs to be greater than 250 ohms. The supply power must in this case be at least 18 V. The communicator or PC is connected as shown in the above drawing. It can optionally be operated via the supply terminals of the ESK II (2) or via a series-connected external resistor (1). The HART communicator can be operated in either hazardous or non-hazardous areas. For use in hazardous areas, a transmitter feeder unit with HART/smart capability is required, e.g. KFD2-STC3-Ex1 supplied by P&F.
1
Folgegerät
2
Hilfs-energie
4...2
0 m
A
EEx ia bzw.EEx ib
SchaltwarteNicht Ex-Bereich
AnlageEx-Bereich
Rext.
4mA 20mA
ESK II
12 (18*) ... 30VDC
0 (250) ...800 Ohm
* HART
11 +
12 -HARTTMTM
11+12-
Rext. 4 ... 20 mAUb
HARTRext.
4mA 20mA
ESK II
12 (18*) ... 30VDC
0 (250) ...800 Ohm
* HART
11 +
12 -HARTTMTM
11+12-
1
2
HART-Communicator
Follow utensil
Power control room non-”Ex” area
our
system ”Ex” area
M 9 indicator
H 250 Installation and operating instructions 27
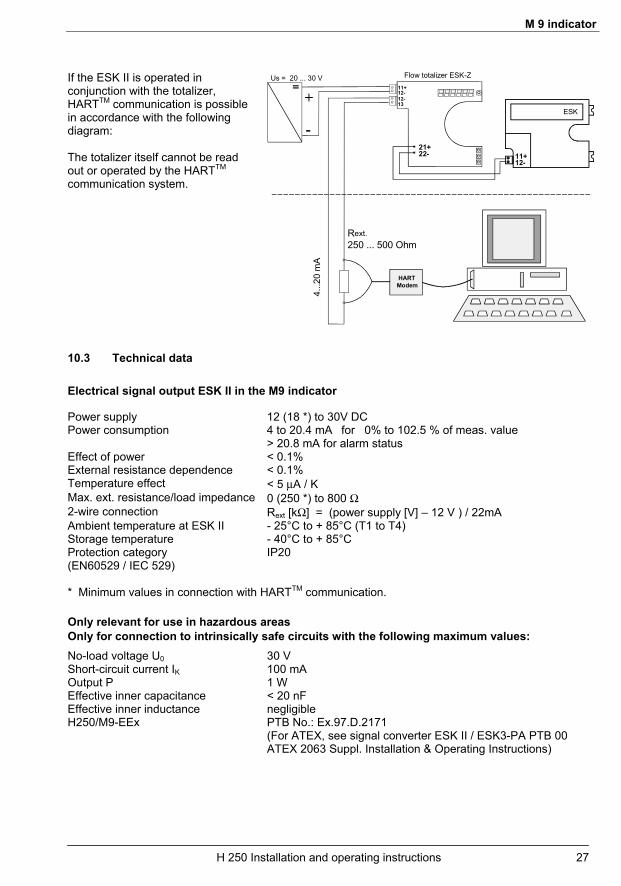
If the ESK II is operated in conjunction with the totalizer, HARTTM communication is possible in accordance with the following diagram: The totalizer itself cannot be read out or operated by the HARTTM communication system.
10.3 Technical data Electrical signal output ESK II in the M9 indicator
Power supply 12 (18 *) to 30V DC Power consumption 4 to 20.4 mA for 0% to 102.5 % of meas. value > 20.8 mA for alarm status Effect of power < 0.1% External resistance dependence < 0.1% Temperature effect < 5 µA / K Max. ext. resistance/load impedance 0 (250 *) to 800 Ω 2-wire connection Rext [kΩ] = (power supply [V] – 12 V ) / 22mA Ambient temperature at ESK II - 25°C to + 85°C (T1 to T4) Storage temperature - 40°C to + 85°C Protection category (EN60529 / IEC 529)
IP20
* Minimum values in connection with HARTTM communication.
Only relevant for use in hazardous areas Only for connection to intrinsically safe circuits with the following maximum values: No-load voltage U0 30 V Short-circuit current IK 100 mA Output P 1 W Effective inner capacitance < 20 nF Effective inner inductance negligible H250/M9-EEx PTB No.: Ex.97.D.2171
(For ATEX, see signal converter ESK II / ESK3-PA PTB 00 ATEX 2063 Suppl. Installation & Operating Instructions)
4...2
0 m
A
HARTModem
Rext.250 ... 500 Ohm
11+12-12-13
21+22-
ESK
11+12-
Us = 20 ... 30 V Gleichstromzähler ESK-Z
+
-
Flow totalizer ESK-Z
28 Installation and operating instructions
11 Flow totalizer Z
Description Flow totalizer Z is operated together with transmitter ESK II. Flow totalizer Z feeds the ESK II module in 2-wire technology, and this supplies an instantaneous flow-proportional current of 4 to 20 mA. A 6-digit LED displays the cumulative flow value appropriate to the measuring range.
Display Comments
Button 1 Flow in % Totalizing continues in the background.
Button 2 Totalizer count e.g. litres or m3
Button 3 Conversion factor Standard: 10% of Q100
Reset R Delete stored totalizer value
Note: Totalizer not to be used in hazardous areas! Flow totalizer Z is factory-set in keeping with the data specified in the order and needs no adjustment. Unless specified otherwise in the order, the totalizer conversion factor is set relative to the measuring range, so that the totalizer count (in litres, m3, etc.) can be read direct. 11.1 Electrical connection The required power is a functional extra-low voltage with protective separation in accordance with VDE 0100 Part 410, or equivalent national regulations. All instruments connected to the measuring circuit (recorders, indicators, etc.) shall be connected in series and may not exceed a max. external resistance of 720 Ω. The supply voltage US of max. 30 VDC to be connected to terminals 11+ and 12- at the totalizer module.
123
R
11+12-12-13
21+22-
ESK
11+12-
Us = 14 ... 30 V
4 ... 20 mA
Durchflußzähler Z
+
-
Flow totalizer Z
M 9 indicator
H 250 Installation and operating instructions 29
If an external indicator is not required, an additional short-circuiting link (not included with flowmeter) must be connected to terminals 12 and 13.
It is then not necessary to connect terminal 13 to the power supply unit. Not intended for use in hazardous areas! If HARTTM communication is required with the ESK II, please refer to Sect. Electrical connection ESK II, HARTTM communication. 11.2 Settings, display mode Reset:
Deletes stored totalized value
Key 1 Current flow rate in %
(0 ... 100%) with decimal point and one decimal place
Key 2: Totalizer no decimal point
Key 3: Display of conversion factor first two decimal points light up
11+ 12- 12- 13
21+ 22-
ESK
11+ 12-
Us = 14 ... 30 V flow totalizer Z
+
-
Display
Reset key
Key 1 Key 2 Key 3
30 Installation and operating instructions
Conversion factor The conversion factor is as a general rule factory-set in relation to the measuring range, so that the current totalized value can be read off at all times. Conversion factor = 10% of the full-scale range, so that the totalized value can be read direct 1:1 from the display. If the measuring range is not known, e.g. in the case of a spare part delivery, a conversion factor of 1000 is factory-set. If the conversion factor needs to be changed or corrected, this can be done by pressing Key 2 at the same time as the supply voltage is switched on. A factor between 1 and 1099 can be set using Keys 1 to 3. Factor 0 is undefined. Key 1: ones
Key 2: tens Key 3: hundreds and thousands
Input is confirmed and terminated by pressing the Reset key. The totalizer then reverts to the display mode selected last. Totalizer count
The totalizer count is saved in the event of a power failure and can be set to zero during operation using the RESET key. All decimal points light up when the totalizer overflows. Press the RESET key to set to zero. Adjustment
Adjustment is not required as the totalizers are factory-adjusted. If readjustment is nevertheless required, this can be done as follows: • At the moment of switching on, press and hold down the RESET key until three decimal points light up. • Set 4.00mA, then press Key 1 until digit 0 appears. • Set 20.00mA, then press Key 3 until the figure 100 appears. Press Key 2 to terminate adjustment. 11.3 Technical data Supply power 14 to 30V DC Input signal 4 to 21.6 mA for 0% to 110% of the measured value Consumption max. 2 W max. external resistance/load impedance
0 to 720 Ω depending on supply voltage
2-wire connection Rext [kΩ] = (supply power [V] – 14 V) / 22mA Ambient temperature - 250C to + 650C Display error < 1% of the displayed integrated value, max. one display unit
M 9 indicator
H 250 Installation and operating instructions 31
12 Permissible process temperature for M9 indicator with/without add-on components
Max. process temperature Tp without ESK, K1, K2, Z
H250/RR/, H250/HC (Hastelloy C4) at ambient temperature (Ta) ≤ 120°C
300°C, other temperatures on request
H250/C (ceramic float) at ambient temperature (Ta) ≤ 120°C
250°C
H250/C (PTFE float) at ambient temperature (Ta) ≤ 70°C
70°C
Min. process temperature Tp without ESK, K1, K2,Z -80°C, others on request Ambient temperature Ta with ESK, K1, K2,Z Standard: - 25°C … 80°C
dependent on process temperature Max. process temperature Tp with optional components: Meter size Application range Flanges to ... non-hazardous area without heating with heating DIN ANSI DIN ANSI
Ta <40°C Tp in
Ta < 60°C Tp in
DN mm inch DN mm inch
Version
°C °C DN15/25 1/2", 1" DN15 ½" M9/ESK II 200 180 (150) M9/HT/ESK II 300 300 (235) M9/ESKII /Z 200 80 M9/HT/ESKII /Z 300 130 M9/K 200 200 (150) M9/HT/K 300 300 (235) M9/KD 200 130 M9/HT/KD 300 295 (235) DN 50 2“ DN 25 1“ M9/ESK II 200 165 (125) M9/HT/ESK II 300 300 (170) M9/ESKII /Z 180 75 M9/HT/ESKII /Z 300 100 M9/K 200 200 (125) M9/HT/K 300 300 (170) M9/KD 200 120 M9/HT/KD 300 195 (170) DN 80/100 3“, 4“ DN 50 2“, 3“ M9/ESK II 200 150 (105) DN 80 M9/HT/ESK II 300 250 (145) M9/ESKII /Z 150 70 M9/HT/ESKII /Z 270 85 M9/K 200 200 (105) M9/HT/K 300 300 (145) M9/KD 190 110 (105) M9/HT/KD 300 160 (145) HT = high-temperature version Figures in brackets: above these temperatures, a high-heat-resistant cable with an allowed duty temperature of min. 100°C must be used. * Max. allowed process temperatures for flowmeters of hazardous-duty design, see Section 14 Certificates of Conformity; for devices with PTB 01 ATEX 2181 approval, see Supplementary Installation and Operating Instructions (ATEX - general approval); and for devices with ESK3 PA, see Supplementary Installation and Operating Instructions PTB 00 ATEX 2063 A.
32 Installation and operating instructions
13 Service - M9 indicator, Retrofitting
The H250 flowmeter mit M9 indicator can be retrofitted with all electrical options. Modules ESK II, flow totalizer Z, Kmin, Kmax or K2 are slipped sideways into the channel section until they click into place. The modules can be replaced or retrofitted without interrupting the process and without requiring recalibration. Also available is a retrofit kit to convert the H250/M9 into a high-temperature version. In this connection, take note of the maximum process temperatures specified in the Table.
13.1 Plug-in contact module The contact module is supplied with one or two inductively actuated limit switches. (See also Sect. Electrical connection for hazardous areas.) Order No.: Contact module Kmin. (with 1 x SC 3,5-N0-Y, 2-wire technology Ex) V 245100010 Contact module Kmax. (with 1 x SC 3,5-N0-Y, 2-wire technology Ex) V 245100011 Contact module K2 (with 2 x SC 3,5-N0-Y, 2-wire technology Ex) V 245100012 Contact module Kmin. (with 1 x SJ 3,5-E2, 3-wire technology) V 245100030 Contact module Kmax. (with 1 x SJ 3,5-E2, 3-wire technology) V 245100031 Contact module K2 (with 2 x SJ 3,5-E2, 3-wire technology) V 245100032 Items included with supply: 1 or 2 contacts, Type SC 3,5-N0-Y in 2-wire technology to DIN 19234 (NAMUR). or 1 or 2 contacts, Type SJ 3,5-E2 –Y in 3-wire technology, direct switching, with output indicator (LED). An isolation switching amplifier is required to operate a limit switch in 2-wire technology (see Sect. Electrical connection M9). To install, unscrew the housing cover. Slide the flow totalizer Z (if provided) out of the subrack. Please also consult the notes in Sect. 10.1 (Electrical connection). Before sliding the contact module into the subrack, bring the contact pointers (1) together in the middle so that the semicircular pointer guides (3) close around the pointer pedestal. If necessary, slacken the locking screw (2) to adjust the contact pointers (1). Insert the contact module in the third rail from the top until the semicircular pointer guide (3) on the board closes round the pointer pedestal. Then connect up (see Sect. Electrical connection M9). The supply terminals of the contact module are of the plug-in type and can be detached for connection of the cables.
1
2
3
M 9 indicator
H 250 Installation and operating instructions 33
To conform to IP protection category requirements, take note of the following: • cable diameter 5 to 10 mm • after inserting the connecting lead, tighten down the union nut on the cable gland. • leave blanking plugs in place on all unused cable entries.
Retrofitting a second limit switch The retrofit kit consists of contact pointer (Kmin or Kmax, as required) with integrated limit switch. The connecting lead for the limit switch features an integrally moulded plug. Unscrew the housing cover to install. Slide flow totalizer Z (if provided) out of the subrack.
• Pull the contact module out of the subrack. • Remove locking screw (1).
Caution: spring (2) is under pressure
• Assemble contact pointer (4), sliding discs (3), spring (2) and locking screw as shown in the drawing. The second sliding disc (3) is already provided for the version with one contact.
• Plug the connector of the limit switch (blue) into the jack on the pcb.
• Slide the contact module back into the subrack and connect up (see Sect. Electrical connection M9).
1 Locking screw 2 compression spring 3 sliding discs 4 contact pointer 5 pc board 6 counternut
13.2 Electrical signal output ESK II in the M9 indicator Order No.: Electrical signal output ESK II V245100114 Electrical signal output ESK II/ Ex V245100113 HARTTM modem (converter RS232 / HART) 4.00313.00.00 KroVaCal software (CD) 317850xx Items included with supply: - 1 ESK with built-in EEPROM (without calibration data) - 1 cable gland (with O-ring) M16 x 1.5 Included with retrofit kit: The ESK II is non-linearized when supplied in the form of a retrofit kit. It includes an initialized EEPROM allowing individual linearization. Included as spare (replacement) The ESK II is factory standardized, so that e.g. a replacement can be made without recalibration. Plug the EEPROM of the old ESK into the new one. If necessary, zero and 100% value can be readjusted (see Sect. 13.2.3).
1
2
3
4
5
6
34 Installation and operating instructions
13.2.1 Installing an ESK II To install or replace the ESK II, first unscrew the cover of the indicator housing. The plug-in unit is easy and quick to install. Two half-round clips are located on the side of the ESK II housing and inserted underneath two pins (1). These pins are located on the baseplate on either side of the pointer pedestal. The hammer clip located in the baseplate snaps into a hole (2) in the base of the ESK housing, close to the supply terminal, to fasten the ESK II securely.
13
2
When the ESK II is retrofitted, the plate (3) for fastening the transformer is pushed aside automatically and can be removed as it is of no further use. Since the sensor system of the ESK directly detects the follower magnet on the pointer system, mechanical adjustment is not necessary. 13.2.2 Replacing an ESK II The ESK II is standardized by the factory, so recalibration of a replacement is not required. The calibration data are stored in the EEPROM. If the flowmeter data or process data have not changed, this EEPROM can continue to be used. First disconnect the ESK II from supply. Disconnect the power lead or simply pull off the terminals. Then use a screwdriver to lift the ESK II (1) and pull it out (2).
1. 2.
Use the screwdriver to slightly press down the lid lock, lift it up and remove the lid.
Lift the EEPROM (1) out of the base with the aid of a screwdriver. Avoid bending the terminal pins by levering up the EEPROM on the two terminal-free sides. This EEPROM (1) is inserted in the replacement ESK II.
Rext.
4mA 20mA
TM1
When inserting the EEPROM (1) into the base of the ESK, make sure the installation position is correct (pin 1 / notch). Carefully plug all eight terminal pins together into the base. Close cover After powering the ESK II, an output current is displayed that is proportional to the scale value. If the ESK II is not built into the indicator, a current of approx. 12 mA is generated. However, should a current of > 20 mA be indicated, this means that possibly one of the terminal pins of the EEPROM is not correctly plugged into the base.
M 9 indicator
H 250 Installation and operating instructions 35
13.2.3 Setting zero and full-scale value at the ESK II Zero and full-scale value (100%) can be set by means of integral pushbuttons. When the pushbutton behind the “4“ is pressed for more than 5 seconds, the measured value will skip to 4mA. The ESK II is then in the zero adjust mode. Optionally, pushbutton 4 for downward correction or pushbutton 20 for upward correction can now be pressed until zero equals 4.00mA precisely. Similarly, the 100% value can be set by pressing pushbutton 20 for longer than 5 seconds.
Rext.
4mA 20mA
ESK II
12 (18*) ... 30VDC
0 (250) ...800 Ohm
* HART
11 +
12 -HARTTMTM
4 20
If neither of the two pushbuttons is pressed for longer than 10 seconds, the ESK II will automatically revert to its measuring mode and include the corrections. These corrections are stored and remain valid even if the ESK II is switched off for a lengthy period. These settings have no effect on the linearity of the ESK II. Further settings can be made with the HARTTM communicator or with a HARTTM modem (converter RS232 / HART) and the KroVaCal PC program. 13.2.4 ESK II, retrofitting and calibration If an ESK II is to be retrofitted, it should be installed as described above under Installation of an ESK. This ESK II does not yet have any calibration data and needs to be individually calibrated. If the M9 indicator has been prepared for an ESK II retrofit, the required calibration data will be found on the indicator housing cover. To linearize requires the KroVaCal conversion program and a HART modem connected to the serial interface of the PC (see Sect. on HART communication). Detailed directions are included with the software. Linearization of the ESK II is carried out in 3 steps:
• Recording of measuring points • Linearization of the characteristic curve by means of the PC • Storage of linearization data in the EEPROM via a serial interface Recording of measuring points [ I = f (Q); non-linear ] I = Signal output values [mA] Q = Flow values of original product, or scale values The measuring points should be recorded at the main scale marks to obtain the best possible linearization results. These point can be approached in three different ways: Dynamic setting: setting of the flow value (original product or reference product established by conversion) Static setting: lifting the float until the pointer indicates the appropriate scale value. Note: merely lifting the pointer is not sufficient! Setting the pointer on the HT version (high-temperature): by lifting the pointer to the appropriate scale value, the current of the ESK II can be read off precisely. The vertical position of the float has no effect on the ESK II.
36 Installation and operating instructions
Both the flow value and the relevant signal output value should be noted down for all measuring points. After all measured values have been recorded, actual linearization can begin. Linearization is carried out using the KroVaCal program, which must be installed in a commercially available PC. Minimum requirements: Processor 80486 hard disk 45 MB available clock frequency 166 MHz screen 800x600 small font 16 MB RAM CD ROM A HART modem connected to the serial interface of the PC allows communication with the ESK II. 13.2.5 Changes and conversion, ESK II The following parameters can be changed with the aid of the KroVaCal program:
• measuring range • process temperature • fluid product • density • viscosity • pressure
Properties and possibilities of the KroVaCal program:
• calibration and conversion to any process fluid and any measuring range • device identification
device address serial number measuring point identifier (tag no.) storage of messages
• digital data retrieval in flow units, in % and in mA • test / setting functions
adjustment 4.00 und 20.00 mA setting the current output to any desired value self-testing of integral components and configurations
• printing of scale plate However, every measuring section has its physical limits which the KroVaCal program will calculate correctly and possibly reject the required change. If a change is carried out with the program, the new data will also be transmitted to the ESK II.
M 9 indicator
H 250 Installation and operating instructions 37
13.3 Flow totalizer Z The flow totalizer can, in conjunction with the electrical current output ESK II, also be retrofitted in the M9 indicator.
Retrofit kit – Order No.: V245100118 Items included: - flow totalizer - new scale with cutout for the totalizer display Replacement - Order No.: V245100018 Item included: - flow totalizer When ordering the totalizer retrofit kit, please specify the device data as shown on the right, and also the measuring range. With the aid of these data, the supplied new scale with cutout for the totalizer display can be prepared in readiness for installation. The flow totalizer is then preset with the conversion factor relative to the measuring range.
Installation: • For retrofitting, unscrew the housing cover of the indicator. • Slide out the existing scale (to be replaced by the new one,
supplied). • Slide flow totalizer unit into the middle rail of the module
rack. • Electrical connection, see Sect. Electrical connection M9. • Subsequently insert the new scale into the module rack. Note: when sliding the scale over the totalizer display, lift it slightly until it frames the totalizer display. • Further settings, see Sect. 11.2. Screw down housing cover.
13.4 High-temperature version M9 indicator Retrofit kit
13.4.1 Installation The flowmeter can remain in the pipeline.
• Note down the position of the pointer before dismantling the indicator!
• Detach both nuts used to fasten the indicator. • Remove indicator and fastening clips (1,2) from the
measuring section. • Remove plastic cap from the HT extension piece (4). • Place gasket (3) exactly in the groove of the HT extension
piece (check correct seating of gasket (3)). • When mounting the HT extension piece, make sure that the
marking (7) (coloured dot) shows in the direction of the cable entry on the indicator.
• Attach the HT extension piece (4) with the three fastening screws (5) to the rear of the indicator.
Fit the distance bolts (6) to the set screws on the measuring section and tighten down (wrench size 14 mm).
Plan view of HT extension piece
13.4.2 Mounting the indicator Position the indicator with fastening clips (1,2) on the distance bolts (6), fit washers and tighten down with the nuts (max 8 Nm).
Fastening clip 1 15/25
15/25
Note: Note mounting position of clips. DN15, DN25 and DN50, DN80, DN100
DN15, DN25 DN50, DN80, DN100 Compare the pointer position with the previously noted indicator value. If there is any deviation: Hold the pointer spindle with a screwdriver (see diagram). Set the pointer to the previously noted value by moving it against the frictional force of the pointer fastener.
1000
800
600
400
200
RP
+
13.5 List of spares M9 indicator Order No. Housing cover and seal 4003400100 Baseplate 4003410100 Module rack 3165450100 Contact module Kmin (SC 3,5-N0, 2-wire tech. Ex) V245100010 Contact module Kmax (SC 3,5-N0, 2-wire tech. Ex) V245100011 Contact module K2 (SC 3,5-N0, 2-wire tech. Ex) V245100012 Contact module K1mm (SJ 3,5-E2, 3-wire tech.) V245100030 Contact module K1max (SJ 3,5-E2, 3-wire tech.) V245100031 Contact module K2 (SJ 3,5-E2, 3-wire tech.) V245100032 Electrical signal output ESK II V245100014 Electrical signal output ESK II / Ex V245100013 Flow totalizer replacement (without scale) V245100018 Flow totalizer retrofit kit with new device scale V245100118 High-temperature extension piece V2451 00021
M 7 indicator
H 250 Installation and operating instructions 45
M7 indicator and add-on components
An EC Type Approval Certificate in conformity with 94/9/EC has not been applied for in respect of the H 250/M7. An appropriate EC Type Approval Certificate is at hand in respect of the limit switches. 15 Transport lock / Removal of locking device
Moving parts of the M7 indicator system are secured by a rubber band (1) to protect against damage in transit. Remove the rubber band before starting up the flowmeter. To do so, unscrew the left housing cover of the M7 indicator.
1
16 Limit switches Kmin / Kmax / K2
Description The H250/M7 variable-area flowmeter can be equipped with a maximum of two electronic limit switches. The limit switch operates with a slot sensor that is inductively actuated by the semicircular metal vane on the measuring pointer. The switching points are set by way of contact pointers on the scale. The position of the contact pointer also serves to visually indicate the set limit value. Versions are available in 2-wire and 3-wire technology: 2-wire technology: SC 2-N0 or SC 3,5-N0-Y | 3-wire technology SJ3,5-E2-Y 16.1 Electrical connection Limit switches SC 2-N0 and SC3,5-N0-Y are connected up in conformity with DIN 19234 (NAMUR). An isolation switching amplifier is required for operation of this limit switch in 2-wire technology (see Electrical connection M9). For electrical connection, remove the left housing cover. K1 = 1 limit switch K2 = 2 limit switches
1 2 3 4− + − +
Κ1 Κ2 + DC - + DC - 1 2 3 4 5 6braun schwarz blau braun schwarz blau
BN
BK
BU
+
DC
-
Limit switches SC 2-N0 and SC 3,5-N0-Y are certified by the Physikalisch-Technische Bundes-anstalt. They are therefore suitable for use in hazardous areas. They are matched for isolation switching amplifiers with certified intrinsically safe control circuit in conformity with NAMUR and DIN 19234. The isolation switching amplifier must be mounted outside the hazardous area. For connection, consult the regulations specified in VDE 0165 or equivalent national standard.
brown black blue brown black blue
46 Installation and operating instructions
Electrical connection for the hazardous area
EEx ia or EEx ib certified isolation switching amplifier with intrinsically safe input circuit (NAMUR), 1 or 2 channels with the following max. values: U0 ≤ 16V, I0 ≤ 52 mA, P0 ≤ 169mW, per circuit
any receiver instrument, recording device
16.2 Setting the limits
The switching points are set by way of the contact pointers. • First remove the left housing cover. • Set contact pointer to the required switching point (value on flow scale) at which the contact is to
operate. • Replace and screw down housing cover. • The device is ready to operate.
16.3 Technical data Limit switches SC 2-N0 / SC 3,5-N0-Y SJ3,5-E2-Y Nominal voltage Ub 8 VDC 10 to 30 VDC Power consumption active area clear 3 mA Output active area clear ≤ 0.3 V Power consumption active area obscured 1 mA Output active area obscured ≥ (UB – 3 V) Ambient temperature at limit switch -25 to + 100°C -25 to + 70°C Continuous current 100 mA No-load power consumption 15 mA Electrical characteristics DIN 19234 (NAMUR) Protection category (EN 60529 / IEC 529) IP 67 Electromagnetic compatibility (EMC) to EN 50081-1, EN 50082-2
For ATEX limit switches: Only for connection to intrinsically safe circuits with the following maximum values:
Limit switches Ui [V] Ii [mA] Pi [mW] Ci [nF] Li [µH] SC 2-NO [Ex] SC 3,5-NO [Ex] ≤ 16 ≤ 52 ≤ 169 ≤ 150 ≤ 150
* dependent on the isolation switching amplifier used Note: take temperature classes into consideration! Note: limit switches SJ 3,5-E2-Y not for use in hazardous areas!
receiver receiver
Power
EEx ia or EEx ib
EEx ia or EEx ib
Control room non-”Ex” area
System ”Ex” area View without left housing cover
max. contact pointer
min. contact pointer
Min
. lim
it
Max
. lim
it
M 7 indicator
H 250 Installation and operating instructions 47
17 Electrical signal output ESK
Description The ESK generates a current of 4 to 20 mA in two-wire technology that is proportional to the current flow rate. Transmission is non-interacting and hysteresis-free. The ESK is factory-calibrated on the basis of the flow measuring range. The calibration data - which are used for linearization of the ESK - are filed in a memory chip (EPROM). The required power is a functional extra-low voltage with protective separation in conformity with VDE 0100 Part 410. All instruments connected to the measuring circuit (indicators, recorders) should be connected in series and, together, should not exceed the maximum external resistance. The ESK features polarity reversal protection.
ESK
+ - Use in hazardous areas (PTB approval only) Flowmeters of hazardous-duty design with ESK transmitter are certified by the Physikalisch- Technische Bundesanstalt. PTB No. Ex-94.D.2067 The supply power must be taken from a certified intrinsically safe feeder unit or repeater power supply unit that is installed outside the hazardous area. For connection, consult the regulations specified in VDE 0165 or equivalent national standard! 17.1 Electrical connection To connect the ESK, first remove the righthand housing cover. To conform to the requirements of the IP protection category, please note the following recommendations:
• Cable diameter 8 to 13 mm • If the fit of incoming cables is excessively tight, remove the appropriate ring from the seal on the
cable gland. • Leave blanking plugs in all unused cable entries.
The power supply Ub is 12.7 to 30 V DC. Load impedance (line resistance + loads) may not exceed 800 Ω.
Conn.principle non-“Ex“ area
Electrical connection hazardous (”Ex”) areas
EEx ia or EEx ib certified repeater power supply unit with intrinsically safe input circuit and
max. values: U0 ≤ 30 V, I0 ≤ 100 mA, P0 ≤ 1.0W
any receiver instrument, recording device The supply power Ub is 12.7 to 30 V DC. Load impedance (line resistance + loads) not to exceed 800 Ω.
Control room non-”Ex” area
EEx ia or EEx ib
Power
System ”Ex” area
Receiver
48 Installation and operating instructions
17.2 Settings The ESK is factory adjusted and calibrated on the basis of the measuring range so that zero and 100% adjustment are not required. If fine adjustment is nevertheles required, this can be carried out as follows: Zero Float at rest. Set 4.00 mA with potentiometer (4).
100% value Lift the float until the pointer indicates the 100%
flow value. Set 20.00 mA with potentiometer (20).
Note Use a non-ferromagnetic screwdriver, otherwise risk of influencing the sensor and falsifying values!
4 20
ESK
These settings have no effect on the linearity of the ESK. 17.3 Technical data Electrical signal output ESK
Supply power 12.7 to 30V DC Power consumption 4 to 21.60 mA for 0% to 110% of meas. value Power influence < 0.1% * External resistance dependence < 0.1% * Temperature effect < 10 µA / K Max. external resistance/load impedance 0 to 800 Ω 2-wire connection Rext [kΩ] = (supply power [V] – 12.7 V) / 22mA Ambient temperature at ESK - 25°C to + 80°C Storage temperature - 40°C to + 85°C Protection category (EN60529 / IEC 529) IP20 * without considering resolution steps
Only relevant for hazardous areas Only for connection to intrinsically safe circuits with the following max. values: No-load voltage U0 30 V Short-circuit current IK 100 mA Output P 1 W Effective inner capacitance < 20 nF Effective inner inductance negligible Individual approval (ESK M7) only PTB No. Ex-94.D.2067
M 7 indicator
H 250 Installation and operating instructions 49
18 Pneumatic signal output P
Description A WT 80 transmitter with VR 80 amplifier is built into the M7 indicator housing to convert the measured flow value into a pneumatic signal of 0.2 – 1 bar (2.9 – 14.5 psig). Start-up
• Use only cleaned, oil-free and moisture-free air to operate the transmitter. • Blow out air intake lines before connecting up. • Intake air pressure to be a constant 1.4 ± 0.1 bar (20.3 psig + 1.45 psig). • Connect up the input and output in accordance with the details given on the information plate on
the underside of the M7 indicator. Important: Do not block or close off the two vents on the underside of the device. If closed off, there is risk that the glass pane will crack. View: Underside of M7 indicator
+ +
+ vent hole
vent hole
PG11
PG11
PG11
• Leak tightness: check NPT screw connections with leak indicator spray. • If necessary, retighten screw connections. • The WT 80 transmitter hs been factory-set in keeping with the order and based on the
measuring range. No further adjustments are necessary. • The device is ready to operate.
Technical data WT 80 Air inlet pressure 1.4 bar ± 0,1 bar Air consumption 480 l/h Air capacity 1800 l/h Output 0.2 to 1.0 bar Linearity error ± 0.5% Hysteresis 0.25% Sensitivity 0.1% Ambient temperature at WT 80 –25°C to +70°C Temperature effect 0.03%/°C Inlet pressure dependence 0.2%/0.1bar Load dependence (at 0.6 bar) 1.2% at 300 l/h 3% at 600 l/h Connections 1/8“ NPT
50 Installation and operating instructions
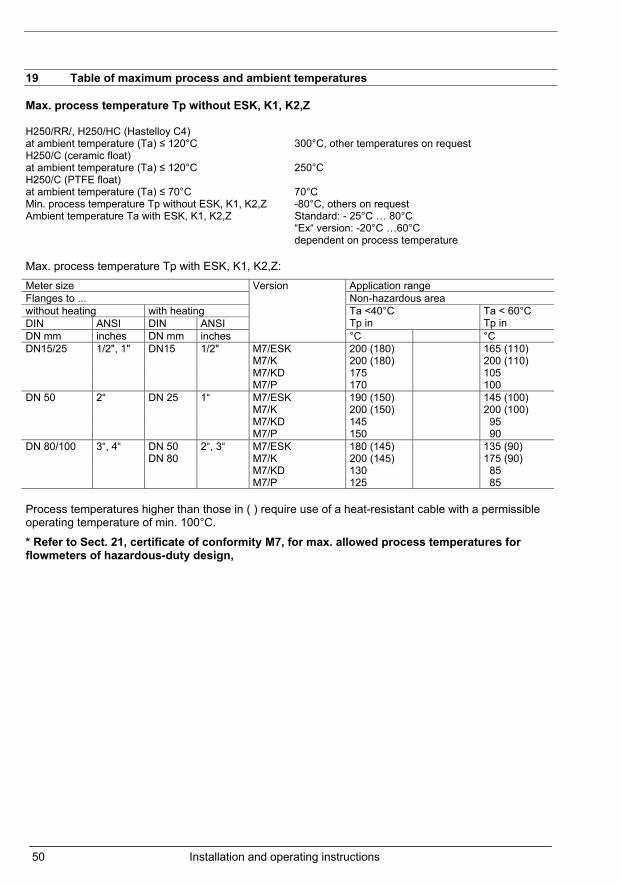
19 Table of maximum process and ambient temperatures
Max. process temperature Tp without ESK, K1, K2,Z H250/RR/, H250/HC (Hastelloy C4) at ambient temperature (Ta) ≤ 120°C
300°C, other temperatures on request
H250/C (ceramic float) at ambient temperature (Ta) ≤ 120°C
250°C
H250/C (PTFE float) at ambient temperature (Ta) ≤ 70°C
70°C
Min. process temperature Tp without ESK, K1, K2,Z -80°C, others on request Ambient temperature Ta with ESK, K1, K2,Z Standard: - 25°C … 80°C
“Ex“ version: -20°C …60°C dependent on process temperature
Max. process temperature Tp with ESK, K1, K2,Z: Meter size Application range Flanges to ... Non-hazardous area without heating with heating DIN ANSI DIN ANSI
Ta <40°C Tp in
Ta < 60°C Tp in
DN mm inches DN mm inches
Version
°C °C DN15/25 1/2", 1" DN15 1/2" M7/ESK 200 (180) 165 (110) M7/K 200 (180) 200 (110) M7/KD 175 105 M7/P 170 100 DN 50 2“ DN 25 1“ M7/ESK 190 (150) 145 (100) M7/K 200 (150) 200 (100) M7/KD 145 95 M7/P 150 90 DN 80/100 3“, 4“ DN 50 2“, 3“ M7/ESK 180 (145) 135 (90) DN 80 M7/K 200 (145) 175 (90) M7/KD 130 85 M7/P 125 85 Process temperatures higher than those in ( ) require use of a heat-resistant cable with a permissible operating temperature of min. 100°C. * Refer to Sect. 21, certificate of conformity M7, for max. allowed process temperatures for flowmeters of hazardous-duty design,
M 7 indicator
H 250 Installation and operating instructions 51
20 Service
The H250 flowmeter with M7 indicator can be retrofitted with an electrical signal output. 20.1 Electrical signal output ESK Order No.: Electrical signal output ESK V 245100014 Electrical signal output ESK / Ex V 245100013 Software, linearization ESK on 3.5“ disk, German V 260100040 Software, linearization ESK on 3.5" disk, English V 260100041 Items included with supply:
The ESK electrical signal output is a two-wire transmitter with an output signal of 4...20 mA. It is non-linearized when supplied in the form of a retrofit kit but includes an EPROM allowing individual linearization. The potentiometers P0 for 4 mA und P100 for 20 mA are factory-set and should not be readjusted before linearization (see Section on “Adjustment"). Installation To retrofit, first unscrew the righthand housing cover. Mount the ESK with two Phillips screws M5. The ESK is initially non-linearized. To connect, refer to Sect. on Electrical connection M7. Linearization The linearization program ESK (Order No. see above) and an appropriate EPROM programming unit are required. The ESK is linearized in 4 steps: • Adjustment of the ESK to the float reference point (RP) = 4 mA • Recording of the measuring points • Linearization of the characteristic curve by means of a PC • Storage of linearization data in the EPROM Adjustment of the ESK to the reference point RP = 4 mA To adjust to the RP, fit the indicator with built-in ESK to the measuring section.
• Connect the ESK to a power unit with a series-connected measuring instrument.
• Remove cover of the ESK. • Use potentiometer RP to adjust the signal output value to
4 mA Caution: use only the supplied “non-ferromagnetic" screwdriver. Potentiometers for 4 mA (P0) and 20 mA (P100) are preset by the factory and should not be readjusted before linearization has been carried out.
11 12 8.12286.00
Rp = 4 mA
P0 P100
+ -
52 Installation and operating instructions
Recording of measuring points I = f (qV) I = signal output values [mA] qV = flow values of the original fluid or main scale marks The measuring points should be recorded in 10% steps or at the main scale marks to obtain the best possible linearization results. These points can be approached in two different ways:
• dynamic setting: setting of the flow value (original fluid or reference fluid established by conversion)
• static setting: • lifting the float until the pointer indicates the appropriate scale value. • Note: merely lifting the pointer is not sufficient.
Both the respective flow value and the associated signal output value should be noted down for all measuring points. After all measuring points have been recorded, actual linearization can then begin. Linearization of the characteristic curve by means of a PC The advice given on installation in the documentation pertaining to the ESK linearization program should be read through first, especially if the program is being used for the first time. The ESK linearization program is started up as follows: Transfer to the directory in which the program is located [e.g. cd ESK] Invoke with “ESK“. After the program start, enter the following data:
• Full-scale range (100% value) for the flowrate (e.g. 1000 for 1000 l/h) with SHIFT F1 100% value ENTER
• Comm. No. or TAG No., without separators or blanks (data are stored ultimately under this
designation) with SHIFT F2 Comm. No. ENTER
• Serial No. of the ESK, without separators or blanks (this number will be found on the side of the ESK module, e.g. 2930500) with
SHIFT F3 Serial No. ENTER
• The recorded measuring points for flow rate and signal output with F1 1st value(qV1) ENTER 1st value(l1) ENTER F2 2nd value(qV2) ENTER 2nd value(l2) ENTER and so on F10 10th value(qV10) ENTER 10th value(I10) ENTER
• Save linearization data on hard disk and/or floppy disk with ALT F8
• Generate and store a Prom File (a:\promfile.prm) with ALT F1
• Terminate program with ESC
M 7 indicator
H 250 Installation and operating instructions 53
Storing linearization data in the EPROM The ESK retrofit kit includes a clean EPROM for storage of the linearization data. When using a suitable programming device, e.g. Galep III, please take note of the directions given in the device manual. After programming, take out the EPROM and label it with the Comm. No. or TAG No. Sticker on “window” of the EPROM to protect against UV light Subsequently replace the adjustment EPROM located in the ESK with the new EPROM containing the linearization data. When plugging the EPROM into the ESK, ensure position is correct (Pin1 / notch)!
X X X X
Sticker with labelling
Notch / orientation Pin 1
Caution: The EPROM is a safety-relevant component. Therefore, use only the supplied EPROM or an equivalent type in a ceramic housing. Linearization is complete once the EPROM has been plugged in. Error messages during data input at the PC
• Full-scale range Entered flow value is greater than qVmax (flow: 100%); i.e. flow for 100%, or current flow value, is incorrect; i.e. entry needs to be corrected.
• Please enter a number Incorrect input format; only characters – no separators or blank spaces – may be entered; use a dot (.) as decimal separator.
• mA-Max I The entered value of current is greater than Imax (22.5 mA); i.e. input needs to be corrected.
• Minimum of 3 values Insufficient number of measuring points; a minimum of 3 points need to be linearized (recommended are 10 values).
• Must be: 100% Entered values are incorrect: flow from the last measuring point must be equal to the flow value for 100%.
• Values implausible Linearization curve does not show a steady rise; check individual measuring points.
• Existing file File cannot be stored because its name already exists; correct the entry (change file name).
• File not found File cannot be loaded; enter correct file name.
54 Installation and operating instructions
20.2 List of spares M7 indicator Order No. Housing cover with seal V027100110 Seal for housing cover 3122220100 Electrical signal output ESK V260100043 Electrical signal output ESK/Ex V260100042 Retrofit kits Limit switch K1 V260100094 Limit switch K2 V260100095 Pneumatic signal output V027100151
M 7 indicator
H 250 Installation and operating instructions 67
Maintenance The flowmeter does not normally require any maintenance when used for the designated purpose. However, cleaning is necessary if the measuring cone or float has been contaminated by the process. To clean, the flowmeter has to be removed from the pipeline. Note Reduce the pressure in pressurized pipes before removing the measuring section. In connection with devices used for measurement of aggressive media, take appropriate safety precautions in respect of residual fluids in the measuring section. Always use new gaskets when reinstalling the measuring section in the pipeline. If you need to return flowmeters for testing or repair to KROHNE If installed and operated in accordance with these Operating Instructions, your flowmeters will rarely present any problems. Should you nevertheless need to return an H 250 flowmeter for checkout or repair, please pay strict attention to the following points: Due to statutory regulations concerning protection of the environment and the health and safety of our personnel, KROHNE may only handle, test and repair returned flowmeters that have been in contact with fluids if it is possible to do so without risk to personnel and environment. This means that KROHNE can only service your unit if it is accompanied by a certificate in line with the following model confirming that the flowmeter is safe to handle. If the flowmeter has been operated with toxic, caustic, flammable or water-endangering products, you are kindly requested
• to check and ensure, if necessary by rinsing or neutralizing, that all cavities are free from such hazardous substances,
• to enclose a certificate with the flowmeter, confirming that it is safe to handle and stating the fluid used.
KROHNE regret that they cannot service your flowmeter unless it is accompanied by such a certificate.
68 H250 Installation and operating instructions
If you need to return a device for testing or repair to KROHNE
Your instrument has been carefully manufactured and tested. If installed and operated in accordance with these operating instructions, your instrument will rarely present any problems. Should you nevertheless need to return an instrument for checkout or repair, please pay strict attention to the following points: Due to statutory regulations concerning protection of the environment and safeguarding the health and safety of our personnel, KROHNE may only handle, test and repair returned instruments that have been in contact with liquids if it is possible to do so without risk to personnel and environment. This means that KROHNE can only service your instrument if it is accompanied by a certificate in line with the following model confirming that the instrument is safe to handle.
If the instrument has been operated with toxic, caustic, flammable or water-endangering liquids, you are kindly requested • to check and ensure, if necessary by rinsing
or neutralising, that all cavities in the instrument are free from such dangerous substances. (Directions on how you can find out whether the primary head has to be opened and flushed out or neutralised are obtainable from KROHNE on request.)
• to enclose a certificate with the instrument
confirming that the instrument is safe to handle and stating the liquid used.
KROHNE regret that they cannot service your instrument unless it is accompanied by such a certificate.
Specimen certificate Company: ……………………………………….. Address: …………………………………………… Department: …………………………………….. Name: ……………………………………………… Tel. No.: …………………………………………. Fax No.: ……………………………………………. The enclosed instrument Type: ………………………………………………………………………………………………………… KROHNE Order No. or Series No.: ………………………………………………………………………. has been operated with the following process liquid: …………………………………………………... Because this process liquid is water-endangering * / toxic * / caustic * / flammable * we have – checked that all cavities in the instrument are free from such substances * – flushed out and neutralised all cavities in the instrument * (* delete where not applicable) We confirm that there is no risk to man or environment through any residual liquid contained in the instrument.
Date: …………………………….. Signature: ………………………………………………………….. Company stamp: