IT Manuale di utilizzo EN User Manual EggTech MADE IN ITALY riversystems.it riversystems.it riversystems.it riversystems.it riversystems.it riversystems.it riversystems.it riversystems.it riversystems.it riversystems.it riversystems.it riversystems.it riversystems.it riversystems.it riversystems.it riversystems.it riversystems.it riversystems.it riversystems.it riversystems.it riversystems.it riversystems.it riversystems.it riversystems.it riversystems.it riversystems.it riversystems.it riversystems.it riversystems.it riversystems.it riversystems.it
Transcript
ITManuale di utilizzo
ENUser Manual
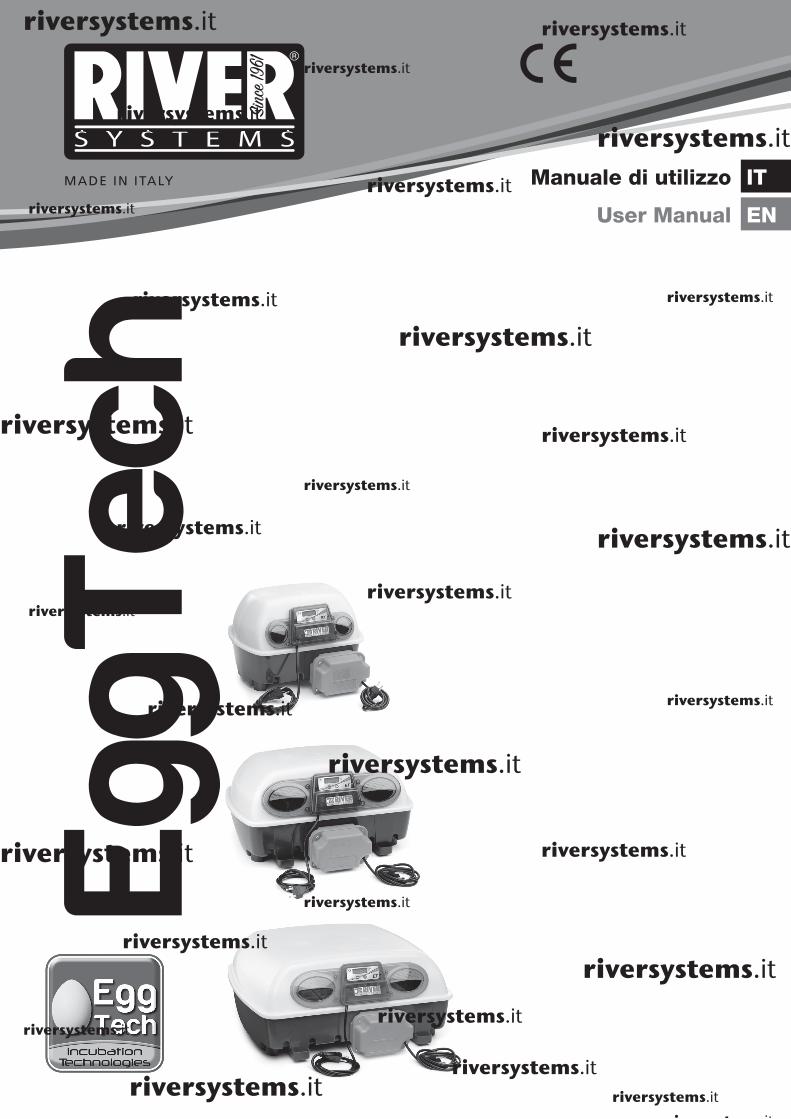
EggTech
MADE IN ITALY
riversystems.it
riversystems.it
riversystems.it
riversystems.it
riversystems.it
riversystems.it
riversystems.it
riversystems.it
riversystems.it
riversystems.it
riversystems.it
riversystems.it
riversystems.it
riversystems.it
riversystems.it
riversystems.it
riversystems.it
riversystems.it
riversystems.it
riversystems.it
riversystems.it
riversystems.it
riversystems.it
riversystems.it
riversystems.it
riversystems.it
riversystems.it
riversystems.it
riversystems.it
riversystems.it
riversystems.it
Thank you for purchasing this River Systems® product, the result of technological innovations and constant research!This manual provides all instructions and advices to properly use the incubator safely and efficiently. Read carefully all parts of this manual before using the machine in order to intervene correctly in the maintenance and to take full advantage of the specific characteristics of the incubator.
The descriptions and illustrations contained in this manual and in the flyer are not binding; photos and illustrations are only for illustrative purposes and refer to ET 24 or ET 49. River Systems srl therefore reserves the right to make changes at any time without obligation, to update the publication, to modify components and accessories for further improvement, or for any manufacturing and/or commercial reason to improve safety and functionality. The instructions, drawings, tables and all contents of this manual are technical in nature and reserved; for this reason no information can be communicated to third parties without written consent from its sole owner, River Systems srl.
In case of dispute the Italian text is the only valid one, and the place of jurisdiction is Padua (Italy).
DECLARATION OF CONFORMITY “CE”The undersigned Stefano Concina as legal representative of company River Systems® s.r.l. based in Via Marco Polo, 33 (ZI) 35011 Campodarsego, Padova (Italy), VAT code: 04289370282 declares that the incubator as per the label below
has been manufactured complying with the following standards:
DIRECTIVES: LVD 2014/35/EU, EMC 2014/30/EU, ROHS 2011/65/EUSTANDARDS: EN 60335-2-71:2003 + A1:2007, EN 60335-1:2012 + AC:2014 + A11:2014, EN 55014-1:2006 + A1:2009 + A2:2011, EN 61000-3-2:2014, EN 61000-3-3:2013, EN 55014-2:2015, EN 62233:2008
and therefore it conforms with the standards in force.
This declaration shall cease to be valid if the machine is modified without our prior approval.
Campodarsego, 23.03.2016
NOTICEBEFORE YOU PERFORM ANY OPERATION, READ CAREFULLY THIS INSTRUCTION MANUAL.
Additional information can be found in the attached flyer. Specifically, there you can find explanatory photos on the use of the incubator, exploded view drawing and spare parts. The flyer also shows examples of eggs, how to select the eggs to incubate, as well as other River Systems products.
1 Control panel 1a Digital display 1b LED “resistor on” 1c Temperature setting button ( ) 1d Temperature setting button ( )2 Electronic card3 Inspection window4 Incubator electric cord5 Lid
6 Bung on hole for connection to humidification system Nebula®
7 Resistor8 Resistor supports9 Spacer10 Fan impeller
- 14 -
INDEX
1. WARNINGS – IMPORTANT PRECAUTIONS............................................................................152. TECHNICAL SPECIFICATIONS AND DATA..............................................................................163. EGG SELECTION AND STORAGE FOR INCUBATION............................................................164. PREPARATION AND START-UP OF THE INCUBATOR.............................................................17 4A. CONTROLS.........................................................................................................................17 4B. USE....................................................................................................................................17 4C. TEMPERATURE SETTING AND ADJUSTMENT.....................................................................17 4D. INCUBATION OF PALMIPEDS-EGGS (GOOSE, DUCK, ETC.).............................................18 4E. INFORMATION FOR A CORRECT INCUBATION.................................................................185. PERIODIC CHECK OF EGGS DURING INCUBATION (CANDLING).........................................196. HATCHING AND BIRTH OF THE CHICK.................................................................................197. FIRST DAYS OF LIFE..............................................................................................................198. PROBLEMS THAT MAY ARISE DURING INCUBATION...........................................................209. MAINTENANCE CLEANING AND STORAGE AT THE END OF THE CYCLE...........................2110. REMOVAL OF THE EGG TURNING UNIT.................................................................................2111. WARRANTY..............................................................................................................................2112. DISPOSING OF THE UNIT.......................................................................................................2213. LIST OF THE SUBSTANCES THAT WOULD DAMAGE THE PLASTICS..................................244
ELEMENTS OF THE INCUBATOR (see attached flyer)
SPARE PARTS (see attached flyer)
EN
11 Motor12 Temperature probe13 Motor support14 Upper protection grill15 Complete lid16 Egg tray bar17 Egg tray element18 Complete egg tray19 Floor for hatching20 Incubator base21 Opening for filling of water basin22 Egg turning unit “Ovomatic” electric cord23 Egg turning unit “Ovomatic”
1. WARNINGS – IMPORTANT PRECAUTIONS When using household appliances it is important to follow some basic safety precautions, including the following ones:1. Use the appliance only when the wiring characteristics conform to the ones written in the present
manual and on the label affixed on the machine.2. While working, the incubator must be on a table, in a horizontal position, stable and secure. The table
must be at least 500 mm high.3. Do not place the incubator next to heat sources.4. Do not leave the appliance within children’s reach.5. This appliance is not to be used by people (children included) with reduced physical, sensorial or mental
capabilities, or with no experience and knowledge, or not properly instructed on the use of the incubator by a person in charge of their safety.
6. To prevent electric shocks, do not immerse the cover in water or other liquids. This is applicable also to the base in the version with egg turning unit art. 556M-1.
7. Do not use or store the appliance in rooms with corrosive, flammable or explosive substances.8. Before using the incubator and before plugging it in, check the external wiring. To disconnect the
machine unplug it from the socket.9. Do not use the incubator if the electric cord, the plug or the upper protection grill are damaged, or if the
incubator has been dropped or has been damaged in any way. Take the appliance to the closest service centre requesting a checkup or reparation.
10. If the message ErtH or ErP1 appears on the display, unplug the incubator and take it to the closest service centre.
11. Keep the incubator safe from hits.12. Do not open the cover of the electronic circuit or remove the fan guard (protection grill). ACCESS
TO THE CLOSED OR PROTECTED PARTS OF THE INCUBATOR IS ALLOWED ONLY IN CASE OF MAINTENANCE OPERATIONS BY AUTHORISED AND SPECIALISED PERSONNEL.
13. Unplug the incubator when not in use, before opening it (lifting the cover) and before cleaning it.14. Clean the machine only after the incubation process is finished.15. Do not use non original accessories. Accessories not recommended or not sold by the producer can
cause damage.16. Do not use the equipment outdoors.17. Do not leave the electric cord hanging on the edge of the table and ensure that it cannot be accidentally
entangled. The cord must be protected and kept out of reach of animals.18. User training should be recorded.19. KEEP THIS MANUAL FOR REFERENCE.
WARNING!IF THE FAN IMPELLER STOPS DURING THE INCUBATION, UNPLUG IMMEDIATELY THE INCUBATOR AND CONTACT THE SERVICE CENTRE!
NOTE:THE PRODUCER CANNOT BE HELD IN ANY WAY RESPONSIBLE FOR ANY ACCIDENT OR DAMAGE DUE TO THE IMPROPER USE OF THE APPLIANCE. THE GUARANTEE BECOMES VOID IN CASE OF IMPROPER USE.
DANGER!OPENING THE CLOSED OR PROTECTED PARTS OF THE INCUBATOR IS ALLOWED ONLY FOR MAINTENANCE OPERATIONS BY TRAINED AND AUTHORISED PERSONNEL.
WARNING:SINCE IT IS IMPOSSIBLE TO DESCRIBE ALL THE OPERATIONS THAT SHALL NOT OR CANNOT BE MADE, ANY OPERATION (NOT BEING ORDINARY OPERATIONS) THAT IS NOT SPECIFICALLY DESCRIBED IN THIS MANUAL IS TO BE CONSIDERED NOT POSSIBLE.
3. EGG SELECTION AND STORAGE FOR INCUBATION Eggs that have travelled can have hatching rates below 50% due to stress, vibrations, sudden temperature changes and asphyxiated embryos (where packaging fails to let the eggs breathe). Anyway, if you use eggs that have travelled, let them rest into an egg tray with their point downwards for at least 24 hours before incubating them.Choose eggs from parent stock that are well developed, well fed and healthy.Parent stock mustn’t be blood-related (males must come from a different source), interbreeding can produce eggs with weak embryos and would lead to more vulnerable chicks with poor health.Make sure that all birds are sexually mature, and preferably younger than 2-3 years old. It is also necessary to respect the correct ratios between males and females and to establish a suitable environment to respect the animals’ well-being.The embryo starts developing before incubation and therefore needs to be appropriately cared for. The hatching rate will decrease if the correct procedure is not followed. Here below are some rules that will help you to obtain eggs suitable for incubation:1. Collect the eggs often. Never store the eggs in the refrigerator.2. Do not incubate dirty eggs: contamination causes chick mortality. Never wash the eggs. If dirty, gently brush them with a dry abrasive sponge to clean.3. Keep the eggs in a cool room with temperature between +14°C and +18°C and humidity of about 65-75%.
- 16 -
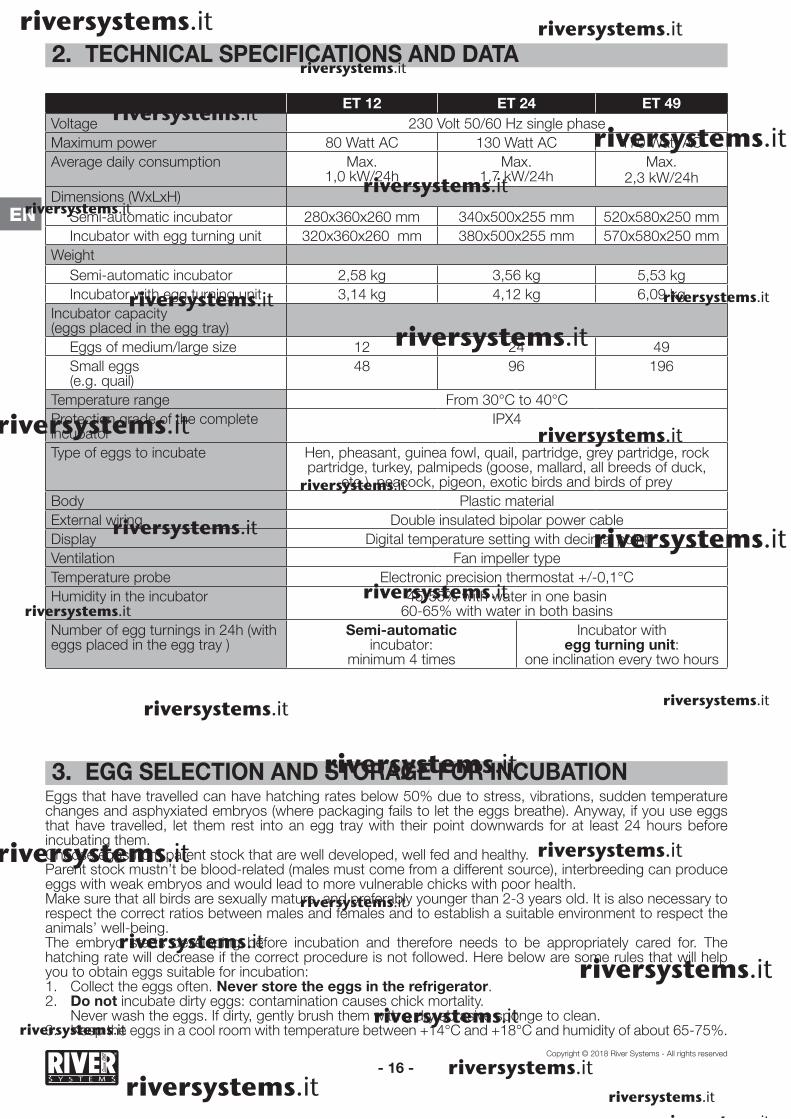
2. TECHNICAL SPECIFICATIONS AND DATA
ET 12 ET 24 ET 49Voltage 230 Volt 50/60 Hz single phaseMaximum power 80 Watt AC 130 Watt AC 170 Watt ACAverage daily consumption Max.
1,0 kW/24hMax.
1,7 kW/24hMax.
2,3 kW/24hDimensions (WxLxH)
Semi-automatic incubator 280x360x260 mm 340x500x255 mm 520x580x250 mmIncubator with egg turning unit 320x360x260 mm 380x500x255 mm 570x580x250 mm
WeightSemi-automatic incubator 2,58 kg 3,56 kg 5,53 kgIncubator with egg turning unit 3,14 kg 4,12 kg 6,09 kg
Incubator capacity (eggs placed in the egg tray)
Eggs of medium/large size 12 24 49Small eggs (e.g. quail)
48 96 196
Temperature range From 30°C to 40°CProtection grade of the complete incubator
IPX4
Type of eggs to incubate Hen, pheasant, guinea fowl, quail, partridge, grey partridge, rock partridge, turkey, palmipeds (goose, mallard, all breeds of duck,
etc.), peacock, pigeon, exotic birds and birds of preyBody Plastic materialExternal wiring Double insulated bipolar power cable Display Digital temperature setting with decimal pointVentilation Fan impeller typeTemperature probe Electronic precision thermostat +/-0,1°CHumidity in the incubator 45-55% with water in one basin
60-65% with water in both basinsNumber of egg turnings in 24h (with eggs placed in the egg tray )
It is essential to keep the eggs in the egg trays with the point downwards, covered with a dark breathable fabric.
4. Eggs are good for incubation from 2nd to 6th/7th day from laying. Incubating eggs older than 8 days considerably reduces the hatching rate, which will be close to zero in case of eggs kept for more than 15 days.
5. Eggs chosen for incubation should never be collected during the breeders’ moulting: often during these days eggs could be unfertilized.
6. Eggs chosen for incubation should never be collected when the animals suffer stress from high or low temperatures.
7. Choose eggs with normal shape (they should not be oblong, spherical, corrugated or misshapen in any way).
8. The egg shell must not be cracked, thin, broken, soft, tapered or blue spotted (old eggs).9. Allow the cold eggs (from storage temperature) to warm to room temperature gradually before putting
them into the incubator. A sudden heating from +14°C to +38°C would cause moisture on the egg shell leading to decreased hatching rates.
10. Avoid incubating eggs from different species. Do not add eggs after having started incubation.
4. PREPARATION AND START-UP OF THE INCUBATOR Put the incubator in a room where the temperature is between +20°C and +25°C. It should be comfortable, clean and well aired but devoid of air draughts. Make sure that the machine is not exposed to direct sun light or placed next to heat sources such as radiators, stoves, etc. We suggest you keep it at home.Do not use or store the incubator in a room where there are chemicals, poisonous, toxic or flammable substances, even in small concentrations, as they will negatively affect the development of embryos.Do not use the incubator where there is the risk of contact with water or other liquids.
4A - CONTROLSThe incubator has no controls: inserting the plugs activates respectively the electric resistor and the motors.
4B - USEOperation of the unit is simple: a) Place the incubator on a flat table, in a horizontal position, stable and secure. The table must be at least
500 mm high. The base of the incubator must rest directly on the table in order to prevent any obstruction of the ventilation holes.
b) Remove the lid and place it beside the machine keeping the grill downwards.c) Remove the floor for hatching from the base of the incubator, as it is necessary only for hatching (last 3
days). DO NOT LEAVE IT INSIDE THE MACHINE DURING INCUBATION! (photo A). NB: store the floor for hatching on a flat surface so that it will not deform (photo B).d) Make sure that the egg tray is in the correct position (on its supports) and that the cradle rows tilt freely in
the two directions (photo C and D).e) Fill the basin on the left with lukewarm preferably demineralized water. Pour the water into the corresponding
opening in the base of the incubator (photo E). Do this slowly, taking care not to allow the water to overflow from the basin: too much liquid would increase the humidity rate lowering the hatching percentage. The second basin (on the right) will be used only for the hatching phase. You can top up the basin(s) even when the incubator is working.
f) Replace the lid. Make sure that the edge of the lower box locates perfectly with the slot in the lid (photo F).
g) Insert the lid plug into a suitable socket. The fan impeller will start immediately, followed by the display that shows the temperature inside the incubator. The LED indicates that the resistor is working (photo G). It will remain illuminated until the set temperature is reached; it will then flash intermittently.
WARNING: IF THE FAN IMPELLER DOESN’T START, UNPLUG IMMEDIATELY THE INCUBATOR AND CONTACT THE SERVICE CENTRE.
The machine is pre-set at a temperature of 37,7°C, ideal for all species of birds. It is recommended you reset the temperature following the instructions here below.If the message ErtH or ErP1 appears on the display, unplug the incubator and take it to the closest service centre.
h) Run the machine empty (without eggs) for at least 2-3 hours in order to stabilize temperature and humidity.i) After ensuring that the machine functions correctly, unplug it and remove the lid placing it beside the
incubator. Gently place the eggs into the tray cradles with their point downwards. Replace the lid and reinsert the plug.INCUBATOR WITH EGG TURNING UNIT SEMI-AUTOMATIC INCUBATOR
Start the egg turning unit by plugging it into a suitable socket. The unit will start working. The egg tray executes one tilting every two hours (photo J: one hour after starting the unit – photo K: two hours later). Note: its movement is scarcely noticeable as it is very slow. Ensure that this actually happens.
Change the inclination of the eggs at least 4 times a day by tilting the handle placed in the front of the incubator. The handle must rest alternately at the 10 o’clock position to the left or the 2 o’clock position to the right (photo L). NEVER LEAVE THE HANDLE (AND THEREFORE THE EGGS) IN A VERTICAL POSITION (h. 12.00). Move the handle gently in order to avoid shocks to the eggs.
Do not cover the incubator or keep it in a box whilst in use. This would prevent the air exchange in the incubator, necessary for the embryo development, that takes place through the ventilation holes present in the base of the incubator and through the two inspection windows (photo M).The incubation cycle starts now. Mark the date on a calendar and follow the instructions shown in the table of section 4E “Information for a correct incubation”.Monitor the presence of water in the basin by looking into the opening every 24 hours (the level you can see inside the opening corresponds to the one in the basin). Fill up with clean and warm demineralized water (+35/40°C).Please beware that it is the water surface and not its quantity that generates humidity, therefore the quantity of water in the basin will not affect the humidity rate. The punctual and constant check for the presence of water (that provides the necessary humidity), will prevent the basin from running out of water.In case of power failure, surround the four sides of the incubator with bottles containing hot water and cover everything with a blanket. This allows the temperature within the incubator to be retained. Once the power is restored, immediately remove all of these items. Do not keep the incubator covered for long periods: low oxygen levels inside the incubator will drastically reduce the hatching rate.
4D - INCUBATION OF PALMIPEDS-EGGS (GOOSE, DUCK, ETC.)From day 10 of incubation to three days prior the foreseen hatching date, unplug the incubator, remove the lid and let the eggs cool for 15 minutes each day. Before putting the lid back on, spray a misting of water on the eggs.
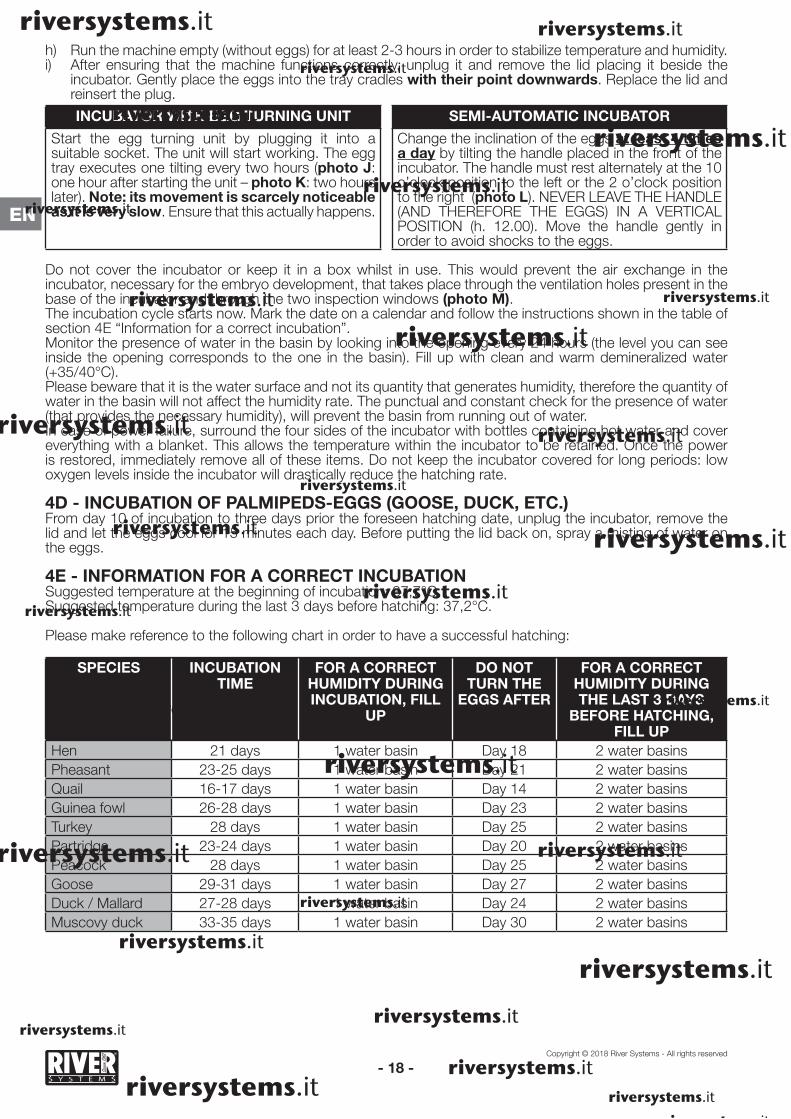
4E - INFORMATION FOR A CORRECT INCUBATION Suggested temperature at the beginning of incubation: 37,7°C.Suggested temperature during the last 3 days before hatching: 37,2°C.
Please make reference to the following chart in order to have a successful hatching:
SPECIES INCUBATION TIME
FOR A CORRECT HUMIDITY DURING INCUBATION, FILL
UP
DO NOT TURN THE
EGGS AFTER
FOR A CORRECT HUMIDITY DURING THE LAST 3 DAYS
BEFORE HATCHING, FILL UP
Hen 21 days 1 water basin Day 18 2 water basinsPheasant 23-25 days 1 water basin Day 21 2 water basinsQuail 16-17 days 1 water basin Day 14 2 water basinsGuinea fowl 26-28 days 1 water basin Day 23 2 water basinsTurkey 28 days 1 water basin Day 25 2 water basinsPartridge 23-24 days 1 water basin Day 20 2 water basinsPeacock 28 days 1 water basin Day 25 2 water basinsGoose 29-31 days 1 water basin Day 27 2 water basinsDuck / Mallard 27-28 days 1 water basin Day 24 2 water basinsMuscovy duck 33-35 days 1 water basin Day 30 2 water basins
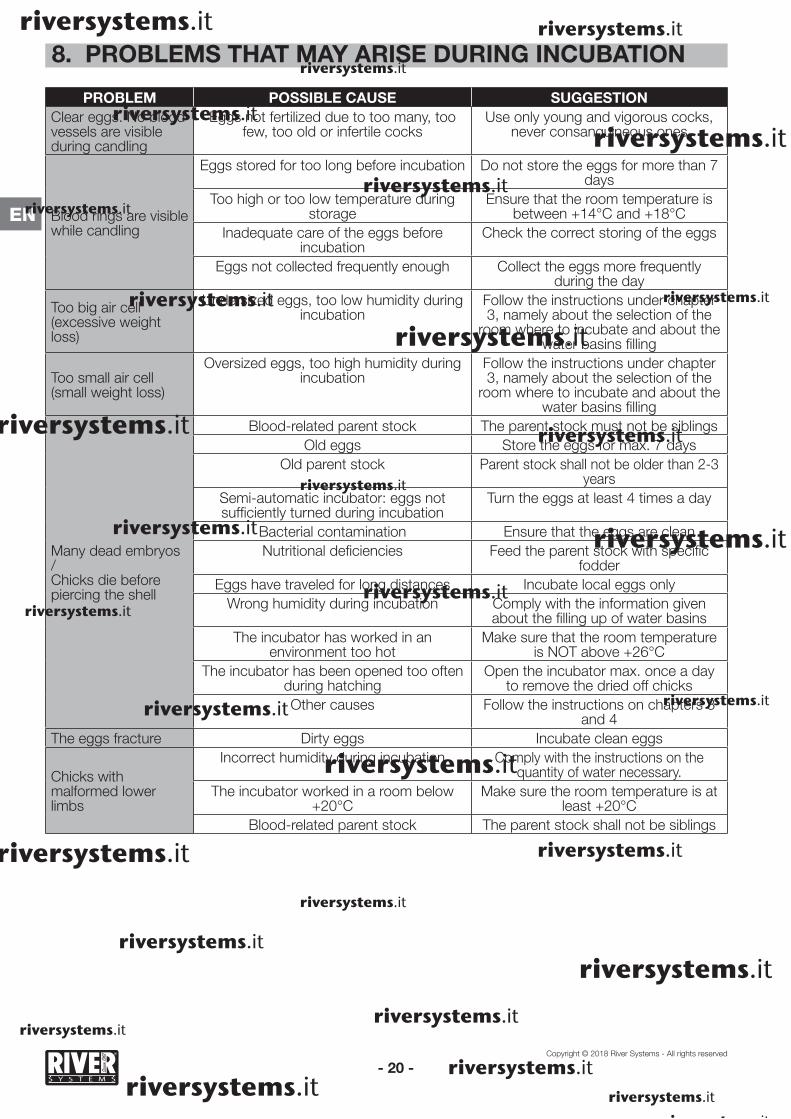
5. PERIODIC CHECK OF EGGS DURING INCUBATION (CANDLING) The candling is a technique that allows to check if the eggs are fertilised or not and to assess the development of the embryo. This operation should be carried out in a dark room, using a strong beam (e.g. an egg tester) on the egg. It shall be repeated three times during the incubation cycle, starting on the 8th/10th day, at intervals of about one week according to the type of egg. The unfertilised eggs or whose embryo is dead must be discarded.The candling is a delicate and complex operation that can lead to eliminating fertilized eggs by mistake. Since it is facultative, if you are not experienced we recommend proceeding directly with the incubation.
6. HATCHING AND BIRTH OF THE CHICKThe following operation is very delicate and should be executed quickly to prevent the eggs from cooling. We suggest that two people perform it in order to reduce the time as much as possible.Three days before the expected hatching date: a)
b) Remove the eggs from the swinging tray and place them gently on a blanket or on a specific egg tray. c) Remove the egg tray (foto O).
d) Put the supplied hatching grill floor (removed before the beginning of the incubation) into the base of the incubator, ensuring that its two plastic tongues cover the internal side of the water openings (photo P) so that the chicks will not fall into them and drown.
e) Distribute the eggs on the grill (photo Q) and close the lid.f) Fill both basins with lukewarm demineralized water.g) Set the temperature to 37,2°C (see instructions on page 17).
IMPORTANTDuring the last 3 days:- Do not turn the eggs. - Do not open the incubator unnecessarily as the necessary humidity and heat for the hatching would
escape, causing the death of the chick inside the shell. It is recommended to open the incubator only after having unplugged it, maximum once a day to extract the dried off chicks.
Keep the newborn chicks in the incubator for about 12 hours. They can stay inside the incubator for 3 days without drinking or eating without damage.Once the scheduled incubation days are over, let the incubator work for 2 or 3 days longer to allow any late chick to hatch.
7. FIRST DAYS OF LIFEPut the chicks in a draught-free room provided with the necessary heat and light where they can be fed and watered.TIPS: you can use a carton box big enough to contain a drinker and a feeder (min. 50x50 cm) and cover its bottom with newspaper sheets that will require daily renewal. For heating, you can hang a reflector with an infrared heat lamp at approximately 20-25 cm from the floor. The temperature can be adjusted by changing the height of the lamp.
- 19 -
INCUBATOR WITH EGG TURNING UNIT SEMI-AUTOMATIC INCUBATORStop the egg turning unit by unplugging it when the eggs are in a vertical position: this will facilitate the removal of the egg tray after the eggs have been taken out.
Remove the metal handle from the front of the in-cubator (photo N).
INCUBATOR WITH EGG TURNING UNIT INCUBATRICE SEMIAUTOMATICATo remove the egg tray simply lift it, pulling it out from the tongue of the egg turning unit. Note for the following cycle:Be careful to reinsert the egg tray correctly when you relocate it. If after several incubation cycles you notice that the slit - where the tongue of the egg turning unit is inserted in - is too large, swap the row with another of the tray.
Remove the egg tray. Note for the following cycle:Be careful to reinsert correctly both the egg tray and the handle when you relocate them.
9. MAINTENANCE CLEANING AND STORAGE AT THE END OF THE CYCLE Cleaning should only be undertaken with the power off and when the appliance is cold.Do not immerse electrical components in water to clean them.Dirt can cause damage to the appliance, to the incubation and to the people using it. Make sure both the inside and outside of the incubator are clean.At the end of the cycle, thoroughly clean the lower part of the incubator with neutral detergent first, then disinfect it with a chlorine-based disinfectant or some household bleach. Do not use alcohol or other chemical detergents. Thoroughly clean the lid exterior with a soft cloth, dampened with clean water and squeezed out.The external part of the protection grill of the lid should be cleaned with a soft cloth moistened with a chlorine-based disinfectant or some household bleach. Blow the internal part with compressed air to remove any feathers dropped by the chicks. During these operations the incubator and the egg turning unit must be unplugged.Do not use solvents, diluents and toxic chemicals. Please refer to the chart at the end of this manual for the list of the substances that would damage the plastic parts.Allow all parts to dry thoroughly. Place the incubator in a dry place, safe from hits and changes in temperature. Do not put any other object on top of it.Do not attempt maintenance on electrical components.
10. REMOVAL OF THE EGG TURNING UNIT If you need to remove the egg turning unit, follow the instructions below:a) Remove the egg tray (photo O). b) After having turn upside down the base of the incubator, remove the two screws at the bottom (photo R
and S).c) Remove the screw inside the base of the incubator (photo T).d) Remove the egg turning unit.
WARNING!DO NOT OPEN THE EGG TURNING UNIT BY REMOVING THE FOUR SCREWS SHOWN BY THE ARROWS (PHOTO U). OPENING THE UNIT WILL CAUSE ITS GUARANTEE TO BE NULL AND VOID.
11. WARRANTYThe warranty is valid only if the incubator is used for its intended use. Apart from the ordinary and extraordinary maintenance described in the CLEANING section, to be carried out as described, any repair or modification made to the appliance by the user or by unauthorized companies will cause the warranty to be null and void.The warranty does not cover any damage caused by incompetence or negligence in the use of the incubator, or by bad maintenance, or lack of it.The products we sell are covered by warranty at the following conditions:1. The warranty is valid for a period of twelve/twenty four (12/24) months: 12 months for firms, 24 months for
private individuals.2. The producer undertakes to replace at its discretion the malfunctioning or wrongly manufactured parts,
only after having thoroughly checked them and having verified the fault.3. Transport and/or shipment costs are always at the purchaser’s care.4. During the period of warranty, all replaced products become the producer’s property.5. Only the original buyer who fulfills the normal maintenance operations described in this manual can benefit
from this warranty. Our responsibility on the warranty expires when the original owner cedes the property of the product or if it has been modified.
6. The warranty does not cover damages caused by excessive stress, such as in case the product is used after having ascertained an anomaly or overheating of the motor, in case of improper use, and if the use and maintenance instructions are not observed.
7. The producer is not to be held responsible for any difficulty that may arise in the reselling or in the use in foreign countries, caused by regulations existing in the Country where the product was sold.
8. The faulty product or part of the product must be delivered to the producer for its replacement; if not, the replaced part will be charged to the buyer.
NOTICETo request the warranty, please indicate the following data:- Model- Purchase date (production of the purchase document)- Detailed description of the problem
NOTE:IF THE METHODS OF INTERVENTION AND USE OF THE EGG INCUBATOR DESCRIBED IN THIS DOCUMENTATION ARE NOT RESPECTED, THE WARRANTY WILL BECOME NULL AND VOID.
The warranty does not cover machine-stops, nonproduction, etc.
12. DISPOSING OF THE UNIT
In case of disposal, please make reference to the local rules for the disposal of electric and electronic appliances (Legislative Decree No. 151 dated 25/7/05 – 2002/96/CE – 2003/108/CE). Do not dispose of it with general household waste. Administrative and criminal penalties will be imposed for non-compliance with standards pertaining to the disposal of electrical waste.
NOTE:THE PRODUCER IS NOT TO BE HELD RESPONSIBLE FOR ANY DAMAGE CAUSED BY THE APPLIANCE, IF NOT USED IN ITS INTEGRAL VERSION, FOR ITS INTENDED USE AND FOLLOWING THE DIRECTIVES GIVEN IN THE PRESENT MANUAL. THE PRODUCER IS IN NO WAY RESPONSIBLE FOR ANY DAMAGE TO PERSONS OR THINGS RESULTING FROM THE SALVAGING OF PARTS OF THE APPLIANCE USED AFTER ITS DISMANTLING.
PRODUCER DATA AUTHORISED SERVICERiver Systems s.r.l.Via Marco Polo, 33 (ZI)35011 Campodarsego Padova (Italy)VAT code: 04289370282
For servicing on the product please refer to your reseller or:
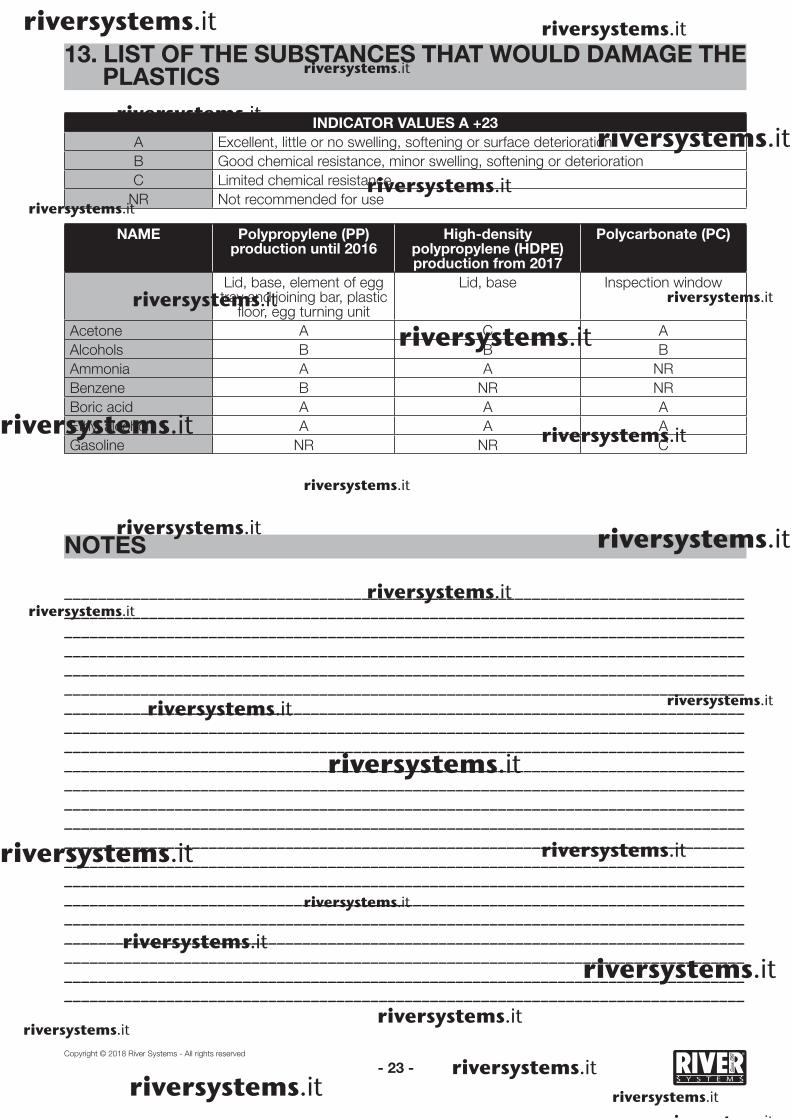
INDICATOR VALUES A +23A Excellent, little or no swelling, softening or surface deteriorationB Good chemical resistance, minor swelling, softening or deteriorationC Limited chemical resistance
NR Not recommended for use
NAME Polypropylene (PP)production until 2016
High-density polypropylene (HDPE)production from 2017
Polycarbonate (PC)
Lid, base, element of egg tray and joining bar, plastic
floor, egg turning unit
Lid, base Inspection window
Acetone A C AAlcohols B B BAmmonia A A NRBenzene B NR NRBoric acid A A AEthyl alcohol A A AGasoline NR NR C
13. LIST OF THE SUBSTANCES THAT WOULD DAMAGE THE PLASTICS