C o m m u n i t y E x p e r i e n c e D i s t i l l e d Get up and running with the highly customizable and powerful e-commerce solution, Magento Magento PHP Developer's Guide Second Edition Allan MacGregor Free Sample
Transcript
C o m m u n i t y E x p e r i e n c e D i s t i l l e d
Get up and running with the highly customizable and powerful e-commerce solution, Magento
Magento PHP Developer's GuideSecond EditionAllan M
acGregor
Magento PHP Developer's GuideSecond Edition
In the world of e-commerce, there are dozens of tools available to use in custom web design and development. Out of all of these options, Magento is the web's fastest growing e-commerce platform. Its architecture makes it possible to extend the functionalities using plugins, which are shared by the community, extensively.
This book is a practical guide packed with examples so developers can understand its fundamental concepts and then start developing and testing Magento code. The book starts by building your knowledge of Magento, providing you with the techniques and tools you require to start your fi rst Magento development. You will then learn to work with data collections and the EAV system, before gradually moving on to extending the frontend and backend. You will learn all about deploying and distributing custom modules.
This book will help you navigate your way around your fi rst Magento developments, helping you to avoid all of the most common headaches that new developers face when fi rst getting started.
Who this book is written forThis book is written for PHP developers who are familiar with frameworks such as Zend or CakePHP and want to start developing and working with Magento. No prior knowledge of Magento is required.
$ 44.99 US£ 28.99 UK
Prices do not include local sales tax or VAT where applicable
Allan MacGregor
What you will learn from this book
Build your very fi rst Magento extension
Deploy and distribute custom modules
Extend Magento's core functionality
Use development techniques and tools for Magento
Implement the design patterns that form Magento
Test Magento with different tools and frameworks
Magento PH
P Developer's G
uideSecond Edition
P U B L I S H I N GP U B L I S H I N G
community experience dist i l led
Visit www.PacktPub.com for books, eBooks, code, downloads, and PacktLib.
Free Sample
In this package, you will find: The author biography
A preview chapter from the book, Chapter 1 'Magento Fundamentals
for Developers'
A synopsis of the book’s content
More information on Magento PHP Developer's Guide Second Edition
About the Author
Allan MacGregor is a Magento Certifi ed Developer Plus with 4 years of Magento experience. He also has a certifi cation in Linux System Administration from IBM. He started working with Magento as a freelancer, looking for a better framework to build e-commerce solutions with, and he is now the Magento lead developer at Demac Media (http://www.demacmedia.com). At Demac Media, he has participated in building core solutions for a wide range of clients; this has given him the experience and knowledge to solve many Magento challenges. As part of an internal project at Demac Media, he worked on Triplecheck.io (http://www.triplecheck.io), a unique service to monitor and audit the code health of a Magento store. He's very passionate about software development in general. He is constantly working with new technologies and frameworks. You can also follow him on Twitter at http://www.twitter.com/allanmacgregor.
PrefaceThis book will help new and not-so-new developers understand and work with the Magento fundamental concepts and standard practices in order to develop and test Magento code.
This book is my attempt at writing a book that answers questions that many developers, including myself, had when we started to develop for Magento, for example, what is EAV? How does the ORM in Magento work? What are observers and events? What were the design patterns used to create Magento?
More importantly, it will also answer questions that many developers still have, for example, what is the standard to develop modules and extend the frontend and backend? How can I properly test my code? What is the best method to deploy and distribute custom modules?
What this book coversChapter 1, Magento Fundamentals for Developers, discusses Magento's fundamental concepts, such as the system architecture and the MVC implementation and its relation with the Zend Framework. All the concepts in this chapter will set the foundation for developers starting with Magento.
Chapter 2, ORM and Data Collections, introduces you to the Magento ORM system. It explains how collections and models are the bread and butter of everyday Magento development. We will learn how to properly work with data collections and the EAV system.
Chapter 3, Frontend Development, discusses the practical use of the skills and knowledge we have acquired so far, and we'll build a fully functional Magento module step by step. The custom module will allow readers to apply a variety of important concepts, such as working with collections, routing, sessions, and caching.
Preface
Chapter 4, Backend Development, extends on what we built in the previous chapter—that is, the frontend part of our module—and create an interface in the Magento backend for interaction with our application data. We will learn about extending the backend and the adminhtml theme, setting data sources, and controlling our extension behavior through confi guration.
Chapter 5, The Magento API, discusses the Magento API and how we can extend it to provide access to the custom data that we captured using our extension.
Chapter 6, Testing and Quality Assurance, teaches us the critical skills required to test our custom Magento modules; this is an integral part of development. We will learn about the different types of tests and the tools available for each particular type of test.
Chapter 7, Deployment and Distribution, discusses the multiple tools available in order to deploy our code to a production environment, and we will also learn how to properly pack our extensions for distribution through channels such as Magento Connect.
Appendix A, Hello Magento!, gives new developers a quick and easy-to-follow introduction to create our fi rst Magento extension.
Appendix B, Understanding and Setting Up Our Development Environment, discusses steps to set up a complete environment for Magento development with MySQL and Apache. Additionally, we will go over the tools available to facilitate the development, several IDEs, and version control systems.
[ 1 ]
Magento Fundamentals for Developers
In this chapter, we will cover the fundamental concepts of working with Magento. We will learn how Magento is structured, and go over the source of Magento's fl exibility, that is, its modular architecture.
Magento is a fl exible and powerful system. Unfortunately, this adds some level of complexity as well. Currently, a clean installation of Magento has around 20,000 fi les and over 1.2 million lines of code.
With all that power and complexity, Magento can be daunting for new developers; but don't worry. This chapter is designed to give new developers all the fundamental concepts and tools they need to use and extend Magento, and in the next chapter, we will dive deep into Magento models and data collection.
Zend Framework – the base of MagentoAs you probably know, Magento is the most powerful e-commerce platform in the market. What you might not know about Magento is that it is also an object-oriented (OO) PHP framework developed on top of Zend Framework.
Zend Framework 2 has been available since 2013, but Magento still relies on Zend Framework 1.11.
Magento Fundamentals for Developers
[ 2 ]
Here's how Zend's offi cial site describes the framework:
"We designed Zend Framework with simplicity in mind. To provide a lightweight, loosely-coupled component library simplifi ed to provide 4/5s of the functionality everyone needs and that lets you customize the other 20% to meet your specifi c business needs. By focusing on the most commonly needed functionality, we retain the simplifi ed spirit of PHP programming, while dramatically lower the learning curve – and your training costs – so developers get up-to-speed quickly."
What exactly is Zend Framework? Zend Framework is an OO framework developed on PHP that implements the Model-View-Controller (MVC) paradigm. When Varien (now Magento Inc.) started developing Magento, they decided to do it on top of Zend because of some components, some of which are as follows:
• Zend_Cache
• Zend_Acl
• Zend_Locale
• Zend_DB
• Zend_Pdf
• Zend_Currency
• Zend_Date
• Zend_Soap
• Zend_Http
In total, Magento uses around 15 different Zend components. The Varien library extends several of the Zend components mentioned before directly. For example, Varien_Cache_Core extends from Zend_Cache_Core.
Using Zend Framework, Magento was built with the following principles in mind:
• Maintainable: By using code pools to keep the core code separate from local customizations and third-party modules
• Upgradable: Magento modularity allows extensions and third-party modules to be updated independently from the rest of the system
• Flexible: Allows seamless customization and simplifies the development of new features
Chapter 1
[ 3 ]
Although experience of using Zend Framework or even understanding it are not requirements to develop Magento, having at least some basic understanding of the Zend components, usage, and interaction can be invaluable information as we start digging deeper into the core of Magento.
You can learn more about Zend Framework at http://framework.zend.com/.
The Magento folder structureThe Magento folder structure is slightly different from other MVC applications. Let's take a look at the directory tree, and each directory and its functions:
• app: This folder is the core of Magento and is subdivided into three important directories:
code: This contains all our application code divided into three code pools, namely core, community, and local
design: This contains all the templates and layouts for our application
locale: This contains all the translation and e-mail template files used for the store
• js: This contains all the JavaScript libraries that are used in Magento• media: This contains all the images and media files for our products and
CMS pages, as well the product image cache• lib: This contains all the third-party libraries used in Magento (such as Zend
and PEAR) as well as the custom libraries developed by Magento, which reside under the Varien and Mage directories
• skin: This contains all CSS, images and JavaScript used by the corresponding theme
• var: This contains our temporary data, such as the cache file, index lock files, sessions, import/export files, and in the case of the Enterprise edition, the full page cache folders
Magento Fundamentals for Developers
[ 4 ]
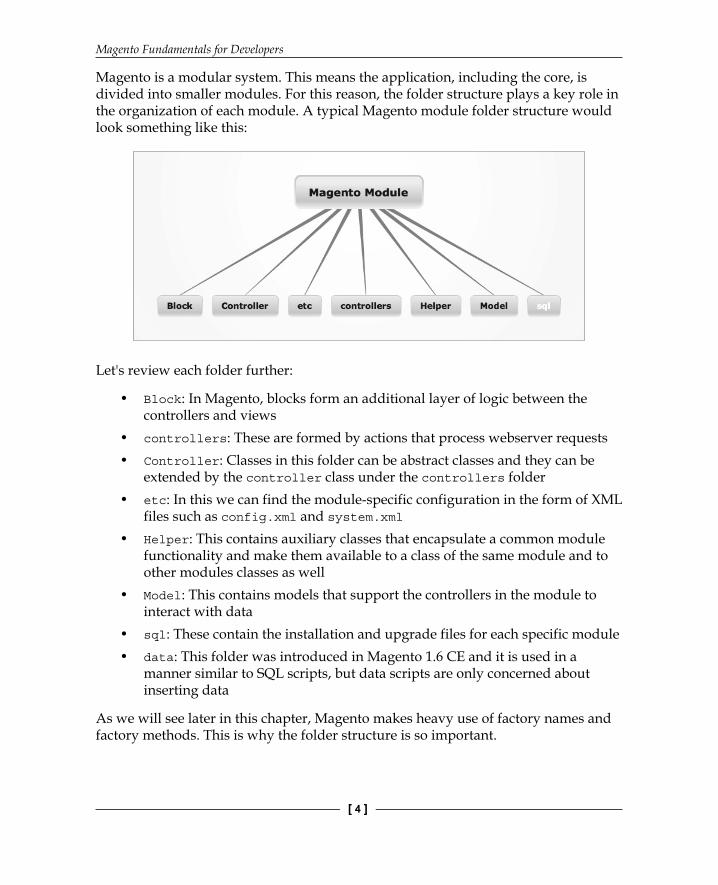
Magento is a modular system. This means the application, including the core, is divided into smaller modules. For this reason, the folder structure plays a key role in the organization of each module. A typical Magento module folder structure would look something like this:
Let's review each folder further:
• Block: In Magento, blocks form an additional layer of logic between the controllers and views
• controllers: These are formed by actions that process webserver requests• Controller: Classes in this folder can be abstract classes and they can be
extended by the controller class under the controllers folder• etc: In this we can find the module-specific configuration in the form of XML
files such as config.xml and system.xml• Helper: This contains auxiliary classes that encapsulate a common module
functionality and make them available to a class of the same module and to other modules classes as well
• Model: This contains models that support the controllers in the module to interact with data
• sql: These contain the installation and upgrade files for each specific module• data: This folder was introduced in Magento 1.6 CE and it is used in a
manner similar to SQL scripts, but data scripts are only concerned about inserting data
As we will see later in this chapter, Magento makes heavy use of factory names and factory methods. This is why the folder structure is so important.
Chapter 1
[ 5 ]
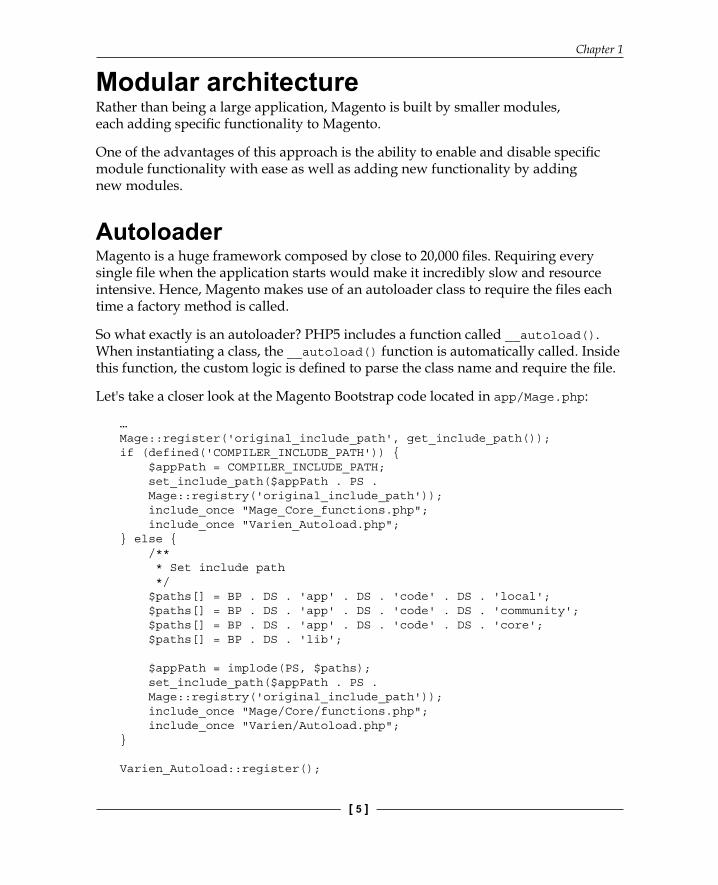
Modular architectureRather than being a large application, Magento is built by smaller modules, each adding specifi c functionality to Magento.
One of the advantages of this approach is the ability to enable and disable specifi c module functionality with ease as well as adding new functionality by adding new modules.
AutoloaderMagento is a huge framework composed by close to 20,000 fi les. Requiring every single fi le when the application starts would make it incredibly slow and resource intensive. Hence, Magento makes use of an autoloader class to require the fi les each time a factory method is called.
So what exactly is an autoloader? PHP5 includes a function called __autoload(). When instantiating a class, the __autoload() function is automatically called. Inside this function, the custom logic is defi ned to parse the class name and require the fi le.
Let's take a closer look at the Magento Bootstrap code located in app/Mage.php:
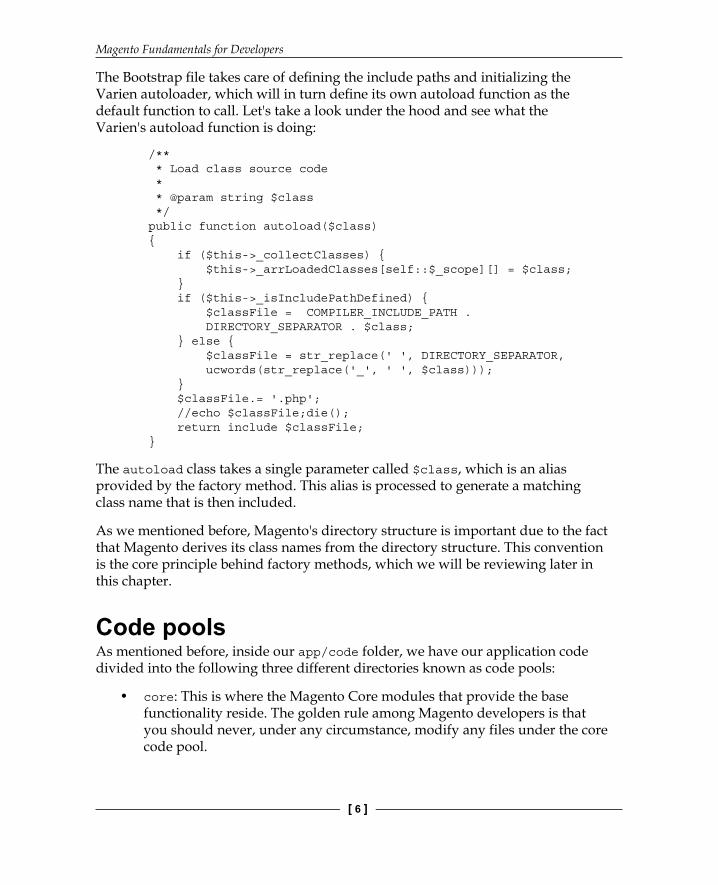
The Bootstrap fi le takes care of defi ning the include paths and initializing the Varien autoloader, which will in turn defi ne its own autoload function as the default function to call. Let's take a look under the hood and see what the Varien's autoload function is doing:
/** * Load class source code * * @param string $class */ public function autoload($class) { if ($this->_collectClasses) { $this->_arrLoadedClasses[self::$_scope][] = $class; } if ($this->_isIncludePathDefined) { $classFile = COMPILER_INCLUDE_PATH . DIRECTORY_SEPARATOR . $class; } else { $classFile = str_replace(' ', DIRECTORY_SEPARATOR, ucwords(str_replace('_', ' ', $class))); } $classFile.= '.php'; //echo $classFile;die(); return include $classFile; }
The autoload class takes a single parameter called $class, which is an alias provided by the factory method. This alias is processed to generate a matching class name that is then included.
As we mentioned before, Magento's directory structure is important due to the fact that Magento derives its class names from the directory structure. This convention is the core principle behind factory methods, which we will be reviewing later in this chapter.
Code poolsAs mentioned before, inside our app/code folder, we have our application code divided into the following three different directories known as code pools:
• core: This is where the Magento Core modules that provide the base functionality reside. The golden rule among Magento developers is that you should never, under any circumstance, modify any files under the core code pool.
Chapter 1
[ 7 ]
• community: This is the location where third-party modules are placed. They are either provided by third parties or installed through Magento Connect.
• local: This is where all the modules and code developed specifically for this instance of Magento reside.
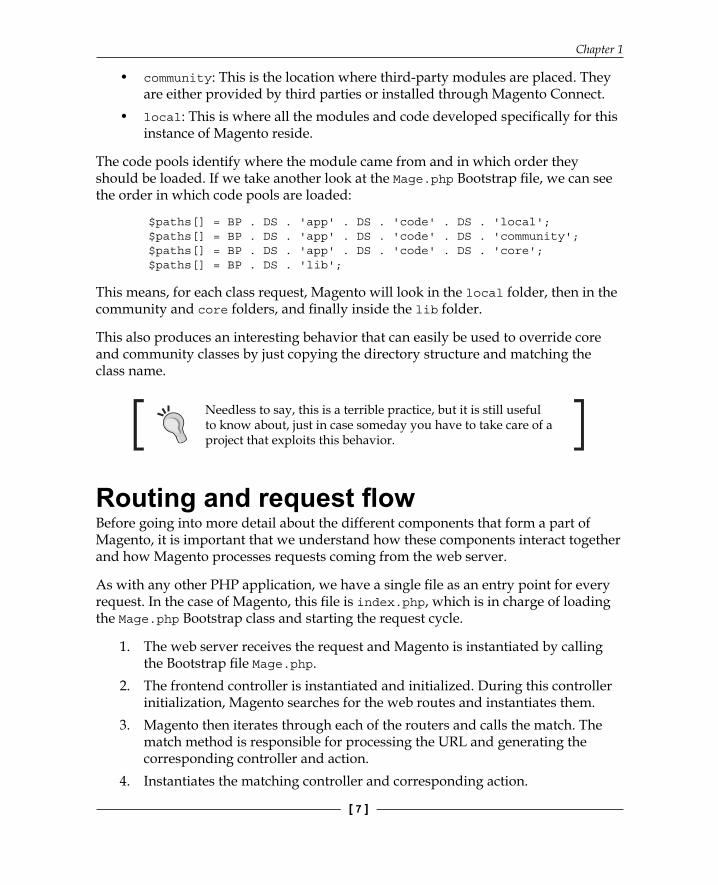
The code pools identify where the module came from and in which order they should be loaded. If we take another look at the Mage.php Bootstrap fi le, we can see the order in which code pools are loaded:
This means, for each class request, Magento will look in the local folder, then in the community and core folders, and fi nally inside the lib folder.
This also produces an interesting behavior that can easily be used to override core and community classes by just copying the directory structure and matching the class name.
Needless to say, this is a terrible practice, but it is still useful to know about, just in case someday you have to take care of a project that exploits this behavior.
Routing and request fl owBefore going into more detail about the different components that form a part of Magento, it is important that we understand how these components interact together and how Magento processes requests coming from the web server.
As with any other PHP application, we have a single fi le as an entry point for every request. In the case of Magento, this fi le is index.php, which is in charge of loading the Mage.php Bootstrap class and starting the request cycle.
1. The web server receives the request and Magento is instantiated by calling the Bootstrap fi le Mage.php.
2. The frontend controller is instantiated and initialized. During this controller initialization, Magento searches for the web routes and instantiates them.
3. Magento then iterates through each of the routers and calls the match. The match method is responsible for processing the URL and generating the corresponding controller and action.
4. Instantiates the matching controller and corresponding action.
Magento Fundamentals for Developers
[ 8 ]
Routers are especially important in this process. Router objects are used by the frontend controller to match a requested URL (route) to a module controller and action. By default, Magento comes with the following routers:
• Mage_Core_Controller_Varien_Router_Admin
• Mage_Core_Controller_Varien_Router_Standard
• Mage_Core_Controller_Varien_Router_Cms
• Mage_Core_Controller_Varien_Router_Default
The action controller will then load and render the layout, which in turn will load the corresponding blocks, models, and templates.
Let's analyze how Magento will handle a request to a category page. We will use http://localhost/catalog/category/view/id/10 as an example. The Magento URI comprises three parts, namely FrontName/ControllerName/ActionName.
Hence, for our example URL, the breakdown is as follows:
• FrontName: This is a catalog• ControllerName: This is a category• ActionName: This is a view
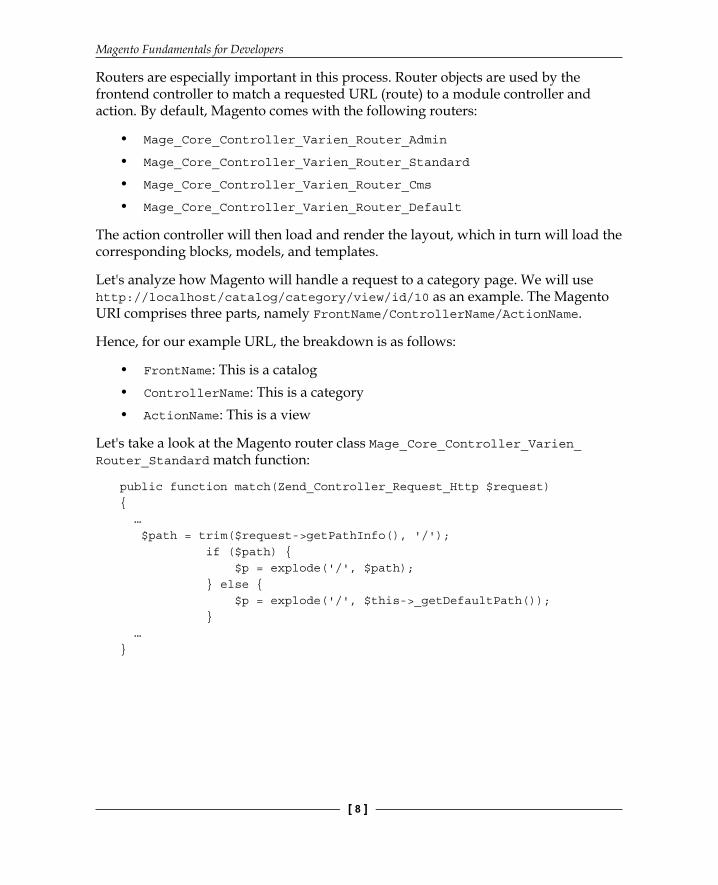
Let's take a look at the Magento router class Mage_Core_Controller_Varien_Router_Standard match function:
public function match(Zend_Controller_Request_Http $request){ … $path = trim($request->getPathInfo(), '/'); if ($path) { $p = explode('/', $path); } else { $p = explode('/', $this->_getDefaultPath()); } …}
Chapter 1
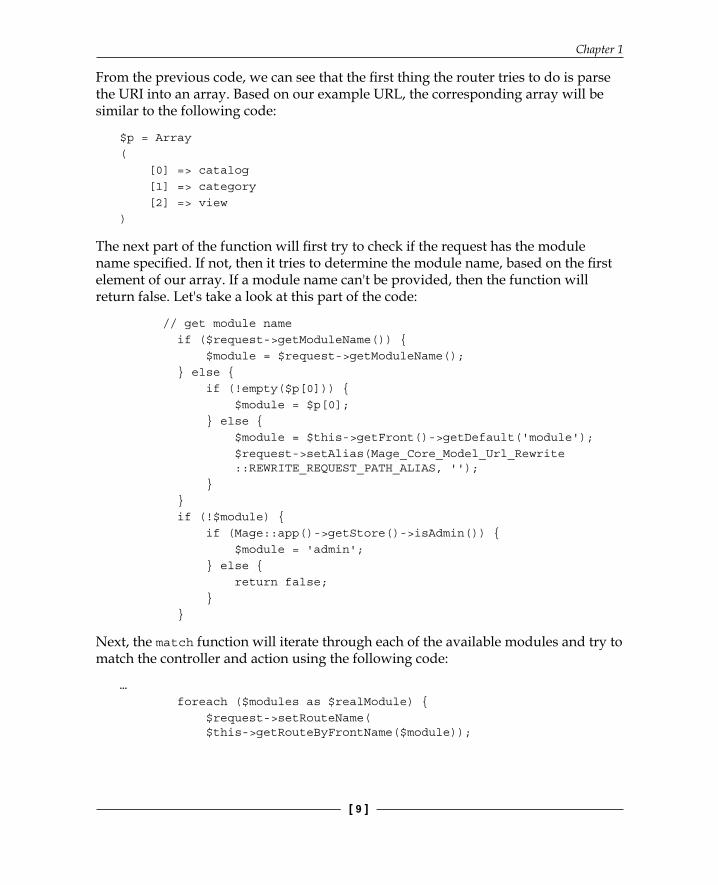
[ 9 ]
From the previous code, we can see that the fi rst thing the router tries to do is parse the URI into an array. Based on our example URL, the corresponding array will be similar to the following code:
The next part of the function will fi rst try to check if the request has the module name specifi ed. If not, then it tries to determine the module name, based on the fi rst element of our array. If a module name can't be provided, then the function will return false. Let's take a look at this part of the code:
// get module name if ($request->getModuleName()) { $module = $request->getModuleName(); } else { if (!empty($p[0])) { $module = $p[0]; } else { $module = $this->getFront()->getDefault('module'); $request->setAlias(Mage_Core_Model_Url_Rewrite ::REWRITE_REQUEST_PATH_ALIAS, ''); } } if (!$module) { if (Mage::app()->getStore()->isAdmin()) { $module = 'admin'; } else { return false; } }
Next, the match function will iterate through each of the available modules and try to match the controller and action using the following code:
… foreach ($modules as $realModule) { $request->setRouteName( $this->getRouteByFrontName($module));
Magento Fundamentals for Developers
[ 10 ]
// get controller name if ($request->getControllerName()) { $controller = $request->getControllerName(); } else { if (!empty($p[1])) { $controller = $p[1]; } else { $controller = $front->getDefault('controller'); $request->setAlias( Mage_Core_Model_Url_Rewrite ::REWRITE_REQUEST_PATH_ALIAS, ltrim($request->getOriginalPathInfo(), '/') ); } }
// get action name if (empty($action)) { if ($request->getActionName()) { $action = $request->getActionName(); } else { $action = !empty($p[2]) ? $p[2] : $front->getDefault('action'); } }
//checking if this place should be secure $this->_checkShouldBeSecure($request, '/'.$module.'/'.$controller.'/'.$action);
$controllerClassName = $this->_validateControllerClassName($realModule, $controller); if (!$controllerClassName) { continue; }
Chapter 1
[ 11 ]
// instantiate controller class $controllerInstance = Mage ::getControllerInstance($controllerClassName, $request, $front->getResponse());
if (!$controllerInstance->hasAction($action)) { continue; }
$found = true; break; }...
Now that looks like an awful lot of code! Let's break it down further. The fi rst part of the loop will check if the request has a controller name. If it is not set, it will check our parameter array's ($p) second value and try to determine the controller name. Then, it will try to do the same for the action name.
If we get this far in the loop, we should have a module name, a controller name, and an action name. Magento will now use these to try and get matched with the Controller class name by calling the following code:
This function will not only generate a matching class name, but it will also validate its existence. In our example case, this function should return Mage_Catalog_CategoryController.
As we now have a valid class name, we can proceed to instantiate our controller object. You may probably notice that so far we haven't done anything with our action yet, and that's precisely the next step on our loop.
Now, our instantiated controller comes with a very handy function called hasAction(). In essence, all this function does is call a PHP function called is_callable(), which will check if our current controller has a public function matching the action name. In our case this will be viewAction().
Magento Fundamentals for Developers
[ 12 ]
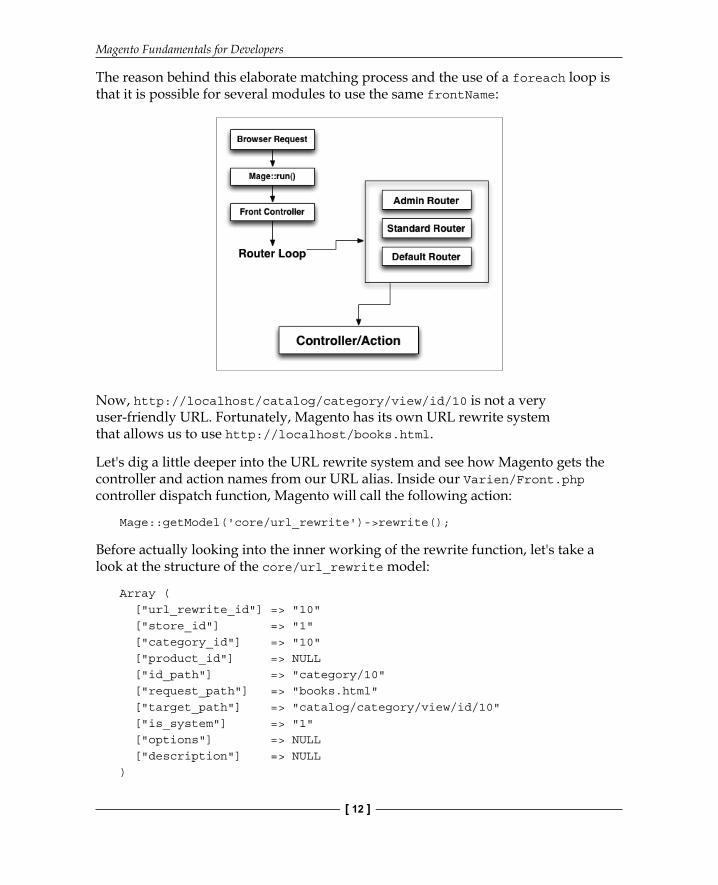
The reason behind this elaborate matching process and the use of a foreach loop is that it is possible for several modules to use the same frontName:
Now, http://localhost/catalog/category/view/id/10 is not a very user-friendly URL. Fortunately, Magento has its own URL rewrite system that allows us to use http://localhost/books.html.
Let's dig a little deeper into the URL rewrite system and see how Magento gets the controller and action names from our URL alias. Inside our Varien/Front.php controller dispatch function, Magento will call the following action:
Mage::getModel('core/url_rewrite')->rewrite();
Before actually looking into the inner working of the rewrite function, let's take a look at the structure of the core/url_rewrite model:
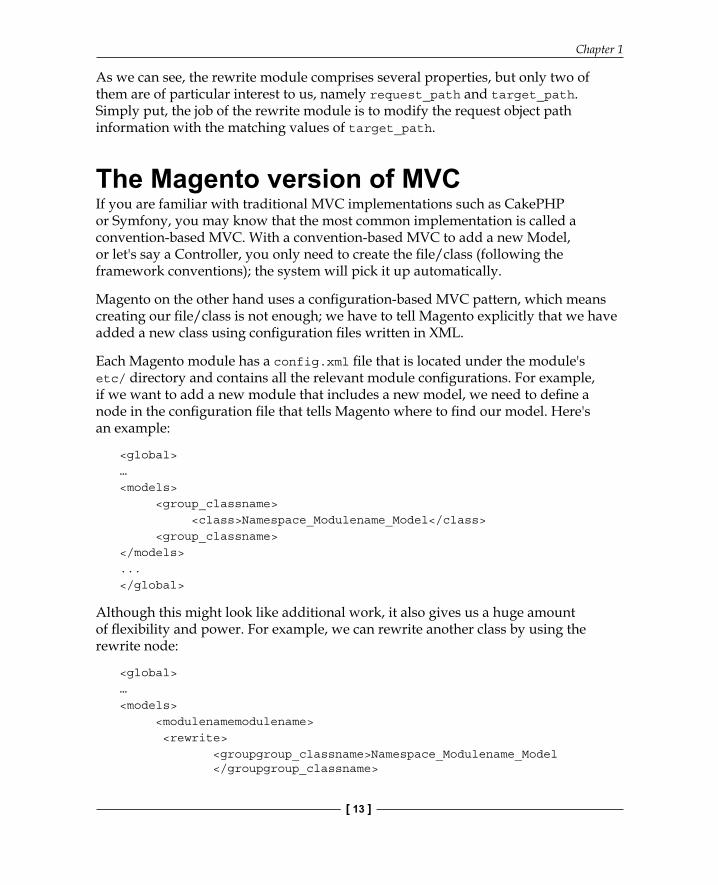
As we can see, the rewrite module comprises several properties, but only two of them are of particular interest to us, namely request_path and target_path. Simply put, the job of the rewrite module is to modify the request object path information with the matching values of target_path.
The Magento version of MVCIf you are familiar with traditional MVC implementations such as CakePHP or Symfony, you may know that the most common implementation is called a convention-based MVC. With a convention-based MVC to add a new Model, or let's say a Controller, you only need to create the fi le/class (following the framework conventions); the system will pick it up automatically.
Magento on the other hand uses a confi guration-based MVC pattern, which means creating our fi le/class is not enough; we have to tell Magento explicitly that we have added a new class using confi guration fi les written in XML.
Each Magento module has a config.xml fi le that is located under the module's etc/ directory and contains all the relevant module confi gurations. For example, if we want to add a new module that includes a new model, we need to defi ne a node in the confi guration fi le that tells Magento where to fi nd our model. Here's an example:
Although this might look like additional work, it also gives us a huge amount of fl exibility and power. For example, we can rewrite another class by using the rewrite node:
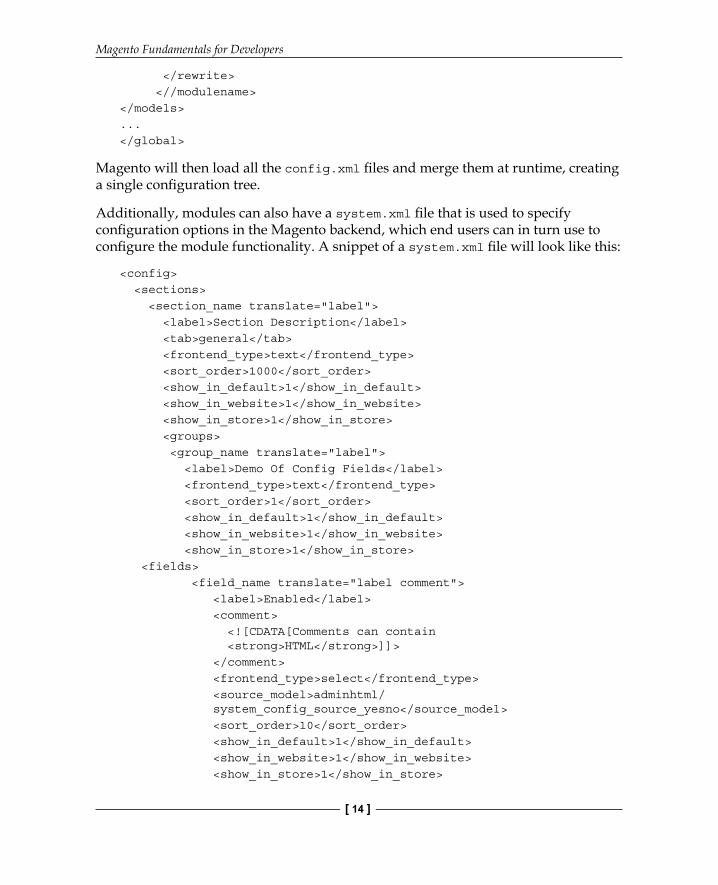
Magento will then load all the config.xml fi les and merge them at runtime, creating a single confi guration tree.
Additionally, modules can also have a system.xml fi le that is used to specify confi guration options in the Magento backend, which end users can in turn use to confi gure the module functionality. A snippet of a system.xml fi le will look like this:
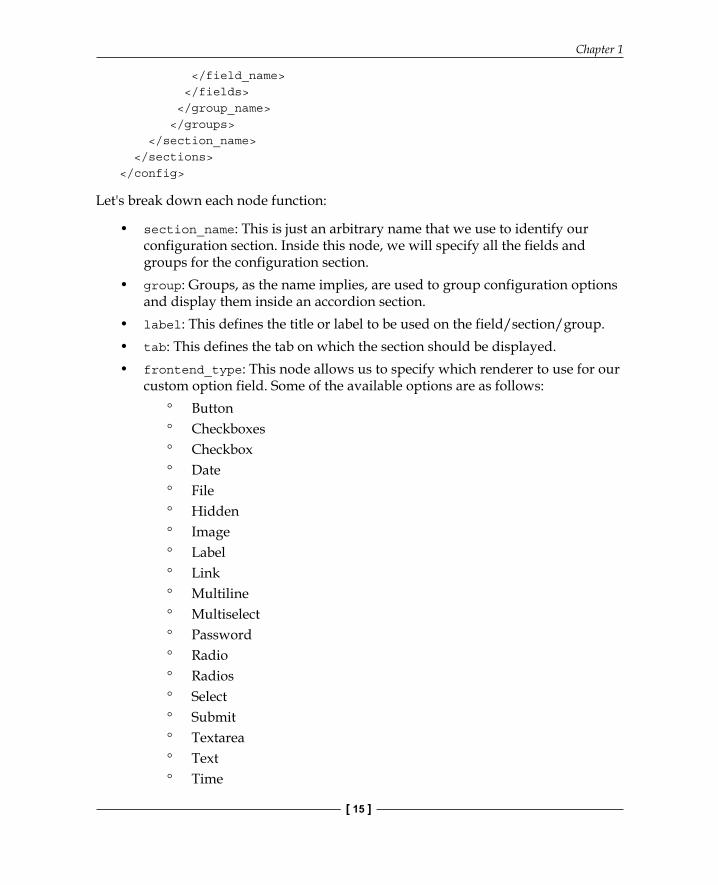
• section_name: This is just an arbitrary name that we use to identify our configuration section. Inside this node, we will specify all the fields and groups for the configuration section.
• group: Groups, as the name implies, are used to group configuration options and display them inside an accordion section.
• label: This defines the title or label to be used on the field/section/group.• tab: This defines the tab on which the section should be displayed.• frontend_type: This node allows us to specify which renderer to use for our
custom option field. Some of the available options are as follows: Button Checkboxes Checkbox Date File Hidden Image Label Link Multiline Multiselect Password Radio Radios Select Submit Textarea Text Time
Magento Fundamentals for Developers
[ 16 ]
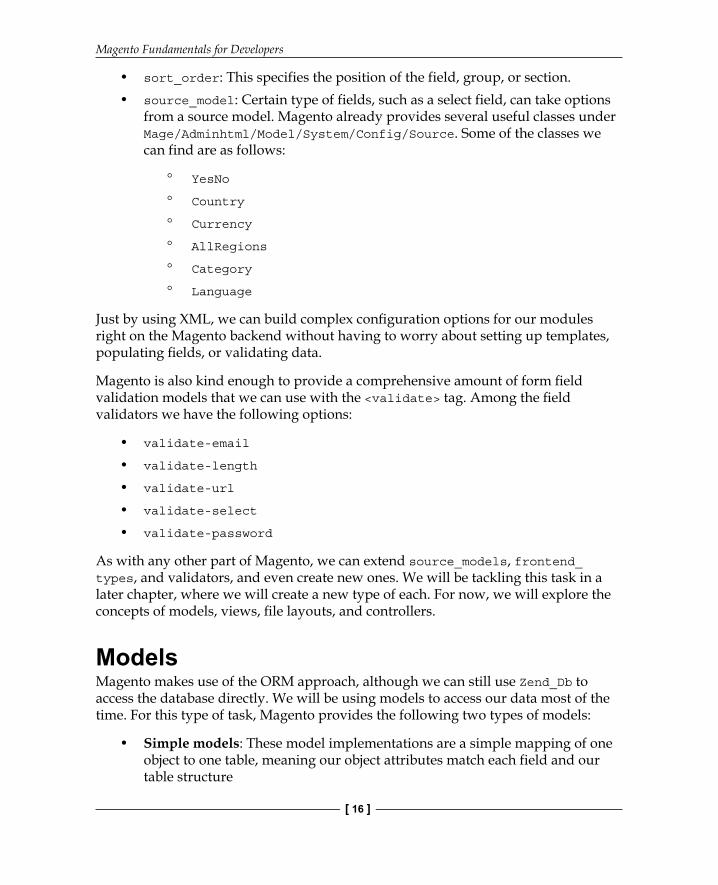
• sort_order: This specifies the position of the field, group, or section.• source_model: Certain type of fields, such as a select field, can take options
from a source model. Magento already provides several useful classes under Mage/Adminhtml/Model/System/Config/Source. Some of the classes we can find are as follows:
YesNo
Country
Currency
AllRegions
Category
Language
Just by using XML, we can build complex confi guration options for our modules right on the Magento backend without having to worry about setting up templates, populating fi elds, or validating data.
Magento is also kind enough to provide a comprehensive amount of form fi eld validation models that we can use with the <validate> tag. Among the fi eld validators we have the following options:
• validate-email
• validate-length
• validate-url
• validate-select
• validate-password
As with any other part of Magento, we can extend source_models, frontend_types, and validators, and even create new ones. We will be tackling this task in a later chapter, where we will create a new type of each. For now, we will explore the concepts of models, views, fi le layouts, and controllers.
ModelsMagento makes use of the ORM approach, although we can still use Zend_Db to access the database directly. We will be using models to access our data most of the time. For this type of task, Magento provides the following two types of models:
• Simple models: These model implementations are a simple mapping of one object to one table, meaning our object attributes match each field and our table structure
Chapter 1
[ 17 ]
• Entity Attribute Value (EAV) models: These type of models are used to describe entities with a dynamic number of attributes
Magento splits the model layer in two parts: a model handling the business logic and a resource handling the database interaction. This design decision allows Magento to support multiple database platforms without having to change any of the logic inside the models.
Magento ORM uses one of PHP's magic class methods to provide dynamic access to object properties. In the next chapter, we will look into models, the Magento ORM, and the data collections in more detail.
Magento models don't necessarily have to be related to any type table in the database or an EAV entity. Observers, which we will be reviewing later, are perfect examples of these type of Magento models.
ViewsThe view layer is one of the areas where Magento truly sets itself apart from other MVC applications. Unlike traditional MVC systems, Magento's view layer is divided into three different components:
• Layouts: These are XML files that define block structures and properties, such as name and which template file to use. Each Magento module has its own set of layout files.
• Blocks: These are used in Magento to reduce the burden on the controller by moving most of the logic into blocks.
• Templates: These are PHTML files that contain the HTML code and PHP tags required.
Layouts give the Magento frontend an amazing amount of fl exibility. Each module has its own layout XML fi les that tell Magento what to include and render on each page request. By using the layouts, we can move, add, or remove blocks from our store, without worrying about changing anything else other than our XML fi les.
Dissecting a layout fi leLet's examine one of the Magento core layout fi les, in this case, the catalog.xml fi le:
<block type="core/template" name="left. permanent.callout" template="callouts/left_col.phtml"> <action method="setImgSrc"><src>images/media/ col_left_callout.jpg</src></action> <action method="setImgAlt" translate="alt" module= "catalog"><alt>Our customer service is available 24/7. Call us at (555) 555-0123.</alt></action> <action method="setLinkUrl"><url>checkout/cart </url></action> </block> </reference> <reference name="right"> <block type="catalog/product_compare_sidebar" before="cart_sidebar" name="catalog.compare.sidebar" template="catalog/product/compare/sidebar.phtml"/> <block type="core/template" name=" right.permanent.callout" template= "callouts/right_col.phtml"> <action method="setImgSrc"><src>images/media/ col_right_callout.jpg</src></action> <action method="setImgAlt" translate="alt" module="catalog"><alt>Visit our site and save A LOT!</alt></action> </block> </reference> <reference name="footer_links"> <action method="addLink" translate="label title" module="catalog" ifconfig="catalog/seo/site_map"> <label>Site Map</label><url helper="catalog/map/getCategoryUrl" /><title>Site Map</title></action> </reference> <block type="catalog/product_price_template" name="catalog_product_price_template" /></default>
Layout blocks comprise three main XML nodes:
• Handle: Each page request will have several unique handles. The layout uses these handles to tell Magento which blocks to load and render on a per page basis. The most commonly used handles are the default handle and the [frontname]_[controller]_[action] handle.
• The default handle is especially useful to set global blocks, for example, adding CSS or JavaScript to all pages on the header block.
Chapter 1
[ 19 ]
• Reference: A <reference> node is use to make references to a block. It is useful for the specification of nested blocks or modifying an already existing block. In our example, we can see how a new child blocks being specified inside <reference name="left">.
• Block: The <block> node is used to load our actual blocks. Each block node can have the following properties:
type: This is the identifier for the actual block class. For example, catalog/product_list makes reference to the Mage_Catalog_Block_Product_List.
name: This is the name used by other blocks to make a reference to this block.
before/after: These properties can be used to position the blocks relative to other block position. Both properties can use a hyphen as value to specify if the module should appear at the very top or the very bottom.
template: This property determines the .phtml template file that will be used to render the block.
action: Each block type has specific actions that affect the frontend functionality. For instance, the page/html_head block has actions to add CSS and js (addJs and addCss).
as: Thi is used to specify the unique identifier that we will be using to call the block from the template. For example, calling a child block by using getChildHtml('block_name').
Blocks are a new concept that Magento implements in order to reduce the controller load. They are basically data resources that communicate directly with the models that manipulate the data if needed and then pass it to the views.
Finally, we have our .phtml fi les. Templates contain HTML and PHP tags and are in charge of formatting and displaying the data from our models. Let's take a look at a snippet from the product view template:
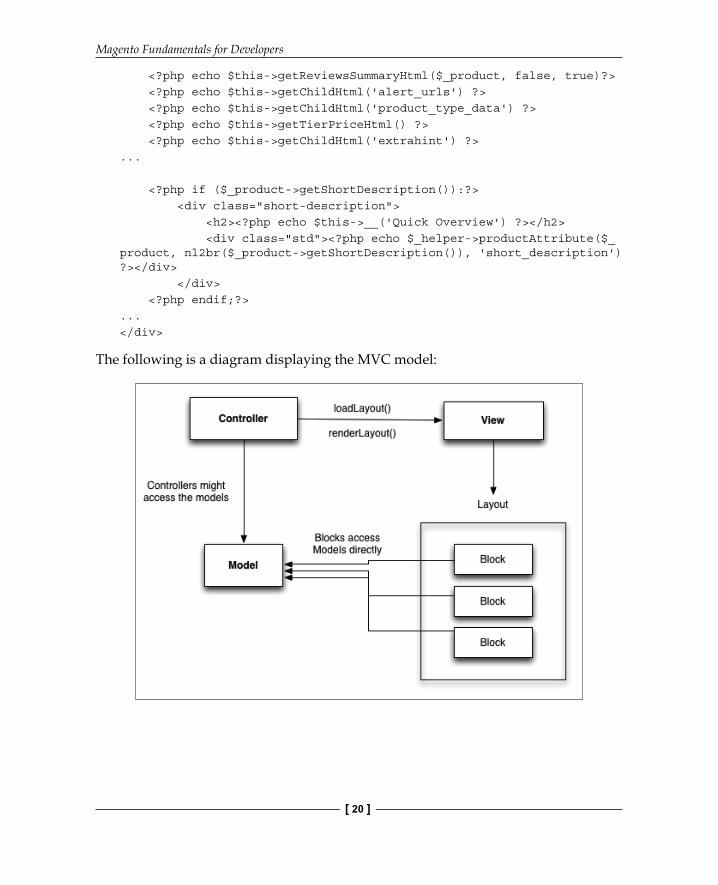
The following is a diagram displaying the MVC model:
Chapter 1
[ 21 ]
ControllersThe Magento MVC controllers are designed to be thin controllers. Thin controllers have little business logic and are mostly used to drive the application requests. A basic Magento controller action will just load and render the layout:
public function viewAction() { $this->loadLayout(); $this->renderLayout(); }
From here, it is the job of the blocks to handle the display logic to get the data from our models, prepare the data, and send it to the views.
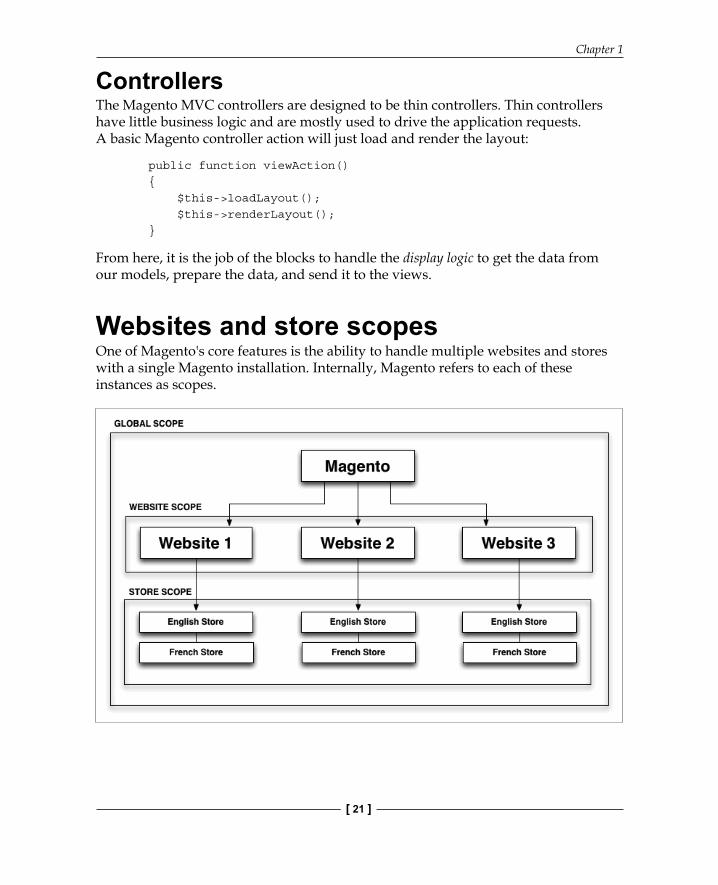
Websites and store scopesOne of Magento's core features is the ability to handle multiple websites and stores with a single Magento installation. Internally, Magento refers to each of these instances as scopes.
Magento Fundamentals for Developers
[ 22 ]
Values for certain elements such as products, categories, attributes, and confi guration are scope-specifi c and can differ on different scopes. This gives Magento tremendous fl exibility. For example, a product can be set up on two different websites with different prices but still share the rest of the attribute confi guration.
As developers, one of the areas where we will be using scopes the most is when working with confi guration. The different confi guration scopes available in Magento are as follows:
• Global: As the name implies, this applies across all scopes.• Website: These are defined by a domain name and are composed by
one or more stores. Websites can be set up to share customer data or be completely isolated.
• Store: These are used to manage products and categories and to group store views. Stores also have a root category that allows us to have separated catalogs per store.
• Store view: By using store views, we can set up multiple languages on our store frontend.
Confi guration options in Magento can store values on three scopes (global, website, and store views). By default, all the values are set on the global scope. Using system.xml on our modules, we can specify the scopes on which the confi guration options can be set. Let's revisit our previous system.xml fi le:
Factory names and functionsMagento makes use of factory methods to instantiate models, helpers, and block classes. A factory method is a design pattern that allows us to instantiate an object without using the exact class name and using a class alias instead.
Magento implements the following factory methods:
• Mage::getModel()
• Mage::getResourceModel()
• Mage::helper()
• Mage::getSingleton()
• Mage::getResourceSingleton()
• Mage::getResourceHelper()
Each of these methods takes a class alias that is used to determine the real class name of the object that we are trying to instantiate. For example, if we want to instantiate a product object, we can do so by calling the getModel() method:
$product = Mage::getModel('catalog/product');
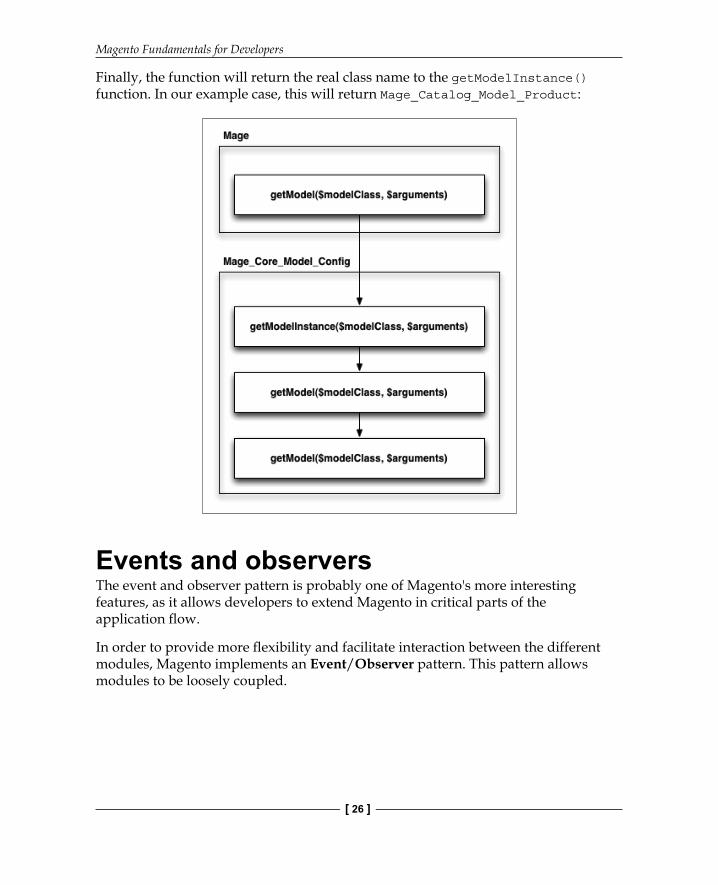
Notice that we are passing a factory name composed of group_classname/model_name. Magento will resolve this to the actual class name of Mage_Catalog_Model_Product. Let's take a closer look at the inner workings of getModel():
public static function getModel($modelClass = '', $arguments = array()) { return self::getConfig()->getModelInstance($modelClass, $arguments); }
getModel calls the getModelInstance from the Mage_Core_Model_Config class.
public function getModelInstance($modelClass='', $constructArguments=array()){ $className = $this->getModelClassName($modelClass); if (class_exists($className)) { Varien_Profiler::start('CORE ::create_object_of::'.$className); $obj = new $className($constructArguments);
In return, getModelInstance() calls the getModelClassName() method that takes a class alias as a parameter. Then, it tries to validate the existence of the returned class, and if the class exists, it creates a new instance of that class and returns it to our getModel() method:
public function getModelClassName($modelClass){ $modelClass = trim($modelClass); if (strpos($modelClass, '/')===false) { return $modelClass; } return $this->getGroupedClassName('model', $modelClass);}
The getModelClassName() method calls the getGroupedClassName() method, which is actually in charge of returning the real class name of our model.
The getGroupedClassName() method takes two parameters, namely $groupType and $classId. The $groupType parameter refers to the type of object that we are trying to instantiate. Currently, only models, blocks, and helpers are supported. The $classId that we are trying to instantiate is as follows:
public function getGroupedClassName($groupType, $classId, $groupRootNode=null){ if (empty($groupRootNode)) { $groupRootNode = 'global/'.$groupType.'s'; } $classArr = explode('/', trim($classId)); $group = $classArr[0]; $class = !empty($classArr[1]) ? $classArr[1] : null;
if (isset($this->_classNameCache[ $groupRootNode][$group][$class])) { return $this->_classNameCache[ $groupRootNode][$group][$class]; }
Chapter 1
[ 25 ]
$config = $this->_xml->global->{$groupType.'s'}->{$group}; $className = null; if (isset($config->rewrite->$class)) { $className = (string)$config->rewrite->$class; } else { if ($config->deprecatedNode) { $deprecatedNode = $config->deprecatedNode; $configOld = $this->_xml->global->{ $groupType.'s'}->$deprecatedNode; if (isset($configOld->rewrite->$class)) { $className = (string) $configOld->rewrite->$class; } } } if (empty($className)) { if (!empty($config)) { $className = $config->getClassName(); } if (empty($className)) { $className = 'mage_'.$group.'_'.$groupType; } if (!empty($class)) { $className .= '_'.$class; } $className = uc_words($className); } $this->_classNameCache[$groupRootNode][$group][$class] = $className; return $className;}
As we can see, getGroupedClassName() is actually doing all the work. It grabs our class alias catalog/product and creates an array by exploding the string on the slash character.
Then, it loads an instance of Varien_Simplexml_Element and passes the fi rst value in our array (group_classname). It also checks if the class has been rewritten, and if it has, we will use the corresponding group name.
Magento also uses a custom version of the uc_words() function that will capitalize the fi rst letters and convert separators of the class alias if needed.
Magento Fundamentals for Developers
[ 26 ]
Finally, the function will return the real class name to the getModelInstance() function. In our example case, this will return Mage_Catalog_Model_Product:
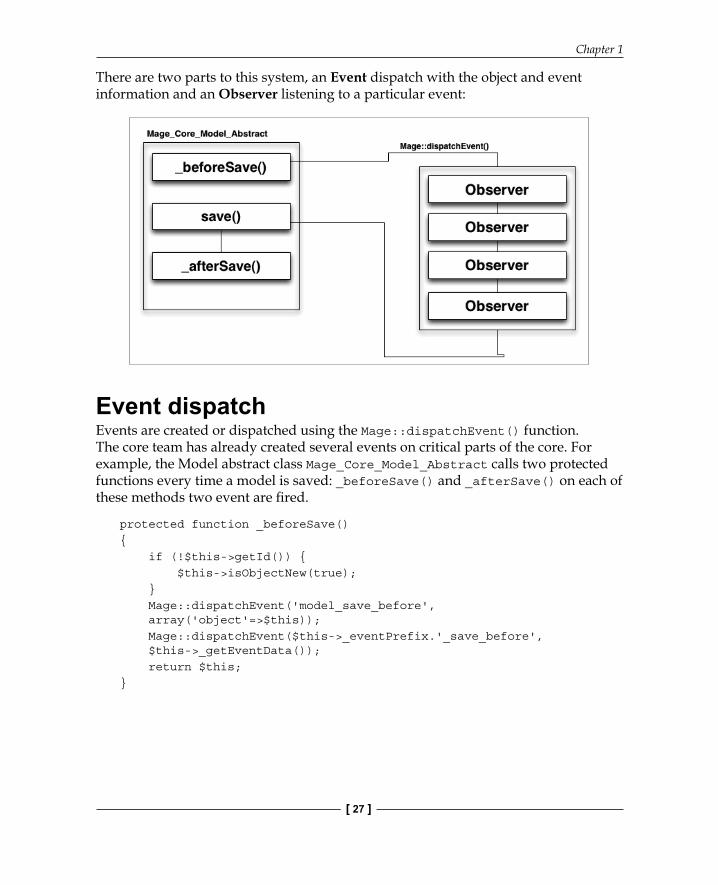
Events and observersThe event and observer pattern is probably one of Magento's more interesting features, as it allows developers to extend Magento in critical parts of the application fl ow.
In order to provide more fl exibility and facilitate interaction between the different modules, Magento implements an Event/Observer pattern. This pattern allows modules to be loosely coupled.
Chapter 1
[ 27 ]
There are two parts to this system, an Event dispatch with the object and event information and an Observer listening to a particular event:
Event dispatchEvents are created or dispatched using the Mage::dispatchEvent() function. The core team has already created several events on critical parts of the core. For example, the Model abstract class Mage_Core_Model_Abstract calls two protected functions every time a model is saved: _beforeSave() and _afterSave() on each of these methods two event are fi red.
protected function _beforeSave(){ if (!$this->getId()) { $this->isObjectNew(true); } Mage::dispatchEvent('model_save_before', array('object'=>$this)); Mage::dispatchEvent($this->_eventPrefix.'_save_before', $this->_getEventData()); return $this;}
Magento Fundamentals for Developers
[ 28 ]
protected function _afterSave(){ $this->cleanModelCache(); Mage::dispatchEvent('model_save_after', array('object'=>$this)); Mage::dispatchEvent($this->_eventPrefix.'_save_after', $this->_getEventData()); return $this;}
Each function fi res a generic model_save_after event, and then a dynamic version based on the type of object being saved. This gives us a wide range of possibilities to manipulate objects through observers.
The Mage::dispatchEvent() method takes two parameters, the fi rst is the event name and the second is an array of data that is received by the observer. We can pass values or objects in this array. This comes in handy if we want to manipulate the objects.
In order to understand the details of the event system, let's take a look at the dispatchEvent() method:
public static function dispatchEvent($name, array $data = array()){ $result = self::app()->dispatchEvent($name, $data); return $result;}
This function is actually an alias to the dispatchEvent() function inside the App core class, located in Mage_Core_Model_App:
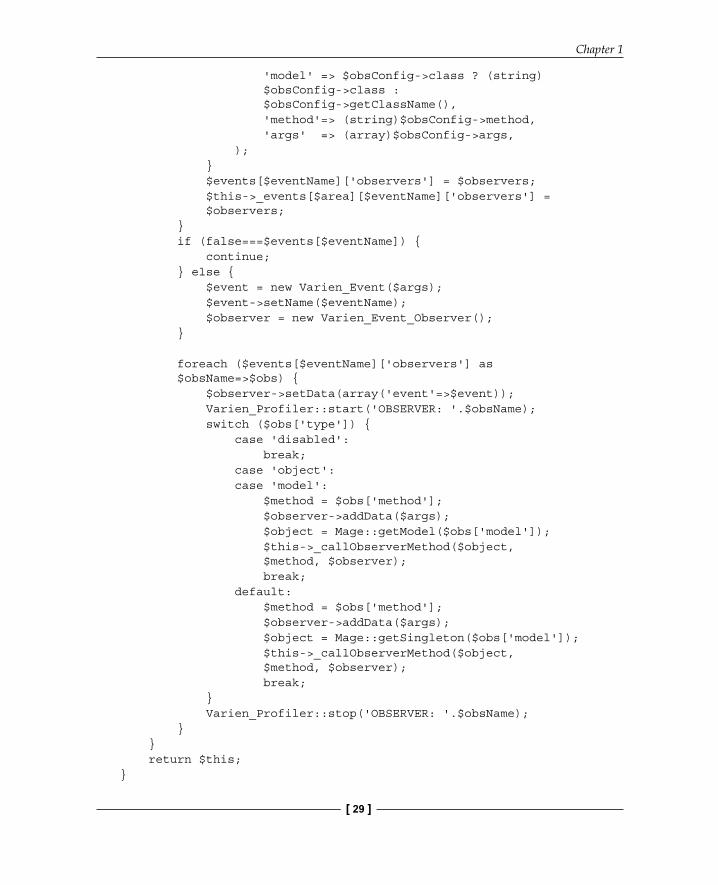
public function dispatchEvent($eventName, $args){ foreach ($this->_events as $area=>$events) { if (!isset($events[$eventName])) { $eventConfig = $this->getConfig()->getEventConfig( $area, $eventName); if (!$eventConfig) { $this->_events[$area][$eventName] = false; continue; } $observers = array(); foreach ($eventConfig->observers->children() as $obsName=>$obsConfig) { $observers[$obsName] = array( 'type' => (string)$obsConfig->type,
The dispatchEvent() method actually does all the work on the Event/Observer model:
1. It gets the Magento confi guration object.2. Then, it walks through the observer's node children, checking if the defi ned
observer is listening to the current event.3. For each of the available observers, the dispatch event tries to instantiate the
observer object.4. Lastly, Magento tries to call the corresponding observer function mapped to
this particular event.
Observer bindingsNow, dispatching an event is only part of the equation. We also need to tell Magento which observer is listening to each event. Not to our surprise, observers are specifi ed through the config.xml fi le. As we saw before, the dispatchEvent() function queries the confi guration object for available observers. Let's take a look at an example config.xml fi le:
The event node can be specifi ed in each of the confi guration sections (admin, global, frontend, and so on) and we can specify multiple event_name children nodes. The event_name node has to match the event name used in the dispatchEvent() function.
Inside each event_name node, we have a single observer node that can contain multiple observers, each with a unique identifi er.
Observer nodes have two properties, <class>, which points to our observer model class, and <method>, which points to the actual method inside the observer class. Let's analyze an example observer class defi nition:
class Namespace_Modulename_Model_Observer{
Chapter 1
[ 31 ]
public function methodName(Varien_Event_Observer $observer) { //some code }}
One interesting thing about observer models is that they don't extend to any other Magento class.
SummaryIn this chapter, we covered many important and fundamental topics about Magento:
While this may seem overwhelming at fi rst sight, it is just the tip of the iceberg. There is a lot more to learn about each of these topics and Magento. The purpose of this chapter is to make developers aware of all the important components of the platform, from the confi guration object to the way the event/object pattern is implemented.
Magento is a powerful and fl exible system and much more than an e-commerce platform. The core team has put a lot of effort in making Magento a powerful framework.
In later chapters, we will not only review all these concepts in more detail, but we will also apply them in a practical manner by building our own extensions.
Where to buy this book You can buy Magento PHP Developer's Guide Second Edition from the
Packt Publishing website.
Alternatively, you can buy the book from Amazon, BN.com, Computer Manuals and most internet
book retailers.
Click here for ordering and shipping details.
www.PacktPub.com
Stay Connected:
Get more information Magento PHP Developer's Guide Second Edition