Aeronautics Research Mission Directorate Make Your Own X-59 Suggested Grades: 3-8 Activity Overview In this activity, you will make a paper airplane version of the X-59. Steps 1. Gather all of you supplies as shown in Figure 1 and listed above. When you print the template, which is the last page of this document, make sure that you select “Fit to Paper” in the print dialog box. 2. When you are using the template, you will be folding along the dashed lines and cutting along the solid lines. Each fold line will be on the outside of the fold. In other words, after folding, you should still be able to see the line. After making a fold, run your fingernail along the fold to make it a firm fold. 3. Fold the paper in half lengthwise as shown in Figure 2. This is done by folding along line 1. 4. Unfold the paper. 5. Fold the two corners into the middle along lines 2 and 2a (see Figure 3). Time: 20 minutes Materials • Airplane Template (or 8½”x11” piece of paper) • Scissors • Tape Figure 1- Gather your supplies. Figure 2- Fold the paper in half lengthwise. Figure 3- Fold the corners in along lines 2 and 2a.
Transcript
Aeronautics Research Mission Directorate
Make Your Own X-59
Suggested Grades: 3-8
Activity Overview
In this activity, you will make a paper
airplane version of the X-59.
Steps
1. Gather all of you supplies as shown in Figure 1 and listed above.
When you print the template, which is the last page of this
document, make sure that you select “Fit to Paper” in the print
dialog box.
2. When you are using the template, you will be folding along the
dashed lines and cutting along the solid lines. Each fold line will be
on the outside of the fold. In other words, after folding, you should
still be able to see the line. After making a fold, run your fingernail
along the fold to make it a firm fold.
3. Fold the paper in half lengthwise as shown in Figure 2. This is
done by folding along line 1.
4. Unfold the paper.
5. Fold the two corners into the middle along lines 2 and 2a (see
Figure 3).
Time: 20 minutes
Materials
• Airplane Template
(or 8½”x11” piece of paper)
• Scissors
• Tape
Figure 1- Gather your supplies.
Figure 2- Fold the paper in half lengthwise.
Figure 3- Fold the corners in along lines 2 and 2a.
6. Fold the two edges into the center along lines 3 and 3a as shown
in Figure 4.
7. Fold the paper in half lengthwise along line 1. Your plane
should look like Figure 5 after this fold.
8. Fold the wings down along lines 4 and 4a as shown in Figure 6.
9. Use your scissors to cut along lines 5 and 5a (see Figure 7)
10. Unfold the plane along line 1.
11. Fold in the edges of each wing, folding along lines 6 and 6a.
Once you have fold both wings, your plane should look like
Figure 8.
Figure 4- Fold the edges in along lines 3 and 3a.
Figure 5- Fold the paper in half lengthwise.
Figure 6- Fold down the wings (along lines 4 and 4a).
Figure 7- Cut along lines 5 and 5a.
Figure 8- Fold in the edges of each wing, along lines 6 and 6a.
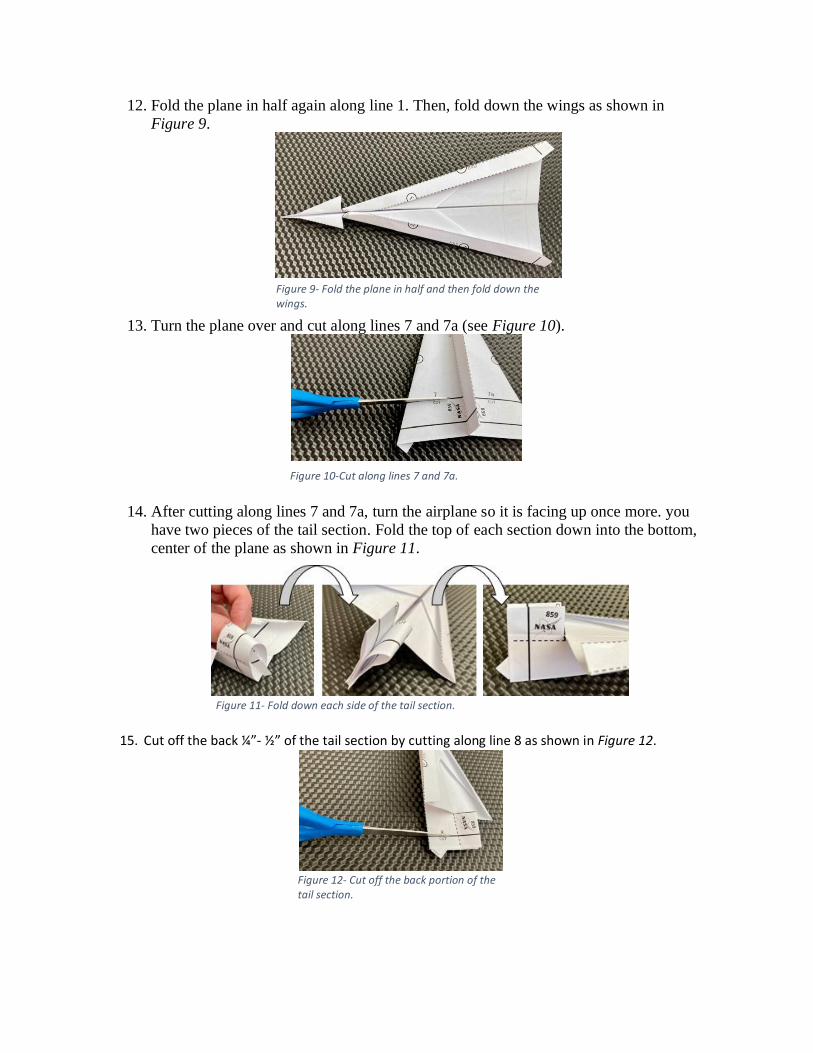
12. Fold the plane in half again along line 1. Then, fold down the wings as shown in
Figure 9.
13. Turn the plane over and cut along lines 7 and 7a (see Figure 10).
14. After cutting along lines 7 and 7a, turn the airplane so it is facing up once more. you
have two pieces of the tail section. Fold the top of each section down into the bottom,
center of the plane as shown in Figure 11.
15. Cut off the back ¼”- ½” of the tail section by cutting along line 8 as shown in Figure 12.
Figure 9- Fold the plane in half and then fold down the wings.
Figure 10-Cut along lines 7 and 7a.
Figure 11- Fold down each side of the tail section.
Figure 12- Cut off the back portion of the tail section.
16. As shown in Figure 13, put one small piece of tape over the top of the tail section to hold the
two pieces together. Put another small piece of tape on the top of the plane, as shown in Figure
13.
17. Your completed plane should look like the one shown in Figure 14. Have fun flying it!!
Figure 13- Place one piece of tape over the top of the tail section and one piece on the top of the plane.
Figure 14- Place one piece of tape over the top of the tail section and one piece on the top of the plane.
Background Information
X-59 (QueSST) One of NASA’s newest
experimental aircraft, the X-59 (QueSST) is
designed to lower the noise created by planes
flying faster than the speed of sound. When
planes fly supersonic (faster than the speed of
sound), the pressure waves they create combine
together and produce a very loud noise called a
sonic boom. This noise is so loud that it can
damage property and disturb animals.
A unique feature of the X-59 is the placement of
two canards in front of the wings. These look
like small wings, but they aren’t designed to
create lift for the plane. Instead, they help change
the movement of the pressure waves so they
don’t combine and form the loud sonic boom. Instead, the plane creates a series of sonic “thumps”
which are much quieter than booms. The effects of these thumps will be tested in locations around
the United States to see if this lower noise level is more acceptable.
Figure 15- The X-59 (QueSST) is designed to fly supersonic without creating a sonic boom.