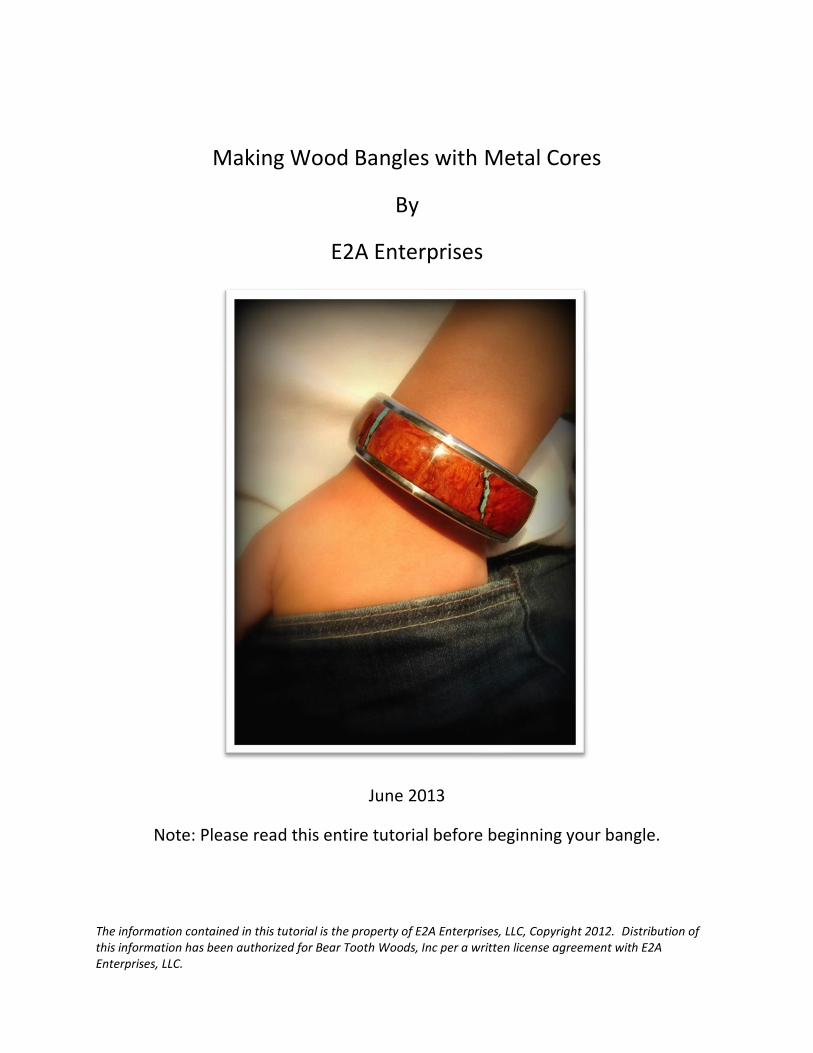
The information contained in this tutorial is the property of E2A Enterprises, LLC, Copyright 2012. Distribution of this information has been authorized for Bear Tooth Woods, Inc per a written license agreement with E2A Enterprises, LLC. Making Wood Bangles with Metal Cores By E2A Enterprises June 2013 Note: Please read this entire tutorial before beginning your bangle.
Transcript
The information contained in this tutorial is the property of E2A Enterprises, LLC, Copyright 2012. Distribution of this information has been authorized for Bear Tooth Woods, Inc per a written license agreement with E2A Enterprises, LLC.
Making Wood Bangles with Metal Cores
By
E2A Enterprises
June 2013
Note: Please read this entire tutorial before beginning your bangle.
The information contained in this tutorial is the property of E2A Enterprises, LLC, Copyright 2012. Distribution of this information has been authorized for Bear Tooth Woods, Inc per a written license agreement with E2A Enterprises, LLC.
1
The Fine Print
Disclaimer When working with wood and shop tools it is important to wear safety glasses, hearing protection and a
dust mask to protect your health and safety. Take time to understand your equipment and the
associated hazards each machine or tool may pose to your safety. The importance of a good dust
collection system cannot be overemphasized. Additionally, many wood species contain oils and/or
substances that are known to be toxic or trigger allergic reactions including skin irritation and
respiratory breathing difficulties. Since most wood purchased does not come with Material Safety Data
Sheets (MSDS), it is important to do your own research to understand the potential negative health side
effects before handling or breathing dust.
The following websites are just a few places you can find specific details on wood species and the
associated health risks during woodworking activities.
The information contained in this tutorial is the property of E2A Enterprises, LLC, Copyright 2012. Distribution of this information has been authorized for Bear Tooth Woods, Inc per a written license agreement with E2A Enterprises, LLC.
2
Liquid Nails® Home Projects Adhesive
Rubber mallet and wood surface
Wood working clamps
Sandpaper and finish wax or CA
Introduction It is now possible to make wood bangles from exotic woods, burls and other non-structural woods using
metal bangle cores from this seller. This tutorial outlines methods for making wood and metal core
bangles. Important pointers will be stated in Bold Print.
It is important to remember that metal core bangles are best suited for wood choices that are
dimensionally stable. This seller sells stabilized wood blanks made especially for the metal core
bangles.
Inside Diameter (ID) Boring and Roughing For boring the ID, ID or OD chuck jaws can be used. In this tutorial the ID clamping method will be used.
Approximately ½ of the blank is bored and the OD roughed, the blank is flipped 180° and the process
repeated. It is important to keep your metal core nearby and check fitment as you bore. Turn the bore
to an ID of approximately 0.040 – 0.060” oversize (.05" average). The wood blank should NOT be a
snug or press fit onto the metal core. A nice loose fit is desirable, leaving room for the flexible
adhesive chosen for gluing. A snug fit may lead to wood failure and cracking. Other wood turning or
machining processes can be used to achieve these same results, depending on the tools available in your
shop.
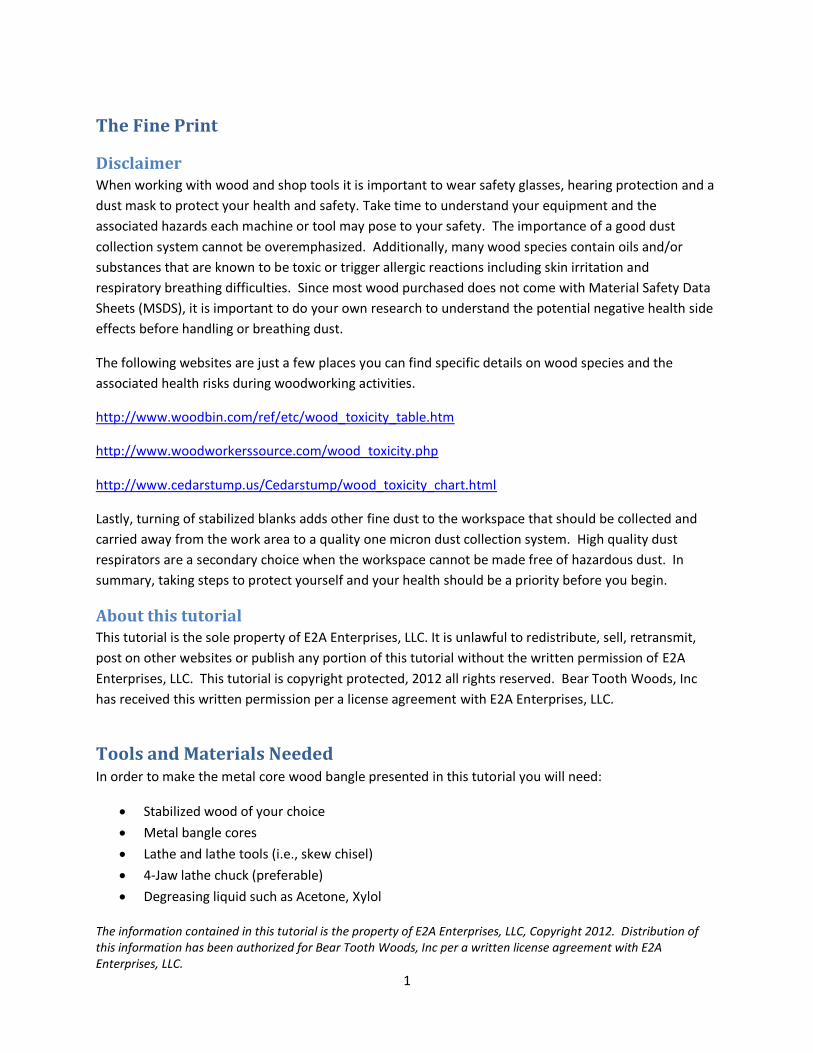
Fit check the core to the wood bore often during the ID boring operation, making sure to not cut too
much off the ID. A sanding drum can be used to do the fine tuning of the core/wood blank fitment (see
Figure 1). Once again, there are many ways to cut the ID to size including sanding, reaming, boring and
turning.
Figure 1. Using a sanding drum to fine tune the core fitment and fit checking the metal core.
The information contained in this tutorial is the property of E2A Enterprises, LLC, Copyright 2012. Distribution of this information has been authorized for Bear Tooth Woods, Inc per a written license agreement with E2A Enterprises, LLC.
3
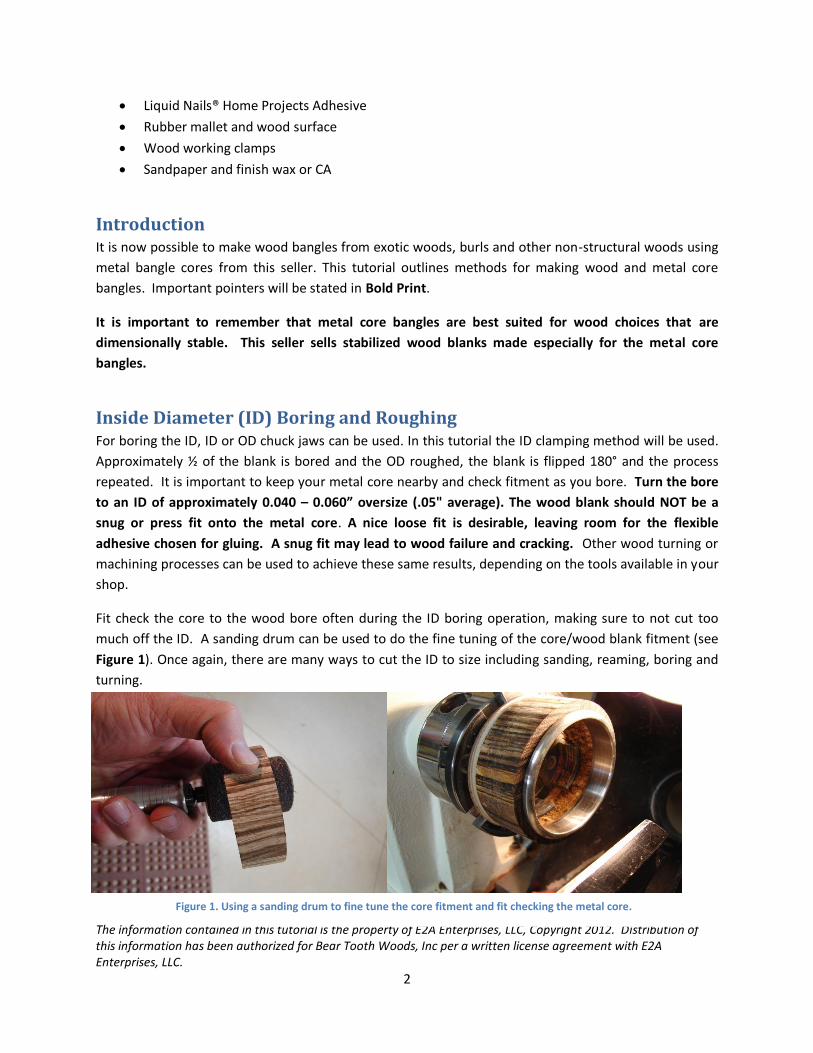
Cutting the blank to length As the blank gets closer to the final size, care must be
taken not to break the wood bangle at this point, as
it may be fragile. A hand ground parting tool can be
used to get the blank close to the right length (this
allows you to save these part-offs for future bangle
use). A combination of sanding and turning can then
be performed to fine tune the length. The blank
length should be 0.005” smaller than the groove
width in the metal bangle blank. It helps to have a set
of digital calipers at this point for measuring, but it is
not essential. In Figure 2, a parting tool is being used
to cut off excess material.
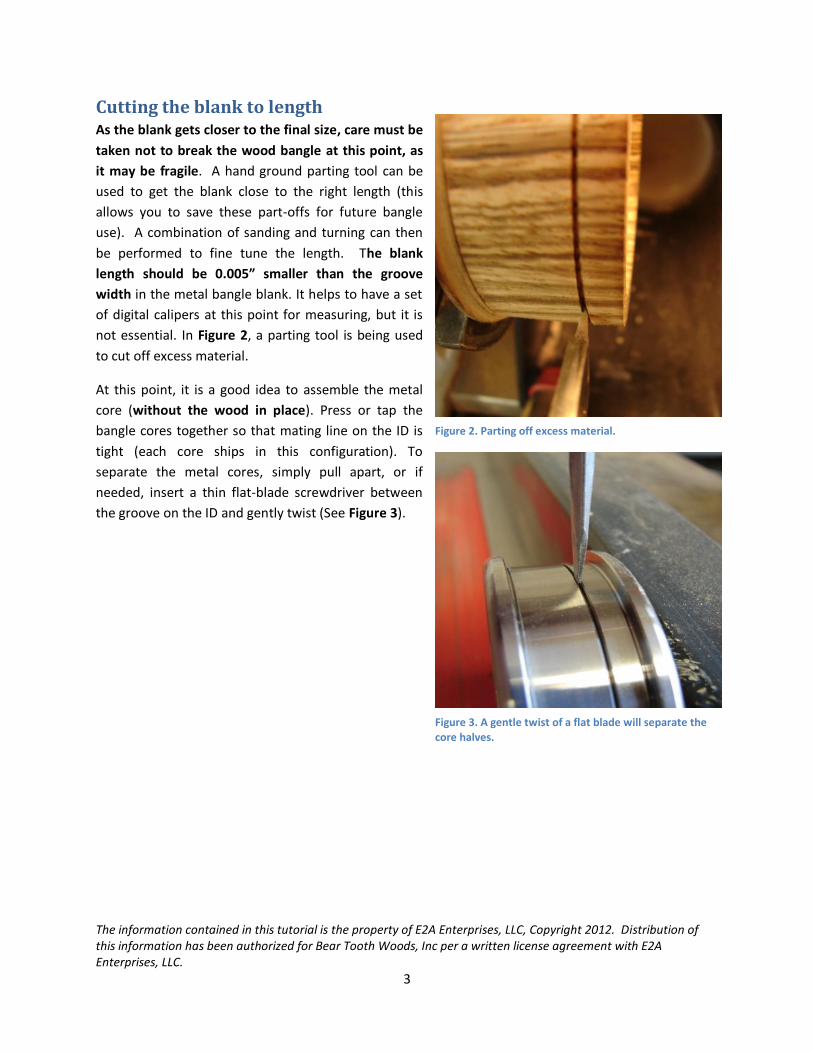
At this point, it is a good idea to assemble the metal
core (without the wood in place). Press or tap the
bangle cores together so that mating line on the ID is
tight (each core ships in this configuration). To
separate the metal cores, simply pull apart, or if
needed, insert a thin flat-blade screwdriver between
the groove on the ID and gently twist (See Figure 3).
Figure 2. Parting off excess material.
Figure 3. A gentle twist of a flat blade will separate the core halves.
The information contained in this tutorial is the property of E2A Enterprises, LLC, Copyright 2012. Distribution of this information has been authorized for Bear Tooth Woods, Inc per a written license agreement with E2A Enterprises, LLC.
4
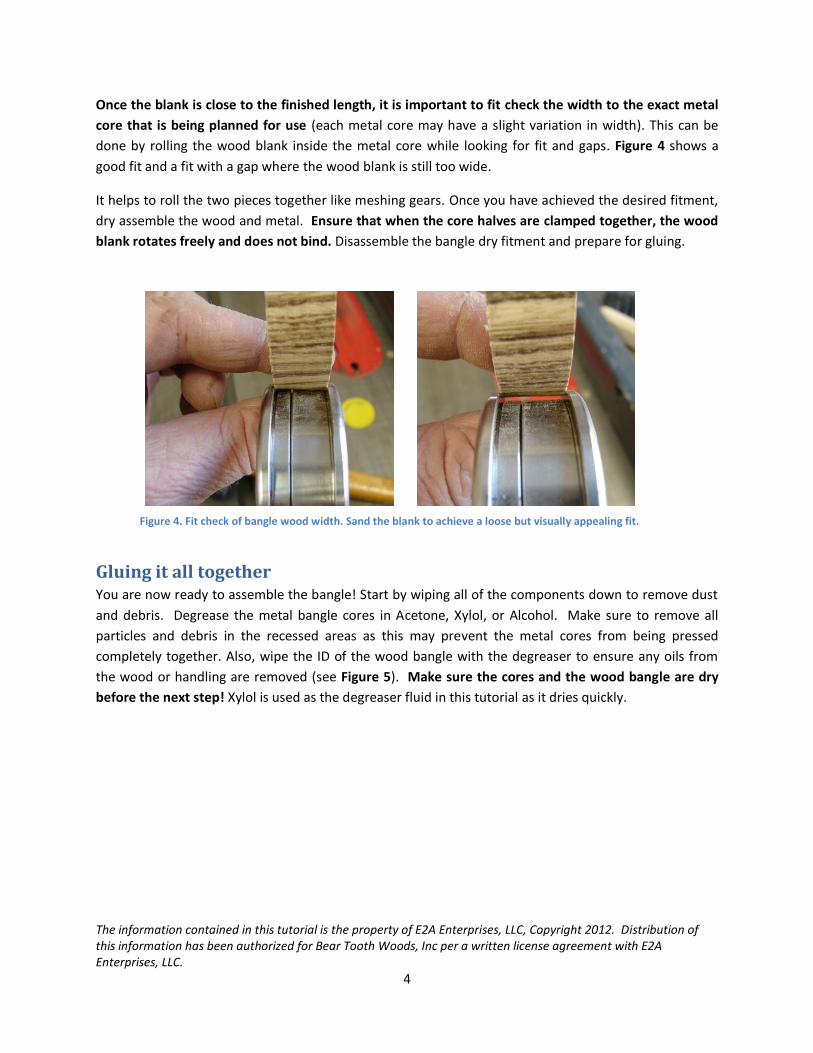
Once the blank is close to the finished length, it is important to fit check the width to the exact metal
core that is being planned for use (each metal core may have a slight variation in width). This can be
done by rolling the wood blank inside the metal core while looking for fit and gaps. Figure 4 shows a
good fit and a fit with a gap where the wood blank is still too wide.
It helps to roll the two pieces together like meshing gears. Once you have achieved the desired fitment,
dry assemble the wood and metal. Ensure that when the core halves are clamped together, the wood
blank rotates freely and does not bind. Disassemble the bangle dry fitment and prepare for gluing.
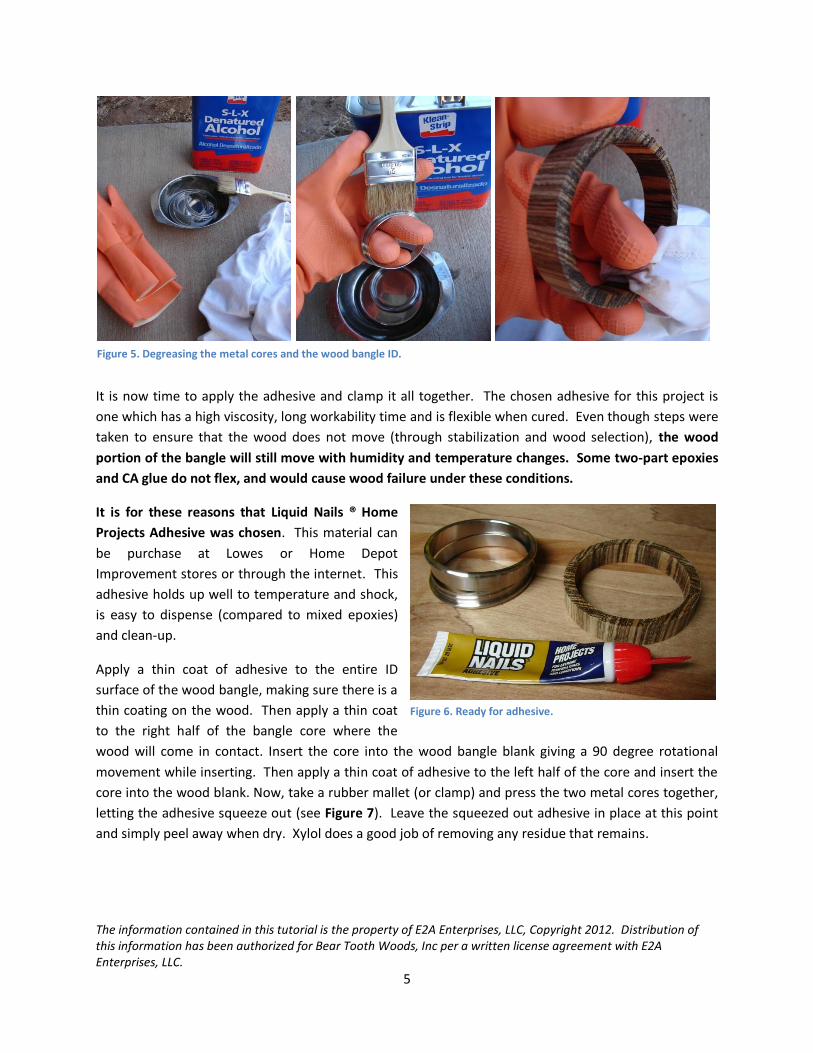
Gluing it all together You are now ready to assemble the bangle! Start by wiping all of the components down to remove dust
and debris. Degrease the metal bangle cores in Acetone, Xylol, or Alcohol. Make sure to remove all
particles and debris in the recessed areas as this may prevent the metal cores from being pressed
completely together. Also, wipe the ID of the wood bangle with the degreaser to ensure any oils from
the wood or handling are removed (see Figure 5). Make sure the cores and the wood bangle are dry
before the next step! Xylol is used as the degreaser fluid in this tutorial as it dries quickly.
Figure 4. Fit check of bangle wood width. Sand the blank to achieve a loose but visually appealing fit.
The information contained in this tutorial is the property of E2A Enterprises, LLC, Copyright 2012. Distribution of this information has been authorized for Bear Tooth Woods, Inc per a written license agreement with E2A Enterprises, LLC.
5
It is now time to apply the adhesive and clamp it all together. The chosen adhesive for this project is
one which has a high viscosity, long workability time and is flexible when cured. Even though steps were
taken to ensure that the wood does not move (through stabilization and wood selection), the wood
portion of the bangle will still move with humidity and temperature changes. Some two-part epoxies
and CA glue do not flex, and would cause wood failure under these conditions.
It is for these reasons that Liquid Nails ® Home
Projects Adhesive was chosen. This material can
be purchase at Lowes or Home Depot
Improvement stores or through the internet. This
adhesive holds up well to temperature and shock,
is easy to dispense (compared to mixed epoxies)
and clean-up.
Apply a thin coat of adhesive to the entire ID
surface of the wood bangle, making sure there is a
thin coating on the wood. Then apply a thin coat
to the right half of the bangle core where the
wood will come in contact. Insert the core into the wood bangle blank giving a 90 degree rotational
movement while inserting. Then apply a thin coat of adhesive to the left half of the core and insert the
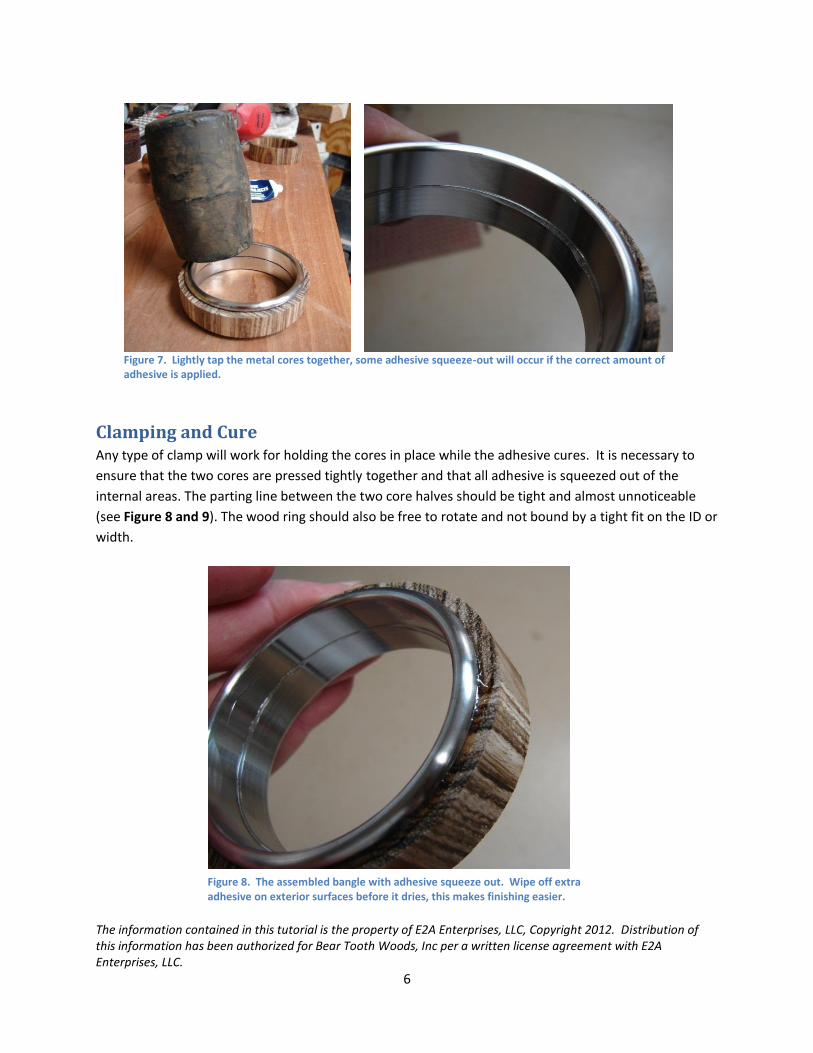
core into the wood blank. Now, take a rubber mallet (or clamp) and press the two metal cores together,
letting the adhesive squeeze out (see Figure 7). Leave the squeezed out adhesive in place at this point
and simply peel away when dry. Xylol does a good job of removing any residue that remains.
Figure 5. Degreasing the metal cores and the wood bangle ID.
Figure 6. Ready for adhesive.
The information contained in this tutorial is the property of E2A Enterprises, LLC, Copyright 2012. Distribution of this information has been authorized for Bear Tooth Woods, Inc per a written license agreement with E2A Enterprises, LLC.
6
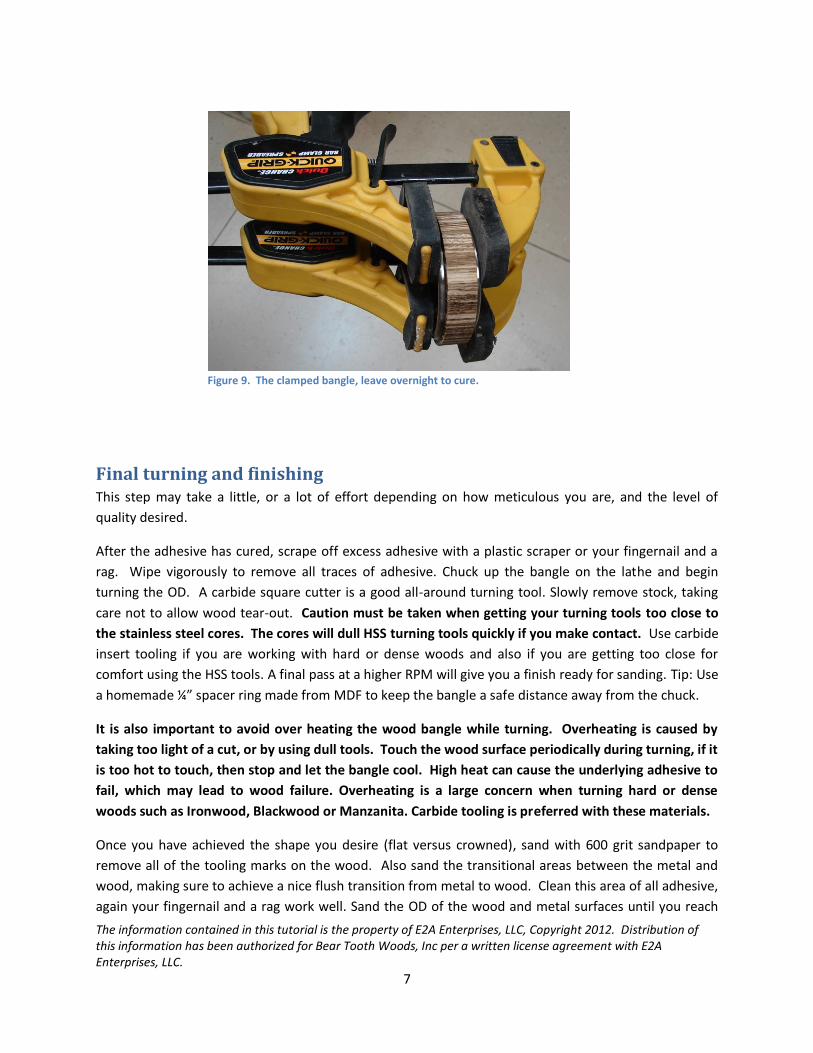
Clamping and Cure Any type of clamp will work for holding the cores in place while the adhesive cures. It is necessary to
ensure that the two cores are pressed tightly together and that all adhesive is squeezed out of the
internal areas. The parting line between the two core halves should be tight and almost unnoticeable
(see Figure 8 and 9). The wood ring should also be free to rotate and not bound by a tight fit on the ID or
width.
Figure 7. Lightly tap the metal cores together, some adhesive squeeze-out will occur if the correct amount of adhesive is applied.
Figure 8. The assembled bangle with adhesive squeeze out. Wipe off extra adhesive on exterior surfaces before it dries, this makes finishing easier.
The information contained in this tutorial is the property of E2A Enterprises, LLC, Copyright 2012. Distribution of this information has been authorized for Bear Tooth Woods, Inc per a written license agreement with E2A Enterprises, LLC.
7
Final turning and finishing This step may take a little, or a lot of effort depending on how meticulous you are, and the level of
quality desired.
After the adhesive has cured, scrape off excess adhesive with a plastic scraper or your fingernail and a
rag. Wipe vigorously to remove all traces of adhesive. Chuck up the bangle on the lathe and begin
turning the OD. A carbide square cutter is a good all-around turning tool. Slowly remove stock, taking
care not to allow wood tear-out. Caution must be taken when getting your turning tools too close to
the stainless steel cores. The cores will dull HSS turning tools quickly if you make contact. Use carbide
insert tooling if you are working with hard or dense woods and also if you are getting too close for
comfort using the HSS tools. A final pass at a higher RPM will give you a finish ready for sanding. Tip: Use
a homemade ¼” spacer ring made from MDF to keep the bangle a safe distance away from the chuck.
It is also important to avoid over heating the wood bangle while turning. Overheating is caused by
taking too light of a cut, or by using dull tools. Touch the wood surface periodically during turning, if it
is too hot to touch, then stop and let the bangle cool. High heat can cause the underlying adhesive to
fail, which may lead to wood failure. Overheating is a large concern when turning hard or dense
woods such as Ironwood, Blackwood or Manzanita. Carbide tooling is preferred with these materials.
Once you have achieved the shape you desire (flat versus crowned), sand with 600 grit sandpaper to
remove all of the tooling marks on the wood. Also sand the transitional areas between the metal and
wood, making sure to achieve a nice flush transition from metal to wood. Clean this area of all adhesive,
again your fingernail and a rag work well. Sand the OD of the wood and metal surfaces until you reach
Figure 9. The clamped bangle, leave overnight to cure.
The information contained in this tutorial is the property of E2A Enterprises, LLC, Copyright 2012. Distribution of this information has been authorized for Bear Tooth Woods, Inc per a written license agreement with E2A Enterprises, LLC.
8
the ID of the core. Remove all remaining adhesive with Xylol and a rag. Blow off all remaining dust and
clear any voids that exist on the wood surface.
For finishing, Cyanoacrylate (CA) provides a hard, durable finish that can be wet sanded to a glass
smooth surface. Use micro-mesh (MM) sandpaper and dry sand using 1500 grit MM. Start by applying a
few drops of Medium CA on a 1" x 1" folded, lint free paper towel. With the bangle rotating at a slow
speed on your lathe, apply the CA onto the bangle surface and allow to rotate for 1 minute. Use a CA
accelerator to speed up the cure time. Next, apply 5 to 20 more coats of Medium CA and repeat the
application process. Do not try to keep the CA on the wood surface, but let the CA coat the entire bangle
face (wood and metal). You will only have a few seconds to get the CA applied before the CA starts to
set-up (getting the CA leveled and smooth quickly will help shorten the wet sanding time). Let the
bangle rotate while the CA slowly dries (5 min or so). Accelerator may be used once the CA is almost
dry. Applying accelerator too soon, when the CA is wet, may turn the CA white or milky color.
It is at this point that should decide if you want to remove the CA from the metal surface, or simply
leave it in place and wet sand it all together. Both have been done and the preferred method is to
remove the CA, however it can be very time consuming.
To remove the CA, use a box cutter blade as a micro-turning tool and slowly turn the CA off of the metal
surface. Take care not to cut the CA off of the wood area, attempting to stop right at the wood-to-metal
interface. Use x 2.0 diopter glasses and get close to the work so you can see the details better. Again,
this step is optional, however with the copper bangle cores, the copper will remain a bright copper color
under the CA while the remainder of the bangle will take on a natural patina.
OPTION 1: If you are careful with your CA application (and a little lucky), you can start the wet sanding
process using 1500 grit MM. However, if there are streaks or grooves, begin with 600 grit wet sandpaper
and wet sand until the grooves are gone. Take care to not sand through the CA finish, as this will cause
streaks in the finish which are very difficult to remove and may require you to start over by turning off
the CA down to bare wood.
OPTION 2: To shorten the overall time spent during finishing, it is possible to apply fewer coats of CA
(five to seven) and skip wet sanding altogether. This is done by applying EEE buffing compound to the
surface of the bangle and buff with a clean cotton rag. Lastly, apply a coat of Shellawax friction polish to
obtain a mirror like finish.
Finally, for the ID finish on the metal core, a fine unitized abrasive wheel on a rotary tool is used to give
the ID a slightly brushed look. Polish the ID of the metal cores has been tired and this can be quite time
consuming. In general, an experienced wood turner can make a finished bangle in about 35 to 40
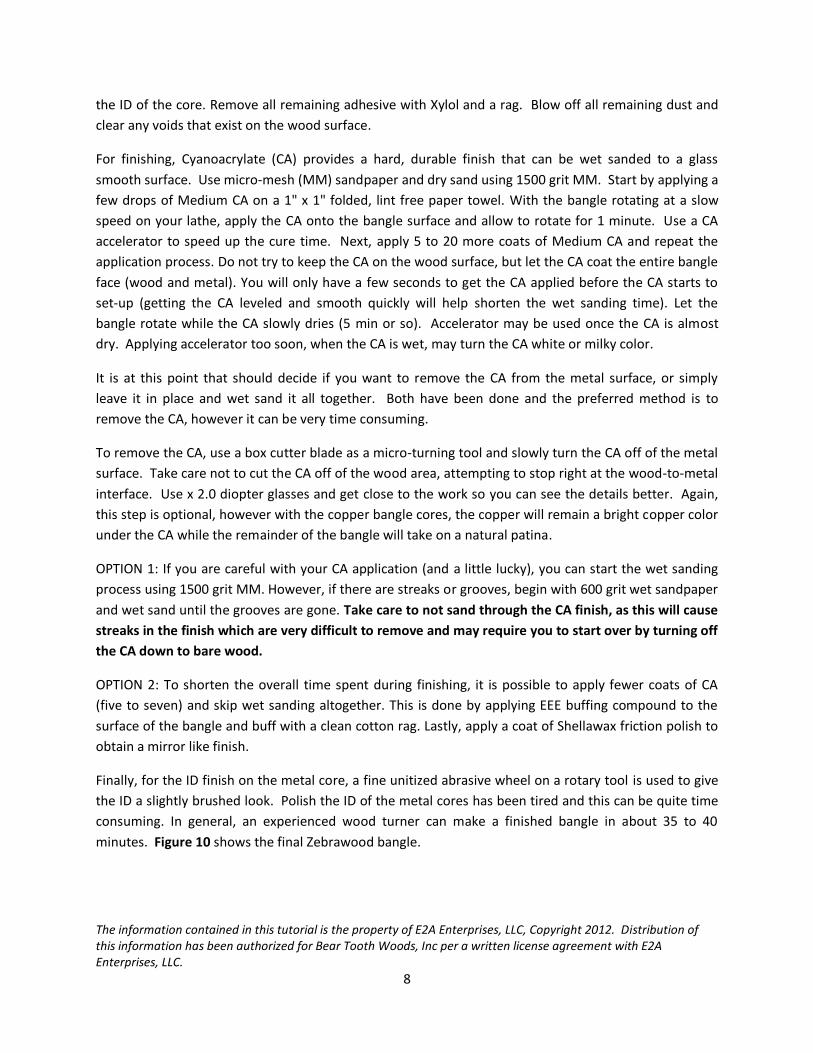
minutes. Figure 10 shows the final Zebrawood bangle.
The information contained in this tutorial is the property of E2A Enterprises, LLC, Copyright 2012. Distribution of this information has been authorized for Bear Tooth Woods, Inc per a written license agreement with E2A Enterprises, LLC.
9
The End This tutorial was written with the hope that you too can make beautiful metal core bangles for gifts,
craft fairs or galleries. The end item is a unique piece of aarable art which is durable and water
resistant. The finished bangles selling for $80 to $200 depending on wood species, and how attractive
the final bangle looks has been seen. High end bangles with crushed turquoise inlay or alumilite cast
blanks are popular and generally bring the most money at art shows.
This seller carries everything you need to make wonderful wood and metal creations. As always, all of
the products are fabricated in Western Colorado! This includes CNC machining and wood stabilizing.
100% MADE IN THE USA.
Happy Turning!
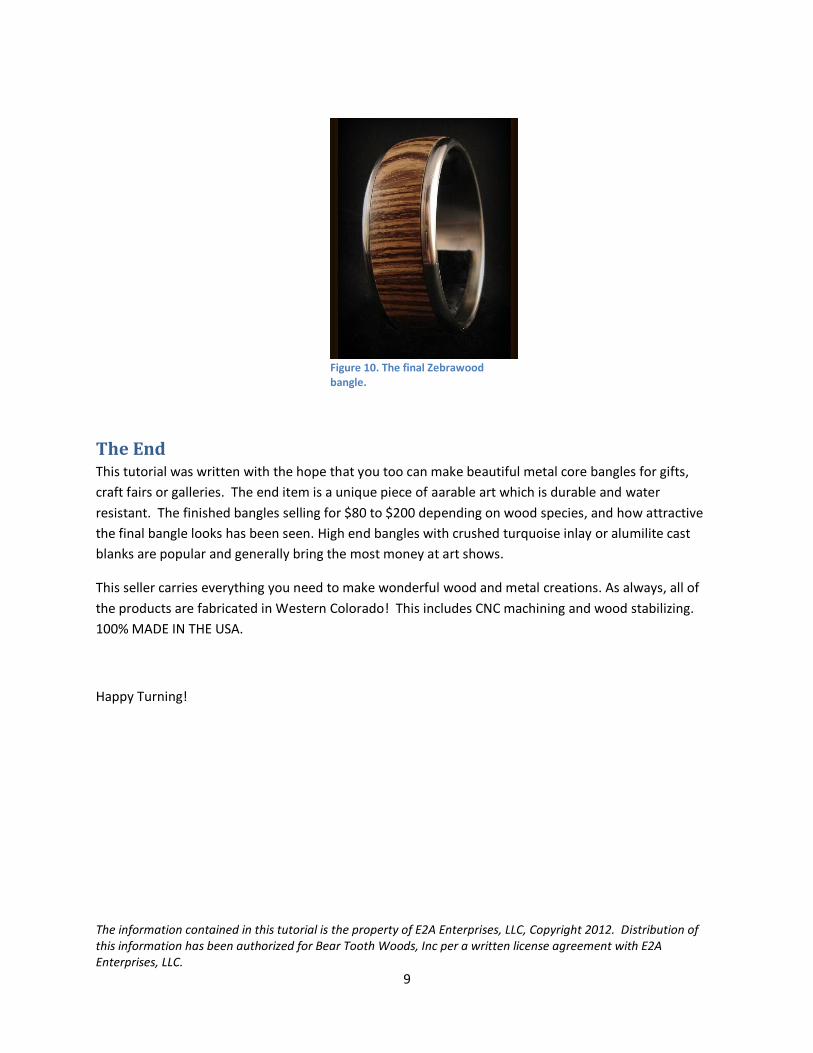
Figure 10. The final Zebrawood bangle.
The information contained in this tutorial is the property of E2A Enterprises, LLC, Copyright 2012. Distribution of this information has been authorized for Bear Tooth Woods, Inc per a written license agreement with E2A Enterprises, LLC.
A1
APPENDIX A - Making a Stabilized Wood Blank
If you would like to make your own Stabilized Wood Blank the directions are as follows:
Tools and Materials Needed 3 3/4 ” and 2 1/4 ” Hole Saw
Drill press and vise
Oven capable of reaching 200 degrees F
Wood Selection and Dimensional Stability Wood is an ever changing material. As it acclimates to its surrounding environment, humidity and
temperature cause this natural material to grow/shrink and change shape. It is important to remember
that metal core bangles are best suited for wood choices that are dimensionally stable. As an
example, in one test an unstabilized hard maple bangle blank subjected to 90% Relative Humidity (RH)
for 60 hours changed diameter by 0.100” in the cross-grain direction. In other words, this bangle blank
was round when dry, but quite an oval when damp!
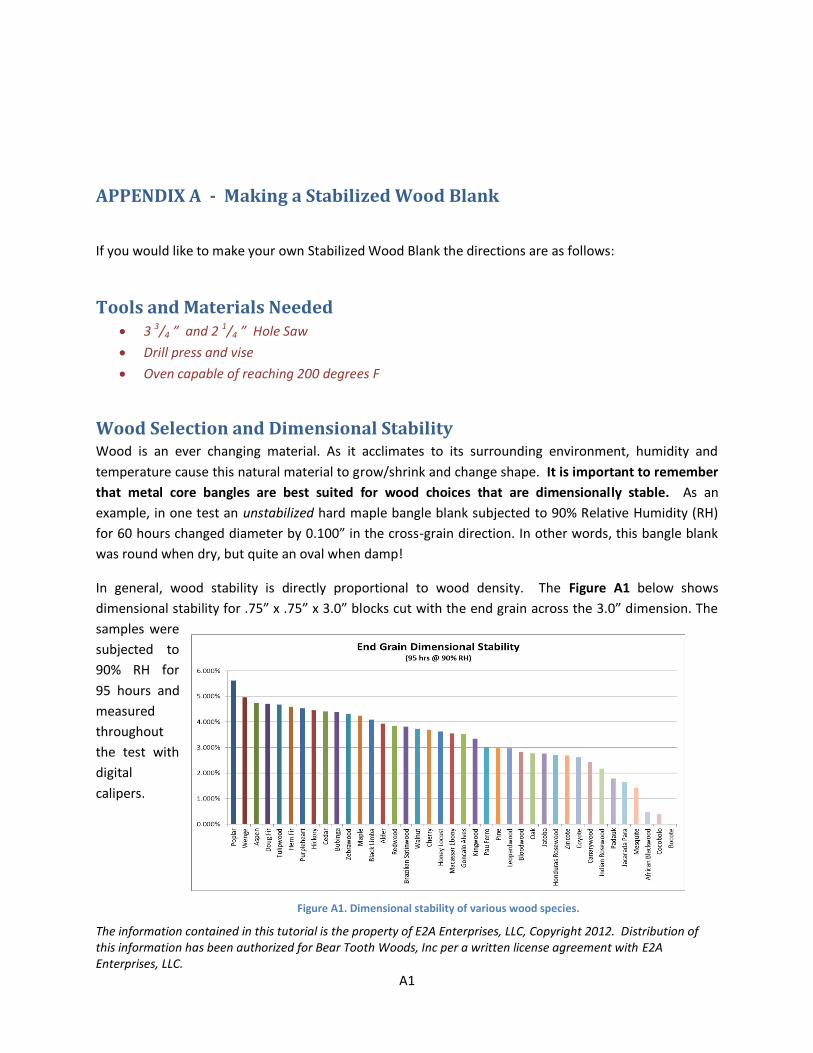
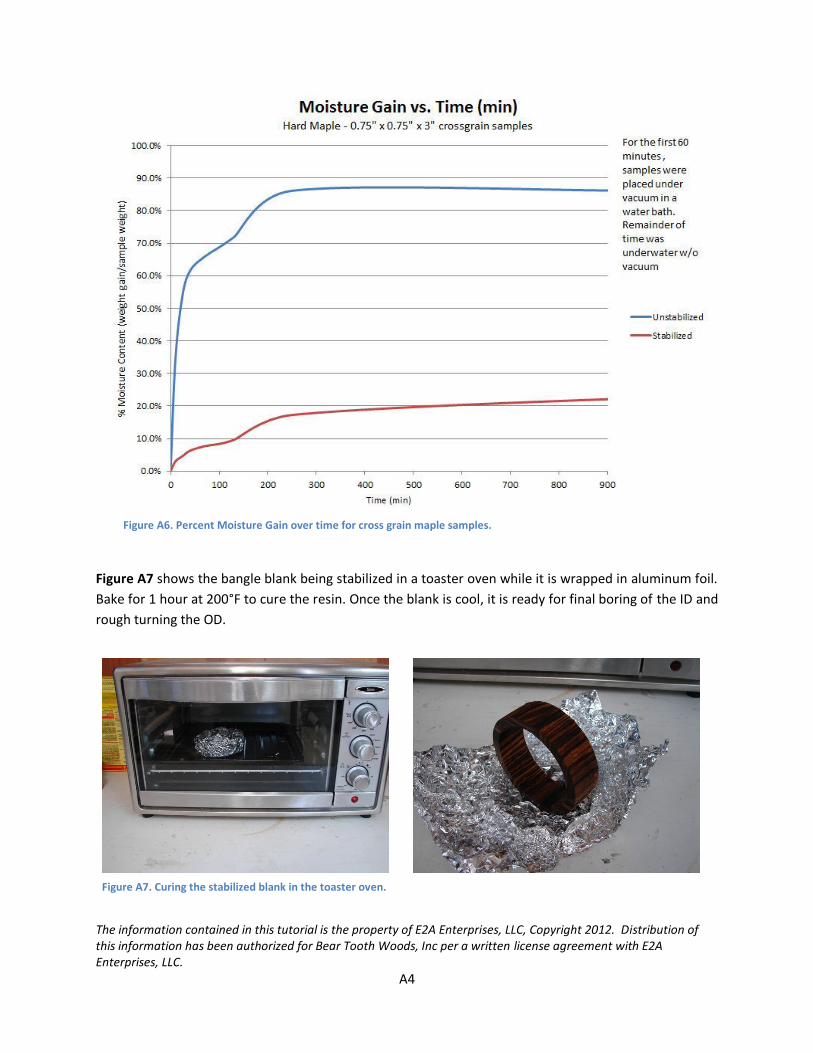
In general, wood stability is directly proportional to wood density. The Figure A1 below shows
dimensional stability for .75” x .75” x 3.0” blocks cut with the end grain across the 3.0” dimension. The
samples were
subjected to
90% RH for
95 hours and
measured
throughout
the test with
digital
calipers.
Figure A1. Dimensional stability of various wood species.
The information contained in this tutorial is the property of E2A Enterprises, LLC, Copyright 2012. Distribution of this information has been authorized for Bear Tooth Woods, Inc per a written license agreement with E2A Enterprises, LLC.
A2
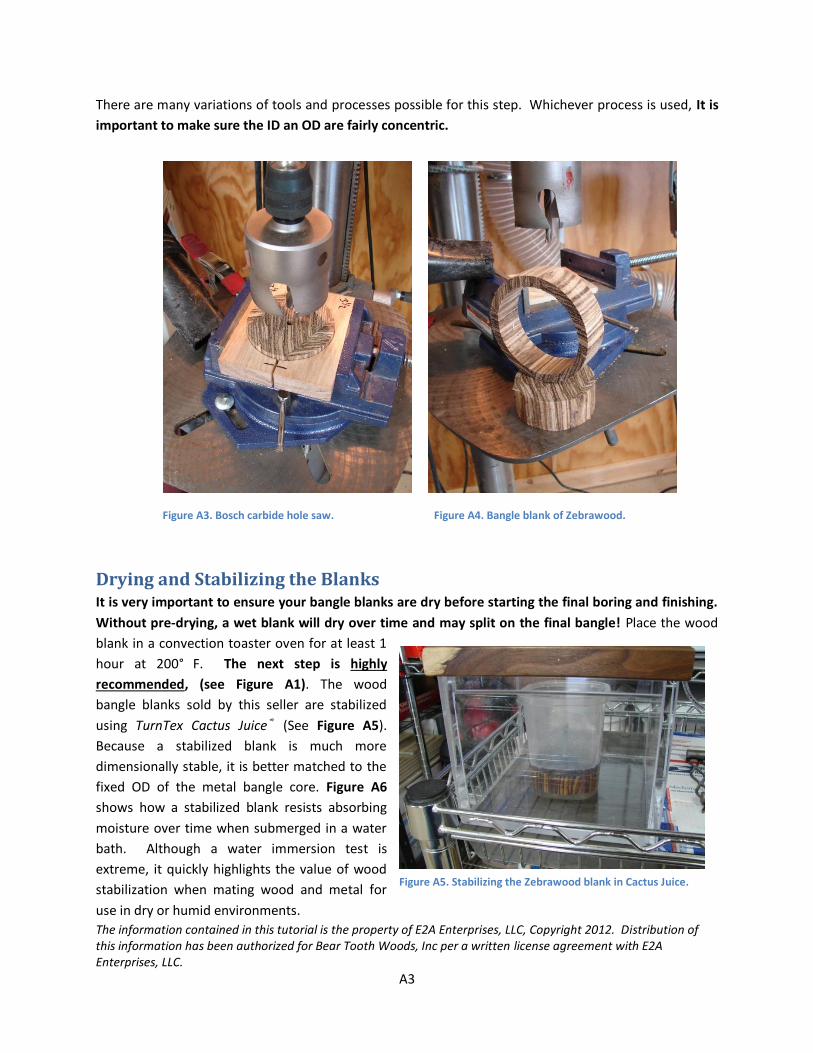
For best results, it is recommended that your wood bangle blanks be stabilized with a high quality resin
system. Wood such as Cocobolo, Bocote, African Blackwood and Desert Ironwood are inherently stable
and do not need to be stabilized.
Cutting the Bangle Blank A 3 3/4 ” and 2 1/4 ” hole saw will be used to cut the starting bangle blank. When cutting oily or gummy
woods, make sure to cut with one edge of the hole saw slightly off of the wood blank. This may leave a
slight flat spot on the OD of the blank, but this flat spot will be turned off when finishing. Use a dust
collector to remove the wood chips and dust from the cutting area (or a dust mask) and safety glasses.
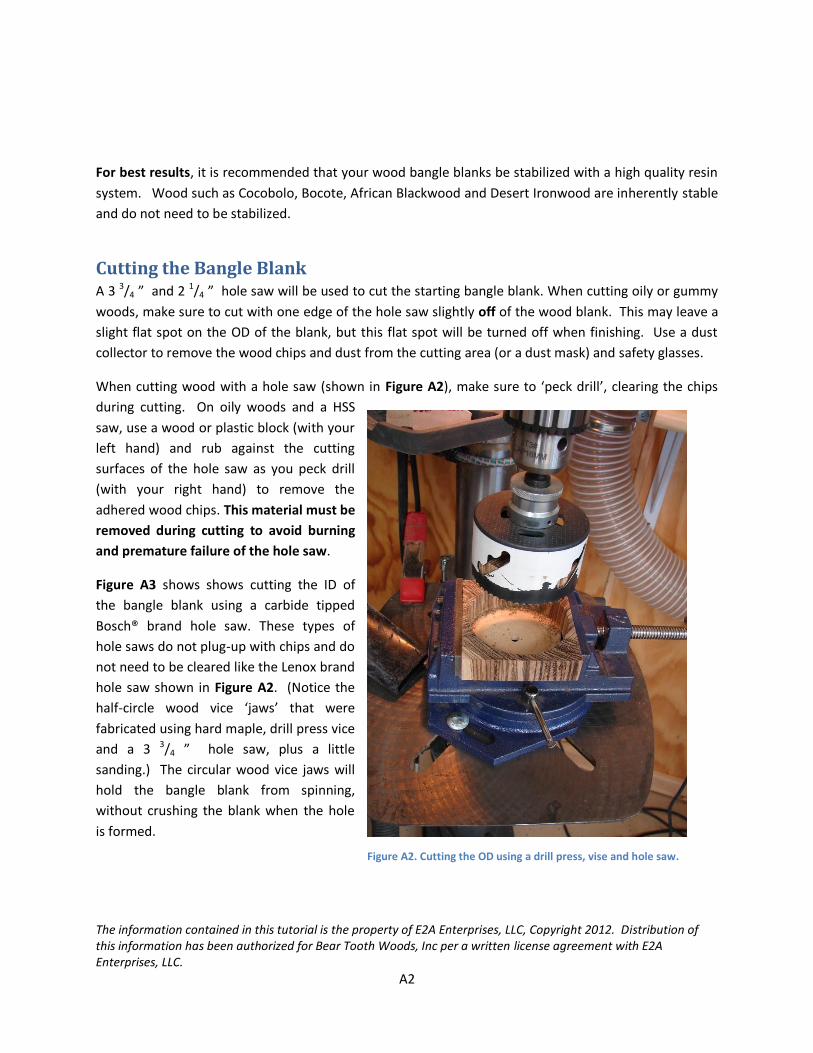
When cutting wood with a hole saw (shown in Figure A2), make sure to ‘peck drill’, clearing the chips
during cutting. On oily woods and a HSS
saw, use a wood or plastic block (with your
left hand) and rub against the cutting
surfaces of the hole saw as you peck drill
(with your right hand) to remove the
adhered wood chips. This material must be
removed during cutting to avoid burning
and premature failure of the hole saw.
Figure A3 shows shows cutting the ID of
the bangle blank using a carbide tipped
Bosch® brand hole saw. These types of
hole saws do not plug-up with chips and do
not need to be cleared like the Lenox brand
hole saw shown in Figure A2. (Notice the
half-circle wood vice ‘jaws’ that were
fabricated using hard maple, drill press vice
and a 3 3/4 ” hole saw, plus a little
sanding.) The circular wood vice jaws will
hold the bangle blank from spinning,
without crushing the blank when the hole
is formed.
Figure A2. Cutting the OD using a drill press, vise and hole saw.
The information contained in this tutorial is the property of E2A Enterprises, LLC, Copyright 2012. Distribution of this information has been authorized for Bear Tooth Woods, Inc per a written license agreement with E2A Enterprises, LLC.
A3
There are many variations of tools and processes possible for this step. Whichever process is used, It is
important to make sure the ID an OD are fairly concentric.
Drying and Stabilizing the Blanks It is very important to ensure your bangle blanks are dry before starting the final boring and finishing.
Without pre-drying, a wet blank will dry over time and may split on the final bangle! Place the wood
Figure A5. Stabilizing the Zebrawood blank in Cactus Juice.
The information contained in this tutorial is the property of E2A Enterprises, LLC, Copyright 2012. Distribution of this information has been authorized for Bear Tooth Woods, Inc per a written license agreement with E2A Enterprises, LLC.
A4
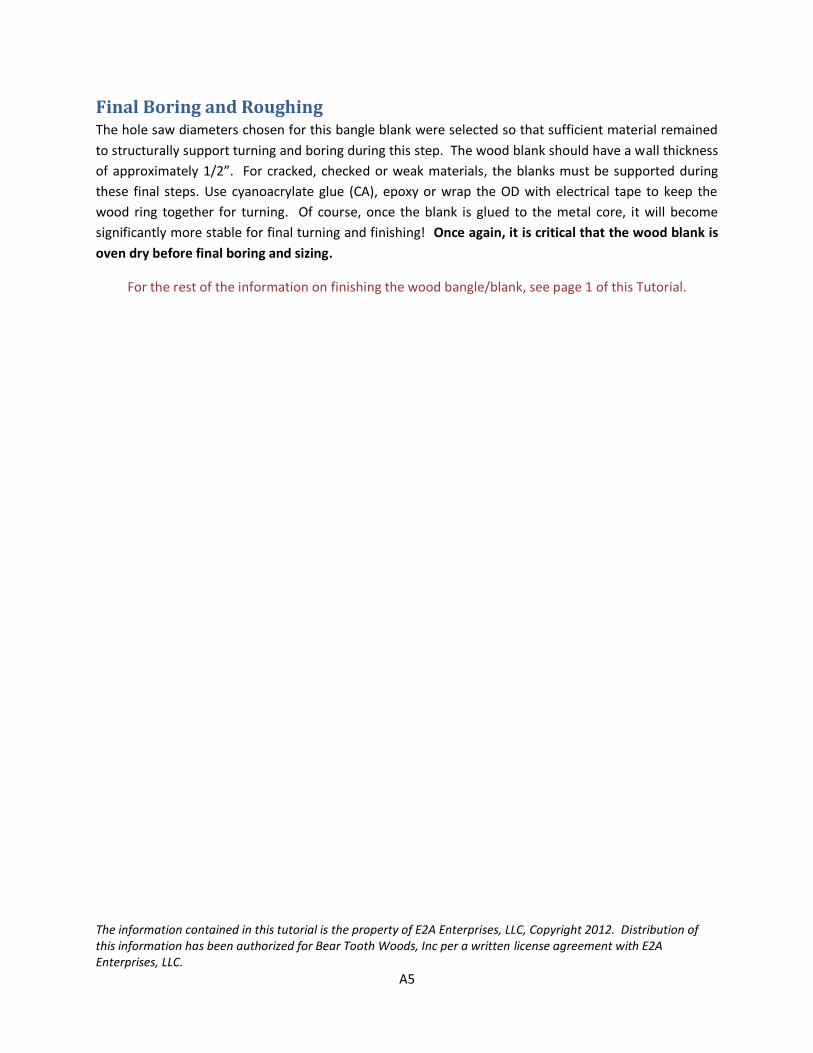
Figure A7 shows the bangle blank being stabilized in a toaster oven while it is wrapped in aluminum foil.
Bake for 1 hour at 200°F to cure the resin. Once the blank is cool, it is ready for final boring of the ID and
rough turning the OD.
Figure A7. Curing the stabilized blank in the toaster oven.
Figure A6. Percent Moisture Gain over time for cross grain maple samples.
The information contained in this tutorial is the property of E2A Enterprises, LLC, Copyright 2012. Distribution of this information has been authorized for Bear Tooth Woods, Inc per a written license agreement with E2A Enterprises, LLC.
A5
Final Boring and Roughing The hole saw diameters chosen for this bangle blank were selected so that sufficient material remained
to structurally support turning and boring during this step. The wood blank should have a wall thickness
of approximately 1/2”. For cracked, checked or weak materials, the blanks must be supported during
these final steps. Use cyanoacrylate glue (CA), epoxy or wrap the OD with electrical tape to keep the
wood ring together for turning. Of course, once the blank is glued to the metal core, it will become
significantly more stable for final turning and finishing! Once again, it is critical that the wood blank is
oven dry before final boring and sizing.
For the rest of the information on finishing the wood bangle/blank, see page 1 of this Tutorial.