63
Malwarebytes Enterprise Edition™ System Administration Guide Version 1.3

Malwarebytes Enterprise Edition™ System Administration Guide Version 1.3

Page ii System Administration Guide
Notices
The products and programs described in this manual are licensed products of Malwarebytes Corporation. This manual contains proprietary information protected by copyright. This manual and all accompanying software and documentation are copyrighted. Malwarebytes Corporation, hereafter referred to as Malwarebytes, does not warrant that the software will work properly in all environments and applications, and makes no warranty or representation, either expressed or implied, with respect to the quality, performance, merchantability or fitness for a particular purpose.
Malwarebytes has made every effort to assure that this manual is accurate. However, information in this manual is subject to change without notice and does not represent a commitment on the part of Malwarebytes. Malwarebytes makes no commitment to update or keep current the information in this manual, and reserves the right to make changes to this manual and/or product without notice. Malwarebytes assumes no responsibility for any inaccuracies and/or omissions with respect to this manual. If you find information in this manual that is incorrect, misleading or incomplete, we would appreciate your comments.
No part of this manual may be reproduced or transmitted in any form or by any means, electronic or mechanical, including photocopying, recording or information storage and retrieval systems, for any purpose other than the purchaser’s personal use, without the express written permission of Malwarebytes.
The Malwarebytes logo, Malwarebytes Enterprise Edition and MEE are trademarks of Malwarebytes Corporation. Microsoft, Windows, Windows Server 2008, Windows Server 2012, Windows 8, Windows 7, Windows Vista, Windows XP, SQL Server, SQL Express, .NET and Internet Explorer are registered trademarks of Microsoft Corporation. All other trademarks or registered trademarks listed belong to their respective owners. Copyright © 2013 Malwarebytes Corporation All rights reserved

System Administration Guide Page iii
Table of Contents
Introduction .................................................................................................................. 1 What is Malware? ........................................................................................................................................... 1 Introducing Malwarebytes Enterprise Edition, Version 1.3 ........................................................................ 1 What’s New in Malwarebytes Enterprise Edition, Version 1.3 .................................................................... 1
System Requirements ................................................................................................... 2 Management Server ...................................................................................................................................... 2
Hardware ......................................................................................................................................................... 2 Software ........................................................................................................................................................... 2 Supported Operating Systems ...................................................................................................................... 2 Supported Microsoft SQL Servers ................................................................................................................. 2
Management Server Console ........................................................................................................................ 2 Hardware ......................................................................................................................................................... 2 Software ........................................................................................................................................................... 2 Supported Operating Systems ...................................................................................................................... 2
Managed Clients ............................................................................................................................................ 3 Hardware ......................................................................................................................................................... 3 Software ........................................................................................................................................................... 3 Supported Operating Systems ...................................................................................................................... 3
System Checks ...................................................................................................................................... 3 System Requirement Checks for Servers ...................................................................................................... 3 Address/Port Validity Checks for Servers ..................................................................................................... 3
MEE Program Installation .................................................................................................................... 5
Introduction to MEE Program Modules ........................................................................................... 13 Home ............................................................................................................................................................ 13 Client module ............................................................................................................................................... 13 Policy module ............................................................................................................................................... 13 Report module ............................................................................................................................................. 13 Admin module ............................................................................................................................................. 13
Home Page Reports ........................................................................................................................... 15 Overall System Status .................................................................................................................................. 15 Online Clients in Last 24 Hours ................................................................................................................... 16 Daily Threat Detections (last 7 days) .......................................................................................................... 16 Clients with Latest Update .......................................................................................................................... 17 Top 10 Threats (last 30 days) ...................................................................................................................... 17 Top 10 Clients with Most Threats (last 30 days) ........................................................................................ 18
Client Module ..................................................................................................................................... 19 Control buttons ............................................................................................................................................ 19
Threat View ................................................................................................................................................... 19 Filter/All ......................................................................................................................................................... 19 Refresh ........................................................................................................................................................... 20 Scan ................................................................................................................................................................ 20 Update Database .......................................................................................................................................... 20

Page iv System Administration Guide
Status indicators .......................................................................................................................................... 20 Client Group Organization panel ................................................................................................................ 21
Right-Click Context Menu ............................................................................................................................ 21 Clients panel ................................................................................................................................................. 22 Customizing Columns on the Client Tab .................................................................................................... 22 Client Information panel ............................................................................................................................. 23
Client Info ...................................................................................................................................................... 23 System Logs .................................................................................................................................................. 23 Security Logs ................................................................................................................................................. 23
Policy module ..................................................................................................................................... 25 Add New Policy ............................................................................................................................................ 25
General Settings ........................................................................................................................................... 26 Protection Settings ....................................................................................................................................... 27 Scanner Settings ........................................................................................................................................... 28 Scheduler Settings ........................................................................................................................................ 29 Ignore List ...................................................................................................................................................... 30 Updater Settings ........................................................................................................................................... 30 Communication ............................................................................................................................................ 31
Edit ................................................................................................................................................................ 31 Remove ......................................................................................................................................................... 31 Disable .......................................................................................................................................................... 31 Refresh .......................................................................................................................................................... 32 Installation Package..................................................................................................................................... 32 Deployment .................................................................................................................................................. 32 Policies panel ............................................................................................................................................... 33 Scanner Settings panel ................................................................................................................................ 33 Policy Deployment panel ............................................................................................................................ 34
Report Module .................................................................................................................................... 35 Report Selector ............................................................................................................................................. 35 Reports .......................................................................................................................................................... 35
Summary Report ........................................................................................................................................... 35 Top Risk Report ............................................................................................................................................. 36 Threat Trend Report ..................................................................................................................................... 38 Client Scan Report ........................................................................................................................................ 39 Policy Deployment Report ........................................................................................................................... 39 Client Signature Report................................................................................................................................ 41 Server System Report ................................................................................................................................... 41
Admin Module .................................................................................................................................... 43 Overview tab ................................................................................................................................................ 43
License Information...................................................................................................................................... 43 Server Address Setting ................................................................................................................................. 43 SQL Database Setting ................................................................................................................................... 43
Signature tab ................................................................................................................................................ 44 Client Package tab ....................................................................................................................................... 45 Administrators tab ....................................................................................................................................... 45 Add New Administrator ............................................................................................................................... 46 Remove Administrator ................................................................................................................................ 48

System Administration Guide Page v
Import Domain User .................................................................................................................................... 48 Synchronize Administrator ......................................................................................................................... 49 Admin Logs tab ............................................................................................................................................ 50 Client Push Install tab .................................................................................................................................. 50
Pre-Requisites – Windows Vista (mandatory) .......................................................................................... 50 Pre-Requisites – Windows 7 (mandatory) ................................................................................................. 50 Pre-Requisites – Windows 8 (mandatory) ................................................................................................. 51 Pre-Requisites – Windows XP (mandatory) .............................................................................................. 51 Pre-Requisites – Creation of Policies (non- mandatory) .......................................................................... 51 Pre-Requisites – Creation of Client Groups (non- mandatory) ............................................................... 51 Scanning the Network – Scan Selection Options ..................................................................................... 52 Scanning the Network – Scan Execution Options .................................................................................... 53 Simulate Client Install .................................................................................................................................. 56 Client Push Install ......................................................................................................................................... 56 Client Uninstall .............................................................................................................................................. 57 Ignore Device(s) ............................................................................................................................................ 57 Copy to Clipboard ......................................................................................................................................... 57
Other Settings tab ........................................................................................................................................ 57 Cleanup Setting ............................................................................................................................................ 57 Domain Setting ............................................................................................................................................. 57 Active Directory Synchronization Setting.................................................................................................. 57

Page vi System Administration Guide

System Administration Guide Page 1
Introduction
What is Malware?
Malware, short for malicious software, is software that is professionally created to overtly or covertly infiltrate a computer system without the owner's informed consent. It is a specific term used by computer professionals to describe a variety of forms of hostile, intrusive, or annoying software.
Software is considered to be malware based on its unwanted and/or unknown behaviors once it infects a computer. Malware includes worms, Trojan horses, spyware, dishonest adware, scareware, crimeware, most rootkits, non-file infector viruses and other malicious and unwanted software.
Malware is self-executing code. Its primary purpose is to make money for its creators.
Introducing Malwarebytes Enterprise Edition, Version 1.3
Malwarebytes Enterprise Edition (MEE), Version 1.3 keeps malware out of systems that are managed by MEE. MEE provides world-class features for:
Advanced Malware Protection and Removal Lightning Quick Scans
Intelligent Heuristics Daily Signature Updates
Multi-language Support Real-Time Protection Automatic Malicious Site Protection
Automated Scanning and Updating
MEE promotes the safety and security of proprietary information—all day, every day.
What’s New in Malwarebytes Enterprise Edition, Version 1.3
Malwarebytes Enterprise Edition has been updated to provide the following new features:
Microsoft Active Directory integration, capable of querying AD to import admin users, computers, groups, and organizational units
Expedited deployment of Malwarebytes managed clients based on membership in Active Directory groups
Set a Domain Query Account to synchronize Active Directory changes Restoration of quarantined objects from any managed client using the Management Console
Ability to utilize third-party tools to deploy managed clients exported as MSI files Automatic configuration of managed client polling intervals based on the number of clients Policy option added which allows managed clients to download signatures directly from the internet
Page 2 System Administration Guide
System Requirements
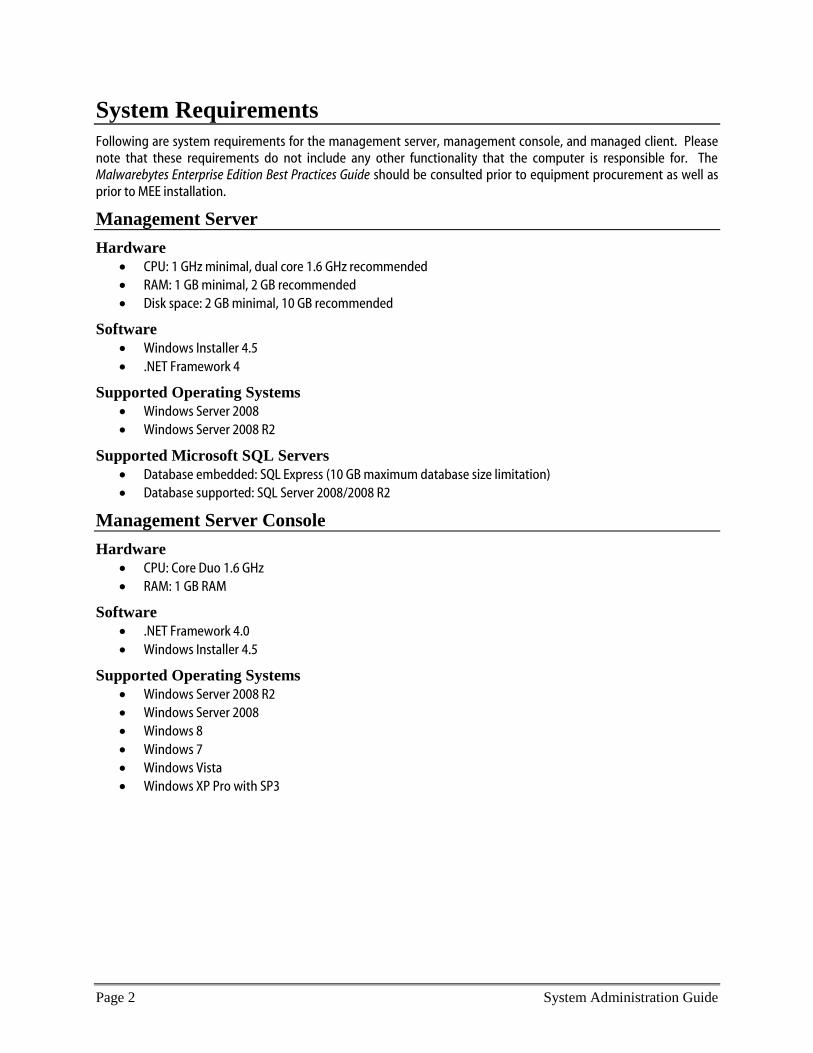
Following are system requirements for the management server, management console, and managed client. Please note that these requirements do not include any other functionality that the computer is responsible for. The Malwarebytes Enterprise Edition Best Practices Guide should be consulted prior to equipment procurement as well as prior to MEE installation.
Management Server
Hardware
CPU: 1 GHz minimal, dual core 1.6 GHz recommended RAM: 1 GB minimal, 2 GB recommended Disk space: 2 GB minimal, 10 GB recommended
Software
Windows Installer 4.5
.NET Framework 4
Supported Operating Systems
Windows Server 2008 Windows Server 2008 R2
Supported Microsoft SQL Servers
Database embedded: SQL Express (10 GB maximum database size limitation) Database supported: SQL Server 2008/2008 R2
Management Server Console
Hardware
CPU: Core Duo 1.6 GHz
RAM: 1 GB RAM
Software
.NET Framework 4.0
Windows Installer 4.5
Supported Operating Systems
Windows Server 2008 R2 Windows Server 2008
Windows 8
Windows 7 Windows Vista Windows XP Pro with SP3

System Administration Guide Page 3
Managed Clients
Hardware
CPU: 1 GHz
RAM: 1 GB Disk space: 100 MB (program + logs)
Software
.NET Framework 3.5
Supported Operating Systems
Windows 8 Windows 7 Windows Vista
Windows XP Pro with SP3
System Checks
The following sections describe system checks that MEE makes during installation.
System Requirement Checks for Servers
If any of the following software has not already been installed, it will be automatically downloaded and installed:
o .NET framework 4.0 (x86 and x64) o Windows Installer 4.5 o SQL Server 2008 R2 Express
If system memory is less than 2 GB, the system administrator receives a warning and must explicitly choose to continue installation.
If free disk space is less than 10 GB but above 2 GB, the system administrator receives a warning, and must explicitly choose to continue installation.
If free disk space is less than 2 GB, the system administrator receives an error and installation aborts.
Address/Port Validity Checks for Servers
If the server address as input does not match the current server address (IP, server name, DNS name, FQDN), the system administrator receives the warning, “The server address is invalid”.
If the input port is invalid or is occupied by other application, the system administrator receives the warning, “The server port is invalid or occupied by other application”.
The server address is the most significant communication approach. Once the server address has been specified, any subsequent changes will cause communication errors. To prevent these errors, select an unchangeable property as the server address. For example, select a fixed server address or fully-qualified domain name (FQDN).

Page 4 System Administration Guide
This page intentionally blank

System Administration Guide Page 5
MEE Program Installation
The following table shows the steps required to install Malwarebytes Enterprise Edition software using the Malwarebytes Wizard. Before you can install, you must obtain the URL and download the software. After the Management System Setup Icon appears on your desktop, you are ready to begin.
1. Click the MEE Setup icon.
2. The Setup Wizard opens.
Click Next.

Page 6 System Administration Guide
3. Read the License Agreement and select the radio button, “I Agree”. Click Next.
4. Copy the License Key from the email that you received from Malwarebytes (or from its distributor). Paste your License Key in the License Key field and click Next.

System Administration Guide Page 7
5. Enter the server address, client communication port and server administration port number if they are not auto-populated for you.
Your server address will be different from the one shown here. Port addresses may be changed if they conflict with existing needs.
Click Next.
6. Choose whether to use the embedded SQL Express database or an existing SQL Server database. If you choose to use an existing database, you must specify the server and instance as well as the SQL Administrator username and password.
Click Next.

Page 8 System Administration Guide
7. Accept the default destination folder for the Malwarebytes Enterprise Edition or browse and select another folder. Click Next.
8. Click Next to confirm installation.

System Administration Guide Page 9
9. The installation progress window displays the installation as it takes place.
10. This window opens following installation.
Leave the mark in the check box to Launch the Management Console Installer.
Click Close.

Page 10 System Administration Guide
11. Click Next to begin installation of the Management Console.
12. Accept the default installation folder for the Management Console or browse and select another folder. Click Next.
.

System Administration Guide Page 11
13. Click Next to confirm installation.
14. The installation progress window displays the installation as it takes place.

Page 12 System Administration Guide
15. The Installation Complete window opens when the installation finishes.
Leave the mark in the check box to accept the default to Launch the Management Console.
Click Close.
16. If you elected to launch the Management Console, the MEE login window opens. The server address is displayed, along with the default Admin user name.
The default password is “Admin”. It must be personalized immediately upon entry.
Enter your password and click Login.

System Administration Guide Page 13
Introduction to MEE Program Modules
MEE is divided into four program modules, each accessible by buttons on the left edge of the Malwarebytes Management Console screen. Each module provides specific program functionality, and in many cases, functionality provided by one module serves as a foundation for the functionality of one or more other modules. Detailed functionality of each module will be described after the program layout has been outlined below. These modules are presented in the order which they appear in the user interface.
Home
Upon entry to the MEE user interface, the Home screen is displayed. While not a program module, the Home screen provides basic system status information pertaining to MEE clients and threats detected by each client.
Client module
The Client module allows the MEE Administrator a dashboard view of all MEE clients which have been installed on the corporate network, as well as computers detected which do not have MEE client software installed. Limited information is available for computers without MEE client software installed. Detailed status information is available for all MEE clients, as well as access to MEE system logs. Many MEE operational functions are available from this screen. Clients may also be organized into a group, which allows MEE functionality to be administered and controlled more easily.
Policy module
The Policy module enables the MEE Administrator to define rules and operational parameters that can be assigned to clients and client groups. In addition, this module allows installation packages to be built and deployed for MEE clients that cannot be installed by standard means.
Report module
The Report module provides a comprehensive set of reports that provide detailed status on all aspects of MEE operation.
Admin module
The Admin module allows the MEE Administrator to control overall functionality of MEE and how this level of functionality is interwoven with client-specific and policy-specific functionality. In addition, this module provides the capability to define and oversee MEE users/administrators, and the specific types of program access granted to them.

Page 14 System Administration Guide
This page intentionally blank

System Administration Guide Page 15
Home Page Reports
When you launch Malwarebytes Enterprise Edition, the initial interface presented is the Home Page, which contains six high-level reports that provide basic status of your protected computers.
Figure 1 – Home Page Reports
Clicking on any of the graphical reports allows them to be superimposed over the Home Page in a larger format. Most reports are also available as individual reports (in the Reports module), accompanied by supporting data. Following is a list of the reports shown on this page, as well as a basic description of each.
Overall System Status
This report shows the condition of your server (good, normal, under stress), number of online clients, clients with latest update, and number of commands completed.
Figure 2 – Overall System Status

Page 16 System Administration Guide
Online Clients in Last 24 Hours
This is a simple graph which shows the number of total MEE clients registered within the last 24-hour period, as well as the number which have been detected as being on-line.
Figure 3 – Online Clients in Last 24 Hours
Daily Threat Detections (last 7 days)
This report shows how many threats were detected on each day. It can show up to seven days. Values along the vertical axis are the number of threats. Values along the horizontal axis are the dates of the threats.
Figure 4 – Daily Threat Detections (last 7 days)

System Administration Guide Page 17
Clients with Latest Update
This report shows how many clients have the latest version of the database. Remnant means the number of clients which do not have the latest update of the database.
Figure 5 – Clients with Latest Update
Top 10 Threats (last 30 days)
This report shows the names of the top ten threats detected during the last 30 calendar days. It also shows the percentage of total threats represented by each one.
Figure 6 – Top 10 Threats (last 30 days)

Page 18 System Administration Guide
Top 10 Clients with Most Threats (last 30 days)
This report shows the top 10 clients which have had the greatest number of malware threats in the last 30 calendar days.
Figure 7 – Top 10 Clients with Most Threats (last 30 days)

System Administration Guide Page 19
Client Module
The Client module enables you to monitor the system health of all clients being managed by Malwarebytes Enterprise Edition (MEE). The screenshot below shows the Client module, in Client View mode. The various main sections of the page are shown highlighted in red. A detailed description of all features follows.
Figure 8 – Client Module
Control buttons
Functionality of the Control buttons is divided between Client module display characteristics and client operations.
Threat View
Threat View specifically relates to detected threats, where found, and when. Threat view is very straightforward and easily understood on first glance. As a result, discussion of this module will focus on the Client View.
Filter/All
The Filter button allows you to filter information relating to clients (client view) or threats (threat view) so only that which is relevant is being displayed. Screenshots of the view-specific filter selection panels are shown below.
Figure 9 – Client Filters (Client View/Threat View)

Page 20 System Administration Guide
Most of the options which you may select need no explanation. The options listed below are explained so that you may utilize them more effectively.
Policy (client view) – Policy created by MEE Administrator and deployed to client computers
Status (client view) – Status of the MEE client (offline, online and idle, scanning, unregistered)
Policy Compliance (client view) – Simply whether the policy being used by client computer(s) is current or out-of-date
Operation (threat view) – The end result of MEE operation upon a detected threat (success, none, <blank>, quarantine, delete on reboot, or detail pertaining to blocked websites)
Object Scanned (threat view) – The specific object (file, memory, registry key) where a threat was detected
To cancel the filtered view, click All.
Refresh
Refresh will simply the refresh screen information. The Auto Refresh button (to the right of the Control buttons) will continually maintain updated screen information, although it may provide to be disruptive should the information you are most concerned with is not on the first page of the display.
Scan
Scan allows a scan to be performed on a selected client (in the Clients panel). There are three types of scans which may be performed. These are:
Quick Scan – A scan of all system locations where malware is known to install itself. This is the scan type recommended by Malwarebytes.
Full Scan – Checks all files on selected drives as well as all areas scanned during a Quick Scan.
Flash Scan – Scans system memory and startup locations for active infections. Other key locations are also scanned using heuristics.
Update Database
This option forces an immediate signature database update on the MEE client, using the current signatures residing on the MEE server. If the selected client is offline, a notification message is displayed to inform you that a database update will occur once the client returns to online status.
Status indicators
Status of all MEE clients is shown in the upper right corner of the Client module. Defined status settings are:
Online – Networked computers with MEE installed and running
Offline – Networked computers with MEE installed, but powered down or no user logged in
Scanning – Networked computers with MEE installed and currently running a scan
Unregistered – Networked computers who have had MEE client installed, but have lost capability to communicate with MEE server (typically due MEE server reinstall, IP address change, switch from IP address to FQDN, or switch from FQDN to IP address)

System Administration Guide Page 21
Client Group Organization panel
This panel allows addition of Client Groups, as well as certain operations based on specified Client Groups. The concept of Client Groups is a simple one. This allows client computers to be organized into groups that represent the way in which they are used, or represent the people/departments which use them. Groups allow the MEE Administrator to execute scans and updates in a coordinated manner. Combined with use of policies (to be discussed in the Policy Module section of this manual), server load and network throughput can be maintained at high levels throughout the enterprise while all necessary communication between MEE server and the protected clients are taking place.
The presentation of this panel is similar in nature to Windows Explorer. Initially, the only group that exists is called Ungrouped Clients. You may add groups to suit your specific needs, and you may nest groups as deeply as you wish to create a granular structure, mimicking a Windows file system (as an example).
Right-Click Context Menu
All operations available in the Client Group Organization panel are performed using the right-click context menu, as shown below.
Figure 10 – Client Group Organization context menu
Following is a description of the operations which are available on this menu:
Add – Add a new Client Group. The Group name must be unique as it pertains to the hierarchy in the group structure. To clarify, you could create a Sales group under North America as well as a Sales group under Europe, but you could not create two groups named Sales under North America.
Add AD OU as Group – Add an Active Directory Organizational Unit as a Client Group. If your company utilizes Active Directory, you are already familiar with this concept as it is the basis of Group Policy Updates. This provides an extension to your existing methodology.
Rename – Rename a Client Group. Names must maintain uniqueness within the same hierarchical level of the tree. Groups which have been added as Active Directory OUs may not be renamed.
Remove – Remove a Client Group. If a Client Group is removed and there are computers which are members of that group, they will be moved to Ungrouped Clients.
Run Quick|Full|Flash Scan Now – Run a scan of the type selected on all members of a selected Client Group. The various scan types are described in the Control discussion earlier in this section.

Page 22 System Administration Guide
Update Client(s) Database Now – Update threat signature databases on all members of a selected Client Group. Please note that while you could perform this operation on All Clients (the highest level of the tree), you may experience network performance issues as a result of the number of clients receiving updates concurrently.
Switch to Other Policy… – Change all members of a selected Client Group to a new protection policy.
Move to Group… – Move a selected Client Group to a new location in the tree, as a child directory of another group selected from a pulldown menu.
Clients panel
This panel provides high-level information for all of the client computers in the network. For the most part, this panel is self-explanatory. Three items do merit additional comments.
To the left of each computer name is a status indicator (described earlier in this section). These status indicators may have a small “P” superimposed over the icon if the computer’s Protection Module is enabled.
New Policy only contains information on an interim basis. When the policy associated with a client/client group is changed, Policy shows the “before” state and New Policy shows the “after” state until the next time that the client communicates with the server, which is defined on the Communication tab for the given policy in the Policy module. Once the client communicates with the server, Policy will show the “after” state and New Policy will be cleared.
The status line which contains computer information may at times be highlighted in alternate colors. If this line is highlighted in red, this indicates that a threat was detected. Even if the threat is removed, the red highlight will remain until the next scheduled scan, or until a manual scan is initiated by the MEE Administrator. This is done specifically to draw attention to the event. If highlighted in yellow, which indicates the client is using an outdated policy or outdated database signatures. If the situation clears, the yellow highlight will return to normal. If the highlighting remains yellow, that likely indicates a communication problem between the client and server which prevents the client from getting current information.
Customizing Columns on the Client Tab
Information shown on the Client tab is easily customized. By right-clicking on any column name, you can customize the columns which appear. Following are the various information fields which may be displayed. Fields shown in bold print are displayed by default.
● Domain/Workgroup ● Last Scan Result
● Logon User ● Last Offline Time
● Last Scan Time ● OS Service Pack
● Database Date ● IP Address
● Database Version ● Physical Address
● Policy ● Subnet Mask
● New Policy ● Default Gateway
● Status ● Preferred DNS
● Client Version ● Alternate DNS
● Last Logon User ● Managed Client Version
Checked fields may be hidden by clicking the Hide button. Unchecked fields may be displayed by clicking the Show button. Clicking the checkmark to change the state of the checkbox also has the same effect. You may also clear all client logs from this right-click menu.

System Administration Guide Page 23
Client Information panel
This panel provides detailed information pertaining to a client which has been selected in the Clients panel. This panel is present only when a client has been selected. Information displayed is broken down into three categories. Each is shown below, with supplemental screenshots to illustrate their purpose.
Client Info
Although detailed, this can be considered as summary information for the computer, its network connection, basic usage information, and certain Malwarebytes installation parameters. All information shown is read-only.
Figure 11 – Client Info panel
System Logs
This panel provides status for the MEE client on the protected computer. Scans and abbreviated scan results are available here, as are dates, times and results of signature database updates. If a client is highlighted in yellow (in the Clients panel) – indicating an update issue – you can gain further information regarding that issue here.
Figure 12 – System Logs
You may use the scrollbar on the right side of this panel to scroll through all status information which is available. Initially, status information is available going back to installation of the MEE client. If logs have been subsequently purged, any information occurring before that date will no longer be available.
Security Logs
This panel provides information about specific threats which have been detected on the selected client, as well as the resolution of each threat.
Figure 13 – Security Logs

Page 24 System Administration Guide
This page intentionally blank

System Administration Guide Page 25
Policy Module
The Policy Module allows the MEE Administrator to define one or more policies which describe specifically how the MEE client software will protect computers. Once defined, installation packages may be created which allow pre-configured MEE client software to be packaged for deployment using alternative means. In this section, we will discuss each of the features and components which provide this functionality. The following is a screenshot of the Policy Module screen, marked (in red) to show the major sections of the screen.
Figure 14 – Policy Module
The Controls section operates primarily on selected policies, but also provides some generic functionality. The Policies section displays all policies which have been defined. Scanner Settings show settings for the selected policy – in this case, the Default Policy. Policy Deployment Settings show which computers that the selected policy is defined for. We will begin the discussion of policies by adding a new policy.
Add New Policy
Clicking the Add button in the Controls section launches the New Policy dialog box. This dialog box contains several tabs which allow a policy to be created which is very specific to your needs.

Page 26 System Administration Guide
Figure 15 – Add New Policy/General Settings
General Settings
The General Settings tab is used to name the policy, and to define some basic policy behavior. Most of the settings here are self-explanatory, but a few are worth mentioning.
The name specified for the policy must be unique.
It may be necessary to terminate Internet Explorer during removal of certain threats. If this is the case, this checkbox may be checked and a scan executed after the policy has propagated out to the client. Terminating Internet Explorer is obviously disruptive to the user, so this should only be done when necessary.
The MEE client is programmed to communicate information about threats detected to Malwarebytes corporate servers to assist us in providing effective anti-malware solutions. At no time is any information pertaining to your machines, your networks or your environment transmitted. You may uncheck the Anonymously report usage statistics checkbox if you wish, with no loss of functionality.
You may check the Create Right Click Context Menu checkbox so that the user of a computer protected by the MEE client can scan an individual file from within Windows Explorer by right-clicking the mouse. The context menu is available to the user whether or not this checkbox is checked, only the presence/absence of Malwarebytes Anti-Malware as a menu choice is affected.

System Administration Guide Page 27
Figure 16 – Add New Policy/Protection Settings
Protection Settings
The Protection Settings tab is used to enable/disable real-time protection on the protected computer, and specify behavior of the protection module. By default, the protection module is disabled. When disabled, the green box with the embedded checkmark is replaced by a red box with an embedded ‘X’. Once enabled, settings are as shown in the above screenshot. Information about each of the Protection Settings is as follows:
While a majority of MEE users choose to use file execution blocking, there are situations that arise which may require that file execution blocking be disabled. These situations are rare, and are usually determined as a result of troubleshooting with or without support of Malwarebytes Technical Support. A majority of these cases can be handled through usage of the Ignore List, which will be discussed later in this section.
As with file execution blocking, most MEE users prefer to use malicious website blocking. In rare cases, a user may want or need to visit websites of this type. In this case, malicious website blocking may be disabled or blocking of specific websites may be disabled through use of the Ignore List, to be discussed later.
Advanced Settings allow the MEE Administrator to configure the MEE client to run with less of a user interface than normal, by selecting Silent mode or Limited user mode. In Silent mode, the only indication that Malwarebytes Anti-Malware is present on their machine is the right-click context menu, if that has been enabled on the General Settings tab. In Limited user mode, Malwarebytes Anti-Malware is present as an icon in the system tray, but only with options to start a scan or to check for updates. The right-click context menu is available there as well, if enabled via General Settings.
Auto Quarantine allows files detected as threats to be automatically moved to Quarantine, assuring they cannot be executed or modified. If this option is unchecked, detection of files classified as threats will result in notifications presented to the user while the file remains unaffected.

Page 28 System Administration Guide
WARNING: If legitimate files are detected as threats and Auto Quarantine is turned on, functionality related to these files would be adversely affected. Legitimate files which are detected in this manner should be added to the Ignore List.
Startup Delay allows the Protection Module to delay activation by the number of seconds specified. In certain circumstances, computers with MEE clients using the Protection Module experience performance issues, usually relating to slow startup. This is most common with computers using the Windows XP operating system, though it may occur with other OS versions as well, depending on specific programs that are executed or initiated at startup. If this occurs in your environment, contact Malwarebytes Business Support for troubleshooting assistance.
Figure 17 – Add New Policy/Scanner Settings
Scanner Settings
The Scanner Settings tab specifies behavior of Malwarebytes Anti-Malware during scanning (as compared to real-time protection offered by the Protection Module). Objects that may be selected are straight forward. The remaining settings are addressed as follows:
There is no provision for scanning files or objects which are encrypted or password-protected.
A Potentially Unwanted Program (PUP) is defined based on the following criteria:
o Does a user intentionally install the program?
o If the user notices the program and sees that it can be removed, do they intentionally remove it?
o Do users typically refer to the program as malware, virus, or other non-benign label?
A Potentially Unwanted Modification (PUM) typically takes the form of a registry edit or Active Directory Group Policy edit. By default, Malwarebytes will remove the PUM. You may override the default action via settings, or place a specific legitimate edit into the Ignore List.

System Administration Guide Page 29
Peer-to-Peer (P2P) software is not shown in scan results by default. It is becoming more accepted as a means of updating commercial software, and is sometimes being used by corporate customers for software distribution within the enterprise. You may override the default setting based on your own requirements.
Figure 18 – Add New Policy/Scheduler Settings
Scheduler Settings
The Scheduler Settings tab allows addition, modifications and deletions of scans that are controlled by the policy. Added information to further describe some of the Scheduler options are as follows:
Wake computer from sleep to perform task allows a computer to be awoken from sleep mode if the client computer is equipped with Wake-on-LAN hardware capability. If the computer is not properly equipped, the scan will not occur at the specified time but will instead occur based on the recovery setting specified on this tab.
Perform scheduled scan silently from system account when checked means that scans will occur in the background, with no user interaction required. When unchecked, the scan is executed in the foreground by the logged-in user account.
Terminate program when scan completes successfully checkbox determines whether the Malwarebytes Anti-Malware user interface remains present on the user’s screen if no threats were detected during a scan. This checkbox is relevant only if scans are executed by the logged-in user rather than the system account.
Restart the computer if required for threat removal is not set by default. Checking this box would compromise the integrity of work being performed by that computer if a restart occurs. A log entry is created if a restart is required.
Once a new scan has been defined, you may highlight the scan in the New Policy window to edit or delete the scan. You may also add additional scans to be governed by the policy.

Page 30 System Administration Guide
Ignore List
The Ignore List provides the capability for the MEE Administrator to specify IP addresses, files, directories, and registry keys to be ignored from scanning. The primary purpose of this feature is to assure that legitimate files, directories and registry keys are not misinterpreted as threats during scans, and that IP addresses which may house files of this type do not trigger web blocking in the Protection Module. While threat signatures are highly accurate, it is impossible to guarantee that a string of data in a legitimate file will never be misinterpreted as a false positive. The following information will assist you with certain types of Ignore List entries:
The specification C:\Users\RNixon refers to a file named RNixon in the C:\Users directory.
The specification C:\Users\RNixon\ refers to the C:\Users\RNixon directory and all files within that directory.
The specification C:\Users\RNixon\* refers to the C:\Users\RNixon directory, all files within that directory, and any embedded subdirectories.
Both private and public IP addresses may be specified.
There is currently no provision for specification of hostnames or fully-qualified domain names. IP addresses that are dynamically-assigned will present issues with regard to the Ignore List.
Figure 19 – Add New Policy/Updater Settings
Updater Settings
The Updater Settings tab controls how and when the MEE client will receive database signature updates which allow it to always be protecting against the most current threats. The MEE client normally receives signature updates for the MEE server (referred to on this screen as the Management server). Depending on a number of factors relating to server performance, network performance and number of installed clients, this may not be the best answer. For this reason, the Updater Settings tab allows customization of this process.
System Administration Guide Page 31
You may specify that an alternate distribution source be used, and choose whether it be your primary source for signature updates, or a backup for the MEE server. If you do choose an alternate source, you must specify an internet URL, IP address or a Windows UNC file specification where the signature update can be found. Should the alternate source be unavailable or unable to provide the signature updates, a failover path (using the internet) is available. If you wish to use this method, please contact Malwarebytes Business Support for assistance in getting this process set up.
You may also choose to use the internet as your primary source for signature updates. If this is the case, MEE will automatically acquire updates from a Malwarebytes content server. No further address specification is required.
If your network environment requires that internal computers utilize a proxy server, you can utilize the Proxy setting… button to specify a proxy server and port number. If usage of that proxy server requires authentication, a username and password may also be specified as part of this choice.
Communication
The Communication tab allows the interval between policy/signature updates to be specified, and if a proxy server must be used. The default setting is to check every five (5) seconds without using a proxy. While the proxy setting is strictly based on requirements defined by your network administrator, it is not recommended that the default time interval be used. Malwarebytes encourages you to assure that signature updates are readily available for all clients, and that policy changes made on the MEE server get pushed out to all affected MEE clients. At the same time, checking for updates at such a short interval will cause high levels of network traffic.
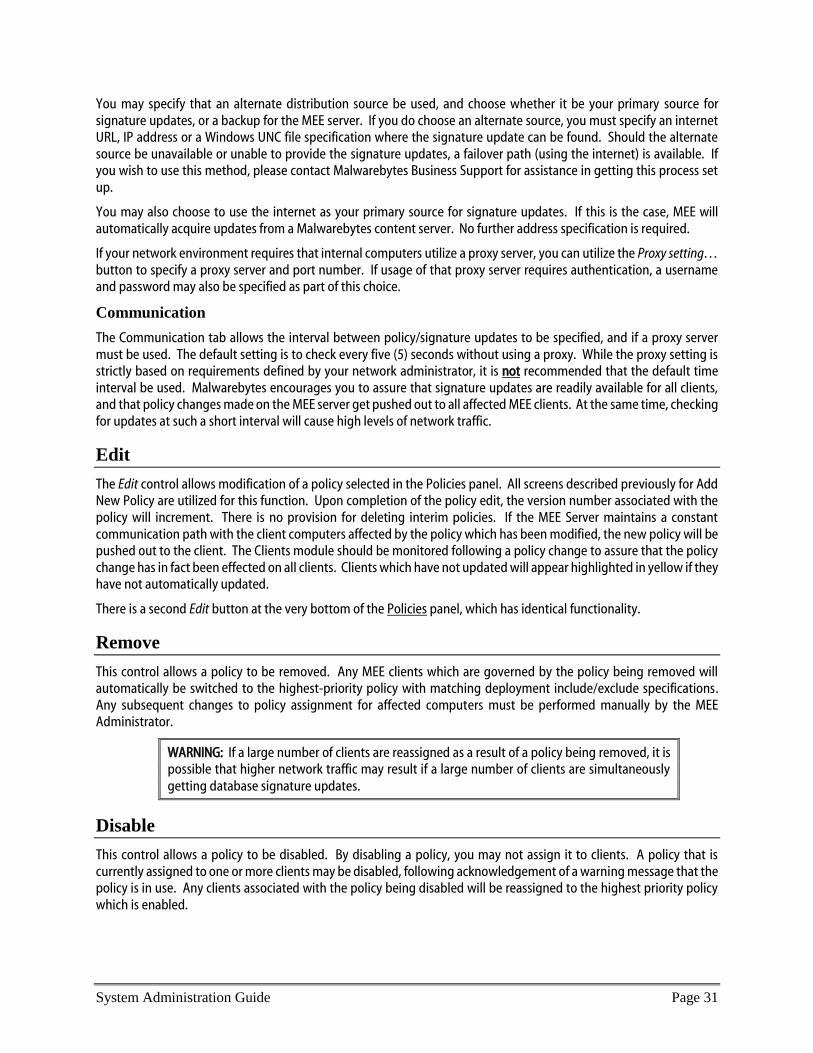
Edit
The Edit control allows modification of a policy selected in the Policies panel. All screens described previously for Add New Policy are utilized for this function. Upon completion of the policy edit, the version number associated with the policy will increment. There is no provision for deleting interim policies. If the MEE Server maintains a constant communication path with the client computers affected by the policy which has been modified, the new policy will be pushed out to the client. The Clients module should be monitored following a policy change to assure that the policy change has in fact been effected on all clients. Clients which have not updated will appear highlighted in yellow if they have not automatically updated.
There is a second Edit button at the very bottom of the Policies panel, which has identical functionality.
Remove
This control allows a policy to be removed. Any MEE clients which are governed by the policy being removed will automatically be switched to the highest-priority policy with matching deployment include/exclude specifications. Any subsequent changes to policy assignment for affected computers must be performed manually by the MEE Administrator.
WARNING: If a large number of clients are reassigned as a result of a policy being removed, it is possible that higher network traffic may result if a large number of clients are simultaneously getting database signature updates.
Disable
This control allows a policy to be disabled. By disabling a policy, you may not assign it to clients. A policy that is currently assigned to one or more clients may be disabled, following acknowledgement of a warning message that the policy is in use. Any clients associated with the policy being disabled will be reassigned to the highest priority policy which is enabled.

Page 32 System Administration Guide
WARNING: If a large number of clients are reassigned as a result of a policy being disabled, it is possible that higher network traffic may result if a large number of clients are simultaneously getting database signature updates.
Refresh
This control simply redisplays the Policies panel using the most current policy information.
Installation Package
This option provides the capability of creating a MEE client installed that can be used exclusive of MEE’s Client Push Install process. This is advantageous if your organization uses third-party installation software, Active Directory Group Policy updates, or has external employees which connect to your network via VPN. Clicking the Installation Package button launches the Export Client Package window, as shown below.
Figure 20 – Export Client Package window
Choose a directory in which the client package will be installed. You can use the standard Windows explorer dialog to browse to the location of your choice. You must select a client group which the client will be part of once installed. You may choose whether the Malwarebytes client will be visible to the user by checking or unchecking the setting regarding start menu and desktop icons. You may also create a single client setup file, as either a stand-alone executable (EXE) file or a Windows Installer (MSI) file. An EXE file is ideal if sending the client via email, placing it on a shared network drive, or by transport on a USB stick. The MSI file is ideal when using third-party installers or AD Group Policy updates. The single file method is recommended. Once all settings have been specified, click Export and the file will be created in the specified directory.
Deployment
The Deployment Wizard is a series of four screens invoked by clicking the Deployment control at the top of the screen. The purpose of this is to make a new or modified policy effective on one or more MEE clients. The second screen of the wizard allows the policy to be deployed to all clients, or to a customized subset using a combination of inclusion and exclusion. A screenshot of this screen is shown below.

System Administration Guide Page 33
Figure 21 – Policy Deployment Wizard (screen 2)
Clicking the Add button in either the Include or Exclude areas of this screen will allow selection of five different parameters which can be used. Parameters available are:
● IP Range ● Domain ● Subnet ● Client Group ● Host Name
Once deployment parameters have been selected, you must confirm your settings, and finally click Deploy Now to deploy the policy to selected computers.
Policies panel
The Policies panel shows basic information about all policies which have been defined. All information fields displayed here have already been discussed in this section with one exception – policy priorities. This setting determines which policies are assigned to new clients as well as clients whose assigned policy has been removed or disabled. Policy priorities are determined by using the Move Up or Move Down buttons on the right-click context menu.
When performing a client push install via the Admin module, a policy is specifically assigned to the client. When changing a policy for a client via the Client module, a policy is specifically assigned there as well. If a policy is removed or disabled, clients who were associated with the now-absent policy are reassigned, and that is where policy priorities come into play. Based on the include/exclude specifications for enabled policies, those clients will be reassigned to the highest priority policy that applies to them. If multiple policies exist which satisfy include and exclude specifications, care should be taken to choose the correct policy for your needs.
Scanner Settings panel
This panel shows scanner settings that have been configured for the policy selected in the Policies panel. All information shown here is read-only.

Page 34 System Administration Guide
Policy Deployment panel
This panel shows deployment settings that have been configured for the policy selected in the Policies panel. All information shown here is read-only.

System Administration Guide Page 35
Report Module
The Report Module provides a series of reports designed to show how Malwarebytes Enterprise Edition is protecting the computers in your environment, breaking down information in a number of formats. All of the reports can be viewed using the graphical interface. Additionally, they can be printed using the standard Windows print dialog.
Report Selector
At the top of the Report Module interface is the report selector. This selector allows the user capability to select the specific report to be viewed, the time frame which the report represents, and also provides print capability. The selector is shown here.
Figure 22 – Report Selector
Reports that are available here via a pulldown menu are:
Summary Report
Top Risk Report Threat Trend Report Client Scan Report
Policy Deployment Report Client Signature Report
Server System Report
After selecting a report, you may choose the time frame for the report. The start and end dates may be entered directly, or you may use the pulldown feature to display a small calendar from which dates can be selected. An Auto Refresh button allows data which appears on the report to be refreshed in real-time. If you are analyzing information which you can see only by scrolling down, you may wish to uncheck the Auto Refresh feature, as each refresh will return you to the top of the data display.
Reports
The remainder of this section will describe each of these reports, their purpose, and how they may also be used for troubleshooting of certain issues which may not be easily detected.
Summary Report
The Summary Report is a high-level dashboard view of MEE system operation. It contains six brief summaries, all based on the time frame specified. The summaries provided are:
Overall System Status – A brief table which sums all of the information shown in the other five summaries, as well as the relative load on the MEE server.
Online Clients in Last 24 Hours – A graphical representation of the number of clients that have been monitored in the most recent 24-hour period, as well as the number of clients that are known to MEE. The two quantities may easily differ from one another for a variety of legitimate reasons.
Daily Threat Detections – A bar graph showing the number of threats detected (by day) over the requested time frame.

Page 36 System Administration Guide
Clients with Latest Update – A pie chart which shows the ratio between clients whose threat signatures are up to date and those whose signatures are obsolete. For optimum performance, all clients should be operating with up-to-date signatures.
Top 10 Threats – A pie chart showing a maximum of ten threats which rank highest in terms of detections during the requested time frame. Each is shown with a unique color for ease of reading. The correlation between color and threat name is shown at the bottom of the pie chart. If the threat name is longer than the space allocated for its name, the threat name will appear with a group of periods in its name. Hovering over the threat name with your mouse will display a tooltip so that the full threat name can be viewed.
Top 10 Clients with most Threats – A pie chart showing a maximum of ten (10) clients with the highest number of detected threats during the requested time frame. Each is shown with a unique color for ease of reading.
All of the summaries which appear here are supplemented by more detailed reports that provide additional detail. The primary purpose here is simply to provide the high-level view of several topics, all at the same time.
Top Risk Report
This report provides three “top ten” pie charts with corresponding tables that provide further information. These three charts are:
Top 10 Threats – Pie chart focused on specific threats, with information provided about users, computers and number of times that the threat has occurred.
Figure 23 – Top 10 Threats Report

System Administration Guide Page 37
Top 10 Clients with most Threats – Pie chart focused on the number of threats encountered by each computer. There is no reference to specific threats involved.
Figure 24 – Top 10 Clients with Most Threats
Top 10 Users with most Threats – Pie chart focused on the number of threats encountered by each user. There is no reference to the specific threats involved.
Figure 25 – Top 10 Users with most Threats

Page 38 System Administration Guide
Threat Trend Report
This report provides vertical bar graphs to show threat detections for each week and each day of the specified time frame. There is no detail provided as to the number of threats, or to the computers or usernames involved.
Figure 26 – Weekly Threat Detections report
Figure 27 – Daily Threat Detections report

System Administration Guide Page 39
Client Scan Report
This report shows the ratio between completed client scans and in process scans over a specified time frame. The number of in process scans should be at or near zero, as these should reflect only those initiated but not yet completed. In process scans that do not fit these criteria indicate problems on a client which prevent scan completion.
Figure 28 – Client Scan Report
Policy Deployment Report
This report is a group of four subreports which focus specifically on policies used by MEE clients. Please note that information shown is current…there is no relation to selected time frames. These subreports are:
Policy Distribution – This report shows a graphical representation of clients utilizing different policies/policy versions. MEE initially assigns a default policy which can be customized by the administrator, but also allows creation of new policies tailored more closely to specific needs of individual computers, departments, or users. If the Up-to-date versus Out-of-date report indicates the presence of clients using obsolete policies, this report will tell you which policies are affected, allowing the situation to be corrected.
Figure 29 - Policy Distribution report

Page 40 System Administration Guide
Up-to-date versus Out-of-date – This report shows the ratio between MEE clients with up-to-date policies as compared to out-of-date policies. This implies one or more policies which have been modified over time, but not at all clients who use these policies have updated to the newest policy version. This indicates a communication issue between these clients and the MEE Server, and is clarified further by the Policy Distribution report.
Figure 30 – Up-to-date vs. Out-of-date report
Protection Module Status Statistics – This report shows the ratio between MEE clients who are taking advantage of real-time protection (Protection Module enabled), or are simply using MEE for periodic scans (disabled).
Figure 31 – Protection Module Status report
Client Group Statistics – This report shows the distribution of computers by client groups in a pie chart format, with specific number of clients in each group shown in a corresponding table. Any computers that are listed as Ungrouped Clients are also shown. Because network throughput can be negatively impacted by signature updates, scans and reporting of scan results, it is ideal to utilize Client Groups to equally distribute this load as widely as possible to minimize traffic spikes. This report is extremely valuable in that regard.

System Administration Guide Page 41
Figure 32 – Client Group Statistics report
Client Signature Report
This report shows two pie charts, the first representing the count of MEE clients sorted by Signature Database version, and the second sorted by the number of clients (in descending order) based on the Signature Database version used. Information presented on the two pie charts is essentially the same. Only the sort order is different. Information shown here is current as of the time that the report is generated. There is no relation to selected start and end dates.
Figure 33 – Client Signature report
Server System Report
This report shows various statistics pertaining to the MEE Server in a table form. While a majority of the information presented here is static in nature, the administrator should pay attention to the amount of system disk free space and database disk free space. Both of these values are critical to system operation.

Page 42 System Administration Guide
Figure 34 – Server System report
System Disk Space is a finite number, and on this report is limited to drive C (the primary disk drive).
System Disk Free Space also refers specifically to drive C. MEE will have an effect on this value by creation of server logs, client logs being processed and logs which are created as a result of infrastructure operations. Additionally, if SQL Server is used in place of SQL Express, increases in Database Disk allocation will cut into System Disk Free Space as well. While no large changes are expected here, this should be monitored on a periodic basis.
Database Disk Space represents the amount of disk space that has been allocated for database usage. If SQL Express is used, this number should not exceed 10000 MB (megabytes). If SQL Server is used, this value will often exceed 10000 MB, and may increase over time if the SQL Database Administrator determines that higher disk allocation is required.
Database Disk Free Space is a critical parameter, and represents the difference between Database Disk Space and the amount of disk that is currently being used. If this value drops to near zero or begins to decrease at a more rapid pace than has been noted during monitoring, increased disk allocation (SQL Server), database maintenance (both SQL Server and SQL Express) or database migration (SQL Express) may be required. This parameter should be monitored on a regular basis.
Please note that all of these values are determined to be accurate only when the MEE Server is installed on a physical server. If installed on a VMware virtual machine, known accuracy issues exist.

System Administration Guide Page 43
Admin Module
The Admin (Administration) module is used to perform server administration tasks. The Admin page features the following tabs:
Overview Signature
Client Package Administrators Admin Logs
Client Push Install Other Settings
Overview tab
The Overview tab displays information pertaining to your MEE product license, server communication settings and SQL database settings. All of these settings are modifiable by the MEE Administrator. Information for each setting is presented below.
License Information
This panel provides information pertaining to your Malwarebytes product license, as well as the capability to contact Malwarebytes Sales regarding licensing and licensing questions, and to enter the product license which you have obtained for your MEE installation.
Server Address Setting
The Server Address Setting panel shows current settings for the MEE Server Address, Client Communication Port number, and Server Communication Port Number. Initially, the Server Address is based on the computer’s IP address. You may also use a fully-qualified domain name (FQDN) instead of an IP address.
WARNING: The Server Address is used for all communications between the MEE Server and MEE Clients deployed on computers/workstations. If the IP address is changed after any client software has been deployed, communication failures between client and server will occur. Use of a static IP address is highly recommended. If this is not possible, a fully-qualified domain name should be used instead.
Port numbers shown are default ports used by MEE. The Server Administration Port uses the standard port number assigned for SSL server communications. If the computer used for MEE is also home to other web-based services/applications, you should change this port number to prevent conflicts.
SQL Database Setting
The SQL Database Setting panel provides shows the data storage mechanism that is used by MEE. It also allows a new external database/instance to be specified in place of the existing database, regardless of whether the existing database is SQL Express or an external SQL Server. If an external SQL Server database is specified, the following information must be supplied.
Database Address – The IP address/FQDN of the computer on which SQL Server is installed (if different than MEE), and the pre-existing instance name, in the format:
IP-or-FQDN\instance

Page 44 System Administration Guide
SA User Name – The pre-existing username of the SQL Administrator (or another database user with permissions set to the same level as the SQL Administrator).
SA Password – The password assigned to the database user
The new database/instance must already exist prior to this change, and security permissions must be set appropriately for the SQL Administrator username that is also specified as part of this change.
WARNING: If a change is to be made to the SQL Database setting after MEE has been put into operation, the customer must take responsibility to migrate all MEE data from the old instance to the new instance prior to implementation of the database change. Depending on the volume of data to be migrated, the amount of time required to perform this task should be considered.
Signature tab
The Signature tab displays current settings pertaining to threat signatures and updates, and provides capability to change the time interval between updates. Each time that signatures are updated, the version number and timestamp of the threat database will be updated. The update frequency controls how often signatures can be updated, and this may be overridden by clicking the Check Update Now button.
Clicking the Change… button associated with Update Frequency will display the Update Settings dialog as shown below.
Figure 35 – Signature Update Settings
Threat signatures are updated on a regular basis. One of several time intervals may be selected using the pulldown menu shown. If a direct connection to the internet is not available and a proxy server is used, the proxy server address and port may be entered after checking the Use proxy server checkbox. If authentication is required to use the proxy server, check the Need user authentication checkbox and enter a valid username and password.

System Administration Guide Page 45
Client Package tab
The Client Package tab allows a new client package (the Malwarebytes Anti-Malware product) to be imported so that it is available for customization and deployment to clients. This tab displays the version and timestamp of the most recent client package which has been imported. Initially after installation, the version and timestamp refer to the client package that is bundled with MEE.
By default, the MEE server checks online every thirty (30) minutes for a new version of Malwarebytes Anti-Malware. After a new version is detected, the Update button becomes enabled and you can update the client package.
The Client Package Tab contains a single panel, Client Package Information. This panel displays the version number of the client product in use, its timestamp, and the date and time on which it was imported.
To update the client package, click the Update button. If there is a new client package available, it will be updated from Malwarebytes internet servers. If there is no new client package available, a notification message is displayed. If a new client package is available for update, click the Import New… button to launch the Import Client Package dialog as shown below.
Figure 36 – Import Client Package dialog
Click Browse to use an Explorer-style dialog to select a directory where the client package update will be stored, and click the Import button. The update will then be saved to the specified location.
Administrators Tab
The Administrators tab contains a list of system users/administrators authorized to use MEE. Within this discussion, the term user will apply to both MEE users and MEE administrators. For each user, the list contains name and contact information, the IP address from which the user last logged on, and the date and time of that logon. The Administrators tab is shown below.

Page 46 System Administration Guide
Figure 37 – Administrators tab
At the bottom left of the screen are four options which allow addition, deletion and modification of user information.
Add New Administrator
Clicking the Add new administrator… button allows the addition of one or more new MEE users via the Add New Administrator window, which pops up at the center of the screen. That window is shown below.
Figure 38 – Add New Administrator dialog

System Administration Guide Page 47
The behavior of this panel is dependent on whether users are being input directly via this panel, or being imported from Active Directory. This determination is made by checking construction of the User Name as it is being typed. If User Name contains a backslash (\) or at sign (@), data entry access to most other fields is immediately disabled, the assumption being that data will instead originate from Active Directory.
When MEE is integrated with Active Directory, you also have the ability to import AD groups. If the user name fits the criteria for an Active Directory domain, the is user group in AD checkbox becomes available for selection. Because a group is not a user, it has no password associated with it. For that reason, a group cannot logon to MEE as a user. The value in adding an AD group here is that every member of the AD group becomes a valid MEE user because of their AD group membership.
Another addition to MEE 1.3 is the ability to assign a Role to the new administrator. If Role is defined as Administrator, the new administrator has full control of MEE. If Role is set to User, the Permissions button allows granular authority to be specified with the Administrator Permission panel. A screenshot of a portion of that panel is shown below.
Figure 39 – Administrator Permission panel
Five primary roles have been defined, which may be selected using the Template pulldown at the upper left corner. Once selected, you may choose specific permissions that you wish to be assigned to that role. In the screenshot above, only Client-based roles are shown to illustrate capabilities. A full list of default permissions assigned to each role is shown in the table below.
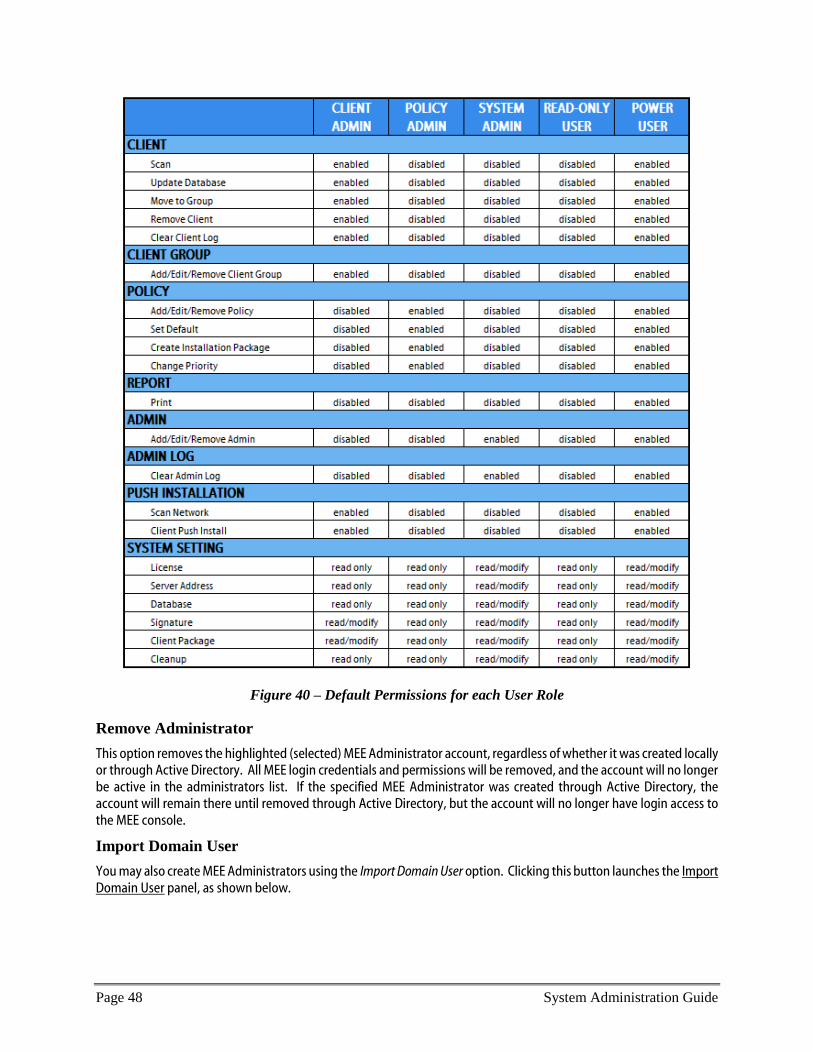
Page 48 System Administration Guide
Figure 40 – Default Permissions for each User Role
Remove Administrator
This option removes the highlighted (selected) MEE Administrator account, regardless of whether it was created locally or through Active Directory. All MEE login credentials and permissions will be removed, and the account will no longer be active in the administrators list. If the specified MEE Administrator was created through Active Directory, the account will remain there until removed through Active Directory, but the account will no longer have login access to the MEE console.
Import Domain User
You may also create MEE Administrators using the Import Domain User option. Clicking this button launches the Import Domain User panel, as shown below.

System Administration Guide Page 49
Figure 41 – Import Domain User panel
The left side of the screen shows the Organizational Unit (OU) structure of the Active Directory installation. When the domain is selected (as shown here), the only AD users that can be imported are ones who are not members of an organizational unit. Selecting an individual OU permits only those users who are a member of that OU to be imported. Permission settings for the selected users may be defined in the same manner as described in the Add New Administrator option which was outlined earlier. In the above screenshot, two AD users are grayed out, and their names are preceded by a checkmark in the checkbox. This indicates that they have already been added to the list of MEE Administrators.
You may also import Active Directory groups in a similar manner. As the above screenshot shows, both users and groups are available for import into MEE. Creation, organization, and membership of groups are performed in Active Directory, and all group settings are carried into MEE console when the group is imported. It is also possible for an Administrator to add a group of users with pre-set permissions, and also import individuals that belong to that group as individual Administrators with different permissions than the group was assigned. This allows Active Directory administrators to update or change permissions for particular users through the MEE console alone for MEE-specific permissions.
Synchronize Administrator
This option issues queries to the domain’s Active Directory Server for all Administrator users and groups, and updates MEE with data returned from the query. Domain User/Admin changes made in Active Directory must be reflected in MEE console so that it remains synchronized with Active Directory. Please note that this option and the Sync Now button on the Other Settings tab of the Admin module accomplish different tasks. Here, synchronization is specific to AD users and groups. The Sync Now button is specific to computers and networked devices which are governed by Active Directory.

Page 50 System Administration Guide
Admin Logs Tab
The Admin Logs tab contains a running log of user logins, logouts, actions taken by users, and the results of those actions. All information shown here is read-only. The following information is presented in the log:
● Event Date and Time ● Event ID ● User Name ● Event Description ● Console IP address ● MEE Server Name ● Category (data type)
You may sort on any of these items by clicking on the item. Clicking the item a second time will reverse the sort order (ascending to descending order, and vice versa). Right-clicking anywhere in the active area of the log displays a context menu which enables the user to refresh the display, save the log as a text file, filter based on any of the categories shown, reset the filter, or clear all logs. Please note that this context menu does not act on individual log entries, but on the log as a whole.
Client Push Install Tab
This tab enables the MEE Administrator to remotely install MEE client software on client computers. There are pre-requisites that must be met before this is possible. We will begin by discussing these pre-requisites.
Pre-Requisites – Windows Vista (mandatory)
Settings pertaining to Windows Firewall behavior must be modified to allow communication between the MEE Server and Windows Vista clients. On the Windows Vista client, perform the following steps:
From the Windows Start Menu, launch Control Panel
Launch Windows Firewall by double-clicking on its icon
On the Windows Firewall screen, click Turn Windows Firewall on or off. This will launch the Windows Firewall Settings screen.
Click the Exceptions tab.
Check the checkboxes for File and Printer Sharing and Network Discovery. Click OK to close the Windows Firewall Settings screen.
Close the Windows Firewall screen. Close the Control Panel screen.
These steps assure that all required ports are available for communication between a Vista client and the MEE Server.
Pre-Requisites – Windows 7 (mandatory)
Settings pertaining to Windows Firewall behavior must be modified to allow communication between the MEE Server and Windows 7 clients. On the Windows 7 client, perform the following steps:
From the Windows Start Menu, launch Control Panel
Launch Windows Firewall by double-clicking on its icon
On the Windows Firewall screen, click Allow a program or feature through Windows Firewall. This will launch the Allowed Programs screen.
Check the checkboxes for File and Printer Sharing and Network Discovery. For both of these items, assure that the Domain checkbox is checked.
Click OK to close the Allowed Programs screen.
Close the Windows Firewall screen. Close the Control Panel screen.
These steps assure that all required ports are available for communication between a Windows 7 client and the MEE Server.

System Administration Guide Page 51
Pre-Requisites – Windows 8 (mandatory)
Settings pertaining to Windows Firewall behavior must be modified to allow communication between the MEE Server and Windows 8 clients. On the Windows 8 client, perform the following steps:
From the Windows Start screen, type the word firewall. Click Settings on the right side of the start screen.
Click Allow an app through Windows Firewall on the left side of the screen. The Allowed apps screen will launch.
Check the checkboxes for File and Printer Sharing and Network Discovery. For both of these items, assure that the Domain checkbox is checked.
Click OK to close the Allowed apps screen.
These steps assure that all required ports are available for communication between a Windows 8 client and the MEE Server.
Pre-Requisites – Windows XP (mandatory)
Settings pertaining to Windows Firewall behavior must be modified to allow communication between the MEE Server and Windows XP clients. On the Windows XP client, perform the following steps:
From the Windows Start Menu, launch Control Panel.
Launch Windows Firewall by double-clicking on its icon. On the Windows Firewall screen, click the Exceptions tab.
Check the checkboxes for File and Printer Sharing.
Click OK to close the Windows Firewall screen.
Launch Administrative Tools by double-clicking on its icon. Launch Local Security Policy by double-clicking on its icon. The Local Security Settings screen will open. Click on Local Policies in the left panel. The main panel will be redisplayed to show relevant settings.
Scroll down to Network access: Sharing and security model for local accounts. Double click on this setting.
Change the value to Classic – local users authenticate as themselves. Click OK to make the change effective.
Close the Local Security Settings window. Close the Administrative Tools window.
These steps assure that all required ports are available for communication between a Windows XP client and the MEE Server, and that the MEE Server is allowed to authenticate when required.
Pre-Requisites – Creation of Policies (non-mandatory)
Another item which must be considered before client software can be pushed out to networked computers is the definition of policies. In a nutshell, a policy determines exactly how MEE will function on a protected computer. Depending on a computer’s function, location, and vulnerability level, many operational parameters may be tuned to afford the best protection. In lieu of a set of pre-defined policies, a single default policy may be used. This subject is described in detail in the Policy Module section of this guide.
Pre-Requisites – Creation of Client Groups (non-mandatory)
The final item which must be considered is creation of client groups. Assigning MEE clients to client groups helps to maintain higher network throughput by coordinating use of network resources when heavier communication between the MEE Server and its clients. This subject is described in detail in the Client Module section of this guide.

Page 52 System Administration Guide
Scanning the Network – Scan Selection Options
The first step in deployment of MEE client software is to identify the network computers. This is done by scanning the network. A preliminary required step is to choose what to scan. This is shown in the screenshot below.
Figure 42 – Methods to select computers
Scan IP range allows you to select a contiguous block of IP addresses. All networked devices within that address range are selected, without regard to device type. Computers, servers, printers, and all other networked devices whose address is within the specified range will be scanned.
PLEASE NOTE that a maximum of 4096 IP addresses can be scanned. Using the address shown above as an example, the maximum range is from 10.10.0.1 to 10.10.255.255. When using contiguous address ranges, the first two octets must remain fixed, while the full range of addresses in the last two octets is available.
Scan IP addresses from file provides the capability to use a text file which contains a list of IP addresses, host names, and fully-qualified domain names (FQDNs) – one entry per line. This method would be valuable if your LAN contains a small isolated subnet or if you utilize VPN connections for remote users/facilities.
Scan computers under OU provides the capability to build your list of computers directly from the Organizational Unit structure contained in Active Directory, as shown in the screenshot below.
Figure 43 – Select OUs for Scan (two examples)

System Administration Guide Page 53
This screenshot shows two examples of how Organizational Units may be selected for scanning. Either of these models may represent your AD structure, but most Active Directory administrators will agree that there is no one model that is ideal for every company. The example on the left shows a hierarchy where each OU is individually selected. Each department has two OUs associated with it – Devices and People. Only the Devices OU is relevant for the purpose of scanning.
The example on the right shows a hierarchy where each departmental OU is part of a higher-level Devices OU. Here, selecting Devices will automatically select every departmental OU below it in the hierarchy. If any of those OUs were to be omitted, it by itself could be unchecked. Again, your AD layout will determine how you select OUs for scanning.
Scanning the Network – Scan Execution Options
Once computers/IP addresses have been selected for scanning, the actual scanning may take place. MEE provides a number of ways to scan your network. Clicking the Scan… button launches the Scan Network window in the center of the screen, as shown below.
Figure 44 – Scan Network window
This window allows selection of the specific type of scan to be used. There are two primary scan options, one which includes other criteria. In addition, the selection criteria used for the scan determines the exact method to be used. These methods are detailed here, to increase understanding of the process, as well as to assist with troubleshooting should any problems arise.
Option 1A: Scan IP range/Scan Network – The MEE Server uses Address Resolution Protocol (ARP) to query each IP address in the specified IP address range. Detected computers respond with their IP address and MAC address. The MEE Server then uses UDP to request identity information from these computers NetBIOS Name Service. Detected computers respond with their hostname (in reverse-text order).
Option 1B: Scan IP range/Scan network and Detect Client Software – This method begins with the steps outlined in Option 1A. When complete, the MEE Server uses SMB over TCP to transfer files to the remote computer. A remote service is then created and executed which will detect MEE client software on the remote computer (if present). Detection status is returned to the MEE server, followed by termination of the remote service, deletion of the test files, and termination of the connection between server and client. Authentication on the remote computer is required, and if the user name to be used does not have sufficient permissions, Windows Management Instrumentation (WMI) must be employed.
Option 2A: Scan IP addresses from file/Scan Network – This method behaves in the same manner as Option 1A, the only difference being that host names and/or fully-qualified domain names are converted to IP addresses via usage of NetBIOS Name Service before detection attempts take place.

Page 54 System Administration Guide
Option 2B: Scan IP addresses from file/Scan network and Detect Client Software – This method is similar to Option 1B, the exception being that host names and/or fully-qualified domain names are converted to IP addresses via usage of NetBIOS Name Service before detection attempts take place.
Option 3A: Scan computers under OU/Scan Network - The MEE Server issues a LDAP query to Active Directory, requesting a list of all computers based in the selected Organizational Unit (OU). Using that list, MEE will populate an internal database table with identifying information for each computer, then using the computer name returned from Active Directory, query the domain name server for the IP address. Finally, the MAC address will be obtained utilizing steps outlined in Option 1A (above)
WARNING: Active Directory enforces a policy which specifies a maximum of one thousand (1000) results can be returned via an LDAP query. This policy may be changed by the AD administrator, but LDAP queries issued by MEE are subject to this policy. If the maximum number of results is returned as a result of this query, MEE cannot issue multiple queries to access the remainder of the computers. In this case, lower level OUs should be utilized (when possible) to return all results.
WARNING: The list of computers returned as a result of an LDAP query may contain both client and server-class computers if they are members of the same OU. MEE client software should not be installed on server-class computers. Care should be taken to identify servers so that they may be ignored as part of any subsequent client installation and/or monitoring.
Option 3B: Scan computers under OU/Scan network and Detect Client Software - This method begins with the steps outlined in Option 3A. When complete, the MEE Server uses SMB over TCP to transfer files to the remote computer. A remote service is then created and executed which detects MEE client software on the remote computer (if present). Detection status is returned to the MEE server, followed by termination of the remote service, deletion of the test files, and termination of the server-client connection. Authentication on the remote computer is required, and if the user name to be used does not have sufficient permissions, Windows Management Instrumentation (WMI) must be employed. Please note that the warnings specified for Option 3A also apply here.
The following screenshot shows the results of a scan using the Scan IP Range method. In this case, there are four computers within the IP address range specified (10.10.10.2-10.10.10.254, the MEE Server being 10.10.10.1).
Figure 45 – Scan Results showing Context Menu

System Administration Guide Page 55
If the scan showed results which contained computers where MEE clients had previously been installed, you could hide those computers by checking the Hide installed client checkbox. The scan may also show devices which are not eligible for installation of MEE clients (servers, printers, fax machines, etc.). These devices can be hidden from the display by checking the Hide ignored device checkbox.
The Admin Logs tab will show the full results of the scan, including all of the IP addresses specified regardless of whether a networked device is associated with that address. The text that appears for addresses of this type is:
Scan failed. A connection attempt failed because the connected party did not properly respond after a period of time, or established connection failed because connected host has failed to respond
It is important to note that MEE considers lack of response as a failure. MEE cannot determine whether a lack of response is due to no device being present or due to a device that is experiencing a networking failure.
Please note the icons shown to the left of each computer name. There are four unique icons used to indicate the status of each computer identified during the scan. The following screenshot shows each status icon.
Figure 46 – Client Status Icons
This is the first time that these computers have been scanned, specifically for the purpose of identifying targets for MEE client installation. As a result, their status (as a client) is unknown.
Referring to the Scan Results screenshot, one computer is highlighted for the purpose of showing the context menu. The menu is shown below.
Figure 47 – Client Push Install Context Menu
Five different operations can be performed on selected clients using this context menu. Each of these operations is explained below.

Page 56 System Administration Guide
Simulate Client Install
This option tests the ability of the MEE Server to open communication ports between itself and a computer on which a MEE client is to be installed on. Once ports have been opened, the server will push several files to the target computer, create a service on the remote computer, use that service to execute certain files, gather pass/fail status, return that status to the server, terminate the remote service, and finally delete the files that were sent to the target computer. If all of these tests pass, the simulation is considered to be a success. Please note that this is only a simulation, and does not actually perform a client push install.
Because this process adds, deletes and executes files that are located on another computer (the client), authentication is required on the client. The domain user name and password for an administrative user on the client is required. In addition, there may be times in which permissions for the administrative user do not provide the level of permissions required for an installation/simulation to occur. In this case, Windows Management Instrumentation (WMI) is utilized to perform the simulation. The WMI service must be running on the client computer, and the simulation must be performed by an admin user whose permissions allow use of the WMI service.
Client Push Install
This option allows MEE client software to be installed on a computer in the corporate network. A screenshot of the Client Push Install panel is shown below.
Figure 48 – Client Push Install Dialog
A Domain\User Name and its associated Password are required for this process. These credentials must provide administrative access to the computer on which the MEE client is to be installed. If there are any permissions issues where the admin user may not be able to accomplish installation tasks, the Enable WMI checkbox can be checked.
You may elect to install MEE client software on this computer as a member of Ungrouped Clients, or as a member of a specific Client Group. A complete discussion of this topic is in the Client Module section of this guide. In addition, a Policy must be selected before installation can occur. This determines behavior of the MEE client during operation. A complete discussion of this topic is in the Policy Module section of this guide.
Finally, you may choose whether Malwarebytes Enterprise Edition client is visible to the computer user via an entry on the Windows start menu and via a desktop icon. If this option is selected, both will be created during installation. If unselected, neither will be created. There is no provision for creating only one of the two visible indicators of Malwarebytes presence on the computer.

System Administration Guide Page 57
Client Uninstall
This option uninstalls a MEE client from a selected network computer. This option should be used as a preferred method of uninstalling software because it uninstalls the client and updates client status on the MEE Server.
Ignore Device(s)
A network scan will detect every networked device on a network. While you may wish to see every networked computer appear on the scan results, it is of little value to see printers, servers, or any other networked device where an MEE client cannot be installed. Selecting and ignoring these devices will change their status icon. You may also check the Hide ignored device checkbox at the upper right corner of the display to hide them.
Copy to Clipboard
This option copies scan results (in text format) to your clipboard, so that you may paste it into Notepad. If you have changed the sort order of the displayed results, the copied results will reflect the information as displayed.
Other Settings Tab
This tab provides capability to modify system settings related to database usage and Active Directory communications. These settings are outlined below.
Cleanup Setting
This option allows the MEE Administrator to define how long threat information is retained, and as a result, the valid lifespan of reporting data. You may choose to retain data indefinitely, or you may choose one of several different cutoff dates. It is strongly recommended that the MEE Administrator be extremely familiar with MEE disk usage characteristics as compared to available space in the SQL environment. This is typically more of an issue if SQL Express is used as the MEE system database, but should not be taken for granted.
Domain Setting
This option allows the account used to query Active Directory to be changed or removed. If the account is removed, the ability to maintain synchronization between MEE and Active Directory is eliminated.
Active Directory Synchronization Setting
MEE attempts to synchronize with Active Directory on regular intervals, in order to assure that all computers controlled by Active Directory are visible to MEE. The default time interval is ten (10) minutes, and this option allows adjustment of that time interval. There is also a Sync Now button, so that any outstanding changes may be immediately reflected in MEE rather than waiting for the next scheduled synchronization.


