Americas HeadquartersCisco Systems, Inc.170 West Tasman DriveSan Jose, CA 95134-1706USAhttp://www.cisco.comTel: 408 526-4000 800 553-NETS (6387)Fax: 408 527-0883
THE SPECIFICATIONS AND INFORMATION REGARDING THE PRODUCTS IN THIS MANUAL ARE SUBJECT TO CHANGE WITHOUT NOTICE. ALL STATEMENTS,INFORMATION, AND RECOMMENDATIONS IN THIS MANUAL ARE BELIEVED TO BE ACCURATE BUT ARE PRESENTED WITHOUT WARRANTY OF ANY KIND,EXPRESS OR IMPLIED. USERS MUST TAKE FULL RESPONSIBILITY FOR THEIR APPLICATION OF ANY PRODUCTS.
THE SOFTWARE LICENSE AND LIMITEDWARRANTY FOR THE ACCOMPANYING PRODUCT ARE SET FORTH IN THE INFORMATION PACKET THAT SHIPPED WITHTHE PRODUCT AND ARE INCORPORATED HEREIN BY THIS REFERENCE. IF YOU ARE UNABLE TO LOCATE THE SOFTWARE LICENSE OR LIMITED WARRANTY,CONTACT YOUR CISCO REPRESENTATIVE FOR A COPY.
NOTWITHSTANDINGANYOTHERWARRANTYHEREIN, ALL DOCUMENT FILES AND SOFTWARE OF THESE SUPPLIERS ARE PROVIDED “AS IS"WITH ALL FAULTS.CISCO AND THE ABOVE-NAMED SUPPLIERS DISCLAIM ALL WARRANTIES, EXPRESSED OR IMPLIED, INCLUDING, WITHOUT LIMITATION, THOSE OFMERCHANTABILITY, FITNESS FORA PARTICULAR PURPOSEANDNONINFRINGEMENTORARISING FROMACOURSEOFDEALING, USAGE, OR TRADE PRACTICE.
IN NO EVENT SHALL CISCO OR ITS SUPPLIERS BE LIABLE FOR ANY INDIRECT, SPECIAL, CONSEQUENTIAL, OR INCIDENTAL DAMAGES, INCLUDING, WITHOUTLIMITATION, LOST PROFITS OR LOSS OR DAMAGE TO DATA ARISING OUT OF THE USE OR INABILITY TO USE THIS MANUAL, EVEN IF CISCO OR ITS SUPPLIERSHAVE BEEN ADVISED OF THE POSSIBILITY OF SUCH DAMAGES.
Any Internet Protocol (IP) addresses and phone numbers used in this document are not intended to be actual addresses and phone numbers. Any examples, command display output, networktopology diagrams, and other figures included in the document are shown for illustrative purposes only. Any use of actual IP addresses or phone numbers in illustrative content is unintentionaland coincidental.
Cisco and the Cisco logo are trademarks or registered trademarks of Cisco and/or its affiliates in the U.S. and other countries. To view a list of Cisco trademarks, go to this URL: http://www.cisco.com/go/trademarks. Third-party trademarks mentioned are the property of their respective owners. The use of the word partner does not imply a partnershiprelationship between Cisco and any other company. (1110R)
Creating, loading, and maintaining configuration files enable you to generate a set of user-configuredcommands to customize the functionality of your Cisco routing device. For a complete description of theconfiguration file management commands, refer to the Cisco IOS Configuration Fundamentals CommandReference.
• Finding Feature Information, page 1
• Prerequisites for Managing Configuration Files, page 1
• Restrictions for Managing Configuration Files, page 2
• Information About Managing Configuration Files, page 2
• How to Manage Configuration File Information, page 8
• Additional References, page 40
Finding Feature InformationYour software release may not support all the features documented in this module. For the latest caveats andfeature information, see Bug Search Tool and the release notes for your platform and software release. Tofind information about the features documented in this module, and to see a list of the releases in which eachfeature is supported, see the feature information table.
Use Cisco Feature Navigator to find information about platform support and Cisco software image support.To access Cisco Feature Navigator, go to www.cisco.com/go/cfn. An account on Cisco.com is not required.
Prerequisites for Managing Configuration Files• You should have at least a basic familiarity with the Cisco IOS environment and the command-lineinterface.
• You should have at least a minimal configuration running on your system. You can create a basicconfiguration file using the setup command (see Using Setup Mode to Configure a Cisco NetworkingDevice for details).
Restrictions for Managing Configuration Files• Many of the Cisco IOS commands described in this document are available and function only in certainconfiguration modes on the router.
Information About Managing Configuration Files
Types of Configuration FilesConfiguration files contain the Cisco IOS software commands used to customize the functionality of yourCisco routing device (router, access server, switch, and so on). Commands are parsed (translated and executed)by the Cisco IOS software when the system is booted (from the startup-config file) or when you enter commandsat the CLI in a configuration mode.
Startup configuration files (startup-config) are used during system startup to configure the software. Runningconfiguration files (running-config) contain the current configuration of the software. The two configurationfiles can be different. For example, you may want to change the configuration for a short time period ratherthan permanently. In this case, you would change the running configuration using the configure terminalEXEC command but not save the configuration using the copy running-config startup-config EXECcommand.
To change the running configuration, use the configure terminal command, as described in the “Modifyingthe Configuration File at the CLI ” section. As you use the Cisco IOS configurationmodes, commands generallyare executed immediately and are saved to the running configuration file either immediately after you enterthem or when you exit a configuration mode.
To change the startup configuration file, you can either save the running configuration file to the startupconfiguration using the copy running-config startup-config EXEC command or copy a configuration filefrom a file server to the startup configuration (see the “Copying a Configuration File from a TFTP Server tothe Router ” section for more information).
Configuration Mode and Selecting a Configuration SourceTo enter configuration mode on the router, enter the configurecommand at the privileged EXEC prompt. TheCisco IOS software responds with the following prompt asking you to specify the terminal, memory, or a filestored on a network server (network) as the source of configuration commands:
Configuring from terminal, memory, or network [terminal]?Configuring from the terminal allows you to enter configuration commands at the command line, as describedin the following section. Configuring from memory loads the startup configuration file. See the “Reexecutingthe Configuration Commands in the Startup Configuration File ” section for more information. Configuringfrom the network allows you to load and execute configuration commands over the network. See the “Copyinga Configuration File from a TFTP Server to the Router ” section for more information.
Managing Configuration FilesRestrictions for Managing Configuration Files
Configuration File Changes Using the CLIThe Cisco IOS software accepts one configuration command per line. You can enter as many configurationcommands as you want. You can add comments to a configuration file describing the commands you haveentered. Precede a comment with an exclamation point ( !). Because comments are not stored in NVRAM orin the active copy of the configuration file, comments do not appear when you list the active configurationwith theshow running-config or more system:running-config EXEC command. Comments do not displaywhen you list the startup configuration with the show startup-config ormore nvram:startup-config EXECmode command. Comments are stripped out of the configuration file when it is loaded onto the router. However,you can list the comments in configuration files stored on a File Transfer Protocol (FTP), remote copy protocol(rcp), or Trivial File Transfer Protocol (TFTP) server. When you configure the software using the CLI, thesoftware executes the commands as you enter them.
Location of Configuration FilesConfiguration files are stored in the following locations:
• The running configuration is stored in RAM.
• On all platforms except the Class A Flash file system platforms, the startup configuration is stored innonvolatile random-access memory (NVRAM).
• On Class A Flash file system platforms, the startup configuration is stored in the location specified bythe CONFIG_FILE environment variable. The CONFIG_FILE variable defaults to NVRAM and canbe a file in the following file systems:
• nvram: (NVRAM)
Copy Configuration Files from a Network Server to the RouterYou can copy configuration files from a TFTP, rcp, or FTP server to the running configuration or startupconfiguration of the router. You may want to perform this function for one of the following reasons:
• To restore a backed-up configuration file.
• To use the configuration file for another router. For example, you may add another router to your networkand want it to have a similar configuration to the original router. By copying the file to the new router,you can change the relevant parts rather than re-creating the whole file.
• To load the same configuration commands on to all the routers in your network so that all the routershave similar configurations.
The copy{ftp: | rcp: | tftp:system:running-configEXECcommand loads the configuration files into therouter as if you were typing the commands in at the command line. The router does not erase the existingrunning configuration before adding the commands. If a command in the copied configuration file replacesa command in the existing configuration file, the existing command will be erased. For example, if the copiedconfiguration file contains a different IP address in a particular command than the existing configuration, theIP address in the copied configuration will be used. However, some commands in the existing configurationmay not be replaced or negated. In this case, the resulting configuration file will be a mixture of the existingconfiguration file and the copied configuration file, with the copied configuration file having precedence.
Managing Configuration FilesConfiguration File Changes Using the CLI
In order to restore a configuration file to an exact copy of a file stored on a server, you need to copy theconfiguration file directly to the startup configuration (using the copyftp:| rcp:| tftp:}nvram:startup-configcommand) and reload the router.
To copy configuration files from a server to a router, perform the tasks described in the following sections:
The protocol you use depends on which type of server you are using. The FTP and rcp transport mechanismsprovide faster performance and more reliable delivery of data than TFTP. These improvements are possiblebecause the FTP and rcp transport mechanisms are built on and use the TCP/IP stack, which isconnection-oriented.
Copy a Configuration File from the Router to a TFTP ServerIn some implementations of TFTP, you must create a dummy file on the TFTP server and give it read, write,and execute permissions before copying a file over it. Refer to your TFTP documentation for more information.
Copy a Configuration File from the Router to an rcp ServerYou can copy configuration file from the router to an rcp server.
One of the first attempts to use the network as a resource in the UNIX community resulted in the design andimplementation of the remote shell protocol, which included the remote shell (rsh) and remote copy (rcp)functions. Rsh and rcp give users the ability to execute commands remotely and copy files to and from a filesystem residing on a remote host or server on the network. The Cisco implementation of rsh and rcpinteroperates with standard implementations.
The rcp copy commands rely on the rsh server (or daemon) on the remote system. To copy files using rcp,you need not create a server for file distribution, as you do with TFTP. You need only to have access to aserver that supports the remote shell (rsh). (Most UNIX systems support rsh.) Because you are copying a filefrom one place to another, you must have read permission on the source file and write permission on thedestination file. If the destination file does not exist, rcp creates it for you.
Although the Cisco rcp implementation emulates the functions of the UNIX rcp implementation--copyingfiles among systems on the network--the Cisco command syntax differs from the UNIX rcp command syntax.The Cisco rcp support offers a set of copy commands that use rcp as the transport mechanism. These rcp copycommands are similar in style to the Cisco TFTP copy commands, but they offer an alternative that providesfaster performance and reliable delivery of data. These improvements are possible because the rcp transportmechanism is built on and uses the TCP/IP stack, which is connection-oriented. You can use rcp commandsto copy system images and configuration files from the router to a network server and vice versa.
You also can enable rcp support to allow users on remote systems to copy files to and from the router.
To configure the Cisco IOS software to allow remote users to copy files to and from the router, use theiprcmdrcp-enable global configuration command.
Restrictions
The rcp protocol requires a client to send a remote username on each rcp request to a server. When you copya configuration file from the router to a server using rcp, the Cisco IOS software sends the first valid usernameit encounters in the following sequence:
1 The username specified in the copy EXEC command, if a username is specified.
2 The username set by the iprcmdremote-username global configuration command, if the command isconfigured.
Managing Configuration FilesCopy Configuration Files from a Network Server to the Router
3 The remote username associated with the current tty (terminal) process. For example, if the user is connectedto the router through Telnet and was authenticated through the username command, the router softwaresends the Telnet username as the remote username.
4 The router host name.
For the rcp copy request to execute successfully, an account must be defined on the network server for theremote username. If the server has a directory structure, the configuration file or image is written to or copiedfrom the directory associated with the remote username on the server. For example, if the system image residesin the home directory of a user on the server, you can specify that user name as the remote username.
Use the iprcmdremote-username command to specify a username for all copies. (Rcmd is a UNIX routineused at the super-user level to execute commands on a remote machine using an authentication scheme basedon reserved port numbers. Rcmd stands for “remote command”). Include the username in the copy commandif you want to specify a username for that copy operation only.
If you are writing to the server, the rcp server must be properly configured to accept the rcp write requestfrom the user on the router. For UNIX systems, you must add an entry to the .rhosts file for the remote useron the rcp server. For example, suppose the router contains the following configuration lines:
hostname Rtr1ip rcmd remote-username User0If the router IP address translates to Router1.company.com, then the .rhosts file for User0 on the rcp servershould contain the following line:
Router1.company.com Rtr1
Requirements for the rcp Username
The rcp protocol requires a client to send a remote username on each rcp request to a server. When you copya configuration file from the router to a server using rcp, the Cisco IOS software sends the first valid usernameit encounters in the following sequence:
1 The username specified in the copy EXEC command, if a username is specified.
2 The username set by the iprcmdremote-username global configuration command, if the command isconfigured.
3 The remote username associated with the current tty (terminal) process. For example, if the user is connectedto the router through Telnet and was authenticated through the username command, the router softwaresends the Telnet username as the remote username.
4 The router host name.
For the rcp copy request to execute, an account must be defined on the network server for the remote username.If the server has a directory structure, the configuration file or image is written to or copied from the directoryassociated with the remote username on the server. For example, if the system image resides in the homedirectory of a user on the server, specify that user name as the remote username.
Refer to the documentation for your rcp server for more information.
Copy a Configuration File from the Router to an FTP ServerYou can copy a configuration file from the router to an FTP server.
Managing Configuration FilesCopy Configuration Files from a Network Server to the Router
Understanding the FTP Username and Password
The FTP protocol requires a client to send a remote username and password on each FTP request to a server.When you copy a configuration file from the router to a server using FTP, the Cisco IOS software sends thefirst valid username it encounters in the following sequence:
1 The username specified in the copy EXEC command, if a username is specified.
2 The username set by the ip ftp username global configuration command, if the command is configured.
3 Anonymous.
The router sends the first valid password it encounters in the following sequence:
1 The password specified in the copy command, if a password is specified.
2 The password set by the ip ftp password command, if the command is configured.
3 The router forms a password username@routername .domain . The variable username is the usernameassociated with the current session, routername is the configured host name, and domain is the domain ofthe router.
The username and password must be associated with an account on the FTP server. If you are writing to theserver, the FTP server must be properly configured to accept the FTP write request from the user on the router.
If the server has a directory structure, the configuration file or image is written to or copied from the directoryassociated with the username on the server. For example, if the system image resides in the home directoryof a user on the server, specify that user name as the remote username.
Refer to the documentation for your FTP server for more information.
Use the ip ftp username and ip ftp password global configuration commands to specify a username andpassword for all copies. Include the username in the copy EXEC command if you want to specify a usernamefor that copy operation only.
Configuration Files Larger than NVRAMTo maintain a configuration file that exceeds size of NVRAM, you should be aware of the information in thefollowing sections:
Compressing the Configuration FileThe servicecompress-config global configuration command specifies that the configuration file be storedcompressed in NVRAM. Once the configuration file has been compressed, the router functions normally.When the system is booted, it recognizes that the configuration file is compressed, expands it, and proceedsnormally. Themorenvram:startup-config EXEC command expands the configuration before displaying it.
Before you compress configuration files, refer to the appropriate hardware installation and maintenancepublication. Verify that your system’s ROMs support file compression. If not, you can install new ROMs thatsupport file compression.
The size of the configuration must not exceed three times the NVRAM size. For a 128-KB size NVRAM, thelargest expanded configuration file size is 384 KB.
Managing Configuration FilesConfiguration Files Larger than NVRAM
The servicecompress-configglobal configurationcommandworks only if you have Cisco IOS software Release10 or later release boot ROMs. Installing new ROMs is a one-time operation and is necessary only if you donot already have Cisco IOSRelease 10 in ROM. If the boot ROMs do not recognize a compressed configuration,the following message is displayed:
Boot ROMs do not support NVRAM compression Config NOT written to NVRAM
Storing the Configuration in Flash Memory on Class A Flash File SystemsOn Class A Flash file system routers, you can store the startup configuration in Flash memory by setting theCONFIG_FILE environment variable to a file in internal Flash memory or USB memory.
See the “Specifying the CONFIG_FILE Environment Variable on Class A Flash File Systems ” section formore information.
Care must be taken when editing or changing a large configuration. Flash memory space is used every timea copysystem:running-confignvram:startup-config EXEC command is issued. Because file managementfor Flash memory, such as optimizing free space, is not done automatically, you must pay close attention toavailable Flash memory.
Loading the Configuration Commands from the NetworkYou can also store large configurations on FTP or TFTP servers and download them at system startup. Touse a network server to store large configura tions, see the “Copying a Configuration File from the Router toa TFTP Server” and “Configure the Router to Download Configuration Files” sections for more informationon these commands.
Configure the Router to Download Configuration FilesYou can configure the router to load one or two configuration files at system startup. The configuration filesare loaded into memory and read in as if you were typing the commands at the command line. Thus, theconfiguration for the router will be amixture of the original startup configuration and the one or two downloadedconfiguration files.
Network Versus Host Configuration FilesFor historical reasons, the first file the router downloads is called the network configuration file. The secondfile the router downloads is called the host configuration file. Two configuration files can be used when allof the routers on a network use many of the same commands. The network configuration file contains thestandard commands used to configure all of the routers. The host configuration files contain the commandsspecific to one particular host. If you are loading two configuration files, the host configuration file shouldbe the configuration file you want to have precedence over the other file. Both the network and hostconfiguration files must reside on a network server reachable via TFTP, rcp, or FTP, and must be readable.
Managing Configuration FilesConfigure the Router to Download Configuration Files
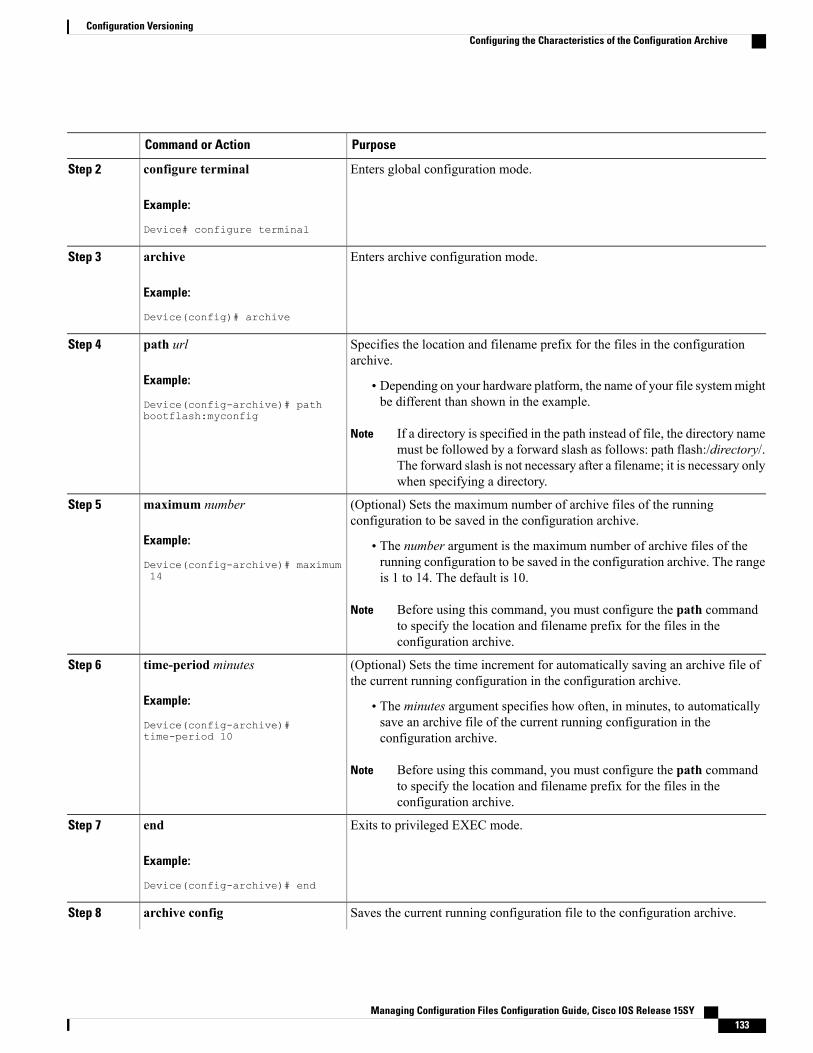
How to Manage Configuration File Information
Displaying Configuration File InformationTo display information about configuration files, complete the tasks in this section:
SUMMARY STEPS
1. enable2. show boot3. more file-url4. show running-config5. show startup-config
DETAILED STEPS
PurposeCommand or Action
Enables privileged EXEC mode.enableStep 1
Example:
Device> enable
• Enter your password if prompted.
Lists the contents of the BOOT environment variable, the name of theconfiguration file pointed to by the CONFIG_FILE environment variable,and the contents of the BOOTLDR environment variable.
show boot
Example:
Device# show boot
Step 2
Displays the contents of a specified file.more file-url
Example:
Device# more 10.1.1.1
Step 3
Displays the contents of the running configuration file. (Command alias forthemore system:running-config command.)
show running-config
Example:
Device# show running-config
Step 4
Displays the contents of the startup configuration file. (Command alias forthemore nvram:startup-config command.)
show startup-config
Example:
Device# show startup-config
Step 5
On all platforms except the Class A Flash file system platforms, the defaultstartup-config file usually is stored in NVRAM. On the Class A Flash filesystem platforms, the CONFIG_FILE environment variable points to thedefault startup-config file. The CONFIG_FILE variable defaults to NVRAM.
Managing Configuration FilesHow to Manage Configuration File Information
PurposeCommand or Action
Modifying the Configuration File at the CLIThe Cisco IOS software accepts one configuration command per line. You can enter as many configurationcommands as you want. You can add comments to a configuration file describing the commands you haveentered. Precede a comment with an exclamation point ( !). Because comments are not stored in NVRAM orin the active copy of the configuration file, comments do not appear when you list the active configurationwith theshow running-config or more system:running-config EXEC command. Comments do not displaywhen you list the startup configuration with the showstartup-config ormore nvram:startup-config EXECmode command. Comments are stripped out of the configuration file when it is loaded onto the router. However,you can list the comments in configuration files stored on a File Transfer Protocol (FTP), remote copy protocol(rcp), or Trivial File Transfer Protocol (TFTP) server. When you configure the software using the CLI, thesoftware executes the commands as you enter them. To configure the software using the CLI, use the followingcommands beginning in privileged EXEC mode:
SUMMARY STEPS
1. enable2. configure terminal3. Do one of the following:
Enters global configuration mode. Enter the necessary configurationcommands. The Cisco IOS documentation set describes configurationcommands organized by technology.
configure terminal
Example:
Device# configure terminal
Step 2
Ends the configuration session and exits to EXEC mode.Do one of the following:Step 3
this command saves the configuration to NVRAM. On the Class A Flash filesystem platforms, this step saves the configuration to the location specifiedby the CONFIG_FILE environment variable (the default CONFIG_FILEvariable specifies that the file should be saved to NVRAM).
Examples
In the following example, the Device prompt name of the Device is configured. The comment line, indicatedby the exclamation mark (!), does not execute any command. The hostname command is used to change theDevice name from Device to new_name. By pressing Ctrl-Z (^Z) or entering the endcommand, the user quitsconfiguration mode. The copy system:running-config nvram:startup-config command saves the currentconfiguration to the startup configuration.
Device# configure terminalDevice(config)# !The following command provides the Device host name.Device(config)# hostname new_namenew_name(config)# endnew_name# copy system:running-config nvram:startup-configWhen the startup configuration is NVRAM, it stores the current configuration information in text format asconfiguration commands, recording only nondefault settings. The memory is checksummed to guard againstcorrupted data.
Some specific commands might not get saved to NVRAM. You will need to enter these commands againif you reboot the machine. These commands are noted in the documentation. We recommend that youkeep a list of these settings so that you can quickly reconfigure your Device after rebooting.
Note
Copying a Configuration File from the Router to a TFTP ServerTo copy configuration information on a TFTP network server, complete the tasks in this section:
What to Do NextAfter you have issued the copy command, you may be prompted for additional information or for confirmationof the action. The prompting will depend on how much information you provide in the copy command andthe current setting of the fileprompt global configuration command.
Managing Configuration FilesCopying a Configuration File from the Router to a TFTP Server
Copying a Configuration File from the Router to an rcp ServerTo copy a startup configuration file or a running configuration file from the router to an rcp server, use thefollowing commands beginning in privileged EXEC mode:
SUMMARY STEPS
1. enable2. configure terminal3. ip rcmd remote-username username4. end5. Do one of the following:
Storing a Running Configuration File on an rcp Server
The following example copies the running configuration file named rtr2-confg to the netadmin1 directory onthe remote host with an IP address of 172.16.101.101:
Router# copy system:running-config rcp://[email protected]/Rtr2-confgWrite file rtr2-confg on host 172.16.101.101?[confirm]Building configuration...[OK]Connected to 172.16.101.101Router#
Storing a Startup Configuration File on an rcp Server
The following example shows how to store a startup configuration file on a server by using rcp to copy thefile:
Rtr2# configure terminal
Rtr2(config)# ip rcmd remote-username netadmin2
Rtr2(config)# end
Rtr2# copy nvram:startup-config rcp:
Remote host[]? 172.16.101.101
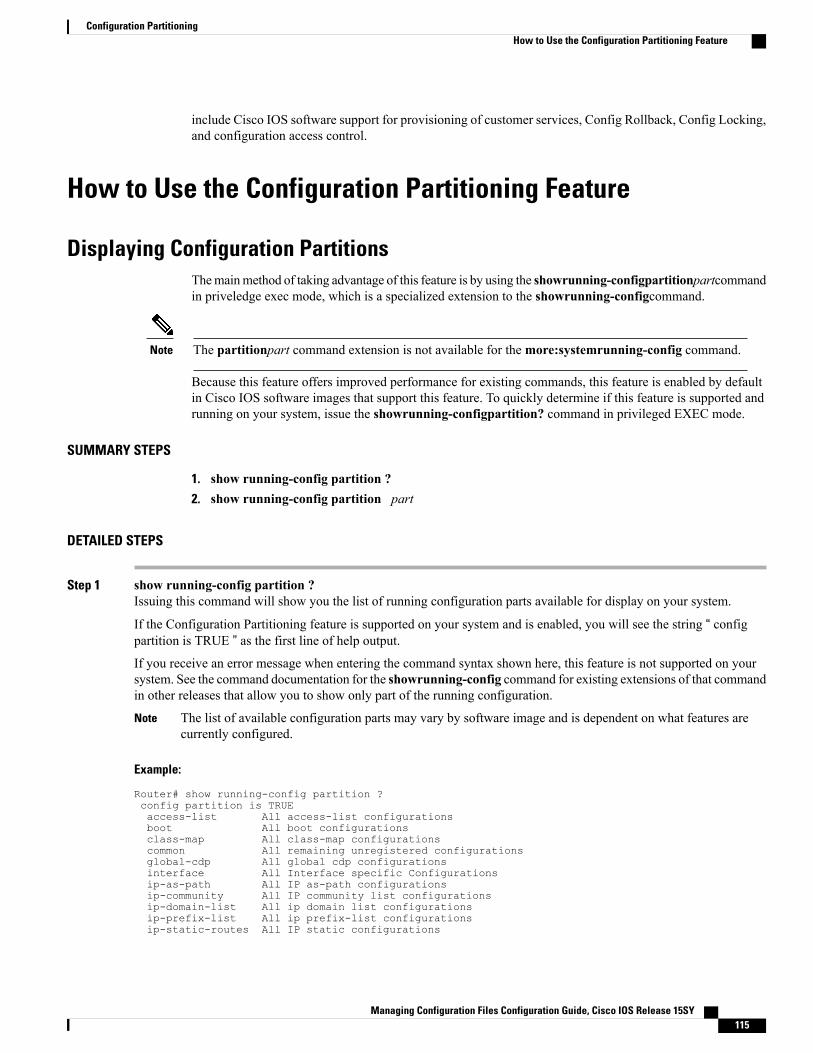
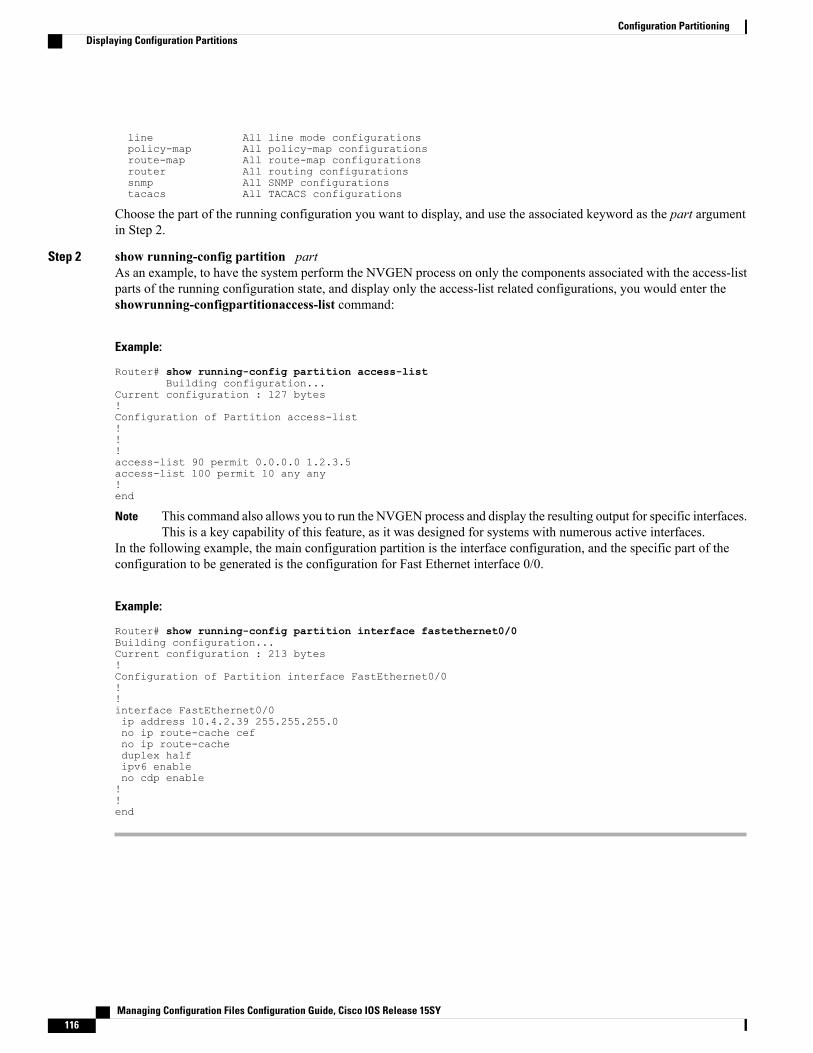
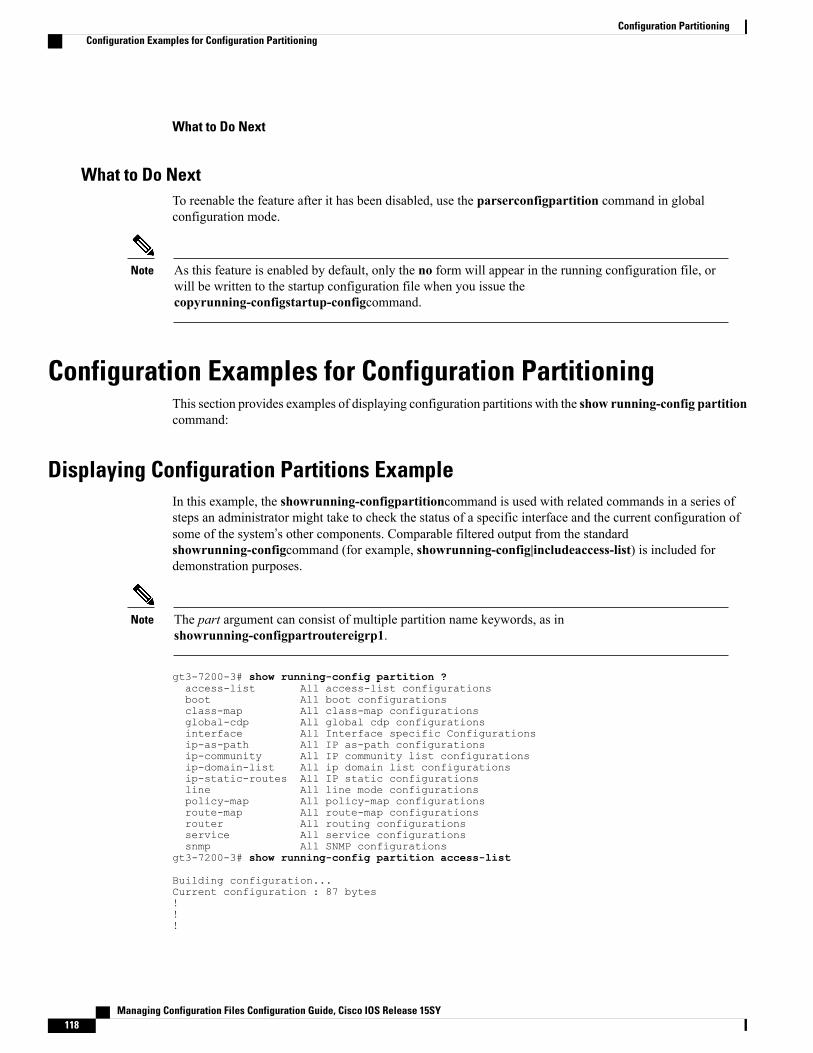
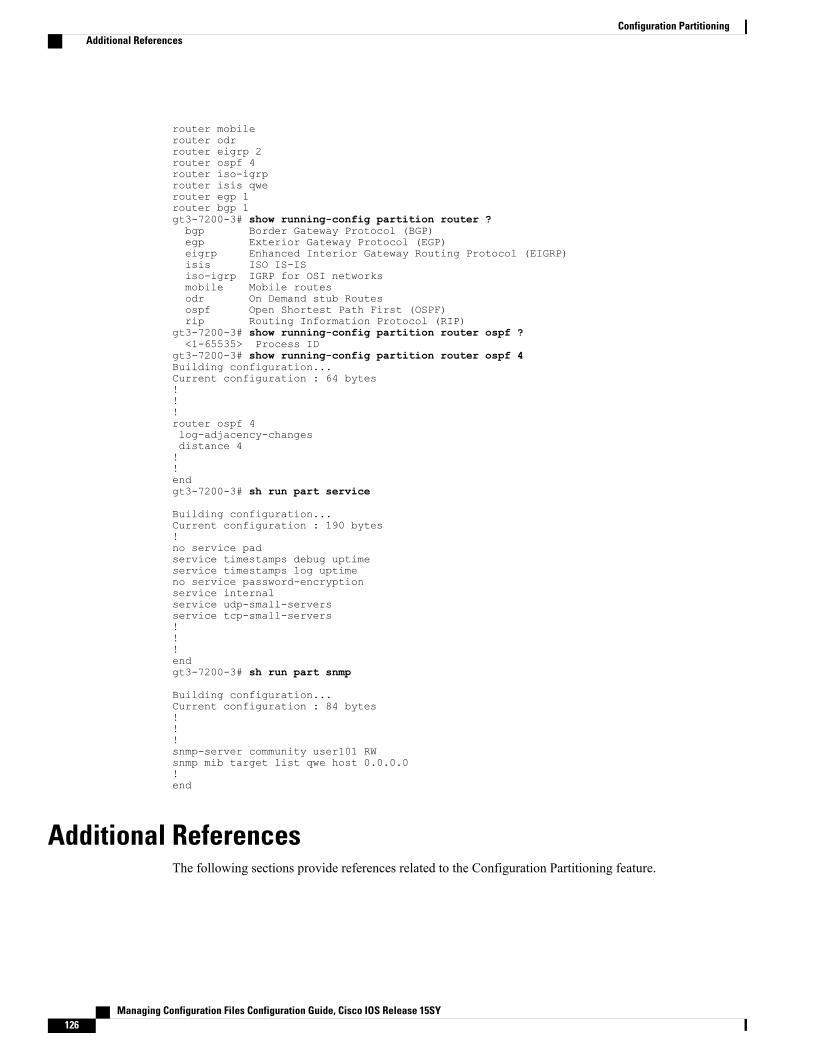
Name of configuration file to write [rtr2-confg]?Write file rtr2-confg on host 172.16.101.101?[confirm]![OK]
What to Do NextAfter you have issued the copy EXEC command, you may be prompted for additional information or forconfirmation of the action. The prompting will depend on how much information you provide in the copycommand and the current setting of the fileprompt global configuration command.
Managing Configuration FilesCopying a Configuration File from the Router to an rcp Server
Copying a Configuration File from the Router to the FTP ServerTo copy a startup configuration file or a running configuration file from the router to an FTP server, completethe following tasks:
SUMMARY STEPS
1. enable2. configure terminal3. ip ftp username username4. ip ftp password password5. end6. Do one of the following:
Storing a Running Configuration File on an FTP Server
The following example copies the running configuration file named rtr2-confg to the netadmin1 directory onthe remote host with an IP address of 172.16.101.101:
Device# copy system:running-config ftp://netadmin1:[email protected]/Rtr2-confgWrite file rtr2-confg on host 172.16.101.101?[confirm]Building configuration...[OK]Connected to 172.16.101.101Device#
Storing a Startup Configuration File on an FTP Server
The following example shows how to store a startup configuration file on a server by using FTP to copy thefile:
Managing Configuration FilesCopying a Configuration File from the Router to the FTP Server
Remote host[]? 172.16.101.101
Name of configuration file to write [rtr2-confg]?Write file rtr2-confg on host 172.16.101.101?[confirm]![OK]
What to Do NextAfter you have issued the copy EXEC command, you may be prompted for additional information or forconfirmation of the action. The prompting will depend on how much information you provide in the copycommand and the current setting of the fileprompt global configuration command.
Copying a Configuration File from a TFTP Server to the RouterTo copy a configuration file from a TFTP server to the Device, complete the tasks in this section:
Configure using tokyo-confg from 172.16.2.155? [confirm] y
Booting tokyo-confg from 172.16.2.155:!!! [OK - 874/16000 bytes]
What to Do NextAfter you have issued the copy EXEC command, you may be prompted for additional information or forconfirmation of the action. The prompting will depend on how much information you provide in the copycommand and the current setting of the fileprompt global configuration command.
Copying a Configuration File from the rcp Server to the RouterTo copy a configuration file from an rcp server to the running configuration or startup configuration, completethe following tasks:
The following example copies a configuration file named host1-confg from the netadmin1 directory on theremote server with an IP address of 172.16.101.101, and loads and runs those commands on the Device:
Device# copy rcp://[email protected]/host1-confg system:running-configConfigure using host1-confg from 172.16.101.101? [confirm]Connected to 172.16.101.101Loading 1112 byte file host1-confg:![OK]Device#%SYS-5-CONFIG: Configured from host1-config by rcp from 172.16.101.101
Managing Configuration FilesCopying a Configuration File from the rcp Server to the Router
Copy rcp Startup-Config
The following example specifies a remote username of netadmin1. Then it copies the configuration file namedhost2-confg from the netadmin1 directory on the remote server with an IP address of 172.16.101.101 to thestartup configuration.
Rtr2# configure terminalRtr2(config)# ip rcmd remote-username netadmin1Rtr2(config)# endRtr2# copy rcp: nvram:startup-configAddress of remote host [255.255.255.255]? 172.16.101.101Name of configuration file[rtr2-confg]? host2-confgConfigure using host2-confg from 172.16.101.101?[confirm]Connected to 172.16.101.101Loading 1112 byte file host2-confg:![OK][OK]Rtr2#%SYS-5-CONFIG_NV:Non-volatile store configured from host2-config by rcp from 172.16.101.101
What to Do NextAfter you have issued the copy EXEC command, you may be prompted for additional information or forconfirmation of the action. The prompting will depend on how much information you provide in the copycommand and the current setting of the fileprompt global configuration command.
Copying a Configuration File from an FTP Server to the RouterTo copy a configuration file from an F TP server to the running configuration or startup configuration, completethe tasks in this section:
Managing Configuration FilesCopying a Configuration File from an FTP Server to the Router
PurposeCommand or Action
(Optional) Allows you to enter global configuration mode.This step is required only if you want to override the defaultremote username or password (see Steps 2 and 3).
configure terminal
Example:
Device# configure terminal
Step 2
(Optional) Specifies the default remote username.ip ftp username username
Example:
Device(config)# ip ftp username user1
Step 3
(Optional) Specifies the default password.ip ftp password password
Example:
Device(config)# ip ftp password guessme
Step 4
(Optional) Exits global configuration mode. This step isrequired only if you override the default remote usernameor password (see Steps 2 and 3).
end
Example:
Device(config)# end
Step 5
Using FTP, copies the configuration file from a networkserver to running memory or the startup configuration.
Managing Configuration FilesCopying a Configuration File from an FTP Server to the Router
Examples
Copy FTP Running-Config
The following example copies a host configuration file named host1-confg from the netadmin1 directory onthe remote server with an IP address of 172.16.101.101, and loads and runs those commands on the Device:
Configure using host1-confg from 172.16.101.101? [confirm]Connected to 172.16.101.101Loading 1112 byte file host1-confg:![OK]Device#%SYS-5-CONFIG: Configured from host1-config by ftp from 172.16.101.101
Copy FTP Startup-Config
The following example specifies a remote username of netadmin1. Then it copies the configuration file namedhost2-confg from the netadmin1 directory on the remote server with an IP address of 172.16.101.101 to thestartup configuration.
Rtr2# configure terminalRtr2(config)# ip ftp usernamenetadmin1Rtr2(config)# ip ftp passwordmypassRtr2(config)# endRtr2# copy ftp: nvram:startup-configAddress of remote host [255.255.255.255]? 172.16.101.101Name of configuration file[rtr2-confg]? host2-confgConfigure using host2-confg from 172.16.101.101?[confirm]Connected to 172.16.101.101Loading 1112 byte file host2-confg:![OK][OK]Rtr2#%SYS-5-CONFIG_NV:Non-volatile store configured from host2-config by ftp from 172.16.101.101
What to Do NextAfter you have issued the copy EXEC command, you may be prompted for additional information or forconfirmation of the action. The prompting will depend on how much information you provide in the copycommand and the current setting of the fileprompt global configuration command.
Maintaining Configuration Files Larger than NVRAMTo maintain a configuration file that exceeds size of NVRAM, perform the tasks described in the followingsections:
Compressing the Configuration FileTo compress configuration files, complete the tasks in this section:
Enters global configuration mode.configure terminal
Example:
Device# configure terminal
Step 2
Specifies that the configuration file be compressed.service compress-config
Example:
Device(config)# service compress-config
Step 3
Exits global configuration mode.end
Example:
Device(config)# end
Step 4
Enters the new configuration:Do one of the following:Step 5
• Use FTP, rcp, or TFTP to copy the newconfiguration.
• If you try to load a configuration that is more thanthree times larger than the NVRAM size, thefollowing error message is displayed:• configure terminal
Building configuration...Compressing configuration from 129648 bytes to 11077 bytes[OK]
Storing the Configuration in Flash Memory on Class A Flash File SystemsTo store the startup configuration in Flash memory, complete the tasks in this section:
SUMMARY STEPS
1. enable2. copy nvram:startup-config flash-filesystem:filename3. configure terminal4. boot config flash-filesystem: filename5. end6. Do one of the following:
• Use FTP, rcp, or TFTP to copy the new configuration. If you try to load a configuration that is morethan three times larger than the NVRAM size, the following error message is displayed:
Enters global configuration mode.configure terminal
Example:
Device# configure terminal
Step 3
Specifies that the startup configuration file be storedin Flash memory by setting the CONFIG_FILEvariable.
boot config flash-filesystem: filename
Example:
Device(config)# boot config slot0:router-config
Step 4
Exits global configuration mode.end
Example:
Device(config)# end
Step 5
Enters the new configuration.Do one of the following:Step 6
• Use FTP, rcp, or TFTP to copy the new configuration. Ifyou try to load a configuration that is more than three timeslarger than the NVRAM size, the following error messageis displayed:
Copying Configuration Files from Flash Memory to the Startup or RunningConfiguration
To copy a configuration file from Flash memory directly to your startup configuration in NVRAM or yourrunning configuration, enter one of the commands in Step 2:
Copy 'ios-upgrade-1' from flash deviceas 'startup-config' ? [yes/no] yes
[OK]
Copying Configuration Files Between Flash Memory File SystemsOn platforms with multiple Flash memory file systems, you can copy files from one Flash memory file system,such as internal Flash memory or a Flash memory card in a PCMCIA slot, to another Flash memory file
Managing Configuration FilesCopying Configuration Files Between Flash Memory File Systems
system. Copying files to different Flash memory file systems lets you create backup copies of workingconfigurations and duplicate configurations for other routers. To copy a configuration file between Flashmemory file systems, use the following commands in EXEC mode:
• The source device and the destination device cannot be thesame. For example, the copyslot1:slot1: command is invalid.
Verifies the checksum of the file you copied.verify dest-filesystem :[partition-number:][filename ]
Step 4
Slot 1 is not applicable for Cisco ASR 900 RSP3 Module.Use bootflash or USB.
Note
Example:
Device# verify flash: slot1:
Example
The following example copies the file named running-config from partition 1 of internal Flash memory topartition 1 of slot 1 on a Cisco 3600 series router. In this example, the source partition is not specified, so therouter prompts for the partition number.
Destination file name [running-config]?Verifying checksum for 'running-config' (file # 2)... OKErase flash device before writing? [confirm]Flash contains files. Are you sure you want to erase? [confirm]Copy 'running-config' from flash: deviceas 'running-config' into slot1: device WITH erase? [yes/no] yes
Erasing device... eeeeeeeeeeeeeeeeeeeeeeeeeeeeeeeeeeeeeeeeeeeeeeeeeeeeeeeeeeeeeeee ...erased![OK - 850/4194304 bytes]Flash device copy took 00:00:30 [hh:mm:ss]Verifying checksum... OK (0x16)
Slot 0 or Slot 1 is not applicable for Cisco ASR 900 RSP3 Module. Use bootflash or USB.Note
Copying a Configuration File from an FTP Server to Flash Memory DevicesTo copy a configuration file from an FTP server to a Flash memory device, complete the task in this section:
SUMMARY STEPS
1. enable2. configure terminal3. ip ftp username username4. ip ftp password password5. end6. copy ftp: [[[//[username:password@]location ]/directory ]/filename ]
What to Do NextAfter you have issued the copy EXEC command, you may be prompted for additional information or forconfirmation of the action. The prompting will depend on how much information you provide in the copycommand and the current setting of the fileprompt global configuration command.
Copying a Configuration File from an rcp Server to Flash Memory DevicesTo copy a configuration file from an rcp server to a Flash memory device, complete the tasks in this section:
information or confirmation. The prompting will depending on howmuch information you provide in the copy command and the currentsetting of the fileprompt command.Example:
Managing Configuration FilesCopying a Configuration File from an rcp Server to Flash Memory Devices
Copying a Configuration File from a TFTP Server to Flash Memory DevicesTo copy a configuration file from a TFTP server to a Flash memory device, complete the task in this section:
confirmation. The prompting will depending on how muchExample:
Device# copy tftp:router-configslot0:new-config
information you provide in the copy command and the current settingof the fileprompt command.
Examples
The following example shows the copying of the configuration file named Device-config from a TFTP serverto the Flash memory card inserted in slot 0 of the Network Processing Engine (NPE) or Route Switch Processor(RSP) card of a Cisco 7500 series Device. The copied file is renamed new-config.
Device# copy tftp:router-config slot0:new-config
Reexecuting the Configuration Commands in the Startup Configuration FileTo reexecute the commands located in the startup configuration file, complete the task in this section:
Managing Configuration FilesCopying a Configuration File from a TFTP Server to Flash Memory Devices
DETAILED STEPS
PurposeCommand or Action
Enables privileged EXEC mode.enableStep 1
Example:
Device> enable
• Enter your password if prompted.
Reexecutes the configuration commands located in the startupconfiguration file .
configure memory
Example:
Device# configure memory
Step 2
Clearing the Startup ConfigurationYou can clear the configuration information from the startup configuration. If you reboot the router with nostartup configuration, the router will enter the Setup command facility so that you can configure the routerfrom scratch.To clear the contents of your startup configuration, complete the task in this section:
SUMMARY STEPS
1. enable2. erase nvram
DETAILED STEPS
PurposeCommand or Action
Enables privileged EXEC mode.enableStep 1
Example:
Device> enable
• Enter your password if prompted.
Clears the contents of your startup configuration.erase nvramStep 2
Example:
Device# erase nvram
For all platforms except the Class A Flash file system platforms, this commanderases NVRAM. The startup configuration file cannot be restored once it has beendeleted. On Class A Flash file system platforms, when you use theerasestartup-configEXECcommand, theDevice erases or deletes the configurationpointed to by CONFIG_FILE environment variable. If this variable points toNVRAM, the Device erases NVRAM. If the CONFIG_FILE environment variablespecifies a Flash memory device and configuration filename, the Device deletesthe configuration file. That is, the Device marks the file as “deleted,” rather thanerasing it. This feature allows you to recover a deleted file.
Managing Configuration FilesClearing the Startup Configuration
PurposeCommand or Action
Deleting a Specified Configuration FileTo delete a specifi ed configuration on a specific Flash device, complete the task in this section:
SUMMARY STEPS
1. enable2. delete flash-filesystem : filename
DETAILED STEPS
PurposeCommand or Action
Enables privileged EXEC mode.enableStep 1
Example:
Device> enable
• Enter your password if prompted.
Deletes a specified configuration file on a specified Flash device.delete flash-filesystem : filenameStep 2
Example:
Device# delete slot0:myconfig
On Class A and B Flash file systems, when you delete a specific file in Flashmemory, the system marks the file as deleted, allowing you to later recovera deleted file using the undelete EXEC command. Erased files cannot berecovered. To permanently erase the configuration file, use the squeezeEXEC command. On Class C Flash file systems, you cannot recover a filethat has been deleted. If you attempt to erase or delete the configuration filespecified by the CONFIG_FILE environment variable, the system promptsyou to confirm the deletion.
Note
Specifying the CONFIG_FILE Environment Variable on Class A Flash FileSystems
On Class A Flash file systems, you can configure the Cisco IOS software to load the startup configurationfile specified by the CONFIG_FILE environment variable. The CONFIG_FILE variable defaults to NVRAM.To change the CONFIG_FILE environment variable, complete the tasks in this section:
(Optional) Allows you to verify the contents of theCONFIG_FILE environment variable.
show boot
Example:
Device# show boot
Step 7
Examples
The following example copies the running configuration file to the first PCMCIA slot of the RSP card in aCisco 7500 series router. This configuration is then used as the startup configuration when the system isrestarted.
What to Do NextAfter you specify a location for the startup configuration file, the nvram:startup-config command is aliasedto the new location of the startup configuration file. Themorenvram:startup-config EXEC command willdisplay the startup configuration, regardless of its location. The erasenvram:startup-config EXEC commandwill erase the contents of NVRAM and delete the file pointed to by the CONFIG_FILE environment variable.
When you save the configuration using the copysystem:running-confignvram:startup-config command,the router saves a complete version of the configuration file to the location specified by the CONFIG_FILEenvironment variable and a distilled version to NVRAM. A distilled version is one that does not contain accesslist information. If NVRAM contains a complete configuration file, the router prompts you to confirm youroverwrite of the complete version with the distilled version. If NVRAM contains a distilled configuration,the router does not prompt you for confirmation and proceeds with overwriting the existing distilledconfiguration file in NVRAM.
Managing Configuration FilesSpecifying the CONFIG_FILE Environment Variable on Class A Flash File Systems
If you specify a file in a Flash device as the CONFIG_FILE environment variable, every time you saveyour configuration file with the copysystem:running-confignvram:startup-config command, the oldconfiguration file is marked as “deleted,” and the new configuration file is saved to that device. Eventually,Flash memory will be full, because the old configuration files still take up memory. Use the squeezeEXEC command to permanently delete the old configuration files and reclaim the space.
Note
Configuring the Router to Download Configuration FilesYou can specify an ordered list of network configuration and host configuration filenames. The Cisco IOSXE software scans this list until it loads the appropriate network or host configuration file.
To configure the router to download configuration files at system startup, perform at least one of the tasksdescribed in the following sections:
• "Configuring the Router to Download the Network Configuration File"
• "Configuring the Router to Download the Host Configuration File"
If the router fails to load a configuration file during startup, it tries again every 10 minutes (the default setting)until a host provides the requested files. With each failed attempt, the router displays the following messageon the console terminal:
Booting host-confg... [timed out]If there are any problems with the startup configuration file, or if the configuration register is set to ignoreNVRAM, the router enters the Setup command facility.
Configuring the Router to Download the Network Configuration FileTo configure the Cisco IOS software to download a network configuration file from a server at startup,complete the tasks in this section:
rcp:[[[//[username@]location ]/directory ]/filename] | tftp:[[[//location ]/directory ]/filename ]} • If you do not specify a network configuration filename, the
Cisco IOS software uses the default filename network-confg.
Example:
Device(config)# boot network tftp:hostfile1
If you omit the address, the Device uses the broadcastaddress.
• You can specify more than one network configuration file.The software tries them in order entered until it loads one.This procedure can be useful for keeping files with differentconfiguration information loaded on a network server.
Enables the system to automatically load the network file uponrestart.
service config
Example:
Device(config)# service config
Step 4
Exits global configuration mode.end
Example:
Device(config)# end
Step 5
Saves the running configuration to the startup configuration file.Device# copy system:running-confignvram:startup-config
Configuring the Router to Download the Host Configuration FileTo configure the Cisco IOS software to download a host configuration file from a server at startup, completethe tasks in this section:
rcp:[[[//[username@]location ]/directory• If you do not specify a host configuration filename, the Deviceuses its own name to form a host configuration filename by
converting the name to all lowercase letters, removing all domain
Example:
Device(config)# boot host tftp:hostfile1
information, and appending “-confg.” If no host nameinformation is available, the software uses the default hostconfiguration filename Device-confg. If you omit the address,the Device uses the broadcast address.
• You can specify more than one host configuration file. TheCisco IOS software tries them in order entered until it loads one.This procedure can be useful for keeping files with differentconfiguration information loaded on a network server.
Enables the system to automatically load the host file upon restart.service config
In the following example, a Device is configured to download the host configuration file named hostfile1 andthe network configuration file named networkfile1. The Device uses TFTP and the broadcast address to obtainthe file.
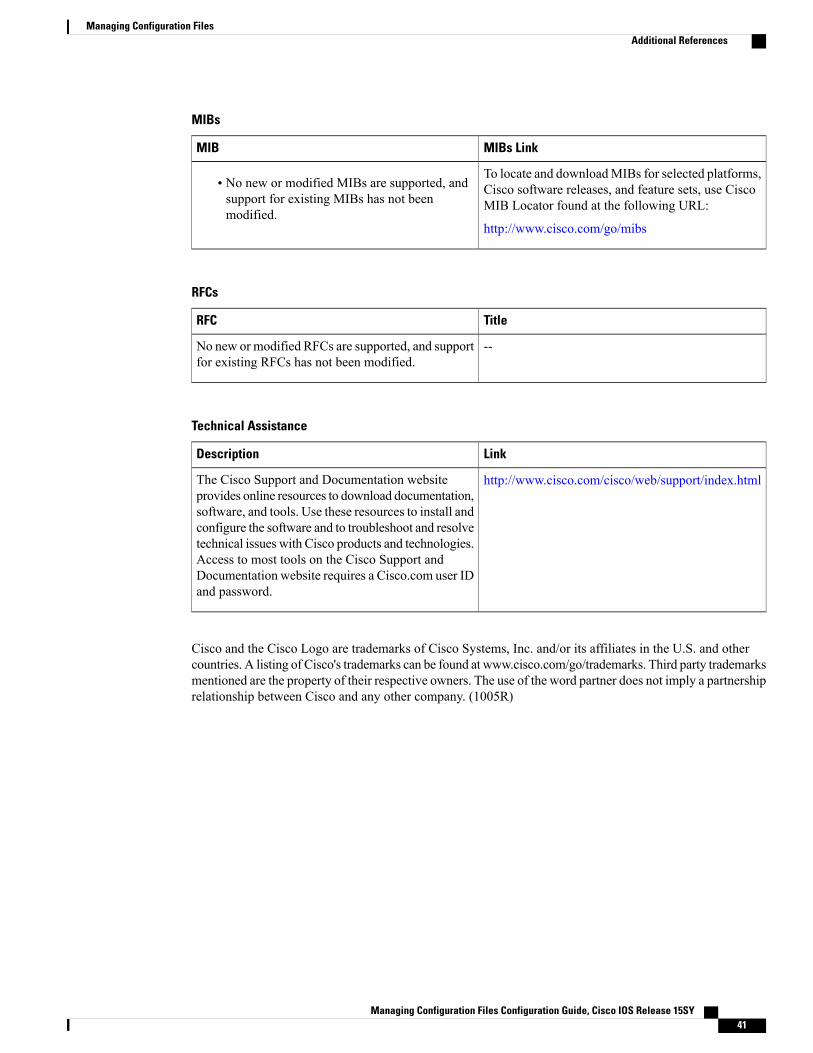
To locate and downloadMIBs for selected platforms,Cisco software releases, and feature sets, use CiscoMIB Locator found at the following URL:
http://www.cisco.com/go/mibs
• No new or modified MIBs are supported, andsupport for existing MIBs has not beenmodified.
RFCs
TitleRFC
--No new or modified RFCs are supported, and supportfor existing RFCs has not been modified.
Technical Assistance
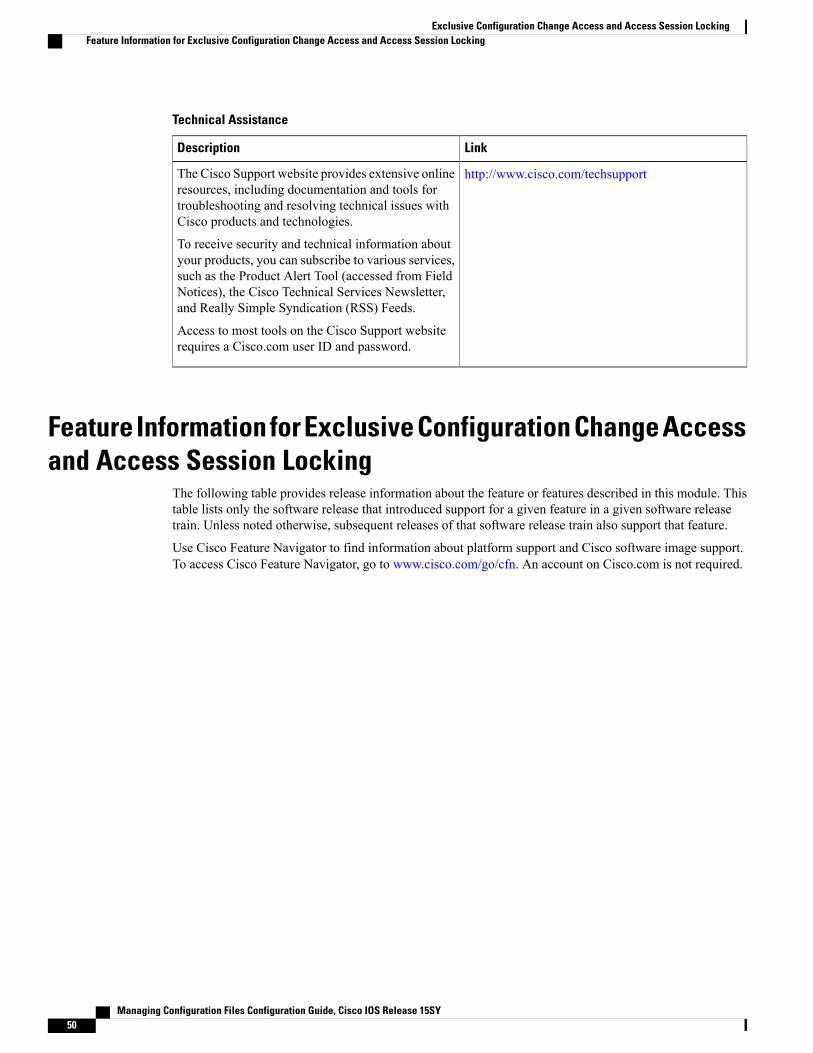
LinkDescription
http://www.cisco.com/cisco/web/support/index.htmlThe Cisco Support and Documentation websiteprovides online resources to download documentation,software, and tools. Use these resources to install andconfigure the software and to troubleshoot and resolvetechnical issues with Cisco products and technologies.Access to most tools on the Cisco Support andDocumentation website requires a Cisco.com user IDand password.
Cisco and the Cisco Logo are trademarks of Cisco Systems, Inc. and/or its affiliates in the U.S. and othercountries. A listing of Cisco's trademarks can be found at www.cisco.com/go/trademarks. Third party trademarksmentioned are the property of their respective owners. The use of the word partner does not imply a partnershiprelationship between Cisco and any other company. (1005R)
C H A P T E R 2Exclusive Configuration Change Access andAccess Session Locking
Exclusive Configuration Change Access (also called the “Configuration Lock” feature) allows you to haveexclusive change access to the Cisco IOS XE running configuration, preventing multiple users from makingconcurrent configuration changes.
The Access Session Locking addition to this feature extends the Exclusive Configuration Change Accessfeature such that show and debug commands entered by the user holding the configuration lock always haveexecution priority; show and debug commands entered by other users are only allowed to run after theprocesses initiated by the configuration lock owner have finished.
The Exclusive Configuration Change Access feature (“exposed lock”) is complementary with the lockingmechanism in the Configuration Replace and Configuration Rollback feature (“rollback lock”).
• Finding Feature Information, page 43
• Information About Locking the Configuration, page 44
• How to Configure Configuration Exclusive Confguration Change-Access and Access Session Locking,page 45
• Configuration Examples for Locking the Configuration, page 48
• Additional References, page 49
• Feature Information for Exclusive Configuration Change Access and Access Session Locking, page50
Finding Feature InformationYour software release may not support all the features documented in this module. For the latest caveats andfeature information, see Bug Search Tool and the release notes for your platform and software release. Tofind information about the features documented in this module, and to see a list of the releases in which eachfeature is supported, see the feature information table.
Use Cisco Feature Navigator to find information about platform support and Cisco software image support.To access Cisco Feature Navigator, go to www.cisco.com/go/cfn. An account on Cisco.com is not required.
Exclusive Configuration Change Access and Access Session LockingDevices running Cisco IOS software maintain a running configuration that determines the configuration stateof the device. Changes to the running configuration alter the behavior of the device. Because Cisco IOSsoftware allows multiple users to change the running configuration via the device CLI (including the deviceconsole and telnet Secure Shell (SSH)), in some operating environments it would be beneficial to preventmultiple users frommaking concurrent changes to the Cisco IOS running configuration. Temporarily limitingaccess to the Cisco IOS running configuration prevents inadvertent conflicts or cases where two users attemptto configure the same portion of the running configuration.
The Exclusive Configuration Change Access feature (also called the “Configuration Lock” feature) allowsyou to have exclusive change access to the Cisco IOS running configuration, preventing multiple users frommaking concurrent configuration changes.
This feature provides exclusive change access to the Cisco IOS running configuration from the time you enterglobal configuration mode by using the configure terminal command. This gives the effect of a “configurationlock,” preventing other users from changing the Cisco IOS running configuration. The configuration lock isautomatically released when the user exits Cisco IOS configuration mode.
The Exclusive Configuration Change Access feature is enabled using the configuration mode exclusivecommand in global configuration mode. Exclusive configuration change access can be set to auto, so that theCisco IOS configuration mode is locked whenever anyone uses the configure terminal command, or it canbe set tomanual, so that the Cisco IOS configuration mode is locked only when the configure terminal lockcommand is issued.
The Exclusive Configuration Change Access feature is complementary with the locking mechanism for theConfiguration Replace and Configuration Rollback feature introduced in Cisco IOS Release 12.2(25)S and12.3(7)T.
Access Session LockingThe Access Session Locking feature extends the Exclusive Configuration Change Access feature such thatshow and debug commands entered by the user holding the configuration lock always have execution priority.This feature prevents concurrent configuration access and also provides an option to prevent simultaneousprocesses, such as a show command entered by another user, from executing while other configurationcommands are being executed. When this feature is enabled, the commands entered by the user with theconfiguration lock (such as configuration commands) always have priority over commands entered by otherusers.
Exclusive Configuration Change Access and Access Session LockingInformation About Locking the Configuration
How to Configure Configuration Exclusive ConfgurationChange-Access and Access Session Locking
Enabling Exclusive Configuration Change Access and Access Session Locking
Effective with Cisco IOS Release 12.2(33)SRE, the Exclusive Configuration Change Access and AccessSession Locking feature is not available in Cisco IOS software. Use the Parser Concurrency and LockingImprovements feature instead of this feature. See the “Enabling Parser Concurrency and LockingImprovements” section for more information.
Note
Perform this task to enable the Exclusive Configuration Change Access and Access Session Locking feature.
SUMMARY STEPS
1. enable2. configure terminal3. configuration mode exclusive4. end
DETAILED STEPS
PurposeCommand or Action
Enables privileged EXEC mode.enableStep 1
Example:
Router> enable
• Enter your password if prompted.
Enters global configuration mode.configure terminal
Exclusive Configuration Change Access and Access Session LockingHow to Configure Configuration Exclusive Confguration Change-Access and Access Session Locking
PurposeCommand or Action
Ends your configuration session and returns the CLI to privilegedEXEC mode.
end
Example:
Router(config)# end
Step 4
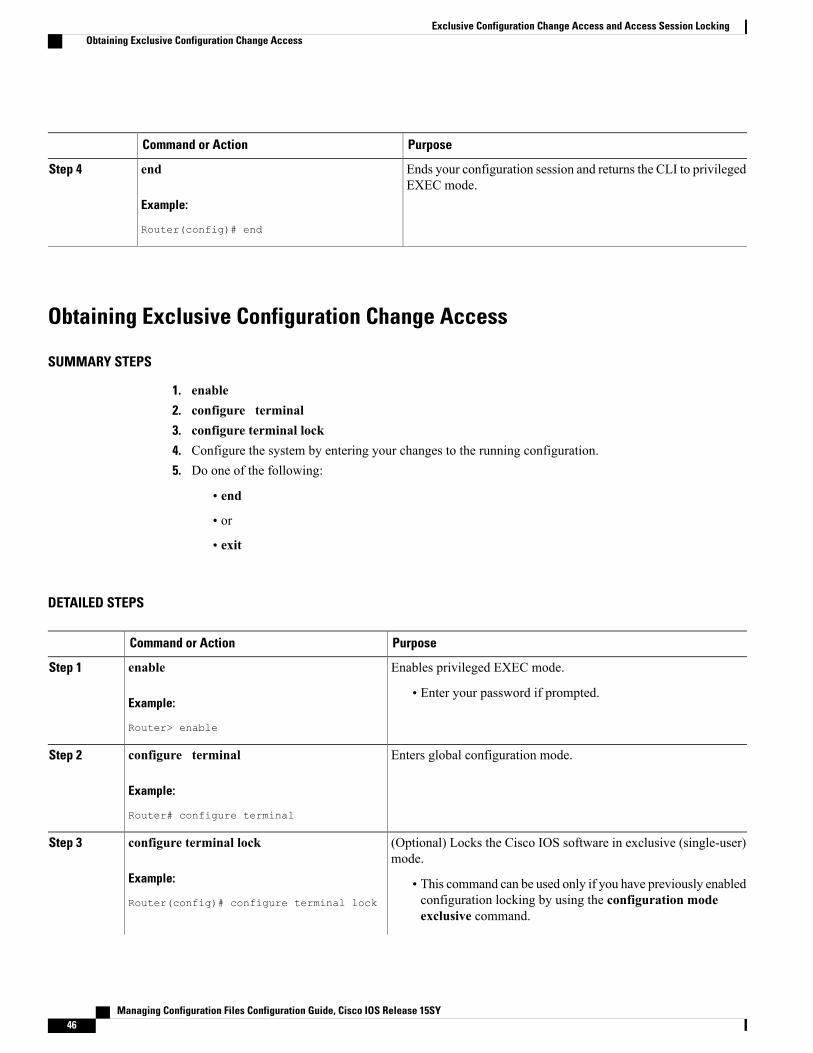
Obtaining Exclusive Configuration Change Access
SUMMARY STEPS
1. enable2. configure terminal3. configure terminal lock4. Configure the system by entering your changes to the running configuration.5. Do one of the following:
• end
• or
• exit
DETAILED STEPS
PurposeCommand or Action
Enables privileged EXEC mode.enableStep 1
Example:
Router> enable
• Enter your password if prompted.
Enters global configuration mode.configure terminal
Example:
Router# configure terminal
Step 2
(Optional) Locks the Cisco IOS software in exclusive (single-user)mode.
configure terminal lock
Example:
Router(config)# configure terminal lock
Step 3
• This command can be used only if you have previously enabledconfiguration locking by using the configuration modeexclusive command.
• This command is available in Cisco IOS Release 12.3(14)T orlater releases.
--Configure the system by entering your changesto the running configuration.
Step 4
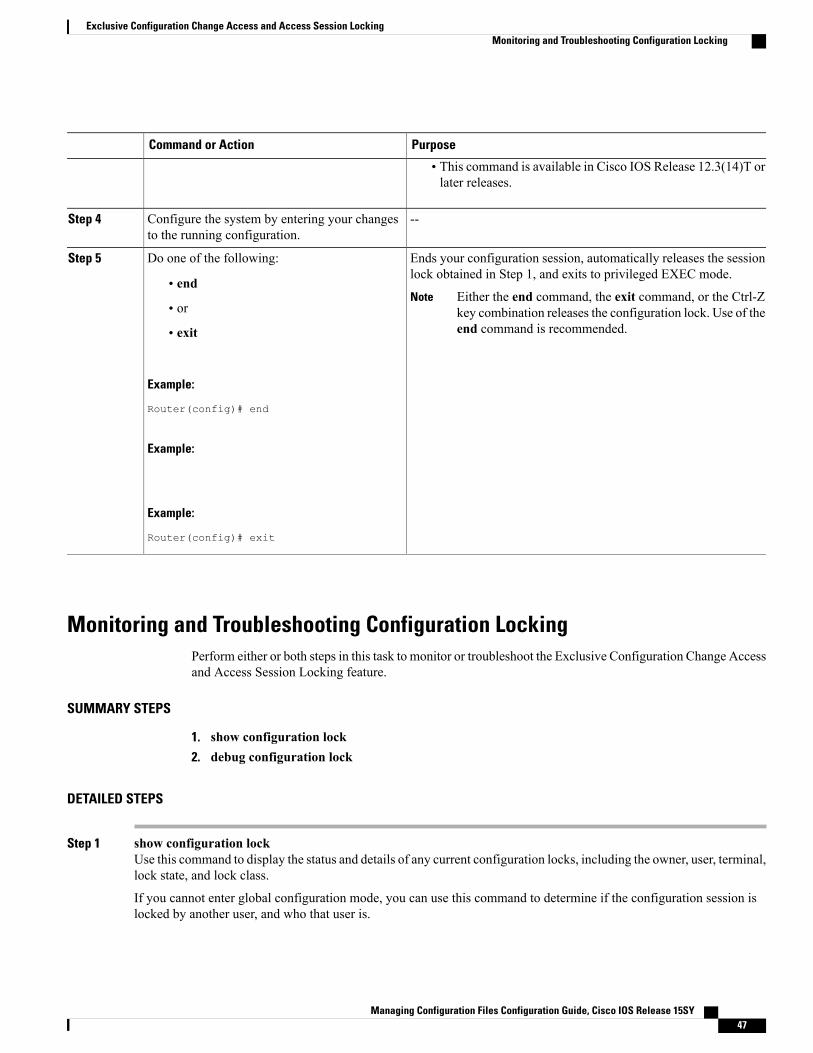
Ends your configuration session, automatically releases the sessionlock obtained in Step 1, and exits to privileged EXEC mode.
Do one of the following:Step 5
• endEither the end command, the exit command, or the Ctrl-Zkey combination releases the configuration lock. Use of theend command is recommended.
Note• or
• exit
Example:
Router(config)# end
Example:
Example:
Router(config)# exit
Monitoring and Troubleshooting Configuration LockingPerform either or both steps in this task to monitor or troubleshoot the Exclusive Configuration Change Accessand Access Session Locking feature.
SUMMARY STEPS
1. show configuration lock2. debug configuration lock
DETAILED STEPS
Step 1 show configuration lockUse this command to display the status and details of any current configuration locks, including the owner, user, terminal,lock state, and lock class.
If you cannot enter global configuration mode, you can use this command to determine if the configuration session islocked by another user, and who that user is.
Exclusive Configuration Change Access and Access Session LockingMonitoring and Troubleshooting Configuration Locking
Example:
Step 2 debug configuration lockUse this command to enable debugging of Cisco IOS configuration locks (exposed class locks or rollback class locks):
Example:
Router# debug configuration lock
Session1 from console==========================Router# configure terminal lockConfiguration mode locked exclusively. The lock will be cleared once you exit out of configurationmode using end/exitEnter configuration commands, one per line. End with CNTL/Z.Router(config)#Parser : LOCK REQUEST in EXCLUSIVE modeParser: <configure terminal lock> - Config. Lock requested by process <3> client <PARSER Client>Parser: <configure terminal lock> - Config. Lock acquired successfully !Router(config)#
Configuration Examples for Locking the Configuration
Configuring an Exclusive Lock in Auto Mode ExampleThe following example shows how to enable the exclusive lock in auto mode for single-user auto configurationmode using the configurationmodeexclusive command. Once the Cisco IOS configuration file is lockedexclusively, you can verify this configuration by using the showconfigurationlockcommand.
http://www.cisco.com/techsupportThe Cisco Support website provides extensive onlineresources, including documentation and tools fortroubleshooting and resolving technical issues withCisco products and technologies.
To receive security and technical information aboutyour products, you can subscribe to various services,such as the Product Alert Tool (accessed from FieldNotices), the Cisco Technical Services Newsletter,and Really Simple Syndication (RSS) Feeds.
Access to most tools on the Cisco Support websiterequires a Cisco.com user ID and password.
Feature Information for Exclusive Configuration Change Accessand Access Session Locking
The following table provides release information about the feature or features described in this module. Thistable lists only the software release that introduced support for a given feature in a given software releasetrain. Unless noted otherwise, subsequent releases of that software release train also support that feature.
Use Cisco Feature Navigator to find information about platform support and Cisco software image support.To access Cisco Feature Navigator, go to www.cisco.com/go/cfn. An account on Cisco.com is not required.
Exclusive Configuration Change Access and Access Session LockingFeature Information for Exclusive Configuration Change Access and Access Session Locking
Exclusive Configuration Change Access and Access Session LockingFeature Information for Exclusive Configuration Change Access and Access Session Locking
Feature InformationReleasesFeature Name
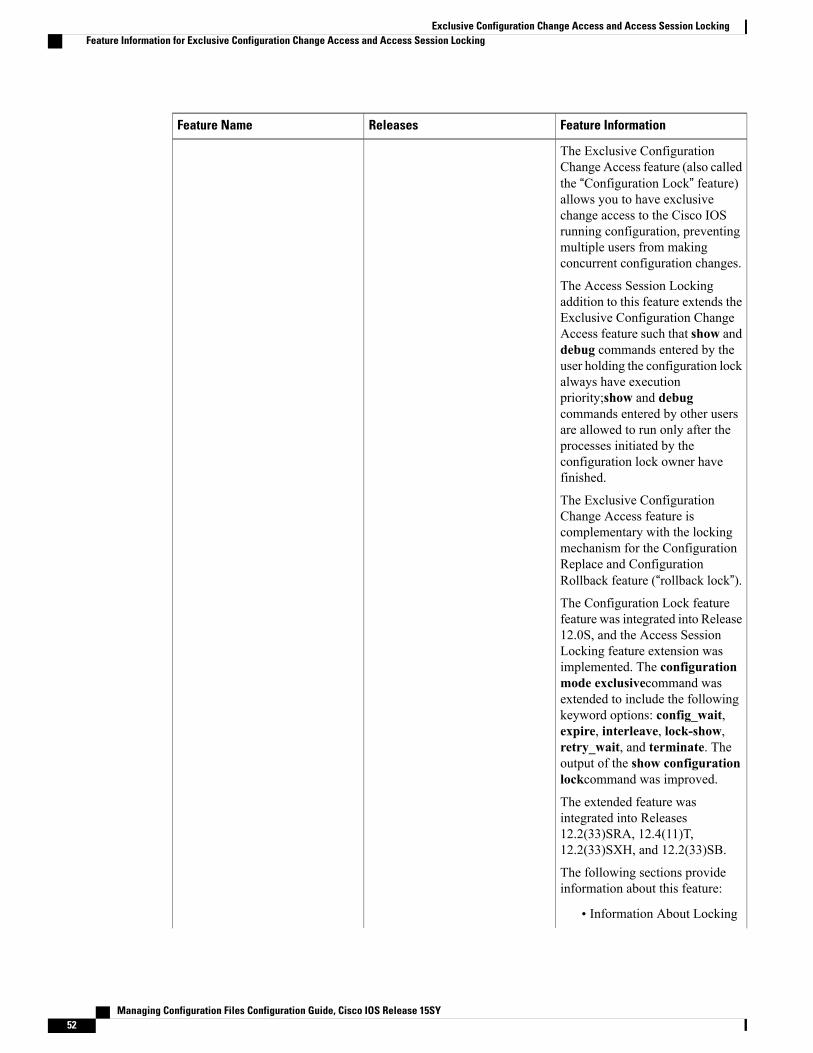
The Exclusive ConfigurationChange Access feature (also calledthe “Configuration Lock” feature)allows you to have exclusivechange access to the Cisco IOSrunning configuration, preventingmultiple users from makingconcurrent configuration changes.
The Access Session Lockingaddition to this feature extends theExclusive Configuration ChangeAccess feature such that show anddebug commands entered by theuser holding the configuration lockalways have executionpriority;show and debugcommands entered by other usersare allowed to run only after theprocesses initiated by theconfiguration lock owner havefinished.
The Exclusive ConfigurationChange Access feature iscomplementary with the lockingmechanism for the ConfigurationReplace and ConfigurationRollback feature (“rollback lock”).The Configuration Lock featurefeature was integrated into Release12.0S, and the Access SessionLocking feature extension wasimplemented. The configurationmode exclusivecommand wasextended to include the followingkeyword options: config_wait,expire, interleave, lock-show,retry_wait, and terminate. Theoutput of the show configurationlockcommand was improved.
The extended feature wasintegrated into Releases12.2(33)SRA, 12.4(11)T,12.2(33)SXH, and 12.2(33)SB.
The following sections provideinformation about this feature:
Exclusive Configuration Change Access and Access Session LockingFeature Information for Exclusive Configuration Change Access and Access Session Locking
Feature InformationReleasesFeature Name
the Configuration
• How to ConfigureConfiguration Lock
The following commands wereintroduced or modified: clearconfiguration lock, configurationmode exclusive, and configureterminal lock.
The Parser Concurrency andLocking Improvements featureprovides a common interface thatensures that exclusive access isgranted to the requested processand prevents others fromconcurrently accessing the CiscoIOS configuration. It allows accessonly to the user holding the lockand prevents other clients fromaccessing the configuration.
The following sections provideinformation about this feature:
Exclusive Configuration Change Access and Access Session LockingFeature Information for Exclusive Configuration Change Access and Access Session Locking
Exclusive Configuration Change Access and Access Session LockingFeature Information for Exclusive Configuration Change Access and Access Session Locking
C H A P T E R 3Configuration Replace and ConfigurationRollback
The Configuration Replace and Configuration Rollback feature provides the capability to replace the currentrunning configuration with any saved Cisco IOS configuration file. This functionality can be used to revertto a previous configuration state, effectively rolling back any configuration changes that were made sincethat configuration file was saved.
• Finding Feature Information, page 55
• Prerequisites for Configuration Replace and Configuration Rollback, page 56
• Restrictions for Configuration Replace and Configuration Rollback, page 56
• Information About Configuration Replace and Configuration Rollback, page 57
• How to Use Configuration Replace and Configuration Rollback, page 59
• Configuration Examples for Configuration Replace and Configuration Rollback, page 66
• Additional References, page 68
• Feature Information for Configuration Replace and Configuration Rollback, page 70
Finding Feature InformationYour software release may not support all the features documented in this module. For the latest caveats andfeature information, see Bug Search Tool and the release notes for your platform and software release. Tofind information about the features documented in this module, and to see a list of the releases in which eachfeature is supported, see the feature information table.
Use Cisco Feature Navigator to find information about platform support and Cisco software image support.To access Cisco Feature Navigator, go to www.cisco.com/go/cfn. An account on Cisco.com is not required.
Prerequisites for Configuration Replace and ConfigurationRollback
The format of the configuration files used as input by the Configuration Replace and Configuration Rollbackfeature must comply with standard Cisco software configuration file indentation rules as follows:
• Start all commands on a new line with no indentation, unless the command is within a configurationsubmode.
• Indent commands within a first-level configuration submode one space.
• Indent commands within a second-level configuration submode two spaces.
• Indent commands within subsequent submodes accordingly.
These indentation rules describe how the software creates configuration files for such commands as showrunning-config or copy running-config destination-url. Any configuration file generated on a Cisco devicecomplies with these rules.
Free memory larger than the combined size of the two configuration files (the current running configurationand the saved replacement configuration) is required.
Restrictions for Configuration Replace and ConfigurationRollback
If the device does not have free memory larger than the combined size of the two configuration files (thecurrent running configuration and the saved replacement configuration), the configuration replace operationis not performed.
Certain Cisco configuration commands such as those pertaining to physical components of a networkingdevice (for example, physical interfaces) cannot be added or removed from the running configuration. Forexample, a configuration replace operation cannot remove the interface ethernet 0 command line from thecurrent running configuration if that interface is physically present on the device. Similarly, the interfaceethernet 1 command line cannot be added to the running configuration if no such interface is physicallypresent on the device. A configuration replace operation that attempts to perform these types of changes resultsin error messages indicating that these specific command lines failed.
In very rare cases, certain Cisco configuration commands cannot be removed from the running configurationwithout reloading the device. A configuration replace operation that attempts to remove this type of commandresults in error messages indicating that these specific command lines failed.
Configuration Replace and Configuration RollbackPrerequisites for Configuration Replace and Configuration Rollback
Information About Configuration Replace and ConfigurationRollback
Configuration ArchiveThe Cisco IOS configuration archive is intended to provide a mechanism to store, organize, and manage anarchive of Cisco IOS configuration files to enhance the configuration rollback capability provided by theconfigurereplace command. Before this feature was introduced, you could save copies of the runningconfiguration using the copyrunning-configdestination-url command, storing the replacement file eitherlocally or remotely. However, this method lacked any automated file management. On the other hand, theConfiguration Replace and Configuration Rollback feature provides the capability to automatically save copiesof the running configuration to the Cisco IOS configuration archive. These archived files serve as checkpointconfiguration references and can be used by the configurereplace command to revert to previous configurationstates.
The archiveconfig command allows you to save Cisco IOS configurations in the configuration archive usinga standard location and filename prefix that is automatically appended with an incremental version number(and optional timestamp) as each consecutive file is saved. This functionality provides a means for consistentidentification of saved Cisco IOS configuration files. You can specify how many versions of the runningconfiguration are kept in the archive. After the maximum number of files are saved in the archive, the oldestfile is automatically deleted when the next, most recent file is saved. The showarchive command displaysinformation for all configuration files saved in the Cisco IOS configuration archive.
The Cisco IOS configuration archive, in which the configuration files are stored and available for use withthe configurereplace command, can be located on the following file systems:
• If your platform has disk0--disk0:, disk1:, ftp:, pram:, rcp:, slavedisk0:, slavedisk1:, or tftp:
• If your platform does not have disk0--ftp:, http:, pram:, rcp:, or tftp:
Configuration ReplaceThe configurereplace command provides the capability to replace the current running configuration with anysaved Cisco IOS configuration file. This functionality can be used to revert to a previous configuration state,effectively rolling back any configuration changes that were made since the previous configuration state wassaved.
When using the configurereplace command, you must specify a saved Cisco IOS configuration as thereplacement configuration file for the current running configuration. The replacement file must be a completeconfiguration generated by a Cisco IOS device (for example, a configuration generated by thecopyrunning-configdestination-url command), or, if generated externally, the replacement file must complywith the format of files generated by Cisco IOS devices. When the configurereplace command is entered,the current running configuration is compared with the specified replacement configuration and a set of diffsis generated. The algorithm used to compare the two files is the same as that employed by theshowarchiveconfigdifferences command. The resulting diffs are then applied by the Cisco IOS parser toachieve the replacement configuration state. Only the diffs are applied, avoiding potential service disruptionfrom reapplying configuration commands that already exist in the current running configuration. This algorithmeffectively handles configuration changes to order-dependent commands (such as access lists) through a
Configuration Replace and Configuration RollbackInformation About Configuration Replace and Configuration Rollback
multiple pass process. Under normal circumstances, no more than three passes are needed to complete aconfiguration replace operation, and a limit of five passes is performed to preclude any looping behavior.
The Cisco IOS copysource-urlrunning-config command is often used to copy a stored Cisco IOS configurationfile to the running configuration. When using the copysource-urlrunning-configcommand as an alternativeto the configurereplacetarget-urlcommand, the following major differences should be noted:
• The copysource-urlrunning-config command is a merge operation and preserves all the commandsfrom both the source file and the current running configuration. This command does not remove commandsfrom the current running configuration that are not present in the source file. In contrast, theconfigurereplacetarget-url command removes commands from the current running configuration thatare not present in the replacement file and adds commands to the current running configuration that needto be added.
• The copysource-urlrunning-config command applies every command in the source file, whether or notthe command is already present in the current running configuration. This algorithm is inefficient and,in some cases, can result in service outages. In contrast, the configurereplacetarget-url command onlyapplies the commands that need to be applied--no existing commands in the current running configurationare reapplied.
• A partial configuration file may be used as the source file for the copysource-urlrunning-configcommand, whereas a complete Cisco IOS configuration file must be used as the replacement file for theconfigurereplacetarget-url command.
In Cisco IOS Release 12.2(25)S and 12.3(14)T, a locking feature for the configuration replace operation wasintroduced. When the configurereplace command is used, the running configuration file is locked by defaultfor the duration of the configuration replace operation. This locking mechanism prevents other users fromchanging the running configuration while the replacement operation is taking place, which might otherwisecause the replacement operation to terminate unsuccessfully. You can disable the locking of the runningconfiguration by using the nolock keyword when issuing the configurereplacecommand.
The running configuration lock is automatically cleared at the end of the configuration replace operation. Youcan display any locks that may be currently applied to the running configuration using theshowconfigurationlock command.
In a scenario when you are performing a configuration replace using a configuration that is not sourcedfrom IOS(such as a custom written configuration) if the login banner has a delimiter that is not the EXTcharacter (ASCII code 003), the banner configuration is rejected and not included in the replacedconfiguration. Non-working delimiters include ^C, %, #, CC etc.
Note
Configuration RollbackThe concept of rollback comes from the transactional processing model common to database operations. Ina database transaction, you might make a set of changes to a given database table. You then must choosewhether to commit the changes (apply the changes permanently) or to roll back the changes (discard thechanges and revert to the previous state of the table). In this context, rollbackmeans that a journal file containinga log of the changes is discarded, and no changes are applied. The result of the rollback operation is to revertto the previous state, before any changes were applied.
The configurereplace command allows you to revert to a previous configuration state, effectively rollingback changes that were made since the previous configuration state was saved. Instead of basing the rollback
Configuration Replace and Configuration RollbackConfiguration Rollback
operation on a specific set of changes that were applied, the Cisco IOS configuration rollback capability usesthe concept of reverting to a specific configuration state based on a saved Cisco IOS configuration file. Thisconcept is similar to the database idea of saving a checkpoint (a saved version of the database) to preserve aspecific state.
If the configuration rollback capability is desired, you must save the Cisco IOS running configuration beforemaking any configuration changes. Then, after entering configuration changes, you can use that savedconfiguration file to roll back the changes (using the configurereplace target-url command). Furthermore,since you can specify any saved Cisco IOS configuration file as the replacement configuration, you are notlimited to a fixed number of rollbacks, as is the case in some rollback models based on a journal file.
Configuration Rollback Confirmed Change OperationThe Configuration Rollback Confirmed Change feature enables an added criterion of a confirmation toconfiguration changes. This functionality enables a rollback to occur if a confirmation of the requested changesis not received in a configured time frame. Command failures can also be configured to trigger a configurationrollback.
The following steps outline how this process is achieved:
1 A new option allows you to request confirmation (a confirmation time limit must be supplied) of theconfiguration changes.
2 You must enter the confirmation command. If no confirmation is entered within the requested time limit,the configuration reverts to its previous state.
Benefits of Configuration Replace and Configuration Rollback• Allows you to revert to a previous configuration state, effectively rolling back configuration changes.
• Allows you to replace the current running configuration file with the startup configuration file withouthaving to reload the router or manually undo CLI changes to the running configuration file, thereforereducing system downtime.
• Allows you to revert to any saved Cisco IOS configuration state.
• Simplifies configuration changes by allowing you to apply a complete configuration file to the router,where only the commands that need to be added or removed are affected.
• When using the configure replace command as an alternative to the copy source-url running-configcommand, increases efficiency and prevents risk of service outages by not reapplying existing commandsin the current running configuration.
How to Use Configuration Replace and Configuration Rollback
Creating a Configuration ArchiveNo prerequisite configuration is needed to use the configurereplace command. Using the configurereplacecommand in conjunction with the Cisco IOS configuration archive and the archiveconfig command is optional
Configuration Replace and Configuration RollbackBenefits of Configuration Replace and Configuration Rollback
but offers significant benefit for configuration rollback scenarios. Before using the archiveconfig command,the configuration archive must be configured. Perform this task to configure the characteristics of theconfiguration archive.
Enters global configuration mode.configure terminal
Example:
Device# configure terminal
Step 2
Enters archive configuration mode.archive
Example:
Device(config)# archive
Step 3
Specifies the location and filename prefix for the files in the Cisco IOSconfiguration archive.
path url
Example:
Device(config-archive)# pathflash:myconfig
Step 4
If a directory is specified in the path instead of file, the directory namemust be followed by a forward slash as follows: path flash:/directory/.The forward slash is not necessary after a filename; it is only necessarywhen specifying a directory.
Note
(Optional) Sets the maximum number of archive files of the runningconfiguration to be saved in the Cisco IOS configuration archive.
maximum number
Example:
Device(config-archive)# maximum14
Step 5
• The number argument is the maximum number of archive files of therunning configuration to be saved in the Cisco IOS configuration archive.Valid values are from 1 to 14. The default is 10.
Configuration Replace and Configuration RollbackCreating a Configuration Archive
PurposeCommand or Action
Before using this command, you must configure the path commandto specify the location and filename prefix for the files in the CiscoIOS configuration archive.
Note
(Optional) Sets the time increment for automatically saving an archive file ofthe current running configuration in the Cisco IOS configuration archive.
time-period minutes
Example:
Device(config-archive)#time-period 10
Step 6
• The minutes argument specifies how often, in minutes, to automaticallysave an archive file of the current running configuration in the Cisco IOSconfiguration archive.
Before using this command, you must configure the path commandto specify the location and filename prefix for the files in the CiscoIOS configuration archive.
Note
Exits to privileged EXEC mode.end
Example:
Device(config-archive)# end
Step 7
Saves the current running configuration file to the configuration archive.archive configStep 8
Example:
Device# archive config
The path commandmust be configured before using this command.Note
Performing a Configuration Replace or Configuration Rollback OperationPerform this task to replace the current running configuration file with a saved Cisco IOS configuration file.
You must create a configuration archive before performing this procedure. See Creating a ConfigurationArchive for detailed steps. The following procedure details how to return to that archived configurationin the event of a problem with the current running configuration.
• The target -url argument is a URL (accessible by the Cisco IOSfile system) of the saved Cisco IOS configuration file that is to
Example:
Device# configure replace flash:myconfig-1list time 30
replace the current running configuration, such as the configurationfile created using the archiveconfig command.
• The list keyword displays a list of the command lines applied bythe Cisco IOS software parser during each pass of the configurationreplace operation. The total number of passes performed is alsodisplayed.
• The forcekeyword replaces the current running configuration filewith the specified saved Cisco IOS configuration file withoutprompting you for confirmation.
• The timeminuteskeyword and argument specify the time (inminutes) within which you must enter the configureconfirmcommand to confirm replacement of the current runningconfiguration file. If the configureconfirm command is not enteredwithin the specified time limit, the configuration replace operationis automatically reversed (in other words, the current runningconfiguration file is restored to the configuration state that existedprior to entering the configurereplace command).
• The nolock keyword disables the locking of the runningconfiguration file that prevents other users from changing therunning configuration during a configuration replace operation.
• The reverttrigger keywords set the following triggers for revertingto the original configuration:
• error--Reverts to the original configuration upon error.
• timerminutes--Reverts to the original configuration ifspecified time elapses.
• The ignorecase keyword allows the configuration to ignore thecase of the confirmation command.
Configuration Replace and Configuration RollbackPerforming a Configuration Replace or Configuration Rollback Operation
PurposeCommand or Action
(Optional) To cancel the timed rollback and trigger the rollbackimmediately, or to reset parameters for the timed rollback, use theconfigurerevertcommand in privileged EXEC mode.
configure revert {now|timer{minutes|idleminutes}}
Example:
Device# configure revert now
Step 3
• now --Triggers the rollback immediately.
• timer --Resets the configuration revert timer.
Example:• Use theminutes argument with the timer keyword to specifya new revert time in minutes.
• Use the idle keyword along with a time in minutes to set themaximum allowable time period of no activity beforereverting to the saved configuration.
(Optional) Confirms replacement of the current running configurationfile with a saved Cisco IOS configuration file.
configure confirm
Example:
Device# configure confirm
Step 4
Use this command only if the timeseconds keyword andargument of the configurereplace command are specified.
Note
Exits to user EXEC mode.exit
Example:
Device# exit
Step 5
Monitoring and Troubleshooting the FeaturePerform this task to monitor and troubleshoot the Configuration Replace and Configuration Rollback feature.
Configuration Replace and Configuration RollbackMonitoring and Troubleshooting the Feature
Example:
Device> enableDevice#
Step 2 show archiveUse this command to display information about the files saved in the Cisco IOS configuration archive. For example:
Example:
Device# show archiveThere are currently 1 archive configurations saved.The next archive file will be named flash:myconfig-2Archive # Name01 flash:myconfig-1 <- Most Recent234567891011121314
The following is sample output from the showarchive command after several archive files of the running configurationhave been saved. In this example, the maximum number of archive files to be saved is set to three.
Example:
Device# show archiveThere are currently 3 archive configurations saved.The next archive file will be named flash:myconfig-8Archive # Name01 :Deleted2 :Deleted3 :Deleted4 :Deleted5 flash:myconfig-56 flash:myconfig-67 flash:myconfig-7 <- Most Recent891011121314
Step 3 debug archive versioningUse this command to enable debugging of the Cisco IOS configuration archive activities to help monitor and troubleshootconfiguration replace and rollback. For example:
Step 4 debug archive config timestampUse this command to enable debugging of the processing time for each integral step of a configuration replace operationand the size of the configuration files being handled. For example:
Time to read file slot0:sample_2.cfg = 0 msec (0 sec)Number of lines read:55Size of file :1054
Starting Pass 1Time to read file system:running-config = 0 msec (0 sec)Number of lines read:93Size of file :2539Time taken for positive rollback pass = 320 msec (0 sec)Time taken for negative rollback pass = 0 msec (0 sec)Time taken for negative incremental diffs pass = 59 msec (0 sec)Time taken by PI to apply changes = 0 msec (0 sec)Time taken for Pass 1 = 380 msec (0 sec)
Starting Pass 2Time to read file system:running-config = 0 msec (0 sec)Number of lines read:55Size of file :1054Time taken for positive rollback pass = 0 msec (0 sec)Time taken for negative rollback pass = 0 msec (0 sec)Time taken for Pass 2 = 0 msec (0 sec)
Total number of passes:1Rollback Done
Step 5 exitUse this command to exit to user EXEC mode. For example:
Configuration Replace and Configuration RollbackMonitoring and Troubleshooting the Feature
Configuration Examples for Configuration Replace andConfiguration Rollback
Creating a Configuration Archive ExampleThe following example shows how to perform the initial configuration of the Cisco IOS configuration archive.In this example, flash:myconfig is specified as the location and filename prefix for the files in the configurationarchive and a value of 10 is set as the maximum number of archive files to be saved.
Replacing the Current Running Configuration with a Saved Cisco IOSConfiguration File Example
The following example shows how to replace the current running configuration with a saved Cisco IOSconfiguration file named flash:myconfig. The configure replace command interactively prompts you toconfirm the operation.
Device# configure replace flash:myconfigThis will apply all necessary additions and deletionsto replace the current running configuration with thecontents of the specified configuration file, which isassumed to be a complete configuration, not a partialconfiguration. Enter Y if you are sure you want to proceed. ? [no]: YTotal number of passes: 1Rollback DoneIn the following example, the list keyword is specified in order to display the command lines that were appliedduring the configuration replace operation:
Device# configure replace flash:myconfig listThis will apply all necessary additions and deletionsto replace the current running configuration with thecontents of the specified configuration file, which isassumed to be a complete configuration, not a partialconfiguration. Enter Y if you are sure you want to proceed. ? [no]: Y!Pass 1!List of Commands:no snmp-server community public rosnmp-server community mystring ro
Configuration Replace and Configuration RollbackConfiguration Examples for Configuration Replace and Configuration Rollback
Reverting to the Startup Configuration File ExampleThe following example shows how to revert to the Cisco IOS startup configuration file using theconfigurereplace command. This example also shows the use of the optional force keyword to override theinteractive user prompt.
Device# configure replace nvram:startup-config forceTotal number of passes: 1Rollback Done
Example: Performing a Configuration Replace Operation with the configureconfirm Command
The following example shows the use of the configure replace command with the time minutes keywordand argument. You must enter the configure confirm command within the specified time limit to confirmreplacement of the current running configuration file. If the configure confirm command is not entered withinthe specified time limit, the configuration replace operation is automatically reversed (in other words, thecurrent running configuration file is restored to the configuration state that existed prior to entering theconfigure replace command).
Device# configure replace nvram:startup-config time 120This will apply all necessary additions and deletionsto replace the current running configuration with thecontents of the specified configuration file, which isassumed to be a complete configuration, not a partialconfiguration. Enter Y if you are sure you want to proceed. ? [no]: YTotal number of passes: 1Rollback DoneDevice# configure confirmThe following example shows the use of the configure revert command with the timer keyword. You mustenter the configure revert command to cancel the timed rollback and trigger the rollback immediately, or toreset parameters for the timed rollback.Device# configure revert timer 100
Performing a Configuration Rollback Operation ExampleThe following example shows how to make changes to the current running configuration and then roll backthe changes. As part of the configuration rollback operation, you must save the current running configurationbefore making changes to the file. In this example, the archiveconfig command is used to save the currentrunning configuration. The generated output of the configurereplace command indicates that only one passwas performed to complete the rollback operation.
Before using the archiveconfig command, you must configure the path command to specify the locationand filename prefix for the files in the Cisco IOS configuration archive.
Note
You first save the current running configuration in the configuration archive as follows:
Configuration Replace and Configuration RollbackReverting to the Startup Configuration File Example
You then enter configuration changes as shown in the following example:
configure terminal!user netops2 password rainuser netops3 password snowexitAfter having made changes to the running configuration file, assume you now want to roll back these changesand revert to the configuration that existed before the changes were made. The showarchive command isused to verify the version of the configuration to be used as a replacement file. The configurereplace commandis then used to revert to the replacement configuration file as shown in the following example:
Device# show archiveThere are currently 1 archive configurations saved.The next archive file will be named flash:myconfig-2Archive # Name01 flash:myconfig-1 <- Most Recent2345678910
Device# configure replace flash:myconfig-1Total number of passes: 1Rollback Done
Additional ReferencesThe following sections provide references related to the Configuration Replace and Configuration Rollbackfeature.
Related Documents
Document TitleRelated Topic
Exclusive Configuration Change Access and AccessSession Locking
Configuration Replace and Configuration RollbackAdditional References
Standards
TitleStandards
--No new or modified standards are supported by thisfeature, and support for existing standards has notbeen modified by this feature.
MIBs
MIBs LinkMIBs
To locate and downloadMIBs for selected platforms,Cisco IOS releases, and feature sets, use Cisco MIBLocator found at the following URL:
http://www.cisco.com/go/mibs
No new or modified MIBs are supported by thisfeature, and support for existing MIBs has not beenmodified by this feature.
RFCs
TitleRFCs
--No new or modified RFCs are supported by thisfeature, and support for existing RFCs has not beenmodified by this feature.
Technical Assistance
LinkDescription
http://www.cisco.com/cisco/web/support/index.htmlThe Cisco Support website provides extensive onlineresources, including documentation and tools fortroubleshooting and resolving technical issues withCisco products and technologies.
To receive security and technical information aboutyour products, you can subscribe to various services,such as the Product Alert Tool (accessed from FieldNotices), the Cisco Technical Services Newsletter,and Really Simple Syndication (RSS) Feeds.
Access to most tools on the Cisco Support websiterequires a Cisco.com user ID and password.
Feature Information for Configuration Replace and ConfigurationRollback
The following table provides release information about the feature or features described in this module. Thistable lists only the software release that introduced support for a given feature in a given software releasetrain. Unless noted otherwise, subsequent releases of that software release train also support that feature.
Use Cisco Feature Navigator to find information about platform support and Cisco software image support.To access Cisco Feature Navigator, go to www.cisco.com/go/cfn. An account on Cisco.com is not required.
Table 2: Feature Information for Configuration Replace and Configuration Rollback
Feature InformationReleasesFeature Name
The Configuration Replace andConfiguration Rollback featureprovides the capability to replacethe current running configurationwith any saved Cisco IOSconfiguration file. Thisfunctionality can be used to revertto a previous configuration state,rolling back any configurationchanges that were made since thatconfiguration file was saved.
The following sections providefeature information:
The following commands weremodified by this feature: archiveconfig, configure confirm,configure replace, debug archiveconfig timestamp, debug archiveversioning, maximum, path(archive configuration), showarchive, show configuration lock,time-period.
Configuration Replace andConfiguration Rollback
The Configuration Versioningfeature allows you to maintain andmanage backup copies of the CiscoIOS running configuration on oroff the device. The ConfigurationReplace feature uses theConfiguration Versioning featureto provide a rollback to a savedcopy of the running configuration.
The Exclusive ConfigurationChange Access feature (also calledthe Configuration Lock feature)allows you to have exclusivechange access to the Cisco IOSrunning configuration, preventingmultiple users from makingconcurrent configuration changes.
The following command wasmodified by this feature and appliesto the Configuration Replace andConfiguration Rollback feature:show configuration lock.
Refer to the separate module,Exclusive Configuration ChangeAccess and Access SessionLocking, for details
Exclusive Configuration ChangeAccess
The Configuration RollbackConfirmed Change feature allowsconfiguration changes to beperformed with an optionalrequirement that they be confirmed.
If this confirmation is not received,the configuration is returned to thestate prior to the changes beingapplied.
This mechanism provides asafeguard against inadvertent lossof connectivity between a networkdevice and the user or managementapplication due to configurationchanges.
The following sections provideinformation about this feature:
The following commands weremodified by this feature: configureconfirm,configurereplace,configurerevert,configure terminal
Configuration Replace and Configuration RollbackFeature Information for Configuration Replace and Configuration Rollback
C H A P T E R 4Configuration Rollback Confirmed Change
The Configuration Rollback Confirmed Change feature allows configuration changes to be performed withan optional requirement that they be confirmed. If this confirmation is not received, the configuration isreturned to the state prior to the changes being applied. The mechanism provides a safeguard againstinadvertent loss of connectivity between a network device and the user or management application due toconfiguration changes.
• Finding Feature Information, page 73
• Information About Configuration Rollback Confirmed Change, page 73
• How to Configure Configuration Rollback Confirmed Change, page 74
• Configuration Examples for Configuration Rollback Confirmed Change, page 76
• Additional References, page 76
• Feature Information for Configuration Rollback Confirmed Change, page 77
Finding Feature InformationYour software release may not support all the features documented in this module. For the latest caveats andfeature information, see Bug Search Tool and the release notes for your platform and software release. Tofind information about the features documented in this module, and to see a list of the releases in which eachfeature is supported, see the feature information table.
Use Cisco Feature Navigator to find information about platform support and Cisco software image support.To access Cisco Feature Navigator, go to www.cisco.com/go/cfn. An account on Cisco.com is not required.
Information About Configuration Rollback Confirmed Change
Configuration Rollback Confirmed Change OperationThe Configuration Rollback Confirmed Change feature enables an added criterion of a confirmation toconfiguration changes. This functionality enables a rollback to occur if a confirmation of the requested changes
is not received in a configured time frame. Command failures can also be configured to trigger a configurationrollback.
The following steps outline how this process is achieved:
1 A new option allows you to request confirmation (a confirmation time limit must be supplied) of theconfiguration changes.
2 You must enter the confirmation command. If no confirmation is entered within the requested time limit,the configuration reverts to its previous state.
How to Configure Configuration Rollback Confirmed Change
Performing a Configuration Replace or Configuration Rollback Operation withConfirmation
Perform this task to replace the current running configuration file with a saved Cisco configuration file.
You must configure a configuration archive before performing this procedure. For detailed steps, see the“Configuring the Characteristics of the Configuration Archive” module in theManaging ConfigurationFiles Configuration Guide. The following procedure details how to return to that archived configurationin the event of a problem with the current running configuration.
Replaces the current running configuration file with a saved configuration file.configure replace target-url[nolock] [list] [force]
Step 2
• target-url—Specifies a URL (accessible by the Cisco file system) of the savedconfiguration file that is to replace the current running configuration, such as the
Configuration Rollback Confirmed ChangeHow to Configure Configuration Rollback Confirmed Change
PurposeCommand or Action
[error] [timer minutes] | timeminutes]
configuration file created by using the archive config command. Depending onyour hardware platform, the name of your file system might be different thanshown in the example.
Example:
Device# configure replace
• nolock—Disables the locking of the running configuration file that prevents otherusers from changing the running configuration during a configuration replaceoperation.bootflash:myconfig-1 list
time 30• list—Displays a list of the command lines applied by the Cisco software parserduring each pass of the configuration replace operation. The total number of passesperformed is also displayed.
• force—Replaces the current running configuration file with the specified savedconfiguration file without prompting you for confirmation.
• ignorecase—Allows the configuration to ignore the case of the confirmationcommand.
• time minutes—Specifies the time (in minutes) within which you must enter theconfigure confirm command to confirm replacement of the current runningconfiguration file. If the configure confirm command is not entered within thespecified time limit, the configuration replace operation is automatically reversed(in other words, the current running configuration file is restored to theconfiguration state that existed prior to entering the configure replace command).
• revert trigger—Sets the following triggers for reverting to the originalconfiguration:
• error—Reverts to the original configuration upon error.
• timer minutes—Reverts to the original configuration if the specified timeelapses.
(Optional) Cancels the timed rollback and triggers the rollback immediately or resetsparameters for the timed rollback.
Configuration Rollback Confirmed ChangePerforming a Configuration Replace or Configuration Rollback Operation with Confirmation
PurposeCommand or Action
Exits to user EXEC mode.exit
Example:
Device# exit
Step 5
Configuration Examples for Configuration Rollback ConfirmedChange
Example: Performing a Configuration Replace Operation with the configureconfirm Command
The following example shows the use of the configure replace command with the time minutes keywordand argument. You must enter the configure confirm command within the specified time limit to confirmreplacement of the current running configuration file. If the configure confirm command is not entered withinthe specified time limit, the configuration replace operation is automatically reversed (in other words, thecurrent running configuration file is restored to the configuration state that existed prior to entering theconfigure replace command).
Device# configure replace nvram:startup-config time 120This will apply all necessary additions and deletionsto replace the current running configuration with thecontents of the specified configuration file, which isassumed to be a complete configuration, not a partialconfiguration. Enter Y if you are sure you want to proceed. ? [no]: YTotal number of passes: 1Rollback DoneDevice# configure confirmThe following example shows the use of the configure revert command with the timer keyword. You mustenter the configure revert command to cancel the timed rollback and trigger the rollback immediately, or toreset parameters for the timed rollback.Device# configure revert timer 100
Additional ReferencesRelated Documents
Document TitleRelated Topic
Cisco IOS Master Command List, All ReleasesCisco IOS commands
http://www.cisco.com/cisco/web/support/index.htmlThe Cisco Support and Documentation websiteprovides online resources to download documentation,software, and tools. Use these resources to install andconfigure the software and to troubleshoot and resolvetechnical issues with Cisco products and technologies.Access to most tools on the Cisco Support andDocumentation website requires a Cisco.com user IDand password.
Feature Information for Configuration Rollback ConfirmedChange
The following table provides release information about the feature or features described in this module. Thistable lists only the software release that introduced support for a given feature in a given software releasetrain. Unless noted otherwise, subsequent releases of that software release train also support that feature.
Use Cisco Feature Navigator to find information about platform support and Cisco software image support.To access Cisco Feature Navigator, go to www.cisco.com/go/cfn. An account on Cisco.com is not required.
Table 3: Feature Information for Configuration Rollback Confirmed Change
Feature InformationReleasesFeature Name
The Configuration RollbackConfirmed Change feature allowsconfiguration changes to beperformed with an optionalrequirement that they be confirmed.
This mechanism provides asafeguard against inadvertent lossof connectivity between a networkdevice and the user or managementapplication due to configurationchanges.
The following commands wereintroduced or modified: configureconfirm, configure replace,configure revert, configureterminal.
Configuration Rollback Confirmed ChangeFeature Information for Configuration Rollback Confirmed Change
C H A P T E R 5Contextual Configuration Diff Utility
The Contextual Configuration Diff Utility feature provides the ability to perform a line-by-line comparisonof any two configuration files (accessible through the Cisco Integrated File System [IFS]) and generate alist of the differences between them. The generated output includes information about configuration linesthat have been added, modified, or deleted, and the configurationmodes within which a changed configurationline exists.
• Finding Feature Information, page 79
• Prerequisites for Contextual Configuration Diff Utility, page 79
• Restrictions for Contextual Configuration Diff Utility, page 80
• Information About Contextual Configuration Diff Utility, page 80
• How to Use the Contextual Configuration Diff Utility, page 81
• Configuration Examples for the Contextual Configuration Diff Utility, page 82
• Additional References, page 84
• Feature Information for Contextual Configuration Diff Utility, page 84
Finding Feature InformationYour software release may not support all the features documented in this module. For the latest caveats andfeature information, see Bug Search Tool and the release notes for your platform and software release. Tofind information about the features documented in this module, and to see a list of the releases in which eachfeature is supported, see the feature information table.
Use Cisco Feature Navigator to find information about platform support and Cisco software image support.To access Cisco Feature Navigator, go to www.cisco.com/go/cfn. An account on Cisco.com is not required.
Prerequisites for Contextual Configuration Diff UtilityThe format of the configuration files used for the Contextual Configuration Diff Utility feature must complywith standard Cisco configuration file indentation rules as follows:
• Start all commands on a new line with no indentation, unless the command is within a configurationsubmode.
• Indent commands within a first-level configuration submode one space.
• Indent commands within a second-level configuration submode two spaces.
• Indent commands within subsequent submodes accordingly.
The device must have a contiguous block of memory larger than the combined size of the two configurationfiles being compared.
Restrictions for Contextual Configuration Diff UtilityIf the device does not have a contiguous block of memory larger than the combined size of the two configurationfiles being compared, the diff operation fails.
Information About Contextual Configuration Diff Utility
Benefits of the Contextual Configuration Diff UtilityThe Contextual Configuration Diff Utility feature provides the ability to perform a line-by-line comparisonof any two configuration files (accessible through the Cisco File System [IFS]) and generate a list of thedifferences between them. The generated output includes information about the following items:
• Configuration lines that have been added, modified, or deleted.
• Configuration modes within which a changed configuration line exists.
• Location changes of configuration lines that are order-sensitive. For example, the ip access-list andcommunity-lists commands are order-sensitive commands dependent on where they are listed withina configuration file in relation to other commands of similar type.
Contextual Configuration Diff Utility Output Format
Diff Operation
The Contextual Configuration Diff Utility feature uses the filenames of two configuration files as input. Adiff operation is performed on the specified files and a list of differences between the two files is generatedas output by using the show archive config differences command. Interpreting the output is dependent onthe order in which the two files are specified in the command. In this section, we assume that the filename ofthe file entered first is file1 and the filename of the file entered second is file2. Each entry in the generatedoutput list is prefixed with a unique text symbol to indicate the type of difference found. The text symbolsand their meanings are as follows:
• A minus symbol (–) indicates that the configuration line exists in file1 but not in file2.
• A plus symbol (+) indicates that the configuration line exists in file2 but not in file1.
Contextual Configuration Diff UtilityRestrictions for Contextual Configuration Diff Utility
• An exclamation point (!) with descriptive comments identifies order-sensitive configuration lines whoselocation is different in file1 than in file2.
Incremental Diff Operation
Some applications require that the generated output of a diff operation contain configuration lines that areunmodified (in other words, without the minus and plus symbols). For these applications, an incremental diffoperation can be performed by using the show archive config incremental-diffs command, which comparesa specified configuration file to the running configuration file ().
When an incremental diff operation is performed, a list of the configuration lines that do not appear in therunning configuration file (in other words, configuration lines that appear only in the specified file that isbeing compared to the running configuration file) is generated as output. An exclamation point (!) withdescriptive comments identifies order-sensitive configuration lines whose location is different in the specifiedconfiguration file than in the running configuration file.
How to Use the Contextual Configuration Diff Utility
Performing a Line-by-Line File Comparison Using the Contextual ConfigurationDiff Utility
SUMMARY STEPS
1. enable2. Enter one of the following:
• show archive config differences [file1 [file2]]
• show archive config incremental-diffs file
3. exit
DETAILED STEPS
PurposeCommand or Action
Enables privileged EXEC mode.enableStep 1
Example:
Device> enable
• Enter your password if prompted.
Performs a line-by-line comparison of any two configuration files(accessible through the Cisco IOS File System and generates alist of the differences between them.
Contextual Configuration Diff UtilityHow to Use the Contextual Configuration Diff Utility
PurposeCommand or Action
Performs a line-by-line comparison of a specified configurationfile to the running configuration file and generates a list of theExample:
Device# show archive config differencesrunning-config startup-config
configuration lines that do not appear in the running configurationfile.
Example:
Device# show archive config incremental-diffsnvram:startup-config
Exits to user EXEC mode.exit
Example:
Device# exit
Step 3
Configuration Examples for the Contextual Configuration DiffUtility
Example: Diff Operation Performed on Running and Startup Configuration FilesIn this example, a diff operation is performed on the running and startup configuration files. The table belowshows the configuration files used for this example.
Table 4: Configuration Files Used for the Diff Operation Example
ip subnet-zeroip cefip name-server 10.4.4.4voice dnis-map 1dnis 111interface GigabitEthernet1/0/0no ip addressno ip route-cacheno ip mroute-cacheshutdownduplex halfip default-gateway 10.5.5.5ip classlessaccess-list 110 deny ip any host 10.1.1.1access-list 110 deny ip any host 10.1.1.2access-list 110 deny ip any host 10.1.1.3snmp-server community private RW
no ip subnet-zeroip cefinterface GigabitEthernet1/0/0ip address 10.7.7.7 255.0.0.0no ip route-cacheno ip mroute-cacheduplex halfno ip classlesssnmp-server community public RO
Contextual Configuration Diff UtilityConfiguration Examples for the Contextual Configuration Diff Utility
The following is sample output from the show archive config differences command. This sample outputdisplays the results of the diff operation performed on the configuration files.
Device# show archive config differences running-config startup-config
+ip subnet-zero+ip name-server 10.4.4.4+voice dnis-map 1+dnis 111interface GigabitEthernet1/0/0+no ip address+shutdown+ip default-gateway 10.5.5.5+ip classless+access-list 110 deny ip any host 10.1.1.1+access-list 110 deny ip any host 10.1.1.2+access-list 110 deny ip any host 10.1.1.3+snmp-server community private RW-no ip subnet-zerointerface GigabitEthernet1/0/0-ip address 10.7.7.7 255.0.0.0-no ip classless-snmp-server community public RO
Example: Incremental Diff Operation Performed on Running and StartupConfiguration Files
In this example, an incremental diff operation is performed on the startup and running configuration files.The table below shows the configuration files used for this example.
Table 5: Configuration Files Used for the Incremental Diff Operation Example
no ip subnet-zeroip cefinterface GigabitEthernet1/0/0ip address 10.7.7.7 255.0.0.0no ip route-cacheno ip mroute-cacheduplex halfno ip classlesssnmp-server community public RO
ip subnet-zeroip cefip name-server 10.4.4.4voice dnis-map 1dnis 111interface GigabitEthernet1/0/0no ip addressno ip route-cacheno ip mroute-cacheshutdownduplex halfip default-gateway 10.5.5.5ip classlessaccess-list 110 deny ip any host 10.1.1.1access-list 110 deny ip any host 10.1.1.2access-list 110 deny ip any host 10.1.1.3snmp-server community private RW
The following is sample output from the show archive config incremental-diffs command. This sampleoutput displays the results of the incremental diff operation performed on the configuration files.
Device# show archive config incremental-diffs startup-config
ip subnet-zeroip name-server 10.4.4.4voice dnis-map 1
Contextual Configuration Diff UtilityExample: Incremental Diff Operation Performed on Running and Startup Configuration Files
dnis 111interface GigabitEthernet1/0/0no ip addressshutdownip default-gateway 10.5.5.5ip classlessaccess-list 110 deny ip any host 10.1.1.1access-list 110 deny ip any host 10.1.1.2access-list 110 deny ip any host 10.1.1.3snmp-server community private RW
Additional ReferencesRelated Documents
Document TitleRelated Topic
Cisco IOS Master Command List, All ReleasesCisco IOS commands
“Managing Configuration Files” module in theManaging Configuration Files Configuration Guide
http://www.cisco.com/cisco/web/support/index.htmlThe Cisco Support and Documentation websiteprovides online resources to download documentation,software, and tools. Use these resources to install andconfigure the software and to troubleshoot and resolvetechnical issues with Cisco products and technologies.Access to most tools on the Cisco Support andDocumentation website requires a Cisco.com user IDand password.
Feature Information for Contextual Configuration Diff UtilityThe following table provides release information about the feature or features described in this module. Thistable lists only the software release that introduced support for a given feature in a given software releasetrain. Unless noted otherwise, subsequent releases of that software release train also support that feature.
Use Cisco Feature Navigator to find information about platform support and Cisco software image support.To access Cisco Feature Navigator, go to www.cisco.com/go/cfn. An account on Cisco.com is not required.
Table 6: Feature Information for Contextual Configuration Diff Utility
Feature InformationReleasesFeature Name
The Contextual Configuration DiffUtility feature provides the abilityto perform a line-by-linecomparison of any twoconfiguration files and generate alist of the differences betweenthem. The generated outputincludes information aboutconfiguration lines that have beenadded, modified, or deleted, andthe configuration modes withinwhich a changed configuration lineexists.
The following commands wereintroduced or modified: showarchive config differences, showarchive config incremental-diffs.
Contextual Configuration Diff UtilityFeature Information for Contextual Configuration Diff Utility
C H A P T E R 6Configuration Change Notification and Logging
The Configuration Change Notification and Logging (Config Log Archive) feature allows the tracking ofconfiguration changes entered on a per-session and per-user basis by implementing an archive function. Thisarchive saves configuration logs that track each configuration command that is applied, who applied thecommand, the parser return code (PRC) for the command, and the time the command was applied. Thisfeature also adds a notification mechanism that sends asynchronous notifications to registered applicationswhenever the configuration log changes.
Before the introduction of the Configuration Change Notification and Logging feature, the only way todetermine if the Cisco software configuration had changed was to save a copy of the running and startupconfigurations to a local computer and do a line-by-line comparison. This comparison method can identifychanges that occurred, but does not specify the sequence in which the changes occurred, or the personresponsible for the changes.
• Finding Feature Information, page 87
• Restrictions for Configuration Change Notification and Logging, page 88
• Information About Configuration Change Notification and Logging, page 88
• How to Configure Configuration Change Notification and Logging, page 89
• Configuration Examples for Configuration Change Notification and Logging, page 95
• Additional References, page 96
• Feature Information for Configuration Change Notification and Logging, page 96
Finding Feature InformationYour software release may not support all the features documented in this module. For the latest caveats andfeature information, see Bug Search Tool and the release notes for your platform and software release. Tofind information about the features documented in this module, and to see a list of the releases in which eachfeature is supported, see the feature information table.
Use Cisco Feature Navigator to find information about platform support and Cisco software image support.To access Cisco Feature Navigator, go to www.cisco.com/go/cfn. An account on Cisco.com is not required.
Restrictions for Configuration Change Notification and Logging• Only complete commands input in a configuration mode are logged.
• Commands that are part of a configuration file applied with the copy command are not logged.
Information About Configuration Change Notification andLogging
Configuration LogThe Configuration Change Notification and Logging feature tracks changes made to the Cisco software runningconfiguration by maintaining a configuration log. This configuration log tracks changes initiated only throughthe CLI or HTTP. Only complete commands that result in the invocation of action routines are logged. Thefollowing types of entries are not logged:
• Commands that result in a syntax error message
• Partial commands that invoke the device help system
For each configuration command that is executed, the following information is logged:
• The command that was executed
• The configuration mode in which the command was executed
• The name of the user that executed the command
• The time at which the command was executed
• A configuration change sequence number
• Parser return codes for the command
You can display information from the configuration log by using the show archive log config command,with the exception of the parser return codes, which are for use by internal Cisco applications only.
Configuration Change Notifications and Config Change LoggingYou can configure the Configuration Change and Notification Logging feature to send notification ofconfiguration changes to the software system logging (syslog) process. Syslog notifications allow monitoringof the configuration log information without performing polling and information gathering tasks.
The Configuration Change Notification and Logging feature allows the tracking of configuration changesentered by users on a per-session and per-user basis. This tool allows administrators to track any configurationchange made to the software running configuration, and identify the user that made that change.
Configuration Change Notification and LoggingRestrictions for Configuration Change Notification and Logging
Config Logger Enhancements for EAL4+ CertificationThe Config Logger Enhancements for EAL4+ Certification feature ensures that the logging process meetsthe requirements set forth in the Conformance to Common Criteria, Evaluation Assurance Level 4+ (EAL4+)Firewall Protection Profiles. These enhancements include changes to meet the following requirements:
• If you change any logging parameters, those changes are logged. This is effected by the sending of asyslog message for each change to the running configuration from a copy operation (for example, copysource running-config).
• Modifications to the group of administrative users are logged; failure attempts for access to privilegedEXEC mode (“enable” mode) are logged.
EAL Certification is not claimed by Cisco. These enhancements provide the groundwork for futurecertification.
Note
The logging actions described above are disabled by default. To enable these logging characteristics, performthe task described in the “Configuring the Configuration Change Notification and Logging Feature” sectionin the "Configuration Change Notification and Logging" feature module.
How to Configure Configuration Change Notification andLogging
Configuring Configuration Change Notification and Logging
• Valid values for the entries argument range from 1 to 1000. Thedefault value is 100 entries.
• When the configuration log is full, the oldest entry is deletedevery time a new entry is added.
If a new log size is specified that is smaller than the currentlog size, the oldest log entries are immediately purged untilthe new log size is satisfied, regardless of the age of the logentries.
Note
(Optional) Suppresses the display of password information inconfiguration log files.
hidekeys
Example:
Device(config-archive-log-config)#hidekeys
Step 7
Enabling the hidekeys command increases security bypreventing password information from being displayed inconfiguration log files.
Configuration Change Notification and LoggingConfiguring Configuration Change Notification and Logging
PurposeCommand or Action
(Optional) Enables the sending of notifications of configurationchanges to a remote syslog.
notify syslog
Example:
Device(config-archive-log-config)#notify syslog
Step 8
Returns to privileged EXEC mode.end
Example:
Device(config-archive-log-config)# end
Step 9
Displaying Configuration Log Entries and StatisticsPerform this task to display entries from the configuration log or statistics about the memory usage of theconfiguration log. You can enter the commands in any order.
To display configuration log entries and tomonitor thememory usage of the configuration log, the ConfigurationChange Notification and Logging feature provides the show archive log config command.
SUMMARY STEPS
1. enable2. show archive log config number [end-number]3. show archive log config all provisioning4. show archive log config statistics5. exit
DETAILED STEPS
Step 1 enableUse this command to enable privileged EXEC mode. Enter your password if prompted. For example:
Example:
Device> enable
Step 2 show archive log config number [end-number]Use this command to display configuration log entries by record numbers. If you specify a record number for the optionalend-number argument, all log entries with record numbers in the range from the value entered for the number argumentthrough the end-number argument are displayed. For example:
This example displays configuration log entry numbers 1 and 2. The range for the number and end-number argumentsis 1 to 2147483647.
Step 3 show archive log config all provisioningUse this command to display all configuration log files as they would appear in a configuration file rather than in tabularformat. For example:
Example:
Device# show archive log config all provisioning
archivelog configlogging enablelogging size 200
This display also shows the commands used to change configuration modes, which are required to correctly apply thelogged commands.
Step 4 show archive log config statisticsUse this command to display memory usage information for the configuration. For example:
Example:
Device# show archive log config statistics
Config Log Session Info:Number of sessions being tracked: 1Memory being held: 3910 bytesTotal memory allocated for session tracking: 3910 bytesTotal memory freed from session tracking: 0 bytes
Config Log log-queue Info:Number of entries in the log-queue: 3Memory being held in the log-queue: 671 bytesTotal memory allocated for log entries: 671 bytesTotal memory freed from log entries:: 0 bytes
Step 5 exitUse this command to exit to user EXEC mode. For example:
Configuration Change Notification and LoggingDisplaying Configuration Log Entries and Statistics
Clearing Configuration Log EntriesEntries from the configuration log can be cleared in one of two ways. The size of the configuration log canbe reduced by using the logging size command, or the configuration log can be disabled and then reenabledwith the logging enable command.
Clearing the Configuration Log by Resetting the Log SizeThis task shows how to clear the configuration log by reducing the log size to 1, then resetting the log size tothe desired value, by entering the logging size command twice.
Disables the logging of configuration changes.no logging enableStep 5
Example:
Device(config-archive-log-config)# no loggingenable
Disabling the configuration log results in allrecords being purged.
Note
Enables the logging of configuration changes.logging enable
Example:
Device(config-archive-log-config)# loggingenable
Step 6
Exits to privileged EXEC mode.end
Example:
Device(config-archive-log-config)# end
Step 7
Configuration Examples for Configuration Change Notificationand Logging
Example: Configuring Configuration Change Notification and LoggingThe following example shows how to enable configuration logging with a maximum of 200 entries in theconfiguration log. In the example, security is increased by suppressing the display of password information
http://www.cisco.com/cisco/web/support/index.htmlThe Cisco Support and Documentation websiteprovides online resources to download documentation,software, and tools. Use these resources to install andconfigure the software and to troubleshoot and resolvetechnical issues with Cisco products and technologies.Access to most tools on the Cisco Support andDocumentation website requires a Cisco.com user IDand password.
Feature Information for Configuration Change Notification andLogging
The following table provides release information about the feature or features described in this module. Thistable lists only the software release that introduced support for a given feature in a given software releasetrain. Unless noted otherwise, subsequent releases of that software release train also support that feature.
Use Cisco Feature Navigator to find information about platform support and Cisco software image support.To access Cisco Feature Navigator, go to www.cisco.com/go/cfn. An account on Cisco.com is not required.
Table 7: Feature Information for Configuration Change Notification and Logging
Feature InformationReleasesFeature Name
The Configuration ChangeNotification and Logging(Configuration Logging) featureallows the tracking of configurationchanges entered on a per-sessionand per-user basis by implementinga configuration log. Theconfiguration log tracks eachconfiguration command that isapplied, who applied the command,the parser return code for thecommand, and the time thecommandwas applied. This featurealso adds a notificationmechanismthat sends asynchronousnotifications to registeredapplications whenever theconfiguration log changes.
The following commands wereintroduced or modified: archive,hidekeys, log config, loggingenable, logging size, notify syslog,show archive log config.
Configuration Change Notification and LoggingFeature Information for Configuration Change Notification and Logging
C H A P T E R 7Configuration Logger Persistency
The Configuration Logger Persistency feature increases the operational robustness of Cisco IOS configurationand provisioning actions by implementing a “quick-save” functionality. When the Configuration LoggerPersistency feature is configured, Cisco IOS software saves just the commands entered since the laststartup-config file was generated, rather than saving the entire startup configuration.
• Finding Feature Information, page 99
• Prerequisites for Configuration Logger Persistency, page 99
• Information About Configuration Logger Persistency, page 100
• How to Configure the Configuration Logger Persistency Feature, page 101
• Configuration Examples for the Configuration Logger Persistency Feature, page 104
• Additional References, page 104
• Feature Information for Configuration Logger Persistency, page 106
• Glossary, page 106
Finding Feature InformationYour software release may not support all the features documented in this module. For the latest caveats andfeature information, see Bug Search Tool and the release notes for your platform and software release. Tofind information about the features documented in this module, and to see a list of the releases in which eachfeature is supported, see the feature information table.
Use Cisco Feature Navigator to find information about platform support and Cisco software image support.To access Cisco Feature Navigator, go to www.cisco.com/go/cfn. An account on Cisco.com is not required.
Prerequisites for Configuration Logger PersistencyTo enable the Configuration Logger Persistency feature, you must have disk0: configured and an externalflash card inserted on the router.
To achieve optimum results from the Configuration Logger Persistency feature, you must have Cisco IOSRelease 12.2(33)SRA, Release 12.4(11)T, Release 12.2(33)SXH, or Release 12.2(33)SB installed on yoursystem.
Information About Configuration Logger Persistency
Use of Configuration Logger Persistency to Save Configuration FilesCisco IOS software uses the startup-config file to save router configuration commands across reloads. Thissingle file contains all the commands that need to be applied when the router reboots. The startup-config filegets updated every time a writememory command or copyurl startup-config command is entered. As thesize of the running-config file grows, the time to save the startup-config file to the NVRAM file systemincreases as well. Startup-config files can be 1 MB and larger. For files of this size, making a single-linechange to the startup-config file requires that the entire startup-config file is saved again even though mostof the configuration has not changed.
The Configuration Logger Persistency feature implements a “quick-save” functionality. The aim is to providea “configuration save”mechanism where the time to save changes from the startup-config file is proportionalto the size of the incremental changes (with respect to the startup-config file) that need to be saved.
The Cisco IOS configuration logger logs all changes that are manually entered at the command-line prompt.This feature also notifies the registered clients when changes to the log occur. The contents of the configurationlog are stored in the run-time memory--the contents of the log are not persisted after reboots.
The Configuration Logger Persistency feature provides a mechanism to persist the configuration commandsentered by users across reloads. Only the commands entered at the command-line interface (CLI) (that is, thecommands entered in configuration mode) are persisted across reload. This feature uses the Cisco IOS securefile system to persist the configuration commands that are generated.
The Cisco IOS configuration logger is different from the system message logging (syslog) facility. Syslogis a general logging facility for tracking system messages. The configuration logger tracks informationabout configuration commands entered at the CLI.
Note
Persisted CommandsThe persisted commands from the Cisco IOS configuration logger are used as an extension to the startupconfiguration. These saved commands provide a quick-save capability. Rather than saving the entirestartup-config file, Cisco IOS software saves just the commands entered since the last startup-config file wasgenerated.
Only the logged commands are persisted. The following additional data from the configuration logger are notpersisted:
Configuration Logger PersistencyInformation About Configuration Logger Persistency
• Time when the command was entered
• Pre- and post-NVGEN output associated with the entered command
• Parser return code output for the entered command
The persisted commands’ primary purpose is for use as a quick-save extension to the startup-config file. Theadditional information associated with a configuration command is not useful for quick-save purposes. If youneed the additional information to be persisted across reboots (for auditing purposes), complete the followingsteps:
1 Enable configuration logger notification to syslog
2 Enable the syslog persistence feature
Alternatively, Cisco Networking Services, CiscoView, or other Network Management systems that manageCisco IOS devices to keep track of configuration changes in an off-the-box storage solution can be used.
By default, upon reload, the persisted commands are appended to the startup-config file. These commandsare applied only when you explicitly configure this behavior using a CLI configuration command.
How to Configure the Configuration Logger Persistency Feature
Enabling the Configuration Logger Persistency FeatureThe Configuration Logger Persistency feature implements a quick-save mechanism so that the time to savechanges from the startup configuration is proportional to the size of the incremental changes (with respect tothe startup configuration) that need to be saved. The persisted commands from the Cisco IOS configurationlogger will be used as an extension to the startup configuration. The saved commands, which are used as anextension to the startup configuration, provide a quick-save ability. Rather than saving the entire startup-configfile, Cisco IOS software saves just the commands entered since the last startup-config file was generated.
To enable the Configuration Logger Persistency feature, perform the following task.
Enables the Configuration Logger Persistency feature:logging persistent auto manualStep 5
Example:
Router(config-archive-log-cfg)# loggingpersistent auto
• The auto keyword specifies that each configuration commandwill be saved automatically to the Cisco IOS secure file system.
• Themanual keyword specifies that you can save the configurationcommands to the Cisco IOS secure file system on-demand. Todo this, you must use the archivelogconfigpersistentsavecommand.
To enable the loggingpersistentauto command, you musthave disk0: configured and an external flash card inserted onthe router.
Note
Sequentially applies the configuration commands saved in theconfiguration logger database (since the last writememorycommand)to the running-config file after a reload.
Specifies the disk space size for writing log messages in theconfiguration logger database; triggers an alert on the console or syslogserver when the log size exceeds the threshold (specified in percentage).
Configuration Logger PersistencyEnabling the Configuration Logger Persistency Feature
PurposeCommand or Action
Specifies the maximum number of entries retained in the configurationlog.
logging size entries
Example:
Router(config-archive-log-cfg)# loggingsize 10
Step 8
• Valid values range from 1 to 1000.
• The default value is 100 entries.
Verifying and Troubleshooting the Configuration Logger Persistency FeatureThree commands can be used to verify, archive, and clear the contents of the configuration log. Fortroubleshooting purposes, the command in Step 4 turns on debugging.
Step 1 show archive log config persistentThis command displays the persisted commands in the configuration log. The commands appear in a configlet format.The following is sample output from this command:
Step 2 clear archive log config persistentThis command clears the configuration logging persistent database entries. Only the entries in the configuration loggingdatabase file are deleted. The file itself is not deleted because it will be used to log new entries. After this command isentered, a message is returned to indicate that the archive log is cleared.
Step 3 archive log config persistent saveThis command saves the configuration log to the Cisco IOS secure file system. For this command to work, thearchivelogconfigpersistentsavecommand must be configured.
Step 4 debug archive log config persistentThis command turns on the debugging function. A message is returned to indicate that debugging is turned on.
Example:
Router# debug archive log config persistentdebug archive log config persistent debugging is on
Configuration Examples for the Configuration Logger PersistencyFeature
Configuration Logger Persistency Configuration on a Cisco 7200 Series RouterExample
In this example, each configuration command is saved automatically to the Cisco IOS secure file system,configuration commands saved in the configuration logger database (since the last writememorycommand)are applied sequentially to the running-config file, and the maximum number of entries retained in theconfiguration log is set to 10:
Router> enableRouter# configure terminalEnter configuration commands, one per line. End with CNTL/Z.Router(config)# archiveRouter(config-archive)# log configRouter(config-archive-log-config)# logging persistent autoconfiguration log persistency feature enabled. Building configuration... [OK]Router(config-archive-log-config)# logging persistent reloadRouter(config-archive-log-config)# logging persistent size 16384 threshold 10Router(config-archive-log-config)# logging size 10Router(config-archive-log-config)# archive log config persistent saveRouter(config-archive-log-config)# endRouter#
Additional ReferencesThe following sections provide references related to the Configuration Logger Persistency feature.
--No new or modified standards are supported by thisfeature.
MIBs
MIBs LinkMIB
To locate and downloadMIBs for selected platforms,Cisco IOS releases, and feature sets, use Cisco MIBLocator found at the following URL:
http://www.cisco.com/go/mibs
No new or modified MIBs are supported by thisfeature.
RFCs
TitleRFC
--No new or modified RFCs are supported by thisfeature.
Technical Assistance
LinkDescription
http://www.cisco.com/techsupportThe Cisco Support website provides extensive onlineresources, including documentation and tools fortroubleshooting and resolving technical issues withCisco products and technologies.
To receive security and technical information aboutyour products, you can subscribe to various services,such as the Product Alert Tool (accessed from FieldNotices), the Cisco Technical Services Newsletter,and Really Simple Syndication (RSS) Feeds.
Access to most tools on the Cisco Support websiterequires a Cisco.com user ID and password.
Feature Information for Configuration Logger PersistencyThe following table provides release information about the feature or features described in this module. Thistable lists only the software release that introduced support for a given feature in a given software releasetrain. Unless noted otherwise, subsequent releases of that software release train also support that feature.
Use Cisco Feature Navigator to find information about platform support and Cisco software image support.To access Cisco Feature Navigator, go to www.cisco.com/go/cfn. An account on Cisco.com is not required.
Table 8: Feature Information for Configuration Logger Persistency
Feature InformationReleasesFeature Name
The Configuration LoggerPersistency feature increases theoperational robustness of Ciscoconfiguration and provisioningactions by implementing a“quick-save” functionality.Effective with Cisco IOS Release12.2(33)SRA, Release 12.4(11)T,Release 12.2(33)SXH, and Release12.2(33)SB, Cisco software savesjust the commands entered sincethe last startup-config file wasgenerated, rather than saving theentire startup configuration.
This feature was integrated intoCisco IOS XE Release 3.9S.
C H A P T E R 8Config Logger Enhancements for EAL4+Certification
The Config Logger Enhancements for EAL4+ Certification feature ensures that the logging process meetsthe requirements set forth in the Conformance to Common Criteria, Evaluation Assurance Level 4+ (EAL4+)Firewall Protection Profiles.
• Finding Feature Information, page 109
• Information About Config Logger Enhancements for EAL4+ Certification, page 109
• Additional References, page 110
• Feature Information for Config Logger Enhancements for EAL4+ Certification, page 111
Finding Feature InformationYour software release may not support all the features documented in this module. For the latest caveats andfeature information, see Bug Search Tool and the release notes for your platform and software release. Tofind information about the features documented in this module, and to see a list of the releases in which eachfeature is supported, see the feature information table.
Use Cisco Feature Navigator to find information about platform support and Cisco software image support.To access Cisco Feature Navigator, go to www.cisco.com/go/cfn. An account on Cisco.com is not required.
Information About Config Logger Enhancements for EAL4+Certification
Config Logger Enhancements for EAL4+ CertificationThe Config Logger Enhancements for EAL4+ Certification feature ensures that the logging process meetsthe requirements set forth in the Conformance to Common Criteria, Evaluation Assurance Level 4+ (EAL4+)Firewall Protection Profiles. These enhancements include changes to meet the following requirements:
• If you change any logging parameters, those changes are logged. This is effected by the sending of asyslog message for each change to the running configuration from a copy operation (for example, copysource running-config).
• Modifications to the group of administrative users are logged; failure attempts for access to privilegedEXEC mode (“enable” mode) are logged.
EAL Certification is not claimed by Cisco. These enhancements provide the groundwork for futurecertification.
Note
The logging actions described above are disabled by default. To enable these logging characteristics, performthe task described in the “Configuring the Configuration Change Notification and Logging Feature” sectionin the "Configuration Change Notification and Logging" feature module.
http://www.cisco.com/cisco/web/support/index.htmlThe Cisco Support and Documentation websiteprovides online resources to download documentation,software, and tools. Use these resources to install andconfigure the software and to troubleshoot and resolvetechnical issues with Cisco products and technologies.Access to most tools on the Cisco Support andDocumentation website requires a Cisco.com user IDand password.
Feature Information for Config Logger Enhancements for EAL4+Certification
The following table provides release information about the feature or features described in this module. Thistable lists only the software release that introduced support for a given feature in a given software releasetrain. Unless noted otherwise, subsequent releases of that software release train also support that feature.
Use Cisco Feature Navigator to find information about platform support and Cisco software image support.To access Cisco Feature Navigator, go to www.cisco.com/go/cfn. An account on Cisco.com is not required.
Table 9: Feature Information for Config Logger Enhancements for EAL4+ Certification
Feature InformationReleasesFeature Name
The Config Logger Enhancementsfor EAL4+ Certification featureensures that the logging processmeets the requirements set forth inthe Conformance to CommonCriteria, Evaluation AssuranceLevel 4+ (EAL4+) FirewallProtection Profiles.
Config Logger Enhancements for EAL4+ CertificationFeature Information for Config Logger Enhancements for EAL4+ Certification
C H A P T E R 9Configuration Partitioning
The Configuration Partitioning feature provides modularization (“partitioning”) of the running configurationstate to provide granular access to the running configuration in Cisco IOS software.
This feature is enabled by default in Cisco IOS software images that include this feature.
The configuration state of a device is retrieved dynamically whenever a user issues the showrunning-configcommand. When the Configuration Partitioning feature is enabled, the system groups the configuration stateof the device into parts (called “partitions”) so that only the configuration state the user wishes to review isretrieved when generating a displayed list of commands in the running configuration. This feature improvesperformance for high-end systems with complex configurations because only a part of the runningconfiguration state is processed when generating the running configuration command list, as opposed to theexisting method of processing the entire system configuration state.
Default configuration partitions are provided by the introduction of this feature; other Cisco IOS softwarefeatures may define their own command partitions in later releases.
• Finding Feature Information, page 113
• Information About Configuration Partitioning, page 114
• How to Use the Configuration Partitioning Feature, page 115
• Configuration Examples for Configuration Partitioning, page 118
• Additional References, page 126
• Feature Information for Configuration Partitioning, page 128
Finding Feature InformationYour software release may not support all the features documented in this module. For the latest caveats andfeature information, see Bug Search Tool and the release notes for your platform and software release. Tofind information about the features documented in this module, and to see a list of the releases in which eachfeature is supported, see the feature information table.
Use Cisco Feature Navigator to find information about platform support and Cisco software image support.To access Cisco Feature Navigator, go to www.cisco.com/go/cfn. An account on Cisco.com is not required.
System Running ConfigurationsManaging the configuration of any Cisco IOS software-based device involves managing the startupconfiguration (startup-config), which is a file stored in nonvolatile memory, and the running configuration(running-config), which is the set of all configuration options currently in effect on the system. Typically, thestartup configuration file is loaded when the system boots, and changes to the system’s running configuration,applied using the command-line interface (CLI), are saved by copying the running configuration to aconfiguration file (either locally or on the network), which can then be used to configure the device at startup,or used to configure other devices.
Retrieving the Running Configuration for Display or Copy OperationsIn the Cisco IOS software configuration model, the configuration state is maintained in a distributed manner,with each component storing its own configuration state. To retrieve global configuration information, thesoftware must poll every component to collect the distributed information. This configuration state retrievaloperation is performed by a process known as nonvolatile generation (NVGEN), and it is invoked by commandssuch as showrunning-config, which is used to display the current configuration state, andcopysystem:running-configuration, which is used to save the running configuration by copying it to a file.When invoked, the NVGEN process queries each system component, each interface instance, and all otherconfigured component objects in a standard sequence. A running configuration file is constructed as NVGENtraverses the system performing these queries, and it is this “virtual file” that is displayed or copied.
Benefits of Partitioning the Running ConfigurationThe Configuration Partitioning feature is the latest in a series of Configuration Generation PerformanceEnhancement Features for Cisco IOS software. (See the “Related Documents” section for related features.)This feature improves the system’s response time by providing a method for querying only the systemcomponent you wish to review when issuing the showrunning-config command.
When the Configuration Partitioning feature is enabled, the system groups the configuration state of the deviceinto parts (called “partitions”) for the purpose of generating the virtual running configuration file (the list ofconfiguration commands). A new command, showrunning-configpartition, allows you to display only thepart of the running configuration that you want to examine, rather than having to display the entire runningconfiguration at once, or displaying only lines that match a certain string.
The key benefit of this feature is that it increases system performance by allowing the system to run theNVGEN process for only the collection of system components (such as specific interfaces) that you need todisplay. This is in contrast to other existing extensions to the showrunning-config command, which onlyfilter the generated list after all system components have been processed.
The selective processing of the system’s configuration state for the purpose of generating a partial runningconfiguration is called “configuration partitioning.”More granular access to configuration information offers important performance benefits for high-end routingplatforms with very large configuration files, while also enhancing configuration management by allowingadvanced configuration features to be implemented at a more granular level. Advanced configuration options
Configuration PartitioningInformation About Configuration Partitioning
include Cisco IOS software support for provisioning of customer services, Config Rollback, Config Locking,and configuration access control.
How to Use the Configuration Partitioning Feature
Displaying Configuration PartitionsThemainmethod of taking advantage of this feature is by using the showrunning-configpartitionpartcommandin priveledge exec mode, which is a specialized extension to the showrunning-configcommand.
The partitionpart command extension is not available for themore:systemrunning-config command.Note
Because this feature offers improved performance for existing commands, this feature is enabled by defaultin Cisco IOS software images that support this feature. To quickly determine if this feature is supported andrunning on your system, issue the showrunning-configpartition? command in privileged EXEC mode.
SUMMARY STEPS
1. show running-config partition ?2. show running-config partition part
DETAILED STEPS
Step 1 show running-config partition ?Issuing this command will show you the list of running configuration parts available for display on your system.
If the Configuration Partitioning feature is supported on your system and is enabled, you will see the string “ configpartition is TRUE ” as the first line of help output.If you receive an error message when entering the command syntax shown here, this feature is not supported on yoursystem. See the command documentation for the showrunning-config command for existing extensions of that commandin other releases that allow you to show only part of the running configuration.
The list of available configuration parts may vary by software image and is dependent on what features arecurrently configured.
Note
Example:
Router# show running-config partition ?config partition is TRUEaccess-list All access-list configurationsboot All boot configurationsclass-map All class-map configurationscommon All remaining unregistered configurationsglobal-cdp All global cdp configurationsinterface All Interface specific Configurationsip-as-path All IP as-path configurationsip-community All IP community list configurationsip-domain-list All ip domain list configurationsip-prefix-list All ip prefix-list configurationsip-static-routes All IP static configurations
Configuration PartitioningHow to Use the Configuration Partitioning Feature
line All line mode configurationspolicy-map All policy-map configurationsroute-map All route-map configurationsrouter All routing configurationssnmp All SNMP configurationstacacs All TACACS configurations
Choose the part of the running configuration you want to display, and use the associated keyword as the part argumentin Step 2.
Step 2 show running-config partition partAs an example, to have the system perform the NVGEN process on only the components associated with the access-listparts of the running configuration state, and display only the access-list related configurations, you would enter theshowrunning-configpartitionaccess-list command:
Example:
Router# show running-config partition access-listBuilding configuration...
Current configuration : 127 bytes!Configuration of Partition access-list!!!access-list 90 permit 0.0.0.0 1.2.3.5access-list 100 permit 10 any any!end
This command also allows you to run the NVGEN process and display the resulting output for specific interfaces.This is a key capability of this feature, as it was designed for systems with numerous active interfaces.
Note
In the following example, the main configuration partition is the interface configuration, and the specific part of theconfiguration to be generated is the configuration for Fast Ethernet interface 0/0.
Example:
Router# show running-config partition interface fastethernet0/0Building configuration...Current configuration : 213 bytes!Configuration of Partition interface FastEthernet0/0!!interface FastEthernet0/0ip address 10.4.2.39 255.255.255.0no ip route-cache cefno ip route-cacheduplex halfipv6 enableno cdp enable!!end
Disabling the Configuration Partitioning FeatureBecause this feature offers improved performance for existing commands, this feature is enabled by defaultfor Cisco IOS software images that support this feature. However, you may want to disable this feature if youdetermine that it is not needed, as this feature does use a small amount of system resources (memory and CPUutilization). To disable configuration partitioning, perform the following task, which assumes you are startingin user EXEC mode.
SUMMARY STEPS
1. enable2. configure terminal3. no parser config partition
DETAILED STEPS
PurposeCommand or Action
Enables privileged EXEC mode.enableStep 1
Example:
Router> enable
• Enter your password if prompted.
Enters global configuration mode.configure terminal
Example:
Router# configure terminal
Step 2
Disables the configuration partitioning feature.no parser config partition
Configuration PartitioningDisabling the Configuration Partitioning Feature
What to Do Next
What to Do NextTo reenable the feature after it has been disabled, use the parserconfigpartition command in globalconfiguration mode.
As this feature is enabled by default, only the no form will appear in the running configuration file, orwill be written to the startup configuration file when you issue thecopyrunning-configstartup-configcommand.
Note
Configuration Examples for Configuration PartitioningThis section provides examples of displaying configuration partitions with the show running-config partitioncommand:
Displaying Configuration Partitions ExampleIn this example, the showrunning-configpartitioncommand is used with related commands in a series ofsteps an administrator might take to check the status of a specific interface and the current configuration ofsome of the system’s other components. Comparable filtered output from the standardshowrunning-configcommand (for example, showrunning-config|includeaccess-list) is included fordemonstration purposes.
The part argument can consist of multiple partition name keywords, as inshowrunning-configpartroutereigrp1.
Note
gt3-7200-3# show running-config partition ?access-list All access-list configurationsboot All boot configurationsclass-map All class-map configurationsglobal-cdp All global cdp configurationsinterface All Interface specific Configurationsip-as-path All IP as-path configurationsip-community All IP community list configurationsip-domain-list All ip domain list configurationsip-static-routes All IP static configurationsline All line mode configurationspolicy-map All policy-map configurationsroute-map All route-map configurationsrouter All routing configurationsservice All service configurationssnmp All SNMP configurations
gt3-7200-3# show running-config partition access-list
Building configuration...Current configuration : 87 bytes!!!
Configuration PartitioningDisplaying Configuration Partitions Example
gt3-7200-3# show running-config partition interface fastethernet0/0Building configuration...Current configuration : 98 bytes!!!interface FastEthernet0/0no ip addressno ip route-cacheshutdownduplex half!!endgt3-7200-3# show running-config partition interface ethernet2/0
Building configuration...Current configuration : 122 bytes!!!interface Ethernet2/0ip address 10.4.2.32 255.255.255.0no ip proxy-arpno ip route-cacheduplex half!!endgt3-7200-3# show running-config partition interface ethernet2/1Building configuration...Current configuration : 94 bytes!!!interface Ethernet2/1no ip addressno ip route-cacheshutdownduplex half!!endgt3-7200-3# show running-config partition interface ethernet2/2
Building configuration...Current configuration : 94 bytes!!!interface Ethernet2/2no ip addressno ip route-cacheshutdownduplex half!!endgt3-7200-3# show running-config partition interface ethernet2/3Building configuration...Current configuration : 94 bytes!!!interface Ethernet2/3no ip addressno ip route-cacheshutdownduplex half!!endgt3-7200-3# show running-config partition interface serial3/0
Configuration PartitioningDisplaying Configuration Partitions Example
Current configuration : 81 bytes!!!interface Loopback234no ip addressno ip route-cacheshutdown!!endgt3-7200-3# configure terminal
Enter configuration commands, one per line. End with CNTL/Z.gt3-7200-3(config)# interface ethernet 2/0.1gt3-7200-3(config-subif)# exitgt3-7200-3(config)# exitgt3-7200-3#00:13:05: %SYS-5-CONFIG_I: Configured from console by consolegt3-7200-3# show running-config partition interface ethernet2/0.1Building configuration...Current configuration : 58 bytes!!!interface Ethernet2/0.1no ip route-cache!!endgt3-7200-3# show run partition ip?ip-as-path ip-community ip-domain-list ip-static-routesgt3-7200-3#sh run part ip-asgt3-7200-3#sh run part ip-as-path
Building configuration...Current configuration : 92 bytes!!!ip community-list standard asd permitip community-list expanded qwe deny uio*!endgt3-7200-3# show running-config | include ip communityip community-list standard asd permitip community-list expanded qwe deny uio*gt3-7200-3#gt3-7200-3# show running-config partition ip-domain-list
Configuration PartitioningDisplaying Configuration Partitions Example
router bgp 1no synchronizationbgp log-neighbor-changesdistance bgp 2 2 2no auto-summary!!endgt3-7200-3#sh run part router egp ?<0-65535> Remote autonomous system numbergt3-7200-3#sh run part router egp 1Building configuration...Current configuration : 46 bytes!!!router egp 1timers egp 20 20!!endgt3-7200-3# show running-config partition router ?bgp Border Gateway Protocol (BGP)egp Exterior Gateway Protocol (EGP)eigrp Enhanced Interior Gateway Routing Protocol (EIGRP)isis ISO IS-ISiso-igrp IGRP for OSI networksmobile Mobile routesodr On Demand stub Routesospf Open Shortest Path First (OSPF)rip Routing Information Protocol (RIP)
gt3-7200-3# show running-config partition router eigrp ?<1-65535> Autonomous system numbergt3-7200-3# show running-config partition router eigrp 1Building configuration...Current configuration : 13 bytes!!!!endgt3-7200-3#gt3-7200-3# sh run part router eigrp 2
Building configuration...Current configuration : 57 bytes!!!router eigrp 2variance 10auto-summary!!endgt3-7200-3# show running-config partition router ?bgp Border Gateway Protocol (BGP)egp Exterior Gateway Protocol (EGP)eigrp Enhanced Interior Gateway Routing Protocol (EIGRP)isis ISO IS-ISiso-igrp IGRP for OSI networksmobile Mobile routesodr On Demand stub Routesospf Open Shortest Path First (OSPF)rip Routing Information Protocol (RIP)
gt3-7200-3# show running-config partition router isis ?WORD ISO routing area tag| Output modifiers<cr>
Configuration PartitioningDisplaying Configuration Partitions Example
!!!router isis qweset-attached-bit route-map qweruse external-metrics!!endgt3-7200-3# show running-config partition router isis ?WORD ISO routing area tag| Output modifiers<cr>
gt3-7200-3# show running-config partition router isogt3-7200-3# show running-config partition router iso-igrp ?WORD ISO routing area tag| Output modifiers<cr>
gt3-7200-3# show running-config partition router iso-igrp
gt3-7200-3# show running-config partition router ?bgp Border Gateway Protocol (BGP)egp Exterior Gateway Protocol (EGP)eigrp Enhanced Interior Gateway Routing Protocol (EIGRP)isis ISO IS-ISiso-igrp IGRP for OSI networksmobile Mobile routesodr On Demand stub Routesospf Open Shortest Path First (OSPF)rip Routing Information Protocol (RIP)
gt3-7200-3# show running-config partition router mobile ?| Output modifiers<cr>
gt3-7200-3# show running-config partition router mobile
Building configuration...Current configuration : 42 bytes!!!router mobiledistance 20!!endgt3-7200-3# sh run | include router
Configuration PartitioningDisplaying Configuration Partitions Example
router mobilerouter odrrouter eigrp 2router ospf 4router iso-igrprouter isis qwerouter egp 1router bgp 1gt3-7200-3# show running-config partition router ?bgp Border Gateway Protocol (BGP)egp Exterior Gateway Protocol (EGP)eigrp Enhanced Interior Gateway Routing Protocol (EIGRP)isis ISO IS-ISiso-igrp IGRP for OSI networksmobile Mobile routesodr On Demand stub Routesospf Open Shortest Path First (OSPF)rip Routing Information Protocol (RIP)
gt3-7200-3# show running-config partition router ospf ?<1-65535> Process ID
gt3-7200-3# show running-config partition router ospf 4Building configuration...Current configuration : 64 bytes!!!router ospf 4log-adjacency-changesdistance 4!!endgt3-7200-3# sh run part service
Building configuration...Current configuration : 190 bytes!no service padservice timestamps debug uptimeservice timestamps log uptimeno service password-encryptionservice internalservice udp-small-serversservice tcp-small-servers!!!endgt3-7200-3# sh run part snmp
Building configuration...Current configuration : 84 bytes!!!snmp-server community user101 RWsnmp mib target list qwe host 0.0.0.0!end
Additional ReferencesThe following sections provide references related to the Configuration Partitioning feature.
1 The “Configuration Logger Persistency” feature allows saving just the commands entered since the last startup-config file was generated, rather than savingthe entire startup configuration.
Standards
TitleStandard
--No standards are associated with this feature.
MIBs
MIBs LinkMIB
--No new or modified MIBs are supported by thisfeature, and support for existing MIBs has not beenmodified by this feature.
RFCs
TitleRFC
--No new or modified RFCs are supported by thisfeature, and support for existing RFCs has not beenmodified by this feature.
http://www.cisco.com/techsupportThe Cisco Support website provides extensive onlineresources, including documentation and tools fortroubleshooting and resolving technical issues withCisco products and technologies.
To receive security and technical information aboutyour products, you can subscribe to various services,such as the Product Alert Tool (accessed from FieldNotices), the Cisco Technical Services Newsletter,and Really Simple Syndication (RSS) Feeds.
Access to most tools on the Cisco Support websiterequires a Cisco.com user ID and password..
Feature Information for Configuration PartitioningThe following table provides release information about the feature or features described in this module. Thistable lists only the software release that introduced support for a given feature in a given software releasetrain. Unless noted otherwise, subsequent releases of that software release train also support that feature.
Use Cisco Feature Navigator to find information about platform support and Cisco software image support.To access Cisco Feature Navigator, go to www.cisco.com/go/cfn. An account on Cisco.com is not required.
Table 10: Feature Information for Configuration Partitioning
Feature InformationReleasesFeature Name
The Configuration Partitioningfeature provides modularization(“partitioning”) of the runningconfiguration state to providegranular access to the runningconfiguration in Cisco IOSsoftware. This feature is enabledby default in Cisco IOS softwareimages that include this feature.
In 12.2(33)SB, this feature wasimplemented on the Cisco 10000series.
The following sections provideinformation about this feature:
Configuration PartitioningFeature Information for Configuration Partitioning
C H A P T E R 10Configuration Versioning
The Configuration Versioning feature allows you to maintain and manage backup copies of the Cisco runningconfiguration on or off the device. The Configuration Replace feature uses the Configuration Versioningfeature to provide a rollback to a saved copy of the running configuration.
• Finding Feature Information, page 131
• Information About Configuration Versioning, page 131
• How to Configure Configuration Versioning, page 132
• Configuration Examples for Configuration Versioning, page 136
• Additional References, page 136
• Feature Information for Configuration Versioning, page 137
Finding Feature InformationYour software release may not support all the features documented in this module. For the latest caveats andfeature information, see Bug Search Tool and the release notes for your platform and software release. Tofind information about the features documented in this module, and to see a list of the releases in which eachfeature is supported, see the feature information table.
Use Cisco Feature Navigator to find information about platform support and Cisco software image support.To access Cisco Feature Navigator, go to www.cisco.com/go/cfn. An account on Cisco.com is not required.
Information About Configuration Versioning
Configuration ArchiveThe Cisco configuration archive provides a mechanism to store, organize, and manage an archive of Ciscoconfiguration files to enhance the configuration rollback capability provided by the configure replacecommand. Before this feature was introduced, you could save copies of the running configuration using thecopy running-config destination-url command, storing the replacement file either locally or remotely.
However, this method lacked any automated file management. With the Configuration Replace andConfiguration Rollback feature, you can automatically save copies of the running configuration to theconfiguration archive. These archived files serve as checkpoint configuration references and can be used bythe configure replace command to revert the configuration to a previous state.
The archive config command allows you to save Cisco configurations in the configuration archive using astandard location and filename prefix that is automatically appended with an incremental version number (andoptional time stamp) as each consecutive file is saved. This functionality provides consistent identificationof saved configuration files. You can specify how many versions of the running configuration are kept in thearchive. After the maximum number of files are saved in the archive, the oldest file is automatically deletedwhen the next, most recent file is saved. The show archive command displays information for all configurationfiles saved in the configuration archive.
The configuration archive, in which the configuration files are stored and available for use with the configurereplace command, can be located on the following file systems depending on your platform:
• If your platform has disk0:—disk0:, disk1:, ftp:, pram:, rcp:, slavedisk0:, slavedisk1:, or tftp:
• If your platform does not have disk0:—bootflash:, ftp:, harddisk:, http:, pram:, rcp:, tftp:, usb0:, or usb1:
How to Configure Configuration Versioning
Configuring the Characteristics of the Configuration ArchiveBefore using the archive config command, the configuration archive must be configured. Perform this taskto configure the characteristics of the configuration archive.
Configuration VersioningHow to Configure Configuration Versioning
PurposeCommand or Action
Enters global configuration mode.configure terminal
Example:
Device# configure terminal
Step 2
Enters archive configuration mode.archive
Example:
Device(config)# archive
Step 3
Specifies the location and filename prefix for the files in the configurationarchive.
path url
Example:
Device(config-archive)# pathbootflash:myconfig
Step 4
• Depending on your hardware platform, the name of your file systemmightbe different than shown in the example.
If a directory is specified in the path instead of file, the directory namemust be followed by a forward slash as follows: path flash:/directory/.The forward slash is not necessary after a filename; it is necessary onlywhen specifying a directory.
Note
(Optional) Sets the maximum number of archive files of the runningconfiguration to be saved in the configuration archive.
maximum number
Example:
Device(config-archive)# maximum14
Step 5
• The number argument is the maximum number of archive files of therunning configuration to be saved in the configuration archive. The rangeis 1 to 14. The default is 10.
Before using this command, you must configure the path commandto specify the location and filename prefix for the files in theconfiguration archive.
Note
(Optional) Sets the time increment for automatically saving an archive file ofthe current running configuration in the configuration archive.
time-period minutes
Example:
Device(config-archive)#time-period 10
Step 6
• The minutes argument specifies how often, in minutes, to automaticallysave an archive file of the current running configuration in theconfiguration archive.
Before using this command, you must configure the path commandto specify the location and filename prefix for the files in theconfiguration archive.
Note
Exits to privileged EXEC mode.end
Example:
Device(config-archive)# end
Step 7
Saves the current running configuration file to the configuration archive.archive configStep 8
Step 1 enableUse this command to enable privileged EXEC mode. Enter your password if prompted. For example:
Example:
Device> enableDevice#
Step 2 show archiveUse this command to display information about the files saved in the configuration archive. For example:
Example:
Device# show archive
There are currently 1 archive configurations saved.The next archive file will be named bootflash:myconfig-2Archive # Name01 bootflash:myconfig-1 <- Most Recent234567891011
Configuration VersioningMonitoring and Troubleshooting the Configuration
121314
The following is sample output from the show archive command after several archive files of the running configurationhave been saved. In this example, the maximum number of archive files to be saved is set to three.
Example:
Device# show archive
There are currently 3 archive configurations saved.The next archive file will be named bootflash:myconfig-8Archive # Name01 :Deleted2 :Deleted3 :Deleted4 :Deleted5 bootflash:myconfig-56 bootflash:myconfig-67 bootflash:myconfig-7 <- Most Recent891011121314
Step 3 debug archive versioningUse this command to enable debugging of the configuration archive activities to help monitor and troubleshootconfiguration replace and rollback. For example:
Step 4 debug archive config timestampUse this command to enable debugging of the processing time for each integral step of a configuration replace operationand the size of the configuration files being handled. For example:
Time to read file slot0:sample_2.cfg = 0 msec (0 sec)Number of lines read:55Size of file :1054
Starting Pass 1Time to read file system:running-config = 0 msec (0 sec)Number of lines read:93Size of file :2539Time taken for positive rollback pass = 320 msec (0 sec)Time taken for negative rollback pass = 0 msec (0 sec)Time taken for negative incremental diffs pass = 59 msec (0 sec)Time taken by PI to apply changes = 0 msec (0 sec)Time taken for Pass 1 = 380 msec (0 sec)
Configuration VersioningMonitoring and Troubleshooting the Configuration
Starting Pass 2Time to read file system:running-config = 0 msec (0 sec)Number of lines read:55Size of file :1054Time taken for positive rollback pass = 0 msec (0 sec)Time taken for negative rollback pass = 0 msec (0 sec)Time taken for Pass 2 = 0 msec (0 sec)
Total number of passes:1Rollback Done
Step 5 exitUse this command to exit to user EXEC mode. For example:
Example:
Device# exitDevice>
Configuration Examples for Configuration Versioning
Example: Creating a Configuration ArchiveThe following example shows how to perform the initial configuration of the configuration archive. In thisexample, bootflash:myconfig is specified as the location and filename prefix for the files in the configurationarchive and a value of 10 is set as the maximum number of archive files to be saved. Depending on yourhardware platform, the name of your file system might be different than shown in the example.
http://www.cisco.com/cisco/web/support/index.htmlThe Cisco Support and Documentation websiteprovides online resources to download documentation,software, and tools. Use these resources to install andconfigure the software and to troubleshoot and resolvetechnical issues with Cisco products and technologies.Access to most tools on the Cisco Support andDocumentation website requires a Cisco.com user IDand password.
Feature Information for Configuration VersioningThe following table provides release information about the feature or features described in this module. Thistable lists only the software release that introduced support for a given feature in a given software releasetrain. Unless noted otherwise, subsequent releases of that software release train also support that feature.
Use Cisco Feature Navigator to find information about platform support and Cisco software image support.To access Cisco Feature Navigator, go to www.cisco.com/go/cfn. An account on Cisco.com is not required.
Table 11: Feature Information for Configuration Versioning
Feature InformationReleasesFeature Name
The Configuration Versioningfeature allows you to maintain andmanage backup copies of the Ciscorunning configuration on or off thedevice. The Configuration Replacefeature uses the ConfigurationVersioning feature to provide arollback to a saved copy of therunning configuration.
The following commands wereintroduced or modified: archiveconfig, debug archive versioning,log config, maximum, path(archive configuration), showarchive, time-period,write-memory.
Configuration VersioningFeature Information for Configuration Versioning
C H A P T E R 11Parser Concurrency and Locking Improvements
In order to overcome the following limitations posed by the Exclusive Configuration Change Access feature,the Parser Concurrency and Locking Improvements feature was introduced in Cisco IOSRelease 12.2(33)SRE:
• The Exclusive Configuration Change Access feature locks the configuration to other users. The lockis automatically released when the lock holder exits from the configuration mode. Any other user inthe configuration mode will be returned to the EXEC mode when the lock is acquired. Also, any usercan execute the clearconfigurationlock command and forcibly remove the lock and allow normalaccess to all users.
• The router can reload when multiple write processes belonging to the same client simultaneously accessthe Cisco IOS configurations in a shared mode.
• The router can reload when EXEC commands concurrently access the data structure.
Effective from Cisco IOS Release 12.2(33)SRE, the Concurrency and Locking Improvements feature is theprimary locking mechanism used to prevent concurrent configuration of Cisco IOS software by multipleusers.
The Parser Concurrency and Locking Improvements feature provides a common interface that ensures thatexclusive access is granted to the requested process and prevents others from concurrently accessing theCisco IOS configuration. It allows access only to the user holding the lock and prevents other clients fromaccessing the configuration.
Effective fromCisco IOSRelease 12.2(33)SRE, the configurationmodeexclusive {auto |manual} commandwill not be available to enable single-user access functionality for the Cisco IOS CLI. Use theparsercommandserializer command to enable configuration access only to the users holding the lock andprevent other clients from accessing the configuration.
• Finding Feature Information, page 139
• Enabling Parser Concurrency and Locking Improvements, page 140
• Configuring Parser Concurrency and Locking Improvements Example, page 141
Finding Feature InformationYour software release may not support all the features documented in this module. For the latest caveats andfeature information, see Bug Search Tool and the release notes for your platform and software release. To
find information about the features documented in this module, and to see a list of the releases in which eachfeature is supported, see the feature information table.
Use Cisco Feature Navigator to find information about platform support and Cisco software image support.To access Cisco Feature Navigator, go to www.cisco.com/go/cfn. An account on Cisco.com is not required.
Enabling Parser Concurrency and Locking ImprovementsPerform this task to enable configuration access only to the users holding a configuration lock and to preventother clients from accessing the running configuration.
The Parser Cconcurrency and Locking Improvements feature does not allow two or more processes toexist simultaneously within the critical section of Cisco IOS configurations.
This feature flags a command to prevent its serialization if an excessive amount of time is required togenerate its output or if its use produces more than 10 kilobytes of output. Examples of commands thatwould not be serialized are the showterminal and showrunning-config commands.
Parser Concurrency and Locking ImprovementsConfiguring Parser Concurrency and Locking Improvements Example
C H A P T E R 12Parser Cache
The Cisco command-line parser in the Cisco software performs the translation and execution (parsing) ofcommand lines. The Parser Cache feature was developed to rapidly process large configuration files, therebydramatically improving load time.
• Finding Feature Information, page 143
• Managing the Parser Cache, page 143
Finding Feature InformationYour software release may not support all the features documented in this module. For the latest featureinformation and caveats, see the release notes for your platform and software release.
Use Cisco Feature Navigator to find information about platform support and Cisco software image support.To access Cisco Feature Navigator, go to http://www.cisco.com/go/cfn . An account on Cisco.com is notrequired.
Managing the Parser CacheTo control the Parser Cache feature, perform the tasks described in the following sections. All of these tasksare optional:
Control of the Parser CacheThe Cisco IOS command-line parser in the Cisco IOS software performs the translation and execution (parsing)of command lines. The Parser Cache feature was developed to rapidly process large configuration files, therebydramatically improving load time.
The Parser Cache feature allows the rapid recognition and translation of configuration lines in a configurationfile that differ slightly from previously used configuration lines (for example, pvc 0/100, pvc 0/101, and soon) by dynamically creating, caching, and reusing simplified parse graphs. This improvement is useful primarilyfor configuration files that repeat similar commands hundreds or thousands of times, such as cases in whichthousands of virtual circuits must be configured for subinterfaces, or hundreds of access lists must be configured.
Performance will improve the most for those files in which the same commands are used repeatedly but thenumerical arguments change from command to command.
The Parser Cache is enabled by default on all platforms using Cisco IOS Release 12.1(5)T and later releases.However, users with Cisco devices that do not require large configuration files may want to disable the ParserCache to free the resources used by this feature. (Memory used by this feature depends on the size of theconfiguration files parsed, but is generally less than 512 KB.)
There are several ways to control the parser cache (these are all optional):
• Clearing the Parser Cache--To free resources or to reset the parser cache memory, you may wish to clearthe parse entries and hit/miss statistics stored by the Parser Cache feature
• Disabling the Parser Cache--The Parser Cache feature is enabled by default. To disable the Parser Cachefeature, use the no parser cache command in global configuration mode. When the parser cache isdisabled, the noparsercache command line is written to the running configuration file. If you wish todisable the parser cache to free system resources, you should clear the parser cache before issuing thenoparsercache command. You will not be able to clear the parser cache after disabling it.
• Reenabling the Parser Cache--To reenable the Parser Cache feature after disabling it, use the parsercachecommand in global configuration mode
• Monitoring the Parser--Statistics about the last configuration file parsed are kept in the system memory,along with hit/miss statistics on the commands parsed by the Parser Cache feature. “Hits” and “misses”refer to the matches that the parser cache was able to make to similar commands used previously in theconfiguration session. Those commands that are matched (“hits”) be parsed more efficiently. The parsercache cannot improve the parse time for those commands it was unable to match (“misses”).
Clearing the Parser CacheTo clear the information stored by the Parser Cache feature, complete the task in this section:
SUMMARY STEPS
1. enable2. clear parser cache
DETAILED STEPS
PurposeCommand or Action
Enables privileged EXEC mode.enableStep 1
Example:
Device> enable
• Enter your password if prompted.
Clears the parse cache entries and hit/miss statistics stored forthe Parser Cache feature.
Disabling the Parser CacheThe Parser Cache feature is enabled by default. To disable the Parser Cache feature, complete the task in thissection:
SUMMARY STEPS
1. enable2. configure terminal3. no parser cache
DETAILED STEPS
PurposeCommand or Action
Enables privileged EXEC mode.enableStep 1
Example:
Device> enable
• Enter your password if prompted.
Enters global configuration mode.configure terminal
Example:
Device# configure terminal
Step 2
Disables the Parser Cache feature:no parser cacheStep 3
Example:
Device(config)# no parser cache
• When the parser cache is disabled, the noparsercache commandline is written to the running configuration file.
• If you wish to disable the parser cache to free system resources, youshould clear the parser cache before issuing the noparsercachecommand. You will not be able to clear the parser cache afterdisabling it.
Reenabling the Parser CacheTo reenable the Parser Cache feature after disabling it, complete the task in this section:
Enters global configuration mode.configure terminal
Example:
Device# configure terminal
Step 2
Enables the Parser Cache feature.parser cache
Example:
Device(config)# parser cache
Step 3
Monitoring the ParserStatistics about the last configuration file parsed are kept in the system memory, along with hit/miss statisticson the commands parsed by the Parser Cache feature. “Hits” and “misses” refer to the matches that the parsercache was able to make to similar commands used previously in the configuration session. Those commandsthat are matched (“hits”) be parsed more efficiently. The parser cache cannot improve the parse time for thosecommands it was unable to match (“misses”).To display the parser statistics, use the following command in privileged EXEC mode:
Displays statistics about the last configuration file parsed and thestatus of the Parser Cache feature.
Router# show parser statisticsStep 1
What to Do Next
The following example shows sample output from the show parser statistics command:
Router# show parser statistics
Last configuration file parsed:Number of Commands:1484, Time:1272 msParser cache:disabled, 0 hits, 0 missesTheshow parser statistics command displays two sets of data, as follows:
• The number of commands in the configuration file that was last copied into the running configuration,and the time it took for the system to parse them (a configuration file can be loaded into the runningconfiguration at system startup, or by issuing commands such as the copysourcerunning-config EXECcommand).
• The status of the parser cache (enabled or disabled) and the number of commandmatches (hits or misses)since the system was started or since the parser cache was cleared.
In the example shown, the hit/miss statistics (0/0) do not match the number of commands in the lastconfiguration file parsed (1484), which indicates that the last configuration file was loaded while the parsercache was disabled.