44
Schedule: Timing Topic 40 minutes Lecture 30 minutes Practice 70 minutes Total 8 8 Manipulating Data

Schedule: Timing Topic40 minutes Lecture30 minutes Practice70 minutes Total
88Manipulating Data
7-2
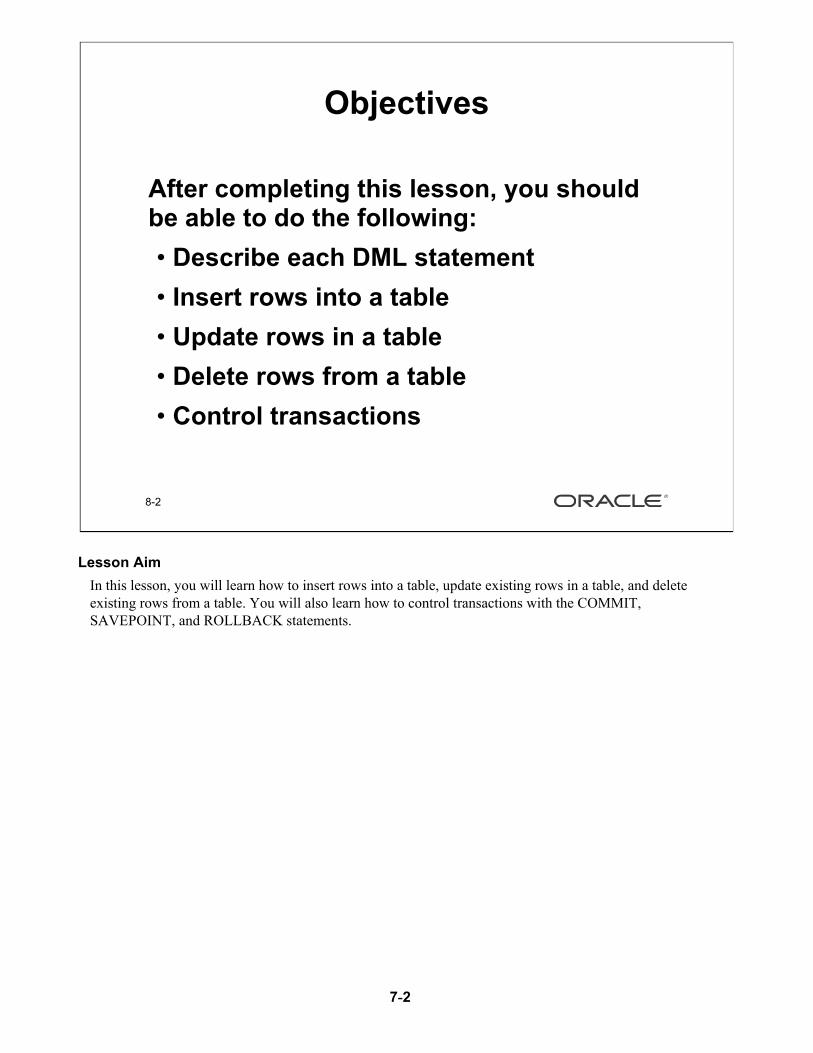
Lesson AimIn this lesson, you will learn how to insert rows into a table, update existing rows in a table, and delete existing rows from a table. You will also learn how to control transactions with the COMMIT, SAVEPOINT, and ROLLBACK statements.
8-2
Objectives
After completing this lesson, you should After completing this lesson, you should be able to do the following:be able to do the following:• Describe each DML statement• Insert rows into a table• Update rows in a table• Delete rows from a table• Control transactions

7-3
8-3
Data Manipulation Language
• A DML statement is executed when you:– Add new rows to a table– Modify existing rows in a table– Remove existing rows from a table
• A transaction consists of a collection of DML statements that form a logical unit of work.
Data Manipulation LanguageData manipulation language (DML) is a core part of SQL. When you want to add, update, or delete data in the database, you execute a DML statement. A collection of DML statements that form a logical unit of work is called a transaction.Consider a banking database. When a bank customer transfers money from a savings account to a checking account, the transaction might consist of three separate operations: decrease the savings account, increase the checking account, and record the transaction in the transaction journal. The Oracle Server must guarantee that all three SQL statements are performed to maintain the accounts in proper balance. When something prevents one of the statements in the transaction from executing, the other statements of the transaction must be undone.
Instructor NoteDML statements can be issued directly in SQL*Plus, performed automatically by tools such as Oracle Developer or programmed with tools such as the 3GL precompilers. Every table has INSERT, UPDATE, and DELETE privileges associated with it. These privileges are automatically granted to the creator of the table, but in general they must be explicitly granted to other users.Starting with Oracle 7.2, you can place a subquery in the place of the table name in an UPDATE statement, essentially the same way a view is used.
7-4
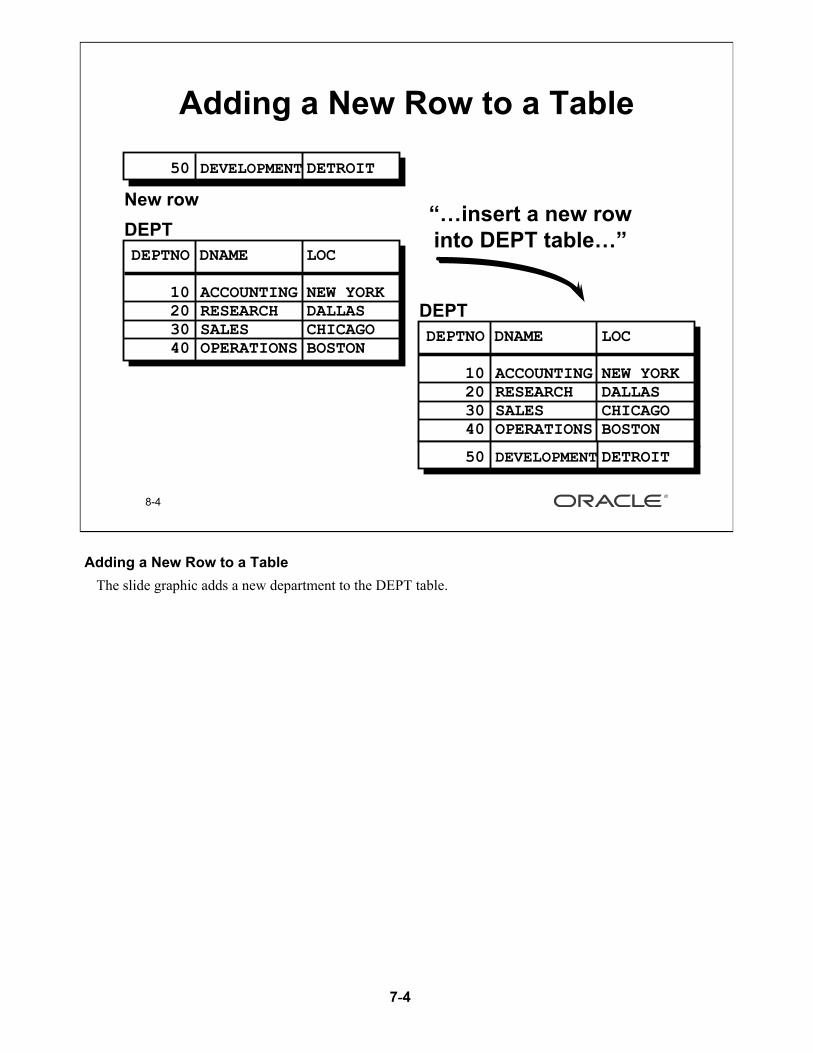
Adding a New Row to a TableThe slide graphic adds a new department to the DEPT table.
8-4
Adding a New Row to a Table
DEPT DEPT DEPTNO DNAME LOC ------ ---------- --------
10 ACCOUNTING NEW YORK20 RESEARCH DALLAS30 SALES CHICAGO40 OPERATIONS BOSTON
New rowNew row
50 DEVELOPMENT DETROIT
DEPT DEPT DEPTNO DNAME LOC ------ ---------- --------
10 ACCOUNTING NEW YORK20 RESEARCH DALLAS30 SALES CHICAGO40 OPERATIONS BOSTON
“…“…insert a new row insert a new row into DEPT table…”into DEPT table…”
50 DEVELOPMENT DETROIT
7-5
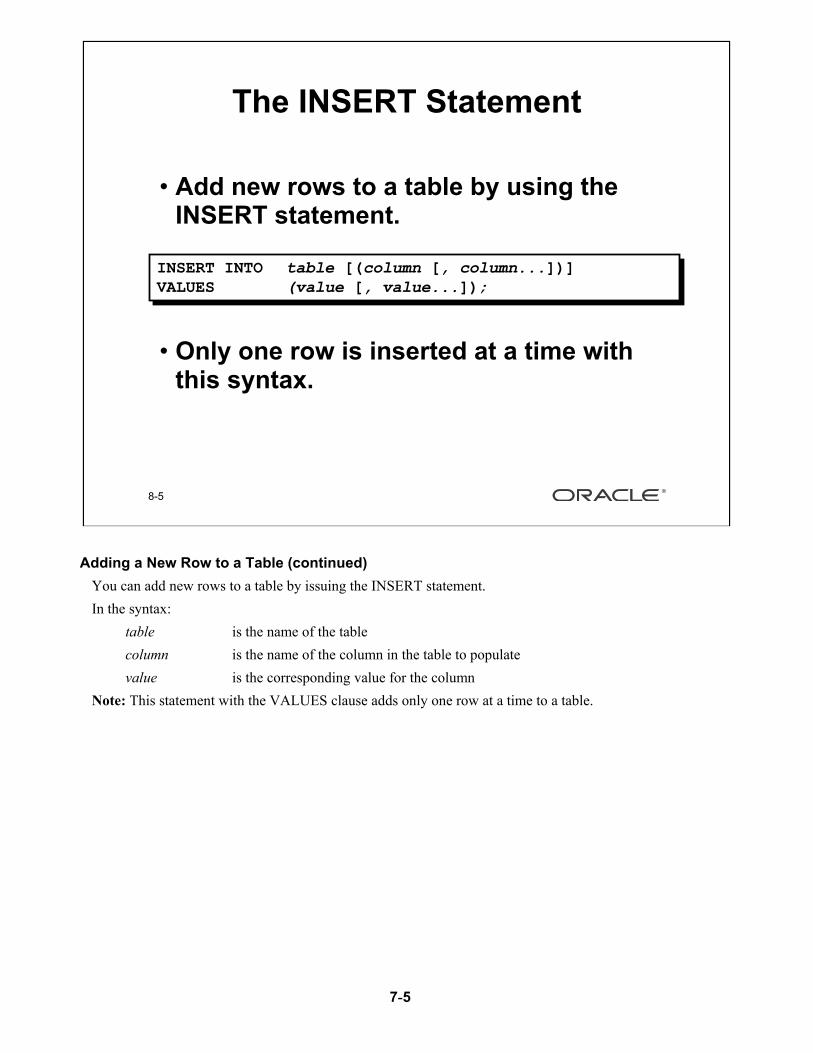
Adding a New Row to a Table (continued)You can add new rows to a table by issuing the INSERT statement. In the syntax:
table is the name of the tablecolumn is the name of the column in the table to populatevalue is the corresponding value for the column
Note: This statement with the VALUES clause adds only one row at a time to a table.
8-5
The INSERT Statement
• Add new rows to a table by using the INSERT statement.
• Only one row is inserted at a time with this syntax.
INSERT INTO table [(column [, column...])]VALUES (value [, value...]);

7-6
8-6
Inserting New Rows
• Insert a new row containing values for each column.
• List values in the default order of the columns in the table.
• Optionally list the columns in the INSERT clause.
• Enclose character and date values within single quotation marks.
SQL> INSERT INTO dept (deptno, dname, loc)2 VALUES (50, 'DEVELOPMENT', 'DETROIT');
1 row created.1 row created.
Adding a New Row to a Table (continued)Because you can insert a new row that contains values for each column, the column list is not required in the INSERT clause. However, if you do not use the column list, the values must be listed according to the default order of the columns in the table.
SQL> DESCRIBE dept
Name Null? Type------------------------------- -------- ------------DEPTNO NOT NULL NUMBER(2)DNAME VARCHAR2(14)LOC VARCHAR2(13)
For clarity, use the column list in the INSERT clause.Enclose character and date values within single quotation marks; do not enclose numeric values within single quotation marks.
Instructor NoteNumber values should not be enclosed in single quotes, because implicit conversion may take place for numeric values assigned to NUMBER datatype columns if single quotes are included.

7-7
8-7
Inserting Rows with Null Values
• Implicit method: Omit the column from the column list.
SQL> INSERT INTO dept (deptno, dname )2 VALUES (60, 'MIS');
1 row created.1 row created.
• Explicit method: Specify the NULL keyword.
SQL> INSERT INTO dept2 VALUES (70, 'FINANCE', NULL);
1 row created.1 row created.
Methods for Inserting Null Values
Be sure that the targeted column allows null values by verifying the Null? status from the SQL*Plus DESCRIBE command.The Oracle Server automatically enforces all datatypes, data ranges, and data integrity constraints. Any column that is not listed explicitly obtains a null value in the new row.
Instructor NoteCommon errors that can occur during user input:
• Mandatory value missing for a NOT NULL column• Duplicate value violates uniqueness constraint• Foreign key constraint violated• CHECK constraint violated• Datatype mismatch• Value too wide to fit in column
Method Description
Implicit Omit the column from the column list.Explicit Specify the NULL keyword in the VALUES list
Specify the empty string ('') in the VALUES list; for character strings anddates only.

7-8
8-8
Inserting Special ValuesThe SYSDATE function records the The SYSDATE function records the current date and time.current date and time.
SQL> INSERT INTO emp (empno, ename, job,2 mgr, hiredate, sal, comm,3 deptno)4 VALUES (7196, 'GREEN', 'SALESMAN',5 7782, SYSDATE, 2000, NULL,6 10);
1 row created.1 row created.
Inserting Special Values by Using SQL FunctionsYou can use pseudocolumns to enter special values in your table. The slide example records information for employee Green in the EMP table. It supplies the current date and time in the HIREDATE column. It uses the SYSDATE function for current date and time. You can also use the USER function when inserting rows in a table. The USER function records the current username.
Confirming Additions to the Table
SQL> SELECT empno, ename, job, hiredate, comm2 FROM emp3 WHERE empno = 7196;
EMPNO ENAME JOB HIREDATE COMM--------- ---------- --------- --------- ---------
7196 GREEN SALESMAN 01-DEC-97
7-9
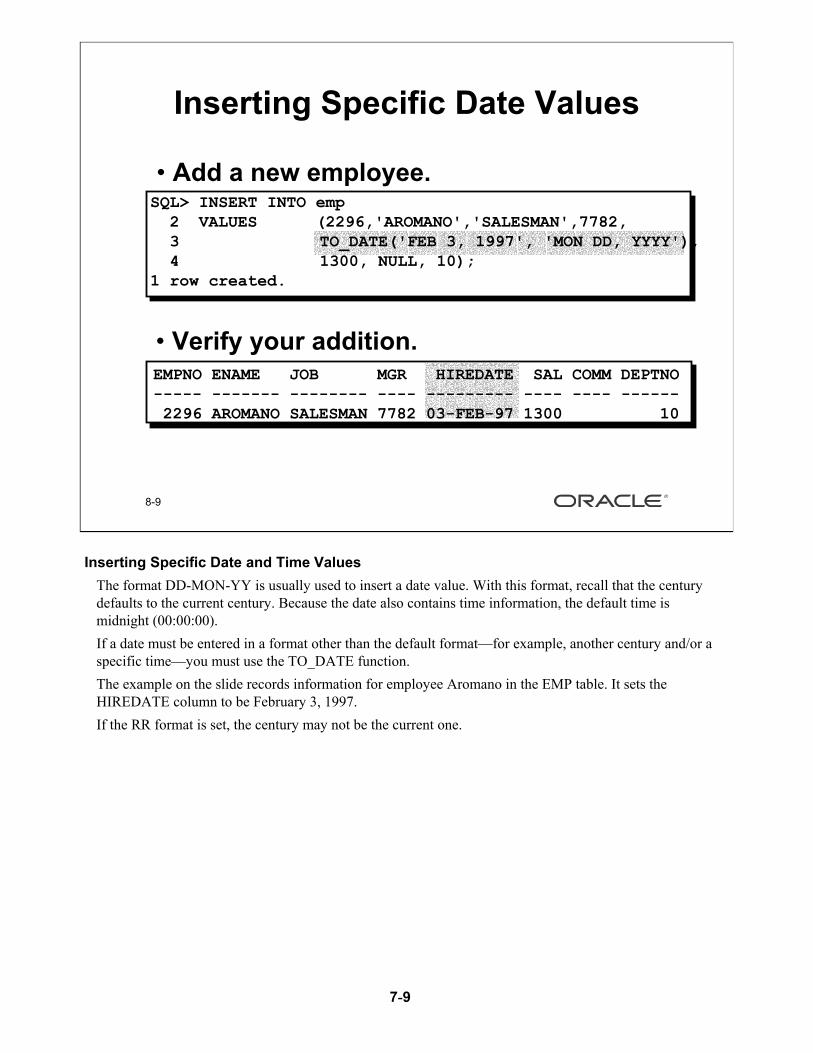
Inserting Specific Date and Time ValuesThe format DD-MON-YY is usually used to insert a date value. With this format, recall that the century defaults to the current century. Because the date also contains time information, the default time is midnight (00:00:00).If a date must be entered in a format other than the default format—for example, another century and/or a specific time—you must use the TO_DATE function.The example on the slide records information for employee Aromano in the EMP table. It sets the HIREDATE column to be February 3, 1997.If the RR format is set, the century may not be the current one.
8-9
Inserting Specific Date Values
• Add a new employee.SQL> INSERT INTO emp2 VALUES (2296,'AROMANO','SALESMAN',7782,3 TO_DATE('FEB 3, 1997', 'MON DD, YYYY'),4 1300, NULL, 10);
1 row created.1 row created.
• Verify your addition.EMPNO ENAME JOB MGR HIREDATE SAL COMM DEPTNO----- ------- -------- ---- --------- ---- ---- ------2296 AROMANO SALESMAN 7782 03-FEB-97 1300 10
7-10
8-10
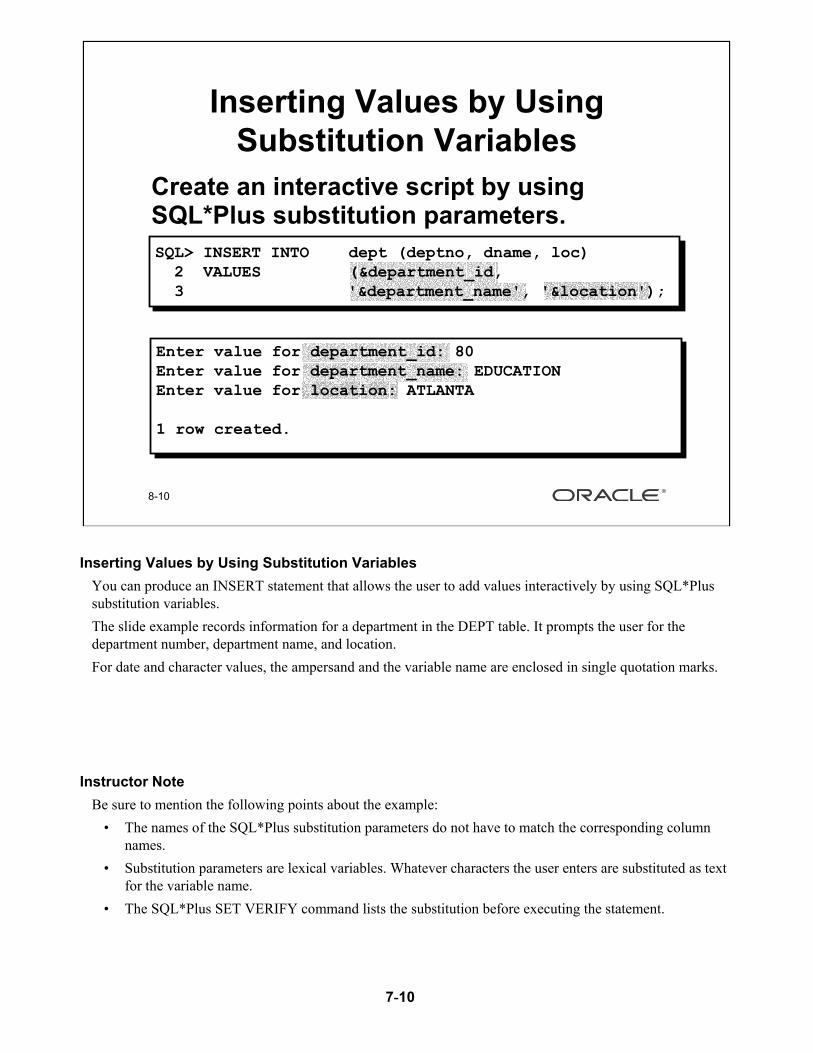
Inserting Values by Using Substitution Variables
Create an interactive script by using Create an interactive script by using SQL*Plus substitution parameters.SQL*Plus substitution parameters.SQL> INSERT INTO dept (deptno, dname, loc)2 VALUES (&department_id,3 '&department_name', '&location');
Enter value for department_id: 8080Enter value for department_name: EDUCATIONEDUCATIONEnter value for location: ATLANTAATLANTA
1 row created.
Inserting Values by Using Substitution VariablesYou can produce an INSERT statement that allows the user to add values interactively by using SQL*Plus substitution variables.The slide example records information for a department in the DEPT table. It prompts the user for the department number, department name, and location.For date and character values, the ampersand and the variable name are enclosed in single quotation marks.
Instructor NoteBe sure to mention the following points about the example:
• The names of the SQL*Plus substitution parameters do not have to match the corresponding column names.
• Substitution parameters are lexical variables. Whatever characters the user enters are substituted as text for the variable name.
• The SQL*Plus SET VERIFY command lists the substitution before executing the statement.
7-11
8-11
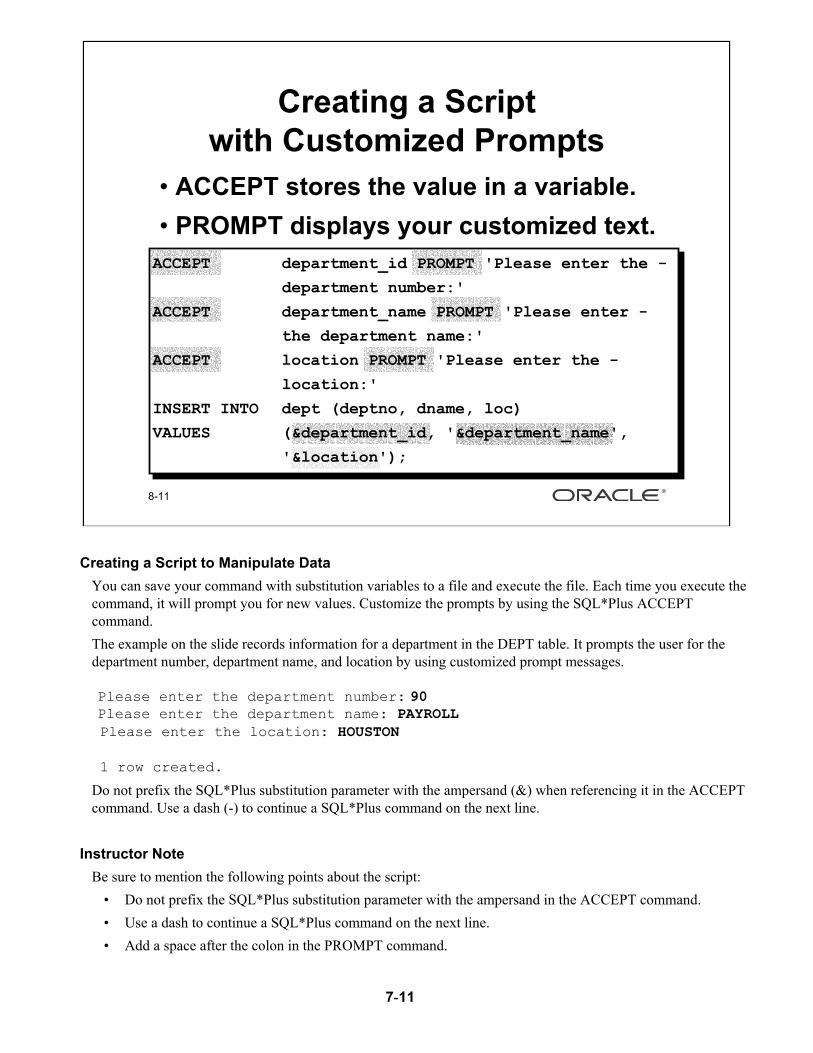
Creating a Script with Customized Prompts
• ACCEPT stores the value in a variable.• PROMPT displays your customized text.ACCEPT department_id PROMPT 'Please enter the -
department number:'
ACCEPT department_name PROMPT 'Please enter -
the department name:'
ACCEPT location PROMPT 'Please enter the -
location:'
INSERT INTO dept (deptno, dname, loc)
VALUES (&department_id, '&department_name',
'&location');
Creating a Script to Manipulate DataYou can save your command with substitution variables to a file and execute the file. Each time you execute the command, it will prompt you for new values. Customize the prompts by using the SQL*Plus ACCEPT command.The example on the slide records information for a department in the DEPT table. It prompts the user for the department number, department name, and location by using customized prompt messages.
Please enter the department number: 90Please enter the department name: PAYROLLPlease enter the location: HOUSTON
1 row created.
Do not prefix the SQL*Plus substitution parameter with the ampersand (&) when referencing it in the ACCEPT command. Use a dash (-) to continue a SQL*Plus command on the next line.
Instructor NoteBe sure to mention the following points about the script:
• Do not prefix the SQL*Plus substitution parameter with the ampersand in the ACCEPT command. • Use a dash to continue a SQL*Plus command on the next line.• Add a space after the colon in the PROMPT command.

7-12
8-12
Copying Rows from Another Table
• Write your INSERT statement with a subquery.
• Do not use the VALUES clause.• Match the number of columns in the
INSERT clause to those in the subquery.
SQL> INSERT INTO managers(id, name, salary, hiredate)2 SELECT empno, ename, sal, hiredate3 FROM emp4 WHERE job = 'MANAGER';
3 rows created.3 rows created.
Copying Rows from Another Table You can use the INSERT statement to add rows to a table where the values are derived from existing tables. In place of the VALUES clause, you use a subquery. Syntax
INSERT INTO table [ column (, column) ]subquery;
where: table is the table namecolumn is the name of the column in the table to populatesubquery is the subquery that returns rows into the table
For more information, see Oracle Server SQL Reference, Release 8, “SELECT,” Subqueries section.
The number of columns and their datatypes in the column list of the INSERT clause must match the number of values and their datatypes in the subquery.
Instructor NotePlease run the script lab9_12.sql to create the managers table. Do not get into too many details on copying rows from another table.

7-13
Changing Data in a TableThe slide graphic changes the department number for Clark from 10 to 20.
8-13
Changing Data in a TableEMPEMP
“…“…update a row update a row in EMP table…”in EMP table…”
EMPEMPEMPNO ENAME JOB ... DEPTNO
7839 KING PRESIDENT 107698 BLAKE MANAGER 307782 CLARK MANAGER 107566 JONES MANAGER 20...
20
EMPNO ENAME JOB ... DEPTNO
7839 KING PRESIDENT 107698 BLAKE MANAGER 307782 CLARK MANAGER 107566 JONES MANAGER 20...

7-14
Updating RowsYou can modify existing rows by using the UPDATE statement.In the above syntax:
table is the name of the tablecolumn is the name of the column in the table to populatevalue is the corresponding value or subquery for the columncondition identifies the rows to be updated and is composed of column names
expressions, constants, subqueries, and comparison operatorsConfirm the update operation by querying the table to display the updated rows.For more information, see Oracle Server SQL Reference, Release 8, “UPDATE.”Note: In general, use the primary key to identify a single row. Using other columns may unexpectedly cause several rows to be updated. For example, identifying a single row in the EMP table by name is dangerous because more than one employee may have the same name.
Instructor NoteDemo: l9sel.sql, l9upd.sqlPurpose: To illustrate displaying the initial state of data, performing updates, and viewing results.
8-14
The UPDATE Statement
• Modify existing rows with the UPDATE statement.
• Update more than one row at a time, if required.
UPDATE tableSET column = value [, column = value, ...][WHERE condition];

7-15
8-15
Updating Rows in a Table• Specific row or rows are modified when
you specify the WHERE clause.
• All rows in the table are modified if you omit the WHERE clause.
SQL> UPDATE emp2 SET deptno = 203 WHERE empno = 7782;
1 row updated.1 row updated.
SQL> UPDATE employee2 SET deptno = 20;
14 rows updated.14 rows updated.
Updating Rows (continued)The UPDATE statement modifies specific rows, if the WHERE clause is specified. The slide example transfers employee 7782 (Clark) to department 20. If you omit the WHERE clause, all the rows in the table are modified.
Note: The EMPLOYEE table has the same data as the EMP table.
SQL> SELECT ename, deptno2 FROM employee;
ENAME DEPTNO---------- ---------KING 20BLAKE 20CLARK 20JONES 20MARTIN 20ALLEN 20TURNER 20...14 rows selected.

7-16
8-16
Updating with Multiple-Column Subquery
SQL> UPDATE emp2 SET (job, deptno) = 3 (SELECT job, deptno4 FROM emp5 WHERE empno = 7499)6 WHERE empno = 7698;
1 row updated.1 row updated.
Update employee 7698’s job and department Update employee 7698’s job and department to match that of employee 7499.to match that of employee 7499.
Updating Rows with a Multiple-Column SubqueryMultiple-column subqueries can be implemented in the SET clause of an UPDATE statement.Syntax
Instructor NoteIt may be worth showing participants that the results would be the same for the example on the slide if two different subqueries were used in the SET clause as illustrated below:
SQL> UPDATE emp2 SET job = (SELECT job FROM emp3 WHERE empno = 7499),4 deptno = (SELECT deptno FROM dept5 WHERE dname = 'SALES')6 WHERE empno = 7698;
UPDATE tableSET (column, column, ...) =
(SELECT column, column, ...FROM tableWHERE condition)
WHERE condition;

7-17
8-17
Updating Rows Based on Another Table
Use Use subqueriessubqueries in UPDATE statements to in UPDATE statements to update rows in a table based on values update rows in a table based on values from another table.from another table.SQL> UPDATE employee2 SET deptno = (SELECT deptno3 FROM emp4 WHERE empno = 7788)5 WHERE job = (SELECT job6 FROM emp7 WHERE empno = 7788);
2 rows updated.2 rows updated.
Updating Rows Based on Another TableYou can use subqueries in UPDATE statements to update rows in a table. The example on the slide updates the EMPLOYEE table based on the values from the EMP table. It changes the department number of all employees with employee 7788’s job title to employee 7788’s current department number.

7-18
Integrity Constraint ErrorIf you attempt to update a record with a value that is tied to an integrity constraint, you will experience an error. In the example on the slide, department number 55 does not exist in the parent table, DEPT, and so you receive the parent key violation ORA-02291.Note: Integrity constraints ensure that the data adheres to a predefined set of rules. A subsequent lesson will cover integrity constraints in greater depth.
Instructor NoteExplain integrity constraints and review the concept of primary key and foreign key.
8-18
UPDATE emp*
ERROR at line 1:ORA-02291: integrity constraint (USR.EMP_DEPTNO_FK) violated - parent key not found
SQL> UPDATE emp2 SET deptno = 553 WHERE deptno = 10;
Updating Rows: Integrity Constraint Error
Department n
umber 55 does not exist
Department n
umber 55 does not exist
7-19
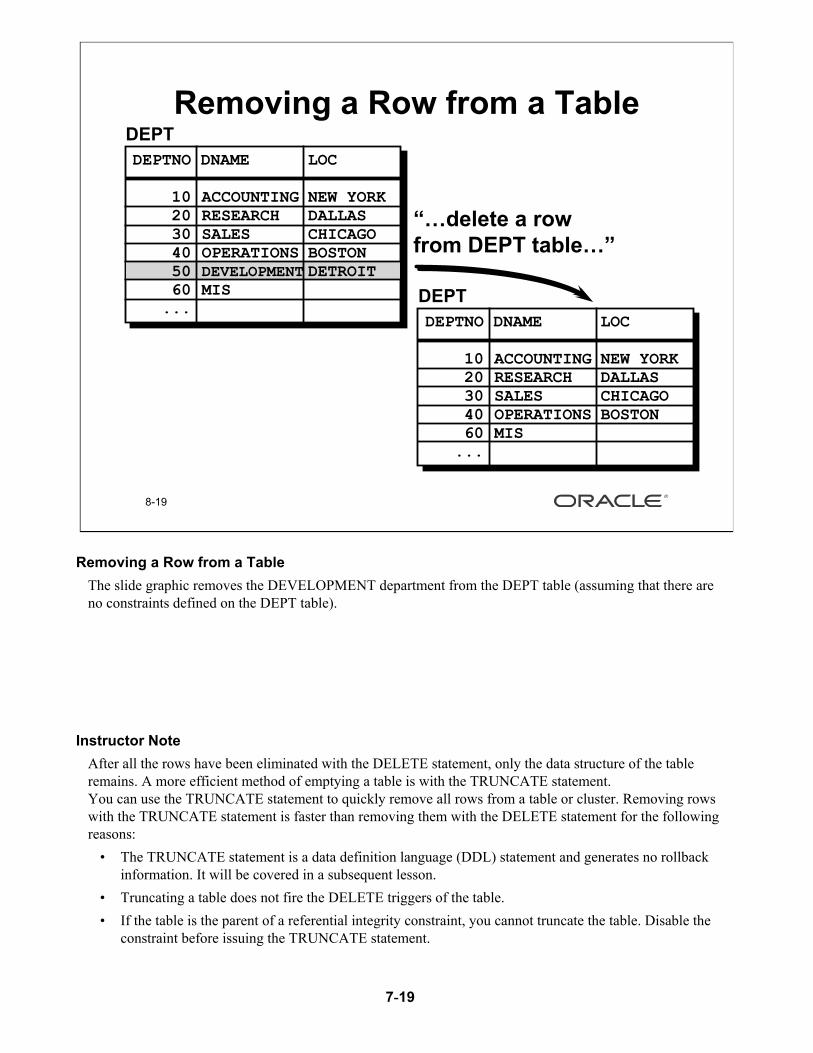
Removing a Row from a TableThe slide graphic removes the DEVELOPMENT department from the DEPT table (assuming that there are no constraints defined on the DEPT table).
Instructor NoteAfter all the rows have been eliminated with the DELETE statement, only the data structure of the table remains. A more efficient method of emptying a table is with the TRUNCATE statement.You can use the TRUNCATE statement to quickly remove all rows from a table or cluster. Removing rows with the TRUNCATE statement is faster than removing them with the DELETE statement for the following reasons:
• The TRUNCATE statement is a data definition language (DDL) statement and generates no rollback information. It will be covered in a subsequent lesson.
• Truncating a table does not fire the DELETE triggers of the table. • If the table is the parent of a referential integrity constraint, you cannot truncate the table. Disable the
constraint before issuing the TRUNCATE statement.
8-19
“…“…delete a row delete a row from DEPT table…”from DEPT table…”
Removing a Row from a Table DEPT DEPT DEPTNO DNAME LOC ------ ---------- --------
10 ACCOUNTING NEW YORK20 RESEARCH DALLAS30 SALES CHICAGO40 OPERATIONS BOSTON50 DEVELOPMENT DETROIT60 MIS...
DEPT DEPT DEPTNO DNAME LOC ------ ---------- --------
10 ACCOUNTING NEW YORK20 RESEARCH DALLAS30 SALES CHICAGO40 OPERATIONS BOSTON60 MIS...
7-20
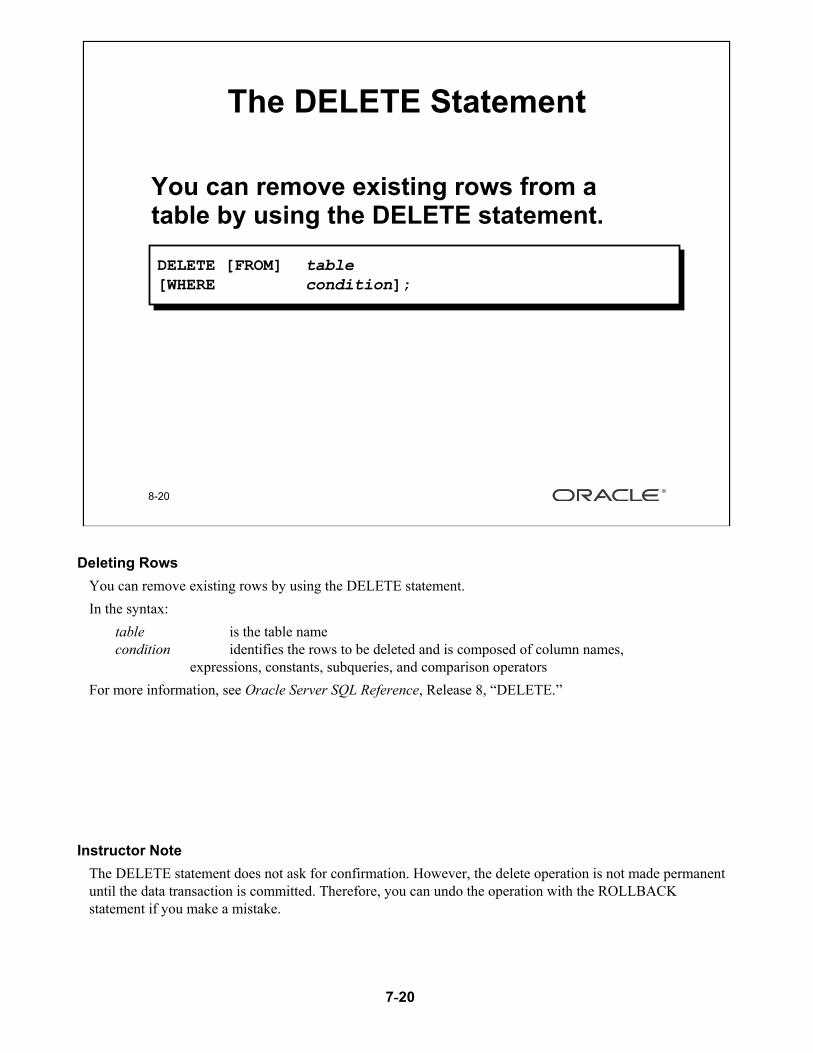
Deleting RowsYou can remove existing rows by using the DELETE statement.In the syntax:
table is the table namecondition identifies the rows to be deleted and is composed of column names,
expressions, constants, subqueries, and comparison operatorsFor more information, see Oracle Server SQL Reference, Release 8, “DELETE.”
Instructor NoteThe DELETE statement does not ask for confirmation. However, the delete operation is not made permanent until the data transaction is committed. Therefore, you can undo the operation with the ROLLBACK statement if you make a mistake.
8-20
The DELETE Statement
You can remove existing rows from a You can remove existing rows from a table by using the DELETE statement.table by using the DELETE statement.
DELETE [FROM] table[WHERE condition];

7-21
8-21
• Specific rows are deleted when you specify the WHERE clause.
• All rows in the table are deleted if you omit the WHERE clause.
Deleting Rows from a Table
SQL> DELETE FROM department2 WHERE dname = 'DEVELOPMENT';
1 row deleted.1 row deleted.
SQL> DELETE FROM department;4 rows deleted.4 rows deleted.
Deleting Rows (continued)You can delete specific rows by specifying the WHERE clause in the DELETE statement. The slide example deletes the DEVELOPMENT department from the DEPARTMENT table. You can confirm the delete operation by displaying the deleted rows using the SELECT statement.
ExampleRemove all employees who started after January 1, 1997.
If you omit the WHERE clause, all rows in the table are deleted. The second example on the slide deletes all the rows from the DEPARTMENT table because no WHERE clause has been specified.Note: The DEPARTMENT table has the same data as the DEPT table.
SQL> SELECT *2 FROM department3 WHERE dname = 'DEVELOPMENT';
no rows selected.
SQL> DELETE FROM emp2 WHERE hiredate > TO_DATE('01.01.1997', 'DD.MM.YYYY');
1 row deleted.
7-22
8-22
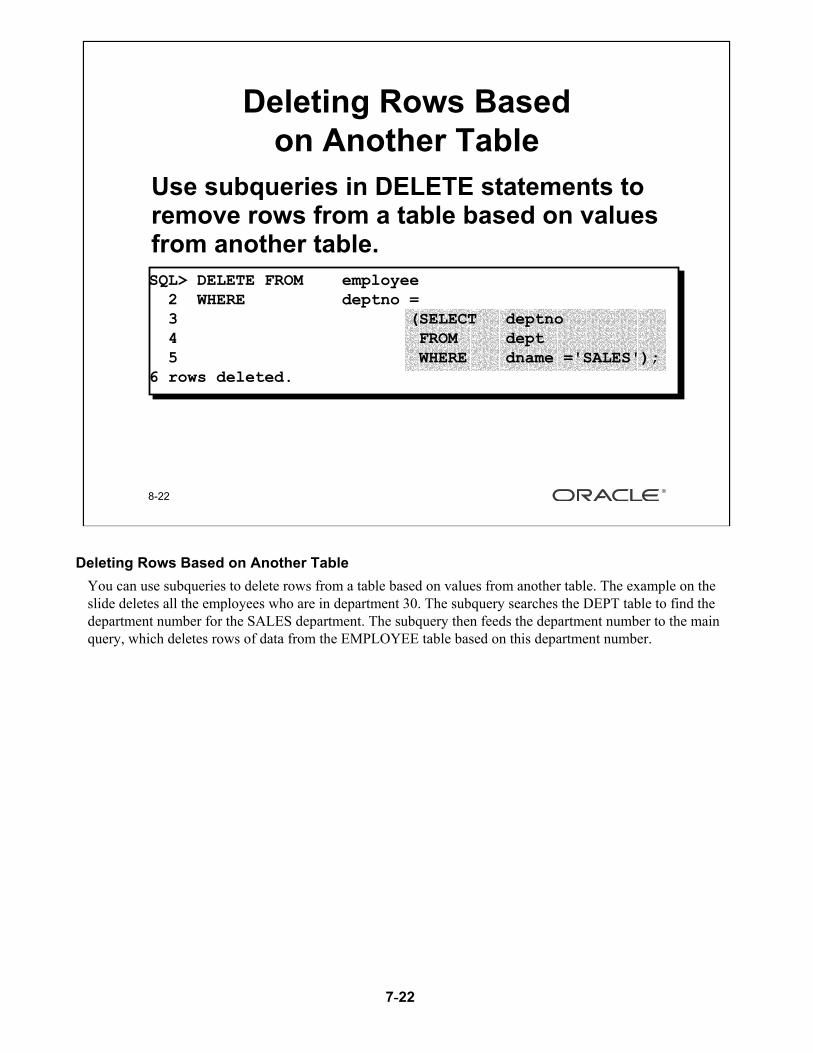
Deleting Rows Based on Another Table
Use Use subqueriessubqueries in DELETE statements to in DELETE statements to remove rows from a table based on values remove rows from a table based on values from another table.from another table.SQL> DELETE FROM employee2 WHERE deptno = 3 (SELECT deptno4 FROM dept5 WHERE dname ='SALES');
6 rows deleted.6 rows deleted.
Deleting Rows Based on Another TableYou can use subqueries to delete rows from a table based on values from another table. The example on the slide deletes all the employees who are in department 30. The subquery searches the DEPT table to find the department number for the SALES department. The subquery then feeds the department number to the main query, which deletes rows of data from the EMPLOYEE table based on this department number.
7-23
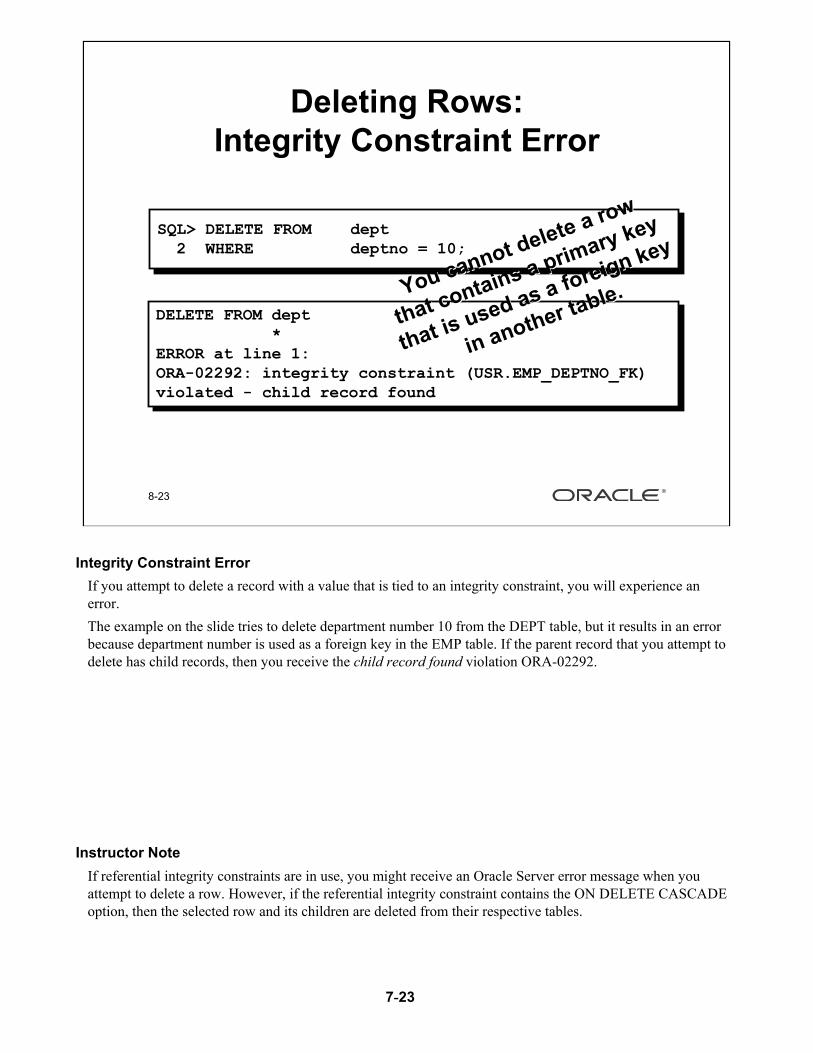
Integrity Constraint ErrorIf you attempt to delete a record with a value that is tied to an integrity constraint, you will experience an error.The example on the slide tries to delete department number 10 from the DEPT table, but it results in an error because department number is used as a foreign key in the EMP table. If the parent record that you attempt to delete has child records, then you receive the child record found violation ORA-02292.
Instructor NoteIf referential integrity constraints are in use, you might receive an Oracle Server error message when you attempt to delete a row. However, if the referential integrity constraint contains the ON DELETE CASCADE option, then the selected row and its children are deleted from their respective tables.
8-23
Deleting Rows: Integrity Constraint Error
SQL> DELETE FROM dept2 WHERE deptno = 10;
DELETE FROM dept*
ERROR at line 1:ORA-02292: integrity constraint (USR.EMP_DEPTNO_FK) violated - child record found
You cannot delete a row
You cannot delete a row
that contains a primary key
that contains a primary key
that is used as a foreign key
that is used as a foreign key
in another table.
in another table.

7-24
8-24
Database Transactions
Consist of one of the following Consist of one of the following statements:statements:• DML statements that make up one
consistent change to the data• One DDL statement• One DCL statement
Database TransactionsThe Oracle Server ensures data consistency based on transactions. Transactions give you more flexibility and control when changing data, and they ensure data consistency in the event of user process failure or system failure.Transactions consist of DML statements that make up one consistent change to the data. For example, a transfer of funds between two accounts should include the debit to one account and the credit to another account in the same amount. Both actions should either fail or succeed together. The credit should not be committed without the debit.
Transaction Types
Type Description
Data manipulationlanguage (DML)
Consists of any number of DML statements that the Oracle Servertreats as a single entity or a logical unit of work
Data definition language(DDL)
Consists of only one DDL statement
Data control language(DCL)
Consists of only one DCL statement
7-25
8-25
Database Transactions
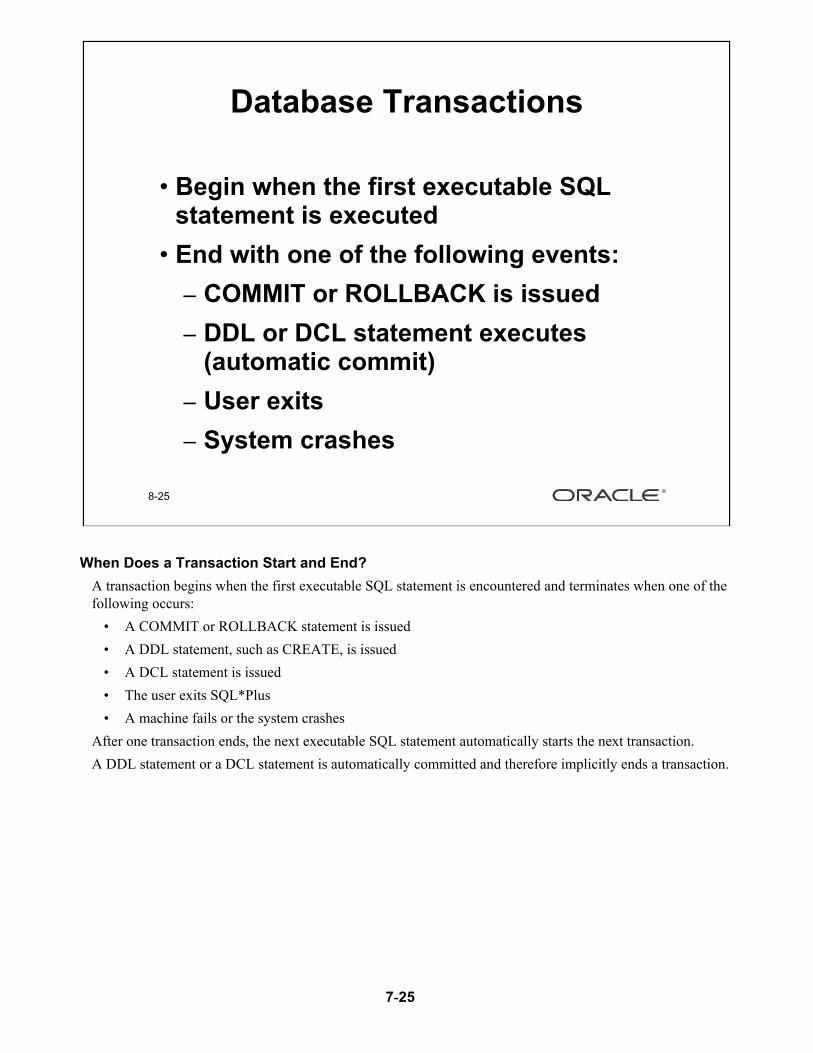
• Begin when the first executable SQL statement is executed
• End with one of the following events:– COMMIT or ROLLBACK is issued– DDL or DCL statement executes
(automatic commit)– User exits– System crashes
When Does a Transaction Start and End?A transaction begins when the first executable SQL statement is encountered and terminates when one of the following occurs:
• A COMMIT or ROLLBACK statement is issued• A DDL statement, such as CREATE, is issued• A DCL statement is issued• The user exits SQL*Plus• A machine fails or the system crashes
After one transaction ends, the next executable SQL statement automatically starts the next transaction.A DDL statement or a DCL statement is automatically committed and therefore implicitly ends a transaction.

7-26
8-26
Advantages of COMMIT and ROLLBACK Statements
• Ensure data consistency• Preview data changes before making
changes permanent• Group logically related operations
7-27
8-27
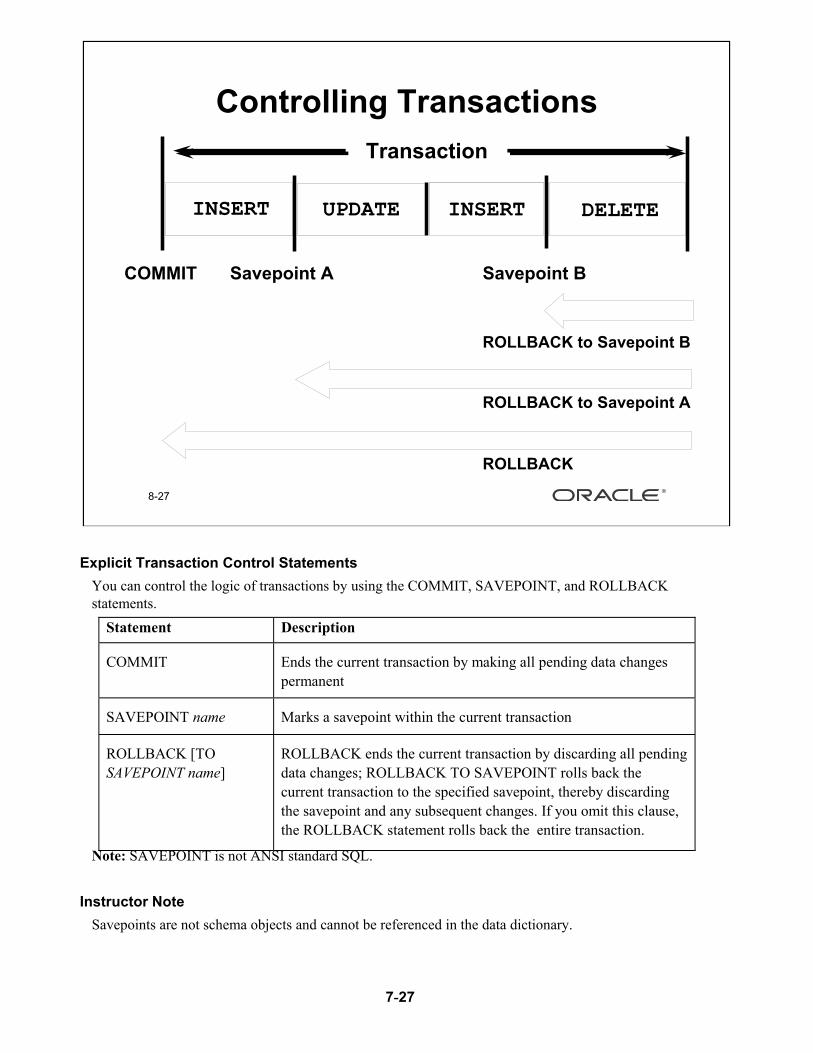
DELETEDELETE
Controlling TransactionsTransactionTransaction
SavepointSavepoint AA
ROLLBACK to ROLLBACK to SavepointSavepoint BB
DELETEDELETE
SavepointSavepoint BBCOMMITCOMMIT
INSERTINSERTUPDATEUPDATE
ROLLBACK to ROLLBACK to SavepointSavepoint AA
INSERTINSERTUPDATEUPDATEINSERTINSERT
ROLLBACKROLLBACK
INSERTINSERT
Explicit Transaction Control StatementsYou can control the logic of transactions by using the COMMIT, SAVEPOINT, and ROLLBACK statements.
Note: SAVEPOINT is not ANSI standard SQL.
Instructor NoteSavepoints are not schema objects and cannot be referenced in the data dictionary.
Statement Description
COMMIT Ends the current transaction by making all pending data changespermanent
SAVEPOINT name Marks a savepoint within the current transaction
ROLLBACK [TOSAVEPOINT name]
ROLLBACK ends the current transaction by discarding all pendingdata changes; ROLLBACK TO SAVEPOINT rolls back thecurrent transaction to the specified savepoint, thereby discardingthe savepoint and any subsequent changes. If you omit this clause,the ROLLBACK statement rolls back the entire transaction.

7-28
Implicit Transaction Processing
Note: A third command is available in SQL*Plus. The AUTOCOMMIT command can be toggled ON or OFF. If set to ON, each individual DML statement is committed as soon as it is executed. You cannot roll back the changes. If set to OFF, COMMIT can be issued explicitly. Also, COMMIT is issued when a DDL statement is issued or when you exit from SQL*Plus.
System FailuresWhen a transaction is interrupted by a system failure, the entire transaction is automatically rolled back. This prevents the error from causing unwanted changes to the data and returns the tables to their state at the time of the last commit. In this way, the Oracle Server protects the integrity of the tables.
8-28
• An automatic commit occurs under the following circumstances:– DDL statement is issued– DCL statement is issued– Normal exit from SQL*Plus, without
explicitly issuing COMMIT or ROLLBACK
• An automatic rollback occurs under an abnormal termination of SQL*Plus or a system failure.
Implicit Transaction Processing
Status CircumstancesAutomatic commit DDL statement or DCL statement is issued
Normal exit from SQL*Plus, without explicitly issuing COMMITor ROLLBACK
Automatic rollback Abnormal termination of SQL*Plus or system failure

7-29
8-29
State of the Data Before COMMIT or ROLLBACK
• The previous state of the data can be recovered.
• The current user can review the results of the DML operations by using the SELECT statement.
• Other users cannot view the results of the DML statements by the current user.
• The affected rows are locked; other users cannot change the data within the affected rows.
Committing ChangesEvery data change made during the transaction is temporary until the transaction is committed.State of the data before COMMIT or ROLLBACK is issued:
• Data manipulation operations primarily affect the database buffer; therefore, the previous state of the data can be recovered.
• The current user can review the results of the data manipulation operations by querying the tables.• Other users cannot view the results of the data manipulation operations made by the current user. The
Oracle Server institutes read consistency to ensure that each user sees data as it existed at the last commit.
• The affected rows are locked; other users cannot change the data in the affected rows.Instructor Note
With the Oracle Server, data changes may actually be written to the database files before COMMIT, but they are still only temporary.If a number of users are making changes simultaneously to the same table, then each user sees only his or her changes until other users commit their changes.Other users see data as it is committed in the database (in other words, before changes).By default, the Oracle Server has row-level locking. It is possible to alter the default locking mechanism.

7-30
8-30
State of the Data After COMMIT
• Data changes are made permanent in the database.
• The previous state of the data is permanently lost.
• All users can view the results.• Locks on the affected rows are released;
those rows are available for other users to manipulate.
• All savepoints are erased.
Committing Changes (continued)Make all pending changes permanent by using the COMMIT statement. Following a COMMIT:State of the data after a COMMIT is issued:
• Data changes are written to the database.• The previous state of the data is permanently lost.• All users can view the results of the transaction.• The locks on the affected rows are released; the rows are now available for other users to perform new
data changes.• All savepoints are erased.

7-31
8-31
Committing Data
SQL> UPDATE emp2 SET deptno = 103 WHERE empno = 7782;
1 row updated.1 row updated.
• Make the changes.
• Commit the changes.SQL> COMMIT;Commit complete.Commit complete.
Committing Changes (continued)The slide example updates the EMP table and sets the department number for employee 7782 (Clark) to 10. It then makes the change permanent by issuing the COMMIT statement.
ExampleCreate a new ADVERTISING department with at least one employee. Make the data change permanent.
Instructor NoteUse this example to explain how COMMIT ensures that two related operations should occur together or not at all. In this case, COMMIT prevents empty departments from being created.
Instructor Note (for page 9-32)Please run the script lab9_32.sql to create the test table and insert data into the table.
SQL> INSERT INTO department(deptno, dname, loc)2 VALUES (50, 'ADVERTISING', 'MIAMI');
1 row created.SQL> UPDATE employee
2 SET deptno = 503 WHERE empno = 7876;
1 row updated.
SQL> COMMIT; Commit complete.

7-32
8-32
State of the Data After ROLLBACKDiscard all pending changes by using the Discard all pending changes by using the ROLLBACK statement.ROLLBACK statement.• Data changes are undone.• Previous state of the data is restored.• Locks on the affected rows are
released.SQL> DELETE FROM employee;14 rows deleted.14 rows deleted.SQL> ROLLBACK;Rollback complete.Rollback complete.
Rolling Back ChangesDiscard all pending changes by using the ROLLBACK statement. Following a ROLLBACK:
• Data changes are undone.• The previous state of the data is restored.• The locks on the affected rows are released.
ExampleWhile attempting to remove a record from the TEST table, you can accidentally empty the table. You can correct the mistake, reissue the proper statement, and make the data change permanent.
SQL> DELETE FROM test;25,000 rows deleted.SQL> ROLLBACK;Rollback complete.SQL> DELETE FROM test
2 WHERE id = 100;1 row deleted.SQL> SELECT *
2 FROM test3 WHERE id = 100;
No rows selected.SQL> COMMIT;Commit complete.

7-33
8-33
Rolling Back Changes to a Marker
• Create a marker in a current transaction by using the SAVEPOINT statement.
• Roll back to that marker by using the ROLLBACK TO SAVEPOINT statement.
SQL> UPDATE...SQL> SAVEPOINT update_done;SavepointSavepoint created.created.SQL> INSERT...SQL> ROLLBACK TO update_done;Rollback complete.Rollback complete.
Rolling Back Changes to a SavepointYou can create a marker in the current transaction by using the SAVEPOINT statement. The transaction therefore can be divided into smaller sections. You can then discard pending changes up to that marker by using the ROLLBACK TO SAVEPOINT statement. If you create a second savepoint with the same name as an earlier savepoint, the earlier savepoint is deleted.
Instructor NoteSavepoints are especially useful in PL/SQL or a 3GL program in which recent changes can be undone conditionally based on runtime conditions.

7-34
8-34
Statement-Level Rollback
• If a single DML statement fails during execution, only that statement is rolled back.
• The Oracle Server implements an implicit savepoint.
• All other changes are retained.• The user should terminate transactions
explicitly by executing a COMMIT or ROLLBACK statement.
Statement-Level RollbackPart of a transaction can be discarded by an implicit rollback if a statement execution error is detected. If a single DML statement fails during execution of a transaction, its effect is undone by a statement-level rollback, but the changes made by the previous DML statements in the transaction will not be discarded. They can be committed or rolled back explicitly by the user.Oracle issues an implicit COMMIT before and after any data definition language (DDL) statement. So, even if your DDL statement does not execute successfully, you cannot roll back the previous statement because the server issued a commit.Terminate your transactions explicitly by executing a COMMIT or ROLLBACK statement.
Instructor NoteThe Oracle Server implements locks on data to provide data concurrency in the database. Those locks are released when certain events occur (such as a system failure) or the transaction is completed. Implicit locks on the database are obtained when a DML statement is successfully executed. The Oracle Server by default locks data at the lowest level possible.Manually acquire locks on the database tables by executing a LOCK TABLE statement or the SELECT statement with the FOR UPDATE clause.
7-35
Read ConsistencyDatabase users make two types of access to the database:
• Read operations (SELECT statement)• Write operations (INSERT, UPDATE, DELETE statements)
You need read consistency so that the following occur:• The database reader and writer are ensured a consistent view of the data.• Readers do not view data that is in the process of being changed.• Writers are ensured that the changes to the database are done in a consistent way.• Changes made by one writer do not disrupt or conflict with changes another writer is
making.The purpose of read consistency is to ensure that each user sees data as it existed at the last commit, before a DML operation started.
8-35
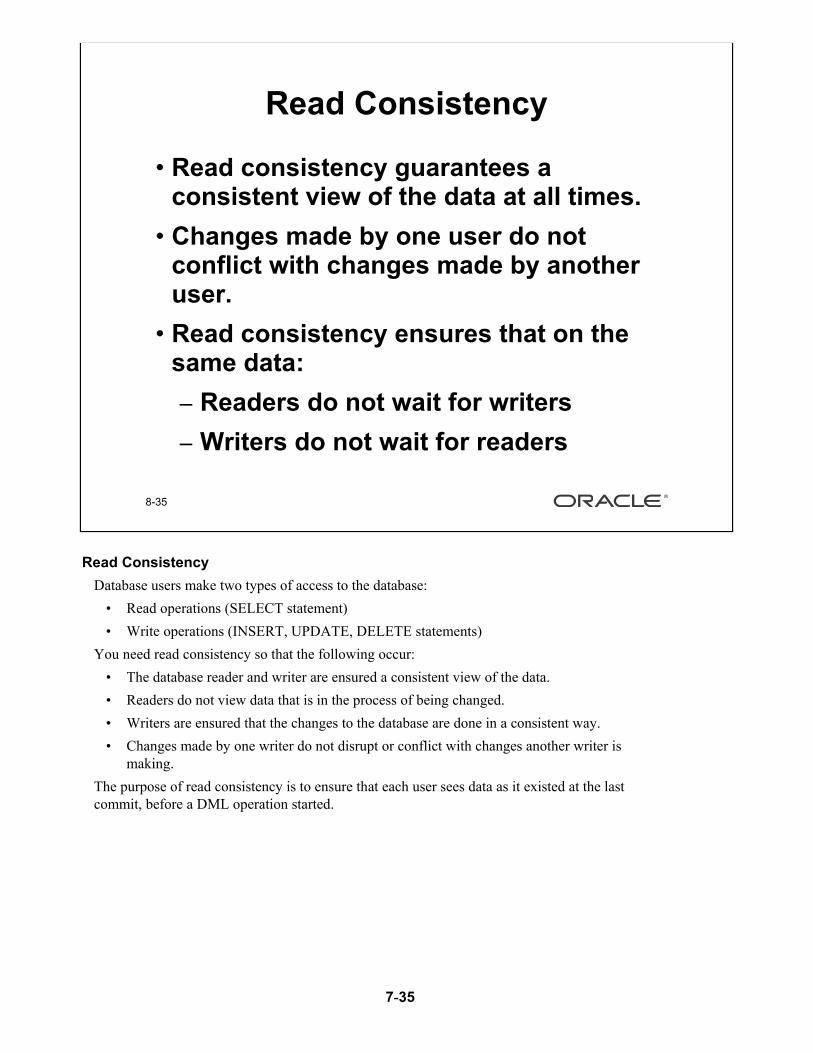
Read Consistency
• Read consistency guarantees a consistent view of the data at all times.
• Changes made by one user do not conflict with changes made by another user.
• Read consistency ensures that on the same data:– Readers do not wait for writers– Writers do not wait for readers
7-36
8-36
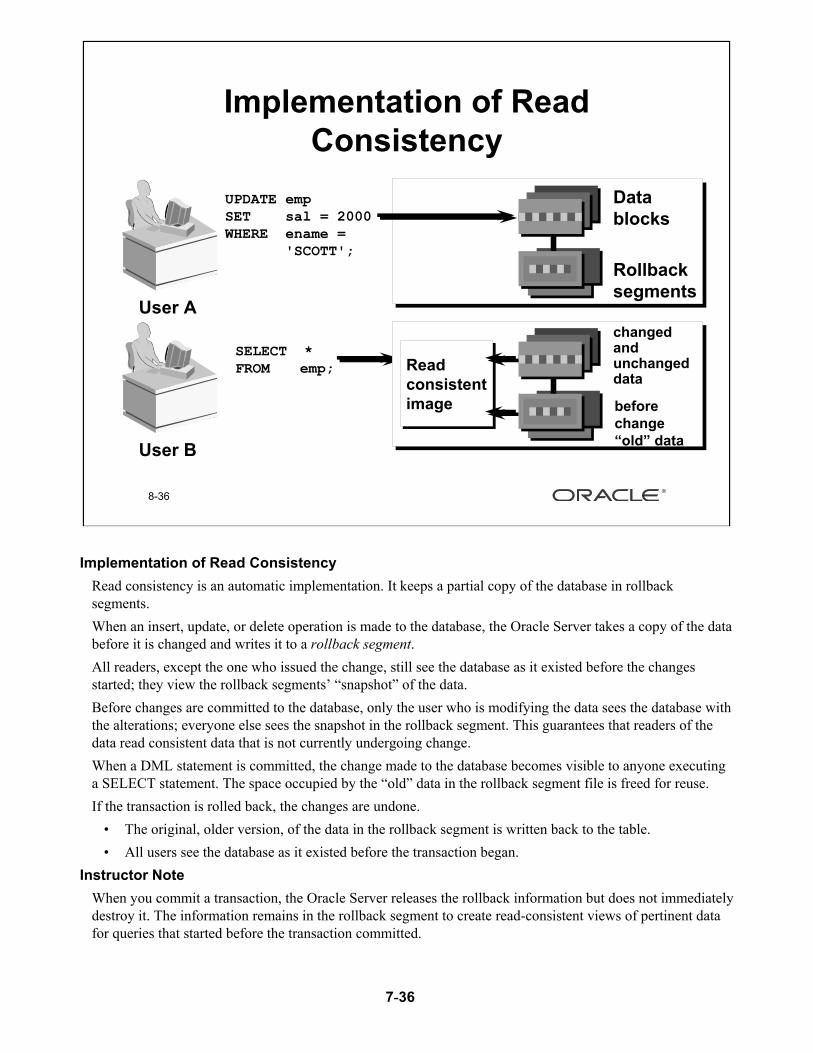
Implementation of Read Consistency
UPDATE UPDATE empempSET SET salsal = 2000= 2000WHERE WHERE enameename = =
'SCOTT';'SCOTT';
DataDatablocksblocks
RollbackRollbacksegmentssegments
changedchangedand and unchanged unchanged datadata
before before changechange“old” data“old” data
User AUser A
User BUser B
ReadReadconsistentconsistentimageimage
SELECT *SELECT *FROMFROM empemp;;
Implementation of Read ConsistencyRead consistency is an automatic implementation. It keeps a partial copy of the database in rollback segments.When an insert, update, or delete operation is made to the database, the Oracle Server takes a copy of the data before it is changed and writes it to a rollback segment.All readers, except the one who issued the change, still see the database as it existed before the changes started; they view the rollback segments’ “snapshot” of the data.Before changes are committed to the database, only the user who is modifying the data sees the database with the alterations; everyone else sees the snapshot in the rollback segment. This guarantees that readers of the data read consistent data that is not currently undergoing change.When a DML statement is committed, the change made to the database becomes visible to anyone executing a SELECT statement. The space occupied by the “old” data in the rollback segment file is freed for reuse.If the transaction is rolled back, the changes are undone.
• The original, older version, of the data in the rollback segment is written back to the table.• All users see the database as it existed before the transaction began.
Instructor NoteWhen you commit a transaction, the Oracle Server releases the rollback information but does not immediately destroy it. The information remains in the rollback segment to create read-consistent views of pertinent data for queries that started before the transaction committed.
7-37
8-37
LockingOracle locks:Oracle locks:• Prevent destructive interaction between
concurrent transactions• Require no user action• Automatically use the lowest level of
restrictiveness• Are held for the duration of the
transaction• Have two basic modes:
– Exclusive– Share
What Are Locks?Locks are mechanisms that prevent destructive interaction between transactions accessing the same resource, either a user object (such as tables or rows) or system objects not visible to users (such as shared data structures and data dictionary rows).
How Oracle Locks DataLocking in an Oracle database is fully automatic and requires no user action. Implicit locking occurs for all SQL statements except SELECT. The Oracle default locking mechanism automatically uses the lowest applicable level of restrictiveness, thus providing the highest degree of concurrency and maximum data integrity. Oracle also allows the user to lock data manually.
Locking ModesOracle uses two modes of locking in a multiuser database:
Lock Mode Description
exclusive Prevents a resource from being shared.The first transaction to lock a resource exclusively, is the only transaction thatcan alter the resource until the exclusive lock is released.
share lock Allows the resource to be shared.Multiple users reading data can share the data, holding share locks to preventconcurrent access by a writer (who needs an exclusive lock).Several transactions can acquire share locks on the same resource.
7-38
SummaryManipulate data in the Oracle database by using the INSERT, UPDATE, and DELETE statements. Control data changes by using the COMMIT, SAVEPOINT, and ROLLBACK statements.The Oracle Server guarantees a consistent view of data at all times.Locking can be implicit or explicit.
Instructor Note (for page 9-37)Please read the Instructor Note on page 9-43.For more information on locking refer to Oracle8i Concepts, Release 8.1.5, “Data Concurrency and Consistency,” and to:http://st-doc.us.oracle.com/8.0/815/server.815/a67781/c01intro.htm#4014
8-38
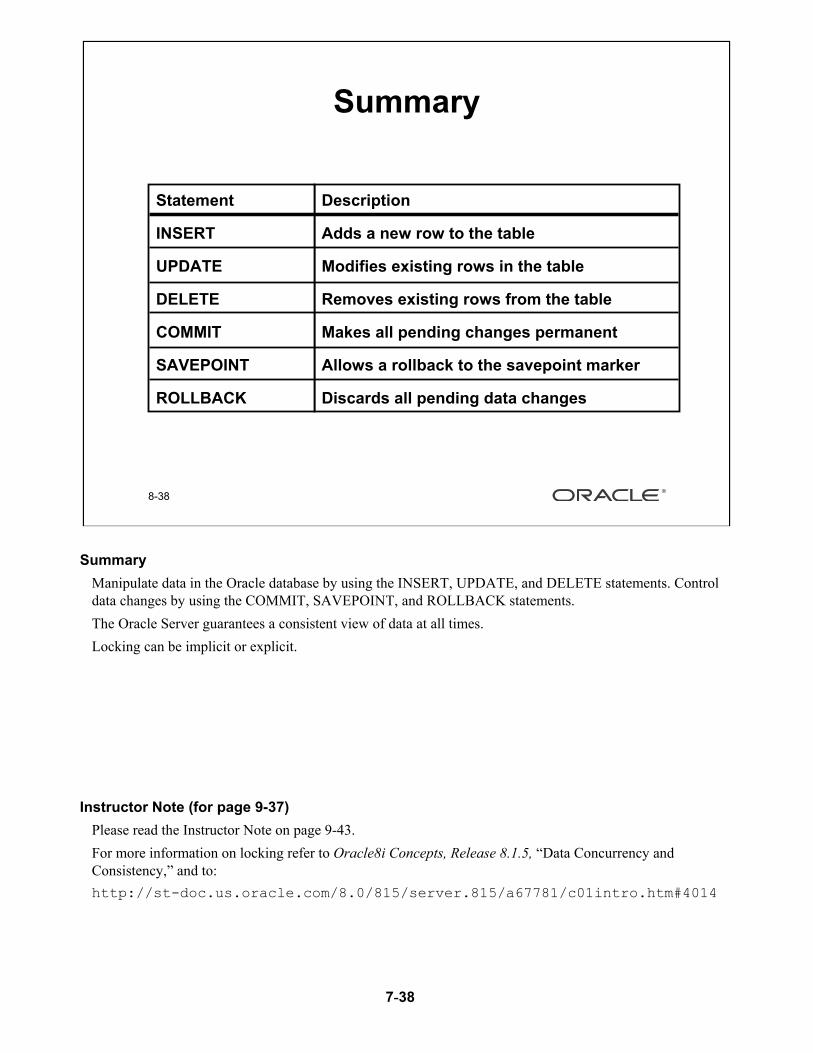
Summary
Description
Adds a new row to the table
Modifies existing rows in the table
Removes existing rows from the table
Makes all pending changes permanent
Allows a rollback to the savepoint marker
Discards all pending data changes
Statement
INSERT
UPDATE
DELETE
COMMIT
SAVEPOINT
ROLLBACK

7-39
8-39
Practice Overview
• Inserting rows into the tables• Updating and deleting rows in the table• Controlling transactions
Practice OverviewIn this practice, you will add rows to the MY_EMPLOYEE table, update and delete data from the table, and control your transactions.
7-40
Computer Application in I.E IIAssignment # 7 for the Spring 2003-2004
Insert data into the MY_EMPLOYEE table.
1. Run the lab9_1.sql script to build the MY_EMPLOYEE table that will be used for the lab.
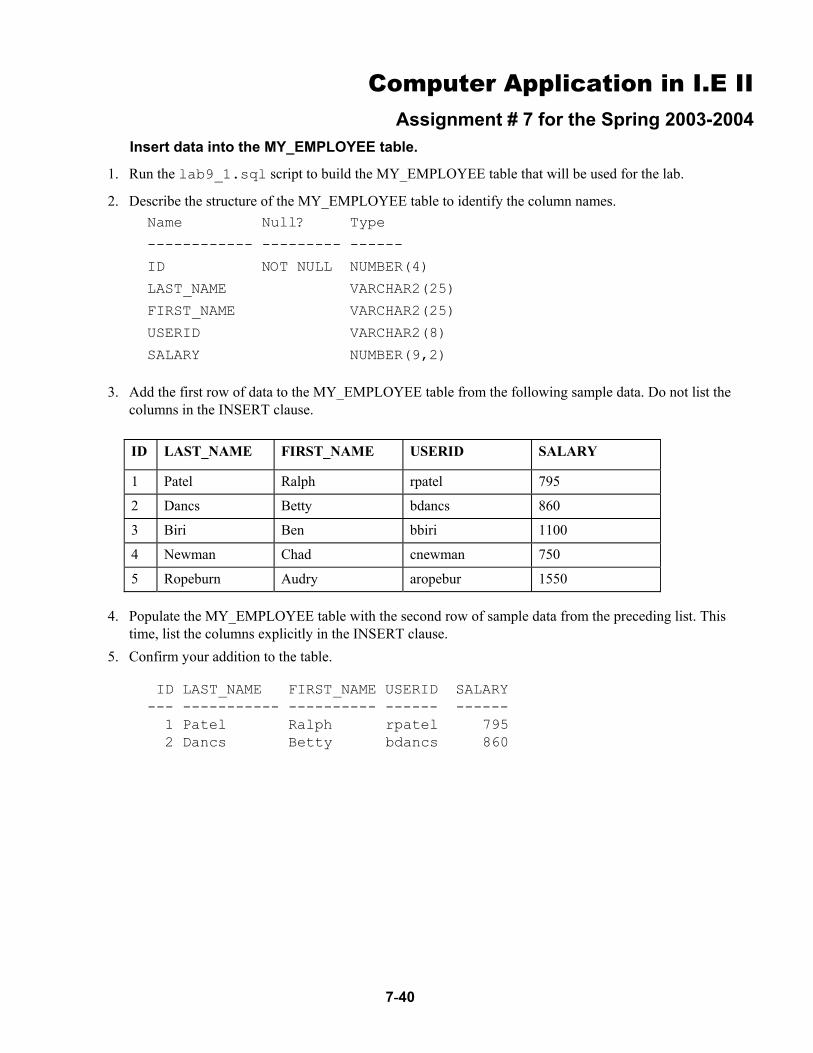
2. Describe the structure of the MY_EMPLOYEE table to identify the column names.Name Null? Type
------------ --------- ------
ID NOT NULL NUMBER(4)
LAST_NAME VARCHAR2(25)
FIRST_NAME VARCHAR2(25)
USERID VARCHAR2(8)
SALARY NUMBER(9,2)
3. Add the first row of data to the MY_EMPLOYEE table from the following sample data. Do not list the columns in the INSERT clause.
4. Populate the MY_EMPLOYEE table with the second row of sample data from the preceding list. This time, list the columns explicitly in the INSERT clause.
5. Confirm your addition to the table.
ID LAST_NAME FIRST_NAME USERID SALARY--- ----------- ---------- ------ ------
1 Patel Ralph rpatel 7952 Dancs Betty bdancs 860
ID LAST_NAME FIRST_NAME USERID SALARY
1 Patel Ralph rpatel 795
2 Dancs Betty bdancs 860
3 Biri Ben bbiri 1100
4 Newman Chad cnewman 750
5 Ropeburn Audry aropebur 1550

7-41
Practice 9 (continued)
6. Create a script named loademp.sql to load rows into the MY_EMPLOYEE table interactively. Prompt the user for the employee’s id, first name, last name, and salary. Concatenate the first letter of the first name and the first seven characters of the last name to produce the userid.
7. Populate the table with the next two rows of sample data by running the script that you created.8. Confirm your additions to the table.
ID LAST_NAME FIRST_NAME USERID SALARY
--- ---------- ---------- ------ ------
1 Patel Ralph rpatel 7952 Dancs Betty bdancs 8603 Biri Ben bbiri 11004 Newman Chad cnewman 750
9. Make the data additions permanent.Update and delete data in the MY_EMPLOYEE table.
10. Change the last name of employee 3 to Drexler.11. Change the salary to 1000 for all employees with a salary less than 900.12. Verify your changes to the table.
LAST_NAME SALARY--------- ------Patel 1000Dancs 1000Drexler 1100Newman 1000
13. Delete Betty Dancs from the MY_EMPLOYEE table.14. Confirm your changes to the table.
ID LAST_NAME FIRST_NAME USERID SALARY--- ---------- ---------- ------ ------
1 Patel Ralph rpatel 10003 Drexler Ben bbiri 11004 Newman Chad cnewman 1000

7-42
Practice 9 (continued)
15. Commit all pending changes.Control data transaction to the MY_EMPLOYEE table.
16. Populate the table with the last row of sample data by running the script that you created in step 6.
17. Confirm your addition to the table.
ID LAST_NAME FIRST_NAME USERID SALARY--- --------- ----------- -------- ------
1 Patel Ralph rpatel 10003 Drexler Ben bbiri 11004 Newman Chad cnewman 10005 Ropeburn Audry aropebur 1550
18. Mark an intermediate point in the processing of the transaction.19. Empty the entire table.20. Confirm that the table is empty.21. Discard the most recent DELETE operation without discarding the earlier INSERT operation.22. Confirm that the new row is still intact.
ID LAST_NAME FIRST_NAME USERID SALARY--- --------- ---------- ---------------
1 Patel Ralph rpatel 1000 3 Drexler Ben bbiri 11004 Newman Chad cnewman 1000 5 Ropeburn Audry aropebur 1550
23. Make the data addition permanent.

7-43
Instructor Note (for page 9-37)Demo: l9select.sqlPurpose: To illustrate the concept of reader does not lock reader.Login to SQL*PLUS using the teach/oracle account.Login to SQL*PLUS using the teach1/oracle account.Run the l9select.sql script in the teach/oracle account. (This script selects all records from the dept table).Run the l9select.sql script in the teach1/oracle account. (This script selects all records from the dept table).In both the logins, the script executes successfully. This demonstrates the concept: reader does not lock reader.
Demo: l9grant.sql, l9update.sql, l9select.sqlPurpose: To illustrate the concept of writer does not lock reader.Run the l9grant.sql script in the teach/oracle account. (This script grants SELECT and UPDATE privileges on the dept table to the teach1 account).Run the l9update.sql script in the teach/oracle account. (This script updates the dept table, changing location of the dept 40 to LA. The update places a lock on the dept table).Run the l9select.sql script in the teach/oracle account. (This script selects all records from the dept table. Observe that the location of deptno 40 is changed to LA).Run the l9select.sql script in the teach1/oracle account. (This script selects all records from the dept table).Observe that the script executes successfully in the teach1/oracle but the location for deptno 40 is still BOSTON. This demonstrates the concept: writer does not lock reader.
Demo: l9update.sql, l9rollback.sql, l9select.sqlPurpose: To illustrate the concept of writer locks writer.Run the l9update.sql script in the teach1/oracle account. (The script does not execute because the dept table is locked by the teach/oracle account.)Switch to the teach/oracle account and run the l9rollback.sql script. (This script rolls back the transaction, thereby releasing the lock on the dept table.)Switch to the teach1/oracle account. You see that the l9update.sql script has executed successfully because the lock on the dept table has been releasedRun the l9select.sql script in the teach1/oracle account. (This script selects all records from the dept table. Observe that the location of deptno 40 is changed to LA.)This demonstrates the concept: writer locks writer.

7-44


