19
Manual 1: working with cutting films. MANUAL 1 R Working with cutting films September 2019

Manual 1: working with cutting films.
MANUAL 1
R
Working with cutting films
September 2019

1 Manual 1: working with cutting films.
R
NECESSARY TOOLS
It goes without saying that you need the right tools if you want to do a good job.
The following tools are essential:
1. Plastic squeegees The plastic squeegee is one of the most important tools for a good application. It
is available in various degrees of hardness.
Soft squeegees wear out rather quickly, and are less suited to press air bubbles
from underneath the vinyl. On the other hand, it is easier to follow the outlines of
uneven surfaces or rivets with a soft squeegee.
Harder squeegees are easier to press air bubbles from underneath the vinyl.
However they are less suited for uneven surfaces.
Anyway, it is very important that the squeegee does not have any sharp edges
that can penetrate into the vinyl.
Plastic squeegees are used only as long as the application tape is still on the vinyl.
2. Felt squeegees
Felt squeegees are used when there is direct contact between the squeegee and
the vinyl. You are less likely to damage the vinyl with a felt squeegee, than you
are with a plastic squeegee. When the application tape has been removed from
the vinyl, we’d rather advise you to use a felt squeegee.
Instead of using a felt squeegee, some sign makers prefer shoving a piece of cloth
or self adhesive felt over their plastic squeegee.
3. Rivet brushes
In the past, this was a tool that was essential for pressing the vinyl round rivets.
Nowadays however, big trailers are made with seamless panels.

Manual 1: working with cutting films.
2 R
4. Knives and Prickers After the vinyl has been applied, you often still see air bubbles underneath the vinyl.
Small air bubbles will disappear automatically after some time, but the larger ones
need to be pricked. Always use a pricker with a very thin needle, and rub the air
from underneath the vinyl with your thumb. If you use a knife to prick the vinyl,
please make sure you don’t make an incision in the vinyl. Just prick the vinyl at the
edge of an air bubble – this will do to rub the air bubble from underneath the vinyl.
A tiny hole will close again by itself.
5. Heat gun If you want to apply cast vinyl onto rivets or other uneven surfaces, we advise you
to heat the film for a while. A heat gun is the perfect tool to do so. Please make
sure you don’t burn the vinyl. The recommended temperature settings are
mentioned in our manual “wrapping”.
6. Small tools, such as a measuring rod, paper tape, grease pencil, spray bottle,
CUTTING LETTERS AND LOGOS
Before cutting a film, leave it as long as possible (at least 12 hours) in the room in
which you are going to cut it, so it can get acclimatized to the room temperature. If
you fail to do so, this can result in unwanted problems, due to the film being less tacky
and more rigid.
The quality when cutting texts and logos from self adhesive films with a computerized
cutting machine depends on the knife pressure on your film and the type of cutting
knife chosen. In general, cutting cast film requires less knife pressure than cutting
calendered films does. Insufficient pressure causes difficulties when peeling the film,
whereas too much pressure on the knife results in cutting through the silicone layer of
the backing paper. This also causes problems when peeling the film, as the backing
paper may be pulled off together with the film (split). After changing the cutting knife
or the film, we advise you always to carry out a small cutting test before starting with
your next job.
KNIFE
FRONT MATERAAL
ADHESIVE
SILICONE LAYER
BACKING PAPER
The cutting knife cuts too deep – the silicone paper may split

Manual 1: working with cutting films
3 R
PEELING THE FILM
Peeling (weeding) is the removal of the superfluous film around a text (positively or negatively). Start
peeling from the upper or lower right hand corner of the text, and pull away the superfluous film with little
short pulls.
This is preferably done at a temperature between 15°C and 23°C.
Do this as quickly as possible after having cut the text on the plotter. The glue can sometimes flow back
together, e.g. when it is too warm.
Remove the superfluous film in an angle of 30°.
30°
APPLYING APPLICATION TAPE (by machine or manually) on the film
Application
tape or -paper
is applied manually on
the cut text in the
following way.
Apply a piece of application tape with-
out creases over the peeled text or logo.
Use a piece that is bigger than the frame you
cut around the text.

Manual 1: working with cutting films.
4 R
Then use the hard plastic Grafityp
squeegee to rub the application
tape firmly. Start at the middle of
the text, and rub towards the
outer side, so the air can easily
escape from underneath the tape.
Any remaining air bubbles are
pricked, after which the
application tape is rubbed firmly
once again.
Always hold the squeegee at an
angle and work in 50%
overlapping movements.
Afterwards cut off the surplus of vinyl and
application tape.
If you cut a peel frame around your desired
text, you have an easy guideline to do so.
This also gives you a perfect horizontal and
vertical border around your text, which
makes it easier and a lot faster to position
your text on a panel, a window, the body of
a car, etc….
Don’t roll up the vinyl with the application tape into a small roll. In that case the application tape might
come off again or get deformed.
CLEANING THE SURFACE Even if it looks like the surface is completely clean, there is often dust or grease on it.
Remove this with clean, dust-free cloths, using isopropanol, ethanol or another liquid that contains little
or no alcohol.
Always test first whether these fluids don’t attack the surface.

Manual 1: working with cutting films.
5 R
APPLYING THE FILMS
There are two ways of applying films, namely dry and wet application. The method to be used, depends
on the size and the level of difficulty of the work. The temperature of the surface and the film should be
more than 10 degrees Celsius.
DRY APPLICATION
This application method is recommended in most cases. The advantage
of it is, that the film will stick immediately at those places, where it is
under tension.
WET APPLICATION
This method is often used for sign making on windows (with sandblast
effect films) or for applying very large pieces of film on panels. The main
advantage of this method is, that it is much easier to rub air bubbles from
underneath the film, but it will take a longer time until the film has reached
its final adhesive strength.
DRY APPLICATION of small stickers
- Position the text in such a way that everything is nicely aligned.
- Draw some reference points, so you can easily replace
the text in the right position afterwards. You can do so
with paper tape or with a grease pencil.
- Now lay the text upside down on a table, so you can
remove the backing paper.
- Start in a corner and carefully remove the backing paper
at an angle towards the other side.
- In some cases it may be hard to transfer a letter to the
application tape. This is mostly due to :
1. insufficient pressure when rubbing the application tape
2. older vinyl
3. incorrect or older application tape. For small characters
and for Graficast films, you’d better use a high tack
application tape. For bigger characters you’d better use an
application tape with medium or low tack.

Manual 1: working with cutting films.
6 R
- Now put the text back at the marked
position.
- Rub the text with a hard squeegee.
Again, start at the middle of the text and
rub towards the outer edges, so air can
escape from underneath. Adhesives are
pressure-sensitive. This means that the
harder you rub, the better the film will
stick to the surface.
- Watch out for scratches! You will not
make any scratches on the film by
rubbing over the application tape with a
hard squeegee. If you rub the film next
to the application tape, you should be
more careful, certainly on varnished
surfaces. Scratches can be avoided by
using a squeegee with hook and loop
strip. (SPAVELC)
- If possible, we advise you to apply all
texts before removing the application
tape. In this way, the adhesive will have
some extra time to stick to the surface.
- Then remove the application tape.
Remove it under an angle of about 180°.
In this way you will have less negative
force on the recently applied characters.
- An air bubble can easily be punctured
after the application. To do so, make a
tiny hole at the edge of the air bubble
and press the air towards this tiny hole.
Very small air bubbles (up to 2
millimeters) will disappear automatically
after some time.

Manual 1: working with cutting films.
7 R
DRY APPLICATION of big stickers.
If the sticker is too big for you to apply all by yourself,
you’d better ask someone to help you.
Very big letters are preferably rubbed one at a time. Each
letter starting in the middle, towards the outer sides.
If you are all alone, you can also work by the “hinge
method”.
.. Position your text by means of some adhesive tape.
.. Make a vertical “hinge” in the middle of your text,
using paper tape.
.. Turn on half
.. Remove the backing paper and cut it as straight as
possible between the letters.
.. Turn this half again, and check whether the reference
points still correspond with each other.
.. Now rub the film with the squeegee. Always do this
with an overlap. Rub until you almost reach the
hinge.
.. Then remove the hinge.
.. Now you continue with the second part of your
sticker. Proceed in exactly the same way as for the
first part. Attention: you continue rubbing where you
left off with the first part.

Manual 1: working with cutting films.
8 R
WET APPLICATION METHOD
This method makes it possible to reposition larger pieces of film with ease. There is
also less chance of closing in air bubbles.
Ideal for applying larger pieces of film on panels or windows, without using
application tape.
Sometimes this work method is also used for smaller jobs in case the ambient
temperature is too high. (25°C – 30°C)
Add a little detergent to a bucket of water and fill a spraying bottle with this mixture.
By using this mixture, it will take a lot longer for the adhesive to stick to the surface.
Use this work method only on even surfaces. Well-spread shaving foam may also be a solution. This allows you to reposition the film a couple of times, whereas the final adhesive strength will remain the same. You may also find liquids on the market, especially for this application.
After about 48 hours the eventual adhesive strength will be just as high as in case of
a dry application (on condition that the temperature does not drop below 15°C).
1. We advise you to mark the exact position with a grease pencil in this case, as
paper tape may move or come loose when it becomes wet.
2. After having marked the right position, you remove the backing paper and lay the text
upside down on a table.
3. Now spray the adhesive side of the stickers AND the surface completely wet.
4. Apply the film and rub it firmly, so all water will disappear from underneath it.
5. If you rub directly on the film, please use a squeegee that doesn’t leave behind any scratches.
6. Depending on the ambient temperature, you will have to wait for about 2 hours
before removing the application tape. If the films comes off the surface as well,
you will have to wait a bit longer.
7. Rub the edges of the film firmly once again.
Some application tapes may leave behind some traces on the finished panel or glass
after 24 hours.

Manual 1: working with cutting films.
9 R
Colour information
It is important to note that the colour codes on the chart, along with their RAL
approximates may differ from batch to batch.
Grafitack Promo Series Gloss
Item Code Description RAL approx. Pantone approx.
P100 Transparent Transparent N/A Transparent N/A
P101 White White 9003
P105 Ivory 1025 4685
P111 Sulphur Yellow 1018 107
P117 Gold Yellow 1033 123
P122 Pastel Orange 2003 1585
P125 Light Orange 2008 166
P131 Orange Red 2002 173
P133 Light Red 2002 179
P135 Red 3000 187
P137 Dark Red 3001 194
P140 Light Blue 5012 299
P142 Azure Blue 5015 300
P144 Traffic Blue 5005 294
P146 Brilliant Blue 5010 286
P148 Royal Blue 5002 287
P149 Dark Blue 5013 280
P150 Turquoise 5018 326
P152 Lemon Green 6018 360
P153 Yellow Green 6018 361
P155 Light Green 6024 347
P156 Medium Green 6032 348
P157 Green 6029 3415
P159 Dark Green 6005 343
P163 Light Brown 8011 462
P166 Dark Brown 8014 4625
P173 Light Grey 7037 423
P176 Dark Grey 7043 425
P180 Black Black 9005
P190 Silver 9006 Silver
P191 Gold Gold Gold
Please note, all Pantone approximates are derived from the RAL number. A manual inspection is essential when an
absolute match is required. These values are strictly only meant for guidance purposes.

Manual 1: working with cutting films.
10
R
Grafitack Promo Series Matt
Item Code Description RAL approx. Pantone approx.
P101M White White 9003
P111M Sulphur Yellow 1018 107
P117M Gold Yellow 1033 123
P122M Pastel Orange 2003 1585
P133M Light Red 2002 179
P135M Red 3000 187
P137M Dark Red 3001 194
P140M Light Blue 5012 299
P144M Traffic Blue 5005 294
P148M Royal Blue 5002 287
P149M Dark Blue 5013 280
P153M Yellow Green 6018 361
P157M Green 6029 3415
P173M Light Grey 7037 423
P176M Dark Grey 7043 425
P180M Black Black 9005
P190M Silver 9006 Silver
P191M Gold Gold Gold
Grafitack ER Series
Item Code Description RAL approx. Pantone approx.
ER40 Light Blue 5012 299
ER90 Silver 9006 Silver
ER91 Gold Gold Gold
Please note, all Pantone approximates are derived from the RAL number. A manual inspection is essential when an
absolute match is required. These values are strictly only meant for guidance purposes.

Manual 1: working with cutting films.
11
R
Grafitack Special Series
Item Code Description RAL approx. Pantone approx.
411 Fluorescent Yellow 1026 803
412 Fluorescent Green 6018 802
413 Fluorescent Orange 2007 804
416 Fluorescent Red 3026 -
R09 Removable White 9003 White
R02 Removable Black 9005 Black
Grafitack 100 Series Matt
Item Code Description RAL approx. Pantone approx.
1100 White 9003 White
1101 White 9016 White
1102 Yellow 1018 114
1103 Light Blue 5015 285
1104 Green 6029 336
1105 Tomato Red 3002 187
1106 Black 9004 Black
1111 Blue 5019 541
1112 Purple 4010 219
1114 Red 2002 1795
1115 Mocka 8003 4635
1116 Brown 8011 462
1117 Light Grey 7030 415
1118 Dark Grey 7012 431
1119 Orange 2003 164
1120 Beige 1014 134
1121 Lemon Yellow 1018 108
1122 Orange Yellow 1033 136
1123 Cornflower Blue 5012 299
1124 Dark Blue 5000 289
1125 Light Green 6018 368
1127 Medium Green 6032 356
Please note, all Pantone approximates are derived from the RAL number. A manual inspection is essential when an
absolute match is required. These values are strictly only meant for guidance purposes.
Manual 1: working with cutting films.
12
R
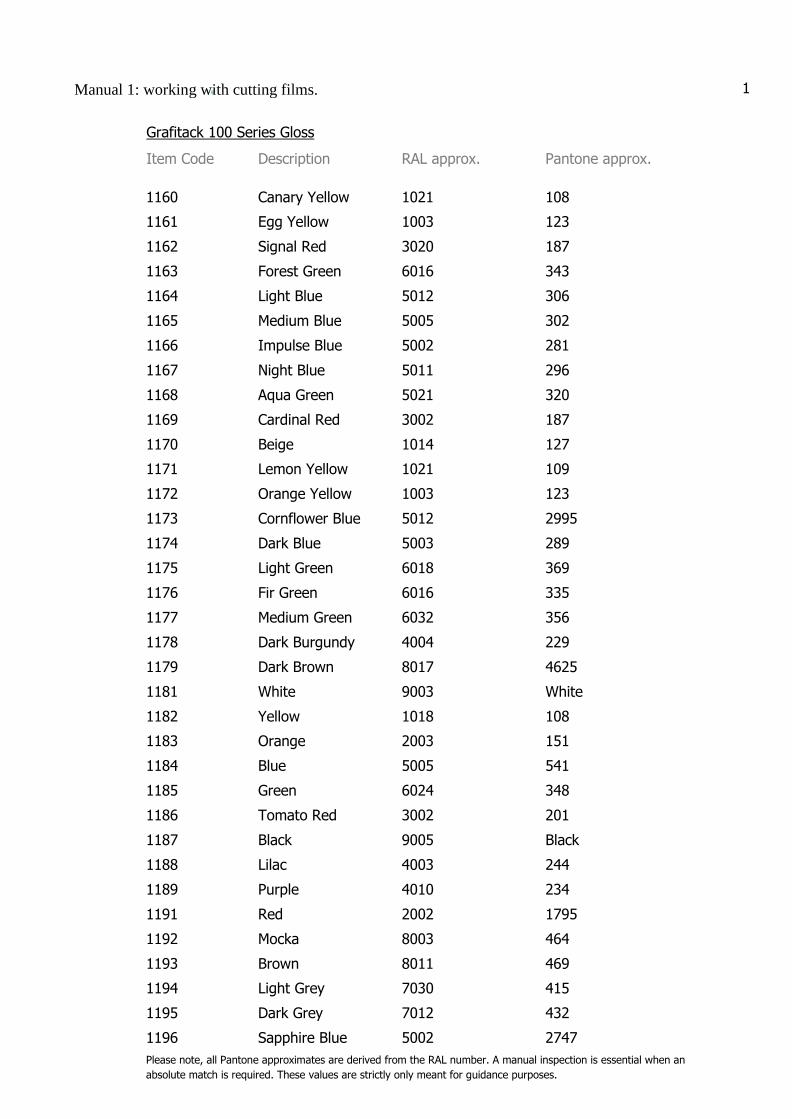
Grafitack 100 Series Gloss
Item Code Description RAL approx. Pantone approx.
1160 Canary Yellow 1021 108
1161 Egg Yellow 1003 123
1162 Signal Red 3020 187
1163 Forest Green 6016 343
1164 Light Blue 5012 306
1165 Medium Blue 5005 302
1166 Impulse Blue 5002 281
1167 Night Blue 5011 296
1168 Aqua Green 5021 320
1169 Cardinal Red 3002 187
1170 Beige 1014 127
1171 Lemon Yellow 1021 109
1172 Orange Yellow 1003 123
1173 Cornflower Blue 5012 2995
1174 Dark Blue 5003 289
1175 Light Green 6018 369
1176 Fir Green 6016 335
1177 Medium Green 6032 356
1178 Dark Burgundy 4004 229
1179 Dark Brown 8017 4625
1181 White 9003 White
1182 Yellow 1018 108
1183 Orange 2003 151
1184 Blue 5005 541
1185 Green 6024 348
1186 Tomato Red 3002 201
1187 Black 9005 Black
1188 Lilac 4003 244
1189 Purple 4010 234
1191 Red 2002 1795
1192 Mocka 8003 464
1193 Brown 8011 469
1194 Light Grey 7030 415
1195 Dark Grey 7012 432
1196 Sapphire Blue 5002 2747
Please note, all Pantone approximates are derived from the RAL number. A manual inspection is essential when an
absolute match is required. These values are strictly only meant for guidance purposes.

Manual 1: working with cutting films.
13
R
Grafitack GEF Series Matt
Item Code Description RAL approx. Pantone approx.
EFM01 White 9003 White
GEFM05 Ivory 1015
GEFM11 Sulphur Yellow 1018 102
GEM13 Shell Yellow 1021 109
GEFM15 Yellow 1023 116
GEFM17 Gold Yellow 1033 123
GEFM22 Pastel Orange 2003 1585
GEFM25 Light Orange 2008 166
GEFM26 Orange 2008 166
GEFM31 Orange Red 2002 185
GEFM33 Light Red 2002 185
GEFM35 Red 3000 187
GEFM37 Dark Red 3001 194
GEFM38 Deep Red 3001 194
GEFM40 Light Blue 5012 299
GEFM42 Azure Blue 5015 300
GEFM44 Traffic Blue 5005 294
GEFM46 Brilliant Blue 5010 286
GEFM48 Royal Blue 5002 287
GEFM49 Dark Blue 5013 280
GEFM50 Turquoise 5018 326
GEFM52 Lemon Green 6018 360
GEFM53 Yellow Green 6018 360
GEFM54 Grass Green 6018 361
EFM55 Light Green 6024 347
GEFM56 Medium Green 6024 347
GEFM57 Green 6029 3415
GEFM59 Dark Green 6005 343
GEFM63 Light Brown 8011 462
GEFM66 Dark brown 8011 462
GEFM73 Light Gray 7037 423
GEFM76 Medium Gray 7037 423
EFM77 Grey 7043 425
EFM80 Black 9005 Black
GEFM90 Silver Silver Silver
GEFM91 Gold Gold Gold

Manual 1: working with cutting films.
14
R
Grafitack GEF Series Gloss
Item Code Description RAL approx. Pantone approx.
GEF01 White 9003
GEF05 Ivory 1015
GEF11 Sulphur Yellow 1018 102
GEF13 Shell Yellow 1021 109
GEF15 Yellow 1023 116
GEF17 Gold Yellow 1033 123
GEF22 Pastel Orange 2003 1585
GEF25 Light Orange 2008 166
GEF26 Orange 2008 166
GEF31 Orange Red 2002 185
GEF33 Light Red 2002 185
GEF35 Red 3000 187
GEF37 Dark Red 3001 194
GEF38 Deep Red 3001 194
GEF40 Light Blue 5012 299
GEF42 Azure Blue 5015 300
GEF44 Traffic Blue 5005 294
GEF46 Brilliant Blue 5010 286
GEF48 Royal Blue 5002 287
GEF49 Dark Blue 5013 280
GEF50 Turquoise 5018 326
GEF52 Lemon Green 6018 360
GEF53 Yellow Green 6018 360
GEF54 Grass Green 6018 361
GEF55 Light Green 6024 347
GEF56 Medium Green 6024 347
GEF57 Green 6029 3415
GEF59 Dark Green 6005 343
GEF63 Light Brown 8011 462
GEF66 Dark Brown 8011 462
GEF73 Light Grey 7037 423
GEF76 Medium Grey 7037 423
GEF77 Grey 7043 425
GEF80 Black 9005 Black
GEF90 Silver Silver Silver
Please note, all Pantone approximates are derived from the RAL number. A manual inspection is essential when an
absolute match is required. These values are strictly only meant for guidance purposes.

Manual 1: working with cutting films.
15
R
Grafitack 200-300 Series Gloss
Item Code Description RAL approx. Pantone approx.
1210 White 9003 White
1211 Light Beige 1014 127
1212 Dark Beige 1024 125
1214 Light Blue 5012 298
1215 Medium Blue 5010 302
1216 Night Blue 5004 5395
1219 Dark Green 6005 342
1220 Brown 8017 4625
1221 Black 9005 Black
1222 Sky Blue 5015 2995
1223 Dark Blue 5002 280
1224 Medium Green 6016 348
1227 Grass Green 6018 375c
1228 Green 6017 361
1229 Lemon Green 6019 381
1236 Pink 4003 211
1238 Purple 4007 2597
1240 Light Yellow 1018 102
1241 Sahara Yellow 1021 108
1242 Light Grey 7038 442
1243 Dark Grey 7042 443
1244 Blue 5005 301
1245 Lilac 4001 2573
1246 Aqua Green 5021 320
1247 Mint 6027 3255
1248 Magenta 4006 234
1260 Azure Blue 5015 3005
1261 Gentian 5017 286
1262 Royal Blue 5003 280
1263 Steel Grey 7005 432
1264 Granite 7043 424
1265 Signal Yellow 1003 142
1266 Brilliant Blue - - 2735
1267 Evening Blue 5013 281
1268 Dark Red 3003 195
1273 Sunflower Yellow

Manual 1: working with cutting films.
16
R
Grafitack 200-300 Series Gloss (continued)
Item Code Description RAL approx. Pantone approx.
1217 Blue Grey 5024 5425
1218 Anthracite 7016 446
1225 Silver Polyester Indoor Silver Silver
1226 Gold Polyester Indoor Gold Gold
1328 Orange 1028 136
1329 Orange Brown 2000 138
1330 Orange Red 2008 166
1331 Signal Red 2002 485
1332 Tomato Red 3000 200
1333 Burgundy 3004 209
1334 Silver MATT 9006 877
1335 Gold MATT -- 871
1336 Slate-Grey 7043 445
1337 Fuchsia 4010 220
1338 Red Orange 2009 173
Please note, all Pantone approximates are derived from the RAL number. A manual inspection is essential when an
absolute match is required. These values are strictly only meant for guidance purposes.

Manual 1: working with cutting films.
17
R
Grafitack Translucent Series
Item Code Description RAL approx. Pantone approx.
TL1149 White 9003 White
TL1128 Yellow 1021 114
TL1129 Green 6029 2415
TL1130 Blue 5017 285
TL1131 Red 3000 1805
TL1151 Grey 7042 444
TL1207 Light Brown 3011 181
TL1211 Sea Green 6016 3275
TL1246 Aqua Green 5018 320
TL1710 Light Blue 5015 300
TL1712 Dark Blue 5003 289
TL1713 Night Blue 5010 540
TL1720 Purple 4007 2613
TL1750 Egg Yellow 1003 123
TL1755 Cornflower Blue 5002 280
TL1760 Bright Green 6018 360
TL1762 Orange 2009 166
TL1770 Fuchsia 4006 240
TL1771 Burgundy 3004 209
TL1772 Dark Brown 8016 497
TL1773 Canary Yellow 1023 109
TL1774 Orange Yellow 1028 123
TL1775 Blue Grey 7011 3308
TL1776 Laguna 5021 3282
TL1777 Fir Green 6026 3302
TL1778 Light Red 2002 179
TL1779 Cardinal Red 3001 187
TL1780 Medium Red 3020 1795
TL1781 Medium Blue 5005 294
TL1782 Apple Green 6024 354
TL1800 Black Blockout 9011 Black
TL1900 Gold Gold Gold
TL1901 Silver 9006 877U
Please note, all Pantone approximates are derived from the RAL number. A manual inspection is essential when an
absolute match is required. These values are strictly only meant for guidance purposes.

Manual 1: working with cutting films.
18
R
Grafitack Graficast Series
Item Code Description RAL approx. Pantone approx. SC1001 White 9003 White
SC1002 Black 9005 Black
SC1000 Transparent Transparent Transparent
SC1020 Light Yellow 1018 102
SC1022 Sunflower Yellow 1023 116
SC1023 Orange Yellow 1028 123
SC1030 Orange 2008 144
SC1050 Medium Red 2002 185
SC1051 Cardinal Red 3000 200
SC1054 Burgundy 3003 188
SC1055 Dark Red
SC1100 Light Blue 5012 298
SC1101 Sky Blue 5012 299
SC1102 Olympic Blue 5015 3005
SC1103 Cosmos Blue 5005 301
SC1105 Dark Blue 5003 294
SC1106 Sapphire Blue 5013 296
SC1107 Azure Blue
SC1123 Petrol Blue 5001 315
SC1124 Ocean Green 6033 3282
SC1125 Petrol Green 5021 3155
SC1150 Grass Green 6018 360
SC1151 Light Green 6017 361
SC1152 Green 6028 348
SC1153 Medium Green 6016 349
SC1154 Dark Green 6005 3308
SC1200 Light Grey 7038 435
SC1201 Light Grey 7042 cool grey 6c
SC1250 Light Beige 1014 1345
SC1251 Beige 1011 4505
SC1253 Mocka 8003 4635
SC1254 Chocolate 8007 478
SC1256 Signal Red 3020 186
SC1270 Emerald Green 6029 349
SC1521 Primrose Yellow Grey Ad 1021 109
SC1021 Primrose Yellow 1021 109
SC1052 Tomato Red 3002 193
SC1104 Royal Blue 5002 288
SC1110 Purple 4007 2597
SC1202 Dark Grey 7016 438
CM55 Silver Metallic Silver Silver
CM56 Anthracite Metallic -- --
Please note, all Pantone approximates are derived from the RAL number. A manual inspection is essential when an
absolute match is required. These values are strictly only meant for guidance purposes.


