14
1 V : 00 COD BR: BC 67 MANUAL DE MONTAGEM COD US: 136AMC ASSEMBLY INSTRUCTIONS INSTRUCCIONES DE MONTAJE

1V : 00
COD BR: BC 67
MANUAL DE MONTAGEM
COD US: 136AMC
ASSEMBLY INSTRUCTIONSINSTRUCCIONES DE MONTAJE

2V : 00

3V : 00
Introdução
IntroducciónIntroduction
Leia atentamente este manual e siga os passos indicados para uma perfeita montagem.
Lea este manual y siga los pasos para el ajuste perfecto.Read this manual and follow the steps for the perfect fit.
Sumário
ResumenSummary
3
4
5
5
4
6Montagem do móvelFurniture assemblyMontaje de la mueble
IntroduçãoIntroductionIntroducción
Antes de começarBefore startingAntes de comenzar
Identificação das peçasIdentifying partsIdentificación de las piezas
Evite acidentesAvoid accidentsEvitar accidentes
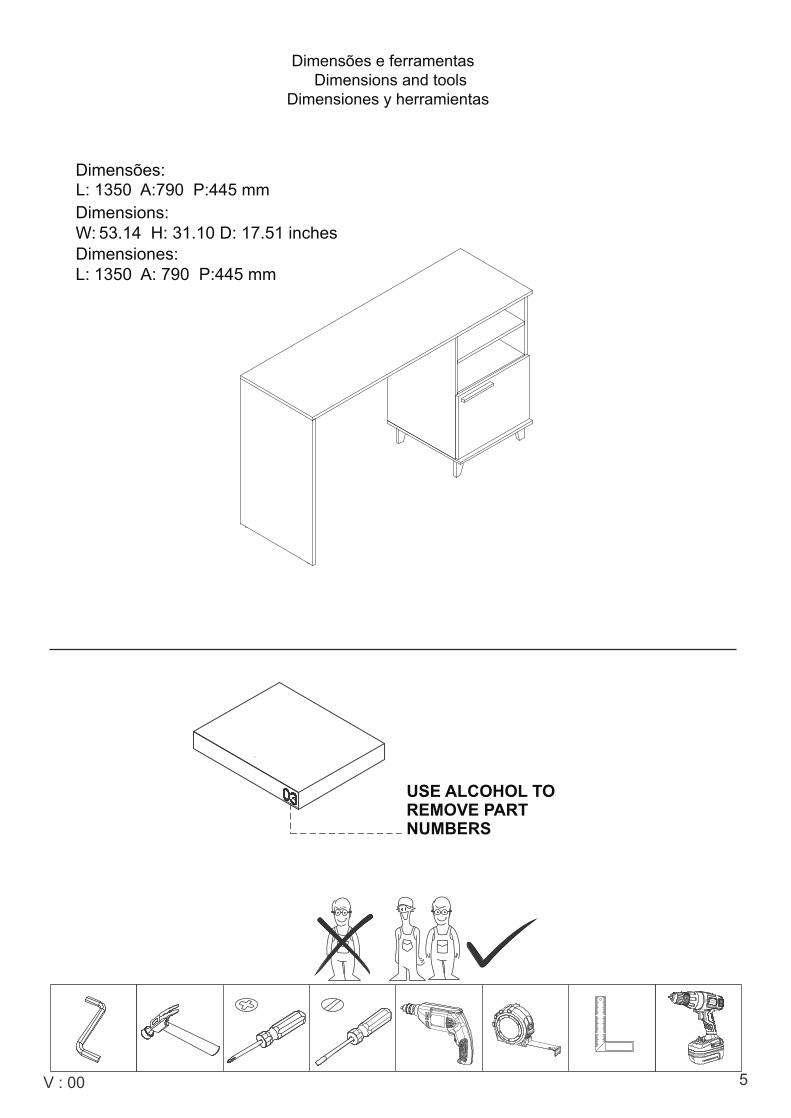
Dimensões e ferramentas Dimensions and tools Dimensiones y herramientas

X4V : 00
Forre a área de montagem com um cobertor ou tapete. Assim, você evita avarias nas peças durante o processo de montagem.
Cubrir la zona de ensamble con una manta o alfombra. De este modo, se evitan daños en las piezas durante el proceso de montaje.
Cover the assembly area with a blanket or carpet to avoid damaging the parts during the assembly process.
Antes de começar
Antes de comenzarBefore starting
Antes de começar a montagem prepare o ambiente, deixando-o completamente limpo e com bom espaço para iniciar o trabalho.
Antes de comenzar el montaje preparar el ambiente, dejándolo completamente limpio ycon bueno espacio para comenzar el trabajo.
Prepare the room before starting the assembly, leaving it completely clean and the area ingood condition to start the work.
Utilize o papelão da própria embalagem, bem como a isomanta de proteção para separar e apoiar as peças retiradas das caixas.
Utilice el cartón de la embalaje y la espuma protectora para separar y apoyan las piezas desmontadas de las cajas.
Use the cardboard of the packaging and the foam sheets protection to separate and support the parts removed from the boxes.
Evite acidentes
Prevenir accidentesAvoid accidents
No se suba ni se apoye en el mueble.
Do not climb or lean on the furniture.
Não escale ou se apoie no móvel.
5V : 00
Dimensões e ferramentas Dimensions and tools
Dimensiones y herramientas
Dimensões:
Dimensiones:L: 1350 A: 790 P:445 mm
Dimensions:W: 53.14 H: 31.10 D: 17.51 inches
L: 1350 A:790 P:445 mm
USE ALCOHOL TO REMOVE PART NUMBERS
6V : 00
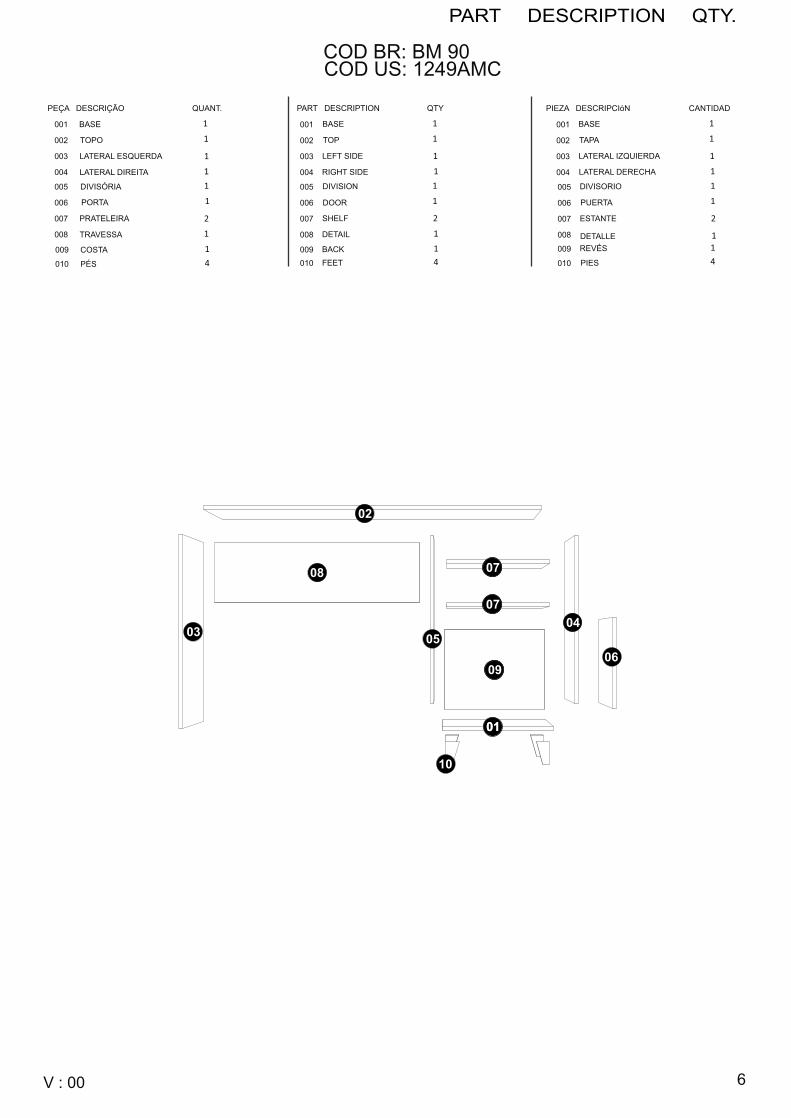
PEÇA DESCRIÇÃO QUANT. PIEZA DESCRIPCIóN CANTIDAD
001
002
003
004
BASE
TOP
LEFT SIDE
RIGHT SIDE
PART DESCRIPTION QTY
COD BR: BM 90COD US: 1249AMC
1
1
1
1BASE
TOPO
LATERAL ESQUERDA
LATERAL DIREITA
1
1
1
1 001
002
003
004
BASE
TAPA
LATERAL IZQUIERDA
LATERAL DERECHA
1
1
1
1001
002
003
004
06
08
10
DIVISÓRIA
PORTA
PRATELEIRA
TRAVESSA
1
2
1
1005
006
007
008
COSTA 1009
005
006
007
008
DIVISION
DOOR
SHELF
DETAIL
1
2
1
1
009 BACK 1
PÉS 4010 010 FEET 4
005
006
007
008
DIVISORIO
PUERTA
ESTANTE
DETALLE
1
2
1
1
009
010
REVÉS
PIES 4
1
7V : 00
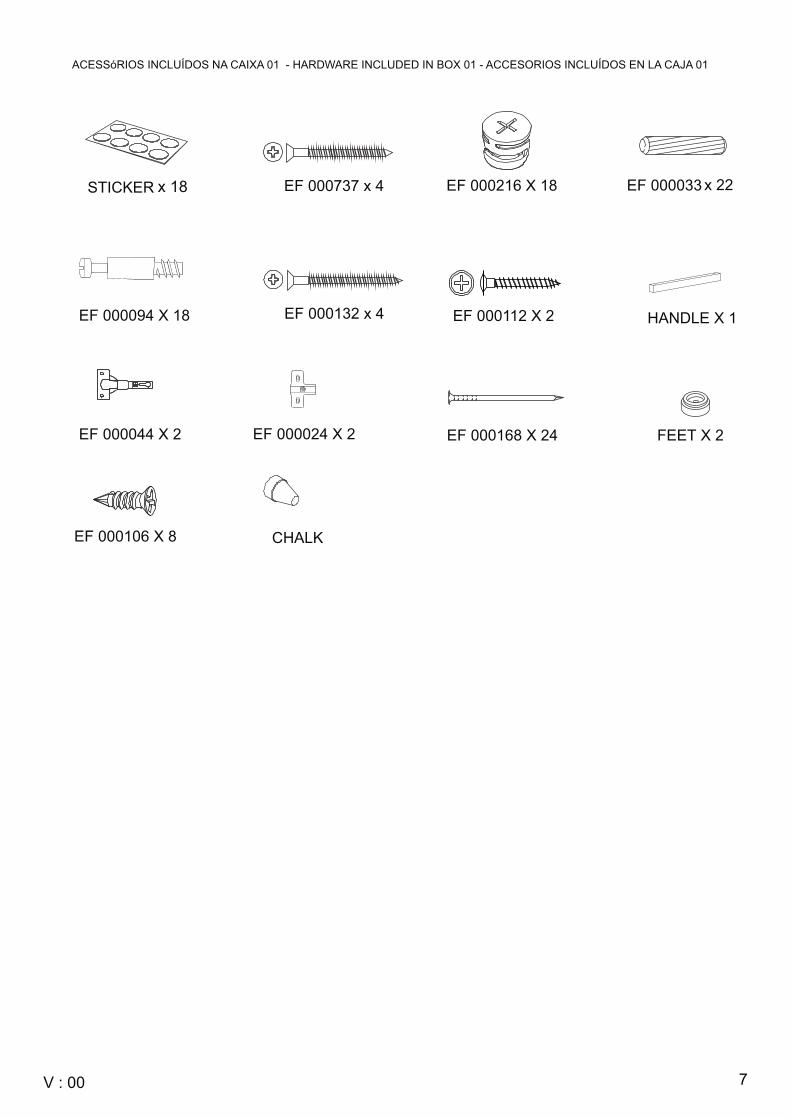
ACESSóRIOS INCLUÍDOS NA CAIXA 01 - HARDWARE INCLUDED IN BOX 01 - ACCESORIOS INCLUÍDOS EN LA CAJA 01
EF 000216 X 18 EF 000033 x 22
EF 000132 x 4
STICKER x 18
EF 000094 X 18
EF 000737 x 4
CHALK
EF 000168 X 24 EF 000024 X 2
EF 000112 X 2 HANDLE X 1
EF 000044 X 2 FEET X 2
EF 000106 X 8

8V : 00
A =21KG - 46 LB
STEP 1
Fix hardware EF 000094 at pre-drilled holes indicated at piece 02, 03, 04 and 05.
EF 000094
B =6KG - 13 LB
A
B
B
B
9
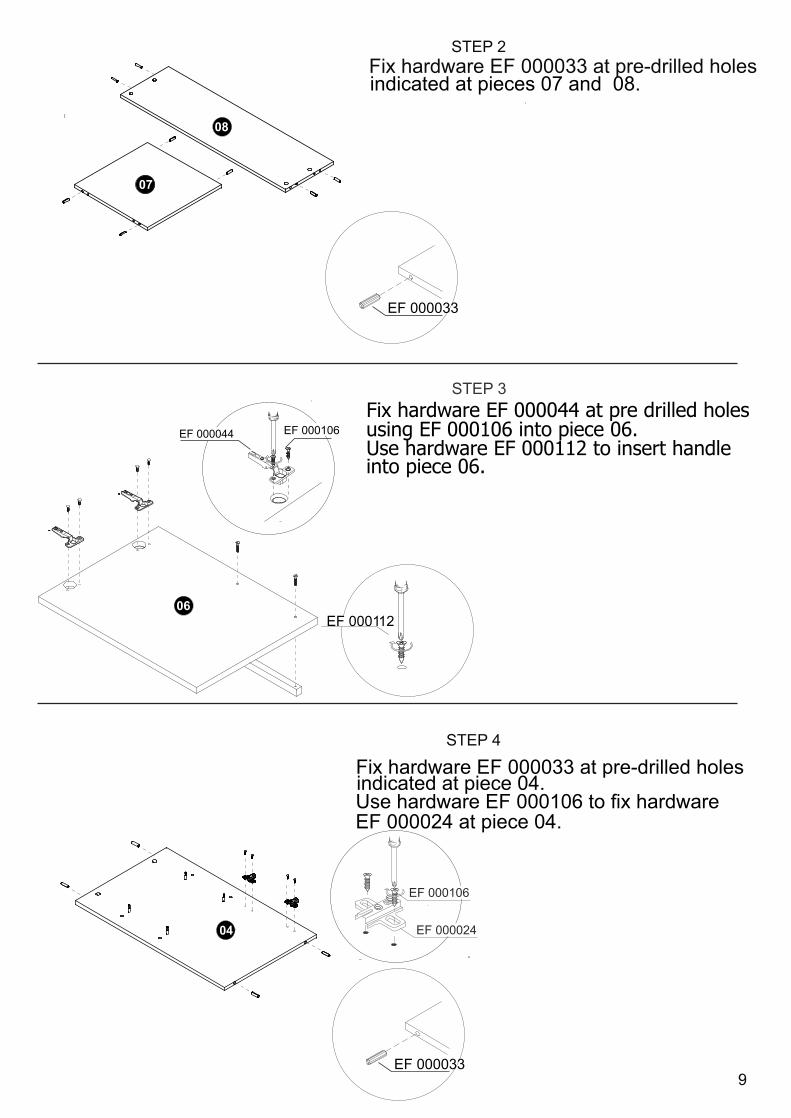
STEP 3
STEP 2
Fix hardware EF 000033 at pre-drilled holes indicated at pieces 07 and 08.
STEP 4
Fix hardware EF 000033 at pre-drilled holes indicated at piece 04.Use hardware EF 000106 to fix hardware
Fix hardware EF 000044 at pre drilled holesusing EF 000106 into piece 06.Use hardware EF 000112 to insert handleinto piece 06.
EF 000024 at piece 04.

10V : 00
STEP 5
STEP 6
STEP 7
Fix hardware EF 000033 at pre-drilled holes indicated at pieces 03 and 05.
Fix feet (10) at piece 01 using using hardware EF 000737.
EF 000737
Connect pieces 03 and 08 fitting hardwares EF 000216 and EF 000094. After fitting, turn hardware EF 000216 to tighten.
EF 000216
EF 000094
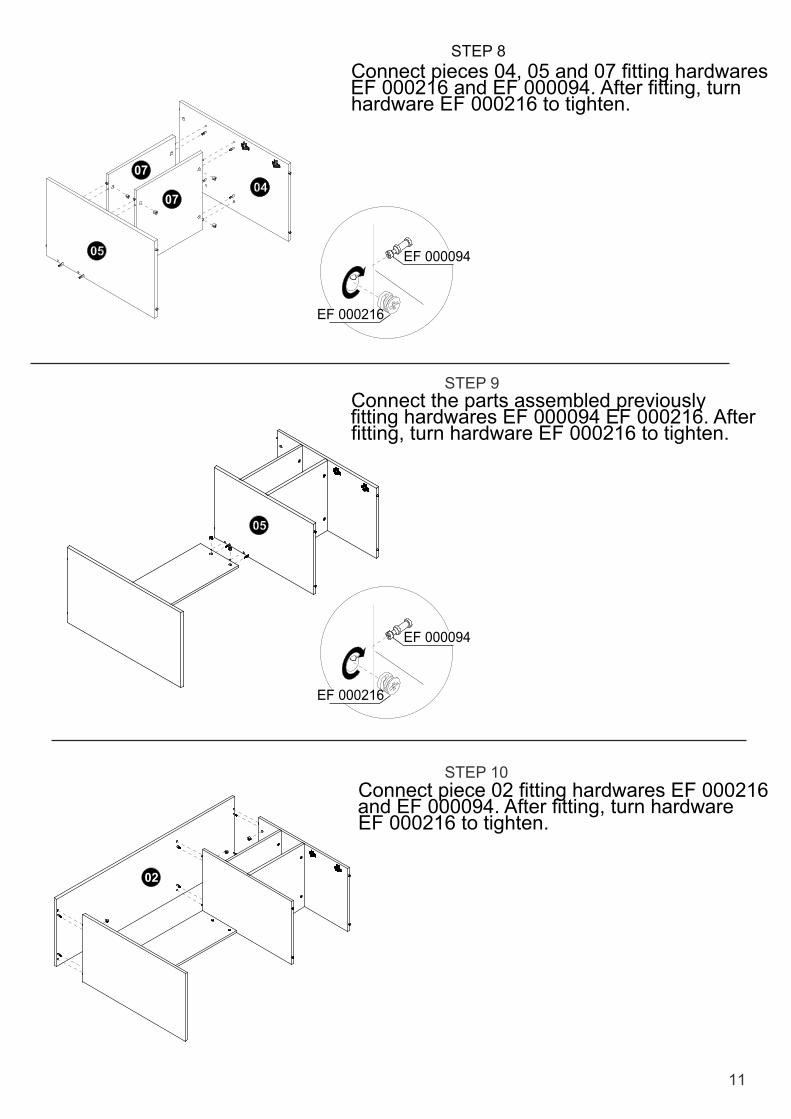
STEP 8
STEP 9
STEP 10
Connect pieces 04, 05 and 07 fitting hardwares EF 000216 and EF 000094. After fitting, turn hardware EF 000216 to tighten.
07
07
EF 000216
EF 000094
Connect the parts assembled previously fitting hardwares EF 000094 EF 000216. After fitting, turn hardware EF 000216 to tighten.
EF 000216
EF 000094
Connect piece 02 fitting hardwares EF 000216 and EF 000094. After fitting, turn hardware EF 000216 to tighten.
11

STEP 11
STEP 12
STEP 13
Fix part 01 at part assembled previously using EF 000132.Use hardware EF 000168 to fix round feet.
EF 000132
Fix piece 09 at the furniture using hardware EF000168.
Fix piece 06 fitting hardwares EF 000044 EF 000025.
EF 000044
EF 000025
12

STEP 14
Chalk
Use the chalk to give the final finish on the product.
Use stickers to cover apparent screws.
Sticker
STEP 9
13

14V : 00


