30
BIAS DELAY Product Manual

BIASDELAYProduct Manual

1 2
INTRODUCTIONFirst and foremost, thank you for purchasing BIAS Delay, the world’s first cross-platform delay pedal! BIAS Delay lets you quickly and easily design thousands of custom delay pedals from scratch. It can be seamlessly integrated with BIAS Pedal Delay for mobile and desktop software.
For all you hardware enthusiasts that are out there, our BIAS Pedal software provides a virtual workshop for you to build your own delay pedals inside and out. From the delay stage to the modulation stage, all the designs you can ever imagine for delay pedals are available for you to customize.
Before you plug in your guitar and start jamming, please take the time to review this owner's manual and go over some of the basics about the pedal.
CONTENTSBIAS DelayIntroduction 1Getting started 5
Overview 9
Function and operation 11
Within the boxConnect to a power sourceSignal ConnectionConnect with BIAS Pedal app
Mono & StereoEngage & BypassSave PresetAssign FootswitchNote SubdivisionTap Tempo and BPMExpression PedalMIDIFactory Reset
Control PanelFootswitch PanelRear Panel

3 4
BIAS PedalIntroduction 20How to get BIAS Pedal 21
BIAS Pedal user interface 25
Preset menu 29
Save Presets 30
Noise Gate 39
Amp Room 40
Signal path 31
ToneCloud 41
Settings 43
Connect with BIAS Delay 45
Redeem & Activate My SoftwareBuy BIAS Pedal on Apple App Store
Desktop VersionMobile Version
How to preview presets on ToneCloudDownload presets from ToneCloud
Desktop versionMobile version
Custom PanelDelay StageMod StagePower ModuleEQ (Equalizer)
Remote ModeDevice Preset MenuStore presets to BIAS DelayDevice Setting MenuFirmware Upgrade
OthersWarranty 49End User License Agreement 54
5 6
GETTING STARTED
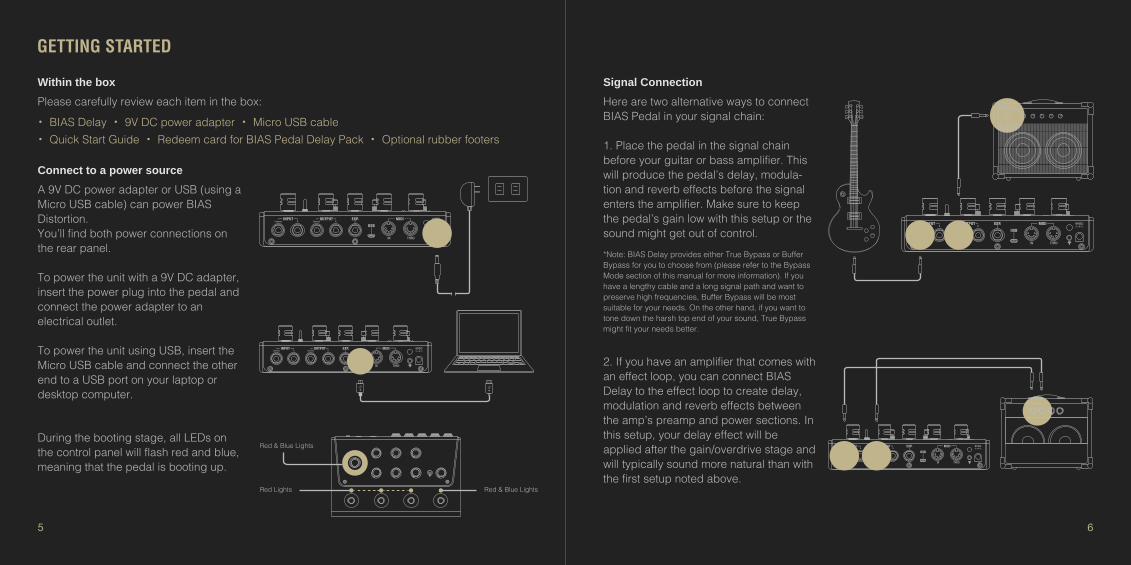
Connect to a power sourceA 9V DC power adapter or USB (using a Micro USB cable) can power BIAS Distortion.You’ll find both power connections on the rear panel.
To power the unit with a 9V DC adapter, insert the power plug into the pedal andconnect the power adapter to an electrical outlet.
To power the unit using USB, insert the Micro USB cable and connect the other end to a USB port on your laptop or desktop computer.
During the booting stage, all LEDs on the control panel will flash red and blue, meaning that the pedal is booting up.
Red & Blue Lights
Red & Blue LightsRed Lights
Signal ConnectionHere are two alternative ways to connect BIAS Pedal in your signal chain:
1. Place the pedal in the signal chain before your guitar or bass amplifier. This will produce the pedal’s delay, modula-tion and reverb effects before the signal enters the amplifier. Make sure to keep the pedal’s gain low with this setup or the sound might get out of control.
2. If you have an amplifier that comes with an effect loop, you can connect BIAS Delay to the effect loop to create delay, modulation and reverb effects between the amp’s preamp and power sections. In this setup, your delay effect will be applied after the gain/overdrive stage and will typically sound more natural than with the first setup noted above.
*Note: BIAS Delay provides either True Bypass or Buffer Bypass for you to choose from (please refer to the Bypass Mode section of this manual for more information). If you have a lengthy cable and a long signal path and want to preserve high frequencies, Buffer Bypass will be most suitable for your needs. On the other hand, if you want to tone down the harsh top end of your sound, True Bypass might fit your needs better.
Within the boxPlease carefully review each item in the box:
・ BIAS Delay ・ 9V DC power adapter ・ Micro USB cable・ Quick Start Guide ・ Redeem card for BIAS Pedal Delay Pack ・ Optional rubber footers

7 8
Connect with BIAS Pedal appBIAS Delay comes with a license for BIAS Pedal - Delay Pack (desktop software). You can redeem the software code on our store page (see Redeem & Activate My Software in this manual).In addition to the BIAS Pedal desktop software, there’s also a mobile version of BIAS Pedal for iPad (sold separately).
To connect with the BIAS Pedal (desktop) software, simply connect BIAS Delay to your computer using the supplied Micro USB cable and launch the BIAS Pedal software.BIAS Delay will automatically connect with the BIAS Pedal software and initiate RemoteMode (see the Remote Mode section of this manual).
*Note: If BIAS Pedal mobile is unable to detect your BIAS Delay, please check that the wireless function is turned on and try reconnecting again. Also try placing your mobile device closer to the pedal.
To connect with BIAS Pedal mobile software, turn on the Wireless function on BIAS Delay by engaging the Wireless button on the rear panel. The LED will start to blink, indicating that the pedal is now in pairing mode and ready for connection.
Then launch BIAS Pedal mobile by going to Settings => Connect. BIAS Pedal mobile will begin searching for an active BIAS Delay nearby and connect with the pedal automatically.

9 10
OVERVIEW
Control Panel
・ Preset knobControls the currently engaged preset. Once a parameter changes, the LED will start to blink, indicating that a change has been made to the current preset. Long-press the Preset knob again to save your changes. BIAS Delay comes with 20 presets in total, with 10 presets assigned to each bank. Press the knob to switch between the 1st bank (red) and 2nd bank (blue).・ MIXControls the echo level.・ FEEDBACKControls the number of repeats.
・ TIMEControls the delay time for each echo.・ MODControls the modulation effect’s level.・ DEPTHControls the oscillation depth of the LFO.・ RATEControls the oscillation speed of the LFO.・ REVERBControls the level of reverberation.・ NOTESelects a note value for the delay time: quarter note, dotted eighth-note or eighth-note triplet.
Footswitch Panel
Rear Panel
・ InputStereo ¼” TS Hi-Z jacks・ Output Stereo ¼” TS jacks・ EXP.¼” TRS jack for an expression pedal (see the Expression Pedal section of this manual for more information)・ USBMicro USB port for supplying power to the pedal and for integrating the pedal with BIAS Pedal (desktop) software・ MIDI In/ThruSupports standard MIDI communication using a 5-pin MIDI connector (see the MIDI section of this manual for more information)
・ Wireless button and associated LEDThere are 3 different LED states for the Wireless button:
> LED blinks slowly - Indicates the pedal is on standby.> LED blinks rapidly - Indicates wireless connection is in pairing mode and ready to connect with BIAS Pedal mobile.> LED is constantly lit - Indicates the pedal is connecting with BIAS Pedal mobile software.・ 9V DC Power JackSupports a 9V DC power supply with negative tips. The minimum current draw is 270mA.
BIAS Delay comes with footswitches labeled A, B and C and a Tap Tempo footswitch. The A, B and C footswitches allow you to alternately engage and bypass presets in BIAS Delay (see the Footswitch Mapping section of this manual for more information).
Using the Tap Tempo footswitch, you can tap the switch twice and the duration between taps will determine the BPM value. (See the Tap Tempo and BPM sections of this manual for more informa-tion.)

11 12
FUNCTION AND OPERATION
2. Engage & Bypass
When you first plug the power in, BIAS Delay pedal will be in Bypass Mode , meaning that the input signal will be passed through the pedal without any modification from the presets’ processing. There are two different bypass types for BIAS Delay:
A. Buffer Bypass (System default) - - The signal will go through the buffer circuit and generate a lower-impedance output signal. This allows the output signal to go through a much longer cable without compromising high frequencies. In addition, Buffer Bypass can prevent the common ‘pop’ noise you’d otherwise hear when engaging or disengaging a preset.
B. True Bypass - This creates a short circuit between input and output to keep the bypassed signal untouched as a high-impedance output signal. If you are using a cable longer than 18.5 feet while using this bypass mode, you might get volume loss in the high frequencies.
To engage a preset and hear its effect, press one of the A, B or C footswitches. Press the same footswitch again to switch back to bypass mode, or press another footswitch to switch to another preset.
1. Mono & Stereo
BIAS Delay comes with stereo inputs and outputs. With mono input (plugging into the leftchannel only), BIAS Delay will duplicate the input signal on both channels so you can still get stereo signal at BIAS Delay’s outputs. This is necessary in order to hear some of BIAS Delay’s stereo effects properly. For example, the Ping Pong preset needs stereo outputs to produce its alternating left and right panning effect.If you also plug into the pedal’s right input, BIAS Delay will switch to stereo mode and process left and right channels independently.
3. Save Preset
Once the preset is on, you can tweak any of the knobs on the control panel to modify its sound. The preset LED will start to blink when you move a knob, indicating that the parameter has changed.
1. hold the preset knob2. LED stop blinking
Preset ON 1. tweak of the knob2. LED start to blink
To save the parameter changes, hold the Preset knob until the LED stops blinking.To dismiss the changes, switch to another preset or switch back to Bypass Mode.

13 14
4. Assign Footswitch
Each footswitch can turn on or off one of the 20 presets assigned to it in the pedal.
5. Note Subdivision
With Note Subdivision, you can customize the subdivision of delay (echo) time. In BIAS Delay, there are 3 different (the most commonly used) note divisions on the control panel. With the BIAS Pedal app, you can access many more subdivision options.
These are the note subdivisions available on the control panel:・ Quarter note ・ Dotted 8th-note ・ 8th note triplet
The note division is affected by your BPM (beats per minute) and Tap Tempo settings in establishing the delay time. Please refer to the Tap Tempo and BPM section immediately below.
6. Tap Tempo and BPM
BIAS Delay comes with a Tap Tempo footswitch that allows you to quickly set the BPM value for the delay effect. The time interval between your two taps represent a beat and sets the BPM* value. To calculate the delay time, take the BPM value and multiply it by the ratio of the note factor.
For example, when the NOTE is set to dotted 8th-note and you tap twice in 0.5 sec time:
2 taps / 0.5sec = 1 beat / 0.5 sec = 120 beats / 60 sec = 120 BPM
So, the delay time at 120 BPM using a dotted 8th-note = 60/(120x4/3) = 0.375 sec for each echo
*BPM = Beats per minute
1. hold the preset knob2. LED stop blinking
1. switch to other presets2. LED start to blink
To assign a different preset for a footswitch, just tweak the Preset knob to switch to another preset. The footswitch LED will start to blink. Hold the Preset knob until the LEDstops blinking, at which point the preset mapping will update.
15 16
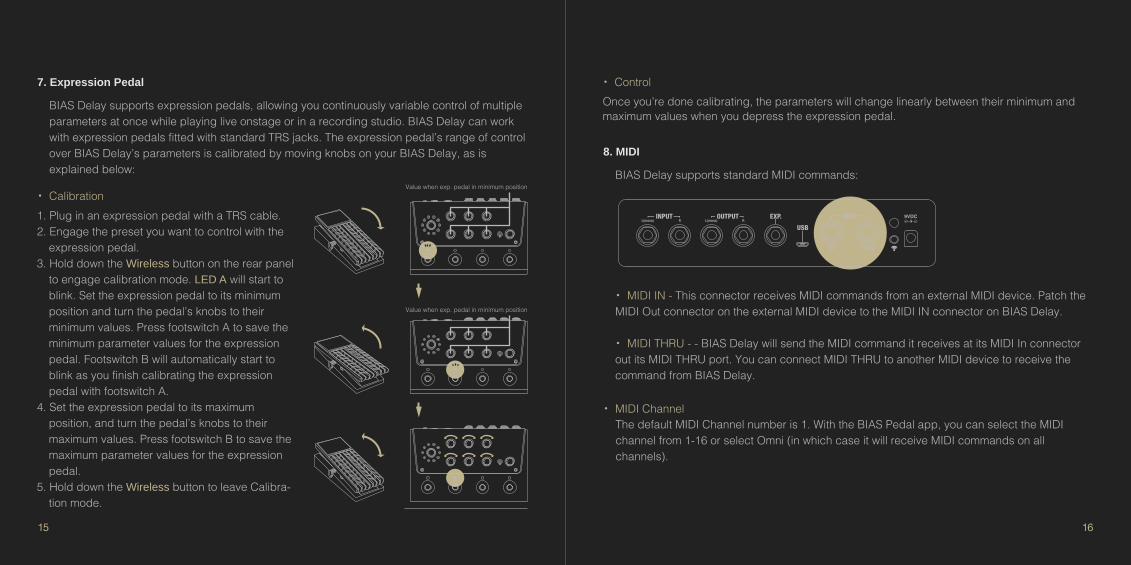
・ ControlOnce you’re done calibrating, the parameters will change linearly between their minimum and maximum values when you depress the expression pedal.
7. Expression Pedal
BIAS Delay supports expression pedals, allowing you continuously variable control of multiple parameters at once while playing live onstage or in a recording studio. BIAS Delay can work with expression pedals fitted with standard TRS jacks. The expression pedal’s range of control over BIAS Delay’s parameters is calibrated by moving knobs on your BIAS Delay, as is explained below:
・ Calibration1. Plug in an expression pedal with a TRS cable.2. Engage the preset you want to control with the
expression pedal.3. Hold down the Wireless button on the rear panel
to engage calibration mode. LED A will start to blink. Set the expression pedal to its minimum position and turn the pedal’s knobs to their minimum values. Press footswitch A to save the minimum parameter values for the expression pedal. Footswitch B will automatically start to blink as you finish calibrating the expression pedal with footswitch A.
4. Set the expression pedal to its maximum position, and turn the pedal’s knobs to their maximum values. Press footswitch B to save the maximum parameter values for the expression pedal.
5. Hold down the Wireless button to leave Calibra-tion mode.
8. MIDI
BIAS Delay supports standard MIDI commands:
・ MIDI IN - This connector receives MIDI commands from an external MIDI device. Patch the MIDI Out connector on the external MIDI device to the MIDI IN connector on BIAS Delay.
・ MIDI THRU - - BIAS Delay will send the MIDI command it receives at its MIDI In connector out its MIDI THRU port. You can connect MIDI THRU to another MIDI device to receive the command from BIAS Delay.
・ MIDI ChannelThe default MIDI Channel number is 1. With the BIAS Pedal app, you can select the MIDI channel from 1-16 or select Omni (in which case it will receive MIDI commands on all channels).
Value when exp. pedal in minimum position
Value when exp. pedal in minimum position

17 18
・ MIDI ClockBIAS Delay supports MIDI clock. When you connect BIAS Delay to a MIDI Clock generator using a MIDI cable, BIAS Delay synchronizes its BPM value to the clock source’s tempo. You can enable or disable the MIDI Clock function in BIAS Pedal.
What is “MIDI Clock” ?MIDI clock is a signal that is used to synchronize all connected MIDI-equipped devices, allowing them to sync to the same tempo via MIDI. Some synthesizers, sequencers and DAWs can work as a MIDI Clock generator, sending MIDI Clock signals to other MIDI-equipped devices.
9. Factory ResetFactory Reset allows you to reset your pedal back to its factory-default state. When you hold down the Wireless button while plugging the pedal’s power in, the pedal will engage Reset Mode. While in Reset Mode, the LED lights will continuously blink. Long-press the Wireless button again to reset the device (the pedal will then reboot to complete the reset process), or short-press it to leave Reset Mode. You can also reset the pedal within the BIAS Pedal app.
Items that will be reset:・ Device name・ MIDI settings・ Presets・ Bypass type・ Footswitch mappings
・ Program ChangeProgram Change allows you to switch presets using an external MIDI device. Here’s how MIDI Program Change messages are mapped to BIAS Delay’s presets:
PC# Preset
PC# 0 Preset 1
PC# 1 Preset 2
PC# 2 Preset 3
PC# 3 Preset 4
PC# 4 Preset 5
PC# 5 Preset 6
PC# 6 Preset 7
PC# 7 Preset 8
PC# 8 Preset 9
PC# 9 Preset 10
PC# 10 Preset 11
PC# 11 Preset 12
PC# 12 Preset 13
PC# 13 Preset 14
PC# 14 Preset 15
PC# 15 Preset 16
PC# 16 Preset 17
PC# 17 Preset 18
PC# 18 Preset 19
PC# 19 Preset 20
・ Control ChangeControl Change allows you to control certain parameter using an external MIDI device’s continu-ous controllers (“CCs”). Here’s how the continuous controllers are mapped to BIAS Delay’s parameters:
CC# Control Value
CC# 15 MIX 0-127
0-127
0-127
0-2
0-127
0-127
0-127
0=up, 127=Down
0=up, 127=Down
0=up, 127=Down
0=first step,127=second step
0=up, 127=Down
0-127
CC# 16 FEEDBACK
CC# 17 TIME
CC# 18 NOTE
CC# 40 MOD
0-127CC# 41 DEPTH
CC# 42 RATE
CC# 49 REVERB
CC# 80 A Footswitch
CC# 81 B Footswitch
CC# 82 C Footswitch
CC# 83 Tap Tempo Footswitch
CC# 93 TAP Footswitch Long Press
CC# 100 Expression Pedal
19 20
INTRODUCTIONBIAS PEDAL
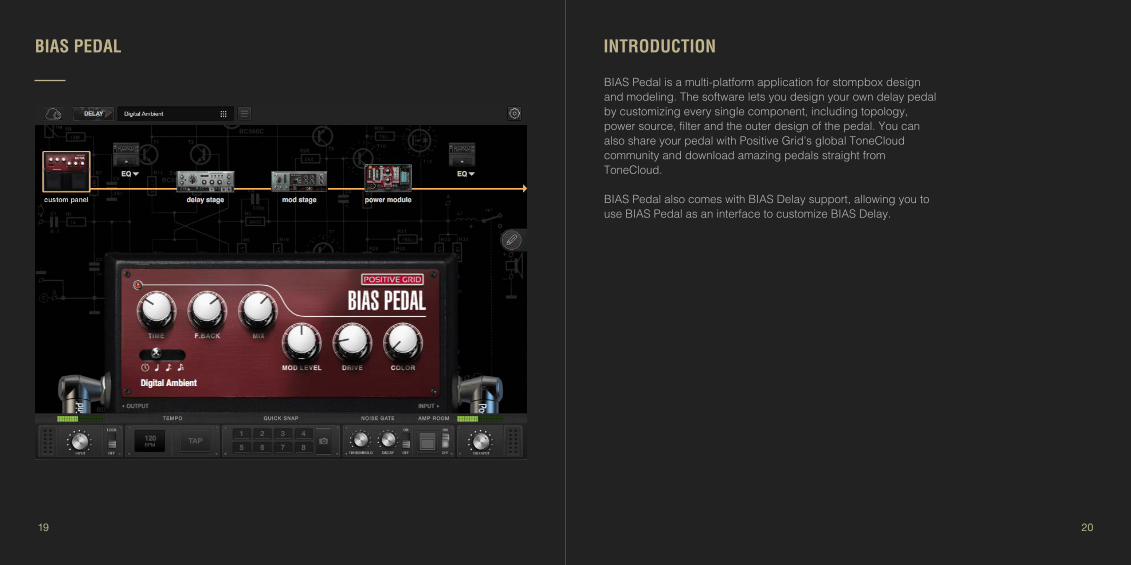
BIAS Pedal is a multi-platform application for stompbox design and modeling. The software lets you design your own delay pedal by customizing every single component, including topology, power source, filter and the outer design of the pedal. You can also share your pedal with Positive Grid’s global ToneCloud community and download amazing pedals straight fromToneCloud.
BIAS Pedal also comes with BIAS Delay support, allowing you to use BIAS Pedal as an interface to customize BIAS Delay.

21 22
HOW TO GET BIAS PEDAL?
Redeem & Activate My SoftwareBIAS Delay comes with BIAS Pedal - Delay Pack (desktop software). Go to our website https://store.positivegrid.com/redeem and enter the redeem code printed on the redeem card.
Once your code has been redeemed, go back to the store page to download the installer and install BIAS Pedal - Delay Pack.
After the installation, you can find BIAS Pedal in your DAW or Applications folder.
To activate your license, just log into your ToneCloud account in BIAS Pedal through thesettings menu. All features found in the Delay Pack will be unlocked once you log in.
System requirements for BIAS Pedal desktop version:
System Requirement
Windows Windows 7 or later
Mac OS X 10.9 or later
Support DAW Requirements
Ableton Live 8.0 or above
Avid Pro Tools 10 or above
Apple Logic Pro 9.0 or above
Apple GarageBand 6.0.5, 10.0 or abov
Cakewalk Sonar X2 or above
Cockos Reaper 3.4 or above
Steinberg Cubase 5.0 or above
Steinberg Nuendo 4.3 or above
PreSonus Studio One Producer/Professional 2 or above

23 24
Buy BIAS Pedal on Apple’s App StoreBIAS Pedal also comes with a mobile version for iPad. Search for BIAS Pedal on the App Store and down-load the trial version for free. You get the full-featured version of BIAS Pedal by unlocking the trial version, which procedure is explained next.
To unlock all the features of BIAS Pedal - Delay Pack and obtain a permanent license for the app, go to Positive Grid’s in-app store by clicking on the shopping-cart icon in the interface’s upper-right corner and follow the prompts to purchase it.

25 26
1. ToneCloud - Enters ToneCloud page 2. Effects page - Switches among your installed software packs. Available software packs include Distortion Pack, Delay Pack and Modulation Pack. 3. Preset menu - Shows the current preset. Click to open the preset menu. 4. Save button - See the Save Preset section of this manual for more information. 5. Setting Menu - See the Settings section of this manual for more information. 6. Signal Path - See the Signal Path section of this manual for more information. 7. Input volume - Controls the input volume. To prevent feedback, the input volume will be muted at startup when using a built-in microphone and speaker as the chosen audio input/output device. 8. Tempo - Shows the current BPM (beats-per-minute) value. You can set the BPM by entering the desired value or by using the built-in tap tempo feature. The BPM range goes from 40 to 400. 9. Quick Snap - Provides 8 slots to save and instantly recall different parameter setups for instant comparison of different settings.10. Noise Gate - See the Noise Gate section of this manual for more information.11. Amp Room - See the Amp Room section of this manual for more information.12. Output volume - Controls the output volume.13. Design button - Customize the look of your pedal. See the Custom Panel section of this manual for more information.
BIAS PEDAL USER INTERFACE
Desktop Version
1
7 8 9 10 11 12
6
2 3 4 5
13

27 28
Mobile Version 1. ToneCloud - Enters the ToneCloud page. 2. Effects page - Switches among your installed software packs. Available software packs include Distortion Pack, Delay Pack and Modulation Pack. 3. Preset menu - Shows the current preset. Press to open the preset menu. 4. Save button - See the Save Preset section of this manual for more information. 5. Setting Menu - See the Settings section of this manual for more information 6. Tooltip - Helpful tips explaining each button and knob. 7. Signal Path - See the Signal Path section of this manual for more information. 8. Input volume - Controls the input volume. To prevent feedback, the input volume will be muted at startup when using a built-in microphone and speaker as the chosen audio input/output device 9. Tempo - Shows the current BPM value. You can set the BPM by entering the desired value or by using the built-in tap tempo feature. The BPM range goes from 40 to 400. 10. Quick Snap - - Provides 8 slots to save and instantly recall different parameter setups for instant comparison of different settings.11. Noise Gate - See the Noise Gate section of this manual for more information.12. Amp Room - See the Amp Room section of this manual for more information.13. Amp Room - See the Amp Room section of this manual for more information.14. Output volume - Controls the output volume.15. Design button - Customize the look of your pedal. See the Custom Panel section of this manual for more information.16. Open in BIAS FX - Import current pedal to BIAS FX. Needs BIAS FX mobile.
1 2 3 4 5 6 7
9 10 11 12 13 14
8
15
16

29 30
1. CATEGORY - Shows all the available preset categories. Each category can store several presets. You can add new categories or delete them. Make sure you don’t delete the entire category if you want to keep the presets that are inside. 2. EDIT (Category) - Renames, reorders or deletes categories. Click Done when you’re finished editing.3. PRESETS - Shows all the pedals in the selected category. Click each pedal to load its sound. Click twice to check its signal path and to change the parameters for this preset.4. EDIT (Preset) - Renames, reorders or deletes presets. You can drag presets to other categories. Click Done when you’re finished editing.
PRESET MENU
・ Overwrite - Save the changes made to the parameters for the current preset. ・ Save as new - Save current parameters as a new preset and select a category to store it to.・ Share to ToneCloud - Share your preset to ToneCloud.・ Delete Pedal - Delete current pedal.
The save button will light up after any parameter changes, indicating that the changes have not been saved yet.
SAVE PRESETS
BIAS Pedal lets you store every pedal you build and recall them anytime, anywhere.
On the top menu bar, click the save button next to the preset name to see the save options.
1 2 3 4

31 32
SIGNAL PATH
The signal path shows you how the signal is being processed. Each module in the signal pathprovides different functionalities and a different control interface. This section will show you howto work with these modules and how to get the tone you want.
Custom PanelThe Custom Panel shows how the pedal looks. You can custom-design the look of your pedalby editing the options listed immediately below.
1. PHOTOLoad a photo from your iPad or computer to use as the background image for thepedal. You can alo adjust the image size and its position on the pedal.
2. RENAMEName or rename your pedal at any time.
3. BOXSelect the type of box. Different boxes come with different knob placements andnumbers.
4. COLORSelect the background color.
5. KNOBSelect the background color.
Delay StagetThe Delay stage allows you to design your own delay effect.
1. Drive (Dry/Wet)This is a dry/wet knob that controls the amount of distortion or dirt that is mixedinto the delay signal path.
2. Drive bypass switchBypasses the drive function on both the wet and dry signal.
3. Delay Type selectorThis selector allows you to switch between Tape, Standard, Ping Pong, andReverse delays.
4. Time, note, dot , tripWhen the Time Mode is selected, you can set the milliseconds, note, dot (dotted note), and trip (triplet) options. Doing so creates delay patterns based on the current global tempo, which you can adjust using the global BPM option in the lower panel.
5. TimeControls the amount of time between your original signal and the delay’s output.

33 34
6. FeedbackSets the amount of feedback, which determines the number of echo repeats.
7. MixAdjusts the level balance between the delay’s wet and dry signal.
8. Bass & TrebleBoosts or cuts the bass and high frequen-cies for the delay signal.
9. InfinityCaptures and freezes the current feedback loop.
10. AnalogThis adds old-school analog character to the wet signal.
11. SaturationControls how much the emulated Tape distortion affects the wet signal.
Mod StageThe Mod Stage controls the modulation and reverb effects.
1. DuckingSets the threshold for the ducking function, which causes the delay signal’s level to decrease when the dry signal exceeds the threshold level.
2. Gain reductionAdjusts how much the delay signal will be reduced in level when ducking occurs.
3. AttackAdjusts how fast the delay signal’s level will decrease when the dry signal exceeds the threshold level.
4. ReleaseAdjusts how long it takes for the wet (delay) signal to return to normal level when the dry input signal goes back below the threshold.
5. Modulation StyleThis selector allows you to choose different modulation styles to flavor the delay tail.

35 36
6. Routing OptionNormal - All signals from the Delay Stage will go into the modulation effect.Wet Only - Only the wet signal will be applied to the modulation effect.
7. WaveformSelects the waveform used by the LFO
8. RateControls the speed of the LFO.
9. DepthControls the depth of the LFO’s oscillation.
10. WidthWidens the stereo image of the modulation effect.
11. MixAdjusts the dry/wet balance of the modulation effect.
12. ReverbControls for the reverberation effect include the following:Size - Adjusts the reflection distance.Level - Adjusts the reverb level.
Power ModuleThe Power Module controls the output stage of the effect. You can switch among differentpower-supply options ranging from 6V to 18V batteries.
1. AttackDetermines how quickly compression is applied.
2. ReleaseDetermines how quickly compression ceases and the signal level recovers.
3. COMPAdjusts the overall compression amount sent to the selected battery module.
4. OutputAdjusts the output gain after compression.
5. BatterySets the input level (threshold) above which compression begins. It is affected by the level of the COMP control.
6V: -45dB~-30dB 9V: -35dB~-20dB12V: -25dB~-10dB18V: -15dB~0dB

37 38
EQ (Equalizer) EQ allows you to adjust the balance of frequencies in the signal. You can turn down the volumeat a certain frequency to make it sound more polished. BIAS Pedal provides 3 EQ module typesfor you to choose from.
Studio EQ・ Preset - Loads factory and user EQ setups. Save and name your user Studio EQ setupshere.・ Gain - Adjusts the boost or attenuation for bass, mid, and high filters.・ Frequency - Sets the frequency for each filter.・ LEVEL - Adjusts the output level of the EQ module.・ MIX - Adjusts the Dry/Wet ratio for the EQ.
Graphic EQ・ Preset - Loads factory and user EQ setups. Save and name your user Graphic EQ setupshere.・ Filter - Filter 1 is a low-cut filter. Filter 8 is a high-cut filter. Filters 2 through 7 are peaking (bell-curve) filters.・ Numbers - Tap a numbered button to turn its filter on.・ LEVEL - Adjusts the output level of the EQ module.・ MIX - Adjusts the Dry/Wet ratio for the EQ.
Parametric EQ・ Preset - Loads factory and user EQ setups. Save and name your user Paramet-ric EQ setups here.・ Slider - Drag the slider to adjust the boost or attenuation amount for different frequen-cies.・ LEVEL - Adjusts the output level for the EQ module.・ MIX - Adjusts the Dry/Wet ratio for the EQ.

39 40
NOISE GATE
Each preset comes with its own individual noise gate control. You can adjust the threshold and decay values that work best for your pedal.
You need to save the preset in order to store its noise gate settings.
・ Threshold - Controls the threshold level. When the input signal is louder than the threshold, the signal is able to pass through the gate. If the input signal is lower than the threshold, the signal will be cut off. Make sure your threshold level is slightly above the background noise.
・ Decay - Controls the decay time of the signal that is being cut off.
AMP ROOM
Amp Room allows you to evaluate the sound of each pedal by pairing with six amp models we have implemented from BIAS Amp. Each amp model has its own unique tonality and gain structure.
On the signal path, you can change the position of pedal and amp to simulate an effects loop.
To do so, simply place the pedal after the amplifier in the Amp Room. You have now created an effects loop.
・ British 900 - Clean, British style amplifier.・ ‘94 MATCH 30 - Clean amplifier.・ Mini Duo Reverb - Clean, American style amplifier.・ ‘67 Dumble Clean - Low gain, glassy amplifier.・ British Lead 800 - Crunch amplifier.・ SLO 100 - High gain amplifier.

41 42
TONECLOUD
In ToneCloud, you can share your own pedal or download custom pedals from other greatmusicians from around the world. You can preview presets in ToneCloud, add them to yourFavorites list, and download them right into BIAS Pedal on your mobile device.
Click the ToneCloud icon in the top-left corner of the software’s interface
1. Home ButtonLeaves ToneCloud
2. PRESETBrowses presets in ToneCloud
3. SearchSearches for a pedal by name
4. My PageManages your uploaded presets and favorite presets
5. LATESTShows the presets most recently uploaded in ToneCloud
6. POPULARShows the most frequently downloaded and most popular presets
1. PEDALShows the most frequently downloaded and most popular presets
How to preview presets in ToneCloudSelect the preset you want to preview (audition). There’s a preview slider for each preset; click it to preview the sound.
Download presets from ToneCloudSelect the preset you want to download. Click the download button and choose the desired location for saving the preset. Then click DOWNLOAD to download it.

43 44
Mobile
・ Connect - Connects with BIAS Delay or another compatible device・ Input Channel - Selects the input channel, which depends on the routing setup for your audio
device.・ Output Selector - Chooses the output device.・ Knob Gesture - Chooses how to control the knobs with gestures on the touch screen.・ Run in Background - Allows BIAS Pedal to run and process sound in the background.・ Latency - Chooses between Low and Normal latency settings. Low latency setting requires
more CPU usage. Set the latency setting to Normal if you hear clicking or popping noises.・ Feedback - Send us your feedback. You can write your feedback or issue a report.・ App Information - Executes a factory reset or shows the app version, DSP engine, and What’s
New page. ・ Positive Grid on Facebook - Links to Positive Grid’s Facebook page.・ Positive Grid on Twitter - Links to Positive Grid’s Twitter page.・ Help Center - Links to our Help Center for guides and FAQs or to write to our support agent.
SETTINGS
Desktop
・ Audio Settings - Selects the audio device, input/output routing, sample rate and buffer size settings.
・ App Information - Executes a factory reset or shows the app version, DSP engine, license and What’s New page.
・ Help Center - Links to our Help Center website for guides and FAQs or to write to our support agent.
・ User Center - Links to the User Center. You can manage your ToneCloud account there.・ Positive Grid Official Site - Links to Positive Grid’s website.・ Positive Grid on Facebook - Links to Positive Grid’s Facebook page・ Positive Grid on Twitter - Links to Positive Grid’s Twitter page.・ Login/Logout - Log in to and out of your ToneCloud account

45 46
CONNECT WITH BIAS DELAY
Remote ModeAfter connecting with BIAS Delay, BIAS Pedal will enter Remote Mode. All actions and changes made inside the BIAS Pedal software will be reflected on the BIAS Delay unit. You can previewall presets from BIAS Pedal and ToneCloud through BIAS Delay. Furthermore, you can managepresets and device settings, or update BIAS Delay to the latest version once new firmware is made available. The following section will show you what you can do when you integrate BIAS Pedal with BIAS Delay.
BIAS Pedal can also function as a remote-control interface for BIAS Delay to allow furthercustomization options.
Device Preset MenuIn Remote Mode, you can manage the presets stored inside BIAS Delay.
Store presets to BIAS Delay
To store new presets to BIAS Delay, simply click the STORE TO PEDAL button on the lower bar. Choose a slot to store the preset and then confirm the change.
1. Device CategoryShows the current presets in BIAS Delay.
2. Slot NameShows which slot the preset is storing its settings to.
3. Footswitch MappingShows the current footswitch mapping (preset assign-ment). You can change the mapping by right clicking and holding the Preset icon.

47 48
Device Setting Menu
・ Disconnect - Disconnects integration with BIAS Delay・ Device Information - Checks the model type, serial number, device name and firmware
version. You can also rename your BIAS Delay and upgrade the firmware here.・ Bypass Type - Selects the bypass type for BIAS Delay. To understand how bypass works, see
the Engage & Bypass section of this manual.・ MIDI Clock - Enables or disables MIDI Clock.・ MIDI Channel - Selects the MIDI channel for receiving MIDI commands・ Backup & Restore - Backup all presets from BIAS Delay here, and store presets in BIAS Pedal.
You can also restore all presets to another device. You can backup up to 5 sets of presets.・ Factory Reset - - Resets BIAS Delay to its factory-default state. All presets, device information
and MIDI settings will be reset.
In Remote Mode, the settings menu will show all the settings for your BIAS Delay.Firmware UpgradeUsing BIAS Pedal, you can update BIAS Delay with new features and bug fixes as they becomeavailable. This allows BIAS Delay to keep improving itself for better performance and sound andmore fun.
Go to Settings menu => Device Information => Firmware to check if there is a new versionavailable to install. BIAS Pedal will begin to update the firmware for BIAS Delay. DO NOT turnthe power off or disconnect the pedal while the firmware update is running.
For more information and FAQs or to contact a support agent, please check our Help Center at:https://help.positivegrid.com/hc/en-us

49 50
WARRANTY
PLEASE READ THIS DOCUMENT CAREFULLY. IT CONTAINS IMPORTANT INFORMATION ABOUT YOUR RIGHTS AND OBLIGATIONS, AS WELL AS LIMITATIONS AND EXCLUSIONSTHAT MAY APPLY TO YOU. BY ACCEPTING DELIVERY OF POSITIVE GRID PRODUCTS, YOU AGREE TO ACCEPT AND BE BOUND BY THESE TERMS AND CONDITIONS.
Limited WarrantyPositive Grid warrants that your new Positive Grid product, when purchased at an authorized Positive Grid retailer or reseller, shall be free of defects in materials and workmanship for a period of One (1) Year from the original date of purchase. Positive Grid may, in its sole discre-tion, require proof of the original purchase date in the form of a dated copy of the original authorized dealer’s invoice or sales receipt.
During the Warranty Period
This is your sole warranty. Positive Grid does not authorize any third party, including any dealer,retailer or sales representative, to assume any liability on behalf of Positive Grid or to make anywarranty for Positive Grid.
・ Positive Grid shall, in its sole discretion, either repair or replace any product that proves to be defective upon inspection by Positive Grid.・ Positive Grid reserves the right to update any product returned for repair and to change or improve the design of the product at any time without notice.・ Positive Grid reserves the right to use reconditioned parts and assemblies as warranty replacements for authorized repairs.・ Service and repairs are to be performed only by Positive Grid or a Positive Grid authorized service center.・ Unauthorized service, repair or modification will void this Limited Warranty.

51 52
Shipping/FreightYou are responsible for all shipping costs to transport your product to Positive Grid or an authorized service center. Positive Grid will pay for shipping and freight charges to return your product after service is complete, within the Country of original purchase only.
Transferability/Assignment of WarrantyThis Limited Warranty is extended to the original retail purchaser. This Limited Warranty can betransferred to anyone who may subsequently purchase this product provided that such transfer is made within the Warranty Period and Positive Grid is provided with all of the following items: allwarranty registration information for the new owner (see www.positivegrid.com/warranty), and aphotocopy of the original sales receipt. Warranty coverage shall be determined by Positive Grid in its sole discretion. When transferring ownership of a product that provides online connectivity to Positive Grid software or ToneCloud, it is very important that you CANCEL your online subscription(s) before transferring ownership of the product.
・ Products purchased from unauthorized Positive Grid retailers or resellers.・ Products presented for warranty support or service without proof of purchase.・ Products that have been altered in a manner that the serial number, name, identification numbers or logos have been tampered with or are missing.・ Products that have been modified from the original design.・ Damages incurred during transit to an authorized Positive Grid service center.・ Damages incurred from unauthorized adjustment, repair or service by anyone other than Positive Grid or an authorized Positive Grid service center・ Damages incurred from physical abuse of the product.・ Damages incurred by fire, flood, earthquake, water, wind, lightning or other natural disaster.・ Damages incurred by liquid contamination.・ Damages incurred from excessive high or low temperature or humidity.・ Damages incurred from inappropriate storage.・ Physically damaged connectors.・ Damage incurred from any use of the product in any application other than the use for which it was intended.
DISCLAIMER AND EXCLUSIONSTHE FOREGOING WARRANTY IS THE ONLY WARRANTY GIVEN BY POSITIVE GRID AND IS INLIEU OF ALL OTHER WARRANTIES, EXPRESS OR IMPLIED, INCLUDING WITHOUT LIMITA-TION ANY IMPLIED WARRANTY OF MERCHANTABILITY OR FITNESS FOR ANY PARTICULAR PURPOSE, EXCEEDING THE SPECIFIC PROVISIONS OF THIS WARRANTY ARE HEREBY DISCLAIMED AND EXCLUDED FROM THIS WARRANTY. UPON EXPIRATION OF THE APPLICA-BLE EXPRESS WARRANTY PERIOD DESIGNATED ABOVE, POSITIVE GRID SHALL HAVE NO FURTHER WARRANTY OBLIGATION OF ANY KIND.
Positive Grid shall NOT be liable for, and this Limited Warranty does not apply to:

53 54
END USER LICENSE AGREEMENT
2. DEFINITIONS
1. GENERAL
This End User License Agreement (“EULA”) is a legal agreement between Positive Grid, Inc.(“Positive Grid”) and the Licensee (either an individual or on behalf of an entity, “Licensee”). By installing, downloading, or otherwise using the software in any manner (including, but not limited to, using the product which the software may be supplied with), Licensee agrees to be bound by the terms of this EULA. If you do not agree or do not have the authority to enter into this EULA, then do not install, download or otherwise use the software or the product which it may be supplied with.
・ “Positive Grid Products” means certain products developed and owned by Positive Grid, which may be comprised of Hardware and Software (as defined in this EULA)
・ “Software” means the computer software (regardless of format or media in which distributed) designed (but not limited) to run with the Hardware, which is owned or licensed by Positive Grid.
・ “Licensee” is to use the Software he receives from Positive Grid, Inc. all copies thereof, and all pertinent documentation exclusively for his own purposes, and must keep it separate from third parties.
LIMITATION OF LIABILITYPOSITIVE GRID SHALL IN NO EVENT BE LIABLE FOR ANY SPECIAL, INCIDENTAL ORCONSEQUENTIAL DAMAGES SUFFERED BY THE PURCHASER OR ANY THIRD PARTY,INCLUDING WITHOUT LIMITATION, DAMAGES FOR LOSS OF PROFITS OR BUSINESS, ORDAMAGES RESULTING FROM USE OR PERFORMANCE OF THE PRODUCT, WHETHER INCONTRACT OR IN TORT EVEN IF POSITIVE GRID HAS BEEN ADVISED OF THE POSSIBILITYTHEREOF. POSITIVE GRID SHALL NOT BE LIABLE FOR ANY EXPENSES, CLAIMS, OR SUITSARISING OUT OF OR RELATING TO ANY OF THE FOREGOING. POSITIVE GRID’S FULLLIABILITY FOR ANY DEFECTIVE PRODUCT SHALL IN NO EVENT EXCEED THE ACTUALPURCHASE PRICE PAID FOR THE DEFECTIVE PRODUCT*
*Some states do not allow the exclusion or limitation or incidental or consequential damages,so the above limitation may not apply to you

55 56
5. LIMITATION OF LIABILITY
If the Software does not perform substantially in accordance with the applicable documentation within 30 days of Licensee’s purchase , liability is limited to refund of Licensee’s purchase price for the Software (without interest)
5. CONSENT TO USE DATA
Positive Grid may collect and use technical information about the Software and devices you use in connection with the Software in a manner that does not personally identify you. Positive Grid may use this information to improve our products or to provide customized services. Positive Grid may also disclose this information to third parties so that they may improve the way their products or services interact with the Software.
3. SCOPE OF USEPositive Grid Products are protected by copyright laws and international treaty provisions, as well as other intellectual property laws and treaties. Any other use or exploitation not explicitly granted to Licensee in this EULA shall not be allowed without written consent from Positive Grid.
・ Positive Grid grants to the Licensee a limited, nonexclusive, nontransferable, revocable license to use the Software solely for Licensee’s use, without any modification. This license is not a sale. This License applies to updates or supplements to the original Software, unless Positive Grid provides other terms along with the update or supplement.・ Licensee may install and personally use the licensed Software on two devices (e.g. one laptop, one work station).・ Licensee may copy the Software, if it is necessary for agreed use. Licensee is authorized to create a backup, if this is necessary to secure the future use.・ Licensee may not separate the components contained in the Software or otherwise reconfig ure the Software to circumvent technical limitations on the use of the Software or to otherwise exceed the scope of each license. ・ Licensee may not export, convey, rent, sublicense, transfer or otherwise distribute the Software or any rights therein to any person or entity.
4. RESERVATION OF RIGHTS・ Ownership. Licensee agrees that Positive Grid owns all legal right, title and interest in and to the Software. Positive Grid reserves all rights not expressly granted to Licensee in this EULA. Title and copyrights to the Software remain with Positive Grid.
・ Trademarks. Nothing in this EULA gives Licensee a right to use any of Positive Grid’s trade names, trademarks, service marks, logos, domain names, or other distinctive brand features. Licensee agrees not to remove, obscure, or alter any proprietary rights notices (including copyright and trademark notices) that may be affixed to or contained within the Software.

57 58
9. ENTIRE AGREEMENT
This EULA is the entire agreement between Licensee and Positive Grid relating to the Software and supersedes all prior or contemporaneous oral or written communications, proposals andrepresentations with respect to the Software or any other subject matter covered by this EULA.Positive Grid may make changes to this EULA, by posting such changes on its website atwww.positivegrid.com
Copyright ©2016 Positive Grid, Inc. All rights reserved. This manual and any associated software, firmware, artwork, product designs, and design concepts are subject to copyright protection. No part of this document may be reproduced, in any form, without prior written permission of Positive Grid, Inc. Your rights to the Software are governed by the accompanying End-User license agreement.
7. TERMINATION OF EULAPositive Grid may terminate this EULA and License at any time if Licensee has breached anyprovision of this EULA
8. ASSIGNMENT AND DELEGATIONThe rights and duties or obligations granted or created under this EULA may not be assigned,transferred or delegated by Licensee without the prior written approval of Positive Grid.


