40
Edition 1 / 01_2018 Manual

Edition 1 / 01_2018Manual

2

Contents
Thank you for flying ADVANCE. . . . . . . . . . . . . . . . . . . . . . . . . . . . . . . . . 4
About ADVANCE . . . . . . . . . . . . . . . . . . . . . . . . . . . . . . . . . . . . . . . . . . . 5
Outstanding features . . . . . . . . . . . . . . . . . . . . . . . . . . . . . . . . . . . . 6
Harness Overview . . . . . . . . . . . . . . . . . . . . . . . . . . . . . . . . . . . . . . 7
Rucksack overview . . . . . . . . . . . . . . . . . . . . . . . . . . . . . . . . . . . . . 9
Safety information . . . . . . . . . . . . . . . . . . . . . . . . . . . . . . . . . . . . . . . . . 10
General recommendations about
paragliding . . . . . . . . . . . . . . . . . . . . . . . . . . . . . . . . . . . . . . . . . . . 10
Preparing the product . . . . . . . . . . . . . . . . . . . . . . . . . . . . . . . . . . . . . . 11
Delivery . . . . . . . . . . . . . . . . . . . . . . . . . . . . . . . . . . . . . . . . . . . . . 11
Delivery package . . . . . . . . . . . . . . . . . . . . . . . . . . . . . . . . . . . . . . 11
Air-Foam Hybrid-Protektor . . . . . . . . . . . . . . . . . . . . . . . . . . . . . . . 11
Adjusting the harness . . . . . . . . . . . . . . . . . . . . . . . . . . . . . . . . . . . 12
Exchanging components . . . . . . . . . . . . . . . . . . . . . . . . . . . . . . . . 14
Installing the reserve . . . . . . . . . . . . . . . . . . . . . . . . . . . . . . . . . . . . 16
Compatibility check . . . . . . . . . . . . . . . . . . . . . . . . . . . . . . . . . . . . 23
Reversing technique . . . . . . . . . . . . . . . . . . . . . . . . . . . . . . . . . . . . 24
Setting up the Rucksack Mode . . . . . . . . . . . . . . . . . . . . . . . . . . . 25
General. . . . . . . . . . . . . . . . . . . . . . . . . . . . . . . . . . . . . . . . . . . . . . 26
Ground handling. . . . . . . . . . . . . . . . . . . . . . . . . . . . . . . . . . . . . . . 26
Clipping in with EASY CONNECT . . . . . . . . . . . . . . . . . . . . . . . . . . 26
Use in Practice . . . . . . . . . . . . . . . . . . . . . . . . . . . . . . . . . . . . . . . . . . . . 26
Takeoff preparation and check . . . . . . . . . . . . . . . . . . . . . . . . . . . . 27
Takeoff and landing . . . . . . . . . . . . . . . . . . . . . . . . . . . . . . . . . . . . 27
Using the speed system . . . . . . . . . . . . . . . . . . . . . . . . . . . . . . . . . 27
Flying with the foot stirrup . . . . . . . . . . . . . . . . . . . . . . . . . . . . . . . 27
Flying with ballast . . . . . . . . . . . . . . . . . . . . . . . . . . . . . . . . . . . . . . 28
Use for training . . . . . . . . . . . . . . . . . . . . . . . . . . . . . . . . . . . . . . . . 28
Winching . . . . . . . . . . . . . . . . . . . . . . . . . . . . . . . . . . . . . . . . . . . . 28
Acro flying . . . . . . . . . . . . . . . . . . . . . . . . . . . . . . . . . . . . . . . . . . . 28
Tandem flying . . . . . . . . . . . . . . . . . . . . . . . . . . . . . . . . . . . . . . . . . 28
Landing in water . . . . . . . . . . . . . . . . . . . . . . . . . . . . . . . . . . . . . . . 29
Care, check & repair . . . . . . . . . . . . . . . . . . . . . . . . . . . . . . . . . . . . . . . 30
Care . . . . . . . . . . . . . . . . . . . . . . . . . . . . . . . . . . . . . . . . . . . . . . . . 30
Air-Foam Hybrid-Protector Care . . . . . . . . . . . . . . . . . . . . . . . . . . . 31
Check . . . . . . . . . . . . . . . . . . . . . . . . . . . . . . . . . . . . . . . . . . . . . . . 31
Repairs . . . . . . . . . . . . . . . . . . . . . . . . . . . . . . . . . . . . . . . . . . . . . . 31
Disposal . . . . . . . . . . . . . . . . . . . . . . . . . . . . . . . . . . . . . . . . . . . . . 31
Technical Data . . . . . . . . . . . . . . . . . . . . . . . . . . . . . . . . . . . . . . . . . . . . 33
Material Description Harness . . . . . . . . . . . . . . . . . . . . . . . . . . . . . 34
Material Description Rucksack . . . . . . . . . . . . . . . . . . . . . . . . . . . . 35
Service . . . . . . . . . . . . . . . . . . . . . . . . . . . . . . . . . . . . . . . . . . . . . . . . . . 36
ADVANCE Service Centres . . . . . . . . . . . . . . . . . . . . . . . . . 36
The ADVANCE website . . . . . . . . . . . . . . . . . . . . . . . . . . . . . . . . . 36
Warranty . . . . . . . . . . . . . . . . . . . . . . . . . . . . . . . . . . . . . . . . . . . . . 36
3

Congratulations on your choice of an PROGRESS 3 – a quality product from ADVANCE. We hope that you will spend many rewarding hours in the air with it.
This user manual is an important part of the harness. Here you will find instructions and important information about safety, care and main-tenance, and that’s why we recommend that you read this document carefully before your first flight.
Register your PROGRESS 3 online on www.advance.ch/warranty; you will then receive product updates or safety-related bulletins about the PROGRESS 3 direct from us. This information will also be available to download from our website at www.advance.ch, as will the latest ver-sion of this manual and further updated information.
If you have any further questions or problems please contact your dealer or get in touch directly with ADVANCE.
Now we wish you a lot of enjoyment with your PROGRESS 3, and al-ways «happy landings».
Team ADVANCE
Thank you for flying ADVANCE
4

ADVANCE, based in Switzerland, is one of the world’s leading para-glider manufacturers. Since it was founded in 1988, the company has consistently pursued its own directions and concepts, both in develop-ment and production. The results are quality products with distinctive characteristics.
Behind the ADVANCE brand name is a team of specialists who share the passion and trust in the company’s products. At home in the air themselves, they contribute their valuable personal experience and dedication to the working processes.
Total control of the production process and supervision of the work-ing practices at the ADVANCE factory in Vietnam ensure a high stand-ard of workmanship. Long term relationships with fabric and line man-ufacturers means that ADVANCE knowledge and expertise also finds its way directly into the development of new materials.
ADVANCE attaches great importance to after-sales customer sup-port, and has built up a worldwide service network for this purpose. An on-going interaction with its customers brings in a steady flow of new knowledge that finds its way into ADVANCE products, thus completing the «Circle of Service».
About ADVANCE
5

Practical, comfortable and universalThe PROGRESS 3 reversible harness provides great versatility in a compact form. Whether for travel, training, thermal flying, short hike and flys or freestyle manoeuvres: With this multitalented harness in S, M and L sizes you are always best equipped for all your exploits.
Outstanding featuresVersatile use
The PROGRESS 3 is a fully-configured paraglider harness and a com-pact rucksack. Considered with its low weight (3.6 kg for the M size), it is perfect for those who prefer low volume paragliding equipment.
Safety from the start
The PROGRESS 3 Air-Foam Hybrid Protector has an ingenious interior. After the rucksack turns into a harness the protector fills with air within 60 seconds. The reversible harness then has fully-functioning protec-tion prior to takeoff.
Top comfort for flying and carrying
Since 2008 3D development techniques for ADVANCE harnesses and rucksacks have guaranteed unique levels of sitting and carrying com-fort – as well as their clean outlines. The effect is doubled in the case of the PROGRESS 3. When a harness, its ergonomic seat surface and Legpads conform to the pilot’s shape in flight: as a rucksack its shoul-der straps and back section generously share the loads.
PROGRESS 3 – Unique Versatility
6
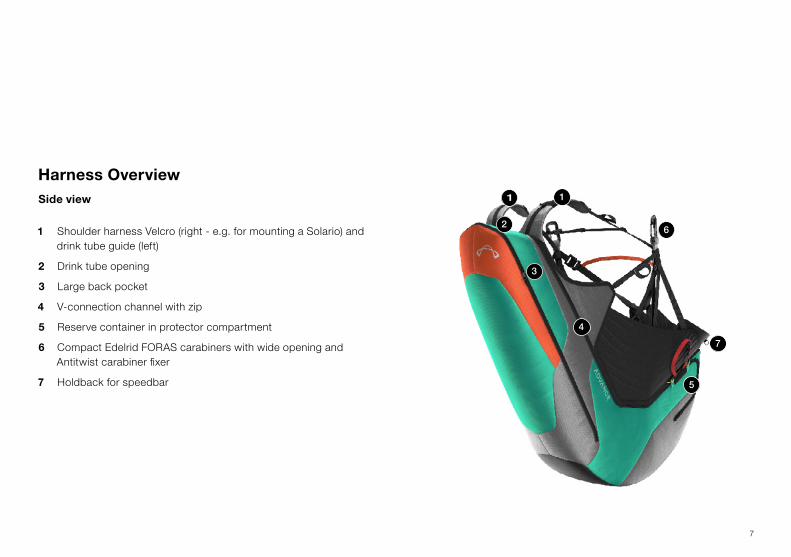
Harness OverviewSide view
1 Shoulder harness Velcro (right - e.g. for mounting a Solario) and drink tube guide (left)
2 Drink tube opening
3 Large back pocket
4 V-connection channel with zip
5 Reserve container in protector compartment
6 Compact Edelrid FORAS carabiners with wide opening and Antitwist carabiner fixer
7 Holdback for speedbar
7

Frontview
8 Small chest strap
9 Traditional 2-buckle closure system
10 Easy Connect System
11 Attachment for optional Footrest
12 Can take Cockpit or Front Container
13 Adjustment buckles for upper body recline
14 Setting for seat angle (lower back support adjusts automatically by running strap)
15 Distance between Legpads
16 2 Side Pockets: 1 exterior zip (left), 1 internal net (rt.)
17 Speed system with Carbon Speedbar
18 Adjustable, certified Air-Foam Hybrid-Protector
8
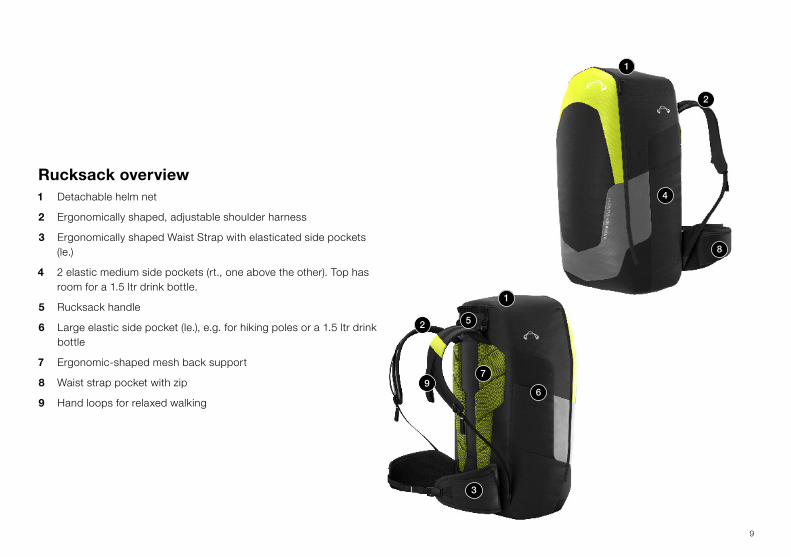
Rucksack overview1 Detachable helm net
2 Ergonomically shaped, adjustable shoulder harness
3 Ergonomically shaped Waist Strap with elasticated side pockets (le.)
4 2 elastic medium side pockets (rt., one above the other). Top has room for a 1.5 ltr drink bottle.
5 Rucksack handle
6 Large elastic side pocket (le.), e.g. for hiking poles or a 1.5 ltr drink bottle
7 Ergonomic-shaped mesh back support
8 Waist strap pocket with zip
9 Hand loops for relaxed walking
9

Like all commercially available reserve parachutes, paraglider harness-es are never suitable for free fall parachuting because their design and construction details do not allow such a thing. Neither the reserve par-achute nor its attachments to the harness can withstand the loadings involved in an abrupt opening.
All harness adjustments should be made before the harness is flown. Correct adjustment of the PROGRESS 3 greatly contributes to safety, correct function and comfort in flight.
No protector can offer complete protection against injury. The PROGRESS 3 Air-Foam Hybrid-Protector only serves to dampen the effects of those ground impacts from a low height that may follow un-lucky takeoffs and landings, and therefore minimise injuries that could result.
When carrying out safety training over water, thought should be given to the fact that the air in the Air-Foam Hybrid-Protector makes it float, and turn the pilot head down. Then there’s the risk that foam parts will eventually fill with water and sink, with the pilot.
PROGRESS 3 certification is restricted exclusively to paraglider sport.
General recommendations about paraglidingTaking part in paragliding sport requires appropriate training and a comprehensive knowledge of the equipment, as well as the neces-sary insurance and licences. A pilot must be able to correctly assess the weather conditions at the chosen site before taking off. His abilities must be sufficient for the demands of the selected paraglider. When carrying out paragliding the pilot must also take responsibility for his care of the natural world and the landscape.
The wearing of an adequate helmet, suitable footwear and clothing, and the carriage of a reserve parachute are all essential. Before every flight all items of equipment must be checked for damage and airwor-thiness. A pre-takeoff check must always be carried out.
While engaged in paragliding every pilot bears sole responsibility for all risks, including those resulting in injury and death. Neither the manu-facturer nor the seller of a paraglider can guarantee the safety of a pi-lot, or be held responsible for it.
Safety information
10

DeliveryBefore delivery every ADVANCE product has to be checked by the dealer for delivery package contents and correct initial settings. A completed warranty form makes sure that deficiencies of the product, attributable to the manufacturer, are covered by the ADVANCE warran-ty (see under “Warranty” in the section” Service”).
We ask you to complete this form on the ADVANCE website under “Warranty”, within 10 days of purchase.
Delivery packageDelivery of a PROGRESS 3 harness contains:
§ Removable EN/LTF-certified Air-Foam Hybrid Protector (91/09)
§ Speed system with Carbon speedbar
§ COMPRESSBAG
§ 2 Edelrid FORAS Twistlock alu carabiners including anti-twist cara-biner clip
§ Ronstan ball-bearing speed pulleys
§ Reserve connection
§ Reserve handle with attached four flap inner container
§ Getting Started Booklet
Optional:
§ Foot stirrup
Air-Foam Hybrid-ProtektorThe PROGRESS 3 internal Air-Foam Hybrid-Protector has a sophistica-ted inner structure and requires no special treatment. When the ruck-sack is reversed into a harness it normally fills with air within approxi-mately 60 seconds and already provides full protection before takeoff. At an impact it absorbs the deceleration energy and softens the blow. Risk of back or pelvic injury can thereby be considerably reduced.
The airbag conforms to the LTF 91/09 certification requirements.
Preparing the product
11

Adjusting the harnessThe PROGRESS 3 is easy to adjust.Put the harness on, close the chest strap and leg straps (2-buckle system) and hang the PROGRESS 3 up by its carabiners in a harness stand.
Shoulder and back strap buckles have Neoprene and light Neoprene covers and allow for continuous adjustment, so that sitting position can be quickly and easily modified in flight. The development team ha-ve established standard settings. These positions are shown by grey sewing on the shoulder and back straps. The seat strap standard set-ting is fully opened. Pictures in this manual show the various adjust-ment possibilities.
ADVANCE recommend that you thoroughly familiarise yourself with these adjustments before your first flight in the harness. As well as that you should always make your first test flight with new equipment in qui-et weather conditions.
Info: For realistic adjustment the harness back pack should be packed as for flight, and the reserve mounted as well. These preparations will provide a good simulation of an in-flight situation.
12
Abs 1 alt aus S4Abs 2 alt aus P2 («GZ einstellen», Abs. 2, S.1)+ geänderte Sätze!Abs 3 geändert!+ Abs. 4 + Info alt aus S4

1 Adjusting the upper body angle Upper body attitude is altered by the adjustable back straps. Pull them in to a reasonably upright back position at which you feel comfortable. These straps are mounted relatively high at the si-des to give good back support, and take weight off your shoulders. Pulled in back straps make you sit up. Completely loosened back straps put the pilot in quite a reclined position. ADVANCE recom-mend the standard setting. The adjustment system allows for quick and straightforward back position changes during flight.
Tip: for easy-running adjustments take the load off the buckles by sitting up.
2 Seatstrap setting The seat strap is adjusted to individual requirements because the seating area adapts itself precisely to the body shape. Pulling in the straps raises the seat surface, resulting in a flatter seat angle. Completely releasing the seat straps makes it easier to get into the harness after takeoff.
3 Shoulder strap adjustment The shoulder straps can be adjusted to suit the pilot’s height and desired sitting position. The neoprene-covered adjusters are at shoulder height and can be set to any position. Pull in the
shoulder straps to a loose fit, until they provide light support with-out putting pressure on the shoulders. An ideal setting for the flying position leaves a gap of about 2 cm between shoulders and strap.
Info: ideally adjusted shoulder straps are quite loose in flight and do not apply pressure on the shoulders, but are still able to pro-vide comfortable support when required.
4 Setting the distance between the leg straps The distance between the leg straps and LegPads on the PROGRESS 3 can be set to suit the individual, and is adjustable during flight. When pulled in, leg strap pressure on the inside of the upper thighs can be relieved during long flights, for example.
Info: the widest interconnect setting will provide the highest PROGRESS 3 comfort for takeoff, landing and ground handling.
13
* Abs. 1 S4 HB, letzter Satz Abs1 aus HB PS Satz vor Tipp* Tipp + folgender Abs.: P2 HB im Absatz Rückengurte einstellen* 2. Sitzgurte aus P 2 HB S. 12 Satz Lendenwirbelstüt-ze rausnehmen d.h in FR nicht beachten* 3. Schultergurte einstellen S4 HB, letzter Satz P2 HB (letzer Satz von Schultergurte einstellen.)* Info aus P2 hinter Schultergurte einstellen* Distanz zw Beingurten aus P 2 HB, dito Info

5 Mini chest strap adjustment The mini chest strap keeps the shoulder straps in the best po-sition for takeoff and landing. The appropriate width can be set as required. If you prefer not to use the mini chest strap it can be un-looped and removed.
6 Adjusting the speed system The speed system should be adjusted to a length where the full travel of the paraglider speed system can be used. Make su-re that the speedlines are not set too short – the wing must not be permanently accelerated in flight.
Exchanging componentsAir-Foam Hybrid-Protektor
The PROGRESS 3 comes with the Air-Foam Hybrid-Protector built in. Its compartment is under the seat surface with the Legpads. You can take it out if it needs repair or replacement.
To do this open the zip that runs across the harness under the Legpads. Then release the Protector from the Velcro fleece tape which holds it central in the compartment, and pull it carefully out.
To reinstall push the Protector back into the open pocket under the Legpads, fasten it in position with the Velcro and the fleece strip then close the zip.
14

Fitting the optional foot stirrupThe optional foot stirrup, included in PROGRESS 3 LTF 91/09 certifica-tion, should be fitted as follows:
The black loops at the ends of the stirrup support lines attach to the small tapes loops below the carabiners with small quick-links (Maillons Rapides). The bungee holdbacks from the harness go through the D rings at the front of the seat shell , and should be tied to the small loops halfway down the stirrup lines – as short as practical, but not under permanent tension.
A speed loop accelerate system is supplied with the foot stirrup. ADVANCE recommend that only this speed system is used when flying with the foot stirrup.
A split ring connects the speed loop to the footrest so that the lo-op can always be conveniently picked up by a foot while flying with the foot stirrup.
Cockpit attachmentA cockpit can be supported from the small tape loops below the chest strap, or from the main carabiners..
15
Installing the reserveGeneral advice
The reserve compartment is under the PROGRESS 3 pilot’s seat. The reserve handle is easy to reach.
Caution: installing the reserve must be done by a suitably skilled person. Your safety depends on it!
Bear in mind that every reserve/harness combination has its own pe-culiarities. To ensure reliable functioning it is essential that pilot and packer are familiar with the system before the reserve is installed. We strongly recommend that the reserve is installed by a qualified person or your ADVANCE dealer.
Suitable reserves/reserve compartment volume
Older type, relatively bulky reserves, are more difficult to de-ploy from modern and more compact harnesses, especially under high g loadings. The certified reserve volume for the PROGRESS 3 depends on harness sizes. S + M size: 2.5–6 Liter, L size: 3–6.5 Liter.
Info: for a general approximation of a reserve volume, its weight in kilos x 2.7 gives a volume in litres. But, depending on packing style and skill, it can still be that a reserve that conforms to
the maximum certified volume for a container, using the weight formula above, cannot be released without problem.
Caution: if the volume of the packed reserve lies within the up-per third of the certified volume range, it is especially important to observe that the reserve has been correctly folded to conform to the length of the inner container!
Caution: when installation is complete only a test release/com-patibility check can confirm that the actual reserve/PROGRESS 3 combination will work.
Caution: a reserve parachute volume can expand by up to 30 % when it has been newly folded. ADVANCE therefore strongly rec-ommend that a new compatibility test is carried out after every repack.
16

Steerable reserves
The PROGRESS 3 can be used with a steerable reserve. The reserve risers connect to the coloured supports under the covers on the har-ness shoulders, using two maillons, each of 2400 daN minimum safe working load. The reserve risers run to the reserve compartment via the channel at the side. The unused harness V-connection can be led through the opening into the back pocket and stowed away.
Caution: steerable reserves tend to take up more volume.
Info: you can also use QuickOut carabiners with a steerable re-serve on the PROGRESS 3.
Installation: general
The reserve handle and the four-flap inner container are fixed together and this combination is designed so that the pull of the handle acts equally over the whole width of the inner conatiner. This minimises the risk of the container jamming in the reserve compartment, or the reserve lines getting caught up. The reserve handle together with the four-flap inner container are essential parts of the harness, and this ar-rangement conforms to the latest LTF certification requirements. Only the original reserve handle with its four-flap inner container is allowed to be used.
Packing the reserve in the inner container
Always fold your reserve to the shape and dimensions of the inner con-tainer supplied with the PROGRESS 3. At the final packing stage put the line bundles opposite the reserve handle. When the lines have been stowed in the inner container there should be 90 cm of reserve line remaining outside, between the inner container and bridle/steera-ble risers.
17

Close the container flap in the order indicated (1-3). Secure the final container flap (3) with a 5 to 6 cm line loop (ca. 3 finger widths). Now check the tension of the bungee loop and adjust if necessary. --> lift the package by the lines - the weight of the reserve should release the line loop.
Closing the inner container
Now close the outer container flap (red border) with two similar line lo-ops (5 to 6 cm). These two line loops are secured in the two attached rubber bands though their eyelets on the outer flap.
18

Connecting the reserve to the harness
The reserve bridle and the harness connection must be connected to each other by the means of a suitable quicklink of at least 2400 daN safe load (fig. 1). These two lines must be stabilised at the maillon, for example by using rubber O rings, to prevent the webbings slipping round and cross-loading the maillon during a reserve deployment.
In collaboration with the PMA (Paraglider Manufacturer’s Association) and German climbing rope manufacturer Edelrid, ADVANCE carri-ed out an exhaustive series of tests in 2017 to investigate the strength of the direct loop-in-loop method of connecting these two webbing items (fig. 2). This involved a series of material combinations of harness V-lines and reserve bridles, such are as used in ADVANCE harnesses with COMPANION reserves. Compared with a Maillon Rapide connec-tion the strength of this arrangement was slightly reduced, but not to an extent that would compromise its function.
For this reason the direct looping of ADVANCE products is reliable and safe, provided certain basic precautionary measures are obser-ved, such as the centering of the connection position on both loops, and then pulling the line junction as tight as possible. We cannot ma-ke a definitive statement about the strength of such a connection of ADVANCE harnesses with other reserve.
Caution: don‘t use sticky tape instead of O rings for locating the loops on the maillon!
Info: when looping a COMPANION reserve to the PROGRESS 3 the V-line Neoprene protector must finally be pulled over the connection.
Fig. 1 Fig. 2
19

Putting the inner container in the reserve compartment
Lead the reserve V-connection lines up from their stitched attach-ments on the shoulder supports, then down to the reserve compart-ment via the opened V-connection channel that runs down the si-de of the harness. After reserve installation this channel closes by zip fastener.
To install the reserve first lay the connection lines in the reserve com-partment followed by the inner container. It is essential that the inner container is installed with the closure flaps facing downward – towards the ground in flight. Follow the instructions illustrated on the inner con-tainer and the inside of the reserve compartment. The silver spots on container and compartment roof must face each other . In addition the reserve handle connection must lie flat, without twist.
Thread short lengths of packing help lines through the two reserve compartment white closure loops .
Caution: if, after a repack, the reserve does not fit in the inner container it must be folded again to match the shape of the inner container.
20

Closing the reserve compartment
Close the lid of the reserve compartment and pull the lower zip from bottom left carefully round the compartment lid to its limit by
the right hand white closure loop. Then run the zip slider back about 4 cm.
Now pull the right hand white closure loop help line through its me-tal eyelet and lead the right hand reserve handle yellow cable th-rough the white loop. Remove the packing help line – taking care not create excess friction heating - and stow the end of the yellow cable in its tape channel .
Pull the V-connection channel zip from its start above the shoul-der supports, carefully all the way down to its end behind the left hand white closure loop. Also here, the zipper must then be run back by about 4 cm. Pull the left white closure loop through its metal eyelet using the help line and lead the left hand yellow cable through this loop. Again remove the help line slowly to avoid friction – and stow the end of the cable in its channel .
Info: even without the packing lines the PROGRESS 3 yellow cables are easy to guide through their white closure loops.
21
Abs 1 neuAbs 1 HB S4Abs 2 P2 HB Abs 2 Rettungsschirmfach verschliessen

Tuck the base of the reserve handle into its neoprene pocket. .Then close the right hand zipper , Then close the right hand zipper by running it all the way round, into its zipper garage. Close the left hand zip: run it up the side of the harness to the top of the harness – this closes the V-connection channel – and be sure to park it in its garage.
Caution: to guarantee a correct release always make sure that the yellow cables run freely.
Info: the zip fasteners will always open easily and reliably when required – even after long intervals between opening.
Caution: never connect the reserve directly to the inner container!
22
Neuer Text!!!Achtung + Info + Achtung Alt S4 HB

Compatibility checkCorrect installation of a reserve must always be tested by a test relea-se. To do this sit in the harness, straps fastened with packed back po-cket, hanging by its carabiners from a harness hanger. Then pull the reserve out by its handle. It is not sufficient to pull the reserve out when not sitting in the harness as for flight. The release procedure must ta-ke place in the flying position, without hindrance, and in accordan-ce with the requirements of this manual. The force required to release the reserve must not be less than 4 daN and not more than 7 daN. If in doubt you should contact a qualified person or your ADVANCE dealer.
The correct throwing technique has to be used – a pull to the side. Anything else can make deployment more difficult.
The following factors can make successful reserve opening more diffi-cult, or prevent it – especially if any apply together:
§ Reserve too big – too much volume for the compartment or inner container.
§ Reserve not folded to the shape of the inner container.
§ Incorrect throwing technique. A pull to the side is required (Caution: don’t pull the reserve handle straight upwards).
§ The reserve volume was suitable for the harness when first fitted in the new harness, but after a repack it is too big.
§ Pilot arm length is a factor: short pilots with short arms can so-metimes not pull out the reserve.
§ Deployment under high g (more than 3g, for example in a spiral dive).
Info: a successful compatibility test can reinforce the tester’s confidence in the reservve system.
Caution: before every flight check that the reserve handle is in its correct position, and that the yellow cables are correctly sited.
Tip: we recommend a brief check of the reserve handle during every flight. This helps to memorise its position. We also advise you to mentally rehearse the sidewards pulling and throwing action.
23

24

Packing the harness back pocketBecause the back pocket is also your rucksack it has enough space to pack everything. But careful packing of this harness backpack has a big effect on flying comfort. Oddly shaped and hard objects can be felt through the back padding, and can be inconvenient for the whole fight.
Pack hiking poles points up in the back pocket.
Tip: ADVANCE recommend rubber tips for your hiking poles. They soften not only the noise on hard roads, but protect your rucksack as well.
Tip: to save space, drinks can be carried in cartons instead of cans, and food in zipbags. When used up these take up little space. Drink systems (e.g. Camelbak) can be stored in the ruck-sack side pockets, or inside the back pocket when flying. The drink tube can go through the opening at the shoulder, and se-cured through the elastic on the shoulder harness.
Reversing techniqueAlways be careful to fully open the zip before turning the product insi-de out!
Converting the harness into a rucksack is like packing a glider: the bet-ter the lines are stowed in the wing the less they will interfere with fol-ding. The same goes for the harness. Arrange the straps, seat surfa-ce and protector neatly in the centre, and reversal into a rucksack will work well.
Packing the rucksack
The PROGRESS 3 is delivered with a COMPRESSBAG – a compres-sion bag – so that the paraglider can be efficiently packed in the ruck-sack. The COMPRESSBAG replaces the usual inner bag and is ideal for the PROGRESS 3. Compact stowing makes a rucksack much mo-re comfortable to carry.
Pack your folded paraglider in the conically shaped COMPRESSBAG. After closing the side zips you can squash the air out of the bag, and reduce the glider volume considerably. This will leave enough room in the rucksack for clothes and instruments.
25

Tip: put the glider at the bottom of the rucksack, to fill up this space. Pull the lower section of the rucksack lid over the glider pack, then pull up the side zips to this level and stand the ruck-sack up. Now pack the remainder of your possessions on top.
The PROGRESS 3 has plenty of room for clothing and instruments. Your helmet can either go inside or be held in the external helmet net. This is adjustable and can fit any size of helmet. There are also three elasticated side pockets and another two on the waist strap for addi-tional small items. The large side pocket on the right can carry hiking poles, for example, or a 1.5 ltr drink bottle. The upper left side pocket can also take a drink flask. The small elastic side pocket on the left is easy to reach while walking.
Caution: never drag the PROGRESS 3 over the ground. Do not pack pointed or sharp objects in the back pocket, the additional pockets or inside the rucksack – they can damage the fabric.
Setting up the Rucksack ModeThe PROGRESS 3 rucksack function is designed to hold a paraglider, helmet and some clothes. Its compact nature and geometry make it very comfortable to carry.
1. Adjusting the waist strap
The fastened waist strap of a packed rucksack should sit directly over the hip bones. The channel in the strap helps you to find this position. Pull in the waist strap so that it feels secure and comfortable. When correctly adjusted most of the rucksack weight will be carried on the waist strap and hips.
2. Shoulder strap adjustment
Pull these in until you can just feel them – but not too tight. The low shoulder strap attachment points accommodate different upper bo-dy lengths. Correctly adjusted shoulder straps sit on the shoulders, but do not apply strong pressure.
26

GeneralThe PROGRESS 3 should principally be flown sitting in a upright positi-on. This gives the best view in the air.
The PROGRESS 3 has plenty of trump cards to play. Weight is distri-buted evenly over the adaptable seat surface, from thighs to shoulder blades. This does away with pressure points, circulation continues unimpeded, and the mind remains alert during long flights.
Ground handlingLight weight and the ability to freely stand upright makes ground hand-ling much less taxing with the PROGRESS 3.
The LegPads (leg straps) and reserve stowage in the protector allow maximum freedom of movement, so that you can give full attention to wing control.
Tip: a wide LegPad distance increases freedom of movement on the ground (see section “Setting the distance between the leg straps”).
Clipping in with EASY CONNECTThe EASY CONNECT coloured markings on the carabiner support lo-ops make it especially easy to clip in an ADVANCE paraglider to the PROGRESS 3. The pilot only has to make sure that the red and blue markings on the paraglider risers join the equivalent red and blue lines on the PROGRESS 3 harness carabiner loops. The EASY CONNECT SYSTEM contributes to greater safety before takeoff.
Use in Practice
27

Takeoff preparation and checkBefore every takeoff you should check the following:
1 Harness and helmet clipped up, reserve OK?
2 Lines clear?
3 Canopy clear?
4 Wind direction and strength assessed?
5 Airspace and field of view clear?
Takeoff and landingPROGRESS 3 floating shoulder straps allow you to stand upright.
Both takeoff and landing turn out to be very comfortable – movement is quite unencumbered, and those useful big takeoff steps are quite possible. Loosened seat straps make it easy to slip back into the har-ness after lift off. To take up the landing position just straighten the back and push the pelvis forward. You’re already in the correct upright position.
Using the speed systemThe PROGRESS 3 has the speed system already mounted. The carbon speedbar hangs under the front of the LegPads and a practical elastic holdback makes it easy to reach. These also make sure that the spee-dbar does not interfere with a reserve throwing.
Pushing the speedbar alters the pilot’s sitting position. The upper body leans back, pushing the shoulders into their straps. The seat takes up a flatter attitude and supports the pilot.
Caution: connect the speed system to the paraglider for every flight. Free-swinging speed lines could prevent a successful re-serve throwing.
Flying with the foot stirrupADVANCE recommends that you only use the optional foot stirrup spe-cially designed for the PROGRESS 3, and the only model to have be-en included in the LTF 91/09 certification process. The high anchoring point provides maximum comfort. Your legs are supported effortless-ly, and you can enjoy long flights. The bungee connection to the front of the seat, and the reserve position, prevent hang ups or tangles wi-th the reserve. When flying with the foot stirrup you should only use the ADVANCE speed loop „Soft“ intended to go with it.
28

Flying with ballastThe PROGRESS 3 was not designed with ballast in mind, and does not have a special compartment for it. If you wish to increase your in-flight weight by carrying water the two loops below the chest straps are pos-sible attachment points.
Info: if you hang a bag of water from these loops the flying be-haviour of a glider can be altered – and the agility of the harness reduced.
Use for trainingThe PROGRESS 3 is perfect for flying schools. Suitable adjustment provides comfortable standing upright before takeoff, ease of getting in the seat after takeoff, a pleasant upright sitting position in the air, dam-ped agility from the harness in flight and quick standing up before lan-ding. An appropriately adjusted harness agility in flight, and the quick and instinctive stand up facility for landing contribute much to comfort and safety.
WinchingADVANCE harnesses ar suitable for winch launching. The PROGRESS 3 may only be connected to the tow link using rope loops or maillons (quick links) fixed directly to the main carabiners. If you are in any doubt
you should always consult the winch driver or someone authorised by the manufacturer.
Acro flyingThe geometry and strength of the PROGRESS 3 means that it is ca-pable of flying acro manoeuvres without problem; but this harness has stowage for only one reserve parachute. As a matter of principle ADVANCE would only recommend a harness with provision for two re-serves for acro flying.
Tandem flyingThe PROGRESS 3 can be used for a tandem passenger.
Other brand paraglidersThe harness can be flown with every paraglider. There is no restriction.
29

Landing in waterIn general, caution is advised when flying over water, whether it be crossing a lake during a cross country, or during SIV safety training. In particular a pilot can land in the water during SIV, intentionally or otherwise. As with all harnesses you should consider that the protec-tor floats initially and can turn the pilot face down, head under water. Wearing a lifejacket is essential during SIV training.
Landing in water without a lifejacket
If an unintentional water landing takes place, outside the protecti-on of the SIV environment, the harness buckles must be unfastened immediately and the PROGRESS 3 taken off. Otherwise the risk of drowning is very high. As general advice ADVANCE recommend that the PROGRESS 3 is not flown over water.
Landing in water with a lifejacket
Even when landing in the water during SIV, with a lifejacket, it is recom-mended that the PROGRESS 3 buckles are unfastened and the har-ness taken off before getting into the boat. When full of water the har-ness gets very heavy and makes it very difficult for the pilot to board the rescue boat.
Maintenance and care after landing in water
After contact with water the PROGRESS 3 Protector should be taken out. The harness, protector and reserve inner container should be ca-refully laid out to dry in a shaded place outside, or in dry room – even better would be to hang the harness up by its carabiners and lightly waft it to and fro. The reserve should be removed and dried separately. It must then be repacked and reinstalled in the PROGRESS 3.
30

CareWeight minimisation was a priority when it came to the choice of mate-rials. The harness was designed for high loadings, but not for extreme physical punishment. The lifespan depends very much on the care of the user. We recommend that signs of wear or damaged seams and webbing are always investigated and, where necessary, in-dividual components of the harness be replaced. In particular, suspected defects should be taken to an authorised ser-vice centre for rectification, without delay.
Caution: do not modify your harness, and never fly with a har-ness that has any kind of damage to its webbing.
It is recommended that the harness is completely checked at least on-ce a year: this must include the condition of the seams and webbing parts, and the operation of the buckles. Don’t forget the regular ai-ring and repacking of your reserve parachute. If your reserve has been thrown in an emergency your harness should also be checked by the manufacturer or an authorised service centre.
Ultraviolet light, temperatures below -20°C and above +60°C, humidi-ty, salt water, aggressive cleaning agents, unsuitable storage as well as physical abuse (dragging over the ground) speed up the ageing process.
The life of your harness can be greatly extended if you observe the fol-lowing points:
§ Allow a wet or damp harness to dry completely at room temperature, or outside in the shade. Always repack your reserve.
§ If your harness gets wet with sea water rinse it thoroughly in fresh water. Always repack your reserve.
§ Only clean your harness with fresh water, and a little neutral soap if necessary. Never use solvents.
§ Check the harness connection and reserve bridle after every reserve deployment.
§ A qualified person must check the harness after any very high loa-ding (e.g. heavy crash).
§ Regularly inspect the harness for damaged seams and webbing. In particular check the harness/reserve connection and the seams ne-ar the main carabiners.
§ Don’t subject the harness to extremes of temperature and make su-re it gets adequate ventilation, to prevent condensation forming.
§ Do not leave the harness in the sun (UV radiation) before and after flying.
Care, check & repair
31

Most reserve parachute manufacturers recommend an inspection and repacking every six months, so as to guarantee a fast and rou-tine opening every time. If the reserve gets wet, damp or overheated it must definitely be repacked. We strongly recommend that you let a qualified person pack your reserve. In addition, ADVANCE also strongly recommend that you regularly check the front container to see that the yellow cables run through their loops properly. Then you can be sure they will easily release the reserve when required.
Air-Foam Hybrid-Protector CareFor maximum protector life it should not be compressed for exten-ded periods, and never stored wet or damp. Apart from this require-ment the Air-Foam Hybrid-Protector needs no special care during nor-mal use. If, however, it is involved in a crash, it must unquestionably be inspected for signs external damage. If the Protector suffers damage it must be replaced. The harness/rucksack must not be stored close to aggressive substances or in long-term heat.
CheckThe complete set of equipment has to have a check at an official ADVANCE checking organisation after every 24 months. At a check all components are evaluated according to strict guidelines and with great
care. Finally the overall condition of the paraglider is assessed and re-corded on the test record.
You can find more information about the check in this manual in sec-tion «Service», or on www.advance.ch.
RepairsAs a general rule you should not attempt to repair a harness yourself. The various seams are made with great precision, and, for this reason, only the manufacturer or an authorised service centre may make re-pairs using original materials.
DisposalEnvironmental protection plays an important role in the selection of materials and the manufacture of an ADVANCE product. We use only non-toxic materials that are subjected to continuous quality and envi-ronmental impact assessments. When your harness reaches the end of its useful life in a number of years’ time, please remove all metal parts and dispose of the rest of the harness in a waste incineration plant.
32

33

PROGRESS 3 S M L
cm 155–172 165–183 178–202cm N. A.* N. A.* N. A.*cm ~ 35* ~ 38* ~ 40*cm ~ 47* ~ 48* ~ 50*
cm ~ 44* ~ 46* ~ 48*
kg 3.3 3.6 3.9
l 75 80 91
EN 1651 & LTF 91/09, 120 kgFire Red/Spectra Green – Fusion Yellow/Dark Shadow
Technical Data
Pilot heightSeating widthSeating depthChest strap width
Support point height
Harness weight incl. carabiners
Rucksack volume
CertificationColours
* The harness seat shell automatically conforms to the pilot’s body shape. The seat surface width and the carabiner height find their own values.
34

86160 – 25 mm – Polyamid Güth & Wolf 20 kN62694 – 15 mm – Polyamid Techni Sangle 13.2 kN70337 – 15 mm – Polyamid Techni Sangle 13.2 kNClip-In-Buckle-System Cobra AustrialpinNylon Oxford 210D, PU3 Seunghee
240T DiagRipstop Stripes: Nylon Robic 100D Seunghee
Foras – 23 kN Aero Tec Twist Lock Edelrid 23 kN2 x Dyneema 10 mm Techni Sangle 2 x 13.5 kN
Material Description Harness
Description Name & Dimension Manufacturer Breaking Load
Leg strapBack strapShoulder strapTwo buckle closure systemCloth seat
Cloth back
CarabinerReserve-V-connection
Air-Foam Hybrid-Protector Internal 25 mm foam wall structure – N-Robic 100D & 20kg/cu.m foam Seunghee
35

Material Description Rucksack
Description Name & Dimension Manufacturer
Aussenstoff Nylon-Robic 100D & 240T diagonal Ripstop&LNT 16008 Seung HeeBodenstoff Cordura 210D Seung Hee
CertificationThe PROGRESS 3 was tested and certified in accordance with DIN EN-Norm 1651 at 120 kg supported weight. The Airfoam-Hybrid-Protector has LTF certification.
36

ADVANCE Service CentresADVANCE operates two company-owned Service Centres that car-ry out checks and repairs of all types. The workshops based in Switzerland and France are official maintenance operations, certi-fied by the German Hanggliding and Paragliding Federation ( DHV ), which has many years’ experience and in-depth product-specific expertise. The ADVANCE worldwide service network includes oth-er authorised service centres which provide the same services. All service facilities use original ADVANCE materials exclusively. You can find all the information about checks and repairs, and the rele-vant addresses at www.advance.ch.
The ADVANCE websiteAt www.advance.ch you will find detailed information about ADVANCE and its products, as well as useful addresses which you can contact if you have any questions.
Among the things you will be able to do on the website are:
§ complete the warranty card online up to 10 days after purchasing the glider, enabling you to enjoy the full benefits of the ADVANCE warranty.
§ find out about new safety-related knowledge and advice concerning ADVANCE products
§ download an application form in PDF format which you can use when sending your glider in for a check at ADVANCE.
§ find an answer to a burning question among the FAQs ( Frequently Asked Questions )
§ subscribe to the ADVANCE Newsletter so that you will be regularly informed by e-mail about news and products.
It is well worth visiting the ADVANCE website regularly because the range of services offered is continuously being expanded.
Product registrationSet up a MyADVANCE-Account on www.advance.ch/garantie and re-gister your harness direct online after purchase. You will then bene-fit from the extended ADVANCE Warranty. This is valid for 3 years and covers defects that can be attributed to manufacturing faults.
In the MyADVANCE-Account you can find all the documentation for your harness as PDF, e. g. manual and other information. You can also look at spare parts for your product and ask ADVANCE support direct.
Service
37

WarrantyAs part of the ADVANCE warranty, we undertake to rectify any de-fects in our products that are attributable to manufacturing faults. In order for a warranty claim to be made, ADVANCE must be notified im-mediately on discovery of a defect, and the defective product sent in for inspection. The manufacturer will then decide how a possible ma-nufacturing fault is to be rectified ( repair, replacement of parts or repla-cement of the product ). This warranty is valid for three years from the date of purchase of the product. Warranty and Service Intervals begin from the date of the first flight, recorded on the identification plate. If no date is evident the applicable date is that on which the harness was transferred from ADVANCE to the ADVANCE dealer. The ADVANCE warranty does not cover any other claim. Claims in respect of damage resulting from careless or incorrect use of the product ( e.g. inadequate maintenance, unsuitable storage, overloading, expo-sure to extreme temperatures, etc. ) are expressly excluded. The same applies to damage attributable to an accident or normal wear and tear.
38

39

suppor [email protected]
+41 33 225 70 10
w w w.advance.ch
advance thun ag
ut t igengstrasse 87
ch 3600 thun


![juditestein.files.wordpress.com · the swell of the muscles [and] the artist's arti- ficial leg, with all its straps and complicated sup- ports." Naively, Kane had not foreseen that](https://static.documents.pub/doc/80x56/5e218cde1655967a7963dfee/the-swell-of-the-muscles-and-the-artists-arti-ficial-leg-with-all-its-straps.jpg)


