Materials Required Material Required size Quantity Plywood 2400 mm x 1200 mm x 4 mm thickness 1 piece Timber Cross - Section (W x H): 25 mm x 25 mm 46 mm x 25 mm 8 metres 2 metres Glass 383 mm (L) x 383 mm (W) x 3 mm thickness 1 piece Black Paint Spray can or Paint can 400 ml Silicon/Plastic tube 7 mm diameter 2 metres Galvanised Nails 25 mm length and 45 mm length Diameter - 2 mm ½ kg Silicon Adhesive Sealant 300 ml (black cord is the best) 300 ml Long Hinge and Screws To fix glass lid to heating box 2 Long Hinges ½ kg Screws Mirror sheet/ Aluminium Foil For reflector panel 4 metres L- Shaped Metal fixtures For the top of the heating box for closing glass lid 4 pieces Insulation Glass fiber or wool or saw dust or paper as required Bolt and Nut Binding Wire 50 mm bolt with fitting nuts As required 4 sets 2 metres PVA Wood Glue As required 1 small tin Building the Heating Box Preparation of Materials 3. Lay the four battens for the frames of the bottom board (A) out in a square; glue them to the bottom inside board of the heating box (Box 1) so they are flush with the outer edge of the bottom inside board. Nail the bottom inside board to the frames with 25 mm galvanised nails at 100 mm centres. 1. Measure/layout and cut components on the 4mm plywood sheet as per diagram. Drill holes for the pot holders on inside boards 3 & 4 as depicted in the illustrations on the previous page. 2. Cut timber battens to the required sizes as demonstrated in items A, B, C, D & E. 5. Take the inside boards (Boards 3, 4, 5, and 6) one at a time and place them vertically and in line with the edge of the inside bottom board (Box 1). Where one of the vertical edges should align with adjacent side of the inside bottom board for the inside box (Box 1) and the other end 4 mm from the edge of the bottom board for the outside box (Box 2). Using PVA wood glue and 25 mm nails, fix the four inside boards to the frame separating the bottom boards. 4. Put insulation between the bottom inside board (Box 1) and the frame and position it on the bottom outside board (Box 2) with equal edge distances all around (33 mm). Glue and nail the outside bottom board to the frame using 25 mm nails at 100 mm centres. 6. Using 25 mm nails and PVA wood glue fix two (B) pillars for each corner and one each in the middle of inside boards 4 and 6. Fix two (B) pillars vertically to inside boards 3 & 5 so they are at the position of the pre-drilled holes to hang the pot holders. 8. Where the outside board on one side overlaps the side board on the adjacent side (shown in the diagram) in each corner of the box is cut away with the hand saw. 7. The outside boards (Boards 7, 8, 9, and 10) should now be fixed to the pillars (B) which are attached to the inside boards. Use both the PVA wood glue and 25 mm nails to fix the outside boards one at a time to the pillars (B). Pack insulation tightly between the inside wall of the box and the outside wall of the box. Tools required Electric/Hand Saw (wood) Electric/Manual Drill Hammer Gloves and safety glasses Screw Driver, Pliers Scissors, Pencil Carpenters Square Ruler/Tape Structure of the Box Solar Cooker Batten for Bottom Board X 4 349mm 25mm C Batten for Top Frame X 4 407mm 25mm Batten for the Glass Lid X 4 403mm E 25mm Batten for Top Frame X 4 474mm 382mm D 46mm Illustration of Cutting Layout for Reflector Panels, Heating Box and Pot Holder Boards Heating Box (Double Layer Structure) Reflector Panels Glass Lid Box 1 (Bottom Inside Board) 374mm Pot Holder Board 1 Pot Holder Board 2 370mm 370mm 135mm 135mm 374mm Box 2 (Bottom Outside Board) 440mm 440mm 436mm 436mm 436mm 436mm Outside Board 7 Outside Board 8 Outside Board 9 Outside Board 10 190mm 190mm 190mm 190mm Cutting Layout on 1.2 metres x 2.4 metres Plywood Sheet Box 1 Outside Board 9 Outside Board 7 Outside Board 10 Outside Board 8 Inside Board 6 Inside Board 5 Inside Board 4 Inside Board 3 Pot Holder Board 1 Pot Holder Board 2 Box 2 Panel 1 Panel 2 Panel 3 Panel 4 4 5 6 3 4mm 212mm Panel 1 212mm 90mm 90mm 603mm 117mm 117mm 603mm 5mm 5mm Panel 2 212mm 424mm 90mm 90mm 603mm 117mm 603mm 5mm 117mm 5mm 5mm Panel 4 212mm 212mm 117mm 117mm 603mm Panel 3 212mm 424mm 424mm 90mm 90mm 603mm 117mm 603mm 5mm 117mm 5mm 424mm 90mm 90mm 90mm 90mm 90mm 90mm 90mm 90mm 90mm 90mm 603mm 403mm 403mm 403mm 403mm Inside Board 3 Inside Board 4 Inside Board 5 Inside Board 6 235mm 235mm 125mm 125mm 80mm 80mm Hole for Pot holder Hole for Pot holder 105mm 105mm 235mm 235mm Face to face Face to face 5mm Timber required for the Heating Box Pillar for Box Side-Board X 14 B A 190mm 25mm MANUAL FOR MAKING A BOX SOLAR COOKER What is solar cooking? A solar cooker is a renewable energy technology that uses the heat energy from the sun to cook food. Types of Solar Cookers Two types of solar cookers have been demonstrated in the Pacific region. (i) The parabolic solar cooker is concave in shape and the reflective metal surface captures the sun’s rays and focus it to one point under a pot. The effect is similar to cooking on an open fire or stove. (ii) The box solar cooker is designed to reflect the sun’s rays into an insulated black box with a transparent lid. The reflected rays heat the air trapped in the box sufficient to cook food. Cooking with a box type solar cooker is similar to cooking in a standard oven but cooking takes a longer period of time. Background Information The manual was originally developed by Ferris University in collaboration with SOPAC and is the result of a series of solar cooking demonstrations in Kiribati and Tuvalu. The manual has been tested during training carried out by Ferris University and the Energy Planning Unit of the Ministry of Public Works and Utilities in Kiribati. As part of the project the original manual has been adapted to take into account material and components that are available in the Pacific region. The correct cutting of the plywood and care in construction will contribute to good performance of the box solar cooker.
Transcript
Materials RequiredMaterial Required size Quantity
Plywood 2400 mm x 1200 mm x 4 mm thickness 1 piece
Timber Cross - Section (W x H):
25 mm x 25 mm
46 mm x 25 mm
8 metres
2 metres
Glass 383 mm (L) x 383 mm (W) x 3 mm thickness 1 piece
Black Paint Spray can or Paint can 400 ml
Silicon/Plastic tube 7 mm diameter 2 metres
Galvanised Nails 25 mm length and 45 mm length
Diameter - 2 mm
½ kg
Silicon Adhesive
Sealant
300 ml (black cord is the best) 300 ml
Long Hinge and
Screws
To fix glass lid to heating box 2 Long Hinges
½ kg Screws
Mirror sheet/
Aluminium Foil
For reflector panel 4 metres
L- Shaped Metal
fixtures
For the top of the heating box for closing glass lid 4 pieces
Insulation Glass fiber or wool or saw dust or paper as required
Bolt and Nut
Binding Wire
50 mm bolt with fitting nuts
As required
4 sets
2 metres
PVA Wood Glue As required 1 small tin
Building the Heating Box
Preparation of Materials
3. Lay the four battens for the frames of the bottom board (A) out in a square; glue them to the bottom inside board of the heating box (Box 1) so they are flush with the outer edge of the bottom inside board. Nail the bottom inside board to the frames with 25 mm galvanised nails at 100 mm centres.
1. Measure/layout and cut components on the 4mm plywood sheet as per diagram. Drill holes for the pot holders on inside boards 3 & 4 as depicted in the illustrations on the previous page.
2. Cut timber battens to the required sizes as demonstrated in items A, B, C, D & E.
5. Take the inside boards (Boards 3, 4, 5, and 6) one at a time and place them vertically and in line with the edge of the inside bottom board (Box 1). Where one of the vertical edges should align with adjacent side of the inside bottom board for the inside box (Box 1) and the other end 4 mm from the edge of the bottom board for the outside box (Box 2). Using PVA wood glue and 25 mm nails, fix the four inside boards to the frame separating the bottom boards.
4. Put insulation between the bottom inside board (Box 1) and the frame and position it on the bottom outside board (Box 2) with equal edge distances all around (33 mm). Glue and nail the outside bottom board to the frame using 25 mm nails at 100 mm centres.
6. Using 25 mm nails and PVA wood glue fix two (B) pillars for each corner and one each in the middle of inside boards 4 and 6. Fix two (B) pillars vertically to inside boards 3 & 5 so they are at the position of the pre-drilled holes to hang the pot holders.
8. Where the outside board on one side overlaps the side board on the adjacent side (shown in the diagram) in each corner of the box is cut away with the hand saw.
7. The outside boards (Boards 7, 8, 9, and 10) should now be fixed to the pillars (B) which are attached to the inside boards. Use both the PVA wood glue and 25 mm nails to fix the outside boards one at a time to the pillars (B). Pack insulation tightly between the inside wall of the box and the outside wall of the box.
6. The inside board square part (shown in the diagram) in each corner of the box is cut
away with the hand saw.
7. Fix 4 frames (C) to the top of the outside boards so that they are flush to the outer side of the outside boards by using glue and reinforce it from the side using 25 mm nails. Fix the remaining 4 frames (D) to the top of the heating box so it is flush with the top of the inside board by using 45 mm nails. The top frames hold together the inside boards to the outside boards through the first frames. Do not put the nails to the inner boards.
8. To fix the Pot Holder Boards 1 & 2 inside the heating box, drill 2 holes on the side
boards of the heating box using an electric drill or a manual drill. From one corner of the side board, mark a point at 80 mm from top and 125 mm from the side. On the other corner of the same side board, mark another point at 80 mm from the top and 105 mm from the side. Take the same measurements to the opposite side board so the holes are in line to each other. Insert the bolts into the holes which would hold the pot-holder boards (see Step 15). The diameter of the holes should be same as that of the bolts.
Tools requiredElectric/Hand Saw (wood)
Electric/Manual Drill
Hammer
Gloves and safety glasses
Screw Driver, Pliers
Scissors, Pencil
Carpenters Square Ruler/Tape
Structure of the Box Solar Cooker
Batten for Bottom Board X 4
349m
m
25mm
CBatten for Top Frame X 4
407m
m
25mm
Batten for the Glass Lid X 4
403m
m
E
25mm
Batten for Top Frame X 4
474mm
382mm
D
46mm
Illustration of Cutting Layout for Reflector Panels,
What is solar cooking?A solar cooker is a renewable energy technology that uses the heat energy from the sun to cook food.
Types of Solar CookersTwo types of solar cookers have been demonstrated in the Pacific region.
(i) The parabolic solar cooker is concave in shape and the reflective metal surface captures the sun’s rays and focus it to one point under a pot. The effect is similar to cooking on an open fire or stove.
(ii) The box solar cooker is designed to reflect the sun’s rays into an insulated black box with a transparent lid. The reflected rays heat the air trapped in the box sufficient to cook food. Cooking with a box type solar cooker is similar to cooking in a standard oven but cooking takes a longer period of time.
Background InformationThe manual was originally developed by Ferris University in collaboration with SOPAC and is the result of a series of solar cooking demonstrations in Kiribati and Tuvalu. The manual has been tested during training carried out by Ferris University and the Energy Planning Unit of the Ministry of Public Works and Utilities in Kiribati. As part of the project the original manual has been adapted to take into account material and components that are available in the Pacific region. The correct cutting of the plywood and care in construction will contribute to good performance of the box solar cooker.
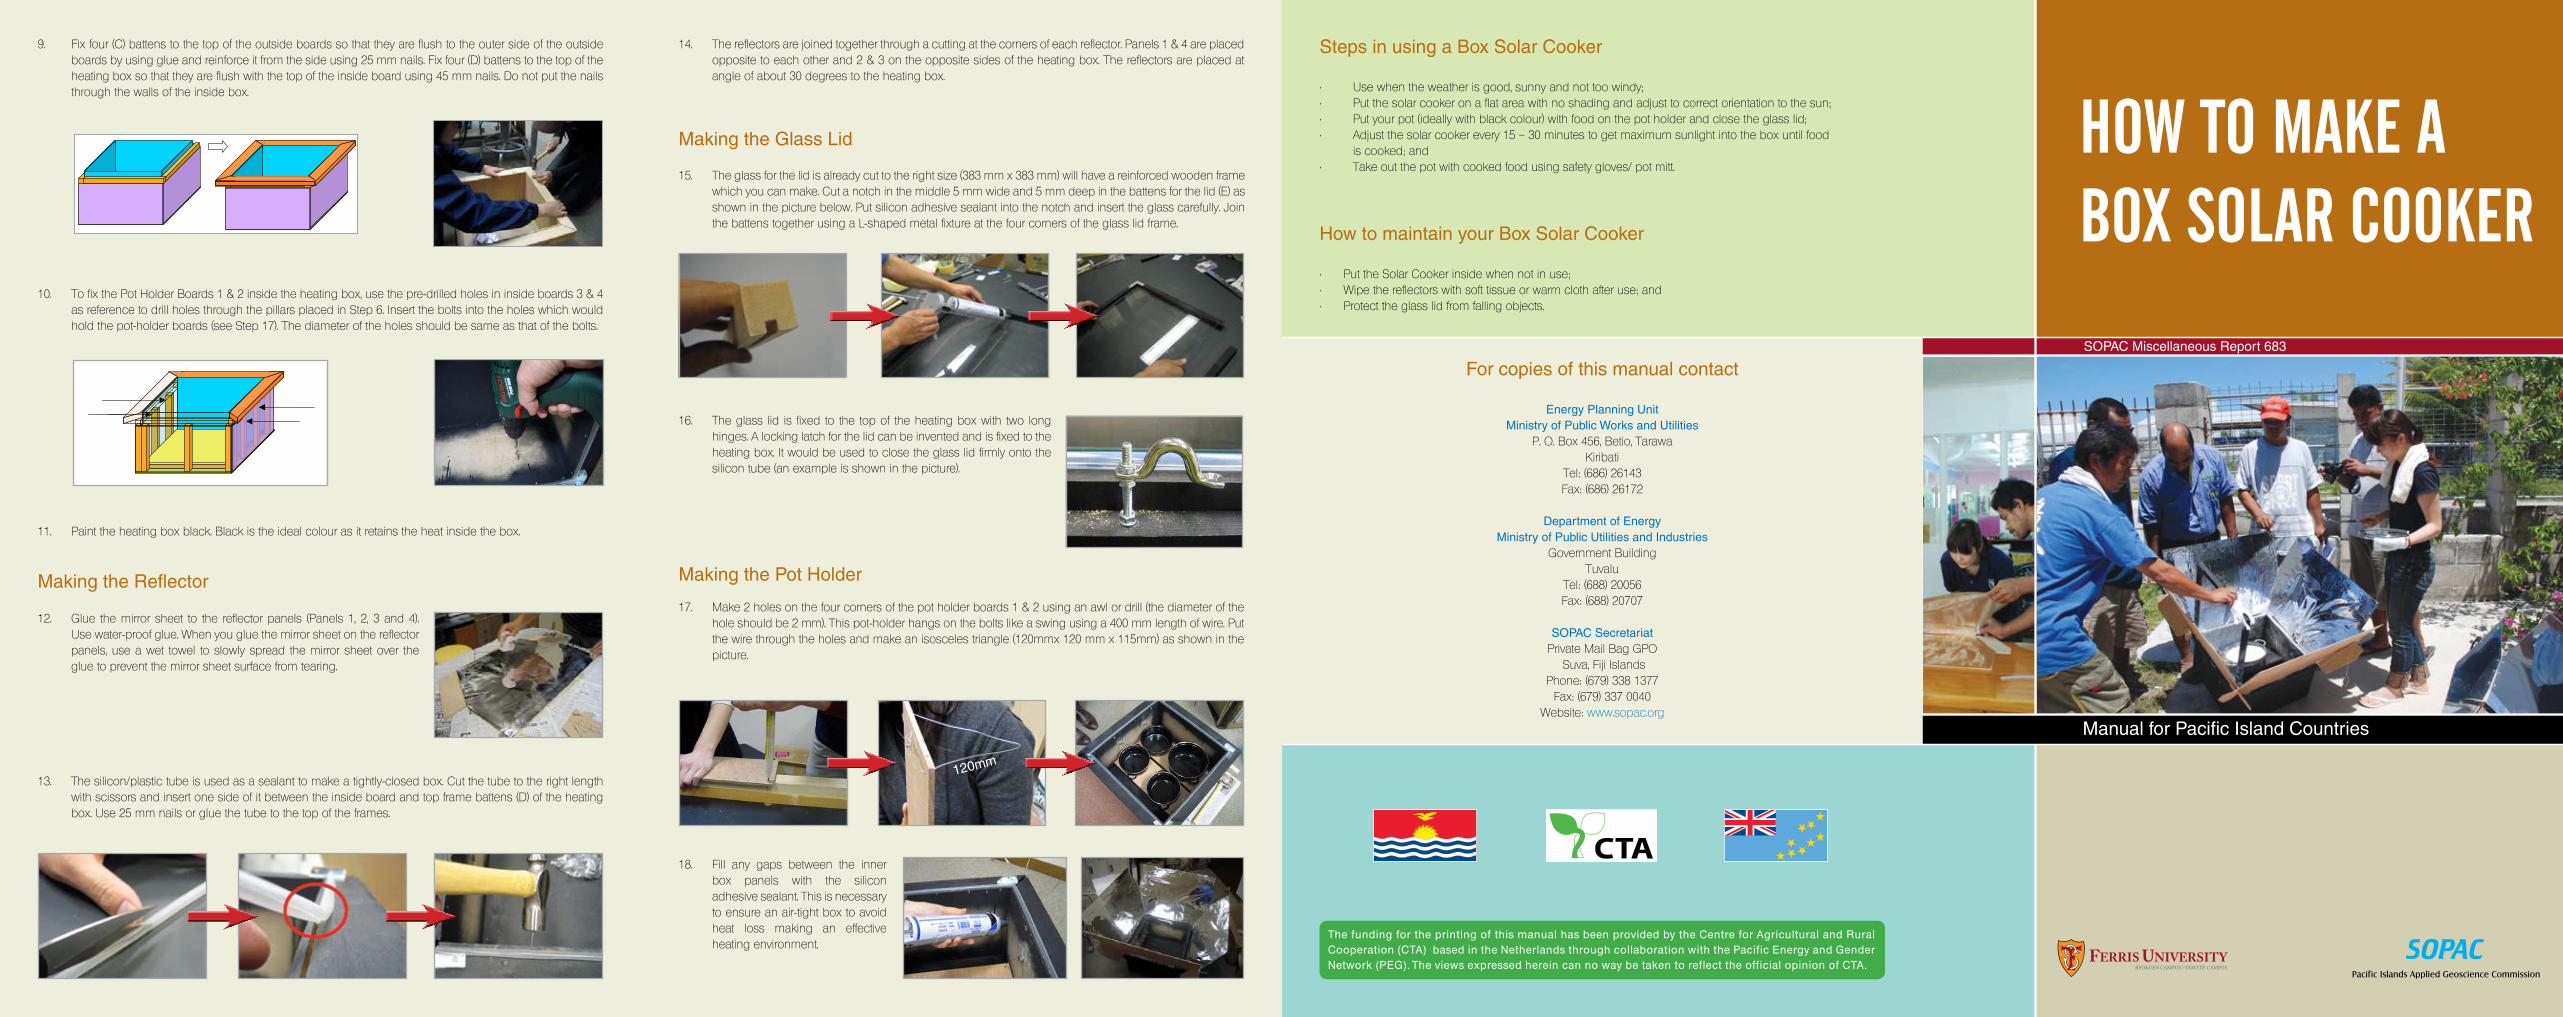
12. Glue the mirror sheet to the reflector panels (Panels 1, 2, 3 and 4). Use water-proof glue. When you glue the mirror sheet on the reflector panels, use a wet towel to slowly spread the mirror sheet over the glue to prevent the mirror sheet surface from tearing.
13. The silicon/plastic tube is used as a sealant to make a tightly-closed box. Cut the tube to the right length with scissors and insert one side of it between the inside board and top frame battens (D) of the heating box. Use 25 mm nails or glue the tube to the top of the frames.
15. The glass for the lid is already cut to the right size (383 mm x 383 mm) will have a reinforced wooden frame which you can make. Cut a notch in the middle 5 mm wide and 5 mm deep in the battens for the lid (E) as shown in the picture below. Put silicon adhesive sealant into the notch and insert the glass carefully. Join the battens together using a L-shaped metal fixture at the four corners of the glass lid frame.
14. The reflectors are joined together through a cutting at the corners of each reflector. Panels 1 & 4 are placed opposite to each other and 2 & 3 on the opposite sides of the heating box. The reflectors are placed at angle of about 30 degrees to the heating box.
17. Make 2 holes on the four corners of the pot holder boards 1 & 2 using an awl or drill (the diameter of the hole should be 2 mm). This pot-holder hangs on the bolts like a swing using a 400 mm length of wire. Put the wire through the holes and make an isosceles triangle (120mmx 120 mm x 115mm) as shown in the picture.
16. The glass lid is fixed to the top of the heating box with two long hinges. A locking latch for the lid can be invented and is fixed to the heating box. It would be used to close the glass lid firmly onto the silicon tube (an example is shown in the picture).
18. Fill any gaps between the inner box panels with the silicon adhesive sealant. This is necessary to ensure an air-tight box to avoid heat loss making an effective heating environment.
Making the Reflector
Making the Glass Lid
Making the Pot Holder
Steps in using a Box Solar Cooker
• Usewhentheweatherisgood,sunnyandnottoowindy;• Putthesolarcookeronaflatareawithnoshadingandadjusttocorrectorientationtothesun;• Putyourpot(ideallywithblackcolour)withfoodonthepotholderandclosetheglasslid;• Adjustthesolarcookerevery15–30minutestogetmaximumsunlightintotheboxuntilfood is cooked; and• Takeoutthepotwithcookedfoodusingsafetygloves/potmitt.
Energy Planning UnitMinistry of Public Works and Utilities
P. O. Box 456, Betio, TarawaKiribati
Tel: (686) 26143Fax: (686) 26172
Department of EnergyMinistry of Public Utilities and Industries
Government BuildingTuvalu
Tel: (688) 20056Fax: (688) 20707
SOPAC SecretariatPrivate Mail Bag GPO
Suva, Fiji IslandsPhone: (679) 338 1377
Fax: (679) 337 0040Website: www.sopac.org
Pacific Islands Applied Geoscience Commission
SOPAC
HOW TO MAkE A BOX SOLAR COOkER
Manual for Pacific Island Countries
SOPAC Miscellaneous Report 683
11. Paint the heating box black. Black is the ideal colour as it retains the heat inside the box.
10. To fix the Pot Holder Boards 1 & 2 inside the heating box, use the pre-drilled holes in inside boards 3 & 4 as reference to drill holes through the pillars placed in Step 6. Insert the bolts into the holes which would hold the pot-holder boards (see Step 17). The diameter of the holes should be same as that of the bolts.
The funding for the printing of this manual has been provided by the Centre for Agricultural and Rural Cooperation (CTA) based in the Netherlands through collaboration with the Pacific Energy and Gender Network (PEG). The views expressed herein can no way be taken to reflect the official opinion of CTA.
9. Fix four (C) battens to the top of the outside boards so that they are flush to the outer side of the outside boards by using glue and reinforce it from the side using 25 mm nails. Fix four (D) battens to the top of the heating box so that they are flush with the top of the inside board using 45 mm nails. Do not put the nails through the walls of the inside box.
6. The inside board square part (shown in the diagram) in each corner of the box is cut
away with the hand saw.
7. Fix 4 frames (C) to the top of the outside boards so that they are flush to the outer side of the outside boards by using glue and reinforce it from the side using 25 mm nails. Fix the remaining 4 frames (D) to the top of the heating box so it is flush with the top of the inside board by using 45 mm nails. The top frames hold together the inside boards to the outside boards through the first frames. Do not put the nails to the inner boards.
8. To fix the Pot Holder Boards 1 & 2 inside the heating box, drill 2 holes on the side
boards of the heating box using an electric drill or a manual drill. From one corner of the side board, mark a point at 80 mm from top and 125 mm from the side. On the other corner of the same side board, mark another point at 80 mm from the top and 105 mm from the side. Take the same measurements to the opposite side board so the holes are in line to each other. Insert the bolts into the holes which would hold the pot-holder boards (see Step 15). The diameter of the holes should be same as that of the bolts.
120mm
inside wall of the box and the outside wall of the box.
8. Where the outside board on one side overlaps the side board on the adjacent side at
one end only (shown in the diagram) in each corner of the box is cut away with the hand saw.
9. Fix four (C) frames to the top of the outside boards so that they are flush to the outer
side of the outside boards by using glue and reinforce it from the side using 25 mm nails. Fix four (D) frames to the top of the heating box so that they are flush with the top of the inside board using 45 mm nails. Do not put the nails through the walls of the inside box.
10. To fix the Pot Holder Boards 1 & 2 inside the heating box, use the pre-drilled holes in
inside boards 3 and 4 as reference to drill holes through the pillars placed in Step 6. Insert the bolts into the holes which would hold the pot-holder boards (see Step 17). The diameter of the holes should be same as that of the bolts.