22
BE76 Beechcraft Duchess Maneuvers Checklist
BE76 Beechcraft Duchess
Maneuvers Checklist

Introduction
Power Settings
This document is intended to introduce to you the standard method of performing maneuvers in Sunair Aviation’s Beechcraft Duchess BE76 aircraft. Each maneuver has been written to reduce the amount of steps and aid in memorization.
The BE76 has six simple power settings each pilot should remember. They are:
1. Climb Power-………………………………25”MP, 2500 RPM 2. Normal Cruise-…………………………….23”MP, 2300 RPM 3. Slow Cruise-……………………………….20”MP, 2300 RPM 4. Pattern / Landing-…………………………18”MP, 2300 RPM 5. Slowing during Clearing Turns-………….18”MP, 2300 RPM
As always, if the approved Airplane Flight Manual and this Maneuvers Checklist disagree, the procedure in the AFM/POH should be followed in the interest of safety
Landing Speed Considerations
Note that there are slight differences in the speeds in our procedures and those specified in the Pilot’s Operating Handbook. Our speeds are slightly higher in order to add a margin of safety should an engine fail while in the landing phase. Accordingly, when calculating landing distances, you should account for the extra speed needed to a complete stop.

Clearing Turns
Clearing Turns
Objective: To visually clear the area surrounding the aircraft so as to not pose a collision hazard to any other traffic
Practical Private Multi Add-on:
Test Comm. Multi Add-on:
Standards ME Instructor:
Restrictions Minimum Optimum Maximum
Altitude 3000’ 3000’ 3000’ Speed 110 110 110
Procedure
1. Establish the Pre-Maneuvers Power Setting (18’’MP/2300) 2. Visually clear the areas to the right, front, left, and behind the aircraft. Also look for
traffic above and below your altitude. 3. Turn 90 to the left. 4. Visually scan the area again. 5. Turn 90 to the right. 6. Scan the area one last time. 7. Announce intentions on Practice Area Advisory Frequency
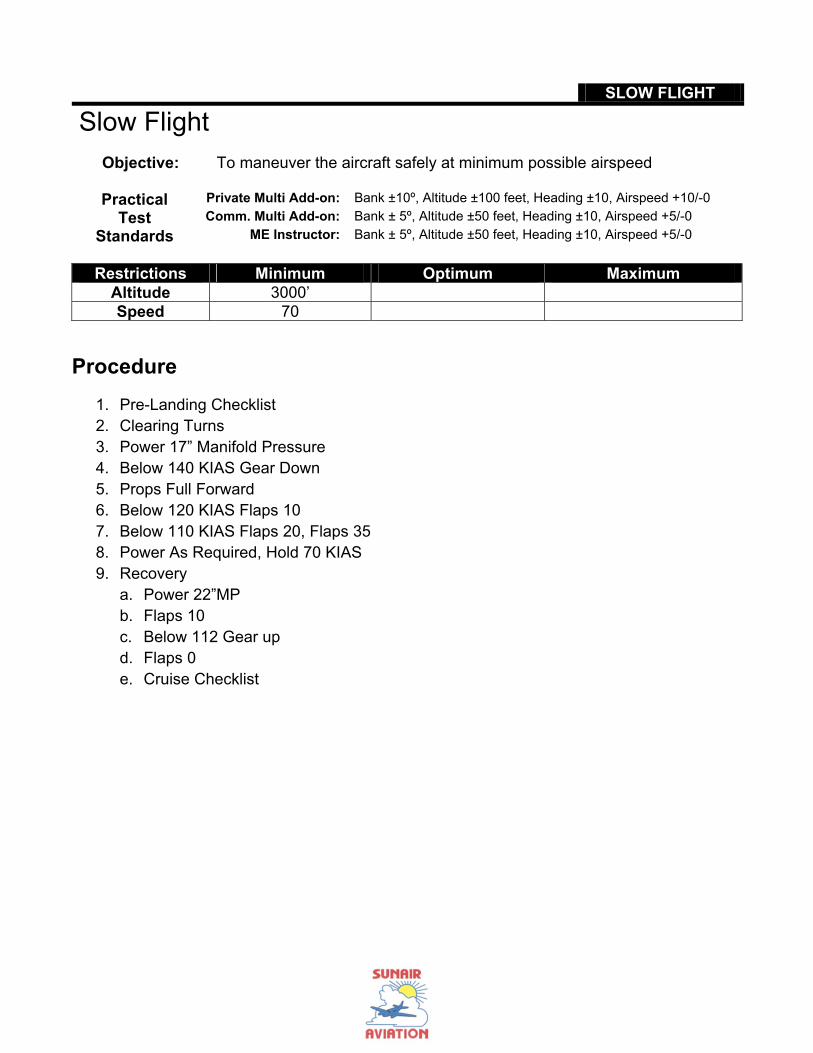
SLOW FLIGHT
Slow Flight
Objective: To maneuver the aircraft safely at minimum possible airspeed
Practical Private Multi Add-on: Bank ±10º, Altitude ±100 feet, Heading ±10, Airspeed +10/-0
Test Comm. Multi Add-on: Bank ± 5º, Altitude ±50 feet, Heading ±10, Airspeed +5/-0
Standards ME Instructor: Bank ± 5º, Altitude ±50 feet, Heading ±10, Airspeed +5/-0
Restrictions Minimum Optimum Maximum
Altitude 3000’ Speed 70
Procedure
1. Pre-Landing Checklist 2. Clearing Turns 3. Power 17” Manifold Pressure 4. Below 140 KIAS Gear Down 5. Props Full Forward 6. Below 120 KIAS Flaps 10 7. Below 110 KIAS Flaps 20, Flaps 35 8. Power As Required, Hold 70 KIAS 9. Recovery
a. Power 22”MP b. Flaps 10 c. Below 112 Gear up d. Flaps 0 e. Cruise Checklist

POWER-OFF STALL
Power-Off Stall
Objective: To demonstrate recovery from a stall in the landing configuration
Practical Private Multi Add-on: Heading ±10º, Bank not to exceed 20º ±10º, VY before Flaps 0º
Test Comm. Multi Add-on: Heading ±10º, Bank not to exceed 20º ±5º, VY before Flaps 0º
Standards ME Instructor: Heading ±10º, Bank not to exceed 20º ±5º, VY before Flaps 0º
Restrictions Minimum Optimum Maximum
Altitude 3000’ Speed
Procedure
1. Pre-Landing Checklist 2. Clearing Turns 3. Power 17” Manifold Pressure 4. Below 140 KIAS Gear Down 5. Prop Full Forward 6. Below 120 KIAS Flaps 10 7. Below 110 KIAS Flaps 20, Flaps 35 8. Establish Descent 85 KIAS (200ft) 9. Reduce Power to Idle and Pitch for Stall (Recovery at First Sign) 10. Recovery
a. Reduce AOA, Apply Full Power, Level Wings b. Flaps 10, Climb 80 KIAS c. Positive Rate- Below 112 KIAS Gear Up d. Climb 85 KIAS e. Flaps Zero f. Cruise Checklist
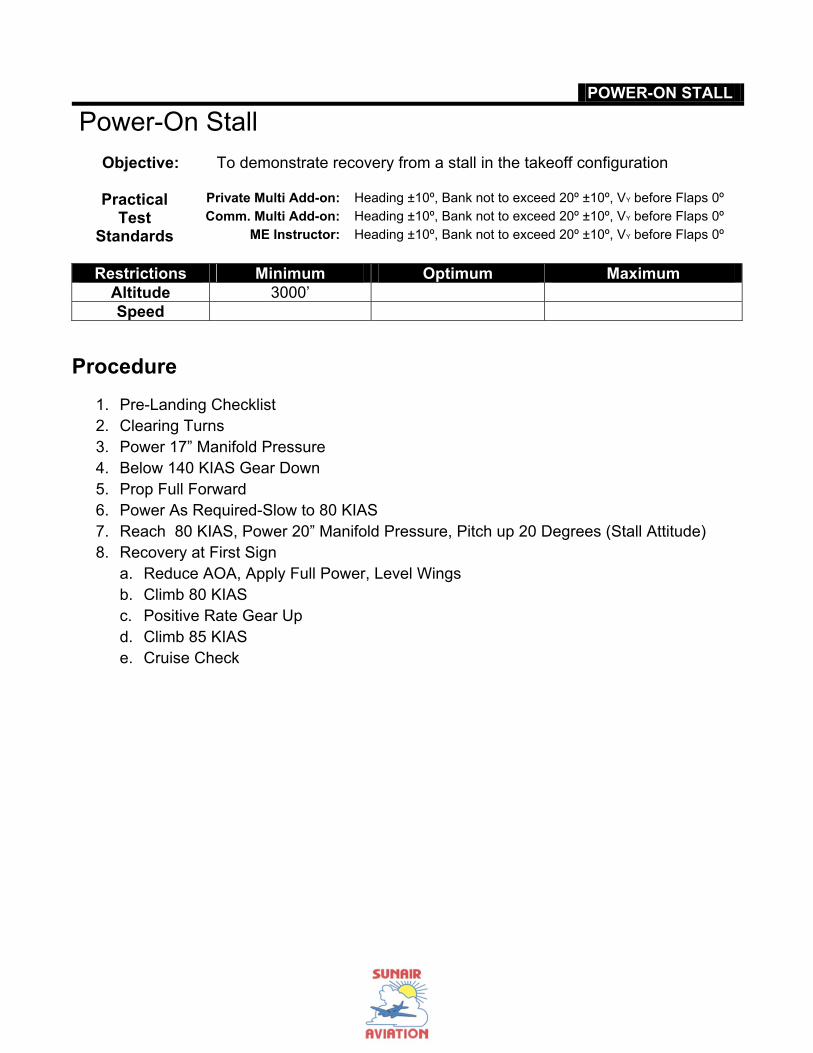
POWER-ON STALL
Power-On Stall
Objective: To demonstrate recovery from a stall in the takeoff configuration
Practical Private Multi Add-on: Heading ±10º, Bank not to exceed 20º ±10º, VY before Flaps 0º
Test Comm. Multi Add-on: Heading ±10º, Bank not to exceed 20º ±10º, VY before Flaps 0º
Standards ME Instructor: Heading ±10º, Bank not to exceed 20º ±10º, VY before Flaps 0º
Restrictions Minimum Optimum Maximum
Altitude 3000’ Speed
Procedure
1. Pre-Landing Checklist 2. Clearing Turns 3. Power 17” Manifold Pressure 4. Below 140 KIAS Gear Down 5. Prop Full Forward 6. Power As Required-Slow to 80 KIAS 7. Reach 80 KIAS, Power 20” Manifold Pressure, Pitch up 20 Degrees (Stall Attitude) 8. Recovery at First Sign
a. Reduce AOA, Apply Full Power, Level Wings b. Climb 80 KIAS c. Positive Rate Gear Up d. Climb 85 KIAS e. Cruise Check
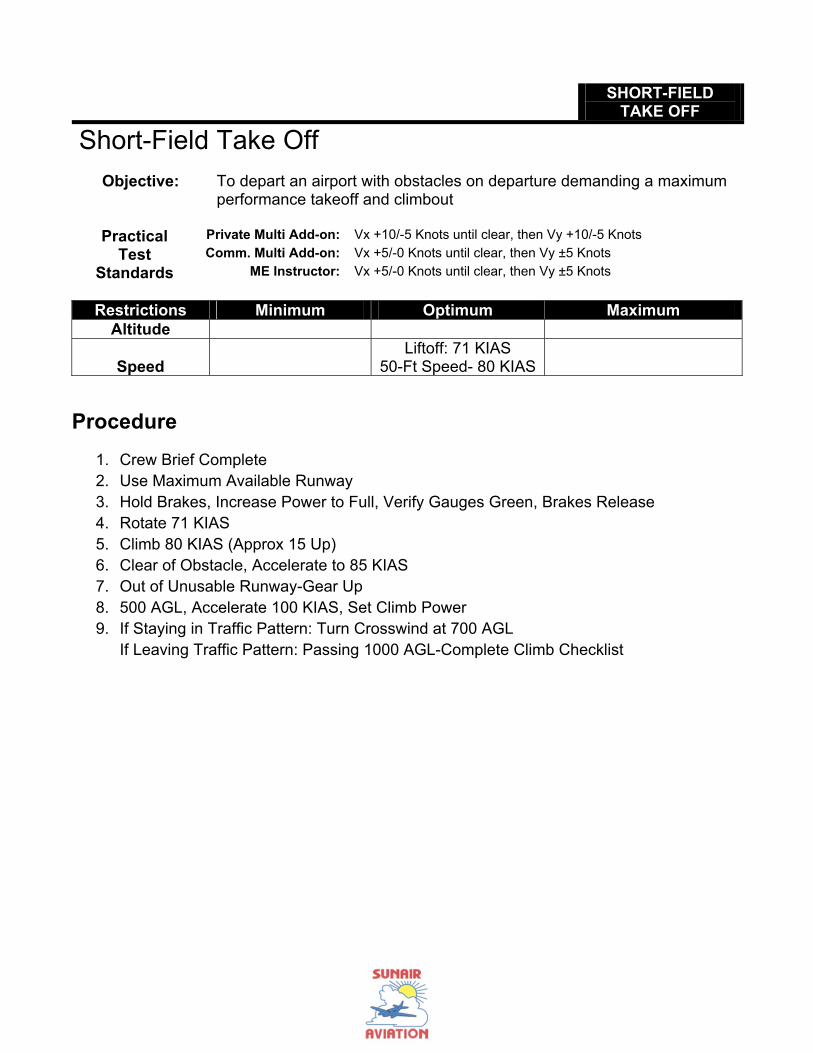
SHORT-FIELD TAKE OFF
Short-Field Take Off
Objective: To depart an airport with obstacles on departure demanding a maximum performance takeoff and climbout
Practical Private Multi Add-on: Vx +10/-5 Knots until clear, then Vy +10/-5 Knots
Test Comm. Multi Add-on: Vx +5/-0 Knots until clear, then Vy ±5 Knots
Standards ME Instructor: Vx +5/-0 Knots until clear, then Vy ±5 Knots
Restrictions Minimum Optimum Maximum
Altitude
Speed Liftoff: 71 KIAS
50-Ft Speed- 80 KIAS
Procedure
1. Crew Brief Complete 2. Use Maximum Available Runway 3. Hold Brakes, Increase Power to Full, Verify Gauges Green, Brakes Release 4. Rotate 71 KIAS 5. Climb 80 KIAS (Approx 15 Up) 6. Clear of Obstacle, Accelerate to 85 KIAS 7. Out of Unusable Runway-Gear Up 8. 500 AGL, Accelerate 100 KIAS, Set Climb Power 9. If Staying in Traffic Pattern: Turn Crosswind at 700 AGL
If Leaving Traffic Pattern: Passing 1000 AGL-Complete Climb Checklist

SHORT-FIELD LANDING
Short-Field Landing
Objective: To arrive at an airport and land safely where there is a limited length of runway and/or obstacles on approach
Practical Private Multi Add-on: VREF ±10/-5 Knots (Plus Wind Factor) within 200 ft. of
touchdown point, on centerline, no side drift Test Comm. Multi Add-on: VREF ± 5 Knots (Plus Wind Factor) within 100 ft. of touchdown
point, on centerline, no side drift Standards ME Instructor: VREF ±5 Knots (Plus Wind Factor) within 100 ft. of touchdown
point, on centerline, no side drift
Restrictions Minimum Optimum Maximum Altitude Speed
80 KIAS Downwind: 100 KIAS
Base: 90 Final: 80
Pattern: 120 KIAS
Procedure
1. Approach Brief Complete 2. Pre-Landing Checklist Complete 5 nm prior 3. Downwind – Set Power 18” Manifold Pressure/2300 RPM (Approx 120 KIAS) 4. Abeam Touchdown Point- Gear Down-Flaps 10-Power As Required (Approx 15” MP) 5. Descend 100 KIAS, Power As Required 6. Turn Base-Flaps 20, GUMPS, Power As Required for 90 KIAS 7. Turn Final-Flaps 35, GUMPS, Power As Required for 80 KIAS 8. During flare, reduce throttles to idle

Normal Takeoff / Crosswind Takeoff
Normal / Crosswind Takeoff
Objective: To depart an airport during normal or crosswind conditions with more than adequate clearance of obstacles on departure
Practical Private Multi Add-on: Vy +10/-5 Knots
Test Comm. Multi Add-on: Vy ±5 Knots
Standards ME Instructor: Vy ±5 Knots
Restrictions Minimum Optimum Maximum
Altitude Speed
Liftoff: 71 Knots Climb 85 Knots
Procedure
1. Crew Brief Complete 2. Use Maximum Available Runway 3. Hold Brakes, Increase Power 2000 RPMS, Verify Gauges Green, Brakes Release 4. Rotate 71 KIAS 5. Climb 85 KIAS 6. Out of Unusable Runway-Gear Up 7. 500 AGL, Accelerate 100 KIAS, Set Climb Power 8. If Staying in Traffic Pattern: Turn Crosswind at 700 AGL
If Leaving Traffic Pattern: Passing 1000 AGL-Complete Climb Checklist

Normal / Crosswind Landing
Normal / Crosswind Landing
Objective: To arrive at an airport and land safely where there is limited length of runway and/or obstacles on approach
Practical Private Multi Add-on: VREF +10/-5 Knots (Plus Wind Factor)
Test Comm. Multi Add-on: VREF +10/-5 Knots (Plus Wind Factor)
Standards ME Instructor: VREF +10/-5 Knots (Plus Wind Factor)
Restrictions Minimum Optimum Maximum
Altitude Speed 85 KIAS Downwind: 100 KIAS
Base: 90 Final: 80
Pattern: 120 KIAS
Procedure
1. Approach Brief Complete 2. Pre-Landing Checklist Complete 5 nm prior 3. Downwind – Set Power 18” Manifold Pressure/2300 RPM (Approx 120 KIAS) 4. Abeam Touchdown Point- Gear Down-Flaps 10-Power As Required (Approx 15” MP) 5. Descend 100 KIAS, Power As Required 6. Turn Base-Flaps 20, GUMPS, Power As Required for 90 KIAS 7. Turn Final-Flaps 35, GUMPS, Power As Required for 85 KIAS 8. During flare, reduce throttles to idle

Go-Around / Rejected Landing
Go-Around / Rejected Landing
Objective: To safely abort a landing and establish climb configuration as quickly as possible
Practical Private Multi Add-on: Vy +10/-5 Knots
Test Comm. Multi Add-on: Vy ±5 Knots
Standards ME Instructor: Vy ±5 Knots
Restrictions Minimum Optimum Maximum
Altitude Speed 80 KIAS
Procedure
1. Apply full power (Verify Mixture, Props, Throttles Full Forward) 2. Pitch 80 KIAS 3. Flaps 10 4. Positive Rate-Gear Up 5. Pitch 85 KIAS 6. Flaps up 7. Sidestep Left or Right – Announce intentions to ATC or CTAF
Performance Maneuvers
Steep Turns
Objective: To maintain two opposite-direction, level turns while rolling out on entry heading for both turns
Practical Private Multi Add-on: 45º Bank ±5º, Altitude ±100ft.,Heading ±10º, Airspeed ±10 Knots
Test Comm. Multi Add-on: 50º Bank ±5º, Altitude ±100ft.,Heading ±10º, Airspeed ±10 Knots
Standards ME Instructor: 50º Bank ±5º, Altitude ±100ft.,Heading ±10º, Airspeed ±10 Knots
Restrictions Minimum Optimum Maximum
Altitude 3000’ Speed 125
Procedure
1. Pre-Landing Checklist 2. Clearing Turns 3. Set power 19”MP-2300RPMS, approximately 125 KIAS 4. Perform two 360º turns, adjust Pitch, Power, and Trim during maneuver 5. Cruise Checklist

Performance Maneuvers
Emergency Descent
Objective: To quickly gain airspeed and lose altitude. Simulation of putting out an engine fire is appropriate for this maneuver and should be practiced
Practical Private Multi Add-on: Maintains Appropriate Airspeed, +0/-10, Altitude ±100 feet
Test Comm. Multi Add-on: Maintains Appropriate Airspeed, +0/-10, Altitude ±100 feet
Standards ME Instructor: Maintains Appropriate Airspeed, +0/-10, Altitude ±100 feet
Restrictions Minimum Optimum Maximum
Altitude 3000’ 5000’ Speed 135 KIAS 140 KIAS
Procedure
1. Pre-Landing Checklist (COWL FLAPS CLOSED) 2. Clearing Turns 3. Throttle-Idle 4. Below 140-Gear Down 5. Props Full Forward 6. Pitch 135 KIAS (Approx 15 Down) 7. Bank 30 Degrees Away from Direction of Simulated Burning Engine
(If Simulating Burning Engine) 8. Level off 10% of VSI Rate (Approx 250’) 9. Leveling off smoothly increase throttles (approx 15”) Below 112 KIAS-Gear Up 10. Set Cruise Power– Cruise Checklist

Engine-Out Maneuvers
Engine Failure During Takeoff Before VMC
Objective: To demonstrate a successful aborted takeoff in the event of an engine failure before lift-off
Practical Private Multi Add-on:
Test Comm. Multi Add-on:
Standards ME Instructor:
Restrictions Minimum Optimum Maximum
Altitude Speed 32 KIAS
Procedure
1. Reduce Throttles to Idle 2. Maintain directional control 3. Apply sufficient braking to stop on the runway 4. Notify ATC/CTAF
Engine-Out Maneuvers
Engine Failure After Liftoff (Simulated)
Objective: To demonstrate a successful engine-failure procedure after liftoff
Practical Private Multi Add-on: Heading ±10 Airspeed ±5 Knots
Test Comm. Multi Add-on: Heading ±10 Airspeed ±5 Knots
Standards ME Instructor: Heading ±10 Airspeed ±5 Knots
Restrictions Minimum Optimum Maximum
Altitude 500’ Speed 85 KIAS 85 KIAS
Procedure
1. Maintain Directional Control of the Aircraft (zero sideslip) 2. Maintain VYSE or VXSE (or as appropriate) 3. Mixture, Props, Throttles- Verify Full Forward-Aux Pumps On 4. Clean Up- Flaps Up, Gear Up 5. Identify-Verify -“Dead Foot, Dead Engine” – reduce throttle on suspected engine 6. Fix or Feather 7. Secure Checklist (If Feathered)

Engine-Out Maneuvers
Approach & Landing with Inoperative Engine
Objective: To approach an airport and land safely with one engine inoperative. This maneuver should only be attempted with a simulated failure
Practical Private Multi Add-on: Stabilized Approach, Airspeed VREF ±10/-5 Knots
Test Comm. Multi Add-on: Stabilized Approach, Airspeed VREF ±5 Knots
Standards ME Instructor: Stabilized Approach, Airspeed VREF ±5 Knots
Restrictions Minimum Optimum Maximum
Altitude Speed
85 KIAS Downwind: 100 KIAS
Base: 90 Final: 85
Pattern: 100 KIAS
Procedure
1. Complete Engine Failure Checklist 2. Approach Brief Complete 3. Pre-Landing Checklist 5nm Prior 4. Power As Required – Maintain 100 KIAS (VYSE or VXSE Minimum) 5. Abeam numbers-Reduce Power As Required-Descend 100 KIAS 6. Base-Below 140 KIAS Gear Down-Power As Req.- 90 KIAS-GUMPS Check 7. Final-Power As Required-Minimum 85 KIAS-Flaps As Required –GUMPS Check 8. During Flare Reduce Throttles to Idle

Engine-Out Maneuvers
VMC Demonstration
Objective: To demonstrate the aircraft’s behavior during simulated VMC conditions. The instructor will block the rudder in order to induce VMC conditions before the stalling speed.
Practical Private Multi Add-on: Heading ±20 feet, Recover to VYSE +10/-5 Knots
Test Comm. Multi Add-on: Heading ±20 feet, Recover to VYSE ±5 Knots
Standards ME Instructor: Heading ±20 feet, Recover to VYSE ±5 Knots
Restrictions Minimum Optimum Maximum
Altitude 5000’ Speed 70 KIAS
Procedure
1. Pre-Landing Checklist 2. Clearing Turns 3. Left Engine-Reduce to Idle 4. Maintain Directional Control 5. Props Full Forward and RT Throttle-Full Forward 6. Establish Zero-Sideslip 7. Maintain VYSE (85 KIAS) 8. Once at VYSE, Set a Pitch Attitude that will enable a 1Knot Decrease per Second 9. Recovery, whichever comes first-
a. Indication of Stall b. 20 Deg. Heading Change c. 70 Knots
10. Recovery a. Reduce Power on RT Engine and Reduce AOA b. Apply Full Power on RT Engine Establish a Climb at VYSE (85 KIAS)
11. Increase power to LT Engine and Set Cruise Power 12. Cruise Checklist
Engine-Out Maneuvers
Drag Demonstration
Objective: To demonstrate the associated drag penalties with different configurations during single-engine operations
Practical Private Multi Add-on:
Test Comm. Multi Add-on:
Standards ME Instructor:
Restrictions Minimum Optimum Maximum
Altitude 3000’ Speed 85 KIAS 85 KIAS 85 KIAS
Procedure
1. Pre-Landing Checklist 2. Clearing Turns 3. Left Engine-Set Zero Thrust (10” MP) 4. Maintain Directional Control 5. Props Full Forward and RT Throttle-Full Forward 6. Establish Zero-Sideslip 7. Maintain VYSE (85 KIAS) 8. Below 140 KIAS-Gear Down –(Note VSI) 9. Below 120 KIAS-Flaps 10 (Note VSI) 10. Below 110 KIAS-Flaps 20 (Note VSI) 11. Below 110 KIAS-Flaps 35 (Note VSI) 12. Left Engine-Idle (Windmill) (Note VSI) 13. Recover
a. Throttles Full b. Flaps 10-Climb 80 KIAS c. Positive Rate-Below 112 Gear Up d. Climb 85 KIAS e. Flaps Up f. Cruise Checklist

Instrument Approaches
Precision Approach, Single Engine
Objective: To safely execute a precision instrument approach procedure with one engine inoperative
Practical Private Multi Add-on: Heading ±10º, Altitude ±100 feet, Airspeed ±10, CDI ¾ Scale
Test Comm. Multi Add-on: Heading ± 10º,Altitude ±100 feet, Airspeed ±10, CDI ¾ Scale
Standards ME Instructor: Heading ± 10º,Altitude ±100 feet, Airspeed ±10, CDI ¾ Scale
Restrictions Minimum Optimum Maximum
Altitude Speed 85 KIAS
Procedure
1. Approach Brief Complete 2. Engine Failure Checklist Complete 3. Pre-Landing Checklist Complete 4. Maneuvering-Power as Required to Maintain 100 KIAS (VYSE or VXSE Minimum) 5. 1 Dot Below GS Intercept-Below 140 KIAS Gear Down 6. Power As Required-100 KIAS (If Unable Maintain VYSE or VXSE) 7. GUMPS 8. Flaps As Required
a. Maximum 10 Flaps

Instrument Approaches
Non-Precision Approach, Single Engine
Objective: To safely execute a non-precision instrument approach procedure with one engine inoperative
Practical Private Multi Add-on: Heading ±10º, Altitude ±100 feet, Airspeed ±10, CDI ¾ Scale
Test Comm. Multi Add-on: Heading ± 10º,Altitude ±100 feet, Airspeed ±10, CDI ¾ Scale
Standards ME Instructor: Heading ± 10º,Altitude ±100 feet, Airspeed ±10, CDI ¾ Scale
Restrictions Minimum Optimum Maximum
Altitude Speed 85 KIAS
Procedure
1. Approach Brief Complete 2. Engine Failure Checklist Complete 3. Pre-Landing Checklist Complete 4. Maneuvering-Power as Required to Maintain 100 KIAS (VYSE or VXSE Minimum) 5. FAF-Below 140 KIAS Gear Down 6. Power As Required-100 KIAS (If Unable Maintain VYSE or VXSE) 7. GUMPS 8. Flaps As Required
a. Maximum 10 Flaps
Note: Circling Approaches: Gear Remains up until leaving the MDA on the Circling Maneuver
Takeoff Briefing
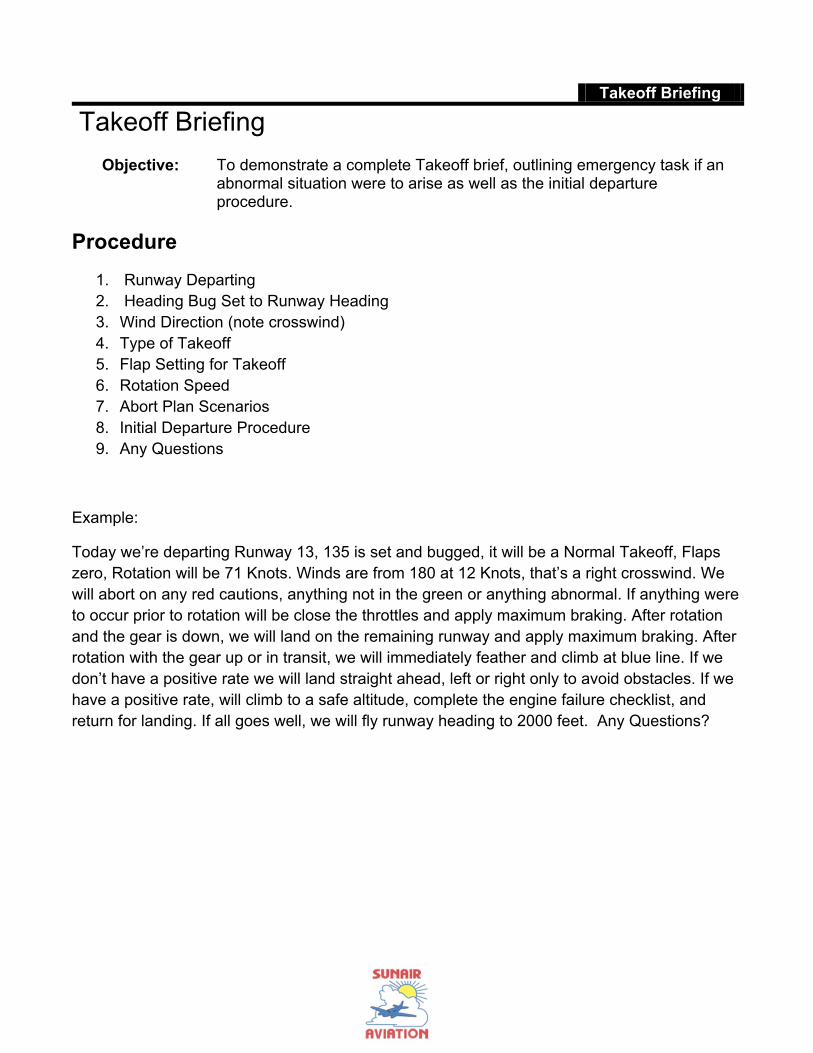
Takeoff Briefing
Objective: To demonstrate a complete Takeoff brief, outlining emergency task if an abnormal situation were to arise as well as the initial departure procedure.
Procedure
1. Runway Departing 2. Heading Bug Set to Runway Heading 3. Wind Direction (note crosswind) 4. Type of Takeoff 5. Flap Setting for Takeoff 6. Rotation Speed 7. Abort Plan Scenarios 8. Initial Departure Procedure 9. Any Questions
Example:
Today we’re departing Runway 13, 135 is set and bugged, it will be a Normal Takeoff, Flaps zero, Rotation will be 71 Knots. Winds are from 180 at 12 Knots, that’s a right crosswind. We will abort on any red cautions, anything not in the green or anything abnormal. If anything were to occur prior to rotation will be close the throttles and apply maximum braking. After rotation and the gear is down, we will land on the remaining runway and apply maximum braking. After rotation with the gear up or in transit, we will immediately feather and climb at blue line. If we don’t have a positive rate we will land straight ahead, left or right only to avoid obstacles. If we have a positive rate, will climb to a safe altitude, complete the engine failure checklist, and return for landing. If all goes well, we will fly runway heading to 2000 feet. Any Questions?

Approach Briefing
Approach Briefing
Objective: To demonstrate a complete VFR Approach Brief, outlining the important elements related to a safe landing.
Procedure
1. Runway Landing 2. Method of Backup Guidance 3. Pattern Altitude 4. Pattern Entry (Note Non-Standard Flow) 5. Type of Landing 6. Flaps Desired 7. Go Around Point 8. Left or Right Turn After Landing 9. Any Questions
Example
Today we are landing Runway 13, I will OBS 135 for backup guidance. Pattern altitude will be 1100 indicated, we will plan on a left downwind, this will be a normal landing with full flaps. We will go around if we are not down by the runway intersection 3-21. After landing it will be a right turn. Any Questions?