105


Contents MS Word 2010 ........................................................................................................................................ 1
I. Enhancement of Document Layout using Object features ............................................................. 1
1. Inserting pictures ........................................................................................................................ 1
2. Enhancing pictures ...................................................................................................................... 1
3. Applying Picture Styles to your images ....................................................................................... 1
4. Adding a picture shape ............................................................................................................... 2
5. Displaying a picture border ......................................................................................................... 3
6. Adding a picture effect ................................................................................................................ 4
7. Editing and adjusting images ...................................................................................................... 4
8. Cropping pictures ........................................................................................................................ 5
9. Resizing pictures ......................................................................................................................... 6
10. Rotating pictures ..................................................................................................................... 7
11. Adding captions to pictures .................................................................................................... 8
II. Special Publication Features for Quality Work ............................................................................... 9
1. Provide Text Alternatives for Images and Graphical Objects ..................................................... 9
2. Avoid “Floating” Elements ........................................................................................................ 10
3. Captioning and numbering of tables and figures...................................................................... 10
4. Captioning tables ...................................................................................................................... 11
5. Automatically captioning tables ............................................................................................... 11
6. Captioning figures ..................................................................................................................... 11
7. Step-by-step captioning and numbering of tables and figures................................................. 12
8. Aligning the table and figure caption ........................................................................................ 14
9. Concatenating chapter number to figure or table number ...................................................... 15
10. Footnotes and endnotes ....................................................................................................... 15
11. How to change the footnote separator ................................................................................ 17
12. Endnotes with Square Brackets ([1],[2],...) ........................................................................... 17
13. Bookmarks ............................................................................................................................ 18
14. Cross references .................................................................................................................... 19
15. Working with Columns. ......................................................................................................... 21
16. Adjust spacing ....................................................................................................................... 22
17. Display text boundaries ........................................................................................................ 22
18. Quickly access options .......................................................................................................... 23
19. Equalize the columns ............................................................................................................ 23

20. Add a column break .............................................................................................................. 24
21. Balance the columns ............................................................................................................. 24
22. Create a title that spans columns ......................................................................................... 25
23. Add a picture ......................................................................................................................... 26
24. Drop Cap ............................................................................................................................... 27
III. Boiler Plate features in MS-Word ............................................................................................. 28
1. Document templates ................................................................................................................ 28
2. Saving and Creating Templates ................................................................................................. 28
3. AutoText .................................................................................................................................... 29
4. Adding Your Own AutoText ...................................................................................................... 29
5. Viewing AutoText Entries .......................................................................................................... 30
6. F3 And AutoText........................................................................................................................ 31
7. AutoCorrect Options ................................................................................................................. 31
8. Difference between Building Blocks/AutoText and AutoCorrect. ............................................ 33
9. create a new Building Block? .................................................................................................... 33
10. Building Blocks Organizer ...................................................................................................... 34
IV. Generating Table of Contents and Indexing in MS Word ......................................................... 35
1. Identify the text that you want to appear in the Table of Contents ......................................... 35
2. Create the Table of Contents .................................................................................................... 36
3. Using a table of contents content control in Word 2007 or Word 2010 .................................. 36
4. Customize the Table of Contents (if you need to) .................................................................... 38
5. How to create a table of contents for several documents ....................................................... 38
6. Other tips about Tables of Contents ......................................................................................... 39
7. PDF for electronic submission................................................................................................... 40
8. Converting Word files to PDF .................................................................................................... 41
9. Save a document to a shared folder on your server ................................................................. 41
V. Document Sharing and Security Issues ......................................................................................... 42
1. Share a Word doc in Windows Live SkyDrive............................................................................ 42
2. Restrict Editing To Secure Word 2010 Document .................................................................... 42
3. Set Document Password: .......................................................................................................... 46
4. Remove Document Password: .................................................................................................. 47
MS PowerPoint 2010 ............................................................................................................................ 49
I. Custom Animation using PowerPoint ........................................................................................... 49
1. Overview of animating text and objects ................................................................................... 49
2. Add animation to an object ...................................................................................................... 49
3. Use ready-made animations ..................................................................................................... 51

4. Set triggers ................................................................................................................................ 52
5. Use the Animation Painter ........................................................................................................ 52
6. Let the timeline help you out .................................................................................................... 52
7. See it all in the Animation Pane ................................................................................................ 52
8. Advanced Animation Time line ................................................................................................. 53
II. Customizing of Presentation using PowerPoint ............................................................................ 54
1. Recording a Voice Narration in PowerPoint ............................................................................. 54
2. Embed or link the narration ...................................................................................................... 54
3. Accompany the narration with notes ....................................................................................... 54
III. Rehearse Timings, Custom Slideshow, and Presentation looping. ........................................... 55
IV. Visual Tools of Enhancement of presentation using PowerPoint ............................................. 58
1. Working with Movies in PPT ..................................................................................................... 58
2. Embed a video in your presentation ......................................................................................... 58
3. Embed a video from a file ......................................................................................................... 58
4. Link to a video file from your presentation .............................................................................. 58
5. Link to a video file on a web site ............................................................................................... 59
6. How to Upload PowerPoint to YouTube ................................................................................... 60
7. How to upload your video to YouTube ..................................................................................... 60
MS Excel 2010 ....................................................................................................................................... 62
I. Introduction: ............................................................................................................................. 62
II. Components of Excel ................................................................................................................ 63
1. The Ribbon ............................................................................................................................ 63
2. Dialog Box Launcher .............................................................................................................. 64
3. Quick Access Toolbar ............................................................................................................ 64
4. Backstage View ..................................................................................................................... 65
5. Quick access to Recent Workbooks and Recent Places: ....................................................... 65
6. Contextual Tabs .................................................................................................................... 66
7. Spreadsheet and Workbooks ................................................................................................ 67
8. Worksheets: .......................................................................................................................... 67
9. Protected View ...................................................................................................................... 68
III. Navigating in Excel ................................................................................................................ 68
1. Insert, Move, & Rename Worksheets ................................................................................... 68
2. Select & Move Worksheet Cells ............................................................................................ 69
3. Range Selection Techniques ................................................................................................. 70
IV. Modifying Cells ...................................................................................................................... 70
1. Understanding Text, Values, & Formulas.............................................................................. 70

2. Editing Cells & Entering Expressions ..................................................................................... 71
3. Inserting Worksheet Rows & Columns ................................................................................. 71
4. Delete Worksheet Rows & Columns ..................................................................................... 71
5. Resizing Columns .................................................................................................................. 72
6. Resizing Rows ........................................................................................................................ 72
7. Merge or Split cells ............................................................................................................... 73
8. Merge Adjacent Cells ............................................................................................................ 73
9. Combining & Splitting Contents ............................................................................................ 73
V. Cell Reference ............................................................................................................................... 75
1. Referencing Methods ................................................................................................................ 75
A. Relative Cell References ........................................................................................................ 75
B. Absolute Cell References ...................................................................................................... 75
C. Mixed Cell References ........................................................................................................... 75
2. Working with Names and Ranges ............................................................................................. 76
A. What Are Range Names? ...................................................................................................... 76
B. Defining and Using Range Names ......................................................................................... 76
VI. Using Logical Functions ......................................................................................................... 77
1. Using the Function Library .................................................................................................... 77
2. The IF function ...................................................................................................................... 78
3. The AND Function ................................................................................................................. 78
4. The OR Function .................................................................................................................... 79
5. Nested IF functions ............................................................................................................... 80
6. Applying Logical Functions .................................................................................................... 80
VII. Lookup functions ................................................................................................................... 80
1. Using VLOOKUP to Find Data ................................................................................................ 81
2. VLOOKUP ............................................................................................................................... 81
3. Hlookup ................................................................................................................................. 82
VIII. Pivot Table............................................................................................................................. 82
1. What is a PivotTable? ............................................................................................................ 82
2. Preparing Data to Create a PivotTable.................................................................................. 82
3. Creating a PivotTable ............................................................................................................ 83
4. Formatting a PivotTable ........................................................................................................ 85
5. Using Slicers to Manipulate PivotTables ............................................................................... 86
6. Creating a PivotChart ............................................................................................................ 87
IX. Data Analysis ......................................................................................................................... 88
1. Sorting Data in Ms-Excel: .......................................................................................................... 88

2. Filter: ......................................................................................................................................... 91
A. What are filters? ................................................................................................................... 91
B. Filtering with AutoFilter ........................................................................................................ 91
C. Filtering Text ......................................................................................................................... 91
D. Filtering numbers: searching for the ‘Top 10’ ....................................................................... 92
E. Filtering dates ....................................................................................................................... 93
F. Removing a filter ................................................................................................................... 93
3. Creating advanced filters .......................................................................................................... 93
4. Conditional Formatting: ............................................................................................................ 94
5. Charts ........................................................................................................................................ 95
A. How To Draw Charts In Excel 2010 ....................................................................................... 95
B. Chart and Graphs Types In Excel 2010 .................................................................................. 95
C. Column Chart ........................................................................................................................ 96
D. Line Graphs ........................................................................................................................... 96
E. Pie Chart ................................................................................................................................ 96
6. Tables: ....................................................................................................................................... 97
A. Creating Tables In Excel 2010 ............................................................................................... 97
B. Properties Of Excel Tables .................................................................................................... 98
C. Deleting an Excel Table ......................................................................................................... 99
1
MS Word 2010
I. Enhancement of Document Layout using Object features
1. Inserting pictures
You've probably heard that pictures liven up your documents. That's true. You may also have heard that
images help reinforce your message and give peoples' eyes a welcome rest. That's also true. But the real
reason you'll want to enhance your Microsoft Office Word 2010 document by adding pictures, clip art,
drawings, and more is that it's great fun and it adds life to your pages. This article provides a brief
introduction to working with images in your Word 2010 documents.
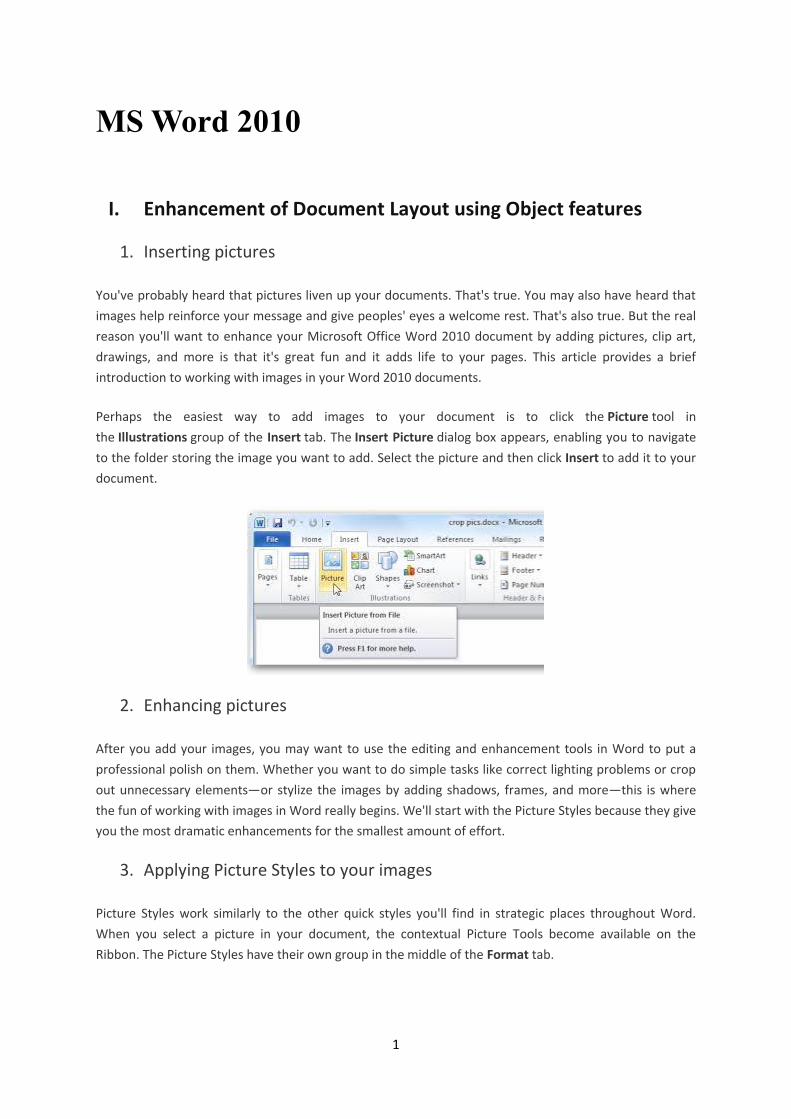
Perhaps the easiest way to add images to your document is to click the Picture tool in
the Illustrations group of the Insert tab. The Insert Picture dialog box appears, enabling you to navigate
to the folder storing the image you want to add. Select the picture and then click Insert to add it to your
document.
2. Enhancing pictures
After you add your images, you may want to use the editing and enhancement tools in Word to put a
professional polish on them. Whether you want to do simple tasks like correct lighting problems or crop
out unnecessary elements—or stylize the images by adding shadows, frames, and more—this is where
the fun of working with images in Word really begins. We'll start with the Picture Styles because they give
you the most dramatic enhancements for the smallest amount of effort.
3. Applying Picture Styles to your images
Picture Styles work similarly to the other quick styles you'll find in strategic places throughout Word.
When you select a picture in your document, the contextual Picture Tools become available on the
Ribbon. The Picture Styles have their own group in the middle of the Format tab.

2
The Picture Style gallery shows the various styles you can apply to the selected image. You can display the
entire selection of styles by clicking the More button in the lower right corner of the gallery (see Figure
1). Preview the various styles by positioning the mouse pointer over an item in the gallery; when you find
one you want to use, click the mouse to select the picture style.
Figure 1 The Picture Styles gallery provides you with many different ways to display an image.
4. Adding a picture shape
If you want to create a unique effect, you can apply a shape to the picture so that the image appears
within the body of the shape. You might do this, for example, when you want a picture to pop off the
page and catch the reader's attention (see Figure 2). To add the shape to the selected image, click Picture
Shape and choose the shape you want to apply from the palette that appears.

3
Figure 2 You can apply a shape to a picture to create a cut-out effect for the image.
5. Displaying a picture border
When you click Picture Border in the Picture Styles group, a color palette appears, enabling you to
choose the color of the border you want to apply, as well as the weight and style of the line used to
create the border. The top portion of the palette lists the colors that match the Theme that is currently
applied to your document; the Standard Colors area of the palette provides primary colors. If you want
to choose a color that does not appear in the palette, click More Outline Colors and then select the color
from either the Standard or Custom tab. To apply it to the selected picture, click OK after you choose the
color.

4
6. Adding a picture effect
Picture effects give you a huge range of special formats you can apply to the selected picture. You can
choose from among a variety of shadow styles, apply a glow to the outer edges, display a reflection of the
image, soften the edges, create a beveled effect, and apply 3-D effects and rotation.
To apply a picture effect, select the picture and then click Picture Effects in the Picture Styles group. A
palette of choices appears. Point to the effects category you want to apply (Preset, Shadow, Reflection,
Glow, Soft Edges, Bevel, and 3-D Rotation). A palette of effects opens to display your choice. Use Live
Preview to see how the different effects will appear in your document (see Figure 3).
Figure 3 Use Picture Effects to enhance your pictures by adding shadows, bevel effects, 3-D effects, and
more.
7. Editing and adjusting images
Word includes a number of image adjustment tools you can use to bring out the best in your images.
You'll find the whole set located in the Adjustment group of the contextual Picture Tools. To display the
tools, click on the picture you want to change. The Picture Tools appear on the Ribbon. The Format tab is
automatically selected.
The Adjustment group is located on the far left. Depending on the type of change you want to make to
your picture, click one of the following tools:
Brightness Changes the amount of light included in an image. When you click Brightness, a palette of
brightness options appears, with values ranging from +40% to -40%. You can use the Live Preview feature
to point to a setting and see how it will affect the selected image. When you find a brightness level you like,
click it to apply it to the image.
Contrast Controls the way in which items in your picture are defined. When you click Contrast, a palette
of contrast options appears. Experiment with the different settings until you find the one that looks right in
your picture.
Recolor Enables you to apply a color wash to your picture that may give it an old-fashioned feel (like a
sepia-toned image) or enable it to blend naturally with the color scheme in the Theme applied to your

5
document. When you click Recolor, a palette appears offering you a number of different color possibilities
(see Figure 4). Again, point to the ones you're considering, and Live Preview will show you the results. Click
the one you decide on, and it is applied to the image in the document.
Figure 4 Use Recolor Picture in the Adjust group to add a color wash to the image in your document.
Compress Pictures Reduces the file size of the image (not the actual size of the image in the document)
so that when you save the file, it will be as compact as possible. When Word displays the Compress
Picturesdialog box, click OK to compress all images in the document. If you want to compress only the
selected images, click the Apply To Selected Pictures Only check box before you click OK.
TIP Click Options in the Compress Pictures dialog box to display additional choices for compression. In
theCompression Settings dialog box, you can choose to compress images on save, delete image areas that
have been cropped, or specify the type of compression you want depending on the desired output for your
document (screen, print, or e-mail).
Change Picture Displays the Insert Picture dialog box so that you can replace the selected photo with a
new one.
Reset Picture Reverses any modifications you've made to the original photo and returns it to its original
size, shape, and coloring.
8. Cropping pictures
Cropping images is a simple process, but it can dramatically improve the look of your photo by enabling
you to remove unnecessary elements from the image. For example, suppose that a diver's swim fin
appears in the corner of an underwater photo you want to use for the Coral Reef Divers annual report.
You can easily crop the photo to remove the unwanted fin and help your readers focus on the important
part of the photo.

6
To crop your photo, follow these steps:
1. Insert the photo in your document and make sure it is selected. The Picture Tools appears.
2. Click Crop in the Size group. The pointer changes to a cropping tool.
3. Position the tool on the edge or corner of the image where you want to begin cropping. Drag the side or
corner of the image inward until the portion of the picture you want to remove has been cropped out
(see Figure 5).
Figure 5 Crop a photo to make sure only the best part of the image is displayed.
TIP When you crop a photo, the rest of the image isn't gone; its display is merely suppressed. This means
that if you decide to move the photo to another part of the document and redisplay the hidden part of
the image, you can do that. Just select the Crop tool again and this time drag the corner or side outward
to reveal the rest of the hidden image. Note, however, that if you have selected the Delete Cropped
Areas Of Pictures check box in theCompression Settings dialog box, the cropped portions of the image
will be deleted when you save the document.
9. Resizing pictures
An operation that goes hand-in-hand with cropping is resizing the images you import. This is one
technique you'll use all the time—pictures rarely come into your documents at just the right size.
Resizing a picture in Word is similar to resizing any object. To begin, click the image. Handles appear
around the edges of the object. If you want to enlarge the image, click in one corner of the picture and
drag the handle outward. When the image is the size you want, release the mouse button.
If resizing your picture to a precise measurement is important, use the Size command available in the
picture's options. Here's how:

7
1. Right-click the image in your document.
2. Choose Size from the options that appear.
3. In the Size dialog box, enter the Height and Width settings (see Figure 6). Additionally, you can enter
other positioning values, such as Rotation and Cropping.
Figure 6 Use the Size dialog box when entering a specific size for an image is important.
4. Click OK to save your settings, and Word resizes the image according to your specifications.
10. Rotating pictures
Some of your documents are likely to be fairly straightforward and won't require a lot of special picture
techniques. But once in a while you will have a reason to do something fun like rotating pictures. The
rotating control in Word enables you to simply drag a picture in the direction you want to rotate it—very
simple and easy to use. Instead of moving the image in predesigned increments, the Rotate tool lets you
be in control of how far you want the picture to rotate.
Start by clicking the picture in your document. You'll notice that a round green handle appears in the top
center of your image. This is the rotate handle. Position the mouse on that handle. The pointer changes
to a curved arrow, indicating that you can drag the handle in the direction you want to rotate the image.

8
TIP When you apply shadows or frames or other special picture effects to the image, Word
automatically takes the angle into account, with no calculating required. Nice.
11. Adding captions to pictures
Readers like to know what your images contain, so unless you're certain that readers will understand
what your images are showing, you may want to consider adding figure captions. The process is simple,
and you can control the look and placement of the text by following these steps:
1. Right-click the picture you want to add the caption to.
2. Click Insert Caption. The Caption dialog box appears, as Figure 7 shows.
Figure 7 You can easily add captions to the images in your document by right-clicking a picture and
choosingInsert Caption.
3. In the top text box, type the caption you want to appear with the figure. You may want to customize the
look of the caption by changing one of the following items:
o If you want to hide the label (for example, Figure), click the Exclude Label From Caption check box.
o If you want to change the way in which the captions are numbered, click the Numbering button and select
your choice.
4. Click OK to save the caption settings and return to the document.
The caption is displayed in a color, font, size, and style that is controlled by the Theme selected for your
document. If you change the Theme later (by clicking the Page Layout tab, selecting Themes, and
choosing a new Theme from the gallery), the captions will be reformatted automatically.

9
II. Special Publication Features for Quality Work
1. Provide Text Alternatives for Images and Graphical Objects
When using images or other graphical objects, such as charts and graphs, it is important to ensure
that the information you intend to convey by the image is also conveyed to people who cannot see
the image. This can be accomplished by adding concise alternative text to of each image. If an image
is too complicated to concisely describe in the alternative text alone (artwork, flowcharts, etc.),
provide a short text alternative and a longer description as well.
Tips for writing alternative text (“Title” in Word 2010)
Try to answer the question "what information is the image conveying?"
If the image does not convey any useful information, leave the alternative text blank
If the image contains meaningful text, ensure all of the text is replicated
Alternative text should be fairly short, usually a sentence or less and rarely more than two sentences
If more description is required (e.g., for a chart or graph), provide a short description in the alternative text (e.g., a summary of the trend) and more detail in the long description, see below
Test by having others review the document with the images replaced by the alternative text
Tips for writing longer descriptions (“Description” in Word 2010)
Long descriptions should be used when text alternatives (see above) are insufficient to answer the question "what information is the image conveying?"
In some situations, the information being conveyed will be how an image looks (e.g., an artwork, architectural detail, etc.). In these cases, try to describe the image without making too many of your own assumptions.
One approach is to imagine you are describing the image to a person over the phone
Ensure that you still provide concise alternative text to help readers decide if they are interested in the longer description
Alternatively, you can include the same information conveyed by the image within the body of the
document, providing the images as an alternate to the text. In that case, you do not have to provide
alternate text within the image.
To add alternative text to images and graphical objects
1. Right-click* the object 2. Select Format Picture… 3. Select the Alt Text option from the list 4. Fill in the Title. If more description is required (e.g., for a chart or graph), provide a
short description in the Title (e.g., a summary of the trend) and more detail in the Description.
At this time, if a Word 2010 document is ever saved to HTML, the Title and Description fields are
combined into a single entry within the HTML <alt> tag. [Tested: September 30th, 2010]

10
When inserting a very small image, or resizing a larger image to be much smaller, Word 2007
assumes that the image is intended to be a bullet-point for a bulleted list. Once Word 2007 defines
the image as a bullet, the option to add alternative text disappears. Select Undo, to redefine the
bullet as an image. When you right-click* the image, select Format Picture… and select the Alt Text
tab in the Format Picture dialog. Alternative text can be found, or can be entered, into the
Alternative text box.
2. Avoid “Floating” Elements
When images and objects are inserted into Word 2010 documents they default to being an “inline
object”. Inline objects keep their position on the page relative to a portion of the text.
A “floating” object keeps its position relative to the page, while text flows around it. As content
moves up or down on the page, the object stays where it was placed. To ensure that images and
objects remain with the text that references it, always position it as an inline object.
Similarly, avoid placing drawing objects directly into the document (e.g., as borders, to create a
diagram). Instead, create borders with page layout tools and insert complete graphical objects.
To prevent an image or object from “floating”
1. Select the object 2. Go to menu item: Page Layout 3. Select Position from the Arrange section
3. Captioning and numbering of tables and figures
In a longer more structured document, you will frequently want to number and add captions to your tables
and figures. You could do this manually, but a better idea is to let Word add these captions and automatically
assign the numbers. You need this automated approach for a number of reasons.
If you want to easily make a cross-reference to the table or figure, Word must maintain the caption.

11
If you want to automatically create a List of Tables or List of Figures for your Table of Contents, Word must
maintain the captions.
If you insert or delete tables or figures, Word will automatically renumber if it maintains the captions.
A caption consists of the word Table or Figure, whichever is appropriate, followed by a number. You may then
choose to add punctuation, such as a period or a colon, and then the text you wish to have for the caption.
4. Captioning tables
You may want to add captions to tables already entered into your document or, alternatively, you may want to
have captions automatically added to any new tables you create.
Adding captions to existing tables
If you have tables without captions in your document and wish to add captions, you can do so quite easily. For
each table:
Click somewhere in the table
Click on the References tab
Click the Insert Caption button
In the Caption box, it will read Table 1 (if it reads Figure 1, choose Table from the Label: drop down list) and
allow you to add further information. If you wish to have punctuation appear after the number, type it, and
then type the text of the caption. Notice that the Position box lets you select Above or Below for the caption,
but table captions are generally positioned above the table.
Repeat the above procedure for every table in your document. Word will automatically provide the correct
table number.
5. Automatically captioning tables
Word can automatically add the caption to a table when the table is created. To do this:
Click on the References tab
Click the Insert Caption button
Click on the AutoCaption button. You will be presented with a list of objects that can be captioned
automatically. One of those is Microsoft Word Table. Click the checkbox beside this item. Confirm the
Options below are what you want and click OK. Now every time you create a table, the caption Table followed
by the appropriate number will be added automatically. You can simply click in the caption line, type any
punctuation you wish, and then type the caption text. Combining manual and automatic captioning
You can manually caption any existing tables, and then ask Word to automatically caption any additional tables
you add. Word will handle the numbering properly.
6. Captioning figures
To caption an existing figure, select the figure and:
Click on the References tab
Click the Insert Caption button
Make sure that Figure is selected in the Label box. The Caption box will read Figure 1 and permit you to type
additional information. Type any punctuation that you wish to have after the number, and then type the text

12
of the caption. Repeat this process with each figure in your document. Note that the caption appears by
default at the bottom of the figure.
Automatic captioning is probably not a viable option for figures. Automatic captioning only works with figures
inserted via an application that supports Object Linking and Embedding (OLE), that is, objects that can be
inserted into a document via the Insert>Object command. Generally, most people insert figures from a variety
of sources, so manually captioning is often necessary.
7. Step-by-step captioning and numbering of tables and figures
Exercise: Now we will ask Word to automatically add captions to any additional tables that we create:
1. Our document already contains 1 table, and we will be adding more. We would like to add a caption to the
existing table, and automatically add captions to any additional tables we create.
2. First, click anywhere inside the existing table.
3. Click on the References tab
4. Click the Insert Caption button
5. In the resulting dialog box, make sure that Table is selected in the Label: box, and Above Selected Item in
the Position box.
6. Click in the Caption box, and type a punctuation mark if you wish, perhaps a colon, then type the text of the caption “Wool Distribution”. Click OK. Note that the caption now appears above your
table.
Now we will ask Word to automatically add captions to any additional tables that we create:
7. Click on the References tab.
8. Click the Insert Caption button.
9. Click on the AutoCaption button.
10. You will be presented with a list of objects that can be captioned automatically. One of those isMicrosoft Word Table. Click the checkbox beside this item. Confirm the Options below are what you want and
click OK.

13
11. Now go to the Jack and Jill rhyme, and click at the end of the text of the Jack and Jill rhyme, andpress
Enter to move to a new line.
12. Click on the Insert tab and click on the Table button, then drag to create a 2x3 table:
Enter the following information into the table.
Table 2: Result of climbing hill
Child Result
Jack Fell down
Jill Broke crown
Note: The caption “Table 2” is created automatically, and you can click after the 2 and type a colon, and then
type the caption “Result of Climbing Hill”.
Now we will add a caption to the Lamb figure that appears in “Mary had a Little Lamb”:
13. Click on the image of the lamb to select it, click on the References tab, and click the Insert
Caption button.

14
14. In the label box, select Figure. Note that that causes the Position to be set to Below selected item.
15. After Figure 1, type desired punctuation, and then the caption, “Mary’s Lamb”. Click OK, and see the
caption added to the document.
Now we will add an additional figure near the top of the document. On your N: drive is an image file
calledfiddle.bmp.
16. Set the mouse pointer after the title of “Hey Diddle Diddle”, press <enter>. Go to
the Insert tab and click on the Picture (Word 2010) or Pictures (Word 2013) button.
Select fiddle.bmp from the N drive.
17. Now click on the fiddle image to select it. Click on the References tab and then the Insert Captionbutton. Make sure that Figure is selected from the drop down list beside Label:. To the caption
field add a colon, followed by “Cat’s Fiddle” and click OK. Note that the picture is captioned as Figure 1
because it appears first in the document, and the picture of the Lamb, which was Figure 1 has been
renumbered to Figure 2.
8. Aligning the table and figure caption
The caption for both figures and tables defaults to left alignment. You may wish to have your captions
centered, particularly if your tables and figures are centered on the page. Captions are inserted with
theCaption style attached. To change the alignment:
Click on the button in the bottom right of the Styles section in the Home tab. In the Styles window that
appears, click on the down arrow beside the Caption style and choose Modify
OR
Scroll to find the Caption style in the style gallery and right click on it and choose Modify.

15
Click on the centre alinment icon ( ) in paragraph group of Home tab and click OK
Since the same style is applied to Figure and Table captions, you cannot have different alignments for these
two types of captions, unless you create a new style for one of the captions. This will work, but you must
remember to apply that style manually to the captions, and if you are creating a List of Tables or List of Figures,
you must remember to tell Word to use items of that style to build the list.
9. Concatenating chapter number to figure or table number
You may wish to have the chapter number appended to the table or figure number in the caption, such as
Table 1.3, or Figure 3.8:
1. Click on the References tab
2. Click the Insert Caption button
3. Choose Table in the Label box
4. Choose the Numbering button and click the Include Chapter Number box
5. Choose Heading 1 beside Chapter starts with style and . (period) beside Use separator:
6. Click OK (note that the type of numbering you choose for your Heading 1s will be used)
7. Repeat the above, but choose Figure in the Label box
10. Footnotes and endnotes
Footnotes and endnotes are handled in a similar fashion, except that footnotes appear at the bottom of the
current page, and endnotes appear at the end of the document.
Exercise:
1. We will continue to use the Nursery Rhymes file. We wish to insert a footnote after the word fiddle in the
rhyme Hey Diddle Diddle. Click your mouse immediately after the word fiddle and click on
the References tab and then the Insert Footnote button. If you are in Print Layout view, you will be

16
shifted to the bottom of the page and be able to enter your footnote text right away. If you are in Draftview,
a new pane will appear at the bottom to allow you to type your footnote. In either case, to return to the same
spot in your document, simply double click on the footnote number. (In Draft view you could also click on the
close button on the right side.
2. Type the footnote text:
The instrument in question was really a violin. The rumour that it was a very expensive Stradivarius was simply that,
mere rumour.
3. To make changes to the settings, if necessary, click on the References tab, click on the corner button in
the Footnotes group to view the following dialogue box:
Here you could make changes to the number format, restart the numbering, convert footnotes to endnotes,
etc. We won't make any changes now so just click the Cancel button.
4. Now, you can return to the place in the document where you were working by:
Double clicking on the footnote number
5. Now, switch views. If you were in Draft switch to Print Layout, and vice versa. Do this by selecting the
appropriate Document View from the View tab.
6. We want to put another footnote, in Jack and Jill, after the word crown. Click after the word crown,
and click on the References tab and then the Insert Footnote button. The footnote number will be
presented, and you can type your footnote. Type this footnote:
A crown is another name for the head. They could have said that Jack broke his head, but that would not
rhyme, so they used the word crown instead.
7. Now return to the main document by double clicking the footnote number.
8. Move the mouse over one of the footnote indicators in the document (don’t click) and see the
note that appears showing the text of the footnote.
9. If you would like to have an 'insert footnote' button your quick access toolbar at the top:
17
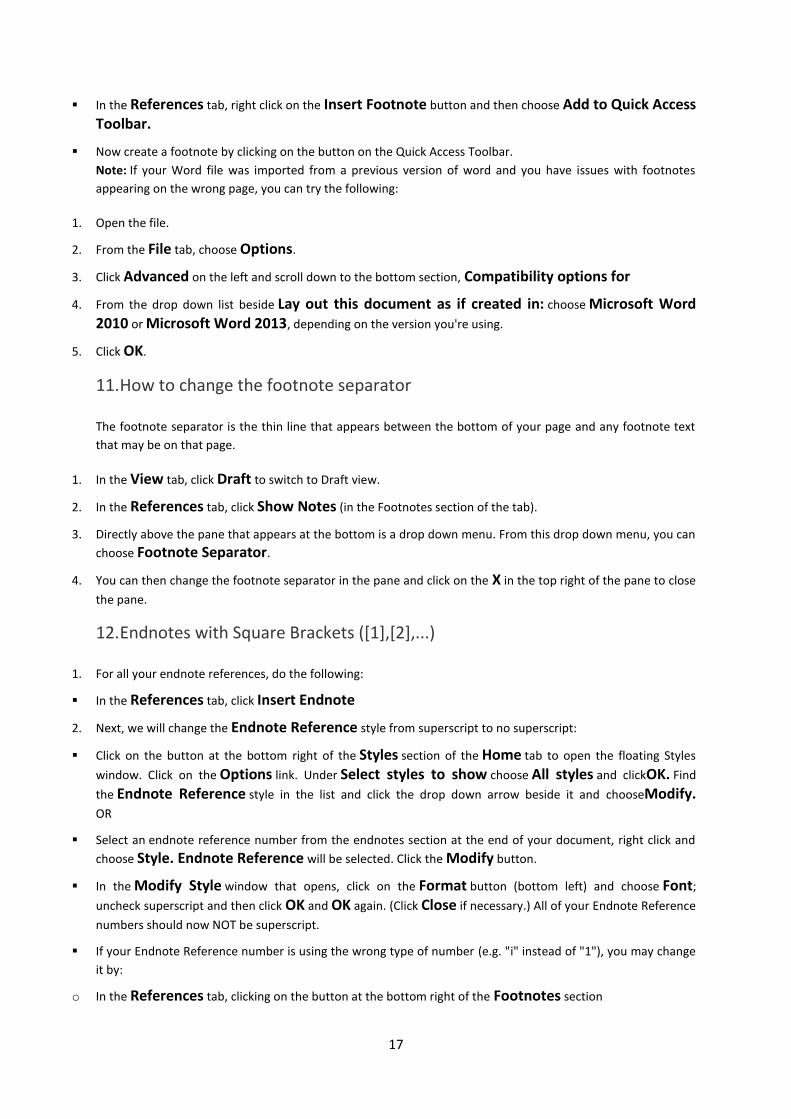
In the References tab, right click on the Insert Footnote button and then choose Add to Quick Access Toolbar.
Now create a footnote by clicking on the button on the Quick Access Toolbar.
Note: If your Word file was imported from a previous version of word and you have issues with footnotes
appearing on the wrong page, you can try the following:
1. Open the file.
2. From the File tab, choose Options.
3. Click Advanced on the left and scroll down to the bottom section, Compatibility options for
4. From the drop down list beside Lay out this document as if created in: choose Microsoft Word 2010 or Microsoft Word 2013, depending on the version you're using.
5. Click OK.
11. How to change the footnote separator
The footnote separator is the thin line that appears between the bottom of your page and any footnote text
that may be on that page.
1. In the View tab, click Draft to switch to Draft view.
2. In the References tab, click Show Notes (in the Footnotes section of the tab).
3. Directly above the pane that appears at the bottom is a drop down menu. From this drop down menu, you can
choose Footnote Separator.
4. You can then change the footnote separator in the pane and click on the X in the top right of the pane to close
the pane.
12. Endnotes with Square Brackets ([1],[2],...)
1. For all your endnote references, do the following:
In the References tab, click Insert Endnote
2. Next, we will change the Endnote Reference style from superscript to no superscript:
Click on the button at the bottom right of the Styles section of the Home tab to open the floating Styles
window. Click on the Options link. Under Select styles to show choose All styles and clickOK. Find
the Endnote Reference style in the list and click the drop down arrow beside it and chooseModify. OR
Select an endnote reference number from the endnotes section at the end of your document, right click and
choose Style. Endnote Reference will be selected. Click the Modify button.
In the Modify Style window that opens, click on the Format button (bottom left) and choose Font;
uncheck superscript and then click OK and OK again. (Click Close if necessary.) All of your Endnote Reference
numbers should now NOT be superscript.
If your Endnote Reference number is using the wrong type of number (e.g. "i" instead of "1"), you may change
it by:
o In the References tab, clicking on the button at the bottom right of the Footnotes section

18
o Beside Number format, choosing the style you like
o Clicking on the Apply button
3. Now, our challenge is to get square brackets around the reference numbers. Save your document before doing
this. We will do this using Word's Replace feature:
Click at the top of your document (or press Ctrl-Home on your keyboard to quickly go to the top of your
document).
In the Home tab, click Replace on the far right (in the Editing section).
Click on the More button. (If you don’t see a More button but do see a Less button, then you can leave
things as they are.)
With your insertion point in the text box beside Find What:, choose the Format button and
chooseStyle then choose Endnote Reference from the list and click OK.
Click in the text box beside Replace With: and type [^&]. Now click on the Replace All button. A message
will pop up to tell you how many replacements were made. Click OK. All of your Endnote Reference numbers
should now have square brackets around them.
Click the Close button to close the Find and Replace window.
13. Bookmarks
A Bookmark marks a place in a document that you may wish to jump to, refer to, etc.
We will insert a bookmark at the location of the song “Inky Dinky Spider”.
Exercise:
1. Select the title “Inky Dinky Spider”. From the Insert tab, click on Bookmark. In the resulting dialog
box, assign the bookmark a name of “spider” and click Add. Initially, you will not see any indication that a
bookmark exists, but the next step will describe how you can view a bookmark 'codes' so you will know where
your bookmarks are.
2. Click on the File tab in the top left and choose Options. Click Advanced from the list on the left, then scroll
down to the section, Show document content. Click on the checkbox to put a checkmark besideShow
bookmarks and click OK.
3. Now you will see the bookmarked text in your document enclosed in square brackets.
The square brackets simply indicate that a bookmark is present. They do not print. Note that you could have
created a bookmark by simply clicking the mouse and not selecting any text. This would be indicated by the
square brackets displaying one on top of the other ( ).
4. Click the mouse near the top of the document, click on the Home tab and from the Find submenu, choose Go To.

19
5. From the list on the left under Go to what: choose Bookmark. If you had multiple bookmarks, you could then choose the one you wanted to go to from the drop down list near the top right under Enter bookmark name:. Choose spider from this list (in this example, we only have one bookmark) and click on the Go To button. We immediately jump to the bookmarked text.
14. Cross references A cross-reference is a referral from one location in a document to a component elsewhere in the document.
For example, “see Table 2: Snowfall in 2003”. Cross references can be made to tables, figures, footnotes,
headings, page numbers, bookmarks, etc.
We will create a cross-reference to the “Jack and Jill” table.
Exercise:
1. Go to the end of “Inky Dinky Spider” and after the word "again" type “As we saw in”. Now click on the References tab and, in the Captions section click on Cross-reference:
2. In the Reference type: drop down list, select Table. Note that a list of all tables appears.
3. Choose Table 2: Result of Climbing Hill. In the Insert reference to: drop down list, select Entire caption (rather than only the table number, or only the text of the caption), and click Insert. Then clickClose.
4. Note that the text now reads:
20
and we can add the text “climbing things can prove dangerous”. Note that the grey area that you see when
you click on the inserted cross-reference text is there to indicate that this is a cross-reference. It will not print.
5. Now we will delete the first table in our document, and we will see what happens to our reference. Drag through to select the caption and the complete Table 1, and press the delete key.
6. Now look at your document and you will see that Table 2 has not been renumbered to Table 1 and the cross
reference is still to Table 2. There are two ways we could fix this:
If we print it or do a print preview, the references will be updated before printing occurs.
We can select the entire document, and force updating by pressing the F9 key. Do this now:
o Home tab: Select/Select All (in the Editing section) or press Ctrl-A on your keyboard
o Press F9. Note that the table numbering and cross-references are updated.
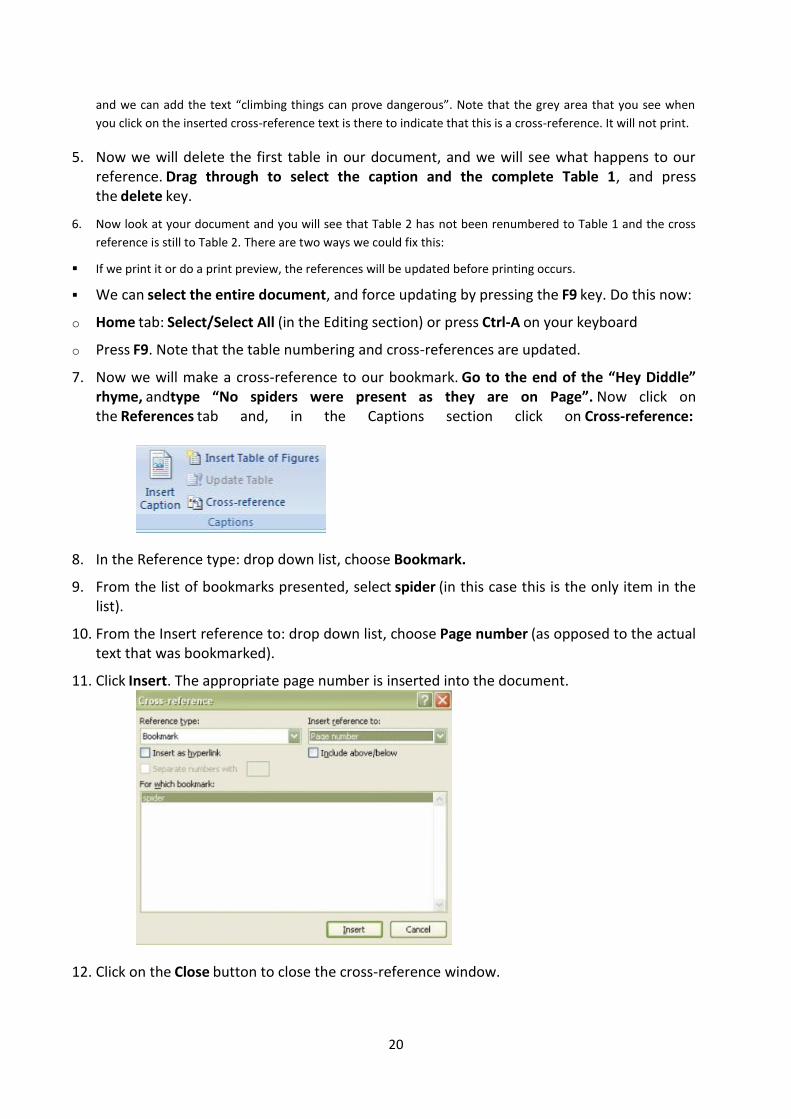
7. Now we will make a cross-reference to our bookmark. Go to the end of the “Hey Diddle” rhyme, andtype “No spiders were present as they are on Page”. Now click on the References tab and, in the Captions section click on Cross-reference:
8. In the Reference type: drop down list, choose Bookmark.
9. From the list of bookmarks presented, select spider (in this case this is the only item in the list).
10. From the Insert reference to: drop down list, choose Page number (as opposed to the actual text that was bookmarked).
11. Click Insert. The appropriate page number is inserted into the document.
12. Click on the Close button to close the cross-reference window.

21
15. Working with Columns.
Arranging text and graphics into columns is an effective way to make your document more readable and to fit more content on a single page. These 10 tips will help you generate columns quickly and easily and maintain them with little to no effort.
Add columns to existing text: When you enable columns, Word will automatically guide
your text into columnar format. If the text already exists, the technique is the same.
However, you must select the text first as shown in Figure A. Then, using the instructions
given in the introduction, select the number of columns you want. Figure B shows the
results of dividing the existing single column of text into two columns.
Figure A
Select existing text to change the column property for only that text.
Figure B
These two columns began as one column.

22
16. Adjust spacing
Columns usually make content more readable because of the shorter lines. You can also use a smaller font than you might ordinarily use. That means you can fit more content on a page using columns. The type of document will determine the number of columns and whether columns are equal in width. However, the general run allows between 40 to 60 characters per line. Any more or less makes the document less readable.
The spacing between columns is the gutter. If it's too narrow, readers will wander across the
gutter to the next column instead of wrapping around to the next line in the column. To
adjust the gutter, choose More Columns from the Columns drop-down (on the Page Layout
tab), as shown in Figure C. In Word 2003, choose Columns from the Format menu.
Figure C
Adjust the spacing between the columns.
Because you're working with short lines, you'll need to rethink paragraph indents. I recommend that you use small indents or don't indent paragraphs at all.
17. Display text boundaries
The document shown in Figure D is displaying text boundaries. Enabling this feature will
help you visualize your document's limitations as you work. Enabling text boundaries is
simple:
1. Click the File menu and choose Options (under Help). In Office 2007, click the Office button and then click Word Options. In Word 2003, choose Options from the Tools menu, and skip to step 3.
2. Select Advanced in the left pane. 3. In the Show Document Content section, check the Show Text Boundaries option. 4. Click OK.

23
Figure D
Displaying text boundaries can facilitate column maintenance.
18. Quickly access options
Many options are available via the Columns dialog (shown in Figure C). To access it, click
inside a multi-column section and double-click the gutter space in the horizontal ruler
(displayed at the top of the page) shown in Figure E.
Figure E
Quickly access column properties by double-clicking the horizontal ruler.
19. Equalize the columns To create columns of equal width and gutter space check the Equal Column Width option in the Columns dialog (at the bottom of the Width And Spacing section). Doing so will dim all but the first column's measurements. Use the first column's settings to adjust all of the columns. Word will adjust the other settings accordingly. Remember, you can use [Ctrl]+Z to undo changes.

24
20. Add a column break When needed, you can force a column break by pressing [Ctrl]+[Shift]+[Enter]. Doing so will
position the cursor at the top of the next column, leaving the remainder of the current
column blank, as shown in Figure F. A column break positions a hard break at the inserted
location and pushes remaining text to the top of the next column. If you insert a column
break in the last column on a page, the break also acts as a page break. If you don't want a
page break there, you'll have to delete the column break.
Figure F
Insert a column break to force text to the top of the next column.
To insert a column break, click the Page Layout tab and choose the Column Break from the Breaks drop-down in the Page Setup section. In Word 2003, choose Break from the Insert menu. Column breaks are similar to page breaks in that they inherit formatting from the following paragraph, which can be confusing. There's nothing special you have to do — knowledge is the simple remedy.
21. Balance the columns
Depending on the amount of text you enter and the length of the columns, you might end up with a long and a short column. You can often insert a column break and balance the text yourself. However, the break remains if you return to a single column. When a forced break isn't the right choice, insert a continuous section break. Doing so creates a new section and Word distributes the text across the columns. To add a continuous section break, do the following:
1. Position the cursor at the end of the last column. 2. On the Page Layout tab, click Breaks on the Page Layout tab. In Word 2003, choose Break
from the Insert menu. 3. Select Continuous in the Section Breaks section.

25
As before, you can adjust the balance between the two columns if you like by pushing text into the next column or pulling text back into the previous column. Unlike the column break method, there's no column break to leave behind if you return to a single column format. However, the section break remains and you'll probably want to remove it. To do so, click Show/Hide on the Standard toolbar to display formatting marks then just delete the section break marker.
22. Create a title that spans columns Entering a title before you generate the columns is simple. You just enter the title and format it as you normally would. Then, set your column properties and start typing your columnar text. If, on the other hand, you enter the title after generating the columns, you might find yourself scratching your head. The good news is, it's just as easy to add the title after you generate the columns as before:
1. Position the cursor at the beginning of the first column, right where you want the title to appear.
2. Enter the title text. 3. Press [Enter] to push the column text to the next line, leaving the title text in a line of its
own, as shown in Figure G. 4. Select the title text. 5. Click the Page Layout tab and click the Columns drop-down in the Page Setup group, then
choose One, as shown in Figure H. In Word 2003, click the Columns tool on the Standard toolbar and choose one column.
6. With the title still selected, click the Center alignment tool in the Paragraph group (on the
Home tab). Figure I shows the centered title in a single column that spans all the columns. In Word 2003, Center is on the Formatting toolbar.
Figure G
Get the title on a line of its own.

26
Figure H
Generate a single column for the title text.
Figure I
This centered title spans the columns.
You're not stuck with a one-column span. You can span the title across two, three, or as many columns as you like, regardless of the number of columns in the section. Just select the text and choose the appropriate number of columns.
In step 5, you might have noticed that Word interested a continuous section break. That's how Word splits the multi-column section from the title section.
23. Add a picture You can insert a picture in a columnar section the same way you would in a normal document (one column). Click the Insert tab and click Picture or Clip Art in the Illustrations

27
group, locate your picture, and continue. Then, right-click the newly inserted graphic and choose Square or Tight from the Wrap Text drop-down in the Arrange group on the contextual Format tab. In Word 2003, right-click the image, choose Format Picture, and click the Layout tab.
24. Drop Cap
Word 2010 offers three widely used formats in Drop Cap gallery, However, there is an
option to customize the layout and size of drop cap according to your requirements.
For dropping first letter cap, select the first letter of paragraph and navigate to Insert tab,
and from Text group, click Drop Cap drop-down button and select a desired drop cap
position.
Drop cap is a large capital letter at the beginning of a text block that has the depth of two or
more lines of regular text. The following illustration shows your options for positioning a
drop cap.
Dropped
In margin
Do any of the following:
Drop Cap

28
III. Boiler Plate features in MS-Word
1. Document templates
Every document created in Word has a template associated with it. A template is a collection of formatting,
styles, macros and possibly text. When you start Word 2010, it opens a blank document based on the
“Normal” or “standard” template. When you go to create a new document by clicking the File tab and
choosing New, or open Word 2013, Word displays a variety of available templates from which you can choose,
including the standard Blank document template which uses the Normal template.
A template is simply a Word document, with a file extension of .dotx (regular template) or .dotm (a template
that may contain macros) instead of .docx.
2. Saving and Creating Templates
Templates you create should be stored in the trusted templates folder:
Word 2013
C:\Users\userid\Documents\Custom Office Templates (Windows 8)
C:\Users\userid\Documents\Custom Office Templates (Windows 7)
Word 2010
o C:\Users\userid\AppData\Roaming\Microsoft\Templates (Windows Vista/7/8)
o C:\Documents and Settings\userid\Application Data\Microsoft\Templates (Windows XP) Where 'userid' is the name of the computer account you are logged into.
Saving here tells Word that it is safe to open even if the template should contain macros or other code.
Because macros can contain malicious code, Word is on the lookout against opening documents with macros.
If your computer security settings are at the recommended level, Word will open any template file, but it will
disable any macros it contains. For templates that are in the (Trusted) Templates folder, however, Word
doesn't disable the macros. It assumes the files are safe, so be sure the files you store there are from a trusted
source.
You may wish to create all the styles you think you will need, and set up some standard formatting, (margins,
etc.) and save these settings as a template:
1. Choose File/Save As
2. For Word 2010, select Microsoft>Templates (or Trusted Templates if you are using Windows XP) on the left side of the Save As window. (In Word 2013 the save location is automatically changed to the templates folder when step 3 is completed)
3. Beside Save as type: select Word Macro-Enabled Template or Word Template. Choose Word Macro-Enabled Template if your template has macros, as the UWaterloo Thesis template does.
4. Enter the File Name:
5. Click Save.
6. To create a new document based on this template, select File/New
For Word 2010, click on My Templates and select your template. Click OK.

29
For Word 2013, click on PERSONAL and select your template.
3. AutoText
AutoText in Word is the feature that displays helpful tooltips while you are typing text. If
you press Enter when you see such a tooltip, Word will accept the suggested completion.
For example, if you start typing the word “monday”, by the time you have typed “mond”,
Word has a good idea what you are trying to type, and presents the following tooltip.
Pressing Enter at this point will insert the word “Monday”. The same thing happens when
you type in the start of months too:
The built in AutoText that comes with Word 2010 only applies to dates such as days or
months, which is a shame. However, you can add your own entries to the AutoText gallery.
4. Adding Your Own AutoText
Suppose you have a portion of text that you know you will have to type in numerous times
in your document. It’s a long piece of text, so it would save time for you to be able to insert
it automatically. This is just the kind of situation that homemade AutoText entries were
made for.
Let’s pretend you are doing a book review and you need to type in the phrase “The
Unbearable Lightness of Being” many times. We’ll now set up an AutoText entry for it.
First of all type out the phrase, then select it and click to the Insert tab > Quick Parts (in the
Text group) > AutoText > Save Selection to AutoText Gallery.

30
When the Create New Building Block window opens, we must type something into the
Name box. The name is what Word will use to recognise what you are typing. We should
also type in a description in the Description box, as this text will appear in the tooltip, once
Word thinks you are typing the phrase.
The entries in the following image are perfect.
This AutoText entry instructs Word to display “The Unbearable Lightness of Being” in a
tooltip whenever you start typing the word “unbearable”. Click OK to save the new
AutoText entry. Now let’s test it out by typing out “unbearable”.
You should find that you don’t need to type out the whole word before the tooltip pops up.
Pressing Enter at this point will insert the whole phrase.
If you complete typing the word “unbearable” without pressing Enter, the AutoText will be
ignored and the single word “unbearable” will remain, so you do get a choice of whether or
not to use the AutoText.
5. Viewing AutoText Entries
To view all the AutoText entries that have been added in the past, click the Quick Parts
button (in the Text group on the Insert tab) and then hover over AutoText. You will see a
gallery of AutoText. If you click on an entry, that will insert the AutoText into your document
where the cursor is currently positioned.

31
To edit existing entries, click the Building Blocks Organizer option in the Quick Parts menu
instead.
The window that then opens allows us to select an entry and amend it by clicking the Edit
Properties button at the bottom. The entry will appear in the AutoText Gallery, and you can
sequence the list by Gallery to help you find it.
6. F3 And AutoText
If you really want to save time, you can type in an abbreviated word in the name box of
the Create New Building Block window. In our example, we could use “un” to stand for the
AutoText entry. The only problem is that there are many words that begin with “un”. How
can Word know that when you type “un” you would like the AutoText tooltip to pop up? It
can’t. And it would be pretty annoying for the tooltip to appear every time you typed “un”,
as most times you wouldn’t need it.
This is where the F3 on your keyboard comes in. If you type in the name of your AutoText
and then press F3, the full phrase will be inserted.
7. AutoCorrect Options
You can customize the way that Word AutoCorrect works: click the File tab > Options >
Proofing, and then click the AutoCorrect Options button near the top of the window.
Click to enlarge
The AutoCorrect window has many tabs, but when it opens, it will display the AutoCorrect
tab. The options at the top are basically a list of yes/no questions in the form of checkboxes,
described as follows:

32
Show AutoCorrect Options buttons – after an autocorrection has been applied, if you hover over the
corrected word you’ll see the AutoCorrect Options button appear (see below). This checkbox turns it off.
Correct TWo INitial CApitals – with this option checked, this sentence would become “Two
Initial Capitals”
Capitalize first letter of sentences – fairly self explanatory.
Capitalize first letter of table cells – similar to the above option, except that table cell
contents are treated in isolation. When you tab to the next cell, or press the spacebar, for
example, the capital letter is applied to the first letter of the first word in the cell.
Capitalize names of days – Word recognises the names of the days (there are only seven,
after all) and when this option is checked, day names with lowercase initial letters are
corrected.
Correct accidental usage of cAPS LOCK key – Word can detect when you’ve accidentally left
the Caps Lock button on and corrects the text you type.
Replace text as you type – this section is geared towards setting up “shortcuts” for long
pieces of text that would be tedious to type in. To set up “cdc” to be converted to “Centers
for Disease Control”, see the image below.
Once you’ve made changes on the AutoCorrect window, click OK to save them. The changes
you make take immediate effect.
AutoCorrect Options Buttons
Replace text as you type

33
8. Difference between Building Blocks/AutoText and AutoCorrect.
• The obvious difference between Building Blocks/AutoText and AutoCorrect is how they are triggered.
• AutoCorrect takes effect as soon as you type text that Word recognizes, followed by a space or punctuation.
• Building Blocks/AutoText requires you to press F3 or accept the AutoComplete prompt if you don’t specifically enable the replacement, nothing happens.
• If you want complete control and don’t like things happening “automatically,” you may prefer Building Blocks/AutoText.
9. create a new Building Block? 1. Type or insert the material you want to include in the new entry. It can be text—from as little
as one character to many pages—or a table, a graphic, fields, text boxes, or any combination of these items.
2. Select all the text or other material to be included in the entry (pay special attention to the paragraph mark at the end of the selection—you may or may not want to include it).
3. Press Alt+F3 to open the Create New Building Block dialog, shown below. Alternatively, you can click the Save Selection to <name> Gallery item at the bottom of almost any gallery.

34
4. The dialog will suggest a name for your entry from the beginning of the selection but you can change the name. The name must be unique within the gallery you are using.
5. Change the Gallery drop down to the gallery of your choice. (If you select AutoText or a Custom gallery, see Adding a Custom or AutoText gallery button to the Quick Access Toolbar .)
6. Choose one of the existing categories, or click Create New Category and create a new one. (The entries in the galleries are sorted and grouped by category.)
7. (Optional) Add a Description. It will be shown in a ScreenTip when you hover your mouse over the thumbnail in the gallery.
8. You can leave the setting to save the entry in Building Blocks.dotx or change it to save in any open template. Building Blocks can only be saved in templates and cannot be saved in regular documents.
9. (Optional) The Options drop down enables you specify where the Building Block is to be inserted, such as in its own paragraph or in its own page.
Assign a Building Block to a keyboard shortcut
Another method for inserting Building Blocks is to create your own keyboard shortcut.
1. Click Office Button>Word Options>Customize, and next to "Keyboard Shortcuts" at the bottom
left, click theCustomize button.
2. Select AutoText in the list on the left. Building Blocks in all galleries will be displayed.
3. Select the name of the entry in the list on the right.
4. Click in the "Press new shortcut key" text box.
5. Press the key combination you want.
6. Click the Assign button.
10. Building Blocks Organizer
To see all of the available Building Blocks, click Insert>Quick Parts>Building Blocks Organizer.
In the Building Blocks Organizer dialog, you can click the column headings to sort the entries. For example, if you click the Gallery column heading the Building Blocks will be grouped by gallery and sorted alphabetically within each group. Clicking an entry places a preview in the box to the right, although text will usually be too small to read.

35
If you created AutoText entries in a previous version of Word, you'll find them stored as Building Blocks in a gallery called AutoText. For more on using Building Blocks in the AutoText gallery see Adding a Custom or AutoText gallery button to the Quick Access Toolbar .
Clicking the Insert button inserts the text of the selected entry into the document at the cursor position.
To edit an entry, select it in the list and then click the Edit Properties button. The Modify Building Blocks dialog box is similar to the Create New Building Block dialog box, and you can change any of the previously assigned properties. This dialog box can also be used to move a Building Block from one to template to another by changing the “Save in” box. This will move the entry, not copy it.
IV. Generating Table of Contents and Indexing in MS Word
Creating a table of contents in a Microsoft Word document is a two-step process. First,
identify the text that you want to appear in the Table of Contents. Second, tell Word to
insert the Table of Contents. Having created your Table of Contents, you can then customize
it in several ways, to suit your needs.
1. Identify the text that you want to appear in the Table of Contents
In your document, click within the first major heading that you want to appear in the Table of Contents. Apply the Heading 1 style to that paragraph. The easiest way to apply the Heading 1 style is:
in Word 2003 and earlier: click the Style box on the Formatting toolbar and choose Heading 1

36
in Word 2007 and Word 2010: on the Home tab, in the Styles group, click the Heading 1 thumbnail.
In the same way, apply the Heading 1 style to other major headings in your document. Apply the Heading 2 style to sub-headings, Heading 3 style to sub-sub-headings etc.
If you don't like the way the heading styles look (eg, you want a different font or font size or colour), don't format the text directly.
2. Create the Table of Contents
Word 2003 and earlier versions
1. Click where you want your Table of Contents to appear.
2. Display the Table of Contents dialog. To do that:
1. In Word 2000, choose Insert > Index and Tables. 2. In Microsoft Word 2002 and 2003, choose Insert > Reference > Index and Tables.
3. Click on the Table of Contents tab. Click OK.
Word 2007 and Word 2010
1. Choose References > Table of Contents.
2. Choose one of the following items on the menu.
There may be custom tables of contents on your menu. If you click the thumbnail for a custom table of contents, your table of contents will be inserted into a content control. (There is further information about content controls below.)
There are two built-in 'automatic' tables of contents: Automatic Table 1 and Automatic Table 2. If you click the thumbnail for either of these, your table of contents will be inserted into a content control, and Word will add a heading. (There is further information about content controls below.) The only difference between the two is the text of the heading ("Contents" and "Table of contents").
There is a built-in "Manual Table". This takes you back to the era of the electric typewriter. If you like typing things out for no good reason and your life expectancy is a lot longer than mine, this is for you.
At the bottom of the menu, you can choose Insert table of contents. This displays the Table of Contents dialog that was also in earlier versions of Word. If you want two or more tables of contents in one document, you must choose this option for the at least the second and subsequent tables of contents.
3. Using a table of contents content control in Word 2007 or Word 2010
You can use the content control to manage your table of contents (Figure 1).

37
Figure 1: A table of contents in a content control
If you attempt to insert another custom or built-in table of contents that will be placed in a content control, then the new one will over-ride the existing one. If you want more than one table of contents in a document, use the "Insert table of contents" menu option for all, or at least the second and subsequent, tables of contents.
How to create a custom table of contents and have it appear on the Table of
Contents menu in Word 2007 or Word 2010
You can save a custom table of contents and have it appear on the References > Table of Contents menu.
1. Insert your table of contents into any document, and adjust it to suit your needs.
2. Add text above and/or below the table of contents as required (for example, add a heading "Table of Contents", preferably formatted with the built-in TOC Heading style).
3. Select the text above, the table of contents, and the text below.
4. Insert > Quick Parts> Save Selection to Quick Part Gallery.
5. In the Create New Building Block dialog:
give your table of contents a name
in the Gallery list, choose Table of Contents
in the Category list, choose 'Create new category' and name your new category
click OK.
You can now insert your table of contents using References > Table of Contents. It will be inserted into a content control, like the built-in tables of contents.

38
Word displays entries in the menu in alphabetical order by category. Sadly, there are few letters in the alphabet before the "B" for "Built-In". If you want your custom tables of contents to appear before the Built-In category, but there is no name between "A" and "Built-In" that suits you, then put a space at the beginning of the category name. For example, name your category " Shauna". A space is alphabetized before a letter, so " Shauna" will be displayed before "Built-In".
4. Customize the Table of Contents (if you need to)
How to change the look of the headings in the document
If you don't like the way your headings look (eg you want a different font, font size, colour, more or less spacing before or after the heading), don't choose Format > Paragraph or Format > Font (in older versions of Word) or use the tools on the Home tab (in newer versions of Word). And don't use the font size or bold buttons on the toolbar or ribbon. Instead, modify the Heading style.
How to change the look of the Table of Contents itself
To modify the Table of Contents itself, you need to display the Table of Contents dialog. To display the dialog for an existing table of contents:
in Word 2000: click within the table of contents and choose Insert > Table of Contents in Word 2002 and Word 2003: click within the ToC and choose Insert > References > Table
of Contents in Word 2007 and Word 2010: click within the ToC and then clickReferences > Table of
Contents > Insert Table of Contents (if the ToC is in a content control, be sure you've clicked the ToC itself, and not any "Contents" heading above the ToC)
From the Table of Contents dialog you can modify the Table of Contents in several ways.
By default, Word shows three levels in your Table of Contents. That is, it puts the text from Heading 1, Heading 2 and Heading 3 in the Table of Contents. If you want to show more or fewer levels, in the Table of Contents dialog, change the number in the Show levels box.
There are very good reasons for using the built-in Heading styles. But if you really need to use other styles (other built-in styles, or custom styles), you can put them in your Table of Contents. In the Table of Contents dialog, click Options, and allocate your style(s) to the appropriate level(s).
To change the font, font size, colour etc used to create the Table of Contents itself, you need to do two things in the Table of Contents dialog. First, make sure that, in the Formats box, you have chosen "From Template". Second, click Modify and modify the relevant TOC style. Word uses style TOC 1 for the top level of contents, TOC 2 for the next level etc
For sophisticated customization, you can edit the switches in the TOC field.
5. How to create a table of contents for several documents
To create one table of contents for several documents, you need to do the following.

39
1. Create a separate document to hold the table of contents (we'll call this "the ToC document").
2. For ease, put all the documents, and your ToC document, in the one folder. 3. In your ToC document, use an RD (Reference Document) field for each document that you
want to include in your Table of Contents. To insert an RD field, do ctrl-F9 and, within the brackets that Word gives you, type RD
"filename". For example { RD "Chapter 1.docx" }. You can't type the curly brackets by hand. You must do ctrl-F9.
If you can't put all your files in one folder, you must use double backslashes and double quotes. For example, { RD "C:\\My folder\\Chapter 1.docx" }.
In theory, you can use relative path names. But it never seems to work properly<g>.
4. Add an RD field for each document that you want to reference, in order. 5. Create the Table of Contents in this ToC document in the usual way. 6. Remember the page number rule: "The Table of Contents will pick up whatever pagination
appears in your document". It applies when using RD fields to create a ToC for many documents. You may have to set the starting page number manually in each document if you want pagination to run consecutively through your project.
6. Other tips about Tables of Contents
A Table of Contents is a field, not ordinary text. To see fields in your document, you can tell Word to display fields with grey shading. The grey doesn't print, but it reminds you that this is a field, not ordinary text. To display fields with grey shading:
in Word 2003 and earlier versions: Tools > Options > View; set the Field Shading box to Always.
in Word 2007: Click the round Office (pizza) button, click Word Options, then, in the menu at left, click Advanced and in the 'Show document content' section set Field Shading to "Always".
in Word 2010: Click File, then Options, then, in the menu at left, click Advanced and in the 'Show document content' section set Field Shading to "Always".
Tables of Contents don't update automatically when you add a new heading to your document. This is because a ToC is a field. To update a Table of Contents, put your cursor in the Table of Contents and press F9to update it. Or ctrl-a F9 to update all fields in the document. In Word 2007 and Word 2010, if your table of contents is in a content control, you can use the content control to update the ToC.
When you update your Table of Contents, always choose to update the Entire Table (Figure 2).

40
Figure 2: Whenever you see this box, always choose the second option and update the entire
table.
Note: It is also possible to create a Table of Contents by marking each individual paragraph
that you want to appear in the ToC. Then, you tell Word to use your marked paragraphs to
create the ToC. You do this using { TC } fields. It seems to me that the chance of human error
in accidentally omitting to mark a heading is large. I wouldn't risk it. But if you're interested,
look at Word's help under TC.
7. PDF for electronic submission
Theses are now submitted electronically in PDF format to the Graduate Office. They should be named, based on your name, Lastname_Firstname.pdf. Word 2010 and Word 2013 have a built in PDF creator, and Word 2007 allows you to download a free PDF creator add-in that works very well with Word 2007 for creating PDF files.
For Word 2007, check to see if the PDF creator add-in is installed:
Click on the Office button in the top left and choose Save As
o If, under Save As, you see PDF or XPS, then the add-in is installed and you can click on PDF or XPS,then browse to where you want your PDF file saved, type in the name you want it to be called, and click Publish.
o If, under Save As, you see Find add-ins for other file formats, then the add-in is not installed. See the next section for instructions on how to install it Word 2007: How to install the add-in if it is not installed:
Sign onto the PC with an administrative account.
Open Word and click on the Office button at top left, then select Save As/Find add-ins for other file formats.
A Word Help window will appear. Browse down and click on the hypertext for Microsoft Save as PDF or XPS Add-in for 2007 Microsoft Office programs.
Internet Explorer (or your default web browser) should load a page.
Click on the Validation button in the middle of the page to continue.
A horizontal message bar will appear near the top of your window (below the Internet Explorer toolbar). Click where it says "click here" and select Install Active X Control from the menu.
Click Run to any windows asking you to install Active X, and then the SavetoPDF... exe file.
At the license page, click in the bottom left to "accept" then the continue button.
A window should appear when the installation is complete.
Click OK.
Close Word and re-open it.

41
8. Converting Word files to PDF
If you are using Word 2010/2013 built in PDF creator
Click on the File tab and choose Save As
Browse to the location where you want it saved.
Choose PDF (*.pdf) beside Save as type:
Click Options. Make sure that the Document structure tags for accessibility and Document Properties is checked and Create bookmarks using Headings is checked and click OK.
Type in the name you want it to be called (based on the Lastname_Firstname.pdf format), and clickSave.
NOTE: Avoid security settings as they may interfere with assistive software How to save a Word 2007 file as PDF using the add-in:
Click on the Office button and choose Save As/PDF or XPS.
Browse to where you want it saved, type in the name you want it to be called (based on theLastname_Firstname.pdf format), and click Publish.
9. Save a document to a shared folder on your server
Once you tell your operating system where to find the shared folder, you can use the Save As command to save files directly to a folder others can access. In Windows 7, you can set up Windows Explorer to recognize the shared folder by mapping the drive. Open Windows Explorer, right-click Network, and choose Map Network Drive. Then, specify a drive letter, choose the folder you want to use, and click Finish. That should add your shared folder to your Network Connections so you can choose the folder to receive the files when you use the Save As dialog box.

42
V. Document Sharing and Security Issues
1. Share a Word doc in Windows Live SkyDrive
The integration of Word 2010 with Windows Live SkyDrive and the addition of the
Word Web App is one of the big stories of the new release. Now you can easily post a
Word document to Windows Live SkyDrive by using the Save To Web tool in the Save
& Send tab and continue editing, formatting, or even sharing it with others, right
from that online space (Figure A). The editing tools in the Word Web App enable you
to do everything you might need to do online, including add new content, research
your topic, and edit and format what's already there. You can give others access to
the file stored in Windows Live SkyDrive so that you can all work together peaceably
on the file in a space that's accessible to everyone.
Figure A
The Word Web App and Word's integration with Windows Live SkyDrive make collaboration easy.
2. Restrict Editing To Secure Word 2010 Document
Keeping your important document protected from any external source would be extremely beneficial.
Sometimes while writing document it become dire need to maintain confidentiality of document and
preventing document from being edited from any unauthenticated source. Word 2010 provides an
option to make your document protected from any unauthorized use, which eventually mitigates the
probable of vulnerability. There are several ways to secure document content but in this post we will be
focusing on how to enforce editing restrictions.

43
To start out with, launch Word 2010 document on which you want to restrict editing. Navigate
to Reviewtab and click Restrict Editing.
You will see Restricting Formatting and Editing pane at the right sidebar providing numerous options to
restrict editing.
Under Formatting restrictions enable Limit formatting to a selection of styles option. For configuring
advance options click Settings.
Upon click Formatting Restrictions dialog will appear, here you can restrict formatting to the desired
styles and prevent others from modifying styles and change formatting of the document. Scroll through
the list and disable the desired options. You can also use the recommended settings by
clicking Recommended Minimum.

44
Under Formatting you can enable several options that lets you to Allow AutoFormat usage which
overrides formatting restrictions, Block Theme or Scheme switching, and Block Quick Style Set Switching.
Click OK to continue.
From Editing restrictions enable Allow only this type of editing in the document option and from it’s list
choose desired option.
If you want users to edit portion of the document content then select the content and under Exceptions
(options), select the users you want to give permission of editing. If you want to add users for this,
clickMore users.

45
Now from Start enforcement click Yes, Start Enforcing protection to protect document from any
unauthenticated user.
Now enter passphrase to make your document password protected. If you want to encrypt document
and allow authorized users to remove protection when they want, then enable User
authentication. Click OKand save the document.
When someone will try to edit the document, Restrict Formatting and Editing bar will appear, but they
can find the regions which they can edit.
Upon clicking Find Next Region I can Edit, it will take you to the content you can edit, as shown in the
screenshot below.

46
If you want to disable protection then click Stop protection. Enter password to let Word 2010 know that
you are an authorized user.
3. Set Document Password:
Once you set a password for a document then you will be able
to open the document only if you know the password. If you lost
your password then there is no way to recover it and to open the document. So you need to be careful
while setting a password for your important document.
Following are the simple steps to set a password for a word document.
Step (1): Open a word document for which you want to set a password.
Step (2): Click the File tab and then click Info option and finally Protect Document button which will
display a list of options to be selected.

47
Step (3): Select Encrypt with Password option simply by clicking over it. This will display an Encrypt
Document dialog box asking for a password to encrypt the document. Same dialog box will appear twice
to enter the same password. After entering password each time, click OK button.
Step (4): Save the changes, and finally you will have your document password protected. Next time when someone will try to open this document it will ask for the password before displaying document content, which confirms that now your document is password protected and you need password to open the document.
4. Remove Document Password:
You can remove a document password only after opening it successfully. Here are the simple steps to
remove a password protection from your word document.
Step (1): Open a word document for which you want to remove the password. You would need correct
password to open the document.

48
Step (2): Click the File tab and then click Info option and finally Protect Document button which will
display a list of options to be selected.
Step (3): Select Encrypt with Password option simply by clicking over it. This will display an Encrypt
Document dialog box and password which will be in the form of dotted. You need to remove these
dotted from the box and make it clear to remove the password from the document.
Now when you will open your document next time, word would not ask you for any password because
you have removed the password protection from the document.

49
MS PowerPoint 2010
I. Custom Animation using PowerPoint You can animate the text, pictures, shapes, tables, SmartArt graphics, and other objects in your Microsoft PowerPoint 2010 presentation to give them visual effects, including entrances, exits, changes in size or color, and even movement.
1. Overview of animating text and objects Animation is a great way to focus on important points, to control the flow of information, and to increase viewer interest in your presentation. You can apply animation effects to text or objects on individual slides, to text and objects on the slide master (slide master: The main slide that stores information about the theme and layouts of a presentation, including the background, color, fonts, effects, placeholder sizes, and positions.), or to placeholders on custom slide layouts. There are four different kinds of animation effects in PowerPoint 2010:
the slide from an edge, or bounce into view.
view, or spiral off of the slide.
size, change color, or spin on its center.
an animation sequence for a slide.). You can use these effects to make an object move up or down, left or right, or in a star or circular pattern (among other effects). You can use any animation by itself or combine multiple effects together. For instance, you can make a line of text fly in from the left while it grows in size by applying a Fly In entrance effect and a Grow/Shrink emphasis effect to it.
2. Add animation to an object 1. To add an animation effect to an object, do the following:
2. Select the object that you want to animate.
3. On the Animations tab, in the Animation group, click the More button, and then select the animation effect that you want.
NOTES
If you do not see the entrance, exit, emphasis, or motion path animation affect that you want, click More Entrance Effects, More Emphasis Effects, More Exit Effects, or More Motion Paths.
After you have applied an animation to an object or text, the animated items are labeled on the slide with a non-printing numbered tag, displayed near the text or object. The tag

50
appears only in Normal view when the Animations tab is selected or the Animation task pane is visible
Apply multiple animation effects to a single object To apply multiple animations onto the same object, do the following: 1. Select the text or object that you want to add multiple animations.
2. On the Animations tab, in the Advanced Animation group, click Add Animation.
View a list of animations currently on the slide You can view the list of all the animations on the slide in the Animation task pane. The Animation task pane shows important information about an animation effect, such as the type of effect, the order of multiple effects in relation to one another, the name of the object affected, and the duration of the effect. To open the Animation task pane, on the Animations tab, in the Advanced Animation group, click Animation Pane.
4. In the task pane, numbers indicate the order in which the animation effects play. The numbers in the task pane correspond to the non-printing numbered tags that are displayed on the slide.
5. Timelines represent the duration of the effects.
6. Icons represent the type of animation effect. In this example, it is an Exit effect.
7. Select an item in the list to see the menu icon (down arrow), and then click the icon to reveal the menu.
Set the effect options, timing, or order for an animation To set the effect options for an animation, on the Animations tab, in the Animation group,
click the arrow to the right of Effect Options and click the option that you want. You can specify the start, duration, or delay timing for an animation on the Animations
tab.

51
To set the start timing for an animation, in the Timing group, click the arrow to the right of the Start menu and select the timing that you want. To set the duration of how long the animation will run, in the Timing group, enter the number of seconds that you want in the Duration box. To set a delay before the animation begins, in the Timing group, enter the number of seconds that you want in the Delay box.
To reorder an animation in the list, in the Animation task pane, select the animation that you want to reorder, and on the Animations tab, in the Timing group, under Reorder Animation, either select Move Earlier to make the animation occur before another animation in the list or select Move Later to make the animation occur after another animation in the list.
Test your animation effect After you add one or more animation effects, to validate that they work, do the following:
On the Animations tab, in the Preview group, click Preview.
Five tips for creating animations in PowerPoint 2010 Takeaway: If you’ve struggled in the past with PowerPoint’s animation tools, you may find the situation has improved with the latest version. Here are a few easy ways to create animation effects with PowerPoint 2010. In previous versions of PowerPoint, animating elements on the screen was in equal parts (to me, at least) amusing and annoying. I loved it when the items did their little swirls or faded into view at just the right time. But I fussed and fumed over that one word bubble that would never arrive on cue. Now in PowerPoint 2010, the animation feature is easier — and goes farther — with just a few clicks of the mouse. Here’s a small taste of these improvements.
3. Use ready-made animations The Add Animation gallery presents simple animations you can easily apply to items on your slide. Simply click the element you want to animate, click the Animation tab, and click Add Animation. The gallery (Figure A) shows a number of simple animations that control the way objects enter, exit, appear, and disappear on your slides.

52
The Add Animation gallery offers assorted ready-made animations you can apply to elements on your slide.
4. Set triggers A trigger enables you to tie your animation to another action on the slide. You can create bookmarks in your presentation that trigger an animation to begin, or you can set the animation to start when you click the mouse. You can further control the trigger by indicating which action you will take to trigger the animation. Set a trigger for an animation by clicking the animated item and then clicking Trigger in the Advanced Animation group of the Animations tab.
5. Use the Animation Painter It’s not unheard of to spend hours trying to get everything in your presentation animated perfectly. Getting things to move at the right speed, in the right order, and ending in the right sequence used to be a pretty tricky business. Now you can automate the animation sequences you like by using the Animation Painter. Available in the Advanced Animation group, the Animation Painter works like the Format Painter tool. You click the element with the animation you want to copy, click Animation Painter, and then drag the pointer over the item you want to receive the animation settings. PowerPoint does the rest.
6. Let the timeline help you out The timeline appears at the bottom of the Animation Pane to help you see how the animations are unfolding on your slide. You can use the timeline to gauge the entry and exit of various items and to determine whether you want to change the time or sequence of events. Each individual animation also shows the length of time it requires by displaying a small time segment to the right of each animation entry. You can scroll along the timeline by clicking the arrows at either end or click the Seconds control to Zoom In or Zoom Out and change the increments of time
You can change the increments on the timeline to fine-tune the animation of elements on your slide.
7. See it all in the Animation Pane The Animation Pane (Figure C) brings together all kinds of information and tools for you to use as you organize, order, and time the animation features you add to elements on your slides. Display the Animation Pane by clicking the Animation tab and choosing Animation Pane in the Advanced Animation group. The task pane lets you preview the animation (click Play), reorder animations, and see where they fall on the timeline. You can also access options related to each animation by clicking its arrow and choosing the tool you want to use. You can set options, control time, or even remove the animation if you like.

53
The Animation Pane brings together all the settings you may want to change for individual animations.
8. Advanced Animation Time line When you need to fine tune the animation timings, you need to display the very powerful Advanced Timeline. When you open the animation pane, which do you see:
With the advanced Timeline you can see the duration, start and end for each animation in relation to the other animations. For advanced animation needs the WITH PREVIOUS setting is utilized more and the animation start position and duration are adjusted with the Advanced Timeline (as example when a subtle overlapping animation is needed).
To see the Advanced Timeline, click any animation and choose SHOW ADVANCED TIMELINE.

54
II. Customizing of Presentation using PowerPoint
1. Recording a Voice Narration in PowerPoint You might want to add narration to a presentation in the following cases:
For a Web-based presentation
For archiving a meeting so that presenters can review it later and hear comments made during the presentation
For self-running slide show presentations
Your computer must be equipped with a sound card, microphone, and speakers for you to record and hear a narration. You can record the narration before you run a presentation, or record it during the presentation and include audience comments in the recording. If you don't want narration throughout the presentation, you can record comments on selected slides. When you're finished recording a narration, a sound icon appears on each slide where you've recorded. You can either click the icon to play the sound, or set up the sound to play automatically. Because voice narration takes precedence over other sounds, if you've inserted another sound to play automatically in the presentation, it gets overridden by the narration. Automatic slide timings As you record, Microsoft PowerPoint records the amount of time you take on each slide. You can choose to save these slide timings with the narration, or you can set slide timings separately. Slide timings are especially useful if you want the presentation to run through automatically. You can turn them off when you don't want the presentation to use them.
2. Embed or link the narration You have a choice to either link or embed the narration.
it travels with the presentation. However, embedding the narration results in a large file size.
ion. The file is then stored where you specify on your hard drive and plays with the presentation. If you present the show on a different computer, you must carry the linked sound file with you and install it on that computer. A linked file will also play faster.
3. Accompany the narration with notes Because audience needs and computer equipment varies, consider accompanying your narration with notes. This benefits anyone who is deaf or hard of hearing or whose computer lacks a sound card. If you save the presentation as a Web page (.htm file), the notes will appear beneath each slide as it displays. If you save it as a presentation (.ppt) file, you can print out the notes and make them available to your audience.
Instructions 1. Prepare the PPTX slides with all the animation effects that you want to include;
2. Prepare notes for each slide with your narration;
3. Take a printout of your notes and mark the places in the text where you want to click for the animation effects to start during the slide show presentation;

55
4. Make mp3 files with your narration for each slide using the notes.
5. From the "Insert" panel, insert audio files in the slides
6. Open the "Animation Pane" in the "Animations" panel a. Move the audio file to the top of the list of effects. Make sure that the animation effect for the audio file is set to "Play." b. From the top-down menu for the audio file in the Animation Pane, click "Start With Previous." The audio file order number should show "0." c. Select from the top-down menu "Effect Options" and change "Stop playing" to "After current slide."
7. Click "Record Slide Show" in the "Slide Show" panel. Use the marks in the printed notes to click and start the animation effects and advance to the next slide while listening to the narration. In PowerPoint 2010 you have an option to save the slide show with the animations and narrations as a high-quality Windows media Video (.wmv) file, played back on computers even if PowerPoint is not installed. To do that, click "Share" and then under 'File Types" select "Create a Video."
III. Rehearse Timings, Custom Slideshow, and Presentation looping.
The purpose of creating a Custom Slide Show is to display only selected slides from your
presentation, without deleting the slides you do not want to show. To understand a Custom
Slide Show, think of your individual slides as songs -- then a Custom Slide Show is a playlist
of those songs! Even better, since this is like a playlist, you do not have to delete the slides
that are not used. And there's more -- you can create any number of Custom Slide Shows
from a single presentation!
Follow these steps to learn how to create Custom Slide Show in PowerPoint 2010:
1. Open the presentation in which you wish to create a Custom Slide Show.
2. Access the Slide Show tab (shown highlighted in within Figure 1) of the Ribbon, and click
the Custom Slide Show button. Within the drop-down menu that appears, click the
Custom Shows option, as shown highlighted in within Figure 1.
Figure 1: Custom Shows option

56
3. This brings up the Custom Shows dialog box, as shown in Figure 2. Note that the area on
the left, that's because this particular presentation contains no Custom Slide Show yet.
To create a Custom Slide Show, click the New button,
Figure 2: Custom Shows dialog box
4. This will open the Define Custom Show dialog box, as shown in
Figure
5. 3: Define Custom Show dialog box
All the options within the Define Custom Show dialog box are explained below, as
marked in Figure 3, above:
A. Slide show name: Here you can provide name for your Custom Slide Show. By
default PowerPoint may just call this Custom Show 1, but you can type in a new,
more descriptive name.
B. Slides in presentation: Shows a list of slides within the current presentation. To
select slide(s), click the slide name(s).
C. Add: This button adds the selected slides from the Slides in presentation area to
the Slides in custom show area. Note that unless you select some slides within
the Slides in presentation area, the Add button stays greyed out. Do note that you
can also add the same slide more than once.
D. Remove: This button removes selected slides from the Slides in custom show area.
Note that unless you select a slide within the Slides in custom show area,
the Remove button stays greyed out.

57
E. Slides in custom show: Once you add the slides, this area shows the list of slides
within the current Custom Show. Figure 4, below shows three slides added
within Slides in custom show list -- you can also see that we have changed the
Custom Show name to 'Important Slides'.
Figure 4: Slides added within Slides in custom show list
F. Re-order: The Up and Down buttons within Figure 4, above) are active only when
there are slides added within Slides in custom show list. Use
the Up and Down buttons to re-order the sequence of the selected slide(s).
Click the OK button to create the Custom Show.
6. This brings you back to the Custom Shows dialog box, as shown in Figure 5. The Custom
Show you just created can be seen within this dialog box.
Figure 5: Custom Shows dialog box with the Custom Show listed
To preview the Custom Show, select it from the list and click the Show button, as shown
within Figure 5 above.
7. Within the Custom Shows dialog box, you will find other buttons such as:
New, to create more Custom Shows
Edit, to edit a selected Custom Show

58
Remove, to delete an existing, selected Custom Show, and
Copy, to create a duplicated copy of the selected Custom Show. This option is very
useful if you want to create similar Custom Shows where only a few slides differ.
8. Once you are happy with your Custom Show, click the Close button, within Figure 5.
IV. Visual Tools of Enhancement of presentation using PowerPoint
1. Working with Movies in PPT You can embed a video or link to a video from your PowerPoint presentation. When you embed your video, you don't have to worry about lost files when you deliver your presentation because all the files are there. If you want to limit the size of your presentation, you can link to a video file on your local drive or to a video file that you uploaded to a web site, such as YouTube.
2. Embed a video in your presentation With Microsoft PowerPoint 2010, you can now embed a video from a file directly into your presentation. And, as you have with earlier versions of PowerPoint, you can also embed an animated .gif file from the Clip Art library. Notes PowerPoint will support QuickTime (.mov, .mp4) and Adobe Flash (.swf) files when you have installed the QuickTime and Adobe Flash players. There are some limitations when using Flash in PowerPoint 2010, including the inability to use special effects (such as shadows, reflections, glow effects, soft edges, bevels, and 3-D rotation), the fade and trim capabilities, and the ability to compress these files for easier sharing and distribution. PowerPoint 2010 does not support 64-bit versions of QuickTime or Flash.
3. Embed a video from a file 1. In Normal view, click the slide in which you want to embed a video. 2. On the Insert tab, in the Media group, click the arrow under Video, and then click Video from file. 3. In the Insert Video dialog box, locate and click the video that you want to embed, and then click Insert.
4. Link to a video file from your presentation

59
You can link to an external video or movie file from your Microsoft PowerPoint 2010 presentation. By linking your video, you can reduce the file size of your presentation. To add a link to a video from your PowerPoint presentation, do the following: 1. On the Slides tab in Normal view, click the slide to which you want to add a video or animated GIF file.
2. On the Insert tab, in the Media group, click the arrow under Video. 3. Click Video from File, locate and click the file that you want to link to. 4. On the Insert button, click the down arrow, and then click Link to file.
IMPORTANT To prevent possible problems with broken links, it is a good idea to copy the videos into the same folder as your presentation, and link to them there
5. Link to a video file on a web site You can link to a video file on your local drive or to a video file that you uploaded to a web site, such as YouTube or hulu. IMPORTANT Please make sure that you obtain the owner's approval before you distribute content (that you did not create) that is copyrighted. 1. On the Slides tab in Normal view, click the slide to which you want to add a video.
2. In your browser, go to the web site that contains the video that you want to link to, such as YouTube or hulu. 3. On the web site, locate the video, and then locate and copy the Embed code.
4. Note Most web sites that contain videos include an embed code, yet the locations of embed codes will differ depending on each web site. And, some videos do not have an embed code, and therefore you cannot link to those. And, to be clear, even though they are called 'embed codes', you are actually linking to the video and not embedding it in your presentation.

60
1. In YouTube, the Embed code is located to the right of the video. 2. Back in PowerPoint, on the Insert tab, in the Media group, click the arrow under Video. 3. Click Video From Web Site. 4. In the Video From Web Site dialog box, paste the embed code, and then click Insert.
6. How to Upload PowerPoint to YouTube Microsoft PowerPoint is the de facto standard for slide show and presentation creation software. With Microsoft PowerPoint you can create slide shows that react as you click, that are optimized for projection or large room display. PowerPoint slide shows also represent an easy way of distributing information in a simple slide format. If you have created a PowerPoint presentation and want to distribute it to someone, without giving them access to edit it, you can use an online site like YouTube to host it. Using YouTube to distribute your PowerPoint presentations requires you to first export it as a video. Microsoft PowerPoint can easily export to video and so no additional software is required.
Instructions 1. Open the Microsoft PowerPoint presentation file that you want to upload to YouTube. Make
sure that it is completely finished and free of errors.
2. Click "File," then click "Save & Send" to load up the alternative export options.
3. Click "Create a Video" under the "File Types" list, then click "Computer & HD Displays." Select the "Web" option from the list, then click "Create Video."
4. Specify a location for your exported video to be saved, then click "Save."
5. Go to the YouTube Video File Upload page (see the "Resources" section of this article) and click "Upload video." Locate your exported video from PowerPoint, select it and click "Upload" to upload your PowerPoint presentation to YouTube.
7. How to upload your video to YouTube Once you have created your video, make sure it's smaller than 2GB in size, in an acceptable file format, and less than 15 minutes unless you have permission to upload videos of unlimited duration. If all of these things are in order, you are now ready to upload! To upload your video: 1. Click the Upload link at the top of any YouTube page.
61
2. Click the Upload video button to browse for the video file you'd like to upload to our site. Select the file you want to upload and click Open.
3. As the video file is uploading, enter as much information about your video as possible in the relevant fields (including Title, Description, Tags, and Category). You're not required to provide specific information, but the more information you include, the easier it is for users to find your video!
4. Click the Save changes button to save the updates you've made to the video file. Have more than one video file to upload? Not a problem! You can upload up to 10 video files in a single uploading session
Here's a list of some well-known formats that YouTube supports:
WebM files - Vp8 video codec and Vorbis Audio codecs
.MPEG4, 3GPP and MOV files - Typically supporting h264, mpeg4 video codecs, and AAC audio codec
.AVI - Many cameras output this format - typically the video codec is MJPEG and audio is PCM
.MPEGPS - Typically supporting MPEG2 video codec and MP2 audio
.WMV - Windows Movie Maker, PowerPoint video
.FLV - Adobe-FLV1 video codec, MP3 audio

62
MS Excel 2010
I. Introduction:
If you have been using Office 2007, then you are already aware that the Ribbon interface
replaced the familiar menus and toolbars with Tabs, Groups, and Commands. Although
Excel 2010 retains the same interface it offers:
(1) A new backstage view to manage your documents
(2) The ability to customize the Ribbon with custom Tabs and Groups
(3) An Info tab that displays different commands, properties, and metadata depending on
the status and location of the document, and
(4) Quick access to Recent Workbooks and Recent Places.
Today's Excel spread sheet isn't just for financial professionals. Microsoft Excel offers
intuitive tools that make it easy to access, connect, and analyse critical data—regardless of
your profession. The first step in learning to use your new software is to start (or in
computer parlance: launch) the Excel Program.
Launch Excel:
1. SELECT (Click) the Windows Start button; this will bring up a set of choices in a menu.
2. Select Programs. Another menu will appear to the right.
3. Locate and Select Microsoft Office and another menu will appear on the right.
4. Locate and Select Microsoft Office Excel 2010. You have now launched Excel.
When Excel starts, it creates a new blank workbook, called Book 1. The Workbook is similar
to a notebook. Inside you have sheets, each of which is called a worksheet. Each worksheet
has a name that appears on a sheet tab at the bottom of the workbook.

63
II. Components of Excel
When you first open Microsoft Excel, you’ll see the basic components.
1. The Ribbon
When you try the new design, you'll discover that the commands you already know how to
use are grouped together in ways that make sense to you.
There are three basic components to the Ribbon:
1) Tabs: There are seven of them across the top. Each represents core tasks you do in
Excel.
2) Groups: Each tab has groups that show related items together.
3) Commands: A command is a button, a box to enter information, or a menu.
The principal commands in Excel are gathered on the first tab, the Home tab. The
commands on this tab are those that Microsoft has identified as the most commonly used
when people do basic tasks with worksheets.
For example, the Paste, Cut, and Copy commands are arranged first on the Home tab, in the
Clipboard group. Font formatting commands are next, in the Font group. Commands to
centre text or align text to the left or right are in the Alignment group, and commands to
insert and delete cells, rows, columns, and worksheets are in the Cells group.
Name Box with
active cell
reference
Scroll bar
Sheet Tab
Grid Lines Row
Headers
Column
Headers

64
Groups pull together all the commands you're likely to need for a particular type of task,
and throughout the task they remain on display and readily available, instead of being
hidden in menus. These vital commands are visible above your work space.
Here's an example of the convenience: If you want text displayed on multiple lines in a cell,
you don't have to click a command on a menu, click a tab in a dialog box, and then click an
option in the dialog box. You just click the Wrap Text button in the
Alignment group, on the Home tab.
2. Dialog Box Launcher
When you see the arrow (called the Dialog Box
Launcher) in the lower-right corner of a group,
there are more options available for the group.
Click the arrow, and you'll see a dialog box or a
task pane.
For example, on the Home tab, in the Font
group, you have all the commands that are
used the most to make font changes:
commands to change the font, to change the
size, and to make the font bold, italic, or
underlined.
3. Quick Access Toolbar
If you often use commands that are not as quickly available as you would like, you can easily
add them to the Quick Access Toolbar, which is above the Ribbon when you first start Excel
2010. On that toolbar, commands are always visible and near at hand.

65
For example, if you use AutoFilter every day, and you don't want to have to click the Data
tab to access the Filter command each time, you can add Filter to the Quick Access Toolbar.
To do that, click on the Dropdown icon on the quick access toolbar and then click More
Commands and select icons to Add to Quick Access.
Or
You can directly right click on the icon and select the option Add to quick access toolbar.
To remove a button from that toolbar, right-click the button on the toolbar, and then click
Remove from Quick Access Toolbar.
4. Backstage View
The Backstage view is the place where you manage your Excel workbooks and the related
data about them. Click on the File tab to create, save, and send workbooks; inspect
workbooks for hidden metadata or personal information. From this view you can access the
most recent documents and folders that were opened, set print options, and preview a
spreadsheet before printing.
5. Quick access to Recent Workbooks and Recent Places:
Prior versions of Microsoft Office displayed a set number of the most recent documents
accessed as so does Office 2010. The newest version also includes “Recent Places,”
shortcuts to folders that you may have accessed within Royal Drive, My Documents, etc.
These new and revised navigation shortcuts provide faster retrieval to any file or folder used
continually by allowing the user to pin shortcuts to the Recent Screen.

66
How to:
1. Click on the tab File and then Recent.
2. Click on the push pin next to any Recent Documents or Recent Places to pin the
desired documents or places to the window. Click the push pin again to remove them
from the window.
To change the default number of documents
that are accessible click on the box “Quickly
access this number of Recent Documents,” located under the Recent Documents pane.
6. Contextual Tabs
The commands on the Ribbon are the ones you use the most. This means some less used
tabs will only appear if you need them (these are called “Contextual Tabs”).
For example, if you don't have a chart in your worksheet, the commands to work with charts
aren't necessary.
But after you create a chart, the Chart Tools appear, with three tabs: Design, Layout, and
Format. On these tabs, you'll find the commands you need to work with the chart. The
Ribbon responds to your action.
Use the Design tab to change the chart type or to move the chart location; the Layout tab to
change chart titles or other chart elements; and the Format tab to add fill colours or to
change line styles. When you complete the chart, click outside the chart area. The Chart
Tools go away. To get them back, click inside the chart. Then the tabs reappear.
Chart
Tools
Created
chart

67
So don't worry if you don't see all the commands you need at all times. Take the first steps.
Then the commands you need will be at hand.
Excel Terminology:
To understand Excel better, you should familiarize yourself with the following terminology:
Spreadsheet, Workbook, Worksheet and cell
7. Spreadsheet and Workbooks
A spreadsheet is a grid of data divided into numbered rows and lettered columns. Each
block in this grid is called a cell, and it can hold an individual piece of text or data. A cell has
a lettered column and numbered row. In Excel, a file/document is considered a spreadsheet,
although it is commonly referred to as a workbook.
8. Worksheets:
The worksheet is a page of data in your spreadsheet (or workbook) that is organized by the
labelled tab displayed at the bottom of the excel window. Each worksheet has 16,384
columns and 1,048,576 rows, so Excel can easily accommodate large datasets.
Your spreadsheet can contain as many as you want. By default, however, all newly opened
Excel spreadsheet have three worksheets.
To view the contents of a worksheet, click on its tab at the bottom- left corner of the Excel
window.
To create a new worksheet, click the small button( ) to the right of all the
worksheets or shortcut to insert a new sheet: Shift + F11

68
9. Protected View
In an effort to increase Office 2010’s security, Microsoft has instituted this feature across all
its products. Documents that are opened from an “untrusted” source (i.e., a spreadsheet
downloaded from Gmail or opened from Outlook) will appear in so-called Protected Mode.
In Protected Mode, you cannot, edit, print, or save files to your computer.
III. Navigating in Excel
Navigate between Worksheets
To move to other Worksheets, you can click their tab with the mouse at the bottom of the
screen (Sheet1, Sheet 2, or Sheet 3) or use the Ctrl key with the Page Up and Page Down
keys to move sequentially up or down through the worksheets.
1. Insert, Move, & Rename Worksheets
Worksheets are much like pages within a book; you peruse through them like you flip the
pages of a book. There are several ways to move and copy worksheets. Right click on the
sheet tab and choose Move or Copy. Select a new position in the workbook for the
worksheet or click the Create a copy checkbox and Excel will paste a copy of that worksheet
in the workbook. The same shortcut menu for the sheet tab also gives you the option to
insert, delete, or rename a worksheet.

69
Navigation Keystrokes
Keystroke Action
↑, ↓, ←, → Moves the active cell up, down, right, or left one cell
Enter Moves the active cell down one cell
Tab Move the active cell to the right one cell
Page Up Moves the active cell up one full screen
Page Down Moves the active cell down one full screen
Home Moves the current cell to column A of the active row
Ctrl + Home Moves the current cell A1
F5( Function Key) Opens the “Go To” dialog box in which you can enter
the cell address of the cell you wish to make active
2. Select & Move Worksheet Cells
To select a large area of cells, select the first cell in the range, press and hold the Shift key,
and then click the last cell in the range. Once you have selected a range of cells, you may
move the cells within the worksheet by clicking and dragging the selection from its current
location to its new one.
To do this, bring your cursor to the side of the selection. When your cursor turns into 4
arrows pointing into opposite directions click and hold on to the mouse and drag where
ever you want to locate it and let go of the mouse.
By pressing and holding the Ctrl key as you drag, Excel will leave the original selection in its
place and paste a copy of the selection in the new location. To move between workbooks,
use the Alt key while dragging the selection.

70
3. Range Selection Techniques
To Select Do This
A single cell Click the cell, or press the arrow keys to move to the cell.
A range of cells Click the first cell in the range, and then drag to the last cell, or
hold down SHIFT while you press the arrow keys to extend the
selection.
A large range of cells Click the first cell in the range, and then hold down SHIFT while
you click the last cell in the range. You can scroll to make the last
cell visible.
All cells on a worksheet Click the Select All button. To select the entire worksheet, you can
also press CTRL+A.
Nonadjacent Cells Select the first cell or range of cells, and then hold down CTRL
while you select the other cells or ranges. Note: You cannot cancel
the selection of a cell or range of cells in a nonadjacent selection
without canceling the entire selection.
Cells to the last used
cell on the worksheet
(lower-right corner)
Select the first cell, and then press CTRL+SHIFT+END to extend the
selection of cells to the last used cell on the worksheet (lower-
right corner).
Cells to the beginning
of the worksheet
Select the first cell, and then press CTRL+SHIFT+HOME to extend
the selection of cells to the beginning of the worksheet.
An entire row or
column
Click the row or column heading. Note: If the row or column
contains data, CTRL+SHIFT+ARROW KEY selects the row or column
to the last used cell. Pressing CTRL+SHIFT+ARROW KEY a second
time selects the entire row or column
Cancel a selection Click any cell on the worksheet.
IV. Modifying Cells
1. Understanding Text, Values, & Formulas
Information entered into cells is categorized as text, values, or formulas. Values must be
numbers, though they can be formatted to appear on the screen as currency or as a
percentage.

71
2. Editing Cells & Entering Expressions
You can edit a cell by selecting the cell and then clicking in the formula bar or by double-
clicking the cell; double-clicking the cell will place your curser inside that cell, allowing you
to edit directly inside the cell. Telephone numbers or social security numbers that contain
other characters (like a dash or parentheses) are treated as text and cannot be used in
calculations. Arithmetic operators (such as +, -, /, and *) are used in formulas.
3. Inserting Worksheet Rows & Columns
Adding rows and columns is very simple. On the Home tab in the Cells group, click the down
arrow under the Insert command.
From here you can insert
cells, rows, and columns
simply by clicking on the
appropriate command. You
can also use the Insert
dialog box. This figure
depicts the Insert dialog
box, which appears when
you select a range of cells,
right click on the selection, and then choose Insert from the
shortcut menu.
Selecting one of these options controls what happens to
existing cells when the new row or column is inserted. You
can tell Excel whether to adjust your formulas accordingly
with the change (this is called cell referencing, which we
will go over in a later section).
4. Delete Worksheet Rows & Columns
To delete cells, rows, or columns, select the Home
tab, then from the Cells group select Insert or
Delete. You can also or right click on a heading or a

72
selection of cells and choose Delete from the shortcut menu.
Clearing, as opposed to deleting, does not alter
the structure of the worksheet or shift un-
cleared data cells. When you want to clear a cell
or range of cells, choose clear from the Editing
group in the Home tab.
What can be confusing about this process is that
you can use the Delete key to clear cells, but it does not remove them from the worksheet
as you might expect.
5. Resizing Columns
In many situations, a cell will be too wide or too narrow to properly display the data it
contains. To resize a column to a new width:
Place your cursor on the gridline between the column to be resized and the column to
the right of it.
Drag the column gridline left or right to resize the column and release the mouse when
colun is at the desired width.
6. Resizing Rows
To resize a row to a new height:
Place your cursor on the gridline between the row to be resized and the one directly
below it.
Drag the gridline up or down to resize the row and release the mouse when then row is
at the desire height.

73
Tip: Double- click on a gridline (whether that of a column or a row) will resize that column or row
precisely to the width or height of the text.
7. Merge or Split cells
Merging two or more adjacent horizontal or vertical cells makes the
cells become one large cell displayed across multiple columns or
rows. The contents of one of the cells appear in the center of the
merged cell.
You can split a merged cell into separate cells again but you cannot split a single cell that has
not been merged.
8. Merge Adjacent Cells
Select two or more adjacent cells that you want to merge.
Note Make sure that the data that you want to
display in the merged cell is in the upper-left cell of
the selected range. Only the data in the upper-left
cell will remain in the merged cell. Data in all of the
other cells of the selected range will be deleted.
On the Home tab, in the Alignment group, click Merge and Center. The cells will be merged
in a row or column, and the cell contents will be centered in the merged cell. To merge cells
without centering, click the arrow next to Merge and Center, and then click Merge Across or
Merge Cells. If the Merge and Center button is unavailable, the selected cells may be in
editing mode. To cancel editing mode, press ENTER.
Split a Merged Cell
Select the merged cell. When you select a merged cell, the Merge and Center button also
appears selected in the Alignment group on the Home tab.
To split the merged cell, click Merge and Center . The contents of the merged cell
will appear in the upper-left cell of the range of split cells.
9. Combining & Splitting Contents
Combine the Contents of Multiple Cells
You can use a formula with the ampersand (&) operator to combine text from multiple cells
into one cell.

74
1. Select the cell in which you want to combine the contents of other cells.
2. To start the formula, type =( Excel 1: The Basics 16 Last updated: 2/09/2011
3. Select the first cell that contains the text that you want to combine, type &" "& (with a
space between the quotation marks), and then select the next cell that contains the text
that you want to combine.
To combine the contents of more than two cells, continue selecting cells, making sure to
type &" "& between selections. If you don't want to add a space between combined text,
type & instead of &" "&. To insert a comma, type &", "& (with a comma followed by a space
between the quotation marks).
4. To finalize the formula, type)
5. To see the results of the formula, press ENTER.
Note: The formula inserts a space between the first and last cells by using a space enclosed
within quotation marks. Use quotation marks to include any literal text — text that does not
change — in the result.
Split the Contents of a Cell across Multiple Cells
1. Select the cell, or entire column, that contains the text values that you want to distribute
across other cells.
Note: A range can be any number of rows tall, but no more than one column wide. Maintain
enough blank columns to the right of the selected column to prevent existing data from
being overwritten by the data that will be distributed.
2. On the Data tab, in the Data Tools group, click Text to Columns.
3. Follow the instructions in the Convert Text to Columns Wizard to specify how you want
to divide the text into columns.
For help with completing all the steps of the wizard, click Help in the Convert to Text Columns

75
V. Cell Reference A cell reference refers to a cell or a range of cells on a worksheet and can be used in a
formula so that Microsoft Office Excel can find the values or data that you want that
formula to calculate.
In one or several formulas, you can use a cell reference to refer to:
Data from one cell on the worksheet.
Data that is contained in different areas of a worksheet.
Data in cells on other worksheets in the same workbook.
1. Referencing Methods
1) Relative,
2) Absolute
3) Mixed references
A. Relative Cell References
When you copy and paste or move a formula that uses relative references, the references in
the formula change to reflect cells that are in the same relative position to the formula. The
formula is the same, but it uses the new cells in its calculation. Relative addressing
eliminates the tedium of creating new formulas for each row or column in a worksheet filled
with repetitive information.
B. Absolute Cell References
If you don’t want a cell reference to change when you copy a formula, make it an absolute
reference by typing a dollar sign ($) before each part of the reference that you don’t want to
change. For example, $A$1 always refers to cell A1. If you copy or fill the formula down
columns or across rows, the absolute reference doesn’t change. You can add a $ before the
column letter and the row number. To ensure accuracy and simplify updates, enter constant
values (such as tax rates, hourly rates, and so on) in a cell, and then use absolute references
to them in formulas.
C. Mixed Cell References
A mixed reference is either an absolute row and relative column or absolute column and
relative row. You add the $ before the column letter to create an absolute column or before
the row number to create an absolute row. For example, $A1 is absolute for column A and

76
relative for row 1, and A$1 is absolute for row 1 and relative for column A. If you copy or fill
the formula across rows or down columns, the relative references adjust, and the absolute
ones don’t adjust.
2. Working with Names and Ranges
Working with numbers isn’t always easy. A complex formula involving several cell ranges
can be difficult to understand. Individual cells that contain important data can be hard to
find on a large worksheet. Cell references like D5:D22 or A33:C33 are somewhat abstract,
and don’t really communicate anything about the data they contain.
In Excel, you can create meaningful names for cells or ranges that can be used to overcome
these difficulties.
A. What Are Range Names?
Range names are meaningful character strings that you can assign to individual cells or cell
ranges. You can use a range name practically anywhere you can use a cell or range
reference. The advantage of using names comes from the fact that a name, like Employees,
is more meaningful and less abstract than a reference like C2:C55. Also, named ranges are
by default absolute, so if you copy or AutoFill a formula using named ranges, it will maintain
its original cell references.
B. Defining and Using Range Names
To define a range name:
Select either a cell or cell range.
On the Formulas Ribbon, choose the Define Name button from the Defined Names
group.
To name your range, type a name in the top text field and click OK. The Scope refers
to the parts of the workbook where your named range will be valid.
Another way to name a cell or range is to:
Select the cell or range of cells.
Click in the Name Box to the left of the formula bar and Type the name
Press Enter.

77
Note: Excel will not accept spaces between words in the names you choose. For example,
“newrange” or “newRange” or “new_Range” would be acceptable, but “New Range” would
not.
Once you have defined your named ranges, you can use them in formulas and functions just
as you would a regular cell or range reference.
VI. Using Logical Functions
Excel 2010’s logical functions are:
AND
OR
IF
NO
FALSE
TRUE
IFERROR
These logical functions are important when doing advanced work in Excel because they can
help you control the behaviour of your worksheets based on specific logical conditions.
1. Using the Function Library
Excel 2010 contains an extensive library of functions that you can call upon to help you solve
problems. These tools are available in the Function Library button group, on the Formulas
ribbon.
The first
and largest button is Insert Function. This button will open a dialog allowing you to search
for and insert hundreds of functions.
You can also click the small fx button next to the formula bar to display the Insert Function
box.

78
Manually entering a function
If you know which function you wish to use, you can enter a function into a worksheet by
inputting it manually (i.e. by typing the function directly into a cell).
When you do this in Excel 2010, a screen tip will appear with the possible functions that
correspond with the letters of the function name you have entered.
For example, if you type =IF into a cell the following appears.
Once you have selected the function you wish to use, continue by typing in a left bracket,
which will cause the function syntax to display in another screen tip.
Continue to enter all the arguments required for the function to give you a result, ensuring
you type a comma between each argument.
Press Enter to display the result.
2. The IF function
Excel’s IF function can often prove to be very useful. You can use this function to branch to
different values or actions depending on a specified condition. The structure of an If
function is as follows: IF(logical test, value if true, value if false)
3. The AND Function
The AND function will return TRUE if all of its arguments are true. If one argument is false,
the AND function will return FALSE. For example, the logical statement 11 is also true. As a
result, the compound statement 11 is TRUE, because both of the statements that are being
joined by AND are true. The following image demonstrates this in Excel.

79
You can have as many as 255 logical arguments to an Excel AND function. The following
table (often referred to as a truth table) may help you understand the AND function. In the
last column of the truth table, you will see the value returned by the function, according to
the corresponding values of the function arguments.
4. The OR Function
The logical OR function will return TRUE if one or more of the arguments to the function are
true. For instance, the logical statement 1<10 OR 2<1 is true, since 1 is less than 10. It does
not matter that the statement 2<1 is false, because you have a choice of either 1 <1 OR 2<1
to make the compound statement true. If one or both of the arguments is true, the overall
OR statement will also be true.
You can have as many as 255 logical arguments to an Excel OR function.
Here is a truth table for the OR function.

80
5. Nested IF functions
The IF function is ideal for making choices based on logical tests. Furthermore, you can nest
IF functions one inside another.
=IF(A1=10,100,IF(A1=5,200,0))
In the case of this IF function, if the value in cell A1 is 10 the function will return 100. If the
value in A1 is not 10, the function will test if the value in A1 is 5. If the value in A1 is 5, the
function will return 200. If it is not 5 (and also not 100) the function will return 0.
When you nest logical functions, you must make sure that the number of closing
parenthesis matches the number of opening parenthesis used in the function. If you count
the parenthesis in the function from the image above, you will see two opening, and two
closing parenthesis.
6. Applying Logical Functions
Nested functions can also be created using the IF and OR functions together; or the IF and
AND functions together.
For example:
Function combination Why is this useful?
IF function + AND function Value is returned if BOTH conditions are TRUE
IF function + OR function Value is returned if ONE of the conditions is TRUE
VII. Lookup functions
Excel 2010 provides two lookup functions that you can use to quickly retrieve information
from data in a table. The functions are called HLOOKUP (horizontal lookup) and VLOOKUP
(vertical lookup).
Value if TRUE Value if TRUE
Value if FALSE

81
The VLOOKUP function will look in the leftmost column of a table for a value you specify.
When it finds the value you specified, it will return a value that is located in the same row, a
specified number of columns into the table. It is called VLOOKUP because it looks vertically
down a column for a match, and then retrieves data from across the row.
HLOOKUP is similar, but it will look horizontally across the upper row of your table, and then
retrieve data from a column further down.
1. Using VLOOKUP to Find Data
The best way to learn how lookup functions work is to look at an example. Here we have a
table of ticket prices for flights to different countries. To simplify matters, the data range for
the table has been given a defined name (Price) that can be used in functions and formulas.
If we activate cell F1 and enter =VLOOKUP ("England", Price, 2) into the formula bar, cell F1
will show the value 550.
The lookup function looked vertically down the leftmost column of the lookup table (Price)
until it found a match for the text string “England.” The function then returned the value
that is in the second (2) column of the table, from the row where the match was found. You
should notice that England, Price, and 2 are the exact arguments used in the function.
The arguments for the lookup function are:
2. VLOOKUP
Value to match, from the left most column of the lookup table
Lookup table name or range
Number of the column in the table containing the relevant data
TRUE or FALSE

82
For the example shown above, the true or false argument was left out. The relevance of the
true or false argument in the VLOOKUP function will be discussed shortly.
3. Hlookup
HLOOKUP is the same as VLOOKUP, except that it looks across rows for a match rather than
down columns. To use HLOOKUP, the lookup table would be arranged in this way.
Since Excel is designed with more cells in the vertical direction than in the horizontal
direction, and because a vertical table design is more intuitive for most people, VLOOKUP is
generally used more often than HLOOKUP.
VIII. Pivot Table
1. What is a PivotTable?
A PivotTable is a powerful tool for exploring and analysing information. A PivotTable helps
you organise and manipulate the raw data in your spreadsheet, giving your insight into
patterns or relationships that might not be obvious at first glance.
You can base a PivotTable on data in your current workbook or even external data from
another source if you wish. With a PivotTable, you can conveniently drag and drop columns
of your data to different areas of the table to examine relationships or trends that may not
be obvious in a traditional Excel table or database.
2. Preparing Data to Create a PivotTable
Ideally, source data for a PivotTable should be structured like a traditional Excel table or
database. The source data should have a row of unique column headings distinguishing the
data and there should be no empty columns interspersed within the data. Also, blank rows
in a source list or database can limit the usefulness of your PivotTable.
The following image shows a block of contiguous data that is well suited for a PivotTable.

83
Notice that there are no empty rows or columns and that every column of data has a unique
label.
3. Creating a PivotTable
To create an Excel 2010 PivotTable:
Select the range of data that you want to base the table on
On the Insert Ribbon, Tables
group, click the PivotTable
button
When the Create PivotTable
dialogue box appears, choose
the table or range option, so the
PivotTable will be based on the
Excel table or range you
selected.
Once you select your data source, you can then choose to locate your PivotTable in an
Existing Worksheet or a New Worksheet.
Click OK to create your PivotTable.

84
Adding Fields to the PivotTable
Once your PivotTable appears, you can add information to it by placing checks in the boxes
next to the headings in the PivotTable field list or by dragging the fields to the designated
areas.
The PivotTable Tools Ribbon
If you close the PivotTable Field List, you can always get it back by clicking the Field List
button on the Options Ribbon.
The Options Ribbon and the Design Ribbon will become available whenever you click inside
the borders of your PivotTable.

85
Modifying Calculations and Data Area Display
The default setting for PivotTable calculations is SUM. This means that the totals shown in
the Grand Total areas of the PivotTable will be derived from summing the values in the rows
and columns.
To modify the way these totals are calculated:
Right click on the Sum of ‘X’ field in the upper left corner of the PivotTable.
Select Value Field Settings from the shortcut menu, then Summarize value field by tab.
Switch the type of calculation to Count, Average, Max or Min, Product, Standard
deviation, or Variance.
Click OK.
Please note: The previous discussion has dealt primarily with PivotTable frames, also
known as classic PivotTable layouts. For information on how to arrange data in the
default Excel 2010 PivotTable layout, please see the downloadable reference material.
4. Formatting a PivotTable
To format a PivotTable:
Click on a cell in the PivotTable, and from the PivotTable Tools tab
Select the Design Ribbon.
On the Design Ribbon, click on one of the preset styles in the PivotTable Styles
group to quickly apply preset formatting to the table
Refreshing a PivotTable
The data in a PivotTable is not linked directly to the source table or range. Instead, the
PivotTable is based on a hidden copy of the source data that is kept in memory by Excel.
This means that changes to the original source list or database will not be automatically
updated in the PivotTable. If you make changes in the source data, you must refresh the
PivotTable to update it.
To refresh a PivotTable:
Click the Refresh button on the Data Ribbon or on the Options Ribbon; or

86
Right click on a cell in the data area of the table and then click the Refresh Data
option from the pop up menu.
5. Using Slicers to Manipulate PivotTables
Slicers
Slicers are visual controls that let you quickly filter data in a PivotTable in an interactive,
intuitive way. If you insert a slicer, you can use buttons to quickly segment and filter the
data to display just what you need. In addition, when you apply more than one filter to your
PivotTable, you no longer have to open a list to see which filters are applied to the data.
Instead, it is shown there on the screen in the slicer. You can make slicers match your
workbook formatting and easily reuse them in other PivotTables, PivotCharts, and cube
functions.
Insert the Slicer
Click anywhere in the PivotTable data area
From the
Options ribbon
located in the
PivotTable Tools
contextual tab
click the Insert
Slicer button located on the Sort & Filter group
From the dialogue box select all the fields that you need to use for filtering your
PivotTable data

87
For each field chosen, a separate filter box is displayed containing the data which
can then be selected for viewing
Place these filter boxes wherever you like
6. Creating a PivotChart
To create a chart based on an existing PivotTable:
Click a cell in the table
On the Options ribbon, Tools group, click the PivotChart button then select a chart
type then click OK. You can select any chart type except XY Scatter, Bubble, or Stock
charts.
Or
On the Insert ribbon, Charts group, click on a chart type then click OK.
Once the chart has been created, select the chart area and then the Design ribbon
which will allow you to apply a preset format to your chart via the Chart Styles
buttons.
Note: Any changes or rearranging of field values in the PivotTable will automatically be
reflected in the PivotChart and vice versa.

88
IX. Data Analysis
1. Sorting Data in Ms-Excel:
You can sort your Excel data on one column or multiple columns. You can sort in ascending
or descending order.
To do sorting based on data:
Open the spreadsheet you want to work in
Click the Sort & Filter > Custom Sort
Select the column you want to sort by (i.e. if I want to sort alphabetically by last
name I would select “Last Name” from the list. If your columns do not have headers
you will just see the column letters in the list.)
You can sort by cell value, color, font color, or cell icon (for the example I used
before I would choose Values).
You can sort Values from A to Z, Z to A, or create your own custom sorting order

89
To create your own custom sorting order:
a. Choose Custom List… from the drop-down menu
b. You can select from a pre-made list (week days or months), any list you
previously made, or create a new list
To create a new list
I. Click the Add button
II. Type a list entry
III. Press the Enter key on your keyboard
IV. Repeat until the list is complete
C. Click the OK button
6. If you would like to sort by another column as the secondary sort click the Add Level
button
7. Follow the same process as 4 – 6. (Adding as many levels as you need.)
8. To delete a level, highlight it and click the Delete Level button.
9. To copy a level, highlight it and click the Copy Level button.

90
10. To move a level, highlight it and click the corresponding directional button.
11. If you want your sort to be case sensitive or sort by rows instead of columns click the
Options… button.
12. Select the options you would like and click the OK button.
13. When you are done creating your sort, click the OK button. Your data will be sorted
according to your specifications.

91
2. Filter:
A. What are filters?
Filtering is a quick and easy way to find and work with a subset of data in an Excel range.
Filters enable you to quickly find all the entries for a particular item, e.g. an employee name
or a product, in a large worksheet.
Filters allow you to select just the data you need, and to hide any data that is not relevant to
your search. For example you might want to find the students with the highest grade, or the
records for a specific department. You can also create your own filters, such as figures
within a specific range or above a particular amount.
Unlike sorting, filtering does not rearrange your data, it simply hides the rows you don’t
want. This will allow you to then edit, format, chart and print your filtered data as you wish.
Preparing to filter
Ensure the data in your worksheet is neat and tidy and you will find filtering easy. Use the
following guidelines to prepare your data:
Use headings The top row of each column should have a heading.
Don’t mix the data The data in a column should all be the same type – don’t mix
text and numbers.
Don’t interrupt Don’t have blank rows or columns. Individual blank cells are
OK.
Keep separate The data to be filtered should be in its own worksheet. If not,
separate it from other data with a blank row or column.
B. Filtering with AutoFilter
The AutoFilter feature in Excel provides a quick way of creating a filter.
C. Filtering Text
To use AutoFilter, click in a cell containing a text data item. Then, on the Data tab, select
Filter.

92
Filter arrows will appear next to each column
heading:
To begin filtering, click on the down arrow next to
the column heading. Excel displays a list of
options as well as all the items in the column.
To see the data for just one item either:
o Remove the ticks from the items you do not wish to see, or
o Choose Text Filters, Equals and type the text item for which you want to see the
data in the box that appears.
All the other rows on the worksheet will be hidden
You can continue to refine your data by filtering on other
columns.
Where you have applied a filter, the row numbers will
appear in blue and the drop down arrow will change to a
filter symbol. You will also see the number of records
found in the status bar at the bottom of the screen.
D. Filtering numbers: searching for the ‘Top 10’
Searching for the Top 10 is available when filtering a column of numbers. This option does
more than its name suggests. With it you can actually find the top or bottom 1 to 500 items.
You can also filter by percentage of total rows in
a column.
From the Number filters menu click on Top
10…
Select Top or Bottom. the number of items
you want to display, and Items or Percent
Click OK

93
E. Filtering dates
Excel provides many options for filtering a column of dates. For example you can select all
this or last year’s dates.
In addition you still have the option to custom filter dates.
F. Removing a filter
AutoFilter can be turned off completely, or just turned off for specific columns.
To turn it off completely, go the Data tab and click Filter.
To remove it for a specific column, click
the autofilter symbol at the top of the
column and select Clear Filter From Name
of Column from the menu.
3. Creating advanced filters
The Advanced Filter command enables you to filter on complex criteria and specify which
records to include in the query results.
To use Advanced Filter you first need to type your criteria into a range on the worksheet.
This range is then used as the source for the complex criteria.
To use the advanced filter:
Copy the column labels you want to use as criteria from the list and paste them into a blank
area of the worksheet. Ensure that there is at least one empty row between your criteria
range and the list to be filtered. The column labels must be exactly the same as in the list,
therefore it is better to copy and paste rather than type them in.
Enter the criteria values.
In the example these are
Manager and >45000

94
Click in the list to be filtered, click the Data tab and choose Advanced from the Sort
and Filter group to display the Advanced Filter dialog box.
Click in the Criteria range and type the range.
Click OK. Only the records matching the criteria will be displayed
4. Conditional Formatting:
Excel 2010's conditional formatting lets you change the appearance of a cell based on its
value or another cell's value. You specify certain conditions, and when those conditions are
met, Excel applies the formatting that you choose. You might use conditional formatting to
locate dates that meet a certain criteria (such as falling on a Saturday or Sunday), to call out
the highest or lowest values in a range, or to indicate values that fall under, over, or
between specified amounts.
Select the cells to which you want to apply
conditional formatting.
On the Home tab, in the Styles group, click the
Conditional Formatting button.
Point to Highlight Cells Rules and then select the
type of criterion you want to use.
Enter the values you want to reference in the text
box.
Click the drop-down
arrow next to the

95
format options and select the desired formatting.
Click OK.
To clear conditional formatting, select the formatted cells and then click the Conditional
Formatting button on the Home tab. Point to Clear Rules and then select Clear Rules from
Selected Cells.
5. Charts
Charts and graphs are a great way of representing your data. Microsoft Excel 2010 offers
almost every chart type and makes it easier to draw them so that your data can quickly
understood in a graphical format.
A. How To Draw Charts In Excel 2010
First of all make sure that there is some data in your excel sheet and that your excel sheet
does not contain any blank cells between the different columns, then click the Insert menu
and choose the chart type that you wish to draw.
B. Chart and Graphs Types In Excel 2010
The chart or graph type will depend on the data for which
you are going to plot the chart. The most commonly used
types include Column Chart, Line Graphs, Pie Chart, Bar
Graph, Area Chart, Scatter Graphs, Stock Chart, and Surface
Chart, among many others. Let’s discuss these chart types,
and the situations in which a specific chart type is used.

96
C. Column Chart
The Column chart is one of the most
commonly used chart type and is used to
show the changes in data over a period of
time or illustrate comparisons among items.
Name Salary
Ravi 15620
Manoj 34850
Sai 28420
Once the chart is drawn, it becomes very easy to change the attributes, right-click the chart
and you will see the options for changing chart types, data, and other formatting.
D. Line Graphs
Line Graphs are mainly used to plot changes in data over time. The best example of this
chart type can be the weekly change in temperature.
E. Pie Chart
The Pie Chart is very useful when you wish to emphasize on a significant element in the
data. It represents data in the form of a pie.

97
6. Tables:
A table is a range of cells that hold data, with each row corresponding to a single occurrence
of an entity. When you create a table, you can manage and analyze the data in that
table independently of data outside the table. You can format the table, filter the table
columns and also publish a table to a server that is running Windows SharePoint Services 3.0
or Windows SharePoint Services “4″. Usually there is an initial row of text headings that
describe the columns of data. For example, you might have rows and rows of employee data
with the following column headings:
ECode
Name
Age
Salary
Each row in the table would hold the above details for a particular employee. But as Excel
2010 handles tabular data perfectly well by default, why would you want to put your data
into a table? Well, tables allow Excel to respond more appropriately to your data if it is held
in a a table. For example, if you create a chart based on the data in a table, the chart will
expand as you add more rows to that table.
A. Creating Tables In Excel 2010
It’s quite easy to create a table in Excel 2010; you simply make a cell active that is in the
range of cells you want to convert into a table and then click Insert > Tables > Table. If your
data has headers, make sure to check the My table has headers box in the create table
window, and then those headers will be used. The good thing is that you don’t need to
select the entire range of cells: Excel can identify the limits of the data and also identify the
headings. The following is an example of tabular data before we convert it into a table.

98
After we convert it to a table, it looks like this:
If you create a table this way, it is given default formatting that you can change using the
Table Styles on the Design tab that appears when the table is selected. Alternatively, you
can select a style when you create the table. To do this, activate any cell in the range you
want to convert and click Home > Styles > Format as Table. Choose a style from the panel
that opens and your table will be created with that style.
B. Properties Of Excel Tables
The main things to notice about tables are:
When any cell in the table becomes active, the Table Tools contextual tab is displayed.
Each column heading contains a drop down list that you can use to sort or filter the data in that column.

99
If you scroll so far down the table that the column headings disappear, the letters that mark the column headings in the worksheet are replaced with the table’s column headings.
The cells have background colours to enhance readability.
Background colours are applied to the cells to help readability.
C. Deleting an Excel Table
If you later decide that you’d prefer your data in its original form (i.e. not in a table), you can
convert it back to a range of cells. Click anywhere in the table and then on the Table Tools
tab, click Design Tools Convert to Range. Once the data is converted back to a range,
the table features are no longer available.
Note that the formatting that was applied to the table is still present. If you want to delete
the table and all its data, select the table and press the delete key.


