23
mCam U mView HD for iP User Manual Pad
mCamView HD
User Manual
mCamView HD for iPad
User Manual
iPad

Seeing the video from anywhere

1. INSTALL AND STARTUP MCAMVIEW HD .......................................... 4
2. THE LAYOUT OF MCAMVIEW HD .................................................... 5
3. MANAGE MCAMVIEW HD IP CAMERAS .......................................... 6
3.1 NEW CAMERA ........................................................................................................ 6
3.2. DELETE CAMERA ..................................................................................................... 7
3.3 CAMERA ADJUSTMENT—STREAM SETTINGS.................................................................. 8
3.3.1 Bandwidth ……………………………………………………………………………………………………..8
3.3.2 Resolution ………………………………………………………………………..........…………………...8
3.3.3 Microphone ………………………………………………………………………………..........…………8
3.4 CAMERA ADJUSTMENT—VIDEO SETTINGS .................................................................... 9
3.4.1 Video .................................................................................................................... 9
3.4.2 Control ............................................................................................................... 10
3.4.3 Night mode control ............................................................................................ 11
3.4.4 Camera Info ....................................................................................................... 12
3.5 CAMERA ADJUSTMENT—CAMERA SETTINGS ............................................................... 13
3.5.1 Network ............................................................................................................. 14
3.5.2 Schedule ............................................................................................................ 16
3.5.3 Admin ................................................................................................................ 21
3.6 ALARM NOTIFICATION(PUSH NOTIFICATION) ............................................................. 23

1. Install and Startup mCamView HD
Step 1. Visit Apple store and search “mCamView HD”.
Step 2. Click to install “mCamView HD” and mCamView HD will proceed the
installation on the desktop of your iPad.
Step 3. After installation is completed, now you can startup mCamView HD software.
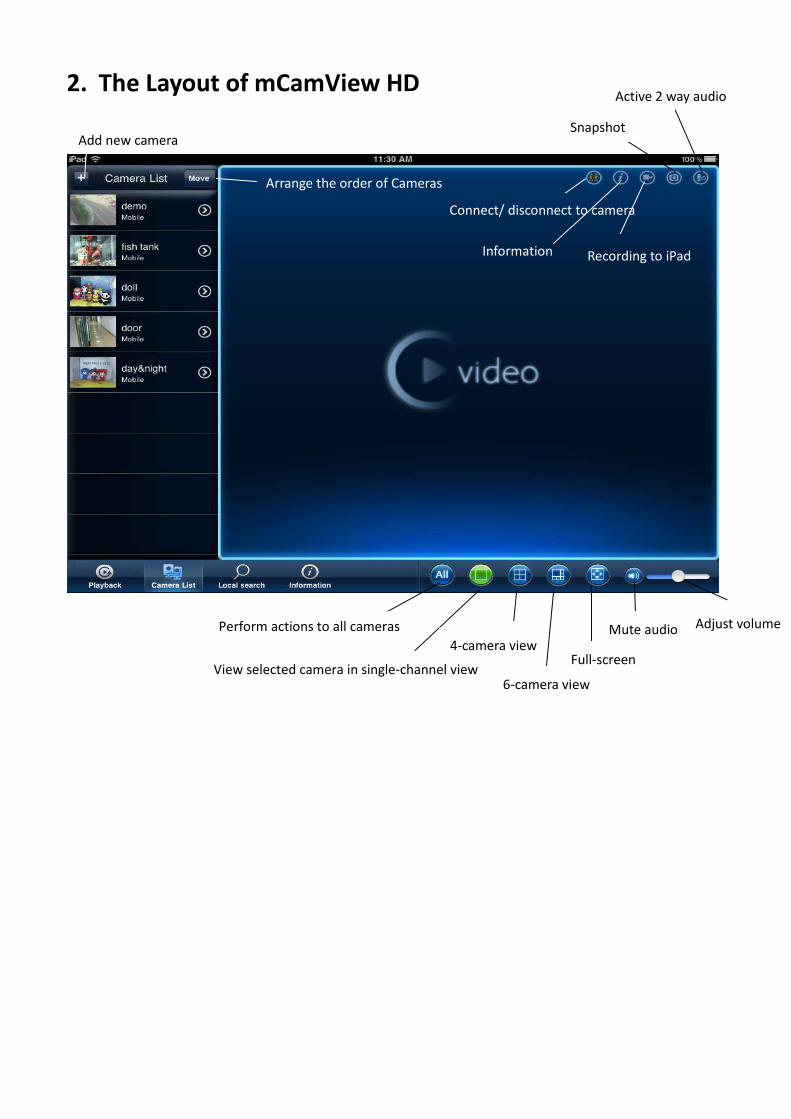
2. The Layout of mCamView HD
Perform actions to all cameras
View selected camera in single
Arrange the order of Cameras
Add new camera
mCamView HD
Perform actions to all cameras
View selected camera in single-channel view
4-camera view
6-camera view
Full
Arrange the order of Cameras
Connect/ disconnect to camera
Information
Snapshot
camera view
Full-screen
Mute audio Adjust volume
Connect/ disconnect to camera
Recording to iPad
Snapshot
Active 2 way audio

3. Manage ip cameras
3.1 Add new Camera
- From Local Search: Please make sure
ID you would like to add to the camera list, then
and the new added camera will be shown on
Manage ip cameras
From Local Search: Please make sure your device and camera are connected to same network
ID you would like to add to the camera list, then Name your IP Camera and fill in camera Password
and the new added camera will be shown on the camera list
your device and camera are connected to same network. Choose the Cam
Name your IP Camera and fill in camera Password. Click done
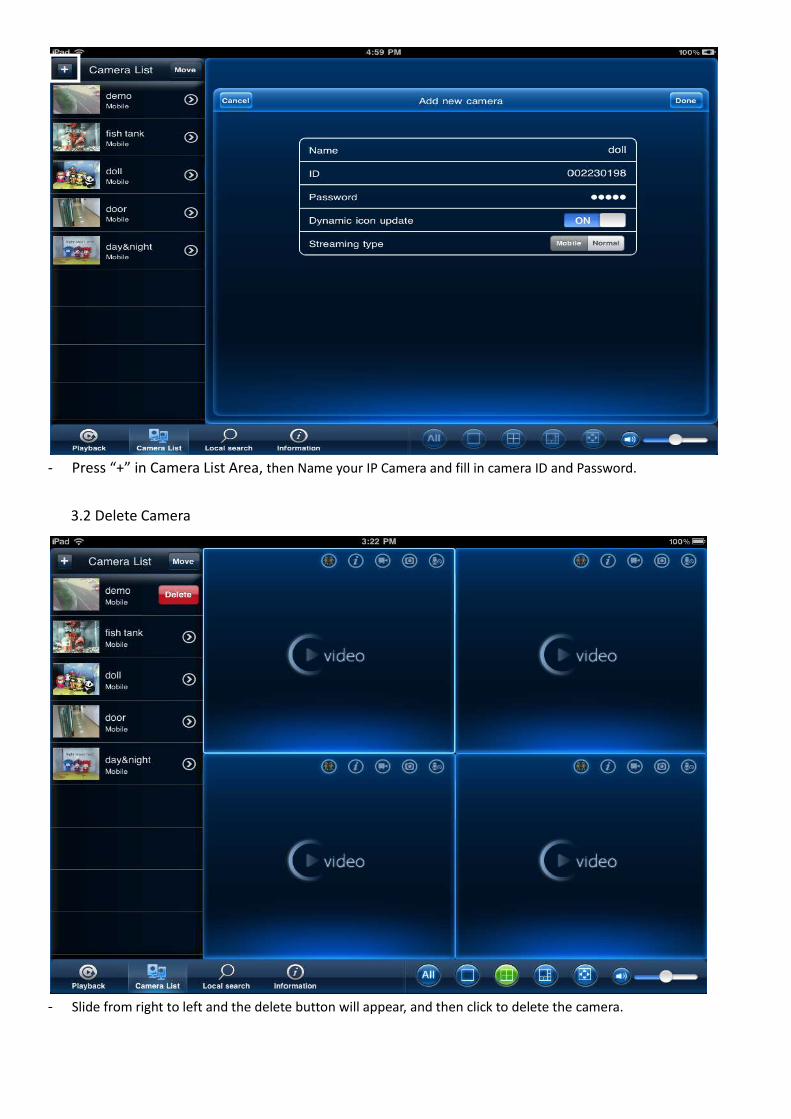
- Press “+” in Camera List Area, then Name your IP Camera and fill in camera
3.2 Delete Camera
- Slide from right to left and the delete button will appear,
then Name your IP Camera and fill in camera ID and
Slide from right to left and the delete button will appear, and then click to delete the camera.
ID and Password.
click to delete the camera.
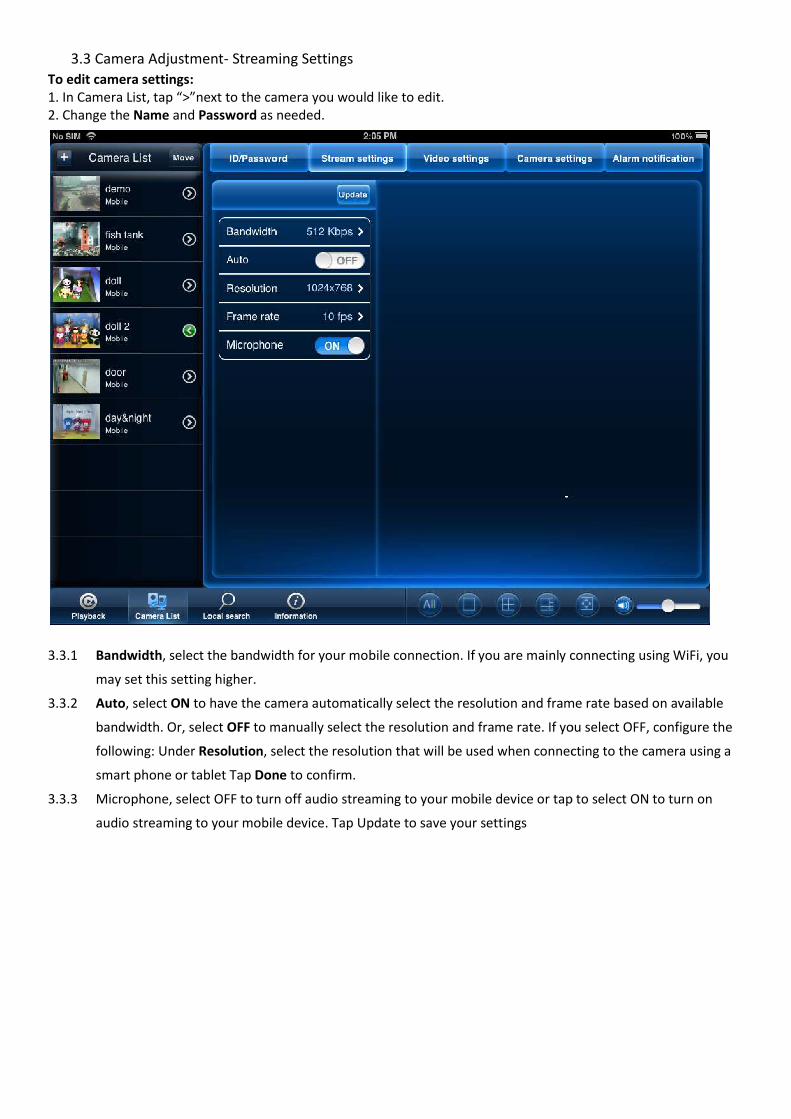
3.3 Camera Adjustment- Streaming Settings
To edit camera settings: 1. In Camera List, tap “>”next to the camera you would like to edit.2. Change the Name and Password as needed.
3.3.1 Bandwidth, select the bandwidth for your mobile connection. If you are mainly
may set this setting higher.
3.3.2 Auto, select ON to have the camera automatically select the resolution and
bandwidth. Or, select OFF to manually select the
following: Under Resolution, select the resolution that will be used when connecting to the
smart phone or tablet Tap Done
3.3.3 Microphone, select OFF to turn off audio streaming to your mobile device or tap to select
audio streaming to your mobile device.
Streaming Settings
next to the camera you would like to edit. as needed.
, select the bandwidth for your mobile connection. If you are mainly connecting using
to have the camera automatically select the resolution and frame rate based on
to manually select the resolution and frame rate. If you select OFF, configure the
, select the resolution that will be used when connecting to the
Done to confirm.
to turn off audio streaming to your mobile device or tap to select
audio streaming to your mobile device. Tap Update to save your settings
connecting using WiFi, you
frame rate based on available
resolution and frame rate. If you select OFF, configure the
, select the resolution that will be used when connecting to the camera using a
to turn off audio streaming to your mobile device or tap to select ON to turn on
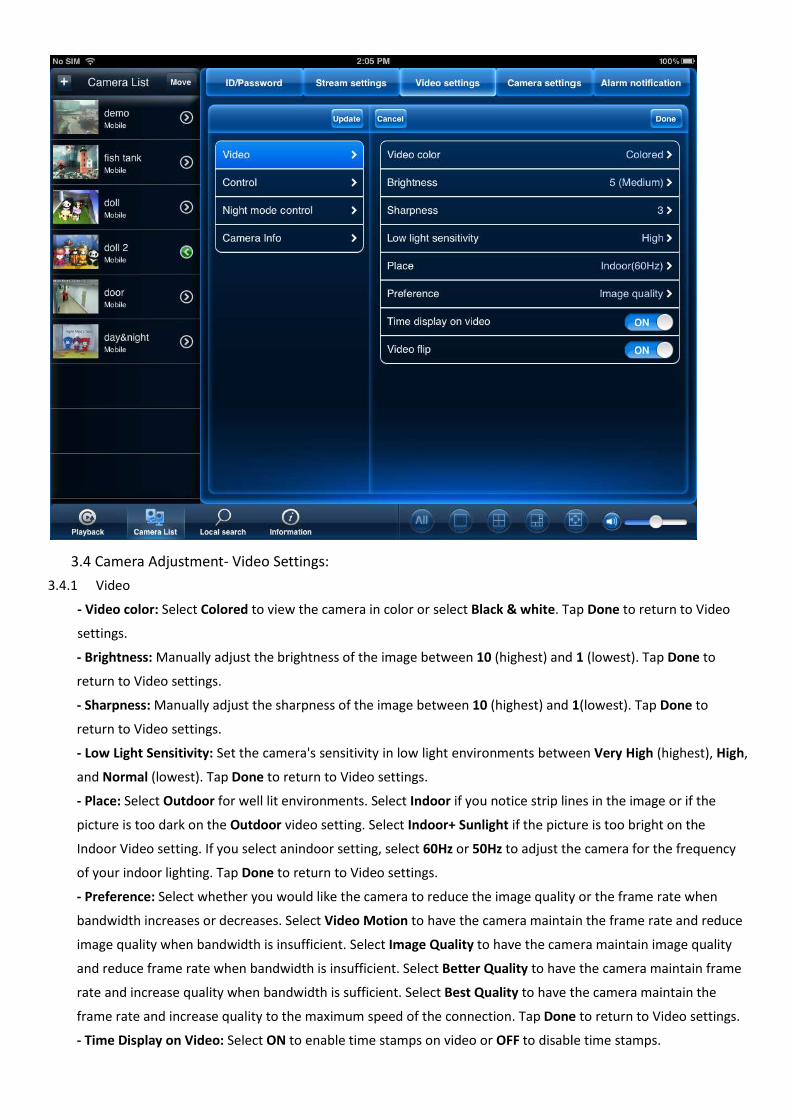
3.4 Camera Adjustment- Video Settings:
3.4.1 Video
- Video color: Select Colored to view the camera in color or select
settings.
- Brightness: Manually adjust the brightness of the image between
return to Video settings.
- Sharpness: Manually adjust the sharpness of the image between
return to Video settings.
- Low Light Sensitivity: Set the camera's sensitivity in low light environments between
and Normal (lowest). Tap Done to return to Video settings.
- Place: Select Outdoor for well lit environments. Select
picture is too dark on the Outdoor video setting. Select
Indoor Video setting. If you select anindoor setting, select
of your indoor lighting. Tap Done to return to Video settings.
- Preference: Select whether you would like the camera to reduce the image quality
bandwidth increases or decreases. Select
image quality when bandwidth is insufficient. Select
and reduce frame rate when bandwidth is insufficient. Select
rate and increase quality when bandwidth is sufficient. Select
frame rate and increase quality to the
- Time Display on Video: Select ON
ettings:
to view the camera in color or select Black & white. Tap
Manually adjust the brightness of the image between 10 (highest) and
Manually adjust the sharpness of the image between 10 (highest) and 1
Set the camera's sensitivity in low light environments between
to return to Video settings.
for well lit environments. Select Indoor if you notice strip lines
video setting. Select Indoor+ Sunlight if the picture is too bright on the
Indoor Video setting. If you select anindoor setting, select 60Hz or 50Hz to adjust the camera for the f
to return to Video settings.
Select whether you would like the camera to reduce the image quality
bandwidth increases or decreases. Select Video Motion to have the camera maintain the frame rate and reduce
is insufficient. Select Image Quality to have the camera maintain image quality
reduce frame rate when bandwidth is insufficient. Select Better Quality to have the
te and increase quality when bandwidth is sufficient. Select Best Quality to have the camera maintain the
frame rate and increase quality to the maximum speed of the connection. Tap Done
ON to enable time stamps on video or OFF to disable
. Tap Done to return to Video
(highest) and 1 (lowest). Tap Done to
1(lowest). Tap Done to
Set the camera's sensitivity in low light environments between Very High (highest), High,
notice strip lines in the image or if the
if the picture is too bright on the
to adjust the camera for the frequency
Select whether you would like the camera to reduce the image quality or the frame rate when
maintain the frame rate and reduce
to have the camera maintain image quality
to have the camera maintain frame
to have the camera maintain the
Done to return to Video settings.
to disable time stamps.
- Video flip: Select ON to flip the camera image vertically and horizontally or select
orientation. This is useful if the camera has been mounted to a
3.4.2 Control
-Status LED, select one of the following:
functions, see "Camera Overview" on page 1.
Turn off after network connected: Status and Network LED's turn on when the
once a network connection is made.
- Motion Sensitivity, select the motion detection sensitivity between
Sensitivity is set to 1, motion detection will be
set to 10, a moving object must be larger than 10% of the video area to trigger motion detection.
to flip the camera image vertically and horizontally or select OFF
This is useful if the camera has been mounted to a wall or ceiling upside down.
Normal: Status and network LED's will function as normal. For details on LED
functions, see "Camera Overview" on page 1. Always turn off: Status and network LED's are turned off at all times.
Status and Network LED's turn on when the camera is powered on and turn off
, select the motion detection sensitivity between 1 (High) and 10 (Low). If Motion Detectio
Sensitivity is set to 1, motion detection will be triggered if a moving object is larger than 1% of the video area. If it is
moving object must be larger than 10% of the video area to trigger motion detection.
OFF for the normal
wall or ceiling upside down.
Status and network LED's will function as normal. For details on LED
Status and network LED's are turned off at all times.
camera is powered on and turn off
(Low). If Motion Detection
triggered if a moving object is larger than 1% of the video area. If it is
moving object must be larger than 10% of the video area to trigger motion detection.
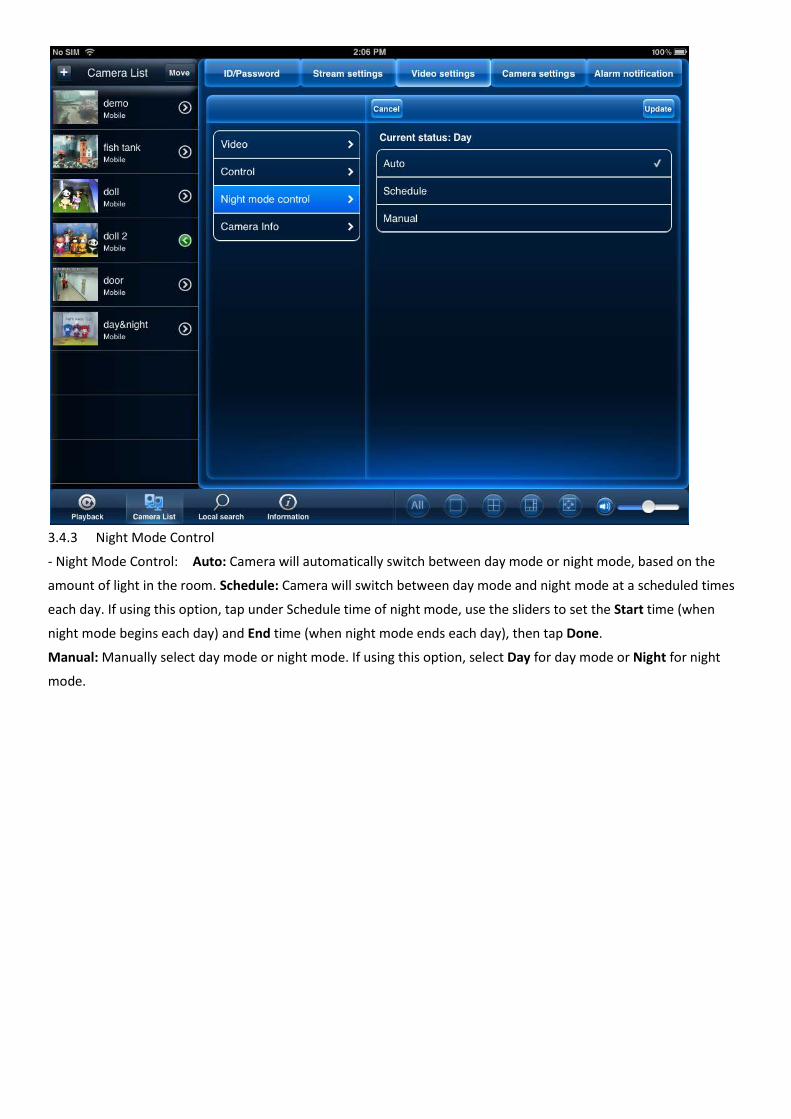
3.4.3 Night Mode Control
- Night Mode Control: Auto: Camera will automatically switch between day mode or night mode, based on
amount of light in the room. Schedule: Camera will switch between day mode and night mode at a scheduled
each day. If using this option, tap under
night mode begins each day) and End time (when
Manual: Manually select day mode or night mode. If using this option, select
mode.
Camera will automatically switch between day mode or night mode, based on
Camera will switch between day mode and night mode at a scheduled
each day. If using this option, tap under Schedule time of night mode, use the sliders to set the
time (when night mode ends each day), then tap Done
Manually select day mode or night mode. If using this option, select Day for day mode or
Camera will automatically switch between day mode or night mode, based on the
Camera will switch between day mode and night mode at a scheduled times
sliders to set the Start time (when
Done.
day mode or Night for night

3.4.4 Camera Info
- Camera Info, it shows you the current model index and which version of firmware you are using.
Camera Info, it shows you the current model index and which version of firmware you are using.
Camera Info, it shows you the current model index and which version of firmware you are using.
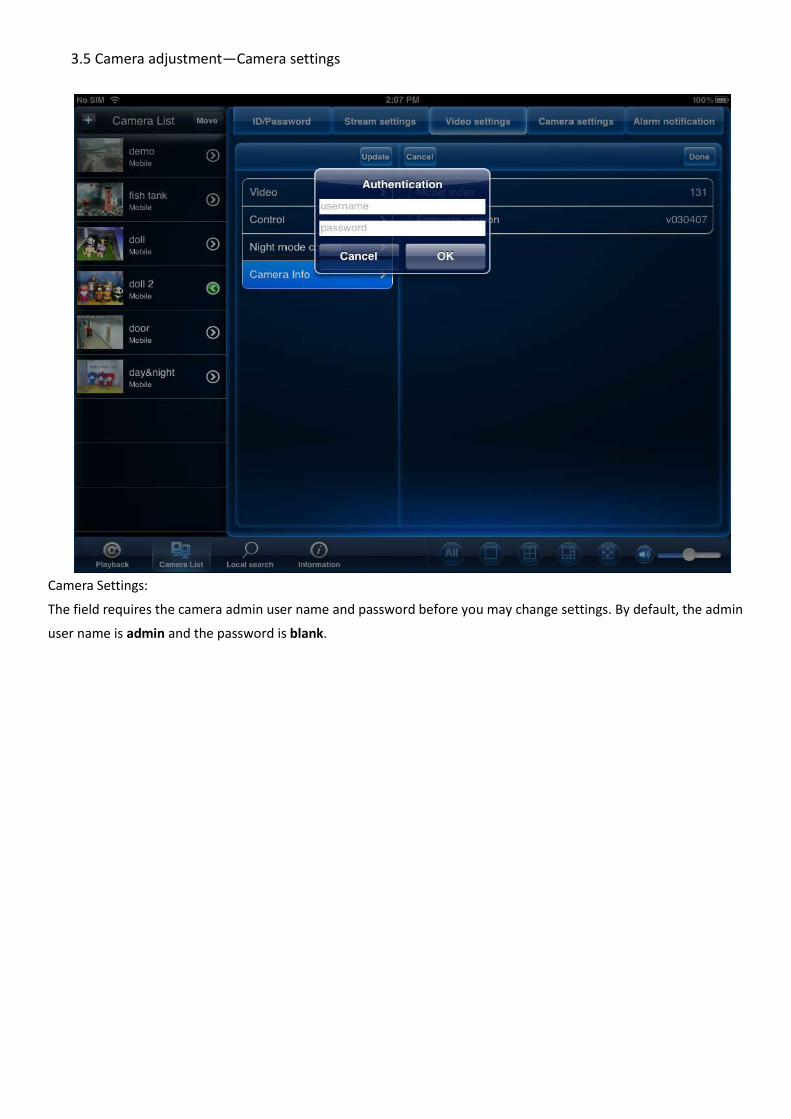
3.5 Camera adjustment—Camera settings
Camera Settings:
The field requires the camera admin user name and
user name is admin and the password is
Camera settings
the camera admin user name and password before you may change settings. By default, the admin
and the password is blank.
password before you may change settings. By default, the admin

3.5.1 Network
-Wired network: Select DHCP (recommended) to allow the camera to automatically obtain an IP
the router or Static to use fixed IP address settings. If you select Static,
Default gateway, DNS1, and DNS2.
(recommended) to allow the camera to automatically obtain an IP
to use fixed IP address settings. If you select Static, configure your
(recommended) to allow the camera to automatically obtain an IP address from
configure your IP Address, Subnet mask,

- WiFi network: To set up the wifi network, simply
point you would like to use and key in the password
Cable, it will connect to the wifi network.
WiFi network: To set up the wifi network, simply slide the wifi bottom on to do the wifi scan
key in the password. Tap Update to save the adjustment.
wifi network.
to do the wifi scan. Choose the access
to save the adjustment. Remove the Ethernet

3.5.2 Schedule
- Email Alarm: to set up email alarm, simply
triggered mode you would like to use. Slide on Send Email, and add
Note: Motion: Use Video motion detection to trigger email alarms. Video motion detection looks f
the image to determine if there is motion. This means that there may be false alarms caused by changes in lighting,
trees moving in the wind,etc.
PIR: Use the PIR motion detector to trigger email alarms. The PIR motion detector
from a person moving around in front of the
effective at higher temperatures.
Email Alarm: to set up email alarm, simply slide on the email trigger to enable the function
would like to use. Slide on Send Email, and add up to 3 email recipients.
Use Video motion detection to trigger email alarms. Video motion detection looks f
the image to determine if there is motion. This means that there may be false alarms caused by changes in lighting,
Use the PIR motion detector to trigger email alarms. The PIR motion detector uses changes
from a person moving around in front of the camera) to determine if there is motion. PIR motion detection is less
to enable the function. And choose the
recipients.
Use Video motion detection to trigger email alarms. Video motion detection looks for movement in
the image to determine if there is motion. This means that there may be false alarms caused by changes in lighting,
uses changes in temperatures (e.g.
camera) to determine if there is motion. PIR motion detection is less

- Speaker Alarm: Select speaker alarm trigger and alarm times
Select speaker alarm trigger and alarm times you would like it to repeat.you would like it to repeat.

- SD Card Recording
To configure microSD card recording:
1. Make sure a microSD card (not included) is inserted into the camera. It is
card before using it with the camera.
Under Recording, select ON to enable microSD recording or
6. Check one of the following recording options:
• Always Recording: Camera will record continuously at all times.
• Schedule Recording: Camera will record according to setti
schedule.
Check Circular recording to set the camera to overwrite the oldest recordings when
the microSD card is full or select Stop recording
when the microSD card is full.
1. Make sure a microSD card (not included) is inserted into the camera. It is recommended to format the microSD
to enable microSD recording or OFF to disable.
6. Check one of the following recording options:
Camera will record continuously at all times.
Camera will record according to settings set in the recording
to set the camera to overwrite the oldest recordings when
Stop recording to set the camera to stop recording
recommended to format the microSD
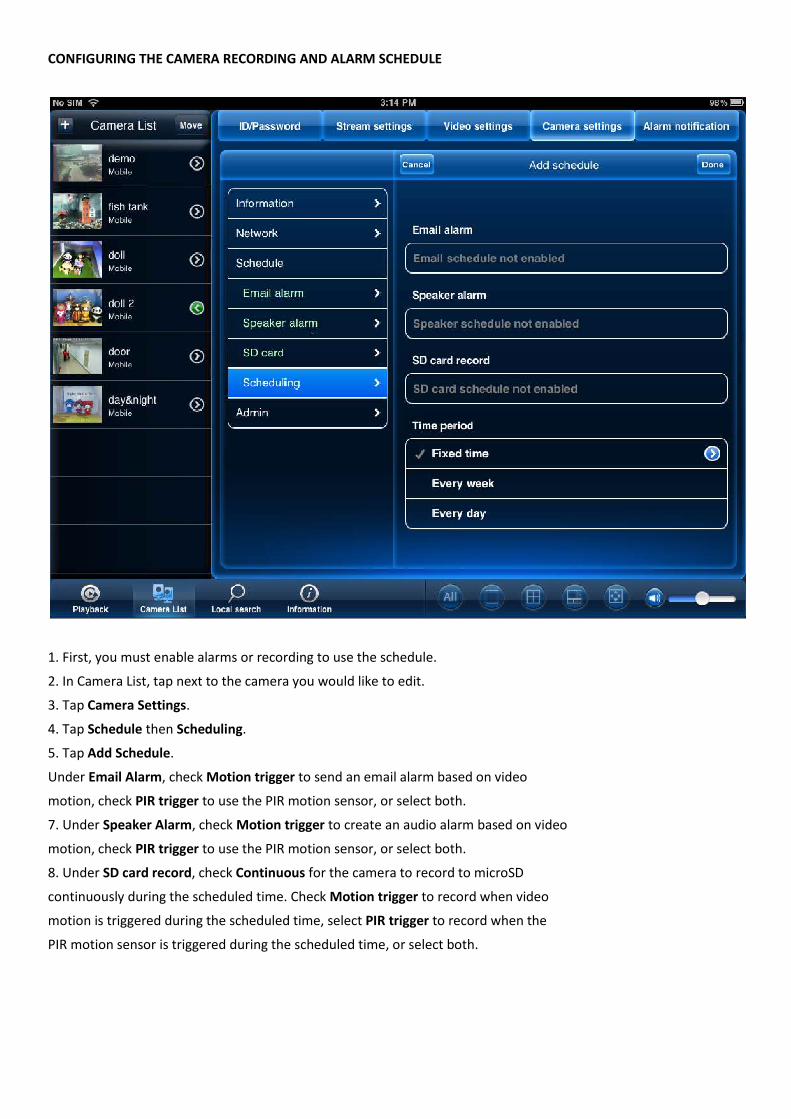
CONFIGURING THE CAMERA RECORDING AND ALARM
1. First, you must enable alarms or recording to use the schedule.
2. In Camera List, tap next to the camera you would like to edit.
3. Tap Camera Settings.
4. Tap Schedule then Scheduling.
5. Tap Add Schedule.
Under Email Alarm, check Motion trigger
motion, check PIR trigger to use the PIR motion sensor, or select both.
7. Under Speaker Alarm, check Motion trigger
motion, check PIR trigger to use the PIR motion sensor, or select both.
8. Under SD card record, check Continuous
continuously during the scheduled time. Check
motion is triggered during the scheduled time
PIR motion sensor is triggered during the scheduled time, or select both.
HE CAMERA RECORDING AND ALARM SCHEDULE
1. First, you must enable alarms or recording to use the schedule.
2. In Camera List, tap next to the camera you would like to edit.
Motion trigger to send an email alarm based on video
to use the PIR motion sensor, or select both.
Motion trigger to create an audio alarm based on video
to use the PIR motion sensor, or select both.
Continuous for the camera to record to microSD
continuously during the scheduled time. Check Motion trigger to record when video
motion is triggered during the scheduled time, select PIR trigger to record when the
PIR motion sensor is triggered during the scheduled time, or select both.
9. Under Time period, select one of the following:
• Every week: Create a weekly recording schedule. Tap and check the days you
would like the schedule to apply to. Tap Start and End and use the sliders to configure
the start and end time for the schedule. Tap Done.
• Every day: Create a daily recording schedule. Tap then tap Start and End and
use the sliders to configure the start and end time for the schedule. Tap Done.
• Fixed time: Create a one time schedule (for example, if you are going on vacation,
and would like to record all the time). Tap then set the Start and End using the
sliders to configure the exact date and time when you would like the schedule to
start and end. Tap Done.
10.Tap Done to save the schedule. Tap Update to save your settings.
To delete a Schedule:
1. From the Scheduling menu, swipe the schedule you would like to delete from left to
right.
2. Tap Delete.
3. Tap Update to save your changes.
5.4.14 CONFIGURING THE CAMERA DATE AND TIME
Configure the camera date and time. The camera syncs with an Internet NTP time server
to automatically provide the correct time, once you have configured your time zone and
daylight savings time settings.
To set the camera date and time:
1. In Camera List, tap next to the camera you would like to edit.
2. Tap Camera Settings.
Configure
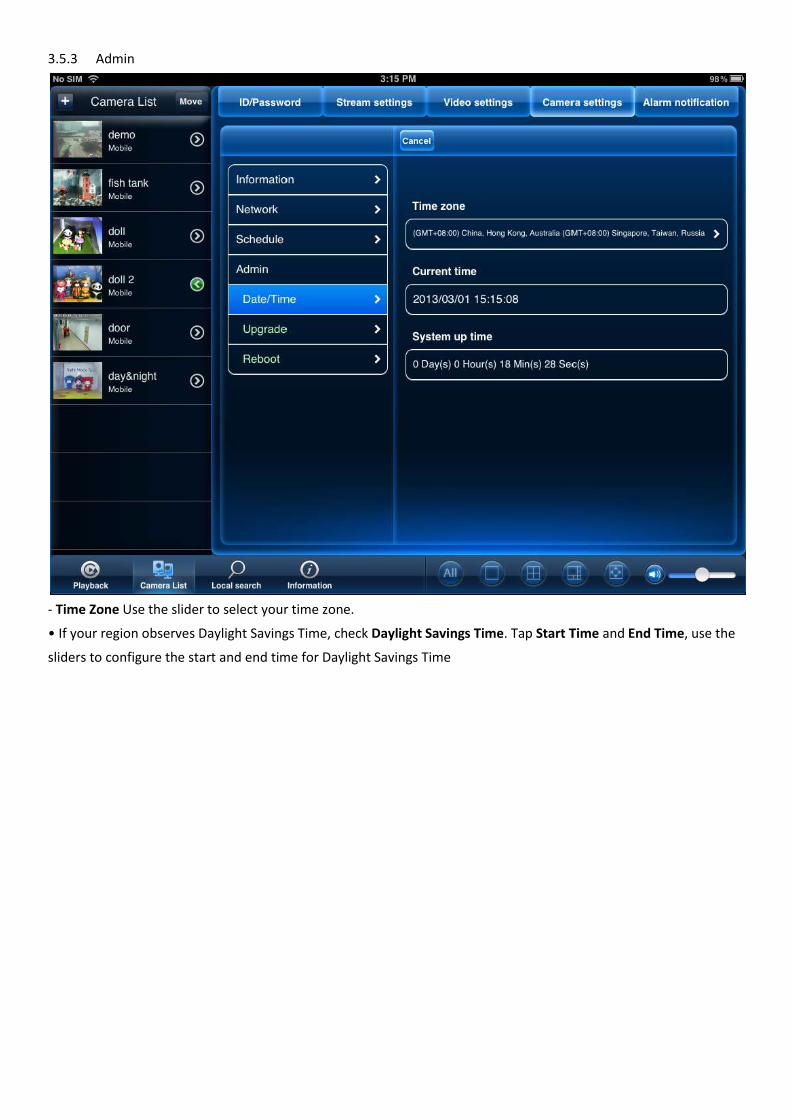
3.5.3 Admin
- Time Zone Use the slider to select your time zone.
• If your region observes Daylight Savings Time, check
sliders to configure the start and end time for
Use the slider to select your time zone.
• If your region observes Daylight Savings Time, check Daylight Savings Time. Tap Start Time
sliders to configure the start and end time for Daylight Savings Time
Start Time and End Time, use the

- Reboot- Tap Admin then Reboot.
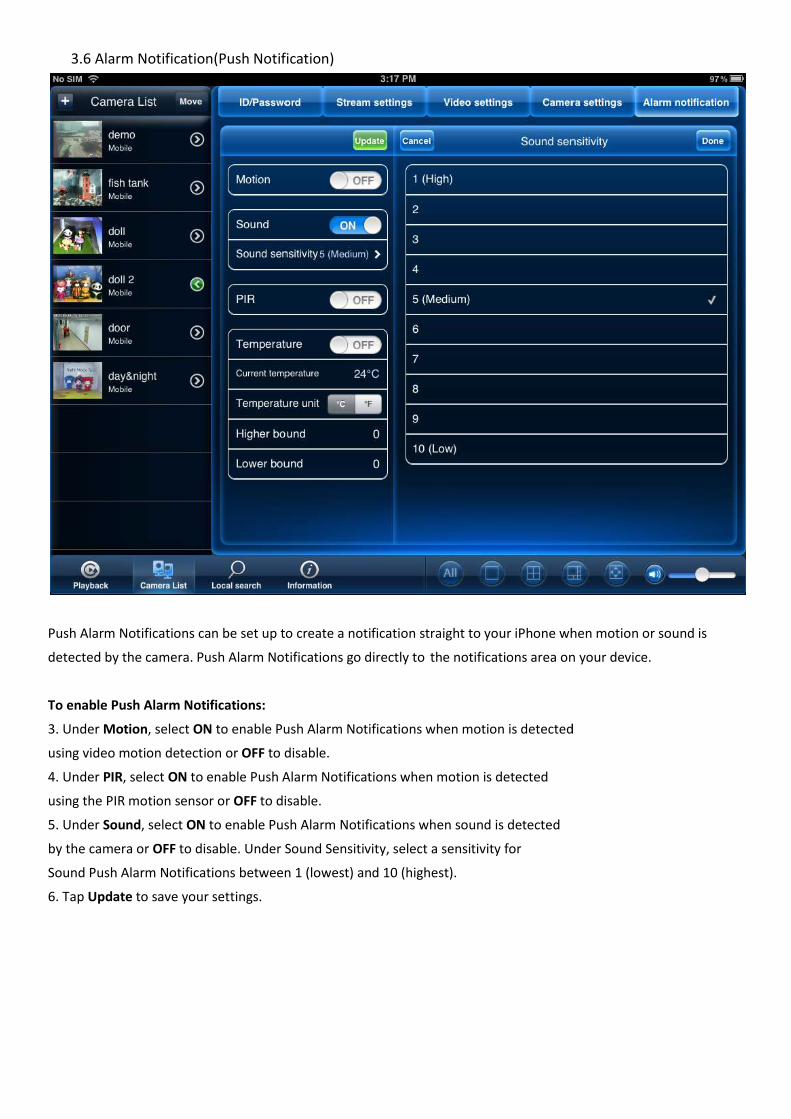
3.6 Alarm Notification(Push Notification)
Push Alarm Notifications can be set up to create a notification straight to your iPhone
detected by the camera. Push Alarm Notifications go directly to
To enable Push Alarm Notifications:
3. Under Motion, select ON to enable Push Alarm Notifications when motion is detected
using video motion detection or OFF to disable.
4. Under PIR, select ON to enable Push Alarm Notifications when motion is
using the PIR motion sensor or OFF to disable.
5. Under Sound, select ON to enable Push Alarm Notifications when sound is detected
by the camera or OFF to disable. Under Sound Sensitivity, select a sensitivity for
Sound Push Alarm Notifications between 1 (lowest) and 10 (highest).
6. Tap Update to save your settings.
Alarm Notification(Push Notification)
Push Alarm Notifications can be set up to create a notification straight to your iPhone when motion or sound is
detected by the camera. Push Alarm Notifications go directly to the notifications area on your dev
to enable Push Alarm Notifications when motion is detected
to disable.
to enable Push Alarm Notifications when motion is detected
to disable.
to enable Push Alarm Notifications when sound is detected
to disable. Under Sound Sensitivity, select a sensitivity for
between 1 (lowest) and 10 (highest).
when motion or sound is
the notifications area on your device.
to enable Push Alarm Notifications when motion is detected


![Mallincam HD-10 II User Manual...HD-10 II User Manual Page i MALLINCAM HD-10 II [Version 1.0] Michael Burns Rock Mallin ... 1.0 03/17/2020 Template Creation . Mallincam HD-10 II User](https://static.documents.pub/doc/80x56/5fa2825ccaa01c19c20df38f/mallincam-hd-10-ii-user-hd-10-ii-user-manual-page-i-mallincam-hd-10-ii-version.jpg)


