20
McKesson Radiology™ Display Protocol Manual
| Date post: | 06-Mar-2018 |
| Category: |
Documents |
| Upload: | truongthien |
| View: | 227 times |
| Download: | 3 times |

McKesson Radiology™
Display Protocol Manual


McKesson Radiology Display Protocol Manual
McKesson Radiology 12.0 Confidential and Proprietary Page 3
Table of Contents Preparing a Site for Display Protocols .......................................................................................................................................... 5
Best Practices for Creating Display Protocols .............................................................................................................................. 6
Creating a New Display Protocol ................................................................................................................................................. 7
Creating a Display Protocol Stage ................................................................................................................................................ 8
Specifying Image and Series placement using the Display Protocol Editor ................................................................................. 9
Updating a Display Protocol ...................................................................................................................................................... 13
Copying a Display Protocol ........................................................................................................................................................ 14
Frequently Asked Questions ...................................................................................................................................................... 16
Troubleshooting Scenarios ........................................................................................................................................................ 19

McKesson Radiology Display Protocol Manual
McKesson Radiology 12.0 Confidential and Proprietary Page 4

McKesson Radiology Display Protocol Manual
McKesson Radiology 12.0 Confidential and Proprietary Page 5
McKesson Radiology Display Protocols
Preparing a Site for Display Protocols
Procedure Codes
McKesson Radiology PACS determines which display protocol to apply to a study based on either body region or procedure code, depending on how the display protocol was saved. If the display protocol uses procedure type, then it is critical that procedure types are consistent in the RIS. For example, if a display protocol was saved for a procedure type labeled “CT Chest w/Contrast”, but the order placed is for a “Chest with Contrast”, the display protocol will not be applied to the latter exam. Multiple procedure codes for the same exam can be common at sites that have undergone recent RIS updates or site-wide changes to billing. It is recommended that users only have one choice when ordering a procedure in the RIS.
Body Region Associations
McKesson Radiology PACS populates its procedure code table with procedure codes sent from the RIS; examples of procedure codes include Chest 2-View, CT Chest w/Contrast, and US Gallbladder. The procedure code table may contain a list of thousands of procedures. Each procedure code should be associated with a body region prior to go-live; a process usually performed by the PACS Administrator. In the above examples, Chest 2-View and CT Chest w/Contrast would both be associated with the body region “Chest.” In addition to display protocols, body region associations are also required for other features in McKesson Radiology PACS, such as study list filters and display protocols.
CHEST(body region)
Chest 1-View(procedure)
Chest 2-View(procedure)
Chest Decub(procedure)
If body region associations are mapped correctly, a display protocol can be set up to automatically apply to all CR Chest exams simply by selecting “CR” as a modality and “Chest” as a body region. If body region associations are not mapped or are mapped incorrectly, the user would have to select “Chest 1-View”, “Chest 2-View”, “Chest Decub”, and perhaps more procedures from a list of thousands of procedure codes.

McKesson Radiology Display Protocol Manual
McKesson Radiology 12.0 Confidential and Proprietary Page 6
Standardizing Modality Series Descriptions
When a display protocol is created, image and series placement are saved based upon DICOM properties in the image and/or series. For example, a CT Chest Axial series may be recognized by the DICOM tags for “Image Type”, “View”, and “Contrast” which is information sent by the modality automatically.
However, under some circumstances, it is possible that these properties are not used, and series description is used instead. In these instances, series description must be consistently and uniquely labeled for each modality of the same type for the entire site. For example, if there are three CT scanners from different vendors, all three scanners must be configured to send the same series description for the CT Chest Axial series mentioned above. The label is arbitrary, but is sensitive to characters and spaces. Common labels would be “Axial” or “AX”; the exact label does not matter as long as all CT scanners use the same labeling consistently.
ROOM 1
Image Type: OriginalView: Axial
Contrast: NoSeries Desc: AX
ROOM 2
Image Type: OriginalView: Axial
Contrast: NoSeries Desc: AX
ROOM 3
Image Type: OriginalView: Axial
Contrast: NoSeries Desc: Lung
Best Practices for Creating Display Protocols
Choose the Right Study
It is important to choose representative studies when building display protocols. It is not recommended to build a display protocol using a trauma study or an abnormal procedure containing images that are not normally captured. Choose a study captured on a modality that is used regularly. It is not recommended to build a display protocol on a study captured on a mobile unit that makes infrequent visits, or a modality that will be replaced in the near future. Make Changes Starting with a Blank Screen
The recommended first step to creating a new display protocol is to start with a blank screen by dragging all the series loaded into viewports off the screen. There are several reasons for this:
1. By default, the “Generic Display Protocol” associates the property “Display Any Series” with each viewport. Dragging a series into a viewport from the thumbnails will replace the “Display Any Series” property with the properties for that series. If this step is not performed, the display protocol will not show any changes the next time it is applied.
2. If series are dragged from viewport to viewport (instead of from the thumbnails), the “Display Any Series” property will be swapped. If this display protocol is saved, there will be no change at all to the original presentation.
3. Dragging and dropping a thumbnail into a viewport will replace the “Display Any Series” property with the properties of the dropped series. However, since each viewport may have displayed a series of images to begin with, it is possible to lose track of which viewports are populated with series that were dragged down from the thumbnail bar.

McKesson Radiology Display Protocol Manual
McKesson Radiology 12.0 Confidential and Proprietary Page 7
Creating a New Display Protocol
1. Open the study of interest along with any comparison studies you would like to save with the display protocol. Drag and drop the series thumbnails into the viewports of choice, or use the Display Protocol Editor (see Chapter 9 – Specifying Image and Series Placement Using the Display Protocol Editor for more information).
2. Click on the Display Protocol button and select Save as New from the dropdown menu.
3. The Save Display Protocol As window is displayed at the General properties tab. This step determines which type of
studies the display protocol will automatically apply to:
a) In the Name field, enter the name of the display protocol.
b) In the Ownership level options, specify the level of ownership of the display protocol. Only PACS Administrators can create site wide display protocols.
c) Specify the applicable rules, which determine which modality, body region, and procedure types the display protocol applies to.
d) Check the Default display for this type of study
check box.
e) Specify which properties to save with the Layout and appearance checkboxes.
4. Click on the Reference Studies tab. This step determines which type of comparison studies to load automatically:
a) Check the Open reference studies automatically check box.
b) Click on the Maximum number of reference studies to open dropdown and specify the maximum number of reference studies that should open.
c) Specify the applicable rules which determine which modality, body region, and procedure type the display protocol will try to open.
Note: Specified body region will load any associated procedure types, eg. If CT is specified for modality and Head; Brain is specified for body region, the protocol will load “Head with contrast”, “Head without contrast”, etc.
d) Specify additional rules if needed to determine whether study statuses or dates should be considered when opening reference studies.
e) Click OK to save the new display protocol.

McKesson Radiology Display Protocol Manual
McKesson Radiology 12.0 Confidential and Proprietary Page 8
Creating a Display Protocol Stage
Display protocol stages can display images in different ways. For example, stage 1 may display the anchor study, and stage 2 may display the anchor and reference. The first stage is always applied when an exam is first opened. Types of Display Protocol Stages
Five types of display protocol stages can be defined. Each display protocol stage type represents the context in which the stage is used and how that stage will function. Stages can be skipped if no relevant images or studies are found for a particular Stage Type:
• Survey Stage: used for quickly viewing all the images in the anchor study. This stage can be skipped when all visible viewports are set with the Blank Viewport property.
• Comparison Stage: used for viewing images in multiple studies. This stage is for comparing images in the anchor study and its reference studies. It can be used for same modality comparison, or cross modality comparison. If no comparison is available, this stage type is skipped.
• Review Stage: used for reviewing flagged images in the anchor study. This is useful as an aid for dictating reports. • Unviewed Stage: used for reviewing unviewed images as a set before an interpretation is completed. • Other Stage: used for any other purpose not covered by the other types.
Modifying a Display Protocol Stage
1. To modify stages, click on the Display Protocol button.
2. Select View/Edit Stages from the dropdown menu, then select Manage Stages. 3. The Manage Stages window appears listing the stages in the specified display protocol. Add, Copy, Update or
Delete a stage by performing one of the bullet points below, and repeat as needed:
a) To add a stage, enter a Stage name and Stage type, then click the Add button.
b) To copy a stage, select the stage of interest from the list and type in a new name in the Stage name field, then click the Copy button.
c) To update a stage, select the stage of interest from the list and type in a new name in the Stage name field and/or click on the Stage type dropdown and select the context in which the stage is used. Click the Update button to save the changes.
d) To delete a stage, select the relevant stage, and click the Delete button.
e) Click the Close button to finish.

McKesson Radiology Display Protocol Manual
McKesson Radiology 12.0 Confidential and Proprietary Page 9
Specifying Image and Series placement using the Display Protocol Editor
The Display Protocol Editor enables you to specify image and series placement and presentation settings (Window/Level, Zoom/Pan settings, and image orientation) of individual viewports. The Display Protocol Editor may be used in the following situations:
• To extend matching criteria in viewports to ensure correct image and series placement. • To troubleshoot an existing display protocol due to incorrect image or series placement. • To configure series placement from different studies on the same monitor, for cross modality comparison.
Specifying Which Study to Display To specify the study (anchor or reference) whose series you want to display: 1. Navigate to the stage of interest.
2. Click the viewport if ito select it.
3. Click the Display Protocol button.
4. Point to View/Edit Properties.
5. Click Series Placement and Appearance.
6. The Display Protocol Editor is displayed. On the
Displayed Study tab, choose whether you want the anchor or reference study display in the viewport.
7. If choosing Reference study, choose any modality or specify a modality.
8. Specify which prior study you want displayed (1st, 2nd, 3rd, etc).

McKesson Radiology Display Protocol Manual
McKesson Radiology 12.0 Confidential and Proprietary Page 10
Specifying Which Series to Display
The series placement settings enable you to specify which series (within the selected study) will display in the viewport. McKesson Radiology PACS compares the matching criterion specified in each viewport with the DICOM data of the series in the study. The first series that matches the criterion is displayed in the viewport. Multiple sets of matching criterion can be specified here. If no series in the study matches the first criterion, McKesson Radiology PACS will attempt to match the series with the next criterion. To specify the study series you want to display:
1. Follow steps 1 to 8 of ‘Specifying Which Study Series to Display’ (previous page).
2. Click on the viewport of interest.
3. Click the Series tab.
4. A list of matching criteria for the selected viewport appears. There is a separate line for each set of matching criteria. A series will drop in this viewport if it matches any one set of criteria. Click on the matching criteria of interest.
5. Click the Edit button to invoke the Series
Matching Criteria screen. The Series Matching Criteria screen allows the user to specify which DICOM properties are desired for series display in the selected viewport.
Note: The pick list can be used to select from a predefined set of criteria. For example, under the Contrast field, the pick list will show the options Yes and No. If contrast is not important for the display protocol, simply remove the options and leave the field blank. It is important to scroll through the list of criteria to ensure that each field is populated with the desired criteria for series placement.

McKesson Radiology Display Protocol Manual
McKesson Radiology 12.0 Confidential and Proprietary Page 11
Display Protocol Matching Criteria
The following is a list of recommended matching criteria to use in a viewport when building McKesson Radiology Display Protocols using the Display Protocol Editor. Always use matching criteria that uniquely
identifies the image/series.
Modality Matching Criteria
CR/DR/RF (Plain Film) • Projection • Series Description*
CT
• View • Image Type • Contrast • Series Description*
MRI
• View • Image Type • Echo Type • Contrast • Pulse Sequence • Diffusion Coefficient (if available) • Series Description*
Ultrasound • Frame Type • Series Description*
Mammography
• Laterality • MG Projection • MG Implant Displacement (if available) • MG Magnification Factor (if available) • MG Spot Compression Factor (if available) • Series Description*
* NOTE: Only use Series Description when no other matching criteria that uniquely identifies the image/series
exists.

McKesson Radiology Display Protocol Manual
McKesson Radiology 12.0 Confidential and Proprietary Page 12
Specifying the Presentation Settings of the Viewport
You can specify the following presentation (formatting) settings in the Appearance tab of the Display Protocol Editor:
• Window/Level • Zoom/Pan • Image orientation
Modifying the Window/Level Click the Window/Level dropdown menu and select the following options to modify:
• Default: Displays images with the Window/Level in the most recently saved Stored Image Presentation (SIP). If the study does not have an SIP, the images are displayed with the Default Window/Level.
• Window/Level Preset: Applies a Window/Level preset to the images.
Modifying the Zoom/Pan Click the Zoom/Pan dropdown menu and then select an option:
• Default: Displays images with the Zoom/Pan settings in the most recently saved SIP. If the study does not have an SIP, the images are zoomed to fit the viewport.
• As Shown: Displays the images with the current Zoom/Pan settings, select As Shown.
• Zoom to Fit: To zoom the images to fit the viewport. • 100%: Displays the images at 100% of the current
size. • Life Size: Displays the images at their life size.
Note: If the monitor is not calibrated for life size image display, than selecting Life Size zooms the image(s) to fit the viewport.
Modifying the Image Orientation Click the Orientation dropdown menu and then select the option:
• Default: Displays the images with the image orientation in the most recently saved SIP. If the study does not have a SIP, the images are displayed with the default orientation.
• Standard (R-L): Displays the images with the standard orientation.
• As Shown: Displays the images with the current orientation.

McKesson Radiology Display Protocol Manual
McKesson Radiology 12.0 Confidential and Proprietary Page 13
Updating a Display Protocol
It is possible to edit the properties of a display protocol if changes need to be made (alternatively, it is also possible to overwrite the display protocol with a new one using the same name).
1. Open the study of interest, and ensure the display protocol you would like to edit is already applied. The name of the currently applied display protocol is shown on the Display Protocol button.
2. If the General or Reference Studies properties of the display protocol need to be edited:
a. Click the Display Protocol button.
b. Point to View/Edit Properties.
c. Select Anchor/Reference Studies.
d. Make changes as needed and click OK.
3. Modify the series and image layouts and presentation settings such as Window/Level, Zoom/Pan, Image Orientation, and Linking status.
4. Click the Display Protocol button.
5. Select Save Changes. If the display protocol contains multiple stages, the Save Multiple Stages warning is displayed:
• Specify whether to save the layout and presentation settings of the currently displayed stage by selecting the option Save the currently displayed stage.
• Specify whether to save the layout and presentation settings of all the stages by selecting the option Save all stages.
7. Click the Save button.

McKesson Radiology Display Protocol Manual
McKesson Radiology 12.0 Confidential and Proprietary Page 14
Copying a Display Protocol
1. Click on the Display Protocol button.
2. Select Manage Display Protocols from the dropdown menu.
3. The following window appears, displaying the available display protocols.
4. Check the Show Other Folders checkbox.
5. Click the Choose button.
6. The Show Other Folders window appears. Click the pick list button.
7. Select the user from whom you want to
copy a display protocol.
8. Click the OK button.
9. Click the OK button to close the Show
Other Folders window.
McKesson Radiology Display Protocol Manual
McKesson Radiology 12.0 Confidential and Proprietary Page 15
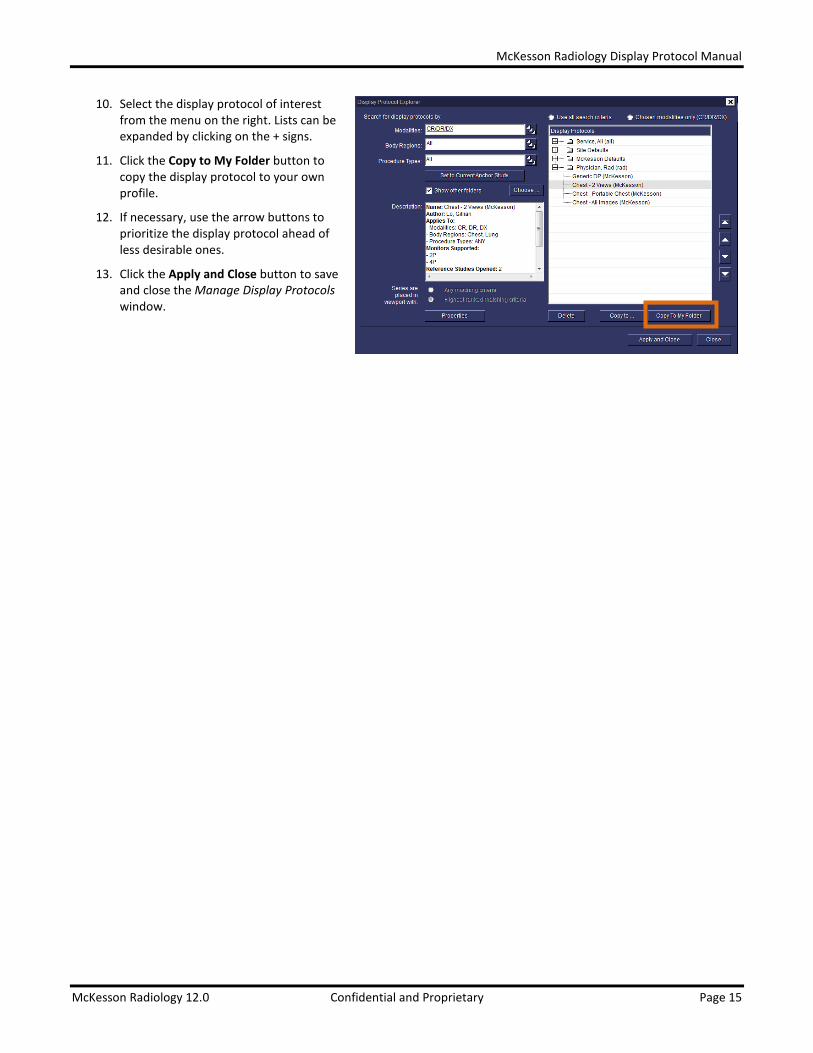
10. Select the display protocol of interest from the menu on the right. Lists can be expanded by clicking on the + signs.
11. Click the Copy to My Folder button to copy the display protocol to your own profile.
12. If necessary, use the arrow buttons to prioritize the display protocol ahead of less desirable ones.
13. Click the Apply and Close button to save and close the Manage Display Protocols window.

McKesson Radiology Display Protocol Manual
McKesson Radiology 12.0 Confidential and Proprietary Page 16
Frequently Asked Questions What are the drawbacks of image/series placement using the Drag and Drop Method?
The “drag and drop” method of building display protocols will save matching criteria for the opened study. However, it will likely need to be extended constantly to accommodate for slight variations in matching criteria due to differences in properties from different modality vendors or different acquisition protocols.
The recommended first step to creating a new display protocol using the “drag and drop” method is to start with a blank screen by dragging all the series loaded into viewports off the screen. There are several reasons for this:
• By default, the “Generic Display Protocol” associates the property “Display Any Series” with each viewport. Dragging a series into a viewport from the thumbnails will replace the “Display Any Series” property with the properties for that series. If this step is not performed, the display protocol will not show any changes the next time it is applied.
• If series are dragged from viewport to viewport (instead of from the thumbnails), the “Display Any Series” property will be swapped. If this display protocol is saved, there will be no change at all to the original presentation.
• Dragging and dropping a thumbnail into a viewport will replace the “Display Any Series” property with the properties of the dropped series. However, since each viewport may have displayed a series of images to begin with, it is possible to lose track of which viewports are populated with series that were dragged down from the thumbnail bar.
When hovering, the mouse cursor over a thumbnail, a popup box appears listing the properties of that series. The properties with an asterisk are determined to be the smallest set of criteria that can be used to uniquely identify that series from the others in the study. For each thumbnail, every property is examined to see if all other thumbnails have the same value for this property. If this is the case, the property is ignored; otherwise, it is asterisked. When the thumbnail is dropped into a viewport, those image or series properties that are asterisked will be associated with the viewport. You can verify this by opening the Display Protocol Editor to view the specific matching criteria for that viewport.
After making changes to series and image layout, make any other presentation changes such as Window/Level, Zoom/Pan, Image Orientation, and Series Linking status before continuing. Save the changes.
What does it mean to “extend” a display protocol? Any series subsequently added into the viewport will add matching criteria to that viewport. For example, if an “Axial Pre” series is dragged into a viewport and saved, then an “Axial Post” is dropped into the viewport and saved again, that viewport will search for both “Axial Pre” and “Axial Post” in the future. This is called “extending” a display protocol, which can be used to accommodate variations in series properties from different modality vendors.
Changes made to the protocol need to be saved by clicking on the Display Protocol button and selecting Save Changes.
When are Series Descriptions used for Series Placement? When no properties can uniquely identify a series, then series description is used as matching criteria instead. This is apparent when a user hovers over the relevant image thumbnail and the only property asterisked is the series description.
It is recommended to avoid using series description and use matching criteria whenever possible. Series descriptions are subject to differences between vendors and technologist manual entry. If the series description saved in a display protocol differs from the series description sent in subsequent studies, even by a single character or space, the display protocol will not hang images correctly.
How does McKesson Radiology determine which Display Protocol to use when I open a study? When creating a display protocol, you can associate the protocol with up to three properties: modality, body region, and procedure type. Modality should always be assigned. Either body region or procedure type can be assigned; it is not
McKesson Radiology Display Protocol Manual
McKesson Radiology 12.0 Confidential and Proprietary Page 17
required to have both. Body region is set up by your PACS Administrator and is recommended for simplicity. For example, if a protocol is assigned to “CT” and “Chest”, the display protocol will automatically apply to “CT Chest W/Contrast”, “CT Chest WO/Contrast”, and “CT Chest W & WO/Contrast”. If you desired separate protocols for all three procedure types, then you would ignore body region and assign the protocol to procedure type instead. How are thumbnails placed in viewports? When a display protocol is applied to a study, the thumbnails are evaluated for placement in the same order in which they appear on the bar. For each thumbnail, the first viewport with matching criteria is chosen for placement; this is the first series with all the properties specified as matching criteria for the viewport. Currently, each sequence is placed in the first viewport that satisfies the matching criteria. The ranking of the matching criteria does not play a part in series placement into viewports. What happens when you swap the contents of two viewports? Swapping two viewports swaps the matching criteria associated with each viewport. The results of swapping the contents are dependent on the actions performed prior to the swap. Case #1: The generic protocol is applied and the contents of two viewports are swapped. Results: This action simply results in swapping the same property “Display Any Series”. When the protocol is saved,
the changes made are not noticed. For this reason, this practice should be avoided while creating protocols. Case #2: One of the two viewports involved in the swap had a thumbnail dropped into it. For example, viewport #1
had a thumbnail dropped into it and is now associated with a set of properties, while viewport #2 is still associated with “Display Any Series”.
Results: Swapping these two viewports will swap the properties as expected; saving the protocol and re-applying it
will result in viewport #2 displaying the expected series; though the same is not necessarily true of viewport #1. To avoid confusion, it is best practice to always drop series from the thumbnail bar.
Case #3: Both viewports involved in the swap had a thumbnail dragged into them. Results: This is the best scenario to work with. The set of image properties associated with each viewport are
exchanged. When this protocol is saved and re-applied, the results are as expected (i.e. the series appear in the viewports in which they were expected to appear).
What happens when the same series is dropped into different viewports? The same thumbnail can be dropped into multiple viewports. For example, this may be used for CT where the radiologist wants to see a Chest exam with Abdomen, Lung, and Mediastinum window/levels at the same time. Once multiple viewports are associated, the specific matching criteria for the viewports cannot be updated or deleted. If the viewports are associated with slightly undesirable matching criteria that may not consistently work, simply add a new set of matching criteria to the first viewport of this collection. This association can be removed by clicking on the “Break” button in the “Series” tab of the Display Protocol Editor. How do display protocols work for different monitor configurations? A display protocol can be adapted to behave differently depending on the number of available active monitors. The recommended approach to use this feature is to build the protocol on the configuration with the lowest number of monitors, and then adapt the protocol to configurations with more monitors. When you build a protocol on a 2-monitor
McKesson Radiology Display Protocol Manual
McKesson Radiology 12.0 Confidential and Proprietary Page 18
configuration and open it on a 4-monitor workstation, the protocol opens up showing the first two monitors with series placed and the last two monitors with blank viewports. However, when a protocol is built on a 4-monitor workstation and then opened on a 2-monitor workstation, the software will revert to the “Generic Display Protocol” until the custom protocol has been extended for the other configuration. This behavior may be unintuitive to users, as it will appear as though the display protocol is not working. To extend a protocol for a different monitor configuration, apply the display protocol on a different monitor configuration, alter the viewports as desired, and use the “Save Changes” feature to update the protocol. This protocol will now work for both monitor configurations.

McKesson Radiology Display Protocol Manual
McKesson Radiology 12.0 Confidential and Proprietary Page 19
Troubleshooting Scenarios
The following section deals with some common scenarios where previously created display protocols fail. As an example, we will use a two monitor display protocol created for a “CR Chest 2-View” (frontal and lateral views) study using the drag and drop method on a perfectly sequenced study. The following are scenarios where this protocol can fail: Missing DICOM properties Description: There is a lateral image on the thumbnail bar but this image does not appear in the viewport as expected.
The empty viewport will list the properties with which it is associated. Explanation: Looking at the DICOM header, you may find that the property “Projection Type” does not exist. This
usually indicates that the projection type was not found anywhere in the DICOM header. Action: Drag down the lateral image and save the display protocol. Take a look through the DICOM header and
see if you find the projection type anywhere. If not, this is a modality problem; keep an eye out to see if all studies from a particular device are like this or if it’s just a rare occurrence. If you do find a projection type value somewhere, inform a member of the McKesson team.
Incorrect DICOM properties Description: As in the previous example, there is a lateral image on the thumbnail bar but this image does not appear
in the viewport as expected. The empty viewport will list the properties with which it is associated. Explanation: Even though the image is visually identified as a lateral image, the DICOM header incorrectly states that
this image is “AP”. Action: An incorrect DICOM tag is typically caused by technologist error or incorrect modality configuration. It is
also possible that the projection is stored correctly in another DICOM tag. A member of the McKesson team should be notified to investigate the problem, but this usually cannot be corrected in PACS.
Variations of expected property values Description: Once again, there is a lateral image on the thumbnail bar but this image does not appear in the viewport
as expected. The empty viewport will list the properties with which it is associated. Explanation: The viewport was saved with the projection type “Lat” which is the most common form of representation,
but for this study, McKesson Radiology PACS extracted “Lateral” or “LL” (short for “Left Lateral”). Action: Verify what value the lateral image has for projection type in its DICOM header. After verifying that it is
just a variation of syntax and not an incorrect value, there are two possible courses of action to take:
a) Drag down the thumbnail to the viewport and “Save Changes”. This viewport will now look for both variations of the value “lateral”.
b) Open the Display Protocol Editor and manually add the variations to the specific matching criteria dialog.

McKesson Radiology Display Protocol Manual
McKesson Radiology 12.0 Confidential and Proprietary Page 20
Image with specific properties is not available Description: A viewport remains blank after a display protocol is applied to a study. The empty viewport will list the
properties with which it is associated. Explanation: The viewport expects an image with certain properties but such an image is not found in the study. Action: There are two possibilities for this error: either the image does not exist in the study or the matching
criteria in the viewport is so constrained that none of the images in the study are considered a fit for that viewport. If the former is the case, the image has not been sent to PACS. To troubleshoot the latter, hover the mouse cursor over the thumbnails that have not been placed in a viewport and check to see how the matching criteria of the viewport can be reduced to “fit” the desired image. For example, the viewport may be looking for a body region of “Chest” which was not sent by the modality. This property should be removed from the display protocol using the Display Protocol Editor.
Improper Series Placement Description: The viewport in question was not populated by the expected image. Explanation: There are a few possible causes for this:
• The expected image was not acquired or sent to PACS. • Not enough properties were set as matching criteria, so a thumbnail that comes before the expected
image is chosen for placement into the viewport. • The expected thumbnail may have been chosen for placement in a previous viewport. • The same image was acquired twice as the patient was not in a favorable position for the first image;
in this case, you’ll have two images with identical properties. The first matching image will always be chosen for placement.
• The study may have more thumbnails than viewports; by the time the image in question is evaluated for placement, all viewports have been filled.
• Owing to mislabeled properties (stemming from incorrect DICOM info), the properties of a thumbnail did not match with the matching criteria of a viewport.
Action: Firstly, determine whether the expected image was sent to PACS. Next, hover over the thumbnail to
determine what the DICOM properties of the image are. Then use the Display Protocol Editor to evaluate whether the series matching criteria of your viewport(s) match the DICOM properties of the image.


