102
MDT Solution P Pack for a Healthcare E Admin Environment nistrators Guide Prepared by Microsoft Version 1.0.0.0 Baseline First published 31 July 2008

MDT Solution Pack for a Healthcare Environment
MDT Solution Pack for a Healthcare Environment
Administrators Guide
MDT Solution Pack for a Healthcare Environment
Administrators Guide
Prepared by
Microsoft
Version 1.0.0.0 Baseline
First published
31 July 2008

Copyright
This document and/or software (“this Content”) has been created in partnership with the National Health Service (NHS) in Eng
Rights to this Content are jointly owned by Microsoft and the NHS in England, although both Microsoft and the NHS are entitle
their rights of ownership. Microsoft acknowledges the contribution of the N
Readers are referred to www.cui.nhs.uk for further information on the NHS CUI Programme.
All trademarks are the property of their respective co
Corporation in the United States and/or other countries.
© Microsoft Corporation and Crown Copyright 2008
Disclaimer
At the time of writing this document, Web sites are referenced using active hyperlinks to the correct Web page. Due to the dynamic nature of Web sites, in
time, these links may become invalid. Microsoft is not responsible for the content of external
The example companies, organisations, products, domain names, e
association with any real company, organisation, product, domain name, e
MDT Solution Pack for a Healthcare Environment
Version 1.0.0.0
This document and/or software (“this Content”) has been created in partnership with the National Health Service (NHS) in Eng
Rights to this Content are jointly owned by Microsoft and the NHS in England, although both Microsoft and the NHS are entitle
their rights of ownership. Microsoft acknowledges the contribution of the NHS in England through their Common User Interface programme to this Content.
for further information on the NHS CUI Programme.
All trademarks are the property of their respective companies. Microsoft and Windows are either registered trademarks or trademarks of Microsoft
Corporation in the United States and/or other countries.
Crown Copyright 2008
are referenced using active hyperlinks to the correct Web page. Due to the dynamic nature of Web sites, in
these links may become invalid. Microsoft is not responsible for the content of external Internet sites.
products, domain names, e-mail addresses, logos, people, places, and events depicted herein are fictitious. No
association with any real company, organisation, product, domain name, e-mail address, logo, person, places, or events is intended or should be
MDT Solution Pack for a Healthcare Environment Administrators Guide
1.0.0.0 Baseline
Prepared by Microsoft
This document and/or software (“this Content”) has been created in partnership with the National Health Service (NHS) in England. Intellectual Property
Rights to this Content are jointly owned by Microsoft and the NHS in England, although both Microsoft and the NHS are entitled to independently exercise
HS in England through their Common User Interface programme to this Content.
mpanies. Microsoft and Windows are either registered trademarks or trademarks of Microsoft
are referenced using active hyperlinks to the correct Web page. Due to the dynamic nature of Web sites, in
mail addresses, logos, people, places, and events depicted herein are fictitious. No
mail address, logo, person, places, or events is intended or should be inferred.
Page ii

MDT Solution Pack for a Healthcare Environment
Version 1.0.0.0
TABLE OF CONTENTS
1 Executive Summary ................................
2 Introduction ................................
2.1 Value Proposition ................................
2.2 MDT Solution Pack Overview
2.2.1 MDT 2008 Deployment Process
2.3 Knowledge Prerequisites
2.3.1 Skills and Knowledge
2.3.2 Training and Assessment
2.4 Infrastructure Prerequisites
2.5 Audience ................................
2.6 Assumptions ................................
3 Using This Document ................................
3.1 Document Structure ................................
4 Develop ................................
4.1 Installing the MDT Solution Pack and Components
4.1.1 Installing Required Components
4.1.2 Pre-Configuration of MDT 2008
4.1.3 Installing the MDT Solution Pack
4.2 Configuring the MDT Solution Pack
4.2.1 Configuring the Windows Vista Solution
4.2.2 Configuring the Windows XP Solution
4.2.3 Configuring the Windows Server 2003 Solution
4.2.4 Configuring the Windows Server 2008 Solution
4.2.5 Windows Server-Based Applications
4.3 Adding Drivers to the MDT Solution Pack
4.3.1 Adding Out-of-the-Box Drivers
4.3.2 Adding Pre-Staged Drivers
4.4 Adding Applications to the MDT Solution Pack
4.4.1 Adding an Application Using the Deployment Workbench
4.4.2 MDT Solution Pack Default Applications
4.4.3 Application Installation Order
4.5 Customising the MDT Solution Pack
4.5.1 MDT Solution Pack Default Scripts
4.5.2 Configuration Scripts and the Task Sequence
4.5.3 Adding Custom Scripts
4.5.4 Incorporating BitLocker into a Task Sequence
4.6 Adding Hotfixes ................................
4.6.1 Windows XP and Windows Server 2003 Hotfixes
MDT Solution Pack for a Healthcare Environment Administrators Guide
1.0.0.0 Baseline
ONTENTS
................................................................................................
................................................................................................................................
................................................................................................
MDT Solution Pack Overview ................................................................................................
MDT 2008 Deployment Process ................................................................
Knowledge Prerequisites ................................................................................................
Skills and Knowledge ................................................................................................
Training and Assessment ................................................................................................
Infrastructure Prerequisites ................................................................................................
................................................................................................................................
................................................................................................
................................................................................................
................................................................................................
................................................................................................................................
olution Pack and Components ................................................................
Installing Required Components ................................................................
Configuration of MDT 2008 ................................................................
Installing the MDT Solution Pack ................................................................
Configuring the MDT Solution Pack ................................................................
Configuring the Windows Vista Solution ................................................................
Configuring the Windows XP Solution ................................................................
Configuring the Windows Server 2003 Solution ...............................................................
Configuring the Windows Server 2008 Solution ...............................................................
Based Applications ................................................................
Adding Drivers to the MDT Solution Pack ................................................................
Box Drivers ................................................................
Staged Drivers ...............................................................................................
Adding Applications to the MDT Solution Pack ................................................................
Adding an Application Using the Deployment Workbench ................................
MDT Solution Pack Default Applications ................................................................
Application Installation Order ................................................................
Customising the MDT Solution Pack ................................................................
MDT Solution Pack Default Scripts ................................................................
Configuration Scripts and the Task Sequence ................................................................
Adding Custom Scripts ................................................................................................
Incorporating BitLocker into a Task Sequence ................................................................
................................................................................................
Windows XP and Windows Server 2003 Hotfixes ................................
Prepared by Microsoft
Page iii
....................................................... 1
.................................... 2
...................................................... 2
................................... 2
......................................................... 3
.......................................... 4
.......................................... 4
.................................... 5
...................................... 5
................................... 6
............................................................. 6
.................................................... 7
.................................................. 7
........................................... 8
................................. 9
......................................................... 9
........................................................ 10
...................................................... 17
....................................................... 21
........................................... 21
.............................................. 24
............................... 27
............................... 31
................................................ 35
.............................................. 39
.......................................................... 39
............................... 42
...................................... 42
............................................... 43
.......................................... 48
............................................................ 50
...................................................... 51
................................................... 51
.................................. 54
...................................... 55
................................. 56
....................................................... 56
............................................................ 57

MDT Solution Pack for a Healthcare Environment
Version 1.0.0.0
4.6.2 Windows Vista and Windows Server 2008 Hotfixes
4.7 Creating a Custom Image
4.7.1 Creating the Windows PE Boot ISO
4.7.2 Creating and Capturing the Custom Image
5 Stabilise ................................
5.1 Understanding Log Files
5.1.1 MDT 2008 Logs ................................
5.1.2 User State Migration Tool Logs
5.1.3 Windows Vista and Windows Server 2008 Setup Logs
5.1.4 Windows XP and Windows Server 2003 Setup Logs
5.2 Troubleshooting Methods
5.2.1 How to Manually Run Rule Processing
5.3 Determining WMI Identifiers
6 Deploy ................................
6.1 Getting Ready to Deploy a Custom Image
6.1.1 Creating the Deployment Operating System
6.1.2 Creating the Deployment Task Sequence
6.2 Deployment Types ................................
6.2.1 Network-Based Deployment
6.2.2 DVD-Based Deployment
6.3 Customising the Deployment Point Builds and Applications
APPENDIX A Skills and Training Resources
PART I Application Compatibility
PART II Imaging ................................
PART III Deployment Process
PART IV 2007 Office System Deployment
PART V Supplemental Training Resources
APPENDIX B Application Installation Guide
PART I Microsoft Office 2007
PART II Adobe Reader 8 ................................
PART III Java Virtual Machine
PART IV .NET Framework 3.0 (Windows XP Only)
APPENDIX C Document Information
PART I Terms and Abbreviations
PART II References ................................
MDT Solution Pack for a Healthcare Environment Administrators Guide
1.0.0.0 Baseline
Windows Vista and Windows Server 2008 Hotfixes ................................
Creating a Custom Image ................................................................................................
Creating the Windows PE Boot ISO................................................................
Creating and Capturing the Custom Image ................................................................
................................................................................................................................
Understanding Log Files ................................................................................................
................................................................................................
tate Migration Tool Logs ................................................................
Windows Vista and Windows Server 2008 Setup Logs ................................
Windows XP and Windows Server 2003 Setup Logs ................................
Troubleshooting Methods ................................................................................................
How to Manually Run Rule Processing ................................................................
Determining WMI Identifiers ................................................................................................
................................................................................................................................
loy a Custom Image ................................................................
Creating the Deployment Operating System ................................................................
Creating the Deployment Task Sequence ................................................................
................................................................................................
Based Deployment ................................................................
Based Deployment ................................................................................................
stomising the Deployment Point Builds and Applications ................................
Skills and Training Resources ................................................................
Application Compatibility ................................................................................................
................................................................................................
Deployment Process – Lite Touch ................................................................
2007 Office System Deployment ................................................................
Supplemental Training Resources ................................................................
Application Installation Guide ................................................................
Microsoft Office 2007 ................................................................................................
................................................................................................
Java Virtual Machine ................................................................................................
.NET Framework 3.0 (Windows XP Only) ................................................................
Document Information ..............................................................................................
Terms and Abbreviations ................................................................................................
................................................................................................
Prepared by Microsoft
Page iv
......................................................... 57
....................................... 59
.................................................. 59
...................................... 60
........................................ 65
......................................... 65
................................................. 66
......................................................... 66
.................................................... 66
....................................................... 67
....................................... 67
............................................. 67
................................... 68
........................................... 69
............................................. 69
.................................... 70
........................................ 73
.................................................. 76
............................................................. 76
................................... 78
.................................................. 79
................................................. 80
................................... 80
.......................................................... 80
................................................ 81
................................................... 81
................................................ 81
................................................. 82
........................................ 82
............................................ 88
..................................... 93
..................................... 95
.............................. 97
.................................. 97
.................................................... 98

MDT Solution Pack for a Healthcare Environment
Version 1.0.0.0
1 EXECUTIVE SUMMARY
Microsoft Deployment Toolkit (
� Help healthcare organisations
desktop build, and the
common in operating system deployment scenarios
� Reduce errors associated with creating build
deployment through the inclusion of scripts
tested platform to build upon
This guide contains step-by-step instructions for the installation and use
MDT Solution Pack for a Healthcare Environment Administrators Guide
1.0.0.0 Baseline
UMMARY
Microsoft Deployment Toolkit (MDT) Solution Pack extends the public version of MDT 2008 to:
healthcare organisations decrease the time required to develop a server build and a
the deployment infrastructure, by providing a packaged set of tasks
common in operating system deployment scenarios
educe errors associated with creating builds and produce higher-quality images for
through the inclusion of scripts in a preconfigured location that provides a
tested platform to build upon
step instructions for the installation and use of the
Prepared by Microsoft
Page 1
extends the public version of MDT 2008 to:
e the time required to develop a server build and a
by providing a packaged set of tasks
quality images for
location that provides a
the MDT Solution Pack.

MDT Solution Pack for a Healthcare Environment
Version 1.0.0.0
2 INTRODUCTIO
In November 2006, Microsoft publicly released BDD
tools for deploying Windows Vista
BDD 2007 Extensions was then
that can be installed over the top of BDD 2007
Windows XP and Windows Vista operating systems.
In March 2008, Microsoft publicly released MDT 2008 (version 4.1)
benefits such as support for the deployment of
The MDT Solution Pack replaces
2008 and provide server specific enhancements.
The supported operating systems for deployment using
� Windows XP Professional
� Windows Vista Enterprise
� Windows Server® 2003 R2 Standard Edition
� Windows Server® 2008 Standard
2.1 Value Proposition
This guide explains how the MDT Solution Pack
� Produce a client or server image
pre-populated task sequences
part of the stand-alone MDT 2008
� Provide a build environment to create operating system images, including automated
installation of the required applications, drivers, hotfixes and additional configurations
needed to create healthcare organisation
operating systems
� Provide a Lite Touch deployment environment to deliv
builds and images to desktop estates of between 10 and 500 seats
� Provide simple step-by
as adding applications and drivers to a build
2.2 MDT Solution Pack
Microsoft has two implementations of
� Lite Touch Installation
� Zero Touch Installation
The MDT Solution Pack can be used to extend
Touch version of MDT 2008 with the
healthcare organisations that do not have a management infrastructure in place
advantage of a solution for full, end
The MDT Solution Pack overlays
features including the Information Center
components that MDT 2008 and
� Windows® Automated Installation Kit (W
� Microsoft® Application Compatibility Toolkit (
MDT Solution Pack for a Healthcare Environment Administrators Guide
1.0.0.0 Baseline
N
Microsoft publicly released BDD 2007, which aimed to provide guidance and
tools for deploying Windows Vista® operating systems, as well as Windows XP operating systems.
then created and provided a set of healthcare-specific enhancements
that can be installed over the top of BDD 2007, and can be used for the deployment of both
Windows XP and Windows Vista operating systems.
In March 2008, Microsoft publicly released MDT 2008 (version 4.1), which provided additional
benefits such as support for the deployment of the Windows server and client operating systems
replaces BDD 2007 Extensions, and has been updated
2008 and provide server specific enhancements.
operating systems for deployment using the MDT Solution Pack
Windows XP Professional with SP3
Windows Vista Enterprise with SP1
2003 R2 Standard Edition with SP2
2008 Standard
Value Proposition
MDT Solution Pack can be used to:
Produce a client or server image more quickly than with existing methods
populated task sequences that are already configured. These task sequences are
alone MDT 2008
ironment to create operating system images, including automated
installation of the required applications, drivers, hotfixes and additional configurations
healthcare organisation-customised images of the supported Windows
Provide a Lite Touch deployment environment to deliver the Windows-based automated
builds and images to desktop estates of between 10 and 500 seats
by-step guidance for using the MDT Solution Pack
ions and drivers to a build
MDT Solution Pack Overview
Microsoft has two implementations of the MDT 2008 methodology:
Installation (LTI)
Installation (ZTI)
can be used to extend either of these implementations
with the MDT Solution Pack extensions will be most useful for
that do not have a management infrastructure in place
advantage of a solution for full, end-to-end deployments.
overlays the public version of MDT 2008 and makes use
features including the Information Center. This provides easy access to download and in
and the MDT Solution Pack require, including:
Automated Installation Kit (Windows AIK)
Application Compatibility Toolkit (ACT) 5.0
Prepared by Microsoft
Page 2
to provide guidance and
operating systems, as well as Windows XP operating systems.
specific enhancements
and can be used for the deployment of both
which provided additional
operating systems.
updated to work with MDT
MDT Solution Pack are:
more quickly than with existing methods due to
. These task sequences are not
ironment to create operating system images, including automated
installation of the required applications, drivers, hotfixes and additional configurations
of the supported Windows
based automated
MDT Solution Pack in basic areas such
either of these implementations; however the Lite
extensions will be most useful for
that do not have a management infrastructure in place, but wish to take
and makes use of new MDT 2008
provides easy access to download and install all the

MDT Solution Pack for a Healthcare Environment
Version 1.0.0.0
� Windows Vista Hardware Assistant
� Volume Activation tools
� Microsoft® Windows
® User State Migration Tool (
� Microsoft® Office migration tools
The MDT Solution Pack, together with
for the problems faced during deployment, including
� Pre-installation phases (
� The installation phase (disk imaging)
� The post-installation phases (
customisation)
The MDT Solution Pack simplifies building, customis
healthcare organisations.
2.2.1 MDT 2008 Deployment Process
The typical process for using MDT 2008
the MDT Solution Pack enhancement
capturing an image in the lab or deploying images in a production environment.
Figure 1: MDT Solution Pack Enhancements
The following list describes each part of the
1. Distribution Share – MDT Solution Pack
the source files that are
Windows Vista images, applications, device drivers, and packages.
Workbench provides a user interface
The MDT Solution Pack
applications to the Applications node in the
adding the most popular applications to the Deployment Workbench.
MDT Solution Pack for a Healthcare Environment Administrators Guide
1.0.0.0 Baseline
Windows Vista Hardware Assistant
Volume Activation tools
User State Migration Tool (USMT)
Office migration tools
together with MDT 2008, provides healthcare organisations
for the problems faced during deployment, including:
installation phases (for example, disk partitioning and formatting)
phase (disk imaging)
installation phases (for example, user state migration, application installation,
simplifies building, customising and deploying Windows
Deployment Process
MDT 2008 to deploy the supported Windows operating systems
enhancements are described in Figure 1. This process is the same whether
capturing an image in the lab or deploying images in a production environment.
The following list describes each part of the MDT Solution Pack enhancement process:
MDT Solution Pack helps to stock the Distribution
are needed to build images for your environment. Source fil
Windows Vista images, applications, device drivers, and packages. The
provides a user interface for adding all source files to the D
The MDT Solution Pack adds third-party applications and healthcare or
applications to the Applications node in the Distribution Point and provides guidance on
adding the most popular applications to the Deployment Workbench.
Prepared by Microsoft
Page 3
healthcare organisations with solutions
user state migration, application installation,
Windows images for
operating systems and
. This process is the same whether
capturing an image in the lab or deploying images in a production environment.
enhancement process:
istribution Share with some of
needed to build images for your environment. Source files include
The MDT Deployment
Distribution Share.
healthcare organisation-specific
and provides guidance on

MDT Solution Pack for a Healthcare Environment
Version 1.0.0.0
2. Task Sequence – After the distribution share is fully stocked, the Deployment Workbench
is used to create a task
source files from the distribution share with a configuration that customises the operating
system installation. The configuration includes a setup answer file (Unattend.xml for
Windows Vista and Windows Server 2008,
Server 2003) and a task sequence
installation. MDT Solution Pack
operating systems to an al
sequence specifies the steps to create a build and references a number of customisation
scripts supplied with MDT Solution Pack
3. Deployment Point – After creating a
installing it. A Deployment
specifies which source files and builds from the
also how to distribute them. Deployment
customisation points for
CustomSettings.ini. This file contains rules for installing
destination computers.
file with additional settings for fully automat
provides guidance on using the
then captured as Windows Images (
into the MDT Lite Touch environment for deployment.
guidance on creating a network
Deployment Point.
4. Destination computer
Distribution Share, added
Sequences to a build,
can be used to deploy
Destination computers can be lab machines that are then
(‘Syspreped’) and captured as WIM files for deployment, or production machines whe
MDT 2008 can provide a fully
If the process is used to create a WIM image of a machine,
imported back into MDT
2.3 Knowledge Prerequisites
To implement the recommendations made throughout this document effectively, a number of
knowledge-based and environmental infrastructure prerequisites should be in place.
outlines the knowledge and skills required to use
the necessary infrastructure prerequisites.
Section 2.3.1 details the prerequisite skills and knowledge
training resources and skill assessment.
2.3.1 Skills and Knowledge
The technical knowledge and minimum skills required to use th
are:
� Familiarity with the following
� Getting Started Guide
� Lite Touch Guide
� Computer Imaging System Feature Team Guide
� Configuration Reference
MDT Solution Pack for a Healthcare Environment Administrators Guide
1.0.0.0 Baseline
After the distribution share is fully stocked, the Deployment Workbench
ask sequence, also referred to as a Build. A task sequence
source files from the distribution share with a configuration that customises the operating
ystem installation. The configuration includes a setup answer file (Unattend.xml for
and Windows Server 2008, or Unattend.txt for Windows XP
task sequence. A task sequence is a list of steps to take during
MDT Solution Pack adds a pre-populated task sequence for
to an already-configured build (task sequence). The pre
sequence specifies the steps to create a build and references a number of customisation
MDT Solution Pack.
After creating a Task Sequence, a Deployment Point
eployment Point is a subset of the Distribution Share. A
specifies which source files and builds from the Distribution Share will be
how to distribute them. Deployment Points are customisable. The primary
customisation points for Deployment Points are rules, which are stored in a file calle
CustomSettings.ini. This file contains rules for installing the Windows operating systems
destination computers. The MDT Solution Pack configures a UK-specific
file with additional settings for fully automating the deployment process.
provides guidance on using the Distribution Shares to create unattended builds that are
Windows Images (WIM). These WIM images can then be b
ouch environment for deployment. This document provides additional
guidance on creating a network-based Deployment Point and a removable media
Destination computer – Once the MDT Solution Pack has helped to create a fully
, added healthcare organisation-specific customisations and
and defined a lab-based deployment point, the MDT 2008
can be used to deploy the Windows operating systems to destination computers.
Destination computers can be lab machines that are then prepared for imaging
and captured as WIM files for deployment, or production machines whe
can provide a fully-scripted installation of the operating system and applications.
If the process is used to create a WIM image of a machine, the WIM image
MDT.
Knowledge Prerequisites
To implement the recommendations made throughout this document effectively, a number of
based and environmental infrastructure prerequisites should be in place.
outlines the knowledge and skills required to use the MDT Solution Pack, while section
the necessary infrastructure prerequisites.
erequisite skills and knowledge and section 2.3.2 details the suggested
skill assessment.
Skills and Knowledge
The technical knowledge and minimum skills required to use this guide and the
following MDT 2008 guides as installed with MDT 2008
Getting Started Guide
Computer Imaging System Feature Team Guide
Configuration Reference
Prepared by Microsoft
Page 4
After the distribution share is fully stocked, the Deployment Workbench
equence associates
source files from the distribution share with a configuration that customises the operating
ystem installation. The configuration includes a setup answer file (Unattend.xml for
or Unattend.txt for Windows XP and Windows
is a list of steps to take during
populated task sequence for the Windows
. The pre-populated task
sequence specifies the steps to create a build and references a number of customisation
Deployment Point is created for
. A Deployment Point
be distributed, and
are customisable. The primary
which are stored in a file called
operating systems on
specific CustomSettings.ini
s. This document
to create unattended builds that are
. These WIM images can then be brought back
provides additional
and a removable media-based
has helped to create a fully-stocked
specific customisations and Task
MDT 2008 process
to destination computers.
pared for imaging
and captured as WIM files for deployment, or production machines where
of the operating system and applications.
image file can be
To implement the recommendations made throughout this document effectively, a number of
based and environmental infrastructure prerequisites should be in place. This section
, while section 2.4 details
etails the suggested
the MDT Solution Pack
2008:

MDT Solution Pack for a Healthcare Environment
Version 1.0.0.0
� Deployment Configuration Guide
� Deployment Configuration Samples Guide
� Office Deployment Guide
� User State Migration Feature Team Guide
� Experience of the installation and configuration of W
� Mount images
� Modify WinPE
� Inject security updates with
� Familiarity with MDT 2008
scenarios using Windows
2.3.2 Training and Assessment
Guidelines on the skill sets required in order to make best use of
reference material and training resources,
mentioned are optional and can be provided by a variety of certified training partners.
2.4 Infrastructure Prerequisites
The MDT Solution Pack is designed to integrate into an existing dev
servers and infrastructure for creating builds and testing deployment. If no such lab exists,
illustrates the infrastructure prerequisites for implementing a development lab for use with
Solution Pack. The development lab support
client builds, and uses two servers.
Figure 2: Infrastructure Prerequisites
MDT Solution Pack for a Healthcare Environment Administrators Guide
1.0.0.0 Baseline
Deployment Configuration Guide
Deployment Configuration Samples Guide
Office Deployment Guide
User State Migration Feature Team Guide
nstallation and configuration of Windows AIK and using the toolkit to:
Inject security updates with ‘PEimg.exe’
MDT 2008 to complete a bare-metal LTI, and Refresh and Replacement
scenarios using Windows operating systems
Training and Assessment
Guidelines on the skill sets required in order to make best use of the MDT Solution Pack
reference material and training resources, are detailed in APPENDIX A. However, all courses
mentioned are optional and can be provided by a variety of certified training partners.
Infrastructure Prerequisites
is designed to integrate into an existing development lab
servers and infrastructure for creating builds and testing deployment. If no such lab exists,
structure prerequisites for implementing a development lab for use with
lopment lab supports all the services and tools required to develop the
two servers.
Prepared by Microsoft
Page 5
AIK and using the toolkit to:
Refresh and Replacement
MDT Solution Pack, as well as
. However, all courses
mentioned are optional and can be provided by a variety of certified training partners.
elopment lab that includes
servers and infrastructure for creating builds and testing deployment. If no such lab exists, Figure 2
structure prerequisites for implementing a development lab for use with the MDT
the services and tools required to develop the

MDT Solution Pack for a Healthcare Environment
Version 1.0.0.0
Recommendation
It is recommended that a healthcare organisation
complete, the healthcare organisation
deploy the final image to target machines.
The servers above perform the roles outlined in
Deployment Server Roles Details
Infrastructure Server Provides the required infrastructure services to the environment including Active Directory
and DHCP
Build Server Host
Automated Installation Kit (
the MDT Solution Pack
Table 1: Client Build Development Lab Servers
2.5 Audience
The guidance contained in this document is targeted a
organisations. Table 2 provides a reading guide for this document, illustrating the roles and the
sections of the document that are likely to be of most interest. T
to is described in section 3.1.
Role Document Usage
IT Manager Review the relevant areas within the document to understand the
justification and drivers, and to develop an understanding of the
implementation requirements
IT Architect Review the relevant areas within the document against local
architecture strategy and
IT Professional/
Administrator
Detailed review and implementation of the guidance to meet local
requirements
Table 2: Document Audience
2.6 Assumptions
Use of this guide and the MDT Solution Pack
organisation has the following in place:
� Windows Server 2003 SP
� Volume-licensed media for Windows Vista
Windows Server 2003
� License keys for Windows Vista
and/or Windows Server 2008
� Administrative access to the server
� Access to the MDT Solution
2008 and the Windows AIK
be found in section 4.1.1
MDT Solution Pack for a Healthcare Environment Administrators Guide
1.0.0.0 Baseline
healthcare organisation creates a lab environment to develop the build
healthcare organisation should install a build server within the production environment to
deploy the final image to target machines.
perform the roles outlined in Table 1:
Details
Provides the required infrastructure services to the environment including Active Directory
and DHCP.
osts all the tools and resources required to generate the initial build including
Automated Installation Kit (Windows AIK), Windows Deployment Server (WDS),
MDT Solution Pack.
Client Build Development Lab Servers
The guidance contained in this document is targeted at a variety of roles within
provides a reading guide for this document, illustrating the roles and the
sections of the document that are likely to be of most interest. The structure of the sections referred
Document Usage
Exe
cutive
Summary
Dev
elop
areas within the document to understand the
justification and drivers, and to develop an understanding of the
implementation requirements
�
Review the relevant areas within the document against local
architecture strategy and implementation plans
�
Detailed review and implementation of the guidance to meet local �
MDT Solution Pack is based on the assumption that the
has the following in place:
Windows Server 2003 SP2 or Windows Server 2008, with all critical updates applied
licensed media for Windows Vista SP1 and/or Windows XP SP3,
SP2 and/or Windows Server 2008
Windows Vista SP1 and/or Windows XP SP3, Windows Server 2003
Server 2008
dministrative access to the server on which the MDT Solution Pack is to be installed
MDT Solution Pack setup files, the publicly-downloadable version of
Windows AIK – download locations and installation instructions for these can
4.1.1
Prepared by Microsoft
Page 6
to develop the build. Once
a build server within the production environment to
Provides the required infrastructure services to the environment including Active Directory®, DNS
ld including Windows
, Windows Deployment Server (WDS), MDT 2008 and
t a variety of roles within the healthcare IT
provides a reading guide for this document, illustrating the roles and the
he structure of the sections referred
Dev
elop
Stabilise
Dep
loy
�
� � �
is based on the assumption that the healthcare
, with all critical updates applied
Windows XP SP3,
Windows XP SP3, Windows Server 2003 SP2
is to be installed
downloadable version of MDT
download locations and installation instructions for these can

MDT Solution Pack for a Healthcare Environment
Version 1.0.0.0
3 USING THIS D
This document is intended for use by
use the MDT Solution Pack to create and depl
document should be used to assist with
and as a reference guide for the most common tasks involved with its use
3.1 Document Structure
This document contains three
� Develop
� Stabilise
� Deploy
Each section is based on the Microsoft IT Project Lifecycle as defined in the Microsoft Solutions
Framework (MSF) Process Model, and the Microsoft Operations Framewo
Lifecycle is described in more detail in
Executive Overview2. The MSF Process Model and MOF describe a high
activities for building, deploying and managing IT solutio
series of procedures, they are flexible enough to accommodate a broad range of IT projects.
As this document is intended to be a step
extra lifecycles stages (Envision
guidance.
Figure 3: MSF Process Model Phases and Document Structure
1 MSF Process Model White Paper {R1
http://www.microsoft.com/downloads/details.aspx?Famil
2 MOF Executive Overview {R2}: http://www.microsoft.com/technet/itsolutions/cits/mo/mof/mofeo.mspx
MDT Solution Pack for a Healthcare Environment Administrators Guide
1.0.0.0 Baseline
DOCUMENT
This document is intended for use by healthcare organisations and IT administrators who wish to
to create and deploy the supported operating system builds
document should be used to assist with the planning and implementation of the
and as a reference guide for the most common tasks involved with its use.
Document Structure
three sections that deal with the project lifecycle, as illustrated in
Each section is based on the Microsoft IT Project Lifecycle as defined in the Microsoft Solutions
Framework (MSF) Process Model, and the Microsoft Operations Framework (MOF). The IT Project
Lifecycle is described in more detail in the MSF Process Model White Paper1 and
. The MSF Process Model and MOF describe a high-level sequence of
activities for building, deploying and managing IT solutions. Rather than prescribing a specific
series of procedures, they are flexible enough to accommodate a broad range of IT projects.
is intended to be a step-by-step guide for using the MDT Solution Pack
nvision, Plan and Operate) are not required or referred to within this
: MSF Process Model Phases and Document Structure
R1}:
http://www.microsoft.com/downloads/details.aspx?FamilyID=e481cb0b-ac05-42a6-bab8-fc886956790e&DisplayLang=en
http://www.microsoft.com/technet/itsolutions/cits/mo/mof/mofeo.mspx
Prepared by Microsoft
Page 7
and IT administrators who wish to
the supported operating system builds. The
the MDT Solution Pack
sections that deal with the project lifecycle, as illustrated in Figure 3:
Each section is based on the Microsoft IT Project Lifecycle as defined in the Microsoft Solutions
rk (MOF). The IT Project
and the MOF
level sequence of
ns. Rather than prescribing a specific
series of procedures, they are flexible enough to accommodate a broad range of IT projects.
MDT Solution Pack, the three
are not required or referred to within this
fc886956790e&DisplayLang=en
http://www.microsoft.com/technet/itsolutions/cits/mo/mof/mofeo.mspx

MDT Solution Pack for a Healthcare Environment
Version 1.0.0.0
4 DEVELOP
During the Develop phase, the solution components are
development environment. The operating systems
according to any previous planning and designing
continue into the stabilisation phase.
Figure 4 acts as a high-level checklist, illustrating the sequence of events
IT Architect need to determine when planning
healthcare organisation:
Figure 4: Sequence for Developing the MDT Solution Pack
MDT Solution Pack for a Healthcare Environment Administrators Guide
1.0.0.0 Baseline
the solution components are installed and configured to provide a
development environment. The operating systems to be deployed can then be configured
planning and designing. Further refinement of these components will
continue into the stabilisation phase.
level checklist, illustrating the sequence of events that the IT Manager and
IT Architect need to determine when planning for the use of the MDT Solution Pack
MDT Solution Pack
Prepared by Microsoft
Page 8
installed and configured to provide a
can then be configured
. Further refinement of these components will
the IT Manager and
DT Solution Pack within a

MDT Solution Pack for a Healthcare Environment
Version 1.0.0.0
4.1 Installing the MDT Solution Pack
This section provides the details of the
requires and the step-by-step guidance for
Note
Many sections of this document
applications and drivers are located. By default
be changed during the installation of
folder will be referred to in the format of
4.1.1 Installing Required Components
Before installing the MDT Solution Pack
build server.
Important
These components do not need to be re
Download This Component
Microsoft Core Extensible Markup Language (MSXML)
Services 6.0
Microsoft Management Console (MMC) 3.0
Microsoft® .NET Framework version 2.0
MDT 2008
Table 3: Required Components
4.1.1.1 Installing the Windows Automated Installation Kit
The components listed in Table
Workbench. MDT 2008 requires other components to create and deploy images. The most notable
component is the Windows AIK
To download and install the Workbench:
1. In the Deployment Workb
2. In the Available for Download
Installation Kit (x86) 1.1
Note
After downloading the
Winpe.cab to C:\Program Files
3. In the Downloaded section of the
Kit (x86) 1.1, and then click
4. Follow the instructions in the
Tip
You can download and install other components in the
Workbench. Examples include the
MDT Solution Pack for a Healthcare Environment Administrators Guide
1.0.0.0 Baseline
MDT Solution Pack and Components
the details of the prerequisite components that the MDT Solution Pack
step guidance for installation.
any sections of this document refer to the ’Distribution folder’. This is the folder where
drivers are located. By default, the folder will be C:\Distribution or D:
be changed during the installation of MDT 2008. When giving file paths in this document
in the format of <Distribution>\<Folder>\<File>.
Required Components
MDT Solution Pack, the components listed in Table 3 must be installed
These components do not need to be re-installed if they are already installed on the build server
From This URL
crosoft Core Extensible Markup Language (MSXML) http://www.microsoft.com/downloads/details.aspx?FamilyID=993c0bcf
3bcf-4009-be21-27e85e1857b1&DisplayLang=en
Microsoft Management Console (MMC) 3.0 http://www.microsoft.com/downloads/details.aspx?FamilyID=4c84f80b
908d-4b5d-8aa8-27b962566d9f&DisplayLang=en
http://www.microsoft.com/downloads/details.aspx?FamilyID=0856eacb
4362-4b0d-8edd-aab15c5e04f5&DisplayLang=en
http://go.microsoft.com/fwlink/?LinkId=103947
the Windows Automated Installation Kit
Table 3 are the minimum requirements to start the Deployment
requires other components to create and deploy images. The most notable
Windows AIK.
To download and install the Windows AIK using the Components node of the Deployment
Deployment Workbench, expand Information Center and select
Available for Download section of the Details pane, select Windows Automated
1.1, and then click Download.
After downloading the Windows AIK, the Deployment Workbench copies the files Waikx86.msi and
Program Files\Microsoft Deployment Toolkit\Windows AIK.
section of the Details pane, select Windows Automated Installation
, and then click Install to automatically install the Windows AIK
Follow the instructions in the Windows AIK installer to complete the installation.
You can download and install other components in the Components node of Deployment
Workbench. Examples include the USMT and the ACT.
Prepared by Microsoft
Page 9
and Components
MDT Solution Pack
. This is the folder where all the MDT files,
Distribution or D:\Distribution and can
. When giving file paths in this document, the Distribution
must be installed on the
the build server.
http://www.microsoft.com/downloads/details.aspx?FamilyID=993c0bcf-
27e85e1857b1&DisplayLang=en
http://www.microsoft.com/downloads/details.aspx?FamilyID=4c84f80b-
27b962566d9f&DisplayLang=en
http://www.microsoft.com/downloads/details.aspx?FamilyID=0856eacb-
aab15c5e04f5&DisplayLang=en
http://go.microsoft.com/fwlink/?LinkId=103947
the Deployment
requires other components to create and deploy images. The most notable
using the Components node of the Deployment
select Components.
Windows Automated
Workbench copies the files Waikx86.msi and
Windows Automated Installation
Windows AIK.
installer to complete the installation.
node of Deployment

MDT Solution Pack for a Healthcare Environment
Version 1.0.0.0
4.1.2 Pre-Configuration of
MDT 2008 needs to have a basic configuration in place prior to installing
This includes:
� Importing operating system files (
Windows XP, Windows Server
� Creating a task sequence
To create the distribution share:
1. In the Deployment Workbench, right
distribution share directory
2. Specify the path in Path for new distribution share direct
MDT Solution Pack for a Healthcare Environment Administrators Guide
1.0.0.0 Baseline
onfiguration of MDT 2008
needs to have a basic configuration in place prior to installing the MDT Solution Pack
Importing operating system files (at least one of the following is required;
, Windows Server 2003 or Windows Server 2008)
equence
To create the distribution share:
In the Deployment Workbench, right-click Distribution Share and select
irectory:
Path for new distribution share directory and click
Prepared by Microsoft
Page 10
MDT Solution Pack.
is required; Windows Vista,
select Create
and click Finish:

MDT Solution Pack for a Healthcare Environment
Version 1.0.0.0
Important
The creation of the distribution share directory, using the Create Distribution Share Wizard, does not
share the folder specified but only creates and populates the folder structure to be used as the distribution
share. The share needs to be created manually and a build user account provided
read the files the share contain
To import the operating system files:
1. In the Deployment Workbench, right
2. The New OS Wizard start
and click Next:
MDT Solution Pack for a Healthcare Environment Administrators Guide
1.0.0.0 Baseline
The creation of the distribution share directory, using the Create Distribution Share Wizard, does not
share the folder specified but only creates and populates the folder structure to be used as the distribution
be created manually and a build user account provided with
contains.
To import the operating system files:
Deployment Workbench, right-click Operating Systems and select
starts and displays the OS Type page. Click Full set of source files
Prepared by Microsoft
Page 11
The creation of the distribution share directory, using the Create Distribution Share Wizard, does not
share the folder specified but only creates and populates the folder structure to be used as the distribution
with permissions to
select New:
Full set of source files

MDT Solution Pack for a Healthcare Environment
Version 1.0.0.0
3. On the Source page, browse to the location of
Next:
4. On the Destination page
MDT 2008 distribution share to store the operating system files and
MDT Solution Pack for a Healthcare Environment Administrators Guide
1.0.0.0 Baseline
, browse to the location of the operating system source files and
page, enter the destination directory name that will be created in the
distribution share to store the operating system files and click
Prepared by Microsoft
Page 12
operating system source files and click
name that will be created in the
click Finish:

MDT Solution Pack for a Healthcare Environment
Version 1.0.0.0
The operating system files will be copied to the
Deployment Workbench as shown in
Figure 5: Deployment Workbench with Operating Systems Configured
To create a basic task sequence:
1. In the Deployment Workbench, right
MDT Solution Pack for a Healthcare Environment Administrators Guide
1.0.0.0 Baseline
The operating system files will be copied to the MDT 2008 distribution share and will appear in the
Deployment Workbench as shown in Figure 5:
: Deployment Workbench with Operating Systems Configured
To create a basic task sequence:
Deployment Workbench, right-click Task Sequences and select
Prepared by Microsoft
Page 13
distribution share and will appear in the
New:

MDT Solution Pack for a Healthcare Environment
Version 1.0.0.0
2. The New Task Sequence
Task sequence ID, Task
Next:
3. On the Select Template
client, or a Standard Server Task Sequence
MDT Solution Pack for a Healthcare Environment Administrators Guide
1.0.0.0 Baseline
k Sequence Wizard starts and displays the General Settings
Task sequence name and Task sequence comments
Select Template page, select either the Standard Client Task Sequence
Standard Server Task Sequence for a server, and click Next
Prepared by Microsoft
Page 14
General Settings page. Type a
omments and click
Standard Client Task Sequence for a
Next:

MDT Solution Pack for a Healthcare Environment
Version 1.0.0.0
4. On the Select OS page
5. On the Specify Product
� Enter the specific product key
� If using a Key Management Server (KMS) for Windows Vista and Windows Server
2008, select Do not specify a product key at this time
MDT Solution Pack for a Healthcare Environment Administrators Guide
1.0.0.0 Baseline
page, select the operating system previously imported and click
roduct Key page, do one of the following, then click N
specific product key for the operating system imported
using a Key Management Server (KMS) for Windows Vista and Windows Server
Do not specify a product key at this time
Prepared by Microsoft
Page 15
, select the operating system previously imported and click Next:
Next:
using a Key Management Server (KMS) for Windows Vista and Windows Server

MDT Solution Pack for a Healthcare Environment
Version 1.0.0.0
6. On the OS Settings page
Explorer Home Page
7. On the Admin Password
you want to be set on this
password at this time
MDT Solution Pack for a Healthcare Environment Administrators Guide
1.0.0.0 Baseline
page, enter the Full Name (User Name), Organization
that you want to use for the build and click Next:
assword page, enter and confirm the local Administrator password that
on this Task Sequence, or click Do not specify an Administrators
time, and click Finish:
Prepared by Microsoft
Page 16
Organization and Internet
:
the local Administrator password that
not specify an Administrators

MDT Solution Pack for a Healthcare Environment
Version 1.0.0.0
The task sequence will be created in the Deployment Workbench as shown in
Figure 6: Deployment Workbench with Task Sequence
4.1.3 Installing the MDT
1. Ensure that the Deployment Workbench is closed and run the
2. The self-extracting executable will prompt for a location to uncompress the installation files
Type the destination folder or click
screen:
MDT Solution Pack for a Healthcare Environment Administrators Guide
1.0.0.0 Baseline
will be created in the Deployment Workbench as shown in Figure
Task Sequence Configured
MDT Solution Pack
Ensure that the Deployment Workbench is closed and run the MDT Solution Pack
extracting executable will prompt for a location to uncompress the installation files
ype the destination folder or click Browse and select a folder from the
Prepared by Microsoft
Page 17
Figure 6:
MDT Solution Pack Installer.
extracting executable will prompt for a location to uncompress the installation files.
older from the Select Folder

MDT Solution Pack for a Healthcare Environment
Version 1.0.0.0
3. Once the files have been extracted to a local folder, the
Solution Pack Launcher will start as shown
automatically, run the
4. From the MDT Solution Pack
5. The MDT Solution Pack
Next:
MDT Solution Pack for a Healthcare Environment Administrators Guide
1.0.0.0 Baseline
Once the files have been extracted to a local folder, the Microsoft Deployment
Launcher will start as shown below. (If the installation does not start
’Start.exe’ file contained in the folder selected in the previous step
MDT Solution Pack Launcher, click Install MDT Solution Pack
MDT Solution Pack Installation wizard starts and displays the Welcome
Prepared by Microsoft
Page 18
eployment Toolkit
f the installation does not start
in the previous step.)
MDT Solution Pack.
Welcome page. Click
MDT Solution Pack for a Healthcare Environment
Version 1.0.0.0
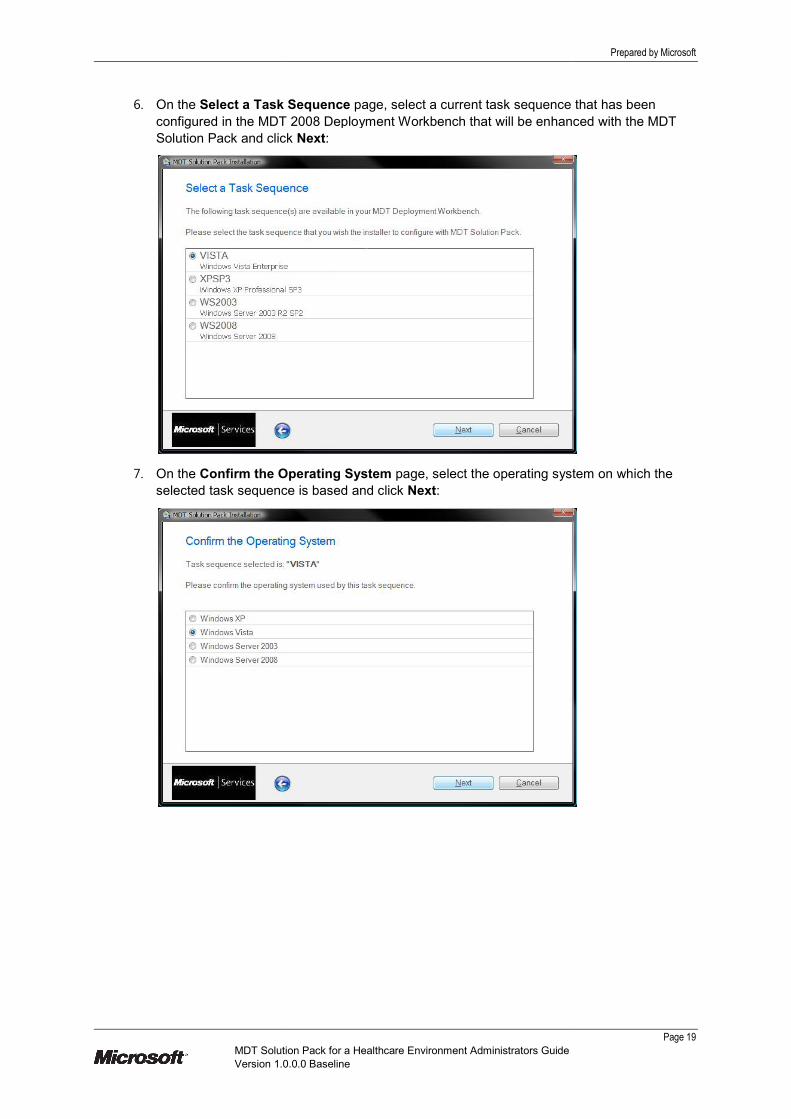
6. On the Select a Task
configured in the MDT 2008
Solution Pack and click
7. On the Confirm the Operating System
selected task sequence is based and click
MDT Solution Pack for a Healthcare Environment Administrators Guide
1.0.0.0 Baseline
a Task Sequence page, select a current task sequence
MDT 2008 Deployment Workbench that will be enhanced with
lick Next:
Confirm the Operating System page, select the operating system
selected task sequence is based and click Next:
Prepared by Microsoft
Page 19
that has been
Deployment Workbench that will be enhanced with the MDT
, select the operating system on which the
MDT Solution Pack for a Healthcare Environment
Version 1.0.0.0
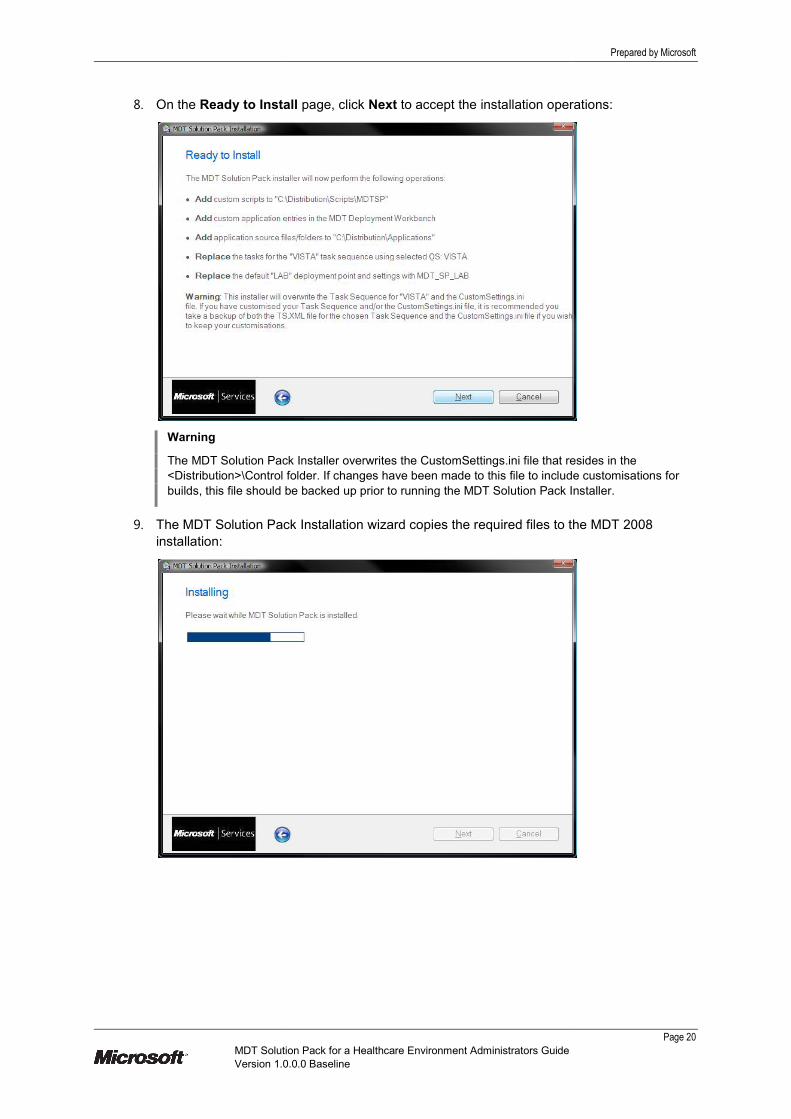
8. On the Ready to Install
Warning
The MDT Solution Pack
<Distribution>\Control folder. If changes have been made to this file to include customisations for
builds, this file should be backed up prior to running the
9. The MDT Solution Pack
installation:
MDT Solution Pack for a Healthcare Environment Administrators Guide
1.0.0.0 Baseline
Ready to Install page, click Next to accept the installation operations
MDT Solution Pack Installer overwrites the CustomSettings.ini file that resides in the
Control folder. If changes have been made to this file to include customisations for
builds, this file should be backed up prior to running the MDT Solution Pack Installer.
MDT Solution Pack Installation wizard copies the required files to the
Prepared by Microsoft
Page 20
operations:
resides in the
Control folder. If changes have been made to this file to include customisations for
Installer.
d files to the MDT 2008

MDT Solution Pack for a Healthcare Environment
Version 1.0.0.0
10. On the Installation Complete
4.2 Configuring the
This section provides details on each of the operating system solutions provided as part of
Solution Pack.
4.2.1 Configuring the Window
The Windows Vista solution contains a preconfigured task sequence for creating a base image
build that can be captured as a WIM file and then deployed through MDT 2008
deployment tools.
4.2.1.1 Gathering and Staging
The CDs, DVDs or download sites containing the installation files for the product
should be provided after the Windows Vista solution has been installed by
The files from each of the installation
in the MDT 2008 Deployment P
Note
A README.TXT file exists in
information on the files that should be located in the
available and installed as part of
MDT Solution Pack for a Healthcare Environment Administrators Guide
1.0.0.0 Baseline
Installation Complete page, click Finish to complete the installation
the MDT Solution Pack
This section provides details on each of the operating system solutions provided as part of
Configuring the Windows Vista Solution
The Windows Vista solution contains a preconfigured task sequence for creating a base image
build that can be captured as a WIM file and then deployed through MDT 2008,
Gathering and Staging Installation Files
download sites containing the installation files for the product
after the Windows Vista solution has been installed by the MDT Solution Pack
The files from each of the installation sources should be copied to the pre-staged
in the MDT 2008 Deployment Point.
A README.TXT file exists in each of the pre-staged application folders, which provides additional
should be located in the applications’ source folders. This can then
available and installed as part of the MDT Solution Pack.
Prepared by Microsoft
Page 21
to complete the installation:
This section provides details on each of the operating system solutions provided as part of the MDT
The Windows Vista solution contains a preconfigured task sequence for creating a base image
, or other
download sites containing the installation files for the products to be installed
MDT Solution Pack.
staged application folder
application folders, which provides additional
. This can then be made

MDT Solution Pack for a Healthcare Environment
Version 1.0.0.0
4.2.1.2 Adjusting MDT Solution Pack
To successfully use the MDT Solution Pack
changed in the CustomSettings.ini and Bootstrap.ini files added by
The CustomSettings.ini file needs to be updated via the properties of
Deployment Point. The Rules
(<>) need to be updated for the environment
The text below is the default CustomSettings.ini file as supplied
MDT Solution Pack. The AdminPassword=
configuration.
[Settings]
Priority=Default
Properties=_SMSTSOrgName, MyCustomProperty
[Default]
OSInstall=Y
_SMSTSOrgName=MDT Solution Pack
SkipApplications=NO
SkipAppsOnUpgrade=NO
SkipProductKey=NO
SkipDeploymentType=NO
SkipDomainMembership=YES
JoinWorkgroup=WORKGROUP
SkipAdminPassword=NO
AdminPassword=<ENTER LOCAL ADMIN PASSWORD
SkipLocaleSelection=YES
KeyboardLocale=en-gb
UserLocale=en-gb
InputLocale=0809:00000809
SkipTimeZone=YES
TimeZone=85
TimeZoneName=GMT Standard Time
SkipCapture=NO
DoCapture=NO
SkipUserData=NO
UserDataLocation=NONE
MDT Solution Pack for a Healthcare Environment Administrators Guide
1.0.0.0 Baseline
MDT Solution Pack Configuration Files
MDT Solution Pack for deploying a Windows Vista build, entries must be
nged in the CustomSettings.ini and Bootstrap.ini files added by the MDT Solution Pack
The CustomSettings.ini file needs to be updated via the properties of the MDT_
tab displays the CustomSettings.ini file: the fields wit
(<>) need to be updated for the environment in which the MDT Solution Pack will be used
The text below is the default CustomSettings.ini file as supplied for a Windows Vista build
AdminPassword= field is an example of a setting that
Properties=_SMSTSOrgName, MyCustomProperty
MDT Solution Pack Windows Vista Build
<ENTER LOCAL ADMIN PASSWORD – IE P@ssw0rd>
InputLocale=0809:00000809
TimeZoneName=GMT Standard Time
Prepared by Microsoft
Page 22
for deploying a Windows Vista build, entries must be
MDT Solution Pack.
MDT_SP_LAB
the fields with angle brackets
will be used.
for a Windows Vista build by the
field is an example of a setting that requires

MDT Solution Pack for a Healthcare Environment
Version 1.0.0.0
The Bootstrap.ini file also needs to be updated via the properties of
Point. On the Rules tab, click the
Notepad. As with the CustomSettings.ini file, various fields need to
in which the MDT Solution Pack
The text below is the default B
installation process, the DeployRoot field will be pre
share:
[Settings]
Priority=Default
[Default]
DeployRoot=<ENTER DEPLOYMENT ROOT
SkipBDDWelcome=YES
UserID=<ENTER CONNECTION ACCOUNT
UserDomain=<ENTER ACCOUNT DOMAIN
UserPassword=<ENTER ACCOUNT PASSWORD
SkipLocaleSelection=YES
KeyboardLocale=0809:00000809
4.2.1.3 Adjusting the MDT Solution Pack
The task sequence that is imported into the
will have a number of pre-staged
script-based tasks will run correctly as the path to the script location is maintained throughout the
import. However, each application installation task will revert to
setting as shown in Figure 7, where MDT will attempt to install all applications from a single task.
This is because the GUID used within the script is different for each installation an
occurs.
Figure 7: Windows Vista Application Installation Task
To reset the imported task sequence
open each task in the MDT Solution Pack
correct application from the Application to install
MDT Solution Pack for a Healthcare Environment Administrators Guide
1.0.0.0 Baseline
ootstrap.ini file also needs to be updated via the properties of the MDT_SP_LAB
click the Edit Bootstrap.ini button to open the Bootstrap.ini file
As with the CustomSettings.ini file, various fields need to be updated for the environment
MDT Solution Pack will be used; these are identified by the angled brackets (<>)
Bootstrap.ini file as supplied by the MDT Solution Pack
installation process, the DeployRoot field will be pre-populated with the appropriate distribution
<ENTER DEPLOYMENT ROOT - IE \\SERVER\Share>
<ENTER CONNECTION ACCOUNT - IE Administrator>
<ENTER ACCOUNT DOMAIN - IE LAB>
<ENTER ACCOUNT PASSWORD - IE P@ssw0rd>
KeyboardLocale=0809:00000809
MDT Solution Pack Windows Vista Task Sequence
that is imported into the Deployment Workbench from the MDT Solution Pack
staged applications and scripts for Windows Vista already configured. All
correctly as the path to the script location is maintained throughout the
import. However, each application installation task will revert to the Install multiple applications
where MDT will attempt to install all applications from a single task.
the GUID used within the script is different for each installation an
Application Installation Task
To reset the imported task sequence in order to install the staged applications from individual tasks,
MDT Solution Pack group with INSTALL: in the task title, and select the
Application to install drop-down list.
Prepared by Microsoft
Page 23
MDT_SP_LAB Deployment
the Bootstrap.ini file in
be updated for the environment
these are identified by the angled brackets (<>).
MDT Solution Pack – as part of the
populated with the appropriate distribution
Windows Vista Task Sequence
MDT Solution Pack
already configured. All
correctly as the path to the script location is maintained throughout the
Install multiple applications
where MDT will attempt to install all applications from a single task.
the GUID used within the script is different for each installation and a mismatch
to install the staged applications from individual tasks,
title, and select the

MDT Solution Pack for a Healthcare Environment
Version 1.0.0.0
The Description field for each
as shown in Figure 8. When the correct application has been selected from the drop
Apply. Complete this for all INSTALL:
Figure 8: Windows Vista Application Installation Task Selection
4.2.2 Configuring the Windows XP Solution
The Windows XP solution contains a preconfigured task sequence for creating a
that can be captured as a WIM file and then
tools.
4.2.2.1 Gathering and Staging Installation Files
The CDs, DVDs or download sites containing the installation files for the product
should be provided after the Windows
The files from each of the installation
in the MDT 2008 Deployment P
Note
A README.TXT file exists in each of the
information on the files that should be located in the applications
available and installed as part of
MDT Solution Pack for a Healthcare Environment Administrators Guide
1.0.0.0 Baseline
field for each INSTALL: task provides information on which application to select
. When the correct application has been selected from the drop
INSTALL: tasks in the MDT Solution Pack group and subgroups.
Application Installation Task Selection
Configuring the Windows XP Solution
The Windows XP solution contains a preconfigured task sequence for creating a
as a WIM file and then deployed through MDT 2008, or other
Gathering and Staging Installation Files
sites containing the installation files for the product
after the Windows XP solution has been installed by the MDT Solution Pack
The files from each of the installation sources should be copied to the pre-staged
in the MDT 2008 Deployment Point.
A README.TXT file exists in each of the pre-staged application folders, which provides additional
information on the files that should be located in the applications’ source folders. This can then be made
available and installed as part of the MDT Solution Pack.
Prepared by Microsoft
Page 24
task provides information on which application to select
. When the correct application has been selected from the drop-down list, click
group and subgroups.
The Windows XP solution contains a preconfigured task sequence for creating a base image build
other deployment
sites containing the installation files for the products to be installed
MDT Solution Pack.
staged application folder
on folders, which provides additional
. This can then be made

MDT Solution Pack for a Healthcare Environment
Version 1.0.0.0
4.2.2.2 Adjusting MDT Solution Pack
To successfully use the MDT Solution Pack
changed in the CustomSettings.ini and Bootstrap.ini files added by
The CustomSettings.ini file needs to be updated via the properties of
Deployment Point. The Rules
(<>) need to be updated for the environment
The text below is the default CustomSettings.ini file as supplied for Windows XP by
Solution Pack. The AdminPassword=
[Settings]
Priority=Default
Properties=_SMSTSOrgName,
[Default]
OSInstall=Y
_SMSTSOrgName=MDT Solution Pack
SkipApplications=NO
SkipAppsOnUpgrade=NO
SkipProductKey=NO
SkipDeploymentType=NO
SkipDomainMembership=YES
JoinWorkgroup=WORKGROUP
SkipAdminPassword=NO
AdminPassword=<ENTER LOCAL ADMIN PASSWORD
SkipLocaleSelection=YES
KeyboardLocale=en-gb
UserLocale=en-gb
InputLocale=0809:00000809
SkipTimeZone=YES
TimeZone=85
TimeZoneName=GMT Standard Time
SkipCapture=NO
DoCapture=NO
SkipUserData=NO
UserDataLocation=NONE
MDT Solution Pack for a Healthcare Environment Administrators Guide
1.0.0.0 Baseline
MDT Solution Pack Configuration Files
MDT Solution Pack for deploying a Windows XP build, entries must be
changed in the CustomSettings.ini and Bootstrap.ini files added by the MDT Solution Pack
file needs to be updated via the properties of the MDT_S
tab displays the CustomSettings.ini file: the fields with angle brackets
(<>) need to be updated for the environment in which the MDT Solution Pack will be used.
The text below is the default CustomSettings.ini file as supplied for Windows XP by
AdminPassword= field is an example of a setting that requires configuration.
Properties=_SMSTSOrgName, MyCustomProperty
MDT Solution Pack Windows XP Build
ENTER LOCAL ADMIN PASSWORD – IE P@ssw0rd>
InputLocale=0809:00000809
TimeZoneName=GMT Standard Time
Prepared by Microsoft
Page 25
for deploying a Windows XP build, entries must be
MDT Solution Pack.
MDT_SP_LAB
the fields with angle brackets
will be used.
The text below is the default CustomSettings.ini file as supplied for Windows XP by the MDT
field is an example of a setting that requires configuration.

MDT Solution Pack for a Healthcare Environment
Version 1.0.0.0
The Bootstrap.ini file also needs to be updated via the properties of
Point. On the Rules tab, click the
Notepad. As with the CustomSettings.ini file, various fields need
in which the MDT Solution Pack
The text below is the default B
installation process, the DeployRoot field will be pre
share:
[Settings]
Priority=Default
[Default]
DeployRoot=<ENTER DEPLOYMENT ROOT
SkipBDDWelcome=YES
UserID=<ENTER CONNECTION ACCOUNT
UserDomain=<ENTER ACCOUNT DOMAIN
UserPassword=<ENTER ACCOUNT PASSWORD
SkipLocaleSelection=YES
KeyboardLocale=0809:00000809
4.2.2.3 Adjusting the MDT Solution Pack
The task sequence that is imported into the
will have a number of pre-staged
script-based tasks will run correctly as the path to the script location is maintained throughout the
import. However, each application installation task will
setting as shown in Figure 9, where MDT will attempt to install all applications from a single task.
This is because the GUID used within the script, is different for each installation and a mismatch
occurs.
Figure 9: Windows XP Application Installation Task
To reset the imported task sequence
open each task in the MDT Solution Pack
correct application from the Application to install
MDT Solution Pack for a Healthcare Environment Administrators Guide
1.0.0.0 Baseline
ootstrap.ini file also needs to be updated via the properties of the MDT_SP_LAB
click the Edit Bootstrap.ini button to open the Bootstrap.ini file
As with the CustomSettings.ini file, various fields need to be updated for the environment
MDT Solution Pack will be used.
Bootstrap.ini file as supplied by the MDT Solution Pack
installation process, the DeployRoot field will be pre-populated with the appropriate distribution
<ENTER DEPLOYMENT ROOT - IE \\SERVER\Share>
<ENTER CONNECTION ACCOUNT - IE Administrator>
<ENTER ACCOUNT DOMAIN - IE LAB>
<ENTER ACCOUNT PASSWORD - IE P@ssw0rd>
KeyboardLocale=0809:00000809
MDT Solution Pack Windows XP Task Sequence
that is imported into the Deployment Workbench from the MDT Solution Pack
staged applications and scripts for Windows XP already configured. All
correctly as the path to the script location is maintained throughout the
import. However, each application installation task will revert to the Install multiple applications
where MDT will attempt to install all applications from a single task.
UID used within the script, is different for each installation and a mismatch
Application Installation Task
To reset the imported task sequence in order to install the staged applications from individ
MDT Solution Pack group with INSTALL: in the task title, and select the
Application to install drop-down list.
Prepared by Microsoft
Page 26
MDT_SP_LAB Deployment
the Bootstrap.ini file in
be updated for the environment
MDT Solution Pack – as part of the
appropriate distribution
Task Sequence
MDT Solution Pack
already configured. All
correctly as the path to the script location is maintained throughout the
Install multiple applications
where MDT will attempt to install all applications from a single task.
UID used within the script, is different for each installation and a mismatch
to install the staged applications from individual tasks,
title, and select the

MDT Solution Pack for a Healthcare Environment
Version 1.0.0.0
The Description field for each
as shown in Figure 10. When the correct application has been selected from the drop
click Apply. Complete this for all
Figure 10: Windows XP Application Installation Task Selection
4.2.3 Configuring the Windows Server 2003 Solution
The Windows Server 2003 solution contains a preconfigured task sequence for creating a
build with a number of server applications installed.
4.2.3.1 Gathering and Staging Installation Files
The CDs, DVDs or download sites containing the installation files for the product
should be provided after the Windows
Pack. The files from each of the installation
folder in the MDT 2008 Deployment P
Note
A README.TXT file exists in each of the
information on the files that should be located in the applications
available and installed as part of
4.2.3.2 Adjusting MDT Solution Pack Configuration Files
To successfully use the MDT Solution Pack
must be changed in the CustomSettings.ini and Bootstrap.ini files added by
Pack.
The CustomSettings.ini file needs to be updated via the properties of
Deployment Point. The Rules
(<>) need to be updated for the environment
MDT Solution Pack for a Healthcare Environment Administrators Guide
1.0.0.0 Baseline
field for each INSTALL: task provides information on which application to select
. When the correct application has been selected from the drop
omplete this for all INSTALL: tasks in the MDT Solution Pack group and subgroups.
Application Installation Task Selection
Configuring the Windows Server 2003 Solution
solution contains a preconfigured task sequence for creating a
with a number of server applications installed.
Gathering and Staging Installation Files
sites containing the installation files for the product
after the Windows Server 2003 solution has been installed by
. The files from each of the installation sources should be copied to the pre
folder in the MDT 2008 Deployment Point.
README.TXT file exists in each of the pre-staged application folders, which provides additional
information on the files that should be located in the applications’ source folders. This can then be made
available and installed as part of MDT Solution Pack.
Adjusting MDT Solution Pack Configuration Files
MDT Solution Pack for deploying a Windows Server 2003 build, entries
must be changed in the CustomSettings.ini and Bootstrap.ini files added by the
gs.ini file needs to be updated via the properties of the MDT_SP_LAB
tab displays the CustomSettings.ini file: the fields with angle brackets
(<>) need to be updated for the environment in which the MDT Solution Pack will be used.
Prepared by Microsoft
Page 27
application to select
. When the correct application has been selected from the drop-down list,
group and subgroups.
solution contains a preconfigured task sequence for creating a server
sites containing the installation files for the products to be installed
solution has been installed by the MDT Solution
pre-staged application
application folders, which provides additional
. This can then be made
for deploying a Windows Server 2003 build, entries
the MDT Solution
MDT_SP_LAB
the fields with angle brackets
will be used.

MDT Solution Pack for a Healthcare Environment
Version 1.0.0.0
The text below is the default CustomSettings.ini file as supplied for Windows Server 2003 by
MDT Solution Pack. The ComputerName=
configuration.
[Settings]
Priority=Default
Properties=_SMSTSOrgName,
OSDAdapter0Gateways,OSDAdapter0IPAddressList,OSDAdapter0SubnetMask,
Server_AdminAccount, Server_AdminPassword, NewDomainDNSName, DomainNetBIOSName,
Root_DN, DHCP_ScopeIP, DHCP_ScopeRangeStart, DHCP_ScopeRangeEnd, SMTP_Domain,
ZTP_AdminAccount, ZTP_AdminPassword, ZTP_ServiceAccount, ZTP_ServicePassword,
ZTP_AdminEmail, BTS_ServiceAccount, BTS_ServicePassword,
ConfigMgr_PID,ConfigMgr_SiteCode, ConfigMgr_SiteName,ConfigMgr_InstallDir,
ConfigMgr_SWDAccount, ConfigMgr_SWDAccountPwd, ConfigMgr_NetAccount
ConfigMgr_NetAccountPwd, ConfigMgr_SiteSecurityMode, SCOM_Management_Group,
SCOM_Admin_Role_Group,SCOM_DBServer, SCOM_ActionsUser, SCOM_ActionsPassword,
SCOM_DB_SERVER, SCOM_SDK_Account, SCOM_SDK_Password, WSUS_ContentDir
[Default]
OSInstall=Y
_SMSTSOrgName=MDT Solution Pack
UserDataLocation=NETWORK
SkipAppsOnUpgrade=YES
SkipCapture=YES
SkipAdminPassword=YES
SkipProductKey=YES
SkipApplications=YES
SkipTaskSequence=NO
SkipComputerName=YES
SkipDomainMembership=YES
SkipUserData=YES
SkipComputerBackup=YES
SkipTimeZone=YES
DeploymentType=NEWCOMPUTER
SkipDeploymentType=YES
SkipSummary=YES
ComputerName=<ENTER SERVER NAME>
'// NIC configuration
OSDAdapter0Gateways=<ENTER NETWORK ADAPTER 0 DEFAULT GATEWAY
OSDAdapter0IPAddressList=<ENTER NETWORK ADAPTER 0 IP ADDRESS
OSDAdapter0SubnetMask=<ENTER NETWORK ADAPTER 0 SUBNET MASK
'// DC Promo information
Server_AdminAccount=<ENTER DOMAIN ACCOUNT
Server_AdminPassword=<ENTER DOMAIN PASSWORD
MDT Solution Pack for a Healthcare Environment Administrators Guide
1.0.0.0 Baseline
The text below is the default CustomSettings.ini file as supplied for Windows Server 2003 by
ComputerName= field is an example of a setting that requires
OrgName,
OSDAdapter0Gateways,OSDAdapter0IPAddressList,OSDAdapter0SubnetMask,
Server_AdminAccount, Server_AdminPassword, NewDomainDNSName, DomainNetBIOSName,
Root_DN, DHCP_ScopeIP, DHCP_ScopeRangeStart, DHCP_ScopeRangeEnd, SMTP_Domain,
_AdminPassword, ZTP_ServiceAccount, ZTP_ServicePassword,
ZTP_AdminEmail, BTS_ServiceAccount, BTS_ServicePassword,
ConfigMgr_PID,ConfigMgr_SiteCode, ConfigMgr_SiteName,ConfigMgr_InstallDir,
ConfigMgr_SWDAccount, ConfigMgr_SWDAccountPwd, ConfigMgr_NetAccount
ConfigMgr_NetAccountPwd, ConfigMgr_SiteSecurityMode, SCOM_Management_Group,
SCOM_Admin_Role_Group,SCOM_DBServer, SCOM_ActionsUser, SCOM_ActionsPassword,
SCOM_DB_SERVER, SCOM_SDK_Account, SCOM_SDK_Password, WSUS_ContentDir
MDT Solution Pack Windows Server 2003 Build
DeploymentType=NEWCOMPUTER
ComputerName=<ENTER SERVER NAME>
OSDAdapter0Gateways=<ENTER NETWORK ADAPTER 0 DEFAULT GATEWAY - IE 192.168.1.1>
0IPAddressList=<ENTER NETWORK ADAPTER 0 IP ADDRESS - IE 192.168.1.2>
OSDAdapter0SubnetMask=<ENTER NETWORK ADAPTER 0 SUBNET MASK - IE 255.255.255.0>
Server_AdminAccount=<ENTER DOMAIN ACCOUNT – IE Administrator>
=<ENTER DOMAIN PASSWORD – IE P@ssw0rd>
Prepared by Microsoft
Page 28
The text below is the default CustomSettings.ini file as supplied for Windows Server 2003 by the
field is an example of a setting that requires
OSDAdapter0Gateways,OSDAdapter0IPAddressList,OSDAdapter0SubnetMask,
Server_AdminAccount, Server_AdminPassword, NewDomainDNSName, DomainNetBIOSName,
Root_DN, DHCP_ScopeIP, DHCP_ScopeRangeStart, DHCP_ScopeRangeEnd, SMTP_Domain,
_AdminPassword, ZTP_ServiceAccount, ZTP_ServicePassword,
ConfigMgr_PID,ConfigMgr_SiteCode, ConfigMgr_SiteName,ConfigMgr_InstallDir,
ConfigMgr_SWDAccount, ConfigMgr_SWDAccountPwd, ConfigMgr_NetAccount,
ConfigMgr_NetAccountPwd, ConfigMgr_SiteSecurityMode, SCOM_Management_Group,
SCOM_Admin_Role_Group,SCOM_DBServer, SCOM_ActionsUser, SCOM_ActionsPassword,
SCOM_DB_SERVER, SCOM_SDK_Account, SCOM_SDK_Password, WSUS_ContentDir
IE 192.168.1.1>
IE 192.168.1.2>
IE 255.255.255.0>

MDT Solution Pack for a Healthcare Environment
Version 1.0.0.0
Root_DN=dc=<ENTER DOMAIN
NewDomainDNSName=<ENTER DOMAIN
DomainNetBIOSName=<ENTER DOMAIN
'// DHCP Settings
DHCP_ScopeIP=<ENTER DCHP SCOPE IP
DHCP_ScopeRangeStart=<ENTER DHCP SCOPE START
DHCP_ScopeRangeEnd=<ENTER DHCP SCOPE END
'// SMTP Server
SMTP_Domain=%NewDomainDNSName%
'// ConfigMgr Server
ConfigMgr_PID=<ENTER CONFIGMGR PID
ConfigMgr_SiteCode=CEN
ConfigMgr_SiteName=Central primary site
ConfigMgr_InstallDir=D:\ConfigMgr
ConfigMgr_SWDAccount=SVC_SDWAcc
ConfigMgr_NETAccount=SVC_NETAcc
ConfigMgr_SWDAccountPwd=<ENTER REQUIRED PASSWORD
ConfigMgr_NETAccountPwd=<ENTER REQUIRED PASSWORD
ConfigMgr_SiteSecurityMode=Mixed
'// SCOM
SCOM_Management_Group=<ENTER SCOM MANAGEMENT GROUP
SCOM_Admin_Role_Group=Administrators
SCOM_DBServer=%ComputerName%
SCOM_ActionsUser=SCOMActions
SCOM_ActionsPassword=<ENTER REQUIRED PASSWORD
SCOM_SDK_Account=SCOMSDK
SCOM_SDK_Password=<ENTER REQUIRED PASSWORD
'// WSUS
WSUS_ContentDir=D:\WSUS
MDT Solution Pack for a Healthcare Environment Administrators Guide
1.0.0.0 Baseline
Root_DN=dc=<ENTER DOMAIN - IE Contoso>,dc=com
NewDomainDNSName=<ENTER DOMAIN - IE Contoso>.com
DomainNetBIOSName=<ENTER DOMAIN - IE Contoso>
DHCP_ScopeIP=<ENTER DCHP SCOPE IP - IE 192.168.1.0>
ScopeRangeStart=<ENTER DHCP SCOPE START - IE 192.168.1.100>
DHCP_ScopeRangeEnd=<ENTER DHCP SCOPE END - IE 192.168.1.200>
SMTP_Domain=%NewDomainDNSName%
ConfigMgr_PID=<ENTER CONFIGMGR PID - IE AAAAA-BBBBB-CCCCC-DDDDD-EEEEE>
ConfigMgr_SiteName=Central primary site
ConfigMgr
ConfigMgr_SWDAccount=SVC_SDWAcc
ConfigMgr_NETAccount=SVC_NETAcc
ConfigMgr_SWDAccountPwd=<ENTER REQUIRED PASSWORD – IE P@ssw0rd>
ConfigMgr_NETAccountPwd=<ENTER REQUIRED PASSWORD – IE P@ssw0rd>
ConfigMgr_SiteSecurityMode=Mixed
SCOM_Management_Group=<ENTER SCOM MANAGEMENT GROUP - IE Contoso>
SCOM_Admin_Role_Group=Administrators
SCOM_DBServer=%ComputerName%
SCOMActions
SCOM_ActionsPassword=<ENTER REQUIRED PASSWORD – IE P@ssw0rd>
SCOM_SDK_Password=<ENTER REQUIRED PASSWORD – IE P@ssw0rd>
Prepared by Microsoft
Page 29
EEEEE>

MDT Solution Pack for a Healthcare Environment
Version 1.0.0.0
The Bootstrap.ini file also needs to be updated via the properties
Point. On the Rules tab, click the
Notepad. As with the CustomSettings.ini file, various fields need to
in which the MDT Solution Pack
The text below is the default B
installation process, the DeployRoot field will be pre
share:
[Settings]
Priority=Default
[Default]
DeployRoot=<ENTER DEPLOYMENT ROOT
SkipBDDWelcome=YES
UserID=<ENTER CONNECTION ACCOUNT
UserDomain=<ENTER ACCOUNT DOMAIN
UserPassword=<ENTER ACCOUNT PASSWORD
SkipLocaleSelection=YES
KeyboardLocale=0809:00000809
4.2.3.3 Adjusting the MDT Solution Pack
Sequence
The task sequence that is imported into the
will have a number of pre-staged
configured. All script-based tasks will
throughout the import. However, each application installation task will revert to
applications setting as shown in
a single task. This is because the GUID used within the script, is different for each installation and a
mismatch occurs.
Figure 11: Windows Server 2003 Application Installation Task
To reset the imported task sequence
open each task in the MDT Solution Pack
correct application from the Application to install
MDT Solution Pack for a Healthcare Environment Administrators Guide
1.0.0.0 Baseline
ootstrap.ini file also needs to be updated via the properties of the MDT_SP_LAB
click the Edit Bootstrap.ini button to open the Bootstrap.ini file
As with the CustomSettings.ini file, various fields need to be updated for the environment
MDT Solution Pack will be used.
Bootstrap.ini file as supplied by the MDT Solution Pack
installation process, the DeployRoot field will be pre-populated with the appropriate distribution
<ENTER DEPLOYMENT ROOT - IE \\SERVER\Share>
<ENTER CONNECTION ACCOUNT - IE Administrator>
<ENTER ACCOUNT DOMAIN - IE LAB>
<ENTER ACCOUNT PASSWORD - IE P@ssw0rd>
KeyboardLocale=0809:00000809
MDT Solution Pack Windows Server 2003
that is imported into the Deployment Workbench from the MDT Solution Pack
staged applications and scripts for Windows Server 200
based tasks will run correctly as the path to the script location is maintained
throughout the import. However, each application installation task will revert to
own in Figure 11, where MDT will attempt to install all applications from
a single task. This is because the GUID used within the script, is different for each installation and a
Application Installation Task
To reset the imported task sequence in order to install the staged applications from individual tasks,
MDT Solution Pack group with INSTALL: in the task title
Application to install drop-down list.
Prepared by Microsoft
Page 30
MDT_SP_LAB Deployment
the Bootstrap.ini file in
be updated for the environment
MDT Solution Pack – as part of the
populated with the appropriate distribution
Server 2003 Task
MDT Solution Pack
Server 2003 already
correctly as the path to the script location is maintained
throughout the import. However, each application installation task will revert to the Install multiple
where MDT will attempt to install all applications from
a single task. This is because the GUID used within the script, is different for each installation and a
to install the staged applications from individual tasks,
title, and select the

MDT Solution Pack for a Healthcare Environment
Version 1.0.0.0
The Description field for each
as shown in Figure 12. When the correct application has been selected from the drop
click Apply. Complete this for all
Figure 12: Windows Server 2003 Application Installation Task Selection
4.2.4 Configuring the Windows Server 2008 Solution
The Windows Server 2008 solution contains a preconfigured task sequence for creating a
build with a number of server applications installed.
4.2.4.1 Gathering and Staging Installation Files
The CDs, DVDs or download sites containing the installation files for the product
should be provided after the Windows
Pack. The files from each of the installation
folder in the MDT 2008 Deployment P
Note
A README.TXT file exists in each of the
information on the files that should be located in the applications
available and installed as part of
4.2.4.2 Adjusting MDT Solution Pack Configuration F
To successfully use the MDT Solution Pack
must be changed in the CustomSettings.ini and Bootstrap.ini files added by
Pack.
The CustomSettings.ini file needs to be updated via the prop
Deployment Point. The Rules
(<>) need to be updated for the environment
MDT Solution Pack for a Healthcare Environment Administrators Guide
1.0.0.0 Baseline
field for each INSTALL: task provides information on which application to select
. When the correct application has been selected from the drop
omplete this for all INSTALL: tasks in the MDT Solution Pack group and subgroups.
Application Installation Task Selection
Configuring the Windows Server 2008 Solution
solution contains a preconfigured task sequence for creating a
with a number of server applications installed.
and Staging Installation Files
sites containing the installation files for the product
after the Windows Server 2008 solution has been installed by
the installation sources should be copied to the pre
folder in the MDT 2008 Deployment Point.
A README.TXT file exists in each of the pre-staged application folders, which provides additional
information on the files that should be located in the applications’ source folders. This can then be made
available and installed as part of the MDT Solution Pack.
Adjusting MDT Solution Pack Configuration Files
MDT Solution Pack for deploying a Windows Server 200
must be changed in the CustomSettings.ini and Bootstrap.ini files added by the
The CustomSettings.ini file needs to be updated via the properties of the MDT_SP_LAB
tab displays the CustomSettings.ini file: the fields with angle brackets
(<>) need to be updated for the environment in which the MDT Solution Pack will be used.
Prepared by Microsoft
Page 31
task provides information on which application to select
. When the correct application has been selected from the drop-down list,
group and subgroups.
solution contains a preconfigured task sequence for creating a server
sites containing the installation files for the products to be installed
solution has been installed by the MDT Solution
pre-staged application
application folders, which provides additional
. This can then be made
for deploying a Windows Server 2008 build, entries
the MDT Solution
MDT_SP_LAB
the fields with angle brackets
will be used.

MDT Solution Pack for a Healthcare Environment
Version 1.0.0.0
The text below is the default CustomSetti
MDT Solution Pack. The ComputerName=
configuration.
[Settings]
Priority=Default
Properties=_SMSTSOrgName,
OSDAdapter0Gateways,OSDAdapter0IPAddressList,OSDAdapter0SubnetMask,
Server_AdminAccount, Server_AdminPassword, NewDomainDNSName, DomainNetBIOSName,
Root_DN, DHCP_ScopeIP, DHCP_ScopeRangeStart, DHCP_ScopeRangeEnd, SMTP_Domain,
ZTP_AdminAccount, ZTP_AdminP
ZTP_AdminEmail, BTS_ServiceAccount, BTS_ServicePassword,
ConfigMgr_PID,ConfigMgr_SiteCode, ConfigMgr_SiteName,ConfigMgr_InstallDir,
ConfigMgr_SWDAccount, ConfigMgr_SWDAccountPwd, ConfigMgr_NetAccount,
ConfigMgr_NetAccountPwd, ConfigMgr_SiteSecurityMode, SCOM_Management_Group,
SCOM_Admin_Role_Group,SCOM_DBServer, SCOM_ActionsUser, SCOM_ActionsPassword,
SCOM_DB_SERVER, SCOM_SDK_Account, SCOM_SDK_Password, WSUS_ContentDir
[Default]
OSInstall=Y
_SMSTSOrgName=MDT Solution Pack
UserDataLocation=NETWORK
SkipAppsOnUpgrade=YES
SkipCapture=YES
SkipAdminPassword=YES
SkipProductKey=YES
SkipApplications=YES
SkipTaskSequence=NO
SkipComputerName=YES
SkipDomainMembership=YES
SkipUserData=YES
SkipComputerBackup=YES
SkipTimeZone=YES
DeploymentType=NEWCOMPUTER
SkipDeploymentType=YES
SkipSummary=YES
ComputerName=<ENTER SERVER NAME>
'// NIC configuration
OSDAdapter0Gateways=<ENTER NETWORK ADAPTER 0 DEFAULT GATEWAY
OSDAdapter0IPAddressList=<ENTER NETWORK ADAPTER 0 IP ADDRESS
OSDAdapter0SubnetMask=<ENTER NETWORK ADAPTER 0 SUBNET MASK
'// DC Promo information
Server_AdminAccount=<ENTER DOMAIN ACCOUNT
Server_AdminPassword=<ENT
MDT Solution Pack for a Healthcare Environment Administrators Guide
1.0.0.0 Baseline
The text below is the default CustomSettings.ini file as supplied for Windows Server 200
ComputerName= field is an example of a setting that requires
,
OSDAdapter0Gateways,OSDAdapter0IPAddressList,OSDAdapter0SubnetMask,
Server_AdminAccount, Server_AdminPassword, NewDomainDNSName, DomainNetBIOSName,
Root_DN, DHCP_ScopeIP, DHCP_ScopeRangeStart, DHCP_ScopeRangeEnd, SMTP_Domain,
ZTP_AdminAccount, ZTP_AdminPassword, ZTP_ServiceAccount, ZTP_ServicePassword,
ZTP_AdminEmail, BTS_ServiceAccount, BTS_ServicePassword,
ConfigMgr_PID,ConfigMgr_SiteCode, ConfigMgr_SiteName,ConfigMgr_InstallDir,
ConfigMgr_SWDAccount, ConfigMgr_SWDAccountPwd, ConfigMgr_NetAccount,
gMgr_NetAccountPwd, ConfigMgr_SiteSecurityMode, SCOM_Management_Group,
SCOM_Admin_Role_Group,SCOM_DBServer, SCOM_ActionsUser, SCOM_ActionsPassword,
SCOM_DB_SERVER, SCOM_SDK_Account, SCOM_SDK_Password, WSUS_ContentDir
DT Solution Pack Windows Server 2008 Build
DeploymentType=NEWCOMPUTER
ComputerName=<ENTER SERVER NAME>
OSDAdapter0Gateways=<ENTER NETWORK ADAPTER 0 DEFAULT GATEWAY - IE 192.168.1.1>
dressList=<ENTER NETWORK ADAPTER 0 IP ADDRESS - IE 192.168.1.2>
OSDAdapter0SubnetMask=<ENTER NETWORK ADAPTER 0 SUBNET MASK - IE 255.255.255.0>
Server_AdminAccount=<ENTER DOMAIN ACCOUNT – IE Administrator>
Server_AdminPassword=<ENTER DOMAIN PASSWORD – IE P@ssw0rd>
Prepared by Microsoft
Page 32
ngs.ini file as supplied for Windows Server 2008 by the
field is an example of a setting that requires
OSDAdapter0Gateways,OSDAdapter0IPAddressList,OSDAdapter0SubnetMask,
Server_AdminAccount, Server_AdminPassword, NewDomainDNSName, DomainNetBIOSName,
Root_DN, DHCP_ScopeIP, DHCP_ScopeRangeStart, DHCP_ScopeRangeEnd, SMTP_Domain,
assword, ZTP_ServiceAccount, ZTP_ServicePassword,
ConfigMgr_PID,ConfigMgr_SiteCode, ConfigMgr_SiteName,ConfigMgr_InstallDir,
ConfigMgr_SWDAccount, ConfigMgr_SWDAccountPwd, ConfigMgr_NetAccount,
gMgr_NetAccountPwd, ConfigMgr_SiteSecurityMode, SCOM_Management_Group,
SCOM_Admin_Role_Group,SCOM_DBServer, SCOM_ActionsUser, SCOM_ActionsPassword,
SCOM_DB_SERVER, SCOM_SDK_Account, SCOM_SDK_Password, WSUS_ContentDir
IE 192.168.1.1>
IE 192.168.1.2>
IE 255.255.255.0>

MDT Solution Pack for a Healthcare Environment
Version 1.0.0.0
Root_DN=dc=<ENTER DOMAIN
NewDomainDNSName=<ENTER DOMAIN
DomainNetBIOSName=<ENTER DOMAIN
'// DHCP Settings
DHCP_ScopeIP=<ENTER DCHP SCOPE IP
DHCP_ScopeRangeStart=<ENTER DHCP SCOPE START
DHCP_ScopeRangeEnd=<ENTER DHCP SCOPE END
'// SMTP Server
SMTP_Domain=%NewDomainDNSName%
'// ConfigMgr Server
ConfigMgr_PID=<ENTER CONFIGMGR PID
ConfigMgr_SiteCode=CEN
ConfigMgr_SiteName=Central primary site
ConfigMgr_InstallDir=D:\ConfigMgr
ConfigMgr_SWDAccount=SVC_SDWAcc
ConfigMgr_NETAccount=SVC_NETAcc
ConfigMgr_SWDAccountPwd=<ENTER REQUIRED PASSWORD
ConfigMgr_NETAccountPwd=<ENTER
ConfigMgr_SiteSecurityMode=Mixed
'// SCOM
SCOM_Management_Group=<ENTER SCOM MANAGEMENT GROUP
SCOM_Admin_Role_Group=Administrators
SCOM_DBServer=%ComputerName%
SCOM_ActionsUser=SCOMActions
SCOM_ActionsPassword=<ENTER REQUIRED PASSWORD
SCOM_SDK_Account=SCOMSDK
SCOM_SDK_Password=<ENTER REQUIRED PASSWORD
'// WSUS
WSUS_ContentDir=D:\WSUS
MDT Solution Pack for a Healthcare Environment Administrators Guide
1.0.0.0 Baseline
Root_DN=dc=<ENTER DOMAIN - IE Contoso>,dc=com
NewDomainDNSName=<ENTER DOMAIN - IE Contoso>.com
DomainNetBIOSName=<ENTER DOMAIN - IE Contoso>
DHCP_ScopeIP=<ENTER DCHP SCOPE IP - IE 192.168.1.0>
RangeStart=<ENTER DHCP SCOPE START - IE 192.168.1.100>
DHCP_ScopeRangeEnd=<ENTER DHCP SCOPE END - IE 192.168.1.200>
SMTP_Domain=%NewDomainDNSName%
ConfigMgr_PID=<ENTER CONFIGMGR PID - IE AAAAA-BBBBB-CCCCC-DDDDD-EEEEE>
ConfigMgr_SiteName=Central primary site
ConfigMgr
ConfigMgr_SWDAccount=SVC_SDWAcc
ConfigMgr_NETAccount=SVC_NETAcc
ConfigMgr_SWDAccountPwd=<ENTER REQUIRED PASSWORD – IE P@ssw0rd>
ConfigMgr_NETAccountPwd=<ENTER REQUIRED PASSWORD – IE P@ssw0rd>
ConfigMgr_SiteSecurityMode=Mixed
SCOM_Management_Group=<ENTER SCOM MANAGEMENT GROUP - IE Contoso>
SCOM_Admin_Role_Group=Administrators
SCOM_DBServer=%ComputerName%
SCOM_ActionsUser=SCOMActions
d=<ENTER REQUIRED PASSWORD – IE P@ssw0rd>
SCOM_SDK_Password=<ENTER REQUIRED PASSWORD – IE P@ssw0rd>
Prepared by Microsoft
Page 33
EEEEE>

MDT Solution Pack for a Healthcare Environment
Version 1.0.0.0
The Bootstrap.ini file also needs to be updated via the properties of
Point. On the Rules tab, click the
Notepad. As with the CustomSettings.ini file, various fields need to
in which the MDT Solution Pack
The text below is the default B
installation process, the DeployRoot field will be pre
share:
[Settings]
Priority=Default
[Default]
DeployRoot=<ENTER DEPLOYMENT ROOT
SkipBDDWelcome=YES
UserID=<ENTER CONNECTION ACCOUNT
UserDomain=<ENTER ACCOUNT DOMAIN
UserPassword=<ENTER ACCOUNT PASSWORD
SkipLocaleSelection=YES
KeyboardLocale=0809:00000
4.2.4.3 Adjusting the MDT Solution Pack
Sequence
The task sequence that is imported into the
have a number of pre-staged applications and scripts for Windows
All script-based tasks will run correctly as the path to the script location is maintained throughout
the import. However, each application installation task will revert to
applications setting as shown in
a single task. This is because the GUID used within the script, is different for each installation and a
mismatch occurs.
Figure 13: Windows Server 2008 Application Installation Task
To reset the imported task sequence
open each task in the MDT Solution Pack
correct application from the Application to install
MDT Solution Pack for a Healthcare Environment Administrators Guide
1.0.0.0 Baseline
ootstrap.ini file also needs to be updated via the properties of the MDT_SP_LAB
click the Edit Bootstrap.ini button to open the Bootstrap.ini file
As with the CustomSettings.ini file, various fields need to be updated for the environment
MDT Solution Pack will be used.
Bootstrap.ini file as supplied by the MDT Solution Pack
installation process, the DeployRoot field will be pre-populated with the appropriate distribution
DEPLOYMENT ROOT - IE \\SERVER\Share>
<ENTER CONNECTION ACCOUNT - IE Administrator>
<ENTER ACCOUNT DOMAIN - IE LAB>
<ENTER ACCOUNT PASSWORD - IE P@ssw0rd>
KeyboardLocale=0809:00000809
MDT Solution Pack Windows Server 2008
that is imported into the Deployment Workbench from MDT Solution Pack
applications and scripts for Windows Server 2008
correctly as the path to the script location is maintained throughout
the import. However, each application installation task will revert to the Install multiple
as shown in Figure 13, where MDT will attempt to install all applications from
a single task. This is because the GUID used within the script, is different for each installation and a
Application Installation Task
To reset the imported task sequence in order to install the staged applications from individual tasks,
MDT Solution Pack group with INSTALL: in the task title, and select the
Application to install drop-down list.
Prepared by Microsoft
Page 34
MDT_SP_LAB Deployment
the Bootstrap.ini file in
be updated for the environment
MDT Solution Pack – as part of the
populated with the appropriate distribution
Server 2008 Task
MDT Solution Pack will
Server 2008 already configured.
correctly as the path to the script location is maintained throughout
Install multiple
where MDT will attempt to install all applications from
a single task. This is because the GUID used within the script, is different for each installation and a
to install the staged applications from individual tasks,
title, and select the

MDT Solution Pack for a Healthcare Environment
Version 1.0.0.0
The Description field for each
as shown in Figure 14. When the correct application has been selected from the drop
click Apply. Complete this for all
Figure 14: Windows Server 2008 Application Installation Task Selection
4.2.5 Windows Server
The Windows Server 2003 and Windows Server 2008 solutions supplied as part of
Solution Pack include the installation command scripts for the following a
� Microsoft® SQL Server
� SQL Server 2005 Service Pack 2
� Internet Information Services 6
� Internet Information Services 7
� Microsoft® Visual Studio
� Windows PowerShell®
� User State Migration Tool version 3.01
� Windows® SharePoint
®
� Microsoft® Windows Server Update Services 3.0
� Application Compatibility Toolkit 5.0
� Office Migration Planning Manager
� Windows Vista Hardware Assessment 2.1
3 The installation command scripts for Windows SharePoint Services with Service Pack 2 are only included for Windows
Server 2003.
MDT Solution Pack for a Healthcare Environment Administrators Guide
1.0.0.0 Baseline
field for each INSTALL: task provides information on which application to select
. When the correct application has been selected from the drop
omplete this for all INSTALL: tasks in the MDT Solution Pack group and subgroups.
Application Installation Task Selection
Windows Server-Based Applications
The Windows Server 2003 and Windows Server 2008 solutions supplied as part of
include the installation command scripts for the following applications
SQL Server® 2005
SQL Server 2005 Service Pack 2
Internet Information Services 6.0 (for Windows Server 2003)
Internet Information Services 7.0 (for Windows Server 2008)
Visual Studio® 2005 Professional
® 1.0
User State Migration Tool version 3.01
® Services with Service Pack 2
3
Windows Server Update Services 3.0
Application Compatibility Toolkit 5.0
Office Migration Planning Manager
Windows Vista Hardware Assessment 2.1
The installation command scripts for Windows SharePoint Services with Service Pack 2 are only included for Windows
Prepared by Microsoft
Page 35
task provides information on which application to select
. When the correct application has been selected from the drop-down list,
group and subgroups.
The Windows Server 2003 and Windows Server 2008 solutions supplied as part of the MDT
pplications:
The installation command scripts for Windows SharePoint Services with Service Pack 2 are only included for Windows

MDT Solution Pack for a Healthcare Environment
Version 1.0.0.0
Important
These server-based application installation scripts are included for use within a test environment only and
provide a mechanism to silently install these applications in their default state.
Note
It should be noted that the installation of
SP2 being installed4.
While the above application installation scripts are provided within
default installation of MDT 2008 provides the ability to select server roles and features for
installation via the task sequence. These roles and features are available for sel
Task Sequence properties and selecting
Sequence tab.
At a high level, the following roles are available for selection:
� Active Directory Certificate Services
� Active Directory Domain Services
� Active Directory Federation Services
� Active Directory Lightweight
� Active Directory Rights Management Services
� Application Server
� DHCP Server
� DNS Server
� Fax Server
� File Services
� Hyper-V™
� Network Policy and Access Services
� Print Services
� Terminal Services
� UDDI Services
� Web Server (IIS)
� Microsoft® Windows
® Deployment Services
Where server roles have multiple subcomponents, it is possible to individually select these by
expanding the role name within the Task Sequence properties. For example, Web Server (IIS) has
three subcomponents, Web Server, Mana
subcomponents also has their own separate subcomponents and
roles can be defined to a detailed level.
The following sections provide some brief information on the c
deployment of SQL Server and IIS.
4 The applications listed in this note ar
5 For more information on Active Directory, see the
http://www.microsoft.com/industry/healthcare/technology/hpo/security/activedirecto
MDT Solution Pack for a Healthcare Environment Administrators Guide
1.0.0.0 Baseline
based application installation scripts are included for use within a test environment only and
provide a mechanism to silently install these applications in their default state.
the installation of Windows SharePoint Services is dependent on SQL Server 2005
While the above application installation scripts are provided within the MDT Solution Pack
default installation of MDT 2008 provides the ability to select server roles and features for
equence. These roles and features are available for sel
Task Sequence properties and selecting Add > Roles > Install Roles and Features
At a high level, the following roles are available for selection:
Active Directory Certificate Services5
Active Directory Domain Services
Active Directory Federation Services
Active Directory Lightweight Directory Services
Active Directory Rights Management Services
Network Policy and Access Services
Deployment Services
Where server roles have multiple subcomponents, it is possible to individually select these by
expanding the role name within the Task Sequence properties. For example, Web Server (IIS) has
three subcomponents, Web Server, Management Tools and FTP Publishing Service. Each of these
their own separate subcomponents and, as such, the installation of server
roles can be defined to a detailed level.
The following sections provide some brief information on the current best practice approach on the
deployment of SQL Server and IIS.
in this note are not part of the Enterprise Agreement and, as such, require purchas
For more information on Active Directory, see the Active Directory Design Guide {R4}:
http://www.microsoft.com/industry/healthcare/technology/hpo/security/activedirectory.aspx
Prepared by Microsoft
Page 36
based application installation scripts are included for use within a test environment only and
nt on SQL Server 2005
MDT Solution Pack, the
default installation of MDT 2008 provides the ability to select server roles and features for
equence. These roles and features are available for selection through the
stall Roles and Features from the Task
Where server roles have multiple subcomponents, it is possible to individually select these by
expanding the role name within the Task Sequence properties. For example, Web Server (IIS) has
gement Tools and FTP Publishing Service. Each of these
the installation of server
urrent best practice approach on the
require purchasing separately.

MDT Solution Pack for a Healthcare Environment
Version 1.0.0.0
4.2.5.1 SQL Server Best Practices
The points below highlight some of the best practices to be aware of when deploying SQL Server
� Install only the features that are specifically required
area of attack’. If additional features are required later
when required
� When deciding on the SQL Server Service Accounts
privilege. It should not be neces
� Where possible, use the Windows Authentication mode for authentication. Windows
Authentication is more secure than Mixed Mode Authentication
� Ensure the latest service packs or security patches are i
Windows Server Update Services (WSUS), Microsoft Baseline Security Analyzer (MBSA)
2.0 (see the MBSA Security TechCenter
� Use multiple disks where possible
performance
� Always place log files on R
disk sets for better performance and reliability
to the article entitled RAID Levels and SQL Serve
Table 4 contains links to more information on SQL Server 2005
organisation’s IT Administrator should review the information to ensur
using current best practice.
Document
Title Description
SQL Server
2005 Security
Best Practices
This document contains detailed information on securing SQL
Server 2005 according to current best practice. The IT Administrator
should review the information in this document and apply any
recommendations that apply to the
implementation of SQL Server 2005.
Storage Top 10
Best Practices
Proper configuration of
and operation of SQL Server. This article covers the top 10 current
best practices to consider when deploying the disk subsystem for a
SQL Server 2005 server.
SQL Server
Best Practices
This site contains links to a number of useful documents and articles
relating to SQL Server 2005 curre
SQL Server
TechCenter
This is the main TechNet
contains links to a wealth of information regarding SQL Server 2005
Table 4: SQL Server 2005 Best Practices – Additiona
6 Microsoft Baseline Security Analyzer
7 Microsoft Update {R6}: http://www.update.microsoft.com/
8 RAID Levels and SQL Server {R7}:
MDT Solution Pack for a Healthcare Environment Administrators Guide
1.0.0.0 Baseline
Best Practices
The points below highlight some of the best practices to be aware of when deploying SQL Server
Install only the features that are specifically required. This reduces any potential ‘
’. If additional features are required later, they can be installed and enabled
When deciding on the SQL Server Service Accounts, always use the principle of least
privilege. It should not be necessary to use an account that has Administrator permissions
Where possible, use the Windows Authentication mode for authentication. Windows
Authentication is more secure than Mixed Mode Authentication
Ensure the latest service packs or security patches are installed using technologies such as
Windows Server Update Services (WSUS), Microsoft Baseline Security Analyzer (MBSA)
see the MBSA Security TechCenter6 Web page) or Microsoft Update
Use multiple disks where possible because the more spindles used, the better the
Always place log files on Redundant Array of Independent Disks (RAID)
ets for better performance and reliability. For more information on RAID levels, refer
RAID Levels and SQL Server8
contains links to more information on SQL Server 2005 best practices. The
IT Administrator should review the information to ensure SQL Server is deployed
Link
This document contains detailed information on securing SQL
Server 2005 according to current best practice. The IT Administrator
should review the information in this document and apply any
recommendations that apply to the healthcare organisation’s
entation of SQL Server 2005.
http://www.microsoft.com/technet/prodtechnol
/sql/2005/sql2005secbestpract.mspx
Proper configuration of storage is critical to optimum performance
and operation of SQL Server. This article covers the top 10 current
best practices to consider when deploying the disk subsystem for a
SQL Server 2005 server.
http://www.microsoft.com/technet/prodtechnol
/sql/bestpractice/storage
This site contains links to a number of useful documents and articles
relating to SQL Server 2005 current best practice.
http://technet.microsoft.com/en
us/sqlserver/bb331794.aspx
This is the main TechNet Web site for SQL Server 2005 and
wealth of information regarding SQL Server 2005.
http://technet.microsoft.com/en
us/sqlserver/default.aspx
Additional Information
Microsoft Baseline Security Analyzer {R5}: www.microsoft.com/technet/security/tools/mbsahome.mspx
http://www.update.microsoft.com/
: http://msdn2.microsoft.com/en-us/library/ms190764(SQL.90).aspx
Prepared by Microsoft
Page 37
The points below highlight some of the best practices to be aware of when deploying SQL Server:
reduces any potential ‘surface
they can be installed and enabled
always use the principle of least
sary to use an account that has Administrator permissions
Where possible, use the Windows Authentication mode for authentication. Windows
nstalled using technologies such as
Windows Server Update Services (WSUS), Microsoft Baseline Security Analyzer (MBSA)
or Microsoft Update7
the better the
isks (RAID) 1+0 (or RAID 1)
For more information on RAID levels, refer
ractices. The healthcare
e SQL Server is deployed
http://www.microsoft.com/technet/prodtechnol
/sql/2005/sql2005secbestpract.mspx
http://www.microsoft.com/technet/prodtechnol
/sql/bestpractice/storage-top-10.mspx
http://technet.microsoft.com/en-
us/sqlserver/bb331794.aspx
http://technet.microsoft.com/en-
us/sqlserver/default.aspx
home.mspx
us/library/ms190764(SQL.90).aspx

MDT Solution Pack for a Healthcare Environment
Version 1.0.0.0
4.2.5.2 IIS 6.0 Best Practices
The points below highlight some of the best practices to be aware of when deploying IIS 6.0
� Install only the features that are specifically required
area of attack’. If additional
when required
� Ensure the latest service packs or security patches are installed using technologies such as
Windows Server Update Services (WSUS), Microsoft Baseline Security Analyzer (MBSA)
2.0 (see the MBSA Security TechCenter
Table 5 contains links to more information on Internet Information Services 6.0
healthcare organisation’s IT Administrator should review the information to ensure the Web
is deployed using current best practice.
Document Title Description
IIS 6.0 Security
Best Practices
Contains general best practice information regarding the
secure deployment and operations of IIS 6.0.
Best Practices for
Web Hosting
Recommendations and best practices for all areas of IIS
6.0 deployment from security to scalability.
Table 5: Internet Information Services 6.0 Best Practices
4.2.5.3 IIS 7.0 Best Practices
The points below highlight some of the best practices to be aware of when deploying IIS 7.0
� Install only the features that are specifically required
area of attack’. If additional features are required later
when required
� If the server is to be used only as a
option of Windows Server 2008
server
� Ensure the latest service packs or security patches are installed using technologies such as
Windows Server Update Serv
2.0 (see the MBSA Security TechCenter
Table 6 contains links to more information on Internet Information Services 7.0
healthcare organisation’s IT Administrator should review the information to ensure the Web
is deployed using current best
Document Title Description
IIS 7.0 Deployment
Guide
Contains information on deploying or upgrading to IIS 7.0. The
information also contains details on deploying the various Web
server types such as Classic ASP Server, Static Content Server
and so on. Information is also provided to assist with installing
the different server types from the command
IIS 7.0 Operations
Guide
Contains information on configuring and operating IIS 7.0
according to current best practice.
Table 6: Internet Information Services 7.0 Best Practices
MDT Solution Pack for a Healthcare Environment Administrators Guide
1.0.0.0 Baseline
IIS 6.0 Best Practices
The points below highlight some of the best practices to be aware of when deploying IIS 6.0
Install only the features that are specifically required. This reduces any potential ‘
’. If additional features are required later, they can be installed and enabled
Ensure the latest service packs or security patches are installed using technologies such as
Windows Server Update Services (WSUS), Microsoft Baseline Security Analyzer (MBSA)
(see the MBSA Security TechCenter {R5} Web page) or Microsoft Update
contains links to more information on Internet Information Services 6.0
IT Administrator should review the information to ensure the Web
s deployed using current best practice.
Link
Contains general best practice information regarding the
secure deployment and operations of IIS 6.0.
http://technet2.microsoft.com/windowsserver/en
/library/ace052a0-a713-423e
4bf198f597b81033.mspx
Recommendations and best practices for all areas of IIS
6.0 deployment from security to scalability.
http://www.microsoft.com/technet/serviceprovid
ers/apps1_5/CMSU_WH_Plan_CONC_Best_Pr
actices_for_Web_Hosting.mspx
: Internet Information Services 6.0 Best Practices – Additional Information
IIS 7.0 Best Practices
The points below highlight some of the best practices to be aware of when deploying IIS 7.0
tall only the features that are specifically required. This reduces any potential ‘
’. If additional features are required later, they can be installed and enabled
If the server is to be used only as a Web Server, consider using the Server Core installation
option of Windows Server 2008, as this will further reduce the surface area of attack
Ensure the latest service packs or security patches are installed using technologies such as
Windows Server Update Services (WSUS), Microsoft Baseline Security Analyzer (MBSA)
see the MBSA Security TechCenter {R5} Web page) or Microsoft Update
contains links to more information on Internet Information Services 7.0
IT Administrator should review the information to ensure the Web
is deployed using current best practice.
Link
Contains information on deploying or upgrading to IIS 7.0. The
information also contains details on deploying the various Web
server types such as Classic ASP Server, Static Content Server
and so on. Information is also provided to assist with installing
he different server types from the command prompt.
http://technet2.microsoft.com/windowss
erver2008/en/library/758f180d
4a79-aed6-d972f4d9891a1033.mspx
Contains information on configuring and operating IIS 7.0
according to current best practice.
http://technet2.microsoft.com/windowss
erver2008/en/library/d0de9475
4ec1-8337-2bcedacd15c71033.mspx
: Internet Information Services 7.0 Best Practices – Additional Information
Prepared by Microsoft
Page 38
The points below highlight some of the best practices to be aware of when deploying IIS 6.0:
his reduces any potential ‘surface
they can be installed and enabled
Ensure the latest service packs or security patches are installed using technologies such as
Windows Server Update Services (WSUS), Microsoft Baseline Security Analyzer (MBSA)
or Microsoft Update {R6}
contains links to more information on Internet Information Services 6.0 best practices. The
IT Administrator should review the information to ensure the Web Server
http://technet2.microsoft.com/windowsserver/en
423e-8e8c-
4bf198f597b81033.mspx
http://www.microsoft.com/technet/serviceprovid
ers/apps1_5/CMSU_WH_Plan_CONC_Best_Pr
ctices_for_Web_Hosting.mspx
The points below highlight some of the best practices to be aware of when deploying IIS 7.0:
his reduces any potential ‘surface
they can be installed and enabled
r using the Server Core installation
surface area of attack of the
Ensure the latest service packs or security patches are installed using technologies such as
ices (WSUS), Microsoft Baseline Security Analyzer (MBSA)
or Microsoft Update {R6}
contains links to more information on Internet Information Services 7.0 best practices. The
IT Administrator should review the information to ensure the Web Server
http://technet2.microsoft.com/windowss
erver2008/en/library/758f180d-7f0e-
2f4d9891a1033.mspx
http://technet2.microsoft.com/windowss
erver2008/en/library/d0de9475-0439-
2bcedacd15c71033.mspx

MDT Solution Pack for a Healthcare Environment
Version 1.0.0.0
4.3 Adding Drivers to
There are two methods of adding drivers to
� Out-of-the-box drivers
driver store. During an
being built is scanned for a list of Plug and Play (PNP) IDs. Once the list is complete
driver store is searched for a set of matching drivers and these drivers are installed on the
workstation. It is important to realise that
workstation
� Pre-staged drivers –
$Drivers folder. During the build process
server and will be scanned during the build or when new
workstation or server
In general, both methods will be used together.
user is likely to add various USB devices. If the drivers for common USB drivers are
they can be installed automatically when the user plugs them in.
4.3.1 Adding Out-of-the
To add a driver to the Deployment Workbench follow the steps below. An
will be used in this example.
1. Copy the extracted driver files to the
copied to <DriveLetter
2. Open the Deployment Workbench
MDT Solution Pack for a Healthcare Environment Administrators Guide
1.0.0.0 Baseline
Adding Drivers to the MDT Solution Pack
There are two methods of adding drivers to the MDT Solution Pack:
box drivers – All drivers are added to the Deployment Workbench into a central
n MDT-based build or deployment process, the workstation
built is scanned for a list of Plug and Play (PNP) IDs. Once the list is complete
driver store is searched for a set of matching drivers and these drivers are installed on the
workstation. It is important to realise that only the matching drivers are copied to the
Drivers are manually copied to the <Distribution>
folder. During the build process, all these drivers are copied to the workstation
and will be scanned during the build or when new hardware is added to the
In general, both methods will be used together. Pre-staged drivers are most useful when the end
user is likely to add various USB devices. If the drivers for common USB drivers are
talled automatically when the user plugs them in.
the-Box Drivers
To add a driver to the Deployment Workbench follow the steps below. An NVIDIA
Copy the extracted driver files to the MDT server; in the following example, they have been
DriveLetter>:\Source\Drivers\nVIDIA:
Open the Deployment Workbench and expand Distribution Share.
Prepared by Microsoft
Page 39
All drivers are added to the Deployment Workbench into a central
the workstation or server
built is scanned for a list of Plug and Play (PNP) IDs. Once the list is complete, the
driver store is searched for a set of matching drivers and these drivers are installed on the
copied to the
<Distribution>\$OEM$\$1\
these drivers are copied to the workstation or
hardware is added to the
drivers are most useful when the end
user is likely to add various USB devices. If the drivers for common USB drivers are pre-staged,
IDIA® display driver
example, they have been

MDT Solution Pack for a Healthcare Environment
Version 1.0.0.0
3. Right-click on Out-of-Box Drivers
4. In the New Driver Wizardthe drivers should be allocated, then click
MDT Solution Pack for a Healthcare Environment Administrators Guide
1.0.0.0 Baseline
Box Drivers and select New:
New Driver Wizard, enter the location of the driver files and the driver group the drivers should be allocated, then click Finish:
Prepared by Microsoft
Page 40
enter the location of the driver files and the driver group to which

MDT Solution Pack for a Healthcare Environment
Version 1.0.0.0
5. One or more driver entries
6. Double-click a driver entry to see extra details
IDs:
MDT Solution Pack for a Healthcare Environment Administrators Guide
1.0.0.0 Baseline
One or more driver entries is added as shown below:
click a driver entry to see extra details, such as the list of supported
Prepared by Microsoft
Page 41
the list of supported Plug and Play

MDT Solution Pack for a Healthcare Environment
Version 1.0.0.0
4.3.2 Adding Pre-Staged
To add a pre-staged driver, simply
<Distribution>\$OEM$\$1\Drivers
An example with an NVIDIA driver is shown in
Figure 15: Pre-staged Driver Location
Important
All drivers pre-staged in this way will be copied to the workstation. Modern drivers can be as large as
100 MB each, so the number and type of drivers installed in this way should be kept to a minimum. The
recommended use for pre-staging is for USB devices that the end user may attach after
deployed.
4.4 Adding Applications to
To add an application to the MDT Solution Pack
� The application source files or media must be available
� A set of command-line swi
user interaction; see the
information on how to silently install applications
MDT Solution Pack for a Healthcare Environment Administrators Guide
1.0.0.0 Baseline
taged Drivers
simply create a new folder with the name
Drivers\<DriverName>.
driver is shown in Figure 15:
in this way will be copied to the workstation. Modern drivers can be as large as
so the number and type of drivers installed in this way should be kept to a minimum. The
staging is for USB devices that the end user may attach after
Adding Applications to the MDT Solution Pack
MDT Solution Pack:
The application source files or media must be available
line switches must be determined so the application can instal
user interaction; see the Automated Build Application Integration guidance
information on how to silently install applications
Prepared by Microsoft
Page 42
in this way will be copied to the workstation. Modern drivers can be as large as
so the number and type of drivers installed in this way should be kept to a minimum. The
staging is for USB devices that the end user may attach after a workstation is
the application can install without
guidance {R3} for

MDT Solution Pack for a Healthcare Environment
Version 1.0.0.0
4.4.1 Adding an Application U
In the Deployment Workbench
to the automated build process.
applications as shown in Figure
Figure 16: Applications Screen in the Deployment Workbench
There are two types of these preconfigured applications:
� Complete – Application source files are supplied and these applications are immediately
ready to be included in the build.
MSXML, fall into this category. These applications are enabled by default
� Placeholder – Application source files are not supplied either due to file size or licens
restrictions. Instead, the command line is given for reference and th
manually downloaded and copied into place.
Reader® applications
9
step-by-step guide to obtaining the source files for,
command-line switches of
default
This section provides a step-by
The example used is Adobe Reader.
example is to be followed, the placeholder
right-click on the Adobe Reader
9 The descriptions of other companies’ pr
should not be considered an endorsement or support by Microsoft.
MDT Solution Pack for a Healthcare Environment Administrators Guide
1.0.0.0 Baseline
Adding an Application Using the Deployment Workbench
In the Deployment Workbench, the Applications pane allows an administrator to add
process. The MDT Solution Pack is supplied preconfigured with a number of
gure 16:
: Applications Screen in the Deployment Workbench
se preconfigured applications:
Application source files are supplied and these applications are immediately
ready to be included in the build. Some of the Microsoft applications, such as Microsoft
fall into this category. These applications are enabled by default
pplication source files are not supplied either due to file size or licens
the command line is given for reference and the source files must be
downloaded and copied into place. The Java® runtime environm
are examples of placeholder applications. APPENDIX B
obtaining the source files for, and determining the required
switches of the placeholder applications. These applications are disabled by
by-step example of adding an application to the MDT Solution Pack
Adobe Reader. As a placeholder for Adobe Reader is already supplied
example is to be followed, the placeholder must be deleted before proceeding. To do this,
Adobe Reader placeholder and select Delete.
of other companies’ products in this document are provided only for convenience.
ement or support by Microsoft.
Prepared by Microsoft
Page 43
sing the Deployment Workbench
allows an administrator to add applications
preconfigured with a number of
Application source files are supplied and these applications are immediately
such as Microsoft
fall into this category. These applications are enabled by default
pplication source files are not supplied either due to file size or licensing
e source files must be
environment and Adobe®
APPENDIX B offers a
and determining the required
the placeholder applications. These applications are disabled by
MDT Solution Pack.
Reader is already supplied, if this
. To do this,
ly for convenience. Any such references

MDT Solution Pack for a Healthcare Environment
Version 1.0.0.0
To add Adobe Reader to the
1. Follow the instructions in
customise its settings. At the end of this process, a folder with the source files
available, as shown below
<DriveLetter>:\Source
2. Expand Distribution Share
and select New:
MDT Solution Pack for a Healthcare Environment Administrators Guide
1.0.0.0 Baseline
the MDT Solution Pack:
ns in APPENDIX B to obtain the source files for Adobe Reader and
e its settings. At the end of this process, a folder with the source files
below. For this example, the folder used will be assumed to be
ource\Adobe\Adobe Reader 8:
Distribution Share in the Deployment Workbench, then right-click
Prepared by Microsoft
Page 44
to obtain the source files for Adobe Reader and
e its settings. At the end of this process, a folder with the source files will be
. For this example, the folder used will be assumed to be
click Applications
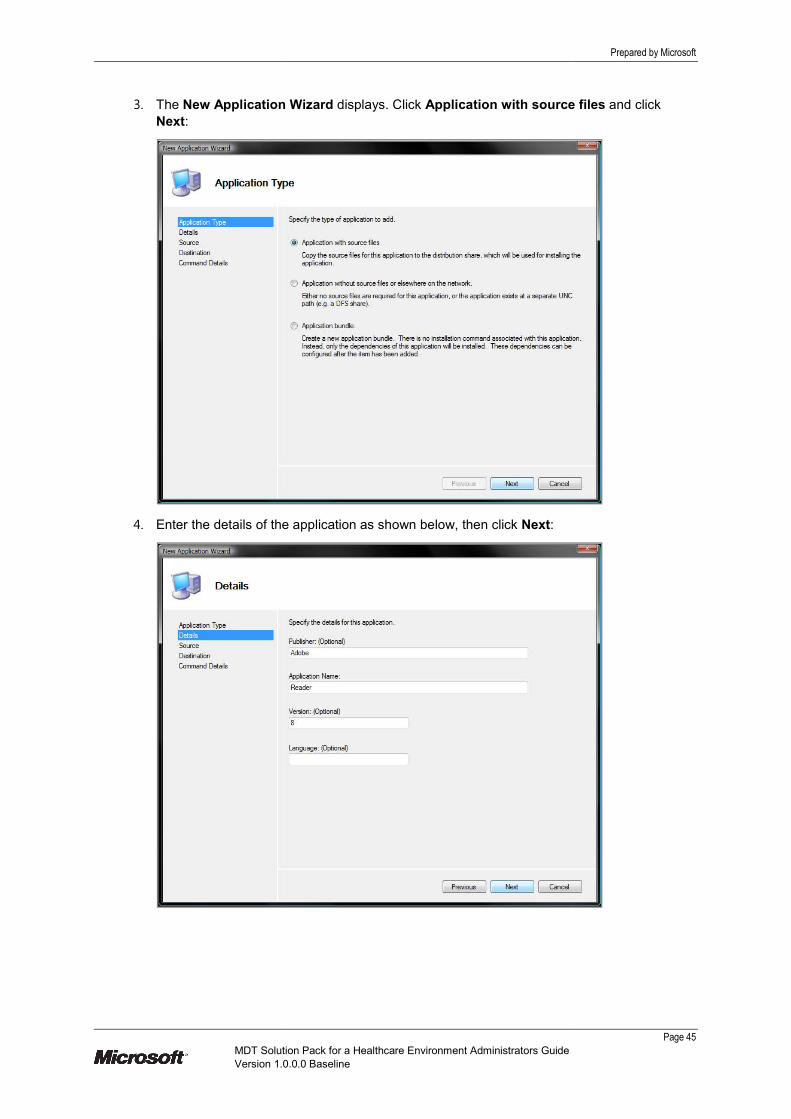
MDT Solution Pack for a Healthcare Environment
Version 1.0.0.0
3. The New Application Wizard
Next:
4. Enter the details of the application as shown
MDT Solution Pack for a Healthcare Environment Administrators Guide
1.0.0.0 Baseline
Application Wizard displays. Click Application with source files
Enter the details of the application as shown below, then click Next:
Prepared by Microsoft
Page 45
Application with source files and click

MDT Solution Pack for a Healthcare Environment
Version 1.0.0.0
5. Enter the directory in which
6. Enter the name of the
<Distribution>\Applications
MDT Solution Pack for a Healthcare Environment Administrators Guide
1.0.0.0 Baseline
in which the application source files are located, then click
ame of the directory that will be created for this application in the
Applications folder of MDT 2008 and click Next:
Prepared by Microsoft
Page 46
the application source files are located, then click Next:
that will be created for this application in the

MDT Solution Pack for a Healthcare Environment
Version 1.0.0.0
7. In Command line, enter the command that will be used to silently install the application.
For Adobe Reader, this
When finished, click N
Note
The Automated Build Application Integration
line commands for other applications.
8. The application source files will be copied to the
the new entry will appear as
MDT Solution Pack for a Healthcare Environment Administrators Guide
1.0.0.0 Baseline
nter the command that will be used to silently install the application.
this is ‘setup.exe’. The working directory is populated automatically.
Next.
Automated Build Application Integration guidance {R3} includes information on the command
line commands for other applications.
The application source files will be copied to the <Distribution>\ Applications
the new entry will appear as shown below:
Prepared by Microsoft
Page 47
nter the command that will be used to silently install the application.
. The working directory is populated automatically.
ormation on the command
Applications folder and

MDT Solution Pack for a Healthcare Environment
Version 1.0.0.0
9. The convention used in
‘INSTALL:’ and operating system configurations with
newly-created application name
10. Click OK to apply the name change. The application wil
subsequent automated builds.
4.4.2 MDT Solution Pack
The MDT Solution Pack is supplied with a number of
the <Distribution>\Application
operating system chosen during the
Note
Not all applications made available through the installation of
into the relevant task sequence. For example
based task sequence, the Microsoft .NET Framework
but is not specified within the
application installation via the
Table 8 lists the applications made available within the Applications folder, and indicates those that
are placed by default within the
Application Folder Name
INSTALL - .NET Framework 1.1
INSTALL - .NET Framework 1.1 SP1
INSTALL - .NET Framework 2.0
INSTALL - .NET Framework 3.5
INSTALL - ACT 5
INSTALL - Adobe Acrobat Reader
MDT Solution Pack for a Healthcare Environment Administrators Guide
1.0.0.0 Baseline
The convention used in the MDT Solution Pack is for application names to be prefixed with
and operating system configurations with ‘CONFIG:’. Double
created application name in the Applications pane to edit the name
to apply the name change. The application will be automatically installed on any
subsequent automated builds.
MDT Solution Pack Default Applications
supplied with a number of application installations that
Applications folder. The available applications are dependent upon the
operating system chosen during the MDT Solution Pack installation.
Not all applications made available through the installation of MDT Solution Pack are placed by default
equence. For example, when installing MDT Solution Pack for a Windows Vista
Microsoft .NET Framework version 3.5 is placed within the Applications folder
but is not specified within the task sequence. If required, this application can be installed by
via the task sequence properties.
lists the applications made available within the Applications folder, and indicates those that
are placed by default within the task sequence for the relevant operating system
Windows
XP
Windows
Vista
Windows
Server 2003
�
�
�
�
�
Prepared by Microsoft
Page 48
is for application names to be prefixed with
. Double-click the
to edit the name:
l be automatically installed on any
s that are placed into
applications are dependent upon the
are placed by default
for a Windows Vista-
is placed within the Applications folder
his application can be installed by adding the
lists the applications made available within the Applications folder, and indicates those that
equence for the relevant operating system:
Windows
Server 2003
Windows
Server 2008
�
�

MDT Solution Pack for a Healthcare Environment
Version 1.0.0.0
Application Folder Name
INSTALL - Adobe Flash Player 9 ActiveX
INSTALL - Adobe Flash Player 9 Plugin
INSTALL - Adobe Shockwave Player
INSTALL - Branding
INSTALL - IIS 6
INSTALL - KMS
INSTALL - MDT
INSTALL - Microsoft ActiveSync 4.5
INSTALL - Microsoft CAPICOM 2.1.0.2
INSTALL - Microsoft Live Meeting 2007
INSTALL - Microsoft Live Meeting Addin Pack 2007
INSTALL - Microsoft MSXML 6.0
INSTALL - Microsoft Office 2003 Primary Interop
Assemblies
INSTALL - Microsoft Office 2007 Primary Interop
Assemblies
INSTALL - Microsoft Office Communicator 2007
INSTALL - Microsoft Office Communicator MUI 2007
INSTALL - Microsoft SMS 2003 Client
INSTALL - Microsoft SoftGrid Client 4.2
INSTALL - Microsoft Virtual Machine Additions
INSTALL - Microsoft Visio Viewer
INSTALL - Microsoft Volume Shadow Copy Client
INSTALL - Microsoft VS2005 Tools for Office
INSTALL - Microsoft VS2005 Tools for Office
INSTALL - Microsoft Windows Installer 3.1
INSTALL - Microsoft Windows Search 4.0
INSTALL - OMPM
INSTALL - PowerShell
INSTALL - Save as PDF and XPS
INSTALL - SQL 2005
INSTALL - SQL 2005 SP2
INSTALL - Sun Java Runtime
INSTALL - Support tools
INSTALL - USMT 3.0.1
INSTALL - Visual Studio 2005
MDT Solution Pack for a Healthcare Environment Administrators Guide
1.0.0.0 Baseline
Windows
XP
Windows
Vista
Windows
Server 2003
Adobe Flash Player 9 ActiveX
�
�
�
�
Microsoft Live Meeting Addin Pack 2007 �
Microsoft Office 2003 Primary Interop �
Microsoft Office 2007 Primary Interop �
Microsoft Office Communicator 2007 �
Microsoft Office Communicator MUI 2007 �
Microsoft Virtual Machine Additions � � �
Microsoft Volume Shadow Copy Client
Microsoft VS2005 Tools for Office
Office SE Runtime �
Microsoft Windows Installer 3.1
Microsoft Windows Search 4.0
�
�
�
�
�
�
�
Prepared by Microsoft
Page 49
Windows
Server 2003
Windows
Server 2008
�
�
�
�
�

MDT Solution Pack for a Healthcare Environment
Version 1.0.0.0
Application Folder Name
INSTALL - WAIK 1.1
INSTALL - Windows XP Hotfixes (Post-SP2)
INSTALL - WS2003 R2 Components
INSTALL - WSS SP2
INSTALL - WSUS SP1
Table 7: Application Installations
4.4.3 Application Installation Order
During the automated build process
were added to the Deployment Workbench. This is sometimes undesirable as
some applications is dependent on other
In the MDT Solution Pack, it is possible
installation order needs to be set, d
tab as shown in Figure 17:
Figure 17: Application Dependencies
For example, if AppA requires App
added to AppA’s dependency list
are installed first.
MDT Solution Pack for a Healthcare Environment Administrators Guide
1.0.0.0 Baseline
Windows
XP
Windows
Vista
Windows
Server 2003
�
SP2) �
�
�
Application Installation Order
uring the automated build process, applications are installed by default in the same order as they
were added to the Deployment Workbench. This is sometimes undesirable as the installation of
some applications is dependent on other applications being already installed.
it is possible to modify the installation order with dependencies.
installation order needs to be set, double-click an application name and select the
A requires AppB and AppC to be installed first, AppB and AppC should be
added to AppA’s dependency list. During installation, MDT 2008 then ensures that
Prepared by Microsoft
Page 50
Windows
Server 2003
Windows
Server 2008
�
�
�
in the same order as they
the installation of
to modify the installation order with dependencies. If the
an application name and select the Dependencies
AppB and AppC should be
that AppB and AppC

MDT Solution Pack for a Healthcare Environment
Version 1.0.0.0
4.5 Customising the
During an automated build (as well as
to perform other operating system configurations. In
are performed by a set of scripts. The scripts are used in the same way as
Deployment Workbench but are prefixed with
18:
Figure 18: Configuration Scripts
4.5.1 MDT Solution Pack
The MDT Solution Pack comes supplied with a number of customisation scripts
into the <Distribution>\Scripts
on the operating system chosen
Script Full Name Script Location
(Within <Distribution>
Generic Client Configuration Scripts (Windows XP and Windows Vista)
CONFIG-CLI: Adjust Event Logs GenericCLI
CONFIG-CLI: Disable CD-ROM
Autorun
GenericCLI
CONFIG-CLI: Set Date Format GenericCLI
CONFIG-CLI: Set Page File Size Generic
CONFIG-CLI: Set System Restore
Percentage
GenericCLI
Windows XP Configuration Scripts:
CONFIG-XP: Activate Screen
Saver
XP\CFG
CONFIG-XP: Apply Windows
Firewall Settings
XP\CFG
MDT Solution Pack for a Healthcare Environment Administrators Guide
1.0.0.0 Baseline
the MDT Solution Pack
as well as when installing applications), an IT administrator
other operating system configurations. In the MDT Solution Pack, these configu
cripts. The scripts are used in the same way as for applications in the
Deployment Workbench but are prefixed with ‘CONFIG:’ rather than ‘INSTALL:
MDT Solution Pack Default Scripts
comes supplied with a number of customisation scripts
Scripts\MDTSP folder. Where these scripts are installed varies depending
operating system chosen. Brief descriptions of all the scripts are shown in
Script Location and File Name
(Within <Distribution>\Scripts\MDTSP\ ) Script Function
Generic Client Configuration Scripts (Windows XP and Windows Vista):
GenericCLI\CFG-EventLog.vbs Customises event logs to overwrite as
needed
GenericCLI\CFG-NoAutoRun.vbs Disables the CD
GenericCLI\CFG-SetDateFormat.exe Configures DD
GenericCLI\CFG-PageFileConfig.wsf Configures the page file size
GenericCLI\CFG-SystemRestorePercent.wsf Configures the maximum percentage of
disk space to use for system restore
CFG-SetScrSavr.VBS Configures and enables the screen saver
CFG-firewall.cmd Configures the Windows Firewall
Prepared by Microsoft
Page 51
an IT administrator may want
these configurations
applications in the
INSTALL:’, as shown in Figure
comes supplied with a number of customisation scripts that are installed
folder. Where these scripts are installed varies depending
. Brief descriptions of all the scripts are shown in Table 8:
Script Function
Customises event logs to overwrite as
Disables the CD Autorun feature
Configures DD-MMM-YYYY date format
Configures the page file size
Configures the maximum percentage of
disk space to use for system restore
Configures and enables the screen saver
Configures the Windows Firewall

MDT Solution Pack for a Healthcare Environment
Version 1.0.0.0
Script Full Name Script Location
(Within <Distribution>
CONFIG-XP: Close Start Menu XP\CFG
CONFIG-XP: Customise Start
Menu Icons
XP\CFG
CONFIG-XP: Customise Folder
View Settings
XP\CFG
CONFIG-XP: Customise Recovery
Options
XP\CFG
CONFIG-XP: Customise Start
Menu Options
XP\CFG
CONFIG-XP: Disable Auto Update
(Windows Update)
XP\CFG
CONFIG-XP: Disable Internet
Connection Wizard Icon
XP\CFG
CONFIG-XP: Disable Unneeded
Services
XP\CFG
CONFIG-XP: Disable Welcome
Screen
XP\CFG
CONFIG-XP: Disable Windows
Tour Icon
XP\CFG
CONFIG-XP: Enable the Quick
Launch Bar
XP\CFG
CONFIG-XP: Move Windows i386
Source Files
XP\CFG
CONFIG-XP: Set boot.ini Timeout XP\CFG
Windows Vista Configuration Scripts:
CONFIG-VISTA: Activate Screen
Saver
Vista
CONFIG-VISTA: Configure
Sidebar
Vista
CONFIG-VISTA: Customise
Folder View Settings
Vista
CONFIG-VISTA: Customise
Recovery Options
Vista
CONFIG-VISTA: Disable simple
file sharing
Vista
CONFIG-VISTA: Disable
Unneeded Services
Vista
MDT Solution Pack for a Healthcare Environment Administrators Guide
1.0.0.0 Baseline
Script Location and File Name
(Within <Distribution>\Scripts\MDTSP\ ) Script Function
CFG-CloseStartMenu.vbs Ensures the Start
the build
CFG-StartIcn.vbs Configures Start
CFG-SetFldr.vbs Configures how folders appear
CFG-XPRecovr.vbs Configures the Windows XP recovery
options
CFG-StartOpt.vbs Configures aspects of the Start
CFG-XPupdate.vbs Disables automatic updates
CFG-RemovICW.vbs Disables the Internet
CFG-ConfigServices.wsf Configures which services to
CFG-nowelcm.vbs Disables the Windows XP welcome
screen
CFG-notour.vbs Disables the Windows XP Tour
CFG-showQL.vbs Enables the quick launch bar
CFG-updi386.vbs Moves the location of the i386 folder
CFG-BootPro.vbs Configures the boot.ini timeout
Note
This script should only be set to run
after the SYSPREP process has
completed.
:
Vista\CFG-SetScrSavr.VBS Configures and enables the screen saver
Vista\CFG-SidebarState.wsf Turns the Windows
Vista\CFG-SetFldr.wsf Configures how folders appear
Vista\CFG-Recovery.vbs Configures the Windows Vista recovery
options
Vista\CFG-DisableSimpleFileSharing.wsf Disables the file sharing wizard
Vista\CFG-ConfigServices.wsf Configures which services to start
Prepared by Microsoft
Page 52
Script Function
Ensures the Start menu is closed during
Configures Start menu icons
Configures how folders appear
Configures the Windows XP recovery
Configures aspects of the Start menu
Disables automatic updates
Disables the Internet Connection Wizard
Configures which services to start
Disables the Windows XP welcome
Disables the Windows XP Tour icon
the quick launch bar
Moves the location of the i386 folder
Configures the boot.ini timeout
This script should only be set to run
the SYSPREP process has
completed.
Configures and enables the screen saver
the Windows Vista sidebar on or off
Configures how folders appear
Configures the Windows Vista recovery
Disables the file sharing wizard
Configures which services to start

MDT Solution Pack for a Healthcare Environment
Version 1.0.0.0
Script Full Name Script Location
(Within <Distribution>
CONFIG-VISTA: Turn off
Welcome Center
Vista
CONFIG-VISTA: Turn on inactive
tray icons
Vista
CONFIG-VISTA: UsabilityOne Vista
CONFIG-VISTA: UsabilityTwo Vista
CONFIG-VISTA: UsabilityThree Vista
Generic Server Configuration Scripts (Windows Server 2003 and Windows Server 2008):
CONFIG-SVR: Autologon GenericSVR
CONFIG-SVR: Create OUs GenericSVR
CONFIG-SVR: DHCP Server GenericSVR
CONFIG-SVR: DNS Server GenericSVR
CONFIG-SVR: Enable Remote
Desktop
GenericSVR
EnableRemoteDesktop.wsf
CONFIG-SVR: Rename
Computer
GenericSVR
CONFIG-SVR: Set Administrator
Password
GenericSVR
CONFIG-SVR: WDS Server GenericSVR
Windows Server 2003 Configuration Scripts:
CONFIG-2K3: Copyi386Folder W2K3
CONFIG-2K3: Promote To DC W2K3
Table 8: Configuration Scripts
Note
Windows Server 2008 shares scripts written for Windows Server 2003; no scripts have been specifically
written for Windows Server 2008
MDT Solution Pack for a Healthcare Environment Administrators Guide
1.0.0.0 Baseline
Script Location and File Name
(Within <Distribution>\Scripts\MDTSP\ ) Script Function
Vista\CFG-TurnOffWelcomeCenter.wsf Disables the Welcome Center
Vista\CFG-ShowInactiveTrayIcons.wsf Ensures tray icons are always visible
Vista\CFG-UsabilityOne.wsf Removes shortcut links from the
menu, which can be customised to
healthcare organisation
Vista\CFG-UsabilityTwo.wsf Hides the Extras
from Start > All Programs
Vista\CFG-UsabilityThree.wsf Configures access to
from the Start menu
Generic Server Configuration Scripts (Windows Server 2003 and Windows Server 2008):
GenericSVR\CONFIG-SVR-Autologon.wsf Used to populate settings to allow reboots
during a custom task sequence
GenericSVR\CONFIG-SVR-CreateOUs.wsf Used to create
structure
GenericSVR\CONFIG-SVR-DHCP.wsf Used to configure DHCP.
installed before this script
GenericSVR\CONFIG-SVR-DNS.wsf Used to configure DNS
GenericSVR\CONFIG-SVR-
EnableRemoteDesktop.wsf
Used to enable remote desktop
GenericSVR\CONFIG-SVR-RenameComputer.wsf Used to rename the computer
Note
This should only be used on a
computer that is NOT a
Controller (DC)
GenericSVR\CONFIG-SVR-ResetAdminPass.wsf Used to set the admin
GenericSVR\CONFIG-SVR-WDS.wsf Used to configure the WDS server.
must be installed before this script is
executed
Windows Server 2003 Configuration Scripts:
W2K3\CONFIG-2K3-Copyi386Folder.wsf Used to copy the i386 folder
W2K3\CONFIG-2K3-promote-to-dc.wsf Used to promote the computer to a
Domain Controller
shares scripts written for Windows Server 2003; no scripts have been specifically
written for Windows Server 2008.
Prepared by Microsoft
Page 53
Script Function
Disables the Welcome Center
Ensures tray icons are always visible
Removes shortcut links from the Start
which can be customised to an
healthcare organisation’s requirements
Extras and Upgrades folder
Start > All Programs
Configures access to Windows features
tart menu
populate settings to allow reboots
during a custom task sequence
Used to create an Organizational Unit
Used to configure DHCP. DHCP must be
installed before this script is executed
Used to configure DNS
Used to enable remote desktop
Used to rename the computer
This should only be used on a
computer that is NOT a Domain
Controller (DC).
set the administrator password
figure the WDS server. WDS
must be installed before this script is
the i386 folder
Used to promote the computer to a
ontroller
shares scripts written for Windows Server 2003; no scripts have been specifically

MDT Solution Pack for a Healthcare Environment
Version 1.0.0.0
Information
Some of the above scripts configure user
options. If the scripts that configure these settings are run during the development of a build prior to
capture, some settings may be lost during the SYSPREP process
configured as expected when the captured build is deployed
these scripts should be run as part of the deployment process
� CONFIG-VISTA: Activate Screen Saver
� CONFIG-VISTA: Customise Folder View Settings
� CONFIG-VISTA: Turn on inactive tray icons
� CONFIG-VISTA: Usability Three
4.5.2 Configuration Scripts and the Task Sequence
The properties for the ’CONFIG
shown in Figure 19:
Figure 19: Disabled Application Properties
A list of enabled applications is
choose to install them or not.
Note
Disabled applications are not
applications can still be installed by the Administrator by adding them to the
MDT Solution Pack for a Healthcare Environment Administrators Guide
1.0.0.0 Baseline
scripts configure user-focused settings, for example, screen saver configuration
configure these settings are run during the development of a build prior to
capture, some settings may be lost during the SYSPREP process. As a result, these settings
configured as expected when the captured build is deployed. To ensure the desired result is achieved,
these scripts should be run as part of the deployment process. Examples of these scripts include:
VISTA: Activate Screen Saver
VISTA: Customise Folder View Settings
VISTA: Turn on inactive tray icons
A: Usability Three
Configuration Scripts and the Task Sequence
CONFIG’ scripts in the Deployment Workbench may appear as disabled
is presented to the user during the build process,
Disabled applications are not presented to the user during the build process. However, disabled
still be installed by the Administrator by adding them to the task sequence.
Prepared by Microsoft
Page 54
or example, screen saver configuration
configure these settings are run during the development of a build prior to
these settings may not be
red result is achieved,
Examples of these scripts include:
appear as disabled, as
so that the user can
to the user during the build process. However, disabled
equence.

MDT Solution Pack for a Healthcare Environment
Version 1.0.0.0
The task sequence can be shown by se
Workbench and then selecting the
Figure 20: Task Sequence
Customised entries installed into the
MDT Solution Pack folder within the
required on the Options tab. It is also possible t
installation order. In the MDT Solution Pack
task sequence.
4.5.3 Adding Custom Scripts
To make writing custom scripts easier in this version of
file and folder have been created. It is recommended that custom scripts are placed in the
<Distribution>\Scripts\MDTSP
VBScript named _Template.wsf
Use the _Template.wsf file by
preconfigured to make the EXTUtil
functions to make scripting easier. Examples of
file.
Once a script has been completed, it can be added to the
‘CONFIG:’ entry. To add the script, follow the instructions for
in section 4.4.1 with the following exceptions:
� Application Type – Click the
network option
� Command Line – Enter “
� Working Directory –
Once configured, add the new script to the Task Sequence
MDT Solution Pack for a Healthcare Environment Administrators Guide
1.0.0.0 Baseline
can be shown by selecting the properties of a task sequence
Workbench and then selecting the Task Sequence tab as shown in Figure 20:
Customised entries installed into the task sequence by the MDT Solution Pack
within the Task Sequence tab, and can be enabled and disabled as
. It is also possible to move items up and down to control
MDT Solution Pack, both CONFIG and INSTALL entries are added to a
Custom Scripts
To make writing custom scripts easier in this version of the MDT Solution Pack
file and folder have been created. It is recommended that custom scripts are placed in the
MDTSP\Custom folder. By default, this folder contains a single template
named _Template.wsf.
Use the _Template.wsf file by copying it and editing it in Notepad. The script has been
EXTUtil scripting library available, which provides a number of simpl
functions to make scripting easier. Examples of EXTUtil use are provided within the _Template.wsf
Once a script has been completed, it can be added to the Deployment Workbench as a new
entry. To add the script, follow the instructions for adding a normal application as shown
with the following exceptions:
Click the Application without source files or elsewhere on the
Enter “cscript.exe <ScriptName>.wsf”
Enter “.\Scripts\MDTSP\Custom”
new script to the Task Sequence for a build, as shown in section
Prepared by Microsoft
Page 55
task sequence in the Deployment
are located in the
and can be enabled and disabled as
to control the
both CONFIG and INSTALL entries are added to a
MDT Solution Pack, a template script
file and folder have been created. It is recommended that custom scripts are placed in the
this folder contains a single template
otepad. The script has been
which provides a number of simple
within the _Template.wsf
orkbench as a new
adding a normal application as shown
Application without source files or elsewhere on the
as shown in section 4.5.2.

MDT Solution Pack for a Healthcare Environment
Version 1.0.0.0
4.5.4 Incorporating BitLocker into a Task Sequence
MDT 2008 introduced an additional
2008 deployment: the encryption of hard disks using BitLocker.
BitLocker can be enabled in the Task Sequence properties by selec
BitLocker from within the Task Sequence
drive or another designated drive to be encrypted. It also provides the ability to create a recovery
key in Active Directory.
Important
The ability to encrypt a drive other than the operating system drive is only available on a Windows Vista
client with Service Pack 1 installed, or a Windows Server 2008
If a machine has more than one drive that requires BitLocker, for example both
system drive (the C: drive) and the data drive (the D: drive), two tasks should be added to the task
sequence. This is because each task can
To ensure BitLocker can be run successfully,
available to MDT 2008. This tool
distribution share directory structure
reside, are as follows:
� <Distribution>\Tools\X86
� Bdehdcfg.exe
� BdeCfgLog.dll
� <Distribution>\Tools\X86
� DedHdCfg.exe.mui
� BdeCfgLog.dll.mui
Recommendation
It is recommended that BitLocker is not used in conjunction with any other hard drive encryption product
Note
To be able to back up the Trusted Platform Module (
information to Active Directory, appropriate schema extensions and access control settings
configured on the domain. For more information
Directory to Back up Windows BitLocker Drive Encryption and Trusted Platform Module Recovery
Information11.
4.6 Adding Hotfixes
In the MDT Solution Pack, there are two ways of adding hotfixes
used depends on the build:
� Windows XP or Windows Server 2003
Hotfixes’
� Windows Vista or Windows Server 2008
Workbench
See sections 4.6.1 and 4.6.2 for more on these methods.
10 Description of the BitLocker Drive Preparation Tool
11 Configuring Active Directory to Back up Windows BitLocker Drive Encryption and Trusted Platform Mod
Information {R9}:
http://technet2.microsoft.com/WindowsVista/en/library/3dbad515
MDT Solution Pack for a Healthcare Environment Administrators Guide
1.0.0.0 Baseline
ing BitLocker into a Task Sequence
MDT 2008 introduced an additional feature available during a Windows Vista or Windows Server
the encryption of hard disks using BitLocker.
BitLocker can be enabled in the Task Sequence properties by selecting Add > Disks > Enable
Task Sequence tab. The options allow for either the operating system
drive or another designated drive to be encrypted. It also provides the ability to create a recovery
The ability to encrypt a drive other than the operating system drive is only available on a Windows Vista
client with Service Pack 1 installed, or a Windows Server 2008 server.
If a machine has more than one drive that requires BitLocker, for example both
system drive (the C: drive) and the data drive (the D: drive), two tasks should be added to the task
each task can only enable BitLocker for one drive.
To ensure BitLocker can be run successfully, the BitLocker Drive Preparation Tool
available to MDT 2008. This tool consists of a number of files, which should be copied to
directory structure. The files required, and the location in which
X86
X86\en-us
DedHdCfg.exe.mui
BdeCfgLog.dll.mui
It is recommended that BitLocker is not used in conjunction with any other hard drive encryption product
Trusted Platform Module (TPM) owner information and BitLocker recover
information to Active Directory, appropriate schema extensions and access control settings
configured on the domain. For more information, read the Microsoft TechNet article
Directory to Back up Windows BitLocker Drive Encryption and Trusted Platform Module Recovery
Adding Hotfixes
there are two ways of adding hotfixes to the build process. The method
Windows XP or Windows Server 2003 – uses an application called ‘BASE
Windows Vista or Windows Server 2008 – can be directly added into the Deployment
for more on these methods.
Description of the BitLocker Drive Preparation Tool {R8}: http://support.microsoft.com/kb/930063
Configuring Active Directory to Back up Windows BitLocker Drive Encryption and Trusted Platform Mod
chnet2.microsoft.com/WindowsVista/en/library/3dbad515-5a32-4330-ad6f-d1fb6dfcdd411033.mspx?mfr=true
Prepared by Microsoft
Page 56
feature available during a Windows Vista or Windows Server
Add > Disks > Enable
tab. The options allow for either the operating system
drive or another designated drive to be encrypted. It also provides the ability to create a recovery
The ability to encrypt a drive other than the operating system drive is only available on a Windows Vista
If a machine has more than one drive that requires BitLocker, for example both the operating
system drive (the C: drive) and the data drive (the D: drive), two tasks should be added to the task
e Preparation Tool10 needs to be
should be copied to the
in which they should
It is recommended that BitLocker is not used in conjunction with any other hard drive encryption product.
owner information and BitLocker recover
information to Active Directory, appropriate schema extensions and access control settings must be
le Configuring Active
Directory to Back up Windows BitLocker Drive Encryption and Trusted Platform Module Recovery
to the build process. The method
BASE-XP: Windows XP
the Deployment
http://support.microsoft.com/kb/930063
Configuring Active Directory to Back up Windows BitLocker Drive Encryption and Trusted Platform Module Recovery
d1fb6dfcdd411033.mspx?mfr=true

MDT Solution Pack for a Healthcare Environment
Version 1.0.0.0
4.6.1 Windows XP and W
When the MDT Solution Pack
‘BASE-XP: Windows XP Hotfixes
Windows XP hotfixes placed in the
Hotfixes (Post-SP2)\ passive_norestart
Figure 21: Windows XP Hotfix Folder
Any Windows XP hotfixes placed in this folder will be automatically installed
during the build process.
4.6.2 Windows Vista
Windows Vista and Windows Server 2008
the Deployment Workbench.
To add a hotfix to the Deployment Workbench:
1. In the Deployment Workbench,
2. Right-click OS Packages
MDT Solution Pack for a Healthcare Environment Administrators Guide
1.0.0.0 Baseline
and Windows Server 2003 Hotfixes
is installed on a Windows XP task sequence, an application called
XP: Windows XP Hotfixes’ is added by default. This application is responsible for installing
Windows XP hotfixes placed in the <Distribution>\Applications\INSTALL: Windows XP
passive_norestart folder, as shown in Figure 21:
Any Windows XP hotfixes placed in this folder will be automatically installed in alphabetical order
Windows Vista and Windows Server 2008 Hotfixes
and Windows Server 2008 hotfixes (in .msu file format) can be added directly into
To add a hotfix to the Deployment Workbench:
In the Deployment Workbench, navigate to Distribution Share > OS Packages
OS Packages and select New.
Prepared by Microsoft
Page 57
, an application called
. This application is responsible for installing
Windows XP
in alphabetical order
Hotfixes
u file format) can be added directly into
OS Packages:

MDT Solution Pack for a Healthcare Environment
Version 1.0.0.0
3. Enter the Package source
Server 2008 hotfixes are stored
folder is used. Click Finish
4. The hotfixes contained in the folder will be imported into the Deployment Workbench as
shown below:
MDT Solution Pack for a Healthcare Environment Administrators Guide
1.0.0.0 Baseline
Package source directory in which one or more Windows Vista
hotfixes are stored. In this example, the H:\MDT_2008_SP
Finish:
contained in the folder will be imported into the Deployment Workbench as
Prepared by Microsoft
Page 58
in which one or more Windows Vista or Windows
SP\Files\Packages
contained in the folder will be imported into the Deployment Workbench as

MDT Solution Pack for a Healthcare Environment
Version 1.0.0.0
4.7 Creating a Custom Image
This section details how to create and capture a
deployed on a large scale using
4.7.1 Creating the Windows PE Boot ISO
To initiate the build, a workstation must be
To create the ISO file for the CD:
1. In the Deployment Workbench,
and select Update:
2. This will initiate a process to
MDT Solution Pack for a Healthcare Environment Administrators Guide
1.0.0.0 Baseline
Custom Image
This section details how to create and capture a custom image. Once captured,
using MDT 2008, or other deployment tools.
Creating the Windows PE Boot ISO
To initiate the build, a workstation must be started from a Windows PE MDT CD.
To create the ISO file for the CD:
In the Deployment Workbench, navigate to Deployment Points, right-click
This will initiate a process to create the boot ISO files and may take several minutes
Prepared by Microsoft
Page 59
d, an image can be
CD.
click MDT_SP_LAB
may take several minutes:

MDT Solution Pack for a Healthcare Environment
Version 1.0.0.0
3. Once the process has completed, browse to the
below:
4. Create a bootable CD using the
LiteTouchPE_x86.wim
4.7.2 Creating and Capturing the
This section lists the steps required to use the Windows PE CD and
capture a build in Windows Image (WIM) format. Once an image has been captured, it can be
imported into MDT 2008 for large
To create and capture a build in WIM format:
1. Start the target workstation from the Windows PE CD created in section
2. When the Windows Deploym
MDT Solution Pack for a Healthcare Environment Administrators Guide
1.0.0.0 Baseline
Once the process has completed, browse to the <Distribution>\Boot folder as shown
Create a bootable CD using the LiteTouchPE_x86.iso CD image file or add the
LiteTouchPE_x86.wim file to a Windows Deployment Services (WDS) server boot section
Creating and Capturing the Custom Image
This section lists the steps required to use the Windows PE CD and MDT 2008
dows Image (WIM) format. Once an image has been captured, it can be
for large-scale deployment as detailed in section 6.1.
To create and capture a build in WIM format:
the target workstation from the Windows PE CD created in section
Windows Deployment Wizard displays, select a task sequence
Prepared by Microsoft
Page 60
folder as shown
or add the
file to a Windows Deployment Services (WDS) server boot section.
MDT 2008 to create and
dows Image (WIM) format. Once an image has been captured, it can be
the target workstation from the Windows PE CD created in section 4.7.1.
select a task sequence and click Next:

MDT Solution Pack for a Healthcare Environment
Version 1.0.0.0
3. When prompted for a product key
applicable, and click N
4. Type a Computer name
MDT Solution Pack for a Healthcare Environment Administrators Guide
1.0.0.0 Baseline
product key, click the appropriate option, providing the key if
Next:
Computer name and click Next:
Prepared by Microsoft
Page 61
the appropriate option, providing the key if

MDT Solution Pack for a Healthcare Environment
Version 1.0.0.0
5. On the Specify whether to restore user
6. Select the required applications and click
MDT Solution Pack for a Healthcare Environment Administrators Guide
1.0.0.0 Baseline
Specify whether to restore user data page, click Next:
applications and click Next:
Prepared by Microsoft
Page 62

MDT Solution Pack for a Healthcare Environment
Version 1.0.0.0
7. When prompted for an Administrator password
(this is the password for the Local Administrator Account)
8. Click Capture an image of this reference computer
File name and then click
MDT Solution Pack for a Healthcare Environment Administrators Guide
1.0.0.0 Baseline
When prompted for an Administrator password, enter and confirm the required password
(this is the password for the Local Administrator Account), then click Next
image of this reference computer. Accept the default
and then click Next:
Prepared by Microsoft
Page 63
the required password
ext:
. Accept the default Location and

MDT Solution Pack for a Healthcare Environment
Version 1.0.0.0
9. On the Ready to begin
The build process begins and take
workstation and the number of applications selected. Once the build is complete
machine is automatically captured in WIM format.
MDT Solution Pack for a Healthcare Environment Administrators Guide
1.0.0.0 Baseline
Ready to begin page, check the settings shown and click Begin
and takes around thirty to sixty minutes depending on the speed of the
workstation and the number of applications selected. Once the build is complete
automatically captured in WIM format.
Prepared by Microsoft
Page 64
in:
minutes depending on the speed of the
workstation and the number of applications selected. Once the build is complete, an image of the

MDT Solution Pack for a Healthcare Environment
Version 1.0.0.0
5 STABILISE
The Stabilise phase involves testing the solution components
resolving and prioritising any issues that are found. Testing during this phase emphasises usage
and operation of the solution components under realistic environmental conditions.
This involves testing and acceptance of
Figure 22 acts as a high-level checklist, illustrating the critical components
Professional responsible for stabilising the design of an
determine:
Figure 22: Sequence for Stabilising the MDT Solution Pack
5.1 Understanding Log Fil
Before troubleshooting MDT 2008
understand the many log files used during an operating system
understanding which log to refer to and at what time, the build and deployment process
appreciated from a troubleshootin
MDT 2008 scripts, as well as the
the Windows XP Hotfix folder)
matches the name of the script
ZTIGather.log. Each script also updates a common log file
contents of logs created by all the
C:\MININT\SMSOSD\OSDLOGS
the completion of a deployment and their destination is dependent
described in Table 9:
Deployment Type Destination
Lite Touch C:\WINDOWS
Zero Touch C:\TEMP
Table 9: Log File Destinations
The rest of this section details the log files that are created during the build and deployment
processes and provides examples of when they can be used for troubleshooting.
MDT Solution Pack for a Healthcare Environment Administrators Guide
1.0.0.0 Baseline
phase involves testing the solution components whose features are complete,
resolving and prioritising any issues that are found. Testing during this phase emphasises usage
and operation of the solution components under realistic environmental conditions.
This involves testing and acceptance of the MDT Solution Pack.
level checklist, illustrating the critical components that
rofessional responsible for stabilising the design of an MDT Solution Pack build needs to
MDT Solution Pack
Understanding Log Files
MDT 2008 and the MDT Solution Pack, there is a requirement to
the many log files used during an operating system build and/or deployment. By
log to refer to and at what time, the build and deployment process
from a troubleshooting perspective.
the MDT Solution Pack scripts EXTUtil.vbs and Install.
), automatically create log files. Each script creates a log file that
matches the name of the script. For example, ZTIGather.wsf creates a log file named
. Each script also updates a common log file called Bdd.log that aggregates the
contents of logs created by all the MDT 2008 scripts. MDT 2008 logs are located in
OSDLOGS folder during the build/deployment process. They are moved at
the completion of a deployment and their destination is dependent on the deployment type
Destination
WINDOWS\TEMP\BDDLogs – unless the /debug:true option has been specified.
TEMP\SMSOSD or C:\SMSOSD – unless the C:\MININT\Archive_OSD.SMS
The rest of this section details the log files that are created during the build and deployment
examples of when they can be used for troubleshooting.
Prepared by Microsoft
Page 65
whose features are complete, and
resolving and prioritising any issues that are found. Testing during this phase emphasises usage
and operation of the solution components under realistic environmental conditions.
the healthcare IT
build needs to
is a requirement to
deployment. By
log to refer to and at what time, the build and deployment process can be
and Install.wsf (found in
automatically create log files. Each script creates a log file that
creates a log file named
.log that aggregates the
located in the
g the build/deployment process. They are moved at
on the deployment type as
option has been specified.
Archive_OSD.SMS file is found.
The rest of this section details the log files that are created during the build and deployment
examples of when they can be used for troubleshooting.
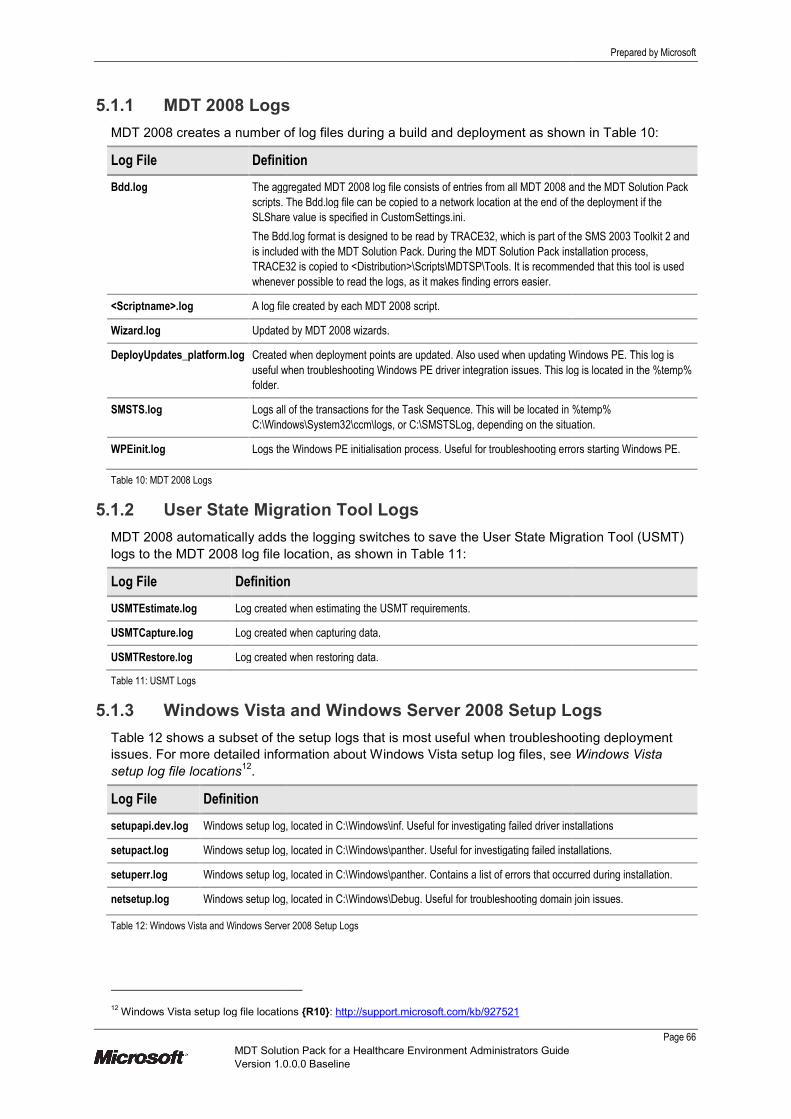
MDT Solution Pack for a Healthcare Environment
Version 1.0.0.0
5.1.1 MDT 2008 Logs
MDT 2008 creates a number of log files during a build and deployment as shown in
Log File Definition
Bdd.log The aggregated MDT 2008 log file
scripts. The B
SLShare value
The Bdd
is included with
TRACE32 is copied to <Distribution>
whenever possible to
<Scriptname>.log A log file created by each
Wizard.log Updated by
DeployUpdates_platform.log Created when deployment points are updated. Also used when
useful when troubleshooting Windows PE driver integration issues.
folder.
SMSTS.log Logs all of the transactions for the Task Sequence. This will be located
C:\Windows
WPEinit.log Logs the Wi
Table 10: MDT 2008 Logs
5.1.2 User State Migration Tool
MDT 2008 automatically adds the logging switches to save the
logs to the MDT 2008 log file location
Log File Definition
USMTEstimate.log Log created when estimating the USMT requirements
USMTCapture.log Log created when capturing data
USMTRestore.log Log created when restoring data.
Table 11: USMT Logs
5.1.3 Windows Vista
Table 12 shows a subset of the setup logs that
issues. For more detailed information
setup log file locations12.
Log File Definition
setupapi.dev.log Windows setup log, located in
setupact.log Windows setup log, located in
setuperr.log Windows setup log, located in
netsetup.log Windows setup log, located
Table 12: Windows Vista and Windows Server 2008
12 Windows Vista setup log file locations
MDT Solution Pack for a Healthcare Environment Administrators Guide
1.0.0.0 Baseline
ogs
MDT 2008 creates a number of log files during a build and deployment as shown in
Definition
The aggregated MDT 2008 log file consists of entries from all MDT 2008 and
scripts. The Bdd.log file can be copied to a network location at the end of the deployment if the
SLShare value is specified in CustomSettings.ini.
dd.log format is designed to be read by TRACE32, which is part of the SMS 2003 Toolkit 2 and
included with the MDT Solution Pack. During the MDT Solution Pack installation process,
TRACE32 is copied to <Distribution>\Scripts\MDTSP\Tools. It is recommended that this tool is used
whenever possible to read the logs, as it makes finding errors easier.
A log file created by each MDT 2008 script.
Updated by MDT 2008 wizards.
Created when deployment points are updated. Also used when updating Windows PE.
useful when troubleshooting Windows PE driver integration issues. This log is located in the %temp%
Logs all of the transactions for the Task Sequence. This will be located in %temp%
Windows\System32\ccm\logs, or C:\SMSTSLog, depending on the situation.
Logs the Windows PE initialisation process. Useful for troubleshooting error
User State Migration Tool Logs
automatically adds the logging switches to save the User State Migration Tool (
location, as shown in Table 11:
Definition
Log created when estimating the USMT requirements.
Log created when capturing data.
Log created when restoring data.
Windows Vista and Windows Server 2008 Setup Logs
shows a subset of the setup logs that is most useful when troubleshooting deployment
or more detailed information about Windows Vista setup log files, see
Windows setup log, located in C:\Windows\inf. Useful for investigating failed driver installations
Windows setup log, located in C:\Windows\panther. Useful for investigating failed installations.
Windows setup log, located in C:\Windows\panther. Contains a list of errors that occurred during installation.
Windows setup log, located in C:\Windows\Debug. Useful for troubleshooting domain join issues.
and Windows Server 2008 Setup Logs
Windows Vista setup log file locations {R10}: http://support.microsoft.com/kb/927521
Prepared by Microsoft
Page 66
MDT 2008 creates a number of log files during a build and deployment as shown in Table 10:
of entries from all MDT 2008 and the MDT Solution Pack
.log file can be copied to a network location at the end of the deployment if the
2, which is part of the SMS 2003 Toolkit 2 and
installation process,
Tools. It is recommended that this tool is used
Windows PE. This log is
This log is located in the %temp%
in %temp%
SMSTSLog, depending on the situation.
Useful for troubleshooting errors starting Windows PE.
User State Migration Tool (USMT)
Setup Logs
bleshooting deployment
about Windows Vista setup log files, see Windows Vista
river installations
Useful for investigating failed installations.
ontains a list of errors that occurred during installation.
seful for troubleshooting domain join issues.

MDT Solution Pack for a Healthcare Environment
Version 1.0.0.0
5.1.4 Windows XP and Windows Server 2003
Table 13 shows a subset of the setup logs that
issues:
Log File Definition
setupapi.log Windows setup log, located in
installations.
setupact.log Windows setup log, located in
setuperr.log Windows setup log, located in
netsetup.log Windows setup log, located in
Table 13: Windows XP and Windows Server 2003
5.2 Troubleshooting Methods
During the troubleshooting process
tested. Testing rules should follow a two
1. Test on a client in the full
2. Launch the process and test within WinPE
5.2.1 How to Manually Run Rule
When creating rules within MDT 2008
Each time a change is made, the entire build process needs to be restarted to see if
the desired effect.
It is, however, possible to initially test
OS, without needing to completely rebuild a machine. The following process is useful
configuring and troubleshooting rule processing within
The rules that are applied to a particular computer are gathered together using a script called
ZTIGather.wsf in conjunction with
need to launch the entire MDT 2008
The steps below detail this process. These can
operating system or WinPE.
To manually run rule processing:
1. Copy ZTIGather.wsf, ZTIGather.xml, ZTIUtility.vbs, CustomSettings.ini, and any user exit
scripts to a folder on the built workstation.
2. Remove the C:\MININT directory
3. Execute ‘cscript.exe ZTIGather.wsf /debug:true
4. Inspect the log C:\MININT
5. Modify CustomSettings.ini
MDT Solution Pack for a Healthcare Environment Administrators Guide
1.0.0.0 Baseline
and Windows Server 2003 Setup Logs
shows a subset of the setup logs that is most useful when troubleshooting deployment
Windows setup log, located in C:\Windows. Records .inf installation actions. Useful for investigating failed driver
Windows setup log, located in C:\Windows. Lists installation actions.
Windows setup log, located in C:\Windows. Details installation errors.
Windows setup log, located in C:\Windows\Debug. Useful for troubleshooting issues related to joining a domain.
and Windows Server 2003 Setup Logs
Troubleshooting Methods
During the troubleshooting process, it is critical that any changes made to the rules
follow a two-stage process:
est on a client in the full operating system (OS) environment.
aunch the process and test within WinPE.
How to Manually Run Rule Processing
MDT 2008, it can take time to tune them to provide the results required.
the entire build process needs to be restarted to see if
to initially test MDT 2008 rule processing manually, on a client in the full
without needing to completely rebuild a machine. The following process is useful
configuring and troubleshooting rule processing within MDT 2008.
d to a particular computer are gathered together using a script called
in conjunction with ZTIGather.xml. These scripts can be run directly without the
MDT 2008 process.
The steps below detail this process. These can be run when the computer is running the host
To manually run rule processing:
Copy ZTIGather.wsf, ZTIGather.xml, ZTIUtility.vbs, CustomSettings.ini, and any user exit
scripts to a folder on the built workstation.
MININT directory, if it already exists.
cscript.exe ZTIGather.wsf /debug:true’.
MININT\SMSOSD\OSDLOGS\ZTIGather.log.
Modify CustomSettings.ini and user exit script(s) as required, and repeat from step 2.
Prepared by Microsoft
Page 67
Setup Logs
bleshooting deployment
eful for investigating failed driver
issues related to joining a domain.
rules can be easily
o provide the results required.
the entire build process needs to be restarted to see if the rules have
on a client in the full
without needing to completely rebuild a machine. The following process is useful for
d to a particular computer are gathered together using a script called
These scripts can be run directly without the
be run when the computer is running the host
Copy ZTIGather.wsf, ZTIGather.xml, ZTIUtility.vbs, CustomSettings.ini, and any user exit
and repeat from step 2.
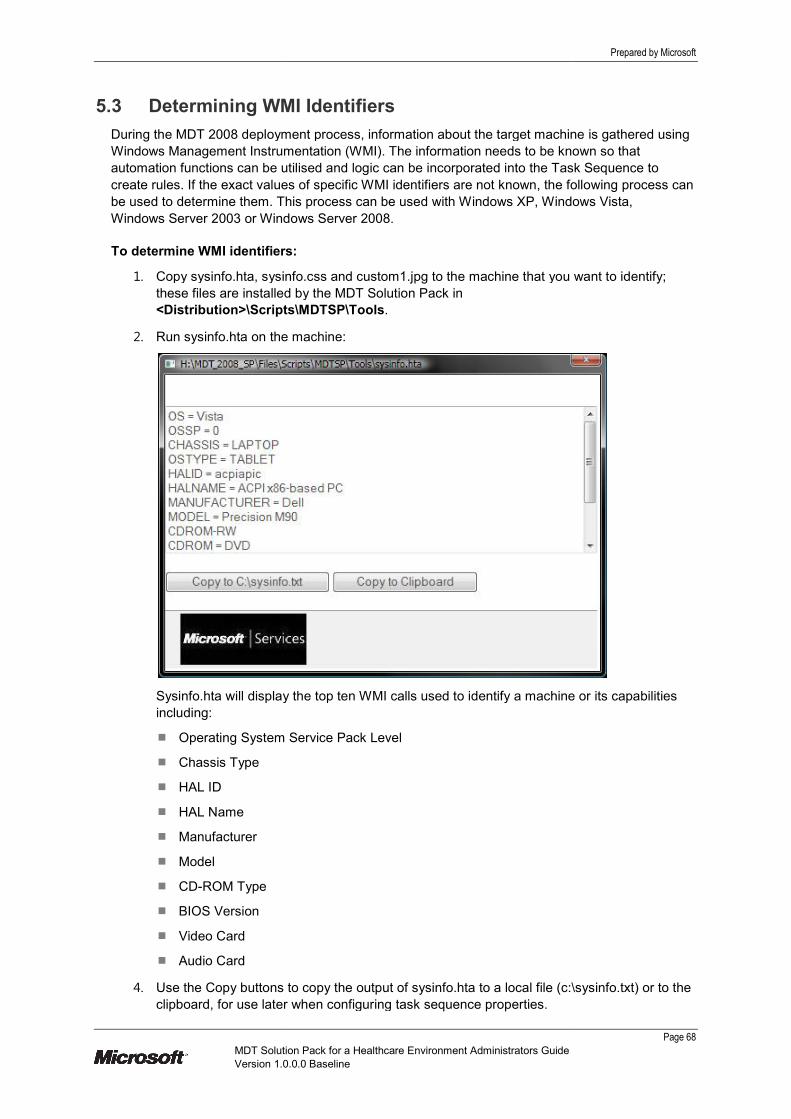
MDT Solution Pack for a Healthcare Environment
Version 1.0.0.0
5.3 Determining WMI Identifiers
During the MDT 2008 deployment process, information about the
Windows Management Instrumentation
automation functions can be utilised and logic can be incorp
create rules. If the exact values of specific WMI identifiers are not known, the following process
be used to determine them. This process can be
Windows Server 2003 or Windows Serve
To determine WMI identifiers:
1. Copy sysinfo.hta, sysinfo.css and
these files are installed by
<Distribution>\Scripts
2. Run sysinfo.hta on the machine
Sysinfo.hta will display
including:
� Operating System Service Pack Level
� Chassis Type
� HAL ID
� HAL Name
� Manufacturer
� Model
� CD-ROM Type
� BIOS Version
� Video Card
� Audio Card
4. Use the Copy buttons
clipboard, for use later when configuring
MDT Solution Pack for a Healthcare Environment Administrators Guide
1.0.0.0 Baseline
WMI Identifiers
deployment process, information about the target machine
Instrumentation (WMI). The information needs to be known so that
automation functions can be utilised and logic can be incorporated into the Task
create rules. If the exact values of specific WMI identifiers are not known, the following process
This process can be used with Windows XP, Windows Vista
Server 2003 or Windows Server 2008.
To determine WMI identifiers:
Copy sysinfo.hta, sysinfo.css and custom1.jpg to the machine that you
files are installed by the MDT Solution Pack in
Scripts\MDTSP\Tools.
Run sysinfo.hta on the machine:
display the top ten WMI calls used to identify a machine or its capabilities
Operating System Service Pack Level
to copy the output of sysinfo.hta to a local file (c:\
, for use later when configuring task sequence properties.
Prepared by Microsoft
Page 68
target machine is gathered using
to be known so that
ask Sequence to
create rules. If the exact values of specific WMI identifiers are not known, the following process can
Windows Vista,
to the machine that you want to identify;
the top ten WMI calls used to identify a machine or its capabilities
\sysinfo.txt) or to the

MDT Solution Pack for a Healthcare Environment
Version 1.0.0.0
6 DEPLOY
During the Deploy phase, the core solution components are deployed for more widespread
application and use, and the deployment is stabilised through ongoing monitoring. The solution is
then transitioned to operations and support.
Figure 23 acts as a high-level checklist, illustrating the critical components
Professional responsible for deploying
Figure 23: Sequence for Deploying the MDT Solution Pack
6.1 Getting Ready to Deploy a Custom Image
Once an image has been captured
Note
A captured WIM image can be thought of as an operating s
another build process and then captured again. In this way
containing some basic healthcare organisation
then be used as the basis for more specific builds, for example
MDT Solution Pack for a Healthcare Environment Administrators Guide
1.0.0.0 Baseline
phase, the core solution components are deployed for more widespread
application and use, and the deployment is stabilised through ongoing monitoring. The solution is
then transitioned to operations and support.
level checklist, illustrating the critical components that
Professional responsible for deploying the MDT Solution Pack needs to determine
MDT Solution Pack
Getting Ready to Deploy a Custom Image
Once an image has been captured, it must be added as a new operating system and b
image can be thought of as an operating system in itself. It can be used as the basis of
another build process and then captured again. In this way, it is possible to create a fairly simple build
healthcare organisation customisations, and to capture this build. This build can
sed as the basis for more specific builds, for example specific departmental
Prepared by Microsoft
Page 69
phase, the core solution components are deployed for more widespread
application and use, and the deployment is stabilised through ongoing monitoring. The solution is
the healthcare IT
needs to determine:
d as a new operating system and build.
can be used as the basis of
it is possible to create a fairly simple build
and to capture this build. This build can
specific departmental builds.

MDT Solution Pack for a Healthcare Environment
Version 1.0.0.0
6.1.1 Creating the Deployment Operating System
1. In the Deployment Workbench, right
2. On the OS Type page, click
MDT Solution Pack for a Healthcare Environment Administrators Guide
1.0.0.0 Baseline
Creating the Deployment Operating System
In the Deployment Workbench, right-click Operating Systems and select
page, click Custom image file and click Next:
Prepared by Microsoft
Page 70
and select New:

MDT Solution Pack for a Healthcare Environment
Version 1.0.0.0
3. In the Image page, select the image as captured in section
be located in <Distribution>
4. On the Setup page, click
Caution
If importing a Windows Vista or Windows Server 2008 custom image into a new Deployment Point
that does not contain the source files for either operating system,
Windows Server 2008 setup files from the specified path
fail.
MDT Solution Pack for a Healthcare Environment Administrators Guide
1.0.0.0 Baseline
page, select the image as captured in section 4.7.2. By default, this image will
<Distribution>\Captures.
click Setup and Sysprep files are not needed, then click
If importing a Windows Vista or Windows Server 2008 custom image into a new Deployment Point
that does not contain the source files for either operating system, click the Copy Windows Vista or
Windows Server 2008 setup files from the specified path option. Otherwise, the deployment will
Prepared by Microsoft
Page 71
. By default, this image will
, then click Next:
If importing a Windows Vista or Windows Server 2008 custom image into a new Deployment Point
Copy Windows Vista or
Otherwise, the deployment will

MDT Solution Pack for a Healthcare Environment
Version 1.0.0.0
5. In the Destination page, type a name such as
6. A new entry for the custom image is displayed in
MDT Solution Pack for a Healthcare Environment Administrators Guide
1.0.0.0 Baseline
page, type a name such as VISTA or XP, then click
A new entry for the custom image is displayed in Operating Systems, as shown below:
Prepared by Microsoft
Page 72
, then click Finish:
, as shown below:

MDT Solution Pack for a Healthcare Environment
Version 1.0.0.0
6.1.2 Creating the Deployment Task Sequence
Once the captured WIM image has been added as a new operating system,
sequence that uses the image as the basis for a build.
1. In the Deployment Workbench, right
2. Enter a meaningful build ID and description, such as
MDT Solution Pack for a Healthcare Environment Administrators Guide
1.0.0.0 Baseline
Creating the Deployment Task Sequence
ed WIM image has been added as a new operating system, create
equence that uses the image as the basis for a build.
In the Deployment Workbench, right-click Task Sequences and select
Enter a meaningful build ID and description, such as VISTADEPLOY, and click
Prepared by Microsoft
Page 73
create a new task
and select New:
, and click Next:
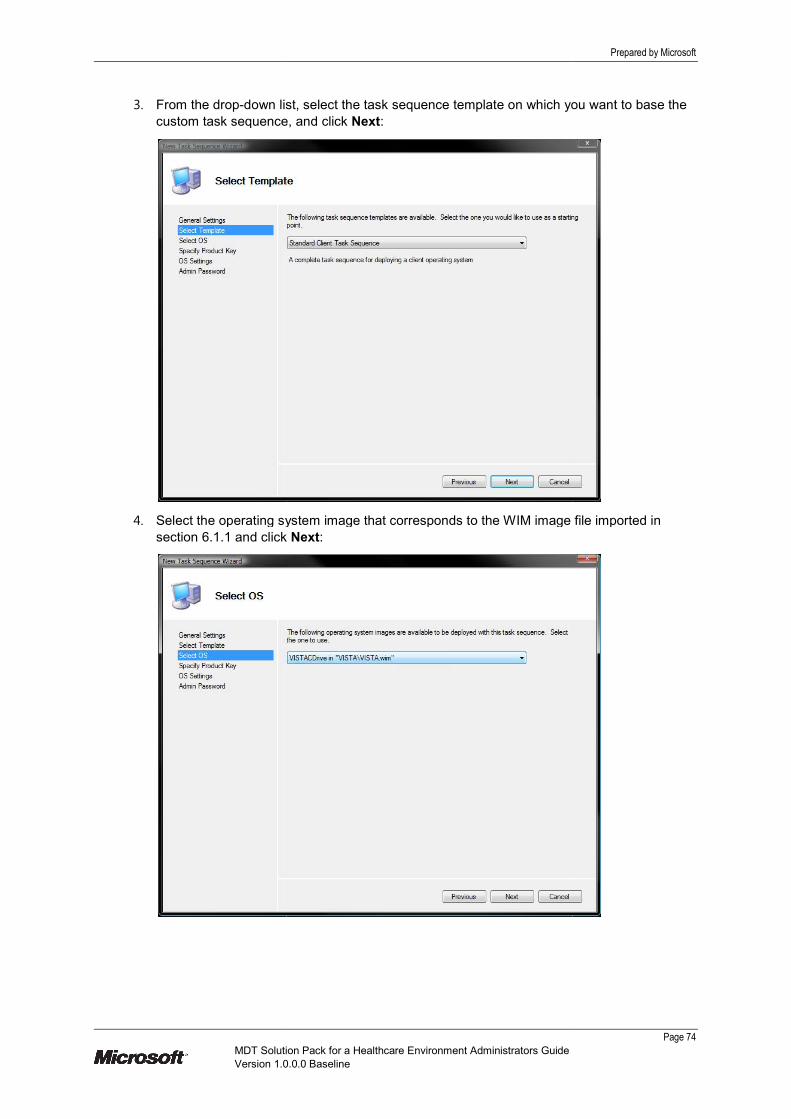
MDT Solution Pack for a Healthcare Environment
Version 1.0.0.0
3. From the drop-down list, select the task sequence template on which you want to base the
custom task sequence, and click
4. Select the operating system image that corresponds to the WIM image file imported in
section 6.1.1 and click
MDT Solution Pack for a Healthcare Environment Administrators Guide
1.0.0.0 Baseline
down list, select the task sequence template on which you want to base the
custom task sequence, and click Next:
Select the operating system image that corresponds to the WIM image file imported in
and click Next:
Prepared by Microsoft
Page 74
down list, select the task sequence template on which you want to base the
Select the operating system image that corresponds to the WIM image file imported in

MDT Solution Pack for a Healthcare Environment
Version 1.0.0.0
5. On the remaining pages, accept the defaults or select settings appropriate to the
organisation. Once complete, the new
Workbench:
6.1.2.1 Windows Vista Default Profile
In Windows XP, any changes and customisations made to the Administrator account during the
build are automatically applied to all users of that
Windows Vista, the Unattend.xml file must be manually edited to enable this functionality.
To manually edit the Unattend.xml file:
1. Select the deployment build created in section
2. Select the OS Info tab and click
Manager.
3. In the Answer File pane, expand
Shell-Setup_neutral.
4. In the Microsoft-Windows
to true:
5. Close the Windows System Image Manager
MDT Solution Pack for a Healthcare Environment Administrators Guide
1.0.0.0 Baseline
On the remaining pages, accept the defaults or select settings appropriate to the
Once complete, the new task sequence will be shown in the Deployment
Windows Vista Default Profile
n Windows XP, any changes and customisations made to the Administrator account during the
build are automatically applied to all users of that workstation, once the machine is deployed.
nattend.xml file must be manually edited to enable this functionality.
nattend.xml file:
Select the deployment build created in section 6.1.2 and edit its properties.
tab and click Edit Unattend.xml to launch the Windows System Image
pane, expand 4 specialize and highlight x86_Micros
Windows-Shell-Setup Properties pane, change the
Windows System Image Manager and save the changes.
Prepared by Microsoft
Page 75
On the remaining pages, accept the defaults or select settings appropriate to the healthcare
equence will be shown in the Deployment
n Windows XP, any changes and customisations made to the Administrator account during the
once the machine is deployed. In
nattend.xml file must be manually edited to enable this functionality.
and edit its properties.
Windows System Image
x86_Microsoft-Windows-
change the CopyProfile value

MDT Solution Pack for a Healthcare Environment
Version 1.0.0.0
6.2 Deployment Types
It is possible to deploy a captured WIM image created with
� Network – Deployment is performed using a network
the MDTSP Distribution Share
Deployment includes a ‘Lab or single
share’, as well as a ‘SMS 2003 OSD’ deployment mech
� DVD – The captured WIM image and
bootable DVD that can be used to deploy the image in remote
surgeries
6.2.1 Network-Based Deployment
To create a new network distribution point:
1. In the Deployment Workbench
MDT Solution Pack for a Healthcare Environment Administrators Guide
1.0.0.0 Baseline
Deployment Types
t is possible to deploy a captured WIM image created with MDT 2008 in two ways:
Deployment is performed using a network-based distribution share, similar to
Distribution Share used to create the WIM image as shown in
includes a ‘Lab or single-server deployment’ and a ‘Separate deployment
as well as a ‘SMS 2003 OSD’ deployment mechanism
The captured WIM image and MDT 2008 configuration scripts are copied to a
bootable DVD that can be used to deploy the image in remote locations
ased Deployment
To create a new network distribution point:
the Deployment Workbench, right-click Deployment Points and select
Prepared by Microsoft
Page 76
in two ways:
ution share, similar to
used to create the WIM image as shown in 4.7.2. Network
server deployment’ and a ‘Separate deployment
configuration scripts are copied to a
locations, such as doctor
and select New:
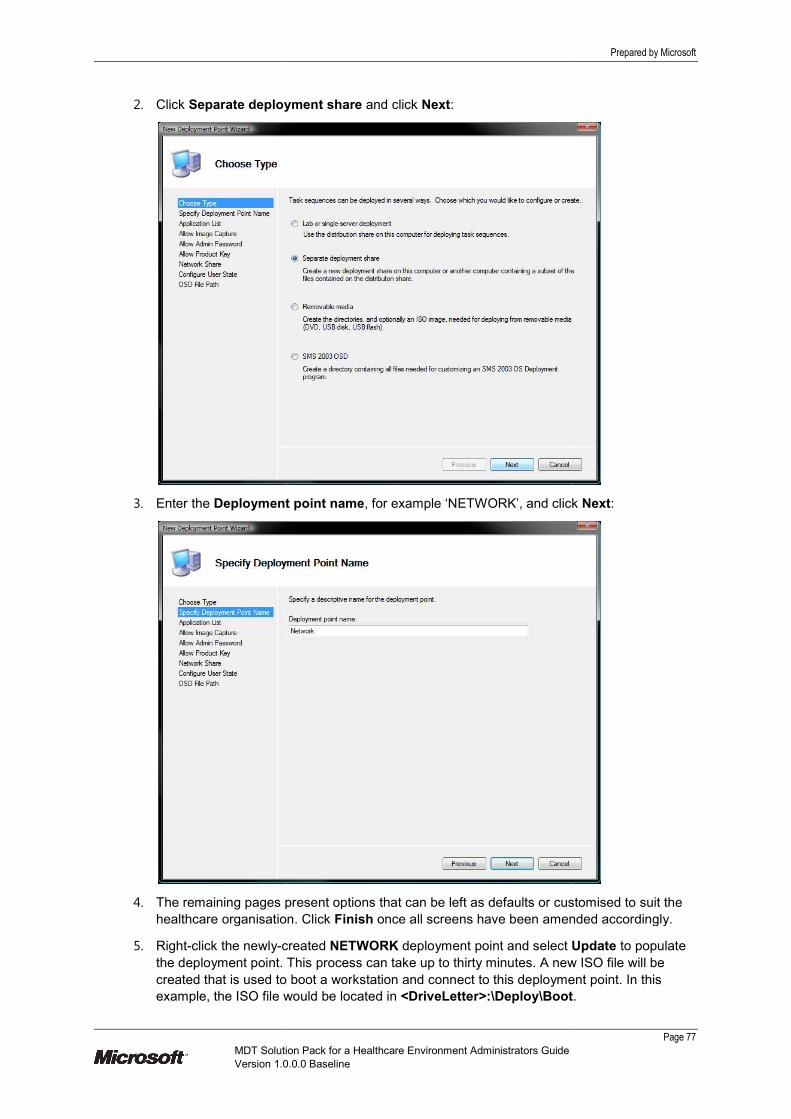
MDT Solution Pack for a Healthcare Environment
Version 1.0.0.0
2. Click Separate deployment share
3. Enter the Deployment point name
4. The remaining pages present options
healthcare organisation
5. Right-click the newly-cr
the deployment point. This pro
created that is used to boot a wor
example, the ISO file would be located in
MDT Solution Pack for a Healthcare Environment Administrators Guide
1.0.0.0 Baseline
Separate deployment share and click Next:
Deployment point name, for example ‘NETWORK’, and click
present options that can be left as defaults or customised to suit the
healthcare organisation. Click Finish once all screens have been amended accordingly.
created NETWORK deployment point and select Update
loyment point. This process can take up to thirty minutes. A new
that is used to boot a workstation and connect to this deployment point. In this
example, the ISO file would be located in <DriveLetter>:\Deploy\Boot
Prepared by Microsoft
Page 77
click Next:
that can be left as defaults or customised to suit the
once all screens have been amended accordingly.
Update to populate
ew ISO file will be
o this deployment point. In this
Boot.

MDT Solution Pack for a Healthcare Environment
Version 1.0.0.0
6.2.2 DVD-Based Deployment
Creating a DVD-based deployment p
section 6.2.1. The deployment point type should
in Figure 24:
Figure 24: Deployment Point Type
Once the DVD deployment point has been created
Deployment Workbench and select
minutes. A new ISO file will then
<DriveLetter>:\Media. Once burned to DVD
workstation from the DVD and deploy the build without any network connectivity to the
server.
MDT Solution Pack for a Healthcare Environment Administrators Guide
1.0.0.0 Baseline
Based Deployment
based deployment point is similar to creating a network-based one
. The deployment point type should, however, be set as Removable
Once the DVD deployment point has been created, right-click the deployment point
and select Update to populate it. This process can take up to
then be created. In this example, the ISO file would be located in
. Once burned to DVD, this ISO file will allow an engineer to boot a
workstation from the DVD and deploy the build without any network connectivity to the
Prepared by Microsoft
Page 78
based one, as described in
Removable Media, as shown
the deployment point in the
to populate it. This process can take up to thirty
the ISO file would be located in
this ISO file will allow an engineer to boot a
workstation from the DVD and deploy the build without any network connectivity to the MDT 2008

MDT Solution Pack for a Healthcare Environment
Version 1.0.0.0
6.3 Customising the Deployment Point Builds and Applications
By default, a newly-created Deployment
task sequences, operating system
Deployment Workbench. To restrict which applications and
Deployment Point, select the Deployment Point
Sequence tabs to make changes
Figure 25: Deployment Point Supported Applications
Figure 26: Deployment Point Supported Builds
MDT Solution Pack for a Healthcare Environment Administrators Guide
1.0.0.0 Baseline
Customising the Deployment Point Builds and Applications
eployment Point (whether network or DVD-based
, operating systems and application files that have been configured in the
Deployment Workbench. To restrict which applications and Task Sequences are supported by a
Deployment Point properties and use the Applications
tabs to make changes, as shown in Figure 25 and Figure 26:
Point Supported Applications
Builds
Prepared by Microsoft
Page 79
Customising the Deployment Point Builds and Applications
based) contains all the
and application files that have been configured in the
are supported by a
Applications and Task

MDT Solution Pack for a Healthcare Environment
Version 1.0.0.0
APPENDIX A
The tables in this Appendix provide details of the suggested training and skill assessment
resources available. This list is not exhaustive; there are many third
The resources listed are those provided by Microsoft
PART I Application Compatibility
For further information on Windows
http://technet.microsoft.com/en
Skill or Technology Area Resource Location
Collecting and analysing the
application inventory
http://technet.microsoft.com/en
gb/desktopdeployment/bb395313.aspx
Testing your mitigation
strategies
http://technet.microsoft.com/en
gb/desktopdeployment/bb395314.aspx
Resolving any outstanding
compatibility issues
http://technet.microsoft.com/en
gb/desktopdeployment/bb395315.aspx
Deploying compatibility
mitigation packages
http://technet.microsoft.com/en
gb/desktopdeployment/bb395316.aspx
Table 14: Application Compatibility Training Resources
PART II Imaging
For further information on imaging see
http://technet.microsoft.com/en
Skill or Technology Area Resource Location
Building a company-standard
image for deployment
http://technet.microsoft.com/en
gb/desktopdeployment/bb395319.aspx
Testing the image in a
controlled pilot program
http://technet.microsoft.com/en
gb/desktopdeployment/bb395320.aspx
Using the right tools and utilities
to deploy the image
http://technet.microsoft.com/en
gb/desktopdeployment/bb395321.aspx
Managing the image lifecycle http://technet.microsoft.com/en
gb/desktopdeployment/bb395322.aspx
Table 15: Imaging Training Resources
MDT Solution Pack for a Healthcare Environment Administrators Guide
1.0.0.0 Baseline
SKILLS AND TRAINING RESOURCES
The tables in this Appendix provide details of the suggested training and skill assessment
resources available. This list is not exhaustive; there are many third-party providers of such skills.
The resources listed are those provided by Microsoft.
Application Compatibility
Windows Application Compatibility see:
http://technet.microsoft.com/en-us/desktopdeployment/bb414773.aspx
Resource Location Description
http://technet.microsoft.com/en-
gb/desktopdeployment/bb395313.aspx
Collect and analyse the application inventory to build your
application portfolio including s
technologies that can be used.
http://technet.microsoft.com/en-
gb/desktopdeployment/bb395314.aspx
Test mitigation strategies to create application mitigation
packages. Provides the tools and methods for successfully
testing and resolving any application compatibility issues.
http://technet.microsoft.com/en-
gb/desktopdeployment/bb395315.aspx
Resolve outstanding compatibility issues to report
compatibility mitigation. Describes how to use the
appropriate tools for automating the testing process
http://technet.microsoft.com/en-
gb/desktopdeployment/bb395316.aspx
Deploy compatibility mitigation packages with core
application deployment or after core application
deployment. Provides details of
that you can use to deploy the
infrastructure.
: Application Compatibility Training Resources
further information on imaging see:
http://technet.microsoft.com/en-gb/desktopdeployment/bb395318.aspx
Resource Location Description
http://technet.microsoft.com/en-
gb/desktopdeployment/bb395319.aspx
Plan for building a company-standard image that needs to
include the applications that are used and the featur
are important across the business functions.
http://technet.microsoft.com/en-
gb/desktopdeployment/bb395320.aspx
Prepare for deployment by testing to make sure the image
meets the requirements for the environment
details about how to plan, initiate, and manage an image
pilot testing program.
http://technet.microsoft.com/en-
gb/desktopdeployment/bb395321.aspx
Decide which tools and technologies will be used to deploy
the image. Provides information to help develop pro
for deploying the company-standard image
http://technet.microsoft.com/en-
gb/desktopdeployment/bb395322.aspx
Aids in understanding changes in the environment that will
require the company-standard image to evolve and will
also help build cases and scenarios for updating the
company-standard image to meet business demands
Prepared by Microsoft
Page 80
ESOURCES
The tables in this Appendix provide details of the suggested training and skill assessment
party providers of such skills.
analyse the application inventory to build your
including suggested processes and
Test mitigation strategies to create application mitigation
the tools and methods for successfully
testing and resolving any application compatibility issues.
Resolve outstanding compatibility issues to report
escribes how to use the
appropriate tools for automating the testing process.
Deploy compatibility mitigation packages with core
application deployment or after core application
of the tools and technologies
that you can use to deploy the application fixes across the
standard image that needs to
include the applications that are used and the features that
are important across the business functions.
for deployment by testing to make sure the image
meets the requirements for the environment. Provides
details about how to plan, initiate, and manage an image
which tools and technologies will be used to deploy
rovides information to help develop processes
standard image.
changes in the environment that will
standard image to evolve and will
also help build cases and scenarios for updating the
standard image to meet business demands.

MDT Solution Pack for a Healthcare Environment
Version 1.0.0.0
PART III Deployment Process
For further information on the Lite Touch Deployment Process, see
http://technet.microsoft.com/en
Skill or Technology Area Resource Location
Ensuring the appropriate LTI
infrastructure exists
http://technet.microsoft.com/en
gb/desktopdeployment/bb395334.aspx
Preparing the deployment
environment
http://technet.microsoft.com/en
gb/desktopdeployment/bb395335.aspx
Preparing the WDS server http://technet.microsoft.com/en
gb/desktopdeployment/bb395336.aspx
Deploying the OS images to the
client computers
http://technet.microsoft
gb/desktopdeployment/bb395337.aspx
Table 16: Deployment Process Training Resources
PART IV 2007 Office System Deployment
For further information on 2007
http://technet.microsoft.com/en
Skill or Technology Area Resource Location
Choose and define your 2007
Office system editions
http://technet.microsoft.com/en
gb/desktopdeployment/bb395348.aspx
Identify upgrade issues http://technet.microsoft.com/en
gb/desktopdeployment/bb395349.aspx
Customize the 2007 Office
system
http://technet.microsoft.com/en
gb/desktopdeployment/bb395351.aspx
Table 17: 2007 Office System Deployment Training Resources
PART V Supplemental Training Resources
Title
Windows Client TechCenter: Windows Vista:
The TechNet Script Center
Script Center Script Repository
Zero Touch Deployment of Windows XP/Office 2003
Table 18: Supplemental Training Resources
MDT Solution Pack for a Healthcare Environment Administrators Guide
1.0.0.0 Baseline
Deployment Process – Lite Touch
further information on the Lite Touch Deployment Process, see:
http://technet.microsoft.com/en-us/library/bb456433.aspx
source Location Description
http://technet.microsoft.com/en-
gb/desktopdeployment/bb395334.aspx
LTI can be performed from within a network using
Windows Deployment Services or stand
portable media created with the Deployment Workbench,
such as DVDs or USB drives.
http://technet.microsoft.com/en-
gb/desktopdeployment/bb395335.aspx
Ensuring that that the deployment environment is properly
prepared to run LTI before deploying images to
computers.
http://technet.microsoft.com/en-
gb/desktopdeployment/bb395336.aspx
How the image-installation process
Windows Deployment Services when deploying to
computers that Systems Managem
not manage.
http://technet.microsoft.com/en-
gb/desktopdeployment/bb395337.aspx
Understanding each deployment scenario (Upgrade
Computer, Replace Computer, New Computer, Refresh
Computer) and how they use different processes
Resources
2007 Office System Deployment
further information on 2007 Microsoft® Office System Deployment, see:
http://technet.microsoft.com/en-us/library/bb490141.aspx
Resource Location Description
http://technet.microsoft.com/en-
gb/desktopdeployment/bb395348.aspx
Clear guidance for the choice of 2007 Office system
versions and deployment options.
http://technet.microsoft.com/en-
gb/desktopdeployment/bb395349.aspx
Guidance on the primary issues faced when upgrading to
the 2007 Office system including feature installation s
settings migration, file conversion issues and file
coexistence with multiple versions of Microsoft Office
http://technet.microsoft.com/en-
gb/desktopdeployment/bb395351.aspx
Creating a customised 2007 Office system installation is a
multi-step process. After creating
deployment package, it can be inserted into the
imaging process so that the customised 2007
system configuration can be included automatically in all
computer images.
Deployment Training Resources
Supplemental Training Resources
Link
Windows Vista: http://www.microsoft.com/technet/windowsvista/default.mspx
http://www.microsoft.com/technet/scriptcenter/default.mspx
http://www.microsoft.com/technet/scriptcenter/scripts/default.mspx
Zero Touch Deployment of Windows XP/Office 2003 http://www.microsoft.com/technet/community/events/winxppro/tnt1
Prepared by Microsoft
Page 81
within a network using
Windows Deployment Services or stand-alone using
portable media created with the Deployment Workbench,
Ensuring that that the deployment environment is properly
prepared to run LTI before deploying images to target
installation process works through
Deployment Services when deploying to
computers that Systems Management Server 2003 does
Understanding each deployment scenario (Upgrade
Computer, Replace Computer, New Computer, Refresh
Computer) and how they use different processes.
for the choice of 2007 Office system
versions and deployment options.
Guidance on the primary issues faced when upgrading to
ystem including feature installation states,
conversion issues and file
coexistence with multiple versions of Microsoft Office.
Creating a customised 2007 Office system installation is a
step process. After creating and testing the
deployment package, it can be inserted into the MDT 2008
imaging process so that the customised 2007 Office
system configuration can be included automatically in all
http://www.microsoft.com/technet/windowsvista/default.mspx
http://www.microsoft.com/technet/scriptcenter/default.mspx
http://www.microsoft.com/technet/scriptcenter/scripts/default.mspx
unity/events/winxppro/tnt1-127.mspx

MDT Solution Pack for a Healthcare Environment
Version 1.0.0.0
APPENDIX B
This section provides step-by-
MDT 2008 Deployment Workbench
� Microsoft Office 2007
� Adobe Reader 8
� Java Virtual Machine
� .NET Framework 3.0
Note
The third-party applications listed
use by healthcare organisations
support by Microsoft.
PART I Microsoft Office 2007
To add Microsoft Office 2007 to the Deployment Workbench:
1. Obtain your Microsoft 2007 Office System sour
2. Open the Deployment Workbench
MDT Solution Pack for a Healthcare Environment Administrators Guide
1.0.0.0 Baseline
APPLICATION INSTALLATION
-step guides to adding a number of application installations into the
Deployment Workbench, including:
listed in this Appendix are presented as examples of common applications in
healthcare organisations. Any such references should not be considered an endorsement or
Microsoft Office 2007
To add Microsoft Office 2007 to the Deployment Workbench:
Obtain your Microsoft 2007 Office System source files through the normal channels.
Deployment Workbench, right-click Applications and select New
Prepared by Microsoft
Page 82
NSTALLATION GUIDE
adding a number of application installations into the
in this Appendix are presented as examples of common applications in
y such references should not be considered an endorsement or
normal channels.
New:

MDT Solution Pack for a Healthcare Environment
Version 1.0.0.0
3. On the Application Type
4. On the Details page, complete the
Note
The Application Name
identify and manage the application in the Deployment Workbench.
MDT Solution Pack for a Healthcare Environment Administrators Guide
1.0.0.0 Baseline
Application Type page, click Application with source files:
complete the relevant fields.
Application Name is the only required field, however completing all of the fields will help to
identify and manage the application in the Deployment Workbench.
Prepared by Microsoft
Page 83
ng all of the fields will help to

MDT Solution Pack for a Healthcare Environment
Version 1.0.0.0
5. On the Source page, browse
Office system source files are held
6. On the Destination page
distribution share to store the application source files for use in
MDT Solution Pack for a Healthcare Environment Administrators Guide
1.0.0.0 Baseline
, browse to the local directory, DVD or shared folder where the 2007
ystem source files are held:
page, specify the name of the directory that will be created in the
distribution share to store the application source files for use in the MDT Solution Pack
Prepared by Microsoft
Page 84
to the local directory, DVD or shared folder where the 2007
the name of the directory that will be created in the
MDT Solution Pack:
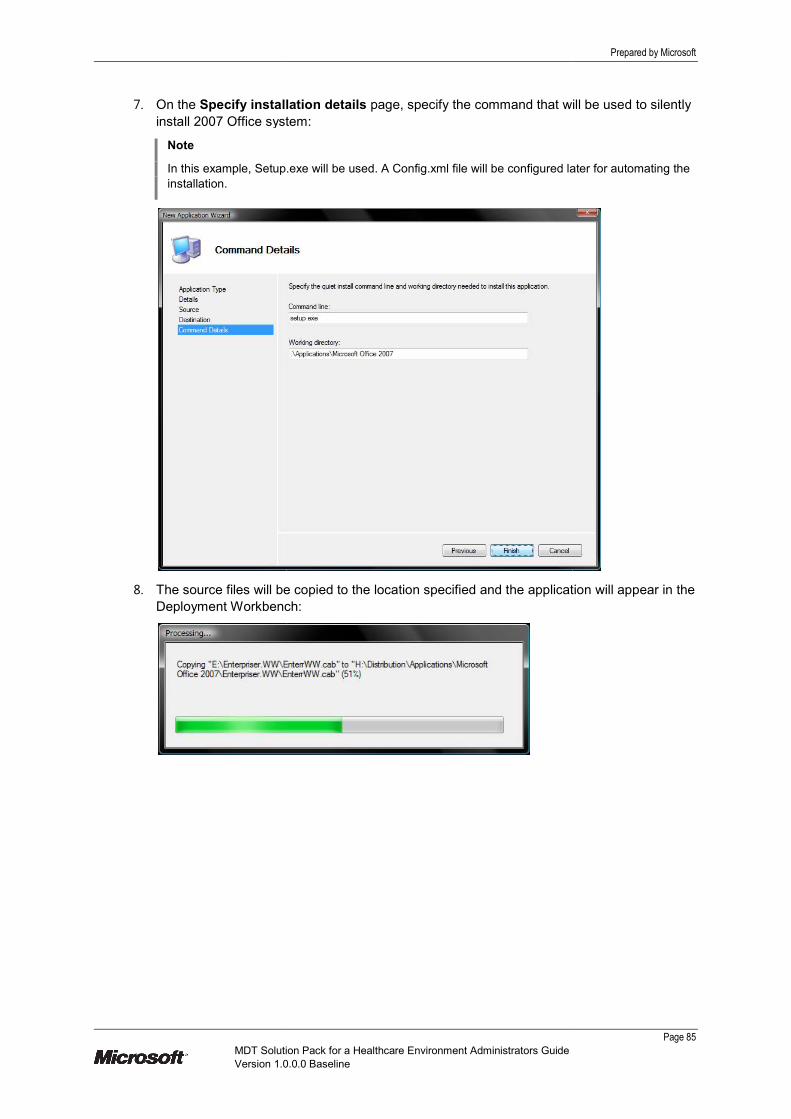
MDT Solution Pack for a Healthcare Environment
Version 1.0.0.0
7. On the Specify installation details
install 2007 Office system
Note
In this example, Setup.exe will be used
installation.
8. The source files will be copied to the location specified and the application will appear in the
Deployment Workbench
MDT Solution Pack for a Healthcare Environment Administrators Guide
1.0.0.0 Baseline
Specify installation details page, specify the command that will be used to silently
ystem:
Setup.exe will be used. A Config.xml file will be configured later for automating the
The source files will be copied to the location specified and the application will appear in the
ench:
Prepared by Microsoft
Page 85
specify the command that will be used to silently
onfig.xml file will be configured later for automating the
The source files will be copied to the location specified and the application will appear in the
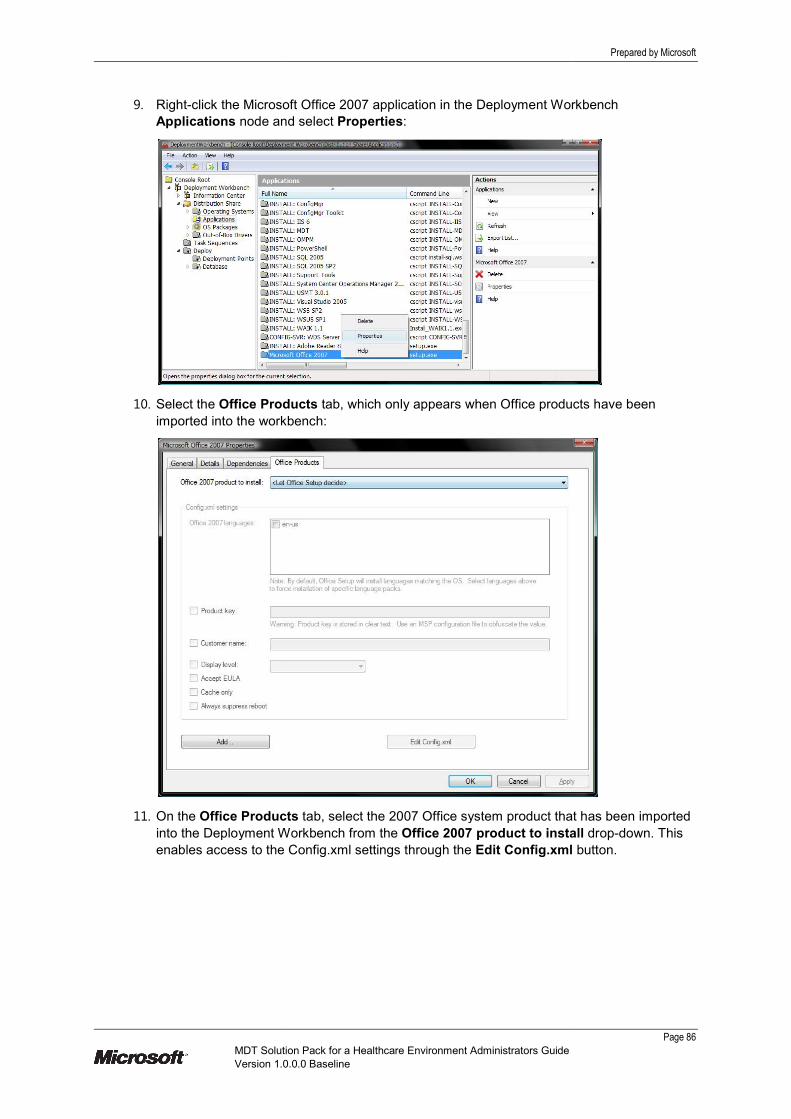
MDT Solution Pack for a Healthcare Environment
Version 1.0.0.0
9. Right-click the Microsoft Office
Applications node and select
10. Select the Office Products
imported into the workbench
11. On the Office Products
into the Deployment Workbench
enables access to the Config.xml settings
MDT Solution Pack for a Healthcare Environment Administrators Guide
1.0.0.0 Baseline
click the Microsoft Office 2007 application in the Deployment Workbench
node and select Properties:
Office Products tab, which only appears when Office products have been
imported into the workbench:
Products tab, select the 2007 Office system product that has been imported
into the Deployment Workbench from the Office 2007 product to install
access to the Config.xml settings through the Edit Config.xml
Prepared by Microsoft
Page 86
application in the Deployment Workbench
only appears when Office products have been
ystem product that has been imported
Office 2007 product to install drop-down. This
onfig.xml button.

MDT Solution Pack for a Healthcare Environment
Version 1.0.0.0
12. Configure the Config.xml settings with your required
Customer name and Display level
select Accept EULA and click
13. The options selected on the
by the 2007 Office system setup to automate the installation process. This file contains the
minimum requirements needed by setup to automate the installation of 2007 Office
14. Close the Config.xml fi
box.
MDT Solution Pack for a Healthcare Environment Administrators Guide
1.0.0.0 Baseline
fig.xml settings with your required Office 2007 language
Display level. If you agree with the terms of the license agreement,
and click Apply.
The options selected on the Office Products tab will be written to the C
ystem setup to automate the installation process. This file contains the
minimum requirements needed by setup to automate the installation of 2007 Office
onfig.xml file (if opened) and click OK to close the Office Properties
Prepared by Microsoft
Page 87
Office 2007 language, Product key,
If you agree with the terms of the license agreement,
Config.xml file used
ystem setup to automate the installation process. This file contains the
minimum requirements needed by setup to automate the installation of 2007 Office system.
Office Properties dialog

MDT Solution Pack for a Healthcare Environment
Version 1.0.0.0
PART II Adobe Reader
To download Acrobat Reader 8:
1. Go to the Adobe Reader
2. Click Different language or operating system?
3. Specify the alternate operat
button.
4. The available versions
Download Adobe Reader
13 The third-party applications shown in this Appendix are presented as examples of common applica
healthcare organisations. Any such references should not be considered an endorsement or support by Microsoft.
14 Adobe Reader download page {R11
MDT Solution Pack for a Healthcare Environment Administrators Guide
1.0.0.0 Baseline
Adobe Reader 8
To download Acrobat Reader 8:
Adobe Reader13 download page
14 on the Adobe Web site.
Different language or operating system?:
Specify the alternate operating system, version and language, and click the
s of Adobe Reader for the selected OS are displayed
Download Adobe Reader for the version required:
party applications shown in this Appendix are presented as examples of common applica
healthcare organisations. Any such references should not be considered an endorsement or support by Microsoft.
R11}: http://www.adobe.com/products/acrobat/readstep2.html
Prepared by Microsoft
Page 88
ing system, version and language, and click the Continue
displayed. Click
party applications shown in this Appendix are presented as examples of common applications in use by
healthcare organisations. Any such references should not be considered an endorsement or support by Microsoft.

MDT Solution Pack for a Healthcare Environment
Version 1.0.0.0
5. Clear Free Google Toolbar
6. A file name similar to ‘
Extracting the Setup Files
In order to customise the setup of Adobe Reader
To extract the setup files:
1. Run the file downloaded in step
installer will extract temporary files
2. When the extraction complete
not click Next.
Depending on the machine
to one of the following temporary locations:
� C:\Users\<user id>
� C:\Documents and Settings
� C:\Documents and Settings
MDT Solution Pack for a Healthcare Environment Administrators Guide
1.0.0.0 Baseline
Free Google Toolbar and click Download:
AdbeRdr812_en_US.exe’ will be downloaded.
Setup Files
In order to customise the setup of Adobe Reader, it is necessary to obtain the underlying .msi files.
file downloaded in step 6 above (for example, AdbeRdr812_en_US.exe
installer will extract temporary files:
When the extraction completes, a prompt for selecting the destination fo
Depending on the machine and operating system in use, the installer setup files
to one of the following temporary locations:
<user id>\AppData\Local\Temp\Adobe Reader 8
Documents and Settings\Administrator\Local Settings\Temp\Adobe Reader 8
Documents and Settings\Administrator\Local Settings\Temp\1\
Prepared by Microsoft
Page 89
ain the underlying .msi files.
_en_US.exe). The
destination folder appears. Do
in use, the installer setup files are copied
Adobe Reader 8
\Adobe Reader 8

MDT Solution Pack for a Healthcare Environment
Version 1.0.0.0
The setup files consist of the following:
� Abcpy.ini
� AcroRead.msi
� Data1.cab
� Setup.exe
� Setup.ini
3. Copy all of the setup files from the tempor
this example, the folder used
4. Cancel the Adobe Reader installation.
MDT Solution Pack for a Healthcare Environment Administrators Guide
1.0.0.0 Baseline
The setup files consist of the following:
Copy all of the setup files from the temporary location to the application source folder
the folder used is <DriveLetter>:\Source\Adobe\Adobe Reader 8
Cancel the Adobe Reader installation.
Prepared by Microsoft
Page 90
ary location to the application source folder – in
Adobe Reader 8:

MDT Solution Pack for a Healthcare Environment
Version 1.0.0.0
Customization Wizard
In order to customise an Adobe Reader installation
Customization Wizard 8. The current version can be downloaded from
Wizard 8 download page15:
Figure 27: Download Page for Adobe Customization Wizard 8
After downloading the wizard, t
To perform the setup customisations:
1. Launch Adobe Customization Wizard 8
15 Adobe Customization Wizard 8 {R12
MDT Solution Pack for a Healthcare Environment Administrators Guide
1.0.0.0 Baseline
Customization Wizard
In order to customise an Adobe Reader installation, it is necessary to download
. The current version can be downloaded from the Adobe Customization
: Download Page for Adobe Customization Wizard 8
downloading the wizard, the setup customisation can be performed.
To perform the setup customisations:
Launch Adobe Customization Wizard 8 from the Start menu:
R12}: http://www.adobe.com/support/downloads/detail.jsp?ftpID=3564
Prepared by Microsoft
Page 91
it is necessary to download the Adobe
Adobe Customization
http://www.adobe.com/support/downloads/detail.jsp?ftpID=3564

MDT Solution Pack for a Healthcare Environment
Version 1.0.0.0
2. From the File menu, s
3. Select the Adobe .msi file.
D:\SOURCE\ACROBAT
4. Use the interface to configure the required customisations. The options chosen are unique
to the healthcare organisation
Installation Tab / Option
Installation Options
Enable Optimization
Enable caching of installer files
Run Installation
If reboot required at the end of
EULA and Online Features
Suppress display of End User License Agreement (EULA)
Online Features – Disable all updates
Disable Help > Purchase Adobe Acrobat
Toolbars and Document Status
Disable Start Meeting
Do not show Beyond Reader at startup
Disable Adobe Online Services
Table 19: Adobe Reader Recommended Customisations
5. From the File menu, select
6. These files are added to
Setup.ini.
When the Adobe Reader setup files have been customised, executing the newly
file will result in a silent and automated
Deployment Workbench, follow the instructions in section
should be used is ’setup.exe’.
MDT Solution Pack for a Healthcare Environment Administrators Guide
1.0.0.0 Baseline
menu, select Open Package.
.msi file. In this example, the .msi file is located at
ACROBAT\AcroRead.msi.
Use the interface to configure the required customisations. The options chosen are unique
healthcare organisation, but some basic recommendations are given in
Installation Tab / Option Configuration State
Clear
Enable caching of installer files Clear
Clear
If reboot required at the end of installation Suppress reboot
Suppress display of End User License Agreement (EULA) Selected
Disable all updates Selected
Purchase Adobe Acrobat Selected
Toolbars and Document Status
Selected
Do not show Beyond Reader at startup Selected
Disable Adobe Online Services Selected
: Adobe Reader Recommended Customisations
select Save Package and close the Adobe Customization Wizard.
added to the D:\SOURCE\ACROBAT folder: AcroRead.mst,
r setup files have been customised, executing the newly
file will result in a silent and automated installation. To add Adobe Reader as an application in the
follow the instructions in section 4.4. The silent installation command that
Prepared by Microsoft
Page 92
Use the interface to configure the required customisations. The options chosen are unique
, but some basic recommendations are given in Table 19:
Customization Wizard.
AcroRead.mst, Setup.exe and
r setup files have been customised, executing the newly-created Setup.exe
To add Adobe Reader as an application in the
The silent installation command that

MDT Solution Pack for a Healthcare Environment
Version 1.0.0.0
PART III Java Virtual Machine
To add Java Virtual Machine to the Deployment Workbench:
1. Go to the Java Downloads for All Operating Systems
Java Virtual Machine17
2. Choose to download for
3. When prompted, select to save the file to the distribution share.
creates a folder ready f
Java Runtime 6:
4. The command line required to install Java Virtual Machine silently has already been added
by the MDT Solution Pack
jre-6u2-windows-i586
IEXPLORER=1 REBOOT=Suppress JAVAUPDATE=0 AgreeToLicense=YES
16 Java Downloads for All Operating Systems
17 The third-party applications shown in this Appendix are presented as examples of common applications in use by
healthcare organisations. Any such references should not be considered an endorsement or support by Microsoft.
MDT Solution Pack for a Healthcare Environment Administrators Guide
1.0.0.0 Baseline
Java Virtual Machine
To add Java Virtual Machine to the Deployment Workbench:
Java Downloads for All Operating Systems Web page16, where
17, is available to download.
for Windows XP/Vista/2000/2003 Offline:
When prompted, select to save the file to the distribution share. The MDT Solution Pack
creates a folder ready for the file to be stored called <Distribution> \ Applicatio
The command line required to install Java Virtual Machine silently has already been added
MDT Solution Pack to the deployment workbench. The command line is as follows:
i586-p-s.exe /quiet /passive /norestart ADDLOCAL=ALL
IEXPLORER=1 REBOOT=Suppress JAVAUPDATE=0 AgreeToLicense=YES
Java Downloads for All Operating Systems {R13}: http://www.java.com/en/download/manual.jsp
party applications shown in this Appendix are presented as examples of common applications in use by
healthcare organisations. Any such references should not be considered an endorsement or support by Microsoft.
Prepared by Microsoft
Page 93
, where Java, including
MDT Solution Pack
Applications \ Sun
The command line required to install Java Virtual Machine silently has already been added
to the deployment workbench. The command line is as follows:
norestart ADDLOCAL=ALL
IEXPLORER=1 REBOOT=Suppress JAVAUPDATE=0 AgreeToLicense=YES
http://www.java.com/en/download/manual.jsp
party applications shown in this Appendix are presented as examples of common applications in use by
healthcare organisations. Any such references should not be considered an endorsement or support by Microsoft.

MDT Solution Pack for a Healthcare Environment
Version 1.0.0.0
5. In the Deployment Workbench,
right-click INSTALL: Sun Java Runtime
6. This application installatio
check box.
MDT Solution Pack for a Healthcare Environment Administrators Guide
1.0.0.0 Baseline
the Deployment Workbench, navigate to Distribution Share > Applications
INSTALL: Sun Java Runtime and select Properties:
llation can now be enabled by selecting the Enable this application
Prepared by Microsoft
Page 94
Applications , then
Enable this application

MDT Solution Pack for a Healthcare Environment
Version 1.0.0.0
PART IV .NET Framework 3.0 (Windows XP Only)
To add .NET Framework 3.0 to the Dep
1. Go to the Microsoft .NET Framework 3.0 Redistributable Package
2. Do not click the Download
programme (2.8 MB) instead of the full distribution package.
Scroll down the page to the
download the full distribution package for the platform you require
18 Microsoft .NET Framework 3.0 Redistributable Package
http://www.microsoft.com/downloads/details.aspx?FamilyID=10cc340b
MDT Solution Pack for a Healthcare Environment Administrators Guide
1.0.0.0 Baseline
.NET Framework 3.0 (Windows XP Only)
To add .NET Framework 3.0 to the Deployment Workbench:
Microsoft .NET Framework 3.0 Redistributable Package18 Web page
Download button as this will only download the installation
programme (2.8 MB) instead of the full distribution package.
Scroll down the page to the Instructions section of the Web page and
istribution package for the platform you require:
distributable Package {R14};
icrosoft.com/downloads/details.aspx?FamilyID=10cc340b-f857-4a14-83f5-25634c3bf043&DisplayLang=en
Prepared by Microsoft
Page 95
Web page:
ation bootstrapper
eb page and click the link to
25634c3bf043&DisplayLang=en

MDT Solution Pack for a Healthcare Environment
Version 1.0.0.0
3. When prompted, select to save the file to the distribution share.
creates a folder ready fo
Microsoft .NET Framework 3.0
4. The command line required to install
by The MDT Solution Pack
dotnetfx3.exe /q /norestart
5. In the Deployment Workbench,
right-click INSTALL-XP: Microsoft .NET Framework 3.0
6. This application installation can now be enabled by
check box.
MDT Solution Pack for a Healthcare Environment Administrators Guide
1.0.0.0 Baseline
When prompted, select to save the file to the distribution share. The MDT Solution Pack
creates a folder ready for the file to be stored called <Distribution> \ Applications
Microsoft .NET Framework 3.0:
The command line required to install .NET Framework 3.0 silently has already been added
MDT Solution Pack to the deployment workbench. The command line is as follows:
dotnetfx3.exe /q /norestart
the Deployment Workbench, navigate to Distribution Share > Applications
XP: Microsoft .NET Framework 3.0 and select Properties
llation can now be enabled by selecting the Enable this application
Prepared by Microsoft
Page 96
MDT Solution Pack
Applications \
silently has already been added
to the deployment workbench. The command line is as follows:
Applications, then
Properties:
Enable this application

MDT Solution Pack for a Healthcare Environment
Version 1.0.0.0
APPENDIX C
PART I Terms and Abbreviations
Abbreviation Definition
ACT Application Compatibility Toolkit
ASP Active Server Pages
BDD Business Desktop Deployment
BIOS Basic Input/Output System
DC Domain Controller
DHCP Dynamic Host Control Protocol
DNS Domain Name System
FTP File Transfer
GUID Globally Unique Identifier
HAL Hardware Abstraction Layer
IIS Internet Information Services
ISO Standards Organisation
JRE Java Runtime Environment
KMS Key Management Service
LTI Lite Touch Installation
MBSA Microsoft Baseline
MDT Microsoft Deployment Toolkit
MMC Microsoft Management Console
MOF Microsoft Operations Framework
MSF Microsoft Solutions Framework
MSI Microsoft Installer
MSXML Microsoft Extensible Mark
OS Operating System
OU Organizational Unit
PNP Plug and Play
RAID Redundant Array of Inexpensive Disks
SMS Systems Management Server 2003
SP Service Pack
TPM Trusted Platform Module
UDDI Universal Description, Discovery, and Integration
USB Universal Serial Bus
USMT User State Migration Tool
VBScript Visual Basic Script
MDT Solution Pack for a Healthcare Environment Administrators Guide
1.0.0.0 Baseline
DOCUMENT INFORMATION
Terms and Abbreviations
Definition
Application Compatibility Toolkit
Active Server Pages
Business Desktop Deployment
Basic Input/Output System
Domain Controller
Dynamic Host Control Protocol
Domain Name System
File Transfer Protocol
Globally Unique Identifier
Hardware Abstraction Layer
Internet Information Services
Standards Organisation
Java Runtime Environment
Key Management Service
Lite Touch Installation
Microsoft Baseline Security Analyser
Microsoft Deployment Toolkit
Microsoft Management Console
Microsoft Operations Framework
Microsoft Solutions Framework
Microsoft Installer
Microsoft Extensible Mark-up Language
Operating System
Organizational Unit
Plug and Play
Redundant Array of Inexpensive Disks
Systems Management Server 2003
Service Pack
Trusted Platform Module
Universal Description, Discovery, and Integration
Universal Serial Bus
State Migration Tool
Visual Basic Script
Prepared by Microsoft
Page 97

MDT Solution Pack for a Healthcare Environment
Version 1.0.0.0
Abbreviation Definition
WDS Windows Deployment Services
WIM Windows Image
Windows AIK Windows Automated Installation Kit
WinPE Windows Pre
WMI Windows Management Instrumentation
WSUS Windows Server
WU Windows Update
XML Extensible Mark
ZTI Zero Touch Installation
Table 20: Terms and Abbreviations
PART II References
Reference Document
R1. Microsoft Download Center:
http://www.microsoft.com/downloads/details.aspx?FamilyID=e481cb0b
fc886956790e&DisplayLang=en
R2. Microsoft TechNet: MOF Executive Overview
http://www.microsoft.com/technet/itsolutions/cits/mo/mof/mofeo.mspx
R3. Automated Build Application Integration
http://www.microsoft.com/industry/healthcare/technology/hpo/desktop/desktop.aspx
R4. Active Directory Design Guide
http://www.microsoft.com/industry/healthcare/technology/hpo/security/activedirectory.aspx
R5. Microsoft TechNet: Microsoft Baseline Security Analyzer:
www.microsoft.com/technet/security/tools/
R6. Microsoft Update: http://www.update.microsoft.com/
R7. MSDN: SQL Server Developer Center
http://msdn2.microsoft.com/en
R8. Microsoft TechNet: Description of the BitLocker Drive Preparation Tool:
http://support.microsoft.com/kb/930063
R9. Microsoft TechNet: Configuring Active Directory to Back up Windows BitLocker Drive Encryption and
Trusted Platform Module Recovery Information:
http://technet2.microsoft.com/WindowsVista/en/library/3dbad515
d1fb6dfcdd411033.mspx?mfr=true
R10. Microsoft Help and Supp
R11. Adobe Web Site: Adobe Reader download page:
R12. Adobe Web Site: Adobe Customization Wizard 8:
http://www.adobe.com/support/downloads/detail.jsp?ftpID=3564
R13. Java Web Site: Java Downloads for All Operating Systems
R14. Microsoft Download Center:
http://www.microsoft.com/downloads/details.aspx?FamilyID=10cc340b
25634c3bf043&DisplayLang=en
Table 21: References
MDT Solution Pack for a Healthcare Environment Administrators Guide
1.0.0.0 Baseline
Definition
Windows Deployment Services
Windows Image
Windows Automated Installation Kit
Windows Pre-Execution Environment
Windows Management Instrumentation
Windows Server Update Services
Windows Update
Extensible Mark-up Language
Zero Touch Installation
References
Microsoft Download Center: MSF Process Model White Paper:
http://www.microsoft.com/downloads/details.aspx?FamilyID=e481cb0b-ac05-42a6-bab8-
fc886956790e&DisplayLang=en
MOF Executive Overview:
http://www.microsoft.com/technet/itsolutions/cits/mo/mof/mofeo.mspx
Automated Build Application Integration:
http://www.microsoft.com/industry/healthcare/technology/hpo/desktop/desktop.aspx
Active Directory Design Guide:
http://www.microsoft.com/industry/healthcare/technology/hpo/security/activedirectory.aspx
Microsoft TechNet: Microsoft Baseline Security Analyzer:
www.microsoft.com/technet/security/tools/mbsahome.mspx
http://www.update.microsoft.com/
SQL Server Developer Center: RAID Levels and SQL Server:
http://msdn2.microsoft.com/en-us/library/ms190764(SQL.90).aspx
Microsoft TechNet: Description of the BitLocker Drive Preparation Tool:
http://support.microsoft.com/kb/930063
Microsoft TechNet: Configuring Active Directory to Back up Windows BitLocker Drive Encryption and
Trusted Platform Module Recovery Information:
http://technet2.microsoft.com/WindowsVista/en/library/3dbad515-5a32-4330-ad6f-
d1fb6dfcdd411033.mspx?mfr=true
Microsoft Help and Support: Windows Vista setup log file locations: http://support.microsoft.com/kb/927521
Adobe Web Site: Adobe Reader download page: http://www.adobe.com/products/acrobat/readstep2.html
Adobe Web Site: Adobe Customization Wizard 8:
http://www.adobe.com/support/downloads/detail.jsp?ftpID=3564
Downloads for All Operating Systems: http://www.java.com/en/download/manual.jsp
Microsoft Download Center: Microsoft .NET Framework 3.0 Redistributable Package:
http://www.microsoft.com/downloads/details.aspx?FamilyID=10cc340b-f857-4a14-83f5-
25634c3bf043&DisplayLang=en
Prepared by Microsoft
Page 98
Version
1.0.0.0
1.0.0.0
Microsoft TechNet: Configuring Active Directory to Back up Windows BitLocker Drive Encryption and
http://support.microsoft.com/kb/927521
//www.adobe.com/products/acrobat/readstep2.html
http://www.java.com/en/download/manual.jsp `


