52
Measure Guideline: Transitioning From Three- Coat Stucco to One-Coat Stucco With EPS K. Brozyna, G. Davis, and A. Rapport IBACOS, Inc. April 2012
Measure Guideline: Transitioning From Three-Coat Stucco to One-Coat Stucco With EPS K. Brozyna, G. Davis, and A. Rapport IBACOS, Inc.
April 2012

This report received minimal editorial review at NREL
NOTICE
This report was prepared as an account of work sponsored by an agency of the United States government. Neither the United States government nor any agency thereof, nor any of their
employees, makes any warranty, express or implied, or assumes any legal liability or responsibility for the accuracy, completeness, or usefulness of any information, apparatus,
product, or process disclosed, or represents that its use would not infringe privately owned rights. Reference herein to any specific commercial product, process, or service by trade name,
trademark, manufacturer, or otherwise does not necessarily constitute or imply its endorsement, recommendation, or favoring by the United States government or any agency thereof. The views and opinions of authors expressed herein do not necessarily state or reflect those of the United
States government or any agency thereof.
Available electronically at http://www.osti.gov/bridge
Available for a processing fee to U.S. Department of Energy and its contractors, in paper, from:
U.S. Department of Energy Office of Scientific and Technical Information
P.O. Box 62 Oak Ridge, TN 37831-0062
phone: 865.576.8401 fax: 865.576.5728
email: mailto:[email protected]
Available for sale to the public, in paper, from: U.S. Department of Commerce
National Technical Information Service 5285 Port Royal Road Springfield, VA 22161 phone: 800.553.6847
fax: 703.605.6900 email: [email protected]
online ordering: http://www.ntis.gov/ordering.htm
Printed on paper containing at least 50% wastepaper, including 20% postconsumer waste
iii
Measure Guideline: Transitioning From Three-Coat Stucco to One-Coat Stucco With EPS
Prepared for:
Building America
Building Technologies Program
Office of Energy Efficiency and Renewable Energy
U.S. Department of Energy
Prepared by:
K. Brozyna, G. Davis, A. Rapport
IBACOS, Inc.
2214 Liberty Avenue
Pittsburgh, Pennsylvania 15222
NREL Technical Monitor: Michael Gestwick
Prepared under Subcontract No. KNDJ-0-40341-02
April 2012

iv
[This page left blank]

v
Contents List of Figures ............................................................................................................................................ vi List of Tables ............................................................................................................................................. vii Definitions ................................................................................................................................................. viii Executive Summary ................................................................................................................................... ix 1 Introduction ........................................................................................................................................... 1 2 Initial Risk Analysis .............................................................................................................................. 3
2.1 Site and Safety Risks ...........................................................................................................3 2.2 Stucco Installation Risks ......................................................................................................4 2.3 Code Issues ..........................................................................................................................4 2.4 Trade Resources ...................................................................................................................4 2.5 Warranty Concerns ..............................................................................................................5
3 Tradeoffs ............................................................................................................................................... 7 3.1 Selection Criteria for One-Coat Stucco With EPS ..............................................................7
3.1.1 Cost and Energy Performance .................................................................................7 3.1.2 Durability and Reliability ........................................................................................8 3.1.3 Occupant Comfort, Health, and Safety ....................................................................9
3.2 System Interactions ..............................................................................................................9 3.2.1 Fenestration ..............................................................................................................9 3.2.2 Heating, Ventilation, and Air Conditioning Loads and Sizing ..............................10
3.3 Cost and Performance of Variations Using One-Coat Stucco ...........................................10 3.3.1 Trowel or Gun Application Methods .....................................................................11 3.3.2 Energy Efficiency ..................................................................................................11
4 Measure Implementation Details ....................................................................................................... 13 4.1 One-Coat Stucco Implementation Details .........................................................................16
4.1.1 Building Preparations.............................................................................................16 4.1.2 Flashing Components.............................................................................................17 4.1.3 Drainage Plane Installation ....................................................................................19 4.1.4 Weep Screed Installation .......................................................................................21 4.1.5 Casing Bead Installation ........................................................................................23 4.1.6 Installing the EPS Insulated Sheathing (Bond Break) ...........................................25 4.1.7 Installing Lath Over EPS .......................................................................................28 4.1.8 Expansion Joints ....................................................................................................29 4.1.9 Installing Corner Bead ...........................................................................................30 4.1.10 Applying the Stucco Coats.....................................................................................30
References ................................................................................................................................................. 37 Bibliography .............................................................................................................................................. 38 Attachment A: Material Specifications for Applying One-Coat Stucco Over EPS ............................. 40 Attachment B: Checklist for Applying One-Coat Stucco Over EPS Foam .......................................... 41
vi
List of Figures Figure 1. Beveling of EPS around a window .......................................................................................... 10 Figure 2. A darby tool ............................................................................................................................... 11 Figure 3. Application of stucco using trowels (left) and a stucco gun (right) .................................... 11 Figure 4. Isometric drawing of a finished one-coat stucco wall assembly ......................................... 16 Figure 5. Proper sloping of recessed window sill ................................................................................. 17 Figure 6. Flashing detail at roof-to-wall transition................................................................................. 17 Figure 7. Proper flashing of window (left) and penetration (right) in a wall assembly ...................... 18 Figure 8. Proper layering of building paper (drainage plane) and window flashing .......................... 20 Figure 9. Liquid-applied coating as drainage plane and window flashing (Courtesy of Protecto
Wrap) .................................................................................................................................................... 21 Figure 10. Detail showing proper layering of weep screed over the drainage plane (Courtesy of
BuildIQ) ................................................................................................................................................ 22 Figure 11. Proper vertical alignment of weep screed on an exterior wall ........................................... 23 Figure 12. Detail of casing bead installed against a window (Courtesy of BuildIQ) .......................... 24 Figure 13. Proper installation of casing bead below a window............................................................ 24 Figure 14. Proper installation of casing bead below wood trim........................................................... 25 Figure 15. Proper installation of EPS bond break with taped joints .................................................... 26 Figure 16. Proper alignment and taping of EPS panels at seams with OSB shear panel ................. 27 Figure 17. Minimize the number of fasteners used to secure the EPS to framing ............................. 27 Figure 18. Proper alignment of EPS panels at corners ......................................................................... 28 Figure 19. Proper installation of lath on EPS ......................................................................................... 29 Figure 20. Expansion joints installed on a wall (left) and below a window (right) ............................. 30 Figure 21. Properly installed corner bead (Courtesy of BuildIQ) ......................................................... 30 Figure 22. Stucco base coat during application .................................................................................... 31 Figure 23. Hydrating (left) and curing (right) the stucco base coat ..................................................... 32 Figure 24. pH testing of the base coat .................................................................................................... 33 Figure 25. Delamination of stucco finish coat ....................................................................................... 33 Figure 26. Architectural plant-on pieces being glued to a wall system .............................................. 34 Figure 27. Hydration of the finish coat ................................................................................................... 34
*Unless otherwise noted, all figures and photos were created by IBACOS.

vii
List of Tables Table 1. Stucco Installation Issues and Concerns .................................................................................. 4 Table 2. Installed Costs and Source Energy Consumption of Insulation Strategies in Climate
Zones ..................................................................................................................................................... 7 Table 3. One-Coat Stucco Installation Sequence, Critical Steps, Risks, and Benefits ...................... 14
*Unless otherwise noted, all tables were created by IBACOS.

viii
Definitions
BEopt Building Energy Optimization software
EPS Expanded Polystyrene
ICC International Code Council
ICC-ES International Code Council Evaluation Service
IECC International Energy Conservation Code
OSB Oriented Strand Board
XPS Extruded Polystyrene

ix
Executive Summary
This guide has been developed to help residential new construction builders transition from using a three-coat stucco system to a one-coat stucco system installed over 1 in. of expanded polystyrene (EPS) insulation.
A one-coat stucco system is a durable and effective wall cladding system when correctly installed. The addition of a continuous layer of 1-in. EPS provides better insulating properties than a typical three-coat stucco system that does not use insulating sheathing. The overall effect of the EPS insulating sheathing used in a one-coat system is to improve comfort conditions for building occupants, versus a wall assembly where no insulating sheathing is installed. The added layer of continuous insulation provides a thermal break that reduces the heat flow rate through the framing members and leads to more stable temperature conditions inside the house. When included with other energy-saving measures in a residential new construction project, a one-coat stucco wall cladding system can become part of an energy-efficient, systems-integrated measure package. The energy savings of a one-coat stucco system come from the addition of the EPS exterior sheathing rather than the stucco finish. The cost and time savings come from the one-coat stucco procedures and materials.
This guide is organized in three main sections to address the installation of a one-coat stucco system: initial risk analysis, tradeoffs, and measure implementation details. The initial risk analysis examines the potential risks of installing a one-coat stucco system that must be anticipated and addressed during the design, construction, and warranty periods. The section on tradeoffs presents an energy performance analysis of installing a one-coat stucco system with the EPS exterior sheathing compared to the regionally common open stud wall with fiberglass batt insulation system. Measure implementation steps provide a more detailed description of the step-by-step installation of a one-coat stucco system, including critical information on proper installation, risk identification, and mitigation. This guide also includes a reference section and bibliography of valuable resources for builders, designers, and code officials. Appendices to this guide include a material specification list based on International Code Council Evaluation Service Acceptance Criteria and American Society of Testing and Materials reports and an installation checklist to be used in the field.

1
1 Introduction
In the western United States, stucco is the dominant exterior finish for residential construction. The two most common stucco systems in use are the traditional three-coat system and the one-coat system. Three-coat stucco consists of a base layer or scratch coat, a fill layer or brown coat, and a finish layer that often is called the color coat. Each layer is applied separately and requires curing time between each coat. Ironically, a one-coat system is typically made of two coats: the base coat and the color, or finish, coat. Three-coat stucco applications are typically ⅞ in. thick: the scratch and brown coats are each ⅜ in. thick, and the finish coat is usually about ⅛ in. thick. A one-coat application is designed to finish out at only ½ in. thickness, not including the thickness of the EPS; the base coat is applied at ⅜ in. thick, and the finish coat is ⅛ in. thick. The thinner profile of one-coat stucco means less material to apply, leading to about a 30% reduction in application time for the one-coat material versus the application time for the three-coat material. These two factors, less material and less time, are the primary attraction to builders who are considering transitioning from a three-coat to a one-coat stucco system.
This Measure Guideline promotes the cost and energy savings benefits of a one-coat stucco wall-cladding system using expanded polystyrene (EPS) insulated sheathing over a traditional three-coat stucco system that does not include insulated wall sheathing, and it encourages builders to adopt the one-coat stucco system over the traditional three-coat stucco system that the builders are currently installing. The guideline identifies the potential risks associated with the installation of a one-coat stucco system and provides mitigation strategies to reduce these risks. Also, the guideline addresses the real effects on the design and construction of a residential building when using a one-coat stucco wall-cladding system and presents options within a one-coat system that can affect the cost and performance of the system. Finally, this guideline provides a clear description of the correct installation process of a one-coat stucco wall-cladding system using EPS insulated sheathing, complete with detailed illustrations of the installation process and a checklist to ensure that high-quality results are achieved.
This guideline is intended for builders who are currently using a three-coat stucco wall-cladding system and who are considering adopting new whole-house energy savings measures. These builders will be looking to adopt new energy-saving measures that align as closely as possible with their current construction practices and that involve as few significant design changes as possible to minimize cost increases. This guideline provides essential information for these builders to make an informed decision about whether or not to adopt a one-coat stucco system with EPS insulated sheathing and provides these builders with general instructions for implementing this change. This guideline also is intended for design professionals (e.g., architects, engineers, illustrators) as a basis for informed design changes and for developing appropriate details for construction drawings and specifications. In addition, this guideline is a useful tool for trade contractors to scope new work proposals and to reinforce their awareness of
Important Definition: Base Coat. The initial stucco layer in a one-coat system that is embedded into the metal lath. The thicker and stronger of the two stucco layers, it provides a smooth base for installation of the finish coat. In three-coat stucco, it is also known as the scratch coat.
Important Definition: Finish Coat. The final layer of stucco, often with color added or that may be painted. It is also known as the color coat.

2
the benefits and potential risks of the one-coat system. Finally, this guideline is also intended to help resolve potential conflicts between builders and code officials in the adoption of a one-coat system.
This guideline is important to the residential building industry because it presents a highly energy-efficient and durable building assembly that reflects current aesthetics and traditional building practices. A one-coat stucco wall-cladding system maintains the look of a traditional three-coat stucco system and uses many of the same materials and application practices. With the addition of a continuous insulating layer of EPS behind the stucco, however, energy savings are realized that enhance the appeal of the one-coat system for achieving higher levels of energy-efficient new construction. This is critical as new energy codes and voluntary compliance programs continue to raise their energy savings targets. For occupants of homes using a one-coat stucco system, the EPS may also provide comfort benefits by reducing the flow rate of heat through the exterior wall assembly. Cost savings are realized for builders, stucco contractors, and building occupants from using the one-coat stucco system with EPS instead of a traditional three-coat system.
3
2 Initial Risk Analysis
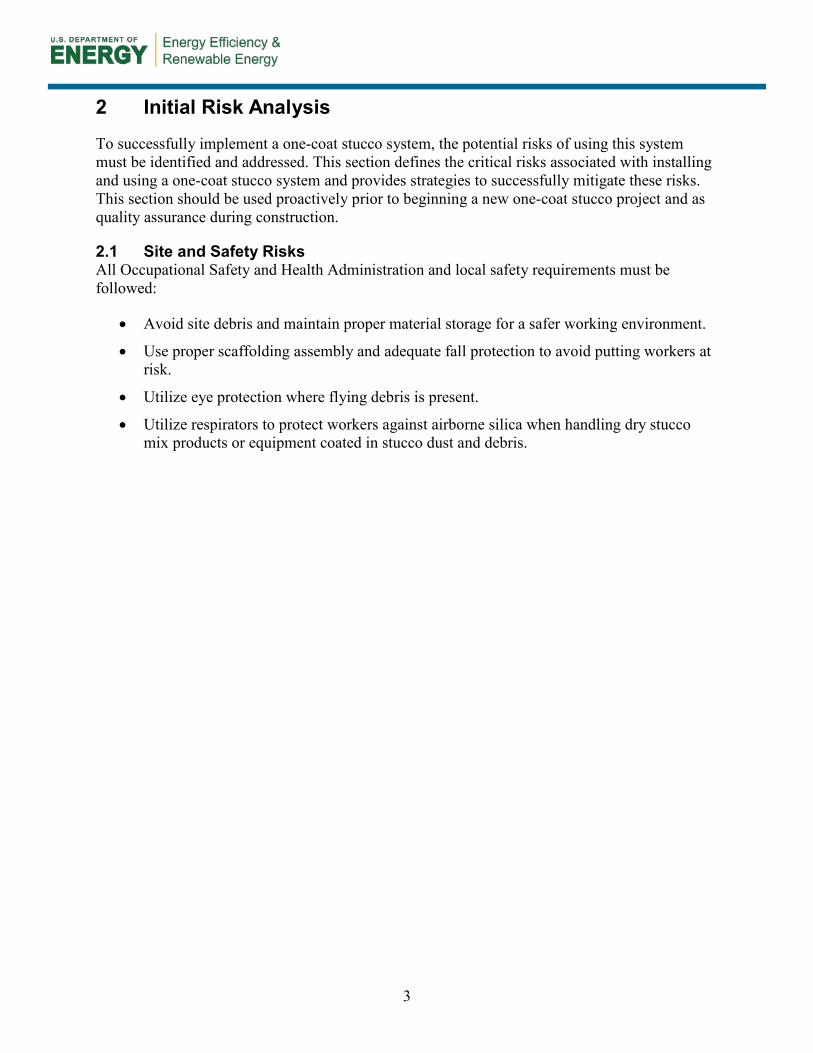
To successfully implement a one-coat stucco system, the potential risks of using this system must be identified and addressed. This section defines the critical risks associated with installing and using a one-coat stucco system and provides strategies to successfully mitigate these risks. This section should be used proactively prior to beginning a new one-coat stucco project and as quality assurance during construction.
2.1 Site and Safety Risks All Occupational Safety and Health Administration and local safety requirements must be followed:
• Avoid site debris and maintain proper material storage for a safer working environment.
• Use proper scaffolding assembly and adequate fall protection to avoid putting workers at risk.
• Utilize eye protection where flying debris is present.
• Utilize respirators to protect workers against airborne silica when handling dry stucco mix products or equipment coated in stucco dust and debris.
4
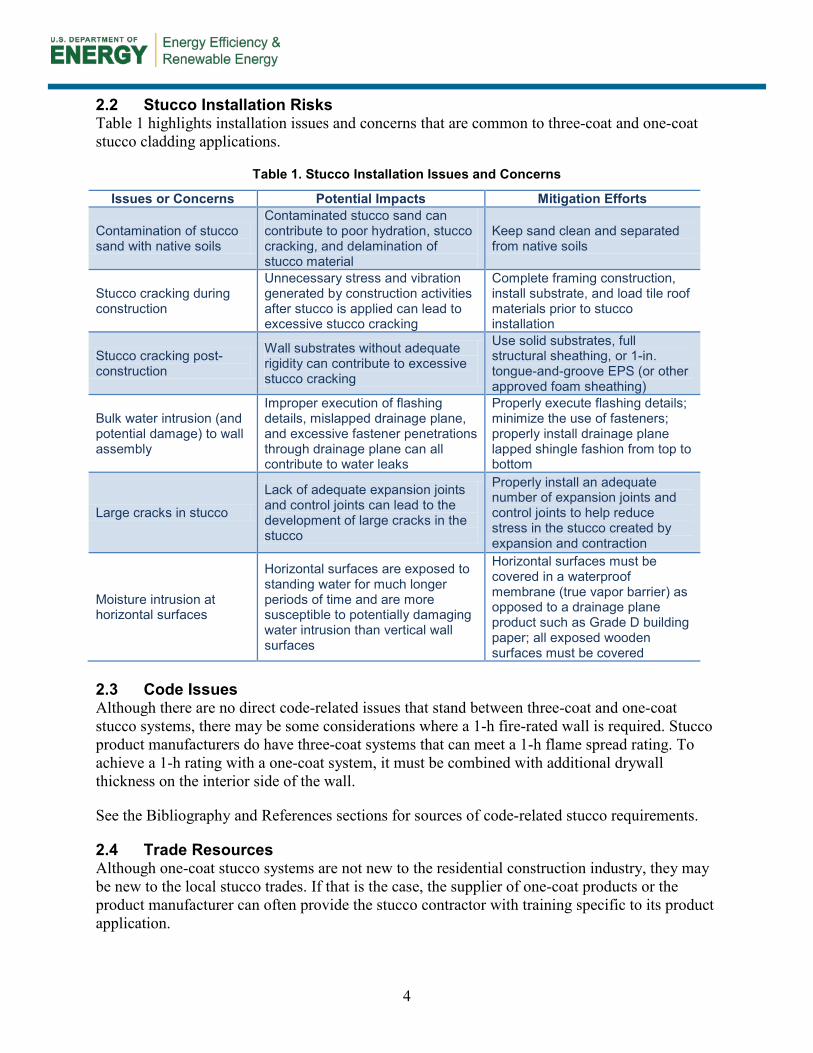
2.2 Stucco Installation Risks Table 1 highlights installation issues and concerns that are common to three-coat and one-coat stucco cladding applications.
Table 1. Stucco Installation Issues and Concerns
Issues or Concerns Potential Impacts Mitigation Efforts
Contamination of stucco sand with native soils
Contaminated stucco sand can contribute to poor hydration, stucco cracking, and delamination of stucco material
Keep sand clean and separated from native soils
Stucco cracking during construction
Unnecessary stress and vibration generated by construction activities after stucco is applied can lead to excessive stucco cracking
Complete framing construction, install substrate, and load tile roof materials prior to stucco installation
Stucco cracking post-construction
Wall substrates without adequate rigidity can contribute to excessive stucco cracking
Use solid substrates, full structural sheathing, or 1-in. tongue-and-groove EPS (or other approved foam sheathing)
Bulk water intrusion (and potential damage) to wall assembly
Improper execution of flashing details, mislapped drainage plane, and excessive fastener penetrations through drainage plane can all contribute to water leaks
Properly execute flashing details; minimize the use of fasteners; properly install drainage plane lapped shingle fashion from top to bottom
Large cracks in stucco
Lack of adequate expansion joints and control joints can lead to the development of large cracks in the stucco
Properly install an adequate number of expansion joints and control joints to help reduce stress in the stucco created by expansion and contraction
Moisture intrusion at horizontal surfaces
Horizontal surfaces are exposed to standing water for much longer periods of time and are more susceptible to potentially damaging water intrusion than vertical wall surfaces
Horizontal surfaces must be covered in a waterproof membrane (true vapor barrier) as opposed to a drainage plane product such as Grade D building paper; all exposed wooden surfaces must be covered
2.3 Code Issues Although there are no direct code-related issues that stand between three-coat and one-coat stucco systems, there may be some considerations where a 1-h fire-rated wall is required. Stucco product manufacturers do have three-coat systems that can meet a 1-h flame spread rating. To achieve a 1-h rating with a one-coat system, it must be combined with additional drywall thickness on the interior side of the wall.
See the Bibliography and References sections for sources of code-related stucco requirements.
2.4 Trade Resources Although one-coat stucco systems are not new to the residential construction industry, they may be new to the local stucco trades. If that is the case, the supplier of one-coat products or the product manufacturer can often provide the stucco contractor with training specific to its product application.

5
Important Definition: Hydration. The chemical reaction that occurs when water is added to cement, causing it to bond together and harden all the components within stucco.
Important Definition: Weep Screed. A hardware component typically used as a bottom termination edge of a stucco cladding. The weep screed provides a drainage point for water migrating down through or behind the stucco and provides a depth gauge to help establish the proper thickness of the stucco.
2.5 Warranty Concerns • Cracking – Similar to all concrete and cement-based plaster, cracks will occur. The
objective with stucco is to keep the cracks very fine and evenly distributed. Large cracks occur when proper preparation or installation procedures are not followed or when the stucco is improperly mixed (e.g., too much water, too much sand, wrong sand particle size). When large cracks do occur, stucco is fairly easy to repair; correcting the root cause of the crack may be the greater challenge.
• Delamination – Delamination is the separation of stucco layers from each other. This often results in the outer layer falling or flaking off the wall surface, exposing the unprotected layer beneath it. This issue can be almost eliminated by following proper mixing and hydration procedures. When delamination does occur, the surface of the base coat must be properly prepared, and a new finish coat must be applied and carefully blended into the existing finish (likely affecting the entire elevation).
• Paint burning – Paint burning is a loss of paint continuity on a stucco exterior. Fresh stucco is highly alkaline, and its pH level ideally lowers to 10 or below as it cures. If stucco is not hydrated properly, its pH level may be too high for painting. Paint burning occurs when stucco is at pH levels higher than 10. At a high pH level, stucco may react to rainfall and splashing with a short-term rise in pH, burning (attacking) the paint and breaking it down to reduce its sheen and color uniformity. The breakdown of the paint coating allows further water entry and subsequent paint burning. The result is a loss of sheen and a mottled appearance on the exterior of the home. Paint burning is particularly an issue in areas of the exterior where water tends to sit on the stucco, such as at eyebrow details. Paint burning can lead to aesthetic issues in the form of chips, holidays (small areas of missing paint), and large areas that have no paint coverage. Paint burning can be avoided by properly hydrating the stucco, installing a primer coat and adequate first and second coats of paint, and achieving consistent paint applications by using proper spraying with backrolling to have complete coverage without bare spots.
• Water intrusion through the foundation – This condition occurs when water cannot properly drain through the stucco at the base of the exterior wall. This takes place when the weep screed is blocked by finished landscaping or is covered by the stucco material during installation. Wicking can also occur when the stucco is installed to grade, providing a porous pathway for water to reach the framing and preventing water from draining at the base of the wall. Also, if the drainage plane has not been extended at least 1 in. below the wall-to-foundation intersection, the sill-to-foundation detail will be exposed to water intrusion. This risk can be avoided by terminating the stucco 8 in. above grade with a weep screed that has unobstructed holes and by extending the drainage plane a minimum of 1 in. past the wall-to-foundation

6
intersection (with the weep screed installed over the drainage plane as shown in Figure 10 later in this document).
• Fading or uneven color – This condition is fairly common to integral stucco color coats and is different than the effects of paint burning. Homeowners should be educated to expect some color variation as a natural effect of the cladding. If excessive, fading or uneven color can be remedied with a fog coat of stucco coloring that is spray applied to the finish surface.
7
3 Tradeoffs
Before proceeding with the proper installation of a one-coat stucco system, it is valuable to understand the cost and performance tradeoffs to using a one-coat system versus other wall cladding systems. The following sections explore the selection criteria for choosing a one-coat system over other wall-cladding systems, interactions with other building systems that may affect cost and performance, and variations within a one-coat system with cost and performance implications.
3.1 Selection Criteria for One-Coat Stucco With EPS The choice of wall cladding has implications to the cost and performance of a new construction project. This section explores the costs associated with one-coat stucco as a wall insulation strategy compared with other wall insulation strategies as well as the costs associated with installation, warranty, and risk. This section also explores the performance of a one-coat stucco system with a focus on the energy efficiency, durability, and reliability of the system and implications to comfort, health, and safety of the building occupants.
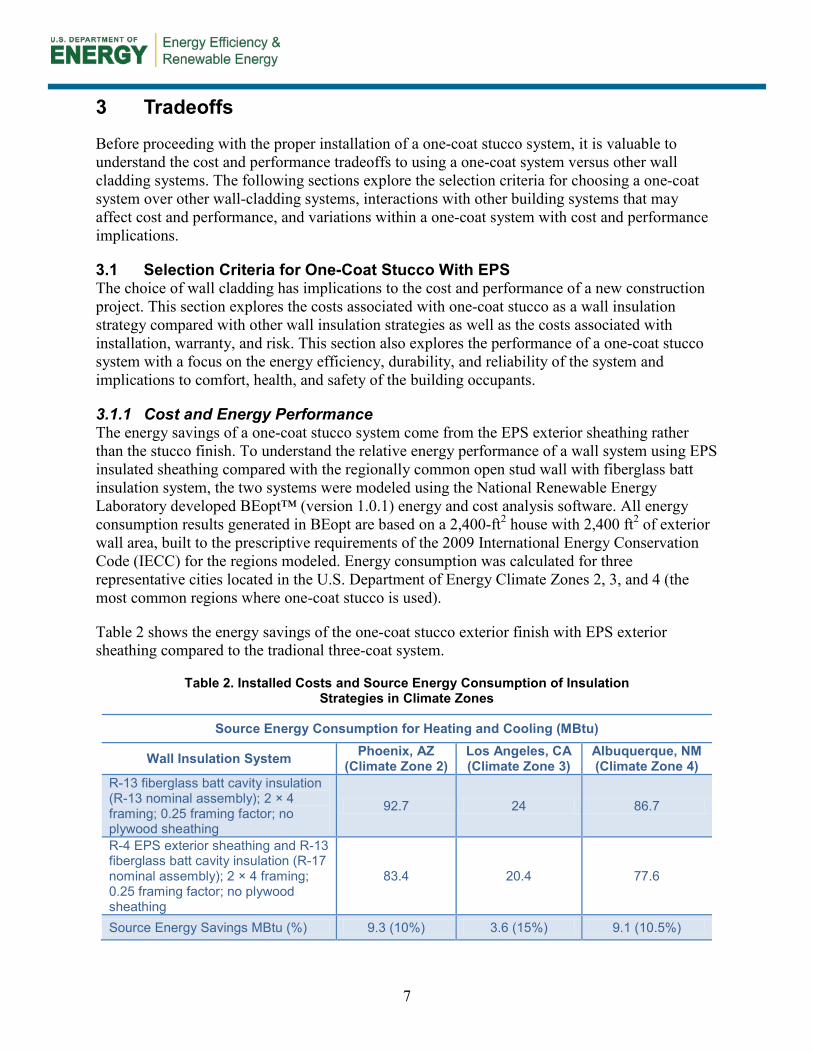
3.1.1 Cost and Energy Performance The energy savings of a one-coat stucco system come from the EPS exterior sheathing rather than the stucco finish. To understand the relative energy performance of a wall system using EPS insulated sheathing compared with the regionally common open stud wall with fiberglass batt insulation system, the two systems were modeled using the National Renewable Energy Laboratory developed BEopt™ (version 1.0.1) energy and cost analysis software. All energy consumption results generated in BEopt are based on a 2,400-ft2 house with 2,400 ft2 of exterior wall area, built to the prescriptive requirements of the 2009 International Energy Conservation Code (IECC) for the regions modeled. Energy consumption was calculated for three representative cities located in the U.S. Department of Energy Climate Zones 2, 3, and 4 (the most common regions where one-coat stucco is used).
Table 2 shows the energy savings of the one-coat stucco exterior finish with EPS exterior sheathing compared to the tradional three-coat system.
Table 2. Installed Costs and Source Energy Consumption of Insulation Strategies in Climate Zones
Source Energy Consumption for Heating and Cooling (MBtu)
Wall Insulation System Phoenix, AZ (Climate Zone 2)
Los Angeles, CA (Climate Zone 3)
Albuquerque, NM (Climate Zone 4)
R-13 fiberglass batt cavity insulation (R-13 nominal assembly); 2 × 4 framing; 0.25 framing factor; no plywood sheathing
92.7 24 86.7
R-4 EPS exterior sheathing and R-13 fiberglass batt cavity insulation (R-17 nominal assembly); 2 × 4 framing; 0.25 framing factor; no plywood sheathing
83.4 20.4 77.6
Source Energy Savings MBtu (%) 9.3 (10%) 3.6 (15%) 9.1 (10.5%)
8
Per the RS Means 2008 Residential Cost Data (Mewis 2007), the cost for traditional three-coat stucco is $3.20/ft2; a one-coat system over EPS is $2.90/ft2. Overall the one-coat system is approximately $1.00/ft2 cheaper than the three-coat system. This difference in price is based on an increase for the EPS foam of $0.71/ft2 and a decrease of $1.01/ft2 for the one-coat application of stucco versus the three-coat application. From an interview with Kenyon Plastering, a stucco contractor serving five southwestern states, in transitioning from three-coat to one-coat, the one-coat system has proven to be easier to install than a three-coat system. Turnaround time to install a one-coat system, even with the added layer of EPS, is less than the time required to install a three-coat system. This is largely due to the reduced number of stucco layers plus the reduced number of on-site trips for installation with reduced overall waiting time for hydration and curing. Coordination of EPS and lath install in one trip has improved the efficiency. For the contractor, there are lower warranty costs and fewer warranty issues because of the better water management properties of the one-coat stucco system over those of a three-coat system (see Section 3.1.2, Durability and Reliability). These benefits allow the contractor to offer the one-coat stucco system at a lower price to the builder.
3.1.2 Durability and Reliability The continuous layer of EPS insulating sheathing on the exterior of the wall in one-coat stucco systems enhances the thermal performance of the wall over the three-coat stucco system regardless of climate zone. The continuous layer of insulation provided by EPS, when installed against a cavity-type wall system (such as 2 × 4 wood frame construction) helps to reduce the effects of thermal bridging. When the temperature difference between the interior and exterior of a house increases (during extreme cold or heat), the increased rate of heat loss or gain through the framing members can become visible on a three-coat stucco system as condensation or frost that adheres to the exterior of the stucco where the framing members are located. This is called ghosting. Over time, the parts that are damper tend to collect more dust from the air, and as a result, the ghosting becomes permanently etched in the wall surface. Eliminating this effect as well as improving the overall thermal performance of the wall system provide additional motivation to consider the one-coat stucco system.
Although three-coat stucco is the tradional method that many builders and tradespersons are familiar with, a one-coat stucco system has better capacity than a three-coat system to effectively manage bulk water and water vapor movement in a wall assembly. This capacity for water management is largely due to the addition of the EPS in the one-coat assembly. The EPS used for the stucco substrate typically has vertical channels manufactured into the back of the panels that allow bulk water to drain through the assembly.
Important Definition: Metal Lath (or Lath). Typically a hexagon wire mesh (similar to chicken wire) that becomes bonded within the base layer of stucco to provide structural integrity. Lath designed for inverted surfaces, such as under soffits, is typically expanded metal (or diamond shaped) product that has greater rigidity and much more surface area to which the stucco can bond.
Important Definition: Thermal Bridging. A phenomenon that occurs when heat flows through the solid framing members in a wall assembly by conduction. Because the R-value of 2 × 4 wall framing is around 3.5 as opposed to the typical 2 × 4 wall cavity insulation value of R-13, the framing members move heat much faster.
9
Also, the EPS is a semipermeable material with a permeance (perm) rating of 2.0 to 5.8 that allows water vapor to transfer through it at a slower rate than through house wrap or building paper. (Most house wrap and building paper are greater than 10 perms.) This quality will help mitigate against the effects of vapor drive that could lead to condensation and moisture damage inside the wall assembly.
The reliability of the one-coat stucco system with EPS compared to the three-coat stucco system is not a primary concern when choosing between the two systems. Both one-coat and three-coat stucco systems are well-established industry practices with a defined set of handling, installation, and maintenance instructions. Insulation systems using EPS or extruded polystyrene (XPS) as exterior sheathing products are also well established and include clear manufacturer instructions for proper installation and performance.
There are real concerns with the durability and reliability of any stucco system as it relates to proper installation techniques and potential risks. These concerns are discussed in detail in Section 2, Initial Risk Analysis and Section 4, Measure Implementation Details of this Measure Guideline.
3.1.3 Occupant Comfort, Health, and Safety The overall effect of the EPS insulating sheathing used in a one-coat system is to improve comfort conditions for building occupants, versus a wall assembly where no insulating sheathing is installed. The added layer of continuous insulation provides a thermal break that reduces the heat flow rate through the framing members and leads to more stable temperature conditions inside the house.
See Section 2, Initial Risk Analysis and Section 4, Measure Implementation Details of this Measure Guideline for associated occupant health and safety concerns related to stucco installation.
3.2 System Interactions Using a one-coat stucco system over EPS has implications for the design and performance of other house systems. The following sections describe the most significant interactions with other building systems.
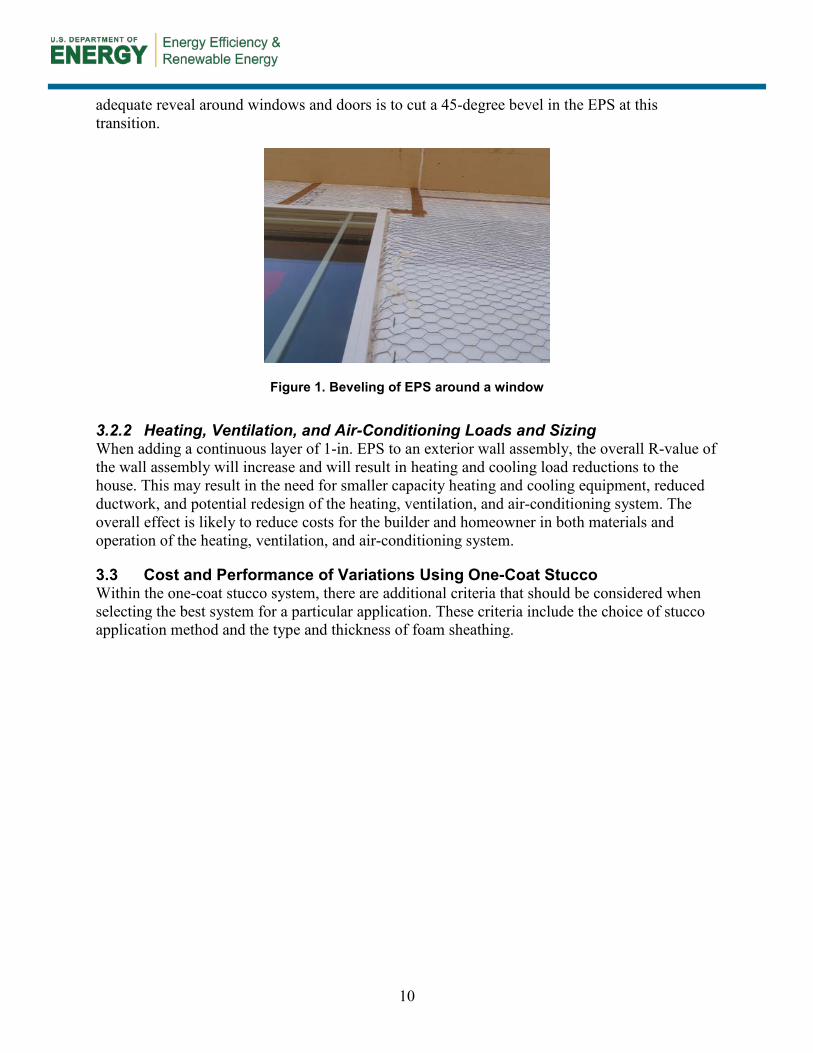
3.2.1 Fenestration The overall wall thickness will increase by around ⅝ in. when using one-coat stucco over 1 in. of EPS instead of three-coat stucco over a 2 × 4, open frame wall. Because the windows and doors are typically fastened directly to the framing or structural sheathing, the increased thickness of the wall will not affect the interior jamb depths on fenestration products; however, the amount of reveal on the exterior will be affected. As shown in Figure 1, a common approach to providing
Important Definition: Permeance (Perm). A measure of the rate of water vapor transmission through a material.
Important Definition: Vapor Drive. The force of water vapor movement from areas of higher to lower concentrations. The greater the difference in concentrations, the stronger the “drive.”
Important Definition: Thermal Break. An element of low thermal conductivity, such as foam plastic insulation, which is placed in an assembly to reduce or prevent the flow of thermal energy between conductive materials.
10
adequate reveal around windows and doors is to cut a 45-degree bevel in the EPS at this transition.
Figure 1. Beveling of EPS around a window
3.2.2 Heating, Ventilation, and Air-Conditioning Loads and Sizing When adding a continuous layer of 1-in. EPS to an exterior wall assembly, the overall R-value of the wall assembly will increase and will result in heating and cooling load reductions to the house. This may result in the need for smaller capacity heating and cooling equipment, reduced ductwork, and potential redesign of the heating, ventilation, and air-conditioning system. The overall effect is likely to reduce costs for the builder and homeowner in both materials and operation of the heating, ventilation, and air-conditioning system.
3.3 Cost and Performance of Variations Using One-Coat Stucco Within the one-coat stucco system, there are additional criteria that should be considered when selecting the best system for a particular application. These criteria include the choice of stucco application method and the type and thickness of foam sheathing.
11
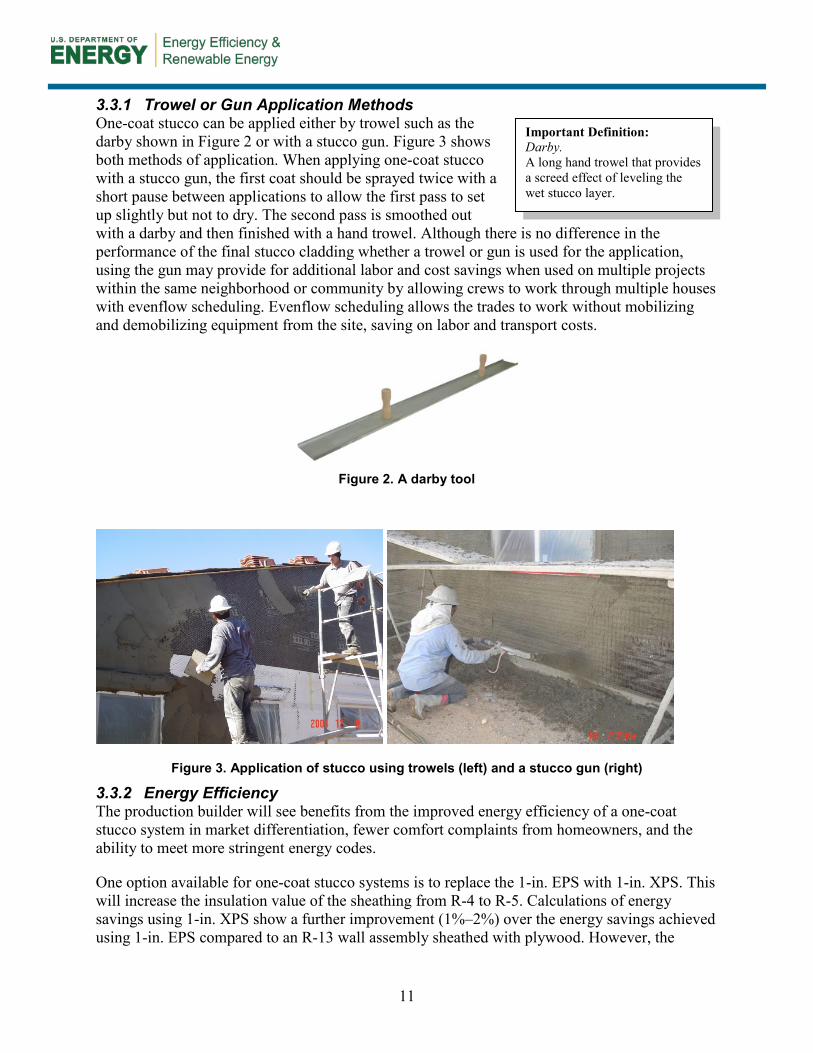
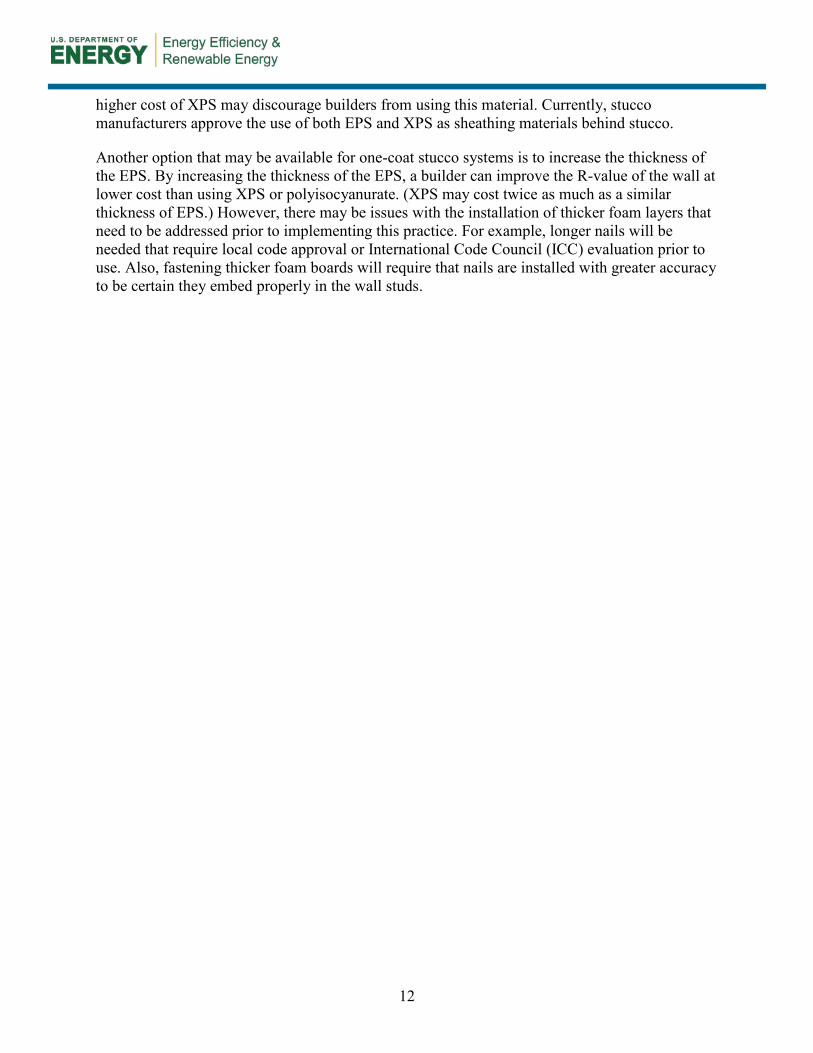
3.3.1 Trowel or Gun Application Methods One-coat stucco can be applied either by trowel such as the darby shown in Figure 2 or with a stucco gun. Figure 3 shows both methods of application. When applying one-coat stucco with a stucco gun, the first coat should be sprayed twice with a short pause between applications to allow the first pass to set up slightly but not to dry. The second pass is smoothed out with a darby and then finished with a hand trowel. Although there is no difference in the performance of the final stucco cladding whether a trowel or gun is used for the application, using the gun may provide for additional labor and cost savings when used on multiple projects within the same neighborhood or community by allowing crews to work through multiple houses with evenflow scheduling. Evenflow scheduling allows the trades to work without mobilizing and demobilizing equipment from the site, saving on labor and transport costs.
Figure 2. A darby tool
Figure 3. Application of stucco using trowels (left) and a stucco gun (right)
3.3.2 Energy Efficiency The production builder will see benefits from the improved energy efficiency of a one-coat stucco system in market differentiation, fewer comfort complaints from homeowners, and the ability to meet more stringent energy codes.
One option available for one-coat stucco systems is to replace the 1-in. EPS with 1-in. XPS. This will increase the insulation value of the sheathing from R-4 to R-5. Calculations of energy savings using 1-in. XPS show a further improvement (1%–2%) over the energy savings achieved using 1-in. EPS compared to an R-13 wall assembly sheathed with plywood. However, the
Important Definition: Darby. A long hand trowel that provides a screed effect of leveling the wet stucco layer.
12
higher cost of XPS may discourage builders from using this material. Currently, stucco manufacturers approve the use of both EPS and XPS as sheathing materials behind stucco.
Another option that may be available for one-coat stucco systems is to increase the thickness of the EPS. By increasing the thickness of the EPS, a builder can improve the R-value of the wall at lower cost than using XPS or polyisocyanurate. (XPS may cost twice as much as a similar thickness of EPS.) However, there may be issues with the installation of thicker foam layers that need to be addressed prior to implementing this practice. For example, longer nails will be needed that require local code approval or International Code Council (ICC) evaluation prior to use. Also, fastening thicker foam boards will require that nails are installed with greater accuracy to be certain they embed properly in the wall studs.

13
4 Measure Implementation Details
This section provides details for the proper installation of a one-coat stucco system, including risk identification, verification and safety procedures, and other important references where needed.
Material specifications for the one-coat stucco components can be found in Attachment A.
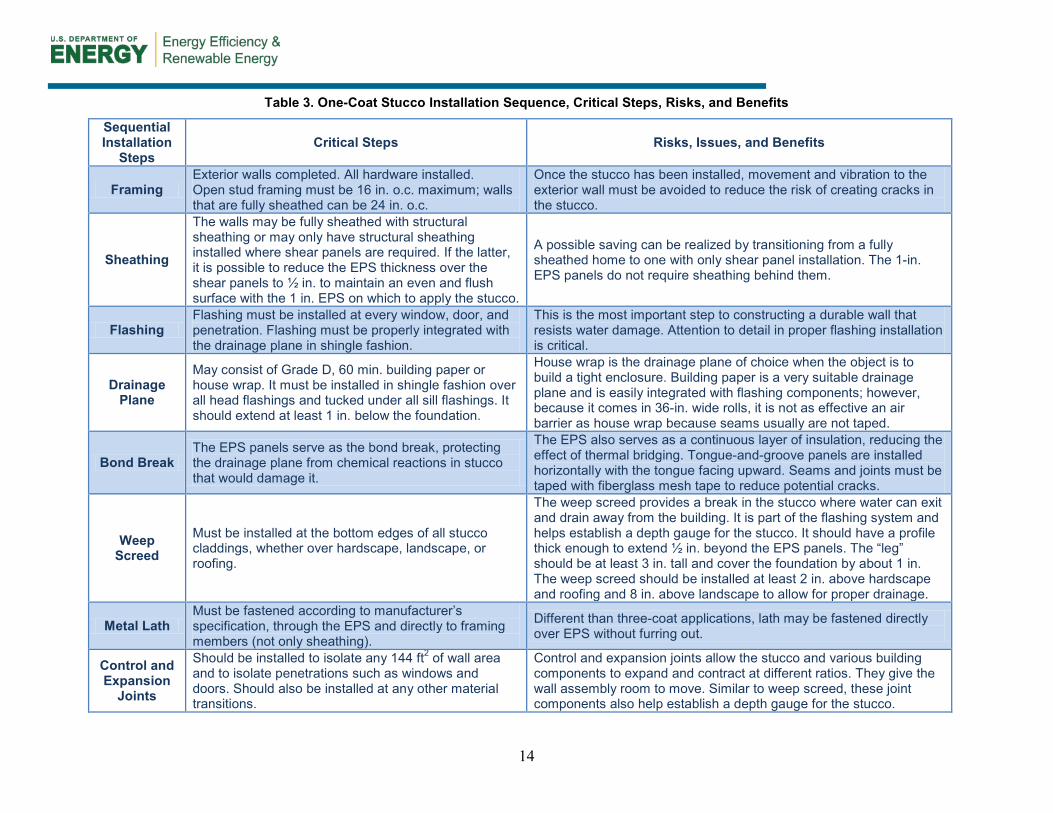
Table 3 provides an overview of the installation sequence and critical steps, risks, and benefits of each component.
Important Definition: Open Framing. A common type of construction in the southwestern United States where the structure is not fully covered in wall sheathing such as oriented strand board or plywood.
14
Table 3. One-Coat Stucco Installation Sequence, Critical Steps, Risks, and Benefits
Sequential Installation
Steps Critical Steps Risks, Issues, and Benefits
Framing Exterior walls completed. All hardware installed. Open stud framing must be 16 in. o.c. maximum; walls that are fully sheathed can be 24 in. o.c.
Once the stucco has been installed, movement and vibration to the exterior wall must be avoided to reduce the risk of creating cracks in the stucco.
Sheathing
The walls may be fully sheathed with structural sheathing or may only have structural sheathing installed where shear panels are required. If the latter, it is possible to reduce the EPS thickness over the shear panels to ½ in. to maintain an even and flush surface with the 1 in. EPS on which to apply the stucco.
A possible saving can be realized by transitioning from a fully sheathed home to one with only shear panel installation. The 1-in. EPS panels do not require sheathing behind them.
Flashing Flashing must be installed at every window, door, and penetration. Flashing must be properly integrated with the drainage plane in shingle fashion.
This is the most important step to constructing a durable wall that resists water damage. Attention to detail in proper flashing installation is critical.
Drainage Plane
May consist of Grade D, 60 min. building paper or house wrap. It must be installed in shingle fashion over all head flashings and tucked under all sill flashings. It should extend at least 1 in. below the foundation.
House wrap is the drainage plane of choice when the object is to build a tight enclosure. Building paper is a very suitable drainage plane and is easily integrated with flashing components; however, because it comes in 36-in. wide rolls, it is not as effective an air barrier as house wrap because seams usually are not taped.
Bond Break The EPS panels serve as the bond break, protecting the drainage plane from chemical reactions in stucco that would damage it.
The EPS also serves as a continuous layer of insulation, reducing the effect of thermal bridging. Tongue-and-groove panels are installed horizontally with the tongue facing upward. Seams and joints must be taped with fiberglass mesh tape to reduce potential cracks.
Weep Screed
Must be installed at the bottom edges of all stucco claddings, whether over hardscape, landscape, or roofing.
The weep screed provides a break in the stucco where water can exit and drain away from the building. It is part of the flashing system and helps establish a depth gauge for the stucco. It should have a profile thick enough to extend ½ in. beyond the EPS panels. The “leg” should be at least 3 in. tall and cover the foundation by about 1 in. The weep screed should be installed at least 2 in. above hardscape and roofing and 8 in. above landscape to allow for proper drainage.
Metal Lath Must be fastened according to manufacturer’s specification, through the EPS and directly to framing members (not only sheathing).
Different than three-coat applications, lath may be fastened directly over EPS without furring out.
Control and Expansion
Joints
Should be installed to isolate any 144 ft2 of wall area and to isolate penetrations such as windows and doors. Should also be installed at any other material transitions.
Control and expansion joints allow the stucco and various building components to expand and contract at different ratios. They give the wall assembly room to move. Similar to weep screed, these joint components also help establish a depth gauge for the stucco.

15
Sequential Installation
Steps Critical Steps Risks, Issues, and Benefits
Base Coat The base layer of stucco is applied in a layer nominally ⅜ in. thick. Although applied as one layer, it is often applied in two passes with a brief pause between passes.
The base layer of stucco must fully embed the lath, and the lath must not show through the surface. Following the manufacturer’s specifications for the proper mixing of water and clean sand is critical to the durability and performance of the stucco cladding.
Hydration
Between the application of the base coat and the finish coat, it is critical to properly hydrate the stucco. Stucco must remain wet long enough for the hydration process to complete. This is necessary to fully cure the stucco, which establishes its hardness. Usually, a base layer of stucco should be kept wet for at least 72 h.
Stucco that is not properly hydrated has a higher pH because the chemical process of hydration is not complete. When the stucco becomes wet at a later time (after the color coat or paint has been applied), the hydration process will resume. The ensuing chemical process of hydration has a tendency to cause delamination of the finish coat of stucco, or it can cause burn through of paint coatings.
Finish (or Color) Coat
A color coat is one where color pigmentation has been added to the finish stucco. Synthetic color coats may also be applied, which offer greater color options and varying levels of sheen. Another option is to apply a natural color finish coat that will be primed and painted after the stucco has cured.
Color coats provide a very durable color finish that may never require painting. Synthetics offer many color options. Typically, the most affordable option is to prime and paint a natural finish.
Hydration
As with the base coat, the finish coat must be properly hydrated to fully cure the stucco. This is not necessary with synthetic finishes. It is important to closely follow the manufacturer’s recommendations on proper curing of finish coats.
If the finish coat is a natural stucco layer that is to be primed and painted, proper hydration for the first 72 h is critical. As with the base layer of stucco, inadequate hydration leads to higher pH levels that have the potential to burn through the paint. After hydrating the stucco, the surface pH should be checked prior to painting. A pH less than 10 is desirable before priming and painting.
Priming and Painting
If color coat is used as the finish no additional painting is required. If the finished stucco is to be painted in lieu of a color coat, it must first be primed. Two coats of paint do not obviate the need for a stucco primer.
The application of the primer and the paint must be backrolled. Whether applied with an airless sprayer or rolled on, backrolling ensures that the finish texturing is fully coated with paint. If complete coats of primer and paint are not applied, moisture can wick into the stucco and lead to blistering of the paint.

16
4.1 One-Coat Stucco Implementation Details The following pages illustrate a common installation procedure for one-coat stucco with EPS and include important details and verification procedures for correct application of materials. Figure 4 shows a peel-away illustration of a completed one-coat stucco wall assembly.
Figure 4. Isometric drawing of a finished one-coat stucco wall assembly
4.1.1 Building Preparations • Framing of the exterior wall must be 100% complete to minimize the need for any further
movement or vibration of the exterior wall, which could contribute to unnecessary stucco cracking. All straps, anchors, and hold-downs should be fully fastened.
• The following one-coat stucco over EPS installation is typically installed over “California style” open frame construction. As such, 1-in. EPS panels are fastened over the drainage plane, which is fastened directly to the stud framing. Over the oriented strand board (OSB) or plywood shear panels, ½-in. EPS panels are installed to maintain a level stucco surface. However, this system can also be installed over fully sheathed wall systems. In such cases, a 1-in. EPS panel would be installed over the entire structure.
• If a tile roof is to be installed, the roof should be covered in underlayment and the roof tile loaded on the roof. (Completed installation is not necessary.)
• If EPS panels are to be installed directly over open studs (California style), minimum 1-in. tongue-and-groove EPS panels must be used as a substrate. When installed over fully
Critical Takeaway: Whenever a wall assembly is fully sheathed, it is important to maintain a ⅛-in. spacing between each panel to allow for expansion of the panel during periods of elevated humidity or in case the panel ever does get wet. Panels fastened without any gaps may buckle and damage the stucco cladding.
17
sheathed (in plywood or OSB), a nontongue-and-groove EPS may be considered. Check the local codes.
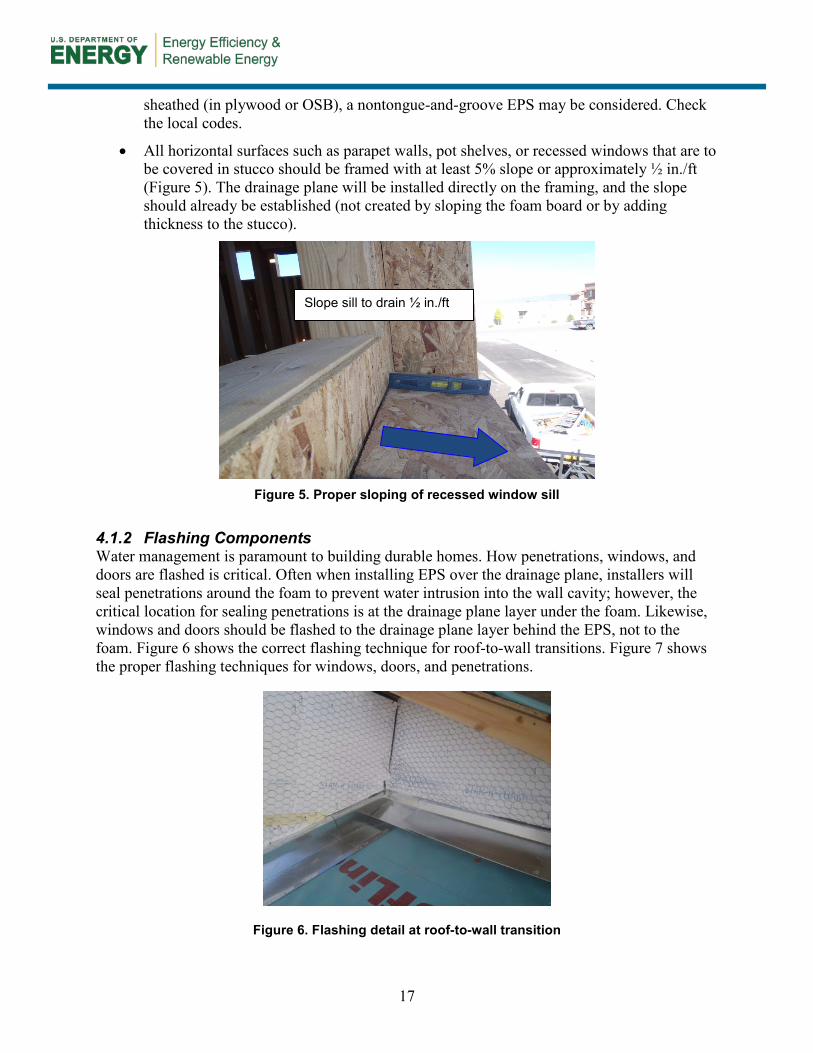
• All horizontal surfaces such as parapet walls, pot shelves, or recessed windows that are to be covered in stucco should be framed with at least 5% slope or approximately ½ in./ft (Figure 5). The drainage plane will be installed directly on the framing, and the slope should already be established (not created by sloping the foam board or by adding thickness to the stucco).
Figure 5. Proper sloping of recessed window sill
4.1.2 Flashing Components Water management is paramount to building durable homes. How penetrations, windows, and doors are flashed is critical. Often when installing EPS over the drainage plane, installers will seal penetrations around the foam to prevent water intrusion into the wall cavity; however, the critical location for sealing penetrations is at the drainage plane layer under the foam. Likewise, windows and doors should be flashed to the drainage plane layer behind the EPS, not to the foam. Figure 6 shows the correct flashing technique for roof-to-wall transitions. Figure 7 shows the proper flashing techniques for windows, doors, and penetrations.
Figure 6. Flashing detail at roof-to-wall transition
Slope sill to drain ½ in./ft

18
Attachment B includes a checklist of component details that are critical to building a water-resistant stucco assembly.
Figure 7. Proper flashing of window (left) and penetration (right) in a wall assembly
• Every penetration through the exterior wall must have flashing installed that can be properly layered into the drainage plane. Everything from windows and doors to pipes and even structured wire (phone, cable, etc.) should have some type of flashing system that will seal the penetration to be watertight. Do not think of the stucco layer or even the EPS bond break as the weatherproofing layer. Although these layers do shed water, the idea is to create a drainage plane layer that will shed water completely without leaks before anything else is even installed.
• Every flashing component must be layered into the drainage plane in shingle (or weatherboard) fashion to direct water away from the wall assembly. The drainage plane should always layer over the top of head flashing components and be tucked under sill flashing components.
• All horizontal surfaces such as parapet walls, pot shelves, or recessed windows should be covered in a waterproof flashing layer. A best practice for pot shelves or recessed windows is to use a liquid-applied waterproofing membrane on the sheathing to ensure complete water protection of all sheathing joints in the wall system.
Critical Takeaway: Flashing products typically differ from drainage plane products in that flashing products have a much higher resistance to moisture; products used for drainage planes must be permeable to allow water vapor to escape from the structure. This characteristic makes drainage plane products subject to leakage when they lie under standing water. Flashing products, on the other hand, should be able to withstand bulk water without leaking. The best flashing products are also self-sealing, meaning that they seal to any fasteners that pass through them.

19
4.1.3 Drainage Plane Installation A drainage plane is a layer of water-resistant material that completely covers the exterior of the home. When water penetrates the exterior finish, it moves down the drainage plane and back to the exterior. The drainage plane protects sheathing and framing from getting wet and prevents moisture buildup in exterior wall cavities. In production homebuilding, house wrap is the material of choice for creating the drainage plane on exterior walls; however, for stucco applications, building paper often is used.
4.1.3.1 House Wrap • If house wrap is to be used as the drainage plane, it should be installed prior to the
windows and doors.
• Install the house wrap and cut out rough openings for doors and windows.
• Overlap all horizontal seams 2 in. and vertical seams 6 in.
• Install windows and doors and complete the flashing details.
• Use only enough 1½-in. cap-head nails to secure the house wrap until the EPS panels are installed.
• If a layer of house wrap breaks within 24 in. above a window or door, add an additional layer of house wrap to provide an apron that extends to at least 24 in. beyond the window or door opening.
4.1.3.2 Building Paper Grade D, 60 min. building paper is typically used for roofs and is made from a virgin kraft paper. It is not felt. Asphalt is impregnated into the kraft paper, providing an excellent barrier for moisture. The kraft paper consists of long fibers that allow it to be of lighter weight than felt. This property allows the kraft paper to have better mechanical properties.
If Grade D, 60 min. building paper is to be used for the drainage plane, install the windows and doors first and then flash according to the following details:
Critical Takeaway: The most significant difference between a traditional three-coat stucco system and an insulated one-coat system is the material used for the bond break. If stucco is installed in direct contact with the drainage plane layer, a chemical reaction causes the stucco to become bonded to the drainage plane, allowing water to quickly wick past it. This is why there should always be a bond break layer. In a three-coat system, the bond break is typically a layer of building paper, installed separately from the drainage plane layer. In a one-coat system, the EPS insulation board acts as the bond break, protecting the drainage plane layer from the effects of the chemical reaction. Additionally, the EPS provides the wall with a continuous layer of insulation.
Critical Takeaway: It is important to restrict the number of fasteners used to install the drainage plane layer and the EPS bond break. The most critical fastening is that which holds the lath in place, as these fasteners bear the weight of the stucco layer. Therefore, to reduce the number of fastener penetrations that go through the drainage plane and flashing, use only as many fasteners as are necessary to hold the drainage plane and EPS bond break securely in place. The best fasteners for the drainage plane layer are 1½-in. cap-head, galvanized nails or cap-head staples because these provide better holding power in windy conditions and seal themselves to the drainage plane.
20
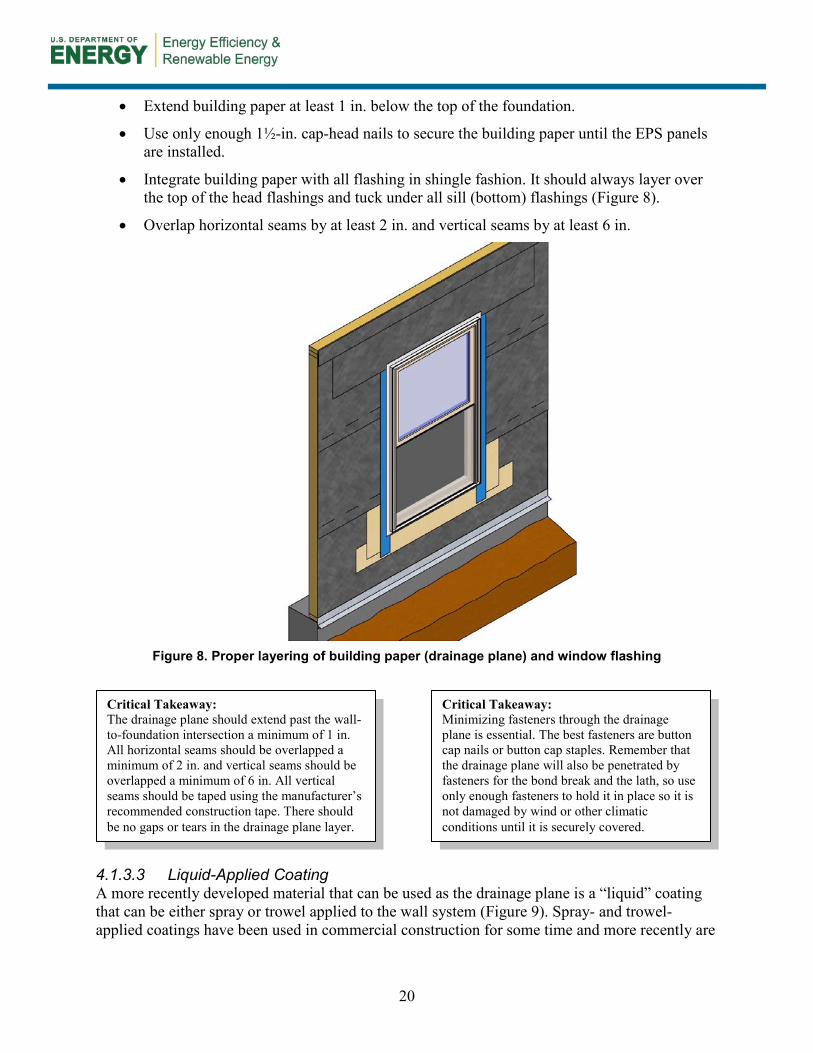
• Extend building paper at least 1 in. below the top of the foundation.
• Use only enough 1½-in. cap-head nails to secure the building paper until the EPS panels are installed.
• Integrate building paper with all flashing in shingle fashion. It should always layer over the top of the head flashings and tuck under all sill (bottom) flashings (Figure 8).
• Overlap horizontal seams by at least 2 in. and vertical seams by at least 6 in.
Figure 8. Proper layering of building paper (drainage plane) and window flashing
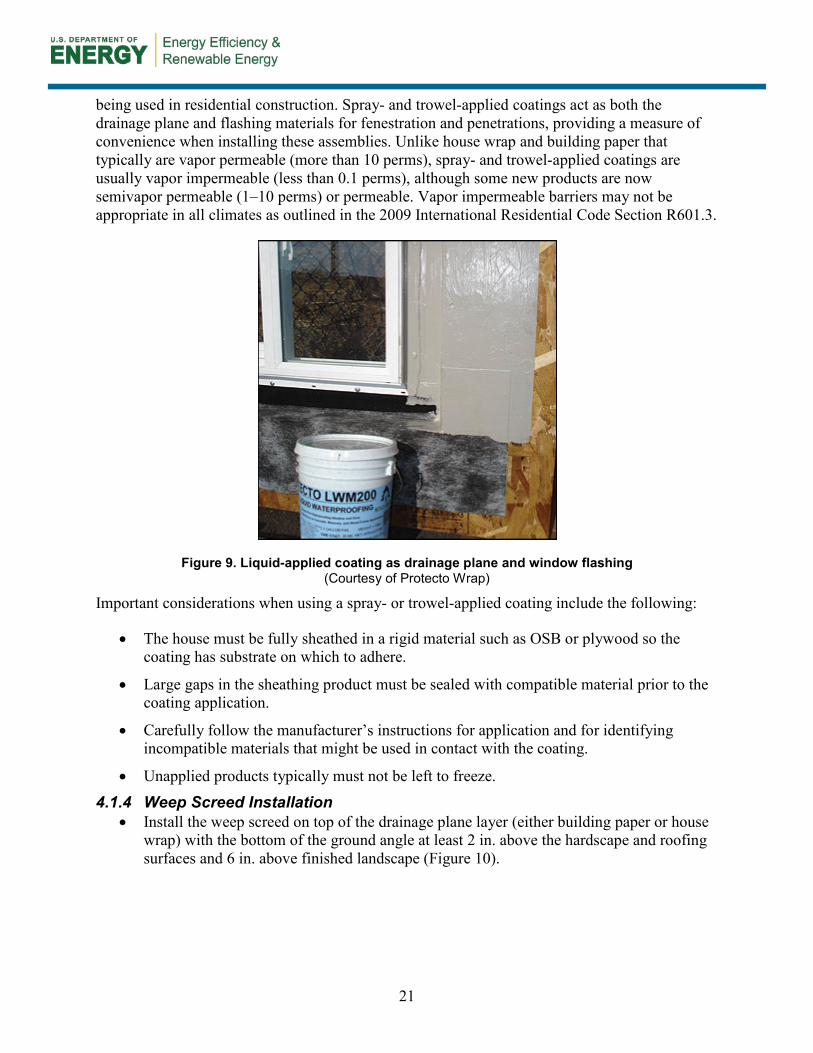
4.1.3.3 Liquid-Applied Coating A more recently developed material that can be used as the drainage plane is a “liquid” coating that can be either spray or trowel applied to the wall system (Figure 9). Spray- and trowel-applied coatings have been used in commercial construction for some time and more recently are
Critical Takeaway: Minimizing fasteners through the drainage plane is essential. The best fasteners are button cap nails or button cap staples. Remember that the drainage plane will also be penetrated by fasteners for the bond break and the lath, so use only enough fasteners to hold it in place so it is not damaged by wind or other climatic conditions until it is securely covered.
Critical Takeaway: The drainage plane should extend past the wall-to-foundation intersection a minimum of 1 in. All horizontal seams should be overlapped a minimum of 2 in. and vertical seams should be overlapped a minimum of 6 in. All vertical seams should be taped using the manufacturer’s recommended construction tape. There should be no gaps or tears in the drainage plane layer.
21
being used in residential construction. Spray- and trowel-applied coatings act as both the drainage plane and flashing materials for fenestration and penetrations, providing a measure of convenience when installing these assemblies. Unlike house wrap and building paper that typically are vapor permeable (more than 10 perms), spray- and trowel-applied coatings are usually vapor impermeable (less than 0.1 perms), although some new products are now semivapor permeable (1–10 perms) or permeable. Vapor impermeable barriers may not be appropriate in all climates as outlined in the 2009 International Residential Code Section R601.3.
Figure 9. Liquid-applied coating as drainage plane and window flashing (Courtesy of Protecto Wrap)
Important considerations when using a spray- or trowel-applied coating include the following:
• The house must be fully sheathed in a rigid material such as OSB or plywood so the coating has substrate on which to adhere.
• Large gaps in the sheathing product must be sealed with compatible material prior to the coating application.
• Carefully follow the manufacturer’s instructions for application and for identifying incompatible materials that might be used in contact with the coating.
• Unapplied products typically must not be left to freeze.
4.1.4 Weep Screed Installation • Install the weep screed on top of the drainage plane layer (either building paper or house
wrap) with the bottom of the ground angle at least 2 in. above the hardscape and roofing surfaces and 6 in. above finished landscape (Figure 10).

22
Figure 10. Detail showing proper layering of weep screed over the drainage plane (Courtesy of BuildIQ)
• Weep screed should have a vertical leg at least 3 in. tall and a depth (ground) of at least 1⅜ in. to accommodate the depth of the stucco base coat (⅜ in.) and the EPS board (1 in.).
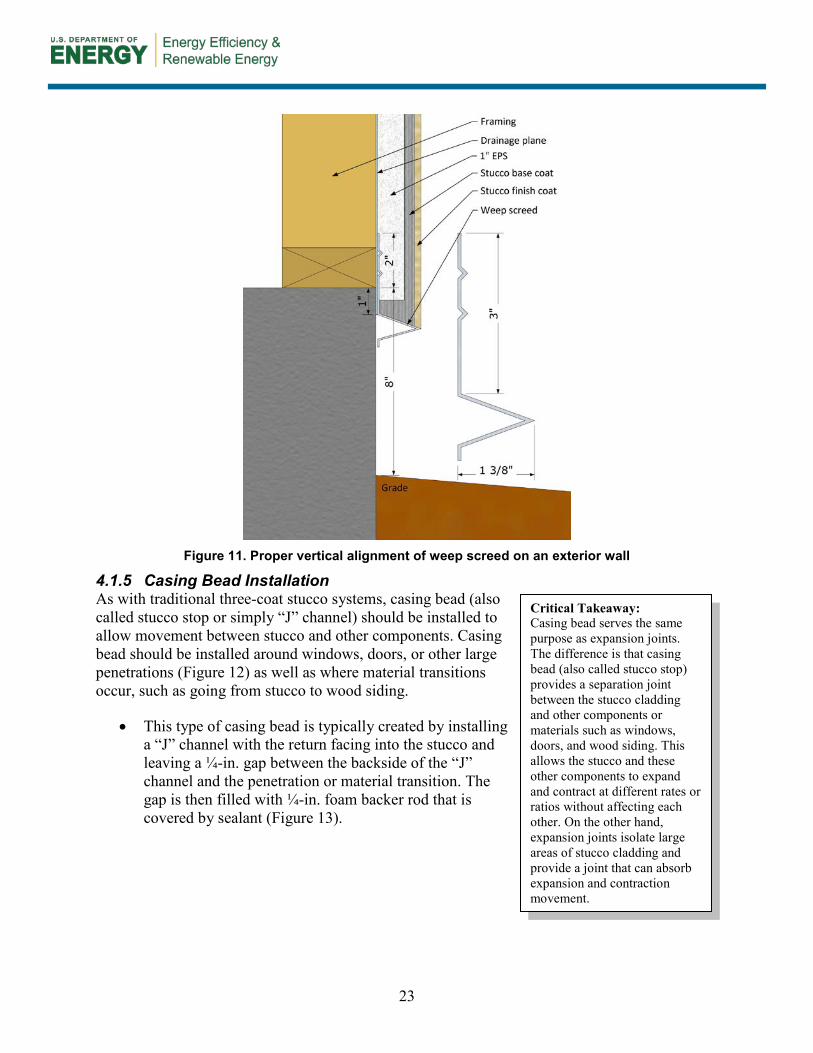
• Weep screed should be installed so that the top edge of the ground angle is 1 in. below the sill-to-foundation transition (Figure 11). The leg of weep screed should extend 2 in. above this transition and 1 in. below.
• Overlap joints in the weep screed by at least 2 in.
• Corners in weep screed are typically mitered.
23
Figure 11. Proper vertical alignment of weep screed on an exterior wall
4.1.5 Casing Bead Installation As with traditional three-coat stucco systems, casing bead (also called stucco stop or simply “J” channel) should be installed to allow movement between stucco and other components. Casing bead should be installed around windows, doors, or other large penetrations (Figure 12) as well as where material transitions occur, such as going from stucco to wood siding.
• This type of casing bead is typically created by installing a “J” channel with the return facing into the stucco and leaving a ¼-in. gap between the backside of the “J” channel and the penetration or material transition. The gap is then filled with ¼-in. foam backer rod that is covered by sealant (Figure 13).
Critical Takeaway: Casing bead serves the same purpose as expansion joints. The difference is that casing bead (also called stucco stop) provides a separation joint between the stucco cladding and other components or materials such as windows, doors, and wood siding. This allows the stucco and these other components to expand and contract at different rates or ratios without affecting each other. On the other hand, expansion joints isolate large areas of stucco cladding and provide a joint that can absorb expansion and contraction movement.

24
Figure 12. Detail of casing bead installed against a window (Courtesy of BuildIQ)
Figure 13. Proper installation of casing bead below a window

25
• Install casing bead around windows, doors, and any large penetrations such as electrical boxes. Similar to the weep screed, the casing bead should have sufficient depth to accommodate the total stucco thickness of 1½ in. (including the EPS).
• Also install casing bead at any material transitions, such as where the stucco will meet with wood siding (Figure 14).
• Press ¼-in. foam backer rod into the gap, and cover with sealant. The sealant should meet American Society for Testing and Materials (ASTM) Specification C920 Class 25.
Figure 14. Proper installation of casing bead below wood trim
4.1.6 Installing the EPS Insulated Sheathing (Bond Break) The EPS bond break should be installed to maintain an even and flush surface for the stucco (Figure 15). EPS panels are to be installed over the entire structure. They act as the bond break and should be installed over the drainage plane, whether or not the structure is fully sheathed. Whether installing a 1-in. or ½-in. layer of EPS (over sheathing or shear panels), it is important to cover every surface to receive stucco, including the gables covering unconditioned attics. Maintaining an even surface to support a consistent stucco thickness is critical to reducing stress cracks in the stucco finish. Any holes or gaps in the EPS panels should be filled in with pieces or slivers of EPS. There are EPS panels manufactured specifically for undercladding applications

26
that are fabricated in 2 × 8-ft sheet with tongue-and-groove edges on the long sides. These are designed to be installed with the long sides running horizontally, with the tongues facing upward to better shed water.
Figure 15. Proper installation of EPS bond break with taped joints
• Install 1-in. by 2 × 8-ft tongue-and-groove EPS panels horizontally with the tongue facing upward.
• Do not cut the EPS short of the corners.
• Make all the seams and joints tight. Any gaps should be filled with slivers of EPS and taped in place with fiberglass mesh tape.
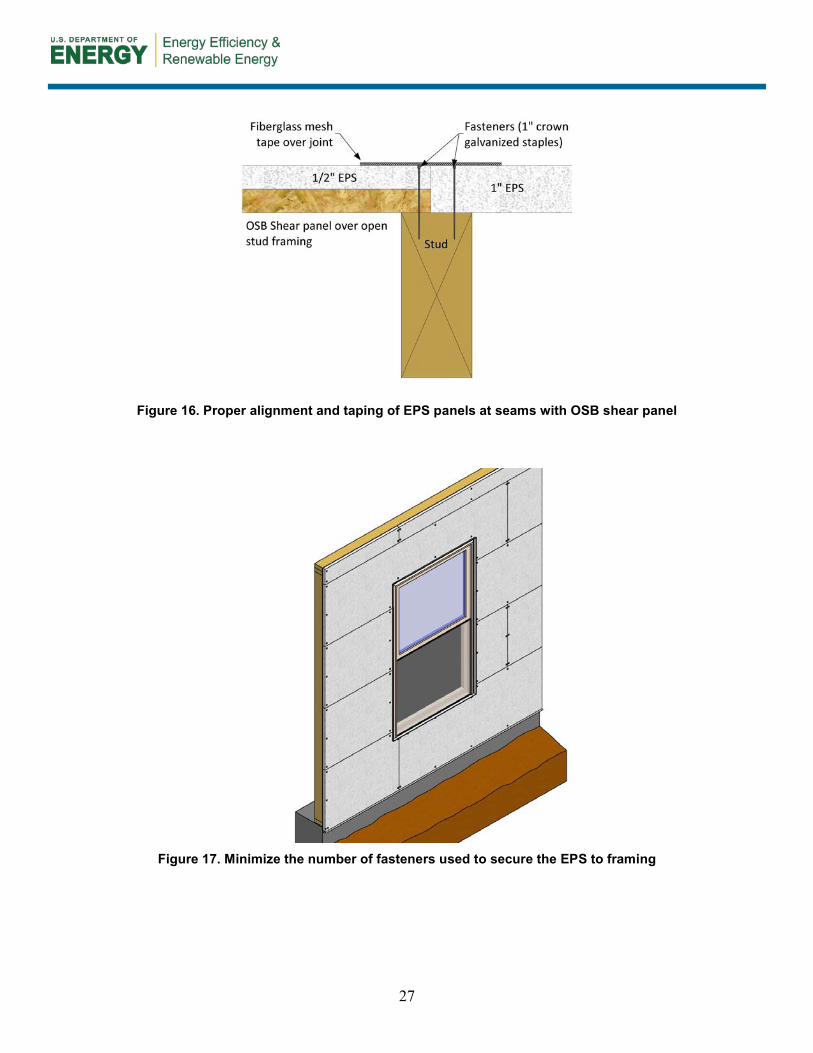
• All seams and joints should be covered with fiberglass mesh tape (Figure 16). This helps prevent cracks from developing at these locations.
• Fasten the EPS in place with only as many fasteners (1-in. crown galvanized staples with 1½-in. leg) into the studs as are required to secure it until the lath is installed. Minimize fasteners to reduce penetrations through the drainage plane (Figure 17).
• If framing is open stud with shear panels (California style), install 1-in. EPS over the drainage plane on stud framing, and install ½-in. EPS over the drainage plane on shear panels (Figure 16).
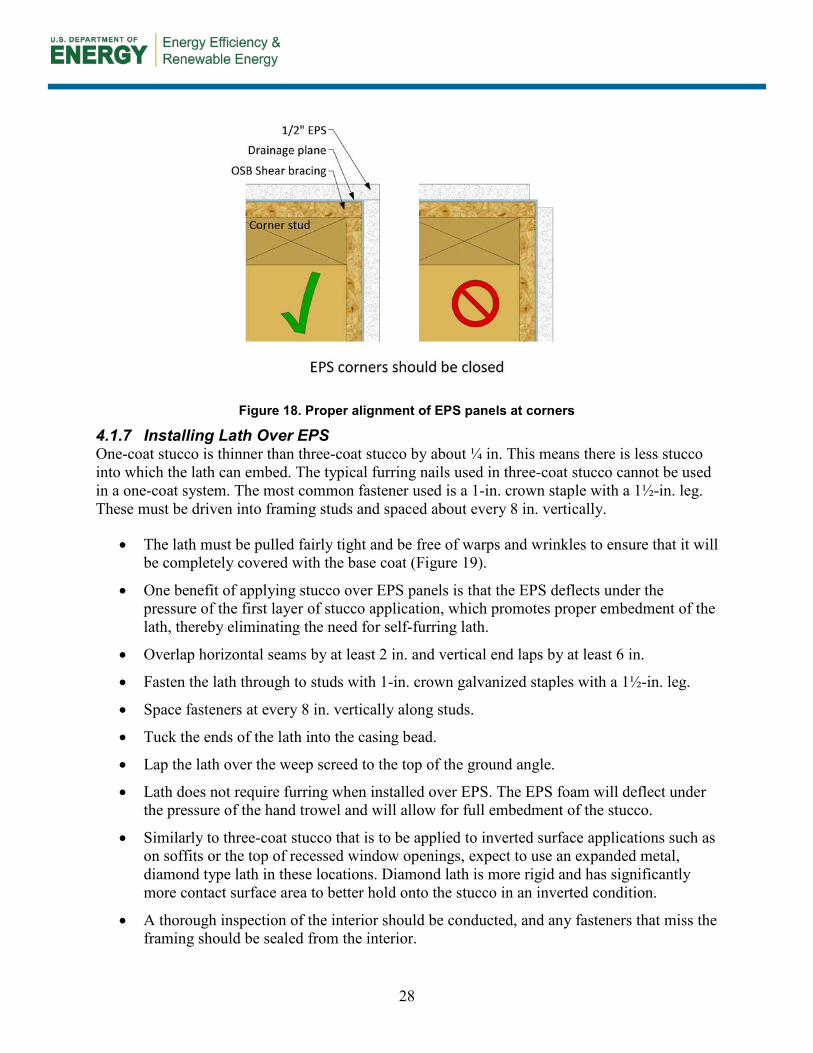
• Install EPS panels to create complete corners (Figure 18). Again, do not cut the EPS short of the corner.
• Tape all joints with mesh tape.
27
Figure 16. Proper alignment and taping of EPS panels at seams with OSB shear panel
Figure 17. Minimize the number of fasteners used to secure the EPS to framing
28
Figure 18. Proper alignment of EPS panels at corners
4.1.7 Installing Lath Over EPS One-coat stucco is thinner than three-coat stucco by about ¼ in. This means there is less stucco into which the lath can embed. The typical furring nails used in three-coat stucco cannot be used in a one-coat system. The most common fastener used is a 1-in. crown staple with a 1½-in. leg. These must be driven into framing studs and spaced about every 8 in. vertically.
• The lath must be pulled fairly tight and be free of warps and wrinkles to ensure that it will be completely covered with the base coat (Figure 19).
• One benefit of applying stucco over EPS panels is that the EPS deflects under the pressure of the first layer of stucco application, which promotes proper embedment of the lath, thereby eliminating the need for self-furring lath.
• Overlap horizontal seams by at least 2 in. and vertical end laps by at least 6 in.
• Fasten the lath through to studs with 1-in. crown galvanized staples with a 1½-in. leg.
• Space fasteners at every 8 in. vertically along studs.
• Tuck the ends of the lath into the casing bead.
• Lap the lath over the weep screed to the top of the ground angle.
• Lath does not require furring when installed over EPS. The EPS foam will deflect under the pressure of the hand trowel and will allow for full embedment of the stucco.
• Similarly to three-coat stucco that is to be applied to inverted surface applications such as on soffits or the top of recessed window openings, expect to use an expanded metal, diamond type lath in these locations. Diamond lath is more rigid and has significantly more contact surface area to better hold onto the stucco in an inverted condition.
• A thorough inspection of the interior should be conducted, and any fasteners that miss the framing should be sealed from the interior.

29
Figure 19. Proper installation of lath on EPS
4.1.8 Expansion Joints Expansion joints should be installed at least every 144 ft2. When possible, expansion joints should align with window and door openings to protect against cracks and to create a look that is more aesthetically pleasing to the homeowner. Expansion joints should be installed between floors and between changes in mass, such as the house-to-garage intersection.
Install expansion joints as follows:
• Divide large wall sections into 144-ft2 areas (per ASTM C1063) with expansion joints. Fasten expansion joints directly over studs (Figure 20).
• Align horizontal expansion joints with the top of the floor joist (subflooring level) when installing on multistory buildings.
• Align expansion joints with the edges of windows and doors (Figure 20).
30
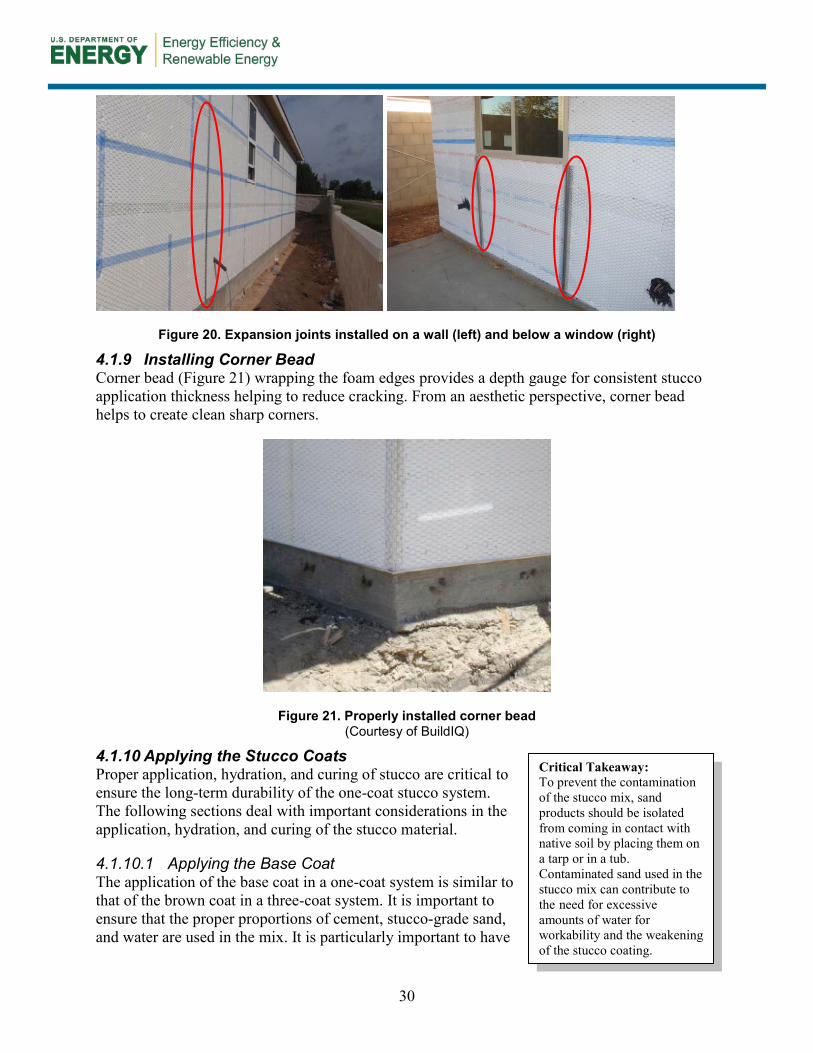
Figure 20. Expansion joints installed on a wall (left) and below a window (right)
4.1.9 Installing Corner Bead Corner bead (Figure 21) wrapping the foam edges provides a depth gauge for consistent stucco application thickness helping to reduce cracking. From an aesthetic perspective, corner bead helps to create clean sharp corners.
Figure 21. Properly installed corner bead (Courtesy of BuildIQ)
4.1.10 Applying the Stucco Coats Proper application, hydration, and curing of stucco are critical to ensure the long-term durability of the one-coat stucco system. The following sections deal with important considerations in the application, hydration, and curing of the stucco material.
4.1.10.1 Applying the Base Coat The application of the base coat in a one-coat system is similar to that of the brown coat in a three-coat system. It is important to ensure that the proper proportions of cement, stucco-grade sand, and water are used in the mix. It is particularly important to have
Critical Takeaway: To prevent the contamination of the stucco mix, sand products should be isolated from coming in contact with native soil by placing them on a tarp or in a tub. Contaminated sand used in the stucco mix can contribute to the need for excessive amounts of water for workability and the weakening of the stucco coating.
31
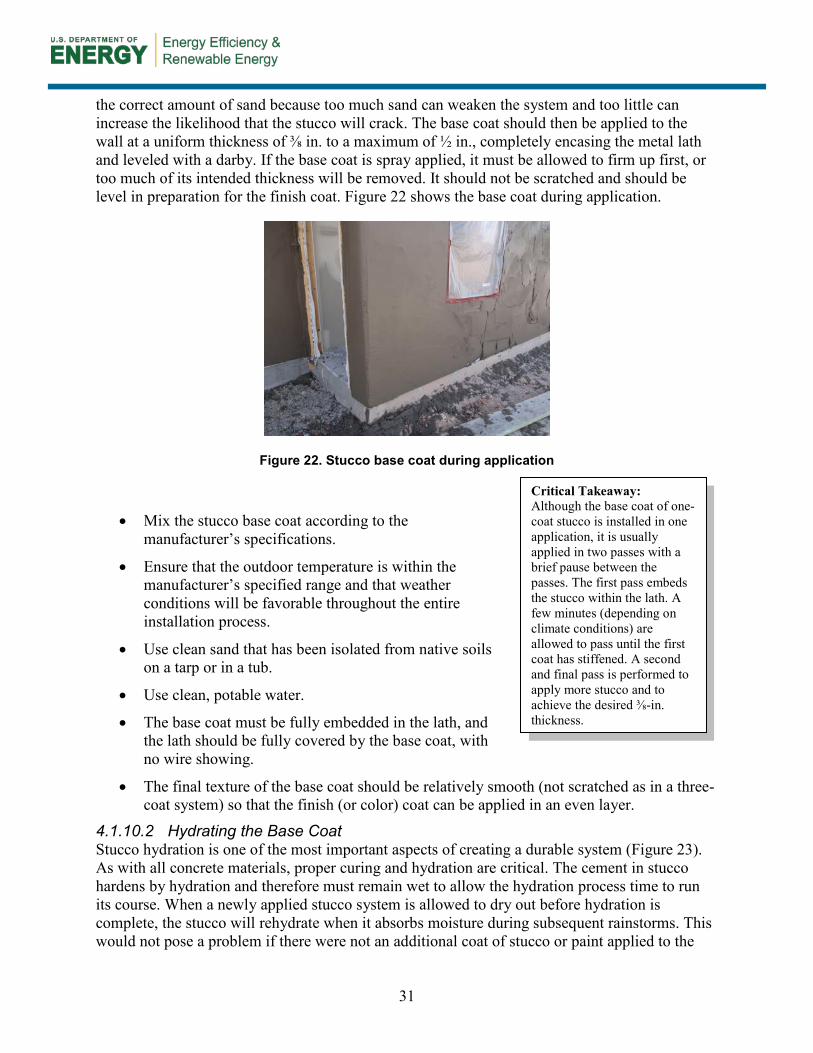
the correct amount of sand because too much sand can weaken the system and too little can increase the likelihood that the stucco will crack. The base coat should then be applied to the wall at a uniform thickness of ⅜ in. to a maximum of ½ in., completely encasing the metal lath and leveled with a darby. If the base coat is spray applied, it must be allowed to firm up first, or too much of its intended thickness will be removed. It should not be scratched and should be level in preparation for the finish coat. Figure 22 shows the base coat during application.
Figure 22. Stucco base coat during application
• Mix the stucco base coat according to the manufacturer’s specifications.
• Ensure that the outdoor temperature is within the manufacturer’s specified range and that weather conditions will be favorable throughout the entire installation process.
• Use clean sand that has been isolated from native soils on a tarp or in a tub.
• Use clean, potable water.
• The base coat must be fully embedded in the lath, and the lath should be fully covered by the base coat, with no wire showing.
• The final texture of the base coat should be relatively smooth (not scratched as in a three-coat system) so that the finish (or color) coat can be applied in an even layer.
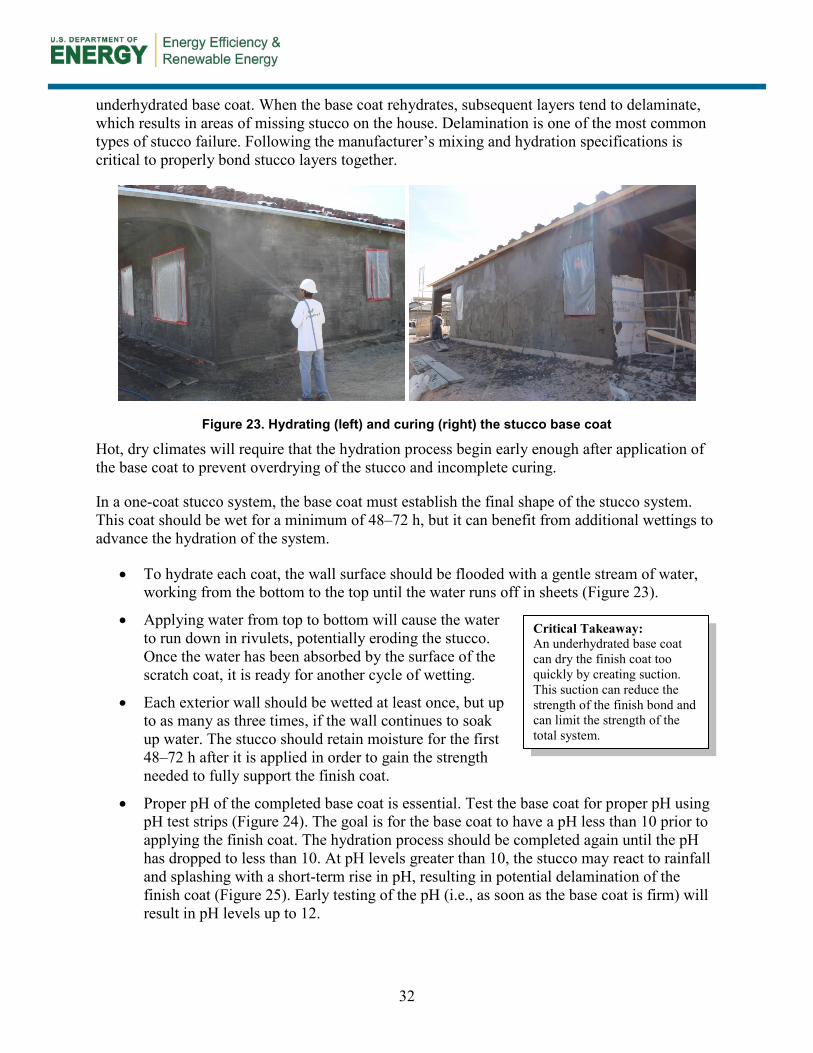
4.1.10.2 Hydrating the Base Coat Stucco hydration is one of the most important aspects of creating a durable system (Figure 23). As with all concrete materials, proper curing and hydration are critical. The cement in stucco hardens by hydration and therefore must remain wet to allow the hydration process time to run its course. When a newly applied stucco system is allowed to dry out before hydration is complete, the stucco will rehydrate when it absorbs moisture during subsequent rainstorms. This would not pose a problem if there were not an additional coat of stucco or paint applied to the
Critical Takeaway: Although the base coat of one-coat stucco is installed in one application, it is usually applied in two passes with a brief pause between the passes. The first pass embeds the stucco within the lath. A few minutes (depending on climate conditions) are allowed to pass until the first coat has stiffened. A second and final pass is performed to apply more stucco and to achieve the desired ⅜-in. thickness.
32
underhydrated base coat. When the base coat rehydrates, subsequent layers tend to delaminate, which results in areas of missing stucco on the house. Delamination is one of the most common types of stucco failure. Following the manufacturer’s mixing and hydration specifications is critical to properly bond stucco layers together.
Figure 23. Hydrating (left) and curing (right) the stucco base coat
Hot, dry climates will require that the hydration process begin early enough after application of the base coat to prevent overdrying of the stucco and incomplete curing.
In a one-coat stucco system, the base coat must establish the final shape of the stucco system. This coat should be wet for a minimum of 48–72 h, but it can benefit from additional wettings to advance the hydration of the system.
• To hydrate each coat, the wall surface should be flooded with a gentle stream of water, working from the bottom to the top until the water runs off in sheets (Figure 23).
• Applying water from top to bottom will cause the water to run down in rivulets, potentially eroding the stucco. Once the water has been absorbed by the surface of the scratch coat, it is ready for another cycle of wetting.
• Each exterior wall should be wetted at least once, but up to as many as three times, if the wall continues to soak up water. The stucco should retain moisture for the first 48–72 h after it is applied in order to gain the strength needed to fully support the finish coat.
• Proper pH of the completed base coat is essential. Test the base coat for proper pH using pH test strips (Figure 24). The goal is for the base coat to have a pH less than 10 prior to applying the finish coat. The hydration process should be completed again until the pH has dropped to less than 10. At pH levels greater than 10, the stucco may react to rainfall and splashing with a short-term rise in pH, resulting in potential delamination of the finish coat (Figure 25). Early testing of the pH (i.e., as soon as the base coat is firm) will result in pH levels up to 12.
Critical Takeaway: An underhydrated base coat can dry the finish coat too quickly by creating suction. This suction can reduce the strength of the finish bond and can limit the strength of the total system.

33
o Testing the pH must be done on a fully wetted area of the base coat. Following the hydration period of 48–72 h, soak a small section of the wall with clean, potable water.
o Hold a test strip against the wall for about 3 seconds.
o Hold the test strip level, and allow about 10 seconds for the strip to respond to the moisture.
o Compare the test strip with the color chart to read the pH.
• After the hydration of the base coat is complete and the pH has tested to be less than 10, the wall is ready to receive architectural details (plant-ons) and the finish coat.
Figure 24. pH testing of the base coat
Figure 25. Delamination of stucco finish coat
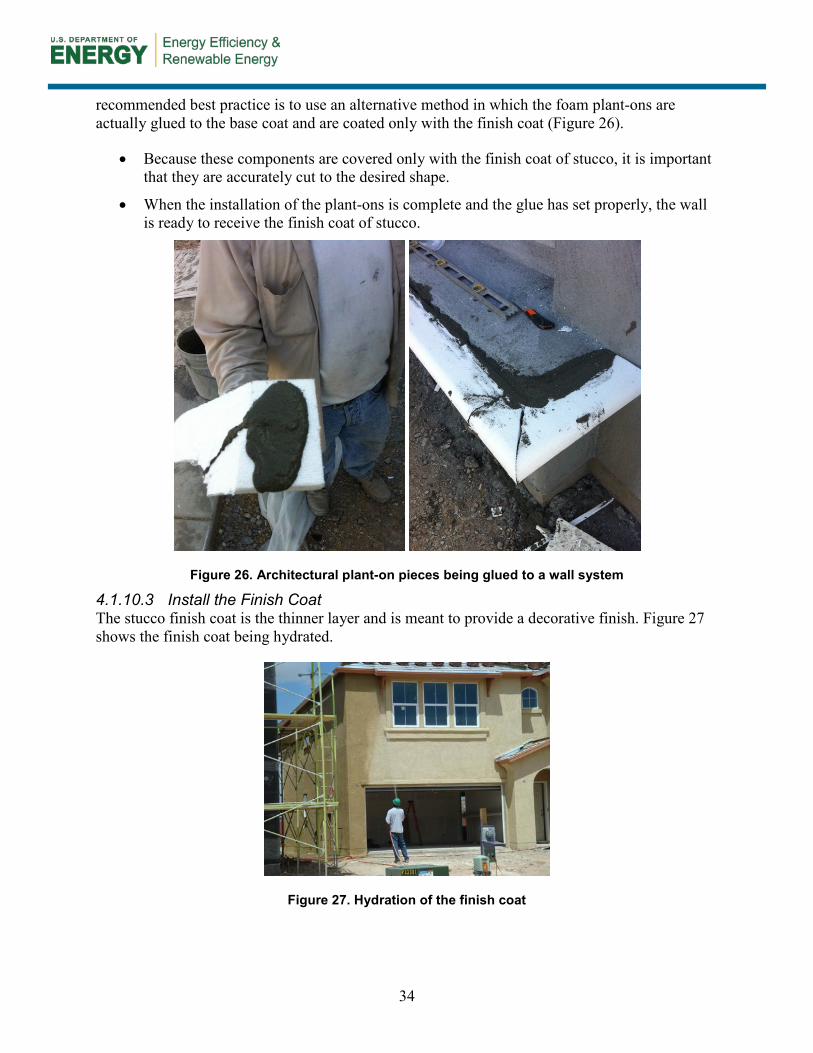
4.1.10.3 Install the Architectural Detailing (“Plant-Ons”) Architectural details are created with pre-formed EPS foam components to form trim around windows and doors or to create decorative bands on the wall. Traditionally, these details have been added to the assembly after the drainage plane layer. They are held in place with many long nails and are wired into the lath and covered with additional lath to support both the base and finish coat over them. However, to eliminate all the additional fasteners used in this technique, a
34
recommended best practice is to use an alternative method in which the foam plant-ons are actually glued to the base coat and are coated only with the finish coat (Figure 26).
• Because these components are covered only with the finish coat of stucco, it is important that they are accurately cut to the desired shape.
• When the installation of the plant-ons is complete and the glue has set properly, the wall is ready to receive the finish coat of stucco.
Figure 26. Architectural plant-on pieces being glued to a wall system
4.1.10.3 Install the Finish Coat The stucco finish coat is the thinner layer and is meant to provide a decorative finish. Figure 27 shows the finish coat being hydrated.
Figure 27. Hydration of the finish coat

35
Follow these steps to install the finish coat:
• Mix the stucco finish coat according to the manufacturer’s specifications.
• Ensure that the outdoor temperature is within the manufacturer’s specified range and that weather conditions will be favorable throughout the installation process.
• Use clean sand that has been isolated from native soils on a tarp or in a tub.
• Use clean, potable water.
• The finish coat should be applied to the wall at a thickness of 1/16 in. to 1/8 in.
• If cementitious, the finish coat requires hydration similar to the base coat (Figure 27) in order to promote proper curing and to provide a hard, durable surface. If the finish coat is acrylic, no additional hydration is needed.
• If the finish coat does not have an integral color, it must be primed and painted when it cures completely.

37
References
2009 International Energy Conservation Code, International Code Council (ICC), Washington, DC, January 2009. 2009 International Residential Code, International Code Council (ICC), Washington, DC, January 2009. ASTM Specification C920-10, Standard Specification for Elastomeric Joint Sealants, American Society for Testing and Materials, West Conshohocken, PA. ASTM C1063-08, Standard Specification for Installation of Lathing and Furring to Receive Interior and Exterior Portland Cement-Based Plaster, American Society for Testing and Materials, West Conshohocken, PA. Guilieri, R. Kenyon Plastering, personal communication, June 14, 2011. Mewis, R.W., ed. (2007). 2008 Residential Cost Data. RS Means, 27th Annual Edition. Massachusetts: Construction Publishers & Consultants.

38
Bibliography
2006 International Residential Code, Sections R314, R315, R316, R602, R703.6, International Code Council (ICC), Washington, DC, February 2006. 2007 California Building Code, Title 24, Part 2, Chapters 14, 25, 26, California Building Standards Commission, Sacramento, CA, June 2007. 2008 Building Energy Efficiency Standards for Residential and Nonresidential Buildings, Subchapter 7, Section 150, California Energy Commission, Sacramento, CA, December 2008. 2008 Building Energy Efficiency Standards for Residential and Nonresidential Buildings, Subchapter 8, Section 151, California Energy Commission, Sacramento, CA, December 2008. 2009 International Energy Conservation Code, International Code Council (ICC), Washington, DC, January 2009. 2009 International Residential Code, Sections R302, R316, R602, R703.6, International Code Council (ICC), Washington, DC, March, 2009. AC11, Acceptance Criteria for Cementitious Exterior Wall Coatings, International Code Council Evaluation Service (ICC-ES), Whittier, CA, March 2010. AC12, Acceptance Criteria for Foam Plastic Insulation, International Code Council Evaluation Service (ICC-ES), Whittier, CA, February 2011. AC191, Acceptance Criteria for Metal Plaster Bases (Lath), International Code Council Evaluation Service (ICC-ES), Whittier, CA, May 2008. AC275, Acceptance Criteria for Glass Fiber Lath Used in Cementitious Exterior Wall Coatings or Exterior Cement Plaster (Stucco), International Code Council Evaluation Service (ICC-ES), Whittier, CA, April 2011. ACI 524R-08: Guide to Portland-Cement Based Plaster, American Concrete Institute, Farmington Hills, MI, 2008. ASTM C 926, Standard Specification for Application of Portland Cement-Based Plaster, American Society for Testing and Materials, West Conshohocken, PA. ASTM C1063-08, Standard Specification for Installation of Lathing and Furring to Receive Interior and Exterior Portland Cement-Based Plaster, American Society for Testing and Materials, West Conshohocken, PA. ASTM C847 - 10a, Standard Specification for Metal Lath, American Society for Testing and Materials, West Conshohocken, PA.
39
ASTM Specification C920-10, Standard Specification for Elastomeric Joint Sealants, American Society for Testing and Materials, West Conshohocken, PA. BuildIQ®, http://buildiq.com/. International Institute for Lath & Plaster, www.iilp.org. Oberg, B.; Baker, R. 2010. Best Practices and Quality Issues in Residential Stucco Applications. Building Enclosure Science & Technology 2 (BEST2) Conference, Portland, OR. Stucco Manufacturers Association, www.stuccomfgassoc.com/. Stucco Resource Guide. 3rd ed. Northwest Wall and Ceiling Bureau, Seattle, WA, 1997.
40
Attachment A: Material Specifications for Applying One-Coat Stucco Over EPS
The following reports from the ICC-ES can be referenced for the standards and specifications for the installation of a one-coat stucco system:
• AC11, Acceptance Criteria for Cementitious Exterior Wall Coatings, International Code Council Evaluation Service (ICC-ES), Whittier, CA, March 2010.
• AC12, Acceptance Criteria for Foam Plastic Insulation, International Code Council
Evaluation Service (ICC-ES), Whittier, CA, February 2011.
• AC191, Acceptance Criteria for Metal Plaster Bases (Lath), International Code Council Evaluation Service (ICC-ES), Whittier, CA, May 2008.
• AC275, Acceptance Criteria for Glass Fiber Lath Used in Cementitious Exterior Wall
Coatings or Exterior Cement Plaster (Stucco), International Code Council Evaluation Service (ICC-ES), Whittier, CA, April 2011.

41
Attachment B: Checklist for Applying One-Coat Stucco Over EPS Foam
This section illustrates the proper installation sequence of a one-coat stucco system over open framing with shear panels installed. This installation sequence is representative of one-coat stucco applications and is meant only as a guideline, not as specifications for every type of one-coat installation. When applicable, important considerations and verification procedures have been noted.
SHEATHING:
_____ If the walls are fully sheathed, is the sheathing fully fastened according to the engineering requirements?
_____ If only shear panels are installed, it is best if all windows and doors are fully wrapped in a band of 6-in. sheathing to provide solid backing for the flashing. Otherwise, any windows and doors within 4 in. of the shear panels should be fully wrapped in a minimum 6-in. band of shear panel.
_____ Are all horizontal surfaces sloped away from the building by at least ½ in./ft?
FLASHING:
_____ Are all the windows, doors, vents, pipes, and electrical penetrations properly flashed in shingle fashion and ready for integration with drainage plane?
DRAINAGE PLANES:
For all:
_____ Is the drainage plane installed in shingle fashion, starting from the bottom of the wall?
_____ Does the drainage plane extend at least 1 in. below the top of the foundation?
_____ Has the drainage plane been fastened with a minimal amount of cap-head fasteners to hold it in place until the bond break is installed?
If house wrap:
_____ Are all the vertical seams overlapped at least 2 in. and horizontal seams overlapped at least 6 in.? (If rigid substrate is used, are the vertical and horizontal seams also taped?)
_____ Are all the head flashings layered under a flap in the housewrap and the corners taped down?
_____ Are all tears or holes sealed or patched?
If Grade D, 60 min. building paper:
42
_____ Are the vertical seams overlapped at least 6 in.? Are the horizontal seams overlapped by at least 2 inches?
_____ Does the drainage plane tuck under all bottom or sill flashing components and over the top of all head flashing components?
WEEP SCREED:
_____ Is the weep screed securely fastened along the bottom edge of all walls 1 in. past the foundation transition to receive stucco?
_____ Is the weep screed fastened over the drainage plane?
_____ Is the weep screed installed over rake roofs with at least 2 in. of clearance off the top of the roof shingles?
_____ Does the weep screed overlap itself at breaks by at least 2 in.?
_____ Has the weep screed been mitered to completely form inside and outside corners?
EPS INSULATED SHEATHING (BOND BREAK):
If installed over minimally required shear panels:
_____ Is ½-inch EPS installed over the shear panels and 1 in. EPS installed over the rest of the wall assembly?
_____ Is EPS installed over the gable ends?
_____ Have all holes and gaps been filled with pieces and slivers of EPS?
_____ Have the EPS panels been fastened with a minimal number of fasteners to hold it securely until the lath is installed?
_____ Are all the seams between the EPS panels taped with fiberglass mesh tape?
METAL LATH:
_____ Has the lath been stretched tightly to minimize bumps in the surface?
_____ Are fasteners (1-in. crown staples, roofing nails, or cap-head nails) spaced according to the manufacturer’s recommendations? (Typically this is every 8 in. along the framing members.)
_____ Does the lath overlap at the seams by at least 2 in.?
ARCHITECTRUAL DETAILING (PLANT-ONS):
_____ Are plant-ons securely glued to the stucco base coat using basecoat material?

43
_____ Does the finish coat completely cover plant-ons and provide smooth transition to the wall finish coat?
CONTROL AND EXPANSION JOINTS
_____ Are the expansion joints installed to isolate every 144 ft2 of wall area and spaced no more than 18 ft apart?
_____ Have the expansion joints been installed in alignment with window and door openings to prevent cracking at these high-stress components?
_____ Are casing beads installed to provide ¼ in. of spacing around doors, windows, and other large penetrations?
_____ Are expansion joints installed to provide ¼ in. of spacing at transitions between stucco and other cladding materials?

DOE/GO-102012-3505 ▪ April 2012
Printed with a renewable-source ink on paper containing at least 50% wastepaper, including 10% post-consumer waste.


![Nurse Stucco Inc.nursestucco.com/wp-content/uploads/2017/02/Nurse-Stucco-IIPP-Manual.pdfNurse Stucco Inc. Injury and Illness Prevention Program [High Hazard] Prepared by: Nurse Stucco](https://static.documents.pub/doc/80x56/5e7cb411957c795622453e76/nurse-stucco-inc-nurse-stucco-inc-injury-and-illness-prevention-program-high.jpg)


