44
Published: 2010-9-17 Release 2.0.4 Copyright © 2010, Juniper Networks, Inc. Media Flow Controller and Media Flow Manager Installation Guide

Media Flow Controller and Media Flow Manager Installation Guide
Published: 2010-9-17
Release
2.0.4
Copyright © 2010, Juniper Networks, Inc.

Media Flow Controller and Media Flow Manager Installation Guide
Juniper Networks, Junos, Steel-Belted Radius, NetScreen, and ScreenOS are registered trademarks of Juniper Networks, Inc. in the United States and other countries. The Juniper Networks Logo, the Junos logo, and JunosE are trademarks of Juniper Networks, Inc. All other trademarks, service marks, registered trademarks, or registered service marks are the property of their respective owners.
Juniper Networks assumes no responsibility for any inaccuracies in this document. Juniper Networks reserves the right to change, modify, transfer, or otherwise revise this publication without notice.
Products made or sold by Juniper Networks or components thereof might be covered by one or more of the following patents that are owned by or licensed to Juniper Networks: U.S. Patent Nos. 5,473,599, 5,905,725, 5,909,440, 6,192,051, 6,333,650, 6,359,479, 6,406,312, 6,429,706, 6,459,579, 6,493,347, 6,538,518, 6,538,899, 6,552,918, 6,567,902, 6,578,186, and 6,590,785.
II Copyright © 2010, Juniper Networks, Inc.

Media Flow Controller and Media Flow Manager Installation Guide
End User License Agreement
READ THIS END USER LICENSE AGREEMENT (“AGREEMENT”) BEFORE DOWNLOADING, INSTALLING, OR USING THE SOFTWARE. BY DOWNLOADING, INSTALLING, OR USING THE SOFTWARE OR OTHERWISE EXPRESSING YOUR AGREEMENT TO THE TERMS CONTAINED HEREIN, YOU (AS CUSTOMER OR IF YOU ARE NOT THE CUSTOMER, AS A REPRESENTATIVE/AGENT AUTHORIZED TO BIND THE CUSTOMER) CONSENT TO BE BOUND BY THIS AGREEMENT. IF YOU DO NOT OR CANNOT AGREE TO THE TERMS CONTAINED HEREIN, THEN (A) DO NOT DOWNLOAD, INSTALL, OR USE THE SOFTWARE, AND (B) YOU MAY CONTACT JUNIPER NETWORKS REGARDING LICENSE TERMS.
1. The Parties. The parties to this Agreement are (i) Juniper Networks, Inc. (if the Customer’s principal office is located in the Americas) or Juniper Networks (Cayman) Limited (if the Customer’s principal office is located outside the Americas) (such applicable entity being referred to herein as “Juniper”), and (ii) the person or organization that originally purchased from Juniper or an authorized Juniper reseller the applicable license(s) for use of the Software (“Customer”) (collectively, the “Parties”).
2. The Software. In this Agreement, “Software” means the program modules and features of the Juniper or Juniper-supplied software, for which Customer has paid the applicable license or support fees to Juniper or an authorized Juniper reseller, or which was embedded by Juniper in equipment which Customer purchased from Juniper or an authorized Juniper reseller. “Software” also includes updates, upgrades and new releases of such software. “Embedded Software” means Software which Juniper has embedded in or loaded onto the Juniper equipment and any updates, upgrades, additions or replacements which are subsequently embedded in or loaded onto the equipment.
3. License Grant. Subject to payment of the applicable fees and the limitations and restrictions set forth herein, Juniper grants to Customer a non-exclusive and non-transferable license, without right to sublicense, to use the Software, in executable form only, subject to the following use restrictions:
a. Customer shall use Embedded Software solely as embedded in, and for execution on, Juniper equipment originally purchased by Customer from Juniper or an authorized Juniper reseller.
b. Customer shall use the Software on a single hardware chassis having a single processing unit, or as many chassis or processing units for which Customer has paid the applicable license fees; provided, however, with respect to the Steel-Belted Radius or Odyssey Access Client software only, Customer shall use such Software on a single computer containing a single physical random access memory space and containing any number of processors. Use of the Steel-Belted Radius or IMS AAA software on multiple computers or virtual machines (e.g., Solaris zones) requires multiple licenses, regardless of whether such computers or virtualizations are physically contained on a single chassis.
c. Product purchase documents, paper or electronic user documentation, and/or the particular licenses purchased by Customer may specify limits to Customer’s use of the Software. Such limits may restrict use to a maximum number of seats, registered endpoints, concurrent users, sessions, calls, connections, subscribers, clusters, nodes, realms, devices, links, ports or transactions, or require the purchase of separate licenses to use particular features, functionalities, services, applications, operations, or capabilities, or provide throughput, performance, configuration, bandwidth, interface, processing, temporal, or geographical limits. In addition, such limits may restrict the use of the Software to managing certain kinds of networks or require the Software to be used only in conjunction with other specific Software. Customer’s use of the Software shall be subject to all such limitations and purchase of all applicable licenses.
d. For any trial copy of the Software, Customer’s right to use the Software expires 30 days after download, installation or use of the Software. Customer may operate the Software after the 30-day trial period only if Customer pays for a license to do so. Customer may not extend or create an additional trial period by re-installing the Software after the 30-day trial period.
e. The Global Enterprise Edition of the Steel-Belted Radius software may be used by Customer only to manage access to Customer’s enterprise network. Specifically, service provider customers are expressly prohibited from using the Global Enterprise Edition of the Steel-Belted Radius software to support any commercial network access services.
The foregoing license is not transferable or assignable by Customer. No license is granted herein to any user who did not originally purchase the applicable license(s) for the Software from Juniper or an authorized Juniper reseller.
4. Use Prohibitions. Notwithstanding the foregoing, the license provided herein does not permit the Customer to, and Customer agrees not to and shall not: (a) modify, unbundle, reverse engineer, or create derivative works based on the Software; (b) make unauthorized copies of the Software (except as necessary for backup purposes); (c) rent, sell, transfer, or grant any rights in and to any copy of the Software, in any form, to any third party; (d) remove any proprietary notices, labels, or marks on or in any copy of the Software or any product in which the Software is embedded; (e) distribute any copy of the Software to any third party, including as may be embedded in Juniper equipment sold in the secondhand market; (f) use any ‘locked’ or key-restricted feature, function, service, application, operation, or capability without first purchasing the applicable license(s) and obtaining a valid key from Juniper, even if such feature, function, service, application, operation, or capability is enabled without a key; (g) distribute any key for the Software provided by Juniper to any third party; (h) use the Software in any manner that extends or is broader than the uses purchased by Customer from Juniper or an authorized Juniper reseller; (i) use Embedded Software on non-Juniper equipment; (j) use Embedded Software (or make it available for use) on Juniper equipment that the Customer did not originally purchase from Juniper or an authorized Juniper reseller; (k) disclose the results of testing or benchmarking of the Software to any third party without the prior written consent of Juniper; or (l) use the Software in any manner other than as expressly provided herein.
5. Audit. Customer shall maintain accurate records as necessary to verify compliance with this Agreement. Upon request by Juniper, Customer shall furnish such records to Juniper and certify its compliance with this Agreement.
6. Confidentiality. The Parties agree that aspects of the Software and associated documentation are the confidential property of Juniper. As such, Customer shall exercise all reasonable commercial efforts to maintain the Software and associated documentation in confidence, which at a minimum includes restricting access to the Software to Customer employees and contractors having a need to use the Software for Customer’s internal business purposes.
7. Ownership. Juniper and Juniper’s licensors, respectively, retain ownership of all right, title, and interest (including copyright) in and to the Software, associated documentation, and all copies of the Software. Nothing in this Agreement constitutes a transfer or conveyance of any right, title, or interest in the Software or associated documentation, or a sale of the Software, associated documentation, or copies of the Software.
8. Warranty, Limitation of Liability, Disclaimer of Warranty. The warranty applicable to the Software shall be as set forth in the warranty statement that accompanies the Software (the “Warranty Statement”). Nothing in this Agreement shall give rise to any obligation to support the Software. Support services may be purchased separately. Any such support shall be governed by a separate, written support services agreement. TO THE MAXIMUM EXTENT PERMITTED BY LAW, JUNIPER SHALL NOT BE LIABLE FOR ANY LOST PROFITS, LOSS OF DATA, OR COSTS OR PROCUREMENT OF SUBSTITUTE GOODS OR SERVICES, OR FOR ANY SPECIAL, INDIRECT, OR CONSEQUENTIAL DAMAGES ARISING OUT OF THIS AGREEMENT, THE SOFTWARE, OR
III

Media Flow Controller and Media Flow Manager Installation Guide
ANY JUNIPER OR JUNIPER-SUPPLIED SOFTWARE. IN NO EVENT SHALL JUNIPER BE LIABLE FOR DAMAGES ARISING FROM UNAUTHORIZED OR IMPROPER USE OF ANY JUNIPER OR JUNIPER-SUPPLIED SOFTWARE. EXCEPT AS EXPRESSLY PROVIDED IN THE WARRANTY STATEMENT TO THE EXTENT PERMITTED BY LAW, JUNIPER DISCLAIMS ANY AND ALL WARRANTIES IN AND TO THE SOFTWARE (WHETHER EXPRESS, IMPLIED, STATUTORY, OR OTHERWISE), INCLUDING ANY IMPLIED WARRANTY OF MERCHANTABILITY, FITNESS FOR A PARTICULAR PURPOSE, OR NONINFRINGEMENT. IN NO EVENT DOES JUNIPER WARRANT THAT THE SOFTWARE, OR ANY EQUIPMENT OR NETWORK RUNNING THE SOFTWARE, WILL OPERATE WITHOUT ERROR OR INTERRUPTION, OR WILL BE FREE OF VULNERABILITY TO INTRUSION OR ATTACK. In no event shall Juniper’s or its suppliers’ or licensors’ liability to Customer, whether in contract, tort (including negligence), breach of warranty, or otherwise, exceed the price paid by Customer for the Software that gave rise to the claim, or if the Software is embedded in another Juniper product, the price paid by Customer for such other product. Customer acknowledges and agrees that Juniper has set its prices and entered into this Agreement in reliance upon the disclaimers of warranty and the limitations of liability set forth herein, that the same reflect an allocation of risk between the Parties (including the risk that a contract remedy may fail of its essential purpose and cause consequential loss), and that the same form an essential basis of the bargain between the Parties.
9. Termination. Any breach of this Agreement or failure by Customer to pay any applicable fees due shall result in automatic termination of the license granted herein. Upon such termination, Customer shall destroy or return to Juniper all copies of the Software and related documentation in Customer’s possession or control.
10. Taxes. All license fees payable under this agreement are exclusive of tax. Customer shall be responsible for paying Taxes arising from the purchase of the license, or importation or use of the Software. If applicable, valid exemption documentation for each taxing jurisdiction shall be provided to Juniper prior to invoicing, and Customer shall promptly notify Juniper if their exemption is revoked or modified. All payments made by Customer shall be net of any applicable withholding tax. Customer will provide reasonable assistance to Juniper in connection with such withholding taxes by promptly: providing Juniper with valid tax receipts and other required documentation showing Customer’s payment of any withholding taxes; completing appropriate applications that would reduce the amount of withholding tax to be paid; and notifying and assisting Juniper in any audit or tax proceeding related to transactions hereunder. Customer shall comply with all applicable tax laws and regulations, and Customer will promptly pay or reimburse Juniper for all costs and damages related to any liability incurred by Juniper as a result of Customer’s non-compliance or delay with its responsibilities herein. Customer’s obligations under this Section shall survive termination or expiration of this Agreement.
11. Export. Customer agrees to comply with all applicable export laws and restrictions and regulations of any United States and any applicable foreign agency or authority, and not to export or re-export the Software or any direct product thereof in violation of any such restrictions, laws or regulations, or without all necessary approvals. Customer shall be liable for any such violations. The version of the Software supplied to Customer may contain encryption or other capabilities restricting Customer’s ability to export the Software without an export license.
12. Commercial Computer Software. The Software is “commercial computer software” and is provided with restricted rights. Use, duplication, or disclosure by the United States government is subject to restrictions set forth in this Agreement and as provided in DFARS 227.7201 through 227.7202-4, FAR 12.212, FAR 27.405(b)(2), FAR 52.227-19, or FAR 52.227-14(ALT III) as applicable.
13. Interface Information. To the extent required by applicable law, and at Customer's written request, Juniper shall provide Customer with the interface information needed to achieve interoperability between the Software and another independently created program, on payment of applicable fee, if any. Customer shall observe strict obligations of confidentiality with respect to such information and shall use such information in compliance with any applicable terms and conditions upon which Juniper makes such information available.
14. Third Party Software. Any licensor of Juniper whose software is embedded in the Software and any supplier of Juniper whose products or technology are embedded in (or services are accessed by) the Software shall be a third party beneficiary with respect to this Agreement, and such licensor or vendor shall have the right to enforce this Agreement in its own name as if it were Juniper. In addition, certain third party software may be provided with the Software and is subject to the accompanying license(s), if any, of its respective owner(s). To the extent portions of the Software are distributed under and subject to open source licenses obligating Juniper to make the source code for such portions publicly available (such as the GNU General Public License (“GPL”) or the GNU Library General Public License (“LGPL”)), Juniper will make such source code portions (including Juniper modifications, as appropriate) available upon request for a period of up to three years from the date of distribution. Such request can be made in writing to Juniper Networks, Inc., 1194 N. Mathilda Ave., Sunnyvale, CA 94089, ATTN: General Counsel. You may obtain a copy of the GPL at http://www.gnu.org/licenses/gpl.html, and a copy of the LGPL at http://www.gnu.org/licenses/lgpl.html.
15. Miscellaneous. This Agreement shall be governed by the laws of the State of California without reference to its conflicts of laws principles. The provisions of the U.N. Convention for the International Sale of Goods shall not apply to this Agreement. For any disputes arising under this Agreement, the Parties hereby consent to the personal and exclusive jurisdiction of, and venue in, the state and federal courts within Santa Clara County, California. This Agreement constitutes the entire and sole agreement between Juniper and the Customer with respect to the Software, and supersedes all prior and contemporaneous agreements relating to the Software, whether oral or written (including any inconsistent terms contained in a purchase order), except that the terms of a separate written agreement executed by an authorized Juniper representative and Customer shall govern to the extent such terms are inconsistent or conflict with terms contained herein. No modification to this Agreement nor any waiver of any rights hereunder shall be effective unless expressly assented to in writing by the party to be charged. If any portion of this Agreement is held invalid, the Parties agree that such invalidity shall not affect the validity of the remainder of this Agreement. This Agreement and associated documentation has been written in the English language, and the Parties agree that the English version will govern. (For Canada: Les parties aux présentés confirment leur volonté que cette convention de même que tous les documents y compris tout avis qui s'y rattaché, soient redigés en langue anglaise. (Translation: The parties confirm that this Agreement and all related documentation is and will be in the English language)).
IV Copyright © 2010, Juniper Networks, Inc.

Media Flow Controller and Media Flow Manager Installation Guide
Document History
Date Media Flow Controller Version Comments
2010-4-27 Release 2.0 Document Version 2.0
2010-5-14 Release 2.0.1 Document Version 2.0a
2010-5-20 Release 2.0.2 Document Version 2.0b
2010-6-17 Release 2.0.2 Document Version 2.0c
2010-9-17 Release 2.0.4 Document Version 2.0d
Date Media Flow Manager Version Comments
2010-9-17 Release 2.0.0 Document Version 2.0d
V

Media Flow Controller and Media Flow Manager Installation Guide
VI Copyright © 2010, Juniper Networks, Inc.

TABLE OF CONTENTS
End User License Agreement ..................................................................... IIIDocument History ........................................................................................V
1Preface ..................................................................................................... 1.9Guide to This Document ............................................................................................... 1.9Documentation and Release Notes .............................................................................. 1.9Typographical Conventions ........................................................................................ 1.10Terminology ................................................................................................................ 1.10Documentation Feedback ........................................................................................... 1.11Requesting Technical Support.................................................................................... 1.11
Self-Help Online Tools and Resources .............................................................................. 1.11Opening a Case with JTAC ................................................................................................ 1.12
2Getting Started ....................................................................................... 2.13Obtaining Software for Installation.............................................................................. 2.13Pre-installation Planning ............................................................................................. 2.14Release Installation Guidelines................................................................................... 2.14
Host Bus Adapter / Hard Drive Controller........................................................................... 2.14Choosing a Controller for Your Media Flow Controller................................................. 2.15Configuring the Controller and Arrays for Optimum Performance................................ 2.15
Accessing the Console Port........................................................................................ 2.15System Requirements................................................................................................. 2.16Example: Machine Setup............................................................................................ 2.16Connecting and Logging In ......................................................................................... 2.18Changing Ethernet Name Assignments After Installation ........................................... 2.18Upgrading and Rebooting ........................................................................................... 2.19
Copyright © 2010, Juniper Networks, Inc. VII

TABLE OF CONTENTS Media Flow Controller and Media Flow Manager Installation Guide
Saving and Applying a Configuration ................................................................................. 2.19Upgrading (Web Interface) ................................................................................................. 2.20Upgrading (CLI) .................................................................................................................. 2.20Rebooting ........................................................................................................................... 2.22Managing Configuration Files............................................................................................. 2.23
Known Installation Issues ........................................................................................... 2.23Installation on Dell Equipment ............................................................................................ 2.23
3Installing Media Flow Controller with a CD or USB ................................ 3.25Before Installing Media Flow Controller with a CD or USB......................................... 3.25Creating CDs .............................................................................................................. 3.25Ethernet Naming Options............................................................................................ 3.25
Flash Ethernet Port LEDs, Ethernet Naming Option 3 ....................................................... 3.26Configure Ethernet Names Interactively, Ethernet Naming Option 4 ................................. 3.27Specify Devices to Use For eth0 and eth1, Ethernet Naming Option 5.............................. 3.29Reset Ethernet Device Naming Back to Default, Ethernet Naming Option 6 ..................... 3.31
Installing Media Flow Controller Software—CD or USB ............................................. 3.31Setting Up Basic System Connectivity........................................................................ 3.33
4Installing Media Flow Controller with PXE ............................................. 4.35PXE Overview............................................................................................................. 4.35Before Installing Media Flow Controller with PXE....................................................... 4.35Setting Up PXE Overview........................................................................................... 4.35
Setting Up Your PXE Server .............................................................................................. 4.36Setting Up the PXE Installation Software ........................................................................... 4.36PXE Installation Options..................................................................................................... 4.37
Installing Media Flow Controller Software from the Network—PXE ........................... 4.38
5Installing Media Flow Manager .............................................................. 5.41Media Flow Manager Overview .................................................................................. 5.41Before Installing Media Flow Manager........................................................................ 5.42Installing Media Flow Manager—CD-ROM/USB ........................................................ 5.42Installing Media Flow Manager from Network—PXE.................................................. 5.42
VIII Copyright © 2010, Juniper Networks, Inc.

CHAPTER 1 Preface Media Flow Controller and Media Flow Manager Installation Guide
CHAPTER 1
Preface
The Juniper Networks Media Flow Controller and Media Flow Manager Installation Guide iswritten for system and network administrators who plan, implement, and manage mediacontent delivery environments. Its purpose is to guide you through the installation of MediaFlow Controller and Media Flow Manager software. In addition to Guide to This Document, thispreface includes these topics:
• Documentation and Release Notes
• Typographical Conventions
• Terminology
• Documentation Feedback
• Requesting Technical Support
Guide to This DocumentThis document provides information on the following topics:
• Getting Started—Describes pre-installation planning and system requirements applicable to all installations, and upgrade/reboot procedures.
• Installing Media Flow Controller with a CD or USB—Describes how to create CD-ROM installation drives, how to install Juniper Networks Media Flow Controller using a CD-ROM or USB drive, and how to configure basic network connections.
• Installing Media Flow Controller with PXE—Describes how to set up your PXE server for a Media Flow Controller installation, how to install Media Flow Controller using PXE, and how to configure basic network connections.
• Installing Media Flow Manager—Describes how to install Media Flow Manager using PXE, and how to configure basic network connections.
Documentation and Release NotesTo obtain the most current version of all Juniper Networks® technical documentation, see theproduct documentation page on the Juniper Networks website athttp://www.juniper.net/techpubs/ .Juniper Networks supports a technical book program to publish books by Juniper Networksengineers and subject matter experts with book publishers around the world. These books gobeyond the technical documentation to explore the nuances of network architecture,deployment, and administration using Junos OS Software and Juniper Networks devices. Inaddition, the Juniper Networks Technical Library, published in conjunction with O'Reilly Media,
Copyright © 2010, Juniper Networks, Inc. Guide to This Document 9

CHAPTER 1 Preface Media Flow Controller and Media Flow Manager Installation Guide
explores improving network security, reliability, and availability using Junos OS configurationtechniques. All the books are for sale at technical bookstores and book outlets around theworld. The current list can be viewed at http://www.juniper.net/books.
Typographical ConventionsTable 1 describes the typefaces used in this book.
TerminologyThis section provides definitions for Juniper Networks and industry-standard terms that maybe unfamiliar to the reader.Edge cache: An appliance placed between the Internet and the Web server that cachescontent (like Java Script, CSS, images, and so forth) and delivers them for the server, freeingup the Web server for other processes. Media Flow Controller as an edge cache is effectivelya “reverse proxy” that provides these benefits: reduces the load (network and CPU) on anorigin server by servicing previously retrieved content and enhances the user experience dueto a decrease in latency.NIC Network Interface Controller/Card. Origin Library The source of media content.
Table 1 Typefaces Used in This Book
Typeface Use Example
Arial Ordinary text. The origin server organizes media content hierarchically.
Arial Bold Commands in running text, and screen elements such as page titles, and option labels.
Use the interface command to configure IP addresses.In the Management Console, use the Setup > Date and time page.
Arial Italic Book titles, and emphasis. See the Juniper Networks Media Flow Controller Administrator’s Guide and CLI Command Reference
Courier New Text displayed online at a command line.
Please enter your IP address
Courier New Bold
Text that you type exactly as shown; variables are shown in chevrons (< > ), parameters (which may include variables) are shown in box brackets ([ ]), options are shown in curly brackets ({ }). Run-on lines are indicated by an indent (as shown at right).
interface eth0 ip address <IP address>
10 Typographical Conventions Copyright © 2010, Juniper Networks, Inc.

Media Flow Controller and Media Flow Manager Installation Guide CHAPTER 1 Preface
Origin Server The media content server. Juniper Networks Media Flow Controller can beconfigured as an Origin Server as well as an Edge Cache.SAS Serial attached SCSI. A data transfer technology designed to move data to and fromcomputer storage devices such as hard drives and tape drives. SATA Serial Advanced Technology Attachment. A computer bus technology primarilydesigned for transfer of data to and from a hard disk. SSD Solid-state drive, a storage device using solid-state memory to store persistent data.
Documentation FeedbackWe encourage you to provide feedback, comments, and suggestions so that we can improvethe documentation. You can send your comments [email protected], or fill out the documentation feedback form athttps://www.juniper.net/cgi-bin/docbugreport/. If you are using e-mail, be sure to include thefollowing information with your comments:■ Document or topic name■ URL or page number■ Software release version (if applicable)
Requesting Technical SupportTechnical product support is available through the Juniper Networks Technical AssistanceCenter (JTAC). If you are a customer with an active J-Care or JNASC support contract, or arecovered under warranty, and need post-sales technical support, you can access our tools andresources online or open a case with JTAC.
• JTAC Policies—For a complete understanding of our JTAC procedures and policies, review the JTAC User Guide located at http://www.juniper.net/customers/support/downloads/710059.pdf
• Product Warranties—For product warranty information, visit http://www.juniper.net/support/warranty/
• JTAC Hours of Operation—The JTAC centers have resources available 24 hours a day, 7 days a week, 365 days a year.
Self-Help Online Tools and ResourcesFor quick and easy problem resolution, Juniper Networks has designed an online self-serviceportal called the Customer Support Center (CSC) that provides you with the following features:
• Find CSC offerings: http://www.juniper.net/customers/support/
• Search for known bugs: http://www2.juniper.net/kb/
• Find product documentation: http://www.juniper.net/techpubs/
Documentation Feedback 11

CHAPTER 1 Preface Media Flow Controller and Media Flow Manager Installation Guide
• Find solutions and answer questions using our Knowledge Base: http://kb.juniper.net/
• Download the latest versions of software and review release notes: http://www.juniper.net/customers/csc/software/
• Search technical bulletins for relevant hardware and software notifications: https://www.juniper.net/alerts/
• Join and participate in the Juniper Networks Community Forum: http://www.juniper.net/company/communities/
• Open a case online in the CSC Case Manager: http://www.juniper.net/cm/
To verify service entitlement by product serial number, use our Serial Number Entitlement(SNE) Tool located at https://tools.juniper.net/SerialNumberEntitlementSearch/
Opening a Case with JTACYou can open a case with JTAC on the Web or by telephone. Please have the serial number of the system.
• Use the Case Manager tool in the CSC at http://www.juniper.net/cm/
• Call 1-888-314-JTAC (1-888-314-5822 – toll free in the USA, Canada, and Mexico)
For international or direct-dial options in countries without toll-free numbers, visithttp://www.juniper.net/support/requesting-support.html
12 Requesting Technical Support Copyright © 2010, Juniper Networks, Inc.

CHAPTER 2 Getting Started Media Flow Controller and Media Flow Manager Installation Guide
CHAPTER 2
Getting Started
This chapter describes pre-installation planning and requirements that applies to all types ofinstallations; as well as upgrading, rebooting, and basic configuration file management.
• “Obtaining Software for Installation” on page 13
• “Pre-installation Planning” on page 14
• “Accessing the Console Port” on page 15
• “System Requirements” on page 16
• “Example: Machine Setup” on page 16
• “Connecting and Logging In” on page 18
• “Changing Ethernet Name Assignments After Installation” on page 18
• “Upgrading and Rebooting” on page 19
• “Known Installation Issues” on page 23
Obtaining Software for InstallationThere are two ways you can obtain the Media Flow Controller or Media Flow Managersoftware for installation on generic x86 64-bit hardware from Juniper Networks Support:
• Juniper Networks ships you a CD or USB drive with the software; you can also download an ISO image and burn a CD. This guide describes how to install from CD or USB drive.
• You use PXE (preboot execution environment) to obtain the software image. You must have a PXE server configured in order to use the PXE installation option and a Web server to serve the image. How to configure your PXE server for Media Flow Controller or Media Flow Manager installation and how to install with PXE is described in this guide.
Important! This guide describes Media Flow Controller and Media Flow Manager installationon generic x86 64-bit hardware. This guide is not intended for use with Juniper NetworksMedia Flow Engine appliances on which the software is pre-installed.
Related Topics• “Requesting Technical Support” on page 11 (for PXE, USB, or CD installation packages).• “Upgrading (Web Interface)” on page 20.• “Upgrading (CLI)” on page 20.• “Installing Media Flow Controller with a CD or USB” on page 25• “Installing Media Flow Controller with PXE” on page 35• “Installing Media Flow Manager” on page 41
Copyright © 2010, Juniper Networks, Inc. Obtaining Software for Installation 13

CHAPTER 2 Getting Started Media Flow Controller and Media Flow Manager Installation Guide
Pre-installation PlanningBefore installing Juniper Networks software, ensure that your hardware meets these conditions:
• Running optimally (all hardware diagnostics have been run and passed successfully).• All data is backed up; Juniper Networks Media Flow Controller completely format all disks
when installed.• Top-quality cables are used. We recommend CAT5e or CAT6 for GbE, CAT6A for 10GbE,
or Fiber LL cables. However, CAT5 cables can be used for GbE if the cable lengths are expected to be short ( for example, 5 feet or less). A poorly functioning cable can inhibit performance.
• NIC is present.• Console server / terminal server are available (recommended).
Tip! Go to NTP Servers Web to find public NTP servers.You also need to know:
• Which physical ports you want named eth0 and eth1. This is important because eth0 (management interface) and eth1 (recommended origin-fetch interface) are usually NOT automatically assigned to the optimal ports (non-traffic bearing); instead, you must make this assignment as part of the installation.
• Hostnames/IP addresses (including but not limited to, Subnet Mask, Default Gateway) for traffic and management ports.
• Hostnames/IP addresses for external servers such as origin servers/libraries, DNS, NTP, logging, or storage servers.
Important! Media Flow Controller and Media Flow Manager do not support RAID arrays.
Release Installation GuidelinesThis section provides information on the way Media Flow Controller works with Host BusAdapters/Hard Drive Controllers.
Host Bus Adapter / Hard Drive ControllerMedia Flow Controller does not natively support RAID of any kind on any hard drive orcombination of hard drives. We recommend that ALL hard disk drives (HDDs) are configuredin "Just a Bunch of Disks" (JBOD) mode with write-cache disabled, regardless of controllerbattery.At initialization, Media Flow Controller attempts to uniquely identify each HDD by itsmanufacturer-given serial number. This allows caches, the physical disks to which Media FlowController writes cached data, to be removed and reinserted into a system without data loss orthe need to re-initialize. Also, because Media Flow Controller is able to uniquely identifycaches, they may be transferred to to another Media Flow Controller (removed from onephysical server and inserted in another running the same version of Media Flow Controller).This lets you hot-swap caches for either new HDDs (provided the controller supportshot-swap) or existing caches—without interrupting content delivery or restarting Media FlowController.
14 Pre-installation Planning Copyright © 2010, Juniper Networks, Inc.

Media Flow Controller and Media Flow Manager Installation Guide CHAPTER 2 Getting Started
Media Flow Controller also attempts to identify the HDD type: SAS, SATA, or SSD. With thisinformation, Media Flow Controller assigns a cache tier to each cache. Cache tiers are theway Media Flow Controller divides the storage of “hot content” (frequently accessed) from“long-tail content” (infrequently accessed).Important! With RAID enabled, Media Flow Controller cannot determine HDD’s serialnumber, or type.
Choosing a Controller for Your Media Flow ControllerMedia Flow Controller has been tested with, and supports, a wide range of Host Bus Adapters(HBAs) including those made by Intel™, 3ware™, LSI™, Adaptec™ as well as OEM (originalequipment manufacturer) cards by IBM™, HP™ (SmartArray™), Dell™ (Perc™), Sun™, andthe controllers typically found in SuperMicro™ based systems.The best controller for your Media Flow Controller depends upon the number and type ofHDDs in your system, as well as factors such as connecting to an external JBOD. Generically,Media Flow Controller is most compatible with HBAs that support standard SCSI pass-through, assign standard Linux device names (that is, /dev/sda, /dev/sdb, and so forth), andallow arrays of one physical disk to be created.
Configuring the Controller and Arrays for Optimum PerformanceFor controllers that require arrays or virtual disks to be defined before physical disks arepresented to the BIOS, and so to the operating system, and be set as bootable, you mustconfigure the Controller BIOS to prepare the hard drives to be caches. To do this:
• Set up each physical HDD as an individual array or virtual disk (sometimes you must set up a RAID 0 of one drive).
• Disable write-cache.
For controllers that do not require arrays or virtual disks to be defined (that is, LSI 1068e withSoftware RAID disabled), no explicit configuration is required.
Related Topics• “Accessing the Console Port” on page 15.
• “System Requirements” on page 16
• “Example: Machine Setup” on page 16
Accessing the Console PortWe recommend you use the Serial Console for first-time access and installation. To access the console port:
• Set your initial console terminal settings to match the default console settings on Juniper Networks Media Flow Controller:
• 9600 baud rate• No parity• 8 data bits• 1 stop bit• No flow control (console port only)
Accessing the Console Port 15
CHAPTER 2 Getting Started Media Flow Controller and Media Flow Manager Installation Guide
Related Topics• “Pre-installation Planning” on page 14.
• “Connecting and Logging In” on page 18
System RequirementsTable 2 lists the minimum requirements or recommendations for optimal performance of theMedia Flow Controller. For the most up-to-date and complete information, see the Media FlowController With VXA Series and Media Flow Manager datasheet.
Related Topics• “Pre-installation Planning” on page 14.
• “Example: Machine Setup” on page 16
Example: Machine SetupTable 3 provides details of an sample configuration; your configuration may differ considerably.In Table 3, and Figure 1, the appliance wiring logic is:
• Eth 0—Running SNMP, sending analytics to another machine, Web management, SSH, and Telnet; connected to your internal network.
• Eth 1—Upstream fetching content from origin; connected to the network that connects to the origin server.
• Eth 2 - 5—Servicing traffic; connected to the public Internet.
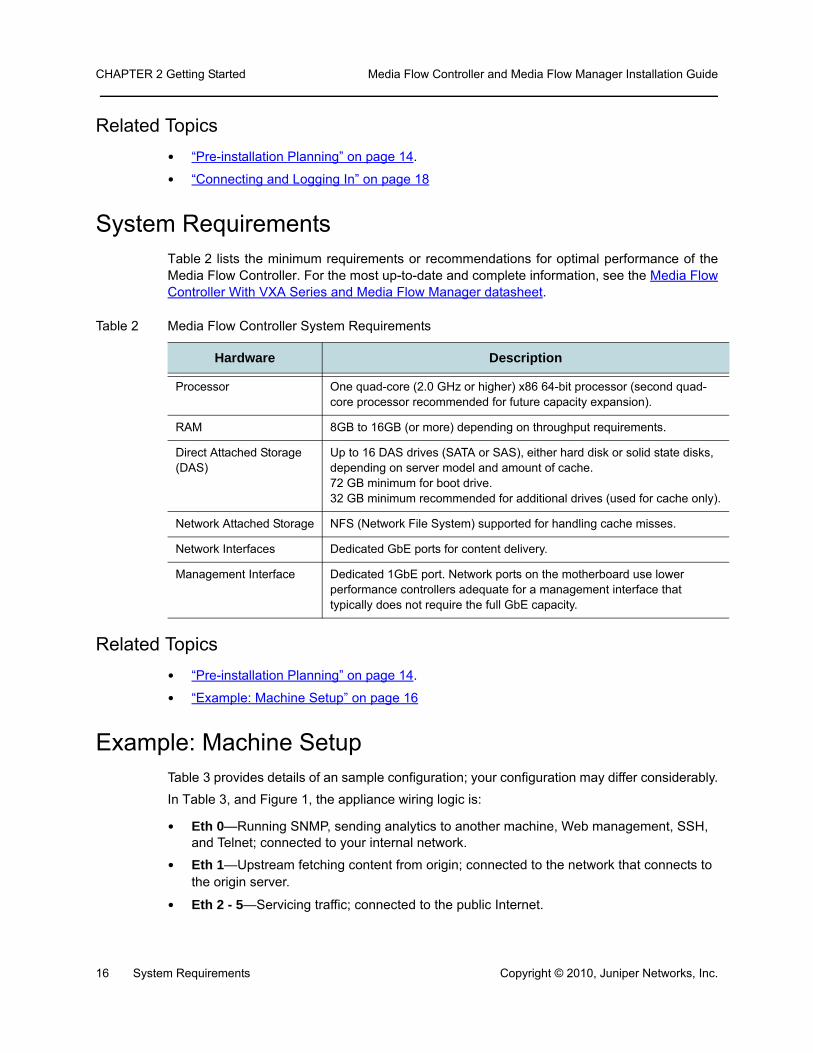
Table 2 Media Flow Controller System Requirements
Hardware Description
Processor One quad-core (2.0 GHz or higher) x86 64-bit processor (second quad-core processor recommended for future capacity expansion).
RAM 8GB to 16GB (or more) depending on throughput requirements.
Direct Attached Storage (DAS)
Up to 16 DAS drives (SATA or SAS), either hard disk or solid state disks, depending on server model and amount of cache.72 GB minimum for boot drive. 32 GB minimum recommended for additional drives (used for cache only).
Network Attached Storage NFS (Network File System) supported for handling cache misses.
Network Interfaces Dedicated GbE ports for content delivery.
Management Interface Dedicated 1GbE port. Network ports on the motherboard use lower performance controllers adequate for a management interface that typically does not require the full GbE capacity.
16 System Requirements Copyright © 2010, Juniper Networks, Inc.

Media Flow Controller and Media Flow Manager Installation Guide CHAPTER 2 Getting Started
Eth 0 and Eth 1 are onboard interfaces whereas Eth 2-5 traffic port recommendations are IntelPro/1000 PT/VT dual- or quad-port NIC for GbE. These are the minimum TCP/UDP portrequirements; other ports can be opened up on an as-needed basis. By default, the MediaFlow Controller management port is 8080.Note! The installation procedure provides several options for correctly identifying and namingthe Ethernet interfaces. See Ethernet Naming Options in Chapter 3, “Installing Media FlowController with a CD or USB for details.
Figure 1 Example Connectivity
Table 3 Example Machine Setup of Management and Traffic Ports
Interface Connectivity IP Address Subnet Mask Gateway Open Ports
Internet Access Purpose
Eth 0 onboard 192.168.1.100 255.255.255.0 192.168.1.1 8080, 22 yes Management
Eth 1 onboard 172.20.46.10* 255.255.255.0 not applicable 80 yes Origin fetch
Eth 2 PCIe card 10.1.1.11 255.255.255.0 not applicable 80 not applicable
Traffic
Eth 3 PCIe card 10.1.2.11 255.255.255.0 not applicable 80 not applicable
Traffic
Eth 4 PCIe card 10.1.3.11 255.255.255.0 not applicable 80 not applicable
Traffic
Eth 5 PCIe card 10.1.4.11 255.255.255.0 not applicable 80 not applicable
Traffic
*Eth0 AND Eth1 can be on the same subnet; this examples indicates they are not.
Switch
User User User
Internet
g015
428Origin
Server
Terminal server console
Switch
Intranet/Internet
OriginServer
Management station
Management VLAN
Media Flow ControllertrafficEth 2, 3, 4...HTTP (80)
origin fetchEth 1
HTTP (80)
managementEth0
HTTP (8080)SSH (22)
HTTP
NFS
Example: Machine Setup 17

CHAPTER 2 Getting Started Media Flow Controller and Media Flow Manager Installation Guide
Related Topics• “Pre-installation Planning” on page 14.
• “System Requirements” on page 16
Connecting and Logging InYou can connect to the command line interface (CLI) with SSH, Telnet (once enabled, Telnet is disabled by default), or serial console using the IP address of your Media Flow Controller or Media Flow Manager. The appliance responds with a login prompt. To connect to the CLI:
1. Enter admin as the user; there is no default password.
2. After you have connected, you must enter enable (for Enable mode) and then configure terminal (for Configure mode) in order to begin configuring Media Flow ControllerMedia Flow Manager.
Likewise, you can log in to the Web-based Management Console by entering the IP addressand port 8080 in a browser window and using admin as the login name.
Related Topics• “Accessing the Console Port” on page 15.
Changing Ethernet Name Assignments After InstallationWhen installing Media Flow Controller 2.0 or earlier software to restore or upgrade it, if you donot assign the correct port to eth0 during installation, your licenses may not work because the2.0 and earlier licenses are tied to the MAC address of the management interface (eth0). Theinstallation process gives you several Ethernet Naming options to configure the eth0 port andto verify that all the interfaces are named correctly; however, if you misconfigure eth0 duringinstallation, and you choose to not do a re-installation to correct the naming, there is aworkaround using the CLI. Note! The CLI to set eth0 automatically renames some or all of the other interfaces as well.Follow these steps using the CLI to name the interface to use as eth0.
1. Enter enable on one line, and configure terminal on the next to get to Configure mode.
2. Enter show license to see what MAC address your licenses are tied to.
3. Enter show interface to see what interfaces the system discovered and determine which one you want for eth0.
4. Use management interface <MAC_address> to name the interface with the correct MAC address to be eth0. All interfaces are re-named.
5. Reboot the machine using reload.
6. After the machine is rebooted, use show interface again to determine what the new Ethernet name assignments are.
7. Use show license to confirm that your licenses are working.
18 Connecting and Logging In Copyright © 2010, Juniper Networks, Inc.

Media Flow Controller and Media Flow Manager Installation Guide CHAPTER 2 Getting Started
Related Topics• “Pre-installation Planning” on page 14.
• “Example: Machine Setup” on page 16
• “Ethernet Naming Options” on page 25
Upgrading and RebootingMedia Flow Controller upgrades maintain saved data and configurations. However, if you re-install the software (as opposed to upgrade only), you must save your current configuration toanother system if you want to keep it, because the installation process deletes all theinformation on the root drive where the configuration data is stored. This topic includes the following tasks:
• “Saving and Applying a Configuration” on page 19
• “Upgrading (Web Interface)” on page 20
• “Upgrading (CLI)” on page 20
• “Rebooting” on page 22
• “Managing Configuration Files” on page 23
Saving and Applying a ConfigurationYou can save a binary file with all current configuration data that can be used to restore the system configuration. You can also reset custom configurations to their factory defaults, upload a saved configuration, and import a configuration from another Media Flow Controller. To save and apply a configuration using the CLI:
1. From Enable or Configure mode, save a configuration to a file; use no-switch to leave the current configuration active. Use show configuration files to see the saved file name.configuration write to <file_name> no-switch
2. Use SCP to send the just-saved configuration file to a server (must have SCP installed); configuration upload <file_name> <URL>
3. When you are ready, fetch the saved configuration file.configuration fetch <URL>/<file_name>
4. Verify that you have the saved configuration file.show configuration files
5. Switch to the saved configuration.configuration switch-to <file_name>
Example:test-vos (config) # configuration write to 04_01_09 no-switchtest-vos (config) # show configuration files04_01_09initial (active)initial.baktest-vos (config) # configuration upload 04_01_09 scp://joe@sv05/home/joePassword: *******
Upgrading and Rebooting 19

CHAPTER 2 Getting Started Media Flow Controller and Media Flow Manager Installation Guide
test-vos (config) # configuration delete 04_01_09test-vos (config) # show configuration filesinitial (active)initial.baktest-vos (config) # configuration fetch scp://joe@sv05/home/joe/04_01_09Password: *******test-vos (config) # show configuration files04_01_09initial (active)initial.baktest-vos (config) # configuration switch-to 04_01_09test-vos (config) # show configuration files04_01_09 (active)initialinitial.baktest-vos (config) #
6. Merge the common settings from a given configuration file to the active configuration file.configuration merge <file_name>
7. Revert the active configuration to either the factory defaults or the last saved configuration. Use keep-basic to preserve licenses and SSH host keys, use keep-connect to preserve anything necessary to maintain network connectivity to the system: interfaces, routes, and ARP; either or both may be used.configuration revert {factory | saved} [keep-basic] [keep-connect]
You can use the Web interface, also referred to as the Management Console, System Config> Config Mgmt page to save a current configuration to a binary file and download it to anothersystem. Later you can use the same page to upload the file and make it active.
Upgrading (Web Interface)When upgrades are available, Juniper Networks will broadcast the upgrade URL to use in thisprocedure. The upgrade preserves the current, saved, configurations; however, you may stillwant to save the current configuration to a file on another system by following the previousprocedure, “Saving and Applying a Configuration” on page 19.You can use the Web-based Management Console, System Config > Upgrade page toeasily upgrade your system if you have an install image URL or have obtained the image andinstalled it locally. Important! After upgrading to the image using the System Config >Upgrade page, you must go to the System Config > Reboot page and reboot your systemfor the upgrade to complete.To install Media Flow Controller or Media Flow Manager, which means removing all the dataon the root drive for a fresh install, see the following installation chapters as appropriate.
Upgrading (CLI)When upgrades are available, Juniper Networks will broadcast the upgrade URL to use in thisprocedure. The upgrade preserves the current, saved, configurations; however, you may stillwant to save the current configuration to a file on another system by following the previousprocedure, “Saving and Applying a Configuration” on page 19.
20 Upgrading and Rebooting Copyright © 2010, Juniper Networks, Inc.

Media Flow Controller and Media Flow Manager Installation Guide CHAPTER 2 Getting Started
To upgrade your system using the CLI:
1. From Enable or Configure mode, fetch the configuration upgrade image file with the Juniper Networks URL.image fetch <URL>/<filename>
2. Install the image.image install <filename>
3. Verify which boot image contains the upgrade.show images
4. Switch to the boot partition containing the upgrade image, if needed.boot system next OR image boot next
5. Verify that the correct partition is set to boot.show images
6. Reboot to that partition.reload
7. Verify that the new image is booted.show version
Example:test-vos-cl130 (config) # image fetch http://123.45.678.9/mfg/mfc-2.1.0-rc-latest/image-mfc-2.1.0-rc-1_11818_184.img 100.0% [#################################################################]
test-vos-cl130 (config) # image install ?<image filename>image-mfc-2.1.0-rc-1_11818_184.img
test-vos-cl130 (config) # image install image-mfc-2.1.0-rc-1_11818_184.imgStep 1 of 4: Verify Image 100.0% [#################################################################]Step 2 of 4: Uncompress Image 100.0% [#################################################################]Step 3 of 4: Create Filesystems 100.0% [#################################################################]Step 4 of 4: Extract Image 100.0% [#################################################################]test-vos-cl130 (config) #
test-vos-cl130 (config) # show image
Images available to be installed: image-mfc-2.1.0-rc-1_11818_184.img mfc-2.1.0-rc 1_11818_184
Installed images: Partition 1: mfc-2.0.2-rc 73_10732_170
Partition 2: mfc-2.1.0-rc 1_11818_184
Last boot partition: 1Next boot partition: 1
No boot manager password is set.
No image install currently in progress.
Upgrading and Rebooting 21

CHAPTER 2 Getting Started Media Flow Controller and Media Flow Manager Installation Guide
test-vos-cl130 (config) # boot system next
test-vos-cl130 (config) # show image
Images available to be installed: image-mfc-2.1.0-rc-1_11818_184.img mfc-2.1.0-rc 1_11818_184
Installed images: Partition 1: mfc-2.0.2-rc 73_10732_170
Partition 2: mfc-2.1.0-rc 1_11818_184
Last boot partition: 1Next boot partition: 2
No boot manager password is set.
No image install currently in progress.
test-vos-cl130 (config) # reload
login as: admin
Juniper Networks Media Flow ControllerLast login: Fri Aug 13 22:56:40 2010 from 172.23.7.251Juniper Networks Media Flow Controller
test-vos-cl130 > entest-vos-cl130 # configure terminaltest-vos-cl130 (config) # show version
Copyright (c) 2008-2010 by Juniper Networks, IncProduct name: mfcProduct release: mfc-2.1.0-rcBuild ID: 1_11818_184Build date: 2010-08-12 13:59:35Target arch: x86_64Built by: build@build04
Uptime: 4m 42.860s
Product model: standardHost ID: 44454C4C-8034-C6C04F443931System memory: 477 MB used / 1532 MB free / 2009 MB totalSwap: 0 MB used / 1028 MB free / 1028 MB totalNumber of CPUs: 2CPU load averages: 2.41 / 1.10 / 0.44
test-vos-cl130 (config) #
Rebooting You can either reboot or shut down the software; if you use shutdown, the system does not reboot until it is power-cycled. To reboot using the CLI:
1. From Enable mode or Configure mode, reboot or shut down the system. reload
22 Upgrading and Rebooting Copyright © 2010, Juniper Networks, Inc.

Media Flow Controller and Media Flow Manager Installation Guide CHAPTER 2 Getting Started
2. Set boot parameters; optionally specify from which location the image boots by default; there are only two locations to choose from so the options are 1 and 2 for location ID. If next is used, set the boot location to be the next one after the one currently booted from. boot {location <location_ID> | next}
3. View boot parameters.boot ?
4. View current settings.show boot
To reboot the system after an upgrade, using the Web interface, go to the System Config >Reboot page.
Managing Configuration FilesYou can save a binary file with all current configuration data that can be used to restore the system configuration. You can also reset custom configurations to their factory defaults, upload a saved configuration, and import a configuration from another Media Flow Controller.To manage configuration files using the CLI:
1. From Configure mode, view configuration file options.configuration ?
2. View current settings. show configuration
3. View configuration file viewing options.show configuration ?
4. Make a configuration file active.switch-to <filename>
5. Save the current configuration through reboots.write memory
To upload a text file with CLI commands (executed immediately in the running configuration),or to enter CLI commands to be executed immediately, using the Management Console, go tothe Setup > Configurations page.
Known Installation Issues
Installation on Dell Equipment• During installation of Media Flow Controller Release 2.0.2 onto a Dell computer, the Host
ID is not set properly. If a license, or licenses, for Release 2.0.2 are generated using that Dell Host ID, and you install a later release, those licenses fail. New licenses using the new Host ID are required. This situation does NOT apply to upgrades, only to re-installations.When installing any release post-Release 2.0.2 on a Dell machine that does not have Release 2.0.2 installed, the Host ID gets set properly.
Known Installation Issues 23

CHAPTER 2 Getting Started Media Flow Controller and Media Flow Manager Installation Guide
24 Known Installation Issues Copyright © 2010, Juniper Networks, Inc.
CHAPTER 3 Installing Media Flow Controller with a CD or USB Media Flow Controller and Media Flow Manager
CHAPTER 3
Installing Media Flow Controller with a CD or USB
This chapter describes installing Media Flow Controller on hardware other than JuniperNetworks VXA Series hardware.
• “Before Installing Media Flow Controller with a CD or USB” on page 25
• “Creating CDs” on page 25
• “Ethernet Naming Options” on page 25
• “Installing Media Flow Controller Software—CD or USB” on page 31
• “Setting Up Basic System Connectivity” on page 33
Before Installing Media Flow Controller with a CD or USBYou can request a CD or a USB drive with the software, or download an ISO image and burnyour own CD, and install using it. You cannot create your own USB drive.Before you install Media Flow Controller with CD or USB:
• Obtain the Media Flow Controller installation image from Juniper Networks Support. See “Requesting Technical Support” on page 11.
• Review “ Pre-installation Planning” 14 for important information.Tip! If you received a Media Flow Controller installation CD or USB drive, skip the next sectionand go directly to Installing Media Flow Controller Software—CD or USB.Important! This guide describes Media Flow Controller and Media Flow Manager installationon generic x86 64-bit hardware. This guide is not intended for use with Juniper NetworksMedia Flow Engine appliances on which the software is pre-installed.
Creating CDsThere are many applications for creating CDs. For example, to burn the ISO image onto a CD,in Linux, you can use a command like this:
sudo cdrecord -v -tao dev=/dev/cdrom <filename>
Ethernet Naming OptionsYou need to know what naming you want for all the ports before beginning installationbecause most installations require manual naming of the Ethernet ports (also known asinterfaces or devices). This is because the default naming order is often confusing or not
Copyright © 2010, Juniper Networks, Inc. Before Installing Media Flow Controller with a CD or USB 25

CHAPTER 3 Installing Media Flow Controller with a CD or USB Media Flow Controller and Media Flow Manager
completely useful, based on the internal PCI hardware address that each device uses. Themost important port to name is eth0, because that port name must be used to access theWeb-based Management Console, and for SSH to get to the command line interface (CLI).Juniper Networks suggests that the built-in ports use single digits, and for each add-in card,use numbers that start with multiples of ten. For example, if the first add-in card is a 4-portcard, then use 10, 11, 12 and 13, and if the second add-in card is a 2-port card, then use 20and 21.After the first phase of the installation is done, the installation procedure offers four options tohelp you correctly identify and name your Ethernet interfaces:
• “Flash Ethernet Port LEDs, Ethernet Naming Option 3” on page 26
• “Configure Ethernet Names Interactively, Ethernet Naming Option 4” on page 27
• “Specify Devices to Use For eth0 and eth1, Ethernet Naming Option 5” on page 29
• “Reset Ethernet Device Naming Back to Default, Ethernet Naming Option 6” on page 31
Important! Media Flow Controller licenses are tied to either the Host ID of the system or theMAC address of the eth0 interface. If you already have a license that is tied to a MAC address,ensure that the correct interface is made eth0, or your license will not work.
Flash Ethernet Port LEDs, Ethernet Naming Option 3If you are at the machine console, you can see which ports have been assigned what by pressing 3 (Flash Ethernet Port LEDs) during the installation. Option 3 does not provide a way to make the assignments; to make the assignments you needto use option 4 or option 5.Note! The flashing of the port LEDs works on most Ethernet devices; if there is a problem, awarning is displayed.Example:Enter 1, 2, 3, 4, 5 or 6 : 3
Flashing eth leds in this order:0000:01:00.0,00:15:17:8A:49:90,eth00000:01:00.1,00:15:17:8A:49:91,eth10000:04:00.0,00:13:72:3C:33:56,eth100000:05:00.0,00:13:72:3C:33:57,eth11Flashing each for 3 seconds, then a 6 second pause, for 3 timesLoop 1Flashing eth0Flashing eth1Flashing eth10Flashing eth11PauseLoop 2Flashing eth0Flashing eth1Flashing eth10Flashing eth11PauseEnter 1 to Reboot to complete the installation.Enter 2 to Halt. Installation will continue when rebooted.Enter 3 to Flash ethernet port LEDs.
26 Ethernet Naming Options Copyright © 2010, Juniper Networks, Inc.

Media Flow Controller and Media Flow Manager Installation GuideCHAPTER 3 Installing Media Flow Controller with a
Enter 4 to Configure ethernet device names interactively.Enter 5 to Specify devices to use for eth0 and eth1.Enter 6 to Reset ethernet device naming back to default.
Enter 1, 2, 3, 4, 5 or 6 :
Configure Ethernet Names Interactively, Ethernet Naming Option 4You can see which ports have been assigned what, and make custom assignments, bypressing 4 (Configure Ethernet Names Interactively) during the installation. This example shows a machine with a 2-port add-in card that has lower PCI addresses,assigned by default, than the built-in ports. The default assignments use the add-in card butthe desired assignments are the built-in ports: the third default (eth10) device for eth0; and thefourth default (eth11) device for eth1. This example shows the assigning of the interfaces.Example (input shown in bold):
Enter 1, 2, 3, 4, 5 or 6 : 4 ==============================================================Current ethernet device naming:eth0 PCI address: 0000:01:00.0 HW address: 00:15:17:8A:49:90 Intel Corporation 82571EB Gigabit Ethernet Controller (rev 06)eth1 PCI address: 0000:01:00.1 HW address: 00:15:17:8A:49:91 Intel Corporation 82571EB Gigabit Ethernet Controller (rev 06)eth10 PCI address: 0000:04:00.0 HW address: 00:13:72:3C:33:56 inet addr: 172.12.172.238 Broadcom Corporation NetXtreme BCM5721 Gigabit Ethernet PCI Express (rev 11)eth11 PCI address: 0000:05:00.0 HW address: 00:13:72:3C:33:57 Broadcom Corporation NetXtreme BCM5721 Gigabit Ethernet PCI Express (rev 11)==============================================================
BEGIN update naming
PCI address: 0000:01:00.0 HW addr: 00:15:17:8A:49:90 Intel Corporation 82571EB Gigabit Ethernet Controller (rev 06)Currently assigned name: eth0
Enter one of the following:a: Keep the current name (eth0)b: Flash the LED for 4 secondsc: Flash the LED for 16 secondsd: Flash the LED for 64 secondse: Flash the LED for 128 secondsThe eth number you want for the name of this device.> 10 PCI address: 0000:01:00.1 HW addr: 00:15:17:8A:49:91 Intel Corporation 82571EB Gigabit Ethernet Controller (rev 06)Currently assigned name: eth1
Enter one of the following:a: Keep the current name (eth1)b: Flash the LED for 4 secondsc: Flash the LED for 16 seconds
Ethernet Naming Options 27

CHAPTER 3 Installing Media Flow Controller with a CD or USB Media Flow Controller and Media Flow Manager
d: Flash the LED for 64 secondse: Flash the LED for 128 secondsThe eth number you want for the name of this device.> 11 PCI address: 0000:04:00.0 HW addr: 00:13:72:3C:33:56 inet addr: 172.12.172.238 Broadcom Corporation NetXtreme BCM5721 Gigabit Ethernet PCI Express (rev 11)Currently assigned name: eth10
Enter one of the following:a: Keep the current name (eth10)b: Flash the LED for 4 secondsc: Flash the LED for 16 secondsd: Flash the LED for 64 secondse: Flash the LED for 128 secondsThe eth number you want for the name of this device.> 0 PCI address: 0000:05:00.0 HW addr: 00:13:72:3C:33:57 Broadcom Corporation NetXtreme BCM5721 Gigabit Ethernet PCI Express (rev 11)Currently assigned name: eth11
Enter one of the following:a: Keep the current name (eth11)b: Flash the LED for 4 secondsc: Flash the LED for 16 secondsd: Flash the LED for 64 secondse: Flash the LED for 128 secondsThe eth number you want for the name of this device.> 1 Done specifying the device to eth number mapping.The new mapping is:0000:04:00.0,00:13:72:3C:33:56 eth00000:05:00.0,00:13:72:3C:33:57 eth10000:01:00.0,00:15:17:8A:49:90 eth100000:01:00.1,00:15:17:8A:49:91 eth11
Use this mapping? (y/n) y
Saving...Enter 1 to Reboot to complete the installation.Enter 2 to Halt. Installation will continue when rebooted.Enter 3 to Flash ethernet port LEDs.Enter 4 to Configure ethernet device names interactively.Enter 5 to Specify devices to use for eth0 and eth1.Enter 6 to Reset ethernet device naming back to default.
Enter 1, 2, 3, 4, 5 or 6 :
28 Ethernet Naming Options Copyright © 2010, Juniper Networks, Inc.

Media Flow Controller and Media Flow Manager Installation GuideCHAPTER 3 Installing Media Flow Controller with a
Specify Devices to Use For eth0 and eth1, Ethernet Naming Option 5If you are satisfied with the interfaces being automatically assigned and only need to set upeth0 and perhaps eth1, and do not want to use the interactive method (option 4), you can useoption 5. Option 5 provides a way to specify which devices to use for eth0 and optionally eth1.This example shows the assigning of the interfaces.Note! The eth-setup options, or "forms": default, least-ports, most-ports, pxe, <URL>, url,HW address; are described in this section. Example (input shown in bold):
Enter 1, 2, 3, 4, 5 or 6 : 5 ==============================================================Current ethernet device naming:eth0 PCI address: 0000:01:00.0 HW address: 00:15:17:8A:49:90 Intel Corporation 82571EB Gigabit Ethernet Controller (rev 06)eth1 PCI address: 0000:01:00.1 HW address: 00:15:17:8A:49:91 Intel Corporation 82571EB Gigabit Ethernet Controller (rev 06)eth10 PCI address: 0000:04:00.0 HW address: 00:13:72:3C:33:56 inet addr: 172.12.172.238 Broadcom Corporation NetXtreme BCM5721 Gigabit Ethernet PCI Express (rev 11)eth11 PCI address: 0000:05:00.0 HW address: 00:13:72:3C:33:57 Broadcom Corporation NetXtreme BCM5721 Gigabit Ethernet PCI Express (rev 11)==============================================================
Enter 0 to not make any ethernet device naming changes. Otherwise enter the specification for eth0, and optionally eth1, and then press return to generate the new port to name mapping. For an explanation of the specifications that can be used enter 'help'.
Enter 0, help or the spec >
Enter 0, help or the spec > help
Syntax forms: default|least-ports|most-ports|pxe|<URL>|url <HWaddr> [<HWaddr>]
Examples of all the forms: default least-ports most-ports pxe http://66.224.165.46/mfd-images/1.0.0-45.img url 00:30:48:B8:F8:22 F8:22 f8:23-ca:A8
When "default" is specified, eth0 and eth1 are assigned in the order that the devices are on the PCI bus. eth0 might not be assigned to the port that you want it to be. The other options allow you to specify which port to use as eth0 (and eth1).
Ethernet Naming Options 29
CHAPTER 3 Installing Media Flow Controller with a CD or USB Media Flow Controller and Media Flow Manager
When "least-ports" is specified, the first NIC card with the least number of ports is used for eth0 (and eth1 if there are two or more ports on that NIC).
When "most-ports" is specified, the first NIC card with the most number of ports is used for eth0 and eth1.
When "pxe" is specified, the interface used to PXE boot from is used for eth0.
You may specify an http or https URL, and the ethernet device that provides access to that URL will be used for eth0.
In the situation where you installed from a URL, you can specify the word "url", and it will use that URL to select eth0 as described above.
You may specify a HWaddr to force eth0 to use that device. You can specify a second HWaddr to be used for eth1. For the HWaddr, aka MAC addr, you do not have to specify all the octets, you may specify as little as two of the right most octets as long as that is unique across all the installed ethernet devices.
Enter 0 to not make any ethernet device naming changes. Otherwise enter the specification for eth0, and optionally eth1, and then press return to generate the new port to name mapping. For an explanation of the specifications that can be used enter 'help'.
Enter 0, help or the spec > 33:56-33:57 = Assigning interface names-- MAC: 00:13:72:3C:33:56 Mapping from: eth2 to: eth0-- MAC: 00:13:72:3C:33:57 Mapping from: eth3 to: eth1-- MAC: 00:15:17:8A:49:90 Mapping from: eth0 to: eth10-- MAC: 00:15:17:8A:49:91 Mapping from: eth1 to: eth11The new mapping is:eth10 PCI address: 0000:01:00.0 HW address: 00:15:17:8A:49:90 Intel Corporation 82571EB Gigabit Ethernet Controller (rev 06)eth11 PCI address: 0000:01:00.1 HW address: 00:15:17:8A:49:91 Intel Corporation 82571EB Gigabit Ethernet Controller (rev 06)eth0 PCI address: 0000:04:00.0 HW address: 00:13:72:3C:33:56 inet addr: 172.12.172.238 Broadcom Corporation NetXtreme BCM5721 Gigabit Ethernet PCI Express (rev 11)eth1 PCI address: 0000:05:00.0 HW address: 00:13:72:3C:33:57 Broadcom Corporation NetXtreme BCM5721 Gigabit Ethernet PCI Express (rev 11)
Enter 0 to NOT USE this new ethernet port naming.Enter 1 to USE this new ethernet port naming.Otherwise enter the specification for eth0, and optionally eth1,and then press return to generate the new port to name mapping.For an explanation of the specifications that can be used enter 'help'.
Enter 0, 1, help or the spec > 1 Saving...
Enter 1 to Reboot to complete the installation.Enter 2 to Halt. Installation will continue when rebooted.Enter 3 to Flash ethernet port LEDs.Enter 4 to Configure ethernet device names interactively.Enter 5 to Specify devices to use for eth0 and eth1.Enter 6 to Reset ethernet device naming back to default.
Enter 1, 2, 3, 4, 5 or 6 :
30 Ethernet Naming Options Copyright © 2010, Juniper Networks, Inc.

Media Flow Controller and Media Flow Manager Installation GuideCHAPTER 3 Installing Media Flow Controller with a
Reset Ethernet Device Naming Back to Default, Ethernet Naming Option 6If at any time in the Ethernet naming process, you want to revert back to the default namesassigned by the system, you can use option 6. Example after assigning interfaces names using option 4 or 5 (input shown in bold):Done specifying the device to eth number mapping.The new mapping is:0000:04:00.0,00:13:72:3C:33:56 eth00000:05:00.0,00:13:72:3C:33:57 eth10000:01:00.0,00:15:17:8A:49:90 eth100000:01:00.1,00:15:17:8A:49:91 eth11
Use this mapping? (y/n) y
Saving...Enter 1 to Reboot to complete the installation.Enter 2 to Halt. Installation will continue when rebooted.Enter 3 to Flash ethernet port LEDs.Enter 4 to Configure ethernet device names interactively.Enter 5 to Specify devices to use for eth0 and eth1.Enter 6 to Reset ethernet device naming back to default.
Enter 1, 2, 3, 4, 5 or 6 : 6
Done
Enter 1 to Reboot to complete the installation.Enter 2 to Halt. Installation will continue when rebooted.Enter 3 to Flash ethernet port LEDs.Enter 4 to Configure ethernet device names interactively.Enter 5 to Specify devices to use for eth0 and eth1.Enter 6 to Reset ethernet device naming back to default.
Enter 1, 2, 3, 4, 5 or 6 :
Installing Media Flow Controller Software—CD or USBWhen the Media Flow Controller software is installed on a machine that does not currentlyhave Media Flow Controller installed, it completely formats all disks in the system. While thesoftware is installing, no progress indicator is given while formatting the drives. Please bepatient. When installing on a machine that has Media Flow Controller currently installed, youhave a choice to retain the data in the caches.To install Media Flow Controller with a CD or USB:
1. If your computer shares the CD boot drive or USB boot port with other computers then the CD or USB drive might not be immediately available. If this happens this installation menu is displayed: Enter 1 to Reboot without installing or restoringEnter 2 to Halt without installing or restoringEnter 3 to Attempt to install from Installation Media
2. Enter 3. A welcome message is displayed followed by a prompt for the end-user license agreement (EULA):
Enter 1 to Read the EULA agreement and continue with installation.Enter 2 to Reboot without installing or restoring.
Installing Media Flow Controller Software—CD or USB 31

CHAPTER 3 Installing Media Flow Controller with a CD or USB Media Flow Controller and Media Flow Manager
Enter 3 to Halt without installing or restoring.
Enter 1, 2, or 3 :
3. Enter 1. The EULA is displayed; press the Space bar to page through it. You can enter q to go to the end of the EULA.
Enter 1 to Read the EULA agreement again.Enter 'accept' to accept the EULA agreement and continue with installation.Enter 2 to Reboot without installing or restoring.Enter 3 to Halt without installing or restoring.
Enter 1, 2, 3, or 'accept' :
4. Enter accept. The following menu is displayed:
Enter 1 to Install Media Flow Controller.Enter 2 to Restore Media Flow Controller.Enter 3 to Reboot without installing or restoring.Enter 4 to Halt without installing or restoring.
Note: Install will delete all cached data. Restore attempts to keep cached data.
Enter 1, 2, 3 or 4 :
5. If this is a first time installation, enter 1.
If this is NOT a first time installation, and you want to erase all the cached data, enter 1.
If this is NOT a first time installation, and you want to preserve cached data, enter 2. In some situations some or all of the cached data still might not be preserved.The installation proceeds; it can take 10 minutes or longer depending on how many disks Media Flow Controller needs to format. When completed, the following menu is displayed:
Installation is done at <number>>>> Phase 1 Installation Done <<<
Enter 1 to Reboot to complete the installation.Enter 2 to Halt. Installation will continue when rebooted.Enter 3 to Flash ethernet port LEDs.Enter 4 to Configure ethernet names interactively.Enter 5 to Specify device for eth0 and eth1.Enter 6 to Reset ethernet naming back to default.
Most systems need the interface names assigned manually; the Ethernet naming default is based on the device’s PCI bus address order and often are not optimally assigned. It is very important that eth0 be assigned to the proper port. Use options 4 or 5 to configure the interface naming. See “Ethernet Naming Options” on page 25, for details.
6. After you have assigned the interface names, at the menu prompt, press 1 to reboot and finish the installation.The installation completes and an "unconfigured" prompt is displayed:
mfc-unconfigured-8a4990 login:
Finish with “Setting Up Basic System Connectivity."
32 Installing Media Flow Controller Software—CD or USB Copyright © 2010, Juniper Networks, Inc.

Media Flow Controller and Media Flow Manager Installation GuideCHAPTER 3 Installing Media Flow Controller with a
Setting Up Basic System ConnectivityAfter Media Flow Controller is installed, follow these steps to set basic network connectivity. Ata minimum, you must assign eth0 an IP address; then the appliance can be remotelyaccessed and configured.To set up basic system connectivity on Media Flow Controller:
1. Log in as adminThere is no default password.
2. Enter configuration mode with these commands:enable configure terminal
3. Set the IP address, hostname, gateway, DNS server, and a domain list (to resolve unqualified hostnames). Install licenses, if you have the license keys. Save the settings when you are finished.interface eth0 ip address <management_port_IP_address> <netmask>hostname <hostname_for_machine>ip default-gateway <gateway_server_IP_address>ip name-server <DNS_server_IP_address>ip domain-list <domain_name_for_resolving_hostnames> ...ntp server <NTP_server_IP_address>license install <license_key>configuration write
4. As you have just changed the network information for your system, you must re-associate Media Flow Controller with the interfaces. Either reboot (reload command) or enter this command:service restart mod_delivery
5. Display the software version. If you have installed licenses, check those, too.show versionshow license
6. Sanity check: From another machine attempt to ping each address, and open an SSH session to the server as Admin.
To complete connecting the machine to your network, plug in the traffic ports Eth2, 3, 4, 5, andconfigure with static IP addresses, or skip this step and hand off further configurations to yoursystem administrator. Table 3, “Example Machine Setup of Management and Traffic Ports,” onpage 17 shows a typical Media Flow Controller configuration.You are now ready to begin configuring Juniper Networks Media Flow Controller or MediaFlow Manager. See the Juniper Networks Media Flow Controller Administrator’s Guide andCLI Command Reference or Media Flow Manager Administrator’s Guide and CLI CommandReference.Note! If an unexpected interface is assigned eth0, your installed licenses will be invalidbecause they rely on the MAC address of an assigned interface and that interface changed. Ifthat is the case, you need to manually assign the interfaces; see “Changing Ethernet NameAssignments After Installation” on page 18 for details.
Setting Up Basic System Connectivity 33

CHAPTER 3 Installing Media Flow Controller with a CD or USB Media Flow Controller and Media Flow Manager
34 Setting Up Basic System Connectivity Copyright © 2010, Juniper Networks, Inc.

CHAPTER 4 Installing Media Flow Controller with PXE Media Flow Controller and Media Flow Manager Installation
CHAPTER 4
Installing Media Flow Controller with PXE
• “PXE Overview” on page 35
• “Before Installing Media Flow Controller with PXE” on page 35
• “Setting Up PXE Overview” on page 35
• “Installing Media Flow Controller Software from the Network—PXE” on page 38
PXE OverviewPXE is a way for a machine without an operating system to find a server, download an imagefrom it, and boot. PXE works by the BIOS first making a DHCP request for network informationfor itself as well as the IP of a TFTP server and the name of an image. It then pulls down fromthe TFTP server a mini-image that is interactive over the console and serial console of themachine, and allows selection of the real image to boot. The real image, in the Media FlowController case, consists of the boot floppy kernel and rootfloppy file system image.Important! This guide describes Media Flow Controller and Media Flow Manager installationon generic x86 64-bit hardware. This guide is not intended for use with Juniper NetworksMedia Flow Engine appliances on which the software is pre-installed.
Before Installing Media Flow Controller with PXEBefore you install Media Flow Controller with PXE:
• Obtain the Media Flow Controller PXE installation package from Juniper Networks Support. See “Requesting Technical Support” on page 11.
• Review “ Pre-installation Planning” 14 for important information.
• Set up your PXE installation configuration file and install the image files appropriately. See “Setting Up PXE Overview” on page 35.
Setting Up PXE OverviewThere are two parts to setting up PXE for installing Media Flow Controller, configuring the PXEconfiguration file, and setting up the software images. When setting up your PXE server, youhave several installation options that you can build into the PXE install menu.
• “Setting Up Your PXE Server” on page 36
• “Setting Up the PXE Installation Software” on page 36
• “PXE Installation Options” on page 37
Copyright © 2010, Juniper Networks, Inc. PXE Overview 35

CHAPTER 4 Installing Media Flow Controller with PXE Media Flow Controller and Media Flow Manager Installation
Setting Up Your PXE ServerSet up your PXE server configuration file with required information and, optionally, installation options described in “PXE Installation Options” on page 37.To set up your PXE server for Media Flow Controller installation:
1. Put these two PXE install package files, both have the same <unique ID> string, into your PXE server tree:rootflop-mfc-<uniqueID>.img vmlinuz-bootflop-mfc-<uniqueID>
2. Edit the PXE server configuration file on your system to make these available for booting from. For example, if the uniqueID string in the Media Flow Controller filenames is 2.1.0, and you place them in a directory named mfc-install, and you want to have the PXE menu for using them be “mfc-install-2.1.0,” then, on a Redhat Linux PXE server, edit pxelinux.cfg/default to add a “LABEL” line, a “kernel” line, an “append initrd” line, and an "IPAPPEND" line, as shown. You can add installation options on the "append initrd" line; see “PXE Installation Options” on page 37 for details. Example:LABEL mfc-install-2.1.0kernel mfc-install/vmlinuz-bootflop-mfc-2.1.0append initrd=mfc-install/rootflop-mfc-2.1.0.img panic=10 noexec=off console=ttyS0,9600n8 console=tty0 ramdisk_size=16384 rw installopt=accept-eula
IPAPPEND 3
Note! There are optional parameters that can be added to the "append initrd" line. See “PXE Installation Options” on page 37 for details.
3. Edit the bootmsg.txt file to add a line that references the label you used:<uniqueLabel> <description text> Using the values given, this would be:mfc-install-2.1.0 Juniper Networks Media Flow Controller installation
Setting Up the PXE Installation SoftwareThe described PXE server setup makes it possible to boot up an environment that allows youto install from the actual Media Flow Controller distribution files. There are two distribution filesin the Media Flow Controller PXE installation package, a matched pair; one is the image*.imgfile and the other is the manufacture*.gz file; the image*.img file is the same file you use forupgrades. You need to put these both in a directory on a Web server so the machine beinginstalled can download the files via HTTP. It is best to put the two files in the same directorywhere you put the rootflop and vmlinuz files (see Step 2 of “Setting Up Your PXE Server” onpage 36). Sample filenames for these are:
image-mfc-2.1.0-rc_5_10705_180.imgmanufacture-mfc-2.1.0-rc_5_10705_180.tgz
For example, if the "append initrd" parameter you configured in the PXE configuration file, isinitrd=pxe/mfc-install/rootflop-mfc-2.1.0.img, then the HTTP URL where the image andmanufacture files are located should be:
http://<pxe_server_name>/pxe/mfc-install/
36 Setting Up PXE Overview Copyright © 2010, Juniper Networks, Inc.

Media Flow Controller and Media Flow Manager Installation Guide CHAPTER 4 Installing Media Flow Controller with
If so configured, the Media Flow Controller installation, by default, downloads the installationfiles from that location. If for some reason the HTTP server on your PXE server cannot be set up for this URL to work,the installfrom parameter must be added to the "append initrd" line in the PXE configurationfile. Use this to specify the HTTP URL from which the image*.img and manufacture*.gz filesare to be downloaded. If the URL is on the same host as the PXE server, you can omit theleading http://<hostname> from the URL. Examples:
installfrom=http://10.200.1.53/archive/mfc/mfc-2.1.0
installfrom=archive/mfc/mfc-2.1.0
To set up the PXE installation software files:
1. Put these two files into a directory by themselves, and give the directory a name reflecting the filenames. For this example, the directory name could be mfc-2.1.0-rc_5.
2. Rename the two files to just image.img and manufacture.tgz. This makes it easier later when you have to specify the URL where these files are. When the files have these names, you only need to specify the URL of the directory.
PXE Installation OptionsPXE installation options can be added on the "append initrd" line that you add to the PXEconfiguration file, using the keywords installopt and installfrom, when you set up your PXEserver for PXE installs. This is described in Step 2 of “Setting Up Your PXE Server” onpage 36.Use the installopt=<option> setting to specify one or more installation options, separated bycommas; no spaces are allowed. See Table 4 on page 37 for a description of the options.Use installfrom=<URL> to specify the URL of the Media Flow Controller image directory, orfile, to install from. This is not needed if you set up your HTTP server on your PXE server tomake the directory with the Media Flow Controller install image file accessible via the directoryspecified on the "append initrd" line (described in “Setting Up the PXE Installation Software”on page 36). With the installfrom option, you specify the entire URL starting with "http://" ofthe install image file; if the HTTP server uses the same IP address as the PXE server, you canomit the "http://<IP_address>" part of the URL.For example, to bypass the EULA and the ETH naming prompts, use these commands in thePXE configuration file on the "append initrd" line: installopt=accept-eula,ethsetup=pxe,auto-eth
Table 4 PXE Installation Options for the PXE Configuration File
Option Description
accept-eula Accept the EULA automatically. When this is used, the EULA is not displayed. Steps 4 and 5 of the Media Flow Controller installation procedure are skipped.
auto-eth Do not show any selections to set up the eth device naming in the install menu; instead, automatically use the interface you specified with the ethsetup option. Options 3, 4, 5, and 6 in Steps and of the Media Flow Controller installation procedure are omitted.
Setting Up PXE Overview 37

CHAPTER 4 Installing Media Flow Controller with PXE Media Flow Controller and Media Flow Manager Installation
Installing Media Flow Controller Software from the Network—PXEBefore you begin:
• See “Before Installing Media Flow Controller with PXE” on page 35.
• Plug your machine into a serial console, with flow control disabled, and configure the BIOS to PXE boot. We recommend connecting the console to the terminal server and opening a TELNET session for this procedure.
• Decide and implement the installation options that you want; these are described in “PXE Installation Options” on page 37. This procedure assumes that NONE of the installation options have been configured in the PXE installation configuration file; however, the PXE installation configuration file must still be modified as described in “Setting Up Your PXE Server” on page 36 for the installation to work.
To install Media Flow Controller with PXE:
1. Reboot the machine in PXE boot mode. The PXE boot prompt is displayed.
2. Type in the label that you configured in the PXE server for the Media Flow Controller installation boot files (for example mfc-2.1.0) and press Enter. If installing from a serial console, you are prompted to log in as root first.
3. Log in as root.
A welcome message is displayed followed by an installation menu:Enter 1 to Reboot without installing or restoringEnter 2 to Halt without installing or restoringEnter 3 to Start the installation from PXE
Enter 1, 2, or 3 and press return :
auto-reboot This option only has an effect if auto-eth is also specified. When set, the machine automatically reboots after step 6 of the Media Flow Controller installation procedure.
ethsetup=<option> Add an additional option, Enter 8 to Use the PXE-boot specification for eth0, to the installation menu, to choose the setting you specified with ethsetup. The options, default, least-ports, most-ports, pxe, <URL>, url, HW address; are described in “Specify Devices to Use For eth0 and eth1, Ethernet Naming Option 5” on page 29.
init-cachekeep-cache
Set init-cache or keep-cache to bypass options 1 and 2 in step 6of the Media Flow Controller installation procedure. Set init-cache for a first-time installation or if you want to empty the cache. Set keep-cache for a restoration installation of Media Flow Controller; in some situations some or all of the cached data still might not be preserved. When set, the options to Install or Restore in step 6 of the Media Flow Controller installation are omitted.
Table 4 PXE Installation Options for the PXE Configuration File
Option Description
38 Installing Media Flow Controller Software from the Network—PXE Copyright © 2010, Juniper Networks, Inc.

Media Flow Controller and Media Flow Manager Installation Guide CHAPTER 4 Installing Media Flow Controller with
4. Enter 3. If the files are accessible, this message is displayed followed by the end-user license agreement (EULA) :Ready to install from <URL_you_entered>
Enter 1 to Read the EULA agreement and continue with installation.Enter 2 to Reboot without installing or restoring.Enter 3 to Halt without installing or restoring.
Enter 1, 2, or 3 :
5. Enter 1. The EULA is displayed and then this menu. You can press the Space bar to page through the EULA or you can enter q (the single letter "q") to jump to the end of the EULA.Enter 1 to Read the EULA agreement again.Enter 'accept' to accept the EULA agreement and continue with installation.
Enter 2 to Reboot without installing or restoring.Enter 3 to Halt without installing or restoring.
Enter 1, 2, 3, or 'accept' : accept
6. Enter accept. The following menu is displayed (options 1 and 2 and the Note are omitted if you set init-cache or keep-cache in the PXE configuration file; see “PXE Installation Options” on page 37):Enter 1 to Install Media Flow Controller.Enter 2 to Restore Media Flow Controller.Enter 3 to Reboot without installing or restoring.Enter 4 to Halt without installing or restoring.Or enter special options as instructed by support personnel.
Note: Install will delete all cached data. Restore attempts to keep cached data.
Enter 1, 2, 3 or 4 :
7. If this is a first time installation, enter 1. If you have set both auto-eth and auto-reboot in the PXE configuration file, the system reboots now using the assignment you made with the ethsetup command; see “PXE Installation Options” on page 37.If this is NOT a first time installation, but you want to erase all the cached data, enter 1.If this is NOT a first time installation, and you want to preserve cached data, enter 2. In some situations some or all of the cached data still might not be preserved.The installation proceeds; it can take 10 minutes or longer depending on how many disks Media Flow Controller needs to format. When completed, the following menu is displayed. (Options 3 through 6 are omitted if you set an ethsetup option in the PXE configuration file; see “PXE Installation Options” on page 37):
Installation is done at <number>>>> Phase 1 Installation Done <<<Enter 1 to Reboot to complete the installation.Enter 2 to Halt. Installation will continue when rebooted.Enter 3 to Flash ethernet port LEDs.Enter 4 to Configure ethernet names interactively.Enter 5 to Specify device for eth0 and eth1.Enter 6 to Reset ethernet naming back to default.Enter 7 to Use the PXE-boot interface for eth0.
(<MAC_address_of_eth0)
Installing Media Flow Controller Software from the Network—PXE 39

CHAPTER 4 Installing Media Flow Controller with PXE Media Flow Controller and Media Flow Manager Installation
8. If option 7 is the correct interface for eth0 (management interface), and you want all the other interfaces to be automatically assigned, enter 7.If option 7 is NOT the correct interface for eth0, you must manually assign the correct interface (most systems need the interface names assigned manually). The Ethernet naming default is based on the device’s PCI bus address order and often are not optimally assigned. It is very important that eth0 be assigned to the proper port. Use options 4 or 5 to configure the interface naming. See “Ethernet Naming Options” on page 25, for details.The interface assignments are displayed and the installation menu reappears. (Options 3 through 6 are omitted if you set an ethsetup option in the PXE configuration file; see “PXE Installation Options” on page 37):
Enter 1 to Reboot to complete the installation.Enter 2 to Halt. Installation will continue when rebooted.Enter 3 to Flash ethernet port LEDs.Enter 4 to Configure ethernet names interactively.Enter 5 to Specify device for eth0 and eth1.Enter 6 to Reset ethernet naming back to default.Enter 7 to Use the PXE-boot interface for eth0.
(<MAC_address_of_eth0)
9. If the interface assignments are correct, enter 1 to reboot and finish the installation.The installation completes and an "unconfigured" prompt is displayed:
mfc-unconfigured-8a4990 login:
Continue with "“Setting Up Basic System Connectivity” on page 33,".
40 Installing Media Flow Controller Software from the Network—PXE Copyright © 2010, Juniper Networks, Inc.
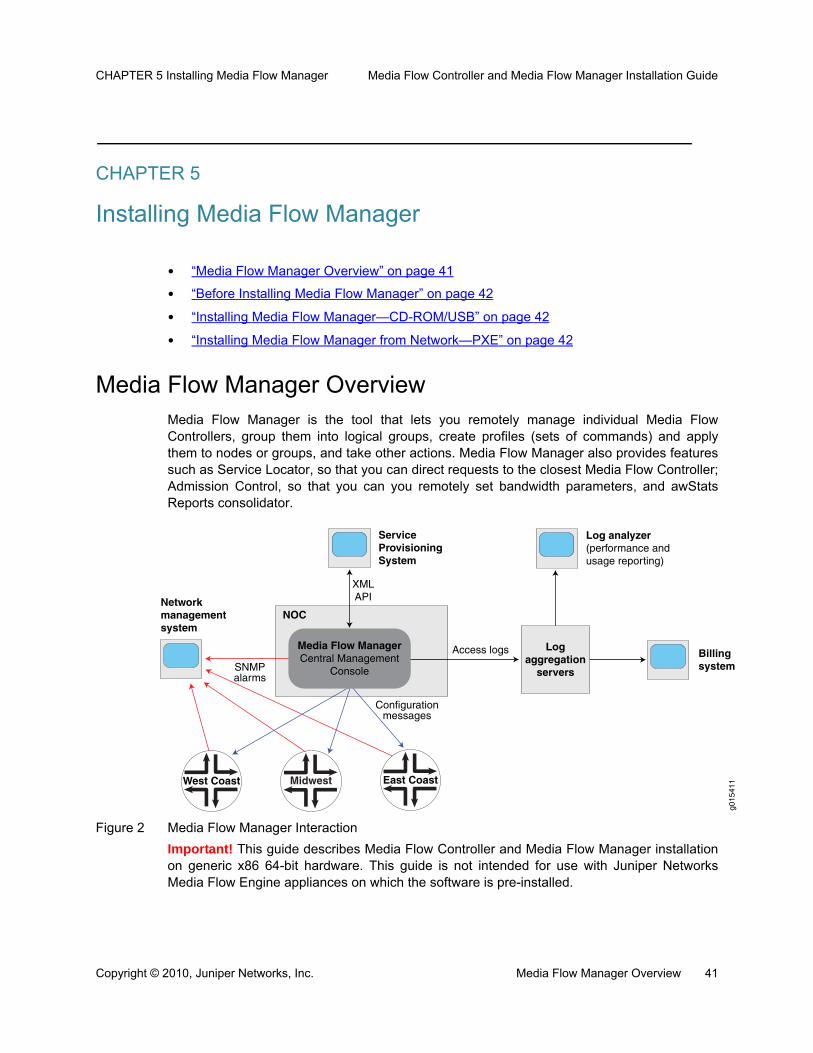
CHAPTER 5 Installing Media Flow Manager Media Flow Controller and Media Flow Manager Installation Guide
g015
411
CHAPTER 5
Installing Media Flow Manager
• “Media Flow Manager Overview” on page 41
• “Before Installing Media Flow Manager” on page 42
• “Installing Media Flow Manager—CD-ROM/USB” on page 42
• “Installing Media Flow Manager from Network—PXE” on page 42
Media Flow Manager OverviewMedia Flow Manager is the tool that lets you remotely manage individual Media FlowControllers, group them into logical groups, create profiles (sets of commands) and applythem to nodes or groups, and take other actions. Media Flow Manager also provides featuressuch as Service Locator, so that you can direct requests to the closest Media Flow Controller;Admission Control, so that you can you remotely set bandwidth parameters, and awStatsReports consolidator.
Figure 2 Media Flow Manager InteractionImportant! This guide describes Media Flow Controller and Media Flow Manager installationon generic x86 64-bit hardware. This guide is not intended for use with Juniper NetworksMedia Flow Engine appliances on which the software is pre-installed.
Media Flow ManagerCentral Management
Console
ServiceProvisioningSystem
Log analyzer(performance andusage reporting)
Logaggregation
servers
XMLAPI
Access logs
Configurationmessages
Networkmanagementsystem
SNMPalarms
MidwestWest Coast East Coast
Billingsystem
NOC
Copyright © 2010, Juniper Networks, Inc. Media Flow Manager Overview 41

CHAPTER 5 Installing Media Flow Manager Media Flow Controller and Media Flow Manager Installation Guide
Before Installing Media Flow ManagerThe procedure for installing Media Flow Manager is very different from that for installing Media Flow Controller. However, much of the information in the previous chapters of this book apply, with the exception of the cache directives and Ethernet naming guidelines (Media Flow Manager does not handle traffic, it is only a management device). If necessary, review this information:
• “Pre-installation Planning” on page 14
• “Upgrading and Rebooting” on page 19
• “Creating CDs” on page 25
• “Before Installing Media Flow Controller with PXE” on page 35.
Installing Media Flow Manager—CD-ROM/USBWhen the Media Flow Manager software is installed, it reformats the root drive in the system.While the software is installing, at times no progress indicator is given while formatting thedrives. Please be patient.
1. Put in the CD-ROM, or plug in the USB drive, and reboot the machine from the installation media.
2. Type the following command to get the Media Flow Manager image file installed. Note! If using PXE, follow this command with the URL of the image file.
install-mfm
The end-user license agreement (EULA) is displayed.
3. You must type yes to proceed. You can also type no, in which case the installation is cancelled; or again to see the EULA again. The following message is displayed:Installation is done at <number>
4. Reboot by typing reboot. When prompted for build choice, do nothing; this brings up the Media Flow Manager platform now on the local disk. The installation completes and an "unconfigured" prompt is displayed:
mfc-unconfigured-8a4990 login:
Finish with “Setting Up Basic System Connectivity” on page 33.
Installing Media Flow Manager from Network—PXEYou must have a configured PXE server (see “Setting Up PXE Overview” on page 35) and the URL of the Juniper Networks Media Flow Manager software image in order to use this procedure. To obtain the Media Flow Manager install package, contact Juniper Networks Support; see “Requesting Technical Support” on page 11. Before you begin: Plug your machine into a serial console, with flow control disabled, andconfigure your BIOS to PXE boot. We recommend connecting the console to the terminalserver and opening a TELNET session for this procedure.
42 Before Installing Media Flow Manager Copyright © 2010, Juniper Networks, Inc.

Media Flow Controller and Media Flow Manager Installation Guide CHAPTER 5 Installing Media Flow Manager
1. Reboot the machine in PXE boot mode. The PXE boot prompt is displayed.
2. Type in the label that you configured in the PXE server for the Media Flow Manager installation boot files (for example, mfm-2.1.0) and press Enter. If installing from a serial console, you are prompted to log in as root first.
3. Log in as root. The system configuration prompt is displayed.
4. Type the following command to get the Juniper Networks Media Flow Manager image file installed. Note! Even though the command uses the abbreviation "mfc" it is for Media Flow Manager, not Media Flow Controller.
install-mfc <URL_of_image_file>
The end-user license agreement (EULA) is displayed.
5. Type yes to proceed. You can also type no, in which case the installation is cancelled; or again to see the EULA again.The following message is displayed:
Installation is done at <number>
6. Reboot by typing reboot. When prompted for build choice, do nothing; this brings up the Media Flow Manager platform now on the local disk.
7. Log in as User admin; there is no default password.
8. Sanity check: From another machine attempt to ping each address, and open an SSH session to the server as Admin. Continue with "“Setting Up Basic System Connectivity” on page 33,".
You are now ready to begin configuring Media Flow Manager. See the Juniper NetworksMedia Flow Manager Administrator’s Guide and CLI Command Reference.
Installing Media Flow Manager from Network—PXE 43

CHAPTER 5 Installing Media Flow Manager Media Flow Controller and Media Flow Manager Installation Guide
44 Installing Media Flow Manager from Network—PXE Copyright © 2010, Juniper Networks, Inc.


![FLOW TEMP. CONTROLLER [MASTER] (Cased)](https://static.documents.pub/doc/80x56/61a5c558c919ca4ec446c173/flow-temp-controller-master-cased.jpg)
![FLOW TEMP. CONTROLLER [MASTER] (Cased) PAC-IF051B-E PAC-IF052B-E FLOW TEMP. CONTROLLER ... · 2013. 2. 12. · PAC-IF051B-E PAC-IF052B-E FLOW TEMP. CONTROLLER [SLAVE] (Cased) PAC-SIF051B-E](https://static.documents.pub/doc/80x56/612d85651ecc515869423db7/flow-temp-controller-master-cased-pac-if051b-e-pac-if052b-e-flow-temp-controller.jpg)


